CHAPTER 1 General principles in the examination of a patient with an orthopaedic problem
In practice, the primary area of interest of the orthopaedic surgeon is in the joints of the limbs and spine, and how well they function. The major part of most orthopaedic examinations is therefore centred on the joint that troubles the patient, but the examination must often be extended to include the nerves and muscles that are responsible for movements in the joint; some of the patient’s other joints may also have to be checked to see if they are affected as well.
Joints possess a remarkable degree of individuality, and it follows that the techniques for examining one joint may have to be varied when it comes to look at another. However, a common sequence is followed, and it may be helpful to keep it in mind. (It is assumed that a full, relevant history has been obtained, and any general physical examination has been carried out.) The examination of the joint itself may be broken down into six distinct steps:
It is not always necessary to keep strictly to this order, or indeed to carry out all of these procedures.
The contents of each chapter of this book are generally ordered in this sequence unless special circumstances dictate otherwise.
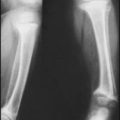
Step 1: Inspection
Look carefully at the joint, paying particular attention to the following points:
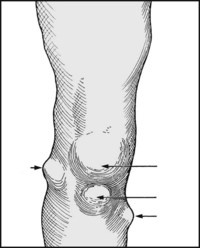
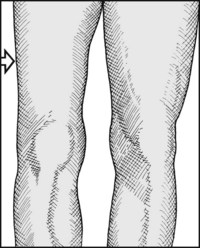
1. Is there swelling? If so, is the swelling diffuse or localised? If the swelling is diffuse, does it seem confined to the joint or does it extend beyond it? Swelling confined to the joint suggests distension of the joint with (a) excess synovial fluid (effusion), e.g. from trauma or a non-pyogenic inflammatory process (such as rheumatoid or osteoarthritis); (b) blood (haemarthrosis), e.g. from recent acute injury or a blood coagulation defect; or (c) pus (pyarthrosis), e.g. from an acute pyogenic infection. Swelling extending beyond the confines of the joint may occur with major infections in a limb, tumours, and problems of lymphatic and venous drainage.
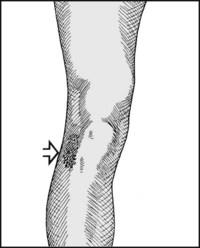
If there is a localised swelling, note its position in relation to the underlying anatomical structures, as this may give a clue to its possible nature or identity.
2. Is there bruising? This might suggest trauma, with a point of impact or gravitational or other spread.
3. Is there any other discoloration or oedema? This might occur as a localised response to trauma or infection.
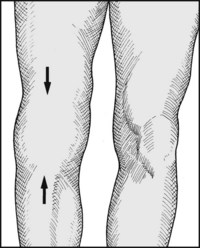
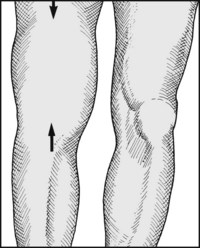
4. Is there muscle wasting? This usually occurs as a result of disuse, from pain or other incapacity, or from denervation of the muscles affected.
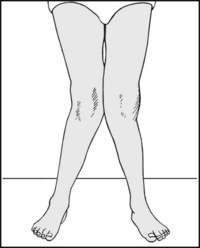
5. Is there any alteration in shape or posture, or is there evidence of shortening? There are many possible causes for each of these abnormalities (including congenital abnormalities, past trauma, disturbances of bone mineralisation and destructive joint disease); their presence should be noted, and explored in further detail during the course of the examination.
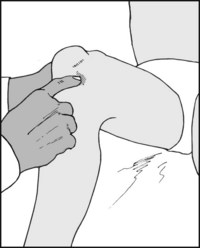
Step 2: Palpation
Some of the points you should note include the following:
1. Is the joint warm? If so, note whether the temperature increase is diffuse or localised, always bearing in mind the false impression that may be caused by the effects of local bandaging. A diffuse increase in heat occurs when a substantial tissue mass is involved, and is seen most commonly in joints involved in pyogenic and non-pyogenic inflammatory processes, and in cases where there is anastomotic dilatation proximal to an arterial block. Away from the joints themselves, infection and tumour should be borne in mind. A localised increase in temperature generally pinpoints an inflammatory process in the underlying anatomical structure. Asymmetrical coldness of a limb commonly occurs where the limb circulation is impaired, e.g. from atherosclerosis.
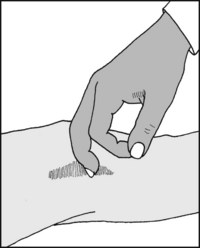
2. Is there tenderness? If so, note whether it is diffuse or localised. Where tenderness is diffuse, the cause is likely to be the same as for an increase in local heat. When there is localised tenderness the site of maximal tenderness should be assiduously sought, as this may clearly identify the underlying anatomical structure that is involved.
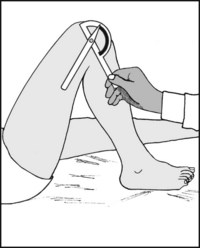
Step 3: Movements
Most (but not all) orthopaedic conditions are associated with some restriction of movements in the related joint(s). Complete loss of movements follows surgical ablation of a joint (arthrodesis), or may occur in the course of some pathological process (such as infection) where fibrous or bony tissue binds the articular surfaces together (fibrous or bony ankylosis): the joint then cannot be moved either actively or passively. In many conditions there is loss of that part of the range of movements which allows the joint to be brought into its neutral position. The commonest loss of this type prevents the joint from being fully extended; this is known as a fixed flexion deformity. Fixed deformities may be caused for example by the contraction of joint capsules, muscles and tendons, or by the interposition of soft tissues or bone between the articular surfaces (e.g. torn menisci, loose bodies). Estimation of the range of movements in the joint is an essential part of any orthopaedic examination. To assess any deviation from normal the good side may be compared with the bad; where this is not suitable (e.g. when both sides are involved) resort must be made to published figures of calculated average ranges. Restriction of the range of movements in a joint is nearly always due to mechanical causes and is consequently a sure indicator of pathology. If the muscles controlling a joint are paralysed, then the passive range of movements must be assessed; occasionally pain or other factors may restrict the active range of movements to a range that is less than the passive. Sometimes a partly or totally paralysed joint can be persuaded to move by invoking gravity or movement elsewhere (trick movements), and the confirmation of paralysis generally begs the determination of its cause.
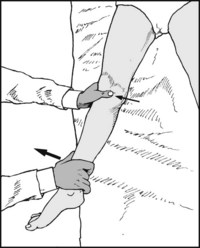
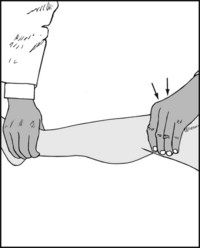
In many joints it is also mandatory to look for evidence of movements in an abnormal plane. To do this the joint is generally stressed in a particular plane and excessive movements are assessed by inspection or by the examination of radiographs. Other accompaniments of movement may require assessment. Rough articular surfaces will produce grating sensations (crepitus) when the joint is moved, and this may be detected by palpation or auscultation. Clicks coming from the joint on movement may be produced through soft tissues moving over bony prominences (generally of little importance), from soft tissues within the joint (e.g. displaced menisci), or from disturbances in bony contours (e.g. from irregularities in a joint surface following a fracture involving the joint).
The strength of muscle contraction (and hence the strength of each joint movement) must be carefully assessed, and especially if found reduced, recorded on the Medical Research Council (MRC) scale:
Muscle strength may be impaired by pain, wasting from disuse, disease or denervation. Finally, attention should be paid to any impairment of overall function in the affected limb as a result of disturbance of movement or muscle power: in the case of the legs, this implies an assessment of the gait. Many tests are available to detect disturbance of separate aspects of upper limb function.
Step 4: Conduction of Special Tests
For most joints there are a number of specific tests for particular aspects of that joint’s function. These include tests for the integrity of certain joint ligaments, and for the examination of structures associated with the joint (e.g. the menisci in the knee). Of particular importance is an appropriate neurological examination (e.g. the testing of specific muscle groups and the determination of any sensory loss). When applicable, the MRC grading of motor and sensory levels should be recorded. The latter is as follows:
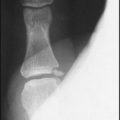
Step 5: Examination of Radiographs
When a radiograph is requested, in most cases the standard views comprising an anteroposterior (AP) and a lateral projection will be provided.
Someone experienced in looking at radiographs will recognise the main pathology at a glance without following any analytical procedure, just as a familiar face is identified without apparently paying conscious attention to the relevant position and size of its main features. Until such skills are developed, it may be helpful for the student to have some simple scheme to follow. One such is to look at each radiograph as though in the cinematic sequence of long shot, medium shot and close-up. In the long (wide-angle) shot a scene is established and the overall relationship of the important features is made clear. Start by looking at the radiograph in a general, unfocused way, as though you were standing well back from it; ask yourself the following questions:
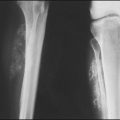
Looking a little more closely, note whether the bone texture appears normal or disturbed, such as in osteoporosis, Paget’s disease, avascular necrosis, osteoporosis etc. Note if there are any areas of new bone, such as exostoses, subperiosteal new bone formation etc. Note whether there are any areas of bone destruction, such as may be found in the presence of many tumours.
Examination of the bone in close-up may be done in two ways: either trace methodically round the contours of the bone, noting any abnormality en route, or go through a checklist of your own making; checklists can have different bases, and can be used in combination. A list may be based on pathology: you might then look for evidence of congenital abnormality, infection (or an inflammatory process), trauma, neoplasm, metabolic disturbance, degeneration; a list may have an anatomical base: you might then assess ligamentous attachments, joint margins, the joint space, and the cortical and cancellous bone elements.
In some situations radiographs additional to the standard AP and lateral projections may be required. These may include:
Step 6: Arranging Further Investigations
This last stage is not always required, but the indications are usually quite clear. The clinical and radiological examinations may have resulted in a differential diagnosis that requires additional tests to allow a firm diagnosis to be made; in many cases the additional tests serve to confirm a strong impression. Occasionally clinical examination fails to clarify the problem and one remains baffled by the cause of the complaint: further investigation may throw some light on the situation, perhaps indicating an area that should be concentrated upon, or suggesting that temporisation and observation may be embarked upon with safety; or occasionally it may suggest that some of the complaint at least may have a functional basis.
The commonest screening tests include the following:
Other regional investigations include the following:
Additional Imaging Techniques
1. CT scans These can show tissue slices in any plane, but characteristically in the median sagittal, parasagittal, coronal and, most importantly, the transverse planes. The last projection cannot be readily obtained with plain X-rays, and can often provide useful additional information which is not otherwise available. In addition, in the CT scan there is a greater range of grey-scale separation, allowing a greater differentiation of tissue types.
2. AP and lateral tomography In this X-ray technique the tube and film are rotated (or slid) in opposite directions during the exposure. Their positions relative to one another and the part being examined determine the tissue slice being clearly visualised. The results are inferior to those obtained by CT scanning, but may be helpful if the latter is not available.
3. MRI scans These avoid any exposure to X-irradiation and produce image cuts as in CT scans, with a greater ability to distinguish between different soft tissues. They are of particular value in assessing neurological structures within the skull and spinal canal, and meniscal and ligamentous structures about the knee and shoulder.
4. Ultrasound Ultrasound imaging, which is generally regarded as being hazard free, readily available and inexpensive, has great sensitivity and is of value in assessing the presence of fluid (e.g. blood) within and around joints, as well as discontinuities in soft tissue structures. It is frequently used in evaluating cases of developmental dysplasia of the hip.
Functional Imaging Techniques
1. Technetium bone scans Bone scans may be performed after the injection of technetium-tagged methylene diphosphonate (99mTc-methylene diphosphonate (MDP)). The facility is widely available, inexpensive and gives rapid results. In the trauma field such scans may assist in the diagnosis of hairline fractures (e.g. of the scaphoid, shin or neck of femur). They may assist in gauging the age of a fracture, and in detecting avascular necrosis of bone. They are of value in the investigation of unexplained pain in the long bones and spine, infections in bone and in the region of prostheses, and in assessing Sudeck’s atrophy (complex regional pain syndrome).
2. SPECT (single-photon emission controlled tomography) This technique may be used to give better localisation and assessment of an active area discovered by a technetium bone scan. It is of particular value in the investigation of back pain.
3. PET (fluorodeoxyglucose (FDG)-positron emission tomography) may be of value in localising infection within a bone. Other methods in the investigation of suspected infections include the use of gallium, or direct labelling of the patient’s own leukocytes with indium or technetium. Leukocyte labelling is of particular value in the evaluation of infection round implants, but requires special facilities.
Arthroscopy
Methods for the examination of all the major joints have been developed and allow direct visualisation of the articular surfaces, the joint capsule, many associated ligaments and, in the case of the knee, the menisci. At the same session biopsy samples may be taken if required, and sometimes treatment procedures may be carried out.
Equipment Requirements
The special tools required for the clinical examination of a patient with an orthopaedic complaint are modest in character. Four are desirable: