24 Ultrasound-Guided Nerve Blocks
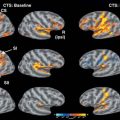
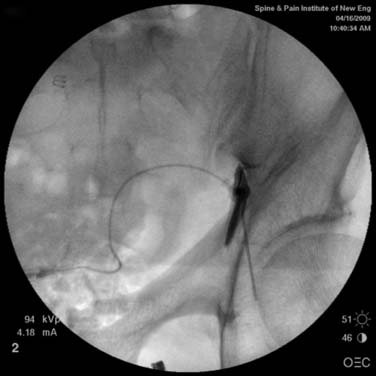
The use of ultrasound guidance to perform nerve blocks has been the most exciting development in the field of regional anesthesia in recent years. Instead of blindly advancing the needle toward the target nerve using anatomic landmarks, nerve stimulator, or paresthesia technique, the needle can now be advanced toward its target while imaging both the nerve and the advancing needle. This helps the operator appreciate variations in anatomy and identify structures such as blood vessels or the pleura that should be avoided while advancing the needle. Furthermore, local anesthetic spread around the nerves can be imaged in real time during performance of the block, which can help improve block quality (Fig. 24-1). Also, intraneural and intravascular positioning of the block needle can be identified early, thereby avoiding severe injury.1–3
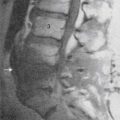
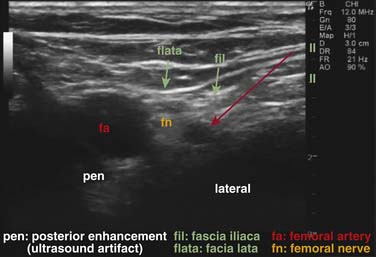
To successfully use this technique, the detailed knowledge of cross-sectional anatomy, significant skill in advancing the needle, and experience in interpreting the ultrasound images is required. This requires the knowledge of artifacts of ultrasound-guided regional anesthesia such as acoustic enhancement and shadowing (Fig. 24-2).4 In addition, an understanding of basic ultrasound technology is needed to successfully practice ultrasound-guided regional anesthesia.5
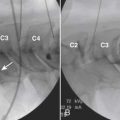
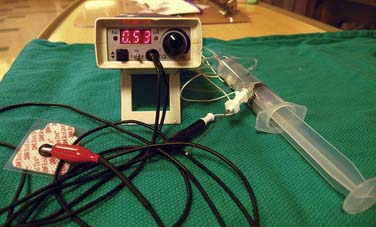
The objective of this chapter is to introduce pain management physicians to ultrasound-guided nerve blocks. Although ultrasound guidance for pain management has only recently gained popularity, pain physicians are using this modality more frequently, sometimes in combination with fluoroscopic guidance. Although the block descriptions in this chapter are for regional anesthesia, we believe that the principles are the same when performing these or other peripheral nerve blocks for pain management. Also, we do not recommend abandoning older approaches such as nerve stimulator or paresthesia techniques; instead, we suggest using the ultrasound image as additional information to safely guide your needle toward the target nerve. Clinical practice has shown that intraneural positioning of a needle may not always cause a paresthesia or even nerve stimulation, particularly in diabetic patients.6 A paresthesia or the presence of motor stimulation using a nerve stimulator may alert you that your needle is too close to the nerve when the needle is poorly imaged with ultrasound. In this chapter, we will therefore also describe the role of nerve stimulation and eliciting paresthesias while performing the various nerve blocks (Fig. 24-3).
Some Brief Facts
The higher the frequency, the shorter the wavelength, the better the resolution.
The transducers both transmit and receive ultrasound beams. The reflected ultrasound beams are received by the transducer and are amplified in the scanner. Different tissues alter the waves in different ways. Some scatter, whereas others reflect the waves directly before they return to the transducer as echoes. Bone and gas significantly reflect and scatter the ultrasound waves, whereas fluids produce a weak echo. Strong echoes appear as bright dots or lines on the screen and weak echoes appear as dark areas. The echoes that return from deeper structures are weaker than those from superficial structures and need to be amplified, which is done by the time-gain-compensation amplifier. After picking the appropriate frequency and depth setting you may be able to improve your image prior to starting the nerve block by adjusting the gain. Another useful function of the scanner is Doppler ultrasound. It can be used to detect blood flow in peripheral vessels and help avoid vascular injury while advancing the needle toward the target nerve. For this reason we recommend using the Doppler function to identify vessels close to the nerve before beginning any nerve block.
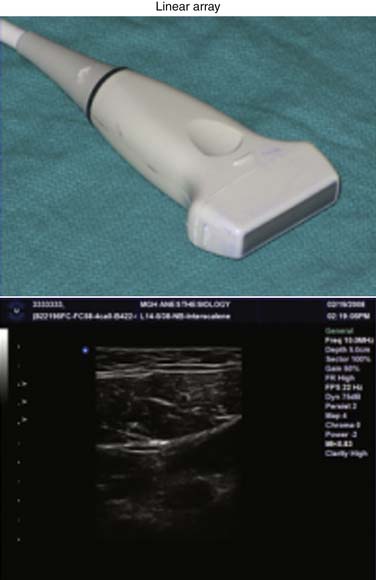
The two types of transducers typically used for nerve blocks are linear array (Fig. 24-4) and microconvex (curvilinear) transducers (Fig. 24-5). The linear array transducer emits high frequency ultrasound beams as the name states in a linear array and produces scans of rectangular shape. These transducers have a larger footprint than the microconvex probes and are better for scanning superficial structures (e.g., axillary nerve block, interscalene nerve block).
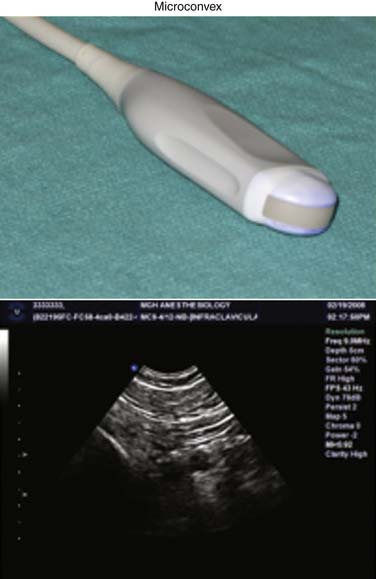
The microconvex transducer has a small footprint and produces scans that are fan-shaped. Thus, larger sections of deeper tissue can be scanned compared to the linear array transducer. The microconvex probes usually also emit lower frequency ultrasound waves. It is therefore used to scan deeper structures (e.g., popliteal nerve block, infraclavicular nerve block) or in cases where only a small space is available for scanning (due to its smaller footprint).
To successfully perform an ultrasound-guided nerve block, the nerve structures that are to be blocked and the structures that should be avoided, such as pleura and blood vessel, need to be clearly identified. The ultrasound probe is typically placed where the needle insertion point would be in a conventional block technique. The needle is then inserted several centimeters from the probe site and advanced in plane of the ultrasound beam (Fig. 24-6). This allows continuous visualization of the needle as a hyperechoic (white) line. This is sometimes challenging particularly when blocking nerves in deeper tissues. However, it is of paramount importance for safely performing the block to image the needle clearly, particularly the needle tip. The needle can easily veer out of plane while advancing, which can lead to significant misjudgment of the location of the needle tip (Fig. 24-7).
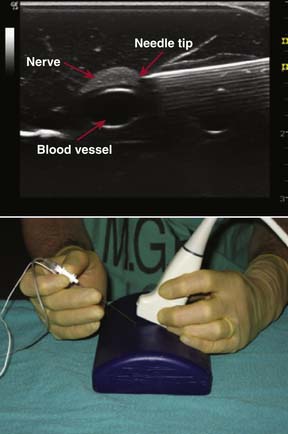
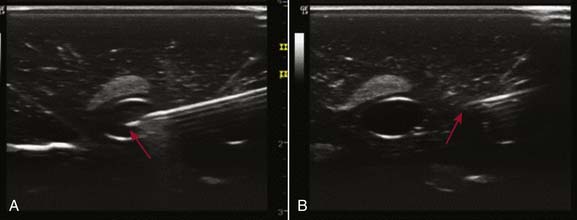
Figure 24-7 Using the in plane needle advancement technique as shown in Figure 24-6. The needle is placed intravascularly. A, intravascular position of the needle in the “blue phantom” model. B, same needle position as on the right, however, the ultrasound probe is placed out of plane. The virtual needle tip appears far away from the vessel. The real needle tip is, in fact, intravascular.
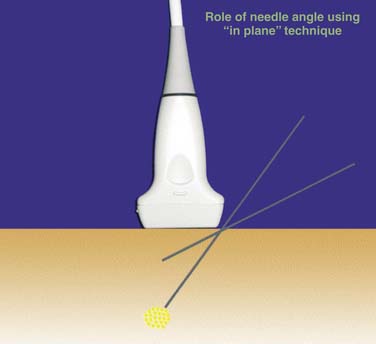
If this should occur we recommend pulling the needle back to just under the skin and then re-advancing it. Optimal imaging of the needle may also require moving the ultrasound transducer from side to side, tilting it, or rotating the probe using a slow and steady motion. In addition, the flatter the angle of approach, the more easily the needle can be visualized.7 It is sometimes helpful to image the needle at a flat angle before advancing the needle at the appropriate angle for the target nerve (Fig. 24-8).
Preparing for Ultrasound-Guided Nerve Block
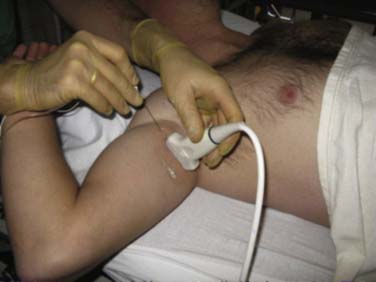
Before performing an ultrasound-guided nerve block the skin needs to be prepped with an alcohol solution and the ultrasound probe should be covered with a sterile drape. For teaching purposes, the sterile cover is not shown in the following images because this would obscure the transducer position. Then, an ultrasound transducer needs to be selected. For very deep structures, a microconvex or a low-frequency linear transducer should be used and for superficial structures, a linear transducer should be chosen. Next, the frequency on the scanner needs to be adjusted (e.g., 10 to 14 mHz for superficial structures, or 5 to 9 mHz for deep scanning). Subsequently the depth on the scanner needs to be set to about 1 to 2 cm deeper than the suspected nerve depth because the image size of the area of interest will be amplified if your depth setting is optimized. Now the gain (amplification) of your ultrasound signal should be adjusted which will frequently improve the image quality and give you better contrast. Always perform the blocks in a comfortable position for the patient and yourself (e.g., sitting position).8 Adjust the bed height so that your back is straight and your arms are bent at an approximately 90-degree angle at the elbows with both hands resting slightly at the wrist level on the patient. Hold the ultrasound probe at its base in your nondominant hand. Rest the ultrasound probe only very slightly on the body of the patient because compression of the tissue above the nerve may obscure the image of vessels close to the nerve, with possible accidental intravascular injection of local anesthetic.9
Upper Extremity Nerve Blocks
Interscalene Nerve Block
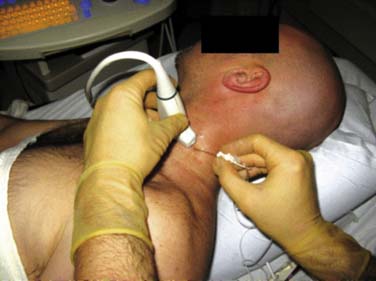
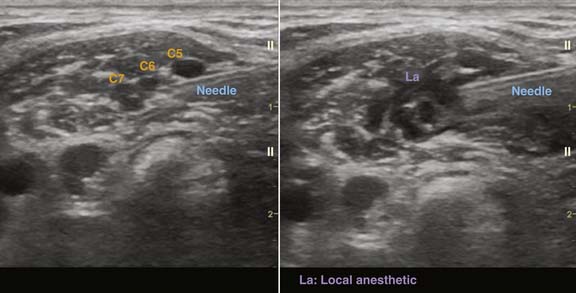
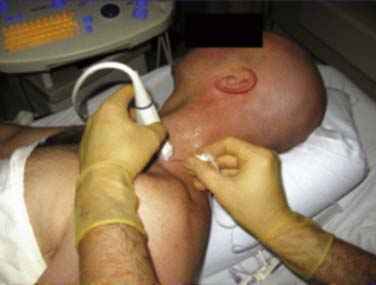
This nerve block is used for shoulder surgery as nerve roots C5, C6, C7 are blocked, including the suprascapular nerve, which supplies the glenohumeral joint of the shoulder (this is not blocked in supra-and infraclavicular nerve blocks.) Also nerve roots C8 and T1 are usually not blocked leading to ulnar sparing. It is performed with the patient in the half-lateral position with the patient’s head turned to the opposite side of the bed (Fig. 24-9). The ultrasound scanner is placed on the contralateral side of the bed. We recommend using an intermediate-to-high frequency (10 to 12 MHz) linear array probe set to a depth of 3 to 4 cm (2.5 cm in thin patients). It is placed above the clavicular head of the sternocleidomastoid muscle at the level of the cricoid cartilage (C6) where the internal jugular vein and carotid artery can easily be identified. The probe is now moved laterally and the anterior and middle scalene muscles are identified. The roots appear as round to oval hypoechoic structures located between the scalene muscles (Fig. 24-10).10 If you cannot identify the roots, move the transducer along an imaginary line made by the interscalene groove in a caudal direction and identify the nerve trunks or divisions in the supraclavicular area. Then follow the nerves back up to the C6 level. At this point we recommend using Doppler ultrasound to identify vascular structures close to the nerve roots because nerve roots and blood vessels appear very similar on the ultrasound image. After centering the nerve roots on the screen and infiltration of the skin with local anesthetic, a 22-gauge, 50 mm needle is inserted 1 to 2 cm lateral to the transducer. The needle is then advanced in plane to the probe through the middle scalene muscle. A distinct pop may be felt and tissue recoil may be seen when the needle enters and exits the middle scalene muscle. The needle tip should end up either between the C5 and C6 or the C6 and C7 nerve roots. Nerve stimulation can be used to confirm that the needle is not too close to the roots. After negative aspiration, 15 to 20 mL of local anesthetic is injected and the hypoechoic spread of local anesthetic around the roots should be visualized on the ultrasound image (Fig. 24-11).

Supraclavicular Nerve Block
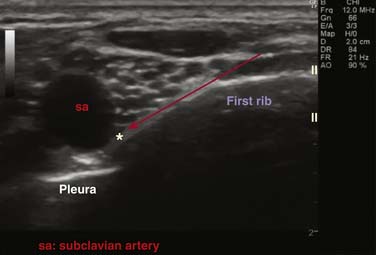
The supraclavicular nerve block is sometimes referred to as the “spinal of the brachial plexus” because of the rapid onset of this dense block. The brachial plexus is blocked at the trunk or division level and is used for surgery of the hand or arm. It is performed with the patient in the half-lateral position with the patient’s head turned to the opposite side of the bed (Fig. 24-12). A high frequency 10 to 14 MHz linear array transducer is placed parallel to the clavicle at a depth setting of 2 to 4 cm. By tilting the probe in a caudad direction, the first rib, pleura, and the subclavian artery can easily be identified. The divisions of the brachial plexus have the appearance of a bunch of grapes at this level and are located lateral superior to the subclavian artery (Fig. 24-13). After infiltration of the skin with local anesthetic a 22-gauge, 50 mm needle is inserted 1 to 2 cm lateral to the transducer. Under ultrasound guidance, the needle is advanced toward the corner formed by the subclavian artery and the first rib (eight-ball corner pocket).11 Injection of 15 to 25 mL of local anesthetic at the corner pocket location will lead to circumferential spread of local anesthetic around the plexus. To advance the needle tip to the corner position, it may be necessary to gently inject 3 to 5 mL of local anesthetic while at the 5 o’clock position to displace the plexus in the cephalad direction. To prevent puncturing the pleura, the hyperechoic line formed by the first rib should never be crossed by the needle. In patients with poor pulmonary function, this block should be used with caution because the incidence of pneumothorax and phrenic nerve block is comparatively high.
Infraclavicular Nerve Block
The patient is positioned supine with the arm abducted 90 degrees at the shoulder and the head slightly turned to the contralateral side (Fig. 24-14). The scanner is set to a depth of ~4 cm, depending on the patient’s body habitus, and placed on the contralateral side of the patient. Alternatively, the operator can sit at the head of the bed with the scanner placed on the ipsilateral side of the patient.
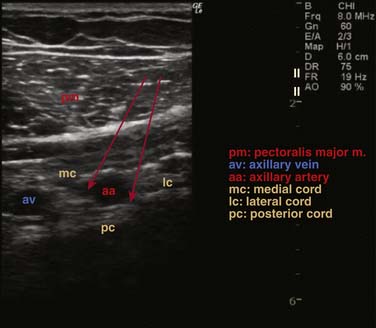
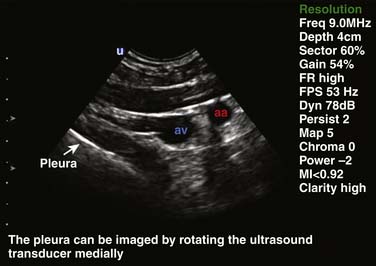
Preferably, a mid- to low-frequency linear array transducer 6 to 9 MHz or microconvex low-frequency transducer is then placed ~2 cm below the cricoid process, in a plane parallel to the axis of the patient’s body, to obtain a good cross-sectional image of the axillary artery and vein (Fig. 24-15). The transducer can be rotated slightly medial to assess the distance of the pleura to the imaging plane (Fig. 24-16). A 22-gauge, 80 mm needle is then inserted ~2 cm cephalad to the transducer advancing the needle in plane, parallel to the plane of the patients body, never directing the needle medially toward the patient’s lung. The needle should be advanced between the lateral cord and the axillary artery toward the 5 or 6 o’clock position of the artery. One third of the local anesthetic should be injected at this position and spread of local anesthetic should be observed toward the medial cord between the artery and the vein. Another one third should be injected at the 4 o’clock, and another one third at the 3 o’clock position. If no spread toward the medial cord is observed, the needle should be withdrawn and advanced toward the medial cord located between the artery and the vein.12 A nerve stimulator set at 0.4 mA can be used as an additional safety factor to avoid injury of the lateral cord while advancing the needle between the lateral cord and axillary artery toward the 5 o’clock position of the artery.
Axillary Nerve Block
The axillary nerve block is indicated in very sick patients with impaired blood coagulation (blood vessels can be easily compressed if injured by the needle) in which general anesthesia would be too risky. In addition, the axillary nerve block is indicated in patients with poor pulmonary function in whom phrenic nerve block and or pneumothorax (supra- or infraclavicular block) would be poorly tolerated. Axillary nerve block may be a good alternative in obese patients in whom the brachial plexus can be poorly imaged in the supra- or infraclavicular location.
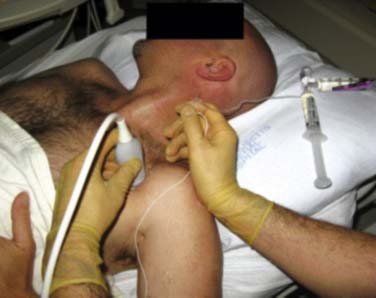
The operator should sit at the head of the bed with the ultrasound scanner positioned on the side of the block. A high-frequency (12 to 14 MHz) linear array probe set at a depth of 2 to 3 cm is placed on the lateral wall of the axilla (Fig. 24-17). The axillary artery and vein are then located and centered in the middle of the screen. To avoid intravascular injection, hold the ultrasound probe gently against the skin surface because the axillary vein can be easily compressed by the probe and be missed on the ultrasound image. Always use Doppler ultrasound to identify blood vessels in the axilla because their anatomic location may vary considerably. A 22-gauge, 50 mm needle is then inserted 1 to 2 cm superior to the transducer and advanced in plane toward the artery. Three injections usually need to be made: One at the 11 o’clock position and one at the 5 o’clock position of the axillary artery leading to circumferential spread of local anesthetic around the artery, thereby blocking the ulnar, median, and radial nerves (Fig. 24-18). The injections need to be made very close to the axillary artery in order to achieve local anesthetic spread within the nerve sheath. A third injection of 3 to 5 mL of local anesthetic is made next to the musculocutaneous nerve without changing the needle entry site. It has an oval to triangular hyperechoic appearance and can be easily visualized between the coracobrachialis and biceps muscles.

Median, Ulnar, and Radial Nerve Block
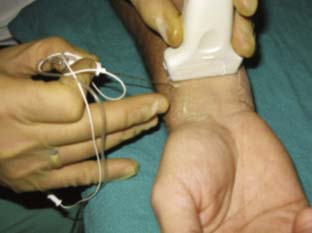
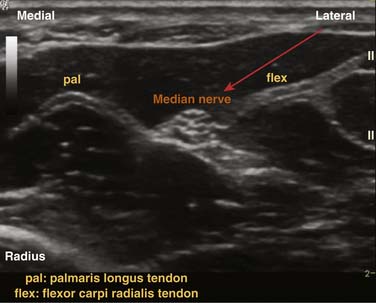
At the wrist, the median nerve is located deep between the palmaris longus tendon and the flexor carpi radialis tendon. Having the patient move the fingers may help you differentiate the nerve from the tendons while imaging. Using a high frequency (12 to 14 MHz) linear array or hockey stick probe set to 2 cm depth, a 22-gauge, 25 mm or 50 mm needle is advanced in plane to the nerve and 3 to 5 mL of local anesthetic is injected (Figs. 24-19 and 24-20).
The ulnar nerve is located posterior to the flexor carpi radialis tendon and lateral to the ulnar artery (Figs. 24-21 and 24-22). The technique is similar to blocking the median nerve just described.
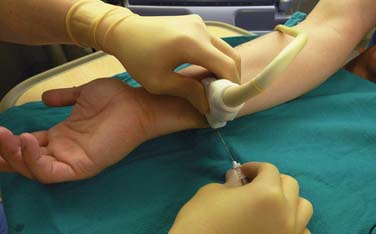
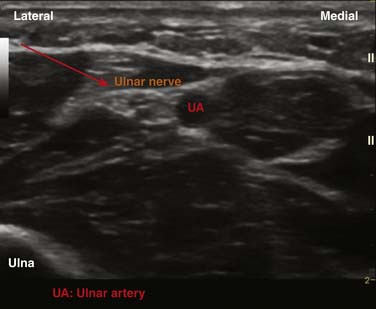
Figure 24-22 Ultrasound scan of the ulnar nerve and artery using a high-frequency linear array transducer.
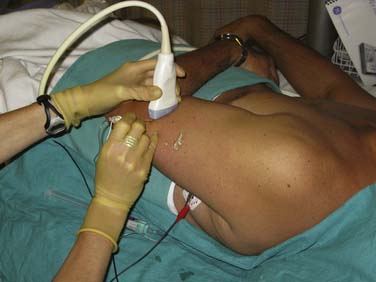
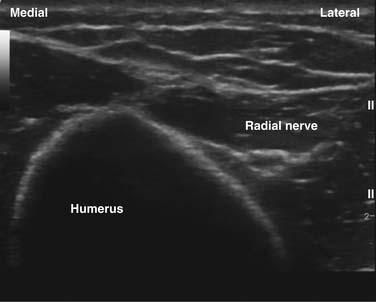
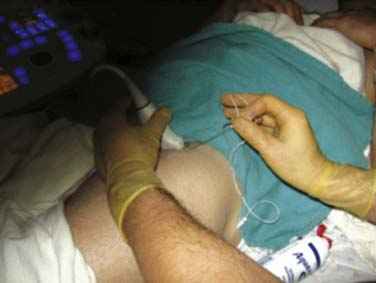
The radial nerve can be blocked with the patient lying in the half-lateral position with the arm flexed and pronated, and resting on the patient’s abdomen. The radial nerve is imaged at the distal third of the upper arm with the transducer placed on the lateral aspect of the triceps. The needle is advanced from lateral in plane to the transducer toward the radial nerve, which can be imaged as it travels to the anterior compartment of the forearm and 3 to 5 mL of local anesthetic is injected at this location (Figs. 24-23 and 24-24).
Lower Extremity Nerve Blocks
Femoral Nerve Block
With the patient in the supine position, an intermediate to high frequency (10 to 12 MHz) linear array probe is placed below the inguinal ligament at the femoral crease (Fig. 24-25). A cross-sectional image of the femoral artery is obtained and the femoral nerve is located just lateral to the artery and centered on the ultrasound screen (see Fig. 24-2). Two fascial layers can be visualized as hyperechoic lines with ultrasound: the superficial fascia lata overlying the femoral vessels and the deeper fascia iliaca overlying the femoral nerve and the iliopsoas muscle. A 50 to 80 mm, 20-gauge needle is inserted 1 to 2 cm lateral to the probe and advanced in plane to the transducer. Along its way, the needle will penetrate the superficial fascia lata and the deeper fascia iliaca. Frequently, a distinct “pop” can be felt and tissue recoil can be seen on the ultrasound screen when the needle penetrates the fascial layers. Twenty to 30 mL of local anesthetic is injected at the 4 to 5 o’clock position of the nerve. To completely encircle the femoral nerve with local anesthetic, a second injection of local anesthetic at the 1 o’clock position sometimes is required.
Subgluteal Sciatic Nerve Block
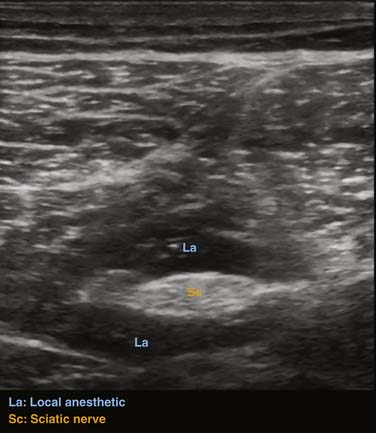
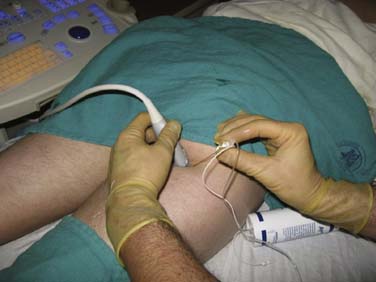
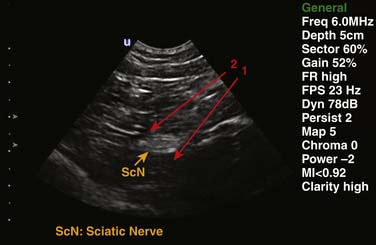
This block can be used for leg surgery in patients who will have a thigh tourniquet. With the patient in the prone position, a line is drawn between the greater trochanter and the ischial tuberosity (Fig. 24-26). From the midpoint of this line, a perpendicular line is extended 4 cm caudally. A low-frequency linear or microconvex probe should be placed at this point, thereby imaging the sciatic nerve in cross-section. Sometimes it may be necessary to identify the sciatic nerve in the popliteal fossa because it is consistently superior and lateral to the popliteal vein and artery at this level. Under ultrasound guidance the sciatic nerve can then slowly be followed cephalad to the subgluteal area. The sciatic nerve at this level has an oval- to disc-shaped appearance (Fig. 24-27). A 20-gauge, 80 mm nerve stimulator needle is then advanced from lateral in line to the transducer to the 5 o’clock and then the 11 o’clock position of the nerve to completely encircle it with local anesthetic (see Fig. 24-1).
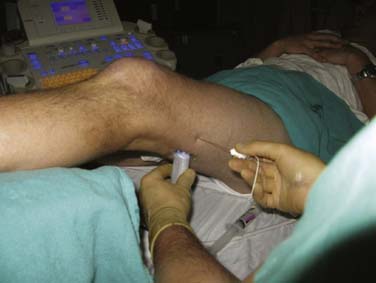
Popliteal Fossa Sciatic Nerve Block
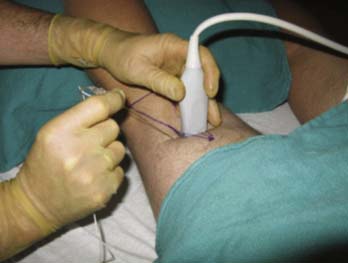
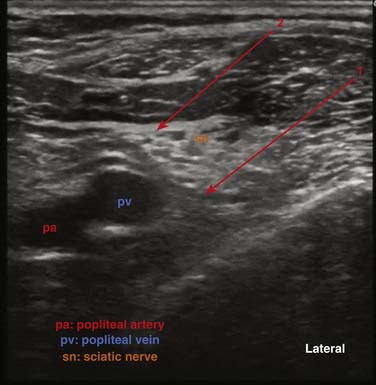
The patient is placed in the prone position with several blankets placed below the patient’s foot so that the leg is flexed at the knee (Fig. 24-28). This will cause the sciatic nerve to appear more round on the ultrasound image. A low frequency (5 to 8 MHz) linear array or microconvex transducer is placed 2 to 3 cm caudal from the tip of a triangle formed by the popliteal crease, biceps femoris muscle, and semimembranous tendon. The popliteal vein and artery are located and imaged in cross-section on the ultrasound screen. The sciatic nerve appears as a hyperechoic round or oval structure that is located superficial and lateral to the popliteal vein. The popliteal vein is superficial and lateral to the popliteal artery (Fig. 24-29). When the sciatic nerve is located, it should be followed in the caudad and cephalad direction to find the point at which it divides into the tibial and the common peroneal nerves (Fig. 24-30). The tibial nerve is larger and is located medial to the common peroneal nerve. The sciatic nerve should be blocked just cephalad from this point. After infiltration of the skin with local anesthetic, a 20-gauge, 80 mm needle is inserted approximately 1 inch lateral from the transducer and advanced in plane toward the 5 o’clock position of the sciatic nerve. At this location 15 mL of local anesthetic is injected and another 15 mL should be injected at 11 o’clock to achieve circumferential spread around the nerve.

In patients who are not able to lie in the prone position, the sciatic nerve can also be blocked with the patient in the supine position with the leg resting on a Mayo stand (Fig. 24-31).
Conclusion
The use of ultrasound guidance for the performance of peripheral nerve blocks has revolutionized the area of regional anesthesia. With a decrease in ultrasound scanner size and cost and the improvement of image quality, ultrasonography has become an indispensable tool for nerve blocks for surgical anesthesia. No doubt, ultrasound imaging will play an increasing role in procedures for pain management because, unlike fluoroscopy, it allows imaging of soft tissues such as nerves, muscle, and blood vessels. However, to use this technology effectively, detailed knowledge of ultrasound technology, needle advancement technique, and cross-sectional anatomy is necessary. This chapter should provide a foundation for learning the principles and techniques for peripheral nerve blocks under ultrasound guidance.
1. Russon K., Blanco R. Accidental intraneural injection into the musculocutaneous nerve visualized with ultrasound. Anesth Analg. 2007;105(5):1504-1505.
2. Robards C., Hadzic A., Somasundaram L., et al. Intraneural injection with low-current stimulation during popliteal sciatic nerve block. Anesth Analg. 2009;109(2):673-677.
3. Martinez Navas A. De la Tabla Gonzalez RO: Ultrasound-guided technique allowed early detection of intravascular injection during an infraclavicular brachial plexus block. Acta Anaesthesiol Scand. 2009;53(7):968-970.
4. Sites B.D., Brull R., Chan V.W., et al. Artifacts and pitfall errors associated with ultrasound-guided regional anesthesia. Part II: A pictorial approach to understanding and avoidance. Reg Anesth Pain Med. 2007;32(5):419-433.
5. Palmer P.E.S. Manual of diagnostic ultrasound. World Health Organization; 1995.
6. Bigeleisen P.E., Moayeri N., Groen G.J. Extraneural versus intraneural stimulation thresholds during ultrasound-guided supraclavicular block. Anesthesiology. 2009;110(6):1235-1243.
7. Gray A.T. Ultrasound-guided regional anesthesia: Current state of the art. Anesthesiology. 2006;104(2):368-373.
8. Sites B.D., Spence B.C., Gallagher J.D., et al. Characterizing novice behavior associated with learning ultrasound-guided peripheral regional anesthesia. Reg Anesth Pain Med. 2007;32(2):107-115.
9. Robards C., Clendenen S., Greengrass R. Intravascular injection during ultrasound-guided axillary block: Negative aspiration can be misleading. Anesth Analg. 2008;107(5):1754-1755.
10. Chan V.W. Applying ultrasound imaging to interscalene brachial plexus block. Reg Anesth Pain Med. 2003;28:340-343.
11. Soares L.G., Brull R., Lai J., Chan V.W. Eight ball, corner pocket: the optimal needle position for ultrasound-guided supraclavicular nerve block. Reg Anesth Pain Med. 2007;32(1):94-95.
12. Sandhu N.S., Capan L.M. Ultrasound-guided infraclavicular brachial plexus block. Br J Anaesth. 2002;89:254-259.