[level-membership-for-emergency-medicine-category]Chapter 10
Tube Thoracostomy
Tube thoracostomy is a procedure used to evacuate an abnormal accumulation of fluid or air from the pleural space and can be performed on an elective, urgent, or emergency basis. Air or fluid can accumulate in the pleural space as a result of spontaneous or traumatic pneumothorax, pleural fluid accumulation of blood, malignancy, infection (empyema), or lymph (chylothorax). The first modern methods to evacuate the contents of the pleural space were developed in the 19th century, but these techniques did not become widespread until 1918, when they were used to treat postinfluenza empyema. Military experience demonstrated that thoracic drainage combined with antiseptics and antibiotics reduced mortality related to thoracic trauma from 62.5% during the Civil War, to 24.6% in World War I, and to 12% in World War II.1
Pathophysiology
Pneumothorax
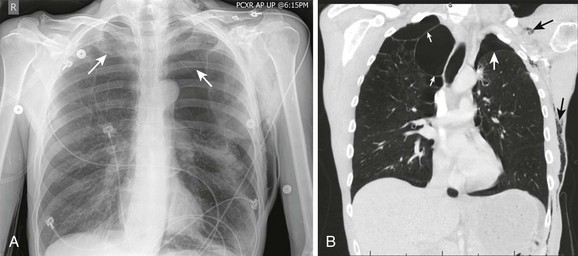
A pneumothorax is caused by the presence of air in the pleural space and the loss of negative pressure (Fig. 10-1). Air can enter the pleural space from the outside as a result of a penetrating injury or internally from a ruptured lung bleb or damaged trachea. Iatrogenic causes from needle procedures such as subclavian venous cannulation, transthoracic biopsy, thoracentesis, positive pressure ventilation (PPV), or cardiopulmonary resuscitation (CPR) are also common (Fig. 10-2). Pneumothoraces are commonly divided into “open” and “closed.” An open pneumothorax indicates that the skin and underlying soft tissue sustained an injury that penetrated into at least the pleural space.
Spontaneous (Closed) Pneumothorax
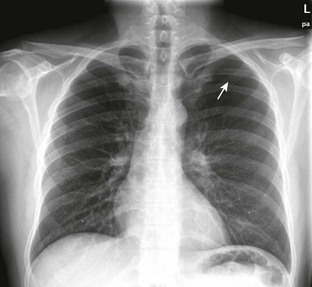
Spontaneous pneumothorax is caused by rupture of a subpleural lung bleb with little or no trauma and can be categorized as either primary or secondary based on the presence of underlying lung disease. Primary spontaneous pneumothorax occurs in a patient without overt lung disease. The typical patient with spontaneous pneumothorax is a tall, thin, 20- to 40-year-old male smoker (Fig. 10-3). Secondary spontaneous pneumothoraces occur in patients with underlying lung or pleural disease, including emphysema, chronic bronchitis, asthma, Marfan’s syndrome, infection, and neoplasm. The morbidity, mortality, and long-term complications associated with pneumothorax increase in patients with underlying lung disease. Whereas a primary pneumothorax may be selectively observed or simply aspirated, a secondary pneumothorax often requires a more aggressive approach to management.
The sudden onset of pleuritic chest pain and dyspnea with exertion or at rest is the most common finding. More subtle manifestations occur with little or no pain and only mild dyspnea on excursion that the patient may ignore for days. A person with a small spontaneous pneumothorax may never seek medical attention, and the process will resolve without treatment. The signs and symptoms do not always correlate well with the size or cause of the collapsed lung. Tube thoracostomy is the most common treatment, but new trials suggest that conservative management or aspiration of first-time primary pneumothoraces results in similar outcomes as traditional tube thoracostomy, though with fewer complications, shorter hospital stay, and lower cost. Conservative management and aspiration are both reasonable initial interventions in clinically stable patients. However, to date no high-quality clinical trials have definitely demonstrated that aspiration is a superior treatment methodology.2–4 Rarely, a spontaneous pneumothorax may be bilateral or progress to tension pneumothorax, a potentially life-threatening condition that is described in more detail later in this chapter.
Tension Pneumothorax
An open pneumothorax can occasionally be manifested as a tension pneumothorax, which is a life-threatening condition that requires immediate intervention. A tension pneumothorax occurs when an injury creates a one-way “flap valve” mechanism that allows air into the pleural space with inspiration but then closes with expiration and traps the air (Fig. 10-4). The progressive accumulation of air in the pleural space leads to ipsilateral complete lung collapse and then impingement on the mediastinum with a shift of the heart toward the uninvolved side, which restricts ventricular filling and subsequently decreases cardiac function. This severe disruption in both respiratory and cardiac function can lead to hypotension and reduced ventilation (both hypoxia and CO2 retention) and eventually to cardiopulmonary collapse.
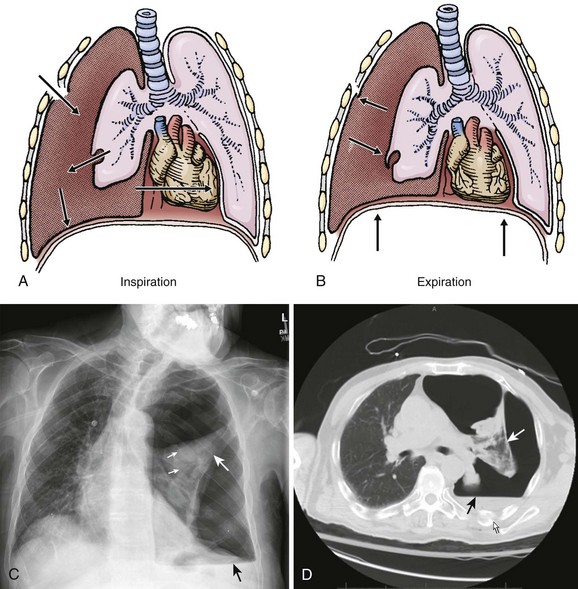
Empyema and Effusions
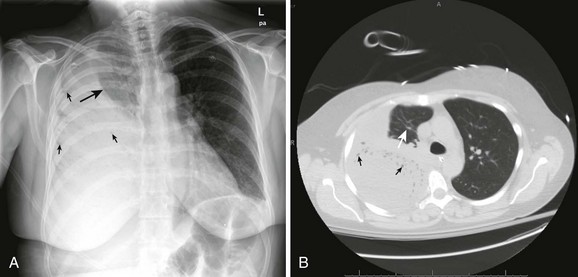
An empyema is an accumulation of pus in the pleural space, usually from a parapneumonic infectious effusion (Fig. 10-5). An empyema can also be caused by violation of the thoracic space by surgical procedures (e.g., tube thoracostomy), trauma, and esophageal perforation. Pleural infection rates have increased 3% per year in the United States in the last 2 decades. The bacteriology of pleural infections appears to track closely with classification of pneumonia as community or hospital acquired. Nearly 60% of cases of community-acquired pneumonia are caused by Streptococcus pneumoniae species, whereas Staphylococcus species account for nearly 45% of hospital-acquired infections.5
Diagnosis
Physical Examination
During the initial phase of resuscitation (airway, breathing, circulation, disability), consider the diagnosis of pneumothorax in patients who are tachycardic, hypotensive, and dyspneic. Similar symptoms occur with pulmonary embolism, pericardial tamponade, and severe pneumonia. Conduct multiple examinations because the diagnosis of tension pneumothorax by physical examination can be very subtle. Use the phrase “look, listen, and feel” as your guideline. Observe the chest wall, which may reveal asymmetric chest expansion, and the neck and forehead veins, which may be distended, even if the patient is hypotensive. The trachea may be deviated away from the side of the pneumothorax. When percussing the chest wall, hyperresonance on the affected side and subcutaneous emphysema may be present. Auscultation may demonstrate diminished breath sounds on the injured side. In one prospective study, the sensitivity, specificity, and diagnostic accuracy of auscultation for hemothorax and pneumothorax were 84%, 97%, and 89%, respectively.6 A false-negative auscultation is more likely than a false-positive one.6 Pulsus paradoxus may be evident. For intubated patients, an early sign of tension pneumothorax is difficulty ventilating because of increased airway pressure.
Stable Patients
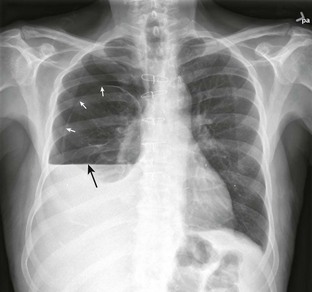
In more stable patients (and those with smaller accumulations) the findings on physical examination are less sensitive, and a chest radiograph or even a computed tomography (CT) scan is usually necessary to make a definitive diagnosis. Physical findings may include unilaterally decreased breath sounds, tachypnea, tachycardia, decreased tactile fremitus, increased resonance with percussion, or subcutaneous emphysema, but the examination may reveal little to no abnormalities with a small pneumothorax. Patients with a pneumothorax involving less than 20% of the hemithorax will often have completely normal findings on chest examination, including equal breath sounds (Fig. 10-6). Pleural fluid collections are difficult to detect by physical examination, particularly with less than 500 mL of fluid in the pleural space. Breath sounds may be decreased and percussion of the bases may be dull.
Parapneumonic empyemas are often accompanied by fever, cough, chest pain, dyspnea, and purulent sputum (see Fig. 10-5). Physical examination may reveal diminished breath sounds, dullness on percussion, egophony, and diminished tactile fremitus on the involved side. Fever will often develop in patients with an indwelling chest tube and empyema. The pleural fluid drainage may be copious and purulent, and respiratory symptoms may worsen.
Radiography
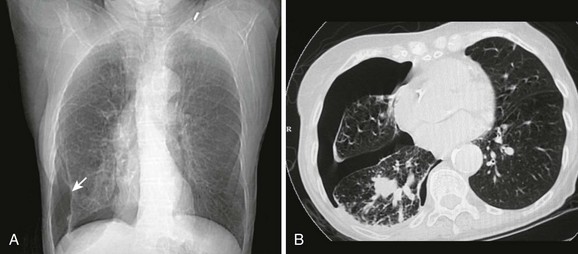
A chest radiograph is an essential tool for diagnosing a pneumothorax in stable patients. In unstable patients with a potential tension pneumothorax the diagnosis should be made clinically, but in rare cases a portable radiograph may be obtained in the resuscitation room if carefully monitored by a clinician. The best plain radiographs for hemothorax or pneumothorax are traditional upright inspiratory posteroanterior and lateral chest radiographs. Diagnostic sensitivity is not increased with an expiratory upright chest radiograph. Upright is preferable to a supine chest radiograph, particularly for a hemothorax, because even with large amounts of blood there may only be slight differences in the density of the lung fields since the blood may layer out evenly. With an upright chest radiograph, 300 to 500 mL of fluid is needed to cause blunting of the costophrenic angle (Fig. 10-7).7 When CT is not available, other useful views include a bilateral decubitus chest radiograph, with the pneumothorax expected to be seen on the side away from the table as gravity pulls the affected lung down.
On a chest radiograph the partially collapsed lung of a pneumothorax appears as a visceral pleural line with no pulmonary markings beyond it (see Figs. 10-1, 10-3, 10-6, and 10-7). It is easy to initially mistake large blebs for a pneumothorax or to identify the scapular border, skin folds, or indwelling lines as a pneumothorax, but a CT scan quickly resolves the issue (Fig. 10-8). Other radiographic findings include hyperlucency of the affected hemithorax, a double diaphragm contour, increased visibility of the inferior cardiac border, better visualization of pericardial fat at the cardiac apex, and possibly a depressed diaphragm. If subcutaneous air is noted on the chest radiograph of a patient with blunt chest trauma, it can be assumed that the air came from an injured lung and that a pneumothorax exists.
It is difficult to accurately predict the size of a pneumothorax on plain radiographs. Greater accuracy in predicting size can be accomplished with a CT scan. With a tension pneumothorax, the chest radiograph reveals lung collapse, a depressed hemidiaphragm on the affected side, and a shift of the mediastinum and trachea to the opposite side (see Fig. 10-4). With a bilateral pneumothorax, no mediastinal shift may be seen.
Thoracic CT
The gold standard for diagnosis is a thoracic CT scan, which can detect a pneumothorax not easily visible on a plain radiograph. CT scans of the chest are much more sensitive than plain radiographs in detecting hemothorax and pneumothorax. They are also more accurate for estimating the size and other characteristics of a pneumothorax (see Figs. 10-1, 10-4, and 10-8). CT scans are not routine for diagnosis of a pneumothorax but are more useful for hemothoraces and other fluid collections. They also offer invaluable information on the cause of such abnormalities. A CT scan may be useful when the diagnosis is unclear or when looking for small amounts of pleural fluid. CT scans are particularly helpful in determining whether an empyema is loculated or draining successfully. About 10% of trauma patients with normal findings on a chest radiograph will demonstrate a small hemothorax or pneumothorax.7–9 The clinical significance of a small, previously undetected occult injury is probably not great, and it has been suggested that a small pneumothorax seen only on CT may be left untreated and simply observed in otherwise stable patients. Some patients with a pneumothorax seen only on CT may also safely undergo PPV without placement of a chest tube.9
Ultrasound
Ultrasound is useful in diagnosing both hemothoraces and pneumothoraces, and its use is reviewed in the Ultrasound Box.10,11
 Ultrasound
Recognizing Pneumothoraxby Christine Butts, MD
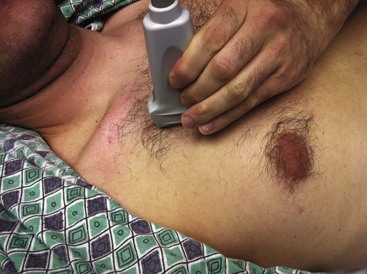
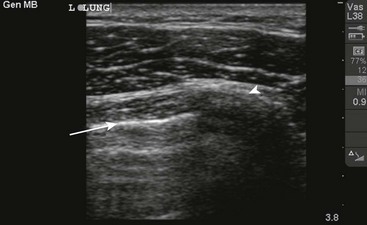
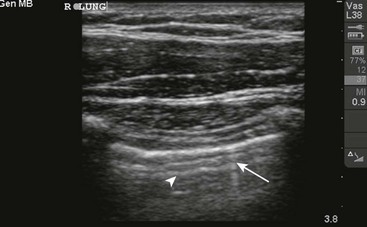
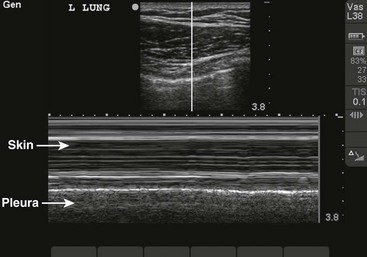
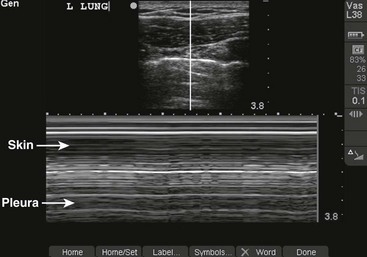
To evaluate for pneumothorax, a high-frequency transducer should be used to ensure a high degree of resolution. In a supine patient the transducer should be placed on the anterior chest wall in the midclavicular line at approximately the second to third intercostal space (Fig. 10-US1). The depth of the image should be adjusted until the ribs are seen as brightly echogenic (white) arcs with acoustic shadows behind them. The pleural line can be found just deep to the ribs and is represented as a horizontal, echogenic line (Fig. 10-US2). In a normal lung the visceral and parietal pleural layers are directly opposed to one another (save for a thin layer of pleural fluid). When the patient breathes in and out, the layers “slide” past each other to allow the lungs to expand. When this is viewed with ultrasound, the pleural line can be seen to slide back and forth with patient respiration. This is referred to as the “slide sign.” In cases in which this interface is disrupted (such as by a pneumothorax), the sliding is lost. When these patients are evaluated with ultrasound, the pleural line will be seen as a static echogenic line that does not change with respiration.
Although the slide sign carries significant sensitivity for ruling out a pneumothorax, other secondary confirmatory findings should be sought as well.1
Comet tail artifacts may be seen in a normal lung. These are hyperechoic vertical lines that extend deep to the pleural interface (Fig. 10-US3). Typically, they will be seen in small numbers in a normal lung. Patients in whom a pneumothorax is present are noted to lack comet tails because this artifact arises from the normal pleural interface, which is disrupted. The presence of comet tails may be used by the sonographer to further rule out a pneumothorax.2,3
In a normal patient, the pleura will slide back and forth as the patient breathes. Because this motion is neither toward nor away from the transducer but instead is parallel, the motion will be seen as a series of hazy lines deep to the pleura. The overlying soft tissue is not in motion and will be seen as a series of clear, flat lines. This typical appearance is described as the “seashore” sign (Fig. 10-US4).
In patients in whom a pneumothorax is present, no motion is detected by ultrasound. Therefore, the M-mode tracing will show clear, flat lines throughout the frame. This is referred to as the “stratosphere” or “bar code” sign (Fig. 10-US5).
References:
1. Blaivas, M, Lyon, M, Duggal, S. A prospective comparison of supine chest radiography and bedside ultrasound for the diagnosis of traumatic pneumothorax. Acad Emerg Med. 2005;12:844–849.
2. Lichtenstein, D, Meziere, G, Biderman, P, et al. The comet-tail artifact: an ultrasound sign ruling out pneumothorax. Intensive Care Med. 1999;25:383–388.
3. Chan, SS. Emergency bedside ultrasound to detect pneumothorax. Acad Emerg Med. 2003;10:91–94.
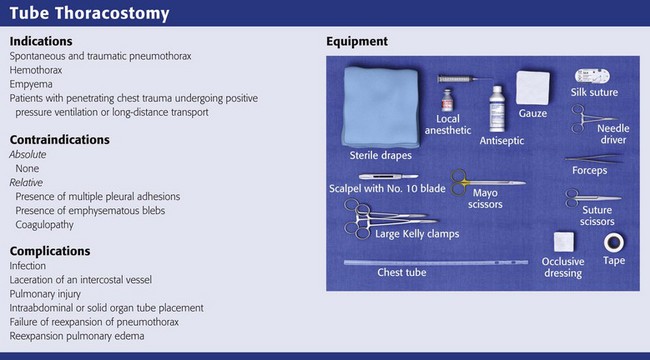
Indications for Tube Thoracostomy
Tube thoracostomy is by far the most common treatment of all types of pneumothoraces, but controversy exists over the treatment of small traumatic and spontaneous primary pneumothoraces. However, the American College of Chest Physicians has developed useful guidelines for the management of primary and secondary spontaneous pneumothoraces (Box 10-1).12
Chest tube placement is probably not necessary in healthy patients with small primary spontaneous or isolated small traumatic pneumothoraces in the absence of respiratory compromise or concomitant injuries or when PPV will not be required. With no intervention, a small pneumothorax will resolve over a period of days to weeks. Supplemental oxygen will speed the process of lung reexpansion by increasing the rate of pleural air absorption. No controlled studies have been conducted to compare the various interventions for primary spontaneous pneumothorax, and there is wide variation in treatment approaches. In particular, no significant difference has been found between simple aspiration and tube drainage with regard to the immediate success rate, early failure rate, duration of hospitalization, and 1-year success and pleurodesis.13 Needle aspiration is associated with reduced analgesia requirements, lower pain scores, and a lower percentage of patients being hospitalized. Recent studies have shown excellent short- and long-term outcomes after video-assisted thoracoscopic treatment (VATS) of primary and secondary spontaneous pneumothorax, and rates of recurrence are lower than after other treatment modalities. However, VATS continues to have a higher complication rate than simple tube thoracostomy does, with 4.6% of patients with spontaneous pneumothorax experiencing serious side effects as a result of the procedure.14,15
In patients with a simple pneumothorax, prolonged suction is rarely required, and the tube can simply be attached to a Heimlich valve or underwater seal.16–18
Hemothorax
Tube thoracostomy is the treatment of hemothorax, but it is also used to monitor the amount and rapidity of blood output, which determines the need for additional interventions, including video-assisted thoracoscopy or open thoracotomy. About three fourths of patients with a traumatic hemothorax can be managed by tube thoracostomy and volume replacement alone. The remaining patients will require immediate or delayed elective thoracotomy. The indications for surgery after an acute hemothorax vary somewhat between authors but are summarized in Box 10-2. Early institution of blood replacement is recommended for patients with massive hemothoraces (>2000 mL) because they are often associated with continuing hemorrhage. Autotransfusion of the shed blood is desirable whenever possible. For patients with active blood loss but stable hemodynamics, VATS can be used to locate and stop the bleeding, evacuate blood clots, and break down adhesions.
Empyema
Treatment of empyema depends on the severity of the infection and the patient’s underlying condition. Some patients with empyema can be treated with serial thoracentesis, but most will require continuous drainage with a chest tube (see Fig. 10-5). Thoracoscopic decortication represents definitive therapy for severe cases. Usually, diagnostic thoracentesis is performed first to assess the fluid for signs of infection. Thick pus on thoracentesis, positive Gram stain, fluid glucose level lower than 60 mg/dL, pH less than 7.20, or elevated lactate dehydrogenase is associated with infection and an effusion that requires chest tube drainage. Once an empyema is detected, therapy should not be delayed because the fluid can quickly become loculated. Generally, the tube is left in place until the pleural drainage fluid becomes clear yellow and accumulates less than 150 mL in 24 hours. An empyema that fails to resolve on chest radiography within 48 hours requires chest CT and a careful review of antibiotic choice. Multiloculated effusions are best managed by thoracoscopic decortication.
Treatment
Treatment of a Possible Tension Pneumothorax in an Unstable Patient
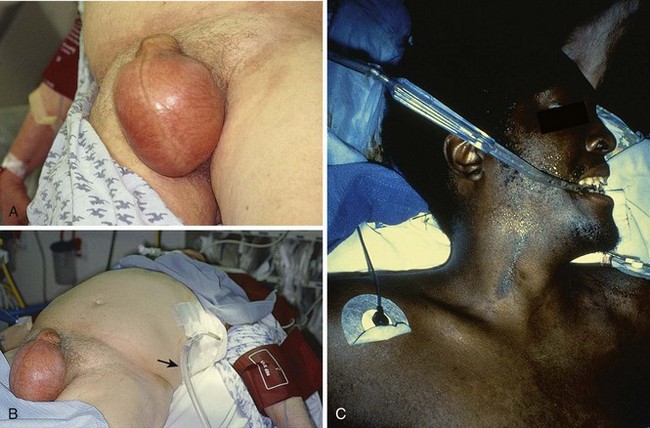
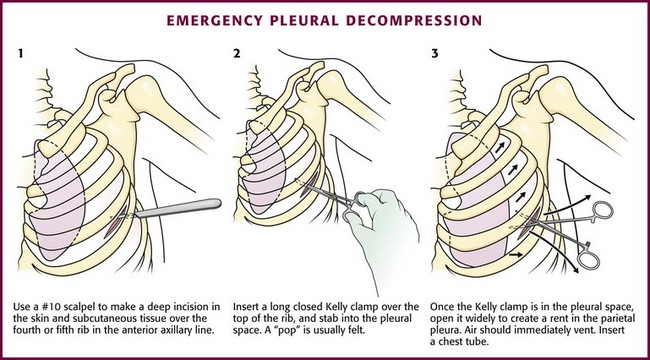
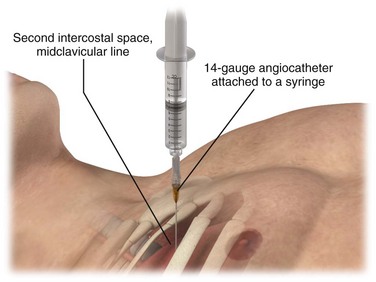
Immediate decompression of the chest must be considered in all injured patients with unexplained hypotension or tachypnea, particularly those with penetrating chest injuries. The goal is to open the pleural space quickly to allow any accumulated air to escape and decompress the chest cavity. This can be accomplished with a scalpel and forceps, as is done at the beginning stages of a thoracostomy (Fig. 10-9), or more commonly, decompression can be achieved with a large-bore needle/angiocatheter combination (minimum of 16 gauge) (Fig. 10-10). Place the catheter in the second intercostal space at the midclavicular line on the side with diminished breath sounds or on both sides if the diagnosis is unclear. Remove the needle, but leave the angiocatheter in place to create a simple pneumothorax. Regardless of whether this is successful in improving the patient’s vital signs, perform a standard tube thoracostomy immediately following the decompression. If the needle decompression is not effective, an open thoracostomy can be started, even without the immediate availability of a chest tube, to help create an exit for the air so that the patient’s respiratory and cardiovascular function can normalize.
Emergency Department Treatment
The standard instruments for a tube thoracostomy tray are listed in Box 10-3 and depicted in Review Box 10-1. The most basic needs are a scalpel, a large (Kelly) clamp, and the thoracostomy (chest) tube.
Thoracostomy tubes are clear plastic tubes of various diameter that are open at both ends (Fig. 10-11). There is a radiopaque strip along the length of the tube that is interrupted by a series of holes along the distal length of the tube. The strip allows visualization of the tube’s location on the postprocedure radiograph and ensures that the side ports are within the pleural cavity. Tube sizes vary from 12 to 42 Fr, with smaller tubes being used for smaller pneumothoraces and larger (a minimum of 36 Fr) tubes for hemothorax and empyema. For pediatric patients, 14-, 16-, 20-, and 24-Fr tubes are adequate.
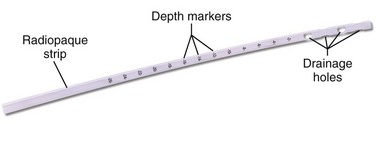
Figure 10-11 Thoracostomy tube.
Procedure
Tube Insertion Site
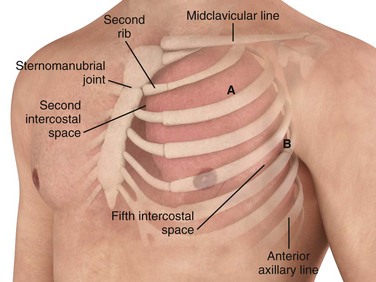
Insert the tube over the top of the rib rather than near the bottom to avoid the neurovascular structures located on the inferior aspect of the ribs. The most common location for a chest tube is the midaxillary to anterior axillary line, usually in the fourth or fifth intercostal space (Fig. 10-12). This approach is cosmetically preferable and better tolerated than the anterior chest wall approach in the second intercostal space of the midclavicular line. The fifth intercostal space is approximately at the level of the nipple or the inferior scapular border in most patients, although the position of the female breast mass leads to variance. To avoid penetrating the abdominal cavity, choose a more superior insertion site because the external landmarks can be misleading. The diaphragm of a supine patient who is not taking a deep breath is much higher than expected.
Patient Preparation
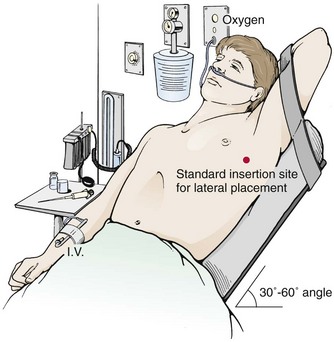
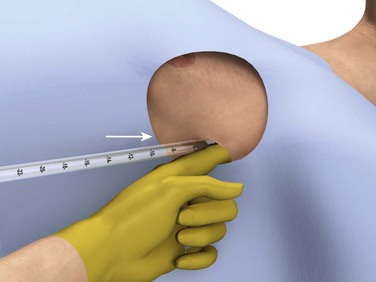
If indicated clinically, start oxygenating and monitoring the patient continuously with cardiac and pulse oximetry. When possible, elevate the head of the bed 30 to 60 degrees (Fig. 10-13) to lower the diaphragm and decrease the risk for injury to the diaphragm, spleen, and liver. Abduct the arm on the affected side, place it over the patient’s head, and restrain it in that position. Clean the skin with a standard surgical scrub and drape the field with sterile towels.
Anesthesia
Tube thoracostomy can be extremely painful, so give parenteral analgesics or procedural sedation to stable patients before the procedure. A common problem is inadequate systemic analgesia and local anesthesia. Use generous local anesthesia, such as up to 5 mg/kg of locally injected 1% lidocaine with or without epinephrine. Slowly inject local anesthetic over the superior aspect of the rib; through the muscle, periosteum, and parietal pleura; and along the entire anticipated tract of passage of the tube (Fig. 10-14). Intermittently aspirate for air or fluid with the needle to find the pleural cavity. If air or fluid is not found, change the insertion site.

Once the tube is in place, administer local anesthetic through the chest tube into the pleural space to reduce pain caused by the tube rubbing against the pleura. In a stable patient, add 10 mL of 0.5% bupivacaine through the chest tube while the patient is lying on the contralateral side.19 After 5 minutes without drainage of the thorax, reinitiate standard gravity or vacuum drainage. Use parenteral analgesic agents as needed to control pain.
Insertion
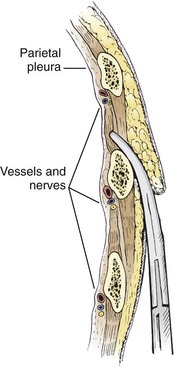
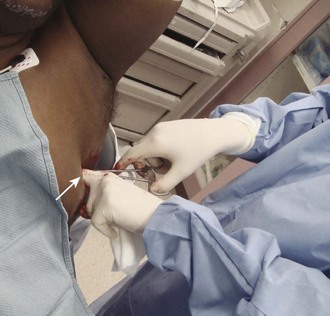
The incision site should be lateral to the edge of the pectoralis major and breast tissue and not through these structures. A common problem is that the skin incision is too short to create and maintain an adequate tract to insert the thoracostomy tube. Make sure that the incision is no less than 3 to 5 cm long (Fig. 10-15, step 1). Make a transverse incision through the skin and subcutaneous tissue with a No. 10 blade over the rib. Some authors advocate making the initial skin incision over a rib lower than the intended intercostal space through which the tube will enter and then “tunneling” the tube under the skin and up over the next rib. This is theoretically done to prevent air leaks, but there is no good evidence to support this practice. It is more common to simply make the incision so that there is a straight path to the pleural cavity, but over the appropriate rib. This avoids the problem of losing the entrance point or increasing damage to soft tissue, both issues in obese patients. After the incision is made, insert a large Kelly clamp to push and spread the deeper tissues. Bluntly dissect a tract over the rib while avoiding the intercostal vessels and nerve on the inferior margin of each rib (Fig. 10-16; also see Fig. 10-15, step 2). Firm resistance will usually be felt when the tough parietal pleura is met. Close the clamp and push it forward with firm pressure to penetrate the pleura and enter the cavity. Considerable force may be needed. To prevent the clamp from penetrating too deeply, hold it at the midshaft a few centimeters distal to the incision and rest the tip against the pleura before pushing through (Fig. 10-17). Penetrating the pleura is usually the most painful portion of the procedure, so consider injecting extra anesthetic or analgesic at this point. On entering the pleural cavity, a palpable pop may be felt and a rush of air or fluid may occur. With only the tips of the clamp in the pleural cavity, spread the clamp to make an adequate hole in the pleura and then withdraw it (see Fig. 10-15, step 3). Make the opening in the parietal pleura wide enough to comfortably insert both a finger and the tube, but avoid a larger pleural opening to reduce the risk for an air leak (Fig. 10-18).
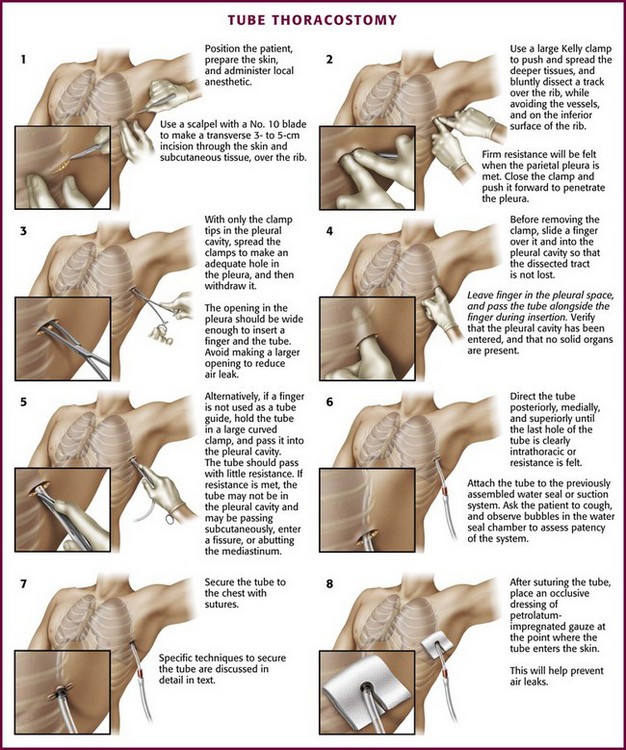
Figure 10-15 Tube thoracostomy. (From Custalow CB. Color Atlas of Emergency Department Procedures. Philadelphia: Saunders; 2005.)
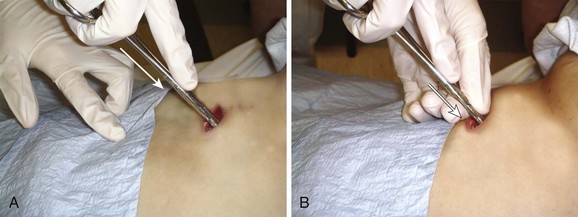
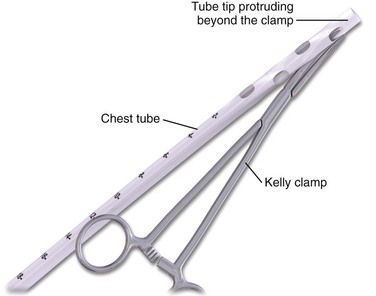
Another common problem occurs at this point, particularly in obese patients: the dissected tract and pleural opening can be lost when the clamp is withdrawn. To prevent this problem, slide a sterile gloved finger over the clamp and into the pleura before withdrawing the clamp (Fig. 10-19). This is done to further define the tract and to verify that the pleura has been entered and that no solid organs have been penetrated. Whenever possible, leave the finger in the pleural space so that the hole is not lost (see Fig. 10-15, step 4) and then pass the tube over, under, or beside the finger into the pleural space, with the fingertip being used to guide the course of the tube (Fig. 10-20). This step allows the clinician to feel the tube passing into the pleural cavity, avoids subcutaneous dissection by the tube, and enhances proper direction of the tube. Pass the tube alone or hold onto a large curved clamp with the tip of the tube protruding beyond the tip of the clamp (Fig. 10-21; also see Fig. 10-15, step 5). Normally, the tube should pass with little resistance. If resistance is met, the tube may not be in the pleural cavity and instead is passing subcutaneously, is in a fissure, or is abutting against the mediastinum (Fig. 10-22). Still using the finger that remains in the pleural space, direct the tube posteriorly, medially, and superiorly until the last hole of the tube is clearly in the thorax, the marker clamp that was previously attached touches the chest wall, or resistance is felt (see Fig. 10-14, step 6). Ensure that all the holes in the tube are within the pleural space. Rotate the tube 360 degrees to reduce the likelihood of kinking.
Confirmation of Tube Placement
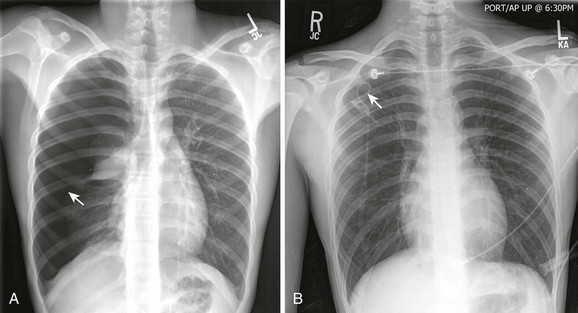
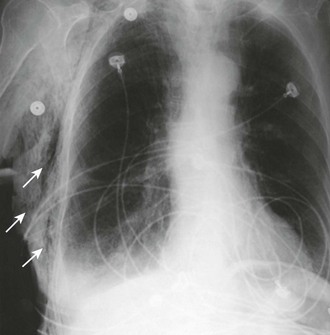
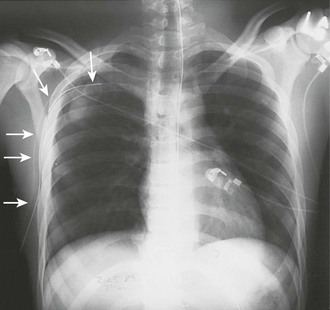
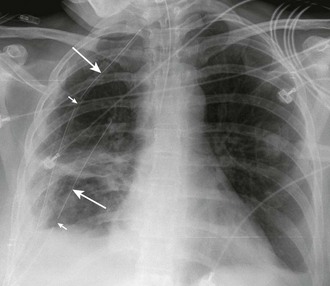
There are many ways to confirm the location of the tube. Slide a finger along the tube to verify that it has entered the pleural cavity. Look for condensation on the inside of the tube and listen for air movement, which is audible during respirations. Observe free flow of blood or fluid. Check to be sure that the tube rotates freely after insertion. A chest radiograph is used for definitive assessment of tube placement (Fig. 10-23). If the tube and most proximal hole are not completely within the pleural space and if the field has remained sterile, advance the tube. If the tube is kinked or dysfunctional or the sterile field has been lost and advancement is required, place a new tube in sterile fashion through the same tract. If the tube has been advanced too far, simply withdraw it to the correct depth.
Securing the Tube
Once the position of the tube has been verified with a radiograph, secure it. There are numerous methods to secure a tube. The usual one is to sew the tube to the skin with large 0 or 1-0 silk or nylon sutures. Nylon sutures are acceptable but must be tied tightly or they will slip on the surface of the tube. One common method is to use a “stay” suture in which the same suture that closes the skin incision is used to hold the tube (Fig. 10-24, plate 1). After this suture is used to close the skin incision at the site of insertion of the tube, wrap the ends tightly and repeatedly around the chest tube and tie it securely. Tie the sutures tightly enough to indent the chest tube slightly and avoid slippage. If the skin incision is especially long, use additional simple sutures to close it completely.
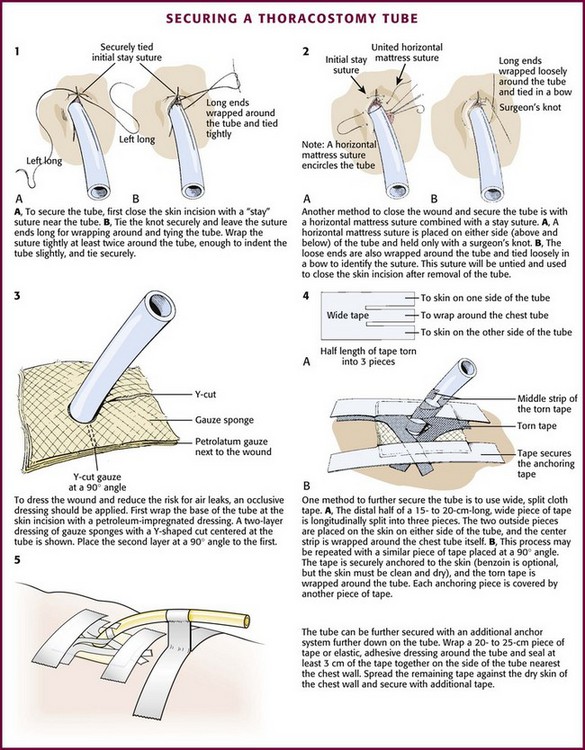
Figure 10-24 Methods of securing a thoracostomy tube.
Another optional suture technique can both help close the skin around the tube and completely close the incision once the chest tube is removed. To do this, place a horizontal mattress suture approximately 1 cm across the incision on either side of the tube, essentially encircling it (Fig. 10-24, plate 2). Secure it with a simple knot that can easily be untied so that it can be opened and retied to close the incision after the tube has been removed.
After suturing the tube in place, apply an occlusive dressing of petrolatum-impregnated gauze at the point where the tube enters the skin to help reduce air leaks. Cover the skin with two or more gauze pads with a Y-shaped cut from the middle of one side to the center (Fig. 10-24, plate 3). Secure this dressing with wide (8- to 9-cm) cloth or elastic adhesive tape with or without benzoin.
Use approximately 10 to 12 cm of tape split into three pieces and extending halfway along its length. Place the two outside pieces on the skin on either side of the tube site, and wrap the center section tightly around the tube (Fig. 10-24, plate 4). Repeat this with a second piece of tape placed at a 180-degree angle to the first. Also securely tape the tube connections. To further secure the tube, use tape to create a loop or stalk by wrapping it around the tube. Then press the tape together for 1 to 2 cm before applying the tape to the chest wall (Fig. 10-24, plate 5).
Drainage and Suction Systems
A basic understanding of chest tube drainage systems is necessary to prevent life-threatening complications associated with their use. All drainage systems have two essential components: a one-way valve to allow air or fluid to drain out of the pleural space without allowing air back into the pleural space and a suction mechanism to increase the rate of drainage. The simplest drainage device is just a one-way valve without suction. This can be accomplished with either an underwater seal or a flutter (Heimlich) valve attached to the end of the chest tube (Fig. 10-25). Normal respiration and coughing are often sufficient to create the pressure necessary to remove excess air from the pleural space and allow the lung to expand. The Heimlich valve does not require suction and can be used for outpatient therapy.
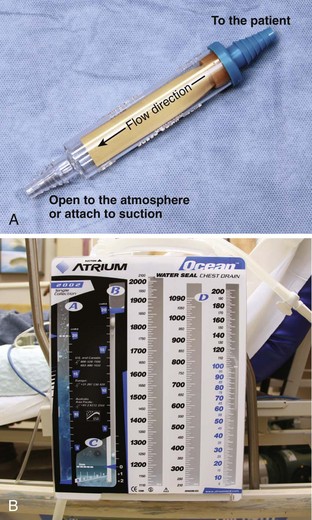
With a one-bottle underwater seal system, the intrapleural fluid or air exits under a small amount of water. It collects in the single reservoir and mixes with the water (Fig. 10-26A). The water above the tube acts as a seal because it is too heavy to be drawn back into the chest. For drainage to occur, intrathoracic pressure must be greater than the water pressure at the distal end of the immersed tube. This pressure is determined by the height of the water above the exit port of the tubing. When the height is too great (the tube is too deep in the water), even coughing may not raise intrapleural pressure sufficiently to drain the chest. Place the collecting bottle below the patient, usually on the floor, to prevent inspiration from generating enough negative pressure to pull the contents of the collection bottle into the chest cavity.
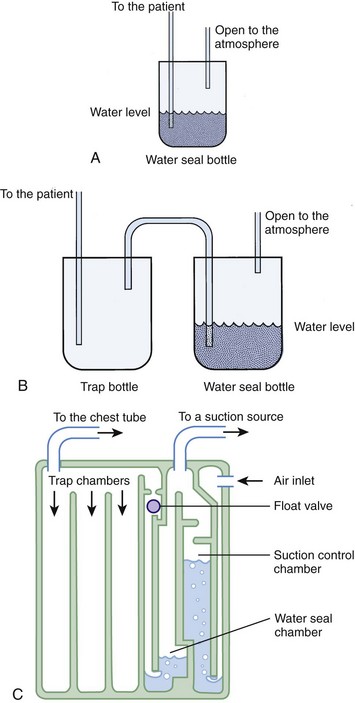
Use suction initially to treat patients with pneumothorax or hemothorax, but replace it with a water seal once drainage and expansion are satisfactory and no persistent air leaks are present. The suction device should have high suction flow (≤20 L/min) and be able to keep the suction constant. Wall suction of 10 to 20 cm H2O is normally used, but the amount of suction in the chest tube depends on the depth of water in the water seal reservoir, not on the suction from the wall valve. When negative pressure from the suction source exceeds the depth of the water in the chamber, air enters from the top of the third tube and causes continuous bubbling (see Fig. 10-26B). This prevents a further increase in pressure in the chest tube. The wall suction dial can be turned down until only occasional bubbling can be detected. Vigorous bubbling does not equate with more suction.
The bottle combinations example is provided to illustrate the principles but is rarely used now. Many types of commercial, enclosed systems are available that essentially combine a two-bottle method that can be connected to suction, but with the addition of an “air leak chamber” (see Fig. 10-26C). Bubbling in this chamber indicates the presence of an air leak, usually from the drainage system itself as a result of a loose tube connection. If bubbling is present, first check the drainage system, tube, and connectors for any problems or loose connections. If the leak continues, check whether all the holes of the chest tube are within the thorax. If the bubbling continues after these steps, a continued air leak may be due to a large hole in the lung parenchyma, which is usually seen only with expiration or with coughing. A continuous air leak or a leak during inspiration indicates a larger and possibly more significant lung injury.20 Surgical intervention is indicated if an air leak persists for longer than 72 hours or if the lung is not completely reexpanded.
When the drainage system is functioning properly, the height of the fluid level in the drainage tube fluctuates with inspiration and expiration. Absence of respiratory fluctuation or a decrease in drainage may indicate that the system is blocked or that the lung is fully expanded. If the tube is blocked, the chest tube or collecting tubing, or both, can be changed or “stripped” to dislodge clots. Replacing the tube is a complicated process associated with risks, but the stripping procedure is controversial because of concern that the potentially high negative pressure from the procedure could damage lung tissue.21 For stripping, clamp the tube proximally and progressively compress it distally and then release it to allow the tube to spring open. The sudden increase in negative pressure may extract clots and fluid from a more proximal location. If the blockage is within the thorax, the tube can be cleared by forcing air or fluid back into the chest. The tube must be clamped distally and then compressed and stripped to force the contents proximally.
Prophylactic Antibiotics
The use of prophylactic antibiotics after placement of a chest tube in the emergency department (ED) is common, but no specific standards exist. It appears reasonable to provide short-term antibiotic prophylaxis since analyses of many studies have shown that antibiotics reduce the incidence of chest tube-associated empyema or pneumonia.22 Guidelines from the Eastern Association of Surgeons of Trauma recommend the use of first-generation cephalosporins during the first 24 hours for patients undergoing chest tube drainage for hemothorax.23
Tube Removal
Chest tubes are rarely removed by emergency clinicians. The usual indication for removal of a chest tube is after a chest radiograph demonstrates complete resolution of the pneumothorax and there is no evidence of an ongoing air leak. Before removal, discontinue suction and establish a water seal. The literature is not clear about the use of a chest radiograph after suction is discontinued and after pulling the tube. Textbooks continue to recommend such practice, but studies have show that it is not necessary for postoperative patients.24,25
Other Techniques
Despite these impediments, recent studies have hinted at the adequacy of small-bore PDCs for the treatment of many conditions. Review of the data available suggests that the rate of blockage and dislodgement is similar with large- and small-bore PDCs and that drainage capability is comparable in all but the most extreme circumstances.26–29 Another study has shown that large-bore PDC placement is associated with significantly more pain and slightly increased rates of empyema.30
Review of the current pulmonology and critical care literature reveals no consensus on the appropriate use of small-bore PDCs; however, recent review articles have attempted to establish rough guidelines for their use. The current literature suggests that patients with malignant effusion, simple pneumothorax without penetrating injury, or a suspected air leak, as well as those with simple or complex parapneumonic effusions, are good candidates for small-bore PDCs. Patients with empyema, penetrating injury, traumatic hemothorax, or complex pneumothorax and those on mechanical ventilation require large-bore PDCs because of the potential for large-volume air leaks in such patients and the need for rapid evacuation of the pleural space.31,32
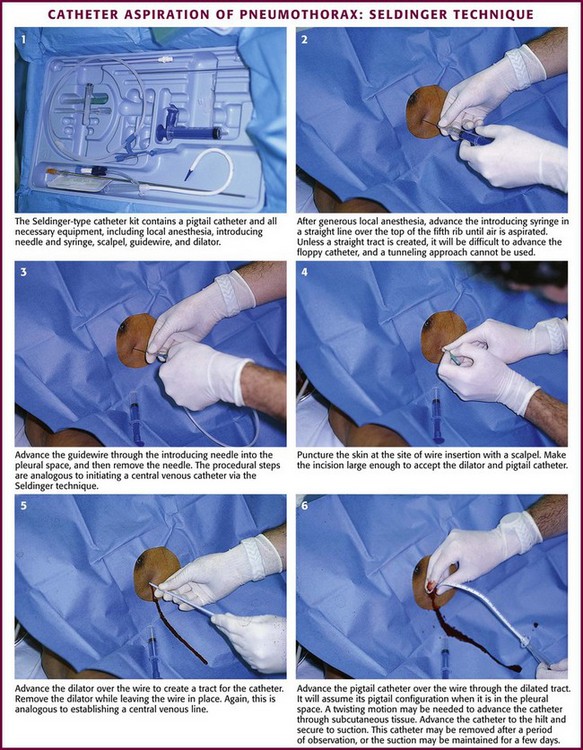
Guidewire Technique for Catheter Aspiration
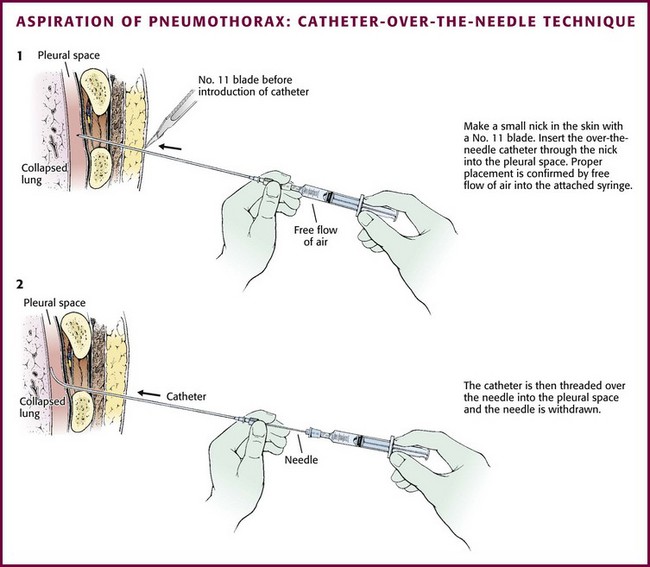
The catheters are placed via a standard “over-the-wire” (Seldinger) technique. The most common insertion site is the second intercostal space in the midclavicular line, but either of the standard locations (the midaxillary to anterior axillary line, usually in the fourth or fifth intercostal space, or the midclavicular line, second intercostal space) can be used. Place the patient in a semi-upright position. Clean the skin with an antiseptic solution and drape the area. Infiltrate locally with lidocaine for anesthesia. Advance the guide needle in a straight line at a 60 degrees angle cephalad over the top of the rib (Figs. 10-27 and 10-28). Unless a straight tract is created, it will be difficult to advance the floppy catheter, so a tunneling approach cannot be used. When the pleural space is identified by intermittent aspiration, halt advancement of the needle. Feed a guidewire through the needle and into the pleural space. Remove the needle while stabilizing the guidewire to keep it in the pleural space. Make a small incision in the skin with a No. 11 blade at the base of the wire to allow passage of the catheter through the skin. Some systems use a dilator over the wire to open the path through the soft tissue. Then thread the minicatheter over the guidewire and into the pleural space. Remove the wire and dilator while leaving the catheter in the pleural space. Advance the catheter through the subcutaneous tissue with a twisting motion. Secure the catheter to the skin with a suture and dress the incision site. The catheter may be removed after a period of observation, or suction may be maintained for a few days. If the catheter becomes clogged with mucus or blood, inject sterile saline through the device to clear it.
Tube Thoracostomy in Pediatric Patients
The technique of tube thoracostomy in pediatric patients is essentially the same as that in adults, but the body size and small spaces between the ribs make the procedure more difficult. The size of the tube increases with the patient’s weight, starting with 8- to 10-Fr catheters for premature infants (Table 10-1). Because of the risk for future breast deformities, avoid the midclavicular approach. Instead, use the anterior axillary line through the fifth intercostal space for newborns and infants.33

Complications
The most common complications include infection, laceration of an intercostal vessel, laceration of the lung, and intraabdominal or solid organ placement of the chest tube (Boxes 10-4 and 10-5). Local infection at the insertion site is common and often related to the emergency nature of the procedure. Subcutaneous emphysema is a frequent, usually benign complication that is self-limited and generally caused by an excessively large opening in the pleura. Subcutaneous air may be a result of the incident that caused the pneumothorax in the first place. The development of palpable subcutaneous air is another complication of chest tube placement. It is usually limited to the insertion site but can become massive with PPV in a patient with continued air leak or an occluded tube.
A rare complication of tube thoracostomy is unilateral reexpansion pulmonary edema. The pulmonary edema ranges from mild to severe, but fatalities have been reported.34 The condition may occur shortly after reexpansion or may be delayed a number of hours. A common factor in these cases seems to be a prolonged period between the development of a pneumothorax and the onset of treatment, but the exact time frame is quite variable. Usually, the pneumothorax has been present for at least 3 to 4 days. Proposed mechanisms include anoxic damage to the alveolar-capillary basement membrane from prolonged pulmonary collapse, loss of surfactant, or rapid fluid shifts. Treatment is supportive, with ventilatory support occasionally being required. Reintroduction of air back into the pleural space and temporary occlusion of the ipsilateral pulmonary artery have been other suggested, but unproved interventions.
References
1. Blaisdell, FW. Pneumothorax and hemothorax. In: Blaisdell FW, Trunkey DD, eds. Cervicothoracic Trauma. New York: Thieme Medical; 1994:215.
2. Chan, SS. The role of simple aspiration in the management of primary spontaneous pneumothorax. J Emerg Med. 2008;34:131–138.
3. Haynes, D, Baumann, MH. Management of pneumothorax. Semin Respir Crit Care Med. 2010;31:769–780.
4. Devanand, A, Koh, MS, Ong, TH, et al. Simple aspiration versus chest-tube insertion in the management of primary spontaneous pneumothorax: a systematic review. Respir Med. 2004;98:579.
5. Lisboa, T, Waterer, GW, Lee, YG. Pleural infection: changing bacteriology and its implications. Respirology. 2011;16:598–603.
6. Chen, SC, Chang, KJ, Hsu, CY. Accuracy of auscultation in the detection of hemopneumothorax. Eur J Surg. 1998;164:643.
7. Brasel, KJ, Stafford, RE, Weigelt, JA, et al. Treatment of occult pneumothoraces from blunt trauma. J Trauma. 1999;46:987.
8. Omert, L, Yeaney, WW, Protetch, J. Efficacy of thoracic computerized tomography in blunt chest trauma. Am Surg. 2001;67:660.
9. Wilson, H, Ellsmere, J, Tallon, J, Kirkpatrick, A. Occult pneumothorax in the blunt trauma patient: tube thoracostomy or observation? Injury. 2009;40(9):928–931.
10. Moore, C, Copel, JA. Point-of-care ultrasonography. N Engl J Med. 2011;346:749–757.
11. Ma, OJ, Mateer, JR, Kirkpatrick, AW. Trauma. In: Ma OJ, Mateer JR, Blaivas M, eds. Emergency Ultrasound. 3rd ed. New York: McGraw-Hill; 2008:77–108.
12. Baumann, MH, Strange, C, Heffner, JE, et al. Management of spontaneous pneumothorax: an American College of Chest Physicians Delphi consensus statement. Chest. 2001;119:590.
13. Kelly, AM. Treatment of primary spontaneous pneumothorax. Curr Opin Pulm Med. 2009;15:376–379.
14. Shaikhrezai, K, Thompson, AI, Parkin, C, et al. Video-assisted thoracoscopic surgery management of spontaneous pneumothorax-long term results. Eur J Cardiothorac Surg. 2011;40:120–123.
15. Chambers, A, Scarci, M. In patients with first episode primary spontaneous pneumothorax is video-assisted thoracoscopic surgery superior to tube thoracostomy alone in terms of time to resolution of pneumothorax and incidence of recurrence? Interact Cardiovasc Thorac Surg. 2009;9:1003–1008.
16. Ayed, AK. Suction verus water seal after thoracoscopy for primary spontaneous pneumothorax: prospective randomized study. Ann Thorac Surg. 2003;75:1593–1596.
17. Zehtabchi, S, Rios, CL. Management of emergency department patients with primary spontaneous pneumothorax: needle aspiration or tube thoracostomy? Ann Emerg Med. 2008;51:91.
18. Marimoto, T, Fukui, T, Koyama, H, et al. Optimum strategy for the first episode of primary spontaneous pneumothorax in young men—a decision analysis. J Gen Intern Med. 2002;17:193.
19. Engdahl, O, Boe, J, Sandstedt, S. Intrapleural bupivacaine for analgesia during chest drainage treatment for pneumothorax. A randomized double-blind study. Acta Anaesthesiol Scand. 1993;37:149.
20. Cerfolio, RJ. Advances in thoracostomy tube management. Surg Clin North Am. 2002;82:833.
21. Sesieme, EB, Dongo, A, Ezemba, N, et al. Tube thoracostomy: complications and management. Pulm Med. 2012;2012:256878.
22. Sun, J, Xu, Z. The role of prophylactic antibiotics in thoracostomy. Aust N Z J Surg. 2010;80:127–128.
23. Luchette, FA, Barrie, PS, Oswanski, MF, et al. Practice management guidelines for prophylactic antibiotic use in tube thoracostomy for traumatic hemopneumothorax: the EAST practice management guidelines work group. J Trauma. 2000;48:753–757.
24. Whitehouse, MR, Patel, A, Morgan, JA. The necessity of routine post-thoracostomy tube chest radiographs in post-operative thoracic surgery patients. Surgeon. 2009;7(2):79–81.
25. Eisenberg, RL, Khabbaz, KR. Are chest radiographs routinely indicated after chest tube removal following cardiac surgery? AJR Am J Roentgenol. 2011;197:122–124.
26. Horsley, A, Jones, L, White, J, et al. Efficacy and complications of small-bore, wire-guided chest drains. Chest. 2006;130:1857–1863.
27. Rahman, NM, Maskell, NA, Davies, CWH, et al. The relationship between chest tube size and clinical outcome in pleural infection. Chest. 2010;137:536–543.
28. Park, JK, Kraus, FC, Haaga, JR. Fluid flow during percutaneous drainage procedures: an in vitro study of the effects of fluid viscosity, catheter size, and adjunctive urokinase. AJR Am J Roentgenol. 1993;160:165–169.
29. Niinami, H, Tabata, M, Takeuchi, Y, et al. Experimental assessment of the drainage capacity of small Silastic chest drains. Asian Cardiovasc Thorac Ann. 2006;14:223–226.
30. Yamaguchi, M, Yoshino, I, Kameyama, T, et al. Use of small-bore Silastic drains in general thoracic surgery. Ann Thorac Cardiovasc Surg. 2007;13:156–158.
31. Baumann, M. What size chest tube? What drainage system is ideal? And other chest tube management questions. Curr Opin Pulm Med. 2003;4:276–281.
32. Fysh, ET, Smith, NA, Lee, YC. Optimal chest drain size: the rise of the small bore catheter. Semin Respir Crit Care Med. 2010;31:760–768.
33. Rainer, C. Breast deformity in adolescence as a result of pneumothorax drainage during neonatal intensive care. Pediatrics. 2003;111:80.
34. Murphy, K, Tomlanovich, MC. Unilateral pulmonary edema after drainage of a spontaneous pneumothorax. Case report and review of the world literature. J Emerg Med. 1983;1:29.
[/level-membership-for-emergency-medicine-category][not-level-membership-for-emergency-medicine-category]Chapter 10
Tube Thoracostomy
Tube thoracostomy is a procedure used to evacuate an abnormal accumulation of fluid or air from the pleural space and can be performed on an elective, urgent, or emergency basis. Air or fluid can accumulate in the pleural space as a result of spontaneous or traumatic pneumothorax, pleural fluid accumulation of blood, malignancy, infection (empyema), or lymph (chylothorax). The first modern methods to evacuate the contents of the pleural space were developed in the 19th century, but these techniques did not become widespread until 1918, when they were used to treat postinfluenza empyema. Military experience demonstrated that thoracic drainage combined with antiseptics and antibiotics reduced mortality related to thoracic trauma from 62.5% during the Civil War, to 24.6% in World War I, and to 12% in World War II.1
Pathophysiology
Pneumothorax
A pneumothorax is caused by the presence of air in the pleural space and the loss of negative pressure (Fig. 10-1). Air can enter the pleural space from the outside as a result of a penetrating injury or internally from a ruptured lung bleb or damaged trachea. Iatrogenic causes from needle procedures such as subclavian venous cannulation, transthoracic biopsy, thoracentesis, positive pressure ventilation (PPV), or cardiopulmonary resuscitation (CPR) are also common (Fig. 10-2). Pneumothoraces are commonly divided into “open” and “closed.” An open pneumothorax indicates that the skin and underlying soft tissue sustained an injury that penetrated into at least the pleural space.
Spontaneous (Closed) Pneumothorax
Spontaneous pneumothorax is caused by rupture of a subpleural lung bleb with little or no trauma and can be categorized as either primary or secondary based on the presence of underlying lung disease. Primary spontaneous pneumothorax occurs in a patient without overt lung disease. The typical patient with spontaneous pneumothorax is a tall, thin, 20- to 40-year-old male smoker (Fig. 10-3). Secondary spontaneous pneumothoraces occur in patients with underlying lung or pleural disease, including emphysema, chronic bronchitis, asthma, Marfan’s syndrome, infection, and neoplasm. The morbidity, mortality, and long-term complications associated with pneumothorax increase in patients with underlying lung disease. Whereas a primary pneumothorax may be selectively observed or simply aspirated, a secondary pneumothorax often requires a more aggressive approach to management.
The sudden onset of pleuritic chest pain and dyspnea with exertion or at rest is the most common finding. More subtle manifestations occur with little or no pain and only mild dyspnea on excursion that the patient may ignore for days. A person with a small spontaneous pneumothorax may never seek medical attention, and the process will resolve without treatment. The signs and symptoms do not always correlate well with the size or cause of the collapsed lung. Tube thoracostomy is the most common treatment, but new trials suggest that conservative management or aspiration of first-time primary pneumothoraces results in similar outcomes as traditional tube thoracostomy, though with fewer complications, shorter hospital stay, and lower cost. Conservative management and aspiration are both reasonable initial interventions in clinically stable patients. However, to date no high-quality clinical trials have definitely demonstrated that aspiration is a superior treatment methodology.2–4 Rarely, a spontaneous pneumothorax may be bilateral or progress to tension pneumothorax, a potentially life-threatening condition that is described in more detail later in this chapter.
Tension Pneumothorax
An open pneumothorax can occasionally be manifested as a tension pneumothorax, which is a life-threatening condition that requires immediate intervention. A tension pneumothorax occurs when an injury creates a one-way “flap valve” mechanism that allows air into the pleural space with inspiration but then closes with expiration and traps the air (Fig. 10-4). The progressive accumulation of air in the pleural space leads to ipsilateral complete lung collapse and then impingement on the mediastinum with a shift of the heart toward the uninvolved side, which restricts ventricular filling and subsequently decreases cardiac function. This severe disruption in both respiratory and cardiac function can lead to hypotension and reduced ventilation (both hypoxia and CO2 retention) and eventually to cardiopulmonary collapse.
Empyema and Effusions
An empyema is an accumulation of pus in the pleural space, usually from a parapneumonic infectious effusion (Fig. 10-5). An empyema can also be caused by violation of the thoracic space by surgical procedures (e.g., tube thoracostomy), trauma, and esophageal perforation. Pleural infection rates have increased 3% per year in the United States in the last 2 decades. The bacteriology of pleural infections appears to track closely with classification of pneumonia as community or hospital acquired. Nearly 60% of cases of community-acquired pneumonia are caused by Streptococcus pneumoniae species, whereas Staphylococcus species account for nearly 45% of hospital-acquired infections.5
Diagnosis
Physical Examination
During the initial phase of resuscitation (airway, breathing, circulation, disability), consider the diagnosis of pneumothorax in patients who are tachycardic, hypotensive, and dyspneic. Similar symptoms occur with pulmonary embolism, pericardial tamponade, and severe pneumonia. Conduct multiple examinations because the diagnosis of tension pneumothorax by physical examination can be very subtle. Use the phrase “look, listen, and feel” as your guideline. Observe the chest wall, which may reveal asymmetric chest expansion, and the neck and forehead veins, which may be distended, even if the patient is hypotensive. The trachea may be deviated away from the side of the pneumothorax. When percussing the chest wall, hyperresonance on the affected side and subcutaneous emphysema may be present. Auscultation may demonstrate diminished breath sounds on the injured side. In one prospective study, the sensitivity, specificity, and diagnostic accuracy of auscultation for hemothorax and pneumothorax were 84%, 97%, and 89%, respectively.6 A false-negative auscultation is more likely than a false-positive one.6 Pulsus paradoxus may be evident. For intubated patients, an early sign of tension pneumothorax is difficulty ventilating because of increased airway pressure.
Stable Patients
In more stable patients (and those with smaller accumulations) the findings on physical examination are less sensitive, and a chest radiograph or even a computed tomography (CT) scan is usually necessary to make a definitive diagnosis. Physical findings may include unilaterally decreased breath sounds, tachypnea, tachycardia, decreased tactile fremitus, increased resonance with percussion, or subcutaneous emphysema, but the examination may reveal little to no abnormalities with a small pneumothorax. Patients with a pneumothorax involving less than 20% of the hemithorax will often have completely normal findings on chest examination, including equal breath sounds (Fig. 10-6). Pleural fluid collections are difficult to detect by physical examination, particularly with less than 500 mL of fluid in the pleural space. Breath sounds may be decreased and percussion of the bases may be dull.
Parapneumonic empyemas are often accompanied by fever, cough, chest pain, dyspnea, and purulent sputum (see Fig. 10-5). Physical examination may reveal diminished breath sounds, dullness on percussion, egophony, and diminished tactile fremitus on the involved side. Fever will often develop in patients with an indwelling chest tube and empyema. The pleural fluid drainage may be copious and purulent, and respiratory symptoms may worsen.
Radiography
A chest radiograph is an essential tool for diagnosing a pneumothorax in stable patients. In unstable patients with a potential tension pneumothorax the diagnosis should be made clinically, but in rare cases a portable radiograph may be obtained in the resuscitation room if carefully monitored by a clinician. The best plain radiographs for hemothorax or pneumothorax are traditional upright inspiratory posteroanterior and lateral chest radiographs. Diagnostic sensitivity is not increased with an expiratory upright chest radiograph. Upright is preferable to a supine chest radiograph, particularly for a hemothorax, because even with large amounts of blood there may only be slight differences in the density of the lung fields since the blood may layer out evenly. With an upright chest radiograph, 300 to 500 mL of fluid is needed to cause blunting of the costophrenic angle (Fig. 10-7).7 When CT is not available, other useful views include a bilateral decubitus chest radiograph, with the pneumothorax expected to be seen on the side away from the table as gravity pulls the affected lung down.
On a chest radiograph the partially collapsed lung of a pneumothorax appears as a visceral pleural line with no pulmonary markings beyond it (see Figs. 10-1, 10-3, 10-6, and 10-7). It is easy to initially mistake large blebs for a pneumothorax or to identify the scapular border, skin folds, or indwelling lines as a pneumothorax, but a CT scan quickly resolves the issue (Fig. 10-8). Other radiographic findings include hyperlucency of the affected hemithorax, a double diaphragm contour, increased visibility of the inferior cardiac border, better visualization of pericardial fat at the cardiac apex, and possibly a depressed diaphragm. If subcutaneous air is noted on the chest radiograph of a patient with blunt chest trauma, it can be assumed that the air came from an injured lung and that a pneumothorax exists.
It is difficult to accurately predict the size of a pneumothorax on plain radiographs. Greater accuracy in predicting size can be accomplished with a CT scan. With a tension pneumothorax, the chest radiograph reveals lung collapse, a depressed hemidiaphragm on the affected side, and a shift of the mediastinum and trachea to the opposite side (see Fig. 10-4). With a bilateral pneumothorax, no mediastinal shift may be seen.
Thoracic CT
The gold standard for diagnosis is a thoracic CT scan, which can detect a pneumothorax not easily visible on a plain radiograph. CT scans of the chest are much more sensitive than plain radiographs in detecting hemothorax and pneumothorax. They are also more accurate for estimating the size and other characteristics of a pneumothorax (see Figs. 10-1, 10-4, and 10-8). CT scans are not routine for diagnosis of a pneumothorax but are more useful for hemothoraces and other fluid collections. They also offer invaluable information on the cause of such abnormalities. A CT scan may be useful when the diagnosis is unclear or when looking for small amounts of pleural fluid. CT scans are particularly helpful in determining whether an empyema is loculated or draining successfully. About 10% of trauma patients with normal findings on a chest radiograph will demonstrate a small hemothorax or pneumothorax.7–9 The clinical significance of a small, previously undetected occult injury is probably not great, and it has been suggested that a small pneumothorax seen only on CT may be left untreated and simply observed in otherwise stable patients. Some patients with a pneumothorax seen only on CT may also safely undergo PPV without placement of a chest tube.9
Ultrasound
Ultrasound is useful in diagnosing both hemothoraces and pneumothoraces, and its use is reviewed in the Ultrasound Box.10,11
Ultrasound
Recognizing Pneumothoraxby Christine Butts, MD
To evaluate for pneumothorax, a high-frequency transducer should be used to ensure a high degree of resolution. In a supine patient the transducer should be placed on the anterior chest wall in the midclavicular line at approximately the second to third intercostal space (Fig. 10-US1). The depth of the image should be adjusted until the ribs are seen as brightly echogenic (white) arcs with acoustic shadows behind them. The pleural line can be found just deep to the ribs and is represented as a horizontal, echogenic line (Fig. 10-US2). In a normal lung the visceral and parietal pleural layers are directly opposed to one another (save for a thin layer of pleural fluid). When the patient breathes in and out, the layers “slide” past each other to allow the lungs to expand. When this is viewed with ultrasound, the pleural line can be seen to slide back and forth with patient respiration. This is referred to as the “slide sign.” In cases in which this interface is disrupted (such as by a pneumothorax), the sliding is lost. When these patients are evaluated with ultrasound, the pleural line will be seen as a static echogenic line that does not change with respiration.
Although the slide sign carries significant sensitivity for ruling out a pneumothorax, other secondary confirmatory findings should be sought as well.1
Comet tail artifacts may be seen in a normal lung. These are hyperechoic vertical lines that extend deep to the pleural interface (Fig. 10-US3). Typically, they will be seen in small numbers in a normal lung. Patients in whom a pneumothorax is present are noted to lack comet tails because this artifact arises from the normal pleural interface, which is disrupted. The presence of comet tails may be used by the sonographer to further rule out a pneumothorax.2,3
In a normal patient, the pleura will slide back and forth as the patient breathes. Because this motion is neither toward nor away from the transducer but instead is parallel, the motion will be seen as a series of hazy lines deep to the pleura. The overlying soft tissue is not in motion and will be seen as a series of clear, flat lines. This typical appearance is described as the “seashore” sign (Fig. 10-US4).
In patients in whom a pneumothorax is present, no motion is detected by ultrasound. Therefore, the M-mode tracing will show clear, flat lines throughout the frame. This is referred to as the “stratosphere” or “bar code” sign (Fig. 10-US5).
References:
1. Blaivas, M, Lyon, M, Duggal, S. A prospective comparison of supine chest radiography and bedside ultrasound for the diagnosis of traumatic pneumothorax. Acad Emerg Med. 2005;12:844–849.
2. Lichtenstein, D, Meziere, G, Biderman, P, et al. The comet-tail artifact: an ultrasound sign ruling out pneumothorax. Intensive Care Med. 1999;25:383–388.
3. Chan, SS. Emergency bedside ultrasound to detect pneumothorax. Acad Emerg Med. 2003;10:91–94.
Indications for Tube Thoracostomy
Tube thoracostomy is by far the most common treatment of all types of pneumothoraces, but controversy exists over the treatment of small traumatic and spontaneous primary pneumothoraces. However, the American College of Chest Physicians has developed useful guidelines for the management of primary and secondary spontaneous pneumothoraces (Box 10-1).12
