Management of Common Dislocations
Preparation of the Patient
Although many authors claim that their reduction method is well tolerated without premedication, they have not usually measured the discomfort of their patients quantitatively.1–5 There are no rigid, generally accepted guidelines for the use of pharmacologic adjuncts in the management of dislocations. Each patient and each dislocation is unique, and the treating clinician must use judgment regarding whether premedication is required, which agent or agents to use, and what dose to give. In general, the authors suggest the judicious use of analgesia with or without sedation for the majority of reductions performed in the ED. A calm, cooperative patient may tolerate attempts at gentle reduction of a major joint such as the shoulder, but even the most stoic of patients may be quite uncomfortable with the manipulations necessary for reduction of a dislocated finger. A radial head dislocation in a child is usually easily treated without analgesia; however, reduction of a hip dislocation is unlikely to be successful without a significant amount of sedation and analgesia. Attempting any reduction technique in an extremely anxious patient without premedication will generally frustrate the operator and further upset the patient and may hinder a successful outcome. When multiple attempts are required and significant force must be exerted because of muscle spasm or an uncooperative patient, there is an additional chance of producing complications during the reduction.
Verbal techniques for alleviating anxiety and discomfort are not to be discounted because they can be of great assistance during joint reduction. In field settings, simple hypnosis techniques have been used successfully for major joint dislocations.6 In the ED, verbal reassurance and distracting conversation are useful adjuncts.
In most circumstances, analgesia or sedation of some sort, or both, will be required; the intravenous (IV) route of drug administration is usually the method of choice because it allows rapid relief of patient discomfort and facilitates repetitive dosing for titration to the desired effect (see Chapter 33). Alternatives to procedural sedation and analgesia include intraarticular injection of local anesthetics, hematoma blocks, peripheral nerve blocks, and regional anesthesia (see Chapters 29, 31, and 32).
General Principles
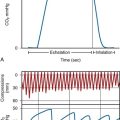
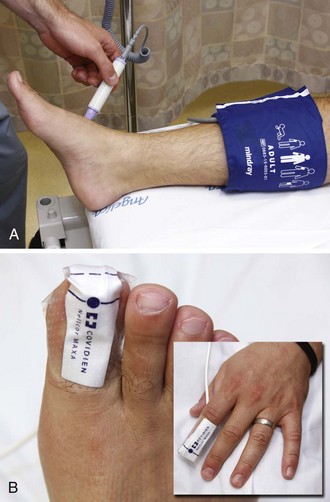
Although the chance that a gentle attempt at reduction will cause a fracture or neurovascular injury is extremely low, careful evaluation before and after reduction, as well as documentation of the patient’s neurovascular status, is important. Frequently, the initial pain of the dislocation is distracting, and paresthesias or a weak pulse may not be readily apparent until the joint has been reduced. When the integrity of the pulse is in question, blood pressure at the wrist or foot may be compared with that in the uninjured extremity, or a pulse oximeter may be applied to the distal end of the fingers (Fig. 49-1).
Some authors question the need for prereduction films in certain patients with obvious or recurrent anterior shoulder dislocation.7,8 Although postreduction radiographs are traditionally obtained, the need for this in a clinically obvious successful shoulder joint relocation has been questioned.8,9 The authors suggest that postreduction films be taken in virtually all patients who have had a dislocation reduced in the ED. Patients who have received sedatives and opioids may not remember the actual successful reduction or the immediate postreduction period. Reinjury after release from the ED without radiographic corroboration of a successful reduction can raise questions about the adequacy of the initial procedure. Occasionally, a fracture is detected on postreduction radiographs that was not obvious on the initial films, or a previously noted minor fracture may be found to reside in an intraarticular location.8
It is generally accepted that the sooner a dislocation is reduced, the better. This alleviates the patient’s discomfort and corrects distortion of the surrounding soft tissues. In some studies the success rate of reduction is higher when attempted closer to the time of injury.2 However, there is no reason to forego an attempt at closed reduction of an “old injury” in the vast majority of dislocations. Chronic dislocations persisting several days, weeks, or longer are often difficult to reduce in a closed manner, but such cases are infrequent.
Timing of Reduction
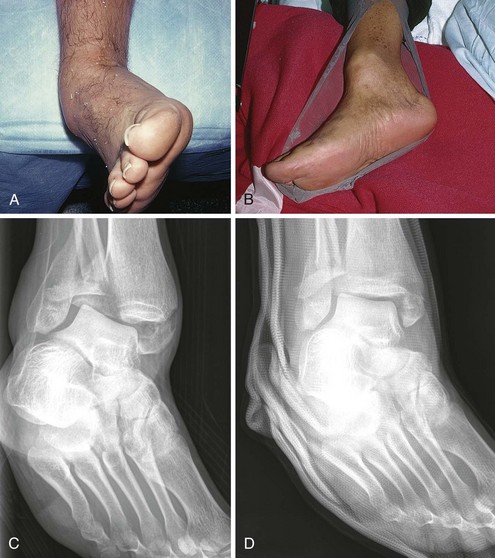
Questions often arise concerning the necessity of immediate reduction versus delayed reduction, with the clinician fearing disastrous neurovascular consequences if a dislocation is not manipulated immediately on arrival at the ED. In reality, there is rarely an instance in which prereduction radiographs, even portable films, cannot be obtained before treatment. Even if the pulse is weak or the fingers are numb, a few minutes’ delay is usually acceptable to gain important radiographic information on the type of dislocation and the presence of an associated fracture and to provide documentation for follow-up clinicians. Important clinical information may be difficult to obtain, or the specific initial injury may be impossible to reconstruct once the joint has been reduced (Fig. 49-2). Of equal importance, a dislocation with concomitant neurovascular injury should be reduced with the least amount of trauma possible, which often requires a few minutes for induction of analgesia and sedation, a time during which radiographs can be obtained. If a vascular or neurologic abnormality is documented before reduction, the joint should be reduced by the most timely and least traumatic procedure available. Each case should be handled individually by taking the specific injury, available resources, and the clinician’s experience into account. Although multiple unsuccessful or forceful attempts at reduction in the ED should be avoided with all dislocations, this is especially important in patients with vascular or neurologic compromise. Occasionally, the more prudent course is reduction under general anesthesia, but this decision must take into consideration the availability of consultation and other resources.
This chapter covers dislocations of the various joints with the exception of wrist dislocations, which are complex and require orthopedic consultation, and temporomandibular joint dislocations, which are discussed in Chapter 63.
Shoulder Dislocations
The human shoulder joint is remarkable for its degrees of motion, but the anatomic features that allow this mobility, contribute to its instability. The glenohumeral joint has the greatest range of motion of any joint in the body, largely because of the loose joint capsule and the shallow nature of the glenoid fossa.10 Posterior dislocation is uncommon, mainly because of the anatomic support of the scapula and the thick muscular support in this area. Anterior support is less pronounced, with the inferior glenohumeral ligament serving as the primary restraint to anterior dislocation.11 The depth of the glenoid fossa is somewhat increased by the fibrocartilaginous glenoid labrum, which forms the rim of this structure.
Most shoulder dislocations are anterior (i.e., the humeral head becomes situated in front of the glenoid fossa). Posterior dislocations are the next most common, but they generally account for less than 4% of shoulder dislocations.12 Uncommon variations include inferior (luxatio erecta), superior, and intrathoracic dislocations.
Anterior Shoulder Dislocations
Anterior dislocations of the shoulder are the most common major joint dislocation encountered and reduced in the ED. The usual mechanism of injury is indirect and consists of a combination of abduction, extension, and external rotation.10,11 Only rarely is the mechanism a direct blow to the posterior aspect of the shoulder. Occasionally, especially with recurrent dislocations, the mechanism is surprisingly minor and can be puzzling to the clinician. An anterior dislocation can be induced by mere external rotation of the shoulder while rolling over in bed or raising the arm overhead. When the first dislocation occurs at a younger age, the recurrence rate is higher. If the first dislocation occurs before 20 years of age, there is an 80% to 92% rate of recurrence. If the first dislocation takes place after 40 years of age, the rate of recurrence is 10% to 15%.10 Rotator cuff injuries, however, occur more frequently in older patients with anterior shoulder dislocations.13
The four types of anterior dislocations are classified according to where the humeral head comes to rest. Subcoracoid dislocations account for more than 75% of anterior dislocations. Other shoulder dislocations include subglenoid dislocation and the uncommon subclavicular and intrathoracic dislocations (Fig. 49-3).10
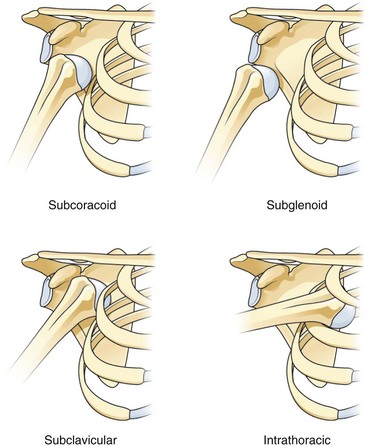
Figure 49-3 Types of anterior shoulder dislocations.
Clinical Assessment
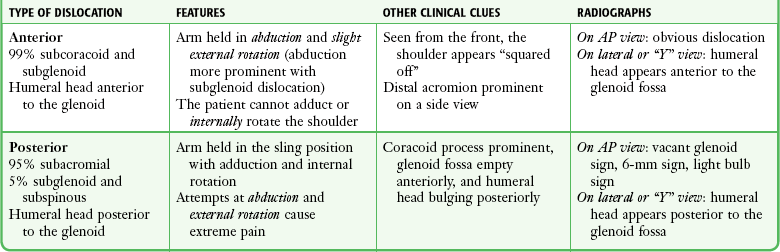
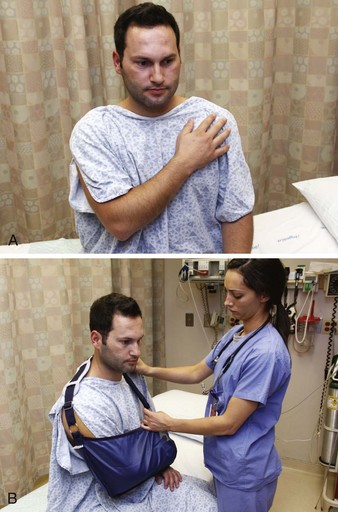
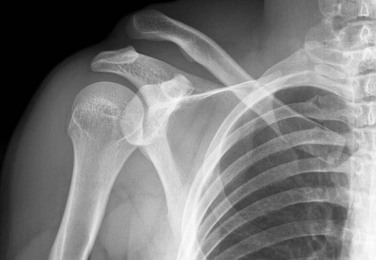
The presence of an anterior shoulder dislocation is usually obvious (Fig. 49-4). A posterior dislocation is more subtle in terms of both clinical and radiographic findings. It can be misdiagnosed as a severe contusion (Table 49-1). A patient with an anterior shoulder dislocation supports the injured extremity and leans toward the injured side while holding the arm in abduction and slight external rotation. The patient cannot adduct or internally rotate the shoulder. Visual inspection reveals loss of the rounded appearance of the shoulder because of absence of the humeral head beneath the deltoid region. The acromion is prominent and an abrupt drop-off below the acromion can be seen or palpated. An anterior fullness in the subclavicular region is visible in thinner individuals and is easily palpable in most others. Comparison with the uninjured side is a useful aid for both visual examination and palpation. Any attempt at internal rotation is quite painful and resisted by the patient. An inability to place the palm from the injured extremity on the uninjured shoulder is consistent with an anterior shoulder dislocation; after reduction, this maneuver should be possible.
TABLE 49-1
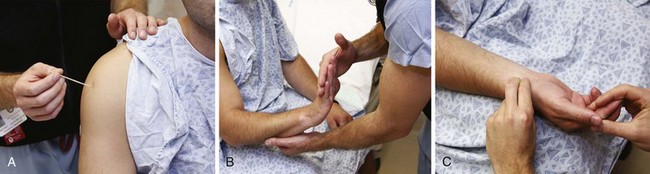
Careful assessment of the neurovascular status of the affected extremity is essential (Figs. 49-5 and 49-6). Injury to the axillary artery is rare. It usually occurs in the elderly13 and can be quickly assessed by a decreased or absent radial pulse or by the appearance of an expanding hematoma. It is important to evaluate the status of the axillary nerve because this is the most common nerve injury resulting from anterior dislocations.14 Assess the sensory component of the axillary nerve by testing for sensation over the lateral aspect of the upper part of the arm in the “regimental badge” area over the deltoid muscle. Test the motor component of the axillary nerve by assessing the strength of the deltoid muscle; however, this is a difficult undertaking in a patient with a dislocated shoulder. Less commonly, the brachial plexus may be injured by a stretch injury and produce variable nerve deficits. Perform a complete assessment of all the major nerves to the arm because other nerve injuries may occur, such as injuries to the ulnar and radial nerves.14 A neurologic deficit does not preclude closed reduction, but in patients with a nerve injury, avoid multiple forceful attempts at reduction.
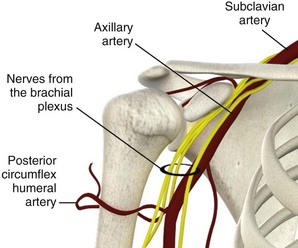
Vascular injuries, such as axillary artery disruption, are rare but usually quite obvious because of dysesthesias and coolness of the involved arm. An expanding axillary hematoma, pulse deficit, peripheral cyanosis, and pallor can be seen. Collateral circulation may produce a faint pulse in the extremity, so comparison with blood pressure on the uninjured side may be helpful. Specific lesions include complete disruption, linear tears, and thrombosis. Axillary artery injuries can occur at all ages, but they are more prominent in the elderly. The artery is particularly at risk with anterior dislocations, and dislocation with spontaneous reduction can produce the injury. Arteriography with surgical repair of the artery is required, occasionally with fasciotomy of the forearm if the ischemia is long-standing.15
Radiologic Examination
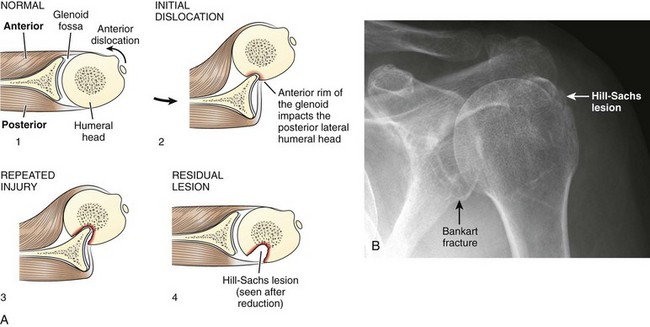
Associated fractures are detected in 15% to 35% of anterior shoulder dislocations, with fractures of the greater tuberosity being the most common.10 The presence of a fracture of the greater tuberosity does not change the initial management of anterior shoulder dislocations, and these fractures usually heal well after closed reduction in routine fashion.10 The Hill-Sachs deformity, a sign of repeated dislocations, produces a groove in the posterolateral aspect of the humeral head and may be seen on prereduction or postreduction films (Fig. 49-7). The Hill-Sachs deformity is caused by impaction of the humeral head against the glenoid rim after dislocation. It rarely has any clinical significance but may result in a loose body within the joint.13 Impaction of the humeral head against the glenoid during dislocation may also cause disruption of the anteroinferior portion of the cartilaginous labrum of the glenoid or the inferior aspect of the bony glenoid, an injury known as a Bankart lesion. It has been implicated as one source of recurrent dislocations but does not affect immediate ED management.13
Fractures of the humeral neck are frequently displaced with attempts at closed reduction, which can lead to avascular necrosis of the humeral head.16 The fact that humeral neck fractures are a known complication of shoulder relocation10 suggests the value of prereduction radiographs of anterior shoulder dislocations. However, some argue that clinically obvious recurrent dislocations and first-time anterior dislocations without a blunt traumatic mechanism (information usually offered by the patient) can be reduced without prior radiographs because fracture is quite unlikely in these situations.7,8 Hendey and coworkers17 performed a prospective validation study of an algorithm for selective radiography that incorporated the mechanism of injury, previous dislocations, and the clinician’s certainty of joint position. In this study, 24 patients with recurrent atraumatic anterior shoulder dislocations who received neither prereduction nor postreduction radiographs had no clinically significant fractures found on follow-up. These patients had much shorter ED lengths of stay than did patients who received only prereduction or postreduction films, or both.17
One retrospective case-control study found that the presence of any of three risk factors (age >40 years, first episode of dislocation, traumatic mechanism of injury defined as a fall greater than one flight of stairs, a fight or assault, or a motor vehicle collision) predicted clinically important fractures with a sensitivity of 97.7%.18 This study has not yet been prospectively validated.
Anterior dislocations are not subtle on routine anteroposterior (AP) radiographs, and this view detects the most important fracture to identify, that of the humeral neck (Fig. 49-8). An adequate AP view, when combined with the typical clinical examination, allows successful management of most anterior shoulder dislocations. A true AP view of the shoulder is taken at a right angle to the scapula and requires rotation of the patient to 30 to 45 degrees.
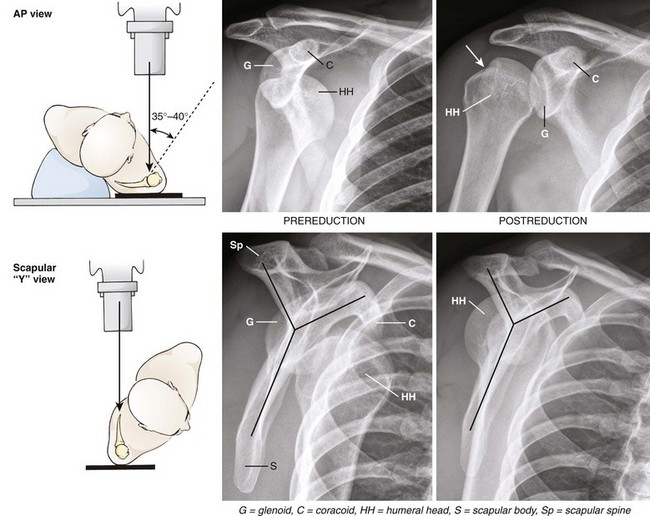
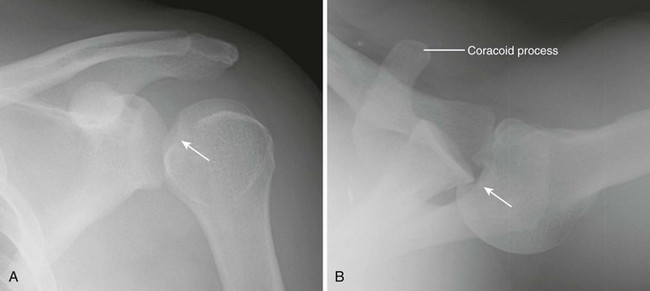
Figure 49-8 Anteroposterior (AP) and scapular “Y” views of an anterior subcoracoid dislocation. The AP views (top row) are fairly easy to interpret. On the prereduction film, the humeral head is clearly dislocated from the glenoid fossa and is seen underneath the coracoid process. The correct anatomic relationship of the humeral head and glenoid is demonstrated on the postreduction film. Note the presence of a Hill-Sachs lesion (arrow) on the superior aspect of the humeral head. The scapular “Y” view (bottom row) is more difficult to understand. The limbs of the “Y” are composed of the scapular spine, the coracoid process, and the scapular body (gray lines). The glenoid fossa is found at the convergence of these limbs in the center of the scapula. On the prereduction view, the humeral head is found anterior, or medial, to the glenoid and under the coracoid, thus confirming the presence of an anterior dislocation. In a posterior dislocation, the humeral head is posterior, or lateral, to the glenoid (see Fig. 49-9). On the postreduction view, the humeral head is correctly positioned in the middle of the “Y,” over the glenoid. (Diagrams from Heppenstall RB. Fracture Treatment and Healing. Philadelphia: Saunders; 1980:374.)
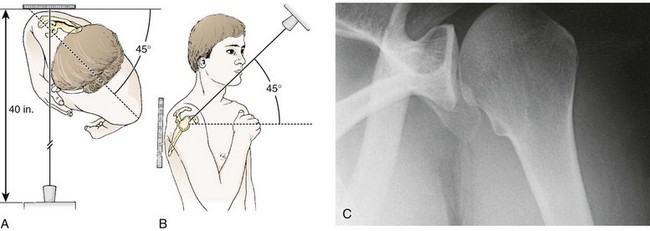
The typical lateral views obtained include a scapular Y view (see Fig. 49-8), a transthoracic view, and an axillary view. These views rarely add to the AP film in patients with an obvious anterior dislocation, but they are of value in posterior dislocations (Fig. 49-9). The usefulness of additional views for anterior shoulder dislocations is primarily to detect fractures, and the previously mentioned lateral views (especially the transthoracic view) are quite limited in this respect.19 The apical oblique view has been found to be more valuable than the oblique scapular projection for acute shoulder trauma.19 This view is obtained by angling the beam 45 degrees caudad with the patient in a 45-degree oblique position (Fig. 49-10).
Postreduction radiographs are obtained to document the success of the reduction. Occasionally, they will reveal a fracture not detected on prereduction radiographs. In one series, 8% of patients with anterior shoulder dislocations had Hill-Sachs deformities noted only on postreduction films.8 More recent reports have highlighted the role of ultrasound in shoulder dislocation, both for diagnosis19,20 and for confirmation of reduction.21
Reduction Techniques
Hippocrates (450 bc) is generally credited with the first detailed description of reduction techniques, and it is believed that a drawing in the tomb of Upuy (1200 bc) is the earliest depiction of such a method.10 The Hippocratic technique involves placement of the operator’s foot in the axilla to allow countertraction. This technique is problematic and not recommended by some authors.3,11 Likewise, the Kocher method, which involves forceful leverage of the humerus, is associated with an increased rate of complications and is generally discouraged in favor of other techniques.10,11
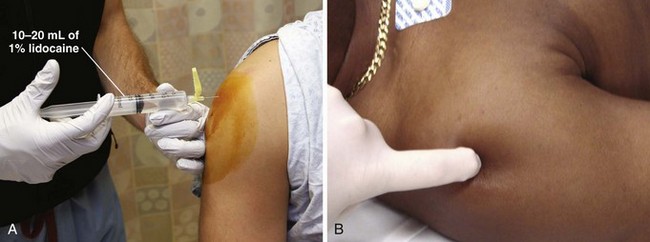
This section discusses several methods of reduction that are well studied, proven to be safe, and easy to master. Regardless of the reduction technique used, gradual, gentle application of the technique is essential. Although all the techniques discussed are generally acceptable and many authors state that their techniques are quite painless,1–5 few studies have quantified the actual pain reported by patients.22 As noted previously, intraarticular lidocaine may also be used to reduce the pain accompanying reduction (Fig. 49-11). In studies by Matthews and Roberts23 and Kosnick and colleagues,24 intraarticular injection of lidocaine was found to offer significant relief of pain during reduction of anterior shoulder dislocations. In addition, a recent metaanalysis showed that intraarticular lidocaine had similar success rates as procedural sedation and led to decreased ED length of stay, decreased personnel times, and reduced overall health care cost, thus making it a useful alternative to procedural sedation and analgesia.25 A Cochrane review reported similar results.26 When using intraarticular lidocaine, any blood present should be aspirated from the glenohumeral joint before injecting the anesthetic. Note that 10 to 20 mL of 1% lidocaine has been used with the intraarticular technique and that it may take as long as 15 to 20 minutes for adequate analgesia. Recently, Blaivas and Lyon27 reported the ED use of ultrasound-guided interscalene blocks for analgesia before reduction of shoulder dislocations (see Chapter 31). It is important to note that neither local nor regional anesthesia produces muscle relaxation, but they may obviate the need for IV access and prolonged observation. Operator judgment is an important part of the decision whether reduction should be attempted without premedication. Advantages of such an approach include avoidance of potential complications from drug therapy, reduced staff requirements, and theoretically, more rapid patient disposition. Certainly, a patient who is markedly intoxicated may require little, if any supplemental sedative therapy. However, all patients who are reluctant or too anxious to cooperate with an attempt at reduction without medication and those with a high degree of muscle spasm should receive premedication. Generally, only one attempt is made; if unsuccessful, further attempts at reduction are made after the IV administration of sedatives. When in doubt, it is best to use pharmacologic adjuncts (see Chapter 33).
Stimson Maneuver (Fig. 49-12A): The Stimson maneuver is a classic technique that offers the advantage of not requiring an assistant. Place the patient prone on an elevated stretcher and suspend about 2.5 to 5.0 kg (5 to 10 lb) of weight from the wrist.10,11 The weights can be strapped to the wrist, or a commercially available Velcro wrist splint can be placed and the weights hung from the strap with a hook.28 The slow, steady traction produced with this method often permits reduction, but 20 to 30 minutes may be required. If needed, facilitate reduction by externally rotating the extended arm.
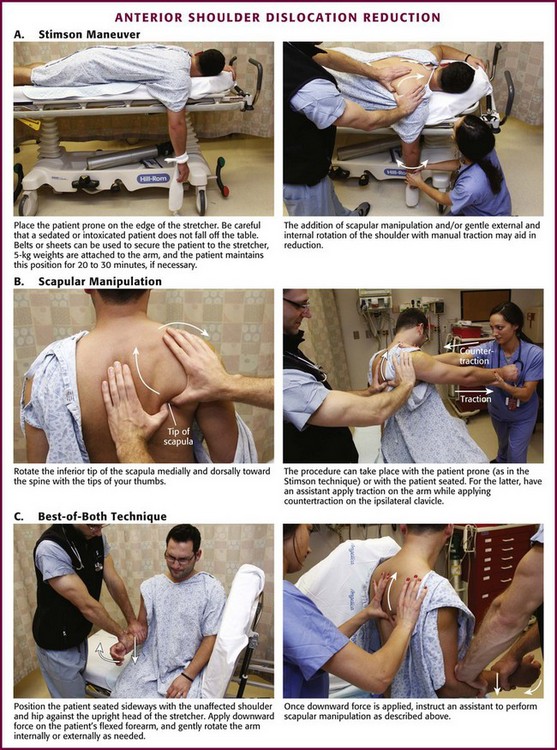
Variations of this method include the recommendation for flexion of the elbow to further relax the biceps tendon and the application of manual traction instead of weights.29,30 Rollinson31 allowed the arm to hang under its own weight after a supraclavicular block and reported a 91% success rate with usually no more than a gentle pull on the arm after 20 minutes in this position. Each variation of the Stimson method can be used in combination with the scapular manipulation technique described later. Indeed, a success rate of 96% has been reported with the combined prone position, hanging weights, IV analgesia and sedation, and scapular manipulation.28
Scapular Manipulation Technique (see Fig 49-12B): This method is popular because of its ease of performance, reported safety, and acceptability to patients. To date, no complications from the scapular manipulation technique have been reported in the literature.22,28,32 Shoulder reduction via this method focuses on repositioning the glenoid fossa rather than the humeral head, and less force is required than with many other methods.23 Its success rate is high, generally greater than 90% in experienced hands.28,32,33 Some studies report higher success rates in patients who have had repeated dislocations and lower rates in patients with an associated greater tuberosity fracture.33 The initial maneuver for scapular manipulation is traction on the arm as it is held in 90 degrees of forward flexion. This may be performed with the patient prone and the arm hanging down, as described for the Stimson method, with or without flexion of the elbow to 90 degrees. Alternatively, this traction may be applied by placing an outstretched arm over the seated patient’s midclavicular region while pulling the injured extremity with the other arm. Regardless of the means of arm traction, slight external rotation of the humerus may facilitate reduction by releasing the superior glenohumeral ligament and presenting a favorable profile of the humeral head to the glenoid fossa.34
The prone patient position is recommended for those not familiar with the technique because it facilitates identification of the scapula for manipulation (medial rotation of the tip). Nonetheless, the technique can be performed with the patient supine given that the patient’s shoulder is flexed to 90 degrees and the scapula is exposed during gentle upward traction on the humerus.35 Although seated scapular manipulation offers the advantage of not requiring the patient to go through the awkward and potentially uncomfortable assumption of the prone position, it is a technically more difficult variation of scapular manipulation, especially if sedation is going to be necessary. When using the prone position, place the injured shoulder over the edge of the bed to allow the arm to hang perpendicular for the application of traction (see Fig. 49-12A).32
After the application of traction, manipulate the scapula to complete the reduction. Anderson and associates32 recommended manipulation of the scapula after the patient’s arm is relaxed; however, success is possible with no delay in performing this second step.22 Manipulate the scapula by stabilizing the superior aspect of the scapula with one hand and pushing the inferior tip of the scapula medially toward the spine. Place the thumb of the hand stabilizing the superior aspect of the scapula along the lateral border of the scapula to assist the pressure applied by the thumb of the other hand. A small degree of dorsal displacement of the scapular tip is recommended as it is being pushed as far as possible in the medial direction.32
BOB Technique (see Fig. 49-12C): A recently described variation of the seated scapular manipulation technique is the “best of both” (BOB) maneuver.36 To perform the BOB maneuver, position the patient seated sideways on the stretcher with the unaffected shoulder and hip against the fully elevated head of the stretcher. Stand on the foot end of the gurney at the patient’s affected side and use one hand to apply downward force on the proximal end of the patient’s bent forearm. Use the other hand to grasp the patient’s hand and gently rotate the arm internally or externally as needed. Once downward force is being applied, ask an assistant to perform the scapular manipulation maneuver described earlier.36
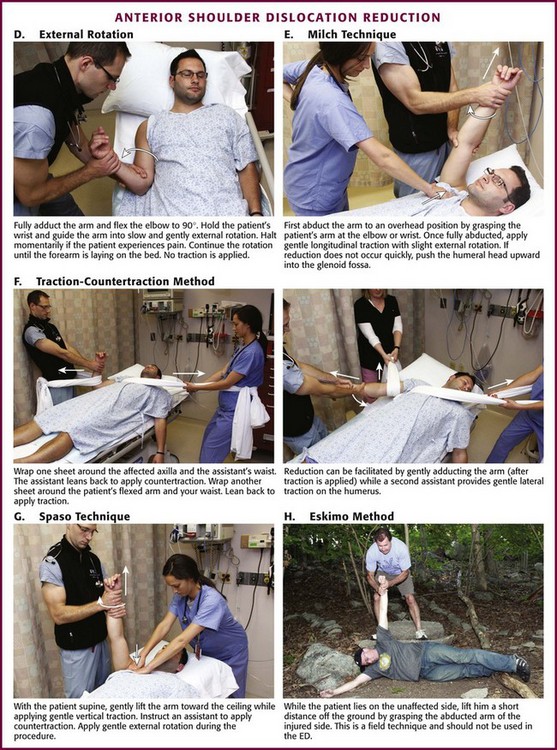
External Rotation Method (see Fig. 49-12D): This method offers the advantage of requiring only one person and no special equipment. The technique needs no strength or endurance on the part of the operator and is well tolerated by patients.3 The actual pain experienced by patients with this technique has not been quantified, but Plummer and Clinton3 stated that it can be performed with “little, if any sedation.” In this technique, the basic maneuver is slow, gentle external rotation of the fully adducted arm. In 1957, Parvin37 described a self-reduction external rotation technique in which the patient sits on a swivel-type chair and grasps a fixed post positioned waist high and slowly turns the body to enact external rotation. Parvin37 reported that the reduction usually takes place at 70 to 110 degrees of external rotation.
Since Parvin’s initial study, this method has been described with the patient supine and the affected arm adducted tightly to the side of the patient.1,38 Flex the elbow to 90 degrees and hold it in the adducted position with the operator’s hand closest to the patient. Use the other hand to hold the patient’s wrist and guide the arm into slow and gentle external rotation. The procedure may require several minutes because each time that the patient experiences pain, the procedure is halted momentarily. Although the report of Mirick and coworkers1 mentioned using the forearm as “a lever,” a later description clearly recommends allowing the forearm to “fall” under its own weight.3 No additional force should be applied to the forearm, and no traction is exerted on the arm.
The end point of the reduction may be difficult to identify because reduction is frequently very subtle. It is therefore recommended that external rotation be continued until the forearm is near the coronal plane (lying on the bed, perpendicular to the body), a process that usually takes 5 to 10 minutes.3 If the patient’s dislocation persists after full external rotation, apply steady gentle traction at the elbow. Reduction may occasionally be noted when the arm is rotated back internally.38 The success rate of this technique in three series performed by emergency clinicians was around 80%.1,38,39
Milch Technique (see Fig. 49-12E): Proponents of this method praise its gentle nature, high success rate, lack of complications, and tolerance by patients.2,5 It can be described as “reaching up to pull an apple from a tree.” The basic steps of this technique are abduction, external rotation, and gentle traction of the affected arm. Finally, if needed, the humeral head can be pushed into the glenoid fossa with the thumb or fingers.
In describing this technique, Milch40 wrote that the fully abducted arm was in a natural position in which there was little tension on the muscles of the shoulder girdle. He postulated that this was related to our ancestral “arboreal brachiation” (swinging from trees). The primary step in this technique is to abduct the affected arm to an overhead position. Russell and colleagues34 had their patients raise their arm and put their hand behind their head as a first step. Although this seems odd, patients can usually do this quite readily with little assistance and be quite comfortable in this position. Alternatively, abduct the arm by grasping the patient’s arm at the elbow or the wrist. Lacey and Crawford41 found that the prone position, with the patient’s shoulder close to the end of the bed, facilitated this step.
Once the arm is fully abducted, apply gentle longitudinal traction with slight external rotation. If reduction does not occur quickly, push the humeral head upward into the glenoid fossa with the thumb or fingers of the other hand. Beattie and associates2 reported a success rate of 70% with the Milch technique, but others have achieved success rates of 90% or greater.5,34
Traction-Countertraction (see Fig. 49-12F): This method is commonly used in the ED, largely because of tradition, clinician comfort, and a high success rate. Clinician familiarity is an advantage of this technique, but it requires more than one operator, some degree of force, and occasionally, endurance. This technique is usually quite uncomfortable for the patient, and premedication is recommended before any attempt.
Once traction has been applied, the operator must be patient because the procedure may take a number of minutes to be successful. The premedication is probably inadequate if the patient resists the procedure or is notably uncomfortable during attempts at reduction. Do not hesitate to order supplementary medications. Gentle, limited external rotation is sometimes useful to speed reduction.10 Applying traction to an arm that is slightly abducted from the patient’s body is often successful, but some operators prefer to slowly bring the arm medial to the patient’s midline while maintaining traction or to have an assistant apply a gentle lateral force to the midhumerus to direct the humeral head laterally. Successful reduction is usually presaged by slight lengthening of the arm as relaxation occurs, and a noticeable “clunk” may occur at the point of reduction. A brief wave of fasciculations in the deltoid may also be seen at the time of reduction.
Spaso Technique (see Fig. 49-12G): This technique was first reported by Spaso Miljesic as a simple, single-operator technique requiring minimal force.42 One published series reported an 87.5% success rate in premedicated patients when performed by junior house officers.43 Place the patient in the supine position and grasp the affected arm around the wrist or distal end of the forearm. Gently lift the affected arm vertically toward the ceiling and apply gentle vertical traction. While maintaining traction continuously, externally rotate the arm. Reduction may be subtle but is generally signaled by hearing or feeling a “clunk.” Completion of this technique may require several minutes of gentle traction to allow the muscles of the patient’s shoulder to relax.43
Other Methods: Poulsen44 reported a method termed the Eskimo technique that may be performed in field settings (see Fig. 49-12H). In this technique the patient lies on the unaffected side and is lifted a short distance off the ground by grasping the abducted arm on the injured side. The patient’s body weight acts to effect the reduction. Poulsen’s success rate was 74% in a series of 23 patients, all of whom were premedicated. However, the author44 also postulated that this technique could place undue stress on the brachial plexus or axillary vessels. Use of this technique, when other options are available, should probably be reserved until more data are obtained.
Noordeen and coworkers45 reported a simple method in which the patient sits sideways in a chair with the affected arm draped over the backrest. The operator holds the arm with the wrist supinated, and the patient is instructed to stand up. The success rate was 72% in 32 patients treated in this manner. A variation of the chair technique, which was successful in 97% of 188 anterior shoulder dislocations, involves operator-applied traction on the patient’s flexed elbow by means of a cloth loop or stockinette.46 Standing beside the patient, the operator holds the involved elbow in 90 degrees of flexion while stepping down on the cloth loop. The patient sits in the chair, and an assistant may help support the patient by applying countertraction under the involved arm.
Postreduction Care
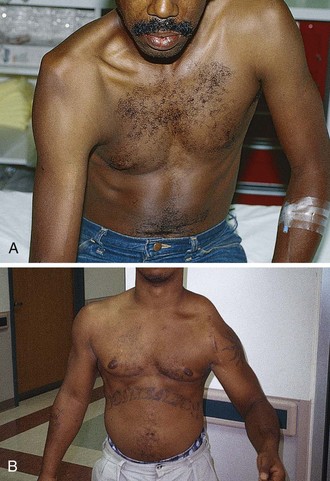
After an attempt at reduction, the neurovascular status of the affected extremity should be rechecked and the results documented on the patient’s record. Indirect evidence that the reduction has been successful includes an immediate decrease in pain, restoration of the round shoulder contour, and increased passive mobility of the shoulder. No harm is done by putting the joint through a limited range of motion. If the patient can tolerate placement of the palm from the injured arm on the opposite shoulder, it is quite likely that the shoulder reduction was successful (see Fig. 49-13A). For patients with possible axillary nerve injury, close to 90% will recover with expectant management. Nevertheless, it is prudent to refer these patients for early orthopedic follow-up.47
Postreduction radiographs are often recommended to make a careful search for new fractures. Although most greater tuberosity fractures do not alter patient management, patients with greater tuberosity fractures displaced more than 1 cm after closed reduction almost always have an associated rotator cuff tear48 and should receive prompt orthopedic consultation because they may require operative repair.
Traditional postreduction treatment focuses on the importance of preventing the shoulder from dislocating again after the patient is discharged. This is best accomplished by immobilizing the joint with a commercially available shoulder immobilizer or a sling and swath to limit external rotation and abduction (see Chapter 50). Orthopedic follow-up is recommended for all anterior shoulder dislocations because the incidence of rotator cuff injury is as high as 38% and it might complicate restoration of normal function.49 Younger patients are usually immobilized for approximately 3 weeks and can be instructed to follow up within 1 or 2 weeks of the event. As a general rule, the older the patient, the shorter the recommended time of immobilization10 because it is important to maintain mobility in joints of the elderly. Those older than 60 years should have early follow-up (e.g., 5 to 7 days) to allow early mobilization and avoid persistent shoulder joint stiffness or adhesive capsulitis.
Since the early 2000s, the wisdom of immobilization in internal rotation has been questioned. Several studies have shown that placing the arm in internal rotation actually increases labral detachment from the glenoid rim whereas some degree of external rotation maximizes contact between the detached labrum and the glenoid rim.50–52 In one study, cadavers were used to measure the force of contact between the labrum and the glenoid rim in different arm positions. The authors of this study found that maximum contact force was actually generated in 45 degrees of external rotation whereas no contact force was generated with the arm in internal rotation.52 One prospective study showed that of 20 patients immobilized in external rotation, none had recurrent dislocation after more than 1 year, whereas of 20 patients immobilized in internal rotation, 6 had recurrent dislocation.51
Despite this growing body of evidence, very few scientific data are available to guide the clinician on the most appropriate position for postreduction immobilization of anterior shoulder dislocations. A recent literature review was designed to assess (1) whether traumatic anterior shoulder dislocations should be immobilized, (2) how long they should be immobilized, and (3) whether the position of immobilization affects outcome. Unfortunately, the study was unable to provide any definitive answers.53 According to the author of this study, “much of this uncertainty is due to the limited size of the evidence base [and] numerous methodologic weaknesses (e.g., small sample sizes, no control groups, and not evaluating findings against statistical tests).”53 More recent studies and reviews have shown conflicting results on whether immobilization in external rotation is preferable to immobilization in internal rotation.54–57 As a result, it is not unreasonable to immobilize the extremity in a manner consistent with the recommendations of the orthopedic surgeons at one’s institution until further evidence is presented. When in doubt, a simple sling or the traditional shoulder immobilizer will certainly suffice pending 5- to 7-day follow-up (see Fig. 49-13B).
It is appropriate to prescribe oral analgesics (either nonsteroidal antiinflammatory drugs or narcotics) to minimize patient discomfort. Instruct the patient to return if the clinical condition worsens. Periodically, one may encounter a return visit from a successfully treated patient who is in severe pain from hemarthrosis. In a series of patients older than 60 years, Trimmings58 reported that excellent pain relief was achieved by aspirating the hemarthrosis 24 to 48 hours after shoulder reduction. This can be accomplished by using the technique of arthrocentesis described in Chapter 53. In addition, intraarticular instillation of 10 to 20 mL of 1% lidocaine (or a longer-acting local anesthetic) may be helpful for further pain relief.
Posterior Shoulder Dislocations
Posterior shoulder dislocations account for less than 4% of all shoulder dislocations.12 Because they are so uncommon, posterior dislocations have the potential to be missed. The emergency clinician must be knowledgeable about these injuries to avoid a misdiagnosis. Delays in diagnosis for weeks to months have been reported with posterior dislocations.59,60 This may lead to increased rates of dislocation arthropathy and chronic pain.13 The mechanism of injury is almost always indirect and consists of a combination of internal rotation, adduction, and flexion.10 Classic precipitating events include seizure, electrical shock, and falls. The patient may also be initially seen at a point long past the original event.60 In addition, patients with seizures may not experience obvious problems in the immediate postictal period because of their altered mental status.
Clinical Assessment
Though clinically less obvious than anterior dislocations, posterior shoulder dislocations do occur in a typical, recognizable manner. Mistakes may be made if the clinician is overly reliant on AP radiographs, which are potentially misleading60 and may result in misdiagnosing the injury as a soft tissue contusion or acromioclavicular (AC) strain. The principal sign of a posterior dislocation is an arm that is somewhat fixed in adduction and internal rotation (Fig. 49-14). Abduction and external rotation are limited, and attempts to perform these movements generally elicit pain.10,12 Inspection and palpation reveal loss of the normal anterior contour of the shoulder, as well as a prominent coracoid and acromion. The shoulder is flattened anteriorly and rounded posteriorly, and the humeral head may be palpable.10,12

Radiologic Examination
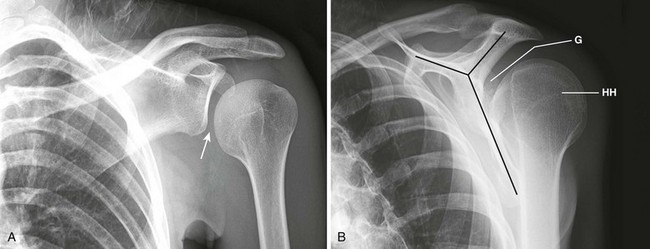
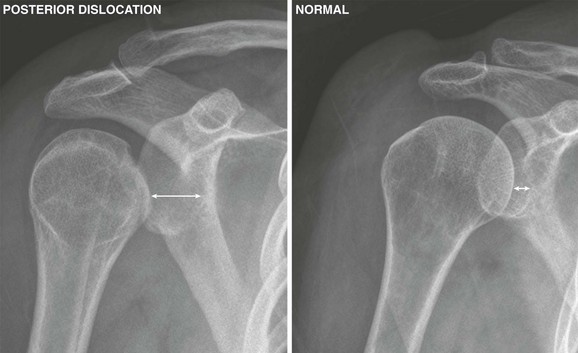
The key point regarding radiographs for posterior shoulder dislocations is the subtle nature of this dislocation on a single AP film (Figs. 49-15A and 49-16A) and the diagnostic importance of the scapular Y view (see Fig. 49-15B) or the axillary view (see Fig. 49-16B). Diagnosis of posterior shoulder dislocation is quite easy with the axillary view, whereas the routine AP and lateral views are difficult to interpret in around half the cases.60 The axillary view is generally available in the radiology department and can be obtained with as little as 20 to 30 degrees of abduction and the plate placed on the shoulder.60 In addition to easy visualization of the posteriorly situated humeral head, the axillary view often reveals an impression fracture of the humeral head (see Fig. 49-16B). The scapular Y view is produced by superimposing the head of the humerus over the coracoid, acromion, and body of the scapula, which form a Y shape. In the event of a posterior shoulder dislocation, the head of the humerus will lie posterior to the glenoid (away from the chest wall) (see Figs. 49-9B and 49-15B).
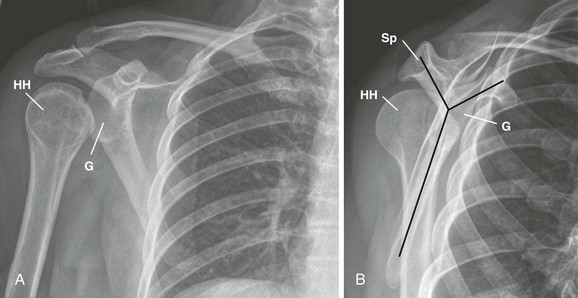
Figure 49-15 Posterior shoulder dislocation seen on a scapular Y view (see also Figs. 49-8 and 49-9). A, The anteroposterior view does not definitively show the dislocation. Because the dislocation is directly posterior, there is no superior or inferior displacement of the humeral head. On superficial observation, the head of the humerus appears to maintain a normal relationship with the glenoid fossa and the acromion process. However, definite abnormalities exist on this film. The space between the humeral head and the glenoid fossa is abnormal, and because of the extreme internal rotation of the humerus, the head and neck are seen end on and resemble a light bulb. B, On the scapular Y view it becomes obvious that the humeral head is posteriorly dislocated. It projects posteriorly under the scapular spine rather than in its normal location, centered over the glenoid fossa. G, glenoid fossa; HH, humeral head; Sp, scapular spine.
Even though axillary and scapular Y views are diagnostic, clues to posterior dislocation do exist on AP films. The internally rotated humeral head appears symmetric on an AP film and is in the shape of a light bulb, as opposed to the normal club-shaped appearance created by the greater tuberosity (Fig. 49-17).61 With posterior dislocation, the space between the articular surface of the humeral head and the anterior glenoid rim is widened, and there is a decrease in the half-moon–shaped overlap of the head and the fossa.59,61 There may also be a compression fracture on the medial aspect of the humeral head, as indicated by a dense line. This is known as the trough sign.61 A fracture of the lesser tuberosity should always prompt a search for the presence of a posterior shoulder dislocation.
Reduction Technique (Fig. 49-18A)
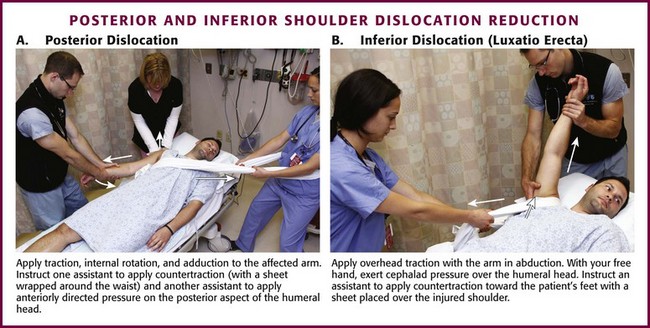
Reduce an acute posterior dislocation by applying traction on the internally rotated and adducted arm combined with anteriorly directed pressure on the posterior aspect of the humeral head.10,60 Generous premedication is usually indicated, and countertraction may be applied with a sheet looped in the affected axilla, very much similar to the procedure described for anterior dislocations. Kwon and Zuckerman10 recommended applying lateral traction on the upper part of the humerus if the humeral head is locked on the posterior glenoid. Hawkins and colleagues60 suggested that posterior dislocations with an impression defect of the humeral head greater than 20% of the articular surface require open reduction. Posterior dislocations that have been diagnosed late are difficult to reduce in a closed manner, but an attempt with adequate premedication is generally indicated.60
Unusual Shoulder Dislocations
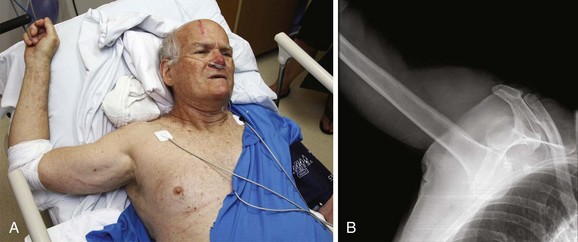
Inferior dislocations of the shoulder, known as luxatio erecta, are quite rare but also quite obvious. The patient has the arm locked in marked abduction with the flexed forearm lying on or behind the head62 (Fig. 49-19). Occasionally, the humerus may have less abduction, thus potentially obscuring the diagnosis.63 The humeral head can be palpated along the lateral chest wall. With this injury, the inferior capsule is almost always torn. Associated injuries include fractures of the greater tuberosity, acromion, clavicle, coracoid process, and glenoid rim. Neurovascular compression may be present, but this is usually reversed once reduction is accomplished.10 Long-term complications include adhesive capsulitis and recurrent dislocations.
Apply overhead traction (generally with the arm in full abduction) in the longitudinal direction of the arm, and exert cephalad pressure over the humeral head much as with the Milch technique (see Fig. 49-18B).10,63 If needed, apply countertraction toward the patient’s feet by using a sheet placed over the injured shoulder. After reduction, bring the abducted arm into adduction against the body and supinate the forearm.64
Alternatively, use the “two-step” maneuver described by Nho and associates65 to reduce inferior dislocations. In this technique, convert the luxatio erecta to an anterior dislocation. To perform this maneuver, place one hand on the medial condyle of the elbow and the other hand around the shaft of the humerus. Push anteriorly on the shaft of the humerus while stabilizing the medial condyle of the elbow, and rotate the humeral head from an inferior to an anterior position. The authors then describe using the external rotation method to reduce what is now a typical anterior dislocation.65
Scapular dislocation or “locked scapula” is a rare condition characterized by obvious protrusion of the lateral border of the scapula and significant swelling of the medial border because of tearing of the musculature.66 To reduce the scapula, apply traction on the abducted arm and apply medial pressure on the scapula.66
AC Joint Subluxation and Dislocation
The AC joint is a true diarthrodial joint that consists of a synovial cavity surrounded by a relatively lax capsule and the weak AC ligament. This structure allows the gliding motion necessary for shoulder movement. The major stability of the AC joint comes from two ligaments. The AC ligament is primarily responsible for joint stability in the AP direction. The coracoclavicular ligament, which has posterior (conoid) and anterior (trapezoid) components, anchors the distal end of the clavicle to the coracoid process of the scapula and therefore supports the joint in a superior-inferior direction. In general, AC injuries arise from a direct force such as a fall on the point of the shoulder with the arm adducted.67 AC joint injuries are categorized according to the Rockwood classification (types I to VI) (Fig. 49-20).

First Degree (Type I)
This injury consists of a minor tear in the AC ligament. The coracoclavicular ligament is intact. The clinical findings are limited to tenderness in the area of the AC joint. Radiographs show little, if any change in position of the clavicle in relation to the acromion.48 Management of this condition consists of a sling for comfort, ice, and mild analgesics. Generally, the symptoms subside with 7 to 10 days of rest.10 Orthopedic referral is not usually necessary unless return to normal function is delayed beyond 2 weeks.
Second Degree (Type II)
In addition to a complete tear of the AC ligament, the coracoclavicular ligament is stretched or incompletely torn.48 The patient generally supports the injured arm and has slight swelling and definite tenderness over the AC joint. Radiographs demonstrate a definite change in the relationship of the distal end of the clavicle to the acromion. However, in type II injuries the inferior edge of the clavicle should not be separated from the acromion by more than half its diameter,48 and on radiographic examination the coracoclavicular distance is the same as that on the uninjured side.10 This injury can be treated in closed fashion with a sling.10 Orthopedic referral is recommended, and some will use a sling-strap device that elevates the arm and depresses the clavicle for these injuries.48
Third Degree (Type III)
In this injury, the distal end of the clavicle is essentially free floating because both the AC and coracoclavicular ligaments are completely disrupted.48 The arm is supported by an uncomfortable-appearing patient, and the distal end of the clavicle is usually seen to be riding high above the acromion. The diagnosis is generally obvious, and radiographs are used mainly to rule out an associated fracture. Radiographic criteria for this degree of injury include the inferior border of the clavicle raised above the acromion or a discrepancy in the coracoclavicular distance between the normal and affected sides (Fig. 49-21).10 These injuries require orthopedic referral, and a fair bit of controversy exists regarding their subsequent management.10,68 Larsen and coworkers69 conducted a prospective, randomized trial of conservative versus operative management of significant AC separations and concluded that conservative management was generally better, with possible exceptions made for patients with significant cosmetic deformity and for those who frequently keep their arm at 90 degrees of abduction. Even though optimal therapy is still unclear, a logical approach would include ED treatment with a sling and early orthopedic referral.
Fourth, Fifth, and Sixth Degrees (Types IV to VI)
In type IV injury, the distal end of the clavicle is free floating and posteriorly displaced into or through the trapezius muscle. Type V injury is characterized by inferior displacement of the scapula with a marked increase (two to three times normal) in the coracoclavicular interspace.10 Type IV and V dislocations generally require surgery, and orthopedic referral is necessary. Type VI injury involves dislocation of the distal end of the clavicle inferiorly. Because this is usually the result of major trauma, multiple other fractures are often present and should be pursued.10
Radiographic Examination
The diagnosis is usually made clinically by noting pain and local tenderness at the AC joint in the absence of other findings. Radiographs are generally indicated to rule out associated fractures and to aid in assessing the degree of injury. A single radiograph of the injured shoulder often suffices, but some clinicians prefer to obtain comparison views of the opposite shoulder. Although their efficacy has never been proved, it has traditionally been recommended that “weighted” films be obtained for suspected type I or II injuries. Weighted films are generally performed after routine “unweighted” radiographs and are obtained by strapping about 4.5 to 7.0 kg (10 to 15 lb) of weight to the patient’s wrists and repeating the radiographs. Weighted films are of questionable value in mild injuries and superfluous in obvious type III to VI injuries. Their use has essentially been abandoned in emergency medicine practice.70 In a prospective study of 70 type I or II injuries, the use of weights was associated with less evident separation in 7 cases, essentially producing a false-negative study in comparison to plain unweighted films. Only three injuries were recategorized as type III after the performance of weighted films.70
Sternoclavicular Dislocations
Despite the fact that the sternoclavicular joint is the least stable joint in the body, sternoclavicular dislocations are rare.71 The primary supports of this joint are the sternoclavicular and costoclavicular ligaments. Anterior dislocations are much more common and usually the result of an indirect mechanism involving a blow thrusting the shoulder forward,48 or they may be atraumatic and be caused by ligamentous laxity in teens and young adults.71 Posterior dislocations also usually result from a blow to the shoulder but can be the result of a direct superior sternal or medial clavicular blow.71 Indeed, athletic injuries and those resulting from motor vehicle accidents account for the vast majority of sternoclavicular dislocations.47,72 Posterior sternoclavicular dislocation (also known as retrosternal dislocation because the medial end of the clavicle dislocates both posteriorly and medially) is potentially life-threatening because injury to the great vessels or compression of the airway might occur.71 Patients may complain of dyspnea, choking, or hoarseness with tracheal compression; dysphagia with esophageal compression; ipsilateral upper extremity pain and swelling with subclavian vessel occlusion; or paresthesias if the brachial plexus is compromised.72 Any suggestion of these complications should prompt immediate surgical consultation.
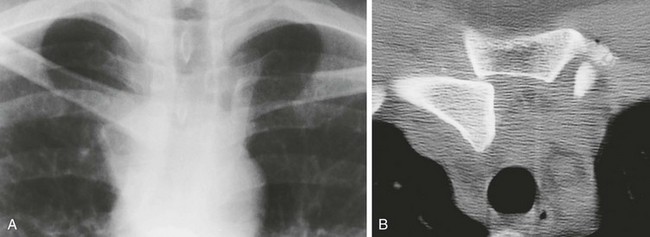
The clinical manifestation of these injuries is usually straightforward and consists of pain, swelling, tenderness, and deformity of the joint. Patients may complain of pain that is worse with arm movement and when they are supine. Plain radiographs of this joint are difficult to interpret and generally include an apical lordotic-type view with the radiographic tube angled 45 degrees cephalad. Confirmation of the diagnosis is best made with a thoracic computed tomography (CT) scan, which may also identify high rib fractures, pulmonary contusion, or pneumothorax (Fig. 49-22).71,73 CT angiography will also show vascular injury associated with posterior dislocations. Children may have epiphyseal disruption with retrosternal displacement of the medial aspect of the clavicle.74
To reduce both types of sternoclavicular dislocation, place a rolled blanket or a sandbag between the scapula and spine in to separate the medial aspect of the clavicle from the manubrium. Apply traction on the 90-degree abducted, 10-degree extended arm in line with the clavicle and then push (anterior dislocation) or lift (posterior dislocation) the clavicle back into position.71 Posterior dislocations may be difficult to reduce and to maintain via closed reduction. Therefore, some authors recommend reduction in an operating suite unless complications necessitate immediate reduction.71 Given the rarity of this injury and the potential for major underlying complications, early consultation is recommended for suspected posterior sternoclavicular dislocations. Once reduced, a clavicle strap may be used to immobilize both anterior and posterior dislocations for up to 6 weeks.72
Elbow Dislocations
The elbow is second only to the shoulder as a site of major joint dislocations in adults; it is the most commonly dislocated joint in children. Anatomically, the principal articulation of the humerus and ulna is a stable hinge joint with the intercondylar groove of the distal end of the humerus nestled in the olecranon fossa. Because of the stability of the elbow, any dislocation is expected to be accompanied by considerable soft tissue damage, and associated fractures of the radial head and coronoid process of the ulna are common. Elbow dislocations are often simply divided into posterior and anterior dislocations (Fig. 49-23). However, there are actually several different types of elbow dislocations in addition to posterior and anterior, including lateral, divergent, and isolated dislocations of the radius.75 In the rare divergent dislocations, the radius and ulna are dislocated in opposite directions, either anterior and posterior or medial and lateral.75
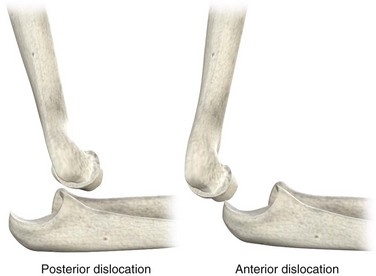
Figure 49-23 Classification of elbow dislocations.
Recent studies have shown that many patients report long-term problems with residual pain and joint stiffness after elbow dislocation.76,77 However, the most serious complication of elbow dislocation is injury to the brachial artery. This injury is possible with any type of elbow dislocation and is a frequent occurrence with open dislocations.75 Vascular compromise can be delayed in onset and result from either unsuspected arterial injury or progressive soft tissue swelling. The circulatory status of the arm must be carefully monitored even after successful reduction.75 Though not absolute, patients with these injuries who have significant or immediate soft tissue swelling or hematoma formation or those who have questionable vascular integrity or neurologic findings are often admitted to the hospital or ED observation unit. In most cases, orthopedic consultation should be sought before disposition.
Injury to the median and ulnar nerves may be the result of stretch, severance, or entrapment. It is difficult to clinically distinguish these causes; therefore, management of nerve injuries is frequently expectant.75 It is imperative to conduct a careful neurologic examination before and after reduction because any increase in findings may indicate entrapment and the need for surgical intervention.75 Myositis ossificans is also a potential complication of elbow dislocations secondary to hemarthrosis, which underscores the advisability of orthopedic consultation early in the course of care.
Posterior Dislocations
Posterior dislocations make up the vast majority of elbow dislocations.48 The usual mechanism is a fall on an outstretched hand with the elbow in extension. Findings on clinical examination are usually diagnostic unless severe soft tissue swelling is present. The patient has a shortened forearm that is held in flexion, and the olecranon is prominent posteriorly. The normally tight triangular relationship of the olecranon and the epicondyles of the distal end of the humerus is disturbed in a posterior dislocation. A defect may also be palpated above the prominence of the olecranon.
Radiologic Examination
Two radiographic views, an AP and a true lateral, should be obtained (Fig. 49-24). The diagnosis is obvious with proper radiographs. A careful search for fractures of the distal end of the humerus, radial head, and coronoid process must be undertaken since they commonly occur in this injury.75 In children younger than 14 years, the fracture is usually a medial epicondyle separation because the epiphyseal plate gives way before the medial collateral ligament of the elbow. Postreduction radiographs are also necessary to confirm reduction and disclose any associated fractures.78

Reduction Techniques and Postreduction Care
As with shoulder reductions, some authors claim that their method of elbow reduction is virtually painless,37,79 but this has not been objectively documented. In general, patients with posterior elbow dislocations are quite uncomfortable, and it is beneficial to administer IV analgesics early in the course of care, preferably before positioning for radiographs. In addition to or in lieu of parenteral sedation and analgesia, some clinicians inject the elbow joint with a local anesthetic (e.g., 3 to 5 mL of 2% plain lidocaine) before attempting reduction. Before injection, the joint should be aspirated to remove blood.
Traditional Traction Method: Place the patient in the supine position and have an assistant stabilize the humerus with both hands80 (Fig. 49-25B). Grasp the wrist and apply slow and steady in-line traction. Slightly flex the elbow to keep the triceps mechanism loose, and hold the wrist supinated while applying traction. Reduction is usually signified by a “clunk” that is heard or felt. If this method is not successful after a reasonable period of traction (10 minutes), gently flex the forearm to effect reduction. Alternatively, apply downward pressure on the proximal volar surface of the forearm to free up the coronoid process.
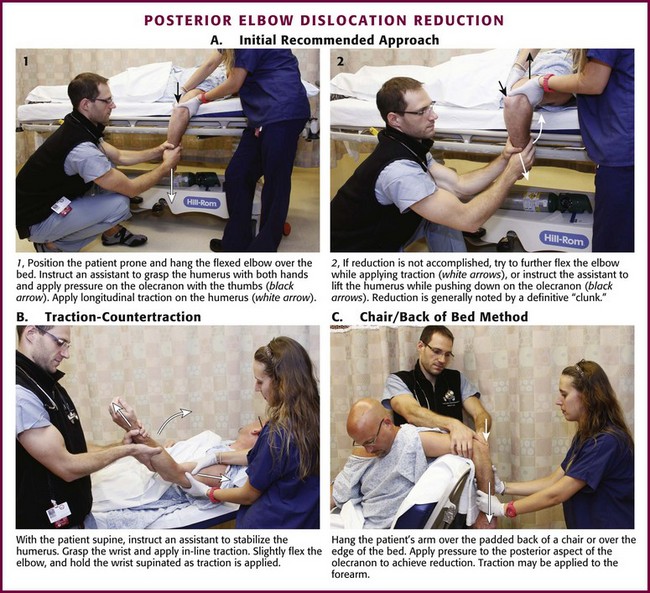
Figure 49-25 Posterior elbow dislocation reduction methods.
Alternatives: Several authors have described variations of a prone method of reduction that are reportedly well tolerated by patients.37,79,80 In the method described by Minford and Beattie,79 position the patient with the arm hanging over the padded back of a chair or over the edge of the bed (see Fig. 49-25C). Apply pressure to the prominent posterior aspect of the olecranon to achieve reduction. Alternatively, apply traction with the elbow flexed over the edge of a chair. Pull down on the hand while using the thumb to guide the olecranon into place.80 Parvin37 positioned the patient as for the Stimson method of shoulder relocation, prone on a stretcher with the arm hanging down, and applied gentle downward traction on the wrist.
Recommended Initial Approach: A prone technique is advantageous because patients tolerate this position quite well. Hang the flexed elbow over the edge of the bed and position an assistant with his or her back toward the patient such that the patient’s humerus can be encircled with both hands and pressure applied with the thumbs on the posterior aspect of the olecranon (see Fig. 49-25A). This pressure on the olecranon is intended to lift it up and away from the humerus. Apply longitudinal traction on the arm with the elbow in slight flexion. If reduction is not accomplished, an attempt may be made to further flex the elbow, or the assistant can be instructed to lift the humerus. Reduction is generally noted by a definite “clunk.”
Postreduction Care: Once reduction is achieved, put the elbow through a gentle range of motion to ensure that the reduction is stable and there is no mechanical block to movement.75 An inability to move the elbow through a smooth range of motion after reduction is often caused by an entrapped medial epicondyle fracture fragment, which requires operative intervention.75 Immobilize the elbow in at least 90 degrees of flexion with the forearm in slight pronation by using a long arm posterior splint (see Chapter 50). A randomized trial is currently under way to assess the long-term outcome of immobilization versus early range of motion.81 After immobilizing the joint, recheck the neurovascular status of the extremity and obtain postreduction radiographs.
After reduction, any signs of delayed vascular compromise are first addressed by loosening the splint and decreasing the degree of flexion. This may restore adequate blood flow.75 If not, immediate surgical consultation is necessary for emergency arteriography, exploration of the brachial artery, or both.78 Delayed brachial arterial injury may not be immediately apparent because of the presence of collateral circulation. The risk for vascular compromise is a reason to consider in-hospital observation. Alternatively, observe the patient in the ED or ED observation unit for 2 to 3 hours after reduction to evaluate for delayed neurovascular compromise before discharge.
Anterior Dislocations
Anterior dislocations of the elbow are quite rare; they usually result from a direct posterior blow onto the olecranon with the elbow flexed.75 On physical examination, the arm is elongated and extended with anterior tenting of the proximal end of the forearm and prominence of the distal end of the humerus posteriorly.75 These injuries are the result of a great deal of force; they are frequently open and accompanied by significant neurovascular injury. An avulsion of the triceps mechanism may also occur.75
To reduce anterior dislocations of the elbow, apply in-line traction and backward pressure on the proximal end of the forearm (Fig. 49-26). An assistant provides countertraction by grasping the humerus with both hands. Given the infrequent nature of anterior dislocations and the high probability of a severe associated injury, the emergency clinician should consider early orthopedic consultation for such dislocations.
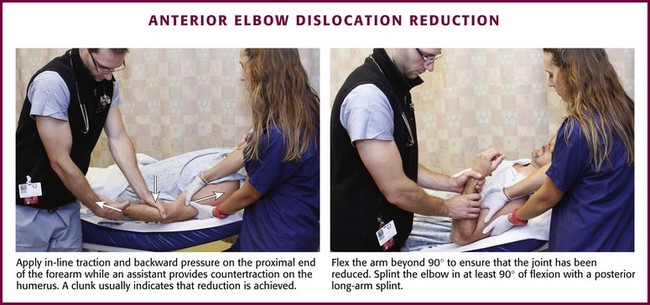
Figure 49-26 Anterior elbow dislocation reduction method.
Radial Head Subluxation (Nursemaid’s Elbow)
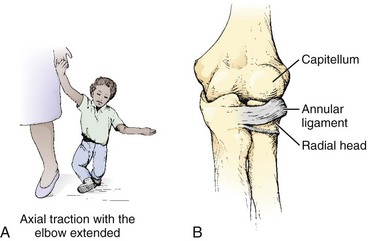
Radial head subluxation is a common pediatric orthopedic issue that generally occurs between the ages of 1 and 3 years. The mean age is just older than 2 years, but this entity has been reported in infants younger than 6 months82,83 and in older children up to the preteen years.84 There is a slight predilection for this injury to occur in girls and in the left arm.83,85 The classic mechanism of injury is longitudinal traction on the arm with the wrist in pronation, as occurs when the child is lifted up by the wrist (Fig. 49-27A).83 There is no support for the common assumption that the relatively small head of the radius in relation to the neck of the radius predisposes the young to this injury.86 The pathologic lesion is generally a tear in the attachment of the annular ligament to the periosteum of the radial neck, with the detached portion becoming trapped between the head of the radius and the capitellum (see Fig. 49-27B).86
Clinical Assessment
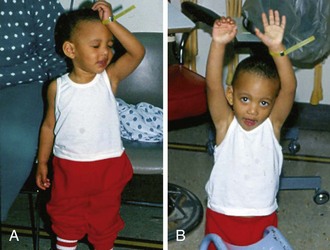
The history offered by the caretaker may not be that of the classic pulling-type mechanism. Schunk,83 in a series of 83 patients, reported that only 51% described such a mechanism whereas 22% reported a fall. In patients younger than 6 months, the mechanism in the majority is simply rolling over in bed.82 Therefore, isolated radial head subluxation in children younger than 6 months does not automatically necessitate a child abuse investigation. The typical patient with a nursemaid’s elbow is in no distress and the arm is held slightly flexed and pronated at the side (Fig. 49-28). This has been termed the nursemaid’s position.87 The exact area of pain is often difficult to locate. The child will refuse to use the arm, and this may be the chief complaint.84 An older child will usually point to the dorsal aspect of the distal end of the forearm when asked where it hurts, which may mislead the clinician to suspect a distal radial buckle fracture.
Although tenderness about the elbow has been reported occasionally, there is often little tenderness or swelling in the elbow region.83,84 In a cooperative child, the arm and shoulder are carefully palpated to discern any tenderness. Areas of focus on palpation should include the clavicle and distal end of the radius because these are common sites for pediatric fractures. When patient anxiety interferes with reliable assessment of tenderness in a child whose arm is in the classic nursemaid’s position, the examiner can stand at a distance and have the parent or caretaker palpate the extremity to ascertain tenderness. This may also be done with a cooperative patient to reassure a doubtful parent regarding the absence of a fracture. If no tenderness is noted on palpation, it is appropriate to attempt reduction without prior radiographs.88
Although resistance to or pain with supination is a frequent finding in patients with radial head subluxation,83 one need not test for this finding until the time of reduction.
Radiographic Examination
Radiographs are not generally needed with the classic finding: a child with an arm in the nursemaid’s position that is not tender (or minimally tender in the radial head area) on palpation and an appropriate history.88 In these cases, findings on radiographs are generally normal, and if obtained, the positioning of the child’s arm by the x-ray technician often effects reduction.83 However, Frumkin86 described three cases of nursemaid’s elbow in which a line drawn through the longitudinal axis of the radius did not normally bisect the capitellum on prereduction radiographs but did so after reduction. Radiographs are sometimes recommended if the child is not moving the arm normally 15 minutes after reduction.87 However, this time frame may be too short because reuse can be delayed for more than 30 minutes, particularly in children initially seen some time after the injury. Quan and Marcuse84 recommended an approach in which no radiographs are obtained on the first visit, including in children released from the ED before regaining full use of the arm. At the time of a 24-hour follow-up visit, radiographs are obtained only if repeat attempts at manipulation are not successful.
Reduction Techniques
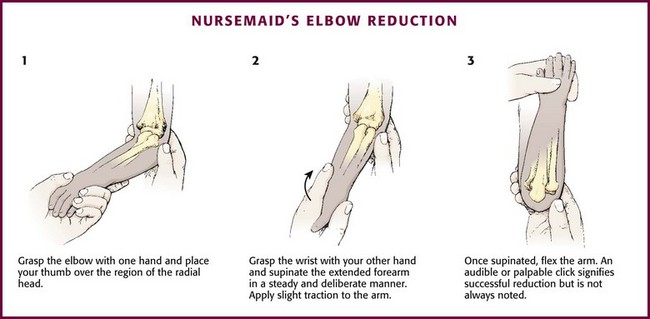
Reduction of nursemaid’s elbow (Fig. 49-29) is generally performed without premedication. If the subluxation has been present for hours, oral or nasal midazolam can be a useful adjunct to overcome the child’s anxiety related to manipulation. It is important to explain to the caretaker that the reduction will probably cause the child discomfort but that this is transient and a clue to the diagnosis. Position the child seated on the lap of an assistant (often a parent) who stabilizes the arm by holding the humerus adducted to the side. Grasp the elbow with one hand and place the thumb over the region of the radial head. Although it has been stated that the thumb can apply pressure on the radial head, this positioning is mainly useful for palpation of the reduction “click.” Grasp the child’s wrist with the other hand and supinate the extended forearm in a steady, deliberate manner. Slight traction before supination is generally recommended, but it is unclear whether this increases the likelihood of successful reduction. Once supinated, flex or extend the arm; however, flexion is the most common maneuver and may actually be somewhat more successful than extension.83 An audible or palpable click signifies successful reduction but is not always noted. Once the reduction has been performed, the child usually cries for a few minutes. Generally, the operator should leave the room and then return in 10 to 15 minutes to repeat the examination. Full use of the arm should be evident (see Fig. 49-28B).
Pronation Method
This technique is performed with the child positioned as for the supination method. However, the forearm is not supinated. Instead, the forearm is rapidly hyperpronated and flexed. A recent study by McDonald and colleagues85 reported equal success rates with this technique and the supination technique.
After Attempted Reduction
If a click is detected, the child will generally regain use of the affected arm quickly (almost always by 30 minutes).84 Therefore, if a definite click is detected, it is reasonable to observe the child for up to 30 minutes before further intervention. If there is still no use at 30 minutes, the operator may try to determine whether supination is still painful, which would suggest the need to repeat the attempt. In children in whom a click is not detected, the majority will not use the arm by 30 minutes.84 Therefore, a repeated attempt at reduction is recommended after 10 to 15 minutes of nonuse in children who do not initially have an initial click during the primary reduction. In these children, two or more attempts are required to produce the click in up to 30% of patients.84
If the child has not regained use of the arm after a few attempts and a reasonable period of time, some authors recommend that radiographs be obtained.87 X-ray films may also help relieve parental anxiety. Alternatively, instructions may be given for 24-hour follow-up if normal function is not restored, with consideration of radiographs at the time of follow-up.84 In two series of patients with nursemaid’s elbow, 6 of 10 patients released without normal arm use had spontaneous restoration of function, whereas the other 4 required remanipulation (which successfully restored function).83,84 Delayed use of radiographs may decrease overall radiation exposure in a child with a radial head subluxation.
On occasion, a successful reduction painfully resubluxates with movement; in this case, immobilization and referral may be necessary.86 If reduction has been achieved clinically and maintained in the ED, analgesics or a follow-up visit is unnecessary. Because other pathology can rarely mimic this condition (e.g., occult fracture, osteomyelitis, joint infection, tumor), full, unrestricted, and painless use of the arm must be evident by 24 hours. If not, further workup is warranted.
Hand Injuries
The hand is extremely susceptible to dislocation injuries because of its frequent use and exposed nature. Proper motion and function of the hand are intimately related to normal anatomic alignment.89 The emergency clinician must therefore be skilled in the diagnosis and management of dislocations about the hand. An improperly managed hand injury can result in significant disability in the patient.
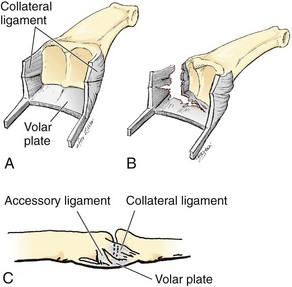
Anatomically, the joints of the digits are quite similar and consist of a hinged joint with a tongue-in-groove–type arrangement.89 The soft tissue support includes two collateral ligaments attached to a volar plate (Fig. 49-30). The volar plate is composed of dense fibrous connective tissue that is thickened at its distal attachment and thinner at its proximal attachment to allow folding with joint flexion.89,90 Dorsal dislocation of a digit requires failure of the volar plate, whereas lateral dislocation disrupts a collateral ligament and induces at least a partial tear in the volar plate.
Radiographic examination of all hand injuries is relatively straightforward and includes at least two views (AP and lateral) of the injured area (Fig. 49-31). The most important radiographic error in evaluating joint injuries in the hand is failing to get a true lateral view of the injured joint.90 This may lead to missing a fracture or a loose body in the joint.

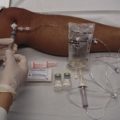
Anesthesia is generally required for proper management of dislocations about the hand. It is most often accomplished with a finger or wrist block (see Chapter 31), although a more proximal regional or Bier block may be used on occasion (see Chapter 32). Getting a secure grip on the digits may be difficult and could complicate the reduction. Wearing rubber gloves or wrapping gauze around the fingers may be useful.
Thumb Dislocations
The opposable thumb is an essential structure for countless activities. Despite its strong ligamentous and capsular support, the exposed positioning of the thumb makes it a frequent site of dislocations and subluxations. The metacarpophalangeal (MCP) joint in the thumb is similar to the MCP joints in the fingers but has a stronger volar plate and collateral ligaments.90
IP Joint Dislocation of the Thumb
The single interphalangeal (IP) joint of the thumb has strong cutaneous-periosteal attachments, and dislocations of this type are therefore frequently open.90 The dislocations are generally dorsal and can be reduced in a manner similar to that for IP dislocations of the finger (Fig. 49-32A and B). The mechanism of injury is recreated by longitudinal traction and hyperextension to distract the phalanges. Reduction is accomplished by flexing the IP joint with continued traction and by applying direct pressure on the base of the distal phalanx.90
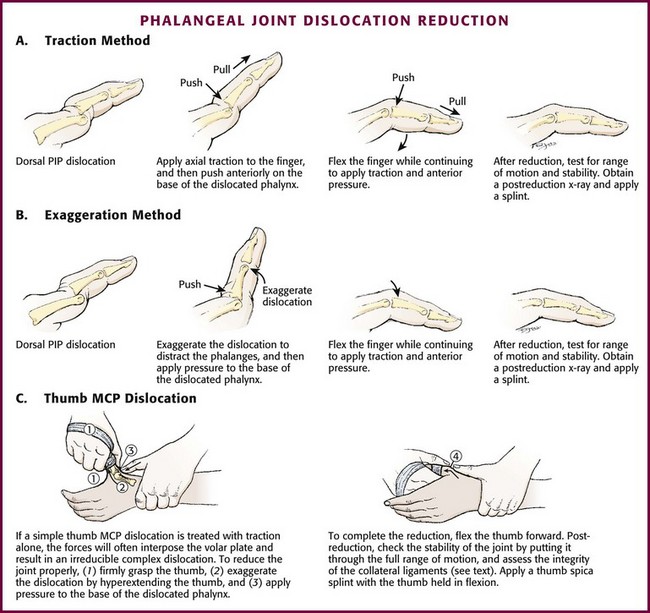
Figure 49-32 Phalangeal dislocation reduction.
After reduction, range of motion is tested and the stability of the reduction is ascertained. An adequate reduction documented on postreduction films is then splinted in slight flexion for 3 weeks.90 Orthopedic or hand specialist referral is advisable.
MCP Joint Injury of the Thumb
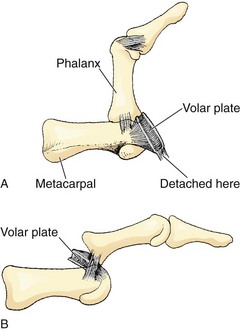
Dorsal Dislocation: The MCP joint of the thumb can be dislocated dorsally by a hyperextension injury. The proximal phalanx will come to rest in a position dorsal to the first metacarpal (Fig. 49-33; also see Fig. 49-31A). There are two basic types of MCP dislocation (this applies to the fingers also): simple and complex. In a complex MCP dislocation, the volar plate becomes entrapped dorsal to the metacarpal head (Fig. 49-34), with the flexor tendons and lumbricals acting to completely entrap the metacarpal head.90 The simple type is amenable to closed reduction, whereas the complex type requires operative reduction because of interposed soft tissue.89,90 It is important to note that a simple MCP dislocation can be converted into a complex one during reduction.89
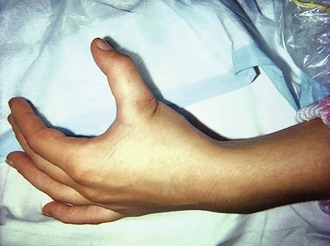
Clinical features that suggest a complex MCP dislocation include a proximal phalanx that is less acutely angulated than with a simple dislocation (i.e., <60 degrees).90 Dimpling may also be noted over the thenar eminence as a result of pressure from the entrapped metacarpal head.89 On radiographic studies of simple dislocations, the joint surfaces are in close contact, whereas they are separated in complex dislocations. The presence of a sesamoid bone in the joint space is diagnostic of a complex MCP dislocation (Fig. 49-35).89
To reduce a simple MCP dislocation, hyperextend the joint as far as possible with the wrist in flexion to relax the tendons (see Fig. 49-32C). Once maximal hyperextension is achieved, push the base of the proximal phalanx distally while bringing the joint back into flexion.89 Applying simple traction alone as an initial maneuver risks trapping the volar plate and creating a complex dislocation.89 After reduction, test the stability of the joint by putting it through a full range of motion. Assess the integrity of the collateral ligaments with the MCP joint in flexion (see later). Simple MCP dislocation injuries generally require casting for 3 weeks with the joints in moderate flexion.90
Volar Dislocation: Volar dislocations are rare and generally associated with collateral ligament ruptures. They are commonly irreducible because of interposition of one or both extensor tendons and the dorsal capsule.89 Orthopedic consultation is required.
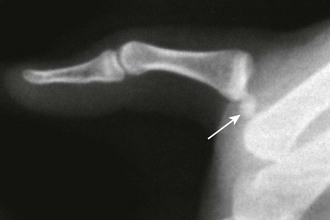
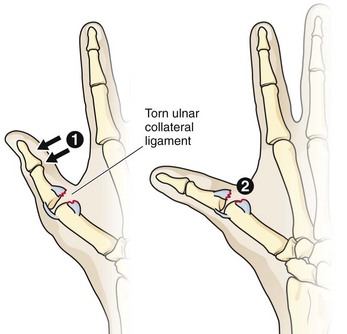
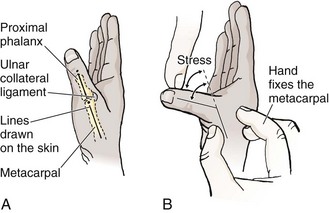
Ulnar Collateral Ligament Rupture: Also known as gamekeeper’s or skier’s thumb, this injury results from a laterally directed force at the thumb MCP joint causing rupture of the ulnar collateral ligament (Fig. 49-36). The usual mechanisms include falling with a ski pole in the hand or having the thumb alone draped over the steering wheel in an auto crash. These injuries are most often initially seen in the reduced state with just a complaint of pain in the area. Early recognition of this injury is essential to prevent further disability because this ligament is important for the grasping function of the thumb. A strain or partial tear probably cannot be diagnosed in the ED. It is therefore prudent to immobilize all significantly “sprained thumbs” in a thumb spica splint for a few days and reexamine those with significant injuries. A complete or severe ligamentous tear is generally diagnosed by stress testing of the MCP joint (Fig. 49-37). Radiographs occasionally demonstrate an avulsion-type fracture. The exact positioning of the thumb for stress testing is debatable, but the metacarpal should be stabilized with the thumb and index finger of one hand while applying stress with the other hand. Louis and associates91 recommended stressing the joint in full flexion because virtually no lateral movement of the MCP joint should be noted in this position. Instability in full flexion of greater than 35 degrees is indicative of a complete rupture. Hossfeld and Uehara90 suggested testing the MCP joint in 20 to 30 degrees of flexion to lessen the stabilizing effects of the volar plate; the results should be compared with stability on the other side.
Cast partial injuries to the ulnar collateral ligament for 3 weeks; complete rupture usually requires operative repair.91 An associated nondisplaced fracture may be treated in closed fashion, whereas a displaced fracture is an indication for operative repair.91
CMC Dislocations of the Thumb
Carpometacarpal (CMC) dislocations of the thumb are uncommon (Fig. 49-38); when present, they often occur with an associated fracture. Because closed reduction is generally unstable, operative stabilization by percutaneous placement of Kirschner wires (K-wires) is usually required.90
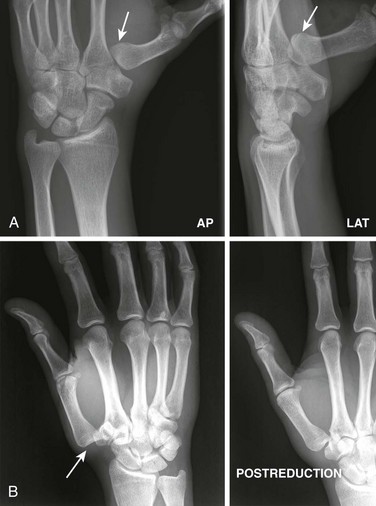
Finger Dislocations
The basic anatomic structure of the fingers is similar to that of the thumb with the exception that the fingers have more lateral support from the MCP joints, which makes collateral ligament injury here much less common than in the thumb. The treatment principles are also similar. It is advisable to order radiographs for a specific finger (not just “hand” films). Complete views of the finger will include an AP view, a true lateral view, and an oblique view. A true lateral view is extremely important for detection of subtle dislocations or small avulsion fractures on the volar surface (Fig. 49-39).
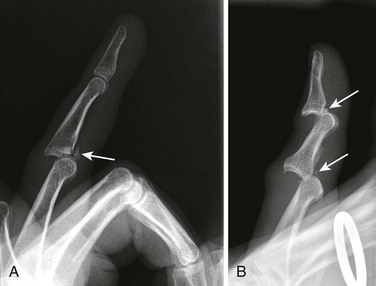
PIP Joint Dislocations
The proximal interphalangeal (PIP) joint is extremely important, and any loss of motion in this joint may severely restrict normal function.89 This joint is also prone to stiffness, so careful treatment of injuries in this area is essential. Injuries to the PIP joint are generally slow to heal and often result in an increase in joint size as a result of scar tissue formation.89 Because of this propensity for a less-than-perfect outcome, it is advisable to refer PIP injuries after emergency care.
Proper examination of the PIP joint (Fig. 49-40) includes the application of ulnar and radial stress to test the integrity of the collateral ligaments and hyperextension to determine the integrity of the volar plate. Inability to actively extend the flexed PIP joint against resistance suggests a central slip rupture, which may progress to a boutonnière deformity (see Chapter 48).89 Such an examination should be carried out after any successful joint reduction. This examination should also be conducted on a painful PIP joint that is radiographically normal to detect soft tissue injury in a spontaneously or field-reduced dislocation. This is extremely important in athletes because coaches often reduce these injuries.89

Dorsal PIP Dislocations: Dorsal PIP dislocations are among the most common types encountered in the ED (Fig. 49-41; also see Fig. 49-31B). The mechanism is usually a blow to the end of the finger, such as from a thrown ball, that creates an axial load and hyperextends the finger.90 The middle phalanx comes to rest dorsal to the proximal phalanx (Fig. 49-42). An associated disruption of the volar plate is generally present.89,90 The deformity is obvious on clinical examination, and radiographs clearly demonstrate the injury. An associated fracture of the volar lip may be detected. If this fracture affects greater than 33% of the joint surface, closed reduction will be unstable because the collateral ligament is attached to the bony fragment. In these cases, operative repair will be necessary.90
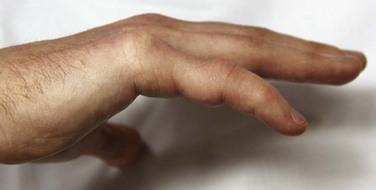
Figure 49-41 Dorsal proximal interphalangeal joint dislocation.
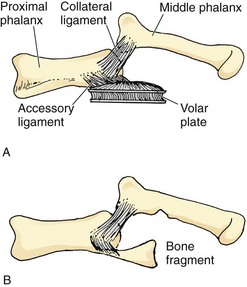
A dorsal PIP dislocation can be reduced after a digital block. The usual method (see Fig. 49-32A and B) is to exaggerate the injury by slight traction and hyperextension, thereby distracting the middle phalanx. Apply pressure to the base of the middle phalanx as the finger is brought into flexion. These injuries usually reduce fairly easily, and failure of routine attempts should raise suspicion of interposed soft tissue, for which orthopedic consultation should be sought.
After reduction is completed, place the joint through a range of motion to ensure stability of the reduction. If stable, splint the joint in 20 to 30 degrees of flexion for 3 weeks.89,90 Alternatively, buddy taping to an adjacent finger for 3 to 6 weeks allows early active motion and prevents hyperextension, which should be avoided.90 Because PIP injuries can be slow to heal and are complicated by stiffness, it is advisable to refer these patients for orthopedic follow-up.
Volar PIP Dislocations: Volar PIP dislocations are uncommon injuries and virtually always accompanied by injury to the central slip of the extensor tendons. If the dislocation is reduced before the ED visit and there is no indication that the dislocation was volar, this injury may be incorrectly treated by splinting in mild flexion as though it were the more common dorsal dislocation. However, with disruption of the central slip of the extensor tendons, immobilization in flexion will lead to the development of a boutonnière deformity.89,92 Even when this is recognized and treated properly, some impairment of mobility may occur. It is generally best to seek early orthopedic consultation for these injuries because some require operative repair. If the emergency clinician accomplishes a closed reduction, postreduction films must demonstrate normal congruity of the joint surfaces, and a central slip attachment fracture must be excluded.92 If so, splinting of only the PIP joint in full extension should be undertaken for 3 weeks and early orthopedic follow-up ensured.89
Lateral PIP Dislocations: Lateral PIP dislocations are fairly common and often reduced in the field. The patient will frequently describe dramatically how the finger was pointing in an unnatural manner (Fig. 49-43). The injury can be detected by applying ulnar and radial stress to the PIP joint. If still dislocated, re-create the injury and then apply longitudinal traction to reduce the dislocation. Treat partial tears of the collateral ligaments by buddy-taping the finger for 3 to 6 weeks.89 Management of complete tears is controversial, with some advocating operative therapy for all such injuries and others using varying durations of immobilization or buddy taping.89 Referral is suggested for all but the mildest of PIP collateral ligament injuries.
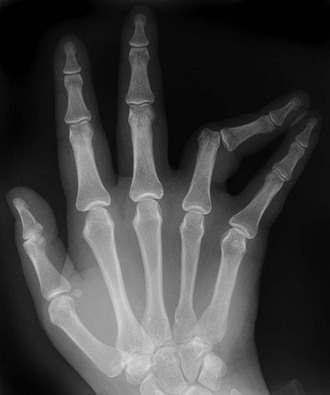
DIP Dislocations
As in the thumb, the distal phalanx is attached firmly to skin and subcutaneous tissue by osteocutaneous fibers. For this reason, dislocations of the distal interphalangeal (DIP) joint are frequently open.89 A DIP dislocation is usually dorsal, and the mechanism is a blow to the end of the finger. Despite the dislocation, the DIP joint may retain some range of motion, so it is important to not overlook these injuries.93 Lateral radiographs are diagnostic.
Management of a dorsal DIP dislocation involves reduction in a fashion similar to that described for other IP joint injuries (see Fig. 49-32). Hyperextend the finger and apply traction to distract the joint, and then apply pressure on the base of the distal phalanx during flexion. Following reduction, check the joint for stability and place the finger in a dorsal splint for 10 to 12 days.89
An injury to the DIP joint that may be confused with a dislocation is the mallet finger (Fig. 49-44). This injury is often caused by forced flexion of an extended finger (e.g., struck by a baseball). The patient is unable to extend the fingertip, but the joint appears normal on passive extension by the examiner. The injury is a rupture of the extensor tendon, with or without avulsion of a small piece of bone. Unless the injury is properly splinted or surgically immobilized, permanent deformity will occur (see Chapter 48).
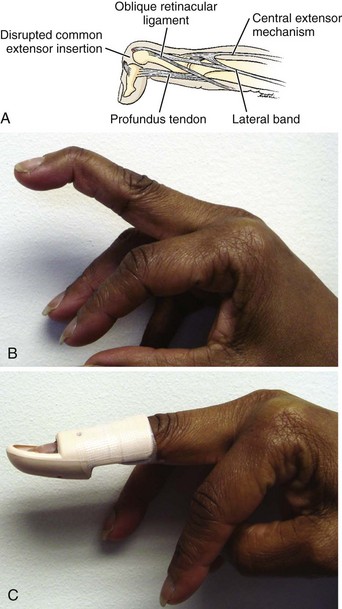
MCP Dislocations
The pathology and management of finger MCP dislocations are identical to those of the thumb, as discussed earlier. The same classification of simple and complex applies; the complex type requires operative repair. Dimpling on the palmar surface suggests the presence of a complex dislocation. It is important to remember that application of traction alone for a simple MCP dislocation may convert it to a complex dislocation. For dorsal dislocations, flex the wrist to relax the tendons and hyperextend the joint as far as possible. Then apply pressure on the base of the proximal phalanx to effect reduction. After reduction of a simple dorsal MCP dislocation, buddy taping is generally sufficient to secure the reduction.89 Volar dislocations are rare and require orthopedic consultation.
CMC Dislocations
CMC dislocations are rare injuries that are frequently misdiagnosed. The usual site of injury is the fifth CMC joint, which is dorsally dislocated.90 The injury is generally the result of a high-energy mechanism, such as a motor vehicle crash or a fall. The diagnosis can be quite difficult to make because the appearance may be subtle even on a lateral radiograph. Associated fractures and other injuries are frequently present, and percutaneous fixation is usually required.90
Carpal Dislocation/Dissociation
The most common carpal injuries are scapholunate dissociation and lunate and perilunate dislocation, although a number of variations exist. These injuries are often sustained by a fall on an outstretched hand. Carpal dislocations and dissociations produce pain, weakness, decreased range of motion, and often significant soft tissue swelling, with many symptoms seemingly out of proportion to the radiographic findings. Specific radiographic diagnosis is frequently difficult, and it is not uncommon for definitive diagnosis to be missed on initial ED evaluation. CT or magnetic resonance imaging may be required to delineate the specifics of the injury. Marked swelling on the dorsal surface of the hand or wrist, in the absence of a definitive fracture on plain radiographs, is a common scenario, and such findings should prompt consideration of carpal dislocation or dissociation (Fig. 49-45). If a diagnosis is not forthcoming, splinting and reevaluation of a markedly swollen and painful hand or wrist in 2 to 3 days is prudent.
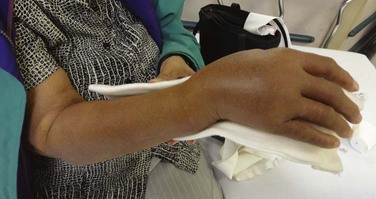
Scapholunate dissociation is characterized by a widened space (>3 mm) between the scaphoid and lunate bones on a plain radiograph. This is best visualized on a posteroanterior view with the hand closed in a fist and the wrist in ulnar deviation (Fig. 49-46). It is indicative of disruption of ligaments stabilizing the two carpal bones. Even though the symptoms and swelling may be impressive, the radiographic findings are subtle and often overlooked, with initial and subsequent complaints being attributed to a severe bruise or sprain. When identified, the hand and wrist are immobilized in the ED by a splint in neutral position or in 10 to 15 degrees of wrist dorsiflexion. Referral should also be initiated.
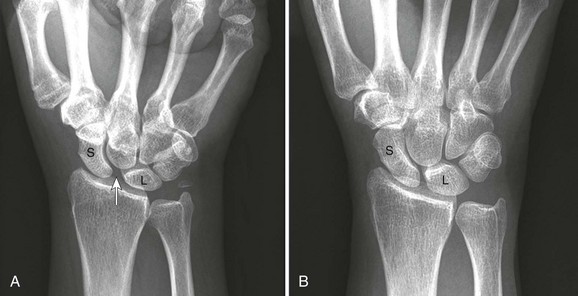
Lunate dislocation and perilunate dislocation (Figs. 49-47 and 49-48) can also occur as a result trauma and produce pain, swelling, and disability. Plain radiographs will usually delineate the pathology. Identification, splinting, and referral are the mainstays of ED treatment. These injuries may be reduced on initial diagnosis. The hand and wrist are immobilized in a splint in neutral position or in 10 to 15 degrees of wrist dorsiflexion.
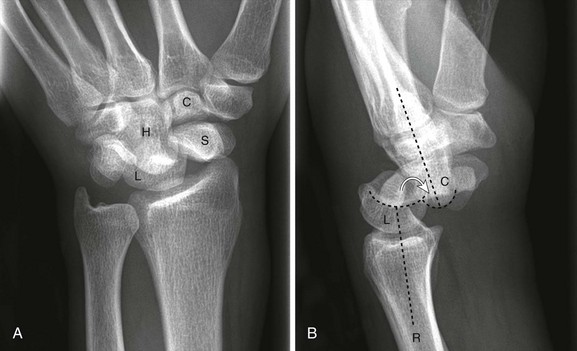
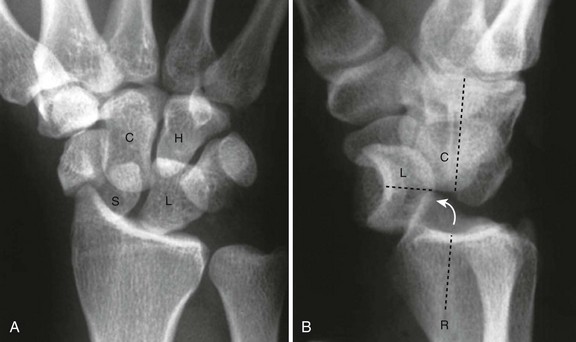
Hip Dislocations
The hip is generally a stable ball-and-socket joint. The head of the femur is deeply situated in the acetabulum, and ligamentous and muscular support is very strong. Therefore, hip dislocations are usually the result of significant force, and a careful search for other limb- or life-threatening injuries must be undertaken. Common mechanisms of hip dislocation include motorcycle or car accidents, vehicles striking pedestrians, and falls.94
Associated fractures are quite common with hip dislocations. In fact, up to 88% of hip dislocations are accompanied by an associated fracture.95 If a fracture complicates the dislocation, orthopedic consultation is generally indicated. However, the emergency clinician should be able to reduce simple hip dislocations, which are dislocations without an associated fracture or with a very minor fracture.96 Hip dislocations may occasionally be missed in the setting of severe trauma because other injuries garner more attention. A missed diagnosis can also occur when a fracture of the femur obscures the clinical picture of hip dislocation.96 Common complications of hip dislocation include sciatic nerve injuries and avascular necrosis of the femoral head. Sciatic nerve injuries are seen with 10% to 14% of posterior hip dislocations.96 Avascular necrosis of the femoral head is one of the more disabling complications associated with hip dislocation. Although it is generally stated that early reduction will reduce the frequency of this complication, evidence for this statement is hard to find. Dreinhofer and coworkers95 noted poor outcomes despite early (i.e., <6 hours) reduction of type I hip dislocations (dislocation without a significant associated fracture). Yang and colleagues94 found that reduction beyond 24 hours was associated with a worse prognosis, but they could not find a significant time factor for those reduced in less than 24 hours. Nevertheless, it is still advisable to reduce hip dislocations as soon as feasible to decrease soft tissue distortion. If evidence of nerve injury exists, the dislocation should be treated as an emergency and be reduced as early as possible.
Radiographic Examination
Dislocation of the hip is generally obvious on the standard AP pelvic film that is often taken during trauma resuscitation (Fig. 49-49). A lateral or oblique view may help clarify the type of dislocation and allow detection of associated fractures.
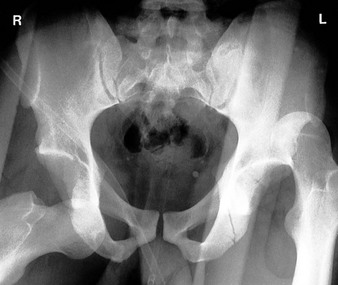
Analgesia and Anesthesia
Dislocation of a prosthetic hip can usually be managed with moderate amounts of IV premedication in the ED. Premedication recommendations for other acute traumatic dislocations run the gamut from general anesthesia for all reductions95 to IV sedation only.97 Most clinicians would agree that some type of IV premedication is necessary, and patients often require deep sedation if the procedure is to be successful in the ED. One should not hesitate to opt for spinal or general anesthesia if reasonable attempts at reduction in the ED fail.
Posterior Hip Dislocation
Posterior dislocation is the most common type of hip dislocation. Posterior dislocations generally occur secondary to a blow to the flexed knee with the hip in varying degrees of flexion (e.g., a knee striking the dashboard in a head-on motor vehicle collision). The greater the amount of flexion of the hip at the time of the injury, the less the chance of an associated fracture.96 The femoral head is forced out of the acetabulum and rests behind it. The sciatic nerve is located just behind the hip joint and may be injured with a posterior hip dislocation. The clinical picture includes a shortened, internally rotated, and adducted leg (Fig. 49-50A).
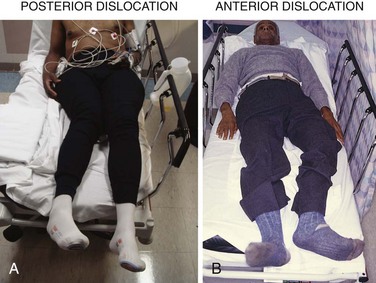
Reduction Techniques
Stimson Technique (Fig. 49-51A): In the prone or gravity method described by Stimson, the patient is placed so that the distal portion of the pelvis overhangs the edge of the stretcher. Flex the hip, knee, and ankle to 90 degrees and apply downward pressure on the posterior aspect of the proximal end of the tibia.96 Gently rotate the hip internally and externally to facilitate reduction. If needed, an assistant may apply direct downward pressure on the femoral head. An alternative and more comfortable way to provide downward pressure on the tibia is to grasp the patient’s ankle, place your knee on the patient’s calf, and use your body weight to apply pressure.97 This method is believed to be the least traumatic; however, associated thoracoabdominal injuries or a need for deep sedation, which may pose an airway risk, may make the prone position risky for the patient.96
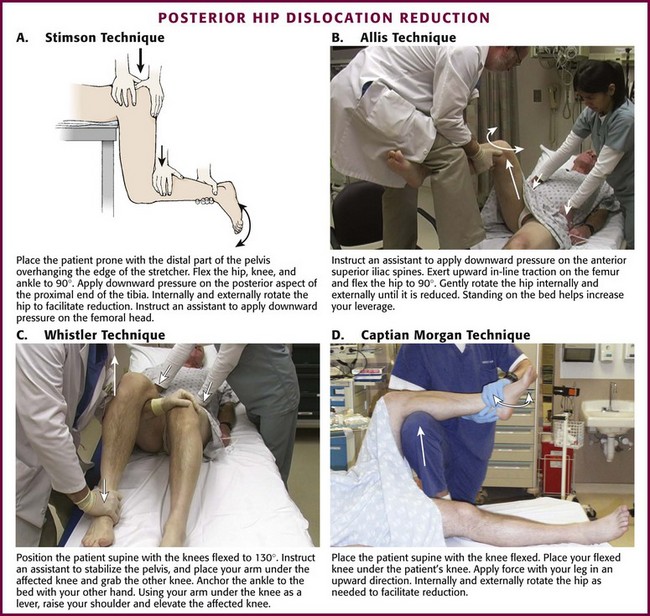
Allis Technique (see Fig. 49-51B): For the Allis technique, place the patient supine and have an assistant stabilize the pelvis by applying downward pressure at the anterior superior iliac spines. Exert upward traction in line with the deformity and flex the hip to 90 degrees. Gently rotate the hip internally and externally until it is reduced.96 Some prefer to stand on the patient’s stretcher so that body weight can be used for leverage. Howard98 suggested modifying this technique by applying lateral traction on the flexed upper part of the femur to disengage the head of the femur from the outer lip of the acetabulum.
Whistler Technique (see Fig. 49-51C): Another method known as the Whistler technique was described by Walden and Hamer.99 Place the patient in the supine position with both knees flexed to 130 degrees. While an assistant stabilizes the pelvis, stand beside the affected limb. Place an arm under the affected knee and grab the unaffected knee. With the other hand, anchor the ankle of the affected leg firmly against the stretcher. Using the arm placed under the knee as a lever, raise your shoulder to elevate the affected knee. This allows the femoral head to move anteriorly around the acetabular rim and relocate.99 Although experience with this technique is limited, it appears to be a promising, gentle reduction method.
Captain Morgan Technique (see Fig. 49-51D): Another gentle method for reducing posterior hip dislocations is similar to the Whistler technique but uses the clinician’s knee as opposed to the arm. For the Captain Morgan technique, place the patient supine with the affected knee flexed. Stand on the affected side and place your flexed knee underneath the patient’s flexed knee. Apply force with your leg in an upward direction. Internal or external rotation can be added as needed. One case series described an extremely high success rate with this method of reduction, with only one failed attempt secondary to bony fragments in the joint space, which required open reduction.100
Dislocations of Hip Prostheses
Dislocation of a hip prosthesis is a separate issue (Fig. 49-52). Unlike primary dislocations, which require significant trauma, a prosthetic hip may dislocate with minimal force, such as rolling over in bed or trying to get out of a chair. Most dislocations occur in the first 3 to 4 months after surgery, but recurrent dislocation may take place much later. The majority of dislocations are posterior. The emergency physician should consider consultation with the orthopedic surgeon who placed the prosthesis.
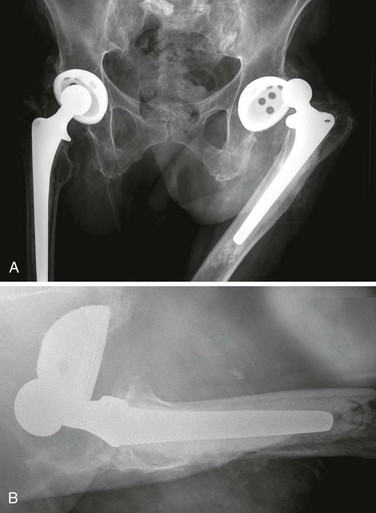
The three major causes of prosthetic hip dislocations include (1) assumption of a position that exceeds the stability of the prosthesis, (2) soft tissue imbalances, and (3) component malposition.101
Emergency clinicians have been shown to be highly successful in reducing prosthetic hip dislocations.102 Reduction techniques are similar to those described earlier; however, the urgency is not as paramount because problems with bone necrosis do not exist. Although complications are occasionally unavoidable, the clinician must be aware that forceful reduction of a dislocated hip prosthesis may dislodge the acetabular cup, fracture underlying osteoporotic bone, or loosen the prosthesis. Unlike other hip dislocations, patients with prosthetic hip dislocations often will not require hospital admission and may be discharged after discussion with the consulting orthopedic surgeon. The most common way to reduce such dislocations is shown in Figure 49-53.
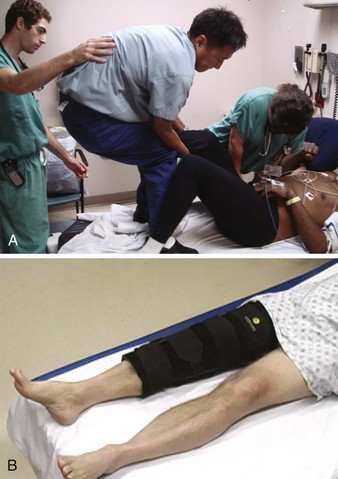
Anterior Hip Dislocation
Anterior hip dislocations are less common than posterior dislocations and account for 10% to 15% of all hip dislocations.96 There are three general types of anterior hip dislocation that are defined by the place where the femoral head comes to rest (Fig. 49-54): iliac or subspinous, pubic, and inferior or obturator dislocation. Anterior hip dislocations generally result from forced abduction of the thigh, which may occur with a fall or motor vehicle crash.96 The clinical picture varies with the type of dislocation. With the obturator (inferior) type, the leg is abducted and externally rotated with varying degrees of flexion. In the other types, the hip is usually extended and externally rotated.96
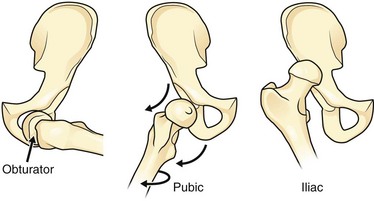
Reduction Techniques (Fig. 49-55)
The Stimson gravity method may work for anterior hip dislocation, although it is not recommended for the pubic type.96 Alternatively, the Allis maneuver can be applied in a modified fashion. Place the patient in a supine position and have an assistant stabilize the pelvis while applying lateral countertraction on the thigh. Flex the hip slightly and apply traction along the long axis of the femur. Gently adduct and internally rotate the leg to effect reduction.96
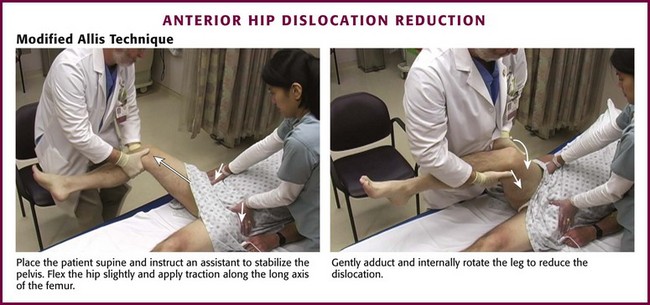
Figure 49-55 Anterior hip dislocation reduction.
For the reverse Bigelow technique, place the hip in partial flexion and abduction. Apply traction in the line of the deformity, and adduct, sharply internally rotate, and extend the hip. Caution should be exercised when using this technique because the sharp internal rotation may result in fracture of the femoral neck in patients with osteoporotic bone.96 As with posterior dislocations, admission to the hospital is required for patients with these injuries.
Knee (Femur, Tibia) Dislocations
Although the knee is a simple hinge joint, dislocations are quite rare because of its strong ligamentous support. The major ligaments include the anterior and posterior cruciate and the collateral ligaments. The usual mechanism of a knee dislocation involves a great deal of force, such as a motor vehicle crash or a sporting injury. However, knee dislocation has been reported after minor mechanisms, such as stepping off a curb or into a hole, usually in association with a twisting action.103 Obese patients may be more likely to dislocate a knee with surprisingly minor trauma, commonly when stepping into a hole causes a twisting motion (Fig. 49-56). As with other joint dislocations, knee dislocations are described with respect to the position of the distal bone in relation to the proximal one (i.e., tibia in relation to the femur).104 The more common types are shown in Figure 49-57. There are five general types of knee dislocation, including anterior (Fig. 49-58), posterior, lateral, and the less common medial and rotatory. Rotatory dislocations may be anteromedial, anterolateral, posterolateral, or posteromedial.105
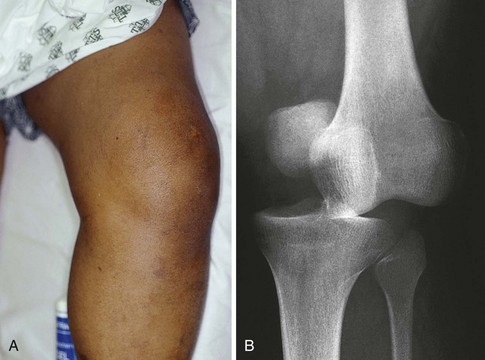
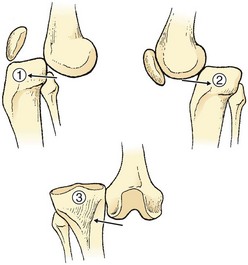
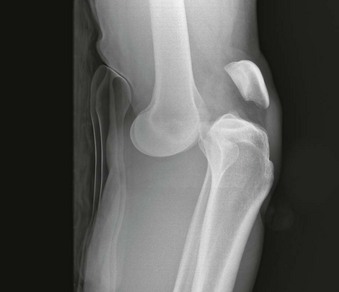
Clinical Assessment
Knee dislocations are usually clinically obvious; however, in some cases the dislocation may have spontaneously reduced before evaluation in the ED and be manifested only as severe knee pain with hemarthrosis. When a spontaneously reduced knee dislocation is associated with other major trauma, the diagnosis can be missed. Obese patients may have a seemingly normal appearance of their knee, but an obvious deformity will be visible on the initial radiographs (see Fig. 49-56). A grossly unstable knee that does not appear to be dislocated is probably a reduced dislocation and carries the same risk for vascular and other complications as a dislocated knee.106 A severely unstable knee can be defined as one that has greater than 30 degrees of recurvatum (hyperextension) on lifting the leg off the stretcher by the heel106 or one that exhibits gross instability after reduction.104 Because pain and muscle spasm may limit the physical examination for stability, a knee hemarthrosis, usually a large one with signs of posterior or calf hemorrhage, is a potential tip-off to a reduced dislocation.
An impressive effusion may not be present with a knee dislocation because the joint capsule is often disrupted and extravasation occurs into the surrounding tissue, usually posteriorly. The most important part of the clinical assessment is the vascular status of the extremity (see the next section). Nerve injury is less common, but peroneal nerve injury is a recognized complication, particularly with a posterolateral dislocation.104 Peroneal nerve injury should be suspected if the patient is unable to dorsiflex the ankle (footdrop) or has decreased sensation on the dorsum of the foot. Posterolateral dislocations may be irreducible because the medial femoral condyle buttonholes through the joint capsule.104 A clue to this injury is the presence of a dimple sign at the medial joint line.
Vascular Injury
The most feared complication of a knee dislocation is severance or internal injury of the popliteal artery (Fig. 49-59). Injury to the popliteal artery may complicate both anterior and posterior knee dislocations and occurs because the artery is relatively fixed both proximally and distally.104 If popliteal artery injury occurs, it is often due to transection with posterior dislocations or traction (producing intimal tears) during anterior dislocations.105 In addition, Varnell and associates106 noted that vascular injury was as common in a severely unstable knee (e.g., field reduced) as in an acutely dislocated knee. The incidence of popliteal artery injury in a dislocated knee is around 20% in most series.106,107 The seriousness of this complication is largely due to the fact that the collateral circulation about the knee is poor,48 and the end result of injury to the popliteal artery (or vein) may be amputation, particularly if recognition of vascular injury is delayed.108,109 It should also be noted that nerve injuries are more common in patients with a vascular injury.110,111
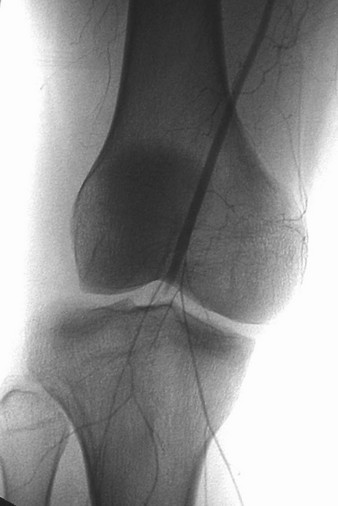
It has previously been stated that popliteal artery disruption may be present despite a normal pulse.112 Such statements have led to recommendations to perform arteriography or exploration of all knee dislocations.104 However, some studies question this perspective. Varnell and associates106 reported a pulse deficit or absent pulse in all patients with vascular injury. Kendall and coworkers107 also reported clear clinical evidence of all popliteal artery injuries in knee dislocations. This group recommended exploration for obvious ischemia, angiography for patients with ischemia whose pulse is restored after relocation, and observation for all others.107 Dennis and colleagues113 reported that physical examination alone had 100% accuracy in predicting the need for surgical intervention in patients with posterior knee dislocations. Miranda and associates114 reported that popliteal artery injury can be safely and reliably predicted by a physical examination that includes specific evaluation for active posterior hemorrhage, expanding hematoma, absent pulse, or the presence of a thrill or bruit. However, it is noted that the hard physical signs of arterial injury might be delayed for 24 to 48 hours. Thus, although focused clinician examination may be quite accurate in the vast majority of cases, any dislocated knee should prompt serious concern about the vascular integrity of the leg given the sometimes subtle or delayed manifestation of vascular injuries.
Simple palpation of the artery may not be sensitive enough to detect a decreased pulse. An ankle-brachial arterial pressure index (ABI) should be considered to compare blood pressure in the ankle with that in the arm. Also, consider digit pulse oximetry to compare the uninjured leg with the injured one. Mills and coworkers111 91reported the results of a prospective study of 38 patients with knee dislocation to evaluate the accuracy of ABI in identifying vascular injury. Patients with an ABI of less than 0.90 underwent arteriography, whereas those with an ABI of 0.90 or greater underwent serial examination and delayed arterial duplex evaluation. Eleven (29%) of the patients had an ABI of less than 0.90, and all of them had arterial injuries requiring surgical intervention. Of the remaining 27 patients with an ABI of 0.90 or greater, none had a vascular injury noted on serial examination or duplex ultrasonography. No patient in this group was found to have vascular compromise at follow-up (range, 4 to 36 months).111
If vascular compromise is detected on clinical assessment, it is appropriate to reduce the knee dislocation without obtaining radiographs, although a few minutes to obtain portable radiographs and to administer IV medication would be unlikely to make a difference in the final outcome.104 Use of Doppler ultrasound for pulse checks and ABI should also be considered with these injuries (see Chapter 1). Early consultation should be sought for knee dislocations because of the high incidence of complications and the frequent need for operative intervention. The decision to pursue angiography in a patient with a dislocated knee is best made in consultation with the patient’s orthopedic surgeon.
Reduction Technique (Fig. 49-60)
The need for IV sedation and analgesia depends on the clinical situation, but it should be considered whenever possible (see Chapter 33). The basic initial approach for all types of knee dislocation is to apply traction to the extremity. This alone is often all that is required for reduction because of severe disruption of the ligamentous support of the knee.78 For anterior dislocations, lift the distal end of the femur to effect reduction. For posterior dislocations, lift the proximal end of the tibia to complete the reduction.48 For medial, lateral, and rotatory dislocations, a similar approach is acceptable, with pressure exerted in the medial or lateral direction as needed.
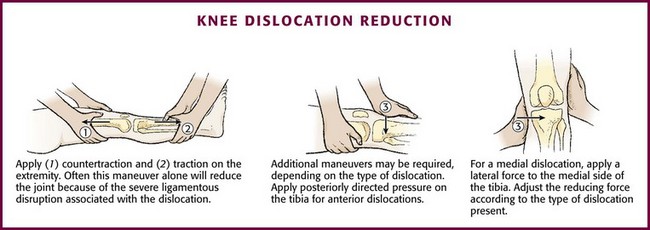
Figure 49-60 Knee dislocation reduction.
After reduction, splint the extremity in 15 degrees of flexion. A posterolateral dislocation may be irreducible, and operative intervention should be considered if reduction is not easily accomplished.48
Dislocations of the Fibular Head
The fibula can be dislocated at its proximal articulation in the knee joint. This is most commonly an anterolateral dislocation.104 The fibular head is normally nestled in a stable manner behind the lateral tibial condyle with two supporting tibiofibular ligaments.115 The tibiofibular joint has a separate synovial cavity, and therefore a typical knee joint effusion will not be seen with this dislocation. When the knee is flexed, the stability of this joint is decreased because of relaxation of the fibular collateral ligament.115 The typical mechanism of injury is a fall on a flexed, adducted leg, often combined with ankle inversion. This mechanism is seen in sports and parachute landings.115 Posterior dislocations can result from a twisting mechanism or a direct blow to the area while the knee is flexed.104
Anterolateral dislocation is the most common type. It is accompanied by obvious prominence of the fibular head anteriorly; no associated neurovascular problems are noted. The less common posterior dislocation may be accompanied by peroneal nerve injury.104 Patients have varying degrees of disability, and some may walk on the leg with only mild discomfort.115 On radiographic examination the three cardinal signs of anterolateral dislocation are lateral displacement of the fibula on an AP film, a widened proximal interosseous space, and anterior displacement of the fibular head on a lateral view (Fig. 49-61).95 If high clinical suspicion exists for fibular head dislocation and radiographs are nondiagnostic, CT is the next study of choice.116,117
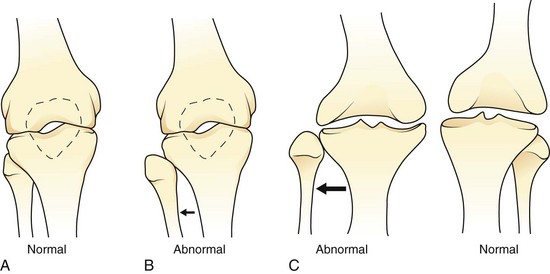
Reduction Technique
To reduce an anterior fibular head dislocation, place the patient supine and flex the affected knee to 90 degrees to relax the biceps femoris tendon. Dorsiflex and externally rotate the foot and apply direct pressure to the fibular head; reduction is usually signified by a snap.104 The method for reduction of a posterior dislocation is the same except that direct pressure is applied in a forward direction. Patients should not bear weight for 2 weeks and should receive orthopedic referral. Immobilization is probably unnecessary.104
Patellar Dislocation
Patellar dislocations are fairly common, especially in adolescents. The usual mechanism is a powerful quadriceps contraction combined with a strong valgus and external rotation component.118 This may be seen in activities such as making a “cut” in sports or with dancing. The patella may also dislocate with a direct blow to the flexed knee.48 Factors predisposing to patellar dislocation include chronic patellofemoral abnormalities such as genu valgum and femoral anteversion.118 Patellar dislocation is described by the relationship of the patella to the knee joint. Lateral dislocations are the most common by far. Other types include superior, medial, and intercondylar (Fig. 49-62).

Figure 49-62 A-D, Various types of patellar dislocation. Lateral dislocation is the most common. AP, anteroposterior.
Clinical Assessment
Lateral dislocation of the patella is generally clinically obvious (Fig. 49-63). The knee is held in some degree of flexion and the patella can easily be seen and palpated on the lateral side of the knee. Tenting of the patella is often detectable unless significant soft tissue swelling is present.
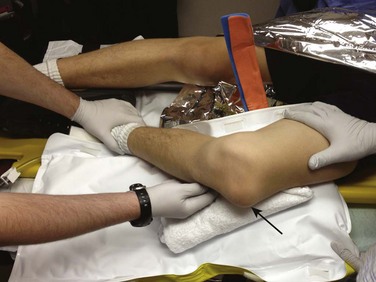
The patella may be spontaneously reduced in the field with simple leg straightening. The patient will report that the leg “went out” and may describe actually seeing the lateral deformity caused by the displaced patella. Clinical clues to a spontaneously reduced patella include the presence of a knee effusion and tenderness along the medial edge of the patella. Fairbank’s test or the patellar “apprehension” sign is elicited when the patella is pushed laterally and the patient grabs for the knee, a response indicative of the sensation of repeated injury.48
Radiographs
Prereduction films are difficult to obtain because the patient is usually in flexion. Some recommend prereduction films when possible in all patients48; however, it is easy to reduce these injuries before radiographs are obtained. The diagnosis is usually obvious, and there are no reports in the literature of complications from gentle reduction. Osteochondral fractures are detectable in about half the patients with patellar dislocations, but many of these fractures are visible only on arthroscopy.118 Postreduction radiographs are recommended, as are prereduction studies, when the diagnosis is uncertain. The clinical diagnosis of patellar dislocation in an older patient should be made with caution because these are primarily injuries involving the young.
Reduction Technique and Postreduction Care (Fig. 49-64)
Reduction of a lateral patellar dislocation is usually quite simple. Premedication is often not required if the patient can be verbally reassured. If the patient is anxious or in great discomfort, premedication should be considered (see Chapter 33). The two basic maneuvers for patellar relocation are extension of the knee and gentle medial pressure applied to the patella while lifting the most lateral edge of the patella over the femoral condyle.48
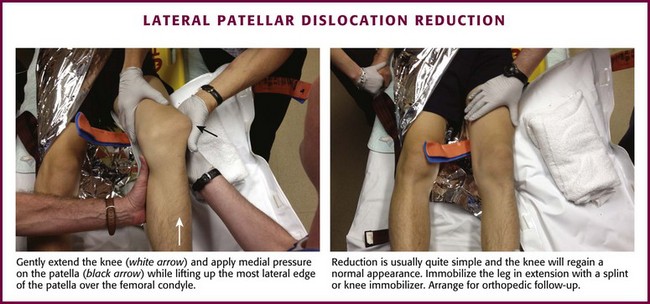
Figure 49-64 Lateral patellar dislocation reduction.
Immobilize the leg in extension with a splint or commercially available knee immobilizer (see Chapter 50). Orthopedic follow-up is necessary because of the need for physical therapy and the high rate of persistent instability.118 However, hospitalization is not required for routine lateral dislocations of the patella. Recurrent dislocations and those associated with an osteochondral fracture might require operative repair.
Ankle Dislocations
The ankle joint is a modified saddle joint in which the talus is nestled in the mortise formed by the distal ends of the tibia and fibula.48 The ligamentous support of the ankle is quite strong, and pure dislocations are uncommon. Usually, there are associated fractures of the ankle joint (Fig. 49-65). Ankle dislocations are described by the relationship of the talus to the tibia. Posterior dislocations of the ankle are more common than anterior dislocations, and they usually result from a fall on a plantar-flexed foot. Patients with posterior dislocations often have an associated fracture of one or more of the malleoli,48 occasionally seen only after reduction (Fig. 49-66). The clinical picture usually consists of significant deformity and disability.
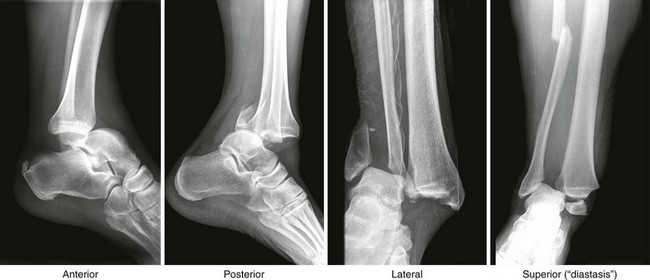
Figure 49-65 Types of ankle dislocation. Note that there are usually associated fractures of the tibia, fibula, or both.

Radiographic Examination
Because of the high rate of associated fractures and the clinical difficulty in assessing for the presence or the exact nature of a dislocation, it is recommended that prereduction radiographs be obtained for all suspected ankle dislocations (see Figs. 49-2 and 49-65). It is acceptable to reduce the dislocation without a radiograph if severe vascular compromise is present, but for the vast majority of cases, the few minutes taken to obtain bedside radiographs and administer IV medications rarely affects the final outcome. It may be impossible to accurately determine the exact type of dislocation unless prereduction films are obtained. AP and lateral views usually suffice for emergency management; other views can be ordered if necessary after the joint is relocated.
Reduction Techniques (Fig. 49-67)
Unless a strong contraindication is present, it is advisable to administer IV sedation and analgesia to patients with an ankle dislocation early in their care, preferably before conducting any manipulations or radiologic studies. Reduction is always painful in an awake patient, and sufficient premedication must be administered. For posterior dislocations, place the patient supine and flex the knee slightly to relax the Achilles tendon. An assistant can do this, or the patient can be positioned such that the knee hangs over the end of the bed. Grasp the foot with both hands; place one hand on the heel and the other on the forefoot. Apply traction on the slightly plantar-flexed foot. Have a second assistant apply downward pressure on the distal end of the tibia and move the heel anteriorly to effect reduction.119
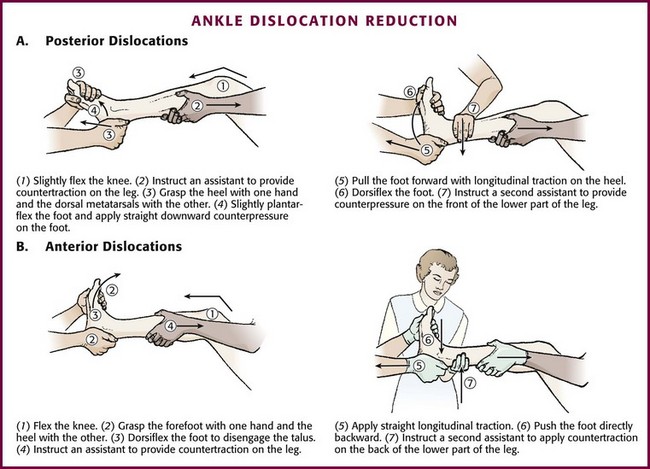
Figure 49-67 Ankle dislocation reduction.
For anterior dislocations, the initial steps and positioning are the same as those for posterior dislocation. However, instead of plantar flexion, dorsiflex the foot to free the talus. The second assistant applies upward pressure on the distal end of the tibia while the operator applies traction and pushes the foot in a posterior direction.48
Lateral dislocations are really fracture-dislocations, and orthopedic consultation is generally required as part of the ED course. The emergency clinician will often need to reduce these injuries because of the extreme lateral deformity and occasional compromise of the dorsalis pedis artery by stretch. Open dislocations (in the absence of vascular compromise) may be better handled by operating room washout before attempting reduction (Fig. 49-68). If a lateral fracture-dislocation is to be reduced in the ED, the approach is quite similar to that for posterior ankle dislocations. However, instead of pressure in the AP direction, the foot is moved medially after the application of traction.48
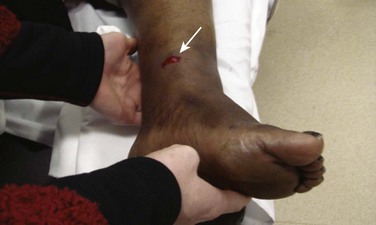
Postreduction Care
After reduction, splint the ankle at 90 degrees with a long leg posterior splint. Application of a stirrup splint in addition to the posterior splint may provide additional stability (see Chapter 50). The necessity of admission to the hospital must be determined in consultation with an orthopedic surgeon. Many patients with these injuries have associated fractures that require surgical intervention.
Dislocations of the Foot
Hindfoot Injuries
Injuries to this area are uncommon and usually result from high-energy transfer. The major dislocations are subtalar and talar dislocations and midtarsal fracture-dislocations (Lisfranc injury). Although x-ray findings are often subtle and easily overlooked, a Lisfranc injury is complex and always a fracture-dislocation because of the rigid nature of the region (Figs. 49-69 and 49-70). These injuries require orthopedic management and are not discussed here.

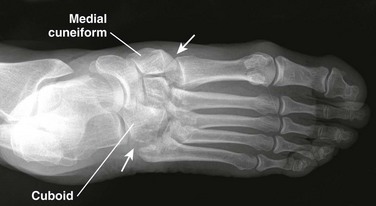
Subtalar Dislocation
This uncommon injury generally occurs secondary to sports, falls from heights, or motor vehicle crashes. The calcaneus, navicular, and forefoot are displaced from the talus (Fig. 49-71).119 The primary mechanisms are severe inversion causing medial dislocation or severe eversion resulting in lateral dislocation. The medial type occurs so commonly during basketball that it has been termed basketball foot.120 This injury is usually seen in young adult males. Medial dislocations constitute the majority (85%) of these injuries, with lateral dislocations making up the rest.120
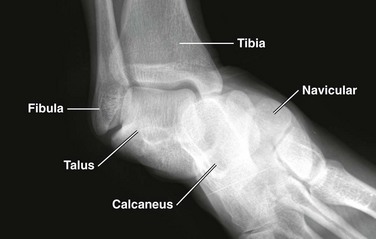
The diagnosis is usually obvious because the talus is prominent and often tents the skin of the proximal part of the foot. The medial type has been termed an acquired clubfoot; the lateral type appears as an acquired flatfoot.120
Some authors recommend spinal or general anesthesia for all such injuries120; however, it is usually possible to reduce these injuries with IV premedication. Position the patient in a supine fashion and flex the hip and knee much as for reduction of a posterior ankle dislocation. Place one hand on the forefoot and grasp the heel with the other hand. Apply firm longitudinal traction to effect reduction. Dangling the leg over the end of the bed allows the operator to use body weight to assist in traction. Once traction is applied, the deformity is initially increased (inversion for medial; eversion for lateral) and then reversed to effect reduction.120
Dislocation of the Talus
In this extremely rare injury, the talus is essentially extruded from its normal position and comes to lie anteriorly. This injury is generally open,120 is not amenable to closed reduction, and virtually always progresses to avascular necrosis.121 Talectomy and arthrodesis are often required,120 and orthopedic referral should be undertaken on an emergency basis if vascular compromise of the foot is present.
MTP Dislocations
These uncommon injuries are generally the result of hyperextension resulting in dorsal dislocation of the great toe metatarsophalangeal (MTP) joint (Fig. 49-72A).122 Among the lesser toe MTP joints, lateral or medial displacement of the digit on the metatarsal head is more common and usually the result of jamming the toe on a piece of furniture.120 As with MCP dislocations, they can be simple or complex. Complex dislocations of the first toe can be suspected by the presence of sesamoid bones in the joint space on prereduction radiographs.120 Complex MTP dislocations are often irreducible.
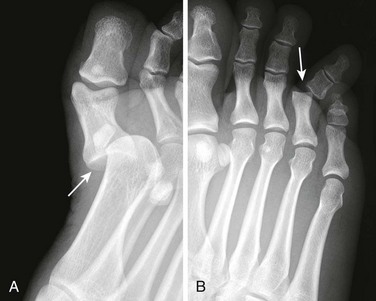
Figure 49-72 Toe dislocations. A, Dorsal dislocation of the first metatarsophalangeal joint. B, Lateral dislocation of the fourth proximal interphalangeal joint. Reduction of toe dislocations follows the same technique as described for finger dislocations (see Fig. 49-32).
For simple MTP dislocations, reduction is accomplished by increasing the deformity through hyperextension and then applying traction while exerting thumb pressure over the base of the dislocated proximal phalanx. Plantar flexion of the foot may be used to relax the flexor tendons.119 Operative intervention is required after reduction if crepitus is present on motion, the joint is unstable, or an intraarticular loose body is noted on postreduction radiographs.120
IP Dislocations
In the foot, IP dislocations result from an axial load on the toe, such as from kicking a wall (see Fig. 49-72B). These dislocations are generally dorsal and can be reduced as in the hand. Specifically, the toe should be dorsiflexed to exaggerate the deformity and then undergo traction followed by plantar flexion. Dislocations of the first toe IP joint are usually buddy-taped to the second toe for 2 to 3 weeks, whereas those of lesser toes can be taped for 10 to 14 days.120 Reduction of dorsal dislocations may be difficult because of entrapment of the plantar plate inside the joint.123 As in the hand, complex dislocations or those failing closed reduction may occur. Such dislocations require open reduction and internal fixation.123
Conclusion
The following points are important regarding the assessment and management of dislocations:
1. A search for other more serious injuries should be undertaken when there is a high-energy mechanism of injury.
2. Neurovascular assessment should be performed early in the evaluation and appropriately documented.
3. Radiographs and IV premedication are generally indicated before attempts at reduction.
4. Reduction attempts should involve gentle, gradual application of force and patience on the operator’s part.
5. After completing reduction, the operator should recheck the patient’s neurovascular status, request postreduction radiographs (except with radial head subluxations), and in certain circumstances, assess the stability and range of motion of the joint.
6. A definite percentage of dislocations are irreducible, and the need for multiple attempts should halt prolonged and forceful attempts in the ED and prompt orthopedic consultation.
7. Dislocations accompanied by neurologic injury should be reduced by the most expeditious and least traumatic method.
References
1. Mirick, MJ, Clinton, JE, Ruiz, E. External rotation method of shoulder dislocation reduction. JACEP. 1979;8:528.
2. Beattie, TF, Steedman, DJ, McGowan, A, et al. A comparison of the Milch and Kocher techniques for acute anterior dislocation of the shoulder. Injury. 1986;17:349.
3. Plummer, D, Clinton, J. The external rotation method for reduction of acute anterior shoulder dislocation. Emerg Med Clin North Am. 1989;7:165.
4. Thakur, AJ, Narayan, R. Painless reduction of shoulder dislocation by Kocher’s method. J Bone Joint Surg Br. 1990;72:524.
5. Garnavos, C. Technical note: modifications and improvements of the Milch technique for the reduction of anterior dislocation of the shoulder without premedication. J Trauma. 1992;32:801.
6. Iserson, KV. Relocating dislocations in a wilderness setting: use of hypnosis. J Wilderness Med. 1991;2:22.
7. Shuster, M, Abu-Laban, RB, Boyd, J. Prereduction radiographs in clinically evident anterior shoulder dislocation. Am J Emerg Med. 1999;17:653.
8. Hendey, GW, Kinlaw, K. Clinically significant abnormalities in post reduction radiographs after anterior shoulder dislocation. Ann Emerg Med. 1996;28:399.
9. Harvey, RA, Trabulsy, ME, Roe, L. Are postreduction anteroposterior and scapular Y views useful in anterior shoulder dislocations? Am J Emerg Med. 1992;10:149.
10. Kwon, YW, Zuckerman, JD, Subluxations and dislocations about the glenohumeral joint. Rockwood and Green’s Fractures in Adults, 6th ed. Bucholz, RW, Heckman, JD, Court-Brown, CM, et al, eds. Rockwood and Green’s Fractures in Adults, Philadelphia: Lippincott, Williams & Wilkins, 2006;Vol 2:1285.
11. Riebel, GD, McCabe, JB. Anterior shoulder dislocation: a review of reduction techniques. Am J Emerg Med. 1991;9:180.
12. May, VR. Posterior dislocation of the shoulder: habitual, traumatic, and obstetrical. Orthop Clin North Am. 1980;11:271.
13. Beeson, MS. Complications of shoulder dislocation. Am J Emerg Med. 1999;17:288.
14. de Laat, EA, Visser, CP, Coere, LN, et al. Nerve lesions in primary shoulder dislocations and humeral neck fractures: a prospective clinical and EMG study. J Bone Joint Surg Br. 1994;76:381.
15. Gates, JD, Knox, JB. Axillary artery injuries secondary to anterior dislocation of the shoulder. J Trauma. 1995;39:581.
16. Hersche, O, Gerber, C. Iatrogenic displacement of fracture-dislocations of the shoulder. J Bone Joint Surg Br. 1994;76:30.
17. Hendey, GW, Chally, MK, Stewart, VB. Selective radiography in 100 patients with suspected shoulder dislocation. J Emerg Med. 2006;31:23.
18. Emond, M, LeSage, N, Lavoie, A, et al. Clinical factors predicting fractures associated with an anterior shoulder dislocation. Acad Emerg Med. 2004;11:853.
19. Yuen, CK, Chung, TS, Mok, KL, et al. Dynamic ultrasonographic sign for posterior shoulder dislocation. Emerg Radiol. 2011;18:47–51.
20. Bize, P, Pugliese, L, Bacigalupe, L, et al. Unrecognized bilateral shoulder dislocation diagnosed by ultrasound. Eur Radiol. 2004;14:350–352.
21. Blakeley, CJ, Spencer, O, Newman-Saunders, T, et al. A novel use of portable ultrasound in the management of shoulder dislocation. Emerg Med J. 2009;26:662–663.
22. McNamara, RM. Reduction of anterior shoulder dislocations by scapular manipulation. Ann Emerg Med. 1993;22:1140.
23. Matthews, DE, Roberts, T. Intra-articular lidocaine versus intravenous analgesic for reduction of acute anterior shoulder dislocations: a prospective randomized study. Am J Sports Med. 1995;23:54.
24. Kosnik, J, Shamsa, F, Raphael, E, et al. Anesthetic methods for the reduction of acute shoulder dislocations: a prospective, randomized study comparing intra-articular lidocaine with intravenous analgesia and sedation. Am J Emerg Med. 1999;17:566.
25. Ng, VK, Hames, H, Millard, WM. Use of intra-articular lidocaine as analgesia in anterior shoulder dislocation: a review and meta-analysis of the literature. Can J Rural Med. 2009;14(4):145–149.
26. Wakai, A, O’Sullivan, R, McCabe, A. Intra-articular lignocaine versus intravenous analgesia with or without sedation for manual reduction of acute anterior shoulder dislocation in adults. Cochrane Database Syst Rev. (4):2011. [CD004919].
27. Blaivas, M, Lyon, M. Ultrasound-guided interscalene block for shoulder dislocation reduction in the ED. Am J Emerg Med. 2006;24:293.
28. Kothari, RU, Dronen, SC. Prospective evaluation of the scapular manipulation technique in reducing anterior shoulder dislocations. Ann Emerg Med. 1992;21:1349.
29. Pick, RY. Treatment of the dislocated shoulder. Clin Orthop. 1977;123:76.
30. Lippert, FG. A modification of the gravity method of reducing anterior shoulder dislocations. Clin Orthop. 1982;165:259.
31. Rollinson, PD. Reduction of shoulder dislocations by the hanging method. S Afr Med J. 1988;73:106.
32. Anderson, D, Zvirbulis, R, Ciullo, J. Scapular manipulation for reduction of anterior shoulder dislocations. Clin Orthop. 1982;164:181.
33. Pishbin, E, Bolvardi, E, Ahmadi, K. Scapular manipulation for reduction of anterior shoulder dislocation without analgesia: results of a prospective study. Emerg Med Australas. 2011;23(10):54–58.
34. Russell, JA, Holmes, EM, Keller, DJ, et al. Reduction of acute anterior shoulder dislocations using the Milch technique: a study of ski injuries. J Trauma. 1981;21:802.
35. Doyle, WL, Ragar, T. Use of the scapular manipulation method to reduce an anterior shoulder dislocation in the supine position. Ann Emerg Med. 1996;27:92.
36. Sagarin, MJ. Best of both (BOB) maneuver for rapid reduction of anterior shoulder dislocation. J Emerg Med. 2005;29:313.
37. Parvin, RW. Closed reduction of common shoulder and elbow dislocations without anesthesia. Arch Surg. 1957;75:972.
38. Danzl, DF, Vicario, SJ, Gleis, GL, et al. Closed reduction of anterior subcoracoid shoulder dislocation: evaluation of an external rotation method. Orthop Rev. 1986;15:75.
39. Tseng, G, Wong, TW, Yeung, KC, et al. Reduction of anterior shoulder dislocation by external rotation. Emerg Med. 1994;6:292.
40. Milch, H. The treatment of recent dislocations and fracture-dislocations of the shoulder. J Bone Joint Surg Am. 1949;31:173.
41. Lacey, T, Crawford, HB. Reduction of anterior dislocations of the shoulder by means of the Milch abduction technique. J Bone Joint Surg Am. 1952;34:108.
42. Miljesic, S, Kelly, AM. Reduction of anterior dislocations of the shoulder: the Spaso technique. Emerg Med. 1998;10:173.
43. Yuen, MC, Yap, PG, Chan, YT, et al. An easy method to reduce anterior shoulder dislocation: the Spaso technique. Emerg Med J. 2001;18:370.
44. Poulsen, SR. Reduction of acute shoulder dislocations using the Eskimo technique: a study of 23 consecutive cases. J Trauma. 1988;28:1382.
45. Noordeen, MHH, Bacarese-Hamilton, IH, Belham, GJ, et al. Anterior dislocation of the shoulder: a simple method of reduction. Injury. 1992;23:479.
46. Westin, CD, Gill, EA, Noyes, ME, et al. Anterior shoulder dislocation: a simple and rapid method for reduction. Am J Sports Med. 1995;23:369.
47. Malik, S, Chiampas, G, Leonard, H. Emergent evaluation of injuries to the shoulder, clavicle, and humerus. Emerg Med Clin North Am. 2010;28:739–763.
48. Simon RR, Sherman SC, Koenigsknecht SJ, eds. Emergency Orthopedics—The Extremities, 5th ed, New York, McGraw-Hill, 2007:264.
49. Toolanen, G, Hildingsson, C, Hedlund, T, et al. Early complications after anterior dislocation of the shoulder in patients over 40 years: an ultrasonographic and electromyographic study. Acta Orthop Scand. 1993;64:549.
50. Itoi, E, Sashi, R, Minagawa, H, et al. Position of immobilization after dislocation of the glenohumeral joint. A study with use of magnetic resonance imaging. J Bone Joint Surg Am. 2001;83:661.
51. Itoi, E, Hatakeyama, Y, Kido, T, et al. A new method of immobilization after traumatic anterior dislocation of the shoulder: a preliminary study. J Shoulder Elbow Surg. 2003;12:413.
52. Miller, BS, Sonnabend, DH, Hatrick, C, et al. Should acute anterior dislocations of the shoulder be immobilized in external rotation? A cadaveric study. J Shoulder Elbow Surg. 2004;13:589.
53. Smith, TO. Immobilisation following traumatic anterior glenohumeral joint dislocation. Injury. 2006;37:228.
54. Itoi, E, Hatakeyama, Y, Sato, T, et al. Immobilization in external rotation after shoulder dislocation reduces the risk of recurrence. A randomized controlled trial. J Bone Joint Surg Am. 2007;89:2124–2131.
55. Finestone, A, Milgrom, C, Radeva-Petrova, DR, et al. Bracing in external rotation for traumatic anterior dislocation of the shoulder. J Bone Joint Surg Br. 2009;91:918–921.
56. Paterson, WH, Throckmorton, TW, Koester, M, et al. Position and duration of immobilization after primary anterior shoulder dislocation: a systematic review and meta-analysis of the literature. J Bone Joint Surg Am. 2010;92:2924–2933.
57. Liavaag, S, Brox, JI, Pripp, AH, et al. Immobilization in external rotation after primary shoulder reduce the risk of recurrence: a randomized controlled trial. J Bone Joint Surg Am. 2011;93:897–904.
58. Trimmings, NP. Haemarthrosis aspiration in treatment of anterior dislocation of the shoulder. J R Soc Med. 1985;78:1023.
59. Detenbeck, LC. Posterior dislocations of the shoulder. J Trauma. 1972;12:183.
60. Hawkins, RJ, Neer, CS, Pianta, RM, et al. Locked posterior dislocation of the shoulder. J Bone Joint Surg Am. 1987;69:9.
61. Cone, RO, Resnick, D. Traumatic disorders of the shoulder. JAMA. 1984;252:540.
62. Grate, I. Luxatio erecta: a rarely seen, but often missed shoulder dislocation. Am J Emerg Med. 2000;18:317.
63. Pirrallo, RG, Bridges, TP. Luxatio erecta: a missed diagnosis. Am J Emerg Med. 1990;8:315.
64. Brady, WJ, Knuth, CJ, Pirrallo, RG. Bilateral inferior glenohumeral dislocation: luxatio erecta, an unusual presentation of a rare disorder. J Emerg Med. 1995;13:37.
65. Nho, SJ, Dodson, CC, Bardzik, KF, et al. The two-step maneuver for closed reduction of interior glenohumeral dislocation (luxatio erecta) to anterior dislocation to reduction. J Orthop Trauma. 2006;20:354.
66. Walker, JS, Walker, BB. Scapular dislocation (locked scapula). Ann Emerg Med. 1990;19:1329.
67. Galatz, LM, Williams, GR, Jr., Acromioclavicular joint injuries. Rockwood and Green’s Fractures in Adults, 6th ed. Bucholz, RW, Heckman, JD, Court-Brown, CM, et al, eds. Rockwood and Green’s Fractures in Adults, Philadelphia: Lippincott, Williams & Wilkins, 2006;Vol 2:1331.
68. Nissen, CW, Chatterjee, A. Type III acromioclavicular separation: results of a recent survey on its management. Am J Orthop. 2007;36(2):89–93.
69. Larsen, E, Bjerg-Nielsen, A, Christensen, P. Conservative or surgical treatment of acromioclavicular dislocation. J Bone Joint Surg Am. 1986;68:552.
70. Bossart, PJ, Joyce, SM, Manaster, BJ, et al. Lack of efficacy of weighted radiographs in diagnosing acute acromioclavicular separation. Ann Emerg Med. 1988;17:20.
71. Ferrera, PC, Wheeling, HM. Sternoclavicular joint injuries. Am J Emerg Med. 2000;18:58.
72. Groh, GI, Wirth, MA. Management of traumatic sternoclavicular joint injuries. J Am Acad Orthop Surg. 2011;19:1–7.
73. Derksen, EJ, Eykelhoff, JA, Schenk, KE, et al. Retrosternal dislocation of the clavicle. Acta Orthop Belg. 1992;58:297.
74. Winter, J, Sterner, S, Maurer, D, et al. Retrosternal epiphyseal disruption of medial clavicle: case and review in children. J Emerg Med. 1989;7:9.
75. Ring, D, Fractures and dislocations of the elbow. Rockwood and Green’s Fractures in Adults, 6th ed. Bucholz, RW, Heckman, JD, Court-Brown, CM, et al, eds. Rockwood and Green’s Fractures in Adults, Philadelphia: Lippincott, Williams & Wilkins, 2006;Vol 1:989.
76. Anakwe, RE, Middleton, SD, Jenkins, PJ, et al. Patient-reported outcomes after simple dislocation of the elbow. J Bone Joint Surg Am. 2011;93:1220–1226.
77. Kesmezacar, H, Sarikaya, IA. The results of conservatively treated simple elbow dislocations. Acta Orthop Traumatol Turc. 2011;44:199–205.
78. Apley AG, Solomon L, eds. Apley’s System of Orthopaedics and Fractures, 7th ed, Oxford, Butterworth-Heinemann, 1993:566.
79. Minford, EJ, Beattie, TF. Hanging arm method for reduction of dislocated elbow. J Emerg Med. 1993;11:161.
80. Lavine, LS. A simple method of reducing dislocations of the elbow joint. J Bone Joint Surg Am. 1953;35:785.
81. De Haan, J, den Hartog, D, Tuinebreijer, WE, et al. Functional treatment versus plaster for simple elbow dislocations (FuncSiE): a randomized trial. BMC Musculoskelet Disord. 2010;11:263.
82. Newman, J. “Nursemaid’s elbow” in infants 6 months and under. J Emerg Med. 1985;2:403.
83. Schunk, JE. Radial head subluxation: epidemiology and treatment of 87 episodes. Ann Emerg Med. 1990;19:1019.
84. Quan, L, Marcuse, EK. The epidemiology and treatment of radial head subluxation. Am J Dis Child. 1985;139:1194.
85. McDonald, J, Whitelaw, C, Goldsmith, LJ. Radial head subluxation: comparing two methods of reduction. Acad Emerg Med. 1999;6:715.
86. Frumkin, K. Nursemaid’s elbow: a radiographic demonstration. Ann Emerg Med. 1985;14:690.
87. Sacchetti, A, Ramoska, EE, Glascow, C. Nonclassic history in children with radial head subluxations. J Emerg Med. 1990;8:151.
88. Macias, CG, Wiebe, R, Bothner, J. History and radiographic findings associated with clinically suspected radial head subluxations. Pediatr Emerg Care. 2000;16:22.
89. Henry, MH, Fractures and dislocations of the hand. Rockwood and Green’s Fractures in Adults, 6th ed. Bucholz, RW, Heckman, JD, Court-Brown, CM, et al, eds. Rockwood and Green’s Fractures in Adults, Philadelphia: Lippincott, Williams & Wilkins, 2006;Vol 1:771.
90. Hossfeld, GE, Uehara, DT. Acute joint injuries of the hand. Emerg Med Clin North Am. 1993;11:781.
91. Louis, DS, Huebner, JJ, Hankin, FM. Rupture and displacement of the ulnar collateral ligament of the metacarpophalangeal joint of the thumb. J Bone Joint Surg Am. 1986;68:1320.
92. Tekkis, PP, Kessaris, N, Enchill-Yawson, M, et al. Palmar dislocation of the proximal interphalangeal joint—an injury not to be missed. J Accid Emerg Med. 1999;16:431.
93. Simpson, MB, Greenfield, GQ. Irreducible dorsal dislocation of the small finger distal interphalangeal joint: the importance of roentgenograms—case report. J Trauma. 1991;31:1450.
94. Yang, R, Tsuang, Y, Hang, Y, et al. Traumatic dislocation of the hip. Clin Orthop. 1991;265:218.
95. Dreinhofer, KE, Schwarzkopf, SR, Haas, NP, et al. Isolated traumatic dislocation of the hip: long-term results in 50 patients. J Bone Joint Surg Br. 1994;76:6.
96. Tornetta, P, III., Hip dislocations and fractures of the femoral head. Rockwood and Green’s Fractures in Adults, 6th ed. Bucholz, RW, Heckman, JD, Court-Brown, CM, et al, eds. Rockwood and Green’s Fractures in Adults, Philadelphia: Lippincott, Williams & Wilkins, 2006;Vol 2:1715.
97. Herwig-Kempers, AH, Veraart, BE. Reduction of posterior dislocation of the hip in the prone position. J Bone Joint Surg Br. 1993;75:328.
98. Howard, CB. A gentle method of reducing traumatic dislocation of the hip. Injury. 1992;23:481.
99. Walden, PD, Hamer, JR. Whistler technique used to reduce traumatic dislocation of the hip in the emergency department setting. J Emerg Med. 1999;17:441.
100. Hendey, GW, Avila, A. The Captain Morgan technique for reduction of the dislocated hip. Ann Emerg Med. 2011;58:536–540.
101. Dorr, LD, Wolf, AW, Chandler, R, et al. Classification and treatment of dislocations of total hip arthroplasty. Clin Orthop. 1983;173:151.
102. Germann, CA, Geyer, DA, Perron, AD. Closed reduction of prosthetic hip dislocation by emergency physicians. Am J Emerg Med. 2005;23:800.
103. Kennedy, JC. Complete dislocation of the knee joint. J Bone Joint Surg Am. 1963;45:889.
104. Schenck, RC, Jr., Stannard, JP, Wascher, DC, Dislocations and fracture dislocations of the knee. Rockwood and Green’s Fractures in Adults, 6th ed. Bucholz, RW, Heckman, JD, Court-Brown, CM, et al, eds. Rockwood and Green’s Fractures in Adults, Philadelphia: Lippincott, Williams & Wilkins, 2006;Vol 2:2037.
105. Seroyer, ST, Musahl, V, Harner, C. Management of the acute knee dislocation: the Pittsburgh experience. Injury. 2008;39:710–718.
106. Varnell, RM, Coldwell, DM, Sangeorzan, BJ, et al. Arterial injury complicating knee disruption. Am Surg. 1989;55:699.
107. Kendall, RW, Taylor, DC, Salvian, AJ, et al. The role of arteriography in assessing vascular injuries associated with dislocations of the knee. J Trauma. 1993;35:875.
108. Green, NE, Allen, BL. Vascular injuries associated with dislocation of the knee. J Bone Joint Surg Am. 1977;59:236–239.
109. Patterson, BM, Agel, J, Swiontkowski, MF, et al. Knee dislocations with vascular injury: outcomes in the Lower Extremity Assessment Project (LEAP) study. J Trauma. 2007;63:855–858.
110. Peskun, CJ, Chalal, J, Steinfeld, ZY, et al. Risk factors for peroneal nerve injury and recovery in knee dislocation. Clin Orthop Relat Res. 2012;470:774–778.
111. Mills, WJ, Barei, DP, McNair, P. The value of the ankle-brachial index for diagnosing arterial injury after knee dislocation: a prospective study. J Trauma. 2004;56:1261.
112. Reckling, FW, Peltier, LF. Acute knee dislocations and their complications. J Trauma. 1969;9:181.
113. Dennis, JW, Jagger, C, Butcher, JL, et al. Reassessing the role of arteriograms in the management of posterior knee dislocation. J Trauma. 1993;35:692.
114. Miranda, FE, Dennis, JW, Veldenz, HC, et al. Confirmation of the safety and accuracy of the physical examination in the evaluation of knee dislocation for injury to the popliteal artery: a prospective review. J Trauma. 2002;52:247.
115. Turco, VJ, Spinella, AJ. Anterolateral dislocation of the head of the fibula in sports. Am J Sports Med. 1985;13:209.
116. Horan, J, Quin, G. Proximal tibiofibular dislocation. Emerg Med J. 2006;23(5):e33.
117. Keogh, P, Masterson, E, Murphy, B, et al. The role of radiography and computed tomography in the diagnosis of acute dislocation of the proximal tibiofibular joint. Br J Radiol. 1993;66:108–111.
118. Hawkins, RJ, Bell, RH, Anisette, G. Acute patellar dislocations: the natural history. Am J Sports Med. 1986;14:117.
119. Hamilton, WC. Injuries of the ankle and foot. Emerg Med Clin North Am. 1984;2:361.
120. Early, JS, Fractures and dislocations of the midfoot and forefoot. Rockwood and Green’s Fractures in Adults, 6th ed. Bucholz, RW, Heckman, JD, Court-Brown, CM, et al, eds. Rockwood and Green’s Fractures in Adults, Philadelphia, Lippincott, Williams & Wilkins, 2006;Vol 2:2337.
121. Detenbeck, LC, Kelly, PJ. Total dislocation of the talus. J Bone Joint Surg Am. 1969;51:283.
122. Anderson, LD. Injuries of the forefoot. Clin Orthop. 1977;122:18.
123. Yang, IB, Sun, K, Sha, W, et al. Interphalangeal dislocation of the toes: a retrospective case series and review of the literature. J Foot Ankle Surg. 2011;50:580–584.