[level-membership-for-emergency-medicine-category]Chapter 4
Tracheal Intubation
Intubation is often the pivotal procedure in the emergency management of critically ill patients. There are several new devices that can improve the likelihood of successful intubation, but it is important to understand that intubation is just one aspect of airway management. The primary objective of airway management is to maintain adequate oxygenation. Intubation allows oxygenation once it is completed, but not during the procedure.1 A comprehensive approach, such as the algorithm described in Chapter 3, is crucial (see Fig. 3-15).2 In the emergency setting it is important to use intubation techniques that have a high likelihood of success, critically recognizing when a given approach has failed and quickly moving to a different technique.
This chapter describes nearly every possible means of tracheal intubation, with emphasis on widely used techniques. The most common means of intubation in the emergency setting is rapid-sequence intubation (RSI), but this approach must be considered very carefully.3 If a difficult intubation is anticipated, awake intubation may be preferred. With good topical anesthesia, nearly any intubating technique can be used for awake intubation, although flexible fiberoptic devices are commonly used. Because many difficult airways cannot be predicted, it is essential to have a well-defined backup plan and appropriate resources. The intubating laryngeal mask airway (LMA Fastrach) is an ideal backup device for failed RSI because it provides ventilation and oxygenation and facilitates tracheal intubation in a high percentage of patients with failed RSI.2
General Approach to Emergency Intubation
Preplanning is the key to successful emergency airway management. Providers should follow a clear, preconceived, practiced airway algorithm that uses readily available and familiar equipment and techniques. When encountering a difficult airway, it is more important to be comfortable with a few well-proven devices and techniques than to try new or unfamiliar devices.2,4 It is important to know when to abandon one approach and move on to the next. No single approach is mandated. The best technique is the one chosen by the clinician at the bedside based on one’s individual experience and expertise and the specific clinical scenario.
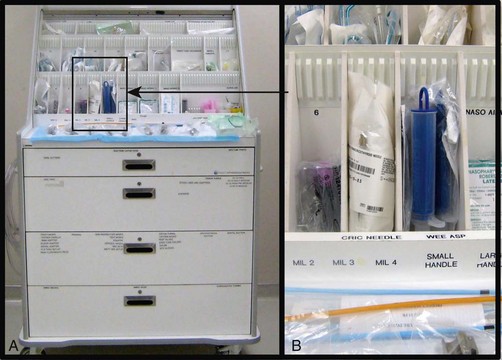
A critical aspect of preparation is making sure that all essential equipment required to perform the airway maneuvers is immediately available and within easy access. This may be accomplished by wall-mounting essential equipment in the emergency department (ED) resuscitation room.5 Alternatively, equipment can be placed in dedicated adult and pediatric airway carts or tackle boxes in an open, organized, and labeled manner, and the carts and boxes checked regularly and stocked (Fig. 4-1).6 Essential equipment that is seldom used but is potentially lifesaving should be clearly identified and placed in an easily accessible location such as a dedicated difficult airway cart. The importance of this concept cannot be overstated. Technical expertise cannot substitute for the lack of essential equipment. In airway management, failure has ominous consequences. Mental, physical, and equipment preparation maximizes the chance of success.
Airway Anatomy
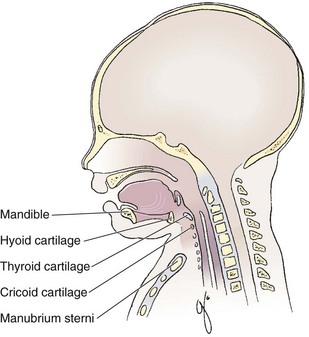
An understanding of airway anatomy and its terminology is requisite for any discussion of airway management procedures (Fig. 4-2). The following terms are used frequently in this chapter:
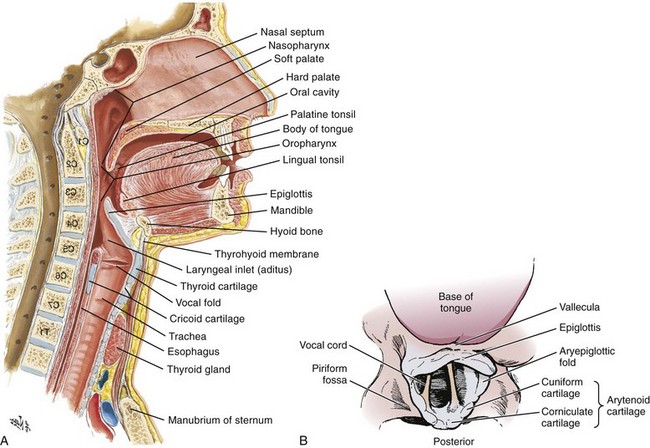
Pharynx: the upper part of the throat posterior to the nasal cavity, mouth, and larynx
1. Nasopharynx: base of the skull to the soft palate
2. Oropharynx: soft palate to the epiglottis
3. Hypopharynx: epiglottis to the cricoid ring (posteriorly), including the piriform sinus/recess/fossa
Piriform sinus/recess/fossa: the pockets on both sides of the laryngeal inlet separated from the larynx by the aryepiglottic folds
Larynx: the anterior structures of the throat (commonly called the voice box) from the tip of the epiglottis to the inferior border of the cricoid cartilage, including the laryngeal inlet
Laryngeal inlet: the opening to the larynx bounded anterosuperiorly by the epiglottis, laterally by the aryepiglottic folds, and posteriorly by the arytenoid cartilage
Arytenoid/posterior cartilage: the posterior aspect of the laryngeal inlet separating the glottis (anterior) from the esophagus (posterior)
1. Corniculate cartilage: the medial portion of the arytenoid/posterior cartilage
2. Cuneiform cartilage: the lateral prominence of the arytenoid/posterior cartilage
3. Interarytenoid notch: the notch between the posterior cartilage
Glottis: the vocal apparatus, including the true and false cords and the glottic opening
Vallecula: the space between the base of the tongue and the epiglottis
Hyoepiglottic ligament: anterior midline ligament connecting the epiglottis to the hyoid bone
Preparation
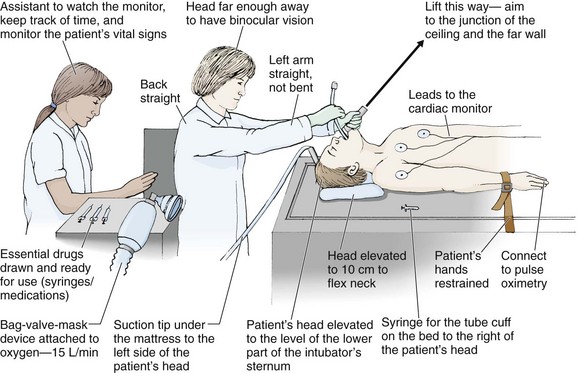
Intubation is best accomplished with two operators, one to perform the intubation and the other to handle equipment, help with positioning, observe the monitor, and keep track of time. Unfortunately, the ideal scenario and adequate time for preparation are not always available to the clinician, who has to make calculated adjustments based on the situation at hand. Before intubating, it is preferable to take the following steps in chronologic order: (1) attach the necessary monitoring devices and administer oxygen, (2) establish intravenous access, (3) draw up essential medications and label them if time permits, (4) confirm that the intubation equipment is available and functioning, (5) reassess oxygenation and maximize preoxygenation, (6) position the patient correctly, and (7) make sure that all team members are aware of the primary procedural approach and the most likely backup plan. In the haste of the moment, it is a common error to forget to preoxygenate or to position the patient optimally. Simple omissions, such as failing to restrain the patient’s hands or remove the patient’s dentures or misplacing the suction tip, can seriously hamper the success of the procedure. One suggested preintubation checklist is presented in Box 4-1. In addition, be sure to use universal precautions by wearing gloves, a gown, and eye and mouth protection.
Preoxygenation
Preoxygenation is one the most important aspects of emergency airway management. Preoxygenation before RSI provides much more time for intubation before desaturation occurs and thus significantly increases the chance for successful intubation on the first attempt. Failure to preoxygenate before RSI is often a critical factor when a straightforward emergency airway becomes an unexpected airway problem. Preoxygenate by providing the maximal fraction of inspired oxygen (Fio2) with a non-rebreather mask for 3 to 5 minutes before intubation. Alternatively, give eight vital capacity breaths from a maximal Fio2 system, such as a non-rebreather mask or a bag-valve-mask device, if there is not enough time for standard preoxygenation.7 When using a bag-valve-mask device for preoxygenation it is important for the exhalation port to have a one-way valve so that room air is not drawn into the mask when the patient inhales.
The purpose of preoxygenation is not solely to maximize oxygen saturation, but also to wash out nitrogen from the patient’s lungs and replace it with oxygen. This provides the maximum safe apneic time during RSI. Those at greatest risk for rapid desaturation include obese, pregnant, critically ill, and pediatric patients, and they will benefit the most from appropriate preoxygenation. Most studies addressing preoxygenation have been conducted under ideal conditions on relatively healthy individuals. It is far more challenging to effectively preoxygenate critically ill patients.8
Morbidly obese patients are best preoxygenated in a 25-degree head-up position because significantly higher oxygen tension can be achieved with this position.9 Patients who are hypoxic despite maximal oxygen delivery have been shown to benefit from 3 minutes of noninvasive positive pressure ventilation (NPPV) with 100% O2 just before intubation.10,11
Sometimes patients who will benefit the most from preoxygenation are uncooperative with a face mask because of delirium from hypoxia, hypercapnia, or other factors. These patients may benefit from delayed-sequence intubation: careful sedation without suppression of respirations, and oxygenation with a face mask or NPPV for 2 to 3 minutes before administration of a paralytic agent.11 Ketamine (1 to 1.5 mg/kg by slow intravenous push) has been suggested for this technique. Delayed-sequence intubation is a commonsense way to deal with a difficult problem, but it has not been well studied and providers using this method should be ready for hypoventilation or apnea.
Another method to delay desaturation during RSI is nasopharyngeal oxygen insufflation during apnea. Many studies have shown that providing oxygen therapy during apnea is much more beneficial than previously considered.12–15 During apnea, oxygen continues to be absorbed through the alveoli, and thus air with a low oxygen concentration remains in the lower airways. Supplying oxygen to the nasopharynx during apnea allows air with a higher oxygen concentration to passively replenish oxygen in the alveoli. In two studies of patients undergoing RSI, nasopharyngeal oxygen insufflation significantly delayed desaturation after the onset of apnea in both normal and morbidly obese patients.12,15 In these studies, nasopharyngeal oxygen insufflation was accomplished by inserting a 10-Fr catheter into the nasopharynx to a distance equal to that from the mouth to the tragus of the ear and delivering oxygen at a flow rate of 5 L/min when apnea occurred.12 Using a standard nasal cannula with a nasopharyngeal airway is simpler and would probably provide the same benefit. It is important to keep the upper airway open with a jaw thrust or artificial airway for this technique to be most beneficial.
Assessing for a Difficult Airway
When trying to predict whether there will be difficulty during emergency intubation, it is important to understand that most of the literature on prediction of difficult laryngoscopy does not apply very well in the emergency setting. A study by Levitan and colleagues in 2004 showed that two thirds of patients who were intubated in their ED via RSI could not be assessed with the most common difficult airway prediction tests (Mallampati scoring, measurement of thyromental distance, and neck mobility testing) because of altered mental status or cervical spine immobilization.16 Even in the best circumstances, only about half of cases of difficult laryngoscopy can be predicted.17 Many factors such as Mallampati scoring and measurement of thyromental distance have not been found to accurately predict difficult laryngoscopy, especially in the emergency setting.16–19 Only obvious anatomic and pathologic abnormalities and a history of difficult intubation are accurate predictors of difficult laryngoscopy.16 The American Society of Anesthesiology Difficult Airway Guidelines state that “in patients with no gross upper airway pathology or anatomic anomaly, there is insufficient published evidence to evaluate the effect of a physical examination on predicting the presence of a difficult airway.”20 This does not mean that emergency providers should ignore factors that are known to be associated with difficult laryngoscopy, but these must be placed in perspective.
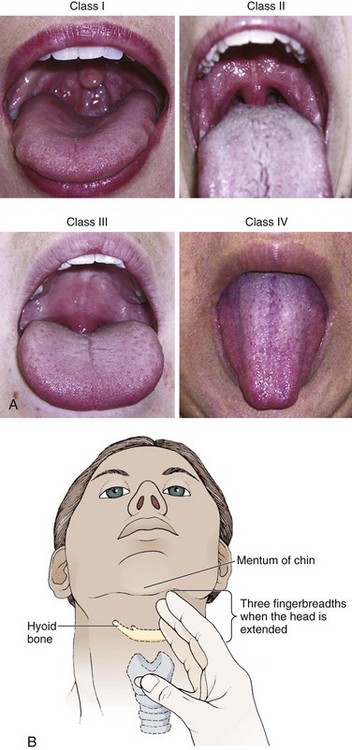
No examination finding alone can predict difficult laryngoscopy, but a combination of multiple factors makes difficulty more likely. The classic predictors of difficult intubation include a history of previous difficult intubation, prominent upper incisors, limited ability to extend at the atlanto-occipital joint,21 poor visibility of pharyngeal structures when the patient extends the tongue (Mallampati classification or the tongue-pharyngeal ratio) (Fig. 4-3A),22 limited ability to open the mouth (suggested by a space less than three fingerbreadths between the upper and lower incisors),23 short thyromental distance (<6 cm from the thyroid notch to the chin with the neck in extension) (Fig. 4-3B),24 and a limited direct laryngoscopic view of the laryngeal inlet (Fig. 4-4).23 A relatively new test is the upper lip bite test, which has been shown in some studies to be more accurate and specific than older tests.25–27 It is essentially a test of anterior mandibular mobility, and the less mobility, the more difficult it is to intubate the patient. Upper lip bite criteria are as follows: class I, the lower incisors can bite the upper lip above the vermillion line; class II, the lower incisors can bite the upper lip below the vermillion line; and class III, the lower incisors cannot bite the upper lip.25 Interestingly, a 2008 study by Tremblay and associates identified factors predictive of difficult GlideScope intubation, which included a high Cormack-Lehane grade during direct laryngoscopy, short thyromental distance, and high upper lip bite test score.28

As noted earlier, many of these predictors cannot be assessed in the emergency setting.16 Fortunately, some of the key predictors are apparent simply by observing the external appearance of the patient’s head and neck. Patients with neck tumors, thermal or chemical burns, traumatic injuries involving the face and anterior aspect of the neck, angioedema, infection of pharyngeal and laryngeal soft tissues, or previous operations in or around the airway suggest a difficult intubation because distorted anatomy or secretions may compromise visualization of the vocal cords. Facial or skull fractures may further limit airway options by precluding nasotracheal (NT) intubation. Patients with ankylosing arthritis or developmental abnormalities such as a hypoplastic mandible or the large tongue of Down’s syndrome are difficult to intubate because neck rigidity and problems of tongue displacement can obscure visualization of the glottis.
Besides these obvious congenital and pathologic conditions, the presence of a short, thick neck is one of the more common predictors of a difficult airway. Such individuals are easily identifiable by observing the head and neck in profile. Obesity alone may not be an independent predictor of difficult intubation, but obese patients with large-circumference necks are likely to be difficult to intubate.29 Facial hair can complicate a difficult airway by rendering bag-mask ventilation ineffective because of the lack of a good mask seal. One patient type that does not immediately stand out as a difficult intubation—but can be surprisingly so—is a patient with an unusually long mandibulohyoid distance (the thyroid prominence appearing low in the neck) and a short mandibular ramus.30 Visualization of the larynx is difficult because of the distance to the larynx and the relative hypopharyngeal location of the tongue.
Knowledge of the poor performance of difficult airway predictors should not make emergency providers more cavalier about using RSI; it should create more concern. The solution is not to avoid RSI, because lack of paralysis makes every intubation more difficult. Instead, it is essential to appreciate the critical importance of having a clear backup plan when intubation with RSI fails.16,31 This situation mandates the need for a preconceived algorithm that uses proven rescue techniques applicable to a broad range of clinical scenarios, such as the bougie (flexible intubating stylet) and the LMA Fastrach.2 The value of the bougie is indisputable, and it is clear that using the LMA Fastrach after failed RSI has decreased the frequency of failed airways and the need for surgical intervention.2,4,32–38 Finally, if RSI is the “go to” method for emergency intubation, providers must be prepared to perform a surgical airway when laryngoscopy, bag-mask ventilation, and backup devices fail.2,39
Direct Laryngoscopy
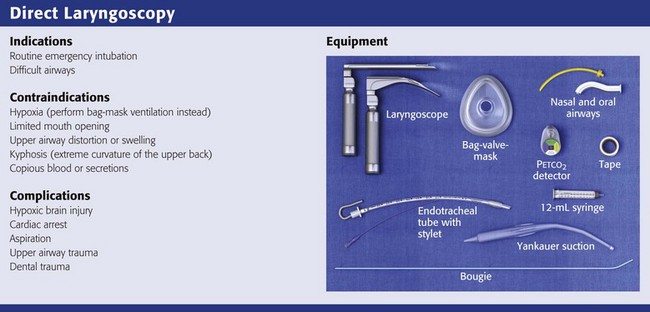
Equipment
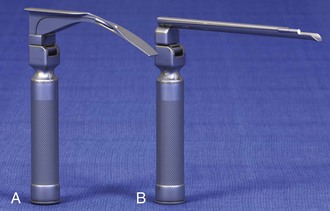
There are two basic blade designs for direct laryngoscopy, curved (Macintosh) and straight (Miller) (Fig. 4-5). Each comes in various adult and pediatric blade sizes. Slight variations in laryngoscopic technique follow from the choice of blade design, and it is often a matter of personal preference. The tip of the straight blade goes under the epiglottis and lifts it directly, whereas the curved blade fits into the vallecula and indirectly lifts the epiglottis via engagement of the hyoepiglottic ligament to expose the larynx.
The illumination provided by the laryngoscope can make a big difference in the ability to visualize the laryngeal inlet. The importance of these factors is underappreciated, as demonstrated by Levitan40 in a survey of the Macintosh blades used in 17 Philadelphia EDs. It was found that only 24% of all blades provided the brightness necessary for fine inspection. This finding was largely explained by the fact that the majority of EDs used the A-Mac (American) as opposed to the clearly superior brightness design of the G-Mac (German) or the intermediate brightness of the E-Mac (English).
Tracheal Tubes
The standard adult endotracheal (ET) tube measures approximately 30 cm in length. Tube size is typically printed prominently on the tube and is based on the internal diameter (ID) and measured in millimeters. The range is 2.0 to 10.0 mm in increments of 0.5 mm. The outer tube diameter is 2 to 4 mm larger than the internal diameter.41 Tubes are also imprinted with a scale in centimeters that indicates the distance from a tube’s distal tip.
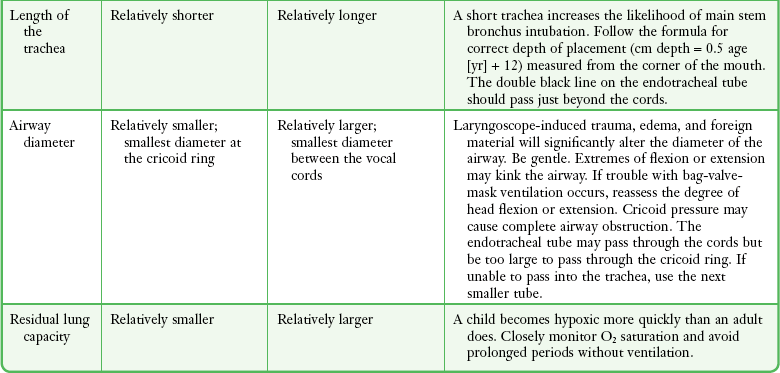
Correct tube size is important in the pediatric population. It is especially important when using an uncuffed tube because a good seal is needed between the ET tube and the upper part of the trachea (Table 4-1). Since tube size is based on the ID, a cuffed tube should generally be a half size (0.5 mm) smaller than an uncuffed tube. The smaller ID of an appropriately sized, small cuffed tube could theoretically make it more prone to plugging from secretions. Cuffed tubes are available down as small as 3-mm ID, although indications for these tubes in neonates and infants are rare. A cuffed tube is used in children with decreased lung compliance who may require prolonged mechanical ventilation. In a child, the smallest airway diameter is at the cricoid ring rather than at the vocal cords, as in adults. Hence, a tube may pass the cords but go no farther. If this should occur, the next smaller size tube should be passed.
TABLE 4-1
Tracheal Tube Sizes for Average Patients*
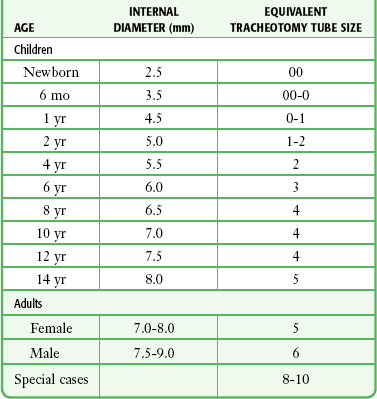
*A slightly smaller size may be required for nasotracheal intubation.
Modified from Applebaum EL, Bruce DL, eds. Tracheal Intubation. Philadelphia: Saunders; 1976.


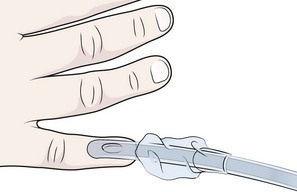
For most clinical situations, using the width of the nail of the little (fifth) finger as a guide is sufficiently accurate and has been shown to be more precise than finger diameter (Fig. 4-6).42 A standard tracheal tube uses a high-volume, low-pressure cuff to avoid pressure necrosis the tracheal lining. A clinical test for determining correct cuff inflation is to slowly inject air until no air leak is audible while the patient is receiving bag-tube ventilation. This usually occurs with 5 to 8 mL of air if the proper size tracheal tube has been selected. Many clinicians use the tension of the pilot balloon as a guide to cuff inflation. Slight compressibility with gentle external pressure indicates adequate inflation for most clinical situations. For long-term use, cuff pressure should be measured and maintained at 20 to 25 mm Hg. Capillary blood flow is compromised in the tracheal mucosa when cuff pressure exceeds 30 mm Hg. In emergency situations, the balloon may simply be inflated with 10 mL of air and adjusted when the patient’s condition has stabilized.
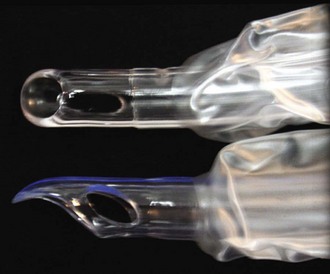
Interest in design of the tip of the tracheal tube has grown as the Seldinger technique is increasingly being applied to intubation. When a tracheal tube is passed over a smaller-caliber introducer (Seldinger technique), regardless of whether it is a tracheal tube introducer or a fiberoptic scope, there is a reasonable chance that the tube will get hung up on the laryngeal soft tissue.43 A tracheal tube that has been designed to overcome this problem has a bevel oriented posteriorly and a flexible tip that decreases the distance between the tube and whatever it is being passed over (Fig. 4-7).
Optimal Patient Positioning for Direct Laryngoscopy
The sniffing position, with the head extended on the neck and the neck flexed relative to the torso, has traditionally been considered the best head position for direct laryngoscopy.44,45 This position aligns the oral, pharyngeal, and laryngeal axes (Fig. 4-8A–C). Horton and colleagues described the ideal sniffing position for normal patients as neck flexion of 35 degrees and atlanto-occipital extension such that the plane of the face is −15 degrees to the horizontal position (Fig. 4-8C).46 In supine patients, neck flexion is achieved by head elevation. Depending on the size and shape of the patient, the amount of head elevation may differ significantly, and the end point should be horizontal alignment of the external auditory meatus with the sternum.44,47–49 In normal-size adults it is usually possible to achieve the sniffing position with 7 to 10 cm of head elevation.50,51 Morbidly obese patients require much more head elevation to achieve the proper sniffing position. In these patients, aligning the external auditory meatus with the sternum requires elevation of the head and neck, as well as the upper part of the back (Fig. 4-8D).3,48,49,52 This can be accomplished by building a ramp of towels and pillows under the upper torso, head, and neck or by using a Troop Elevation Pillow (Mercury Medical, Clearwater, FL) or similar device (see Fig. 3-2).3,48,49,52 Alternatively, elevating the head to a 25-degree backup position may achieve the same purpose.53

Two studies have shown that elevating the head (flexing the neck) beyond the sniffing position often improves visualization of the glottis.48,54 Because the amount of head elevation needed for optimal laryngoscopy varies depending on individual patient anatomy, it is important to make laryngoscopy a dynamic procedure. This is best accomplished by putting your right hand behind the patient’s head to lift, flex, and extend the head as needed to bring the glottis into view.55 Optimal positioning of the head and neck is not possible in trauma patients who require in-line stabilization of the cervical spine. This is one of the aspects that makes trauma airways so challenging and makes other maneuvers, such as external laryngeal manipulation, even more important in these patients.55
Procedure and Technique of Direct Laryngoscopy
Place the patient in the supine position with the head at the level of the lower part of the intubator’s sternum (Fig. 4-9, step 2). To maintain the best mechanical advantage, keep your back straight and do not hunch over the patient; bend only at the knees (Fig. 4-10). Keep the left elbow relatively close to the body and flex it slightly to provide better support. In a severely dyspneic patient who cannot tolerate lying down, perform direct laryngoscopy with the patient seated semi-erect and the clinician on a step stool behind the patient.56
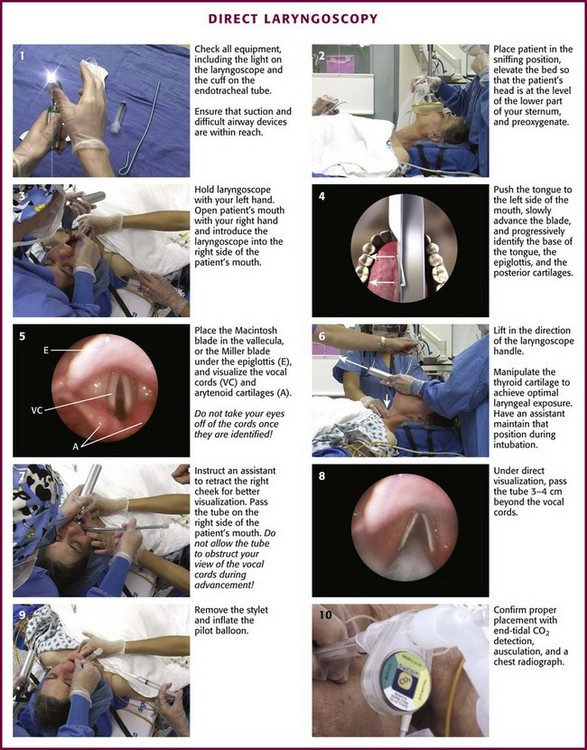
Figure 4-9 Direct laryngoscopy.
Grasp the laryngoscope in the left hand with the back end of the blade pressed into the hypothenar aspect of your hand. Draw the patient’s lower lip down with your right thumb, and introduce the tip of the laryngoscope into the right side of the patient’s mouth (Fig 4-9, step 3). Slide the blade along the right side of the tongue while gradually displacing the tongue toward the left as you move the blade to the center of the mouth (Fig. 4-9, step 4). If you initially place the blade in the middle of the tongue, it will fold over the lateral edge of the blade and obscure visualization of the airway. Placing the blade in the middle of the tongue and failing to move the tongue to the left are two common errors that prevent visualization of the vocal cords (Fig. 4-11).
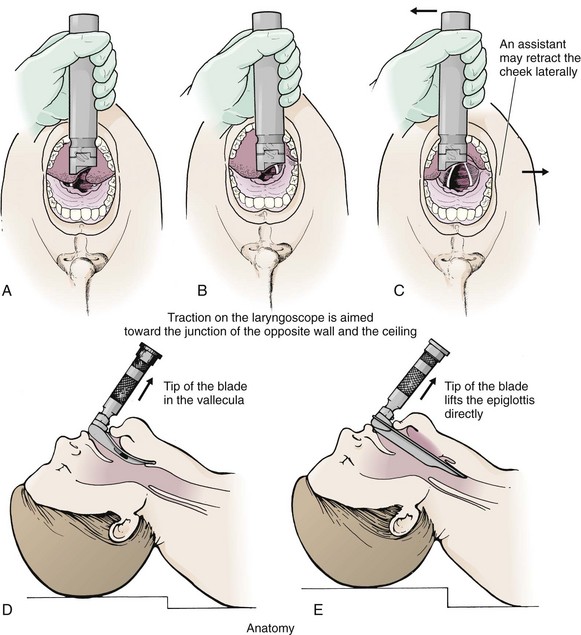
As you move the tip of the blade toward the base of the tongue, exert force along the axis of the laryngoscope handle by lifting upward and forward at a 45-degree angle (Fig. 4-9, step 6). The direction of this force is critical because if the force is too horizontal or too vertical, poor visualization will result. The epiglottis should come into view with this maneuver. It may help to have an assistant retract the cheek laterally to further expose the laryngeal structures. Avoid bending the wrist because it can result in dental injury if the teeth are used as a fulcrum for the blade.
The step after visualization of the epiglottis depends on which laryngoscope blade is being used. With the curved blade, place the tip into the vallecula, the space between the base of the tongue and the epiglottis (Fig. 4-11D). Continued anterior elevation of the base of the tongue and the epiglottis will expose the vocal cords. If the tip of the blade is inserted too deeply into the vallecula, the epiglottis may be pushed down and obscure the glottis.22 When using the straight blade, insert the tip under and slightly beyond the epiglottis and directly lift it up (Fig. 4-11E). If the straight blade is placed too deeply, the entire larynx may be elevated anteriorly and out of the field of vision. Gradually withdraw the blade to allow the laryngeal inlet to drop down into view. If the blade is deep and posterior, the lack of recognizable structures indicates esophageal passage; gradually withdraw the blade to permit the laryngeal inlet to come into view.
Infants and Children
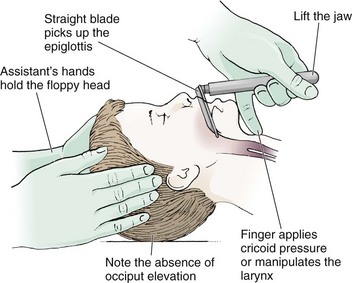
It is helpful to appreciate the anatomic differences between children and adults when intubating pediatric patients (Fig. 4-12 and Table 4-2). Children’s proportionately larger heads naturally place them in the sniffing position, so a towel under the occiput is rarely necessary (Fig. 4-13). The large head of newborns can result in a posterior positioning of the larynx that prevents visualization of the vocal cords. A small towel under the infant’s shoulders should correct this problem. The head may also be floppy and may benefit from stabilization by an assistant. The child’s increased tongue-to-oropharynx ratio and shorter neck hinder forward displacement of the tongue and, coupled with a U-shaped epiglottis, can make visualization of the glottis difficult. Consequently, direct laryngoscopy in infants and young children is generally best performed with a straight blade: Miller size 0 for premature infants, size 1 for normal-sized infants, and size 2 for older children. The infant’s larynx lies higher and relatively more anterior. If no laryngeal structures are visible after laryngeal pressure, gradually withdraw the blade. Inadvertent advancement of the blade into the esophagus is a common error.

Sellick’s Maneuver, External Laryngeal Manipulation, Bimanual Laryngoscopy, and BURP
Sellick’s Maneuver: There is some good evidence that Sellick’s maneuver (cricoid pressure) helps prevent gastric inflation during bag-mask ventilation.57–62 The only evidence suggesting that cricoid pressure prevents regurgitation consists of five cadaver studies,62–66 one small human study,67 and some case reports68—poor evidence by today’s standards of evidence-based medical practice.57,69 Furthermore, there are many reports of significant regurgitation and aspiration regardless of the application of Sellick’s maneuver.70–73 Despite the lack of evidence, many experts believe that Sellick’s maneuver is critical during RSI.74–77
Because aspiration has dire consequences and Sellick’s maneuver has traditionally been considered integral to patient safety during emergency airway management,69 it is reasonable to apply cricoid pressure as long as it does not interfere with ventilation and intubation. Unfortunately, there is significant evidence that it can interfere with ventilation and intubation, so it is best to apply Sellick’s maneuver on a case-by-case basis with full understanding of the benefits and drawbacks of cricoid pressure.69
When applied during bag-mask ventilation, Sellick’s maneuver reduces tidal volume, increases peak inspiratory pressure, and prevents good air exchange.58,60,61,78–85 There are mixed data about the effects of cricoid pressure during larynoscopy,86 but several studies have shown that it worsens visualization of the larynx.87–89 Cricoid pressure also decreases successful insertion of and intubation through LMAs.90–97
Because of lack of evidence of the utility of Sellick’s maneuver and evidence of adverse effects, routine use of cricoid pressure during bag-mask ventilation of patients in cardiac arrest is not recommended in the 2010 American Heart Association Guidelines for Cardiopulmonary Resuscitation and Emergency Cardiovascular Care.98 Also, it is recommended that cricoid pressure be released immediately if there is any difficulty either intubating or ventilating a patient in an emergency setting.69,73,81,99,100 In addition, it is reasonable to release or relax cricoid pressure during insertion of an LMA, during intubation with an intubating LMA (ILMA), or if ventilation with the LMA is difficult.57,69,96
Some authors believe that improper technique is to blame for the many reported failures of Sellick’s maneuver.57 The proper technique for applying Sellick’s maneuver is to place the thumb and middle finger on either side of the cricoid cartilage and the index finger in the center anteriorly.62 Apply 30 N (6.7 lb) of force to the cricoid cartilage in the posterior direction.57,77 As a reference, about 40 N of digital force on the bridge of the nose will usually cause pain.57
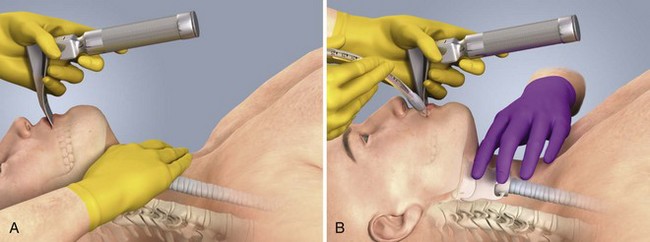
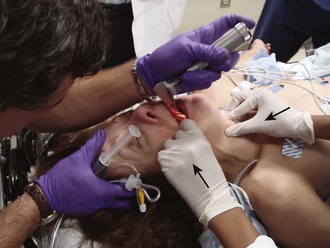
External Laryngeal Manipulation, Bimanual Laryngoscopy, and BURP: ELM is the application of pressure on the thyroid cartilage in an attempt to improve the view of the larynx during laryngoscopy. Multiple studies have shown that ELM performed by the laryngoscopist (bimanual laryngoscopy) is superior to having an assistant apply anterior neck pressure.88,101 Bimanual laryngoscopy is best because the direction and amount of force that will optimize laryngeal exposure is variable. BURP is sometimes optimal, but it often worsens the laryngoscopic view,88 so it is best to move the larynx in a variety of directions to determine the optimal ELM. The best way to quickly apply a variety of different forces to the larynx to determine the optimal ELM is by manipulation of the larynx with the laryngoscopist’s right hand (Fig. 4-14).101
Operator-directed posterior displacement of the larynx during laryngoscopy was described by Brunnings in 1912.102 After Sellick described the use of cricoid pressure to avoid regurgitation in 1961, it became common to have an assistant apply anterior neck pressure during laryngoscopy.62 In 1993 Knill reported that having an assistant apply BURP to the cricoid or thyroid cartilage improved visualization of the glottis during two cases of difficult laryngoscopy.103 In 1993 Takahata and coworkers performed a prospective study of 630 intubations and found that BURP produced better laryngeal exposure than just backward pressure did in patients with difficult laryngoscopy.104 However, a 2005 prospective crossover trial by Snider and colleagues found no benefit with routine application of the BURP maneuver.105
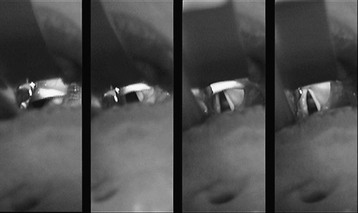
Studies by Benumof, Levitan, and colleagues have demonstrated that it is best to apply pressure on the thyroid cartilage (not the cricoid cartilage) and suggested that ELM should be applied by the laryngoscopist’s right hand, not by an assistant.88,101,106 They also found that the direction of force required for optimal ELM was not always upward and rightward and that the amount of backward pressure was variable.88 In a 1996 study of 181 patients, Benumof and Cooper found that external manipulation was optimal when applied to the thyroid cartilage in 88% of patients and to the cricoid cartilage in only 11% of patients.101 In a 2006 cadaveric study of 1530 laryngoscopies by 104 laryngoscopists, Levitan and associates found that bimanual laryngoscopy was more effective than both BURP and cricoid pressure for optimizing laryngeal exposure (Figs. 4-15 and 4-16; see also Fig. 4-14).88 In addition, they found that cricoid pressure worsened the view of the larynx in 29% of cases and BURP worsened it in 35%.88 Finally, in a 2002 study of eight first-year emergency medicine residents performing 271 intubations in an operating room setting, Levitan and colleagues found that bimanual laryngoscopy (ELM performed by the laryngoscopist) consistently improved laryngeal exposure by novice intubators (see Fig. 4-12).106
Passing the Tube
Once the vocal cords have been visualized, the final step is to pass the tube under direct vision through the vocal cords and into the trachea. It is best to use a malleable stylet for all emergency intubations. The best stylet shape is straight with a 35-degree hockey-stick bend at the proximal cuff (“straight-to-cuff”). In a 2006 study, Levitan and colleagues showed that stylet bend angles greater than 35 degrees made ET tube passage more difficult.107
Tracheal Tube Introducer (Bougie)
If direct laryngoscopy does not bring the vocal cords fully into view, a tracheal tube introducer may be used to facilitate intubation. This adjunct is a long, thin, semirigid introducer that, with the aid of a laryngoscope, is passed through the laryngeal inlet and over which an ET tube is advanced through the cords and into the trachea. The technique, originally described more than 60 years ago by Macintosh,108 was recommended for patients in whom visualizing the vocal cords was difficult. It has also been shown to be effective when the laryngeal inlet cannot be visualized at all.109 It is the most common airway adjunct used in British EDs for complicated intubations.110 Its efficacy has been demonstrated prospectively during difficult intubations in the operating room, as a pivotal component of a difficult airway algorithm in the operating room, and when compared with conventional laryngoscopy in the ED.33,111,112
A variety of tracheal tube introducers are available today (Fig. 4-17). The original adjunct was called the gum elastic bougie, or simply “the bougie,” and is currently available in a reusable form for both adult and pediatric patients (Eschmann Tracheal Tube Introducer, Portex Sims, Kent, UK). The adult size comes in two forms, a 60-cm (15-Fr) version with a short, 40-degree hockey-stick curve at the end and a straight one that is 70 cm. The adult version can accommodate a 5.5-mm ET tube. The pediatric version is 70 cm (10 Fr) and straight and can accommodate a 4.0-mm tube. A polyethylene introducer designed for single use is also available and comes only in the 60-cm version (Flextrach ETTube Guide, Greenfield Medical Sourcing, Austin, TX). A variation of this concept is the FROVA Introducer (Cook Critical Care, Bloomington, IN), a plastic introducer with a similar profile to the others except that it has a hollow lumen through which the patient can be ventilated when an accompanying adapter is attached.

Consider using a tracheal tube introducer when a difficult airway is anticipated; it can also be helpful in all intubations when visualization of the laryngeal inlet is limited. A trauma patient with cervical spine precautions is a typical example. The presence of blood and vomitus is rarely a significant complicating factor. Its safety record is impressive despite decades of use, and only two complications have been reported, perforation of the pharyngeal wall after recent head and neck surgery113 and atelectasis from blood clots after mild bronchial trauma.114
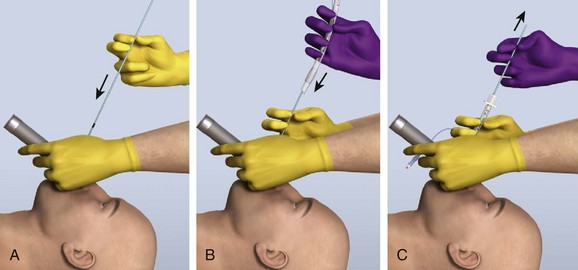
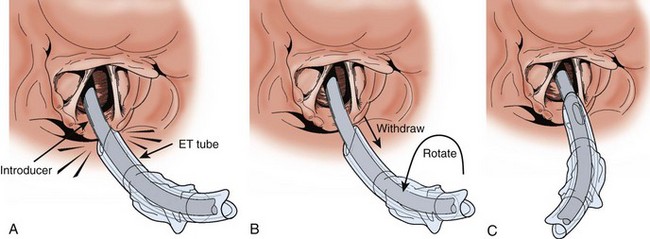
Shaping the introducer may not be necessary in many cases, but with difficult laryngeal views, create a 60-degree bend in the distal introducer (see Fig. 4-17D).115 Ideally, tracheal tube introducer-assisted intubation is a two-person procedure (Fig. 4-18). Use the laryngoscope in the normal fashion to obtain the best possible view of the larynx. If the cords are in full view, proceed with intubation with a styletted ET tube. If the view is suboptimal, an assistant can pass the tracheal tube introducer to the operator for placement anterior to the arytenoids and into the larynx. If only the epiglottis is visible, place the introducer, with a 60-degree distal bend, just under the epiglottis and direct it anteriorly. With the laryngoscope still in place and the introducer stabilized by the operator, the assistant slides the ET tube over the introducer. Pass the tube through the larynx. Just before entering the larynx, rotate the tube 90 degrees counterclockwise to avoid having the tip of the ET tube get caught on the laryngeal structures (Fig. 4-19).43 Withdraw the laryngoscope and confirm proper tube placement. While securing the ET tube, ask the assistant to remove the introducer.
There are a number of confirmatory findings after successful introducer placement. If any portion of the arytenoids is visible and the introducer was seen to pass anterior to them without resistance, the introducer is in the airway. Unlike seeing an ET tube “go through the cords” when in fact the laryngeal inlet may have been momentarily obscured by the tube or balloon, the smaller-caliber introducer does not obscure the view of the glottis and thus avoids this potential pitfall. In addition to better visual confirmation, successful passage is indicated, up to 90% of the time, by feeling clicks produced by the angled tip of the introducer as it strikes against the tracheal rings.116 An assistant will also usually feel confirmatory movement in the airway if the anterior aspect of the neck is palpated. If there is still any question whether the introducer is in the airway, advance it at least 40 cm, at which point resistance should be felt as the introducer passes the carina and into a main bronchus. If this is not felt, the introducer is most likely in the esophagus. Withdraw it and reattempt placement.
Several technical points should be emphasized. The first is that it is important to create a curve in the distal portion of the introducer when the laryngeal inlet is not visible. This is not uniformly appreciated, even in England where the bougie is used commonly.111 It is a mistake to think that the factory-formed curve at the tip will be sufficient to access the glottis in these situations. Although there may be some benefit to lubricating the distal end of the introducer, in emergency intubations, lubricating the full length of the introducer makes it slippery and hard to handle without conferring any obvious advantage. Lubricating the ET tube, conversely, remains critical for smooth passage through the vocal cords. A common error when first using the tracheal tube introducer is to remove the laryngoscope before passing the ET tube over the introducer. This often results in difficulty placing the tube because it is displaced posteriorly by the weight of the pharyngeal soft tissues and gets hung up on the laryngeal structures. Reinsert the laryngoscope. Pull the tube back 2 cm to disengage the soft tissue. Rotate the tube 90 degrees counterclockwise and then readvance it. In instances in which it is difficult to get the introducer sufficiently anterior to access the laryngeal inlet, make sure that the introducer lines up with the operator’s line of vision. If the introducer enters the mouth at a significant angle above this line, most often when the clinician is too close to the patient, it may be deflected posteriorly by the lip or intraoral structures and escape the attention of the operator. This creates the impression that the introducer is “too floppy.”
Laryngospasm
If the patient is not paralyzed, laryngospasm, or persistent contraction of the adductor muscles of the vocal cords, may prevent passage of the tube. Inadequate anesthesia is often the cause. Pretreat with topical lidocaine to decrease the likelihood of laryngospasm occurring. Lidocaine, 2% or 4%, can be sprayed directly onto the vocal cords. An infrequent but effective means of achieving tracheal anesthesia is transtracheal puncture and injection of a bolus of 3 to 4 mL of lidocaine through the cricothyroid membrane. Laryngospasm is usually brief and often followed by a gasp. Be ready to pass the tube at this moment. Occasionally, the spasm is prolonged and needs to be disrupted with sustained anterior traction applied at the angles of the mandible, the jaw-lift maneuver. Do not force the tube at any time because it could cause permanent damage to the vocal cords. Consider using a smaller tube. Prolonged, intense spasm may ultimately require muscle relaxation with a paralyzing drug (see Chapter 5). Pediatric patients are far more prone to laryngospasm than adults are.117 In a child, if vocal cord spasm prevents passage of the tube, a chest-thrust maneuver may momentarily open the passage and permit intubation.118
Positioning and Securing the Tube
Secure the ET tube in a position that minimizes both the chance of inadvertent, main stem endobronchial intubation and the risk for extubation. The tip should lie in the midtrachea with room to accommodate neck movement. Because tube movement with both neck flexion and extension averages 2 cm, the desired range of tip location is between 3 and 7 cm above the carina.119
The average tracheal length is between 10 and 13 cm. On a radiograph, the tip of the tube should ideally be 5 ± 2 cm above the carina when the head and neck are in a neutral position. On a portable radiograph, the adult carina overlies the fifth, sixth, or seventh thoracic vertebral body. If the carina is not visible, it can be assumed that the tip of the tube is properly positioned if it is aligned with the third or fourth thoracic vertebra. In children, the carina is more cephalad than in adults, but it is consistently situated between T3 and T5. In children, T1 is the reference point for the tip of the ET tube.120
Estimate the proper depth of tube placement before radiographic confirmation by using the following formulas, in which length represents the distance from the tip of the tube to the upper incisors in children121,122 and from the upper incisors123 or the corner of the mouth124 in adults:
| Children: | Tracheal tube depth (cm) = [age (yr)/2] + 12 |
| Adults: | Tracheal tube depth (cm) = 21 cm (women) |
| Tracheal tube depth (cm) = 23 cm (men) |
In adults, this method has been shown to be more reliable than auscultation in determining the correct depth of placement.123 One can anticipate that tall male patients will often require deeper placement, to 24 or 25 cm, and that short women will often require a shallower placement of 19 or 20 cm.
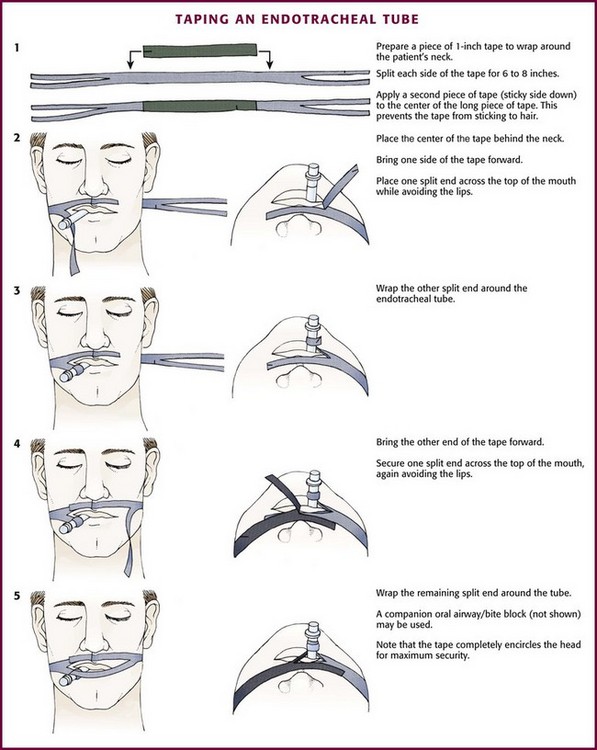
After placement of the tracheal tube, auscultate both lungs under positive pressure ventilation. Take care to auscultate posterolaterally because auscultation anteriorly can reveal sounds that mimic breath sounds but arise from the stomach. With the tube in position and the cuff inflated, secure the tube in place. Attach commercial ET tube holders, adhesive tape, or umbilical (nonadhesive cloth) tape securely to the tube and around the patient’s head (Figs. 4-20 and 4-21). Position the tube at the corner of the mouth, where the tongue is less likely to expel it. This position is also more comfortable for the patient and allows suctioning. A bite block or oral airway to prevent crimping of the ET tube or damage from biting is commonly incorporated into the system used to secure the tube.
Unintentional extubation can have disastrous consequences, particularly if the patient was difficult to intubate initially. Secure the ET tube immediately after correct placement has been confirmed. Orotracheal intubation is associated with a higher rate of unplanned extubation than NT intubation is.125 During transport, moving the intubated patient, or taking radiographs, designate one person to tend to the ET tube to avoid unplanned extubation. Inadequate sedation is another risk factor for unplanned extubation.125 If long-acting paralytics have not been administered, consider sedation or physical restraints to prevent self-extubation by an agitated or confused patient.
Confirmation of Tracheal Tube Placement
Clinical Assessment: Confirm tracheal placement clinically by seeing the tube pass through the vocal cords (Table 4-3). If any question remains, apply posterior pressure on the ET tube while the laryngoscope is still in place and expose the tube by altering the angle as it passes between the cords.126 Absent or diminished breath sounds, any sound or vocalization, increased abdominal size, and gurgling sounds during ventilation are clinical signs of esophageal placement. If the patient can moan or groan, the tube is not in the trachea! Critically, esophageal placement is not always obvious. One may hear “normal” breath sounds if only the midline of the thorax is auscultated. The presence of condensation of the ET tube as a means of confirming tracheal placement may also be misleading. Blinded observers noted condensation of the ET tube during ventilation in 23 of 27 esophageal intubations in an animal model.127 One way to clinically assess tracheal placement after several ventilations or during spontaneous respiration is to note whether air is felt or heard to exit through the tube after cuff inflation. If tidal volume is adequate, the exit of air should be obvious. It is important to note that when an appropriately sized tube is placed in the trachea, the patient cannot groan, moan, or speak. Vocalization strongly suggests esophageal placement.
TABLE 4-3
Assessing Proper Tube Placement
| TEST | INTERPRETATION |
| Observe the tube pass through the vocal cords | Accurate way to ensure placement; if in doubt, look again after intubation |
| Auscultation of breath sounds over the chest | May be misleading, especially if only the midline is examined; listen in both axillae |
| Auscultation over the stomach | Gurgling indicates esophageal placement |
| Condensation (fog) forms inside the tube with each breath | Quite reliable |
| Observe the chest rise with positive pressure and fall with release | Generally reliable if good chest rise is present; may be absent in patients with a small tidal volume or severe bronchospasm |
| Feel air exiting from the end of the tube after inflation | Reliable |
| Air remains in the lung after the end of the tube is occluded and exits when the occlusion is removed | Reliable, but one may “ventilate” a closed area of the esophagus |
| Ask the patient to speak; listen for moaning or other sounds | If the tube is in proper place, no sound is possible |
| Chest radiograph | Generally reliable but can be misleading |
| End-tidal CO2 measurements | Reliable if a good persistent waveform is present; can be misleading with nasotracheal intubation if the tip is curled supraglottically: it will give a positive CO2 reading |
| Aspiration technique | Tracheal location with a patent tube if 30-40 mL of air is aspirated without resistance; probable esophageal location if unable to aspirate the syringe easily or delayed bulb refill occurs; can be misleading with nasotracheal intubation if the tube has curled supraglottically |
| Fiberoptic bronchoscope | Reliable if tracheal rings are seen down the endotracheal tube |
| Lighted stylet down the endotracheal tube | Reliable if transillumination seen in the low midline portion of the neck |
| Ultrasound detection of tracheal tube location | Appears to be reliable but not well studied |
Asymmetric breath sounds indicate probable main stem bronchus intubation. Because of the angles of takeoff of the main bronchi and the fact that the carina lies to the left of midline in adults, right main stem intubation is most common and is indicated by decreased breath sounds on the left side. When asymmetric sounds are heard, deflate the cuff and withdraw the tube until equal breath sounds are present. Bloch and coworkers128 reported accurate pediatric tracheal positioning if after noting asymmetric breath sounds the tube is withdrawn a defined distance beyond the point at which equal breath sounds are first heard: 2 cm in children younger than 5 years and 3 cm in older children.
Esophageal Detector Device: An aspiration technique used to determine ET tube location was first described by Wee in 1988.129 The technique takes advantage of the difference in tracheal and esophageal resistance to collapse during aspiration to locate the tip of the tracheal tube. After intubation, attach a large syringe to the end of the ET tube and withdraw the plunger of the syringe. If the tube is placed in the trachea correctly, the plunger will pull back without resistance as air is aspirated from the lungs. If the tracheal tube is in the esophagus, resistance is felt when the plunger is withdrawn because the pliable walls of the esophagus collapse under the negative pressure and occlude the end of the tube. Another device that uses the same principle as syringe aspiration is the self-inflating bulb (e.g., Ellick device).
In the initial study conducted in an operating room, tube placement was identified correctly in 99 of 100 cases (51 esophageal, 48 tracheal).129 The result was considered equivocal in the remaining case. That tube was removed and found to be nearly totally occluded with purulent secretions. Slight resistance was noted in one patient with right main stem intubation; the resistance decreased when the tube was pulled back. Before use, always check the esophageal detector device for air leaks. If any connections are loose, the leak may allow the syringe to easily be withdrawn, thereby mimicking tracheal location of the tube.
When using the aspiration technique, apply constant, slow aspiration to avoid occlusion of the tube from tracheal mucosa drawn up under the high negative pressure. If the tracheal tube is placed correctly, 30 to 40 mL of air can be aspirated without resistance. If air was initially aspirated and some resistance is then encountered, the tracheal tube should be pulled back between 0.5 and 1.0 cm and rotated 45 degrees. This takes the tube out of the bronchus if it has been placed too deeply and changes the orientation of the bevel if the tube has been temporarily occluded with tracheal mucosa. Air is easily aspirated if the tube was in the trachea, but repositioning it will make no difference if the tube was in the esophagus. The syringe aspiration technique can be used before or after ventilation of the patient. Apply continuous cricoid pressure pending confirmation of proper tube placement. Inflation of the tube cuff has no effect on the reliability of the test.130 This device is reliable, rapid, inexpensive, and easy to use.130
A squeeze-bulb aspirator is an alternative to the syringe technique. Attach the bulb to the ET tube and squeeze; if the tube is in the esophagus, it is accompanied by a flatus-like sound followed by absent or markedly delayed refilling. Insufflation of a tube in the trachea is silent with instantaneous refill. An early study with the Ellick evacuator bulb device reported that 82% of esophageal intubations were identified.131 A later study using a slightly different bulb device (Respironics, Murrysville, PA) found that all 45 esophageal intubations were detected.132 The device is cheap, easy to use, and operated single-handedly in less than 5 seconds.131 The bulb should not be used in freezing temperatures because of loss of elasticity. Confusion may occur if the esophageal tube is tested more than once because subsequent inflations may be silent. With repeated assessments, false-positive refilling of the bulb may occur as a result of instillation of air during the first attempt. This observation has led to a recommendation that the bulb be compressed before it is attached to the ET tube. Delayed, though complete refilling of the bulb may occur with bronchial tube placement or placement in the more pliable pediatric airway. The bulb suction modification of the aspiration technique has not been studied as thoroughly as the syringe technique.
A significant number of false positives occur with esophageal detection devices (the tube is correctly placed in the trachea, but the device suggests that it is in the esophagus). These patients are almost uniformly obese. Fiberoptic evaluation found that the tracheal wall was invaginated into the ET tube because of the negative pressure.133 In such circumstances, if the intubation was felt to be successful, visually confirm that the ET tube went through the cords. Alternatively, if the patient has a perfusing rhythm and an expired CO2 device is available, it should be used. To date, there has been one reported case of unrecognized esophageal intubation undetected by the syringe aspiration technique.134 In this case there was marked gastric distention from forceful bag-mask ventilation. The esophageal detection device is not reliable in confirming tracheal tube depth and position after intubation because easy aspiration of air will occur if the tip of the tube is located supraglottically (expired CO2 will also be misleading).
End-Tidal CO2 Detector Devices: A high level of CO2 in exhaled air is the physiologic basis for capnography and the principle on which end-tidal CO2 pressure (Petco2) detectors were developed (see Chapter 2). Continuous waveform capnography is recommended by the American Heart Association guidelines as the most reliable method of confirming and monitoring correct placement of an ET tube (class I, level of evidence [LOE]). This recommendation is based on multiple studies showing 100% accuracy of waveform capnography for detecting correct ET tube placement.98 Continuous waveform capnography is accurate even in cardiac arrest. Patients with prolonged cardiac arrest will still have a typical square waveform but a low Petco2 value.
When waveform capnography is not available, emergency providers may have to rely on colorimetric CO2 indicators, which correspond to CO2 levels flowing through the device when placed on the tracheal tube adapter (Fig. 4-9, step 10). The typical device displays opposite colors (e.g., yellow and purple) to indicate low levels of CO2 in esophageal gas versus the high levels of CO2 exhaled from the respiratory tree. Handheld quantitative or semiquantitative electronic CO2 monitors are also available. Eventually, all prehospital defibrillators will have advanced monitoring capability that includes capnography.
A multicenter study of a colorimetric device demonstrated an overall sensitivity of 80% and a specificity of 96%.135 In patients with spontaneous circulation and an inflated tracheal tube cuff, the sensitivity and specificity were 100%. The poor sensitivity (69%) noted in patients in cardiac arrest was due to the fact that low exhaled CO2 levels were seen with both very-low-flow states and esophageal intubation. The device must be used with caution in cardiac arrest victims. CO2 levels return to normal after return of spontaneous circulation. Furthermore, colorimetric changes may be difficult to discern in situations with reduced lighting, and secretions can interfere with the change in color. Regardless of the monitoring device, patients should be ventilated for a minimum of six breaths before taking a reading. Otherwise, recent ingestion of carbonated beverages can result in spuriously high CO2 levels with esophageal intubation.136 Colorimetric changes do not rule out glottic positioning of the tip of the ET tube. Adequate ventilation and oxygenation may be achieved in the glottic position, but there is still a risk for aspiration in the absence of a protected airway and the potential for further tube dislodgment. Glottic positioning may be difficult to detect clinically. The only signs may be persistent cuff leak or diminished chest rise with ventilation. Radiographic evidence or direct visualization confirms the diagnosis.137
Ultrasound Detection of Tracheal Tube Location: Some early data suggested that ultrasound may play a future role in identifying tube location after intubation. There are two reports and both are small. The first study, performed with cadavers, had a sensitivity of 100% and a specificity of 97%.138 The second study, which was conducted in the operating room, had both a sensitivity and specificity of 100%.139
Comparison of Detector Devices: In the setting of spontaneous circulation, both syringe aspiration and Petco2 detection are highly reliable means of excluding esophageal intubation. An animal study comparing these techniques with clinical assessment and measuring the speed and accuracy of determining tube placement demonstrated that both the syringe esophageal detector device and Petco2 detection were highly accurate, approaching 100%.140 The esophageal detector device was more rapid, with determination in 13.8 seconds versus 31.5 seconds for Petco2 detection. The detector device remained accurate when air was insufflated into the esophagus for 1 minute, thus simulating unrecognized esophageal placement. Clinical assessment alone yielded an alarming 30% rate of failure to identify esophageal intubation. In the setting of cardiac arrest, the aspiration method is more reliable than CO2 detection because its accuracy is not dependent on the presence of blood flow.
An unequivocal method for determining tracheal tube location uses the fiberoptic scope. Passage of the scope through the tube with visualization of the tracheal rings confirms ET placement and position within the trachea. Placement of a lighted stylet down the tracheal tube and successful transtracheal illumination can also be used to determine correct ET placement.141
Complications of Intubation
Though seldom associated with serious complications, unrecognized placement of the tip of the ET tube in the right main stem bronchus may cause hypoxia, atelectasis, pneumothorax, and unilateral pulmonary edema.142 Obtain a chest radiograph soon after intubation to confirm tube positioning. Endobronchial intubation was clinically unrecognized without a chest film in 7% of prehospital intubations in one study.143 Persistent asymmetric breath sounds after correct tube positioning suggests unilateral pulmonary pathology (e.g., main stem bronchus obstruction, pneumothorax, hemothorax).
Generally, dentures are removed for intubation but kept in place for bag-mask ventilation. Check for loose or missing teeth before and after orotracheal intubation. Look for any avulsed teeth not found in the oral cavity on the postintubation chest film. Broken teeth are the most common complication of laryngoscopy.144 Laceration of the mucosa of the lips, especially the lower lip, may occur. Tracheal or bronchial injuries are rare but serious and usually occur in infants and the elderly as a result of their decreased tissue elasticity.145
Vomiting with aspiration of gastric contents is another serious complication that can occur during intubation. Case reports of both adult respiratory distress syndrome and chronic lung disease are thought to be due to aspiration of activated charcoal.145,146 In patients who are obtunded or who are at high risk for seizures or vomiting, consider tracheal intubation before the administration of activated charcoal.
There are ongoing concerns that direct laryngoscopy may cause or worsen spinal cord injury in a patient with an unstable cervical spine injury. These concerns are essentially theoretical, with no credible data to prove or disprove a true effect. Many anesthesiologists prefer awake fiberoptic intubation in this setting, but no data support one approach over another. A cadaveric study of intubation during fluoroscopy showed that direct laryngoscopy with in-line immobilization in the setting of complete C4-5 ligamentous instability did not result in clinically significant movement.147 The greatest degree of motion occurs at the atlanto-occipital junction and decreases with each sequential interspace, and studies of cervical spine instability at these higher levels have not been performed.148 It can also be argued that cadaveric studies do not accurately depict the trauma setting, and yet this model is probably going to remain the best one available. Unless new information emerges regarding the risks of orotracheal intubation with direct laryngoscopy, it appears to be a safe approach when performed in conjunction with in-line immobilization.
Intubation can be complicated by a persistent air leak. This is generally caused by failure of either the cuff or the pilot balloon or by positioning the cuff balloon between the vocal cords. If the cuff balloon is leaking, replace the tracheal tube (see “Changing Tracheal Tubes” later in this chapter). If the pilot balloon is determined to be leaking, this can usually be remedied without changing the tube.149 An incompetent one-way balloon valve can be fixed by placing a stopcock in the inflating valve. Reinflate the cuff and shut off the stopcock to solve the problem. If the leak involves the pilot balloon or if the distal inflation tube has been inadvertently severed, cut off the defective part and slide a 20-gauge catheter into the inflation tube. Then connect the stopcock to the catheter, inflate the cuff, and close the stopcock.
Tracheal stricture used to be a significant late complication of long-term intubation with low-volume, high-pressure cuffs. The use of high-volume, low-pressure cuffs has markedly decreased the incidence of this complication.150 Tubes with high-pressure cuffs are obsolete and should be avoided.
Conclusion
Direct laryngoscopy is the most common means of securing a definitive airway. With adequate preparation and emphasis on preoxygenation and positioning, it is usually successful. RSI has rendered patients much more amenable to direct laryngoscopy for emergency airway management (see Chapter 5). Once the patient is paralyzed, it becomes the clinician’s supreme responsibility to ventilate, oxygenate, and protect the patient’s airway. Mastery of direct laryngoscopy fulfills part of this obligation. Being prepared for failure and having a successful backup plan fulfills this responsibility. The remainder of this chapter is devoted to adjuncts and alternatives to direct laryngoscopy.
Video and Optical Laryngoscopes
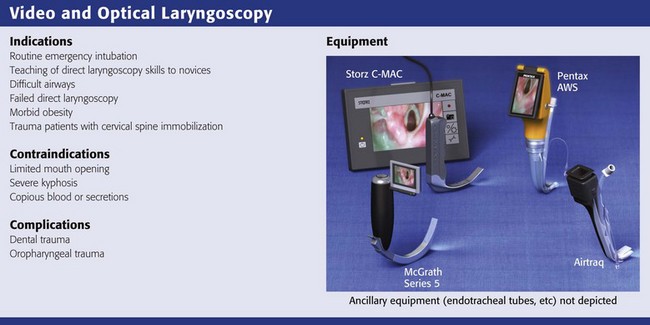
Several video and optical laryngoscopes are transforming airway management. These devices are all somewhat similar in that they use video, fiberoptics, or mirrors to visualize the larynx. They provide a better view of the glottis with less effort and have a shorter learning curve than direct laryngoscopy does. Only the Macintosh shaped video laryngoscopes are designed to sweep the tongue aside and allow either a direct or video view of the larynx. The other devices are made to look around the curve of the tongue rather than lifting it or pushing it aside, so they are more angulated. The drawback of more angulated devices is that getting an excellent view of the vocal cords does not always correlate with easy intubation151,152 because it can be difficult to manipulate the ET tube around the sharp curve of the blade. Adding a tube channel to the blade obviates the need to manipulate the ET tube around the sharp curve but may add other complexities.151 Because expense is a major impediment to the widespread use of video laryngoscopy, the relatively inexpensive Airtraq device (see category 3 below) may be a good choice in settings in which difficult intubation is rare and funding is limited.4
Video and optical laryngoscopes can be divided into three broad catagories152:
1. Video laryngoscopes with standard Macintosh blades (Storz C-MAC, GlideScope Direct Intubation Trainer, McGrath MAC, Venner A.P. Advance Mac Blade)
2. Video laryngoscopes with angulated blades (GlideScope, McGrath Series 5, Storz D-Blade)
3. Video or optical laryngoscopes with a tube channel (Airtraq, Pentax AWS, KingVISION)
See the following sections for pictures and manufacturers of each device.
Video Laryngoscopes with Standard Macintosh Blades
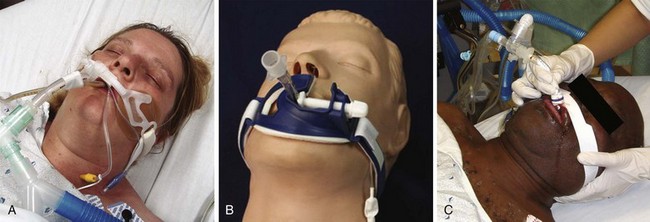
These devices have blades that are exactly the same or very similar to a standard English or German Macintosh direct laryngoscope. They all have a digital camera adjacent to the light source a few centimeters proximal to the tip. Each of these devices can be used for either conventional direct laryngoscopy or video laryngoscopy. The Storz C-MAC is the only device in this group that has been sufficiently tested (Fig. 4-22).153–161 The laryngeal view obtained on the video monitor is better than the direct view in most patients.154,156 The improved laryngeal view provided by the camera is especially helpful in morbidly obese patients and in trauma patients who require cervical spine immobilization.153,160
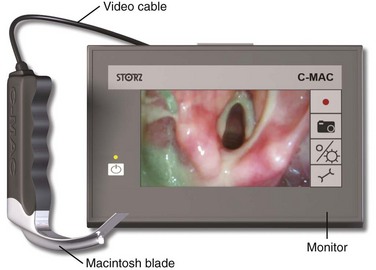
Figure 4-22 The Storz C-MAC video laryngoscope.
Background
The Storz Video Macintosh Laryngoscope was introduced into clinical practice by Kaplan, Berci, and colleagues in 2002.159 The latest version of this device, the Storz C-MAC, is smaller, more portable, and cheaper.152 It also has a wider field of view because the camera is on the blade instead of in the handle.162 The C-MAC consists of a one-piece blade, a cable, and a monitor. It can record digital video or still images onto a Secure Digital memory card. Older versions of this device were referred to as the Storz Video Macintosh Laryngoscope, Storz BERCI DCI Video Laryngoscope, Storz V-MAC BERCI DCI, and Storz Berci-Kaplan Videolaryngoscope.154,156,161,163 The GlideScope Direct Intubation Trainer, McGrath MAC, and Venner A.P. Advance Mac Blade appear similar in design, but they are all very new and untested.
Pathophysiology
There is limited research but some data that the Storz C-MAC provides better glottic visualization and decreases the number of intubation attempts in patients with cervical spine immobility and morbid obesity.153,160
Indications
The Storz C-MAC may be a good option for routine intubations at academic institutions that are teaching novice intubators. In 2008, Howard-Quijano and coauthors published a prospective, randomized, crossover study of 37 novice intubators (medical students and residents) who performed 222 intubations with the Storz Video Macintosh system.155 The novice intubators performed only direct laryngoscopy and were not allowed to see the video monitor in any case. Intubations were randomized so that either the instructors could see the video monitor or it was covered by a drape. Novice intubators were given 2 minutes to intubate before the instructor took over. When instructors were allowed to see the video monitor, the novice intubators had a 69% success rate and a 3% rate of esophageal intubation. When instructors were blinded to the video monitor, the novice intubators had a 55% success rate and a 17% rate of esophageal intubation. Also, a 2008 manikin study by Low and associates showed that novices who learned direct laryngoscopy skills via the Storz Video Macintosh system found it easier to intubate, had more confidence, and exhibited improved knowledge of airway anatomy.163
Use of the C-MAC may also be indicated when direct laryngoscopy is difficult. In 2006, Kaplan and coauthors published a prospective multicenter trial in which the direct laryngoscopy view was compared with the video view during 865 intubations with the Storz Video Macintosh system.157 They reported 7 cases in which the direct view of the larynx was easy and the video view was difficult and 100 cases in which the direct view was difficult and the video view was easy. In 2009, Jungbauer and colleagues studied 200 patients with Mallampati class III or IV anatomy.156 They randomized patients to intubation with direct laryngoscopy or with the Storz Video Macintosh system. The success rate with direct laryngoscopy was 92% and the success rate with the Storz Video Macintosh system was 99%. Finally, in 2010 Cavus and coworkers published a report of three patients in whom there was unexpected difficulty with direct laryngoscopy but good glottic visualization and successful intubation on the first attempt with the Storz C-MAC.162
Two studies compared the Storz C-MAC with the GlideScope and McGrath systems. A 2009 study of 450 patients with normal airways by van Zundert and colleagues showed that those intubated with the Storz C-MAC were intubated more quickly and had a higher first-pass success rate than did those intubated with the GlideScope or McGrath MAC.161 Another study compared the C-MAC with the GlideScope and McGrath in 150 morbidly obese patients and found that those intubated with the C-MAC had significantly fewer intubation attempts and a shorter intubation time.160
In addition, the C-MAC may be useful in trauma patients with cervical spine immobilization. Two studies suggest that the C-MAC provides better visualization of the glottis and decreases the number of intubation attempts in manikins with a stiff cervical spine.163
Procedure
Much of the procedure for laryngoscopy with the C-MAC is similar to that for direct laryngoscopy. Keep in mind that the tip of the C-MAC is usually placed in the vallecula, but when laryngoscopy is difficult, it may help to directly lift the epiglottis with the tip of the blade; this is known as the “straight-blade technique.”162
Video Laryngoscopes with Angulated Blades
The GlideScope (Verathon, Bothell, WA), McGrath Series 5 (Aircraft Medical Ltd., Edinburgh, United Kingdom), and Storz D-Blade (Karl Storz, Tuttlingen, Germany) video laryngoscopes are similarly shaped devices that have sharply angulated, nonchanneled, and narrow-flanged blades.151,152,164,165 All of these devices have a distal angulation of about 60 degrees and a digital camera a few centimeters proximal to the tip. These blades do not allow laryngoscopy by direct visualization. They are designed to follow the natural curvature of the upper airway and look around the tongue rather than displace it. Excellent visualization of the glottis is nearly always achieved when the distal tip of the blade is in or near the vallecula. Because the point of reference is from the location of the camera near the distal tip of these devices, they reliably provide a panoramic view of the larynx that cannot be achieved with direct laryngoscopy. Both the GlideScope and the McGrath allow easy visualization of the larynx, even with inexperienced providers or difficult airway anatomy.160,161,164,166–171 However, maneuvering the ET tube around the severe angle of the blade and into the trachea is more difficult, and this is where problems can occur.151 In one large trial involving inexperienced GlideScope operators, the device was abandoned in 3.7% of intubations despite the fact that an excellent view of the glottis was achieved in most of these cases.164
Background
In 2001 the original GlideScope video laryngoscope became the first commercially available video laryngoscope. The first report of its use was a case report of management of a difficult airway.172 Three GlideScope models are now available: the GVL, which has a reusable plastic handle and a mountable monitor; the Cobalt AVL, which uses disposable plastic blades to cover a reusable video baton with a mountable monitor; and the Ranger, which has a small portable monitor and the choice of a reusable blade or a video baton with disposable blades (Ranger Single Use). All GlideScope models have a lens antifog mechanism and digital recording capability.
The McGrath portable video laryngoscope is another device with similar characteristics but is more compact. It became available in 2005, and the current model is called the McGrath Series 5 (Fig. 4-23). The shape of the blade is very similar to that of the GlideScope, but it has a small video monitor (1.7 inches diagonally) on the end of the handle. It also has an adjustable-length, detachable metal blade (camera stick) that is covered by a disposable plastic blade during use, so no part of the handle or metal blade makes contact with the patient. It has no recording capability.
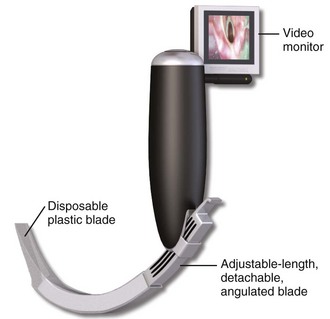
Figure 4-23 The McGrath Series 5 video laryngoscope.
Indications
The GlideScope, McGrath Series 5, and Storz D-Blade may be especially useful when direct laryngoscopy is difficult or fails. In 2010, Noppens and coauthors reported a series of 61 patients with failed direct laryngoscopy, all with Cormack-Lehane grade III and IV views, who subsequently had good laryngoscopic views and 95% were successfully intubated with a McGrath video laryngoscope.173 In 2011, Cavus and colleagues published a very similar series of 20 patients with grade III and IV views who had failed direct laryngoscopy but subsequently had good laryngoscopic views and were all successfully intubated with the Storz D-Blade.174 There are many case reports of easy intubations with the GlideScope and McGrath video laryngoscopes after failed direct laryngoscopy.172,175 In addition, several case reports show that the GlideScope and McGrath can facilitate successful awake intubation in patients with known or suspected difficult airways.176–178
A significant advantage of the more angulated video laryngoscopes is that they can provide a good view of the larynx when the neck is in the neutral position. Not surprisingly, there are several small studies and case reports demonstrating that the GlideScope and McGrath provide good laryngoscopic views and a high rate of successful intubation in patients with cervical spine immobilization.179–181 In 2006, Lai and associates published a series of 12 patients with ankylosing spondylitis and difficult direct laryngoscopy. Eight of these patients were able to be intubated nasotracheally with the GlideScope.182 There is also a case report of a patient with severe ankylosing spondylitis who was easily intubated on the first attempt with the McGrath.183
Finally, the GlideScope is useful for routine intubations by inexperienced or novice intubators. In a 2009 study by Nouruzi-Sedeh and coworkers, 20 novices each intubated five patients with direct laryngoscopy and five patients with the GlideScope. They had a 51% success rate with direct laryngoscopy and a 93% success rate with the GlideScope.169
Contraindications
Contraindications to using angulated video laryngoscopes are not well described in the literature. As with any video or optical device, blood or secretions on the lens may decrease visualization of the larynx. Fogging was a problem with older fiberoptic devices, but this problem is rare with the newer video devices. Limited mouth opening (<2 cm) can make insertion of these devices more challenging. The biggest contraindication is probably lack of experience or absence of a rigid stylet to allow the operator to maneuver the ET tube around the sharp angle of the blade.151
Procedure and Technique
Grasp the video laryngoscope in the left hand and place it in the patient’s mouth with the scissor technique. Under direct vision, advance it through the oropharynx along the midline of the tongue (Fig. 4-24, step 4). Then look up at the monitor while continuing to advance the blade down the midline of the tongue, progressively identifying the base of the tongue and the epiglottis. With a gentle lifting motion, place the tip of the blade in the vallecula. Elevate the epiglottis and expose the laryngeal inlet (Fig. 4-24, step 5). If the glottis is not well visualized, tilt the handle back slightly to enhance exposure. Manipulate the neck externally to enhance visualization. If more exposure is required, place the tip of the blade under the epiglottis and gently lift and tilt back. While attempting to optimize the laryngeal view, be careful to not place the blade too close to the laryngeal inlet because it may tip the larynx anteriorly and inferiorly and thus make it more difficult to access the laryngeal inlet and pass the tube through it.
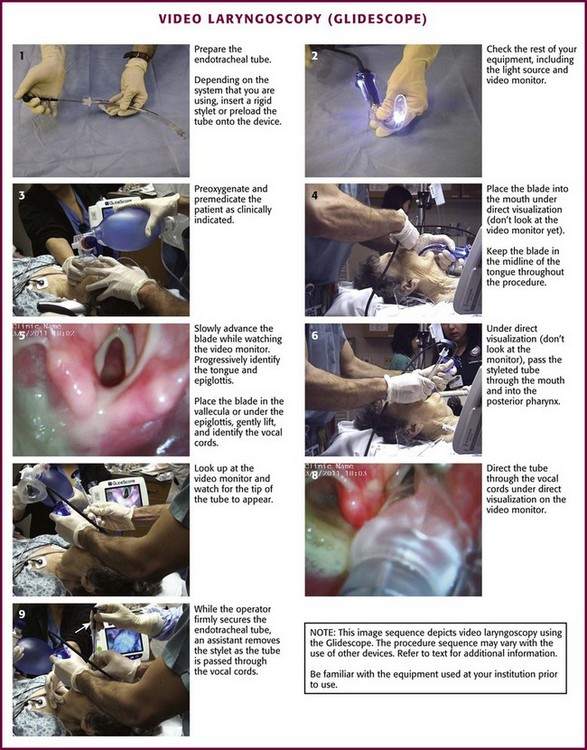
Use a rigid steel GlideRite stylet, which has the same 60-degree curve as the blade of the GlideScope, McGrath, and D-Blade. Alternatively, a malleable stylet with a 60-degree distal bend or a bougie may be acceptable, but these devices may fail if tube passage is challenging. Pass the ET tube through the oropharynx under direct vision until it passes under the curve of the blade, and then look for it on the monitor (Fig. 4-24, step 6). Decrease the chance of soft tissue injury by carefully passing the ET tube along the side of the GlideScope.184 When the tip of the ET tube comes into view, direct it into the glottis and advance it to the appropriate depth (Fig. 4-24, step 8). If a malleable stylet or bougie is used, it may be difficult to get the tube to go anterior enough. If a malleable stylet must be used, try introducing the tube from the right side of the patient and rotating it 90 degrees and vertically into a midline position behind the tongue. This will help the tip of the stylet maintain its shape as it passes through the oropharynx. Another option is to use a Parker Flex-It intubation stylet to direct the tip of the ET tube anteriorly.164 It is important to realize that the fixed steel (GlideRite) stylet needs to be withdrawn as the ET tube is passed through the vocal cords because the tip of the stylet will be essentially pointing toward the ceiling as it approaches the laryngeal inlet (Fig. 4-24, step 9). The large knob on the proximal end of the GlideRite stylet is designed to be pushed up by the tip of the intubator’s thumb, thus making ET tube advancement and stylet withdrawal a one-handed procedure.
Complications
Several relatively minor complications have been reported with use of the GlideScope. There are case reports of injury to the soft palate and tonsillar pillars, as well as two cases of puncture of the right palatopharyngeal arch, one requiring surgical repair.184–186
Summary
Video-assisted laryngoscopy is a major advancement in visualization of the laryngeal inlet. These devices are very promising because they provide an improved laryngeal view and have a shorter learning curve than direct laryngoscopy does. The majority of intubation failures are due to an inability to pass the tube through the larynx despite excellent glottic views.164 Using a fixed steel stylet (GlideRite stylet) helps, but does not eliminate this problem.151 Advancements need to be made in achieving tracheal intubation once the glottis is seen. The addition of a tube channel obviates the need to maneuver the ET tube around the sharp angle of the blade, and channeled devices are described in the next section.
Video and Optical Laryngoscopes with a Tube Channel
Four devices allow indirect video or optical visualization of the larynx and also provide a channeled blade to guide the ET tube through the vocal cords. The Airtraq (Prodol Meditec S.A., Vizcaya, Spain) and Pentax AirWay Scope (AWS) (Pentax, Tokyo) are the only devices in this group that have been sufficiently tested (Figs. 4-25 and 4-26). The KingVISION (King Systems, Noblesville, IN) and Venner A.P. Advance Difficult Airway Blade (DAB) (Venner Medical, Singapore) are very new and essentially untested. The ET tube is inserted into the channel before the device is placed in the airway, and the channel guides the ET tube into the trachea once the glottis is visualized. This design helps alleviate the most common problem associated with video and optical laryngoscopy, difficulty placing the ET tube despite an excellent view of the glottis. Several small studies have demonstrated the utility of the Airtraq and Pentax AWS, but the KingVISION is very new and untested.
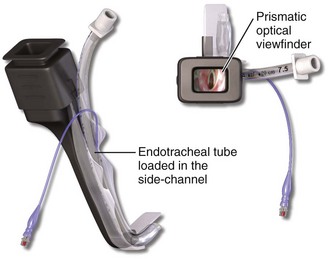
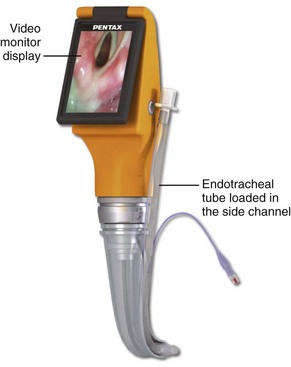
Figure 4-26 The Pentax AWS (Air Way Scope).
Background
The concept of a laryngoscope shaped like the natural curvature of the upper airway and containing a channel to guide the ET tube is not new, but the addition of optics and video just recently made this concept a reality.187–190 The advantage of these devices is that they provide an excellent view of the glottis with little need for maneuvering and they eliminate the requirement for the hand-eye coordination needed to pass the ET tube around an acute curve.191–193
Anatomy and Physiology
All three of the channel-guided devices have the same curvature as the normal upper airway. They allow visualization of the glottis by looking around the tongue instead of trying to straighten the airway and push the tongue out of the way. They consistently provide a better view of the glottis and may lead to less airway trauma and hemodynamic stimulation than occurs with direct laryngoscopy.188,194,195
Indications
Difficult intubation with direct laryngoscopy is an indication for using a channel-guided optical or video device. The Airtraq and Pentax AWS have a high rate of success in patients with known or predicted difficult airways.168, 188,194 In 2009, a study by Asai and colleagues reported 270 patients with difficult airways by direct laryngoscopy (grade III and IV views) and found that 268 of these patients (99.3%) had good glottic visualization and were easily intubated with the Pentax AWS.194 In a 2009 trial of patients with expected difficult airways, Malik and coworkers randomized 75 patients to direct laryngoscopy, the Pentax AWS, or the GlideScope.168 The rate of successful intubation was 84% with direct laryngoscopy, 96% with the GlideScope, and 100% with the Pentax AWS.
The Airtraq and Pentax AWS are particularly useful for difficult airways because of cervical spine immobilization and morbid obesity.196–199 In 2007, Ndolo and coauthors published a study of 106 morbidly obese patients who were randomized to intubation with direct laryngoscopy or the Airtraq.200 All patients randomized to the Airtraq were successfully intubated, but six patients in the direct laryngoscopy group required rescue intubation with the Airtraq. In 2007, Maharaj published a study of 40 patients with cervical spine immobilization who were randomized to direct laryngoscopy or the Airtraq.198 All patients randomized to the Airtraq group were intubated on the first attempt and were intubated faster and with less difficulty than the direct laryngoscopy group. Dhonneur, Ndoko, and their colleagues described alternative techniques for insertion of the Airtraq into the mouths of morbidly obese patients.199,200 They rotated the device 90 to 180 degrees for initial insertion of the distal tip into the patient’s mouth and then rotated it into the normal orientation before advancing it into the hypopharynx.
In 2008, Enomoto and associates studied 203 patients with manual in-line neck stabilization who required intubation.197 They randomized these patients to intubation with direct laryngoscopy or the Pentax AWS. The intubation success rate with direct laryngoscopy was 89% versus 100% with the Pentax AWS. A similar study by Liu and coworkers in 2009 included 70 patients with manual in-line stabilization of the cervical spine and randomized them to intubation with the Pentax AWS or the GlideScope.166 They reported a 100% rate of successful intubation with the Pentax AWS and 89% with the GlideScope. In addition, two studies used fluoroscopy to compare cervical spine motion during intubation with direct laryngoscopy versus intubation with the Pentax AWS.201,202 Both studies found that intubation with the Pentax AWS caused less movement of the upper cervical spine than direct laryngoscopy did.
The Airtraq is generally used during RSI but may also be used for awake intubation of patients with difficult airways.203,204 When compared with direct laryngoscopy, both the Airtrach and Pentax AWS consistently provide better visualization of the glottis and have a higher rate of successful intubation.168,188,189,194,197 Most impressively, two small studies and one large trial have shown that the Airtraq has a very high rate of success after failed direct laryngoscopy.4,188,189 In 2011, Amathieu and coauthors reported the results of a large prospective trial in which they used an algorithm that specified use of the Airtraq as a backup for all cases of failed RSI with direct laryngoscopy.4 They had 28 patients who could not be intubated with direct laryngoscopy after multiple attempts, including the use of a bougie. Intubation with the Airtrach was successful in 27 of 28 of these patients (97%), and the other patient was intubated with an ILMA.4
Procedure
Dhonneur, Ndoko, and colleagues described alternative techniques for insertion of the Airtraq in morbidly obese patients.199,200 They rotate the device 90 to 180 degrees for initial insertion of the distal tip into the patient’s mouth and then rotate it into the normal orientation (handle toward the patient’s feet) before advancing it into the hypopharynx. This helps alleviate problems with the handle of the device striking the patient’s chest during insertion.
Intubating Laryngeal Mask Airways
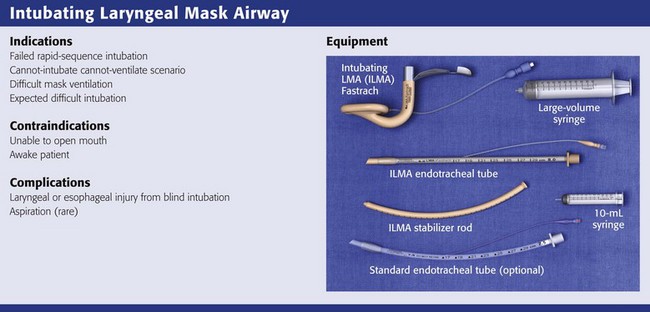
ILMAs are unique devices because they are easy to insert, provide excellent ventilation and oxygenation (better than bag-mask ventilation), and also provide a reliable means of tracheal intubation.35,205–208 Many clinicians who have used the Fastrach ILMA in an emergency setting insist on having this device in their difficult airway tool kit.* It is impossible to overstate the value of this device for failed emergency RSI, and unlike other rescue devices, a large volume of data support its use in general and in the setting of failed RSI.† Subsequently, it has become the primary rescue device for failed RSI in many emergency departments.
There are many different LMAs and other extraglottic devices on the market, and this can cause confusion. Although several extraglottic devices (see Chapter 3) can be used for rescue ventilation or oxygenation, only the devices discussed here can also provide a reliable means of tracheal intubation. The Fastrach is the only device in this group that has been extensively tested and the only ILMA that can reliably facilitate blind intubation (without fiberoptic guidance).‡
Indications
The LMA Fastrach is indicated as an alternative to bag-mask ventilation or as a conduit for intubation of difficult airways.212 In the cannot-intubate/cannot-ventilate scenario it is a reliable rescue device. In this situation, adequate ventilation with the ILMA is possible in nearly all cases.2,4,96 The ILMA is more successful for ventilation and intubation of difficult airways than the LMA Classic.96 For inexperienced providers, ventilation with the ILMA is usually superior to face mask ventilation.219
The ILMA can also be used as a primary ventilation and intubation device in patients with difficult airways.212 Studies of difficult airway management with the ILMA show that almost all patients can be adequately ventilated with the ILMA and 94% to 99% can be intubated through the device.§ Patients who are difficult to intubate by direct laryngoscopy are often easy to intubate with the ILMA because many anatomic factors that cause difficult direct laryngoscopy do not affect placement or function of the LMA Fastrach.35,36
Intubation through the LMA Fastrach
The LMA ET tube, also known as the LMA Fastrach, is designed specifically for the ILMA. There are two versions of the LMA ET tube: a reusable and a single-use disposable. The reusable version is made of silicone and the single-use version is made of polyvinyl chloride (PVC). The specialized LMA ET tubes are soft and straight and have a midline-beveled tip. These features are designed to allow the LMA ET tubes to emerge from the ILMA mask at an acute angle and to minimize potential injury to the vocal cords and esophagus. The drawback of the specialized Fastrach ET tubes is that they have low-volume high-pressure cuffs, which could potentially cause ischemic damage to the trachea, and there are no clinical data on how long these tubes can remain in place.222 Use of a standard ET tube for intubation through the LMA Fastrach has been well studied and is the current practice in many EDs.223–225 Another option is to use a Parker Flex-Tip ET tube (see Fig. 4-7).226
Procedure and Technique
Before intubation through the ILMA, make sure that the patient is ventilating optimally through the device. Determine this by manually ventilating the patient while holding the ILMA handle with a “frying-pan” grip. If any resistance is felt, adjust the handle by slight rotation in the sagittal plane and then lift the entire device toward the ceiling (see the “Chandy maneuver,” Fig. 4-27, step 3).
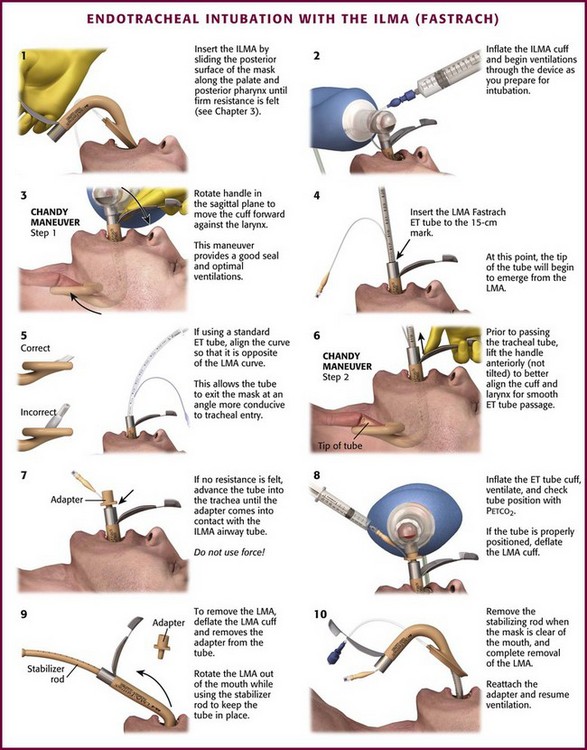
Figure 4-27 Endotracheal (ET) intubation with the intubating laryngeal mask airway (ILMA) (Fastrach).
Before inserting the ET tube, lubricate it generously. Advance the ET tube with the curve opposite that of the LMA Fastrach curve (Fig. 4-27, step 5). When the tube has advanced to 15 cm, the tip will start to emerge from the LMA Fastrach mask. Just before advancing the tube, use the frying-pan grip and apply a slight anterior lift (not a tilt) to further align the aperture of the ILMA with the glottis (second part of the “Chandy maneuver,” Fig. 4-27, step 6). Do not use a levering action. While holding the handle in this position, gently pass the tracheal tube to about 16.5 cm. In this position the ET tube will push the epiglottic elevating bar up and may now come in contact with the larynx or esophagus. If cricoid pressure is being applied, decrease it because it may interfere with passage of the ET tube through the glottis. If no resistance is encountered, advance the tube into the trachea until the tracheal tube adapter comes in contact with the proximal end of the ILMA tube (Fig. 4-27, step 7). Do not use force when advancing the tube.
If the ET tube does not pass into the trachea easily, withdraw the ET tube to the 15-cm mark and readjust the position of the LMA Fastrach. If the tube meets resistance at about 17 cm, this may indicate a fully down-folded epiglottis or impaction of the tip of the tube against the anterior laryngeal wall. Rotating the tube may overcome impaction of the tip. To correct a down-folded epiglottis, remove the ET tube and perform the “up-down maneuver” by rotating the ILMA outward 5 to 6 cm without deflating the mask and then sliding it back into the hypopharynx (see Chapter 3, Fig. 3-9, steps 9 and 10). If these maneuvers are unsuccessful, it is likely that the wrong size LMA Fastrach is being used. Consider using a fiberoptic scope to guide intubation (also see the “Insertion Technique and Maneuvers Guide,” on the company website: www.lmana.com).
Using a Standard ET Tube
Use of a standard ET tube is not recommended by the manufacturer, but it is a well-studied and common practice.224,227–229 The manufacturer warns that using a standard ET tube may be associated with a greater likelihood of laryngeal trauma, but there are no reports of such trauma in the literature. The only report of significant trauma with blind intubation through the LMA Fastrach is a case report of esophageal perforation and subsequent death caused by use of the specialized LMA ET tube.230 A laboratory study showed that a standard PVC ET tube exerts 7 to 10 times more pressure on distal structures than the silicone LMA ET tube does, but the clinical relevance of this finding is unknown.223,231 Some experts suggest warming the tip of a standard PVC ET tube (to soften it) before insertion through the LMA Fastrach.224,227,229
Because of the potential for injury with blind intubation through the ILMA, use fiberoptic guidance if there is any difficulty. If using a standard ET tube, insert the ET tube with its curvature opposite the curvature of the LMA Fastrach tube (Fig. 4-27, step 5). This allows the ET tube to exit the Fastrach at a less acute angle and then to advance into the trachea more easily.213,229
If intubation through the LMA Fastrach fails, the device can still be used to provide ventilation and oxygenation during more invasive airway procedures, such as retrograde intubation or cricothryotomy.232
LMA Fastrach Removal
To remove the ILMA, deflate the cuff (Fig. 4-27, step 8), but be careful to not deflate the ET tube cuff. Start by removing the ET tube adapter. Then hold the proximal end of the ET tube in place while rotating the ILMA out of the hypopharynx. As the ILMA passes over the ET tube and out of the mouth, hold the ET tube in place with the stabilizer rod provided with the ILMA (see Fig. 4-27, step 9). When the ET tube pilot balloon comes in contact with the stabilizer rod, remove the stabilizer rod to allow the pilot balloon to travel through the ILMA tube. Then reattach the ET adapter and resume ventilation. Adjust the depth of the ET tube as needed.
Intubation through the LMA Classic
The recommended technique for tracheal intubation through the LMA Classic uses an FOB and has a high success rate but requires a smaller ET tube and some adjustment maneuvers.233,234 Blind intubation through a nonintubating LMA (LMA Classic or LMA Unique) has a poor success rate and is not recommended.235–237 Using a tracheal tube introducer as a guide through the LMA is also unlikely to be successful and is not recommended.238,239
Fiberoptic Intubation through the LMA Classic: After ensuring that the LMA is ventilating properly, place a well-lubricated ET tube into the LMA tube and advance it to a depth of 24 cm (No. 5 LMA), so that the tip of the ET tube has just passed the fenestrations. Pass a lubricated FOB through the ET tube and advance it through the vocal cords. If the epiglottis is deflected downward, manipulate the tip of the FOB under the epiglottis until the vocal cords come into view. Pass the ET tube over the FOB and into the trachea, and then inflate the ET tube cuff and ventilate the patient. Check for correct ET tube placement with a Petco2 detector.
Alternatively, place a hollow introducer, such as an Aintree Intubation Catheter (Cook Critical Care, Bloomington, IN; www.cookmedical.com), in conjunction with an FOB, through the LMA and into the trachea (Fig. 4-28). Remove the LMA while leaving the exchange catheter as an introducer for the ET tube, much like a conventional tracheal tube introducer.
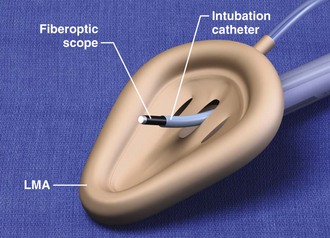
Cricoid pressure may impede placement and intubation through the LMA.93,94 Release cricoid pressure, if necessary, to accomplish these procedures.
Flexible Fiberoptic Intubation
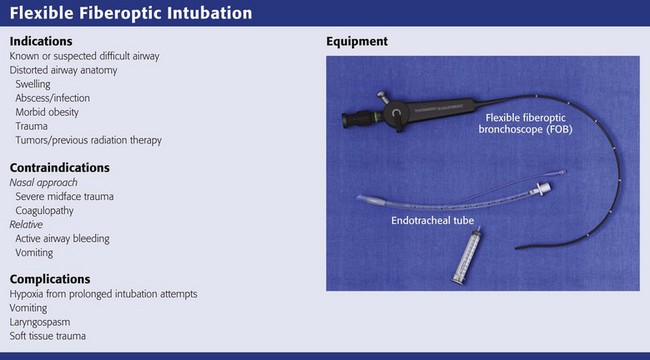
Flexible fiberoptic intubation with an FOB is the most common technique used by anesthesiologists for known difficult airways. Physicians who perform fiberoptic intubations daily have a success rate of nearly 100% when using this technique for difficult intubations.240 In the ED, with more difficult intubating conditions and less experienced fiberoscopists, the success rate is 50% to 90%.241–244 The most common reason cited for failure of flexible fiberoptic intubation in the operating room is clinician inexperience.245 In the ED, failure is most often attributed to poor visibility from blood, vomitus, and other secretions.241–243 Mlinik and colleagues243 found that successful ED fiberoptic intubations averaged 2 minutes whereas failures averaged 8 minutes. They recommended consideration of alternative approaches if intubation attempts take more than 3 minutes. ED clinicians have the opportunity to develop fiberoptic laryngoscopy skills when performing diagnostic nasopharyngoscopy on ambulatory patients.
Indications and Contraindications
Patients with known or suspected difficult airways are good candidates for awake or semi-awake fiberoptic intubation. Patients with distorted airway anatomy, including swelling of the mouth or tongue, upper airway abscess or infection, morbid obesity, cervical spine injury, trismus, and penetrating and blunt neck trauma, are all good candidates for awake fiberoptic intubation. Patients with laryngeal tumors, especially those with a history of radiation therapy encompassing the cervical region, may be impossible to intubate by any other nonsurgical method. An FOB can also be helpful when assessing and intubating patients with airway obstruction from presumed foreign body aspiration. Flexible fiberoptic intubation is best used as the initial approach to tracheal intubation, but it may be used as a rescue device when other methods fail.246 Flexible fiberoptic intubation can also be performed through an ILMA or LMA after difficult ventilation or failed intubation.
Procedure and Technique
Preparation of the upper airway is important for successful awake or semi-awake fiberoptic intubation. Deliver local anesthetic to the upper airway by one of several methods. Nebulized lidocaine (4 to 6 mL of a 4% solution) can be used to anesthetize the entire upper airway if time permits. Lidocaine (3 mL of a 4% solution) can also be injected percutaneously through the cricothyroid membrane via a 20-gauge needle, thereby providing anesthesia to the larynx and trachea. Some laryngeal and tracheal anesthesia can also be achieved by transoral spray with a laryngeal tracheal anesthetic set. Finally, lidocaine (4%) can be sprayed through the working channel of the fiberoptic scope during the procedure via the “spray as you go” technique. The maximum dose of lidocaine for airway anesthesia is 3 to 4 mg/kg (about 200 mg in an adult). Sedation for fiberoptic intubation can be accomplished with ketamine, etomidate, propofol, fentanyl, alfentanil, or midazolam (see Chapter 5). The goal of sedation is to preserve spontaneous respiration but limit patient movement and reaction to the procedure. A combination of good topical anesthesia and mild sedation allows the best chance for successful intubation.
The greatest impediment to successful fiberoptic intubation is an inability to visualize the larynx because blood or secretions have covered the optical element and cannot be removed. Suction actively just before introduction of the FOB. Once the scope is in place, suction minor secretions through the fiberoptic suction port. Significant blood and secretions are best removed by high-flow oxygen through the suction port, which serves simultaneously to remove blood and secretions, defog the tip, and increase the inspired O2 content. The setup required for oxygen insufflation should be available immediately, if not already attached to the suction port before the scope is inserted. Once the scope has entered the trachea, difficulty advancing the ET tube may be encountered. The tip of the tube most commonly catches on the right arytenoid cartilage or vocal cord. To fix this, withdraw the tube 2 cm, rotate it counterclockwise 90 degrees, and readvance the tube to remedy the problem (see Fig. 4-19).
Nasal Approach
To prepare the nose and upper airway, administer vasoconstrictors, topical anesthetics, and lubricants. Vasoconstrictors such as 0.25% or 1.0% phenylephrine drops, oxymetazoline (Afrin) spray, or 4% cocaine spray can limit epistaxis. Ample 2% lidocaine gel in the nasal cavity helps the tube negotiate the nasopharynx without complication. Hypopharyngeal anesthesia, as described previously, minimizes gagging and laryngospasm. Place the well-lubricated ET tube in the nostril first to a depth of about 10 cm and then pass the scope through it. Alternatively, mount the ET tube over the scope and first pass the scope through the nostril (Fig. 4-29). Either sequence is acceptable. The advantage of first passing the tracheal tube through the nose is that it avoids the possibility of secretions covering the scope and positions the scope just above the laryngeal inlet. Its disadvantages are that NT placement may cause bleeding and, in some patients, the tube may not pass easily into the nasopharynx. In some patients the mouth is not accessible at all because of trismus, swelling, or trauma (e.g., angioedema caused by an angiotensin-converting enzyme [ACE] inhibitor), so the nasal route is the only option for fiberoptic intubation (Fig. 4-30).

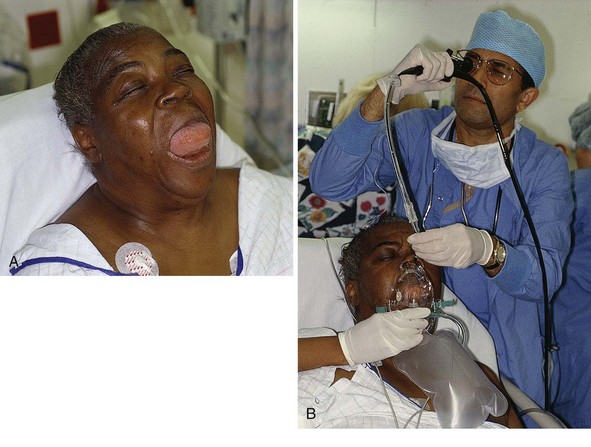
Prepare the most patent nostril and advance the ET tube until it makes the bend into the nasopharynx. If negotiating this bend is difficult, place a well-lubricated FOB through the tube and into the oropharynx to serve as a guide for the ET tube. Once the tracheal tube is in the oropharynx, perform thorough oropharyngeal suctioning before introducing the scope into the ET tube. Advance the FOB toward the larynx. The epiglottis and vocal cords are seen with little or no manipulation of the tip of the FOB in 90% of patients.236 Advance the scope and keep the cords in view by making frequent minor adjustments of the tip of the scope.
In a comatose or obtunded patient, the tongue and other soft tissues may obscure the view of the larynx. This can be alleviated by asking an assistant to pull the tongue forward or apply a chin- or jaw-lift maneuver. Advance the scope through the larynx to the carina and pass the ET tube over the firmly held FOB into the trachea. Remember that in adults, the average distance from the naris to the epiglottis is 16 to 17 cm. If the scope has been advanced much beyond this distance and the glottis is still not seen, the scope is probably in the esophagus.247 If the scope meets resistance at about this same level and only a pink blur is visible, the tip of the scope is probably in a piriform sinus. Transillumination of the soft tissues may confirm this and indicate the necessary corrective maneuvers.
Oral Approach
Difficulty with the oral approach can be minimized by using an oral intubating airway (Fig. 4-31). This adjunct resembles an oropharyngeal airway but is longer and has a cylindrical passage through which the FOB and tracheal tube are passed. The tip of this airway lies just cephalad to the epiglottis and ensures midline positioning. Make sure that the patient is either adequately anesthetized or obtunded before the oral airway is placed to minimize gagging or vomiting. Place a well-lubricated FOB, premounted with an ET tube, through the oral intubating airway and fiberoptically intubate the trachea (Fig. 4-29, upper right inset). Advance the ET tube over the scope and into the trachea. This may require the same counterclockwise maneuver as described with the nasal approach. After successful intubation, the oral airway can be left in place as a bite block or may be removed over the ET tube after removal of the tube adapter. Some oral intubating airways can be removed from the mouth without disconnecting the ET tube adapter.
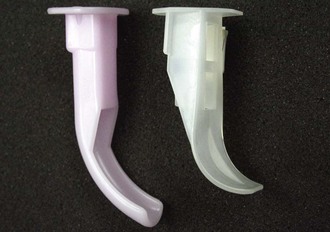
An alternative approach to the traditional oral fiberoptic intubation for an anticipated difficult airway requires two clinicians. One performs direct laryngoscopy, places the tip of the fiberoptic scope under the epiglottis, and blindly advances it while the second clinician, holding the body of the scope, directs the tip fiberoptically through the cords (Fig. 4-32).
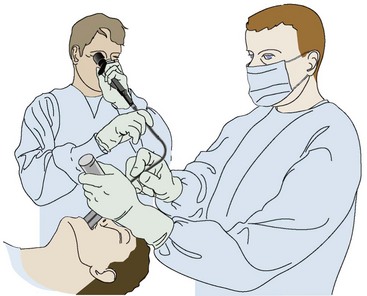
Complications
Complications of fiberoptic orotracheal intubation include hypoxia from prolonged intubation attempts, emesis, and laryngospasm. Oxygen saturation monitoring should alert the clinician to hypoxia. Most complications seen with fiberoptically guided NT intubation are associated with passing the ET tube through the nasopharynx. Epistaxis is the most common, followed by other nasopharyngeal injuries. A rare but potentially significant complication may result if on blind advancement of the fiberoptic scope through the ET tube the tip of the scope exits through Murphy’s eye (distal side port of the ET tube).248 Attempts at passing the ET tube through the larynx will fail because the tip of the tube, now extending off the midline, will catch on the laryngeal structures. To avoid this complication, introduce the scope before placing the ET tube.
Optical Stylets
A class of devices that incorporates fiberoptics into a semirigid metal or metal-reinforced stylet was introduced in the late 1990s. These devices can be used in conjunction with direct laryngoscopy or as stand-alone intubating devices. They have been shown to require direct laryngoscopic assistance in 8% to 20% of cases and in general are more successful when used in this way.249,250 Pass the tip of the fiberoptic stylet, with its overlying ET tube, under the epiglottis and direct it through the glottis and into the trachea. Visibility can be hampered by blood and secretions, but less so than with flexible fiberoscopy.251 These devices are far more intuitive and require less practice than an FOB does. The Shikani Optical Stylet and Levitan FPS Scope (Clarus Medical, Minneapolis) are examples of these malleable optical stylets (Fig. 4-33). The Shikani Optical Stylet is most often used similarly to the Trachlight, with the added feature of fiberoptic visualization of anatomic structures lying just beyond the tip of the tube. The Levitan FPS Scope is designed to be used with a laryngoscope and serves as a stylet for the tracheal tube while providing fiberoptic visualization if required. The Bonfils Retromolar Intubation Fiberscope (Storz Endoscopy, Culver City, CA) is rigid but otherwise structurally and functionally similar to the Shikani. The distal end of the Bonfils has a fixed curve of 40 degrees, whereas the other scopes are malleable up to 120 degrees. Power for the Shikani and Bonfils stylets may be supplied by either an external source or batteries. Video cameras can be attached to the eyepiece of all of these devices but have the drawback of making them less maneuverable. The Bonfils is available with an integrated video module. The Levitan stylet is shorter than the other devices, and although it conforms more to the normal length of a stylet, it currently requires that the tube be cut at 27.5 to 28 cm before mounting it on the stylet. It can accommodate down to a 5.5-mm-ID tube. The Shikani stylet comes in two sizes, the adult, which accommodates a 5.5-mm-ID tube, and a pediatric version, which goes down to a 3.5-mm-ID tube. An adjustable plastic ET tube stop is located proximally on the stylet, secures the tube at the desired length, and provides a means for oxygen supplementation during the procedure.
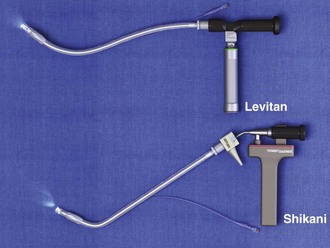
The Video-Optical Intubation Stylet (VOIS; Acutonic Medical Systems AG, Baar, Switzerland) is a semirigid fiberoptic scope that is used like a malleable stylet and attaches to the ET tube via a sliding adapter located on the more distal aspect of a 2-m length of fiberoptic cable. An external light source is required. The image is transmitted to a monitor but can also be viewed through an eyepiece. Direct laryngoscopy is used routinely with the VOIS. Mannequin studies of the VOIS versus the Bullard scope and the Shikani scope versus the gum elastic boogie demonstrated greater success with Cormack-Lehane grade III views (Fig. 4-4C) with the semirigid fiberoptic stylets.252,253
Indications and Contraindications
Semirigid fiberoptic stylets are useful when the glottis cannot be seen readily. Blood and secretions may complicate their use, but less so than with flexible fiberoscopy. The Bonfils stylet, with its fixed 45-degree curve, is not recommended for patients with severely limited neck extension or limited mouth opening.254
Procedure and Technique
There have been no reported complications with semirigid fiberoptic stylets other than the failures or prolonged attempts usually related to poor visibility from blood and secretions.249
[/level-membership-for-emergency-medicine-category][not-level-membership-for-emergency-medicine-category]Chapter 4
Tracheal Intubation
Intubation is often the pivotal procedure in the emergency management of critically ill patients. There are several new devices that can improve the likelihood of successful intubation, but it is important to understand that intubation is just one aspect of airway management. The primary objective of airway management is to maintain adequate oxygenation. Intubation allows oxygenation once it is completed, but not during the procedure.1 A comprehensive approach, such as the algorithm described in Chapter 3, is crucial (see Fig. 3-15).2 In the emergency setting it is important to use intubation techniques that have a high likelihood of success, critically recognizing when a given approach has failed and quickly moving to a different technique.
This chapter describes nearly every possible means of tracheal intubation, with emphasis on widely used techniques. The most common means of intubation in the emergency setting is rapid-sequence intubation (RSI), but this approach must be considered very carefully.3 If a difficult intubation is anticipated, awake intubation may be preferred. With good topical anesthesia, nearly any intubating technique can be used for awake intubation, although flexible fiberoptic devices are commonly used. Because many difficult airways cannot be predicted, it is essential to have a well-defined backup plan and appropriate resources. The intubating laryngeal mask airway (LMA Fastrach) is an ideal backup device for failed RSI because it provides ventilation and oxygenation and facilitates tracheal intubation in a high percentage of patients with failed RSI.2
General Approach to Emergency Intubation
Preplanning is the key to successful emergency airway management. Providers should follow a clear, preconceived, practiced airway algorithm that uses readily available and familiar equipment and techniques. When encountering a difficult airway, it is more important to be comfortable with a few well-proven devices and techniques than to try new or unfamiliar devices.2,4 It is important to know when to abandon one approach and move on to the next. No single approach is mandated. The best technique is the one chosen by the clinician at the bedside based on one’s individual experience and expertise and the specific clinical scenario.
A critical aspect of preparation is making sure that all essential equipment required to perform the airway maneuvers is immediately available and within easy access. This may be accomplished by wall-mounting essential equipment in the emergency department (ED) resuscitation room.5 Alternatively, equipment can be placed in dedicated adult and pediatric airway carts or tackle boxes in an open, organized, and labeled manner, and the carts and boxes checked regularly and stocked (Fig. 4-1).6 Essential equipment that is seldom used but is potentially lifesaving should be clearly identified and placed in an easily accessible location such as a dedicated difficult airway cart. The importance of this concept cannot be overstated. Technical expertise cannot substitute for the lack of essential equipment. In airway management, failure has ominous consequences. Mental, physical, and equipment preparation maximizes the chance of success.
Airway Anatomy
An understanding of airway anatomy and its terminology is requisite for any discussion of airway management procedures (Fig. 4-2). The following terms are used frequently in this chapter:
Pharynx: the upper part of the throat posterior to the nasal cavity, mouth, and larynx
1. Nasopharynx: base of the skull to the soft palate
2. Oropharynx: soft palate to the epiglottis
3. Hypopharynx: epiglottis to the cricoid ring (posteriorly), including the piriform sinus/recess/fossa
Piriform sinus/recess/fossa: the pockets on both sides of the laryngeal inlet separated from the larynx by the aryepiglottic folds
Larynx: the anterior structures of the throat (commonly called the voice box) from the tip of the epiglottis to the inferior border of the cricoid cartilage, including the laryngeal inlet
Laryngeal inlet: the opening to the larynx bounded anterosuperiorly by the epiglottis, laterally by the aryepiglottic folds, and posteriorly by the arytenoid cartilage
Arytenoid/posterior cartilage: the posterior aspect of the laryngeal inlet separating the glottis (anterior) from the esophagus (posterior)
1. Corniculate cartilage: the medial portion of the arytenoid/posterior cartilage
2. Cuneiform cartilage: the lateral prominence of the arytenoid/posterior cartilage
3. Interarytenoid notch: the notch between the posterior cartilage
Glottis: the vocal apparatus, including the true and false cords and the glottic opening
Vallecula: the space between the base of the tongue and the epiglottis
Hyoepiglottic ligament: anterior midline ligament connecting the epiglottis to the hyoid bone
Preparation
Intubation is best accomplished with two operators, one to perform the intubation and the other to handle equipment, help with positioning, observe the monitor, and keep track of time. Unfortunately, the ideal scenario and adequate time for preparation are not always available to the clinician, who has to make calculated adjustments based on the situation at hand. Before intubating, it is preferable to take the following steps in chronologic order: (1) attach the necessary monitoring devices and administer oxygen, (2) establish intravenous access, (3) draw up essential medications and label them if time permits, (4) confirm that the intubation equipment is available and functioning, (5) reassess oxygenation and maximize preoxygenation, (6) position the patient correctly, and (7) make sure that all team members are aware of the primary procedural approach and the most likely backup plan. In the haste of the moment, it is a common error to forget to preoxygenate or to position the patient optimally. Simple omissions, such as failing to restrain the patient’s hands or remove the patient’s dentures or misplacing the suction tip, can seriously hamper the success of the procedure. One suggested preintubation checklist is presented in Box 4-1. In addition, be sure to use universal precautions by wearing gloves, a gown, and eye and mouth protection.
Preoxygenation
Preoxygenation is one the most important aspects of emergency airway management. Preoxygenation before RSI provides much more time for intubation before desaturation occurs and thus significantly increases the chance for successful intubation on the first attempt. Failure to preoxygenate before RSI is often a critical factor when a straightforward emergency airway becomes an unexpected airway problem. Preoxygenate by providing the maximal fraction of inspired oxygen (Fio2) with a non-rebreather mask for 3 to 5 minutes before intubation. Alternatively, give eight vital capacity breaths from a maximal Fio2 system, such as a non-rebreather mask or a bag-valve-mask device, if there is not enough time for standard preoxygenation.7 When using a bag-valve-mask device for preoxygenation it is important for the exhalation port to have a one-way valve so that room air is not drawn into the mask when the patient inhales.
The purpose of preoxygenation is not solely to maximize oxygen saturation, but also to wash out nitrogen from the patient’s lungs and replace it with oxygen. This provides the maximum safe apneic time during RSI. Those at greatest risk for rapid desaturation include obese, pregnant, critically ill, and pediatric patients, and they will benefit the most from appropriate preoxygenation. Most studies addressing preoxygenation have been conducted under ideal conditions on relatively healthy individuals. It is far more challenging to effectively preoxygenate critically ill patients.8
Morbidly obese patients are best preoxygenated in a 25-degree head-up position because significantly higher oxygen tension can be achieved with this position.9 Patients who are hypoxic despite maximal oxygen delivery have been shown to benefit from 3 minutes of noninvasive positive pressure ventilation (NPPV) with 100% O2 just before intubation.10,11
Sometimes patients who will benefit the most from preoxygenation are uncooperative with a face mask because of delirium from hypoxia, hypercapnia, or other factors. These patients may benefit from delayed-sequence intubation: careful sedation without suppression of respirations, and oxygenation with a face mask or NPPV for 2 to 3 minutes before administration of a paralytic agent.11 Ketamine (1 to 1.5 mg/kg by slow intravenous push) has been suggested for this technique. Delayed-sequence intubation is a commonsense way to deal with a difficult problem, but it has not been well studied and providers using this method should be ready for hypoventilation or apnea.
Another method to delay desaturation during RSI is nasopharyngeal oxygen insufflation during apnea. Many studies have shown that providing oxygen therapy during apnea is much more beneficial than previously considered.12–15 During apnea, oxygen continues to be absorbed through the alveoli, and thus air with a low oxygen concentration remains in the lower airways. Supplying oxygen to the nasopharynx during apnea allows air with a higher oxygen concentration to passively replenish oxygen in the alveoli. In two studies of patients undergoing RSI, nasopharyngeal oxygen insufflation significantly delayed desaturation after the onset of apnea in both normal and morbidly obese patients.12,15 In these studies, nasopharyngeal oxygen insufflation was accomplished by inserting a 10-Fr catheter into the nasopharynx to a distance equal to that from the mouth to the tragus of the ear and delivering oxygen at a flow rate of 5 L/min when apnea occurred.12 Using a standard nasal cannula with a nasopharyngeal airway is simpler and would probably provide the same benefit. It is important to keep the upper airway open with a jaw thrust or artificial airway for this technique to be most beneficial.
Assessing for a Difficult Airway
When trying to predict whether there will be difficulty during emergency intubation, it is important to understand that most of the literature on prediction of difficult laryngoscopy does not apply very well in the emergency setting. A study by Levitan and colleagues in 2004 showed that two thirds of patients who were intubated in their ED via RSI could not be assessed with the most common difficult airway prediction tests (Mallampati scoring, measurement of thyromental distance, and neck mobility testing) because of altered mental status or cervical spine immobilization.16 Even in the best circumstances, only about half of cases of difficult laryngoscopy can be predicted.17 Many factors such as Mallampati scoring and measurement of thyromental distance have not been found to accurately predict difficult laryngoscopy, especially in the emergency setting.16–19 Only obvious anatomic and pathologic abnormalities and a history of difficult intubation are accurate predictors of difficult laryngoscopy.16 The American Society of Anesthesiology Difficult Airway Guidelines state that “in patients with no gross upper airway pathology or anatomic anomaly, there is insufficient published evidence to evaluate the effect of a physical examination on predicting the presence of a difficult airway.”20 This does not mean that emergency providers should ignore factors that are known to be associated with difficult laryngoscopy, but these must be placed in perspective.
No examination finding alone can predict difficult laryngoscopy, but a combination of multiple factors makes difficulty more likely. The classic predictors of difficult intubation include a history of previous difficult intubation, prominent upper incisors, limited ability to extend at the atlanto-occipital joint,21 poor visibility of pharyngeal structures when the patient extends the tongue (Mallampati classification or the tongue-pharyngeal ratio) (Fig. 4-3A),22 limited ability to open the mouth (suggested by a space less than three fingerbreadths between the upper and lower incisors),23 short thyromental distance (<6 cm from the thyroid notch to the chin with the neck in extension) (Fig. 4-3B),24 and a limited direct laryngoscopic view of the laryngeal inlet (Fig. 4-4).23 A relatively new test is the upper lip bite test, which has been shown in some studies to be more accurate and specific than older tests.25–27 It is essentially a test of anterior mandibular mobility, and the less mobility, the more difficult it is to intubate the patient. Upper lip bite criteria are as follows: class I, the lower incisors can bite the upper lip above the vermillion line; class II, the lower incisors can bite the upper lip below the vermillion line; and class III, the lower incisors cannot bite the upper lip.25 Interestingly, a 2008 study by Tremblay and associates identified factors predictive of difficult GlideScope intubation, which included a high Cormack-Lehane grade during direct laryngoscopy, short thyromental distance, and high upper lip bite test score.28
As noted earlier, many of these predictors cannot be assessed in the emergency setting.16 Fortunately, some of the key predictors are apparent simply by observing the external appearance of the patient’s head and neck. Patients with neck tumors, thermal or chemical burns, traumatic injuries involving the face and anterior aspect of the neck, angioedema, infection of pharyngeal and laryngeal soft tissues, or previous operations in or around the airway suggest a difficult intubation because distorted anatomy or secretions may compromise visualization of the vocal cords. Facial or skull fractures may further limit airway options by precluding nasotracheal (NT) intubation. Patients with ankylosing arthritis or developmental abnormalities such as a hypoplastic mandible or the large tongue of Down’s syndrome are difficult to intubate because neck rigidity and problems of tongue displacement can obscure visualization of the glottis.
Besides these obvious congenital and pathologic conditions, the presence of a short, thick neck is one of the more common predictors of a difficult airway. Such individuals are easily identifiable by observing the head and neck in profile. Obesity alone may not be an independent predictor of difficult intubation, but obese patients with large-circumference necks are likely to be difficult to intubate.29 Facial hair can complicate a difficult airway by rendering bag-mask ventilation ineffective because of the lack of a good mask seal. One patient type that does not immediately stand out as a difficult intubation—but can be surprisingly so—is a patient with an unusually long mandibulohyoid distance (the thyroid prominence appearing low in the neck) and a short mandibular ramus.30 Visualization of the larynx is difficult because of the distance to the larynx and the relative hypopharyngeal location of the tongue.
Knowledge of the poor performance of difficult airway predictors should not make emergency providers more cavalier about using RSI; it should create more concern. The solution is not to avoid RSI, because lack of paralysis makes every intubation more difficult. Instead, it is essential to appreciate the critical importance of having a clear backup plan when intubation with RSI fails.16,31 This situation mandates the need for a preconceived algorithm that uses proven rescue techniques applicable to a broad range of clinical scenarios, such as the bougie (flexible intubating stylet) and the LMA Fastrach.2 The value of the bougie is indisputable, and it is clear that using the LMA Fastrach after failed RSI has decreased the frequency of failed airways and the need for surgical intervention.2,4,32–38 Finally, if RSI is the “go to” method for emergency intubation, providers must be prepared to perform a surgical airway when laryngoscopy, bag-mask ventilation, and backup devices fail.2,39
Direct Laryngoscopy
Equipment
There are two basic blade designs for direct laryngoscopy, curved (Macintosh) and straight (Miller) (Fig. 4-5). Each comes in various adult and pediatric blade sizes. Slight variations in laryngoscopic technique follow from the choice of blade design, and it is often a matter of personal preference. The tip of the straight blade goes under the epiglottis and lifts it directly, whereas the curved blade fits into the vallecula and indirectly lifts the epiglottis via engagement of the hyoepiglottic ligament to expose the larynx.
The illumination provided by the laryngoscope can make a big difference in the ability to visualize the laryngeal inlet. The importance of these factors is underappreciated, as demonstrated by Levitan40 in a survey of the Macintosh blades used in 17 Philadelphia EDs. It was found that only 24% of all blades provided the brightness necessary for fine inspection. This finding was largely explained by the fact that the majority of EDs used the A-Mac (American) as opposed to the clearly superior brightness design of the G-Mac (German) or the intermediate brightness of the E-Mac (English).
Tracheal Tubes
The standard adult endotracheal (ET) tube measures approximately 30 cm in length. Tube size is typically printed prominently on the tube and is based on the internal diameter (ID) and measured in millimeters. The range is 2.0 to 10.0 mm in increments of 0.5 mm. The outer tube diameter is 2 to 4 mm larger than the internal diameter.41 Tubes are also imprinted with a scale in centimeters that indicates the distance from a tube’s distal tip.
Correct tube size is important in the pediatric population. It is especially important when using an uncuffed tube because a good seal is needed between the ET tube and the upper part of the trachea (Table 4-1). Since tube size is based on the ID, a cuffed tube should generally be a half size (0.5 mm) smaller than an uncuffed tube. The smaller ID of an appropriately sized, small cuffed tube could theoretically make it more prone to plugging from secretions. Cuffed tubes are available down as small as 3-mm ID, although indications for these tubes in neonates and infants are rare. A cuffed tube is used in children with decreased lung compliance who may require prolonged mechanical ventilation. In a child, the smallest airway diameter is at the cricoid ring rather than at the vocal cords, as in adults. Hence, a tube may pass the cords but go no farther. If this should occur, the next smaller size tube should be passed.
TABLE 4-1
Tracheal Tube Sizes for Average Patients*
*A slightly smaller size may be required for nasotracheal intubation.
Modified from Applebaum EL, Bruce DL, eds. Tracheal Intubation. Philadelphia: Saunders; 1976.
For most clinical situations, using the width of the nail of the little (fifth) finger as a guide is sufficiently accurate and has been shown to be more precise than finger diameter (Fig. 4-6).42 A standard tracheal tube uses a high-volume, low-pressure cuff to avoid pressure necrosis the tracheal lining. A clinical test for determining correct cuff inflation is to slowly inject air until no air leak is audible while the patient is receiving bag-tube ventilation. This usually occurs with 5 to 8 mL of air if the proper size tracheal tube has been selected. Many clinicians use the tension of the pilot balloon as a guide to cuff inflation. Slight compressibility with gentle external pressure indicates adequate inflation for most clinical situations. For long-term use, cuff pressure should be measured and maintained at 20 to 25 mm Hg. Capillary blood flow is compromised in the tracheal mucosa when cuff pressure exceeds 30 mm Hg. In emergency situations, the balloon may simply be inflated with 10 mL of air and adjusted when the patient’s condition has stabilized.
Interest in design of the tip of the tracheal tube has grown as the Seldinger technique is increasingly being applied to intubation. When a tracheal tube is passed over a smaller-caliber introducer (Seldinger technique), regardless of whether it is a tracheal tube introducer or a fiberoptic scope, there is a reasonable chance that the tube will get hung up on the laryngeal soft tissue.43 A tracheal tube that has been designed to overcome this problem has a bevel oriented posteriorly and a flexible tip that decreases the distance between the tube and whatever it is being passed over (Fig. 4-7).
Optimal Patient Positioning for Direct Laryngoscopy
The sniffing position, with the head extended on the neck and the neck flexed relative to the torso, has traditionally been considered the best head position for direct laryngoscopy.44,45 This position aligns the oral, pharyngeal, and laryngeal axes (Fig. 4-8A–C). Horton and colleagues described the ideal sniffing position for normal patients as neck flexion of 35 degrees and atlanto-occipital extension such that the plane of the face is −15 degrees to the horizontal position (Fig. 4-8C).46 In supine patients, neck flexion is achieved by head elevation. Depending on the size and shape of the patient, the amount of head elevation may differ significantly, and the end point should be horizontal alignment of the external auditory meatus with the sternum.44,47–49 In normal-size adults it is usually possible to achieve the sniffing position with 7 to 10 cm of head elevation.50,51 Morbidly obese patients require much more head elevation to achieve the proper sniffing position. In these patients, aligning the external auditory meatus with the sternum requires elevation of the head and neck, as well as the upper part of the back (Fig. 4-8D).3,48,49,52 This can be accomplished by building a ramp of towels and pillows under the upper torso, head, and neck or by using a Troop Elevation Pillow (Mercury Medical, Clearwater, FL) or similar device (see Fig. 3-2).3,48,49,52 Alternatively, elevating the head to a 25-degree backup position may achieve the same purpose.53
Two studies have shown that elevating the head (flexing the neck) beyond the sniffing position often improves visualization of the glottis.48,54 Because the amount of head elevation needed for optimal laryngoscopy varies depending on individual patient anatomy, it is important to make laryngoscopy a dynamic procedure. This is best accomplished by putting your right hand behind the patient’s head to lift, flex, and extend the head as needed to bring the glottis into view.55 Optimal positioning of the head and neck is not possible in trauma patients who require in-line stabilization of the cervical spine. This is one of the aspects that makes trauma airways so challenging and makes other maneuvers, such as external laryngeal manipulation, even more important in these patients.55
Procedure and Technique of Direct Laryngoscopy
Place the patient in the supine position with the head at the level of the lower part of the intubator’s sternum (Fig. 4-9, step 2). To maintain the best mechanical advantage, keep your back straight and do not hunch over the patient; bend only at the knees (Fig. 4-10). Keep the left elbow relatively close to the body and flex it slightly to provide better support. In a severely dyspneic patient who cannot tolerate lying down, perform direct laryngoscopy with the patient seated semi-erect and the clinician on a step stool behind the patient.56
Figure 4-9 Direct laryngoscopy.
Grasp the laryngoscope in the left hand with the back end of the blade pressed into the hypothenar aspect of your hand. Draw the patient’s lower lip down with your right thumb, and introduce the tip of the laryngoscope into the right side of the patient’s mouth (Fig 4-9, step 3). Slide the blade along the right side of the tongue while gradually displacing the tongue toward the left as you move the blade to the center of the mouth (Fig. 4-9, step 4). If you initially place the blade in the middle of the tongue, it will fold over the lateral edge of the blade and obscure visualization of the airway. Placing the blade in the middle of the tongue and failing to move the tongue to the left are two common errors that prevent visualization of the vocal cords (Fig. 4-11).
As you move the tip of the blade toward the base of the tongue, exert force along the axis of the laryngoscope handle by lifting upward and forward at a 45-degree angle (Fig. 4-9, step 6). The direction of this force is critical because if the force is too horizontal or too vertical, poor visualization will result. The epiglottis should come into view with this maneuver. It may help to have an assistant retract the cheek laterally to further expose the laryngeal structures. Avoid bending the wrist because it can result in dental injury if the teeth are used as a fulcrum for the blade.
The step after visualization of the epiglottis depends on which laryngoscope blade is being used. With the curved blade, place the tip into the vallecula, the space between the base of the tongue and the epiglottis (Fig. 4-11D). Continued anterior elevation of the base of the tongue and the epiglottis will expose the vocal cords. If the tip of the blade is inserted too deeply into the vallecula, the epiglottis may be pushed down and obscure the glottis.22 When using the straight blade, insert the tip under and slightly beyond the epiglottis and directly lift it up (Fig. 4-11E). If the straight blade is placed too deeply, the entire larynx may be elevated anteriorly and out of the field of vision. Gradually withdraw the blade to allow the laryngeal inlet to drop down into view. If the blade is deep and posterior, the lack of recognizable structures indicates esophageal passage; gradually withdraw the blade to permit the laryngeal inlet to come into view.
Infants and Children
It is helpful to appreciate the anatomic differences between children and adults when intubating pediatric patients (Fig. 4-12 and Table 4-2). Children’s proportionately larger heads naturally place them in the sniffing position, so a towel under the occiput is rarely necessary (Fig. 4-13). The large head of newborns can result in a posterior positioning of the larynx that prevents visualization of the vocal cords. A small towel under the infant’s shoulders should correct this problem. The head may also be floppy and may benefit from stabilization by an assistant. The child’s increased tongue-to-oropharynx ratio and shorter neck hinder forward displacement of the tongue and, coupled with a U-shaped epiglottis, can make visualization of the glottis difficult. Consequently, direct laryngoscopy in infants and young children is generally best performed with a straight blade: Miller size 0 for premature infants, size 1 for normal-sized infants, and size 2 for older children. The infant’s larynx lies higher and relatively more anterior. If no laryngeal structures are visible after laryngeal pressure, gradually withdraw the blade. Inadvertent advancement of the blade into the esophagus is a common error.
Sellick’s Maneuver, External Laryngeal Manipulation, Bimanual Laryngoscopy, and BURP
Sellick’s Maneuver: There is some good evidence that Sellick’s maneuver (cricoid pressure) helps prevent gastric inflation during bag-mask ventilation.57–62 The only evidence suggesting that cricoid pressure prevents regurgitation consists of five cadaver studies,62–66 one small human study,67 and some case reports68—poor evidence by today’s standards of evidence-based medical practice.57,69 Furthermore, there are many reports of significant regurgitation and aspiration regardless of the application of Sellick’s maneuver.70–73 Despite the lack of evidence, many experts believe that Sellick’s maneuver is critical during RSI.74–77
Because aspiration has dire consequences and Sellick’s maneuver has traditionally been considered integral to patient safety during emergency airway management,69 it is reasonable to apply cricoid pressure as long as it does not interfere with ventilation and intubation. Unfortunately, there is significant evidence that it can interfere with ventilation and intubation, so it is best to apply Sellick’s maneuver on a case-by-case basis with full understanding of the benefits and drawbacks of cricoid pressure.69
When applied during bag-mask ventilation, Sellick’s maneuver reduces tidal volume, increases peak inspiratory pressure, and prevents good air exchange.58,60,61,78–85 There are mixed data about the effects of cricoid pressure during larynoscopy,86 but several studies have shown that it worsens visualization of the larynx.87–89 Cricoid pressure also decreases successful insertion of and intubation through LMAs.90–97
Because of lack of evidence of the utility of Sellick’s maneuver and evidence of adverse effects, routine use of cricoid pressure during bag-mask ventilation of patients in cardiac arrest is not recommended in the 2010 American Heart Association Guidelines for Cardiopulmonary Resuscitation and Emergency Cardiovascular Care.98 Also, it is recommended that cricoid pressure be released immediately if there is any difficulty either intubating or ventilating a patient in an emergency setting.69,73,81,99,100 In addition, it is reasonable to release or relax cricoid pressure during insertion of an LMA, during intubation with an intubating LMA (ILMA), or if ventilation with the LMA is difficult.57,69,96
Some authors believe that improper technique is to blame for the many reported failures of Sellick’s maneuver.57 The proper technique for applying Sellick’s maneuver is to place the thumb and middle finger on either side of the cricoid cartilage and the index finger in the center anteriorly.62 Apply 30 N (6.7 lb) of force to the cricoid cartilage in the posterior direction.57,77 As a reference, about 40 N of digital force on the bridge of the nose will usually cause pain.57
External Laryngeal Manipulation, Bimanual Laryngoscopy, and BURP: ELM is the application of pressure on the thyroid cartilage in an attempt to improve the view of the larynx during laryngoscopy. Multiple studies have shown that ELM performed by the laryngoscopist (bimanual laryngoscopy) is superior to having an assistant apply anterior neck pressure.88,101 Bimanual laryngoscopy is best because the direction and amount of force that will optimize laryngeal exposure is variable. BURP is sometimes optimal, but it often worsens the laryngoscopic view,88 so it is best to move the larynx in a variety of directions to determine the optimal ELM. The best way to quickly apply a variety of different forces to the larynx to determine the optimal ELM is by manipulation of the larynx with the laryngoscopist’s right hand (Fig. 4-14).101
Operator-directed posterior displacement of the larynx during laryngoscopy was described by Brunnings in 1912.102 After Sellick described the use of cricoid pressure to avoid regurgitation in 1961, it became common to have an assistant apply anterior neck pressure during laryngoscopy.62 In 1993 Knill reported that having an assistant apply BURP to the cricoid or thyroid cartilage improved visualization of the glottis during two cases of difficult laryngoscopy.103 In 1993 Takahata and coworkers performed a prospective study of 630 intubations and found that BURP produced better laryngeal exposure than just backward pressure did in patients with difficult laryngoscopy.104 However, a 2005 prospective crossover trial by Snider and colleagues found no benefit with routine application of the BURP maneuver.105
Studies by Benumof, Levitan, and colleagues have demonstrated that it is best to apply pressure on the thyroid cartilage (not the cricoid cartilage) and suggested that ELM should be applied by the laryngoscopist’s right hand, not by an assistant.88,101,106 They also found that the direction of force required for optimal ELM was not always upward and rightward and that the amount of backward pressure was variable.88 In a 1996 study of 181 patients, Benumof and Cooper found that external manipulation was optimal when applied to the thyroid cartilage in 88% of patients and to the cricoid cartilage in only 11% of patients.101 In a 2006 cadaveric study of 1530 laryngoscopies by 104 laryngoscopists, Levitan and associates found that bimanual laryngoscopy was more effective than both BURP and cricoid pressure for optimizing laryngeal exposure (Figs. 4-15 and 4-16; see also Fig. 4-14).88 In addition, they found that cricoid pressure worsened the view of the larynx in 29% of cases and BURP worsened it in 35%.88 Finally, in a 2002 study of eight first-year emergency medicine residents performing 271 intubations in an operating room setting, Levitan and colleagues found that bimanual laryngoscopy (ELM performed by the laryngoscopist) consistently improved laryngeal exposure by novice intubators (see Fig. 4-12).106
Passing the Tube
Once the vocal cords have been visualized, the final step is to pass the tube under direct vision through the vocal cords and into the trachea. It is best to use a malleable stylet for all emergency intubations. The best stylet shape is straight with a 35-degree hockey-stick bend at the proximal cuff (“straight-to-cuff”). In a 2006 study, Levitan and colleagues showed that stylet bend angles greater than 35 degrees made ET tube passage more difficult.107
Tracheal Tube Introducer (Bougie)
If direct laryngoscopy does not bring the vocal cords fully into view, a tracheal tube introducer may be used to facilitate intubation. This adjunct is a long, thin, semirigid introducer that, with the aid of a laryngoscope, is passed through the laryngeal inlet and over which an ET tube is advanced through the cords and into the trachea. The technique, originally described more than 60 years ago by Macintosh,108 was recommended for patients in whom visualizing the vocal cords was difficult. It has also been shown to be effective when the laryngeal inlet cannot be visualized at all.109 It is the most common airway adjunct used in British EDs for complicated intubations.110
[/not-level-membership-for-emergency-medicine-category]
