Prehospital Immobilization
Spine Immobilization
The first recommendations for spinal immobilization following blunt trauma came from the American Academy of Orthopaedic Surgeons in 1971.1 These guidelines called for spinal immobilization of patients with symptoms or physical findings suggestive of spinal injuries.1,2 Since then, recommendations for spinal immobilization have evolved considerably. During the 1980s and 1990s, indications for spinal immobilization were based primarily on the mechanism of injury, regardless of the presence or absence of symptoms or physical findings suggestive of a spine injury.2,3 This resulted in routine prehospital spinal immobilization for all but the most trivial injuries and an abundance of unnecessary radiographs. Such wide-scale prehospital immobilization was initiated despite scant scientific evidence of improved patient outcomes. As a result, efforts were initiated to determine whether historical or clinical data could reasonably identify who had and who did not have serious injuries that would theoretically benefit from prehospital immobilization.
Growing concern over the cost of cervical spine radiographs and excessive radiation exposure led to the development of easily applied low-risk criteria that could identify the vast majority of significant injuries in an attempt to safely reduce the overuse of cervical spine radiography.4 In early 2000, two large prospective studies validated the use of clinical criteria to rule out injury to the cervical spine in victims of blunt trauma.5,6 These studies dramatically reduced the number of unnecessary cervical spine radiographs following blunt trauma and led some investigators to question the prehospital practice of spinal immobilization based solely on mechanism of injury.2,7–9
In 1998, Hauswald and colleagues7 published the results of a 5-year retrospective review comparing patients from Malaysia, where cervical spine immobilization was nonexistent, to patients from New Mexico, where cervical spine immobilization based on the mechanism of injury was standard practice. Based on their results, the authors concluded that out-of-hospital immobilization has little or no effect on neurologic outcome in patients with blunt spinal injuries.7 More recently, researchers sought to determine whether prehospital providers could apply a set of clinical decision rules (Box 46-1) to selectively immobilize patients after blunt trauma.10,11 A 4-year prospective study in two Michigan counties found that the use of a selective immobilization protocol resulted in spine immobilization for most patients with spinal injury without causing harm to patients in which spine immobilization was withheld.10 A larger study in New York demonstrated that selective immobilization based on a statewide protocol resulted in only one nonimmobilized unstable cervical spine fracture in more than 32,000 patient encounters.11 Several other trials supported the use of clinical criteria for cervical spine clearance by prehospital care providers and hence supported the safety of avoiding routine immobilization for injuries that are extremely unlikely to be clinically significant.12,13
Although spinal fracture and spinal cord injury (SCI) can have devastating results, the incidence of such injuries in trauma patients is relatively low, about 2% to 5% in most reviews. Unfortunately, most final neurologic outcomes after spinal cord trauma can be prognosticated by the initial evaluation, and lifelong disability has been set by the primary insult, not by prehospital or emergency department (ED) interventions. Sundheim and Cruz14 calculated that only 0.03% to 0.16% of all out-of-hospital trauma patients may be expected to have secondary SCI that may be helped by immobilization. The number needed to immobilize to prevent one secondary injury is between 625 and 3333 trauma patients, but wholesale dismissal of any benefit from immobilization is not justified. It is important to note, however, that despite zealous use of prehospital cervical spine immobilization and countless medical and legal attempts to prove worsening of injury from its absence, there is little scientific evidence quantifying the effect of spinal immobilization in trauma patients or the possible adverse effects of its application (Box 46-2). Simply stated, the effect of spinal immobilization on mortality, neurologic injury, spinal stability, and adverse effects in trauma patients remains uncertain by evidence-based medicine, and no randomized prospective trials have been conducted.
Epidemiology
According to the National Spinal Cord Injury Statistical Center (NSCISC), an estimated 12,000 new, survivable SCIs occur in the Unites States annually.15 The NSCISC estimates that 265,000 people were living with SCI in the United States in 2010.15 Since 2005, the most common cause of SCI is motor vehicle collision, which accounts for just more than 40% of cases, followed by falls and acts of violence, primarily gunshot wounds.15 Sports such as American football, rugby, swimming and diving, gymnastics, ice hockey, track and field (specifically pole vaulting), cheerleading, and baseball all place participants at increased risk for spinal injuries.15 The cost of care in both the immediate and extended care setting can be exorbitant, especially among the young. The average lifetime cost of medical care for patients with SCI varies depending on the level of injury but ranges from 500,000 to more than 3 million dollars.15
Pathophysiology
The direction and strength of the injurious force may help predict the type of injury sustained. Generally speaking, the basic forces that can be exerted on the spine are flexion, extension, rotation, lateral bending, distraction (stretching), and compression (axial loading).16,17 Of course, complex mechanisms may exert multiple forces. For example, high-speed rollover motor vehicle collisions could easily exert all the aforementioned forces.
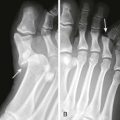
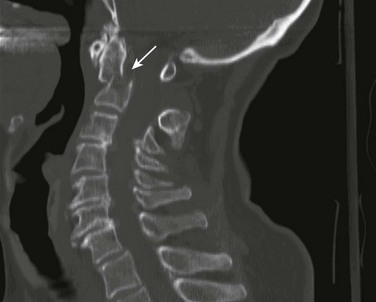
Injuries to the upper cervical spine (C1 and C2) (Fig. 46-1) occur more often in older, osteoporotic patients than in younger patients. The spectrum of injuries in the cervicocranium includes occipital condyle fractures, occipitoatlantal dislocations, dislocations and subluxations of the atlantoaxial joint, fractures of the ring of the atlas, odontoid fractures, fractures of the arch of the axis, and fractures of the lateral mass of the axis (Fig. 46-2). Involvement of the spinal cord at this high level can cause devastating neurologic injury, and it is reasonable to believe that many of these injuries are not reported because they result in death.18 Subaxial cervical spinal injuries involving C3-7 have a broad spectrum of clinical implications. Approximately two thirds of cervical injuries causing quadriplegia occur within the lower cervical spine, with fractures occurring most often in C6 and C7 and dislocations most commonly occurring between C5-6 and C6-7.19
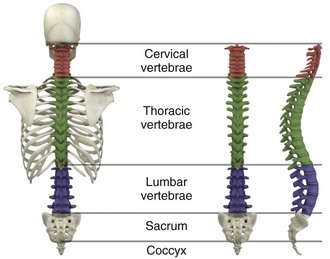
Figure 46-1 The human spinal column.
The orientation of the facets in the thoracic spine allows significantly less flexion and extension than in the cervical or lumbar spine. In addition, the free space between the thoracic spinal cord and the borders of the spinal canal is relatively small, and the blood supply is less robust. These factors increase the susceptibility of the spinal cord to injuries at this level. At the thoracolumbar junction there is an acute transition in stability because of the loss of rib restraint, which increases the risk for flexion-extension and rotational injuries. Disk size and shape also change, thus making this section of the spine particularly susceptible to injury. Approximately half of all vertebral body fractures and 40% of all SCIs occur between T11 and L2.20
The lumbar spine is protected only by the abdominal and paraspinous musculature, which makes it subject to distraction and shear forces, such as seen with lap belt injuries. There is also a higher prevalence of compression and burst fractures in the lumbar spine. These fractures commonly occur when axial loading forces straighten the natural lordosis at the moment of impact.21
The sacrum forms both the terminal portion of the spine and the central portion of the pelvis, which gives it added stability and makes isolated sacral fractures uncommon. Such fractures are usually caused by direct trauma or falls from a height or occur as a result of sacral insufficiency secondary to osteopenia, chronic steroid use, or previous pelvic irradiation. More often, sacral fractures occur as a result of high-energy mechanisms and are associated with major pelvic disruption.22
Indications
The National Association of EMS Physicians recommends spinal immobilization of prehospital trauma patients who sustain an injury with a mechanism that has the potential for causing spinal injury and who have at least one of the following clinical criteria: altered mental status, intoxication, a distracting painful injury (e.g., long-bone fracture), a neurologic deficit, and spinal pain or tenderness.2
Extremes of age and the presence of communication barriers (e.g., language, hearing impairment) may affect the ability to accurately assess the patient’s perception and communication of pain and should lower one’s threshold for spinal immobilization.2,3 It is also important to remember that serious cervical cord injuries can occur in the absence of demonstrable fractures. SCI is common in elderly patients with cervical spondylosis, in whom an arthritic osteophyte may sever a portion of the cord as permanently as a fracture or dislocation. In such cases there may be little subjective pain, and the mechanism of injury may appear seemingly minor.23
Contraindications
Spinal immobilization is contraindicated (or may require modification) when its use could harm the patient, when it is logistically impossible, or when the scene is unsafe (Box 46-3). Good clinical judgment, not blind application of protocols, is essential. For example, if application of a cervical collar will cause or mask airway compromise secondary to swelling, an expanding hematoma, or other process, it should not be used. Obviously, if a patient requires a surgical airway, the EMS provider will need immediate, unencumbered access to the anterior aspect of the neck. Sometimes preexisting airways (e.g., tracheotomy tube) and associated equipment prohibit proper application of a cervical collar. These situations can often be managed with an improvised cervical immobilizer, such as a collar fashioned from a towel roll or prolonged manual stabilization without traction.
Other conditions that may prevent spinal immobilization or require modification of standard techniques and equipment (e.g., towel roll and manual in-line stabilization) include obesity, impaled objects, underlying respiratory problems or acute respiratory distress (e.g., from congestive heart failure or ascites), altered mental status (e.g., combative patients because of intoxication or psychiatric illness), and cervical dislocation with fixed angulation or anatomic limitations from preexisting conditions such as ankylosing spondylitis and kyphosis.24
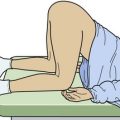
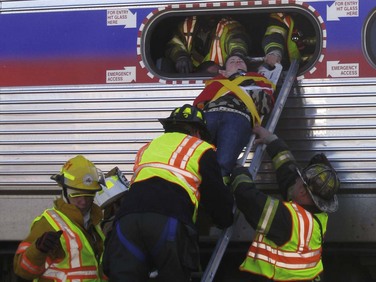
There are also scenarios when spinal immobilization is logistically difficult or impossible. In a mass casualty incident, for instance, spinal immobilization of multiple victims with a low probability of spinal injury is impractical (Fig. 46-3).
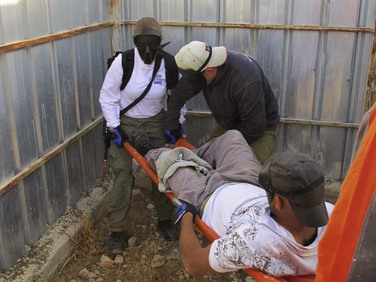
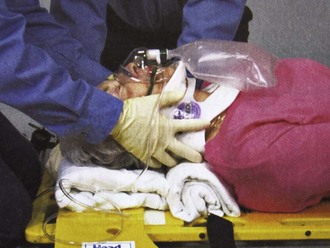
Finally, spinal immobilization may need to be delayed or modified when the scene poses a significant threat to the patient or providers (see Box 46-3).16 In these situations, the prehospital provider may opt for rapid extrication of the patient from the scene without immobilization of the spine (Fig. 46-4).
Equipment
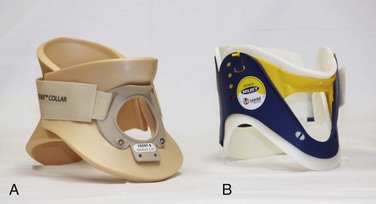
Traditionally, cervical collars have used a four-point support structure at the bottom of the collar—at the two trapezius muscles posteriorly and at the two clavicles anteriorly. Most modern collars are modified rigid head-cervical-thoracic devices that use the sternum as a fifth support structure. Current collar designs support the head with winglike flaps on the collar’s upper posterior edges. Anteriorly, the collar supports the mandible. The collar’s flaring design generally prevents compression of the thyroid cartilage and cervical vessels, even when applied firmly. Some collars come as single units that conform to the neck once a chin support has been assembled, whereas others come in two parts, with a front and a back that are secured with Velcro (Fig. 46-5). Some manufacturers have developed collars that have adjustable heights to account for different neck lengths. Soft collars, though comfortable, have no role in spinal immobilization because they provide minimal support and do not reduce cervical motion to any significant degree.25,26
Investigators have attempted to evaluate cervical collars in an objective fashion. The accepted “gold standard” for comparison is the halo brace, which restricts motion to 4% flexion-extension, 1% rotation, and 4% lateral bending.27 Unfortunately, even the best cervical collars (when used independently) restrict flexion and extension by only 70% to 75% and overall neck movement by 50% or less.28 A number of studies have evaluated neck motion in volunteers immobilized supine on a backboard with various collars in place.25,26,29–32 Although these studies demonstrated small differences among some of the collars, overall they merely confirm the fact that cervical collars alone are inadequate to immobilize the cervical spine completely. Thus, it is important to keep in mind that for effective cervical spine immobilization, differences among the various types of cervical collars are less important than proper application, a snug but comfortable fit, and most importantly, use of adjunctive equipment.
Cervical Extrication Splints
A large variety of short spine boards (Fig. 46-6) and intermediate-stage extrication devices are available for prehospital use. Generally, these devices are manufactured from rigid lightweight material. They have a narrow board design that permits easy application in automobiles or confined spaces and are constructed with multiple openings along the edges to allow a variety of strapping options. Ideally, these devices should also be translucent so that radiographs can be readily obtained in the ED, and they should allow repeated use and easy clean up. When not in use, store extrication splints with their straps secured in their individual retainers to reduce the likelihood of becoming entangled during application.
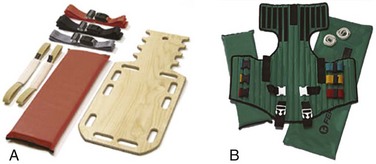
One commonly used device that meets all these criteria is the Kendrick Extrication Device (KED) (see Fig. 46-6B). This device consists of two layers of nylon mesh impregnated with plastic and sewn over plywood slats to provide rigidity. It has a nylon loop behind the patient’s head that is continuous with the pelvic support straps for additional strength. Part of its anterior thoracic panels can be folded backward to fit obese, pregnant, or pediatric patients.33 When properly applied, the KED is a snug-fitting, highly adaptable immobilizer that can be used in even the most adverse circumstances.
When patients require immobilization or extrication (or both) in more difficult or treacherous environments, many EMS providers prefer the LSP half-back, which resembles a KED but is more rugged and durable. In addition to providing spinal immobilization, it also acts as a harness and can be used for hauling patients over flat surfaces, as well as vertical lifts (Fig. 46-7).34

Mosesso and coworkers35 compared six prehospital cervical immobilization devices and concluded that the devices were similar in their ability to immobilize the cervical spine.
Full-Body Spine Immobilizers
Full-Body Spine Boards (Backboards): Backboards are made of wood or plastic composites and can be either rectangular or tapered in shape (Fig. 46-8A). Most rescuers prefer the tapered type because it takes up less horizontal room when angled into a narrow opening or doorway. In addition, the slight narrowing of these boards on either end enhances the effectiveness of strapping.
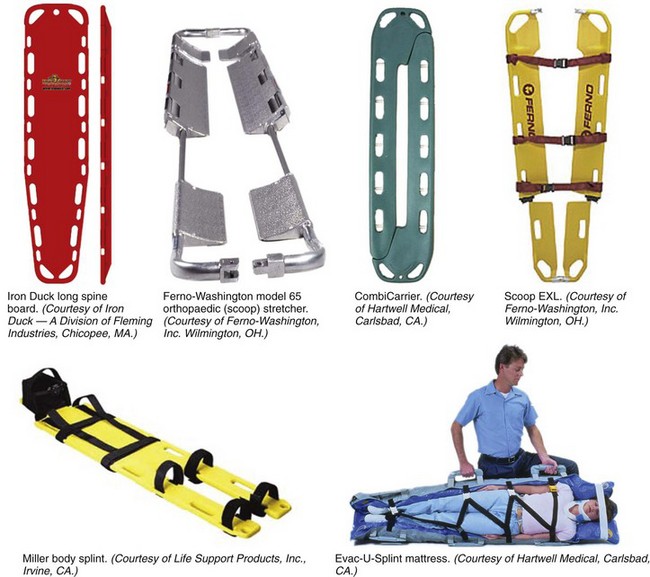
Figure 46-8 Full-body spine boards (backboards.)
The biggest drawback of using backboards as immobilizers is lack of patient comfort. Board splints, as a class, are the least comfortable of all immobilizers. Studies have demonstrated that spinal immobilization on a hard backboard causes head, back, and jaw pain.36,37 Pain in these areas may become severe if patients are left immobilized on these boards for extended periods.38–40 In addition, the pain caused by application of a backboard may be difficult to separate from other sources of pain in a trauma patient and might lead to unnecessary and costly radiographs.2 Discomfort may be minimized by using padding at points of contact between a bony prominence and the board. This concept was reaffirmed by Hauswald and colleagues,41 who found that increasing the amount of padding on a backboard decreases the amount of ischemic pain caused by immobilization.
Scoop Stretchers: If an injured person has to be extricated from a tight location, a smooth backboard is probably the best device to immobilize and move the victim. If the victim is not in a tight location, the scoop stretcher is an ideal field immobilizer (see Fig. 46-8B). In fact, one recent study found that using the Sterno scoop stretcher caused less spinal motion than did a traditional long backboard and logroll technique.42
The scoop interferes slightly with the ischial section of a half-ring traction splint but works well with Sager-type devices. The Ferno-Washington model 65 scoop (Ferno-Washington, Inc., Wilmington, OH) is the most widely used stretcher of this type. Other devices such as the Combi-Carrier (Hartwell Medical, Carlsbad, CA) and the Scoop EXL (Ferno-Washington, Inc., Wilmington, OH) offer lightweight polymer construction and additional spine support (see Fig. 46-8C and D).
Full-Body Splints: Various devices take the concept of full-body immobilization one step further than the spine board. One popular device is the Miller body splint, which consists of a polyethylene shell injected with closed-cell foam that is radiographically translucent and provides buoyancy in water (see Fig. 46-8E). This full-body splint features a removable head harness and a thoracic harness, as well as pelvic and lower extremity belts. The space between the lower extremities facilitates wrapping with bandage material in the event of fractures. In addition, it is shaped so that it can easily fit into a basket-type rescue stretcher. Similar spine immobilization systems are available for pediatric patients (e.g., Pedi-Pac, Ferno-Washington, Inc., Wilmington, OH).
An important innovation in the area of spine immobilization in the United States has been the vacuum mattress splint (e.g., EVAC-U-SPLINT, Hartwell Medical, Carlsbad, CA, and Immobile-Vac, MDI, Gurnee, IL) (see Fig. 46-8F). It consists of a vinyl-coated polyester envelope filled with thousands of 1.1-mm-diameter polyester foam spheres. A manual or electric vacuum pump is used to evacuate the interior to a pressure of about 0.25 atm. This reduction in internal pressure causes the mattress to conform to the contours of the patient’s body. Vacuum splints have been shown to produce lower sacral interface pressure and lower mean pain scores than traditional hard backboards37,43 and may provide better immobilization in patients with known SCI.44,45 It should also be pointed out, however, that vacuum splints are larger and more cumbersome than backboards, thus making ambulance storage more difficult.
Lateral Neck Stabilizers: Lightweight objects such as blocks (10 × 10 × 15 cm) made of medium-density foam rubber are commonly used to provide additional lateral stabilization of the head and neck. Foam blocks are inexpensive and disposable and do not slip on the backboard. Disposable cardboard devices that have the same advantages as foam blocks are also available (Fig. 46-9A).

Another commercial device is the Universal Head Immobilizer. It is a lateral neck stabilizer designed to quickly and easily fasten the patient’s head to a scoop stretcher or spine board (see Fig. 46-9B). The Universal Head Immobilizer is made of a Herculite nylon and polyethylene foam platform fastened to the stretcher with Velcro straps. The lateral pillows are then attached to the nylon platform by means of large Velcro interfaces.
Foam Padding: Padding increases comfort and can help prevent further injury. It can also help support an injured extremity or impaled object or allow an obese or kyphotic patient to lie supine on a long backboard (Fig. 46-10).29 Pregnant women may benefit from padding under the right hip to help shift the gravid uterus off the inferior vena cava and increase venous return.46 Padding applied under the neck and shoulders prevents hyperflexion in children with large occiputs (Fig. 46-11) or in individuals wearing certain types of helmets (e.g., bicycle, motorcycle, rock climbing) that cannot be removed in the field.

Procedure
The first priority in cervical spine immobilization is providing manual in-line stabilization in the neutral position. This can be done with the patient standing, seated, supine, or prone and consists simply of placing both hands on the sides of the patient’s head to prevent flexion, rotation, or bending. Do not apply cervical traction because it can increase the risk for SCI, and be sure to maintain manual in-line stabilization during application of the cervical collar and until the patient can be fully immobilized in an intermediate-stage corset-type device or on a long backboard (see later in this section). Once the cervical spine has been manually stabilized in the neutral position, examine the neck for swelling, ecchymosis, deformity, bony tenderness, or penetrating wounds. Application of a cervical collar follows and is generally a straightforward procedure (Fig. 46-12). The rescuer’s intentions should be thoroughly explained to the patient throughout the procedure.
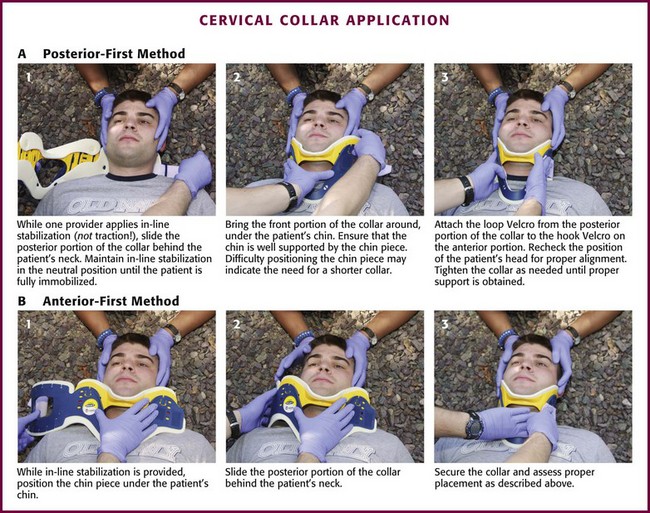
Figure 46-12 Cervical collar application.
Once the collar is in place, conscious patients should be cautioned repeatedly against movement of the head. Investigate any persistent complaints of pain or dyspnea by removal and possible replacement of the device while manual stabilization is maintained. The size of collar should be determined from the manufacturer’s suggested guidelines. For example, the Stifneck collar (Laerdal Medical Corp., Wappingers Falls, NY) is available in various sizes and uses the distance from the top of the shoulder to the chin to determine the appropriate size. Use the tallest collar that does not cause hyperextension. For extremely short necks, a special cervical collar such as the No-Neck (Laerdal Medical Corp., Wappingers Falls, NY) is recommended. In cases in which a cervical collar of the proper size is not available, an improvised device should be made from available material (Fig. 46-13).
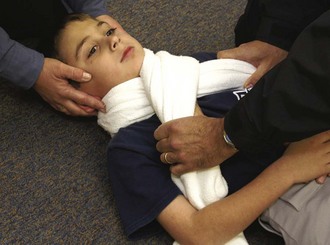
It should also be remembered that application of a cervical collar should not be attempted until the patient’s head has been brought into a neutral position and manual in-line stabilization has been applied.28 If the patient experiences cervical muscle spasm, increased pain, neurologic complaints (e.g., paresthesias, weakness), or airway compromise, immediately halt any further movement of the head and neck. In these situations, immobilize in the position that the patient was found by using an alternative technique (e.g., blanket, towel roll, manual in-line stabilization).
Thoracolumbar Spine Immobilization
Sitting Position: To immobilize patients who are in a sitting position, use a short backboard or commercially available cervical extrication device (e.g., KED). At least two rescuers should be present to apply an extrication splint to a sitting patient. Interestingly, a recent study by Shafer and Naunheim found that healthy volunteers who were allowed to extricate themselves from the front seat of a car and lie down on a long spine board while wearing a cervical collar had less spinal movement than did those who were placed in cervical collars and moved onto the board directly or after application of a KED.47 Nevertheless, use of KEDs or short boards remains the most common method for vehicle extrication.
Open the device butterfly style and gently slide it behind the victim via a rocking motion (Fig. 46-14, step 1). If necessary, carefully rock the patient forward a few degrees to facilitate placement of the splint. Once behind the victim, free the splint’s pelvic support straps from their retainers and allow them to dangle at the patient’s sides. Next, bring the lateral thoracic panels around the chest just beneath the patient’s shoulders. Grasp these panels and slide the splint upward until the top edges of the panels firmly engage the patient’s axillae. Now use the thoracic straps to secure the splint, beginning with the middle strap, then the bottom strap, and finally the top strap (see Fig. 46-14, step 2).
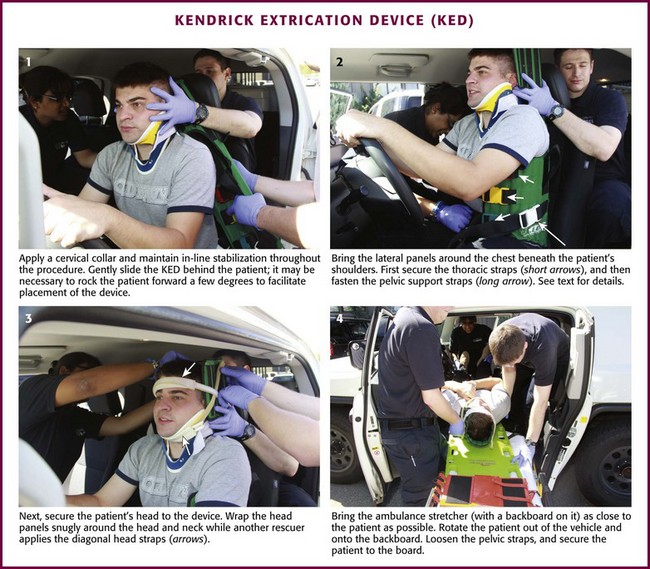
Figure 46-14 Kendrick Extrication Device. Use of other short boards follows the same principles as depicted here.
Next, secure the head to the device (see Fig. 46-14, step 3). When using the KED, wrap the head panels snugly around the head and neck while another rescuer applies the diagonal head straps. It may be necessary to place padding behind the head to maintain a neutral position. Use the forehead as a point of engagement for one strap and the cervical collar for the other.
As a final step, tighten all buckles until the entire splint is firmly in place. The patient can now be moved. If the patient is to be lifted from a vehicle, bring the ambulance cot with a spine board on it as close to the patient as possible (see Fig. 46-14, step 4). While one rescuer supports the patient’s knees, the other rescuer uses the handholds on the splint to lift the patient. The patient should be rotated and laid in a supine position onto a backboard. Loosen the pelvic straps to allow the legs to be lowered onto the backboard. The legs can then be extended and secured to the backboard or left in the flexed position with a pillow placed under the knees for support.
Recumbent Position: A patient who is found in a recumbent position should be placed in a supine position, if not already in one. If repositioning is necessary, examine the back during the process. Physical examination, spinal immobilization, airway management, and transport are easier to accomplish with the patient in the supine position.
Scoop Stretcher.: A patient who is in a supine position can be moved by means of a scoop stretcher. In a conscious patient, rescuers should explain that they are about to apply a scoop-type stretcher, which may be cold to the touch, beneath the patient’s body. Apply a cervical collar and maintain manual in-line cervical stabilization until the patient is completely secured to the stretcher.
Full-Body Spine Boards (Backboards).: There are several ways of placing a patient onto a spine board. The precise technique used will depend on the space available and the position of the patient within that space. For lengthwise extrication, as from an automobile seat, the patient can be slid, either feet first or head first, onto the backboard. It is important that the patient be moved as a unit during this process. Place one end of the backboard on the seat or doorsill of the automobile. One rescuer stabilizes the opposite end of the board while at least two other rescuers lift and slide the patient’s body onto the board. Once the patient is secured to the board, slide the board out of the vehicle and onto a waiting stretcher. Maintain manual cervical in-line stabilization throughout the procedure and avoid spinal compression or traction.
When space permits, lateral extraction is preferred. If the patient is in the recumbent position, logroll or slide the patient onto the board. The logroll maneuver requires the presence of at least three rescuers. Position one rescuer at the patient’s head to apply manual in-line cervical stabilization (Fig. 46-15, step 1). It is this person’s responsibility to oversee and direct body movement throughout the procedure. Next, position the backboard next to the patient’s body (see Fig. 46-15, step 2). To minimize thoracolumbar movement, extend the patient’s arms at the sides with the palms resting on the lateral aspect of the thighs.48 To keep the patient from reaching for a rescuer or object during transfer, some rescuers prefer to have patients cross their arms across the thorax. However, this maneuver has not been shown to prevent or minimize thoracolumbar movement. If one arm is injured, place the backboard against this side so that the patient can be rolled onto the uninjured extremity. Position the other rescuers on the side that the patient will be rolled toward, with one rescuer at the midchest level and the other at the legs. The rescuer at the chest should reach across the victim and take hold of the shoulder and hips while the other rescuer grasps the hips and lower part of the legs. When everyone is ready, the rescuer at the head gives the command to roll the patient onto the side (see Fig. 46-15, step 3). If possible, examine the patient’s back at this point. Slide the backboard under the patient, and when everyone is ready, the rescuer at the head gives the command to roll the patient back onto the board (see Fig. 46-15, step 4). Before applying straps, it is often necessary to center the patient on the board.
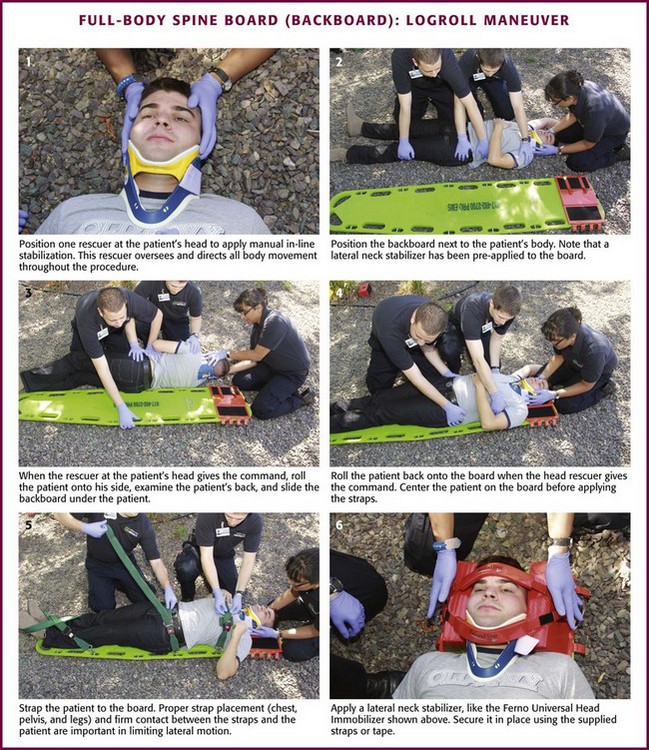
Various techniques can be used to secure a patient to the backboard. In addition to the standard thoracic, pelvic, and lower extremity straps, use of an abdominal strap significantly reduces lateral motion without compromising respiration.49 Proper strap placement and firm contact between the straps and the patient are also important in limiting lateral motion (see Fig. 46-15, step 5).50
After the body has been strapped to the board, the head can be secured. If necessary, padding can be placed under the occiput to maintain the head in the neutral position. Apply a lateral neck stabilizer (e.g., foam blocks, HeadBed device) and secure the head in place with tape or straps (see Fig. 46-15, step 6). Most taping techniques involve the use of one piece across the forehead and one piece across the cervical collar. Note that this method of securing a patient to a backboard is designed for horizontal lifting only.
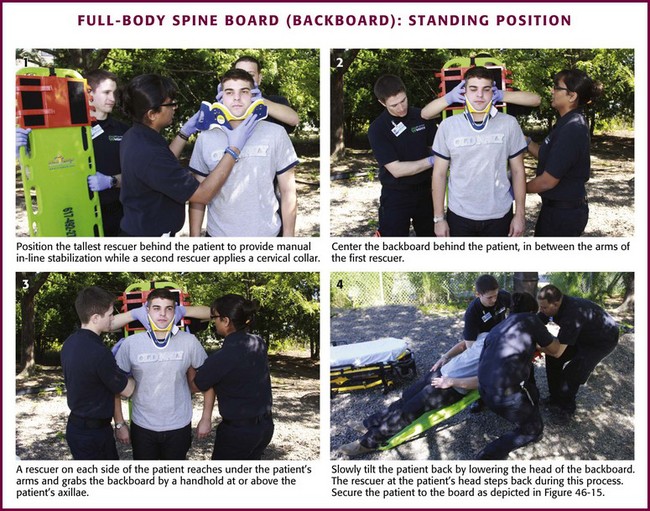
Standing Position: A standing patient with a potential spine injury must be immobilized and placed in the supine position. One technique for placing these patients on a backboard that is quick, safe, and effective is presented here.51 Position the tallest rescuer behind the patient to manually stabilize the head while a second rescuer applies a cervical collar (Fig. 46-16, step 1). The first rescuer must maintain manual in-line cervical stabilization until the patient is completely secured to the board. Center the backboard behind the patient between the arms of the rescuer who is stabilizing the head and neck (see Fig. 46-16, step 2). Facing the patient, a rescuer on each side reaches under the patient’s arms and grabs the backboard by a handhold at or above the patient’s axillae (see Fig. 46-16, step 3). The patient’s elbows are then brought closer to the body. If additional personnel are available, position a rescuer at the feet to prevent the board from sliding out. Slowly tilt the patient back by lowering the head of the backboard (see Fig. 46-16, step 4). The rescuer at the head should step back during this process while maintaining the patient’s head and neck in neutral alignment. When the backboard is completely horizontal, secure the patient to the backboard in the usual fashion.
Pediatric Patients
In the neutral position, the pediatric cervical spine is normally lordotic or extended.52 However, because the occiput is large, positioning the child’s body on a standard backboard may force the neck into flexion or a relative kyphosis. The clinical significance of this is currently unclear, but theoretically it may be hazardous for young children. Therefore, the standard backboard should be modified to adapt to the child’s larger head size. As a rough guide, the external auditory meatus should be on the same level as the midpoint of the shoulder. Suggested modifications include a cutout in the backboard that accommodates the occiput or a pad under the back at the level of the chest (see Fig. 46-11). If not modified, the standard backboard in conjunction with the disproportionately large head of a child may force the neck into hyperflexion and potentially aggravate an underlying cervical spine injury. Nypaver and Treloar53 showed that all children required elevation of the back (mean height, 25.4 ± 6.7 mm) for correct neutral position on a spine board. Children younger than 4 years required more elevation than did those 4 years or older. It must be pointed out, however, that there have been no published reports of a cord lesion resulting from the use of standard immobilization techniques and equipment in children.52
Complications
A collar that is too small for a patient may be either too tight for the girth of the neck (with obvious complications) or too short to provide adequate immobilization. Too large a collar commonly results in hyperextension, which can exacerbate a preexisting spinal injury. Underlying spinal abnormalities from conditions such as ankylosing spondylitis, rheumatoid arthritis, or kyphosis can also contribute to exacerbation of injuries with cervical collar application.24
Improper or prolonged application of an extrication collar may impede venous return and raise intracranial pressure (ICP).54 Although the clinical significance of increased ICP produced by cervical immobilization is still unknown, two studies have confirmed that application of a rigid cervical collar causes a statistically significant and sustained rise in ICP.55,56 Kolb and colleagues55 reported a 24.8–cm H2O increase in cerebrospinal fluid pressure in 20 adult patients undergoing lumbar puncture. Hunt and associates56 reported a 4.6–mm Hg mean rise in ICP in 30 patients with severe traumatic brain injury. The largest rise in ICP was noted in patients with a baseline ICP higher than 15 mm Hg. The authors of these studies concluded that the elevation in ICP produced by cervical immobilization might have deleterious effects in patients with acute or sustained intracranial hypertension.55,56
Long-term use of the Philadelphia extrication collar (Philadelphia Cervical Collar Co., Westville, NJ) as part of the treatment plan for an underlying cervical spine injury has been associated with pressure ulcers of the scalp.57 Because some collars (e.g., Philadelphia and Stifneck) have been shown to exert higher capillary closing pressure at contact points, it is suggested that collars with favorable skin pressure patterns and superior patient comfort (e.g., Nec-Loc, Jerome Medical, Moorestown, NJ) be used for long-term application.
One final complication should be mentioned. A patient who, for whatever reason, actively resists placement of a cervical collar or other splint should not be forced to wear it (Fig. 46-17). Postictal and intoxicated patients may present such a dilemma. Immobilization of a combative patient cannot be accomplished without considerable muscular exertion, not only by rescuers but also by the patient. If fractures do exist, it is possible that struggling can cause further damage. If the patient permits manual stabilization, this should be used as an alternative. Sedation may be used judiciously to enhance compliance.
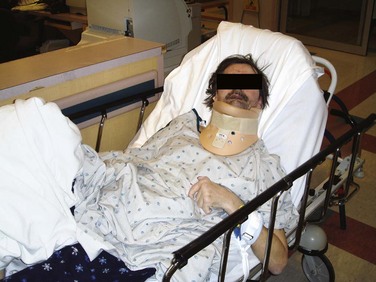
Figure 46-17 This seizure patient was initially postictal and combative and did not allow prehospital cervical spine immobilization. Although this is a dilemma for all involved, it is best to avoid forcing such immobilization (see Box 46-1). Sedation may be an alternative if injury is suspected and immobilization is deemed clinically necessary. Despite a now clear mental status and no neck pain (and National Emergency X-radiology Utilization Study rules negative), an unneeded collar was subsequently applied in the emergency department, to the annoyance of the patient, who then became very agitated and tried to leave. Note that the patient is now physically restrained and is incorrectly still upright.
Thoracolumbar Immobilization
Victims are generally strapped in place on a spine board to prevent sliding during transport. If too few straps are used or if the straps are loosely applied, motion during transport can occur. Moreover, even when applied correctly, spinal immobilization on a hard board may be extremely uncomfortable for patients and may induce pressure-related tissue damage. In one study, 100% of healthy volunteers reported significant pain after only 30 minutes on a long spine board.36 Occipital headaches, as well as mandibular, lumbar, and sacral pain, developed in these subjects. Other studies have demonstrated elevated tissue interface pressure in patients on spine boards without air mattress padding.38,58,59 These studies underscore the need to use adequate padding and remove patients from the board as soon as possible.
Excessive strapping can interfere with respiratory function in both children60 and adults.61–63 In healthy children 6 to 15 years old, forced vital capacity (FVC) has been shown to decrease from 4% to 59% during spinal immobilization.60 Totten and Sugarman63 evaluated the effect of two spinal immobilization methods (wooden backboard and vacuum mattress) on eight respiratory function measurements in healthy volunteers. In comparing baselines for each method, six of the eight measures (FVC, FVC%, forced expiratory volume in 1 second [FEV1], FEV1%, peak expiratory flow [PEF], and forced expiratory flow [FEF25-75%]) were reduced an average of 15%. Although this may not be a problem in healthy volunteers, the effects on patients with chest trauma or preexisting respiratory disease may be significant.63
Extremity Immobilization
Background
The earliest evidence of upper extremity splinting comes from the Egyptians circa 300 bce. In 1903 archaeologists from the Hearst expedition discovered two specimens whose open fractures had been treated with wooden splints and bandages. Their bones showed no signs of healing, so the subjects probably died soon after their injuries; however, numerous other ancient Egyptian specimens that have been discovered show evidence of well-healed forearm fractures.64
The purpose of splinting is to prevent motion of broken or dislocated bone ends. Carefully applied splints decrease pain while minimizing further damage to muscles, nerves, and blood vessels. Splinting also reduces the risk of converting a closed injury to an open one.65 Nevertheless, injuries to adjacent structures may still occur, so circulation, motor function, and sensation distal to the injury must be assessed early and monitored closely during transport.
Equipment
Various types of splints are currently available for immobilizing upper extremity injuries. Emergency care providers should be well trained and familiar with their equipment. The type of splint used is less important than the expertise of the provider applying the splint. Upper extremity splints can be divided into two basic types: rigid and soft.66
Rigid Splints: Rigid and semirigid splints are the mainstays of EMS fracture care (Fig. 46-18A-C). These splints are made of many different material, including cardboard, plastic, aluminum, wire, and wood. They are fastened to the injured extremity with tape, gauze, cravats, or Velcro straps. Rigid splints are generally nonflexible (some commercially available splints may have some flexibility in their design) and, when applied properly, immobilize the limb in a rigid fashion to maintain stability. Although most commercial rigid splints are prepadded, many will still benefit from additional soft padding to cushion the splint and increase comfort. This is particularly true over bony prominences. When applying rigid splints, leave the fingertips exposed so that the distal circulation can be continuously monitored.
Cardboard splints are excellent for long-bone fractures in the upper part of the arm. They can be formed into many shapes and are easy to apply, inexpensive, lightweight, radiolucent, and compatible with magnetic resonance imaging. Splints made from wax-impregnated cardboard are also water resistant. Plastic, aluminum, wire, and wood splints, though less malleable, are also good choices. An inexpensive aluminum splint that is popular with emergency care providers and can be found in many wilderness medical kits is the SAM Splint (Sam Medical Products, Portland, OR) (see Fig. 46-18D). The SAM Splint is built from a thin core of soft aluminum alloy sandwiched between two layers of closed-cell foam. The SAM Splint is extremely pliable. Bent into any of three simple curves, it is extremely strong and provides support for any fractured or injured extremity. In addition, it is water resistant, lightweight, radiolucent, reusable, and not affected by extreme temperatures or altitudes. These characteristics make it an ideal tool for emergency care providers and outdoor enthusiasts.
Vacuum splints (see Fig. 46-18E) are a special type of rigid splint in which the air is evacuated from a closed bag containing tiny foam beads. This compresses the contents into a solid mass and results in a rigid splint. Injuries can be encased and immobilized in the position in which they are found, thereby reducing patient discomfort. Flexibility of the splint before removal of the air allows molding of the splint to conform to the patient’s position. Vacuum splints are radiolucent and do not apply external pressure, thus ensuring maximum circulation to the injured extremity.
Soft Splints: Soft splints include air splints, pillows, slings, and swaths. Depending on the type of injury being treated, immobilization with pillows, slings, or swaths alone may be inadequate because they allow significant flexibility and motion. Therefore, when treating fractures and dislocations, these splints are most effective when used with some form of a rigid device. However, even when used alone, pillows, slings, or swaths provide cushioning and some limitation of motion that may be adequate for less severe injuries such as sprains and contusions.
Air splints are soft splints that become rigid when inflated. Besides providing immobilization, they help compress the underlying soft tissue to reduce local hemorrhage. These devices are sensitive to differences in atmospheric pressure and temperature. Therefore, constantly monitor their inflation to ensure that the underlying tissue is not being subjected to pressure-induced ischemia and the development of a compartment syndrome. One study suggested a maximum splint pressure of 15 mm Hg to reduce the risk for ischemia.67 With long ambulance transport times, deflate the splint for 5 minutes every 1.5 hours.68
Pillow splints (see Fig. 46-18F) can be fashioned from any soft bulky material and are excellent choices for hand or wrist injuries. These splints are extremely comfortable and can be applied easily.
Slings and swaths are generally used in combination with a rigid or a soft splint. When used alone, they can effectively immobilize injuries to the shoulder, clavicle, or humerus (see Fig. 46-18G).
Procedures
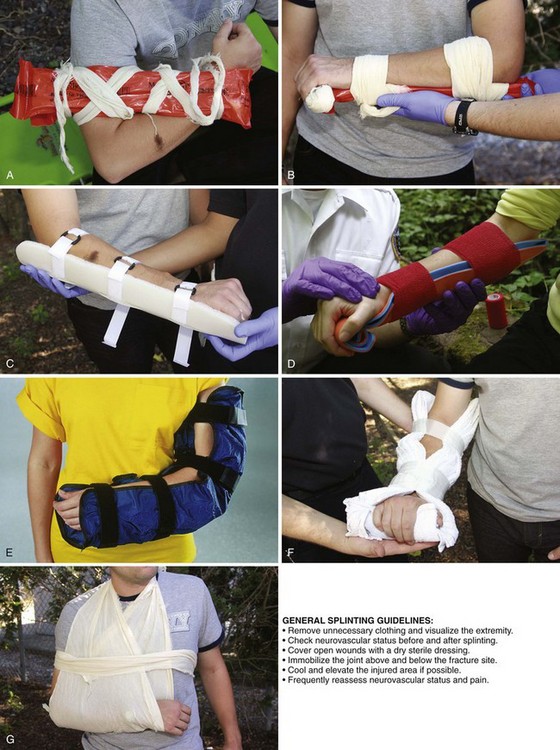
To properly apply a splint to an injured extremity, several guidelines should be followed. Communication is important to ensure that the patient understands what is being done at all times. When possible, administer an appropriate analgesic to make splint application less painful. Remove any unnecessary clothing to adequately visualize the injured extremity. Stabilize the fracture site manually to help limit unnecessary movement and prevent further injury. Check the patient’s neurovascular status (i.e., pulse, motor, and sensation) before and after the application of a splint. For a severely angulated extremity with neurovascular compromise, reduce the deformity with gentle longitudinal traction (but not exceeding 10 lb of pressure) before splinting. Make only one attempt at fracture reduction. If resistance or pain is encountered, splint the extremity in the position found. Cover open wounds with a dry sterile dressing before applying the splint. Apply the splint (Table 46-1) by using the orthopedic principle of immobilizing the joint above and below a suspected fracture site. Cool and elevate the injured area to help reduce local swelling and pain. Once the splint has been applied, assess distal neurovascular status frequently. Any deterioration requires immediate evaluation of the splint to determine whether excessive pressure is being applied. In addition, frequently assess and treat pain.
TABLE 46-1
Management of Specific Upper Extremity Orthopedic Injuries
| SITE | SUGGESTED IMMOBILIZATION TECHNIQUES |
| Clavicle | Sling and swath |
| Shoulder | Sling and swath as it lies |
| Humerus | Cardboard or vacuum splint with a sling and swath |
| Elbow | Cardboard or vacuum splint as it lies |
| Forearm | Cardboard, malleable metal, air, or vacuum splint with a sling and swath |
| Wrist | Pillow, cardboard, malleable metal, or vacuum splint applied in the position found |
| Hand | Pillow, cardboard, or malleable metal splint in the position of function |
| Finger | Tongue depressor or small malleable metal splint |
Rigid Splints: To apply a rigid splint, have an assistant provide support and gentle traction above and below the injury. Apply the splint on the side of the extremity away from any open wounds. The splint should be large enough to immobilize the joint above and below a suspected fracture or the bone above and below a dislocation and be well padded to reduce the risk for pressure necrosis. Secure the splint to the extremity with gauze, tape, cravats, or Velcro straps (see Fig. 46-18A-C).
Soft Splints: The application procedure for an air splint depends on whether the splint is equipped with a zipper. If the splint does not have a zipper, first place the splint over the rescuer’s arm until the bottom edge lies above the wrist. Use this hand to grasp the hand of the patient’s injured extremity and use the free hand to provide support and gentle traction above the injury (Fig. 46-19A). An assistant then slides the splint onto the patient’s arm (see Fig. 46-19B). Smooth out any wrinkles and inflate the splint until finger pressure makes a slight dent (see Fig. 46-19C). Open a zippered air splint and place it around the injured area. Close the zipper and inflate the splint as described previously. With air splints that completely enclose the hand, continuously assess the distal circulation by checking fingertip color, temperature, and capillary refill.
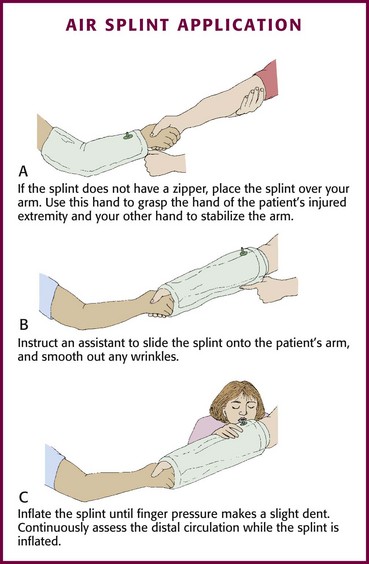
Figure 46-19 Air splint application.
Apply pillow splints by encasing the injury in the pillow and securing it with tape, cravats, or gauze (see Fig. 46-18F). If possible, keep the nail beds exposed to allow frequent neurovascular checks.
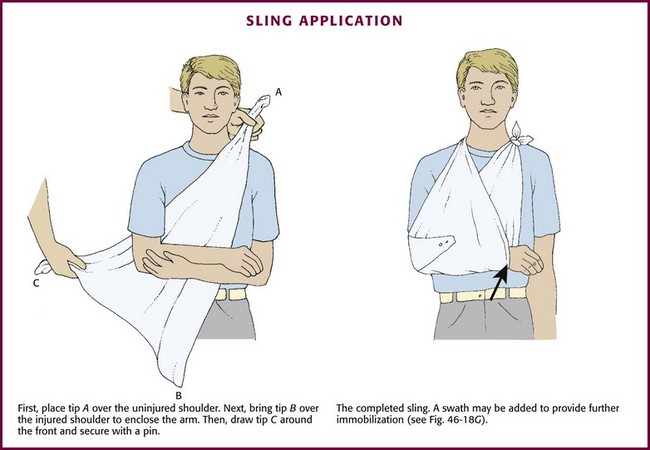
To apply a sling, have an assistant support the injured arm in a flexed position across the patient’s chest (Fig. 46-20). Place the long edge of the triangular bandage lengthwise along the patient’s side opposite the injury with its tip over the uninjured shoulder. Bring the other tip over the injured shoulder to enclose the arm in the sling. Adjust the sling so that the arm rests comfortably with the hand higher than the elbow. Tie the ends of the sling together at the side of the neck and pad the knot for comfort. Finally, wrap the point of the sling at the elbow around the front of the forearm and pin. With the sling properly applied, rest the patient’s arm comfortably against the chest with the fingertips exposed.
To apply a swath, place a cravat of sufficient length under the uninjured arm and over the injured arm at the level of the midhumerus. Tie the ends circumferentially around the thorax so that the injured extremity is secured snugly to the chest (see Fig. 46-18G). In adults, two cravats may have to be tied together in an end-to-end fashion to produce a swath of sufficient length.
Complications
Potential complications of upper extremity splinting include pressure necrosis, conversion of a closed injury to an open one, and loss of neurovascular function. With the use of air splints, there is the additional risk of pressure-induced tissue ischemia and compartment syndrome.67
Lower Extremity
Injuries to the lower extremities, including sprains, fractures, and dislocations, are also commonly encountered by prehospital care providers. As with upper extremity injuries, application of a splint is an essential part of the prehospital management of lower extremity injuries. Many of the principles, techniques, and complications discussed for upper extremity splinting also apply to injuries to the lower extremity; the SAM Splint (see Fig. 46-18D) and pillow splint (Fig. 46-18F) are just two examples (Fig. 46-21; also see Fig. 46-18). Table 46-2 provides recommendations for immobilizing a variety of lower extremity injuries. One fundamental difference between splinting upper and lower extremity injuries is use of a traction splint in the management of femoral fractures. The remainder of this section focuses on the use of traction splints.
TABLE 46-2
Management of Specific Lower Extremity Orthopedic Injuries
| SITE | SUGGESTED IMMOBILIZATION TECHNIQUES |
| Hip | Traction splint and long backboard or secure the injured leg to the uninjured leg Long backboard with the limb supported by pillows |
| Femur | Traction splint or pneumatic antishock garment |
| Knee | Cardboard or vacuum splint in the position found |
| Tibia/fibula | Cardboard, air, or vacuum splint |
| Ankle | Pillow or air splint |
| Foot | Pillow or air splint |
| Toe | Tape to the adjacent toe |
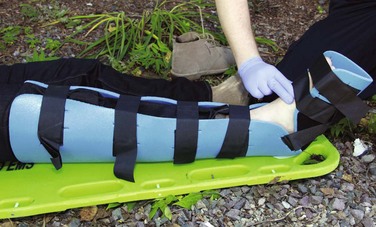
Figure 46-21 Prefabricated padded leg splint. Similar to the arm splints described earlier, many prefabricated leg splints are commercially available. Their application and use mirror the general principles of splinting described in Figure 46-18.
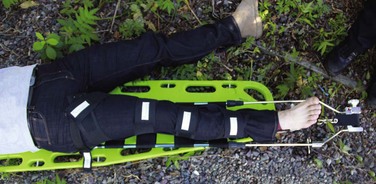
The use of traction and countertraction for alignment and reduction of fractures dates from the time of Hippocrates.69 In the late 1800s, Sir Hugh Owen Thomas developed the first full-ring traction splint for the definitive management of fractured femurs.64,69 However, because the Thomas full-ring splint was difficult to apply on the battlefield, it was later modified by his nephew, Sir Robert Jones, and other surgeons to a half-ring design that made it easier to apply during battle. During World War I, the modified splint was credited with reducing the mortality rate associated with fractured femurs from 80% to 15%.69 Since then, several additional modifications that carry the name of their inventors (e.g., Glenn Hare, Joseph Sager, Allen Klippel) have furthered the development of lower extremity traction splints. Today, traction splints are a nearly universal piece of equipment found on most ambulances, and their application is an integral part of the prehospital care provider’s skill set. The main purpose of the traction splint is to immobilize a fractured femur.70,71
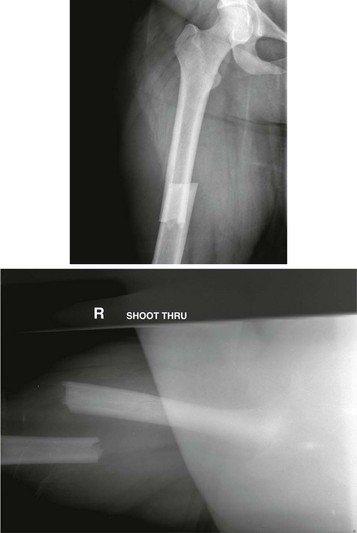
In the setting of a fractured femur, muscle spasm and overlap of fragments may cause the thigh to lose its cylindrical shape and adopt a more spherical appearance (Fig. 46-22).69 The resultant decreased tissue pressure and increased volume may allow 1 to 2 L of blood to accumulate at the fracture site. Traction splints are designed to align fracture segments and restore the cylindrical shape of the thigh (Fig. 46-23). This in turn increases tissue pressure, decreases the potential space for blood loss, and inhibits further hemorrhage. In addition, traction splints help reduce pain, prevent further damage to neurovascular structures, and lower the incidence of fat embolism.70,71
Indications
Application of a lower extremity traction splint is indicated whenever a fractured femur is suspected.66,72,73 Clinical signs of a fractured femur include thigh pain associated with limb shortening, angulation, crepitus, swelling, or ecchymosis.
Contraindications
Do not use traction splints on patients with pelvic fractures, hip injuries with gross displacement, significant injuries involving the knee, or avulsion or amputation of the ankle or foot.73 Use of traction splints is not recommended in the presence of an associated distal tibia-fibula or ankle fracture in the same extremity. In these circumstances, the amount of traction required to realign the fractured femur can distract the distal fracture site. A variety of rigid splints may be considered in these settings.
Equipment
Regardless of the type or manufacturer, the basic traction splint consists of a metal frame that extends from the proximal end of the thigh to an area distal to the heel. The padded proximal end fits against the ischial tuberosity and serves as the anatomic fixation point. The proximal portion of the splint may be a ring that encircles the proximal end of the thigh, a partial ring, or a padded bar. At the distal end of the splint is typically a ratchet-type device that when engaged, creates traction on the distal end of the femur. All traction splints also have several soft elastic straps that support the thigh and leg.73
Commonly used traction splints include the Hare Traction Splint, Kendrick Traction Device, Sager Emergency Traction Splint, and the Ferno-Trac (Fig. 46-24). Each of these splints has its own advantages, disadvantages, and unique method of application. For example, traction splints that use a half-ring design apply countertraction to the ischial tuberosity from below the shaft of the femur. This produces flexion at the hip joint of up to 30 degrees and will not allow complete fracture alignment unless the patient is in a reclining position about 30 degrees from horizontal or the injured extremity is elevated to create the same angle. Traction splints that do not use a half ring do not cause hip flexion.

Procedure
Application of the Ferno-Trac Traction Splint (Ferno-Washington, Wilmington, OH) and the Sager Emergency Traction Splint (Minto Research and Development, Redding, CA) is illustrated in Figures 46-25 and 46-26, respectively.
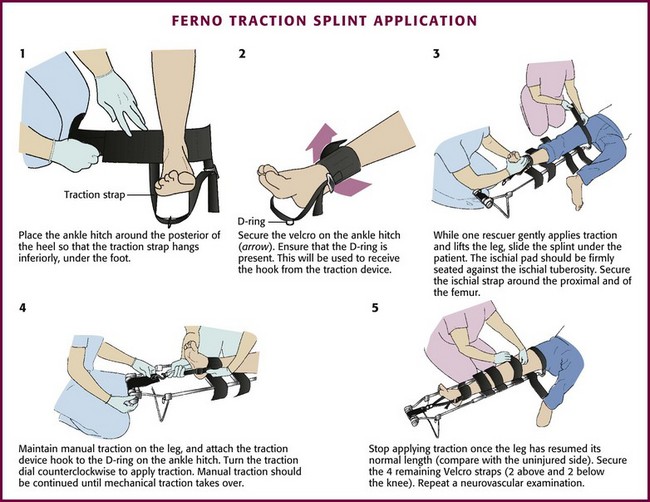
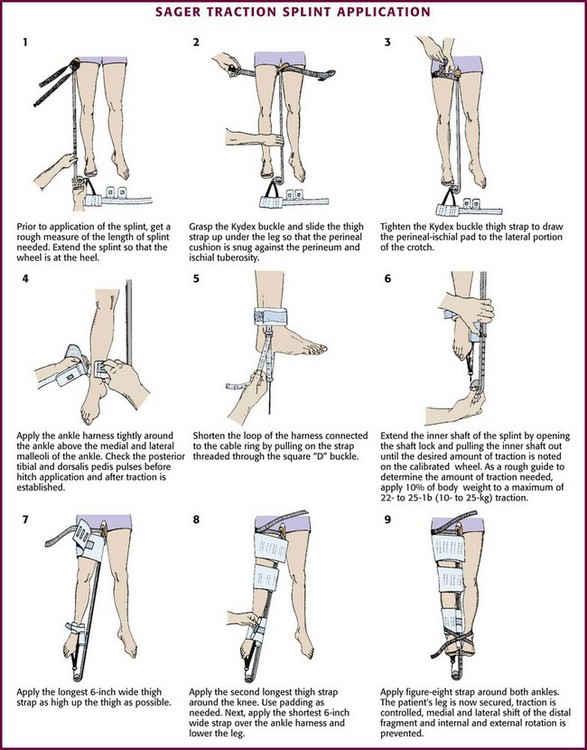
Next, place the ankle harness immediately above the medial and lateral malleoli and attach it to the distal end of the traction splint. Ferno-Trac and other similar traction splints use a ratchet mechanism to apply constant (static) traction on the ankle strap. For Sager-type devices, gently extend the inner shaft of the splint until the desired amount of traction is achieved. The newest Sager model, the SX405, uses a handle to lengthen the inner shaft until the fractured leg is the same length as the uninjured leg. This traction handle also enables providers to set and document the traction force applied. The Sager Emergency Traction Splint is unique in that it provides gentle, quantifiable traction that is dynamic in nature. This dynamic function permits the traction to decrease automatically as muscle spasm decreases and leg length increases.69 Regardless of which splint is being used, apply traction gradually to approximately 10% of body weight or a maximum of 15 lb. Only rarely will more traction be required.72,73 The goal is to stabilize the fracture and maintain proper limb alignment. Use the least amount of force necessary to accomplish this task.74
Pelvic Immobilization
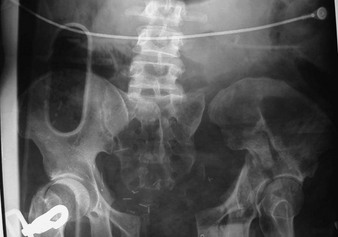
Pelvic fractures cause significant morbidity and mortality, especially in the elderly. The decreased bone density in older individuals contributes to the likelihood of sustaining pelvic fractures from low- to moderate-energy mechanisms, such as falls from a standing height. The findings on physical examination may be subtle, such as slight asymmetry of the lower extremities, so a high index of suspicion is important. In younger individuals, pelvic injuries are usually associated with high-energy mechanisms, with the most common being motor vehicle collisions.75 Major pelvic trauma can lead to severe, uncontrollable hemorrhage, hypovolemic shock, and multisystem organ failure (Fig. 46-27).76
In the prehospital setting, early stabilization of fracture segments to control hemorrhage, along with gentle handling and immediate transport to a trauma center, is the cornerstone of treatment.77 However, even the most experienced prehospital provider may find it difficult to identify pelvic injuries in the field (the exception being an open-book fracture).
Indications and Contraindications
For any patient with significant pelvic pain or tenderness or evidence of pelvic instability after trauma, apply a pelvic circumferential compression device, especially if the patient is hypotensive.78,79 There are no contraindications to pelvic stabilization in patients with presumed pelvic fractures.
Procedure
Several methods exist for stabilizing pelvic fractures in the prehospital setting, including pelvic sheeting, commercially available pelvic circumferential compression devices (also known as pelvic binders) such as the SAM Sling (Fig. 46-28), vacuum “beanbag” mattress splints, and pneumatic antishock garments (PASGs). However, with the advent of commercial pelvic binders and their well-documented list of complications and disadvantages, application of a PASG for pelvic fracture stabilization is no longer recommended.80,81 When using any pelvic stabilizing device it must be remembered that aggressively moving patients or palpating the injured pelvis (e.g., pelvic rock) can precipitate further vascular injury or clot disruption and lead to life-threatening hemorrhage.
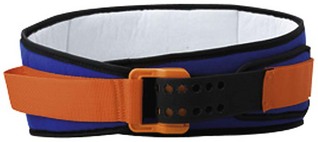
Figure 46-28 The SAM Sling may be used to stabilize a fractured pelvis. (Courtesy of SAM Medical Products, Portland, OR.)
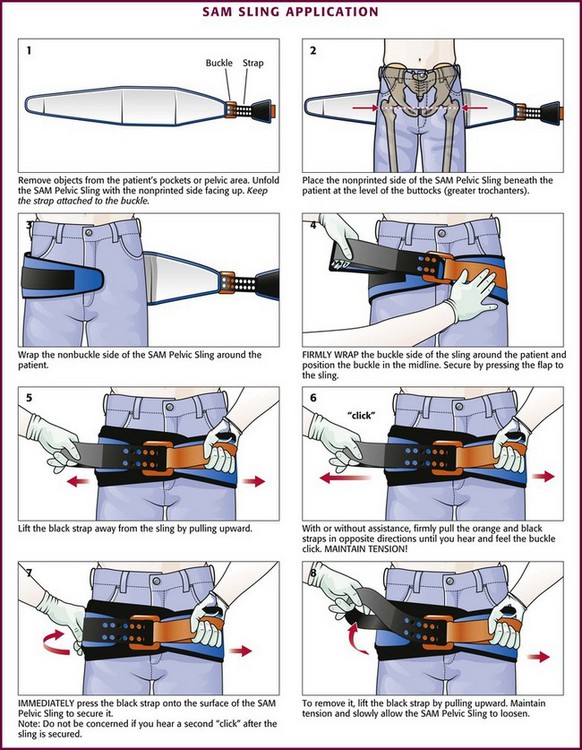
Stabilization of the pelvis consists primarily of compressing the bony ring. This can be accomplished by using a sheet or commercially available pelvic binder. To apply a sheet, place it over a long spine board and then gently logroll the patient (but no more than 15 degrees) into position on the board.78 Alternatively, lift the patient with a scoop stretcher and then slide the sheet beneath the patient. Regardless of which method is used, wrap the sheet around the greater trochanters and tie the ends into a knot to compress the bony pelvis (Fig. 46-29). Pelvic binders are designed for quick and easy application in the field or ED. They are easy to maintain, reusable, and sized to fit 95% of the adult population. The pelvic binder acts similar to a bed sheet and, when placed properly (over the area of the greater trochanters), provides a safe and effective force to stabilize pelvic fractures.82,83 Application of one such device, the SAM Sling, is illustrated in Figure 46-30.

Complications
Application of any pelvic compression device can damage the underlying soft tissue, as well as organs enclosed within the bony pelvis, including the bladder, urethra, and vagina.84 However, the potential benefits of pelvic stabilization far outweigh these rare potential complications and should not discourage one from applying a pelvic stabilization device.84
Removal of Helmets and Protective Equipment
The majority of modern sports helmets consist of a hard polycarbonate shell lined with foam padding, adjustable air cells, or both. Density, strength, and rigidity vary depending on the type of impact that the helmet is designed to protect against (Fig. 46-31). Many helmets are considered multisport and meet the requirements for several potential mechanisms of injury and varying degrees of impact.85
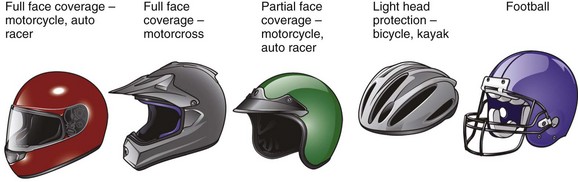
Figure 46-31 Types of helmets.
Motorcycle helmets may or may not have a full face guard, but in either case they have been shown to reduce the incidence of severe head injury and death and are associated with shorter hospital stays and reduced hospital cost.86–88 Although early studies suggested that the use of motorcycle helmets might be associated with an increased incidence of cervical spine injuries,89,90 this concern has not been substantiated.91–93
Most of the early research in the area of helmet removal focused on the removal of motorcycle helmets. More recently, the spotlight has turned to football helmet removal because football players commonly sustain head and neck trauma, and their care is frequently complicated by the presence of additional protective equipment.94
Helmet removal requires a careful, methodical approach to avoid compounding a possible injury to the spinal cord.95,96 Fluoroscopic studies have detected spinal motion even in the best of circumstances when removing hockey and football helmets.95–97 As with all trauma victims, the initial management of an injured athlete is to address the ABCs (airway, breathing, circulation). However, it is important to note that a properly fitting sports helmet holds the head securely in a neutral position of alignment and minimizes any motion, provided that the athlete is also wearing shoulder pads. In this case, removing the face mask but leaving the helmet and shoulder pads in place will allow adequate airway control while maintaining proper alignment of the cervical spine and reducing the risk for further injury.94,98
Motorcycle and motor sport helmets do not usually have a removable face mask, do not always fit properly, and are worn without shoulder pads. Thus, in contrast to helmets worn by athletes, motorcycle and motor sport helmets should be removed routinely to properly immobilize the spine.94
Indications
For years, the proper management of a spine-injured athlete prompted much debate and disagreement among various health care professionals. In 1998, the National Athletic Trainers’ Association formed the Inter-Association Task Force (IATF) for the Appropriate Care of the Spine-Injured Athlete, which in 2001 released a comprehensive set of guidelines and recommendations titled Prehospital Care of the Spine-Injured Athlete.99 This consensus document outlines the current recommendations for removal of helmet and shoulder pads, which include the following99:
l. If the helmet and chin strap fail to hold the head securely so that immobilizing the helmet does not also adequately immobilize the head
l. If the helmet and chin strap design prevent adequate airway control or ventilation, even after removal of the face mask
l. If the face mask cannot be removed after a reasonable period
l. If the helmet prevents proper immobilization for transportation in an appropriate position
If the athlete’s helmet is not removed, maintain cervical spine immobilization with a properly fitting helmet by using tape, commercially available foam blocks, and a backboard. If it does become necessary to remove the helmet, the principle of “all or nothing” should apply. That is, remove the helmet and shoulder pads (if present) at the same time to avoid hyperextension of the cervical spine.94,95,100 If in doubt regarding the need for removal of a sport helmet, the National Athletic Trainers’ Association suggests remembering two overarching principles: (1) exposure and access to vital life functions (e.g., airway, chest for cardiopulmonary resuscitation or use of an automated external defibrillator) must be established or easily achieved in a reasonable and acceptable manner, and (2) neutral alignment of the cervical spine should be maintained while allowing as little motion of the head and neck as possible.100
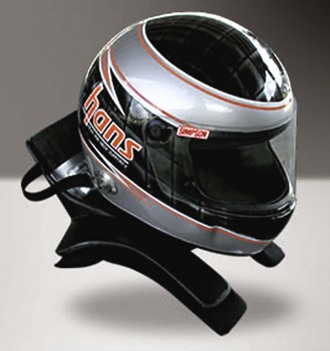
In contrast to athletic helmets, motorcycle and motor sport helmets should be removed in the prehospital setting.66 Motorcycle helmets with a full face guard make it very difficult to assess and manage the airway and to evaluate injuries to the head and neck. The helmet’s large size and design may cause significant neck flexion if left in place when the patient is placed on a backboard. Though thought to reduce the risk for head and cervical spine injury, the increasing use of head and neck restraint devices (e.g., the HANS device; Fig. 46-32) in professional motor sports has further complicated cervical spine management and helmet removal.
In the ED, stable patients typically undergo imaging studies of the cervical spine before removal of the helmet and shoulder pads. The National Collegiate Athletic Association and the IATF recommend that the helmet (with the face mask removed) and shoulder pads remain in place until the initial radiographic evaluation is completed.99 However, two small studies involving healthy volunteers found that the helmet and shoulder pads worn by athletes may interfere with standard cervical spine radiographic evaluation.101,102 The authors of these studies recommend incorporating procedures for controlled and cautious removal of equipment before initial radiographic evaluation.101,102 A study by Wanninger and associates103 evaluated the use of computed tomography (CT) as a viable alternative to cervical spine clearance in an injured helmeted athlete. Although the findings in this small study require further validation, the use of CT for initial triage and diagnosis seems promising.
Contraindications
The only absolute contraindication to helmet removal is neck pain or paresthesias associated with the procedure or an inability to remove the helmet because of an impaled object (e.g., deer antler through a motorcycle helmet).104,105 Relative contraindications to helmet removal include unfamiliarity with the technique and lack of sufficient assistance.106,107
Procedure
Whenever possible, treat injured athletes with a suspected cervical spine injury with their equipment (e.g., helmet, chin strap, shoulder pads) left in place to minimize any risk for further cervical spine motion.96 However, when present, remove face masks at the earliest opportunity, before transportation and despite the absence of any respiratory complaints.99,100,106,108
A variety of tools (e.g., FM Extractor, Trainer’s Angel, anvil pruner, polyvinyl chloride pipe cutter, or power screwdriver) and techniques are used for face mask removal.96 All emergency care providers should have tools for face mask removal readily available and be familiar with their use. The choice of equipment is less important than the skill and experience of the personnel using it.109 To remove the face mask of a football helmet, cut the four plastic loop straps that secure the face mask to the helmet. Similarly, remove hockey and lacrosse face masks by unscrewing the external screws holding them in place. Maintain in-line stabilization to keep the head and neck in the neutral position during the entire procedure. With practice, the face mask of any helmet can be quickly and safely removed with minimal risk of extraneous movement of the cervical spine.98
The National Athletic Trainers’ Association protocol for helmet and shoulder pad removal discussed in this chapter has been shown to effectively limit motion of the cervical spine during removal of equipment.110 Proper removal of a helmet and shoulder pads requires at least two (and preferably three or four) individuals along with in-line stabilization of the cervical spine throughout the procedure.86,106,111
One rescuer manually stabilizes the head and neck in the neutral position by placing her or his hands on each side of the helmet with the thumbs pointing up (Fig. 46-33, step 1). A second rescuer then removes the chin strap by cutting or unsnapping it (see Fig. 46-33, step 2). Next, this rescuer removes the left or right cheek and jaw pads from the helmet by first slipping the flat blade of a screwdriver or bandage scissors between the pad snaps and the helmet’s inner surface and twisting slightly. Once separated from the helmet, remove the pads by sliding them out firmly and slowly. Remove the opposite side in the same manner. Note that some helmet models (e.g., Riddell Revolution) are padded with a number of air-filled bladders that must be deflated (rather than removed) before removal of the helmet (Fig. 46-34).112 In this case, the second rescuer deflates the air inflation system by releasing the air at the external ports with the inflation needle that comes with the helmet. Alternatively, an 18-gauge needle or air pump needle may be tried. If an inflation needle is not available (or an 18-gauge needle or air pump needle does not work), directly puncture the bladders with an 18-gauge needle.
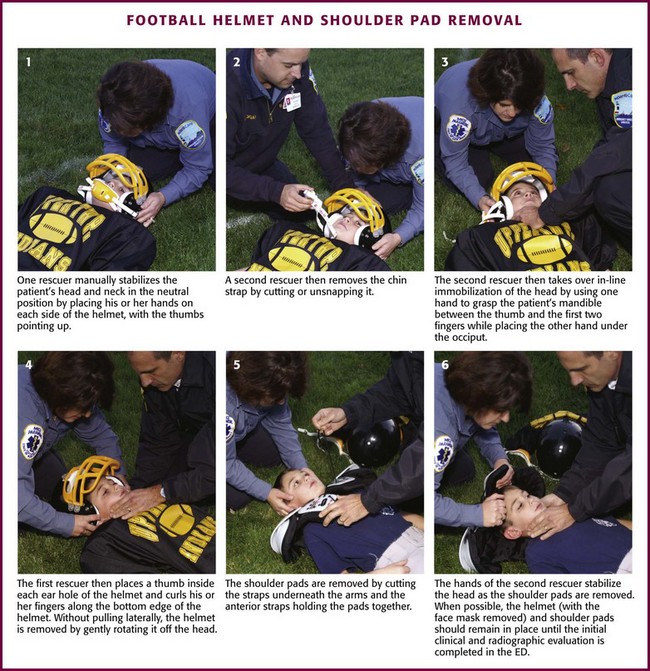

The second rescuer then takes over in-line immobilization of the head by using one hand to grasp the patient’s mandible between the thumb and the first two fingers while placing the other hand under the occiput (see Fig. 46-33, step 3). The first rescuer then places a thumb inside each ear hole of the helmet and curls his or her fingers along the bottom edge of the helmet (see Fig. 46-33, step 4). At this point some experts recommend easing the helmet off by pulling laterally and longitudinally in line with the head and neck.111 However, this maneuver may actually tighten the helmet at the occiput and the forehead.113 The IATF recommends rotating the helmet off the head in a gentle fashion without pulling laterally.99 Remove shoulder pads by cutting the straps underneath the arms and the anterior straps holding the pads together (see Fig. 46-33, step 5). If a cervical orthosis (e.g., neck roll, cowboy collar, or butterfly restrictor) is present, disconnect it from the helmet and shoulder pads before removal.
When possible, remove the shoulder pads and helmet simultaneously to prevent the head from falling into extension. If the shoulder pads cannot be removed simultaneously, manually stabilize the head in the neutral position during the procedure. The hands of the second rescuer can be moved superiorly as the helmet is being removed so that the thumb and first fingers grasp the maxilla at each side of the nose in the maxillary notch (see Fig. 46-33, step 6).
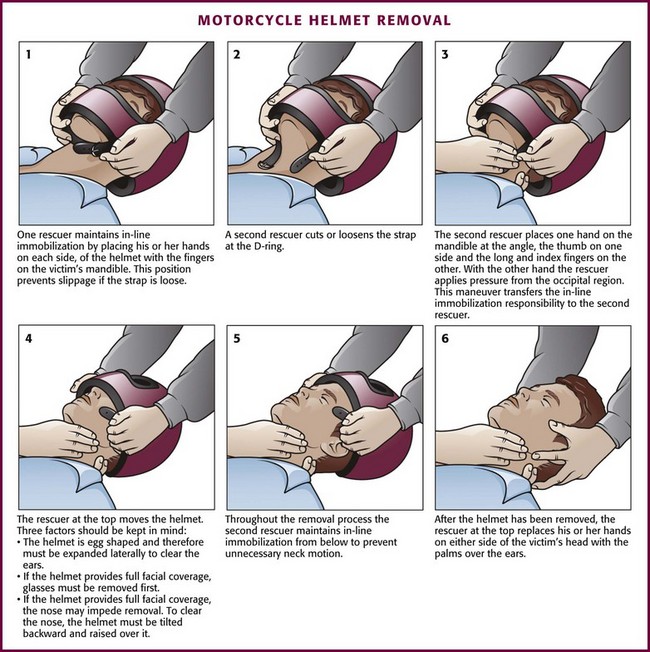
Motorcycle Helmet Removal
For the reasons described earlier, motorcycle helmets should be removed in the prehospital setting. The removal method endorsed by the American College of Surgeons in 1997 is the method most often used today (Fig. 46-35).114 Providers should be aware that unacceptable cervical motion can occur during removal of a motorcycle helmet if the shoulders are not properly elevated; a folded sheet or jacket placed behind the patient’s shoulders may help limit any cervical motion associated with the procedure.115
If attempts to remove the helmet result in pain or paresthesias, the advanced trauma life support guidelines recommend removing the helmet via a technique described by Aprhamian and coworkers.116 This technique uses a cast saw to bivalve the helmet in the coronal plane. Following division of the outer rigid shell, incise the inner foam material and remove it with the head and neck in neutral alignment. Although this approach does provide an alternative method of removing the helmet, the intense vibrations produced during use of the cast cutter may exacerbate an underlying spinal injury. In addition, even with the proper equipment available to the prehospital care provider, the technique may be slow and difficult with modern, well-fitting, high-quality helmets.106,117,118
The preferred method of helmet removal in organized motor sports is the Eject Helmet Removal System (formerly the Hats Off System), which consists of an inflatable air bladder that can be placed into the helmet before use or introduced into the crown of the helmet with a specially designed insertion tool. When inflated with a hand pump or CO2 cartridge, it purportedly loosens the helmet to allow easy removal (Fig. 46-36).117 Despite little scientific data supporting its use, the Indycar Racing League, American Speed Association, and American Motorcycle Association have made the Eject Helmet Removal System mandatory at all of their events. In addition, the Championship Auto Racing Teams and National Association for Stock Car Auto Racing have strongly recommended its use.
Figure 46-36 The Eject Helmet Removal System. This device uses a small air bladder that is neatly folded in an accordion fashion and placed underneath the helmet liner. A small tube runs under the padding and fastens to the bottom of the rim of the helmet to provide easy access. The device may be prefitted into the rider’s helmet or inserted at the time of removal by using an insertion tool that allows the airbag to be slid up inside the top of a helmet. (Courtesy of Shock Doctor, Minneapolis, MN. Available at http://www.ejectsafety.com. Accessed September 2012.)
Complications
Underlying cervical spine injuries may be exacerbated by failure to adhere to proper helmet removal techniques. Although this is not supported by conclusive evidence, the few related studies seem to suggest that there may be a risk with helmet removal.96 In a cadaveric model, Donaldson and colleagues118 demonstrated that even in the best clinical setting, there is a significant amount of motion during removal of helmets and shoulder pads. Larger studies are needed to determine whether there is a real and significant risk in the clinical setting.
Special Circumstances
Clinical Clearance of Immobilized Patients in the ED
Patients with low-risk injuries who have been immobilized by EMS personnel in the field often remain in uncomfortable positions while unattended or unevaluated in a busy ED. Many of these patients do not have a spinal injury yet often undergo prolonged immobilization before their complaints can be addressed or spinal injury can be clinically excluded and they can be removed from a backboard or other immobilization. Backboard immobilization by itself, for 30 to 60 minutes, will often result in iatrogenic backboard-initiated pain, even in healthy pain-free noninjured volunteers.119 Such new or additional pain can prompt unnecessary imaging studies, result in patient inconvenience, and initiate the use of unneeded analgesics. It is therefore desirable to attend to immobilized patients in a prompt manner to avoid such problems. However, the average backboard time reported in one university hospital ED study was 54 minutes (range, 10 to 201) in patients eventually cleared clinically. Immobilization times averaged 181 minutes (range, 133 to 239) in patients not removed from a backboard until after radiographic clearance.119 Since the average time spent in backboard immobilization in an ED may exceed times associated with iatrogenic injury, the clinical criteria used by nurses and house staff to clear the patient of a spinal injury can be implemented.
Numerous studies have concluded that nurse clearance of spine injuries agrees closely with physician decisions to clinically clear an immobilized patient.120,121 Criteria used to clinically clear an immobilized patient can be based on absence of the following: altered level of consciousness, drug or alcohol impairment, pain or posterior cervical spine tenderness, distracting injuries, or new focal subjective or objective neurologic deficits. These are similar to various validated clinical criteria such as the Canadian C-Spine Rule or the National Emergency X-radiography Utilization Study criteria.
Gunshot Wounds to the Head
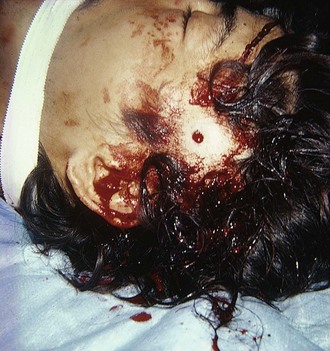
An isolated gunshot wound to the head is not an indication for routine cervical spine immobilization. Such intervention may lead to missed injuries under the collar and airway compromise and delay resuscitation or impede intubation because of unwarranted concern for manipulating the spine (Fig. 46-37). In one study of 215 patients with gunshot wounds to the head, no bony or ligamentous injuries unrelated to direct bullet injury were identified in any patient, and none sustained indirect blast- or fall-related injuries to the spinal cord.122 In this study, cervical spine immobilization was deemed to compromise securing of the airway. There is no meaningful recovery from gunshot injuries to the spinal cord.
Seizure Patients
Patients who have had a seizure in the field are at some risk for a spine injury, albeit it quite low and poorly characterized. They may be immobilized by EMS personnel or in the ED because of a presumed risk for spinal injury (see Fig. 46-17). Frequently, the patient’s postictal mental status does not allow meaningful clinical evaluation, and attempts at immobilization can prompt further patient confusion and agitation, or struggling may exacerbate injuries that do exist. There are sparse data on this subject, but McArthur and Rooke, in a retrospective study of 1656 seizure patients, found no spinal fractures but did note a mandibular, tibial, and nasal fracture.123 This study questioned the need for full spinal precautions in patients sustaining uncomplicated seizures. It would be prudent to consider sedation of agitated seizure patients who will not tolerate immobilization of the neck or spine when there is clinical concern for a spinal injury based on the mechanism of injury, physical findings, an obvious motor deficit, significant facial trauma, or patient complaints.
References
1. American Academy of Orthopaedic Surgeons, Committee on Injuries. Fractures and dislocations of the spine. In: Emergency Care and Transportation of the Sick and Injured. Chicago: American Academy of Orthopaedic Surgeons; 1971:111.
2. Domeier, RM. Indications for prehospital spinal immobilization. Prehosp Emerg Care. 1999;3:251.
3. Hankins, DG, Rivera-Rivers, EJ, Ornato, JP, et al. Spinal immobilization in the field: clinical clearance criteria and implementation. Prehosp Emerg Care. 2001;5:88.
4. Hoffman, JR, Schriger, DL, Mower, W, et al. Low-risk criteria for cervical spine radiography in blunt trauma: a prospective study. Ann Emerg Med. 1992;21:1454.
5. Hoffman, JR, Mower, WR, Wolfson, AB, et al. Validity of a set of clinical criteria to rule out injury to the cervical spine in patients with blunt trauma. N Engl J Med. 2000;13:94.
6. Stiell, IG, Wells, GA, McKnight, D, et al. Canadian C-Spine Rule study for alert and stable trauma patients: I. Background and rationale. Can J Emerg Med. 2002;4:84.
7. Hauswald, M, Ong, G, Tandberg, D, et al. Out-of-hospital spinal immobilization: its effect on neurologic injury. Acad Emerg Med. 1998;5:214.
8. Kwan, I, Bunn, F, Roberts, IG. Spinal immobilization of trauma patients. Cochrane Database Syst Rev. 2001. [2CD002803].
9. Orledge, JD, Pepe, PE. Out-of-hospital spinal immobilization: is it really necessary? Acad Emerg Med. 1998;5:203.
10. Domeier, RM, Frederiksen, SM, Welch, K. Prospective performance assessment of an out-of-hospital protocol for selective spine immobilization using clinical spine clearance criteria. Ann Emerg Med. 2005;46:123.
11. Burton, JH, Dunn, MG, Harmon, NR, et al. A statewide, prehospital emergency medical service selective patient spine immobilization protocol. J Trauma. 2006;61:161.
12. Brown, LH, Gough, JE, Simonds, WB. Can EMS providers adequately assess trauma patients for cervical spine injury? Prehosp Emerg Care. 1998;2:33.
13. Stroh, G, Braude, D. Can an out-of-hospital cervical spine clearance protocol identify all patients with injuries? An argument for selective immobilization. Ann Emerg Med. 2001;37:609.
14. Sundheim, SM, Cruz, M. The evidence for spinal immobilization: an estimate of the treatment benefit. Ann Emerg Med. 2006;48:217.
15. Spinal Cord Injury Facts and Figures at a Glance. National Spinal Cord Injury Statistical Center, Birmingham, AL https://www.nscisc.uab.edu/public_content/pdf/Facts%202011%20Feb%20Final.pdf, 2011. [Available at].
16. Augustine, J. Spinal trauma. In Campbell JE, ed.: International Trauma Life Support for Pre-hospital Care Providers, 6th ed, Upper Saddle River, NJ: Pearson Prentice Hall, 2008.
17. Hockberger, RS, Kaji, AH, Newton, E. Spinal Injuries. In Marx JA, Hockberger RS, Walls RM, et al, eds.: Rosen’s Emergency Medicine, 7th ed, St. Louis: Mosby, 2009.
18. France, JC, Gocke, RT. Injuries of the cervicocranium. In Browner BD, Levine AM, Jupiter JB, et al, eds.: Skeletal Trauma, 4th ed, Philadelphia: Saunders, 2008.
19. Kwon, BK, Anderson, PA. Injuries of the lower cervical spine. In Browner BD, Levine AM, Jupiter JB, et al, eds.: Skeletal Trauma, 4th ed, Philadelphia: Saunders, 2008.
20. Lee, Y, Templin, C, Eismont, F, et al. Thoracic and upper lumbar spine injuries. In Browner BD, Levine AM, Jupiter JB, et al, eds.: Skeletal Trauma, 4th ed, Philadelphia: Saunders, 2008.
21. Levine, AM, Low lumbar fractures. Skeletal Trauma, 4th ed. Philadelphia, Saunders, 2008.
22. Levine, AM. Fractures of the sacrum. In Browner BD, Levine AM, Jupiter JB, et al, eds.: Skeletal Trauma, 4th ed, Philadelphia: Saunders, 2008.
23. Barron, MM. Cervical spine injury masquerading as a medical emergency. Am J Emerg Med. 1988;7:54.
24. Podolsky, SM, Hoffman, JR, Pietrafesa, CA. Neurologic complications following immobilization of cervical spine fracture in a patient with ankylosing spondylitis. Ann Emerg Med. 1983;12:538.
25. Podolsky, S, Baraff, LJ, Simon, RR, et al. Efficacy of cervical spine immobilization methods. J Trauma. 1983;23:461.
26. Karbi, OA, Caspari, DA, Tator, CH. Extrication, immobilization and radiological investigation of patients with cervical spine injuries. Can Med Assoc J. 1988;139:617.
27. Sumchai, AP, Sternbach, GL, Laufer, M. Cervical spine traction and immobilization. Top Emerg Med. 1988;10:9.
28. National Association of Emergency Medical Technicians, American College of Surgeons, Committee on Trauma. Pre-hospital Trauma Life Support. St. Louis: Mosby; 2007.
29. De Lorenzo, RA. A review of spinal immobilization techniques. J Emerg Med. 1996;14:603.
30. Chandler, DR, Nemejc, C, Adkins, RH, et al. Emergency cervical-spine immobilization. Ann Emerg Med. 1992;21:1185.
31. Rosen, PB, McSwain, NE, Arata, M, et al. Comparison of two new immobilization collars. Ann Emerg Med. 1992;21:1189.
32. Solot, JA, Winzelberg, GG. Clinical and radiological evaluation of Vertebrace extrication collars. J Emerg Med. 1990;8:79.
33. Markenson, D, Foltin, G, Tunik, M, et al. The Kendrick Extrication Device used for pediatric spinal immobilization. Prehosp Emerg Care. 1999;3:66.
34. Half-back Extrication/Lift Harness User Instruction Manual, St. Louis, Allied Healthcare Products, Inc, 2003. Available at, http://www.blackwoodfire.org/docs/rescue%20companyops/lsphalfback.pdf.
35. Mosesso, VN, Porter, RS, Menegazzi, JJ, et al. Comparison of prehospital cervical immobilization devices [abstract]. Prehosp Disaster Med. 1990;5:301.
36. Chan, D, Goldberg, R, Tascone, A, et al. The effect of spinal immobilization on healthy volunteers. Ann Emerg Med. 1994;23:48.
37. Cross, DA, Bakerville, J. Comparison of perceived pain with different immobilization techniques. Prehosp Emerg Care. 2001;5:270.
38. Cordell, WH, Hollingsworth, JC, Olinger, ML, et al. Pain and tissue-interface pressure during spine-board immobilization. Ann Emerg Med. 1995;26:31.
39. Lerner, EB, Billittier, AJ, Moscati, RM. The effects of neutral positioning with and without padding on spinal immobilization of healthy subjects. Prehosp Emerg Care. 1998;2:112.
40. Lerner, EB, Moscati, R. Duration of patient immobilization in the ED. Am J Emerg Med. 2000;18:28.
41. Hauswald, M, Hsu, M, Stockoff, C. Maximizing comfort and minimizing ischemia: a comparison of four methods of spinal immobilization. Prehosp Emerg Care. 2000;4:250.
42. Krell, JM, McCoy, MS, Sparto, PJ, et al. Comparison of the Ferno Scoop Stretcher with the long backboard for spinal immobilization. Prehosp Emerg Care. 2006;10:46.
43. Lovell, ME, Evans, JH. A comparison of the spinal board and the vacuum stretcher: spinal stability and interface pressure. Injury. 1994;25:179.
44. Johnson, DR, Hauswald, M, Stockhoff, CY. Comparison of a vacuum splint device to a rigid backboard for spinal immobilization. Am J Emerg Med. 1996;14:369.
45. Hamilton, RS, Pons, PT. The efficacy and comfort of full-body vacuum splints for cervical-spine immobilization. J Emerg Med. 1996;14:553.
46. Tsuei, BJ. Assessment of the pregnant trauma patient. Injury. 2006;37:367.
47. Shafer, JS, Naunheim, RS. Cervical spine motion during extrication: a pilot study. West J Emerg Med. 2009;2:74.
48. Suter, RE, Tighe, TV. Thoraco-lumbar spinal stability during variations of the log-roll maneuver. Prehosp Disaster Med. 1992;7:133.
49. Mazolewski, P, Manix, TH. The effectiveness of strapping techniques in spinal immobilization. Ann Emerg Med. 1994;23:129.
50. Manix, T. How effective are body-to-board strapping techniques? J Emerg Med Serv. 1995;20:45.
51. Elling, R, Politis, J. Backboarding the standing patient. J Emerg Med Serv. 1987;12:64.
52. Treloar, DJ, Nypaver, M. Angulation of the pediatric cervical spine with and without cervical collar. Pediatr Emerg Care. 1997;13:5.
53. Nypaver, M, Treloar, D. Neutral cervical spine positioning in children. Ann Emerg Med. 1994;23:208.
54. Raphael, JH, Chetai, R. Effects of the cervical collar on cerebrospinal fluid pressure. Anaesthesia. 1994;49:437.
55. Kolb, JC, Summers, RL, Galli, RL. Cervical collar–induced changes in intracranial pressure. Am J Emerg Med. 1999;17:135.
56. Hunt, K, Hallworth, S, Smith, M. The effects of rigid collar placement on intracranial and cerebral perfusion pressure. Anaesthesia. 2001;56:511.
57. Plaisier, B, Gabrram, SG, Schwartz, RJ, et al. Prospective evaluation of craniofacial pressure in four different cervical orthoses. J Trauma. 1994;37:714.
58. Walton, R, DeSalvo, JF, Ernst, AA, et al. Padded versus unpadded spine board for cervical spine immobilization. Acad Emerg Med. 1995;2:725.
59. Keller, BPJA, Lubbert, PHW, Leenan, LPH. Tissue-interface pressures on three different support services for trauma patients. Injury. 2005;36:946.
60. Schafermeyer, RW, Ribbeck, BM, Gaskins, J, et al. Respiratory effects of spinal immobilization in children. Ann Emerg Med. 1991;20:1017.
61. Bauer, D, Kowalsk, R. Effect of spinal immobilization on pulmonary function in healthy, non-smoking man. Ann Emerg Med. 1988;17:915.
62. Walsh, M, Grant, T, Mickey, S. Lung function compromised by spinal immobilization. Ann Emerg Med. 1990;19:615.
63. Totten, VY, Sugarman, DB. Respiratory effects of spinal immobilization. Prehosp Emerg Care. 1999;3:347.
64. Colton, CL. The history of fracture treatment. In Browner BD, Levine AM, Jupiter JB, et al, eds.: Skeletal Trauma, 4th ed, Philadelphia: Saunders, 2008.
65. Worsing, RA. Principles of prehospital care of musculoskeletal injuries. Emerg Med Clin North Am. 1984;2:205.
66. Cambell JC, ed. Basic Trauma Life Support. Brady/Prentice Hall: Upper Saddle River, NJ, 2000:138.
67. Christensen, KS, Trautner, S, Stockel, M, et al. Inflatable splints: do they cause tissue ischemia? Injury. 1986;17:167.
68. Alvero, EM. Life on a limb: management of upper extremity injuries. J Emerg Serv Med. 1988;13:42.
69. Borschneck, AG. Why traction? J Emerg Med Serv. 1985;10:44.
70. Borschneck, AG. Traction splint: proper design and application are the keys. JEMS. 2004;29:70.
71. Lee, C, Porter, KM. Pre-hospital management of lower limb fractures. Emerg Med J. 2005;22:660.
72. Clark, JD. Femur fractures: complications and treatments of traumatic femoral shaft fractures. J Emerg Med Serv. 2003;28:82.
73. Bledsoe, BE, Barnes, D. Traction splint, an EMS relic? J Emerg Med Serv. 2004;29:64.
74. American Academy of Orthopaedic Surgeons. Emergency Care and Transportation of the Sick and Injured. Sudbury, MA: Jones & Bartlett; 1998.
75. Sathy, AK, Starr, AJ, Smith, WR, et al. The effect of pelvic fracture on mortality after trauma: an analysis of 63,000 trauma patients. J Bone Joint Surg Am. 2009;91:2803–2810.
76. Geeraerts, T, Chhor, V, Cheisson, G, et al. Clinical review: initial management of blunt pelvic trauma patients with haemodynamic instability. Crit Care. 2007;11:204.
77. Sasser, SM, Hunt, RC, Sullivent, EE, et al. CDC guidelines for field triage of injured patients. MMWR Recomm Rep. 2009;58(RR-1):1.
78. Lee, C, Porter, K. The pre-hospital management of pelvic fractures. Emerg Med J. 2007;24:130.
79. Vermeulen, B, Peter, R, Hoffmeyer, P, et al. Pre-hospital stabilization of pelvic dislocations: a new strap belt to provide temporary hemodynamic stabilization. Swiss Surg. 1999;5:43.
80. Rice, PL, Rudolph, M. Pelvic fractures. Emerg Med Clin North Am. 2007;25:795.
81. Fowler, RL, Pepe, PE, Stevens, JT. Shock evaluation and management. In Campbell JE, ed.: International Trauma Life Support by Prehospital Providers, 6th ed, Upper Saddle River, NJ: Pearson Prentice Hall, 2008.
82. Cole, PA. Specialty update: what’s new in orthopaedic trauma. J Bone Joint Surg Am. 2003;85:2260.
83. Krieg, JC, Mohr, M, Ellis, TJ, et al. Emergent stabilization of pelvic ring injuries by controlled circumferential compression: a clinical trial. J Trauma. 2005;59:659.
84. Bottlang, M, Krieg, JC, Mohr, M, et al. Emergent management of pelvic ring fractures with the use of circumferential compression. J Bone Joint Surg Am. 2002;84(suppl 2):43–47.
85. Which Helmet for Which Activity? U.S. Consumer Safety Product Commission. Available at http://www.cpsc.gov/CPSCPUB/PUBS/349.pdf.
86. American College of Surgeons Committee on Trauma. Advanced Trauma Life Support For Doctors, 7th ed. Chicago: American College of Surgeons; 2004.
87. , Laws: bicycle helmet use. Traffic Safety Facts. National Highway Traffic Safety Association: Washington, DC, 2008. Available at, http://www.nhtsa.gov/DOT/NHTSA/Communication%20&%20Consumer%20Information/Articles/Associated%20Files/810886.pdf.
88. , Motorcycle helmet use in 2009—overall results. Traffic Safety Facts. National Highway Traffic Safety Association: Washington, DC, 2009. Available at, http://www-nrd.nhtsa.dot.gov/Pubs/811254.PDF.
89. Bachulis, BL, Sangster, W, Gorrell, GW, et al. Patterns of injury in helmeted and non-helmeted motorcyclists. Am J Surg. 1988;155:708.
90. Krantz, KPG. Head and neck injuries to motorcycle and moped riders: with special regard to the effect of protective helmets. Injury. 1985;16:253.
91. Wagle, VG, Perkins, BS, Vallera, A. Is helmet use beneficial to motor cyclists? J Trauma. 1993;34:120.
92. Orsay, EM, Muelleman, RL, Peterson, TD, et al. Motorcycle helmets and spinal injuries: dispelling the myth. Ann Emerg Med. 1994;23:802.
93. Thom DR, Hurt HH, Smith TA, et al. Atlas and axis injuries in fatal motorcycle collisions. In: 39th Proceedings of the Association for the Advancement of Automotive Medicine. Barrington, IL: Association for the Advancement of Automotive Medicine (AAAM); 1995.
94. Kleiner, DM, Pollack, AN, McAdam, C. Helmet hazards: do’s & don’ts of football helmet removal. JEMS. 2001;26:3.
95. Gastel, JA, Palumbo, MA, Hulstyn, MJ, et al. Emergency removal of football equipment: a cadaveric cervical spine injury model. Ann Emerg Med. 1998;32:411.
96. Wanninger, KN. Management of the helmeted athlete with suspected cervical spine injury. Am J Sports Med. 2004;32:1331.
97. Prinsen, RK, Syrotuik, DG, Reid, DC. Position of the cervical vertebrae during helmet removal and cervical collar application in football and hockey. Clin J Sport Med. 1995;5:155.
98. Kleiner, DM, Almquist, JL, Hoenshel, RW, et al. The effects of practice on facemask removal skills [abstract]. J Athl Train. 2000;35:S60.
99. Inter-Association Task Force for Appropriate Care of the Spine-Injured Athlete. Guidelines for the Appropriate Care of the Spine-Injured Athlete. Dallas: National Athletic Trainers’ Association; 2001.
100. Swartz, EE, Boden, BP, Courson, RW, et al. National Athletic Trainers’ Association position statement: acute management of the cervical spine–injured athlete. J Athl Train. 2009;44:306.
101. Davidson, RM, Burton, JH, Snowise, M, et al. Football protective gear and cervical spine imaging. Ann Emerg Med. 2001;38:26.
102. Veenema, K, Greenwald, R, Karnali, M, et al. The initial lateral cervical spine film for the athlete with a suspected neck injury: helmet and shoulder pads on or off? Clin J Sport Med. 2002;12:123.
103. Wanninger, KN, Rothman, R, Foley, J, et al. Computed tomography is diagnostic in the cervical imaging of helmeted football players with shoulder pads. J Athl Train. 2004;39:217.
104. Remz, RM. Training Medical Personnel in Techniques for Proper Motorcycle Helmet Removal. Washington: DC: Motorcycle Riders’ Foundation; 2001.
105. Wanninger, KN. Cervical spine injury management in the helmeted athlete. Curr Sports Med Rep. 2011;10:45–49.
106. Branfoot, T. Motorcyclists, full-face helmets and neck injuries: can you take the helmet off safely, and if so, how? J Accid Emerg Med. 1994;11:117.
107. Sanchez, AR, II., Sugalski, MT, LaPrade, RF. Field-side and pre-hospital management of the spine-injured athlete. Curr Sport Med Rep. 2011;10:45.
108. Kleiner, DM. Pre-hospital care of the spine-injured athlete: monograph summary. Inter-Association Task Force for Appropriate Care of the Spine-Injured Athlete. Clin J Sport Med. 2003;13:59.
109. Hoenshel, RW, Pearson, DB, Kleiner, DM. The technique most commonly employed with the FM extractor [abstract]. J Athl Train. 2001;36:S70.
110. Peris, MD, Donaldson, WF, Towers, J, et al. Helmet and shoulder pad removal in suspected cervical spine injury human control model. Spine. 2002;27:995.
111. Patel, MN, Rund, DA. Emergency removal of football helmets. Phys Sport Med. 1994;22:57.
112. Swartz, EE, Norkus, S. Riddell helmet research continues [letter]. NATA News. 2003;3:62.
113. Almquist, JL. Spine injury management: a comprehensive plan for managing the cervical spine–injured football player. Sport Med Update. 1998;13:8.
114. McSwain, NE, Jr., Gamelli, RL, American College of Surgeons Committee on Trauma. Helmet removal from injured patients. Bull Am Coll Surg. 1997;82(8):42–44.
115. Meyer, RD, Daniel, WW. The biomechanics of helmets and helmet removal. J Trauma. 1985;25:329.
116. Aprahamian, C, Thompson, BM, Darin, JC. Recommended helmet removal techniques in a cervical spine injured patient. J Trauma. 1984;24:841.
117. AMA Makes Hats Off Helmet Removal System mandatory for 2007 Supercross and Outdoor National Series. Transworld Motocross 2006. Available at http://motocross.transworld.net/1000018300/features/ama-makes-hats-off-helmet-removal-system-mandatory-for-2007-supercross-andoutdoor-national-series/.
118. Donaldson, WF, Lauerman, WC, Heil, B, et al. Helmet and shoulder pad removal from a player with suspected cervical spine injury. Spine. 1998;23:1729.
119. Lerner, EB, Moscati, R. Duration of patient immobilization in the ED. Am J Emerg Med. 2000;18:28.
120. Miller, P, Coffey, F, Reid, AM, et al. Can emergency nurses use the Canadian cervical spine rule to reduce unnecessary patient immobilization? Accid Emerg Nurs. 2006;14(3):133.
121. Meek, R, McGannon, D, Edwards, L. The safety of nurse clearance of the cervical spine using the National Emergency X-radiography Utilization Study low-risk criteria. Emerg Med Australas. 2007;19:372.
122. Kaups, KL, Davis, JW. Patients with gunshot wounds to the head do not require cervical spine immobilization and evaluation. J Trauma. 1998;44:865.
123. McArthur, CL, Rooke, CT. Are spinal precautions necessary in all seizure patients? Am J Emerg Med. 1995;13:512.