Chapter 7
Functional training of the respiratory muscles
THE RATIONALE FOR FUNCTIONAL TRAINING
As was discussed in Chapter 3 (section ‘Non-respiratory functions of the respiratory muscles’), the role of the respiratory muscles extends far beyond that of driving the respiratory pump. This fact explains why most, if not all patients, find walking makes them more breathless than riding a stationary cycle ergometer. However, the contribution of the respiratory muscles to postural control (balance) and core stabilization is not addressed directly in a rehabilitation context. This is surprising because these non-respiratory roles have profound implications for how we should train these muscles to optimize their function and minimize the unpleasant symptoms that they generate. A detailed description of the trunk musculature and its non-respiratory roles can be found in Chapter 3. The current section will focus upon the specific rationale for functional training of the respiratory muscles.
Because of the multiple roles of the trunk muscles, respiratory muscle training cannot be optimized if it is delivered using an exclusively ‘isolationist’ model of training, i.e., if optimal function is to be achieved, the core stabilizing role of the diaphragm must be trained in the context of an activity that challenges core stability. Notwithstanding this, there remains a role for the isolated training of the ‘Foundation’ phase (see Ch. 6), which provides the foundation onto which functional training is built – in other words, an ‘isolate, then integrate’ approach to training.
As was explained in Chapter 5, muscles respond to training in highly specific ways that limit the transferability of training benefits when the training stimulus is non-functional (e.g., an isolated leg extension is unlikely to improve walking performance). In functional training, muscles are subjected to forces during functional movements in order to develop the neuromuscular system in ways that are transferable to real-world activities. To date, a missing element from the functional training repertoire has been any consideration of the role of respiratory muscles (major trunk stabilizers and controllers) in functional movements, and vice versa.
In his book on low back disorders, Professor Stuart McGill rightly highlights the specific challenge that elevated ventilation represents to spine stability, as well as the increased risk that it poses for back injury (McGill, 2007). The therapeutic approach suggested by McGill is to undertake a range of stabilizing exercises (e.g., side bridge) immediately after an activity that raises ventilation, the idea being that the resultant hyperpnoea is superimposed on exercises that challenge the stabilizing musculature. The aim is to produce what McGill calls a ‘grooved’ pattern of muscle activation, similar to a rope running in a well-worn slot, so that breathing and stabilization take place simultaneously but without any compromise to either. Often, people cope with their inability to meet the conflicting demands on their respiratory muscles by holding their breath during exercises such as a side bridge. This is clearly a bad ‘groove’ to get stuck in.
In addition to providing a stable platform, the respiratory muscles play an important role in postural control during brief perturbations to balance. A good example of this is the automatic, anticipatory activation of specific trunk muscles immediately before large arm movements (see Ch. 3). The role of the diaphragm in this type of postural control is pre-programmed (‘grooved’); this is known because diaphragm activation precedes movements that destabilize the body (Hodges et al, 1997a; Hodges et al, 1997b). However, this automatic activation does not mean that the programme is not dynamic or adaptable; rather, the programme varies according to the movement parameters of the task and according to factors such as the prevailing postural conditions (stable or unstable), muscle fatigue, injury, pain and so on. For muscles that are involved in automatic anticipatory postural adjustments, such as the transversus abdominis, isolated specific training can normalize previously abnormal patterns of motor activation, i.e., restore a programme to normality (‘flip the rope back into the groove’) (Tsao & Hodges, 2008). In other words, isolated voluntary training of muscles involved in automatic anticipatory postural adjustments leads to improvement in complex automatic control strategies. The similarity of the diaphragm’s role to that of the transversus abdominis makes it extremely likely that this effect is also present for the diaphragm. Therefore, isolated voluntary training of the diaphragm (the kind of training undertaken during Foundation IMT) most likely enhances its automatic functioning during complex movements. The implications of this pre-programmed role of the diaphragm also need to be considered, and they are incorporated within the guidance on functional training provided below.
ASSESSING PATIENT NEEDS
Historically, patients being considered for Foundation IMT have typically been assessed on the basis of their inspiratory muscle function, and specifically their maximal inspiratory pressure (MIP) (see Ch. 6, sections ‘Patient selection’ and ‘Assessment of respiratory muscle function’). However, as was explained in Chapter 6, there are a number of reasons why MIP is not a good predictor of the likely benefits of Foundation IMT, and especially of Functional IMT. First, although reference values for MIP exist, the measurement is not straightforward to undertake, the equations have very poor predictive power (Enright et al, 1994; McConnell & Copestake, 1999) and the definition of ‘weakness’ is primarily statistical and not functional (Enright et al, 1994). Secondly, although patients with a MIP < 60 cmH2O appear to show larger improvements than those with stronger inspiratory muscles (Lotters et al, 2002; Gosselink et al, 2011), those with stronger inspiratory muscles still show an improvement in breathlessness and exercise tolerance after IMT (Lotters et al, 2002). Thirdly, MIP takes no account of the demand side of the demand / capacity relationship of the inspiratory muscles; the closest functional correlates of dyspnoea are not indices of airway obstruction or gas exchange impairment, but rather inspiratory muscle function (O’Donnell et al, 1987; Killian & Jones, 1988) and the degree of lung hyperinflation (O’Donnell et al, 1998; Marin et al, 2001) – in other words, the relative load upon the inspiratory muscles. Finally, in the context of Functional IMT, MIP provides no insight into the conflicts that might exist between the respiratory and non-respiratory functions of the trunk muscles.
Accordingly, the use of functional, patient-centred indices would seem to be the most appropriate way to approach assessing the degree of functional overload of the inspiratory muscles, and thence the most appropriate approach to IMT. For severely incapacitated patients, Foundation IMT may be the most that can be achieved, but for those who are ambulatory, or have the potential to become so, functional training regimens can be developed. Since a functional approach has not been applied to date, there is no empirical evidence to guide the prescription of IMT based upon the demand / capacity imbalance principle. However, in order to ‘get the ball rolling’ in terms of generating functional, patient-centred indices of inspiratory muscle overload, one potential method is suggested below (see section ‘Assessment of load / capacity imbalance’). Prior to this, the assessment of dyspnoea is described briefly; as dyspnoea is not only the primary correlate of load / capacity imbalance, it is also relatively easy to assess.
Assessment of dyspnoea
Reflexive assessment of dyspnoea
Of the many reflexive methods available, two of the most widely used and best supported by evidence are the Medical Research Council (MRC) Scale and the Baseline Dyspnoea Index (BDI) and Transition Dyspnoea Index (TDI) (BDI-TDI). Copies of these instruments can be found in Boxes 7.1 and 7.2A,B, respectively. These scales provide a useful insight into the limitations imposed upon everyday life by dyspnoea. In addition, the BDI-TDI allows changes to be monitored in response to interventions or disease progression.
• What activities cause you to get out of breath, e.g., gardening, drying after bathing?
• How long can you do the activity for before you stop or slow down?
• What position are you in when you get breathless, e.g., standing?
• How breathless are you when you sit / stand / walk / etc. (a rating scale can be used to quantify this)?
• What activities have you changed or stopped doing because of breathlessness, e.g., gardening?
• How have you modified your activities because of breathlessness, e.g., sit instead of stand, use a walking aid?
• Do you ever lose your balance when you are out of breath, or feel that you need to steady yourself?
• Do you get low back pain, or feel your back is weak, or unstable?
Assessment of dyspnoea during exercise
The most commonly used and well-validated scale for the assessment of dyspnoea during exercise is the Category Ratio scale created by Borg (1982, 1998). This is a general intensity scale with ratio properties that can be used to quantify either breathing or limb effort independently, as well as concurrently within the same exercise test (Borg et al, 2010). A copy of the instrument and instructions for its use can be found in Boxes 7.3 and 7.4 respectively. Typically, the scale is presented to the participant periodically during exercise, and they report their perception verbally or by pointing at the scale. This enables symptom profiles to be generated, as well as isolated ratings at specified intensities of exercise. Furthermore, participants can be asked to exercise to a specified level of perceived effort for the purposes of exercise training, or to compare physical capacity between individuals.
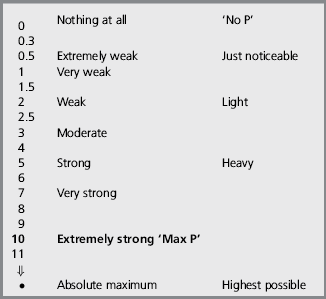
Assessment of dyspnoea during loaded breathing
The Borg CR-10 can also be used during a loaded breathing task to assess breathing effort perception and its response to training (Weiner et al, 2000; Magadle et al, 2002; Weiner et al, 2003; Beckerman et al, 2005). Typically, participants breathe against a series of fixed-pressure threshold loads corresponding to unloaded breathing, and 5, 10, 20 and 30 cmH2O. After breathing against each load for 1 minute, participants provide an intensity rating using the Borg CR-10. Ideally, the test should be discontinuous such that each rating is discrete, independent of other ratings and unaffected by accumulated inspiratory muscle fatigue; randomization of load presentation is also recommended. The test is susceptible to differences in breathing pattern, so use of a breathing pacer is advisable (a breathing pacer App can be obtained at www.physiobreathe.com/apps).
No published data are currently available to define normal ranges for this test, but ratings of effort are inversely proportional to inspiratory muscle strength (MIP), and the test also exhibits excellent sensitivity to changes in MIP following IMT (Weiner et al, 2000; Magadle et al, 2002; Weiner et al, 2003; Beckerman et al, 2005). Since no normative data exist currently, it is recommended that practitioners / clinics develop their own methods and normative data for identifying patients with abnormally high ratings of dyspnoea. Notwithstanding the lack of published normative data, a look-up chart can be found in Figure 7.1 (see also section ‘Assessment of load / capacity imbalance’, below). It should also be noted that some patients with asthma may have abnormally low ratings (Kikuchi et al, 1994), which is a contraindication for IMT (see Ch. 6, section ‘Contraindications’).
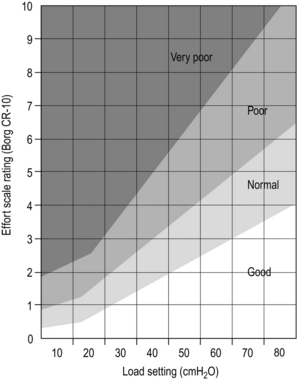
Figure 7.1 Load / capacity imbalance chart. Chart for assessing the extent of functional imbalance between the combined intrinsic and extrinsic loading of the inspiratory muscles, and the capacity of the inspiratory muscles to deliver inspiratory pressure. After breathing against a given load for 60 seconds, the participant rates their effort using the Borg CR-10 scale. Good = no imbalance and above average inspiratory muscle function.
Normal = no imbalance with normal inspiratory muscle function.
Poor = imbalance such that intrinsic and extrinsic inspiratory loading exceeds inspiratory muscle capacity.
Very poor = large imbalance such that intrinsic and extrinsic inspiratory loading exceeds inspiratory muscle capacity considerably. (The chart is based on unpublished data from McConnell and colleagues.)
Assessment of load / capacity imbalance
The look-up chart in Figure 7.1 can be used to assess the extent to which there is a functional imbalance between the combined, intrinsic and extrinsic loading of the inspiratory muscles and the capacity of the inspiratory muscles to deliver inspiratory pressure. The chart is based upon unpublished data collected from normal individuals and those with respiratory disease by McConnell and colleagues over the course of two decades. To undertake the test, the participant breathes against one to three inspiratory loads using the methods described in the section ‘Assessment of dyspnoea during loaded breathing’, above. The resulting Borg CR-10 rating can then be compared with the rating classifications on the chart.
FUNCTIONAL TRAINING EXERCISES
Underlying principles
Functional IMT should be preceded by a 6-week period of Foundation IMT, and the development of good diaphragm breathing technique (see Ch. 6). When embarking upon the Functional phase of training, it is important to ensure that patients have good technique and exercise form, before adding any resistances. Start patients off by performing each exercise with nothing more than a focus on maintaining slow, deep diaphragmatic breathing throughout. Using an external breathing pacer that provides an auditory cue (obtainable via www.physiobreathe.com/apps) can be very helpful for supporting this process, as well as during the functional exercises themselves. Next add an external resistance to inhalation using an inspiratory muscle-training device (IMTD) set on its minimum load. Gradually increase the load on the IMTD over a period of a few weeks until it reaches the prescribed level for the exercise. See Box 7.5 for guidance regarding abdominal bracing and achieving a neutral spine position, as well as the sections on breath control and load setting in Chapter 6. In addition, consider incorporating IMT into interval training, drills or circuits; the IMT can be introduced into the recovery phase of interval training, or it can be a separate station during a drill or circuit.
Before using these exercises, be sure to note the following principles:
• The limb resistances imposed using cords or bands should be low to begin with, but they can be increased as the training progresses. Don’t be too ambitious with the resistance, which is intended primarily to create a postural challenge to the trunk, not to create a resistance-training stimulus to the limbs.
• Ensure elastic resistances are under tension at the start of the exercise (see the previous point for guidance on resistance level).
• For exercises involving hand weights, if these are not available they can be substituted with other items such as cans of food or bags loaded with heavy items.
• For exercises that incorporate abdominal bracing (see section ‘Tips for Bracing and Posture’), add the IMTD only once patients able to force their diaphragm into the braced abdominal compartment.
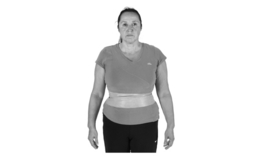
• The compressive effects of tight clothing can be simulated by wrapping elastic resistance bands around the appropriate areas of the trunk (Fig. 7.3).
| Ideal equipment | Alternative equipment |
| Inspiratory muscle training device | Pursed lips with braced trunk |
| Swiss ball | Chair with balance cushion |
| Balance cushion | Close foot stance |
| Dumbbells (1–10 kg) | Canned food, small sand bags |
| Small medicine ball (2–10 kg) | Canned food, medium sand bags |
| Step | Stairs |
| Elastic resistance band or cord | |
| Exercise mat | Carpeted area |
| Bounceable ball | |
| Small shopping bag | |
| Chair with and without arms |
• Light: equivalent to the 50- to 100-repetition maximum (20–40% of MIP, or an effort rating of 2 to 3 on the Borg CR–10 scale)
• Moderate: equivalent to the 20- to 40-repetition maximum (50–60% of MIP, or an effort rating of 4 to 6 on the Borg CR-10 scale).
Some suggested workout protocols are provided at the end of this chapter, and video clips of all exercises are available at www.physiobreathe.com.
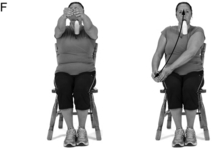
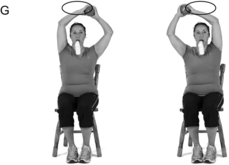
Stretching and mobilizing
Developing range of movement is as important for the thorax as it is for any other part of the body. However, the trunk and rib cage are often overlooked when it comes to these activities, despite the fact that these areas include numerous muscles, their attachments, and associated connective tissue (e.g., the rib cage). The rib cage is potentially a huge source of resistance to inhalation, especially in restrictive diseases such as kyphoscoliosis. Any resistance to thoracic expansion increases the work of breathing and the associated perception of breathing effort. The exercises below are grouped into sets of ‘Easy’, ‘Moderate’ and ‘Difficult’ exercises that stretch the trunk in the anterior, posterior and lateral planes, as well as during rotation. Easy and moderate stretches are based on those of Minoguchi et al (2002). These sets can be used to stretch and mobilize the rib cage in order to free-up rib expansion and reduce breathing effort. Each movement should be sustained at maximum range of movement for around 30 seconds.
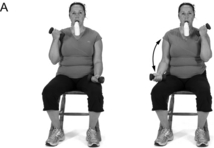
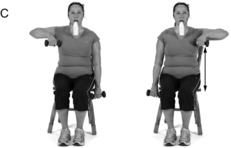
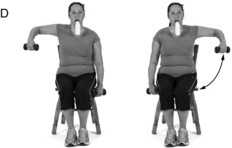
Easy
Easy stretching and mobilizing exercises are performed seated on a chair, in the sequence:
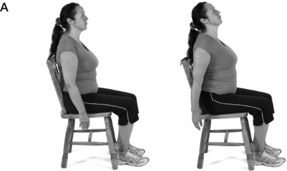
(A) anterior trunk stretch
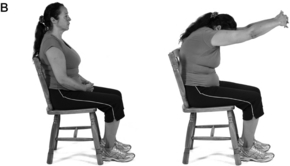
(B) posterior trunk stretch
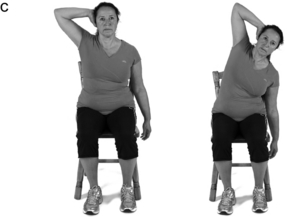
(C) lateral stretch (perform on both sides)
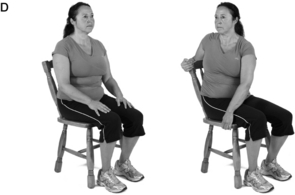
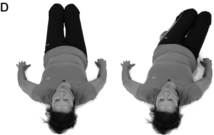
(D) seated rotation (perform in both directions).
Moderate
Moderate stretches and mobilizing exercises are performed standing on both feet, in the sequence:
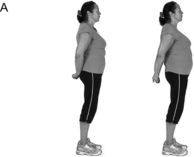
(A) upper trunk anterior stretch
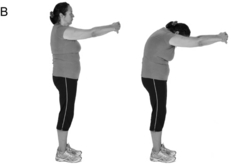
(B) standing posterior stretch
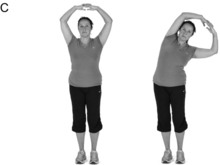
(C) standing lateral stretch (perform on both sides)

(D) standing rotation (perform in both directions).


Breath control
As was described in Chapter 6, developing breath control is a skill that can and should be practised, because it maximizes breathing efficiency and minimizes the distracting influence of dyspnoea. This can be practised in situations where breathing demand / distress is high; under these conditions, patients should be encouraged to practise deep, slow breath control, and to slow their breathing frequency as much as they can tolerate (a breathing pacer App can be obtained at www.physiobreathe.com/apps). Keeping breathing calm and relaxed under stressful conditions can help to minimize stress and anxiety, and build a sense of mastery.
In addition, below are three further exercises that can help overcome the urge to synchronize breathing with the cadence of movement, which is almost always too high. The exercises involve high-cadence body movements, during which the patient should practise deep, slow, controlled breathing that is deliberately not synchronized with movement (a breathing pacer App can be obtained at www.physiobreathe.com/apps).
Marching on the spot
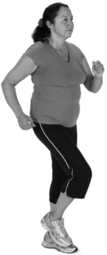
Procedure:: The patient should march on the spot at a challenging but manageable pace. This exercise will also increase breathing demand, and is therefore more difficult than the Swiss ball bounce. The natural urge will be to synchronize breathing to the cadence of the movement, but this should be replaced by a deep, slow breathing pattern that is deliberately slower than the movement, and asynchronous.
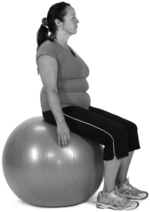
Ball bounce on the spot
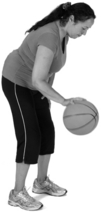
Procedure:: The patient should bounce the ball on the spot. This exercise will increase breathing demand slightly, but will also challenge postural control and stabilization. The natural urge will be to synchronize breathing to the cadence of the bouncing, but this should be replaced by a deep, slow breathing pattern that is deliberately slower than the movement, and asynchronous.
Trunk strength and lumbopelvic stability exercises
As was described in Chapter 3, an association has been found between respiratory problems and low back pain. For example, epidemiological data suggest that back pain is more prevalent in women with disorders of continence and respiration than in those without (Smith et al, 2006). Furthermore, physiological data show that the postural function of the diaphragm, abdominal and pelvic floor muscles is reduced by incontinence (Deindl et al, 1994) and respiratory disease (Hodges et al, 2000). Accordingly, it is reasonable to suggest that lumbopelvic stability is impaired in people with respiratory problems, and that correcting this deficit will be beneficial for patients’ back pain as well as their dyspnoea. Typical responses in people who are unable to accommodate the simultaneous demands of both stabilization and breathing are either to suspend breathing or to seek stability from an external support, e.g., wall, furniture or walking aid. Thus, training patients so that they are able to accommodate the demands of stabilization and breathing simultaneously should enhance their functional capacity during a wide range of daily activities.
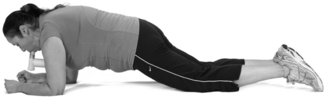
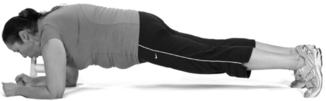
Plank
Benefits:: This is a ‘bread-and-butter’ core exercise for developing trunk strength and lumbopelvic stability. It engages the entire trunk- and pelvic-stabilizing musculature including the diaphragm. This exercise builds ‘inner strength’, facilitating the ability to maintain pelvic stability in the face of large posturally challenging movements of the legs, such as walking and stair climbing. Combining this stabilizing exercise with a breathing challenge ensures that both functions can be performed without compromise to either.
Procedure:: Adopt the starting position shown above for the selected level of difficulty. If using an IMTD, this should be held in the mouth, without using the hands. Once in position, brace the abdominal muscles (maximally) and breathe slowly and deeply at around 12 breaths per minute throughout the exercise. If using an IMTD, inhale forcefully through the IMTD before exhaling slowly and fully for about 4 seconds (breathing rate should be around 12 per minute). Ensure maintenance of a completely straight bodyline and do not allow flexion at the hip or abdomen.
Variations:: To add difficulty, do any of the following: raise one straight leg off the floor and move it toward the ceiling, bring one knee toward the elbow on the same side of the body (as if climbing a rock face), or bring one knee in and underneath the body toward the opposite elbow. As the leg is raised, inhale forcefully through the IMTD before exhaling slowly as it is lowered. Repeat using the opposite leg. Swap breathing phases between sets so that the exhalation occurs as the leg is lifted.

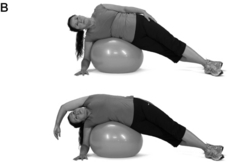
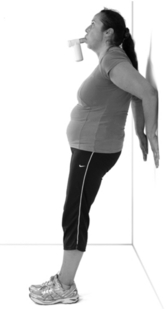
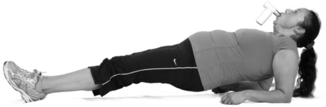
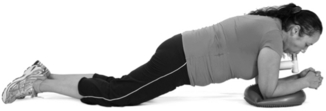
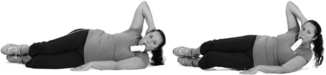
Side bridge
Benefits:: This is another ‘bread-and-butter’ core exercise for developing trunk strength and lumbopelvic stability. It engages the entire trunk- and pelvic-stabilizing musculature including the diaphragm, as well as the back extensors. Superimposing the requirement for increased breathing effort onto this exercise helps ensure that the challenge of keeping the trunk stiff does not lead to a failure to maintain deep, controlled breathing.
Procedure:: Adopt the starting position shown for the selected level of difficulty. If using an IMTD, this should be held in the mouth without using the hands. Once in position, brace the abdominal muscles (maximally) and breathe slowly and deeply at around 12 breaths per minute throughout the exercise. If using an IMTD, inhale forcefully through the IMTD before exhaling slowly and fully for about 4 seconds (breathing rate should be around 12 per minute). Ensure maintenance of a completely straight bodyline and do not allow flexion at the hip or abdomen.


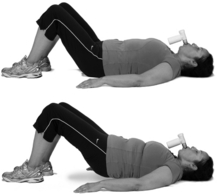
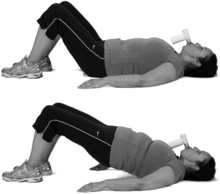
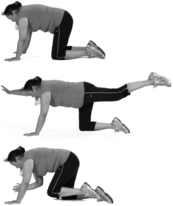
Bridge
Benefits:: This exercise helps to develop balance between the posterior and anterior muscles of the trunk. When undertaken with a leg lift, the exercise challenges the ability to maintain pelvic alignment (if the unsupported hip drops towards the floor, the deep stabilizers are weak).
Procedure:: Adopt the starting position shown for the selected level of difficulty. If using an IMTD, this should be held in the mouth without using the hands. Once in position, brace the abdominal muscles (maximally) and breathe slowly and deeply at around 12 breaths per minute throughout the exercise. If using an IMTD, inhale forcefully through the IMTD before exhaling slowly and fully for about 4 seconds (breathing rate should be around 12 per minute). Ensure maintenance of a completely straight bodyline and do not allow flexion at the hip or abdomen.
Variations:: To add difficulty, raise a straightened leg as high as possible (there is a tendency to sag in the middle or tilt to one side). As the leg is raised, inhale forcefully through the IMTD before exhaling slowly as it is lowered. Repeat using the opposite leg. Swap breathing phases between sets so the exhalation occurs as the leg is lifted.
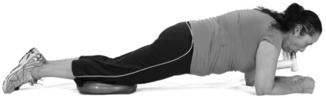
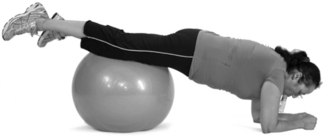
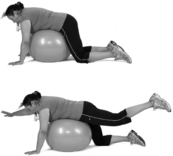
Plank with lower body instability
Benefits:: This is a slightly more advanced version of the plank in which a postural control dimension is added to the exercise so that trunk stabilization must be maintained under conditions of instability. Because the lower body is the unstable section, the emphasis is on the pelvic stabilizers. This exercise helps to develop control over the linkage between movements of the upper and lower body.
Procedure:: Adopt the starting position shown above for the selected level of difficulty. If using an IMTD, this should be held in the mouth, without using the hands. Once in position, brace the abdominal muscles (maximally) and breathe slowly and deeply at around 12 breaths per minute throughout the exercise. If using an IMTD, inhale forcefully through the IMTD before exhaling slowly and fully for about 4 seconds (breathing rate should be around 12 per minute). Ensure maintenance of a completely straight bodyline and do not allow flexion at the hip or abdomen.
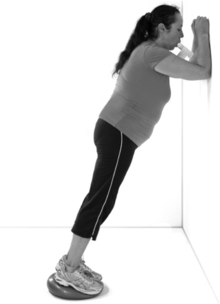
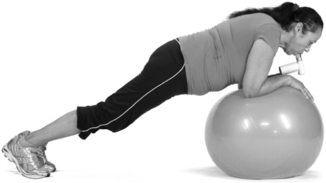
Plank with upper body instability
Benefits:: This is a slightly more advanced version of the plank in which a postural control dimension is added to the exercise so that trunk stabilization must be maintained under conditions of instability. Because the upper body is the unstable section, the emphasis is on the trunk stabilizers. This exercise helps to develop control over the linkage between movements of the upper and lower body.
Procedure:: Adopt the starting position shown for the selected level of difficulty. If using an IMTD, this should be held in the mouth, without using the hands. Once in position, brace the abdominal muscles (maximally) and breathe slowly and deeply at around 12 breaths per minute throughout the exercise. If using an IMTD, inhale forcefully through the IMTD before exhaling slowly and fully for about 4 seconds (breathing rate should be around 12 per minute). Ensure maintenance of a completely straight bodyline and do not allow flexion at the hip or abdomen.
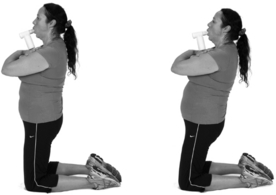
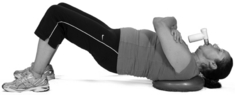
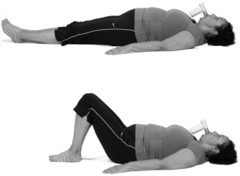
Gluteal bridge
Benefits:: This is a good exercise for the gluteals and hamstrings, as well as the trunk and deep pelvic stabilizers. It challenges the ability to breathe effectively during hip extension.
Procedure:: Adopt the starting position shown for the selected level of difficulty. If using an IMTD, this should be held in the mouth without using the hands. Once in position, brace the abdominal muscles (maximally) and breathe slowly and deeply at around 12 breaths per minute throughout the exercise. If using an IMTD, inhale forcefully through the IMTD before exhaling slowly and fully for about 4 seconds (breathing rate should be around 12 per minute). In the Easy and Difficult versions, ensure maintenance of a completely straight bodyline and do not allow flexion at the hip or abdomen.
Variations:: To add difficulty to the Difficult version, raise one foot off the floor and straighten the leg in line with the rest of the body; hold for 5 seconds. Alternate the raised leg for the duration of the exercise. If the pelvis tilts towards the floor when weight is taken off one foot, this indicates that the deep stabilizers are weak.
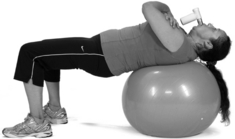
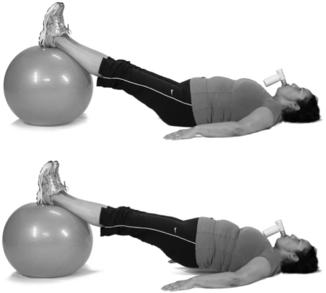
Gluteal bridge with upper body instability
Benefits:: This is a slightly more advanced version of the gluteal bridge in which a postural control dimension is added to the exercise. Because the upper body is the unstable section, the emphasis is on the trunk stabilizers. This exercise helps to develop control over the linkage between movements of the upper and lower body.
Procedure:: Adopt the starting position shown above for the selected level of difficulty. If using an IMTD, this should be held in the mouth without using the hands. Once in position, brace the abdominal muscles (maximally) and breathe slowly and deeply at around 12 breaths per minute throughout the exercise. If using an IMTD, inhale forcefully through the IMTD before exhaling slowly and fully for about 4 seconds (breathing rate should be around 12 per minute). In the Easy and Difficult versions, ensure maintenance of a completely straight bodyline and do not allow flexion at the hip or abdomen.
Variations:: To add difficulty to the Moderate and Difficult versions, raise one foot off the floor and straighten the leg in line with the rest of the body; hold for 5 seconds. Alternate the raised leg for the duration of the exercise. If the pelvis tilts towards the floor when weight is taken off one foot, the deep stabilizers are weak. Be careful to maintain a straight bodyline and to keep the hips level.
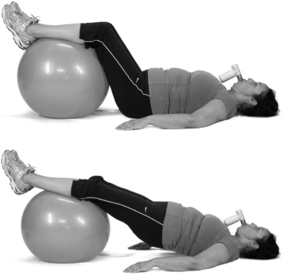
Gluteal bridge with lower body instability
Benefits:: This is a slightly more advanced version of the gluteal bridge in which a postural control dimension is added to the exercise. Because the lower body is the unstable section, the emphasis is on the pelvic stabilizers. This exercise helps to develop control over the linkage between movements of the upper and lower body.
Procedure:: Adopt the starting position shown for the selected level of difficulty. If using an IMTD, this should be held in the mouth without using the hands. Once in position, brace the abdominal muscles (maximally) and breathe slowly and deeply at around 12 breaths per minute throughout the exercise. If using an IMTD, inhale forcefully through the IMTD before exhaling slowly and fully for about 4 seconds (breathing rate should be around 12 per minute). In the Easy and Difficult versions, ensure maintenance of a completely straight bodyline and do not allow flexion at the hip or abdomen.
Variations:: To add difficulty, raise one foot off the support and straighten the leg in line with the rest of the body; hold for 5 seconds. Alternate the raised leg for the duration of the exercise. If the pelvis tilts towards the floor when weight is taken off one foot, the deep stabilizers are weak. Be careful to maintain a straight bodyline and to keep the hips level.
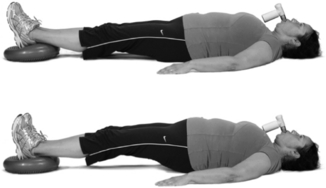
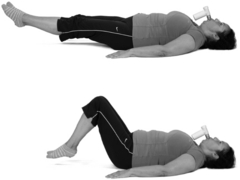
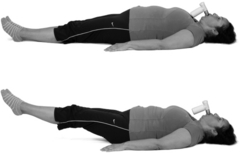
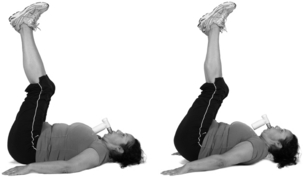
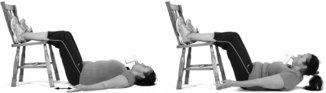
Leg raise
Benefits:: This exercise challenges the pelvic and low back stabilizers during hip flexion. As with other exercises in this sub-section, it challenges the ability to maintain lumbopelvic stability without suspending breathing.
Procedure:: Adopt the starting position shown above for the selected level of difficulty. If using an IMTD, this should be held in the mouth without using the hands. Once in position, brace the abdominal muscles (maximally) and breathe slowly and deeply at around 12 breaths per minute throughout the exercise. If using an IMTD, please follow the instructions regarding breathing pattern for each level of difficulty. Push the back towards the floor, but concentrate on maintaining a neutral spine (it may help to place the fingers under the small of the back). For Moderate and Difficult versions, raise the feet about 15 to 20 cm (6 to 8 inches) off the floor and brace the abdominal corset muscles (maximally).
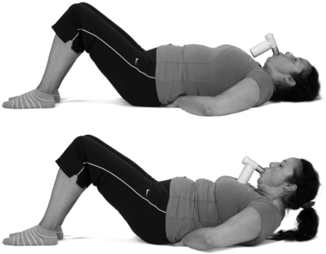
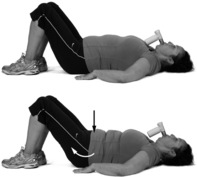
Braced curl-up
Benefits:: During this exercise, the rectus abdominis and other expiratory muscles pull the ribs downwards in an expiratory movement. Developing the ability to inhale under these conditions will enhance the ability to breathe in situations where the body movements and breathing are out of phase in terms of the actions required of the respiratory muscles, i.e., inhaling during non-respiratory activation of expiratory muscles.
Procedure:: Adopt the starting position shown; this is the same for all levels of difficulty. If using an IMTD, this should be held in the mouth without using the hands. Once in position, brace the abdominal muscles (maximally). Curl up and raise the shoulders off the floor 8 to 10 cm (3 to 4 inches), curling into the brace and keeping the neck position neutral (don’t allow the chin to rest on the chest). While in the ‘up’ position, take three to six rapid, but deep and forceful inhalations through the IMTD. Maintain the up position for long enough to complete the required number of breath repetitions. Make sure the brace is maintained during the up phase. Then relax, release the brace and rest the shoulders on the floor for no more than 2 or 3 seconds before repeating (15 to 30 seconds up, 2 or 3 seconds down).
Variations:: To add difficulty, take the feet off the floor and pulse them up and down a few centimetres. Here are two other alternatives: keep one leg extended, either resting on the floor or raised 2 to 3 inches (swap legs between sets); extend one leg and the opposite arm, raising them off the floor in time with the inhalations (swap limbs between sets).
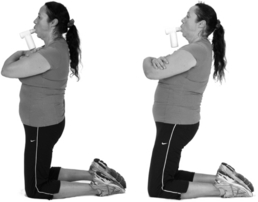
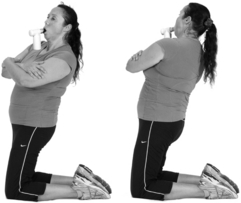
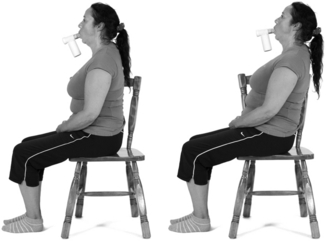
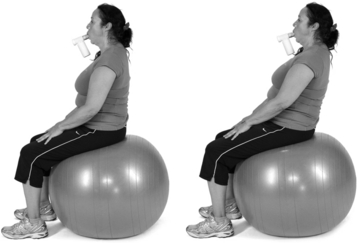
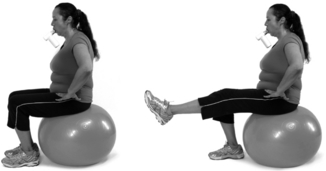
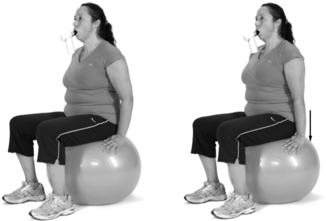
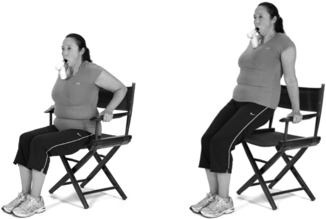
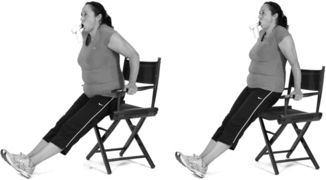
Seated hip extension
Benefits:: This exercise requires activation of the trunk-stabilizing muscles to prevent toppling backwards. The muscles involved exert compressive forces on the chest wall and abdomen, which must be overcome during inhalation.
Procedure:: Adopt the starting position shown. If using an IMTD, this should be held in the mouth without using the hands. Once in position, brace the abdominal muscles (moderately). Ensure that the hips are extended as far as is comfortable so that the shoulders are behind the hips. Rest the hands on the thighs, or fold the arms across the chest. Once in position inhale forcefully through the IMTD, completing the 30 repetitions continuously.
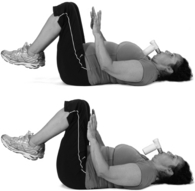
Reverse curl
Benefits:: During this exercise, compressive (expiratory) forces are exerted on the rib cage and abdomen. The exercise therefore develops the ability to inhale under these conditions, which will enhance the ability to breathe in situations where the body movements and breathing are out of phase in terms of the actions required of the breathing muscles, i.e., inhaling during non-respiratory activation of expiratory muscles.
Procedure:: Adopt the starting position shown for the selected level of difficulty. If using an IMTD, this should be held in the mouth without using the hands. Once in position, brace the abdominal muscles (maximally). For specific guidance see the description for each version.
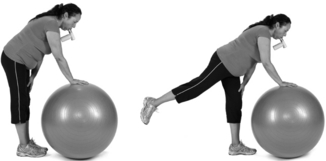
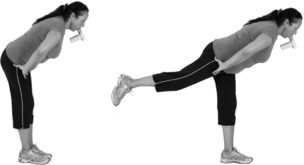
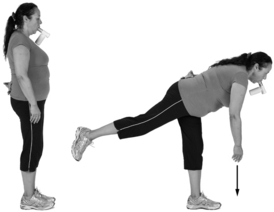
Hip extension
Benefits:: This exercise challenges core stabilization in all three planes of movement, as well as engaging the gluteals and hamstrings and encouraging full hip extension. The ability to extend at the hip is essential for efficient ambulation and is impaired in patients who use walking aids.
Procedure:: Adopt the starting position shown for the selected level of difficulty. If using an IMTD, this should be held in the mouth without using the hands. Once in position, adopt a neutral spine alignment and brace the abdominal muscles (moderately). For specific guidance see the description for each version.
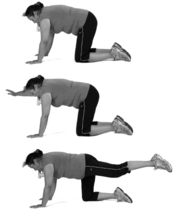
Superman
Benefits:: This exercise is a bread-and-butter exercise for promoting healthy, ‘grooved’ muscle activation patterns whilst ensuring that this can be combined (automatically) with breathing. It involves the deep pelvic stabilizers, the extensors of the hip and lumbar spine as well as the transversus abdominis. This exercise places a particular emphasis on developing lumbopelvic stability.
Procedure:: Adopt the starting position shown above for the selected level of difficulty. If using an IMTD, this should be held in the mouth without using the hands. Once in position, adopt a neutral spine alignment and brace the abdominal muscles (moderately). For specific guidance see the description for each version.
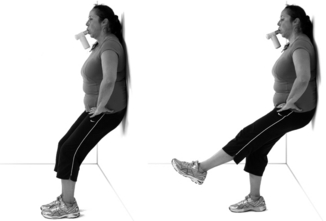
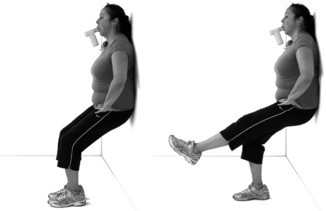
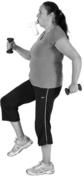
Ski squats with leg lift
Benefits:: This exercise challenges the ability to keep the hips level, and it puts emphasis on the development of strength in the lumbopelvic stabilizers. The added breathing challenge helps ensure that forceful breathing does not jeopardize pelvic stability.
Procedure:: Adopt the starting position shown for the selected level of difficulty. If using an IMTD, this should be held in the mouth without using the hands. Once in position, adopt a neutral spine alignment and brace the abdominal muscles (maximally). Extend one knee and inhale forcefully through the IMTD before exhaling slowly and fully for about 3 seconds, whereupon the starting position is resumed (the breathing rate should be around 15 per minute). Be careful not to allow the hip to drop to the unsupported side. Repeat with the opposite leg, alternating for as many repetitions as possible.
Bent leg deadlift
Benefits:: This exercise has been described as ‘the best core exercise of them all’, because it is such a great challenge to the entire lumbopelvic-stabilizing system as well as to the trunk (from ankles to shoulders). This exercise is a staple of weight training, but carries a high risk of injury if not performed with good style. A common fault is losing the flat-back posture, and this can occur if the drive to breathe overwhelms the ability to maintain the braced position. By using a manageable resistance and imposing a breathing challenge simultaneously, the dual demands that these challenges impose can be accommodated.
Procedure:: Adopt a starting position appropriate to the level of difficulty, i.e., bring the hands closer to the ankles for greater difficulty. If using an IMTD, this should be held in the mouth, without using the hands. Once in position, adopt a neutral spine alignment and brace the abdominal muscles (maximally). As the hips are extended, inhale forcefully through the IMTD and exhale when returning to the starting position. Alternate this pattern between sets so that the exhalation occurs during hip extension. Concentrate on not allowing the brace to release during either phase of breathing. Also concentrate on maintaining good lifting form and extending fully at the hip (rolling the shoulders back can help with this).
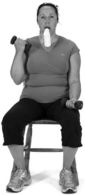
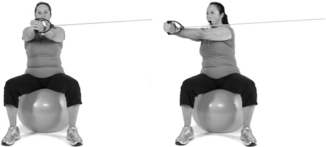
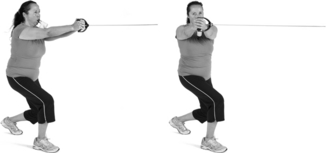
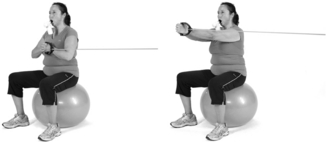
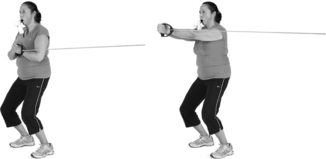
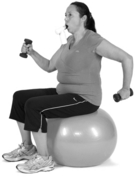
Dynamic trunk activation exercises
Benefits:: The exercises are all designed to train the ability of the trunk to move and control a resistance imposed via the upper limbs without the need to suspend breathing. These types of challenges engage the diaphragm and transversus abdominis in a feed-forward manner that is intended to stiffen the trunk. Although this mechanism is good for stability, it impedes breathing. These exercises therefore develop the ability to manage the demands of dynamic trunk loading without impairing breathing.
Procedure:: Difficulty is graded primarily according to posture, which can be: (1) seated, (2) standing on two feet, or (3) standing on one foot. Difficulty can also be graded according to the size of the resistance being moved in the hands; the exercise can commence with no resistance. Adopt the starting position appropriate to the level of difficulty. If using an IMTD, this should be held in the mouth without using the hands. Once in position, adopt a neutral spine alignment and brace the abdominal muscles (moderately). As the hand resistance is overcome, inhale forcefully through the IMTD and exhale when returning to the starting position. Arm movements should ideally be unilateral to maximize the postural challenge created. Alternate the breathing pattern between sets so that the exhalation occurs as the resistance is overcome.
Stance variations
Easy
Perform exercises seated on a chair or Swiss ball. Add difficulty by lifting one leg or both legs.
Moderate
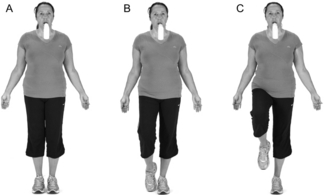
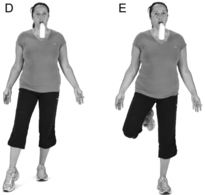
Perform exercises in a standing position with the following posture variations: (A) standing on two feet with close stance, (B) standing on one leg with toe providing support, (C) marching on the spot, (D) tapping the ground with the toe, moving it ‘round the clock’, and (E) with rhythmic knee flexion.
Arm movement variations

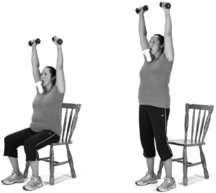
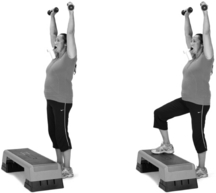
Rise with overhead weight
Benefits:: In this exercise, a weight is held overhead whilst either moving from sitting to standing or stepping up. This is an exercise that combines the need for lumbopelvic and thoracic stabilization with a demand for postural control. It is a good ‘compound’ exercise that will be beneficial to a wide range of everyday activities.
Procedure:: Adopt the starting position shown above for the selected level of difficulty. If using an IMTD, this should be held in the mouth without using the hands. Once in position, adopt a neutral spine alignment and brace the abdominal muscles (moderately). For specific guidance see the description for each version.
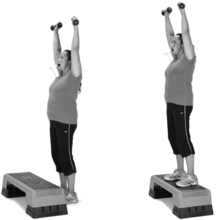
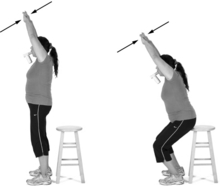
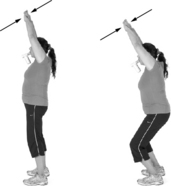
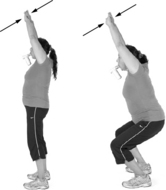
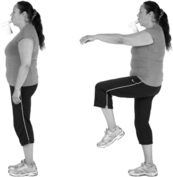
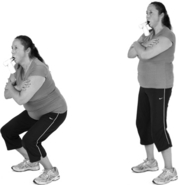
Squat with overhead resistance
Benefits:: This exercise is more challenging than it appears, involving the quadriceps, gluteals, lumbopelvic stabilizers, upper back, shoulders and chest. By combining a body-weight squat with an additional challenge to the trunk (from the overhead resistance) and a breathing resistance, the exercise becomes more challenging than a conventional squat. This exercise enhances the ability to coordinate and control multiple actions involving large muscle groups.
Procedure:: Adopt the starting position shown above for the selected level of difficulty. If using an IMTD, this should be held in the mouth without using the hands. Once in position, adopt a neutral spine alignment and brace the abdominal muscles (moderately). For specific guidance see the description for each version.
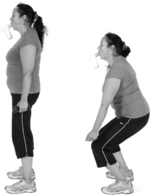
Bag pick-up
Benefits:: This exercise simulates the everyday demands of picking up and carrying a bag of shopping, challenging both trunk stabilization and postural control. The former compresses the trunk, whereas the latter necessitates feed-forward activation of the diaphragm and transversus abdominis. Superimposing a controlled breathing demand upon these challenges facilitates the ability to meet them in daily life.
Procedure:: Adopt the starting position shown for the selected level of difficulty. If using an IMTD, this should be held in the mouth without using the hands. Once in position, adopt a neutral spine alignment and brace the abdominal muscles (moderately). For specific guidance see the description for each version.
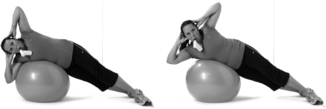
Side crunch
Benefits:: This lateral trunk flexion exercise involves not only the oblique muscles but also those of the rib cage. Developing these muscles is beneficial for activities that involve twisting or flexing the trunk. This exercise essentially compresses the rib cage so combining it with a breathing exercise that requires forceful inhalation will help to build the ability to inhale during movements that compress the chest.
Procedure:: Adopt the starting position shown for the selected level of difficulty. If using an IMTD, this should be held in the mouth without using the hands. Once in position, brace the abdominal muscles (moderately). For specific guidance see the description for each version.
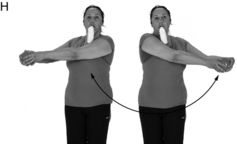
Trunk lateral rotation
Benefits:: This exercise involves the trunk rotators, which are responsible for controlling the counter-rotation of the shoulders during walking. Too much rotation will generate instability, inefficiency, and loss of balance. This exercise will help to develop the ability to control trunk movement, even when breathing demand is high, as well as overcoming the trunk compression that the rotation produces.
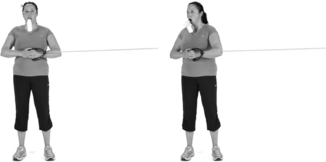
Trunk anti-rotation press
Benefits:: This exercise requires the ability to resist a rotational force, which is as hard as actually generating rotational movement. The exercise is harder than it looks; watch out for asymmetry between sides and work to correct this.
Procedure:: Adopt the starting position shown for the selected level of difficulty. If using an IMTD, this should be held in the mouth without using the hands. Once in position, brace the abdominal muscles (moderately). For specific guidance see the description for each version.
Close arm dip
Benefits:: The emphasis of this exercise is not the triceps (as it would be in a normal dip), but the complex of muscles around the shoulders that are responsible for pulling movements. These actions compress the thorax and therefore oppose inhalation.
Arms should remain close to the body to maximize scapular involvement and thoracic compression.
Procedure:: Adopt the starting position shown for the selected level of difficulty. If using an IMTD, this should be held in the mouth without using the hands. Once in position, brace the abdominal muscles (moderately). For specific guidance see the description for each version.
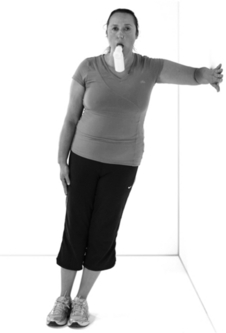
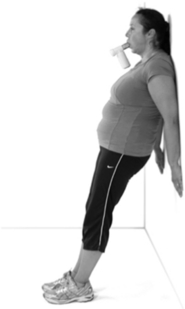
Postural control exercises
Benefits:: Standing on one leg is challenging for most people, but when breathing effort perturbs balance it can be virtually impossible. This exercise will develop the ability to dissociate the destabilizing influence of breathing from balance.
Procedure:: Adopt the starting position shown for the selected level of difficulty. If using an IMTD, this should be held in the mouth without using the hands. Once in position, brace the abdominal muscles (moderately) and breathe slowly and deeply at around 12 breaths per minute throughout the exercise. If using an IMTD, inhale forcefully through the IMTD before exhaling slowly and fully for about 4 seconds (breathing rate should be around 12 per minute). For specific guidance see the description for each version.

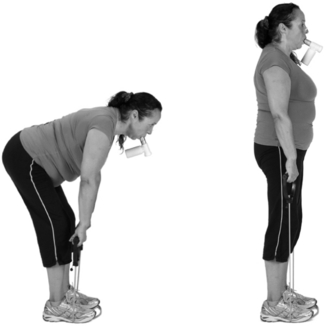
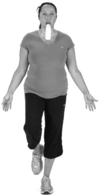
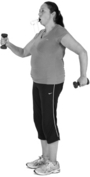
Dumbbell running
Benefits:: This exercise involves the entire trunk musculature, deltoids and biceps. It challenges the ability of the postural control system to maintain an upright posture. Most people find that they become much more breathless during walking and running activities than they do during cycling. This is because the postural control system is required to make continuous adjustments to posture during walking or running, which brings the breathing function into conflict with the postural function of these muscles. This exercise helps develop the ability to cope with external destabilizing forces that can cause loss of balance and breathlessness during ambulation.
Procedure:: Adopt the starting position shown for the selected level of difficulty. If using an IMTD, this should be held in the mouth without using the hands. Once in position, brace the abdominal muscles (moderately). For specific guidance see the description for each version.
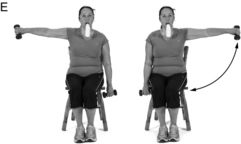
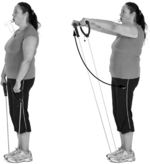
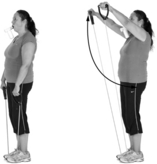
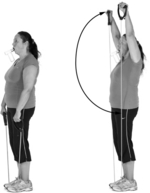
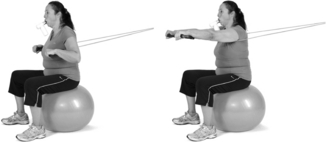
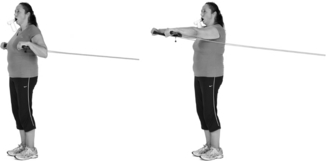
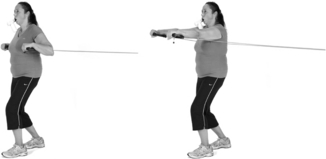
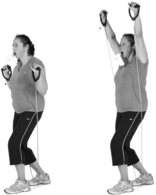
Resisted front raise
Benefits:: Simply flinging the arms away from the body requires feed-forward activity of the diaphragm and tranversus abdominis to maintain balance. In situations where breathing demand is high, there is a direct conflict between the requirements for breathing and the requirements for postural control – and breathing always wins (see Ch. 1). This exercise helps to develop the ability to meet both of those demands comfortably, without compromising either. The benefits will be translated into a myriad of everyday activities where the demands of postural control and breathing are high (e.g., walking on uneven ground). Resistance can be generated using a weight or elastic resistance band. A weight is preferable, because it acquires momentum during movement.
Procedure:: Adopt the starting position shown for the selected level of difficulty. If using an IMTD, this should be held in the mouth without using the hands. Once in position, brace the abdominal muscles (moderately). For specific guidance see the description for each version.
Variations:: In addition to increasing duration, or the size of the resistance, this exercise can be made more challenging by increasing cadence, using a balance cushion, or adopting a split stance (one foot in front of the other, shoulder-width apart).
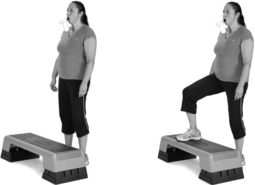
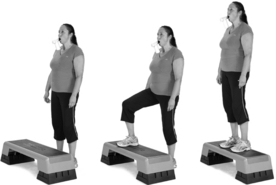
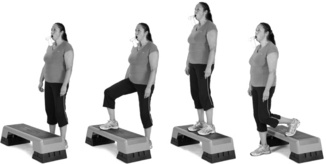
Step-up / down
Benefits:: This exercise involves the lumbopelvic stabilizers, as well as the hip, knee and ankle extensors. Stepping is an activity that causes many people to become breathless. This is not only because stepping is metabolically hard work, but also because it requires the respiratory muscles to be engaged simultaneously in active postural control. This exercise develops the ability to deal with these dual demands.
Procedure:: Adopt the starting position shown for the selected level of difficulty. If using an IMTD, this should be held in the mouth without using the hands. Once in position, brace the abdominal muscles (moderately). For specific guidance see the description for each version.
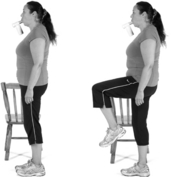
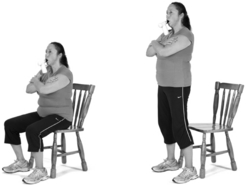
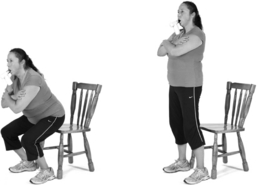
Sit-stand
Benefits:: Sitting and standing doesn’t just require adequate strength in the hip and knee extensors, it also requires good core stability and postural control. Typically, people inhale just before rising, and perform a weak Valsalva to produce stability and stiffness in the trunk and pelvis. This exercise will reduce the reliance upon this pneumatic pressure for stability, replacing it with good neuromuscular strength and coordination.
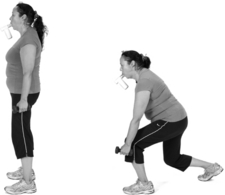
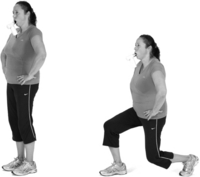
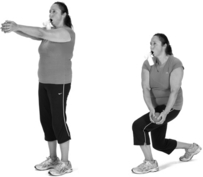
Lunge
Benefits:: This exercise challenges the ability to maintain postural control during a compound exercise that involves large muscle groups. It will develop the capacity to breathe effectively during movements that require forceful activation of large muscle groups.

Pushing and pulling exercises
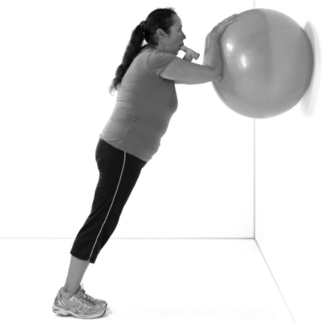
Benefits:: The chest press requires the ability to transform the trunk into a stable platform, but doing so places huge demands on the ability of the trunk muscles to carry out their breathing function (because the muscle actions tend to compress the rib cage). This exercise will help develop the coordinated action of the trunk stabilization and control musculature during the press movement. Undertaking this exercise in an unstable standing position and with a breathing challenge will improve the ability to coordinate the stabilizing and breathing actions of the trunk during an exercise that compresses the rib cage. This transforms a simple chest press into a core exercise that is highly functional.
Procedure:: Adopt the starting position shown for the selected level of difficulty. If using an IMTD, this should be held in the mouth without using the hands. Once in position, brace the abdominal muscles (moderately). For specific guidance see the description for each version.
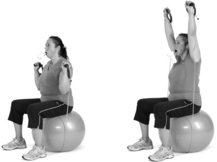
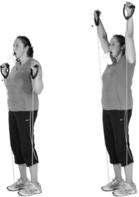
Shoulder press
Benefits:: This exercise is good for postural control, and it involves the trunk musculature, shoulders and triceps. As with the chest press, the shoulder press requires the ability to transform the thorax into a stable platform. This places huge demands on the ability of the trunk muscles to carry out their breathing function because this action stiffens the trunk (making inhalation more challenging). This exercise will help develop the coordinated action of the trunk stabilization and control musculature during the shoulder-press movement. An unstable standing position and a breathing challenge improve the ability to coordinate the stabilizing and breathing actions of the trunk. This transforms the exercise into a core exercise that is highly functional.
Procedure:: Adopt the starting position shown for the selected level of difficulty. If using an IMTD, this should be held in the mouth without using the hands. Once in position, brace the abdominal muscles (moderately). For specific guidance see the description for each version.
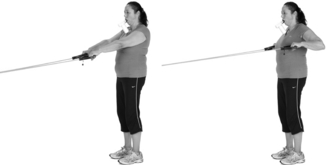
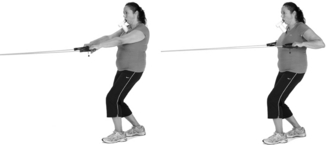
Resisted pull
Benefits:: This exercise is good for postural control, and it involves the back, shoulder and biceps muscles. Any action that compresses the rib cage creates a challenge to breathing, which is precisely what pulling movements impose. The use of a low anchor point for the resistance creates a postural challenge that pulls the body downwards as well as forwards. Undertaking the exercise in an unstable, upright position transforms it into a functional core activity. The single-arm version of the exercise also adds a rotational challenge that will train the trunk rotators.
Procedure:: Adopt the starting position shown for the selected level of difficulty. If using an IMTD, this should be held in the mouth without using the hands. Once in position, brace the abdominal muscles (moderately). For specific guidance see the description for each version.

Suggested workout protocols
Protocol two: ambulatory patient with heart failure and low back pain
Protocol three: active patient with neuromuscular disease and a history of falls
Protocol four: healthy older person with idiopathic dyspnoea
2. Ball bounce on the spot 186
4. Moderate gluteal bridge with upper body instability 194
5. Moderate gluteal bridge with lower body instability 195
8. Moderate bent leg deadlift 203
9. Standing side swing 204 and 205
11. Moderate rise with overhead weight 206
References
Beckerman, M., Magadle, R., Weiner, M., et al. The effects of 1 year of specific inspiratory muscle training in patients with COPD. Chest. 2005;128:3177–3182.
Borg, E., Borg, G., Larsson, K., et al. An index for breathlessness and leg fatigue. Scand. J. Med. Sci. Sports. 2010;20:644–650.
Borg, G.A. Psychophysical bases of perceived exertion. Med. Sci. Sports Exerc. 1982;14:377–381.
Borg, G. Borg’s Perceived Exertion and Pain Scales. Champaign, IL: Human Kinetics; 1998.
Deindl, F.M., Vodusek, D.B., Hesse, U., et al. Pelvic floor activity patterns: comparison of nulliparous continent and parous urinary stress incontinent women. A kinesiological EMG study. Br. J. Urol. 1994;73:413–417.
Enright, P.L., Kronmal, R.A., Manolio, T.A., et al. Respiratory muscle strength in the elderly. Correlates and reference values. Cardiovascular Health Study Research Group. Am. J. Respir. Crit. Care Med. 1994;149:430–438.
Fletcher, C.M., Elmes, P.C., Fairbairn, A.S., et al. The significance of respiratory symptoms and the diagnosis of chronic bronchitis in a working population. Br. Med. J. 1959;2:257–266.
Gosselink, R., De Vos, J., van den Heuvel, S.P., et al. Impact of inspiratory muscle training in patients with COPD: what is the evidence? Eur. Respir. J. 2011;37:416–425.
Hodges, P.W., Butler, J.E., McKenzie, D.K., et al. Contraction of the human diaphragm during rapid postural adjustments. J. Physiol. 1997;505(pt 2):539–548.
Hodges, P.W., Gandevia, S.C., Richardson, C.A. Contractions of specific abdominal muscles in postural tasks are affected by respiratory maneuvers. J. Appl. Physiol. 1997;83:753–760.
Hodges, P.W., McKenzie, D.K., Heijnen, I., et al. Reduced contribution of the diaphragm to postural control in patients with chronic airflow limitation. In Proceedings of the Thoracic Society of Australia and New Zealand. Australia: Melbourne; 2000.
Kikuchi, Y., Okabe, S., Tamura, G., et al. Chemosensitivity and perception of dyspnea in patients with a history of near-fatal asthma. N. Engl. J. Med. 1994;330:1329–1334.
Killian, K.J., Jones, N.L. Respiratory muscles and dyspnea. Clin. Chest Med. 1988;9:237–248.
Lotters, F., van Tol, B., Kwakkel, G., et al. Effects of controlled inspiratory muscle training in patients with COPD: a meta-analysis. Eur. Respir. J. 2002;20:570–576.
Magadle, R., Berar-Yanay, N., Weiner, P. The risk of hospitalization and near-fatal and fatal asthma in relation to the perception of dyspnea. Chest. 2002;121:329–333.
Mahler, D.A., Weinberg, D.H., Wells, C.K., et al. The measurement of dyspnea. Contents, interobserver agreement, and physiologic correlates of two new clinical indexes. Chest. 1984;85:751–758.
Marin, J.M., Carrizo, S.J., Gascon, M., et al. Inspiratory capacity, dynamic hyperinflation, breathlessness, and exercise performance during the 6-minute-walk test in chronic obstructive pulmonary disease. Am. J. Respir. Crit. Care Med. 2001;163:1395–1399.
McConnell, A.K. Breathe strong, perform better. Champaign, IL: Human Kinetics; 2011.
McConnell, A.K., Copestake, A.J. Maximum static respiratory pressures in healthy elderly men and women: issues of reproducibility and interpretation. Respiration. 1999;66:251–258.
McGill, S. Low back disorders, second ed. Champaign, IL: Human Kinetics Europe Ltd; 2007.
Minoguchi, H., Shibuya, M., Miyagawa, T., et al. Cross-over comparison between respiratory muscle stretch gymnastics and inspiratory muscle training. Intern. Med. 2002;41:805–812.
O’Donnell, D.E., Sanii, R., Anthonisen, N.R., et al. Effect of dynamic airway compression on breathing pattern and respiratory sensation in severe chronic obstructive pulmonary disease. Am. Rev. Respir. Dis. 1987;135:912–918.
O’Donnell, D.E., Lam, M., Webb, K.A. Measurement of symptoms, lung hyperinflation, and endurance during exercise in chronic obstructive pulmonary disease. Am. J. Respir. Crit. Care Med. 1998;158:1557–1565.
Smith, M.D., Russell, A., Hodges, P.W. Disorders of breathing and continence have a stronger association with back pain than obesity and physical activity. Aust. J. Physiother. 2006;52:11–16.
Tsao, H., Hodges, P.W. Persistence of improvements in postural strategies following motor control training in people with recurrent low back pain. J. Electromyogr. Kinesiol. 2008;18:559–567.
Weiner, P., Berar-Yanay, N., Davidovich, A., et al. Specific inspiratory muscle training in patients with mild asthma with high consumption of inhaled beta(2)-agonists. Chest. 2000;117:722–727.
Weiner, P., Magadle, R., Beckerman, M., et al. Comparison of specific expiratory, inspiratory, and combined muscle training programs in COPD. Chest. 2003;124:1357–1364.


