Extensor and Flexor Tendon Injuries in the Hand, Wrist, and Foot
Extensor Tendons
Functional Anatomy
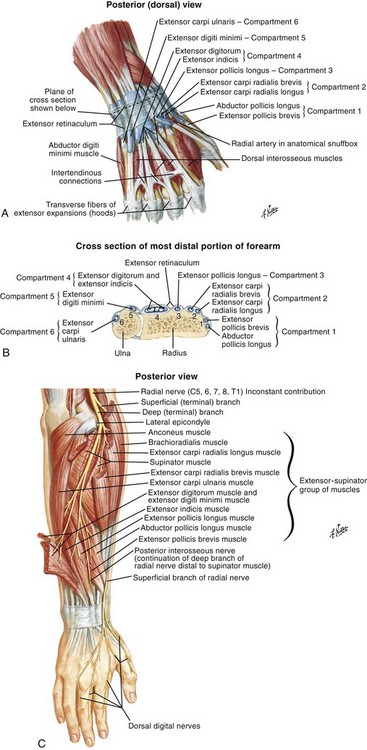
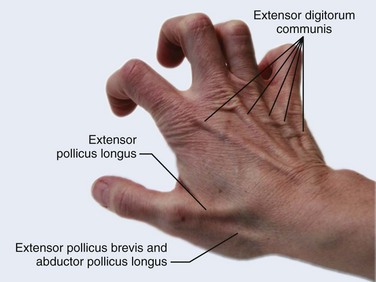
There are 12 extrinsic extensors of the wrist and digits, all of which are innervated by the radial nerve. The muscles that give rise to these tendons originate in the forearm and elbow (Fig. 48-1). The extrinsic extensor tendons reach the hand and digits by passing through a fibroosseous tendon sheath (retinaculum) located at the dorsal surface of the wrist. This synovium-lined sheath provides smooth gliding of the tendons and prevents bowstringing when the wrist is extended.1 The dorsal retinaculum contains six compartments or subdivisions (Fig. 48-2). These compartments are numbered from the radial to the ulnar side of the wrist.
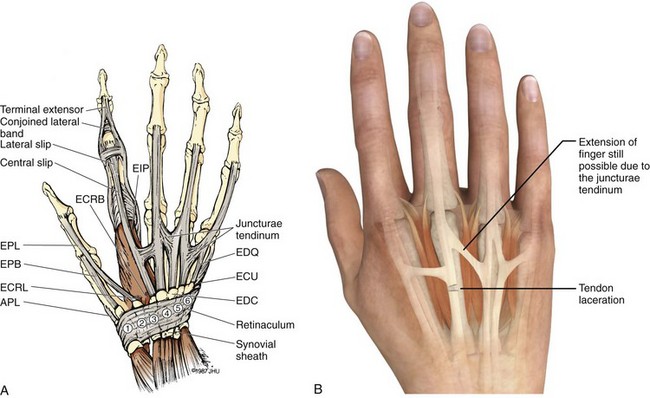
The course of the extensor tendons along the fingers is more complex, but a basic understanding of this anatomy is essential for the emergency clinician to evaluate and treat extensor tendon injuries (Fig. 48-3). The EIP tendon joins the EDC tendon at the level of the metacarpophalangeal (MCP) joint in the index finger. The EDM tendon parallels the course of the EDC tendon; the four EDC tendons eventually insert at the base of the proximal, middle, and distal phalanges. The most proximal insertion of the EDC tendon is at the level of the base of the proximal phalanx. The tendon actually inserts in two ways. First, there is a loose dorsal insertion just distal to the MCP joint. In addition, the EDC tendon inserts into the volar plate via the sagittal bands. The sagittal bands are circumferential structures at the level of the metacarpal head that serve to keep the EDC tendon centered over the metacarpal head, as well as to provide a stable connection with the volar plate located on the palmar side of the hand. After its primary insertion at the level of the MCP joint, the EDC tendon then extends dorsally along the digit. The EDC trifurcates over the proximal phalanx (Fig. 48-4). Its major central slip inserts on the base of the middle phalanx (Fig. 48-5). The lateral branches of the EDC tendon join with the lateral bands from the interossei and lumbricals to form the conjoined lateral bands. The two conjoined lateral bands then fuse together over the middle phalanx to form the terminal extensor mechanism (TEM), which inserts into the base of the distal phalanx (Fig. 48-6). The triangular ligament is a connection between the two conjoined lateral bands that assists in keeping these structures on the dorsal aspect of the digit.
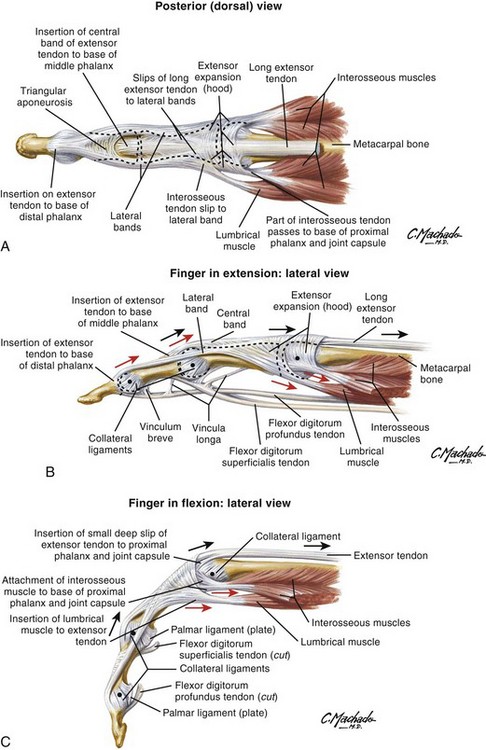
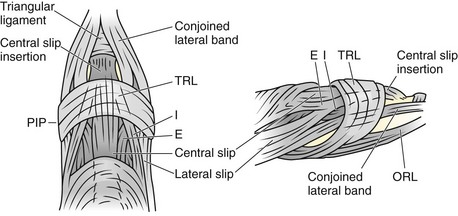
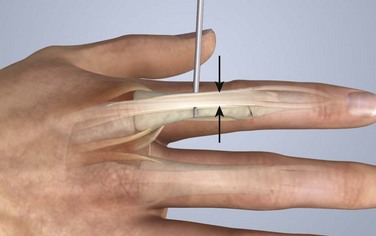
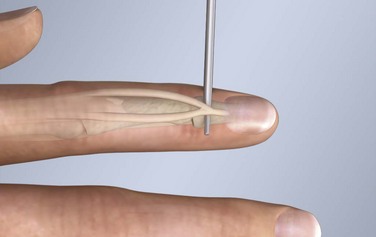
Figure 48-6 The terminal extensor mechanism.
General Approach to Extensor Tendon Injuries
The key to detecting extensor tendon injuries in the ED is to perform a careful and thorough history and physical examination. Closed injuries may appear innocuous at first but can result in tendon injuries that may lead to severe deformities or dysfunction if undetected (Figs. 48-7 to 48-9). Closed injuries are also commonly associated with fractures. A hand radiograph is recommended for closed-hand injuries when a fracture is suspected or for open-hand injuries in which a fracture or foreign body is suspected. It is generally accepted that all open injuries that result from glass should be radiographed. Plain radiographs have a sensitivity of approximately 98% for detecting radiopaque foreign bodies (e.g., gravel, glass, metal).2
After assessing the strength and neurovascular status of the injured hand it is imperative that the emergency clinician visually inspect the wound thoroughly. Inspection should include an assessment of the degree of wound contamination, as well as a search for foreign bodies and occult tendon lacerations. It is often necessary to extend the skin laceration to aid in the visualization of a possible tendon injury. Some investigators have advocated for the use of ultrasound in the diagnosis of suspected extensor (and flexor) tendon lacerations in the hand.3 This is a potentially attractive tool since it is easy to use and noninvasive and provides point-of-care analysis, but the use of sonography for detection of hand and digit tendon injuries cannot yet be advocated for routine use by emergency physicians. Because an extensor tendon is a mobile structure, it is imperative that if it is exposed, it be visualized in its entirety through a full range of motion. It is especially important to examine the tendon in the position that it occupied at the time of injury because the tendon injury frequently does not lie directly under the external skin wound (see Fig. 48-8).
Preparation for Repair
The choice of suture material depends on the location of the tendon injury. For repair of complete tendon injuries on the dorsum of the hand, nonabsorbable, synthetic braided sutures are preferred.4 Polyester sutures, such as Ethibond or Mersilene, are recommended. Nylon sutures are acceptable but are less ideal because colored nylon may be visible under the skin. Chromic and plain gut should be avoided because they will dissolve before adequate tendon healing has occurred. Silk is not desirable because of its reactivity. Most extensor tendons on the dorsum of the hand will accommodate 4-0 sutures, but 5-0 suture material may be needed for smaller tendons. Small, “plastic repair” tapered needles should be used to avoid tearing the tendon. Partial tendon injuries in the digits are best repaired with fine, synthetic absorbable sutures such as polyglactin (Vicryl). Complex lacerations that involve tissue loss and fraying of the tendon margins (e.g., table saw injuries) represent a particularly challenging clinical scenario that may make an otherwise straightforward tendon repair very difficult. In these cases, Lalonde and Kozin recommend closing the lacerated skin and tendon together (i.e., dermatotenodesis). Take large, composite bites of skin and tendon together, 5 to 10 mm on either side of the wound, with 3-0 or 4-0 nylon sutures tied outside the skin. Tighten the sutures until the digit is in full extension.5
Before repairing a tendon injury, it is imperative that the clinician use adequate anesthesia so that thorough wound exploration can occur. A field block or regional nerve block can be used on the dorsum of the hand, whereas local anesthesia or a digital nerve block can be used on the fingers. The choice of anesthetic composition has been the subject of long-standing controversy. Traditional teaching admonishes the use of epinephrine in anesthetics for fear of digital ischemia; however, many clinicians readily use lidocaine with epinephrine in the hand and fingers without complications. There is ample anecdotal and clinical evidence supporting the safety profile of epinephrine in digital anesthesia. Epinephrine has the benefit of prolonging the anesthetic effect and promoting a bloodless field during wound exploration and repair.6 It is important that the digits be fully anesthetized or, in the case of more proximal wounds on the hand, that the area around the wound be liberally anesthetized because many lacerations must be extended to afford access to the surgical field. It is a common error to avoid extending a laceration and to attempt examination, cleaning, or repair through a small initial skin laceration.
Atraumatic technique is essential for minimizing adhesions and scar tissue formation. Tendons should be handled delicately, with crushing force or excessive punctures with forceps and needles avoided. Forceps should be used only on the exposed, cut end of the tendon whenever possible.7
Patterns of Injury and Management
Treatment of extensor tendon injury depends primarily on whether the injury is open or closed, as well as the anatomic location of the injury. The most widely accepted classification system is that developed by Verdan,8 which divides the hand and wrist into eight anatomically based zones (Fig. 48-10). It is quite useful for emergency clinicians to become familiar with this classification because in many instances the zone of injury can help determine whether tendon repair should be attempted in the ED. One must keep in mind that repair of lacerated extensor tendons within 72 hours of injury is still considered primary closure. Therefore, although emergency clinicians may repair many extensor tendon injuries immediately, some injuries are best managed with delayed repair. In these cases, initial care in the ED should consist of sterile skin preparation, copious wound irrigation and inspection for foreign bodies, skin closure, splint application, and referral to a hand specialist for further care in 1 to 5 days. A dorsal plaster or fiberglass splint in which a metal foam finger splint is incorporated is an ideal way to totally immobilize a finger (Fig. 48-11) (see Chapter 50).
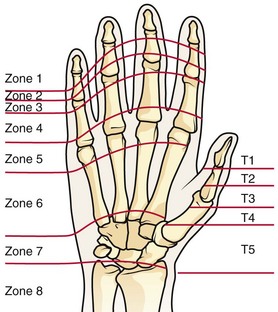
Figure 48-10 Dorsum of the left hand. The injury classification system recommended by Verdan8 includes eight anatomically based zones. (Adapted from Blair WF, Steyers CM. Extensor tendon injuries. Orthop Clin North Am. 1992;23:142.)
Zone 6 Injuries1,4,9
Once both ends of the injured tendon have been located, the technique used for repair depends on the size and shape of the tendon. Whereas larger, round tendons can accommodate sutures that pass through the core of the tendon, smaller or flat tendons are difficult to repair with this technique. Most of the tendons in zone 6 can be repaired with either a modified Kessler or a modified Bunnell core suture technique using 3-0 or 4-0 nonabsorbable suture (Fig. 48-12). Both these techniques involve first placing a single suture in half of the cut tendon. Place the suture in the tendon core by inserting the suture needle into the exposed, cut end and then weaving the suture through the lateral tendon margins. Next, place the same suture through the core of the opposite half of the cut tendon. Tie the suture ends in a square knot in between the cut ends of the tendon to bring the two halves together.
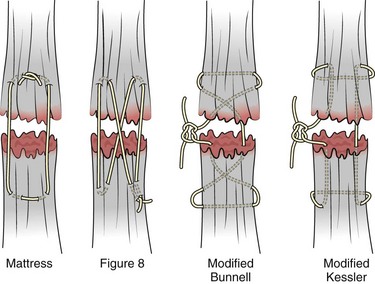
Figure 48-12 Suture techniques used for extensor tendon repair.
Smaller tendons may be repaired with a figure-of-eight or horizontal mattress suture (see Fig. 48-12). Small, tapered needles should be used to avoid tearing the tendon. In a cadaver study comparing these multiple suture techniques, it was found that the modified Bunnell technique provided the strongest extensor tendon repair.10 In addition, this technique produced no gapping between the repaired tendon ends and minimized the postrepair restriction of flexion at the MCP and proximal interphalangeal (PIP) joints. It is important to passively test the degree of flexion at the MCP joint after a zone 6 tendon repair to be certain that the tendon has not been excessively shortened.
To improve the tensile strength of the repair, a number of other suture techniques may be used.4 One option is to increase the number of suture strands that cross the repair site (e.g., four strands rather than two). A cadaver study that compared various four-strand tendon repair techniques concluded that the Massachusetts General Hospital technique was more resistant to gap formation than either the Krackow-Thomas or the four-strand modified Bunnell technique.11 However, this cadaver model could not assess tendon shortening or subsequent range of motion.12 Another way to improve tensile strength is to place a peripheral suture in addition to the core suture. Place a running cross-stitch suture of synthetic, absorbable material (e.g., 5-0 polyglycolic acid, polyglactin, polydioxanone) circumferentially around the repair site or just on the dorsal surface of the tendon across the laceration site. Alternatively, place sutures laterally along both sides of the tendon, starting at about 1 cm on either side of the repair site. The ultimate choice of repair technique will depend largely on the treating clinician’s familiarity with extensor tendon repair, as well as the size of the tendon.
The approach to partial extensor tendon lacerations is not well defined, and no definitive standard of care exists. One evidence-based analysis identified 141 papers in its literature search, but none were relevant to the question of repair of partial extensor tendon injuries.13 The authors concluded that there is no direct evidence to assist in answering this question. Given the lack of literature on the subject, a reasonable approach may be to extrapolate from data on flexor tendon injuries. It has been demonstrated that many partial flexor tendon lacerations do well without repair,14 but hand surgeons still disagree on the need for repair of these injuries. In a survey of hand surgeons, 30% of respondents repaired all partial flexor tendon lacerations and 45% repaired only lacerations with greater than 50% involvement of the cross-sectional area.15 Except at the wrist level, extensor tendons are not covered with synovium and are less likely than flexor tendons to form adhesions after repair. This encourages some authors to recommend repair of most partial extensor tendon lacerations. Although the ideal approach to these injuries is not known, it is reasonable to consider repair of partial extensor tendon lacerations to be optional if less than 50% of the cross-sectional area is involved. However, if not repaired, such injuries must be splinted for 3 to 4 weeks to ensure that a partial laceration is not converted into a complete injury. Skin closure, splinting, and referral for follow-up is a standard approach to unsutured partial extensor tendon lacerations.
After repair of a lacerated EDC tendon in zone 6, apply a plaster or fiberglass volar splint so that the wrist is in 30 to 45 degrees of extension, the affected MCP joint is in neutral (0 degrees of flexion), and the unaffected MCP joints are in 15 degrees of flexion. The PIP and distal interphalangeal (DIP) joints should be allowed full range of motion. After 10 days, the MCP joints are allowed 20 to 30 degrees of flexion. If there is an isolated EIP or EDM tendon injury, only the index or little finger must be included in this splint. Dynamic extension splinting may be used as early as 2 days after tendon repair, so close follow-up is recommended.16
Zone 5 Injuries17,18
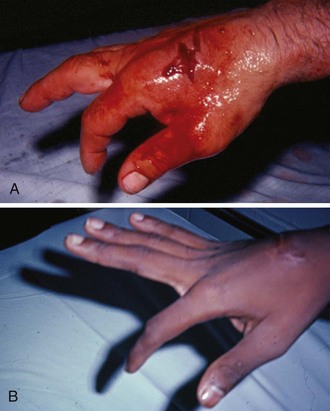
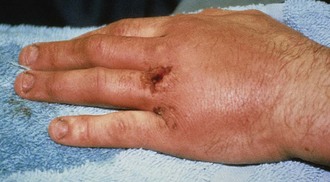
Zone 5 consists of the area over the MCP joint. Open injuries in this region should be considered secondary to a human tooth bite until proved otherwise (Fig. 48-13), especially if the injury occurs over the first or second MCP joint because this is frequently the location of a clenched-fist (“fight-bite”) injury. ED evaluation must begin with a careful and persistent history and physical examination, although patients’ reluctance to admit to punching someone in the mouth is notorious. The wound should be inspected through its full range of motion because the position of the EDC tendon changes with hand position. It is generally recommended that radiographs be obtained for all these injuries to evaluate for metacarpal head fractures, air in the joint space, or the presence of a foreign body such as a tooth fragment (Fig. 48-14).16
If after a thorough evaluation it is determined that a human bite in this region has resulted in a superficial skin laceration only, without injury to the underlying tendon or joint, outpatient management is appropriate. The wound should be copiously irrigated and left open. A volar splint is applied with the wrist in 45 degrees of extension, the MCP joints in the neutral position (0 degrees of flexion), and the hand dressed with a bulky dressing. The use of prophylactic antibiotics for these “low-risk” human bites on the hand is controversial, and clinical trials have yielded mixed results.19,20 Despite the lack of compelling clinical evidence for either approach, many authors recommend that 3 to 5 days of prophylactic antibiotics be given to these patients. Regardless of whether antibiotics are prescribed, patients should be seen in 24 to 36 hours for a repeated examination to evaluate for wound infection.
If a human bite results in tendon damage, including partial or complete laceration, some clinicians opt for admission and intravenous antibiotics. However, no specific standard of care exists. Outpatient therapy is acceptable in a reliable patient who has access to follow-up. Delayed closure with evaluation and repair of the tendon should be undertaken by a hand surgeon after 7 to 10 days of antibiotic therapy.4,16 Primary closure of even seemingly clean and well-irrigated human bites in this region is not advisable because of the increased risk for wound infection, as well as the potential for septic destruction of the MCP joint if it is violated. If an open joint is noted on physical examination, a more aggressive approach is warranted. Such patients are generally admitted for intravenous antibiotics after copious irrigation.4,16
Closed extensor tendon injuries in zone 5 usually result from the acute or recurrent application of compressive force to the MCP joint capsule. Closed injuries in this region are sometimes referred to as a boxer’s knuckle. Repetitive closed injury to the MCP joint region can produce small tears in the EDC tendon, the sagittal bands, or the joint capsule. These patients tend to have chronic and recurrent pain and swelling in the MCP joint region but usually have normal radiographic findings. Acute trauma may result in the same injuries or cause more severe damage to the extensor hood. Such patients may have complete disruption of the extensor mechanism, including damage to the central tendon and the sagittal bands. The MCP joint is swollen, has decreased mobility, and may exhibit an extensor lag. Traumatic subluxation of an EDC tendon may be present and usually involves the middle finger with subluxation to the ulnar side (Fig. 48-15). Dislocation to the radial side is less common, probably because of the juncturae tendinum on the ulnar side, which can compensate for injuries to the ulnar sagittal band.21 The subluxation becomes more prominent with flexion at the MCP joint. Controversy exists regarding the initial management of closed injuries in this region. Whereas some authors prefer initial surgical repair,18 others use an initial trial of extension splinting in some or all cases.4,16,17,21 Splinting the MCP joint in neutral or slight flexion for 6 weeks has been recommended for dislocations initially seen within 3 weeks of injury, with operative repair being reserved for more delayed manifestations or patients who fail splint therapy.16
Zone 3 Injuries1,16,18
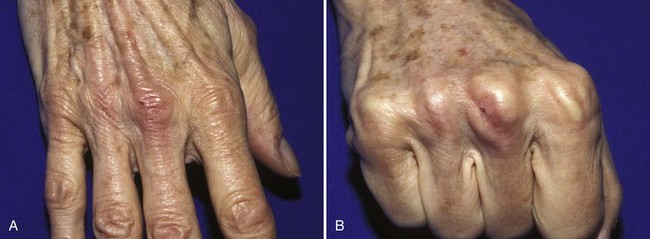
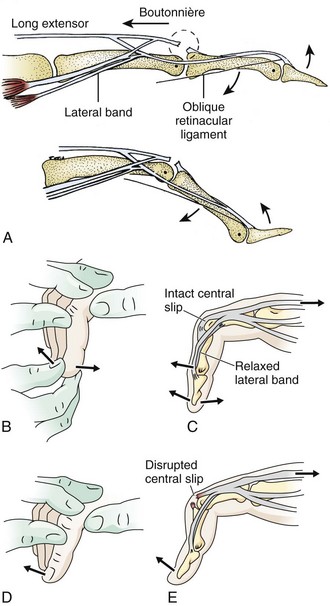
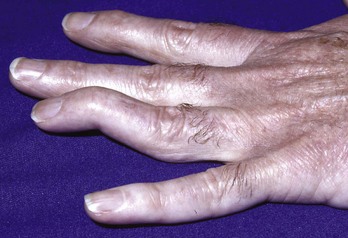
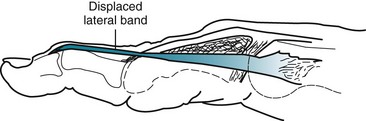
A boutonnière deformity develops when the central slip is ruptured by an open or closed mechanism that leads to unopposed action of the flexor digitorum superficialis tendon (Fig. 48-16). This results in flexion at the PIP joint, protrusion of the head of the proximal phalanx between the two lateral bands, and disruption of the triangular ligament. When this occurs, the lateral bands are displaced volar to the axis of motion of the PIP joint. The lateral bands then paradoxically become flexors of the PIP joint. In addition, the extensor hood mechanism is pulled more proximally, which results in increased tension on the TEM and hyperextension at the DIP joint. Thus, a boutonnière deformity consists of flexion of the PIP joint with hyperextension at the DIP joint.
Figure 48-16 Boutonnière deformity. This can be an open or a closed injury. Note the flexion of the proximal interphalangeal joint and extension of the distal interphalangeal joint from a laceration of the central slip mechanism (see Fig. 48-17).
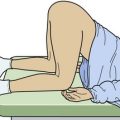
Patients with closed injuries in zone 3 are commonly encountered in the ED. They may complain of a direct blow to the dorsal PIP joint or a “jammed” finger. This injury occurs when an object such as a ball delivers a sudden axial loading force with forced flexion of the PIP joint while it is extended. These patients commonly complain of a painful, swollen PIP joint, which often makes the examination difficult. Some of these injuries may represent PIP joint dislocations that were spontaneously or manually reduced before arrival of the patient at the ED. The tendon injury that is important to recognize in this setting is an occult isolated central slip rupture. Patients may have decreased extension at the PIP joint, but extension is generally normal because the lateral bands are the primary extenders of this joint. With forced extension against resistance, patients usually have pain and may have decreased strength. To eliminate pain as the cause of the decreased mobility, it may be helpful to test PIP extension against resistance after performing a digital block. With acute central slip rupture, PIP joint extension may be particularly weak when the MCP and wrist joints are held in maximal flexion. In this position, a 15-degree or greater loss of active extension is highly suggestive of a central slip injury.18 The Elson test may also help identify this injury (Fig. 48-17).22
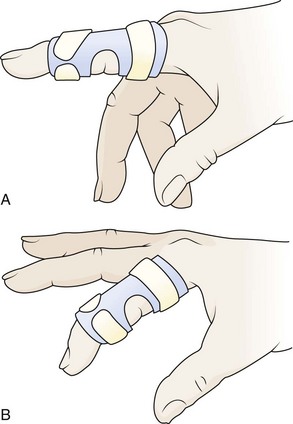
A boutonnière deformity does not usually develop in patients with closed zone 3 injuries until 10 to 21 days after injury. The only way to prevent this deformity is to have a high index of suspicion for its presence and treat these patients conservatively. It is advisable that all patients with a swollen, tender PIP joint and pain with flexion or extension be splinted and referred for close follow-up. Apply a dorsal splint overlying the PIP joint while keeping it in full extension. This can be accomplished with an aluminum foam-backed splint or a Bunnell (“safety pin”) splint, although the latter may not be available in the ED.16 The MCP and DIP joints should be left free to have full, active range of motion (Fig. 48-18). If a central slip attachment fracture is present, orthopedic consultation is recommended because these patients may require surgical internal fixation.23
Zone 1 and 2 Injuries1,4,16,18
Zones 1 and 2 consist of the area over the DIP joint and the middle phalanx, respectively. In zone 2 the conjoined lateral bands come together to form the TEM and are held together, in part, by the triangular ligament. The TEM inserts on the base of the distal phalanx and allows extension at the DIP joint. Complete disruption of the TEM results in an inability to extend at the DIP joint. Because of the unopposed action of the flexor digitorum profundus (FDP) tendon, the DIP joint rests in the flexed position. This is known as a mallet deformity of the finger (Fig. 48-19A). When evaluating DIP motion, it is important to isolate the function of the extensor tendon by holding the PIP joint in full extension (Fig. 48-19B and C). Normally, full active extension is possible.
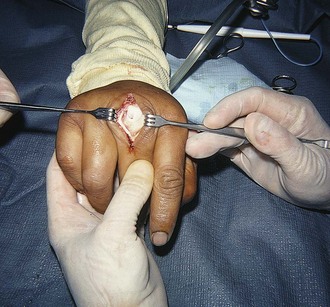
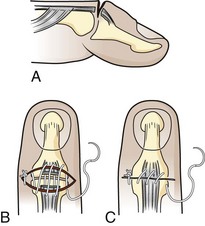
Tendon lacerations in zones 1 or 2 that result in a partial or complete mallet deformity generally warrant discussion with a hand surgeon (Fig. 48-20). Management consists of repair of the lacerated tendon and postrepair immobilization. Some surgeons will use only an external splint; others prefer placement of a Kirschner wire (K-wire) through the distal phalanx into the middle phalanx to help stabilize the joint. One technique for tendon repair involves placement of a roll-type suture (dermatotenodesis) that incorporates the tendon and overlying skin into a single suture (Fig. 48-21).1,16 The DIP joint is then splinted in full extension for at least 6 weeks. Occult partial tendon lacerations are important to recognize to prevent the development of a mallet deformity. If there is a partial tendon laceration in zone 1 or 2 that does not result in any extension lag, the approach to repair is variable, and it is advisable to discuss the repair with the consulting hand surgeon. In general, partial tendon lacerations involving less than 50% of the tendon area that do not result in an extension lag may be splinted in extension for 7 to 10 days with or without repair of the tendon itself.16 Partial tendon lacerations involving more than 50% that do not result in an extension lag may be repaired by a hand surgeon or an emergency clinician who is experienced in the repair of these injuries. In either case it is advisable to discuss with the consultant hand surgeon whether the tendon will be repaired in the ED or the operating room.
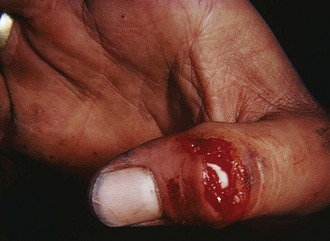
Figure 48-20 An open mallet finger can be repaired surgically.
If a zone 1 or 2 partial tendon laceration is repaired in the ED, it can be approximated by using a combination of running and cross-stitch sutures16 with 5-0 nonabsorbable (e.g., Prolene) suture material. In general, given the diminutive size of the extensor tendon in this region, placement of core sutures is not possible. It is important that the tendon ends be approximated but not pulled too tightly; otherwise, joint stiffness and limitation of flexion will occur. After repair of a partial tendon laceration, splint the DIP joint in extension for 6 to 8 weeks, followed by 2 to 4 weeks of night splinting and active range-of-motion exercises. Patients should be warned after tendon repair that there is likely to be some residual loss of flexion at the DIP joint, even in the best case.
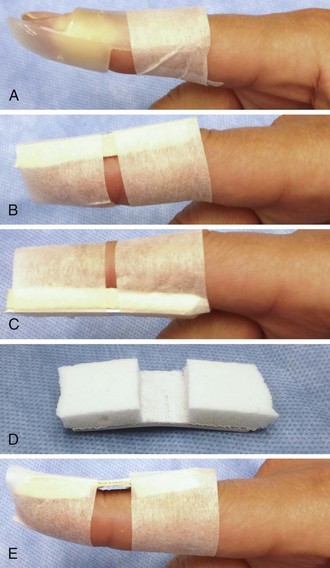
Treat both type 1 and type 2 injuries with splinting in full extension for 6 to 8 weeks. Either a dorsal or palmar splint should hold the DIP joint in extension or slight hyperextension (5 to 10 degrees) while allowing free range of motion of the PIP joint (Fig. 48-22). With a properly fitted splint, no flexion of the DIP joint should occur. The splint can be constructed from an aluminum, foam-backed splint or from a prefabricated Stack splint. A Cochrane review of treatment of mallet finger injuries found inadequate data to establish the most effective type of splint, but the Stack splint is the editor’s preference for ease of application and patient comfort.24 Be careful to avoid excessive sustained pressure from the splint on the DIP joint area because skin necrosis may occur. Strictly maintain the DIP joint in full extension for 6 to 8 weeks, including during sleep and splint changes. Adherence to this instruction is essential since patients have a tendency to test its function on their own, thus tearing the healing tendon fibers. The most common reason for failure of treatment is patient noncompliance with prolonged splinting. Whenever the splint is removed, support the distal fingertip in full extension at all times. Should DIP joint extension be lost at any point during the initial treatment period, reset the treatment clock for an additional 6 weeks.
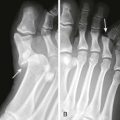
The third type of closed injury is an intraarticular avulsion fracture of the dorsal lip of the distal phalanx with volar displacement of the remaining portion of the distal phalanx (Fig. 48-23). Such injuries are best referred for definitive treatment consisting of either surgery or more complex splinting. Normally, the DIP collateral ligaments hold the distal phalanx in place; however, if there is a large enough fracture fragment (usually >50% of the articular surface), the remaining distal phalanx fragment displaces in the volar direction secondary to unopposed action of the FDP tendon. When volar displacement of the distal phalanx occurs, this injury may require more aggressive treatment to achieve an optimal outcome.18 Unfortunately, there are no adequate published randomized, controlled trials comparing operative versus conservative treatment of these injuries.24 Operative repair usually involves open reduction and internal fixation of the fracture with placement of a K-wire for additional stabilization. It is important to remember that it is the presence of volar subluxation, not the size of the avulsion fracture, that is most often considered when determining the need for operative management.

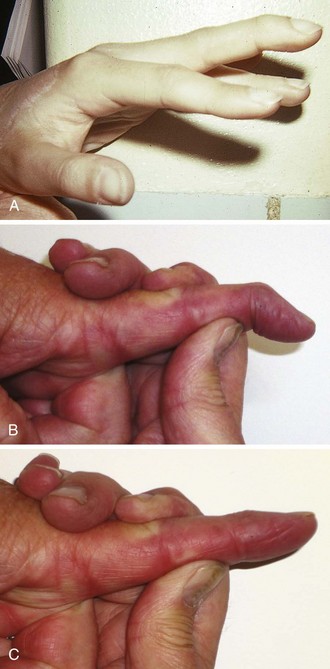
Any injuries, whether open or closed, that result in complete disruption of the TEM may result in a swan neck deformity (Figs. 48-24 and 48-25). This deformity consists of flexion at the DIP joint (a mallet finger) and hyperextension at the PIP joint. It results from increased extension force on the middle phalanx caused by dorsal and proximal displacement of the lateral bands. This complication can often be avoided if disruption of the TEM is diagnosed and treated correctly in the ED.
Complications
Extensor tendon injuries in zone 7 tend to have the worst prognosis. Because of the presence of a synovial lining, postrepair adhesions may develop. Adhesions may lead to decreased excursion of the extensor tendons with resultant decreased mobility at the wrist. There may also be limitation of finger flexion when the wrist is flexed, as well as limitation of finger extension when the wrist is extended. Because of the lack of synovium, the low risk for adhesions, greater tendon excursion, the relatively simple anatomy, and the usual lack of associated injuries, zone 6 tendon injuries tend to have fewer complications than other areas of the hand. The tendons in zone 6, however, do have a tendency to shorten if the ends are approximated too tightly. This may result in restriction of PIP and MCP joint flexion. In addition, worse outcomes may occur with complex zone 6 tendon injuries when additional soft tissue or bony injuries are present.16,25
Zone 5 injuries are particularly prone to infection because injuries in this region commonly occur from a human bite. In addition, if the extensor hood covering the MCP joint is not repaired carefully, subluxation of the EDC tendon may occur.9 If complex partial tendon lacerations in zone 4 are managed too aggressively, tendon shortening and stiffness may result. As discussed previously, these injuries are often best managed by splinting alone. A common complication of zone 3 extensor tendon injury is the development of a boutonnière deformity, which usually results from failure to diagnose or adequately immobilize a central slip injury. Similarly, undiagnosed or improperly treated extensor tendon injuries in zones 1 and 2 may lead to either a swan neck or a chronic mallet deformity of the digit. DIP joint splinting itself may result in skin ulceration or tape allergy, often occurring in the second week of treatment.16 Skin breakdown may ensue if the DIP joint is splinted in hyperextension because of decreased skin perfusion.
Postrepair Care and Rehabilitation
Zone 1 and 2 injuries are usually treated with static splinting, as described previously. After 6 weeks, active range-of-motion exercises should begin. Night splinting is recommended for an additional 2 to 6 weeks.1,16,18 Some authors also recommend wearing the splint during the day when performing heavy tasks.16 It is advisable to give the patient a number of extra splints so that the patient (or family) can change the splint frequently to avoid pressure injury. During splint changes it is important that the DIP joint be held in full extension either by using the other hand or by placing the finger against a table. If an extension lag develops at any time, continuous splinting must be repeated. Closed injuries of the central slip (zone 3) are often treated with a boutonnière splint for 4 to 6 weeks, followed by 2 to 6 weeks of gradual flexion exercises and night splinting. During the initial period of immobilization, the patient should be instructed to passively flex the DIP joint every hour to maintain gliding and proper position of the lateral bands.
Lacerations in zones 3 and 4 have traditionally been treated with static splinting from the forearm to the digits. An alternative approach is to splint only the DIP and PIP joints in extension and begin a “short-arc-motion” protocol within 1 to 2 days of repair.26 This consists of active motion at the PIP joint progressing from 0 to 30 degrees the first 2 weeks to 0 to 50 degrees in the fourth week. When compared with static splinting, this protocol may lead to better PIP and DIP joint flexion without resulting in tendon rupture or a boutonnière deformity. Dynamic extension splints are also proving to be useful for rehabilitation of zone 3 and 4 tendon injuries.16,26,27
Early motion after extensor tendon repair has been found to be most useful in zones 5 through 7. A dynamic extension splint in which the wrist is extended 45 degrees and all finger joints rest in the neutral position is commonly used. A volar block allows 30 to 40 degrees of MCP joint flexion, whereas a dynamic traction mechanism passively extends the digits. Dynamic splinting is started 1 to 3 days after repair. Active motion is added at 3 to 4 weeks, and resistance is added at 7 weeks. A randomized, controlled trial of zone 5 and 6 extensor tendon repairs found total active motion with dynamic splinting to be superior to static splinting at 4 to 8 weeks, but not at 6 months. However, grip strength in the affected hand was improved at 6 months with dynamic splinting.28 A short-arc-motion protocol with controlled active motion at the MCP joint has also been shown to be safe and effective when started 24 to 48 hours after repair.9 One comparative trial reported that dynamic extension splinting and controlled active mobilization worked equally well for zone 5 and 6 tendon injuries.29 All early range-of-motion protocols are most beneficial when managed closely by a skilled hand therapist. Patient age, associated injuries, suture type, and repair technique all affect the choice of rehabilitation protocol.9 Most importantly, patients must be reliable and motivated to take advantage of early range-of-motion techniques. It is best to refer patients to a hand surgeon or hand therapist as soon as possible after repair so that rehabilitation can begin in a timely manner.
Extensor Tendon Injuries of the Foot
The tibialis anterior muscle originates on the shaft of the tibia and interosseous membrane and inserts on the medial cuneiform and the base of the first metatarsal. The tibialis anterior extends the foot at the ankle joint and inverts the foot at the subtalar and transverse tarsal joints. Spontaneous rupture of the tibialis anterior tendon may be seen in both elderly and young patients who have been injured during athletic activity. Injury to this tendon commonly results from forceful attempted dorsiflexion of the ankle while it is held fixed in the plantar-flexed position.28 Patients generally have decreased strength of foot dorsiflexion because the toe extensors are used to accomplish this motion. Rupture or laceration of the tibialis anterior tendon should be promptly referred to an orthopedic surgeon for consideration of formal operative repair. In some cases, closed injuries of the tibialis anterior tendon may be managed nonoperatively, depending on the extent of the patient’s symptoms and functional impairment.30
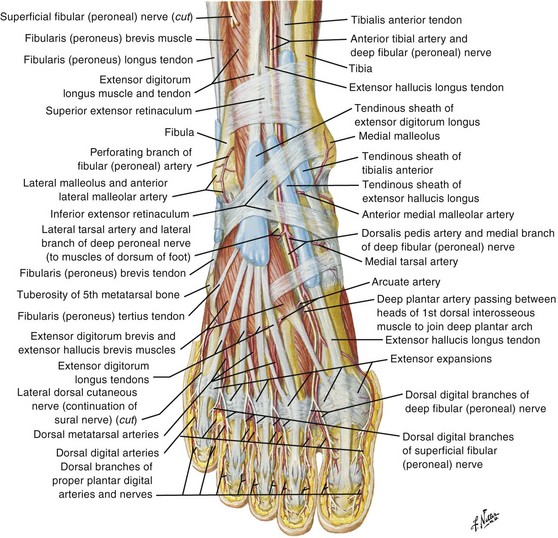
The EDL and EHL tendons both originate from the shaft of the fibula and interosseous membrane. The EHL tendon inserts into the base of the distal phalanx of the great toe, and the EDL tendon divides into four branches that insert on toes 2 through 5 (Fig. 48-26). Both the EHL and the EDL tendons primarily result in extension of the toes and dorsiflexion at the ankle. The extensor digitorum brevis (EDB) and extensor hallucis brevis (EHB) muscles originate from the upper part of the calcaneus. The EHB tendon joins the lateral aspect of the EHL tendon before inserting on the great toe. The EDB muscle gives rise to three tendons that join the lateral side of the EDL tendons going to toes 2 through 4 (see Fig. 48-26).
Injury to the EHL and EDL tendons may result from a sharp object lacerating the dorsum of the foot. Patients may have weakness of or an inability to extend the involved toe. The examiner may be unable to palpate the injured tendon. Whether one should repair EHL or EDL tendon lacerations is controversial. However, many authors favor repair because failure to repair EDL tendons may result in a claw deformity of the adjacent toes.31 Lacerations of the EHL and EDL tendons at the level of the ankle are usually repaired, whereas lacerations on the dorsum of the foot and the toe are managed variably. If the patient has significant pain or any flexion deformity of the involved toe, one should probably repair the lacerated tendon. Repair is also favored when both ends of the tendon are easily visualized in the wound and the patient is willing to undergo prolonged immobilization after repair.32 Because management of these injuries is controversial, it is advisable to discuss the care of these patients with the consulting orthopedic surgeon. Extensor tendon repair of the foot is not usually performed in the ED setting. Superficial cutaneous nerves are easily injured on the dorsum of the foot during wound exploration, which can lead to the formation of a chronic, painful neuroma. If the injury is repaired in the ED, the technique for repair is similar to that used for the dorsum of the hand (zone 6). A posterior splint that includes the toes should be applied after tendon repair. Splint the ankle in 90 degrees with the toes in the neutral position.
Flexor Tendon Injuries
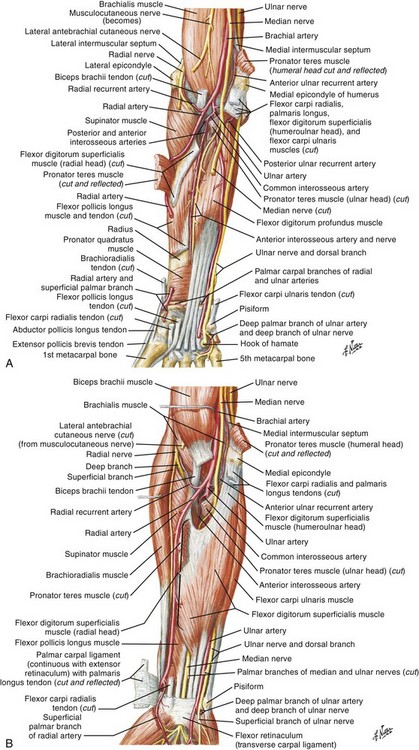
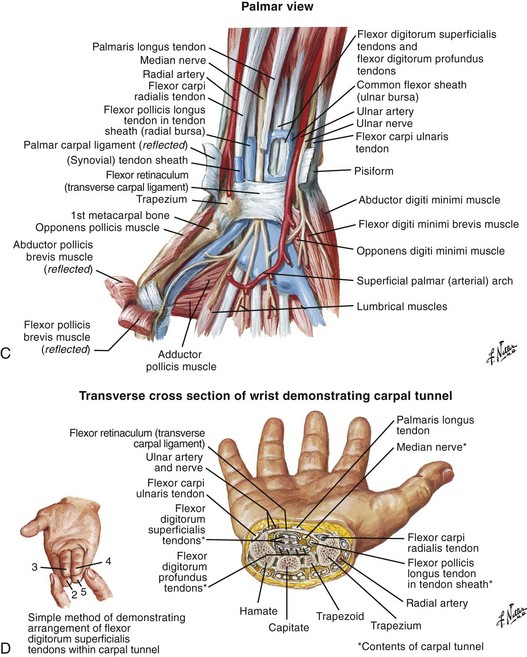
Flexor tendon injuries are more difficult to diagnose and more challenging to treat than extensor tendon injuries. In general, repair of flexor tendons is not performed by emergency clinicians. Anatomic and biomechanic issues, the physiology of flexor tendons and tendon healing, and follow-up rehabilitation and physical therapy are complex and formidable. A satisfactory outcome is more difficult to achieve with an injured flexor tendon than with a similar degree of injury to an extensor tendon. Unlike extensor tendons, flexor tendons are influenced by a number of pulley mechanisms. The tendon must glide through delicate tendon sheaths, so even a minor defect in tendon integrity is physiologically magnified (Fig. 48-27). In addition, flexor tendon injuries are often associated with nerve and vascular injuries.
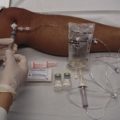
The main clinical mandates for emergency clinicians are to diagnose or consider flexor tendon injuries, provide initial proper wound care, and expedite appropriate consultation and follow-up. Unlike the more superficial extensor tendons, flexor tendons are often buried deep within the hand and forearm, and it is frequently not readily possible to visualize the tendon in the recesses of a wound. Puncture wounds of the palm often injure flexor tendons, but deep puncture wounds prohibit visualization of the injured structures (Fig. 48-28). Therefore, a partial flexor tendon injury may be clinically silent until rupture occurs days or weeks later. Delayed repair of undiagnosed flexor tendons may be complicated by tendon retraction or scar formation, and tendon transfer and grafting may be necessary.
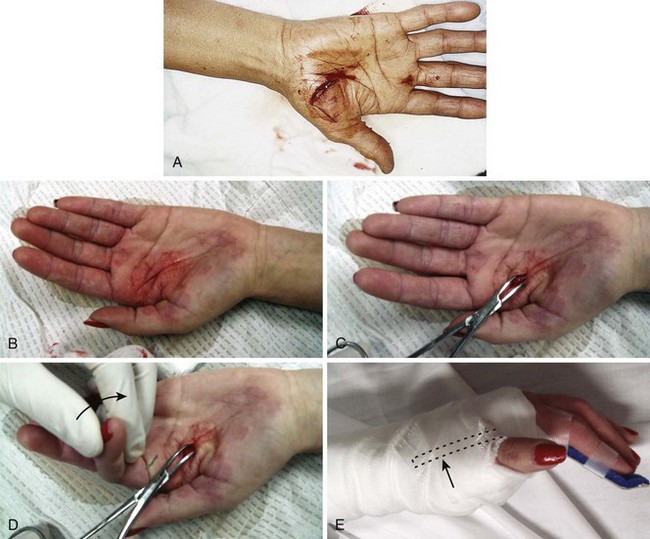
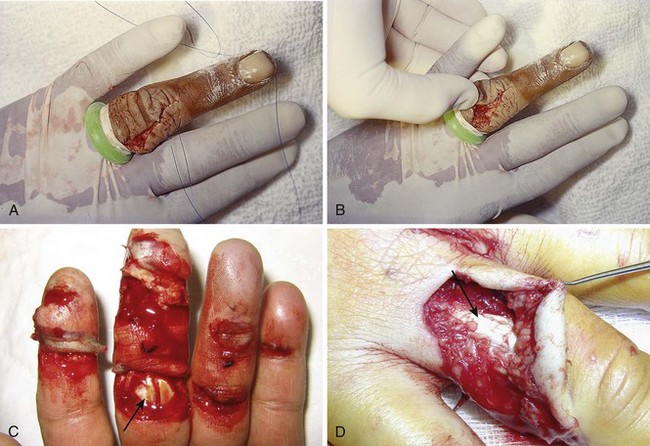
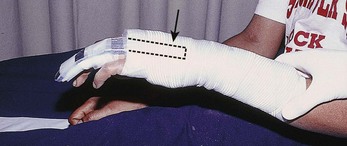
Figure 48-28 Deep puncture wounds of the palm may injure the flexor tendons. A, The depth of this wound precludes extensive exploration to visualize the tendon. Partial tendon lacerations may still initially allow full function. Clues to a partial flexor tendon laceration include weakness of flexion or pain with attempts at flexion against resistance, but many partial lacerations are clinically silent. Despite full function, this wound’s location and depth suggest the possibility of at least a partial tendon injury. The prudent course would include meticulous wound care, splinting, skin closure, and contact with a hand specialist to arrange reexamination in a few days while cautioning the patient that a flexor tendon injury may be present and delayed repair for up to 1 to 3 weeks yields results comparable to immediate repair. Immediate repair is often eschewed because of swelling and wound contamination. Further care may be required. B, This palm laceration from the sharp top of a metal can seemed superficial. Function was normal. C, When examined with the fingers in extension, the tendon was readily visualized, a surprise to the clinician given the benign and superficial appearance of the laceration. The visualized tendon was intact. D, When the fingers were flexed (arrow), the position of the hand when the injury occurred, a 20% to 30% laceration of the tendon was demonstrated. E, This injury will do well with 3 weeks of splinting and no tendon repair. Follow-up with a hand surgeon in a few days is prudent. Note the outrigger aluminum splint incorporated into a short-arm plaster splint (arrow; see Fig. 48-11).
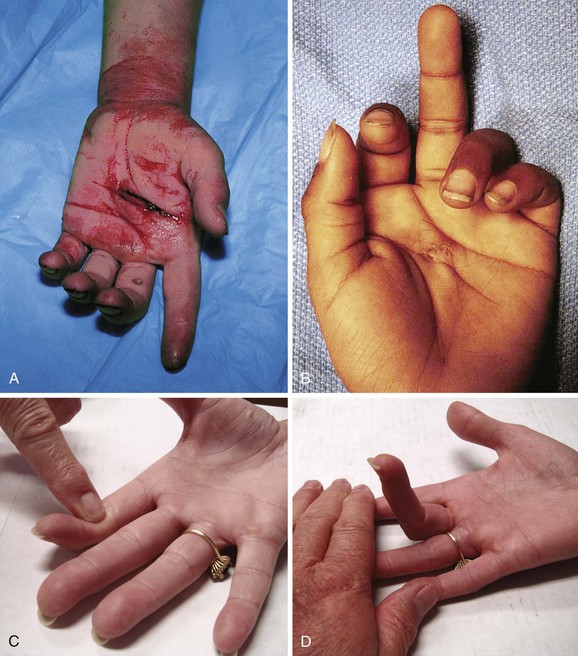
Notwithstanding the previous discussion, complete flexor tendon injuries are often apparent on physical examination, either by testing individual tendons or by the resting posture of the injured hand. In contrast, partial tendon lacerations are commonly clinically unappreciated because no functional deficit is evident. Clinical clues to a potential flexor tendon injury are weakness of flexor tendon function (difficult to evaluate in an acutely injured extremity), pain at the site of injury when performing active range of motion against resistance, and an abnormal resting posture of the hand (Fig. 48-29A and B), which can be determined by careful examination but is always difficult in a child or uncooperative patient (see Fig. 48-29C and D). However, the emergency clinician may not be able to arrive at a complete or accurate diagnosis without surgical exploration. Moreover, it is counterproductive and potentially harmful to attempt extensive exploration of the deep recesses of the hand or forearm in the ED merely to visualize a suspected flexor tendon injury.
Completely transected flexor tendons are surgically repaired by a consultant, usually on an elective basis. Most hand surgeons are reluctant to perform primary repair of a flexor tendon injury on ED patients and prefer to have the wound cleaned, the skin closed, and the patient scheduled for subsequent definitive repair. The final outcome of flexor tendon surgery depends on multiple factors; however, surgical repair of most flexor tendons accomplished within 10 to 21 days of injury (delayed primary repair) generally produces final outcomes similar to those with immediate repair.33–35 Therefore, if a partial tendon laceration is not diagnosed at the initial visit and rupture is noted at the time of removal of the skin sutures or inspection of the wound, immediate referral to a hand surgeon would be expected to provide a similar result as that expected had the injury been diagnosed at the time of the initial ED visit.
Partial flexor tendon lacerations, if appreciated, are usually treated by careful wound cleaning, skin closure, splinting, and referral for reevaluation in 1 to 5 days. Definitive treatment of partial lacerations remains quite controversial. Some surgeons will repair all partial tendon lacerations, whereas others take a more conservative approach. The conservative approach is supported by experimental evidence suggesting that surgical repair of partially lacerated tendons results in weaker tendons than if the tendons were not surgically repaired.36 Wray and colleagues suggest forgoing suturing in favor of splinting, followed by early mobilization of tendons with lacerations involving 25% to 95% of the cross-sectional area.37 Without conclusive evidence either way, a reasonable approach would be to suture tendon lacerations involving greater than 50% of the cross-sectional area with special surgical techniques, suture tendon lacerations involving 25% to 50% of the cross-sectional area with simple or special suture techniques, and simply trim injuries that affect less than 25% of the cross-sectional area to promote normal gliding function.35 All decisions concerning the type and timing of repair should be made in concert with a consultant while keeping in mind that some decisions regarding surgical repair of partial injuries cannot be made for weeks or months.
Following evaluation of a known or suspected flexor tendon injury, suture the skin and splint the hand to protect the tendon and minimize retraction. Techniques vary, and the initial splinting positions are probably inconsequential to the final outcome if the duration of splinting does not exceed 7 to 14 days. As a guideline, splinting with the wrist in 30 degrees of flexion, the MCP joints in 70 degrees of flexion, and the IP joints in 10% to 15% of flexion has been recommended.38 There are no data to support or refute the value of prophylactic antibiotics for any soft tissue injury that has been properly cleaned. Although no definitive standard of care has been promulgated, many clinicians prescribe 3 to 5 days of antibiotics effective against gram-positive organisms (including Staphylococcus aureus) if the tendon is injured. Antibiotics are recommended if the degree of contamination is significant, cleaning has been delayed, there are unusual sources of injury, or the patient is immunocompromised. Specific written instructions with a definite follow-up time frame outlined and assistance in patient referral will probably improve the final outcome, but flexor tendon injuries often produce lifelong disability despite even ideal care in the ED.
Achilles Tendon Rupture
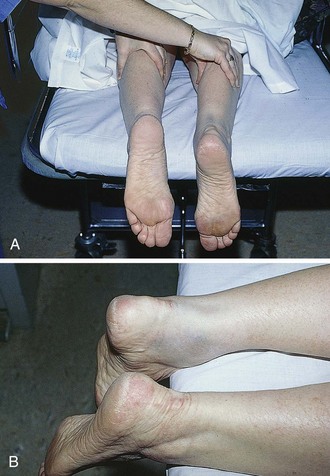
An Achilles tendon rupture can lead to serious morbidity. Although definitive care of such injuries is not performed in the ED, it is important to make the correct diagnosis and institute proper and prompt referral. This injury is easy to miss, and it is not always diagnosed on the first visit. In a recent case series the diagnosis was missed in more than 20% of cases.39 It is usually initially considered a minor ankle sprain by both the patient and clinician. Rupture often occurs with steroid use, with degenerative conditions, and in the elderly, but Achilles tendon rupture can also occur in healthy athletic patients with no history of heel pain and often with seemingly minor trauma. Fluoroquinolone antibiotics have been implicated in Achilles tendon rupture, especially in the elderly. This led the Food and Drug Administration to issue a “black box” warning on the use of all fluoroquinolones for this condition in 2008. Mechanisms for rupture include sudden overload of the tendon by forceful plantar flexion of the foot, as in recreational sports involving jumping (basketball), pushing a heavy object, or stepping up. The injury is usually a complete as opposed to a partial tear, and rupture occurs in a region 2 to 6 cm proximal to the tendon’s insertion on the calcaneus. Occasionally, a snap or pop may be appreciated by the patient. Pain may not be perceived in the tendon itself; instead, heel or diffuse ankle pain may be experienced. Because multiple structures plantar-flex the foot, the initial result is weakness of the ankle, and importantly, complete loss of motion of the foot does not occur. Characteristic ecchymosis may be evident in 48 to 72 hours after injury.
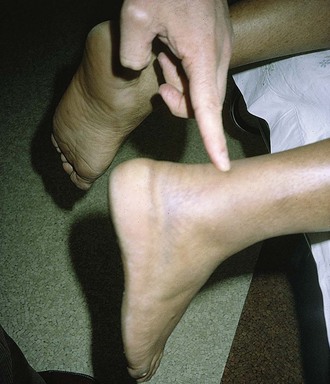
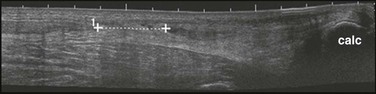
The diagnosis may be suggested by a palpable defect in the tendon, but this can be subtle or absent (Fig. 48-30). The calf squeeze test (Thompson’s test) is a physical finding that is 96% to 100% sensitive. To perform this test, have the lie patient prone on a stretcher with the feet overhanging the edge. Squeeze the calf and observe for strong passive plantar flexion of the foot. If the foot does not move, a complete tear is diagnosed (Fig. 48-31). When the diagnosis is not clinically certain or when the possibility of other injuries exists, emergency imaging should be performed. With isolated Achilles tendon rupture, standard radiographs will be normal. Magnetic resonance imaging (MRI) is diagnostic but not usually indicated in the ED. Some practitioners have recently advocated using ultrasound to diagnose both complete and partial tendon ruptures.40 Sonography is an appealing diagnostic tool given its relatively low cost, portability, safety profile, and the ability to perform static and dynamic evaluations and compare the contralateral side. A sonographic Thompson test can also be performed by directly visualizing the tendon with a high-frequency, linear ultrasound probe while the calf muscle of the prone patient is gently squeezed. The Achilles tendon is assessed, proximally to distally, for synchronous movement. Complete tears are recognized by retraction of the proximal tendon end; echogenic adipose tissue (Kager’s fat) may be seen to herniate between the torn ends of the tendon (Fig. 48-32). No studies have evaluated the diagnostic accuracy of ultrasound performed by emergency physicians for Achilles tendon rupture.39 Treatment varies from conservative splinting to surgery and is controversial. Splinting the foot in mild plantar flexion (gravity equinus) can protect the tendon for follow-up in 1 to 5 days.
Knee Extensor Tendon Rupture41
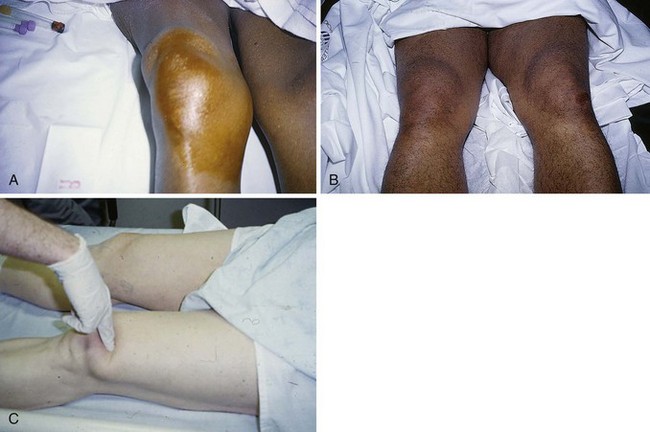
With either type of rupture, a large hemarthrosis is usually produced and often prompts the incorrect diagnosis of a ligamentous injury (such as an anterior cruciate ligament rupture). A palpable defect superior or inferior to the patella may be appreciated, but diffuse swelling can hide this finding (Fig. 48-33). Lack of the expected defect can be misleading in the presence of a large hemarthrosis. In cases in which the history consists of only minor trauma and the findings on physical examination are subtle, malingering or noncooperation with the examination may be incorrectly contemplated by the clinician. With complete rupture, a supine patient is unable to actively extend the knee or lift a straightened leg off the stretcher, and the knee flexes when posterior thigh support is removed from the raised leg. Weak extension, especially in the sitting position, may be possible if portions of the medial and lateral retinacula are intact, even with a complete rupture of the central rectus femoris. With complete rupture the patient cannot walk, and the knee gives way immediately. As one would intuit, however, a knee immobilizer allows the patient to apparently walk normally. Partial tears may allow the patient to walk with a peculiar forward-leaning gait that helps support the knee in extension.
Plain radiographs have normal findings except for the occasional patellar avulsion fracture. With quadriceps tendon ruptures, a low-riding patella (patella baja) may be present as the patella falls inferiorly. Conversely, a high-riding patella (patella alta) is often seen with patella tendon ruptures as the quadriceps tendon and patella retract superiorly. MRI is definitive in identifying nuances of the process. As with Achilles tendon rupture, sonography is an emerging diagnostic imaging tool used by some ED providers to assess for ruptures of the quadriceps and patella tendons.40 Partial tears of either tendon may be treated conservatively; complete tears require surgical repair, usually as soon as the diagnosis is made. Although definitive treatment is not undertaken in the ED, early diagnosis may improve the long-term outcome. A 2- to 3-week delay in diagnosis makes recovery less complete and repair more problematic. The postoperative period of recovery for the elderly is prolonged and difficult. Acute injuries diagnosed in the ED may be treated with a knee immobilizer and crutches with 1- to 2-day follow-up, but admission is often warranted to expedite definitive intervention.36
References
1. Rockwell, WB, Butler, PN, Byrne, BA. Extensor tendon: anatomy, injury, and reconstruction. Plast Reconstr Surg. 2000;106:1592.
2. Manthey, DE, Storrow, AB, Milbourn, JM, et al. Ultrasound versus radiography in the detection of soft-tissue foreign bodies. Ann Emerg Med. 1996;28:7.
3. Blaivas, M, Lyon, M, Brannam, L, et al. Water bath evaluation technique for emergency ultrasound of painful superficial structures. Am J Emerg Med. 2004;22:589.
4. Thompson, JS, Peimer, CA. Extensor tendon injuries: acute repair and late reconstruction. In: Chapman MW, ed. Chapman’s Orthopaedic Surgery. 3rd ed. Philadelphia: Lippincott, Williams & Wilkins; 2001:1485.
5. Lalonde, DH, Kozin, S. Tendon disorders of the hand. Plast Reconstr Surg. 2011;128:1e.
6. Chowdhry, S, Seidenstricker, L, Cooney, DS, et al. Do not use epinephrine in digital blocks: myth or truth? Part II. A retrospective review of 1111 cases. Plast Reconstr Surg. 2010;126:2031.
7. Manske, PR. Principles of tendon repair. In: Chapman MW, ed. Chapman’s Orthopaedic Surgery. 3rd ed. Philadelphia: Lippincott, Williams & Wilkins; 2001:1461.
8. Verdan, CE. Primary and secondary repair of flexor and extensor tendon injuries. In Flynn JE, ed.: Hand Surgery, 2nd ed, Baltimore: Williams & Wilkins, 1975.
9. Hart, RG, Uehara, DT, Kutz, JE. Extensor tendon injuries of the hand. Emerg Med Clin North Am. 1993;11:637.
10. Newport, ML, Williams, CD. Biomechanical characteristics of extensor tendon suture techniques. J Hand Surg [Am]. 1992;17:1117.
11. Howard, RF, Ondrovic, L, Greenwald, DP. Biomechanical analysis of four-strand extensor tendon repair techniques. J Hand Surg [Am]. 1997;22:838.
12. Newport, ML, Tucker, RL. New perspectives on extensor tendon repair and implications for rehabilitation. J Hand Ther. 2005;18:175.
13. Smith, M, Martin, B. Towards evidence-based emergency medicine: best BETs from the Manchester Royal Infirmary. Repair of partial lacerations of the extensor tendons of the hand. J Accid Emerg Med. 2000;17:285.
14. McGeorge, DD, Stilwell, JH. Partial flexor tendon injuries: to repair or not. J Hand Surg [Br]. 1992;17:176.
15. McCarthy, DM, Boardman, ND, 3rd., Tranaglini, DM, et al. Clinical management of partially lacerated digital flexor tendons: a survey of hand surgeons. J Hand Surg [Am]. 1995;20:273.
16. Strauch, RJ. Extensor tendon injuries. In: Wolfe SW, ed. Green’s Operative Hand Surgery. 6th ed. New York: Churchill Livingstone; 2011:159.
17. Hame, SL, Melone, CP, Jr. Boxer’s knuckle: traumatic disruption of the extensor hood. Hand Clin. 2000;16:375.
18. Scott, SC. Closed injuries to the extension mechanism of the digits. Hand Clin. 2000;16:367.
19. Zubowicz, VN, Gravier, M. Management of early human bites of the hand: a prospective randomized study. Plast Reconstr Surg. 1991;88:111.
20. Broder, J, Jerrard, D, Olshaker, J, et al. Low risk of infection in selected human bites treated without antibiotics. Am J Emerg Med. 2004;22:10.
21. Catalano, LW, 3rd., Gupta, S, Ragland, R, 3rd., et al. Closed treatment of nonrheumatoid extensor tendon dislocations at the metacarpophalangeal joint. J Hand Surg [Am]. 2006;31:242.
22. Elson, RA. Rupture of the central slip of the extensor hood of the finger. J Bone Joint Surg Br. 1986;68:229.
23. Imatami, J, Hashizume, H, Wake, H, et al. The central slip attachment fracture. J Hand Surg [Br]. 1997;22:107.
24. Handoll, HH, Vaghela, MV. Interventions for treating mallet finger injuries. Cochrane Database Syst Rev. (3):2004. [CD004574].
25. Carl, HD, Forst, R, Schaller, P. Results of primary extensor tendon repair in relation to the zone of injury and pre-operative outcome estimation. Arch Orthop Trauma Surg. 2007;127:115.
26. Evans, RB. Immediate active short arc motion following extensor tendon repair. Hand Clin. 1995;11:483.
27. Ip, WY, Chow, SP. Results of dynamic splintage following extensor tendon repair. J Hand Surg [Br]. 1997;22:283.
28. Mowlavi, A, Burns, M, Brown, RE. Dynamic versus static splinting of simple zone V and zone VI extensor tendon repairs: a prospective, randomized, controlled study. Plast Reconstr Surg. 2005;115:482.
29. Khandwala, AR, Webb, J, Harris, SB, et al. A comparison of dynamic extension splinting and controlled active mobilization of complete divisions of extensor tendons in zones 5 and 6. J Hand Surg [Br]. 2000;25:140.
30. Murphy, GA. Disorders of tendons and fascia. In: Canale ST, ed. Campbell’s Operative Orthopaedics. 10th ed. St. Louis: Mosby; 2003:4204.
31. Floyd, DW, Heckman, JD, Rockwood, CA. Tendon lacerations in the foot. Foot Ankle. 1983;4:8.
32. Scaduot, AA, Cracchiolo, A. Lacerations and ruptures of the flexor or extensor hallucis longus tendons. Foot Ankle Clin. 2000;5:725.
33. Hart, RG, Kutz, JE. Flexor tendon injuries of the hand. Emerg Med Clin North Am. 1993;11:621.
34. Schneider, LH, Hunter, JM, Norris, TR, et al. Delayed flexor tendon repair in no man’s land. J Hand Surg [Am]. 1977;2:452.
35. Steinberg, DR. Acute flexor tendon injuries. Orthop Clin North Am. 1992;23:125.
36. Zobitz, ME, Zhao, C, Amadio, PC, et al. Comparison of mechanical properties of various suture repair techniques in a partially lacerated tendon. J Biomech Eng. 2000;122:604.
37. Wray, RC, Holtman, B, Weeks, PM. Clinical treatment of partial tendon lacerations without suturing and early motion. Plast Reconstr Surg. 1977;59:231.
38. Herndon, JH. Tendon injuries—flexor surface. Emerg Med Clin North Am. 1985;3:341.
39. Fessell, DP, Jacobson, JA. Ultrasound of the hindfoot and midfoot. Radiol Clin North Am. 2008;46:1027.
40. Legome, E, Pancu, D. Future applications for emergency ultrasound. Emerg Med Clin North Am. 2004;22:817.
41. Hak, DJ, Sanchez, A, Trobisch, P. Quadriceps tendon injuries. Orthopedics. 2010;33:40.