[level-membership-for-pulmolory-and-respiratory-category]
Emergency Cardiovascular Life Support
After reading this chapter you will be able to:
 List the causes of sudden cardiac arrest (SCA).
 List the signs of SCA, heart attack, stroke, and foreign body airway obstruction.
 Describe how to perform cardiopulmonary resuscitation (CPR) on adults, children, and infants.

 State how to administer synchronized cardioversion.
 Describe how to evaluate quality and effectiveness of CPR.
 List the complications that can occur as a result of resuscitation of SCA.
 State when not to initiate CPR.
 Describe how to apply key adjunct equipment during advanced cardiovascular life support (ACLS).
 State common drugs and drug routes used during ACLS.
 Describe how to monitor patients before cardiac arrest, during CPR, and after cardiac arrest.
Causes And Prevention Of Sudden Death
Sudden cardiac arrest (SCA) is a leading cause of death in many parts of the world.1 In the United States and Canada, approximately 350,000 people per year experience SCA and receive an attempted resuscitation.2 The incidence of out-of-hospital SCA is 50 to 55 per 100,000 persons per year.2 The incidence of in-hospital cardiac arrest is 3 to 6 per 1000 admissions. Pulseless ventricular rhythms are the first manifestation of cardiac arrest in 25% of cases.2,3 Successful resuscitation depends on immediate CPR and delivery of a shock before pulseless ventricular rhythms deteriorate into asystole. In cases of SCA related to asphyxia secondary to trauma, drug overdose, or upper airway obstruction, CPR with chest compressions and ventilation before the shock is critical.
Basic Life Support
1. Check for lack of movement or response and no normal breathing or only gasping.
2. If no response and no breathing or only gasping, check pulse within 10 seconds (health care providers only).
3. Activate emergency response system (get automated external defibrillator [AED] if close to your location).
4. If no AED is available, start chest compressions and rescue breathing for adult cardiac arrest (use cycles of 30 compressions to two ventilations).
5. Open airway and check breathing.
6. If not breathing, give two breaths that produce chest rise and immediately resume chest compressions (push hard and deep).
Steps 4 through 7 are referred to as the CABDs of resuscitation—circulation, airway, breathing, and defibrillation. Table 34-1 summarizes the CABDs of CPR for adults, children (1 year old to puberty), and infants (<1 year old).
TABLE 34-1
Steps for Cardiopulmonary Resuscitation (CPR) in Adults, Children, and Infants
| Procedure | Adult | Child | Infant |
| Compressions | |||
| Where to check pulse (limit pulse check to <10 sec) | Carotid artery | Carotid or femoral artery | Brachial artery |
| Hand placement | Heel of one hand on sternum in center of chest, between nipples. Second hand on top of first with hands overlapped and parallel | Lower half of sternum with heel of one hand or with two hands (for larger children). Do not compress over xiphoid | Sternum with two fingers placed just below nipple line in center of chest |
| Compression-to-ventilation ratio | One or two rescuers 30 : 2 | One rescuer 30 : 2; two rescuers 15 : 2 | One rescuer 30 : 2; two rescuers 15 : 2 |
| Cycles of compression-to-ventilation | 5 | 5 | 5 |
| Depth of compressions (push in hard and fast, allow chest to recoil fully) | 2 in | At least one-third anteroposterior diameter of chest or 2 in (5 cm) | At least one-third anteroposterior diameter of chest or  in (4 cm) in (4 cm) |
| Compression rate | 100/min | 100/min | 100/min |
| Breathing | |||
| Obstructive procedure | Responsive: If mild, allow victim to clear the airway by coughing. If severe, repeat abdominal thrusts until foreign body is expelled, or the choking victim becomes unresponsive. Consider chest thrusts if abdominal thrusts are ineffective, if rescuer is unable to encircle victim’s abdomen, or if victim is in the late stages of pregnancy | Same as for adult | Responsive: If mild, allow infant to clear the airway by coughing. If infant is unable to make a sound (severe obstruction), deliver five back blows (slaps) followed by chest thrusts repeatedly until object is expelled or infant becomes unresponsive. Abdominal thrusts should not be done on infants because they may damage the largely unprotected liver |
| Unresponsive: Carefully move victim to the ground, immediately activate EMS system, and begin CPR, but look into the mouth before giving breaths. If a foreign body is seen, it should be removed. Follow ventilation with chest compressions | Unresponsive: Activate EMS system and begin CPR, but look into the mouth before giving breaths. If a foreign body is seen, it should be removed. Follow ventilation with chest compressions | ||
| Rescue Breathing | |||
| Palpable pulse, but no spontaneous breaths or inadequate breathing | 10-12/min, 1 breath every 5-6 sec | 12-20/min, 1 breath every 3-5 sec, if palpable pulse ≥60/min | 20/min, 1 breath every 3 sec, if palpable pulse ≥60/min |
Restoring Circulation
Determining Pulselessness
 Rule Of Thumb
Assessment of the pulse of an unresponsive patient by health care providers should be limited to 5 to 10 seconds to avoid delaying chest compressions. Pulse checks are difficult to accomplish with any fidelity. Pulse and rhythm checks should not be done after a shock until five cycles of CPR have been completed. Pulse checks should not be done by lay rescuers.4
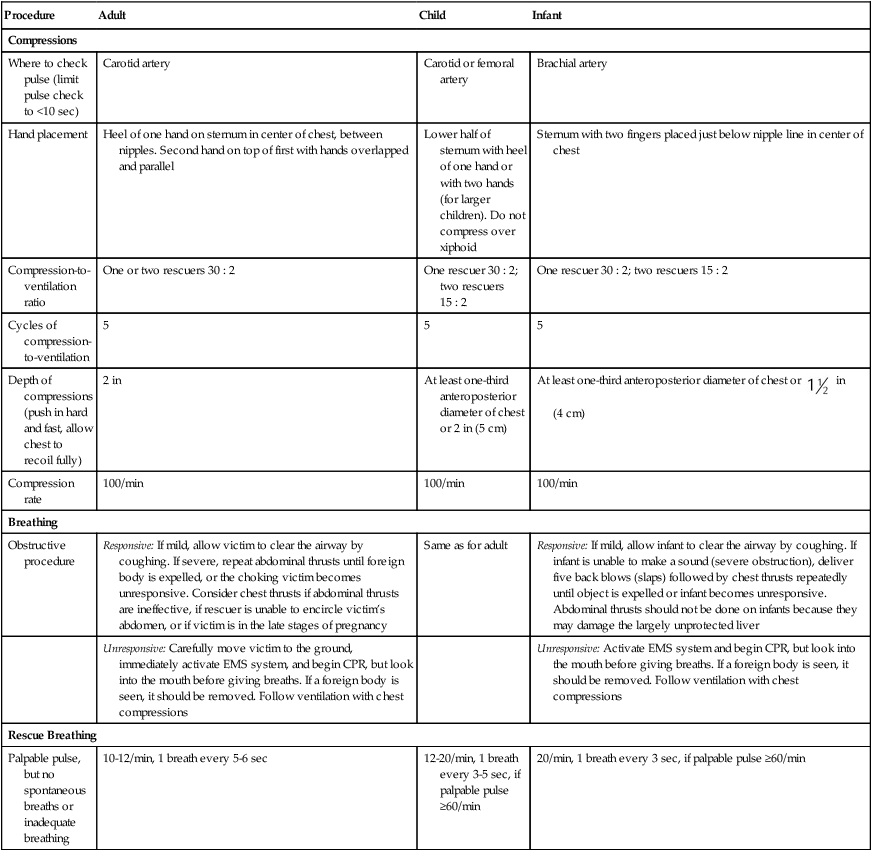
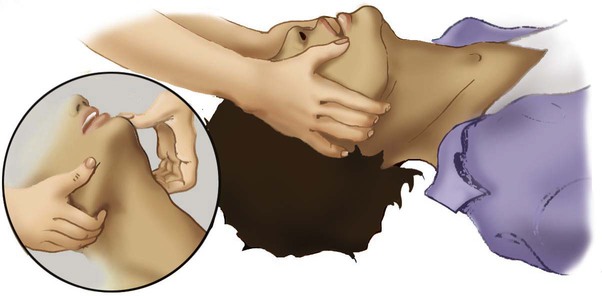
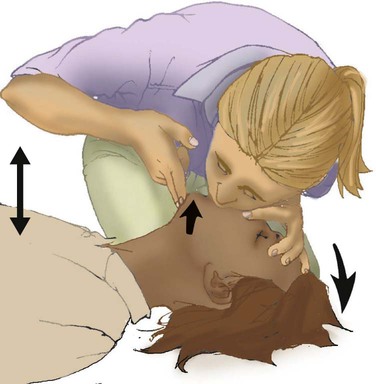
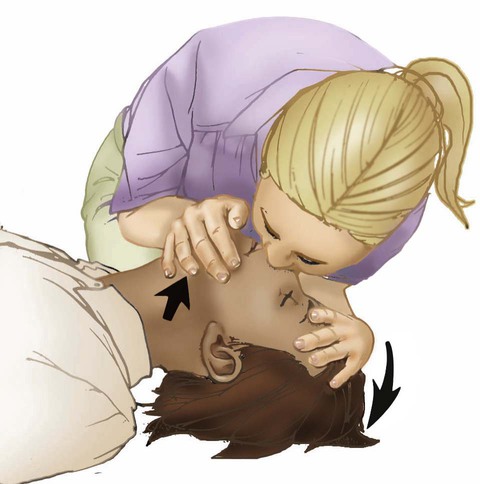
Pulselessness is evaluated by palpating a major artery. In adults and children older than 1 year, the carotid artery in the neck or femoral artery should be palpated. To locate the carotid artery, the rescuer should maintain the head-tilt with one hand while sliding the fingers of the other hand into the groove created by the trachea and the large neck muscles (Figure 34-1). The carotid artery area must be palpated gently to avoid compressing the artery or pushing on the carotid sinus. Because the pulse may be slow, weak, or irregular, the artery may need to be assessed for approximately 10 seconds for the presence or absence of a pulse to be confirmed.
If the patient has a pulse but is not breathing, ventilation must be started immediately, at the appropriate rate of 8 to 10 breaths/min (every 6 to 8 seconds). If no pulse is palpable, external chest compressions must be interposed with ventilatory support (see Table 34-1).
Providing Chest Compressions
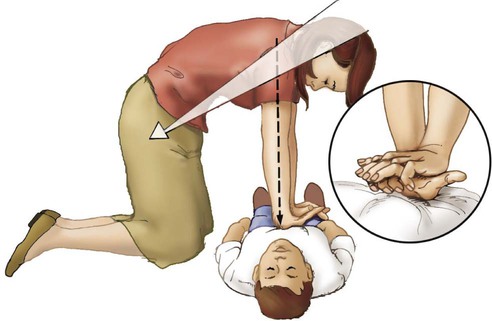
Adequate circulation can be restored in a pulseless victim using external chest compressions. The rescuer manually compresses the lower half of the sternum (for an adult patient) at a rate of 100 compressions/min. The duty cycle for downstroke and upstroke (release) is 600 msec with a 1 : 1 downstroke-to-upstroke ratio. It is very important to have a complete upstroke so as not to increase intrathoracic pressure during the diastolic phase. The best way to ensure that the upstroke is complete is for the rescuer to take his or her hand slightly off the chest between compressions.5 Cardiac output produced by external chest compressions is approximately one-fourth of normal cardiac output, with arterial systolic blood pressures between 60 mm Hg and 80 mm Hg. Blood flow during chest compression probably results from changes in the intrathoracic pressure.
Adults
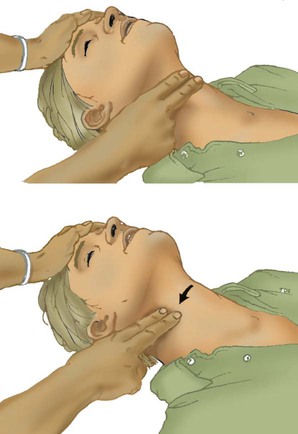
The procedure for providing chest compressions to adults is as follows (Figures 34-2 and 34-3):
1. Place the victim in a supine position on a firm surface, such as the ground or the floor, because chest compressions are more effective when the victim is on a firm surface. When victims are in bed or on a stretcher, place a board or tray under them. A cardiac arrest board is ideal, but a removable bed piece or food tray may have to be used.
2. Expose the patient’s chest to identify landmarks for correct hand position. If the victim is fully clothed, quickly remove or cut off any clothing or underwear.
3. Choose a position close to the patient’s upper chest so that the weight of your upper body can be used for compression. If the patient is on a bed or stretcher, stand next to it with the patient close to that side. If the bed is high or you are short, you may need to lower the bed, stand on a stool or chair, or kneel on the bed next to the victim. If the patient is on the ground, kneel at his or her side.
4. Identify the lower half of the victim’s sternum, in the center of the chest between the nipples, and place the heel of your hand on the sternum with your other hand on top, and lock your elbows.6
5. Perform compression with the weight of your body exerting force on your outstretched arms, elbows held straight. Your shoulders should be positioned above the patient so that the thrust of each compression goes straight down onto the sternum, using your upper body weight and the hip joints as a fulcrum (see Figure 34-2). It is acceptable to let your hands leave the victim’s chest ever so slightly to ensure a complete upstroke (see Figure 34-3).
6. Compress the sternum 2 in (5 cm) at a rate of 100 compressions/min. The compression phase of the cycle should be equal in duration to the upstroke phase.
7. If CPR must be interrupted for transportation or advanced life support measures, resume chest compressions as quickly as possible. Compressions should not cease for more than 5 seconds (30 seconds if the victim is being intubated).
Children
1. Place the victim in the supine position on a firm surface. Small children may require additional support under the upper body; this is particularly true when chest compressions are given with mouth-to-mouth ventilation because extension of the neck raises the shoulders. The head should be no higher than the body.
2. As with an adult, identify the lower half of the sternum. Because the liver and spleen of younger children lie higher in the abdominal cavity, take special care to ensure proper positioning as described previously. However, use only one hand to compress. Use the other hand to maintain head position and maintain an airway.
3. Compress the chest approximately 2 in (5 cm) at a rate of 100 compressions/min. Generally, the heel of one hand is sufficient to achieve compression. As with adults, compression and relaxation times should be equal in length and delivered smoothly.
Infants
The procedure for infants (≤1 year of age) is as follows (Figure 34-4):

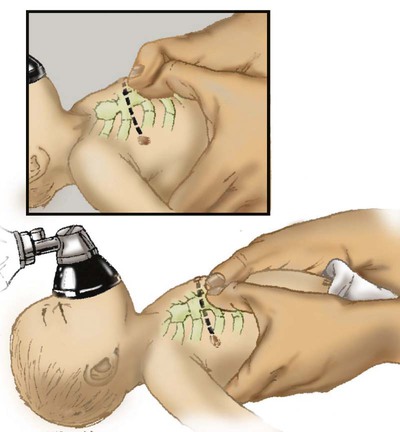
1. Use the lower half of the sternum for compression in an infant. Proper placement is determined by imagining a line across the chest connecting the nipples. Place your index finger along this line on the sternum. Then place your middle and ring fingers next to the index finger. Raise your index finger and perform compressions with the middle and ring fingers. Use the other hand to maintain the infant’s head position and airway.
2. Compress the sternum approximately 1.5 in (4 cm) at a rate of at least 100 compressions/min. Compression and upstroke phases should be equal in length and delivered smoothly. Your fingers should remain on the chest at all times.
Neonates
Chest compressions are indicated if the neonate’s heart rate decreases to less than 60 beats/min despite adequate ventilation with 100% oxygen (O2) for 30 seconds. Before starting chest compressions, the rescuer should ensure that the neonate is being ventilated optimally.7 Neonatal chest compressions are delivered on the lower third of the sternum to a depth of approximately one-third of the anteroposterior diameter of the chest to achieve an approximate rate of 100 compressions/min.7–10 Two methods have been described. The first method uses a “wraparound” technique (Figure 34-5). To use this method, the rescuer encircles the neonate’s chest with both hands and compresses the sternum with two thumbs, using the other fingers of both hands to support the neonate’s back. The rescuer should position the thumbs just below the victim’s intermammary line, taking care not to compress the xiphoid process. Compression should be performed smoothly, with downstroke and upstroke times approximately equal. Delivering a slightly shorter compression than relaxation phase may allow for more blood flow in a very young infant.11 In all infants, the chest should be allowed to expand fully after a compression. After every third compression, the neonate should receive a breath of 100% O2, coordinated with compressions to avoid simultaneous delivery. The second method, the two-finger technique (see Figure 34-4), may have advantages when access to the umbilicus is required.
Restoring the Airway
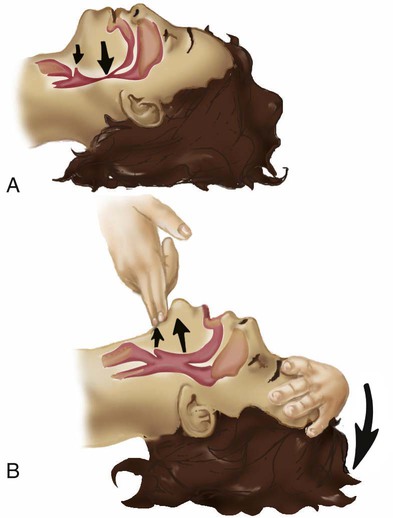
The most common cause of airway obstruction is loss of muscle tone, which causes the tongue to fall back into the pharynx, blocking airflow. Movement of the lower jaw and extension of the neck pulls the tongue from the posterior pharyngeal wall and opens the airway. One of two procedures can be used: (1) The head-tilt/chin-lift method is the primary procedure recommended for a layperson when spinal trauma is not suspected (Figures 34-6 and 34-7). (2) The jaw thrust is used mainly by trained clinicians when spinal neck injuries are suspected and is no longer recommended by the AHA for lay rescuers (see Figure 34-7). Health care providers should use a head-tilt/chin-lift procedure if the jaw thrust maneuver does not open the airway.4 One of these maneuvers usually can open the airway and may be the only lifesaving measure required. Research supports using manual in-line spinal immobilization rather than motion restriction devices that may complicate airway management during CPR.8 Cervical collars can cause increased intracranial pressure in a patient with a head injury.9 After the airway is cleared and opened, the rescuer must immediately assess the victim’s ventilation.
Restoring Ventilation
Before attempting to provide artificial ventilation, the rescuer should assess for the presence of breathing. To determine breathlessness, the rescuer places his or her ear over the victim’s mouth and nose while simultaneously observing for spontaneous chest movement (Figure 34-8). Breathlessness exists if no chest movement or breath sounds are present or only gasping is present. This evaluation should take no longer than 3 to 5 seconds to complete.
Providing Artificial Ventilation
Mouth-to-Mouth Ventilation
Adults
The procedure for adults is as follows (Figure 34-9):
1. Place the victim on his or her back on a hard, flat surface.
2. Kneel at the patient’s side, and open and clear the airway as previously described. Pinch the victim’s nose with your thumb and index finger close to the nares to prevent air from escaping during ventilation.
3. Take a slightly deeper than normal breath and deliver 500 ml over 1 second, while making a seal over the victim’s mouth. A good seal over the patient’s mouth is essential. If a good seal cannot be obtained using this method, attempt mouth-to-nose ventilation.
4. Remove your mouth from the patient’s mouth, and allow the victim to exhale passively. Provide a second breath after exhalation is complete.
5. After successfully delivering two breaths, immediately assess the circulatory status.
6. Should the initial attempt to ventilate fail, reposition the victim’s head and repeat the effort. If a second attempt at ventilation fails, the victim may have foreign body airway obstruction (FBAO), and the procedures for handling such situations described elsewhere in this chapter should be followed.
7. Assuming mouth-to-mouth ventilation is successful and the patient remains apneic, continue the effort at a rate of one breath every 6 to 7 seconds to maintain the minimal adult rate of 8 to 10 breaths/min.
Infants and Children
Airway opening maneuvers for children and infants are similar to maneuvers for adults, with several key differences. Anatomic differences in the infant’s airway make it especially susceptible to occlusion by the tongue. The infant’s head should be extended only slightly, or it should be tilted back gently into a neutral position when the head-tilt/chin-lift maneuver is used. The procedure for children and infants is as follows (Figure 34-10):

1. If the patient is an infant (<1 year old), create an airtight seal by placing your mouth over the infant’s nose and mouth (see Figure 34-10).
2. If the patient is a child between 1 year old and puberty, ventilate the victim’s lungs using the same technique as would be used for an adult (see Figure 34-9).
3. Provide an initial breath (over 1 second) sufficient to cause a visible rise in the chest. In infants, small puffs of air from the rescuer’s cheeks are usually sufficient to achieve adequate ventilation.
4. Remove your mouth, and allow the victim to exhale passively. Provide a second breath after this deflation pause.
5. After successfully delivering two breaths, immediately assess the pulse (<10 seconds).
6. If the initial attempt to ventilate fails, reposition the victim’s head and repeat the effort. A child’s head may need to be moved through a wide range of positions to secure an open airway. Hyperextension of a child’s neck can cause obstruction and should be avoided. If a second attempt at ventilation fails, the victim may have FBAO, and the appropriate procedures outlined elsewhere in this chapter should be followed.
7. Assuming mouth-to-mouth ventilation is successful and the child remains apneic, continue to provide one breath every 3 to 5 seconds to maintain a rate of 12 to 20 breaths/min.
Mouth-to-Nose Ventilation
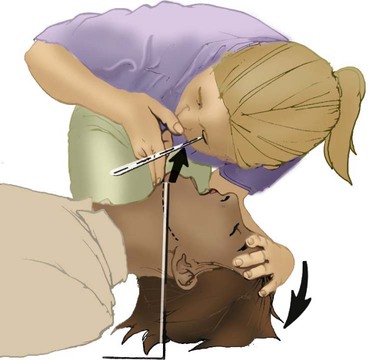
Mouth-to-mouth ventilation cannot be performed in some situations; these include trismus (involuntary contraction of the jaw muscles, also known as lockjaw) and traumatic jaw or mouth injury. Also, sometimes it is difficult to maintain a tight seal with the lips using the mouth-to-mouth method. In these situations, mouth-to-nose ventilation should be used. The procedure is as follows (Figure 34-11):
1. Place the victim on his or her back.
2. Use the head-tilt/chin-lift maneuver to establish the airway, taking care to close the mouth completely.
3. Inhale slightly deeper than normal and exhale into the patient’s nose. Greater force may need to be applied than would be used with mouth-to-mouth ventilation because the nasal passageways are smaller.
4. Remove your mouth from the victim’s nose to allow the patient to exhale passively. If the patient does not exhale through the nose (because of nasopharyngeal obstruction from the soft palate), open the victim’s mouth or separate his or her lips to facilitate exhalation.
5. After successfully delivering two slow breaths, immediately assess the circulatory status.
6. If the victim remains apneic, maintain ventilation at the rate appropriate for his or her age.
Mouth-to-Stoma Ventilation
1. Place the victim on his or her back with the neck in vertical alignment. Usually, the neck does not need to be extended and the nose or mouth does not need to be sealed because oropharyngeal structures are bypassed by the stoma.
2. Ensure that the stoma is clear of any obstructing matter and breathe directly into the stoma (or tube). If the victim has a cuffed tracheostomy tube in place, inflate the cuff to prevent air from escaping around the tube. If the tube is uncuffed, the mouth and nose may need to be sealed off with your hand or a tight-fitting face mask, using a pediatric face mask to create an adequate peristomal seal for bag-mask ventilation.
3. After delivering two breaths, immediately assess the circulatory status.
4. If the victim remains apneic, maintain ventilation at the rate appropriate for his or her age.
One-Rescuer versus Two-Rescuer Adult Cardiopulmonary Resuscitation
 Rule Of Thumb
Lay rescuers should be taught to do 100 compressions/min until the AED arrives for all age groups because it is easier to remember.4 Emphasis should be placed on teaching lay rescuers to “push hard and fast” on the sternum.
 Rule Of Thumb
Health care providers should use a 30 : 2 compression-to-ventilation ratio on adults and children. A 3 : 1 compression-to-ventilation ratio for infants (≤1 year of age) should be used when there are two rescuers.4,10,11
 Rule Of Thumb
Automated External Defibrillation
Early Defibrillation
1. The most common initial rhythm in witnessed sudden cardiac arrest is VF.
2. The treatment for VF is electrical defibrillation.
3. The probability of successful defibrillation diminishes rapidly over time.
Studies have shown that survival rates are highest when immediate bystander CPR is provided and defibrillation occurs within 5 minutes after SCA.12
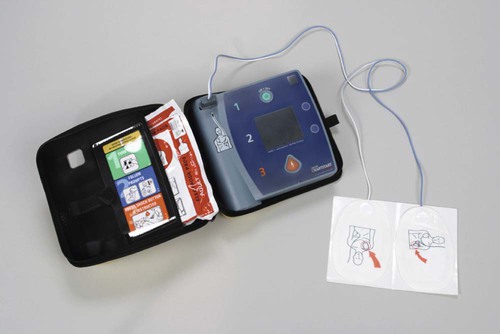
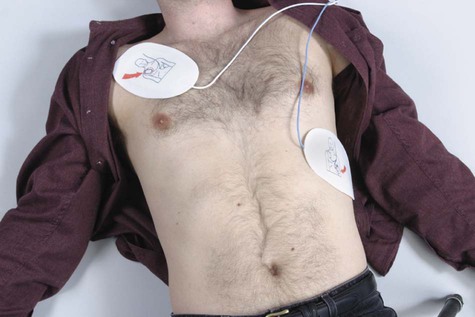
The AHA recommendation is that automated external defibrillators (AEDs) be made available to individuals expected to respond to emergencies, such as police, security personnel, ski patrol personnel, flight attendants, and first-aid volunteers (Figure 34-12). Early defibrillation has already proven to be effective in saving lives of people who otherwise may have not been successfully resuscitated.12 After appropriate training and implementation of the CABs, this step is inserted as the letter D, for defibrillation. This step should be initiated within 2 minutes of when CPR is begun. EMS providers arriving at the scene of a cardiac arrest should give a period of CPR (five cycles, or about 2 minutes) before checking a rhythm and attempting defibrillation. If the EMS provider witnesses the collapse or for in-hospital situations, the rescuer should use the defibrillator as soon as it is available. In an adult drowning victim or a victim of FBAO who becomes unconscious, a health care provider working alone may give about five cycles (approximately 2 minutes) of CPR before activating the emergency response system.4
VF cardiac arrest is less common in children than adults and accounts for 5% to 15% of pediatric and adolescent arrests.13,14 The AHA recommends use of an AED for children older than 1 year who are in cardiac arrest and encourages the use of a pediatric dose-attenuator system if one is available. If such a system is unavailable, a standard AED is recommended. The standard doses recommended by the AHA for manual defibrillation of children are 2 J/kg for the first attempt and 4 J/kg for subsequent attempts.15 Research has shown that lower energy (120 to 200 J) biphasic waveform shocks have equivalent or higher success in terminating VF than three stacked monophasic waveform shocks delivering escalating energy of 200 J, 300 J, and 360 J.16 AEDs should be deployed in locations where there is a high incidence of witnessed SCA, such as airports, casinos, and sports facilities.
Automated External Defibrillators
The rescuer should not delay chest compressions by stopping to recheck the rhythm or pulse. The rhythm is checked by the AED after five cycles (approximately 2 minutes) of CPR have been completed. The rescuers should be prepared to initiate another five cycles of CPR immediately after a second shock has been delivered. The rescuer administering chest compressions should be changed every 2 minutes. The rescuer providing 2 minutes of chest compressions should be prepared to deliver a shock as soon as he or she removes the hands from the victim’s chest. The second rescuer should be in position to start chest compressions as soon as the shock is delivered. If no shock is advised by the AED, the AED voice prompt should instruct the rescuer to resume CPR immediately starting with chest compressions. If the message reads “No shock indicated,” CPR should be performed for 1 to 2 minutes, and then the rhythm analysis should be repeated. A 1- to 2-minute period of CPR after a no-shock prompt from the AED delivers O2 and metabolic substrates to the myocardium, increasing the probability that a perfusing rhythm will occur. The rescuer should not be concerned that chest compressions might trigger the return of VF in the presence of a postshock organized rhythm.17 Figure 34-13 indicates how the AED is used by the rescuer.
 Rule Of Thumb
Evaluating Effectiveness of Cardiopulmonary Resuscitation
CPR providers need to judge continuously both the effectiveness of CPR and the victim’s response. Ventilation can be evaluated by observing visible rise and fall of the victim’s chest during mouth-to-mouth resuscitation. Air that is escaping can be heard and felt during exhalation. Researchers at the AHA 2005 CPR and emergency cardiovascular care consensus conference reached the following conclusions regarding the effectiveness of chest compressions:18
1. “Effective” chest compressions are essential for providing blood flow during CPR.
2. To give “effective” chest compressions, “push hard and push fast.” Compress the adult chest at a rate of about 100 compressions/min, with a depth of 2 inches (for adults). Allow the chest to recoil completely after each compression, and allow approximately equal compression and relaxation times.
The cycle time is 600 msec if the chest is compressed at a rate of 100 compressions/min. The time to deliver 30 compressions is 18 seconds if the compression rate is held constant at 100 compressions/min. It takes a rescuer 4 seconds to deliver two breaths with a 1-second inspiratory time and a 1-second expiratory time. Assuming 2 seconds are lost switching from compressions to ventilations, the total ventilation time is 6 seconds. The CPR cycle time is 24 seconds; 2.5 cycles/min would optimally deliver 75 compressions and five breaths. The AHA has encouraged the use of CPR prompts after studies showing compression and ventilation rates are frequently too fast or slow.19,20 Every effort possible must be made to decrease the number of interruptions in chest compressions.
Hazards and Complications
Neck and Spine Injuries
Health care providers can aggravate neck or spine injuries by inappropriately moving the victim’s head. However, only approximately 2% of victims with blunt trauma have a spinal injury. Spinal injury risk is greatest if the victim has craniofacial injury or a Glasgow Coma Scale score of less than 8.21 The victim should be carefully assessed for head, neck, or spine injuries. If this type of injury is apparent, the head should be carefully supported, and side-to-side motion must be avoided. In such situations, using the jaw thrust maneuver rather than the head-tilt/chin-lift method to open the airway is recommended by the AHA.4 If jaw thrust is unsuccessful in establishing an airway, the rescuer should try a slight head-tilt.4
Gastric Inflation
During prolonged mouth-to-mouth ventilation, air enters the esophagus and stomach. Some gastric inflation is not unusual, particularly in children, and occurs in approximately 17% of cases.22 Severe gastric inflation puts pressure on the diaphragm, restricting lung expansion. Gastric inflation also can increase vagal tone and cause reflex bradycardia and hypotension.
 Rule Of Thumb
The best way to avoid gastric inflation during bag-mask ventilation is to deliver breaths with low to moderate flow (<30 L/min) over 1 second.23 VT size should be only large enough to cause visible chest rise. The health care provider should not ventilate and compress the chest simultaneously with a bag-mask device.
Internal Trauma
External cardiac compression is hazardous, and every attempt should be made to minimize trauma by using the correct technique. Complications associated with chest compression include gastric perforation, laceration of the liver, contusion of the lung, fractured ribs or sternum, pneumothorax, hemothorax, cardiac tamponade, and soft tissue emphysema.24,25 These complications most often are linked to improper hand position. Placement of the hands too far to either the left or the right can cause fractured ribs or lacerated lung. Incorrect placement on the left can injure the heart. Placing the hands too high on the sternum can fracture the sternum; placing the hands too low can cause a fractured xiphoid process or a lacerated liver. Correct identification of landmarks and proper hand placement minimize the likelihood of these complications.
Foreign Body Airway Obstruction
Manual removal of FBAO from the upper airway also can be hazardous because of the possibility of forcing the object deeper into the airway or traumatizing the airway. This hazard can be minimized by attempting to remove FBAO only when the provider can see solid material obstructing the airway in an unresponsive patient and using extreme care in removing it.4
Health Concerns and Cardiopulmonary Resuscitation
Laypeople and health care professionals are concerned regarding possible transmission of infectious diseases, such as AIDS, during CPR.26 In one survey, 45% of the physicians and 80% of the nurses who responded indicated that they would refuse to provide mouth-to-mouth ventilation for a stranger.27 The actual risk of disease transmission during mouth-to-mouth ventilation is very small. No reports on transmission of HIV, hepatitis B virus, hepatitis C virus, or cytomegalovirus were found.28 However, the reluctance to initiate CPR poses a clear threat to the effectiveness of early intervention in life-threatening emergencies, which affects the public as a whole. A bystander who is not trained in CPR should provide hands-only (chest compression only) CPR, with an emphasis on “push hard and fast,” or follow the directions of the emergency medical dispatcher.4
 Rule Of Thumb
Although technically blood or body fluids can be exchanged through mouth-to-mouth ventilation, CDC surveillance of job-related contraction of AIDS has never discovered such an incident.28 Other infectious diseases, such as herpes simplex and tuberculosis, may present a higher risk to the rescuer, but few cases have been reported. Although the risk of transmission is believed to be low, health care providers who perform mouth-to-mouth ventilation on someone suspected to have tuberculosis should obtain a follow-up evaluation using standard approaches. In addition, any health care provider who might hesitate to provide mouth-to-mouth ventilation to a victim in need should always carry (and know how to use) an appropriate barrier device for this purpose. Equipment contaminated with blood or other body fluids during a resuscitation effort should always be discarded in appropriate receptacles or thoroughly cleaned and disinfected according to hospital protocols.
Treating Foreign Body Airway Obstruction
Abdominal Thrusts (Heimlich Maneuver)
Forceful thrusts applied to the epigastrium can dislodge an obstruction caused by a food bolus, vomitus, or other foreign body. Quick thrusts to the abdomen rapidly displace the diaphragm upward, increasing intrathoracic pressure and creating expulsive expiratory airflow. As with a normal cough, this expulsive airflow may be sufficient to expel the foreign body from the airway. The procedure for performing abdominal thrusts on adults and children is as follows (Figure 34-14):
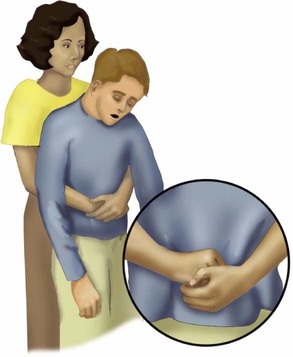
1. If the victim is sitting or standing, stand behind the victim and wrap your arms around his or her waist. Make a fist with one hand and place the thumb side midline on the abdomen slightly above the navel and well below the tip of the xiphoid process (see Figure 34-14). Grasp the fist with the other hand and deliver a quick upward and inward thrust. Each thrust should be a separate and distinct movement. Repeat the process until the obstruction is removed or the victim loses consciousness.
2. If an adult victim with FBAO becomes unresponsive, the rescuer should move the patient to the ground, activate the EMS system, and begin CPR. Each time the mouth is opened during cycles of compressions and ventilation, the rescuer should look into the victim’s mouth for FBAO and remove it; this should be done without increasing the time to deliver two breaths (approximately 6 seconds). The routine use of blind finger sweeps to remove FBAO in adults, children, and infants is not recommended by the AHA.4,11
3. A conscious victim who is alone can attempt to dislodge the foreign body with self-administered abdominal thrusts, performed by pressing his or her fist into the abdomen or pushing the abdomen against a firm surface such as a counter top, sink, chair back, railing, or tabletop.
Internal Organ Damage
The major hazard associated with abdominal thrusts that are performed when an individual has choked and lost consciousness is possible damage to internal organs, such as laceration or rupture of abdominal or thoracic viscera.29 The body of clinical data regarding choking is largely retrospective and anecdotal. Abdominal thrusts have been recommended for relief of FBAO in adults and children since 1975 based mostly on early anecdotal case reports. Abdominal thrusts are recommended by the AHA and several other resuscitation councils for use for unresponsive adult and child (but not infant) victims. Abdominal thrusts are not recommended for infants younger than 1 year because of their relatively unprotected abdomens and large livers. Rational conjecture and common practices suggest that back blows may loosen obstruction so that subsequent abdominal or chest thrusts may relieve obstruction. The risk of internal organ damage from abdominal thrusts in a conscious patient can be minimized by the rescuer placing his or her arms and fist below the victim’s xiphoid process and lower margin of the ribs.
Back Blows and Chest Thrusts
Because abdominal maneuver can easily cause abdominal injury when applied to infants, a combination of back blows and chest thrusts should be used to clear foreign bodies from the upper airway. Back blows alone may create sufficient force to dislodge trapped objects, but if this is ineffective, the back blows should be followed with five chest thrusts. The rescuer should continue inspecting the airway until the airway is restored. This procedure is as follows (Figure 34-15):
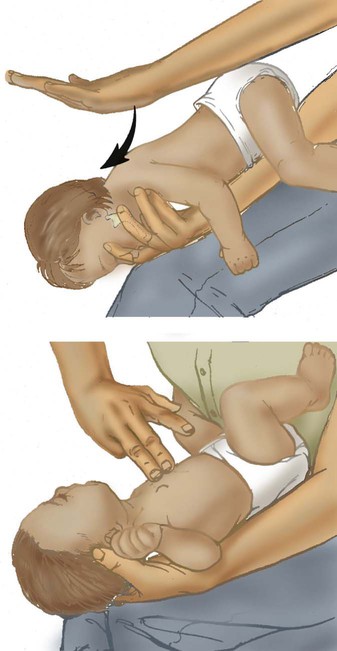
1. Back blows can be administered to infants more efficiently if the child is held straddled over one arm with the head lower than the body.
2. Use the flat portion of your hand to deliver gently, but quickly, five back blows between the shoulder blades.
3. If the back blows do not clear the infant’s airway, turn the infant over and institute a series of five chest thrusts. Similar to abdominal thrust, chest thrust creates a rapid increase in intrathoracic pressure, aiding expulsion of the foreign body. Chest thrusts for infants are performed in the same manner and at the same location as cardiac compressions but at a slower rate.
4. Try to clear the airway between attempts to expel the foreign body. First, visually inspect the oral cavity and remove any foreign matter that can be seen. Deep blind finger sweeps of the mouth of an infant, child, or adult are not recommended.
Evaluating Effectiveness of Foreign Body Removal
If successive attempts to clear the airway fail, more aggressive techniques are indicated, if available. These include direct laryngoscopy and foreign body removal with Magill forceps, transtracheal catheterization, cricothyrotomy, and tracheotomy. These methods require specially trained health care professionals and equipment, and they are aptly categorized as advanced life support techniques. Transtracheal catheterization and cricothyrotomy are discussed later in this chapter, and laryngoscopy, bronchoscopy, and tracheotomy were described in Chapter 33.
Advanced Cardiovascular Life Support
ACLS extends BLS capabilities by providing additional measures beyond immediate ventilatory and circulatory assistance. These measures include using accessory equipment to support ventilation and oxygenation, monitoring the electrocardiogram (ECG), establishing an intravenous (IV) route for drug administration, and applying selected pharmacologic agents and electrical therapies (Figure 34-16). The AHA claims that “the foundation of ACLS is good BLS care, beginning with prompt high-quality bystander CPR and, for pulseless ventricular rhythms, attempted defibrillation within minutes of collapse.”28
Airway Management
Pharyngeal Airways
Oropharyngeal airways come in many different sizes to fit adults, children, and infants. Figure 34-17 shows the two most common oropharyngeal airway designs: (1) the Guedel airway (see Figure 34-17, A) and (2) the Berman airway (see Figure 34-17, B). Both types have an external flange, a curved body that conforms to the shape of the oral cavity, and one or more channels. The Guedel airway has a single center channel, whereas the Berman airway uses two parallel side channels.

In either approach, incorrect placement can displace the tongue, pushing it farther back into the pharynx and worsening the obstruction. Oropharyngeal airways must be inserted carefully and by trained personnel only. As shown in Figure 34-17, C, when properly inserted, the tip of an oropharyngeal airway lies at the base of the tongue above the epiglottis, with the flange portion extending outside the teeth. Only in this position can the device properly maintain airway patency.
Endotracheal Intubation
An advanced airway allows the rescuer to achieve one or more of the following goals:
1. Deliver ventilations that are not synchronous with chest compressions
3. Maintain adequate ventilation
4. Isolate and protect the airway from aspiration
5. Provide access for clearance of secretions
6. Provide an alternative route for administration of selected drugs
Attempts to intubate the trachea must never interfere with providing adequate ventilation and oxygenation by other means. Only highly trained personnel should perform endotracheal intubation, and each attempt should not exceed 30 seconds because ventilation is absent during the procedure. Adequate ventilation and oxygenation must be provided between attempts. Figure 34-18 shows a cuffed orotracheal tube properly positioned in the trachea. It is being used with a manual bag-mask device to provide ventilation and oxygenation. Adequate ventilation and oxygenation can be provided with 10 to 12 breaths/min.
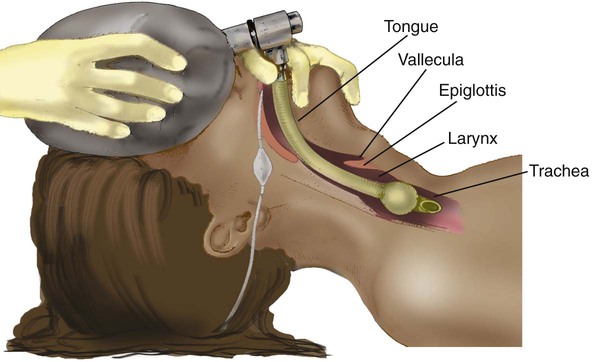
RTs should be trained in endotracheal intubation techniques, as applied in both emergency life support and mechanical ventilation situations. Details about the necessary equipment, procedures, and short-term and long-term complications of endotracheal intubation are provided in Chapter 33.
Bag-Mask Devices
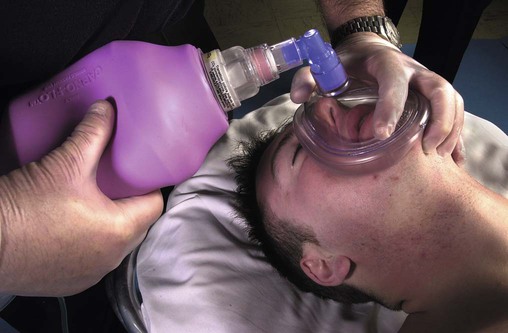
One-way valves on bag-mask devices should be simple, dependable, and jam-free. All health care professionals responding to a cardiac arrest call should be familiar and skilled in the use of such a device for support of ventilation and oxygenation. Application of the bag-mask device is best performed with the practitioner positioned at the head of the victim, using the head-tilt maneuver to maintain the airway (Figure 34-19). The rescuer delivers VT adequate to produce visible chest rise (6 to 7 ml/kg or 500 to 600 ml) over 1 second. Using this smaller VT decreases airway pressure and minimizes risk of gastric inflation.
It is important to deliver the two breaths during CPR over only 3 to 4 seconds so that the optimal number of chest compressions per minute can be delivered (75 compressions/min, rate of delivery 100 compressions/min). The 30 : 2 compression-to-ventilation ratio allows for only five breaths to be delivered per minute. It is critical that all five breaths be delivered with visible chest rise. After an advanced airway replaces the face mask, the ventilatory rate should be 8 to 10 breaths/min during CPR. Slower rates of 6 to 8 breaths/min might be needed for patients with chronic obstructive pulmonary disease (COPD) to prevent air trapping and the development of auto–positive end expiratory pressure (PEEP). Ventilatory rates greater than 12 breaths/min are not recommended during CPR because they lead to increased intrathoracic pressure, impeding venous return to the heart during chest compressions,30 and hyperventilation.
 Rule Of Thumb
Design
Figure 34-20 is a schematic of a typical bag-mask device, showing gas movement and valve action during both the inhalation-compression and exhalation-relaxation phases. The key components shown in this schematic are the nonrebreathing valve (left), the bag itself, the O2 inlet and bag inlet valve (to the right of the bag), and the O2 reservoir tube (far right).
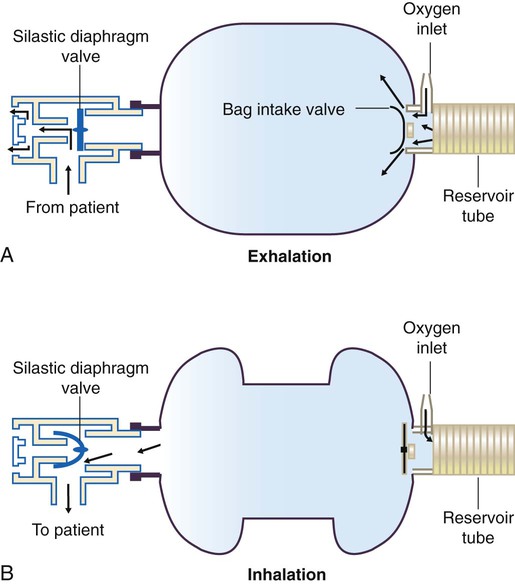
During exhalation (see Figure 34-20, A), gas flows out from the patient’s lungs through the nonrebreathing valve into the atmosphere. At the same time (while the bag expands), the intake valve opens, and 100% O2 flows into the bag from both the reservoir and the O2 inlet.
During the inhalation phase (see Figure 34-20, B), the bag is compressed manually, causing bag pressure to increase. This increase in bag pressure simultaneously closes the inlet valve and opens the nonrebreathing valve, forcing gas into the patient. While the bag inlet valve is closed, O2 coming in through the O2 inlet goes into the reservoir tube, where it is stored for the next breath.
Use
To use a bag-mask device, the health care provider is positioned at the head of the patient’s bed. Ideally, an oral airway is inserted, and the head-tilt method is used to keep the airway open (assuming there are no neck injuries). While using one hand to keep the patient’s head extended and the mask tightly sealed to the patient’s face, the health care provider uses the other hand to compress the bag (see Figure 34-19).
Hazards and Troubleshooting
Gastric inflation is another common hazard encountered when using a bag-valve device with a face mask. Gastric inflation can be minimized by providing low to moderate inspiratory flows (<30 L/min).23 For an adult, a full 1 second should be used to deliver VT of 500 ml.
Mini Clini
Ventilation During Cardiopulmonary Resuscitation
 Problem
No, it is not. The ventilation rate should be 8 to 10 breaths/min, and VT should be limited to achieve chest rise to avoid excessive ventilation.30 Ventilation rates greater than 12 breaths/min and large VT (>6 to 7 ml/kg) increase intrathoracic pressure and impede venous return to the heart during chest compressions.30 During CPR, hyperventilation reduces cardiac output and decreases coronary and cerebral perfusion. Increases in central venous pressure, as a result of increased intrathoracic pressure, can decrease cerebral blood flow. Increased airway pressures and auto-PEEP generated by hyperventilation should be avoided. The AHA 2010 guidelines for CPR and emergency cardiovascular care state that “routine hyperventilation during and after cardiac arrest is detrimental and it is considered a Class III procedure” (i.e., the risk is greater than the benefit).4 Ventilation with VT of 500 to 600 ml at rates of one breath every 6 to 8 seconds is all that is needed to maintain a normocarbic level during CPR.
Hyperventilation during resuscitation of a cardiac arrest victim markedly decreases coronary perfusion pressure and survival rates.30 Overzealous ventilation with high rates (>12 breaths/min) during resuscitation of cardiac arrest increases intrathoracic pressure, impedes venous return, decreases cardiac output, decreases coronary artery perfusion pressure, increases gastric inflation, and provides more ventilation than is needed.
Restoring Cardiac Function
Electrocardiogram Monitoring
Given their important role in ACLS, RTs must be skilled in recognizing arrhythmias. Although an experienced RT may be able to interpret quickly gross arrhythmias appearing on electrocardiographic monitors at the bedside, these skills develop only after much practice with actual rhythm strips. Chapter 17 presents a review of ECG interpretation. The reader should focus on the following arrhythmias:
• Premature atrial contractions
• Supraventricular tachycardia (SVT)—a classification of arrhythmias, including but not limited to:
• Atrioventricular blocks—first degree, second degree types I and II, and third degree
• Premature ventricular contractions
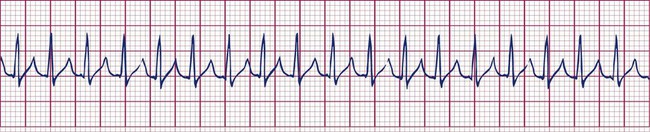
Supraventricular Tachycardia
The term supraventricular tachycardia is commonly used to describe any tachycardia not of ventricular origin. This grouping can include sinus tachycardia, atrial tachycardia, junctional tachycardia, atrial flutter, and atrial fibrillation (with rates >100 beats/min). These individual supraventricular arrhythmias are identified by ECG and treated accordingly (Figure 34-21).
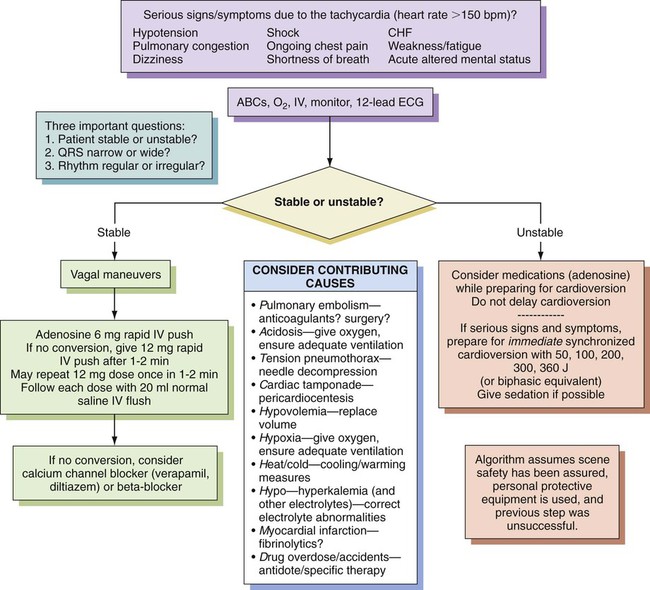
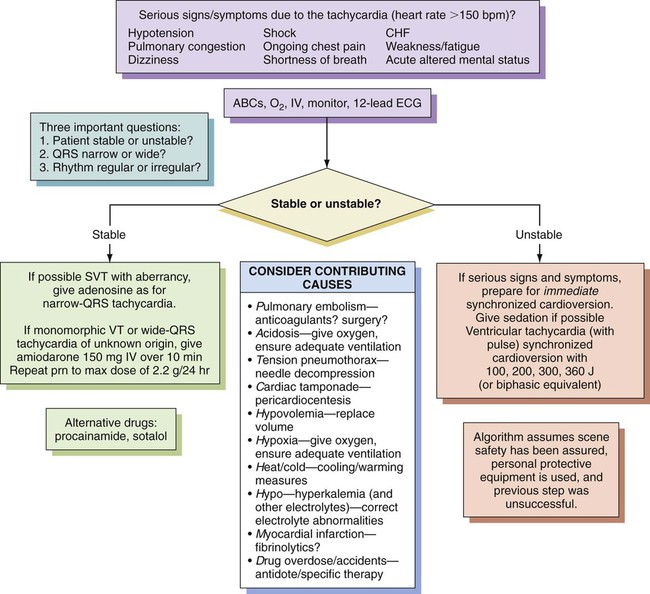
The treatment of SVT varies according to the clinical situation (Figure 34-22). If a patient with SVT is ill or unstable, the treatment of choice is immediate synchronized electrical cardioversion as described elsewhere in this chapter. If the patient is stable, other interventions are tried before cardioversion is considered. The most common nonelectrical treatment for SVT is vagal stimulation by carotid artery massage or Valsalva maneuver. If these attempts are ineffective and the patient remains stable, drugs such as adenosine, diltiazem, verapamil, or beta blockers (as a second-line agent) may halt SVT. These drugs work primarily on the nodal tissue by slowing ventricular response to atrial arrhythmias, or they block the reentry SVT that travels through the atrioventricular node.
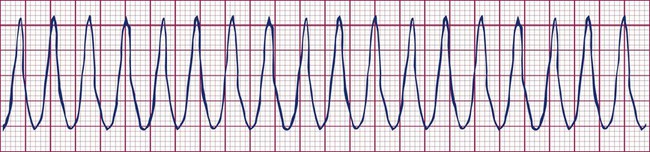
Ventricular Tachycardia
VT occurs when one or more irritable foci within the ventricle discharge at rapid rates, creating the appearance of a prolonged chain of premature ventricular contractions. Rates typically range from 140 to 220 beats/min and usually are regular (Figure 34-23).
Although VT may come and go in brief episodes, or paroxysms, it is always a sign of a serious underlying pathologic condition and should be treated immediately. In stable patients, VT is managed with amiodarone.31 Alternative drugs for wide-complex regular tachycardias are procainamide and sotalol.32 For patients with sustained VT who exhibit hypotension, ischemic chest pain, shortness of breath, decreased consciousness, or signs of pulmonary edema, immediate synchronized cardioversion is indicated (Figure 34-24). Patients with sustained VT in full cardiac arrest are treated similarly to patients with VF.
Ventricular Fibrillation
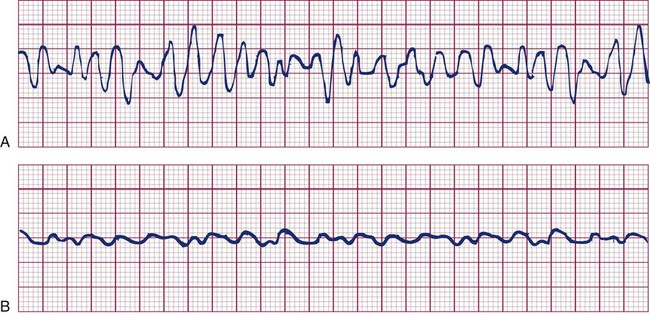
VF is a rapid, sustained, and uncontrolled depolarization of the ventricles. During VF, the ECG is characterized by irregular, widened, and poorly defined QRS complexes, known as coarse VF (Figure 34-25, A). These complexes widen farther and lose amplitude, resembling a coarse asystole, which now is defined as fine VF (Figure 34-25, B). Rather than exhibiting coordinated contractions, the ventricles quiver in a totally disorganized manner. Cardiac output during VF is zero. The rapid decrease in cardiac output produces an acute cerebral hypoxia, often manifested by convulsions. VF is uniformly fatal if not corrected immediately.
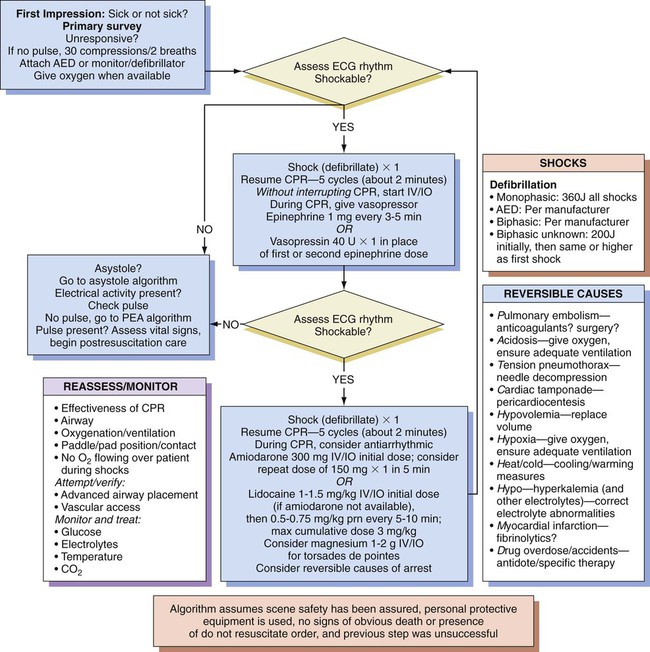
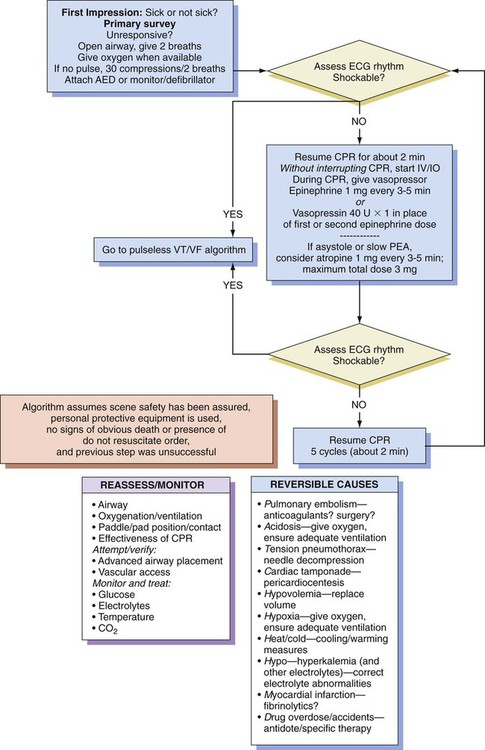
Pulseless Electrical Activity
PEA that is not shockable can result from several reversible causes (Figure 34-26). The immediate primary treatment is uninterrupted CPR for about 2 minutes with vasopressor given simultaneously. The best secondary approach is to identify and treat reversible causes (e.g., for hypovolemia, replace volume; for tension pneumothorax, needle decompression). In asystole or slow PEA, atropine administration can be considered (see Figure 34-26).
Pharmacologic Intervention
Although the full range of drug use in ACLS is beyond the scope of this chapter, RTs must have a general knowledge of both the various drug categories and the specific agents used in emergency situations.33 Table 34-2 summarizes the major drug categories and primary agents currently used in ACLS.
TABLE 34-2
Drugs Used in Advanced Cardiovascular Life Support
| Drug | Indications | Contraindications | Route | Dosage | Pharmacologic Effects |
| Adenosine | PSVT | Use with caution if patient has asthma; poison-induced or drug-induced tachycardia; second-degree or third-degree heart block | IV bolus | 6 mg IV for 1-2 sec followed by 20-ml saline bolus; repeat twice with 12 mg in 1-2 min if needed | Decrease in AV node conduction |
| Amiodarone | Atrial and ventricular tachyarrhythmias | Prolonged QT interval | IV; IO | 150-300 mg IV over 10 min; may repeat every 10 min to maximum of 2.2 g in 24 hr | Increased PR and QT intervals; decreased sinus node function; inhibited alpha- and beta-adrenergic responses |
| Atropine sulfate | Sinus bradycardia; asystole; PEA; organophosphate poisoning | Sinus, atrial, and ventricular tachycardia; hypothermic bradycardia; infranodal (type II) AV block; new third-degree with wide QRS complexes | IV bolus; IO; endotracheal* | 0.5-1.0 mg IV repeated every 3-5 min to total dose of 3 mg | Increased heart rate; increased force of atrial contractions |
| Calcium chloride | Hypokalemia; hyperkalemia; calcium channel blocker toxicity | Do not use routinely in cardiac arrest | IV (not to be mixed with other drugs) | 500-1000 mg for hyperkalemia and channel blocker overdose | Increased force of contractions; increased ventricular excitability |
| Diuretics: furosemide (Lasix) | CHF; pulmonary edema | Hypovolemia | IV infusion | 0.5-1.0 mg/kg bolus over 1-2 min; slowly increase to 2.0 mg/kg over 1-2 min if no response | Diuresis or venodilation |
| Dobutamine | Depressed myocardial contractility | Systolic blood pressure <100 mm Hg and signs of shock; suspected poison-induced or drug-induced shock | IV infusion | 2.0-20 µg/kg/min, titrate so heart rate does not increase by >10% of baseline | Increased force of contractions; enhanced AV conduction |
| Dopamine | Hypotension with signs and symptoms of shock; second-line drug for symptomatic bradycardia | Use with caution in cardiogenic shock with accompanying CHF | IV infusion | 2.0-20 µg/kg/min | Increased renal and splenic flow at low doses (1-5 µg/kg/min); beta-adrenergic effects at moderate doses (5-10 µg/kg/min); alpha-adrenergic effects at high doses (>10 µg/kg/min) |
| Epinephrine | Cardiac arrest; VF; pulseless tachycardia; asystole; PEA; symptomatic bradycardia; severe hypotension; anaphylaxis; severe allergic reaction | VT and frequent PVCs | IV bolus; IO; endotracheal*; IV infusion | 1 mg every 3-5 min in cardiac arrest, up to 0.2 mg/kg; 2-10 µg/min infusion, titrate to patient response | Increased heart rate; increased force of contractions; vasoconstriction; increased coronary perfusion pressure; increased myocardial irritability; increased myocardial O2 consumption |
| Isoproterenol | Refractory torsades de pointes unresponsive to magnesium sulfate; temporary control of bradycardia in heart transplant patients; poisoning from beta blockers | Cardiac arrest; VT; frequent PVCs | IV infusion | 2-10 µg/min, titrate to adequate heart rate | Increased heart rate; increased force of contractions; vasodilation |
| Lidocaine | Alternative to amiodarone in cardiac arrest from VF/VT; stable monomorphic VT with preserved ventricular function; stable polymorphic VT with normal baseline QT interval and preserved left ventricular function when ischemia is treated and electrolyte balance is corrected; stable polymorphic VT with baseline QT prolongation if torsades suspected | Signs of lidocaine toxicity; prophylactic use in acute MI | IV bolus; IV infusion; IO; endotracheal† | 1-1.5 mg/kg bolus every 5-10 min up to 3 mg/kg | Increased electrical stimulation threshold; depressed ventricular electrical activity |
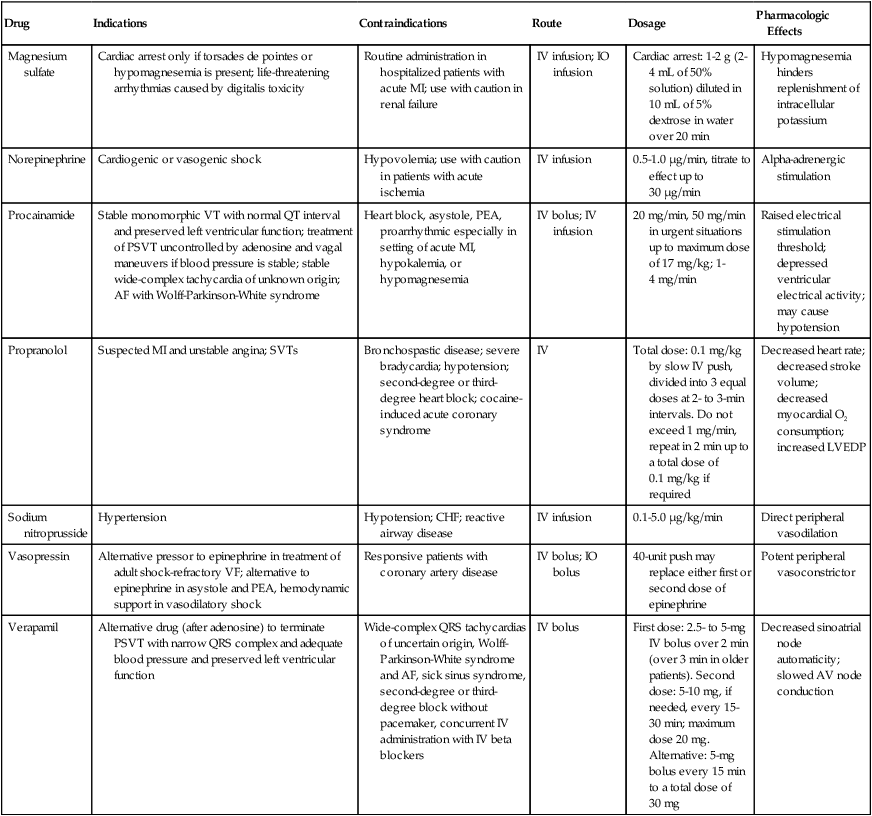
| Magnesium sulfate | Cardiac arrest only if torsades de pointes or hypomagnesemia is present; life-threatening arrhythmias caused by digitalis toxicity | Routine administration in hospitalized patients with acute MI; use with caution in renal failure | IV infusion; IO infusion | Cardiac arrest: 1-2 g (2-4 mL of 50% solution) diluted in 10 mL of 5% dextrose in water over 20 min | Hypomagnesemia hinders replenishment of intracellular potassium |
| Norepinephrine | Cardiogenic or vasogenic shock | Hypovolemia; use with caution in patients with acute ischemia | IV infusion | 0.5-1.0 µg/min, titrate to effect up to 30 µg/min | Alpha-adrenergic stimulation |
| Procainamide | Stable monomorphic VT with normal QT interval and preserved left ventricular function; treatment of PSVT uncontrolled by adenosine and vagal maneuvers if blood pressure is stable; stable wide-complex tachycardia of unknown origin; AF with Wolff-Parkinson-White syndrome | Heart block, asystole, PEA, proarrhythmic especially in setting of acute MI, hypokalemia, or hypomagnesemia | IV bolus; IV infusion | 20 mg/min, 50 mg/min in urgent situations up to maximum dose of 17 mg/kg; 1-4 mg/min | Raised electrical stimulation threshold; depressed ventricular electrical activity; may cause hypotension |
| Propranolol | Suspected MI and unstable angina; SVTs | Bronchospastic disease; severe bradycardia; hypotension; second-degree or third-degree heart block; cocaine-induced acute coronary syndrome | IV | Total dose: 0.1 mg/kg by slow IV push, divided into 3 equal doses at 2- to 3-min intervals. Do not exceed 1 mg/min, repeat in 2 min up to a total dose of 0.1 mg/kg if required | Decreased heart rate; decreased stroke volume; decreased myocardial O2 consumption; increased LVEDP |
| Sodium nitroprusside | Hypertension | Hypotension; CHF; reactive airway disease | IV infusion | 0.1-5.0 µg/kg/min | Direct peripheral vasodilation |
| Vasopressin | Alternative pressor to epinephrine in treatment of adult shock-refractory VF; alternative to epinephrine in asystole and PEA, hemodynamic support in vasodilatory shock | Responsive patients with coronary artery disease | IV bolus; IO bolus | 40-unit push may replace either first or second dose of epinephrine | Potent peripheral vasoconstrictor |
| Verapamil | Alternative drug (after adenosine) to terminate PSVT with narrow QRS complex and adequate blood pressure and preserved left ventricular function | Wide-complex QRS tachycardias of uncertain origin, Wolff-Parkinson-White syndrome and AF, sick sinus syndrome, second-degree or third-degree block without pacemaker, concurrent IV administration with IV beta blockers | IV bolus | First dose: 2.5- to 5-mg IV bolus over 2 min (over 3 min in older patients). Second dose: 5-10 mg, if needed, every 15-30 min; maximum dose 20 mg. Alternative: 5-mg bolus every 15 min to a total dose of 30 mg | Decreased sinoatrial node automaticity; slowed AV node conduction |
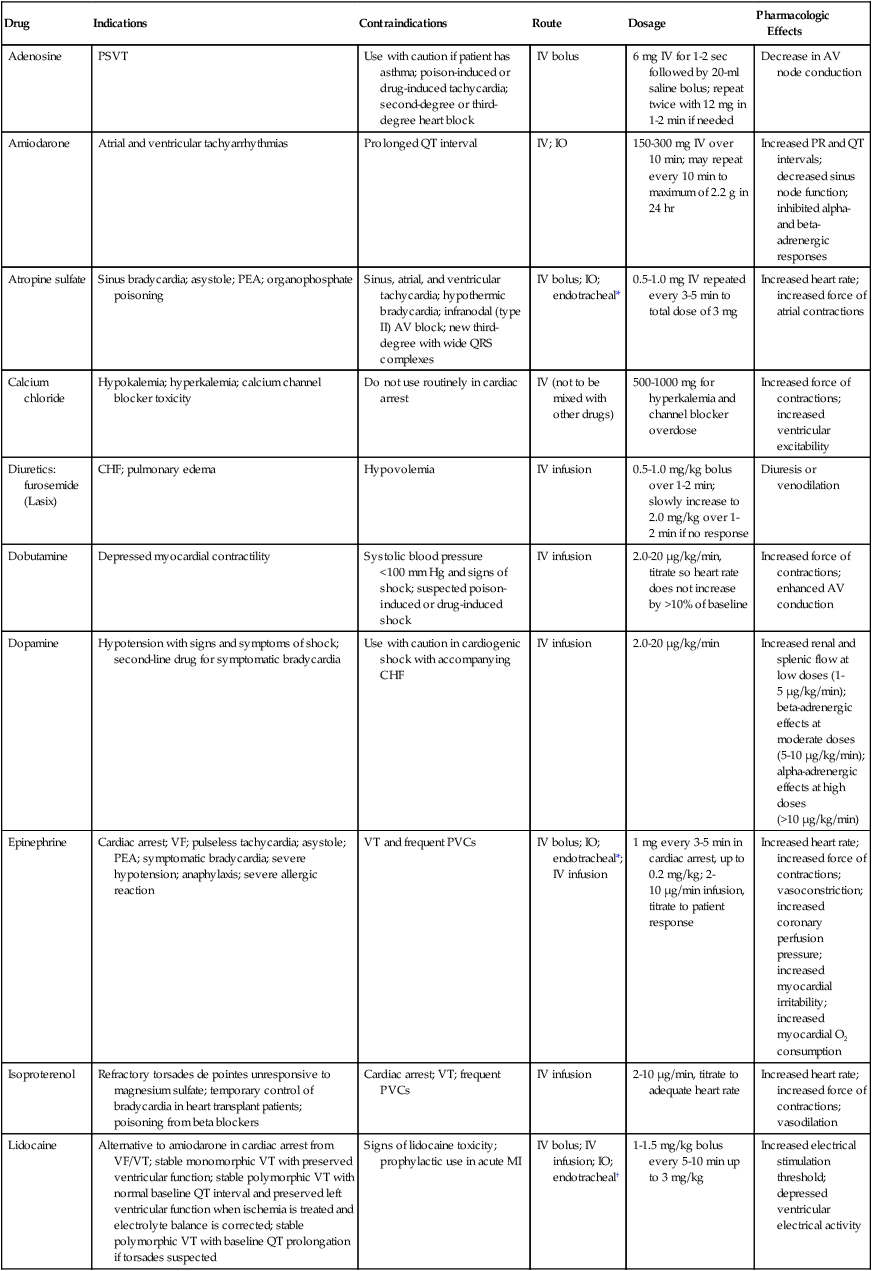
*Endotracheal tube dosage is usually double IV dosage.
†Dose of lidocaine via an endotracheal tube is 2.0-2.5 times the normal IV dose diluted in 10 mL of normal saline or sterile water to be used only when IV and IO access is unavailable.
Routes of Administration
Selected drugs, such as epinephrine, lidocaine, and atropine, also may be given through an endotracheal tube when IV and intraosseous access are unavailable. Optimal doses are unknown, but higher doses in larger volumes are necessary if this route is used. Typically, for intratracheal instillation, 2 to 2.5 times the usual IV dose, diluted in 10 ml of sterile water34,35 or normal saline or distilled water, should be given. Administration of epinephrine, lidocaine, and atropine into the trachea results in lower blood concentrations than when the same dose is given intravascularly.32
The intraosseous route also is an option, especially in small children or infants. Chapter 32 provides information about pharmacologic agents often used in ACLS.
Mini Clini
Route of Drug Administration During Advanced Cardiovascular Life Support
 Problem
Because of its strong inotropic and alpha-adrenergic effects, epinephrine should be the first drug during resuscitation of cardiac arrest, and it should be administered as soon as possible. Drugs given via a peripheral vein require 1 to 2 minutes to reach the central circulation. Epinephrine can convert fine VF to coarse VF and improves the chance for successful electrical defibrillation. In this case, because IV and intraosseous routes are unavailable, epinephrine should be directly instilled into the endotracheal tube at 2 to 2.5 times the IV dose diluted in 5 to 10 ml of distilled water.32 Other drugs that can be administered through the endotracheal tube are naloxone, atropine, vasopressin (direct instillation dose unknown at this time), epinephrine, and lidocaine (NAVEL).
Electrical Therapy
Unsynchronized Countershock (Defibrillation)
If a biphasic defibrillator is available, the AHA recommends an initial energy level of 120 to 200 J for defibrillation of adults and 2 to 4 J/kg for defibrillation of children and infants.15 For children older than 1 year, if a shockable rhythm persists after five cycles of CPR, the rescuer should give one shock (4 J/kg) and resume compressions immediately. AHA 2010 guidelines recommend a 360-J shock for monophasic defibrillators for the first and subsequent shocks.15 If VF recurs, the previously successful energy level should be used for subsequent shocks, and compressions should be resumed immediately.
Synchronized Countershock (Cardioversion)
Cardioversion is considered when a patient with an organized arrhythmia producing a high ventricular rate exhibits signs or symptoms of cardiac decompensation. These so-called tachyarrhythmias include SVT, atrial flutter, atrial fibrillation, and monomorphic VT with pulses. Cardioversion is ineffective for treatment of junctional tachycardia or multifocal atrial tachycardia.15
Electrical Pacing
Pacemaker therapy is used to treat sinus bradycardias that produce serious signs and symptoms and that do not respond to atropine (Figure 34-27). Electrical pacing also is used to manage second-degree type II and third-degree heart block. Electrical pacing also can be used to treat some tachyarrhythmias. In these cases, the pacemaker is set to discharge faster than the underlying rate. After a few seconds, the pacemaker is stopped to allow the heart’s intrinsic rate to return. This is called overdrive pacing. Although overdrive pacing has shown promise in treating certain types of SVT and VT, pharmacologic intervention (when the patient is stable) and cardioversion (when the patient is unstable) remain the treatments of choice.
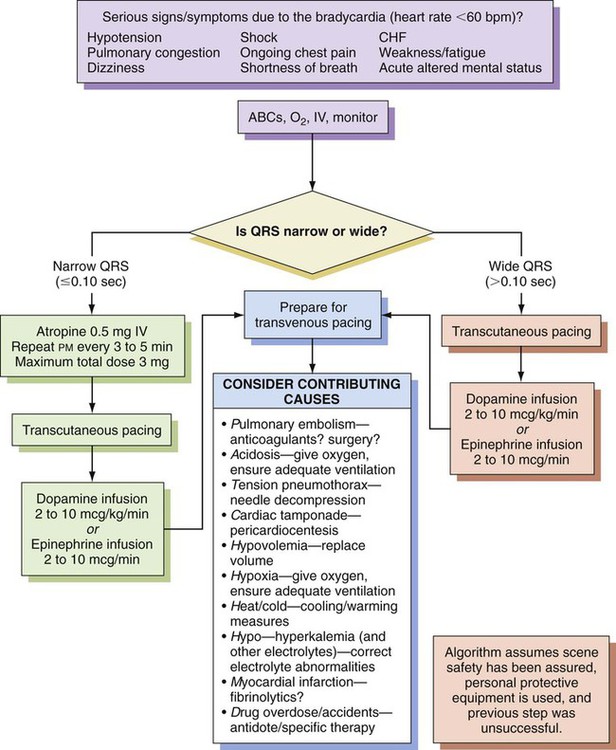
Because defibrillation can cause damage to permanent pacemakers, care should be taken not to place the electrode paddles near these devices. After a patient with a permanent pacemaker undergoes either cardioversion or defibrillation, the device should be checked for proper functioning. Pacing is not recommended by the AHA for patients in asystolic cardiac arrest because it is ineffective and may delay or interrupt the delivery of chest compressions.15
 Problem
Patient Care Following Resuscitation
If the patient is conscious and breathing spontaneously after resuscitation, supplemental O2, maintenance of an IV infusion, and continuous cardiac and hemodynamic monitoring may be all that is necessary. A 12-lead ECG, chest x-ray, ABG analysis, and clinical chemistry profile should be obtained as soon as possible. The 2010 AHA guidelines recommend that providers of care after cardiac arrest should “(1) control body temperature to optimize survival and neurological recovery; (2) identify and treat acute coronary syndromes; (3) optimize mechanical ventilation to minimize lung injury; (4) reduce the risk of multiorgan injury and support organ function if required; (5) objectively assess prognosis for recovery; and (6) assist survivors with rehabilitation services when required.”36 The patient should be closely supervised in an intensive care or coronary care unit, especially during the first 24 hours after a cardiac arrest.37
Only in this setting can underlying organ system insufficiency or failure be properly identified and managed.37 The organs most likely to exhibit failure after resuscitation are the lung, heart and vasculature, and kidneys. Central nervous system failure is an ominous sign and generally indicates a failed resuscitation attempt.
Respiratory Management
If the patient remains apneic or exhibits irregular breathing after resuscitation, mechanical ventilation is instituted through a properly positioned endotracheal tube, with an initial O2 concentration of 100%. ABGs, preferably obtained through an arterial line, are analyzed as needed until the oxygenation and acid-base status of the patient stabilize. ABG analysis also helps differentiate between pulmonary and nonpulmonary (or cardiac) causes of hypoxemia and tissue hypoxia. Mechanical ventilation is adjusted to maintain a normal PaCO2 level. Hyperventilation is detrimental and should be avoided. Higher ventilatory rates and larger VT may cause hyperventilation. This hyperventilation may generate increased airway pressures and auto-PEEP, leading to an increase in cerebral venous and intracranial pressures and a decrease in coronary artery and cerebral arterial pressures.38 Cerebral blood flow may decrease, causing increased brain ischemia, if hyperventilation results in increased intrathoracic pressure. For details of the selection and use of mechanical ventilators and appropriate patient monitoring procedures, see Chapters 41 to 46.
[/level-membership-for-pulmolory-and-respiratory-category][not-level-membership-for-pulmolory-and-respiratory-category]
Emergency Cardiovascular Life Support
After reading this chapter you will be able to:
List the causes of sudden cardiac arrest (SCA).
List the signs of SCA, heart attack, stroke, and foreign body airway obstruction.
Describe how to perform cardiopulmonary resuscitation (CPR) on adults, children, and infants.
State how to administer synchronized cardioversion.
Describe how to evaluate quality and effectiveness of CPR.
List the complications that can occur as a result of resuscitation of SCA.
State when not to initiate CPR.
Describe how to apply key adjunct equipment during advanced cardiovascular life support (ACLS).
State common drugs and drug routes used during ACLS.
Describe how to monitor patients before cardiac arrest, during CPR, and after cardiac arrest.
Causes And Prevention Of Sudden Death
Sudden cardiac arrest (SCA) is a leading cause of death in many parts of the world.1 In the United States and Canada, approximately 350,000 people per year experience SCA and receive an attempted resuscitation.2 The incidence of out-of-hospital SCA is 50 to 55 per 100,000 persons per year.2 The incidence of in-hospital cardiac arrest is 3 to 6 per 1000 admissions. Pulseless ventricular rhythms are the first manifestation of cardiac arrest in 25% of cases.2,3 Successful resuscitation depends on immediate CPR and delivery of a shock before pulseless ventricular rhythms deteriorate into asystole. In cases of SCA related to asphyxia secondary to trauma, drug overdose, or upper airway obstruction, CPR with chest compressions and ventilation before the shock is critical.
Basic Life Support
1. Check for lack of movement or response and no normal breathing or only gasping.
2. If no response and no breathing or only gasping, check pulse within 10 seconds (health care providers only).
3. Activate emergency response system (get automated external defibrillator [AED] if close to your location).
4. If no AED is available, start chest compressions and rescue breathing for adult cardiac arrest (use cycles of 30 compressions to two ventilations).
5. Open airway and check breathing.
6. If not breathing, give two breaths that produce chest rise and immediately resume chest compressions (push hard and deep).
Steps 4 through 7 are referred to as the CABDs of resuscitation—circulation, airway, breathing, and defibrillation. Table 34-1 summarizes the CABDs of CPR for adults, children (1 year old to puberty), and infants (<1 year old).
TABLE 34-1
Steps for Cardiopulmonary Resuscitation (CPR) in Adults, Children, and Infants
| Procedure | Adult | Child | Infant |
| Compressions | |||
| Where to check pulse (limit pulse check to <10 sec) | Carotid artery | Carotid or femoral artery | Brachial artery |
| Hand placement | Heel of one hand on sternum in center of chest, between nipples. Second hand on top of first with hands overlapped and parallel | Lower half of sternum with heel of one hand or with two hands (for larger children). Do not compress over xiphoid | Sternum with two fingers placed just below nipple line in center of chest |
| Compression-to-ventilation ratio | One or two rescuers 30 : 2 | One rescuer 30 : 2; two rescuers 15 : 2 | One rescuer 30 : 2; two rescuers 15 : 2 |
| Cycles of compression-to-ventilation | 5 | 5 | 5 |
| Depth of compressions (push in hard and fast, allow chest to recoil fully) | 2 in | At least one-third anteroposterior diameter of chest or 2 in (5 cm) | At least one-third anteroposterior diameter of chest or in (4 cm) |
| Compression rate | 100/min | 100/min | 100/min |
| Breathing | |||
| Obstructive procedure | Responsive: If mild, allow victim to clear the airway by coughing. If severe, repeat abdominal thrusts until foreign body is expelled, or the choking victim becomes unresponsive. Consider chest thrusts if abdominal thrusts are ineffective, if rescuer is unable to encircle victim’s abdomen, or if victim is in the late stages of pregnancy | Same as for adult | Responsive: If mild, allow infant to clear the airway by coughing. If infant is unable to make a sound (severe obstruction), deliver five back blows (slaps) followed by chest thrusts repeatedly until object is expelled or infant becomes unresponsive. Abdominal thrusts should not be done on infants because they may damage the largely unprotected liver |
| Unresponsive: Carefully move victim to the ground, immediately activate EMS system, and begin CPR, but look into the mouth before giving breaths. If a foreign body is seen, it should be removed. Follow ventilation with chest compressions | Unresponsive: Activate EMS system and begin CPR, but look into the mouth before giving breaths. If a foreign body is seen, it should be removed. Follow ventilation with chest compressions | ||
| Rescue Breathing | |||
| Palpable pulse, but no spontaneous breaths or inadequate breathing | 10-12/min, 1 breath every 5-6 sec | 12-20/min, 1 breath every 3-5 sec, if palpable pulse ≥60/min | 20/min, 1 breath every 3 sec, if palpable pulse ≥60/min |
Restoring Circulation
Determining Pulselessness
Rule Of Thumb
Assessment of the pulse of an unresponsive patient by health care providers should be limited to 5 to 10 seconds to avoid delaying chest compressions. Pulse checks are difficult to accomplish with any fidelity. Pulse and rhythm checks should not be done after a shock until five cycles of CPR have been completed. Pulse checks should not be done by lay rescuers.4
Pulselessness is evaluated by palpating a major artery. In adults and children older than 1 year, the carotid artery in the neck or femoral artery should be palpated. To locate the carotid artery, the rescuer should maintain the head-tilt with one hand while sliding the fingers of the other hand into the groove created by the trachea and the large neck muscles (Figure 34-1). The carotid artery area must be palpated gently to avoid compressing the artery or pushing on the carotid sinus. Because the pulse may be slow, weak, or irregular, the artery may need to be assessed for approximately 10 seconds for the presence or absence of a pulse to be confirmed.
If the patient has a pulse but is not breathing, ventilation must be started immediately, at the appropriate rate of 8 to 10 breaths/min (every 6 to 8 seconds). If no pulse is palpable, external chest compressions must be interposed with ventilatory support (see Table 34-1).
Providing Chest Compressions
Adequate circulation can be restored in a pulseless victim using external chest compressions. The rescuer manually compresses the lower half of the sternum (for an adult patient) at a rate of 100 compressions/min. The duty cycle for downstroke and upstroke (release) is 600 msec with a 1 : 1 downstroke-to-upstroke ratio. It is very important to have a complete upstroke so as not to increase intrathoracic pressure during the diastolic phase. The best way to ensure that the upstroke is complete is for the rescuer to take his or her hand slightly off the chest between compressions.5 Cardiac output produced by external chest compressions is approximately one-fourth of normal cardiac output, with arterial systolic blood pressures between 60 mm Hg and 80 mm Hg. Blood flow during chest compression probably results from changes in the intrathoracic pressure.
Adults
The procedure for providing chest compressions to adults is as follows (Figures 34-2 and 34-3):
1. Place the victim in a supine position on a firm surface, such as the ground or the floor, because chest compressions are more effective when the victim is on a firm surface. When victims are in bed or on a stretcher, place a board or tray under them. A cardiac arrest board is ideal, but a removable bed piece or food tray may have to be used.
2. Expose the patient’s chest to identify landmarks for correct hand position. If the victim is fully clothed, quickly remove or cut off any clothing or underwear.
3. Choose a position close to the patient’s upper chest so that the weight of your upper body can be used for compression. If the patient is on a bed or stretcher, stand next to it with the patient close to that side. If the bed is high or you are short, you may need to lower the bed, stand on a stool or chair, or kneel on the bed next to the victim. If the patient is on the ground, kneel at his or her side.
4. Identify the lower half of the victim’s sternum, in the center of the chest between the nipples, and place the heel of your hand on the sternum with your other hand on top, and lock your elbows.6
5. Perform compression with the weight of your body exerting force on your outstretched arms, elbows held straight. Your shoulders should be positioned above the patient so that the thrust of each compression goes straight down onto the sternum, using your upper body weight and the hip joints as a fulcrum (see Figure 34-2). It is acceptable to let your hands leave the victim’s chest ever so slightly to ensure a complete upstroke (see Figure 34-3).
6. Compress the sternum 2 in (5 cm) at a rate of 100 compressions/min. The compression phase of the cycle should be equal in duration to the upstroke phase.
7. If CPR must be interrupted for transportation or advanced life support measures, resume chest compressions as quickly as possible. Compressions should not cease for more than 5 seconds (30 seconds if the victim is being intubated).
Children
1. Place the victim in the supine position on a firm surface. Small children may require additional support under the upper body; this is particularly true when chest compressions are given with mouth-to-mouth ventilation because extension of the neck raises the shoulders. The head should be no higher than the body.
2. As with an adult, identify the lower half of the sternum. Because the liver and spleen of younger children lie higher in the abdominal cavity, take special care to ensure proper positioning as described previously. However, use only one hand to compress. Use the other hand to maintain head position and maintain an airway.
3. Compress the chest approximately 2 in (5 cm) at a rate of 100 compressions/min. Generally, the heel of one hand is sufficient to achieve compression. As with adults, compression and relaxation times should be equal in length and delivered smoothly.
Infants
The procedure for infants (≤1 year of age) is as follows (Figure 34-4):
1. Use the lower half of the sternum for compression in an infant. Proper placement is determined by imagining a line across the chest connecting the nipples. Place your index finger along this line on the sternum. Then place your middle and ring fingers next to the index finger. Raise your index finger and perform compressions with the middle and ring fingers. Use the other hand to maintain the infant’s head position and airway.
2. Compress the sternum approximately 1.5 in (4 cm) at a rate of at least 100 compressions/min. Compression and upstroke phases should be equal in length and delivered smoothly. Your fingers should remain on the chest at all times.
Neonates
Chest compressions are indicated if the neonate’s heart rate decreases to less than 60 beats/min despite adequate ventilation with 100% oxygen (O2) for 30 seconds. Before starting chest compressions, the rescuer should ensure that the neonate is being ventilated optimally.7 Neonatal chest compressions are delivered on the lower third of the sternum to a depth of approximately one-third of the anteroposterior diameter of the chest to achieve an approximate rate of 100 compressions/min.7–10 Two methods have been described. The first method uses a “wraparound” technique (Figure 34-5). To use this method, the rescuer encircles the neonate’s chest with both hands and compresses the sternum with two thumbs, using the other fingers of both hands to support the neonate’s back. The rescuer should position the thumbs just below the victim’s intermammary line, taking care not to compress the xiphoid process. Compression should be performed smoothly, with downstroke and upstroke times approximately equal. Delivering a slightly shorter compression than relaxation phase may allow for more blood flow in a very young infant.11 In all infants, the chest should be allowed to expand fully after a compression. After every third compression, the neonate should receive a breath of 100% O2, coordinated with compressions to avoid simultaneous delivery. The second method, the two-finger technique (see Figure 34-4), may have advantages when access to the umbilicus is required.
Restoring the Airway
The most common cause of airway obstruction is loss of muscle tone, which causes the tongue to fall back into the pharynx, blocking airflow. Movement of the lower jaw and extension of the neck pulls the tongue from the posterior pharyngeal wall and opens the airway. One of two procedures can be used: (1) The head-tilt/chin-lift method is the primary procedure recommended for a layperson when spinal trauma is not suspected (Figures 34-6 and 34-7). (2) The jaw thrust is used mainly by trained clinicians when spinal neck injuries are suspected and is no longer recommended by the AHA for lay rescuers (see Figure 34-7). Health care providers should use a head-tilt/chin-lift procedure if the jaw thrust maneuver does not open the airway.4 One of these maneuvers usually can open the airway and may be the only lifesaving measure required. Research supports using manual in-line spinal immobilization rather than motion restriction devices that may complicate airway management during CPR.8 Cervical collars can cause increased intracranial pressure in a patient with a head injury.9 After the airway is cleared and opened, the rescuer must immediately assess the victim’s ventilation.
Restoring Ventilation
Before attempting to provide artificial ventilation, the rescuer should assess for the presence of breathing. To determine breathlessness, the rescuer places his or her ear over the victim’s mouth and nose while simultaneously observing for spontaneous chest movement (Figure 34-8). Breathlessness exists if no chest movement or breath sounds are present or only gasping is present. This evaluation should take no longer than 3 to 5 seconds to complete.
Providing Artificial Ventilation
Mouth-to-Mouth Ventilation
Adults
The procedure for adults is as follows (Figure 34-9):
1. Place the victim on his or her back on a hard, flat surface.
2. Kneel at the patient’s side, and open and clear the airway as previously described. Pinch the victim’s nose with your thumb and index finger close to the nares to prevent air from escaping during ventilation.
3. Take a slightly deeper than normal breath and deliver 500 ml over 1 second, while making a seal over the victim’s mouth. A good seal over the patient’s mouth is essential. If a good seal cannot be obtained using this method, attempt mouth-to-nose ventilation.
4. Remove your mouth from the patient’s mouth, and allow the victim to exhale passively. Provide a second breath after exhalation is complete.
5. After successfully delivering two breaths, immediately assess the circulatory status.
6. Should the initial attempt to ventilate fail, reposition the victim’s head and repeat the effort. If a second attempt at ventilation fails, the victim may have foreign body airway obstruction (FBAO), and the procedures for handling such situations described elsewhere in this chapter should be followed.
7. Assuming mouth-to-mouth ventilation is successful and the patient remains apneic, continue the effort at a rate of one breath every 6 to 7 seconds to maintain the minimal adult rate of 8 to 10 breaths/min.
Infants and Children
Airway opening maneuvers for children and infants are similar to maneuvers for adults, with several key differences. Anatomic differences in the infant’s airway make it especially susceptible to occlusion by the tongue. The infant’s head should be extended only slightly, or it should be tilted back gently into a neutral position when the head-tilt/chin-lift maneuver is used. The procedure for children and infants is as follows (Figure 34-10):
1. If the patient is an infant (<1 year old), create an airtight seal by placing your mouth over the infant’s nose and mouth (see Figure 34-10).
2. If the patient is a child between 1 year old and puberty, ventilate the victim’s lungs using the same technique as would be used for an adult (see Figure 34-9).
3. Provide an initial breath (over 1 second) sufficient to cause a visible rise in the chest. In infants, small puffs of air from the rescuer’s cheeks are usually sufficient to achieve adequate ventilation.
4. Remove your mouth, and allow the victim to exhale passively. Provide a second breath after this deflation pause.
5. After successfully delivering two breaths, immediately assess the pulse (<10 seconds).
6. If the initial attempt to ventilate fails, reposition the victim’s head and repeat the effort. A child’s head may need to be moved through a wide range of positions to secure an open airway. Hyperextension of a child’s neck can cause obstruction and should be avoided. If a second attempt at ventilation fails, the victim may have FBAO, and the appropriate procedures outlined elsewhere in this chapter should be followed.
7. Assuming mouth-to-mouth ventilation is successful and the child remains apneic, continue to provide one breath every 3 to 5 seconds to maintain a rate of 12 to 20 breaths/min.
Mouth-to-Nose Ventilation
Mouth-to-mouth ventilation cannot be performed in some situations; these include trismus (involuntary contraction of the jaw muscles, also known as lockjaw) and traumatic jaw or mouth injury. Also, sometimes it is difficult to maintain a tight seal with the lips using the mouth-to-mouth method. In these situations, mouth-to-nose ventilation should be used. The procedure is as follows (Figure 34-11):
1. Place the victim on his or her back.
2. Use the head-tilt/chin-lift maneuver to establish the airway, taking care to close the mouth completely.
3. Inhale slightly deeper than normal and exhale into the patient’s nose. Greater force may need to be applied than would be used with mouth-to-mouth ventilation because the nasal passageways are smaller.
4. Remove your mouth from the victim’s nose to allow the patient to exhale passively. If the patient does not exhale through the nose (because of nasopharyngeal obstruction from the soft palate), open the victim’s mouth or separate his or her lips to facilitate exhalation.
5. After successfully delivering two slow breaths, immediately assess the circulatory status.
6. If the victim remains apneic, maintain ventilation at the rate appropriate for his or her age.
Mouth-to-Stoma Ventilation
1. Place the victim on his or her back with the neck in vertical alignment. Usually, the neck does not need to be extended and the nose or mouth does not need to be sealed because oropharyngeal structures are bypassed by the stoma.
2. Ensure that the stoma is clear of any obstructing matter and breathe directly into the stoma (or tube). If the victim has a cuffed tracheostomy tube in place, inflate the cuff to prevent air from escaping around the tube. If the tube is uncuffed, the mouth and nose may need to be sealed off with your hand or a tight-fitting face mask, using a pediatric face mask to create an adequate peristomal seal for bag-mask ventilation.
3. After delivering two breaths, immediately assess the circulatory status.
4. If the victim remains apneic, maintain ventilation at the rate appropriate for his or her age.
One-Rescuer versus Two-Rescuer Adult Cardiopulmonary Resuscitation
Rule Of Thumb
Lay rescuers should be taught to do 100 compressions/min until the AED arrives for all age groups because it is easier to remember.4 Emphasis should be placed on teaching lay rescuers to “push hard and fast” on the sternum.
Rule Of Thumb
Health care providers should use a 30 : 2 compression-to-ventilation ratio on adults and children. A 3 : 1 compression-to-ventilation ratio for infants (≤1 year of age) should be used when there are two rescuers.4,10,11
Automated External Defibrillation
Early Defibrillation
1. The most common initial rhythm in witnessed sudden cardiac arrest is VF.
2. The treatment for VF is electrical defibrillation.
3. The probability of successful defibrillation diminishes rapidly over time.
Studies have shown that survival rates are highest when immediate bystander CPR is provided and defibrillation occurs within 5 minutes after SCA.12
The AHA recommendation is that automated external defibrillators (AEDs) be made available to individuals expected to respond to emergencies, such as police, security personnel, ski patrol personnel, flight attendants, and first-aid volunteers (Figure 34-12). Early defibrillation has already proven to be effective in saving lives of people who otherwise may have not been successfully resuscitated.12 After appropriate training and implementation of the CABs, this step is inserted as the letter D, for defibrillation. This step should be initiated within 2 minutes of when CPR is begun. EMS providers arriving at the scene of a cardiac arrest should give a period of CPR (five cycles, or about 2 minutes) before checking a rhythm and attempting defibrillation. If the EMS provider witnesses the collapse or for in-hospital situations, the rescuer should use the defibrillator as soon as it is available. In an adult drowning victim or a victim of FBAO who becomes unconscious, a health care provider working alone may give about five cycles (approximately 2 minutes) of CPR before activating the emergency response system.4
[/not-level-membership-for-pulmolory-and-respiratory-category]
