Central Venous Catheterization and Central Venous Pressure Monitoring
Central venous access remains a cornerstone of resuscitation and critical care in both the emergency department (ED) and intensive care unit. Advanced hemodynamic monitoring, rapid infusion of fluid, placement of transvenous pacemakers, and administration of selected medications all require reliable central venous access. Central venous catheterization has also gained acceptance in the resuscitation and treatment of critically ill children (see Chapter 19). Traditionally, the subclavian vein (SV), internal jugular (IJ) vein, and femoral vein have provided reliable and easily obtainable vascular access through the use of identifiable anatomic landmarks. Over the past decade, the increased availability of, training in, and provider competence in bedside ultrasonography have had a significant impact on the standard approach to both peripheral and central venous catheterization. Ultrasound-guided central venous catheterization has improved success rates, reduced complication rates, decreased the time required to perform the procedure, and resulted in overall cost savings.
Historical Perspective
In 1667, the first known central venous catheter (CVC) was placed into a human IJ vein by Lower for a blood transfusion into the carotid artery of a sheep.1 Modern central venous catheterization heralds back to at least 1928 when Werner Forssmann, a 25-year-old German surgeon, performed a venous cutdown on his own left antecubital vein, inserted a ureteral catheter to a distance of 65 cm, and then climbed several flights of stairs to the radiology suite to confirm that it terminated in the right atrium. Although the hospital fired Dr. Forssmann for not obtaining permission, he went on to win the 1956 Nobel Prize for his pioneering efforts.1,2
Duffy reported a large series of femoral, jugular, and antecubital vein catheterizations in 1949.3 Aubaniac developed subclavian venipuncture while working on French Army casualties between 1942 and 1952.4 His infraclavicular SV approach was refined by Keeri-Szanto in 1956, and the supraclavicular approach to the vein was first described by Yoffa in 1965.5,6 Aside from Duffy’s earlier work, Hermosura (1966) and English (1969) are generally credited with scientific development of the percutaneous IJ approach.7
The most important advancement in modern CVC came in 1953 when the Swedish radiologist Sven Seldinger had the idea of advancing large catheters over a flexible wire that was inserted through a percutaneous needle.8,9 The role of central venous pressure (CVP) monitoring in the maintenance of optimal blood volume helped popularize central catheterization in the United States.10 This was accelerated by the advent of the pulmonary artery catheter, which was developed by Jeremy Swan and William Ganz in 1968.11 Swan, who was inspired by his observations of a sailing boat during a picnic with his children, developed a flow-directed balloon that allowed measurement of pulmonary artery pressure.12
Anatomy
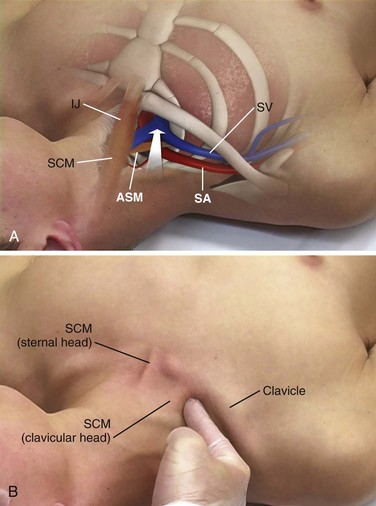
The SV begins as a continuation of the axillary vein at the outer edge of the first rib. It joins the IJ vein to become the innominate (sometimes referred to as the brachiocephalic) vein 3 to 4 cm proximally. The SV has a diameter of 10 to 20 mm, is approximately 3 to 4 cm long, and is valveless. After crossing over the first rib, the vein lies posterior to the medial third of the clavicle. It is only in this area that there is an intimate association between the clavicle and the SV. The costoclavicular ligament lies anterior and inferior to the SV, and the fascia contiguous to this ligament invests the vessel. Posterior to the vein and separating it from the subclavian artery is the anterior scalene muscle, which has a thickness of 10 to 15 mm. The phrenic nerve passes over the anterior surface of the scalene muscle laterally and runs immediately behind the junction of the SV and the IJ vein. The larger thoracic duct (on the left) and the smaller lymphatic duct (on the right) pass over the anterior scalene muscle and enter the SV near its junction with the IJ vein. Superior and posterior to the subclavian artery lies the brachial plexus. The dome of the left lung may extend above the first rib, but the right lung rarely extends this high (Fig. 22-1).
IJ Vein
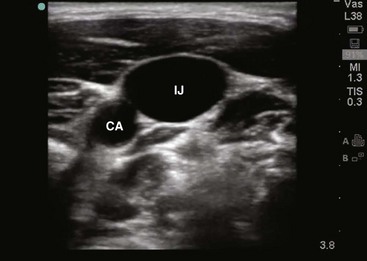
The IJ vein begins just medial to the mastoid process in the jugular foramen at the base of the skull and is formed by the inferior petrosal sinus and the sigmoid sinus. It runs inferiorly and passes under the sternal end of the clavicle to join the SV and form the innominate or brachiocephalic vein. At the level of the thyroid cartilage, the IJ vein, the internal carotid artery, and the vagus nerve course together in the carotid sheath just deep to the sternocleidomastoid (SCM) muscle. Within the carotid sheath, the IJ vein typically occupies the anterior lateral position and the carotid artery lies medial and slightly posterior to the vein. This relationship is relatively constant, but studies have found that the carotid artery may overlap the IJ. Note that normally the IJ vein migrates medially as it nears the clavicle, where it may lie directly over the carotid artery. When using the most common (central) approach, the IJ tends to be more lateral than expected.13,14 Furthermore, in 5.5% of those studied, the IJ vein may even be medial to the carotid artery.14–17 The relationship between the IJ vein and the carotid artery also depends on head position. Excessive head rotation can cause the carotid artery to rotate over the IJ vein.18,19
Generally, the right IJ is bigger than the left IJ because of its connection to the SV and the right atrium. The IJ vein can be pulsatile, but in contrast to the aorta, these pulsations are not palpable. When visualized, however, the presence of venous pulsations can give an indication of patency of the IJ vein to the right atrium. The IJ vein also changes size with respiration. Because of the negative intrathoracic pressure at end-inspiration, blood in the IJ vein is actually drawn into the right atrium and the diameter of the IJ vein shrinks. In contrast, at end-expiration the increased intrathoracic pressure will limit return of blood to the right atrium and the diameter of the IJ vein will increase. Another unique characteristic of the IJ vein is its distensibility. The IJ vein will enlarge when pressure in the vein is increased, such as when flow of blood back to the right atrium is obstructed, as with thrombosis. This distensibility can be advantageous for the placement of central venous access. Use of a head-down (Trendelenburg) position or a Valsalva maneuver will increase the diameter of the IJ vein and thereby increase the likelihood of successful puncture (Fig. 22-2).
Femoral Vein
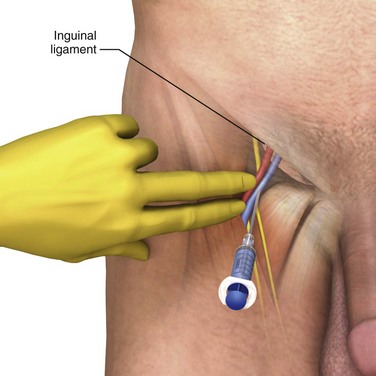
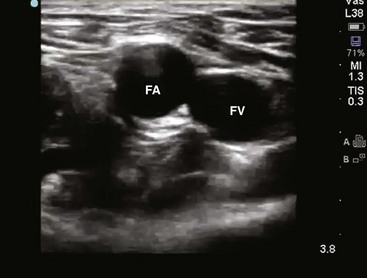
The femoral anatomy is less complex than that of the neck and shoulder and contains fewer vital structures. The femoral vein is most easily cannulated percutaneously in patients with a palpable femoral pulse. The femoral vein begins at the adductor canal (also known as Hunter’s canal) and ends at the inferior margin of the inguinal ligament, where it becomes the external iliac vein. It is contained within the femoral triangle (inguinal ligament, medial border of the adductor longus, and lateral border of the sartorius muscle). Medially, the femoral vein abuts a robust system of lymphatics. Laterally, the vein is intimately associated with the femoral artery. The femoral nerve courses down into the leg just lateral to the femoral artery. These relationships from lateral to medial can be remembered with the mnemonic NAVEL (nerve, artery, vein, empty space, lymphatics). Note that as the femoral artery and vein course down the leg within the femoral sheath, their side-by-side relationship frequently rotates such that the femoral artery may lie on top of the vein. Therefore, to avoid arterial puncture, keep cannulation attempts just under the inguinal ligament. When cannulating this vessel distal to the inguinal ligament, ultrasound guidance can be helpful to avoid arterial puncture (Fig. 22-3).
Indications
Central venous access has several clinical indications (see Review Box 22-1). If necessary, any central venous approach could be used for each of these situations. However, certain approaches offer advantages over others in specific clinical settings. The clinical indications are discussed in detail in the following sections.20–22
CVP Monitoring and Oximetry
For a period, pulmonary artery catheterization somewhat supplanted CVP monitoring; however, there is little evidence that this practice has any benefit with regard to patient mortality or quality of life. In the specific setting of resuscitation of patients in septic shock, CVP monitoring has reemerged as an important component of “early goal-directed therapy.”23,24 Continuous or episodic measurements of central venous O2 saturation play a prominent role in current protocols for the aggressive treatment of septic shock.23,24
Central venous catheterization is widely used as a vehicle for rapid volume resuscitation. Notwithstanding, short large-caliber peripheral catheters can be as effective as central access because of the properties of Poiseuille’s law, which states that the rate of flow is proportional to the radius of the catheter and inversely proportional to its length.3 To illustrate, the gravity flow rate of saline through a peripheral 5-cm, 14-gauge catheter is roughly twice that through a 20-cm, 16-gauge CVC. Consequently, placement of large-bore peripheral catheters is generally the fastest method of volume loading.
Delivery of High-Flow Fluid Boluses and Blood Products
The advent of thermoregulating high-volume rapid infusers affords the advantage of using central venous catheterization in the setting of severe hemorrhagic shock or hypothermia. The available systems can infuse blood warmed to 37°C through an 8.5-Fr introducer sheath 25% more rapidly than through a 14-gauge peripheral intravenous (IV) line and up to 50% faster than through an 18-gauge peripheral IV line.25 The Level 1 Rapid Infuser and the Belmont FMS 2000 are examples of modern systems with infusion rates as high as 1500 mL/min.25 Massive air embolism was a concern with early rapid infusers, but safety precautions have now been engineered to prevent this. Still, if the catheter is misplaced, fluid or blood can be rapidly infused into the thorax, mediastinum, or peritoneum with serious consequences.
Emergency Venous Access and Inability to Achieve Peripheral Access
The predictable anatomic locations of the subclavian and femoral veins and the speed with which they can be cannulated have prompted their use in cardiac arrest and other emergency situations. The need for a central line during cardiopulmonary resuscitation (CPR) is controversial.26–28 When achieved easily, central venous cannulation, especially via the IJ or SV route, is preferred over peripheral venous access because it provides a rapid and reliable route for the administration of drugs to the central circulation of patients in cardiac arrest. With resuscitation for aortic catastrophes or thoracoabdominal trauma, two CVCs, “one above and one below” the diaphragm, are often used.
Patients with a history of IV drug use, major burns, chronic disease, dehydration, or morbid obesity and those who require long-term access may have inadequate peripheral IV sites. Central venous cannulation may be indicated as a means of venous access in these patients even under nonemergency conditions.29 More recently with the use of ultrasound, deep brachial, axillary, and basilic vein cannulation may be attempted before central venous catheterization. This approach avoids the complications that can be associated with central venous access.
Routine Serial Blood Drawing
Additionally, serial lactate levels may help guide early goal-directed resuscitation. With an imbalance in oxygen supply (Do2) and consumption (Vo2), tissue hypoperfusion and hypoxia lead to anaerobic metabolism. The final product of this process is lactate. Arterial lactate levels would best represent overall perfusion since such samples contain blood coming from the pulmonary veins, superior vena cava (SVC), and inferior vena cava (IVC). Peripheral lactate preferentially reflects perfusion and metabolism in the compartment from which the blood was drawn, but not overall perfusion. Arterial and central venous lactate correlate closely more than 96% of the time, whereas peripheral venous lactate and arterial lactate correlate only 87% of the time.30
Infusion of Hyperalimentation and Other Concentrated Solutions
Central catheters, though safer than peripheral IV lines, are not immune to extravasation; indeed, fatal cases have been reported if the catheter becomes wedged up against the vessel wall, valves, or endocardium.31 Strategies to avoid this complication include delivering vesicant drugs only through the distal ports or reconfirming that the proximal port is safely in the vein by aspirating blood through it.31
Other Indications
Other indications for central venous access include insertion of a pulmonary artery catheter or transvenous pacemaker, cardiac catheterization, pulmonary angiography, and hemodialysis. A pulmonary artery catheter can be valuable for determining fluid and hemodynamic status in the critically ill. Its widespread use in the 1980s and 1990s drew heavy criticism because data showing a benefit in patient-oriented outcomes were lacking. Pulmonary artery catheters have subsequently lost popularity and should be used only when the diagnostic benefits outweigh the potential risks.32,33 Catheters such as the Uldall and Quinton devices can be inserted within minutes, thereby permitting emergency or short-term hemodialysis. However, these catheters are very large and relatively stiff and have been known to perforate the vena cava or atrial walls, with fatal outcomes.34,35 Extra caution should be applied during their insertion, possibly under ultrasound or fluoroscopic guidance.
Contraindications
General contraindications to the various techniques of central venous access are presented in Review Box 22-1. Table 22-1 lists the general advantages and disadvantages with each approach. Most contraindications listed are relative and should be viewed in the context of the patient’s overall condition, urgency of need, and availability of alternative options for vascular access. Perhaps the only true absolute contraindication is insertion of catheters impregnated with antibiotics (most commonly tetracycline, rifampin, or chlorhexidine) if the patient has a serious allergy to the drug.36,37 Local cellulitis and distorted local anatomy or landmarks are relative contraindications to any access route. Each technique is contraindicated in patients with distorted local anatomy or landmarks preventing safe insertion. Insertion of catheters through freshly burned regions, though somewhat challenging, is not associated with a higher incidence of infection until approximately 3 days after the burn, when bacterial colonization accelerates.38,39 One of the more commonly encountered impediments to CVC placement is morbid obesity.40 Surface landmarks in the neck are often obscured, and an abdominal pannus can block the femoral access site and consequently require deeper insertions and steeper angles. An ultrasound-guided IJ approach is safer under these circumstances.40 Insertion of another catheter on the same side as a preexisting one risks the complication of entrapment.41 Combativeness is an important factor in the decision to place a CVC because the risk for mechanical complications greatly increases in uncooperative patients. Sometimes it is best to sedate and intubate critically ill patients before attempting central venous catheterization. Other relative contraindications include conditions predisposing to sclerosis or thrombosis of the central veins, such as vasculitis, previous long-term cannulation, or illicit IV drug use via any of the deep venous systems.
TABLE 22-1
Advantages and Disadvantages of Central Venous Access Techniques
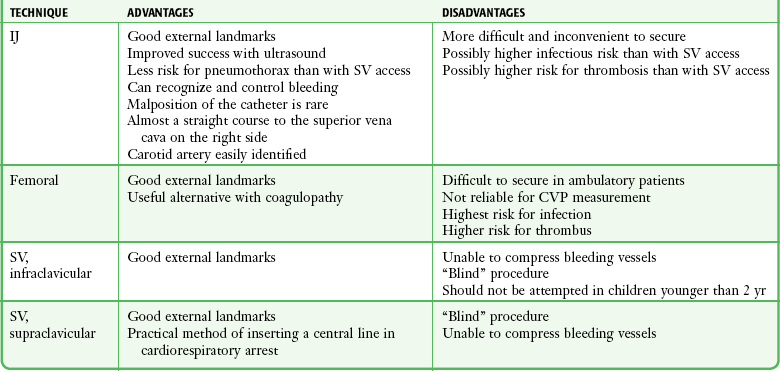
CVP, central venous pressure; IJ, internal jugular; SV, subclavian vein.
Coagulopathy is a frequent concern surrounding insertion of a CVC, with the overall risk for clinically significant hemorrhage in these patients approximating 2%.42 A transfusion of fresh frozen plasma is commonly used to correct any existing coagulopathy. However, a recent review concluded that if good technique is used, correction of coagulopathy is not generally required before or during the procedure.43 Mumtaz and coworkers found that even in thrombocytopenic patients (platelet count <50 × 109/L), bleeding complications occurred about 3% of the time and were limited to bleeding at the insertion site44; these complications were managed with additional sutures. Although the occasional patient may require a blood transfusion or replacement of clotting factors if a hemorrhagic complication arises, prophylactic correction of an abnormal international normalized ratio or platelet count before the procedure is not routinely necessary.43–45 Risk can be further reduced in coagulopathic patients with the use of ultrasound-guided placement techniques.14,46–49
Subclavian Approach
SV access is contraindicated in patients who have previously undergone surgery or sustained trauma involving the clavicle, the first rib, or the subclavian vessels; those with previous radiation therapy involving the clavicular area; those with significant chest wall deformities; and those with marked cachexia or obesity. Patients with unilateral deformities not associated with pneumothorax (e.g., fractured clavicle) should be catheterized on the opposite side. Subclavian venipuncture is not contraindicated in patients with penetrating thoracic wounds unless the injuries are known or suspected to involve the subclavian vessels or SVC. Generally, cannulate the vein on the same side as the chest wound to avoid the possibility of bilateral pneumothoraces. When (preexisting) SV injury is suspected, cannulate on the opposite side. Exercise greater caution when placing a CVC in the SV in coagulopathic patients because this vessel is not compressible. Formerly, subclavian venipuncture was not recommended for use in small children, but in experienced hands it has been demonstrated to be safe.50–52
IJ Approach
Cervical trauma with swelling or anatomic distortion at the intended site of IJ venipuncture is the most important contraindication to the IJ approach. Likewise, the presence of a cervical collar is problematic. Although bleeding disorders are relative contraindications to central venous cannulation, the ultrasound-guided IJ approach is preferred over the SV route because the IJ site is compressible. However, prolonged compression of the artery to control bleeding could impair the cerebral circulation if collateral blood flow is compromised. In a study by Oguzkurt and colleagues, only minor bleeding complications occurred in less than 2% of patients after ultrasound-guided IJ catheterization.47 In the setting of severe bleeding diatheses, the ultrasound-guided femoral approach is an acceptable alternative. Ultrasound-guided IJ placement is preferred in patients with abnormal anatomy from previous IJ trauma, small IJ vessels, and morbid obesity. Historically, carotid artery disease (obstruction or atherosclerotic plaque) is a relative contraindication to IJ cannulation because inadvertent puncture or manipulation of the artery could dislodge a plaque. If a preceding SV catheterization has been unsuccessful, the ipsilateral IJ route is generally preferred for a subsequent attempt. In this manner, bilateral iatrogenic complications can be avoided.
Femoral Approach
Contraindications to femoral cannulation include known or suspected intraabdominal hemorrhage or injury to the pelvis, groin, iliac vessels, or IVC. Additionally, avoid the femoral approach when known or suspected deep venous thrombosis is present. Palpation for femoral pulsations during CPR is difficult, and the pulsations are often venous rather than arterial.28,53 Ultrasound-guided catheterization of the femoral vein during CPR is more successful and less likely than the standard landmark-oriented approach to incur inadvertent arterial puncture.28
Procedure
The most commonly used method for central venous cannulation is the Seldinger (guidewire) technique, in which a thin-walled needle is used to introduce a guidewire into the vessel lumen. Seldinger originally described this technique in 1953 as a method of placing a catheter for percutaneous arteriography.17 The Seldinger technique is illustrated in Figure 22-9. To obtain vascular access, insert a small needle into the intended vessel. Once the introducer needle is positioned within the lumen of the vessel, thread a wire through the needle and then remove the needle. The wire, now within the vessel, serves as a guide over which the catheter is inserted. Although the Seldinger technique involves several steps, it can be performed quickly once mastered. More importantly, this technique broadens the application of central venous cannulation by permitting the insertion of standard infusion catheters, multilumen catheters, large-bore rapid infusion systems, introducer devices, hemodialysis devices, and even peripheral cardiopulmonary bypass cannulas. Given this flexibility, the use of Seldinger-type systems is advantageous despite their greater cost.
Ultrasound guidance has revolutionized the cannulation of central veins. As with all anatomic structures in the human body, veins are highly variable in their location. Not surprisingly, research has demonstrated that the ability to see the internal structure’s location and proximity to other structures greatly increases the safety and success rate while decreasing the time required to perform the procedure.46–49,54–56 These advantages have been recognized by national organizations. In a report from the Agency for Healthcare Research and Quality (AHRQ), use of ultrasound guidance was listed as one of the top 10 ways to reduce morbidity and mortality.57 Many hospitals now require the use of ultrasound guidance for the placement of all CVCs.
The basic materials required for central venous cannulation are shown in Review Box 22-1 and are discussed in further detail below. The catheter may be a component in a guidewire system or may be of the over-the-needle variety (the other widely used method for catheter placement). Several types of CVC Seldinger-type prepackaged kits are commercially available, and the variations in each kit are discussed in the next section.
Equipment
Preparation and organization of equipment ahead of time are imperative for a successful procedure. Most catheters now come from the manufacturer in convenient sterile kits. We strongly recommend stocking all additional equipment such as sterile gowns, gloves, and drapes in a dedicated “central line cart.” This is a fundamental part of the “bundling” practice that has been shown to reduce the search for supplies, improve compliance with full-barrier technique, and subsequently decrease catheter-related infections.58–63 Sterile barrier precautions with cap, face mask, sterile gown, and gloves should be used at all times during insertion of CVCs.61,64,65
Ultrasound
Historically, many clinicians preferred to first locate the position of a central vein with a small exploratory or “finder” needle rather than directly cannulating the vein with a larger needle to accommodate a guidewire or catheter. This practice is less practical for the SV approach and has largely been replaced with the use of bedside ultrasound. Ultrasound-guided CVC placement allows the provider to survey the anatomy before the procedure, guide insertion of the needle into the correct vessel, and confirm placement of the catheter in the vessel.14,47–49 See the Ultrasound Box.
Needle
Virtually any needle or catheter can be used to introduce a guidewire into a vessel, but there are advantages to using needles specifically designed for passage of a guidewire. These needles must be large enough to accommodate the desired wire yet be as small as possible to minimize bleeding complications. The introducer needles provided with CVCs or introducer devices are usually thin walled to maximize lumen size relative to the overall needle diameter. If a needle that is not thin walled is used, choose a size that is 1 gauge smaller (larger bore) than that listed in Table 22-2. If unsure, simply test the equipment first to ensure compatibility.
TABLE 22-2
Needle Sizes for Venous and Arterial Catheters*
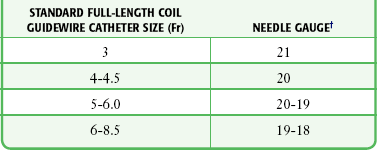
*Any size of catheter from 3.0 to 8.5 Fr may be introduced with a 22-gauge needle if a solid wire (e.g., Cor-Flex, Cook Critical Care) is used.
†All needle gauges are for thin-walled needles only, the type supplied in central line kits.
Standard needles may have a uniformly straight-bore lumen throughout their length. A wire passing into a straight needle may encounter an obstacle at the proximal end. The proximal end of a Seldinger needle incorporates a funnel-shaped taper that guides the wire directly into the needle (Fig. 22-4). It is advisable to use a non–Luer-Lok or slip-tip type of syringe because the added twisting that is required to remove a Luer-Lok syringe from the introducer needle may dislodge a tenuously placed needle. Safety syringe systems exist that permit passage of the wire without removal of the aspirating syringe by using a central tunnel in the barrel. This device incorporates a hollow syringe through which the guidewire can pass directly into the introducing needle without detachment. It also reduces the risk for air embolism, which can occur when the needle is open to air. It is not uncommon for the wire to become snagged at the junction of the safety syringe and the needle hub. In this case, simply remove the syringe and insert the wire directly.
Guidewire
Two basic types of guidewires are used: straight and J shaped. Straight wires are for use in vessels with a linear configuration, whereas J-wires are for use in tortuous vessels. Both wires have essentially the same internal design (Fig. 22-5). The flexibility of the wire is the result of a stainless steel coil or helix that forms the bulk of the guidewire. Within the central lumen of the helix is a straight central core wire, called a mandrel, that adds rigidity to the steel coil. The mandrel is usually fixed at one end of the helix and terminates 0.5 and 3.0 cm from the other end to create a flexible or floppy tip. Wires are also available with two flexible ends, one straight and the other J shaped. The flexible end of the guidewire allows the wire to flex on contact with the wall of a vessel. If the contact is tangential, as with an infraclavicular approach to the SV, a straight wire is generally preferred. If the angle is more acute, as with an external jugular approach to the SV, or if the vessel is particularly tortuous or valves must be traversed, a J-shaped wire may be used. The more rounded leading edge of the J-wire provides a broader surface to manipulate within the vessel and decreases the risk for perforation. This is especially advantageous when attempting to thread a wire through a vessel with valves. Many guidewires also contain a straight safety wire that runs parallel to the mandrel to keep the wire from kinking or shearing.
It is important to emphasize that guidewires are delicate and may bend, kink, or unwind. A force of 4 to 6 lb may cause a wire to rupture. Wires should thread easily and smoothly and never be forced; the worst complications of CVC placement are associated with the application of excessive force across parts of the apparatus that are not threading smoothly.66 If a wire is not passing easily, withdraw the wire and the introducer needle as a single unit. Embolization of portions of the guidewire is possible, and sharp defects in the wire may perforate vessel walls (Fig. 22-6). If one encounters a good flash of blood but cannot readily manipulate the wire, this may indicate that the outer wire coils are entrapped against the proximal sharp edge of the needle bevel. The J can be straightened remotely by applying gentle force on the wire in each direction, which may allow retrieval of the wire.55 Wires should be inspected for small defects such as kinks, sharp ends, or spurs before use and especially after a failed attempt. Wires may be threaded into the introducer needle hub more easily by using the plastic sleeve attached to the wire as shown in Figure 22-5C.
Catheters
A number of different catheter and introducer devices have been developed, and the method of passage into the vessel varies accordingly. The functions of catheters have become more sophisticated as well, most notably for continuous monitoring of central venous oxygen saturation and cardiac output. Generally, one can place single-, double-, and triple-lumen catheters by sliding the catheter directly over a guidewire into the intended vessel (Fig. 22-7A). Catheter insertion lengths are listed in Table 22-3. Larger catheters or devices without lumens can be introduced with a sheath-introducer system. Over-the-needle catheters can be introduced once intravascular placement is attained.
TABLE 22-3
Formulas for Catheter Insertion Length Based on Patient Height and Approach
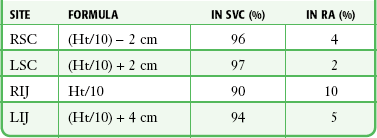
From Czepizak C, O’Callaghan JM, Venus B. Evaluation of formulas for optimal positioning of central venous catheters. Chest. 1995;107:1662. Reproduced by permission.
The Desilets-Hoffman–type sheath introducer became available in 1965 to aid in arteriography procedures that require many catheter changes. This device is commonly but incorrectly termed a “Cordis,” which is a proprietary trade name. The sheath-introducer unit includes two parts, an inner dilator and an outer sheath as shown in Figure 22-7B. The dilator is rigid with a narrow lumen to accommodate the guidewire. It is longer and thinner than its sheath and has a tapered end that dilates the subcutaneous tissue and vessel defect created by the needle. The sheath (or introducer catheter when used as a cannula for inserting Swan-Ganz catheters, transvenous pacemakers, or other devices) has a blunt end and is simply a large-diameter catheter.
Special catheters have been developed to prevent bacterial contamination and line sepsis.37,67,68 These catheters are impregnated with either antiseptics (silver sulfadiazine and chlorhexidine) or antibiotics (minocycline, rifampin, or cefazolin) to reduce bacterial colonization and microbial growth. Also, heparin-coated catheters are available that prevent fibronectin binding, thereby inhibiting the formation of bacterial biofilm on the catheter’s surface. These catheters can decrease catheter-associated infection (CAI) significantly and are cost-effective when the prevalence of CAI is greater than 2%.42 They should be avoided in patients with a history of heparin-induced thrombocytopenia.69 Minocycline- and rifampin-impregnated catheters are currently considered to be the most effective.37,67 Other interventions that decrease central line infections include the use of full sterile barrier precautions,61,65 skin preparation with chlorhexidine solution,61–63,70 and placement by experienced physicians.65,71–73
Many different catheters are currently manufactured. Although this leads to great flexibility in choice and cost, it often results in confusion when a clinician is handed an unfamiliar catheter during an emergency. It is best to use one brand routinely and to ensure that all medical personnel are thoroughly familiar with its use.74
Technique
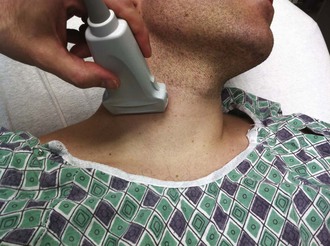
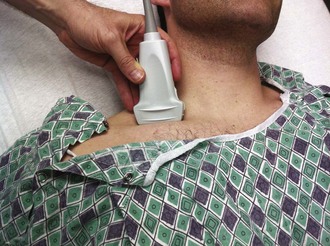
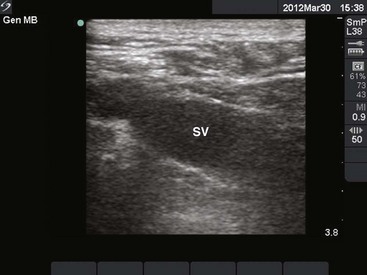
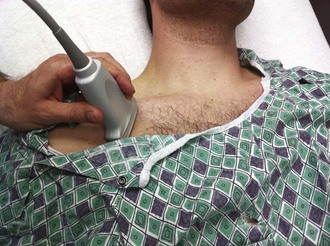
When possible, discuss the procedure with the patient and obtain written informed consent. Place the patient and yourself in an appropriate position for the specific vessel being accessed. If available, perform an ultrasound survey to identify the patient’s anatomy, ensure vessel patency, and confirm the puncture site (Fig. 22-8). Ultrasound-guided CVC placement has been shown to decrease procedure times, as well as complication rates.46–49 Additionally, compliance with a central line bundling policy has been shown to significantly decrease central line–associated bloodstream infections.60–63 Prepare and drape the puncture site while maintaining sterile technique, and observe universal precautions throughout the procedure (Fig. 22-9, steps 1 and 2). A gown, surgical cap, mask, eye protection, and sterile gloves should be worn throughout the procedure when possible. When performing ultrasound-guided placement of a CVC, ensure that a sterile transducer sheath and sterile transducer gel are used during the procedure (see Fig. 22-9, step 3). Using an assistant will prove valuable in patient preparation, maintenance of sterility, and handling of the equipment.
Guidewire Placement with the Seldinger Technique
When performing ultrasound-guided placement of a CVC, begin with an ultrasound survey of the target vein, surrounding structures, and venipuncture location, as shown in Figure 22-8. Veins can easily be distinguished from the nearby artery by applying external pressure with the transducer. Veins collapse completely with pressure, whereas arteries may deform but do not usually collapse. Occasionally, the vein does not collapse with pressure. If this occurs, a thrombus may be present in the vein or the structure has been misidentified. If a suspected vein does not collapse with pressure, it is not an appropriate vessel for cannulation. If available, Doppler functions may also be helpful in the differentiation of veins and arteries. Select a venipuncture location where branching of the vein will allow the shortest path of the needle, will not obstruct passage of the catheter, and will not allow inadvertent puncture of other vital anatomic structures. (See Chapter 66 for additional information and descriptions of the ultrasound technique.)
Prepare the catheter for insertion by flushing each lumen with sterile normal saline. Anesthetize the insertion site with lidocaine or bupivacaine (see Fig. 22-9, step 5). Attach a small syringe to an introducing needle that is large enough to accommodate the guidewire. Insert the needle and syringe together. Slowly advance the needle into the vein and apply steady negative pressure on the syringe (see Fig. 22-9, step 6). When performing ultrasound-guided CVC placement, follow the needle trajectory in the soft tissue and observe penetration of the vessel. If the tip of the needle is not visualized at all times with ultrasound, the needle may be passed into structures other than the vein. The key concept in using ultrasound guidance for venous access is to visualize the tip of the needle at all times during cannulation (Fig. 22-10). Once the tip of the needle enters the vessel lumen, blood will be aspirated freely. Stabilize the needle hub to prevent movement of the needle and displacement of the tip from the vessel, and remove the syringe. The need to disconnect the syringe can be eliminated by use of the Arrow Safety Syringe. After removing the syringe, cap the needle hub with your thumb before passing the guidewire to minimize the potential for air embolism.
Introduce the flexible end of the guidewire into the hub of the needle (see Fig. 22-9, step 7). It may be easier to introduce the J-wire by advancing the plastic sleeve contained in the kit onto the floppy end of the wire to straighten the J shape. This straightened end is then introduced into the needle hub. The guidewire should thread smoothly through the needle into the vessel without resistance. Do not force the wire if resistance is encountered, but remove it from the needle and reattach the syringe to aspirate blood and reconfirm intravascular needle placement. It is important for the wire to slip easily from the needle during removal. If resistance to removal of the wire is felt, the wire and needle should be removed as a single unit to prevent shearing of the wire and resultant wire embolism. It has been recommended by some that no wire should ever be withdrawn through the introducing needle.75 Although there are no clinical data to support this recommendation and newer wires are stronger and more resistant to shearing, it represents the safest course of action. The recommendation to remove the needle and wire as a unit is sometimes disregarded because of reluctance to abandon a potentially successful venipuncture. The clinician performing the procedure must use both caution and good judgment to determine the best course of action but should not withdraw the guidewire against resistance. Manipulation of the wire within an introducer needle should be done only with standard coil guidewires. Solid wires (such as Cor-Flex Wire Guides from Cook Critical Care) have a small lip at the point at which the flexible coil is soldered to the wire. This lip can become caught on the edge of the tip of the needle and shear off the coil portion of the wire. Solid wires must thread freely on the first attempt or the entire wire and needle assembly must be removed. Keep backup wires on hand.
If threading easily, advance the guidewire until at least one quarter of the wire is within the vessel. The further into the vessel the wire extends, the more stable its location when the catheter is introduced. However, advancing the guidewire too far may result in ventricular ectopy secondary to endocardial irritation, myocardial puncture leading to tamponade, or entanglement in a previously placed pacemaker, internal defibrillator, or IVC filter. In both the left and right IJ vein and infraclavicular SV approaches, fluoroscopic study during passage of the guidewire has determined the mean distance from skin to the SVC-atrial junction to be 18 cm.75 This distance has been recommended as the greatest depth of guidewire insertion for these approaches. It should be noted that 18 cm is not necessarily the appropriate final depth for the catheter being placed (see discussion below).
Occasionally, a wire threads easily past the tip of the needle and then suddenly will not advance farther. If the introducer needle demonstrated free return of blood at the time of wire entry and the initial advancement of the wire met no resistance, the two options are to halt the procedure or seek confirmation of wire position. The guidewire within the lumen of the vessel can be visualized and confirmed via cross-sectional and longitudinal views on ultrasound. Alternatively, the needle may be removed, the wire fixed in place with a sterile hemostat, and a radiograph taken to confirm the position of the wire.75,76 A freely advancing wire may suddenly stop once it is well within a vessel if the vessel makes an unsuspected bend or is being compressed or deviated by another structure, such as a rib or muscle. This seems especially common with the infraclavicular approach to the SV and can sometimes be remedied by a more lateral approach.
Sheath Unit and Catheter Placement
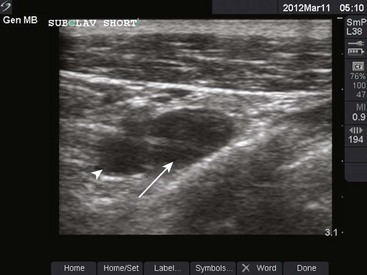
Once the wire is placed into the vessel, remove the needle in preparation for passage of the catheter (see Fig. 22-9, step 8). Proper positioning of the guidewire within the vessel lumen can be confirmed by cross-sectional and longitudinal ultrasound imaging (Fig. 22-11).76 This can be done at any point while inserting the wire to ensure that the correct vessel has been cannulated and that puncture of the posterior wall has not occurred. This technique can be quite useful when resistance is encountered while feeding the guidewire. A small skin incision is required at the site of the wire to widen the opening (see Fig. 22-9, step 9). Make the incision approximately the width of the catheter to be introduced and extend it completely through the dermis.
When placing soft multiple-lumen catheters, the tissue must be dilated from the skin to the vessel before placement of the catheter. Thread the guidewire through the distal opening of the rigid dilator until it extends through the proximal end of the dilator (see Fig. 22-9, step 10). The wire must always be visibly protruding from the end of the dilator or catheter during insertion to avoid inadvertent advancement of the wire into the circulation and potential loss of the wire. While maintaining control of the guidewire proximally, thread the dilator over the wire into the skin with a twisting motion. Advance the rigid dilator only a few centimeters into the vessel, and then remove it. Once the dilator is removed, thread the soft catheter into position over the wire. Placement of multiple-lumen catheters requires identification of the distal lumen and its corresponding hub. Find the distal lumen at the very tip of the catheter. The corresponding hub is usually labeled “distal” by the manufacturer. If there is any confusion, inject a small amount of sterile saline through each hub until it is observed exiting the distal lumen. Once the distal hub is identified, remove its cover cap to allow passage of the guidewire. Place the catheter by threading the guidewire into the distal lumen and advancing it until it protrudes from the identified hub (see Fig. 22-9, step 11). It is imperative that the guidewire protrude from the catheter hub and that it be firmly grasped as the wire and catheter are advanced. If the wire does not protrude from the proximal end of the catheter, withdraw the wire at the skin entry point until it protrudes enough to be grasped. While maintaining control of the guidewire proximally, advance the catheter into the vessel to the desired catheter insertion length (see Fig. 22-9, step 12). Ultrasonography can be used to verify proper catheter placement. After insertion of the catheter the wire must be removed (see Fig. 22-9, step 13) and the catheter must be anchored to the skin with sutures. When removing the wire from a catheter it must slip out easily. If any resistance is met, remove both the wire and the catheter as a single unit and reattempt the procedure. A common cause of a “stuck wire” is a small piece of adipose tissue wedged between the wire and the lumen of the catheter. Avoid this problem by creating a deep enough skin nick and adequate dilation of the tract before inserting the catheter.
When placing a single-lumen, Desilets-Hoffman sheath-introducer system, the dilator and larger single-lumen catheter are inserted simultaneously as a dilator-sheath unit. The dilator-sheath unit must first be assembled by inserting the dilator through the catheter’s diaphragm (Fig. 22-12, step 2). When assembled correctly, the dilator “snaps” into place within the lumen of the sheath and protrudes several centimeters from the distal end of the catheter.
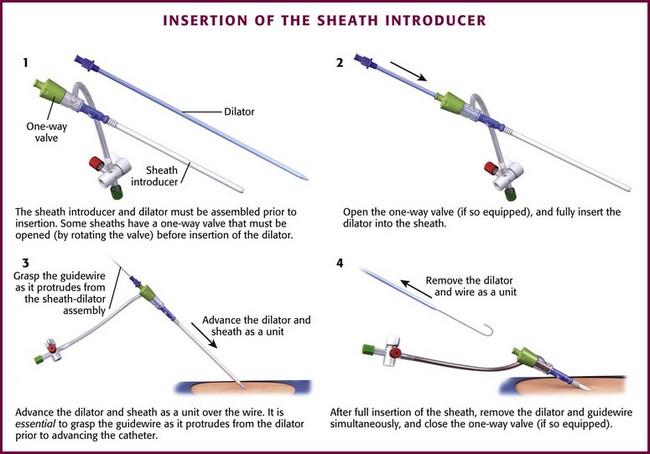
Figure 22-12 Insertion of the sheath introducer. Insertion of a sheath introducer varies slightly from that for a triple-lumen catheter—the dilator and the catheter are inserted simultaneously as depicted. The remainder of the steps are analogous to those in Figure 22-9. Once inserted, sheath introducers facilitate the placement of devices such as pulmonary artery catheters and transvenous pacemakers.
After successful guidewire placement and after the skin incision is made, thread the dilator-sheath assembly over the wire (see Fig. 22-12, step 3). It is imperative that the guidewire protrude from the proximal end of the dilator-sheath assembly and that it be firmly grasped as the wire and unit is advanced. If the wire does not protrude from the proximal end of the assembly, withdraw the wire at the skin entry point until it protrudes enough to be grasped. While maintaining control of the guidewire proximally, advance the assembly through the skin with a twisting motion until it is within the vessel. Grasp the unit at the junction of the sheath and dilator. This prevents the thinner sheath from kinking or bending at the tip or from bunching up at the coupler end. Keep the assembly intact and advance it through the skin to the hub. Once the catheter is placed, remove the wire and dilator from the sheath simultaneously (see Fig. 22-12, step 4). When removing the wire and dilator, the dilator must “unsnap” from the sheath unit, and the wire must slip out easily. Once the single-lumen sheath-introducer catheter is placed correctly, it may be used to facilitate the placement of additional intraluminal devices such as a pulmonary artery catheter, transvenous cardiac pacemaker, or additional multiple-lumen catheter. At times, critically ill patients who require initial large-volume resuscitation will later require multiple medications and therapies that dictate the need for a multiple-lumen catheter. An alternative method of placing a multiple-lumen catheter is to thread the catheter through a standard Desilets-Hoffman sheath-introducer system.
It is important to consider the depth of insertion of the catheter (see Table 22-3). The proper depth of catheter insertion is site specific (see below). After successful CVC placement, the catheter should be anchored to the skin with sutures (see Fig. 22-9, step 15). Each port should be immediately capped and flushed with a saline solution (see Fig. 22-9, step 14). The catheter insertion site should be dressed appropriately and all sharp implements disposed of in appropriate receptacles (see Fig. 22-9, step 16).
Replacement of Existing Catheters
Replacement of an existing catheter begins with selecting a guidewire longer than either of the devices to be exchanged. Use meticulous aseptic technique.70 Insert the guidewire into the existing CVC until a few centimeters of wire is protruding from the proximal end. With one hand holding the wire securely, remove the catheter and wire as a single unit until the tip of the catheter just clears the patient’s skin. Grasp the wire at the point where it exits the skin and only then release the wire at the other end. Then slide the catheter off the wire and insert the new device in the normal fashion. Exercise caution with this technique because catheter embolization can occur, especially if a catheter is cut to allow use of a shorter guidewire for the exchange. In patients without evidence of line sepsis, exchanging the guidewire does not increase the incidence of CAI if performed properly.70
Site Selection
IJ Approach
The IJ vein provides an excellent site for placement of a CVC. However, there is a 5% to 10% risk for complications, with serious complications occurring in about 1% of patients.46 Failure rates have been found to be 19.4% for landmark-placed IJ catheterization by a junior practitioner and 5% to 10% by a clinician with extensive experience.77 Despite its potential complications, the IJ vein is in many cases preferred over other options for central venous access. In contrast to the SV, arterial punctures are easier to control because direct pressure can be used, and the incidence of pneumothorax is lower. Hematoma formation is easier to diagnose because of the close proximity of the IJ vein to the skin. In addition, the right IJ vein provides a straight anatomic path to the SVC and right atrium. This is advantageous for passage of catheters or internal pacemaker wires to the heart. Disadvantages of IJ vein cannulation over other sites include a relatively high carotid artery puncture rate and poor landmarks in obese or edematous patients.40,46
The IJ technique is useful for routine central venous access and for emergency venous access during CPR because the site is removed from the area of chest compressions. The differences in morbidity between the SV and the IJ vein approach have probably been overstated.20,73,78,79 Catheter malposition is more frequent in the SV, but the risk for infection is probably slightly higher with IJ sites.20,22,42,65 The rate of arterial puncture is higher with IJ attempts, but the SV is not a compressible site.20,42 Though counterintuitive, the evidence available does not support a significant difference in the rate of pneumothorax and hemothorax.20,42 Although there may be a slight difference in complications between the two routes, in the absence of specific contraindications clinicians should use the technique with which they are most familiar. The rapid development of real-time ultrasound guidance may tip the scales toward the IJ as the preferred site.14,47–49,80,81
Femoral Approach
Cannulation of the femoral vein for central venous access has become increasingly popular, especially for venous access, infusion ports, passage of transvenous pacemakers, and placement of pressure measurement catheters in critically ill patients.81 The relatively simple and superficial anatomy surrounding the femoral vein affords a rapid approach to the central venous system and avoids many of the more significant complications associated with cannulation of the IJ vein and SV. These benefits are tempered somewhat by several long-term disadvantages, including higher infection rates and an increased risk for venous thrombosis. Other indications for ED femoral cannulation include emergency cardiopulmonary bypass for resuscitation purposes, charcoal hemoperfusion for severe drug overdoses, and dialysis access. The femoral area is less congested than the head and neck area with monitoring and airway equipment, and conscious patients who are still bedridden may turn their head and use their arms more freely without moving the central line. The femoral site is contraindicated in ambulatory patients who require central access.
Specific Vessel Access Techniques
Infraclavicular Subclavian Approach
Positioning
Place the patient supine on the stretcher with the head in a neutral position and the arm adducted at the side. Some authors have advocated various shoulder-, back-, head-, and arm-positioning maneuvers, but they take extra time and the help of an assistant and are often not helpful.82–92
We believe that the best position for almost all infraclavicular SV attempts is the neutral shoulder position with the arm adducted.82–93 Turning the head away may be helpful but is certainly not required if cervical injuries are suspected.83,85,90 Interestingly, Jung and colleagues found that in children, tilting the head toward the catheterization site improved catheter malposition rates.94 This technique has not been studied in adults.
In difficult cases, placing a small towel roll under the ipsilateral shoulder90 or having an assistant place caudal traction of about 5 cm on the extremity may also be helpful.93 Placing the patient in a moderate Trendelenburg position (10 to 20 degrees) decreases the risk for air embolism.85,95 The claim that this position distends the vein is controversial, but it may do so to a small favorable degree.83,85,87 If the Trendelenburg position is impractical, the SV approach is probably less affected than the IJ approach when resorting to a neutral or even an upright position.83,85,87
Placing a pillow under the back is commonly recommended to make the clavicle more prominent, but as the shoulder falls backward, the space between the clavicle and the first rib narrows, thus making the SV less accessible.92 Significant compression of the subclavian vessels between these bony structures occurs as the shoulders retract, which can cause a “pinch off” of the catheter as it slides through the SV between the clavicle and the first rib.92,96
Venipuncture Site
The right SV is usually selected first because of the lower pleural dome on the right and the need to avoid the left-sided thoracic duct. The more direct route between the left SV and the SVC is a theoretical advantage of left-sided subclavian venipuncture; however, there is no higher incidence of catheter malposition when the right infraclavicular SV approach is used. In conscious patients, anesthetize the point of needle entry with 1% lidocaine. If possible, infiltrate the periosteum of the clavicle to make the procedure less painful. Opinions vary regarding the best point of needle entry, more so than for the IJ or femoral approaches. With nonobese patients, look for the “deltopectoral triangle,” which is bounded by the clavicle superiorly, the pectoralis major medially, and the deltoid muscle laterally.88,97 The junction of the middle and medial thirds of the clavicle lies just medial to this triangle. Further medially, the vein lies just posterior to the clavicle and above the first rib, which acts as a barrier to penetration of the pleura. This protective effect is theoretically diminished when a more lateral location is chosen. However, when approaching the vein more medially, some clinicians have difficulty puncturing the SV, dilating the tissues, and passing the J-wire. Other recommended sites of approach include lateral and inferior to the junction of the clavicle and the first rib, with the needle aimed at this junction, and entry at the site of a small tubercle in the medial aspect of the deltopectoral groove. We recommend puncturing the skin at the lateral portion of the deltopectoral triangle via a shallow angle of attack.88
Needle Orientation
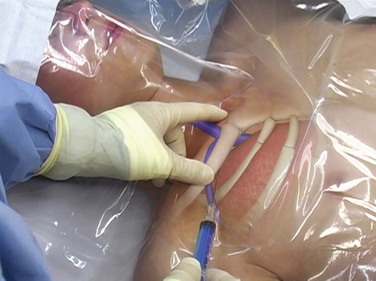
Before inserting the needle, place your left index finger in the suprasternal notch and your thumb at the costoclavicular junction (Fig. 22-13). These landmarks serve as reference points for the direction that the needle should travel. Aim the needle immediately above and posterior to your index finger. Watch for vessel entry, signaled by flashback of dark venous blood, which usually occurs at a depth of 3 to 4 cm. If the tip of the needle is truly intraluminal, there will be free-flowing blood. Return of pulsatile flow signifies arterial puncture, and the needle should be withdrawn immediately. A single arterial puncture without laceration rarely causes serious harm. Using this technique eliminates the need to measure angles, to “walk” the clavicle, or to concentrate excessively on maintaining the needle parallel to the chest wall. Avoid using sweeping motions of the tip of the needle to prevent unseen injuries.
Supraclavicular Subclavian Approach
The goal of the supraclavicular SV technique is to puncture the SV in its superior aspect as it joins the IJ vein. Insert the needle above and behind the clavicle, lateral to the clavicular head of the SCM muscle. Advance it in an avascular plane while directing it away from the subclavian artery and the dome of the pleura (Fig. 22-14). The right side is preferred because of the lower pleural dome, its more direct route to the SVC, and location of the thoracic duct on the left side. The patient’s head may be turned to the opposite side to help identify the landmarks.
Subclavian Ultrasound Technique
Typically, puncture of the SV occurs at the point where the vein is coursing deep to the clavicle. However, with ultrasound, visualization of the SV can be difficult at this location because of interference with the overlying bone. Fortunately, more distally the vein lies farther away from the clavicle and chest wall. Hence, access to the SV typically occurs lateral to the curve of the clavicle bone, in the proximal axillary vein. As the vein moves laterally, the mean depth from the skin increases from 1.9 to 3.1 cm while the distance from the rib cage to the vein increases from 1 to 2 cm. The arteriovenous distance also increases from 0.3 to 0.8 cm, and there is less overlap of the artery and vein.98 Because the vein is not in close proximity to the clavicle, if a hematoma develops, manual pressure can be used to stop the bleeding. Furthermore, the axillary vein is farther from the chest wall and pleural surface, thus decreasing the possibility of pleural injury and subsequent pneumothorax. In clinical studies, ultrasound-guided axillary vein access had a first–needle pass success rate of 76% with successful placement in 96% of cases. Despite the use of ultrasound, however, the catheter malposition rate was unchanged at approximately 15%.99
IJ Approach
Position is critical for maximizing the success of blind (landmark technique) cannulation of the IJ vein. Place the patient in a supine position with the head down and turned about 15 to 30 degrees away from the IJ vein to be cannulated. Rotate the head slightly away from the site of insertion. Rotating the head more than 40 degrees has been shown to increase the risk for overlapping the carotid artery over the IJ vein.19 Occasionally, placing a towel roll under the scapula helps extend the neck and accentuate the landmarks. Stand at the head of the bed with all equipment within easy reach. This may involve moving the bed to the center of the room to allow a table or work surface to be placed at the head of the bed.
Ask the patient to perform a Valsalva maneuver just before inserting the needle to increase the diameter of the IJ vein. Alternatively, the patient can be asked to hum. Trendelenburg positioning, the Valsalva maneuver, and humming all increase the area of the vessel by about 30% to 40%.100 If the patient is unable to cooperate, coordinate the insertion with respiration because the IJ vein is at its largest diameter just before inspiration. In intubated patients, this relationship is reversed because mechanical ventilation increases intrathoracic pressure at end-inspiration. External abdominal compression also helps distend the IJ vein.
Venipuncture Site
The right IJ vein provides a more direct route to the right atrium for transvenous pacing. The left IJ vein is often more tortuous and catheters must negotiate two 90-degree turns at the junction of the left IJ vein with the SV and at the junction of the SV with the SVC. However, if the right IJ vein is obstructed or scarred by previous access, the left IJ vein may be accessed with the same technique. Of note, the right IJ vein has been observed to be twice the size of the left IJ vein in 34% of normal adults.101
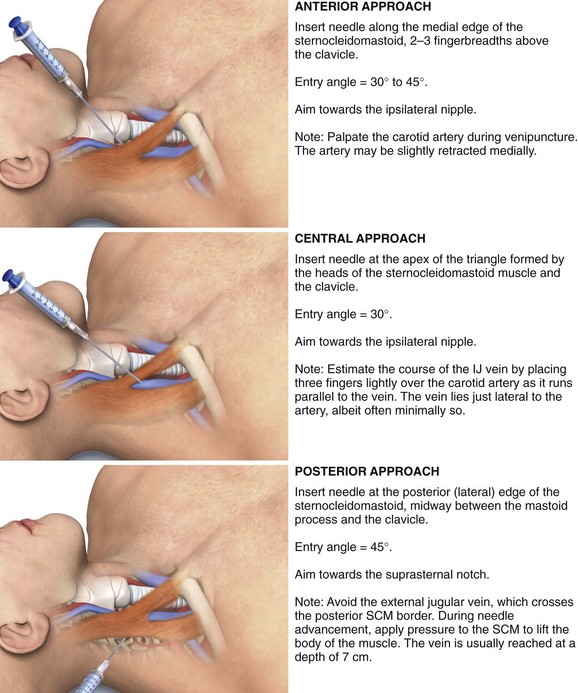
Aspirate before injecting anesthetic so that it is not injected into the carotid artery or IJ vein. Once infiltration is completed, use the needle to locate the IJ vein by aspirating blood into the syringe. Note the depth and angle of needle entry and use this as a mental guide to finding the IJ vein with the introducer needle. Typically, an 18-gauge 2.5-cm introducer needle attached to a syringe is used initially to puncture the IJ vein. However, needle selection may vary depending on the central line kit used. The operator may choose from three approaches: central, posterior and anterior (Fig. 22-15).
Central Route: This approach is favored by some who believe that the incidence of cannulation of the carotid artery is decreased and the cupula of the lung is avoided.101 First, palpate and identify the triangle formed by the clavicle and the sternal and clavicular heads of the SCM. Use a marking pen or a local anesthetic skin wheal to mark the lateral border of the carotid pulse, and perform all subsequent needle punctures lateral to this point.
Posterior and Anterior Routes: In the posterior approach, make the puncture at the posterior (lateral) edge of the SCM approximately midway between its origin at the mastoid process and its insertion at the clavicle. The external jugular vein courses in this area and can be used as a landmark, with the puncture occurring where the external jugular vein crosses the posterolateral border of the SCM. Be careful to not strike the external jugular vein. Advance the needle toward the suprasternal notch, just under the belly of the SCM, at an angle of approximately 45 degrees to the transverse plane. During advancement of the needle, apply pressure to the SCM in an effort to lift the body of the muscle. The vein is usually reached at a depth of 7 cm in an average-sized adult. Because the posterior approach occurs higher in the neck, there is less risk for hemothorax, pneumothorax, or carotid puncture.102 The benefits of the posterior approach are more dramatic in obese patients, with carotid puncture occurring in 3% of patients versus up to 17% with the anterior approach.103
IJ Ultrasound Technique
Cannulation of the IJ vein is an optimal location for the use of ultrasound guidance. Whereas the landmark approach is associated with a complication rate of between 5% and 10% irrespective of the technique used or experience of the operator, with the use of ultrasound, the complication rate is significantly reduced.101 Even with novice users of ultrasound for IJ vein cannulation, first-attempt success is significantly increased when compared the blind landmark technique, 43% versus 26%.104 With experience, however, the first-attempt success rate improves to more than 75%.16,17,105 Use of ultrasound for placement of central lines in the IJ vein has also been shown to decrease overall catheter placement failures by 64%, reduce complications by 78%, and decrease the need for multiple catheter placement attempts by 40% in comparison to the standard landmark placement technique.106,107 The primary reason for the increased success rate is the variation in anatomy of the IJ vein relative to the carotid artery. The anatomy of the IJ vein has been shown to be aberrant in 9% to 19% of cases.101,104,107 Furthermore, the IJ vein may be unusually small (i.e., <0.5 cm) in up to 14% of patients. In some patient populations the IJ vein is thrombosed in up to 2.5%.104
Femoral Approach
Positioning and Needle Orientation
After the instillation of local anesthetic, introduce the needle at a 45-degree angle in a cephalic direction approximately 1 cm medial to this point and toward the umbilicus (Fig. 22-16). Palpate the femoral pulse two fingerbreadths beneath the inguinal ligament. Note that while palpating the artery, pressure from the operator’s fingers can compress the adjacent vein and impede cannulation. Avoid this anatomic distortion by releasing digital pressure while keeping the fingers on the skin to serve as a visual reference to the underlying anatomy. The depth of the needle required to reach the vein varies with body habitus, but in thin adults, the vein is quite superficial and is usually reached at a depth of approximately 2 to 3 cm. Return of dark, nonpulsatile blood signals successful venous penetration.
Aftercare
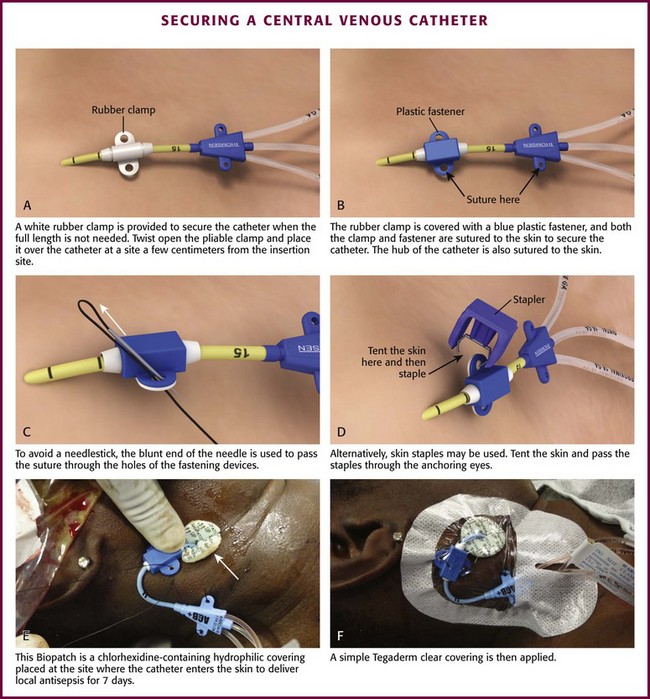
After the central venous catheter is placed, it will need to be anchored in place by one of three techniques: StatLock, suture, or staple (Fig. 22-17). The StatLock may not hold well in patients with oily skin but is excellent for older patients with thin skin. For suturing, one will need the sterile, nonabsorbable suture material (usually 2-0 silk) provided in the CVC kit. The straight suture needles found in many sets are awkward for many clinicians, so a curved needle with a driver may be helpful. To avoid a needlestick with the straight needle, pass the blunt end of the needle through the anchoring devices and pull the suture forward manually. Place the suture in the skin approximately a half centimeter from the catheter to anchor the central line in place. Several knots should be made to secure the line. Avoid making knots that place excessive pressure on the skin because this can lead to difficulty removing the knots and necrosis. Loose knots can lead to migration of the catheter and loss of access. Stapling a central line into place can be just as effective as suturing; however, the staples tend to fall out after a few days.
Dressing
Clean the area around the catheter insertion site with chlorhexidine, and then use a clear dressing (such as Tegaderm) to cover up the insertion site of the catheter once secured (see Fig. 22-9, step 16). Apply a chlorhexidine patch (Biopatch) at the site where the catheter enters the skin (see Fig. 22-17E and F). Because dressings are inspected and changed periodically, place a simple dressing and avoid excessive amounts of gauze and tape. Take care to protect the skin against maceration.
Assessing Line Placement
Check all tubing and connections for tightness to prevent air embolism, loss of fluid, or bleeding. Before infusing IV fluids, lower the IV fluid reservoir to below the level of the patient’s right atrium and check the line for backflow of blood. Free backflow of blood is suggestive but not diagnostic of intravascular placement. Backflow could occur from a hematoma or hemothorax if the catheter is free in the pleural space. A pulsatile blood column may be noted if the catheter has been inadvertently placed in an artery. Less pronounced pulsations might also occur if the catheter is advanced too far and reaches the right atrium or ventricle. In addition, pulsations may be noted with changes in intrathoracic pressure as a result of respirations, although these pulsations should occur at a much slower rate than the arterial pulse. A final method of checking intravascular placement is to attach a syringe directly to the catheter hub and aspirate venous blood. It is also advisable to ensure that the catheter is easily flushed with a saline solution. This carries the additional benefit of removing air from the system. Radiographs are also always indicated to verify catheter location and assess for potential complications, except after routine femoral line placements. In an awake patient, infusing fluids via a catheter tip positioned in the IJ vein may produce an audible gurgling or flowing sound in the patient’s ear.108
Radiographs
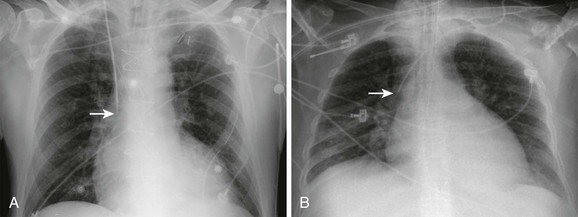
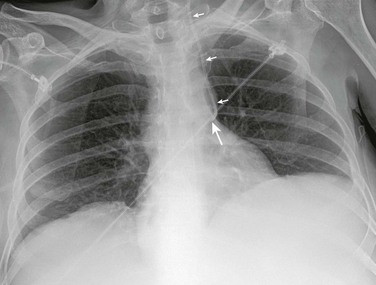
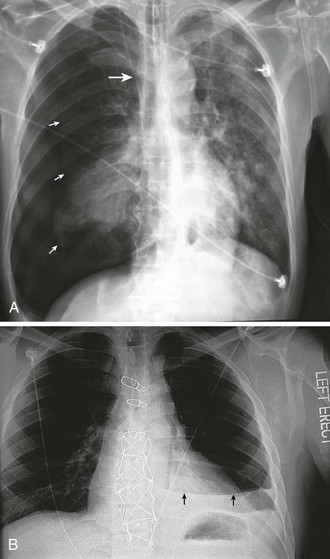
Following placement of lines involving puncture of the neck or thorax, listen to the lungs to detect any inequality of lung sounds suggestive of a pneumothorax or hemothorax. Obtain a chest film as soon as possible to check for hemothorax, pneumothorax, and the position of the tip of the catheter (Fig. 22-18). Because small amounts of fluid or air may layer out parallel to the radiographic plate with the patient in the supine position, take the film in the upright or semi-upright position whenever possible. In ill patients, a rotated or oblique projection on a chest radiograph may be obtained, and the clinician may be confused about the proper position of the catheter. In such cases, repeat the radiograph. A misplaced catheter tip is usually obvious on a properly positioned standard posteroanterior chest radiograph (Fig. 22-19), but occasionally, injection of contrast material may be required. For example, a catheter in one of the internal thoracic veins may simply appear more lateral than expected, but because of the close proximity of these veins and the SVC, malposition may not be appreciated by this subtle finding. Misplaced catheters should be repositioned or replaced.
Attention should also be given to the possibility of a retained guidewire. Although this complication is rare, if not specifically considered it can be overlooked by both clinicians and radiologists.109,110
Postprocedure radiographs are not always necessary for routine replacement of catheters over guidewires. If such patients are stable and being hemodynamically monitored, radiography may be deferred safely in the absence of apparent complications or clinical suspicion of malposition.111,112
Special Considerations for Other Vessels
Basilic and Cephalic Approaches
Passing a catheter into the central circulation is difficult via the basilic and cephalic routes, and failure is common. Insertion of a peripheral IV central catheter through these routes is often performed by specialized teams and is less suitable for emergency indications. The cephalic vein may terminate inches above the antecubital fossa or bifurcate before entering the axillary vein and send a branch to the external jugular vein. The cephalic vein may also enter the axillary vein at a right angle, thereby defeating any attempt to pass the catheter centrally. Furthermore, both the basilic and the cephalic systems contain valves that may impede catheterization. Abduction of the shoulder may help advance the catheter if resistance near the axillary vein is encountered. The incidence of failure to place the catheter in the SVC ranges from a high of 40% to a low of 2%.44,113 The greatest success rate (98%) reported was obtained with slow catheter advancement and the patient in a 45- to 90-degree upright position.44 A flexible catheter was introduced into the basilic vein until the tip was judged to be proximal to the junction of the cephalic and basilic veins and distal to the junction of the IJ vein with the innominate vein. The wire stylet was withdrawn 18 cm, and the catheter was advanced slowly 1 cm at a time, with 2 seconds allowed between each 1-cm insertion. The natural flexibility of Bard catheters contributed to negotiation into the SVC when the patient was upright. This time-consuming technique is contraindicated when the patient cannot tolerate an upright position.
The basilic and cephalic venous systems are entered through the large veins in the antecubital fossa. Placement of a tourniquet aids venous distention and initial venous puncture. When veins are not visible, they may be identified with bedside ultrasound (as described in Chapter 66). The basilic vein, located on the medial aspect of the antecubital fossa, is generally larger than the radially located cephalic vein. Furthermore, the basilic vein usually provides a more direct route for passage into the axillary vein, SV, and SVC.
Vascular Access in Cardiac Arrest
Immediate vascular access is required for resuscitation during cardiac arrest. Femoral CVCs are often used in this setting. The infraclavicular SV approach is also commonly used during cardiac arrest if logistics permit. The intuitive rationale for femoral CVC placement has been that much of the resuscitation activity, including chest compressions, occurs on the thorax, thus limiting the clinician’s ability to safely place a higher line. During cardiac arrest, the availability of drugs delivered to the central circulation may be slower via the femoral route than via supraclavicular SV or IJ vein infusions.113,114 Additionally, pulsations felt in the groin during CPR may be venous instead of arterial,28 and there is a high rate of unrecognized catheter malposition and arterial injury.28,115 To place a femoral catheter blindly (without ultrasound guidance or clear identification of the arterial pulse), divide the distance from the anterior superior iliac spine to the symphysis pubis into thirds. The artery typically lies at the junction of the medial and middle thirds and the vein 1 cm medial to this location. Blind femoral central line insertions during arrest are less than optimal. The increasingly available intraosseous placement systems and bedside ultrasonography are beginning to supplant such “blind” CVC placements during cardiac arrest and other emergencies that require immediate vascular access.
CVP Monitoring
CVP Measurement
Although described by Forssman in 1931, it was not until the early 1960s that measurement of CVP became commonplace as a means of assessing cardiac performance and guiding fluid therapy.10 CVP measurements are most frequently used as a guide for determination of a patient’s volume status and fluid requirements and for investigation of tamponade.116 CVP monitoring has often been criticized as ineffective, outmoded, and unreliable,117 but in the last few years a resurgence in its use has occurred.118 Astute clinicians can maximize the usefulness of this diagnostic tool by understanding its basic principles, indications, and limitations.119–121
Physiology
Simply stated, CVP is the pressure exerted by blood against the walls of the intrathoracic venae cavae. Because pressure in the great veins of the thorax is generally within 1 mm Hg of right atrial pressure, CVP reflects the amount of blood or pressure at which blood is returning to the heart. Pressure in the central veins has two significant hemodynamic effects. First, the pressure promotes filling of the heart during diastole, a factor that helps determine right ventricular end-diastolic volume (preload). Second, CVP is also the backpressure of the systemic circulation and opposes return of blood from peripheral blood vessels into the heart. CVP is therefore a measure of both the ability of the heart to pump blood (cardiac function) and the tendency for blood to flow from the peripheral veins (venous return to the heart). The CVP reading is determined by a complex interaction of intravascular volume, right atrial and ventricular function, venomotor tone, and intrathoracic pressure.116,117,119,120
To measure CVP, place the tip of a pressure-monitoring catheter into any of the great systemic veins of the thorax or into the right atrium.119,121 You can also use the femoral vein for measurement as long as there is no evidence of increased abdominal pressure.10,122 The catheter is connected to a simple manometer or to an electronic pressure transducer interfaced with a monitoring system, at the level of the right atrium, that is capable of calculating a mean pressure value and displaying pressure waveforms.119,121 The waveforms produced correlate with the cardiac cycle and create a typical wave pattern.
Indications for and Contraindications to CVP Measurement
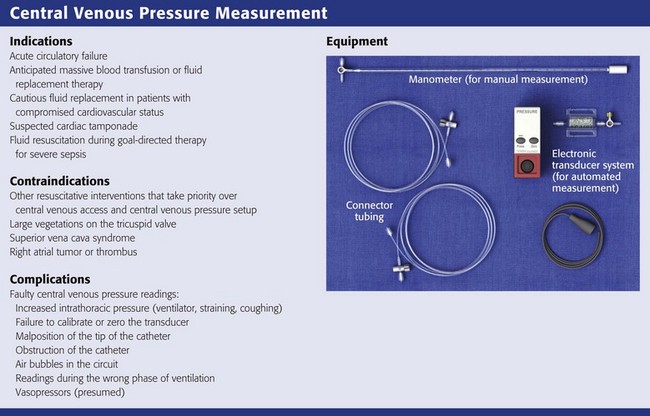
The five traditional major indications for monitoring CVP are:
2. Anticipated massive blood transfusion or fluid replacement therapy
3. Cautious fluid replacement in patients with compromised cardiovascular status
4. Suspected cardiac tamponade
5. Fluid resuscitation during goal-directed therapy in patients with severe sepsis
A common misconception is that CVP consistently reflects pressure in the left side of the heart. The measurement that best reflects changes in left ventricular pressure and reserve is left atrial pressure or the nearly equivalent pulmonary capillary wedge pressure (PCWP). Development of the flow-directed pulmonary artery catheter has allowed repeated measurements of PCWP, thus permitting reliable estimation of left atrial pressure.121
CVP monitoring is most helpful in patients without significant preexisting cardiopulmonary disease. Numerous studies highlight the unreliability of right-sided hemodynamic monitoring in patients with underlying cardiac or pulmonary disease.111,115 Ultimately, however, the differences noted are not a failure of CVP monitoring to reflect central hemodynamics. Rather, the disagreements noted by previous authors simply highlight the complexity of the relationship between ventricular and vascular compliance, blood volume, and filling pressure in various disease states. As with pulmonary artery occlusion pressure measurements, the clinician is cautioned to be aware of the assumptions involved and to recognize the scenarios in which these assumptions do not hold true.
Procedure
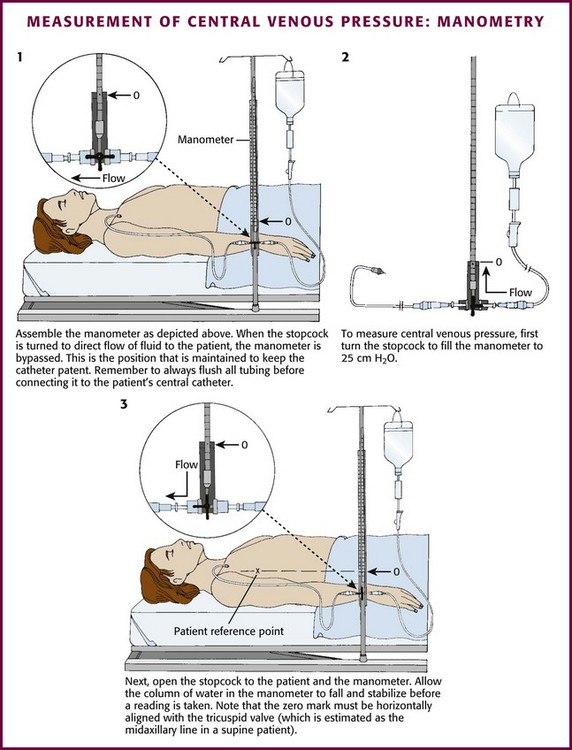
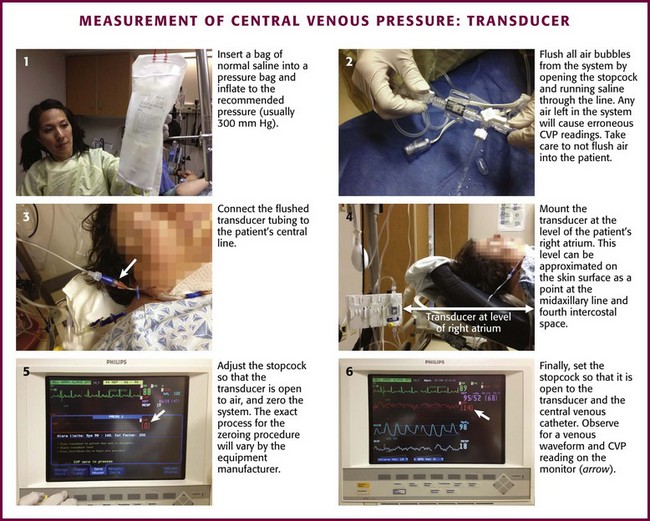
Although CVP may be determined with a manometry column assembled at the bedside (Fig. 22-20), the most common technique in practice is measurement with an electronic transducer interfaced to a monitoring system (Fig. 22-21). Typical transducers include a nipple valve attached to a pressurized bag of saline to allow easy flushing of the system. To use these manometers, attach the transducer to the patient’s central line with a length of flexible, yet fairly rigid-walled tubing filled with saline. Place a three-way stopcock between the patient and the transducer to simplify line flushing and calibration.
After the system has been flushed, place the stopcock (with the transducer still open to air) at the level of the patient’s right atrium. Zero (calibrate) the monitor detecting the transducer’s signal with the transducer at the level of the right atrium, which can be approximated on the skin surface as a point at the midaxillary line and the fourth intercostal space.119,121 Finally, set the stopcock so that the transducer is in continuity with the patient’s venous catheter.
In spontaneously breathing patients, take readings at the end of a normal inspiration. If the patient is receiving positive pressure ventilation, the changes in CVP during the respiratory cycle are reversed: it rises with inspiration and decreases with expiration. In these patients, take readings near the end of expiration.121 Thus, during both normal and mechanical ventilation, the lowest reading is a useful estimate of mean CVP.
Errors in CVP Measurement
A number of extrinsic factors may alter the accuracy of the CVP reading (Box 22-1).116,119,121 In addition to the position of the patient, such factors include changes in intrathoracic pressure, malposition of the tip of the catheter, obstruction of the catheter, and failure to calibrate or zero the line. Activities that increase intrathoracic pressure, such as coughing or straining, may cause spuriously high measurements. Make sure that the patient is relaxed at the time of measurement and breathing normally. In mechanically ventilated patients, CVP will be elevated to an extent directly proportional to the ventilatory pressure being delivered and inversely proportional to the mechanical compliance of the lung. Care should be exercised in interpreting filling pressure in this circumstance because ventilator-induced elevations in CVP are not artifactual but represent changes in the hemodynamic physiology of the patient. As in spontaneously breathing patients, CVP measurements are meaningful only in relaxed, sedated, or paralyzed subjects.
If the tip of the catheter has passed into the right ventricle, a falsely elevated CVP measurement is obtained. Recognition of a characteristic right ventricular pressure waveform on the patient’s monitor should hopefully preclude this error. Such fluctuations may also occasionally be seen in appropriately positioned CVP lines when significant tricuspid regurgitation or atrioventricular dissociation (a cannon “a” wave) is present.117 Inaccurate low venous pressure readings are seen when a valvelike obstruction at the tip of the catheter occurs as a result of either clot formation or contact against a vein wall. Wave damping secondary to air bubbles in the transducer or tubing also leads to faulty readings. Using poorly zeroed lines may result in inaccurate measurements that may be interpreted as a change in the patient’s status when none has actually taken place. The transducer should be zeroed to the same level for every measurement.
Interpretation of CVP Measurement
Normal CVP values are as follows:
In the late stages of pregnancy (30 to 42 weeks), CVP is physiologically elevated, and normal readings are 5 to 8 cm H2O higher. A CVP reading of less than 6 cm H2O is consistent with low right atrial pressure and reflects a decrease in the return of blood volume to the right heart. This may indicate that the patient requires additional fluid or blood. A low CVP reading is also obtained when vasomotor tone is decreased, as with sepsis, spinal cord injury, or other forms of sympathetic interruption.
A CVP reading falling within a normal range is viewed in relation to the clinical scenario. A reading higher than 12 cm H2O indicates that the heart is not effectively circulating the volume presented to it. This may occur in a normovolemic patient with underlying cardiac disease such as left ventricular hypertrophy (with associated poor ventricular compliance) or in a patient with a normal heart who is volume-overloaded. High CVP can also be related to variables other than pump failure, such as pericardial tamponade, restrictive pericarditis, pulmonary stenosis, tricuspid regurgitation, pulmonary hypertension, and pulmonary embolism.123
Changes in blood volume, vessel tone, and cardiac function may occur alone or in combination with one another; therefore, it is possible to have a normal or elevated CVP in the presence of normovolemia, hypovolemia, and hypervolemia.123 Interpret the specific CVP values with respect to the entire clinical picture. The response of CVP to an infusion is more important than the initial reading.
Fluid Challenge
Monitoring CVP may be helpful as a practical guide to fluid therapy.116,118–121 Serial CVP measurements provide a fairly reliable indication of the capability of the right side of the heart to accept an additional fluid load. Although PCWP is a more sensitive index of left heart fluid needs (and in some clinical situations measurement of PCWP is essential), serial measurement of CVP can nonetheless provide useful information.
A fluid challenge can help assess both volume deficits and pump failure.120 Although a fluid challenge can be used with either PCWP monitoring or CVP monitoring, only the fluid challenge for CVP monitoring is discussed here. Slight variations in the methodology of fluid challenge are reported in the literature. Generally, fluid boluses of 250 to 500 mL of crystalloid are administered sequentially and CVP is measured 10 minutes after each bolus. Repeat the fluid challenge until measurements indicate that adequate volume expansion has occurred. Discontinue the fluid challenge as soon as hemodynamic signs of shock are reversed or signs of cardiac incompetence are evident.
Cardiac Tamponade
In cardiac tamponade, pericardial pressure rises to equal right ventricular end-diastolic pressure. The pericardial pressure encountered in pericardial tamponade characteristically produces an elevated CVP.123 The degree of elevation in CVP is variable, and one must interpret measurements cautiously; CVP readings in the range of 16 to 18 cm H2O are typically seen with acute tamponade, but elevations of up to 30 cm H2O may be encountered. The precise CVP reading is often lower than one might intuitively expect, and it is not uncommon to encounter tamponade with a CVP of 10 to 12 cm H2O. A normal or even low CVP reading may be seen if the tamponade is associated with significant hypovolemia. An excessive rise in CVP after fluid challenge may be more important than a single reading in the diagnosis of pericardial tamponade.
Complications
More than 15% of patients who receive CVCs experience some type of complication, and complications occur despite pristine technique.42,73 This percentage is not surprising in view of the close proximity of vital structures, the complexity of patients’ medical conditions, and the emergency circumstances under which many of these procedures are often performed. The number of complications increases, especially those involving thrombosis and infection, with longer durations of catheterization and increasing severity of illness.25 Although clinicians strive to limit complications, their occurrence cannot naïvely be viewed as evidence of faulty technique or substandard care. Common complications with the different approaches are summarized in Box 22-2 and Table 22-4 and can generally be categorized as mechanical, infectious, and thrombotic. Key complications and injuries by approach are discussed below.
TABLE 22-4
Anatomic Structures That Can Be Injured by Central Venous Cannulation
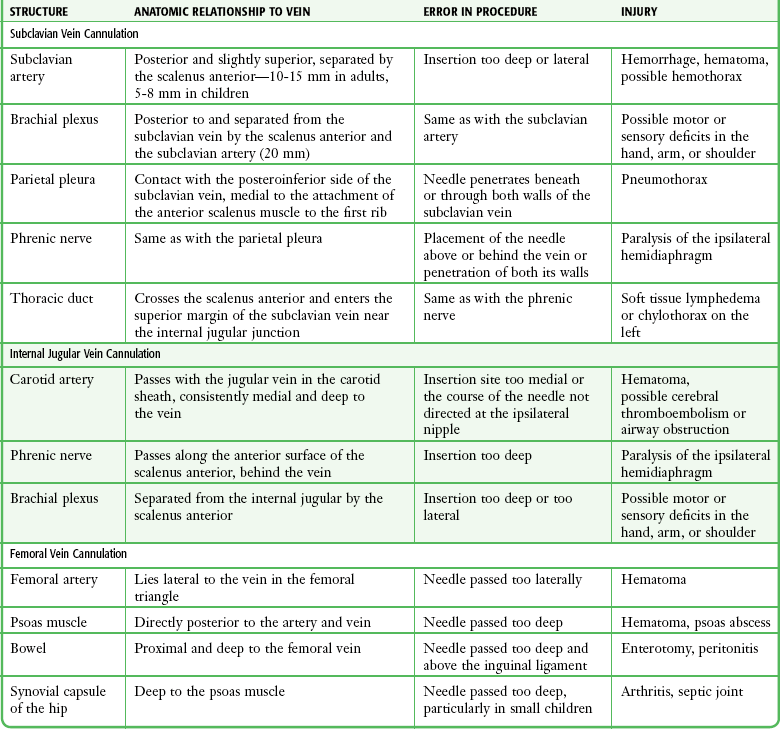
From Knopp R, Dailey RH. Central venous cannulation and pressure monitoring. JACEP. 1977;6:358.
The number of lumens does not directly affect the rate of catheter-related complications.42,73 One 3-year retrospective review of all central catheters placed in the ED (supraclavicular SV, IJ, and femoral lines) reported a mechanical complication rate of 3.4%, or 22 of 643 lines placed.124 Complications were defined as pneumothorax, hematoma, line misplacement, hemothorax, or any issue with the CVC (excluding infection or thrombosis) that required an inpatient consultation. In general, failure and complication rates increase as the number of percutaneous punctures increase. Historically, operator skill and experience have reliably predicted complication or success rates.42,73 It has previously been reported that clinicians who have placed more than 50 CVCs have less than half the complication rates of those who have fewer than 50 attempts.73
Published complication rates vary in the literature and can now be classified according to whether ultrasound guidance was used during the procedure (Table 22-5).42,47 Recent studies have demonstrated that ultrasound-guided CVC placement techniques have improved success rates, reduced complication rates, and decreased time needed to perform the procedure.46–49 As a result, ultrasound guidance for CVC placement is recommended by the U.S. Department of Health and Human Services. Reports by the AHRQ list ultrasound guidance for central vein cannulation as one of its most highly rated safety practices.57,125
TABLE 22-5
Frequency of Complications without and with Ultrasound Guidance

IJ, internal jugular; NA, not applicable; SC, subclavian vein.
Mechanical Complications
The most commonly reported mechanical complications are arterial puncture, hematoma, and pneumothorax. Inadvertent arterial puncture and hematoma formation are usually easily recognized and controlled with simple compression. Rarely, an artery is lacerated to such an extent that bleeding is significant and operative repair is necessary. In cardiac arrest, low-flow, or shock states, arterial puncture may not be obvious, and arterial cannulation and intraarterial administration of medications have occurred. This can lead to the subsequent development of ischemia or thrombosis of the artery and limb. When systolic blood pressure rises, arterial pulsations become more obvious. In critically ill patients, however, this complication may escape detection for some time. It has been reported that ultrasound-guided placement of IJ CVCs decreases the rate of arterial puncture to 1.4%.47
Though poorly studied, patients with a coagulopathy may experience significant bleeding from CVC placement, especially if arterial puncture or laceration has occurred. Mumtaz and coworkers cited a 3% bleeding rate in coagulopathic patients who experienced only minor bleeding that could be controlled with digital pressure.44 Although central venous access may be performed safely in patients with underlying disorders in hemostasis without correction of the coagulopathy, caution is nevertheless urged. Areas amenable to arterial compression are preferred in these patients.44
Pneumothorax occurs in up to 6% of subclavian venipunctures and can also occur with the IJ approach42,73,126 (Fig. 22-22A). Initially, the importance of this complication was minimized, but reports of fatalities caused by tension pneumothorax, bilateral pneumothorax, and combined hemopneumothorax followed.55 One would expect a higher incidence of pneumothorax if the procedure is performed during CPR or positive pressure ventilation. A small pneumothorax can quickly become a life-threatening tension pneumothorax with positive pressure ventilation. Treatment of a catheter-induced pneumothorax is controversial, but not all patients will require formal tube thoracostomy. Some authors have reported that many stable outpatients exhibiting a pneumothorax after insertion of a CVC can be managed successfully by observation alone (60% in one series) or catheter (pigtail/Heimlich valve) aspiration, with large tube thoracostomy being reserved for refractory cases or emergency settings.126,127 Critically ill patients or those undergoing mechanical ventilation are more likely to require invasive treatment of a catheter-induced pneumothorax.
Hemothorax may occur after laceration of the SV or subclavian artery, puncture of the pulmonary artery, or intrathoracic infusion of blood (Fig. 22-22B). Hydrothorax occurs as a result of infusion of IV fluid into the pleural space. Hydromediastinum is also possible. These are rarely serious complications, but fatalities have been reported. Surgical repair is occasionally required. Arteriovenous fistula formation has also been reported.128 Additional pulmonary complications include tracheal and endotracheal cuff perforation.
Air embolism is a very rare, but potentially life-threatening complication of central venous cannulation. Undoubtedly, minor and clinically inconsequential amounts of air enter the venous circulation during many cannulation procedures. Maintaining constant occlusion (with the operator’s finger) on all needles that are located in central veins can minimize this occurrence. A 14-gauge needle can transmit 100 mL of air per second with a 5–cm H2O pressure difference across the needle.95 Air embolism may occur if the line is open to air during catheterization or if it subsequently becomes disconnected. The recommended treatment is to place the patient in the left lateral decubitus position to relieve air bubble occlusion of the right ventricular outflow tract.95 If this is unsuccessful, aspiration with the catheter advanced into the right ventricle has been advocated.95 Emergency thoracotomy to aspirate air (see Chapter 18) and cardiothoracic surgical consultation may also be warranted.
Catheter or wire embolization resulting from shearing of a through-the-needle catheter by the tip of the needle is a serious and generally avoidable complication. Embolization can occur when the catheter or wire is withdrawn through the needle or if the guard is not properly secured. Adverse events after embolization include arrhythmias, venous thrombosis, endocarditis, myocardial perforation, and pulmonary embolism.75 The mortality rate in patients who did not have these catheters removed has been reported to be as high as 60%.75 Transvenous retrieval techniques by interventional radiology are usually attempted, followed by open surgery if they are unsuccessful.75 Entire guidewires may also embolize to the general circulation if the tip is not constantly secured by the operator throughout the procedure. Although the precise incidence of retained or “lost” guidewires is unknown, it is rarely reported in the literature. Initiatives by national safety bodies such as the National Quality Forum in the United States have focused on reducing the incidence of retained wires by classifying them as “never” events that require mandatory reporting in many states.
Delayed perforation of the myocardium is a rare, but generally fatal complication of central venous catheterization by any route.129 The presumed mechanism is prolonged contact of the rigid catheter with the beating myocardium. The catheter perforates the myocardial wall and causes tamponade either by bleeding from the involved chamber or by infusion of IV fluid into the pericardium. The right atrium is involved more commonly than the right ventricle.95 All clinicians who insert such catheters or care for such patients should be aware of this deadly complication, which results in profound deterioration with hypotension, shortness of breath, and shock. Emergency echocardiography, pericardiocentesis, and operative intervention by a thoracic surgeon may all be required for salvage of the patient. This can also occur with misplacement of the CVC in the pericardiophrenic vein.130,131 Fortunately, this complication is preventable by using a postinsertion chest film to confirm the position of the tip of the catheter and repositioning any catheter if the tip is within the cardiac silhouette.
Catheter knotting or kinking may occur if the catheter is forced or repositioned or if an excessively long catheter is used.130–132 The most common result of kinking is poor flow of IV fluids, although rare complications as severe as SVC obstruction have been seen.130–132
Neurologic complications are extremely rare and presumably caused by direct trauma from the needle during venipuncture. Brachial plexus palsy and phrenic nerve injury with paralysis of the hemidiaphragm have been reported.133,134 Infusing hypertonic medications into the IJ vein via a malpositioned catheter may result in a variety of neurologic complications from retrograde perfusion of intracranial vessels.135
Infectious Complications
Infectious complications include local cellulitis, thrombophlebitis, generalized septicemia, osteomyelitis, and septic arthritis.54 The incidence of septic complications varies from 0% to 25%.70,136 The frequency with which infectious complications occur is directly related to the attention given to aseptic technique during insertion and aftercare of the catheter. Femoral venous catheterization carries a greater risk for infection than subclavian catheterization does. Merrer and associates reported the overall infectious complication rate from femoral and subclavian catheters to be 19.8% and 4.5%, respectively.129 Ultrasound-guided IJ CVC placement has resulted in a decrease in the rates of central line–associated bloodstream infections (CLABSIs).49 The exact mechanism by which ultrasound-guided CVC placement results in a lower risk for infection is unclear; it may be related to a reduced number of skin punctures. Organisms most commonly recovered from colonized femoral catheters are coagulase-negative staphylococci, Enterobacteriaceae, Enterococcus species, and Pseudomonas aeruginosa.129
CVCs cause an estimated 80,000 CLABSIs and are implicated in up to 28,000 deaths per year in patients in the intensive care unit.60–62 The average cost has been estimated at $45,000 per patient with a CLABSI, with an cumulative cost of $2.3 billion annually.60–62 Recently, the Centers for Disease Control and Prevention has recommended that central line bundling policies be implemented to significantly decrease the incidence of CLABSI.61,62 This bundling policy includes five evidence-based interventions: (1) hand washing, (2) maximal barrier precautions, (3) chlorhexidine skin antisepsis, (4) optimal catheter site selection with avoidance of the femoral vein if possible, and (5) daily review of the necessity for the line and prompt removal of unnecessary lines.63
Thrombotic Complications
Thrombosis and thrombophlebitis are significant risks associate with placement of a CVC. The risk for catheter-related thrombosis is directly related to the site of access. In one trial, catheter-related thrombosis was reported in up to 21.5% of patients with femoral CVCs and in 1.9% of patients with SV CVCs. For SV and IJ CVCs, it is important to determine that the tip of the catheter rests in the SVC, especially during the infusion of irritating or hypertonic solutions.129 Thrombi may form secondary to prolonged contact of the catheter against the vascular endothelium. One autopsy study found a 29% incidence of mural thrombi in the innominate vein, SVC, and right ventricle of patients who had central lines in place an average of 8 days before death.65 The clinical importance of these thrombi remains unclear; however, any thrombosis has the potential to embolize. Moreover, catheter-related thrombosis is a cause of SVC obstruction syndrome.137
Subclavian Approaches
Although both approaches to the SV are relatively safe, the infraclavicular SV approach is more likely to be associated with complications. In a randomized, prospective comparison of supraclavicular SV and infraclavicular SV puncture in 500 ED patients, complication rates were 2.0% and 5.1%, respectively.138 The most significant complications are pneumothorax and puncture of the subclavian artery; the highest reported incidence of pneumothorax is 2.4%.18,66,138 Adherence to the techniques recommended for supraclavicular SV puncture decreases the risk for these complications because the needle is directed away from the pleural dome and subclavian artery. The relatively superficial location of the vein when approached from above the clavicle (1.5 to 3.5 cm) lessens the risk for puncture or laceration of deep structures.
IJ Approach
Many complications of IJ cannulation are similar to those of SV access. The incidence of complications appears to be higher with use of the left IJ vein than with the right.16 One common complication unique to the IJ approach is a localized hematoma in the neck.139 With the IJ approach, pressure can easily be maintained on the area of swelling, and most hematomas will resolve spontaneously. If puncture of the carotid artery is recognized and treated with compression, it rarely causes significant morbidity in the absence of marked atherosclerotic disease, although arteriovenous fistulas may occur after IJ puncture.128 Several neurologic complications unique to the IJ site of venipuncture have also been reported as a result of hematomas or direct injury. Such complications include damage to the phrenic nerves, iatrogenic Horner’s syndrome, trauma to the brachial plexus, and even passage of a catheter into the thecal space of the spinal canal.135 If the carotid artery is punctured, one may again attempt IJ or SV cannulation on the same side after appropriate, prolonged (15- to 20-minute) compression. The IJ vein valve is frequently damaged when cannulated, which often results in incompetence of the valve. The clinical significance of this, if any, is unknown.140
Femoral Approach
Because vital structures in the neck and chest are not at risk, complications of femoral vein cannulation are generally less severe than those of other routes for central venous access. The most common immediate complications involve bleeding from damage to either the femoral artery or the femoral vein (Fig. 22-23). This can usually be managed with 10 to 15 minutes of direct pressure. Extra care should be taken in anticoagulated patients or after the administration of thrombolytic agents. In extreme cases when hemostasis cannot be achieved through direct pressure, a vascular surgeon should be consulted.
Two more complications merit special mention. The first is the increased risk for catheter infection. Presumably caused by anatomic association with the anogenital region, many studies have found that femoral lines become infected at significantly higher rates than IJ or supraclavicular SV lines do.61,62,65,129 Of note, some studies have failed to find a statistical difference, and it is unclear how much of the effect is due to the actual location of the line versus how it is placed and managed.
The majority of studies show that the incidence of deep vein thrombosis is also increased in lines placed via the femoral route,129,141 although the clinical significance of these clots has not been definitively addressed.
Training and Simulation
CVC placement and ultrasound guidance techniques have a relatively steep learning curve. Simulation is recommended by the AHQR to teach these techniques.57,125 Simulation training is independently associated with higher rates of correct needle insertion on the first attempt, as well as with higher successful CVC placement rates.125,142,143 There are many simulation models that can be used. Kendall and Faragher described a phantom model as an easy, inexpensive method for ultrasound-guided CVC placement training.144
References
1. Mueller, RL, Sanborn, TA. The history of interventional cardiology: cardiac catheterization, angioplasty, and related interventions. Am Heart J. 1995;129:146.
2. Fontenot, C, O’Leary, JP. Dr. Werner Forssman’s self-experimentation. Am Surg. 1996;62:514.
3. Duffy, B. The clinical use of polyethylene tubing for intravenous therapy: a report on 72 cases. Ann Surg. 1949;130:929.
4. Aubaniac, R. [Subclavian intravenous injection; advantages and technic.]. Presse Med. 1952;60:1456.
5. Keeri-Szanto, M. The subclavian vein, a constant and convenient intravenous injection site. AMA Arch Surg. 1956;72:179.
6. Yoffa, D. Supraclavicular subclavian venepuncture and catheterisation. Lancet. 1965;2:614.
7. Kalso, E. A short history of central venous catheterization. Acta Anaesthesiol Scand Suppl. 1985;81:7.
8. Higgs, ZC, Macafee, DA, Braithwaite, BD, et al. The Seldinger technique: 50 years on. Lancet. 2005;366:1407.
9. Seldinger, SI. Catheter replacement of the needle in percutaneous arteriography: a new technique. Acta Radiol. 1953;39:368.
10. Wilson, JN, Grow, JB, Demong, CV, et al. Central venous pressure in optimal blood volume maintenance. Arch Surg. 1962;85:563.
11. Swan, HJ, Ganz, W, Forrester, J, et al. Catheterization of the heart in man with use of a flow-directed balloon-tipped catheter. N Engl J Med. 1970;83:447.
12. Palmieri, TL. The inventors of the Swan-Ganz catheter: H. J. C. Swan and William Ganz. Curr Surg. 2003;60:351.
13. Bailey, PL, Whitaker, EE, Palmer, LS, et al. The accuracy of the central landmark used for central venous catheterization of the internal jugular vein. Anesth Analg. 2006;102:1327.
14. Karakitsos, D, Labropoulos, N, De Groot, E, et al. Real-time ultrasound-guided catheterization on the internal jugular vein: a prospective comparison with the landmark technique in critical care patients. Crit Care. 2006;10:6.
15. Gordon, AC, Saliken, JC, Johns, D, et al. US-guided puncture of the internal jugular vein: complications and anatomic considerations. J Vasc Interv Radiol. 1998;9:333.
16. Troianos, CA, Kuwik, RJ, Pasqual, JR, et al. Internal jugular vein and carotid artery anatomic relation as determined by ultrasonography. Anesthesiology. 1996;85:43.
17. Denys, BG, Uretsky, BF. Anatomical variations of internal jugular vein location: impact on central venous access. Crit Care Med. 1991;19:1516.
18. Turba, UC, Uflacker, R, Hannegan, C, et al. Anatomic relationship of the internal jugular vein and the common carotid artery applied to percutaneous transjugular procedures. Cardiovasc Intervent Radiol. 2005;28:303.
19. Lobato, EB, Sulek, CA, Moody, RL, et al. Cross-sectional area of the right and left internal jugular veins. J Cardiothorac Vasc Anesth. 1999;13:136.
20. Ruesch, S, Walder, B, Tramer, MR. Complications of central venous catheters: internal jugular versus subclavian access—a systematic review. Crit Care Med. 2002;30:454.
21. Knopp, R, Dailey, RH. Central venous cannulation and pressure monitoring. JACEP. 1977;6:358.
22. Biffi, R, Orsi, F, Pozzi, S, et al. Best choice of central venous insertion site for the prevention of catheter-related complications in adult patients who need cancer therapy: a randomized trial. Ann Oncol. 2009;20:5.
23. Rivers, E, Nguyen, B, Havstad, S, et al. Early goal-directed therapy in the treatment of severe sepsis and septic shock. N Engl J Med. 2001;345:1368.
24. Lee, AJ, Cohn, JH, Ranasinghe, JS. Cardiac output assessed by invasive and minimally invasive techniques. Anesthesiol Res Pract. 2011;2011:475151.
25. Barcelona, SL, Vilich, F, Cote, CJ. A comparison of flow rates and warming capabilities of the Level 1 and Rapid Infusion System with various-size intravenous catheters. Anesth Analg. 2003;97:358.
26. Manning, JE, Murphy, CA, Jr., Batson, DN, et al. Aortic arch versus central venous epinephrine during CPR. Ann Emerg Med. 1993;22:703.
27. Rivers, EP, Martin, GB, Smithline, H, et al. The clinical implications of continuous central venous oxygen saturation during human CPR. Ann Emerg Med. 1992;21:1094.
28. Hilty, WM, Hudson, PA, Levitt, MA, et al. Real-time ultrasound-guided femoral vein catheterization during cardiopulmonary resuscitation. Ann Emerg Med. 1997;29:331.
29. Costantino, TG, Parikh, AK, Satz, WA, et al. Ultrasonography-guided peripheral intravenous access versus traditional approaches in patients with difficult intravenous access. Ann Emerg Med. 2005;46:456.
30. Nascente, AP, Assuncao, M, Guedes, CJ, et al. Comparison of lactate values obtained from different sites and their clinical significance in patients with severe sepsis. Sao Paulo Med J. 2011;129:1.
31. Denner, AM, Townley, SA. Preventing extravasation from central venous catheters. Anaesthesia. 2006;61:614.
32. Shah, MR, Hasselblad, V, Stevenson, LW, et al. Impact of the pulmonary artery catheter in critically ill patients: meta-analysis of randomized clinical trials. JAMA. 2005;294:1664.
33. Wheeler, AP, Bernard, GR, Thompson, BT, et al. Pulmonary-artery versus central venous catheter to guide treatment of acute lung injury. for the National Heart, Lung, and Blood Institute Acute Respiratory Distress Syndrome (ARDS) Clinical Trials Network. N Engl J Med. 2006;354:2213.
34. Tapson, JS, Uldall, PR. Fatal hemothorax caused by a subclavian hemodialysis catheter. Thoughts on prevention. Arch Intern Med. 1984;144:1685.
35. Barton, BR, Hermann, G, Weil, R, 3rd. Cardiothoracic emergencies associated with subclavian hemodialysis catheters. JAMA. 1983;250:2660.
36. Rubinson, L, Diette, GB. Best practices for insertion of central venous catheters in intensive-care units to prevent catheter-related bloodstream infections. J Lab Clin Med. 2004;143:5.
37. Lorente, L, Lecuona, M, Ramos, MJ, et al. The use of rifampicin-miconazole–impregnated catheters reduces the incidence of femoral and jugular catheter–related bacteremia. Clin Infect Dis. 2008;47:1171.
38. Andel, H, Rab, M, Felfernig, M, et al. The axillary vein central venous catheter in severely burned patients. Burns. 1999;25:753.
39. Franceschi, D, Gerding, RL, Phillips, G, et al. Risk factors associated with intravascular catheter infections in burned patients: a prospective, randomized study. J Trauma. 1989;29:811.
40. Pieracci, FM, Barie, PS, Pomp, A. Critical care of the bariatric patient. Crit Care Med. 2006;34:1796.
41. Dhanani, J, Senthuran, S, Olivotto, R, et al. The entrapped central venous catheter. Br J Anaesth. 2007;98:89.
42. McGee, DC, Gould, MK. Preventing complications of central venous catheterization. N Engl J Med. 2003;348:1123.
43. Segal, JB, Dzik, WH. Transfusion Medicine/Hemostasis Clinical Trials Network: paucity of studies to support that abnormal coagulation test results predict bleeding in the setting of invasive procedures: an evidence-based review. Transfusion. 2005;45:1413.
44. Mumtaz, H, Williams, V, Hauer-Jensen, M, et al. Central venous catheter placement in patients with disorders of hemostasis. Am J Surg. 2000;180:503.
45. Doerfler, ME, Kaufman, B, Goldenberg, AS. Central venous catheter placement in patients with disorders of hemostasis. Chest. 1996;110:185.
46. Mey, U, Glasmacher, A, Hahn, C, et al. Evaluation of an ultrasound-guided technique for central venous access via the internal jugular vein in 493 patients. Support Care Cancer. 2003;11:148.
47. Oguzurt, L, Tercan, F, Kara, G, et al. US-guided placement of temporary internal jugular vein catheters: immediate technical success and complications in normal and high-risk patients. Eur J Radiol. 2005;55:125.
48. Kumar, A, Chuan, A. Ultrasound guided vascular access: efficacy and safety. Best Pract Res Clin Anaesthesiol. 2009;23:299.
49. Leung, J, Duffy, M, Finckh, A. Real-time ultrasonographically-guided internal jugular vein catheterization in the emergency department increases success rates and reduces complications: a randomized, prospective study. Ann Emerg Med. 2006;48:5.
50. Sheridan, RL, Weber, JM. Mechanical and infectious complications of central venous cannulation in children: lessons learned from a 10-year experience placing more than 1000 catheters. J Burn Care Res. 2006;27:713.
51. Yao, M-L, Chiu, P-C, Hsieh, K-S, et al. Subclavian central venous catheterization in infants with body weight less than 10 kg. Acta Paediatr Taiwan. 2004;45:324.
52. Finck, C, Smith, S, Jackson, R, et al. Percutaneous subclavian central venous catheterization in children younger than one year of age. Am Surg. 2002;68:401.
53. Jastremski, MS, Matthias, HD, Randell, PA. Femoral venous catheterization during cardiopulmonary resuscitation: a critical appraisal. J Emerg Med. 1984;1:387.
54. Alderson, PJ, Burrows, FA, Stemp, LI, et al. Use of ultrasound to evaluate internal jugular vein anatomy and to facilitate central venous cannulation in paediatric patients. Br J Anaesth. 1993;70:145.
55. Cajozzo, M, Quintini, G, Cocchiera, G, et al. Comparison of central venous catheterization with and without ultrasound guide. Transfus Apher Sci. 2004;31:199.
56. Conz, PA, Dissegna, D, Rodighiero, MP, et al. Cannulation of the internal jugular vein: comparison of the classic Seldinger technique and an ultrasound-guided method. J Nephrol. 1997;10:311.
57. Agency for Healthcare Research and Quality, Making Health Care Safer: A Critical Analysis of Patient Safety Practices. Publication No. 01-E058, Rockville, MD, Agency for Healthcare Research and Quality, 2001.
58. Pronovost, PJ, Berenholtz, SM, Goeschel, CA, et al. Creating high reliability in health care organizations. Health Serv Res. 2006;41:1599.
59. Berenholtz, SM, Pronovost, PJ, Lipsett, PA, et al. Eliminating catheter-related bloodstream infections in the intensive care unit. Crit Care Med. 2004;32:2014.
60. Cherry, RA, West, CE, Hamilton, MC, et al. Reduction of central venous catheter associated blood stream infections following implementation of a resident oversight and credentialing policy. Patient Saf Surg. 2011;5:15.
61. Centers for Disease Control and Prevention (CDC). Vital signs: central line–associated blood stream infections—United States, 2002, 2008, 2009. MMWR Morb Mortal Wkly Rep. 2011;60(8):243–248.
62. Pronovost, P, Needham, D, Berenholtz, S, et al. An intervention to decrease catheter-related bloodstream infections in the ICU. N Engl J Med. 2006;335:26.
63. Furuya, EY, Dick, A, Perencevich, EN, et al. Central line bundle implementation in US intensive care units and impact on bloodstream infections. PLoS One. 2011;6(1):e15452.
64. Hu, KK, Lipsky, BA, Veenstra, DL, et al. Using maximal sterile barriers to prevent central venous catheter–related infection: a systematic evidence-based review. Am J Infect Control. 2004;32:142.
65. Centers for Disease Control and Prevention (CDC). Guidelines for intravascular catheter-related infections. Available at http://www.cdc.gov/hicpac/pdf/guidelines/bsi-guidelines-2011.pdf
66. Robinson, JF, Robinson, WA, Cohn, A, et al. Perforation of the great vessels during central venous line placement. Arch Intern Med. 1995;155:1225–1228.
67. Darouiche, RO, Raad, II., Heard, SO, et al. A comparison of two antimicrobial-impregnated central venous catheters. Catheter Study Group. N Engl J Med. 1999;340:1.
68. Maki, DG, Stolz, SM, Wheeler, S, et al. Prevention of central venous catheter–related bloodstream infection by use of an antiseptic-impregnated catheter. A randomized, controlled trial. Ann Intern Med. 1997;127:257.
69. Maloney, JP. Lessening the punch of heparin-induced thrombocytopenia. Chest. 2002;122:5.
70. Safdar, N, Kluger, DM, Maki, DG. A review of risk factors for catheter-related bloodstream infection caused by percutaneously inserted, noncuffed central venous catheters: implications for preventive strategies. Medicine (Baltimore). 2002;81:466.
71. Sherertz, RJ. Update on vascular catheter infections. Curr Opin Infect Dis. 2004;17:303.
72. Bacuzzi, A, Cecchin, A, Del Bosco, A, et al. Recommendations and reports about central venous catheter–related infection. Surg Infect. 2006;7(suppl 2):S65.
73. Taylor, RW, Palagiri, AV. Central venous catheterization. Crit Care Med. 2007;35:5.
74. Risser, D, Simon, R, Rice, M, et al. A structured teamwork system to reduce clinical errors. In: Spath P, ed. Error Reduction in Health Care: A Systems Approach to Improving Patient Safety. San Francisco: Jossey-Bass, 2000.
75. Unnikrishnan, KP, Sinha, PK, Nalgirkar, RS. An alternative and simple technique of guidewire retrieval in a failed Seldinger technique. Anesth Analg. 2005;100:898.
76. Stone, MB, Nagdev, A, Murphy, MC, et al. Ultrasound detection of guidewire position during central venous catheterization. Am J Emerg Med. 2010;28:82.
77. Lichtenstein, D, Saifi, R, Augarde, R, et al. The internal jugular veins are asymmetric. Usefulness of ultrasound before catheterization. Intensive Care Med. 2001;27:301.
78. Timsit, J-F. What is the best site for central venous catheter insertion in critically ill patients? Crit Care. 2003;7:397.
79. Kusminsky, RE. Complications of central venous catheterization. J Am Coll Surg. 2007;204:4.
80. Milling, TJ, Jr., Rose, J, Briggs, WM, et al. Randomized, controlled clinical trial of point-of-care limited ultrasonography assistance of central venous cannulation: The Third Sonography Outcomes Assessment Program (SOAP-3) Trial. Crit Care Med. 2005;33:1764.
81. Feller-Kopman, D. Ultrasound-guided central venous catheter placement: the new standard of care? Crit Care Med. 2005;33:1875.
82. Bullock, RE, Anto, J. Placement of a central line in the prone position. Anaesthesia. 2004;59:511.
83. Fortune, JB, Feustel, P. Effect of patient position on size and location of the subclavian vein for percutaneous puncture. Arch Surg. 2003;138:996.
84. Kitagawa, N, Oda, M, Totoki, T, et al. Proper shoulder position for subclavian venipuncture: a prospective randomized clinical trial and anatomical perspectives using multislice computed tomography. Anesthesiology. 2004;101:1306.
85. Rajaram, SS, Dellinger, RP. Positioning for central venous access. Semin Anesth Perioper Med Pain. 2005;24:211.
86. Rodriguez, CJ, Bolanowski, A, Patel, K, et al. Classical positioning decreases the cross-sectional area of the subclavian vein. Am J Surg. 2006;192:135.
87. Suarez, T, Baerwald, JP, Kraus, C. Central venous access: the effects of approach, position, and head rotation on internal jugular vein cross-sectional area. Anesth Analg. 2002;95:1519.
88. Thompson, EC, Calver, LE. Safe subclavian vein cannulation. Am Surg. 2005;71:180.
89. von Goedecke, A, Keller, C, Moriggl, B, et al. An anatomic landmark to simplify subclavian vein cannulation: the “deltoid tuberosity.”. Anesth Analg. 2005;100:623.
90. Boyd, R, Saxe, A, Phillips, E. Effect of patient position upon success in placing central venous catheters. Am J Surg. 1996;172:380.
91. Jesseph, JM, Conces, DJ, Jr., Augustyn, GT. Patient positioning for subclavian vein catheterization. Arch Surg. 1987;122:1207.
92. Tan, BK, Hong, SW, Huang, MH, et al. Anatomic basis of safe percutaneous subclavian venous catheterization. J Trauma. 2000;48:82.
93. Kitagawa, N, Oda, M, Totoki, T, et al. Proper shoulder position for subclavian venipuncture: a prospective randomized clinical trial and anatomical perspectives using multislice computed tomography. Anesthesiology. 2004;101:1306.
94. Jung, C-W, Bahk, J-H, Kim, M-W, et al. Head position for facilitating the superior vena caval placement of catheters during right subclavian approach in children. Crit Care Med. 2002;30:297.
95. Maddukuri, P, Downey, BC, Blander, JA, et al. Echocardiographic diagnosis of air embolism associated with central venous catheter placement: case report and review of the literature. Echocardiography. 2006;23:315.
96. Mirza, B, Vanek, VW, Kupensky, DT. Pinch-off syndrome: case report and collective review of the literature. Am Surg. 2004;70:635.
97. Moran, SG, Peoples, JB. The deltopectoral triangle as a landmark for percutaneous infraclavicular cannulation of the subclavian vein. Angiology. 1993;44:683.
98. Galloway, S, Bodenham, A. Ultrasound imaging of the axillary vein—anatomical basis for central venous access. Br J Anaesth. 2003;90:589.
99. Sharma, A, Bodenham, AR, Mallick, A. Ultrasound-guided infraclavicular axillary vein cannulation for central venous access. Br J Anaesth. 2004;93:188.
100. Lewin, MR, Stein, J, Wang, R, et al. Humming is as effective as Valsalva’s maneuver and Trendelenburg’s position for ultrasonographic visualization of the jugular venous system and common femoral veins. Ann Emerg Med. 2007;50:73.
101. Sulek, CA, Blas, ML, Lobato, EB. A randomized study of left versus right internal jugular vein cannulation in adults. J Clin Anesth. 2000;12:142.
102. Willeford, KL, Reitan, JA. Neutral head position for placement of internal jugular vein catheters. Anaesthesia. 1994;49:202.
103. Chudhari, LS, Karmarkar, US, Dixit, RT, et al. Comparison of two different approaches for internal jugular vein cannulation in surgical patients. J Postgrad Med. 1998;44:57.
104. Slama, M, Novara, A, Safavian, A, et al. Improvement of internal jugular vein cannulation using an ultrasound-guided technique. Intensive Care Med. 1997;23:916.
105. Mallory, DL, Shawker, T, Evans, RG, et al. Effects of clinical maneuvers on sonographically determined internal jugular vein size during venous cannulation. Crit Care Med. 1990;18:1269.
106. Randolph, AG, Cook, DJ, Gonzales, CA, et al. Ultrasound guidance for placement of central venous catheters: a meta-analysis of the literature. Crit Care Med. 1996;24:2053.
107. Turba, UC, Uflacker, R, Hannegan, C, et al. Anatomic relationship of the internal jugular vein and the common carotid artery applied to percutaneous transjugular procedures. Cardiovasc Intervent Radiol. 2005;28:303.
108. Motonaga, GK, Lee, KK, Kirsch, JR. The efficacy of the Arrow staple device for securing central venous catheters to human skin. Anesth Analg. 2004;99:1436.
109. Lum, TE, Fairbanks, RJ, Pennington, EC, et al. Profiles in patient safety: misplaced femoral line guidewire and multiple failures to detect the foreign body on chest radiography. Acad Emerg Med. 2005;12:658–662.
110. Cassie, CD, Ginsberg, MS, Panicek, DM. Unsuspected retained 60-cm intravenous guidewire. Clin Imaging. 2006;30:287–290.
111. Amshel, CE, Palesty, JA, Dudrick, SJ, et al. Are chest x-rays mandatory following central venous recatheterization over a wire? Am Surg. 1998;64:499–501. [discussion 501-502].
112. Cullinane, DC, Parkus, DE, Reddy, VS, et al. The futility of chest roentgenograms following routine central venous line changes. Am J Surg. 1998;176:283–285.
113. Emerman, CL, Pinchak, AC, Hancock, D, et al. Effect of injection site on circulation times during cardiac arrest. Crit Care Med. 1988;16:1138.
114. Dalsey, WC, Barsan, WG, Joyce, SM, et al. Comparison of superior vena caval and inferior vena caval access using a radioisotope technique during normal perfusion and cardiopulmonary resuscitation. Ann Emerg Med. 1984;13:881.
115. Emerman, CL, Bellon, EM, Lukens, TW, et al. A prospective study of femoral versus subclavian vein catheterization during cardiac arrest. Ann Emerg Med. 1990;19:26.
116. Magder, S. Central venous pressure: a useful but not so simple measurement. Crit Care Med. 2006;34:2224.
117. Kumar, A, Anel, R, Bunnell, E, et al. Pulmonary artery occlusion pressure and central venous pressure fail to predict ventricular filling volume, cardiac performance, or the response to volume infusion in normal subjects. Crit Care Med. 2004;32:691.
118. Trzeciak, S, Dellinger, RP, Abate, NL, et al. Translating research to clinical practice: a 1-year experience with implementing early goal-directed therapy for septic shock in the emergency department. Chest. 2006;129:225.
119. Magder, S. How to use central venous pressure measurements. Curr Opin Crit Care. 2005;11:264.
120. Vincent, J-L, Weil, MH. Fluid challenge revisited. Crit Care Med. 2006;34:1333.
121. Polanco, PM, Pinsky, MR. Practical issues of hemodynamic monitoring at the bedside. Surg Clin North Am. 2006;86:1431.
122. Desmond, J, Megahed, M. Is the central venous pressure reading equally reliable if the central line is inserted via the femoral vein? Emerg Med J. 2003;20:467.
123. Magder, S. Central venous pressure monitoring. Curr Opin Crit Care. 2006;12:219.
124. Steele, R, Irvin, CB. Central line mechanical complication rate in emergency medicine patients. Acad Emerg Med. 2001;8:2.
125. Agency for Healthcare Research and Quality. Patient Safety and Quality: Simulation Training Improves Insertion of Central Venous Catheters. Rockville, MD: AHRQ; 2011.
126. Laronga, C, Meric, F, Truong, MT, et al. A treatment algorithm for pneumothoraces complicating central venous catheter insertion. Am J Surg. 2000;180:523.
127. Giacomini, M, Iapichino, G, Armani, S, et al. How to avoid and manage a pneumothorax. J Vasc Access. 2006;7:7.
128. Ricolfi, F, Valiente, E, Bodson, F, et al. Arteriovenous fistulae complicating central venous catheterization: value of endovascular treatment based on a series of seven cases. Intensive Care Med. 1995;21:1043.
129. Merrer, J, De Jonghe, B, Golliot, F, et al. Complications of femoral and subclavian venous catheterization in critically ill patients: a randomized controlled trial. JAMA. 2001;286:700.
130. Pikwer, A, Baath, L, Davidson, B, et al. The incidence and risk of central venous catheter malpositioning: a prospective cohort study in 1619 patients. Anaesth Intensive Care. 2008;36:30.
131. Tripathi, M, Dubey, PK, Ambesh, SP, et al. Direction of the J-tip of the guidewire, in Seldinger technique, is a significant factor in misplacement of subclavian vein catheter: a randomized, controlled study. Anesth Analg. 2005;100:21.
132. Vesely, TM. Central venous catheter tip position: a continuing controversy. J Vasc Interv Radiol. 2003;14:527.
133. Depierraz, B, Essinger, A, Morin, D, et al. Isolated phrenic nerve injury after apparently atraumatic puncture of the internal jugular vein. Intensive Care Med. 1989;15:132.
134. Porzionato, A, Montisci, M, Manani, G, et al. Brachial plexus injury following subclavian vein catheterization: a case report. J Clin Anesth. 2003;15:582.
135. Defalque, RJ, Fletcher, MV. Review: neurological complications of central venous cannulation. JPEN J Parenter Enteral Nutr. 1988;12:406.
136. Warren, DK, Quadir, WW, Hollenbeak, CS, et al. Attributable cost of catheter-associated bloodstream infections among intensive care patients in a nonteaching hospital. Crit Care Med. 2006;34:2084.
137. Ansari, MJ, Syed, A, Wongba, W, et al. Superior vena cava obstruction presenting as a complication of repeated central venous cannulations. Compr Ther. 2006;32:189–191.
138. Nevarre, DR, Domingo, OH. Supraclavicular approach to subclavian catheterization: review of the literature and results of 178 attempts by the same operator. J Trauma. 1997;42:305.
139. Eisen, LA, Narasimhan, M, Berger, JS, et al. Mechanical complications of central venous catheters. J Intensive Care Med. 2006;21:1.
140. Wu, X, Studer, W, Erb, T, et al. Competence of the internal jugular vein valve is damaged by cannulation and catheterization of the internal jugular vein. Anesthesiology. 2000;93:319.
141. Joynt, GM, Kew, J, Gomersall, CD, et al. Deep venous thrombosis caused by femoral venous catheters in critically ill adult patients. Chest. 2000;117:178.
142. Warren, DK, Zack, JE, Mayfield, JL, et al. The effect of an education program on the incidence of central venous catheter–associated bloodstream infection in a medical ICU. Chest. 2004;126:1612.
143. Evans, LV, Dodge, KL, Shah, TD, et al. Simulation training in central venous catheter insertion: improved performance in clinical practice. Acad Med. 2010;85:9.
144. Kendall, JL, Faragher, JP. Ultrasound-guided central venous access: a homemade phantom for simulation. Can J Emerg Med. 2007;9:5.

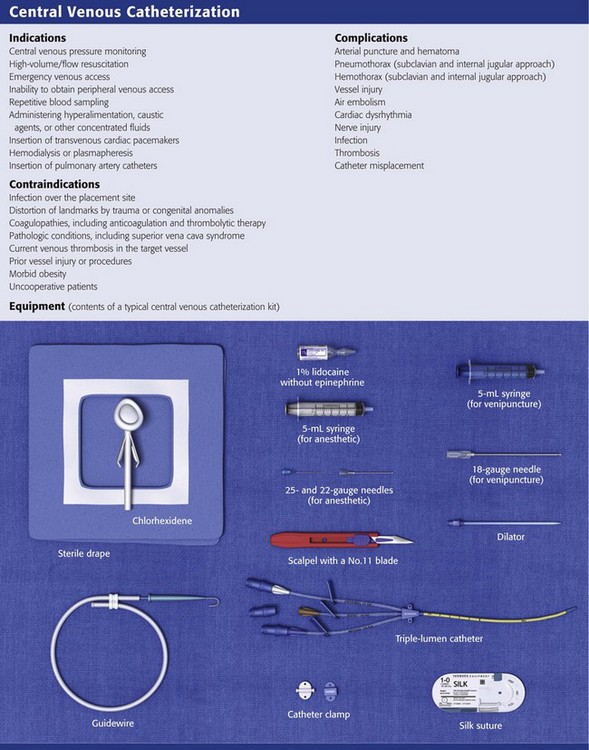
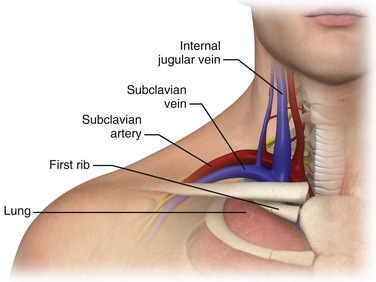
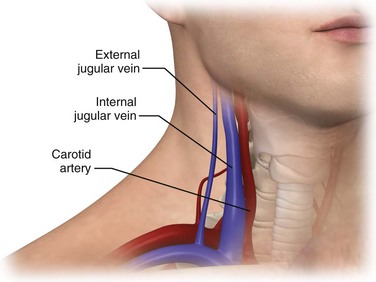
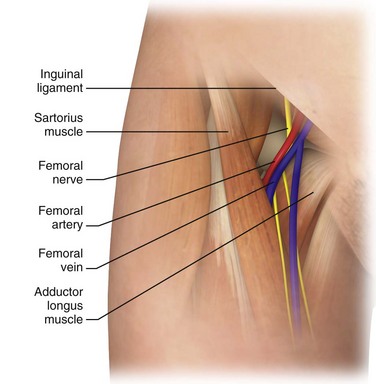
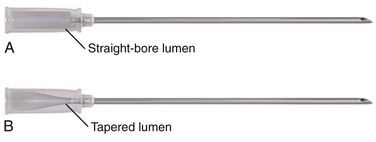
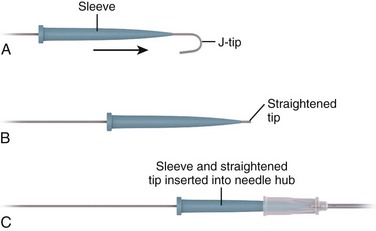
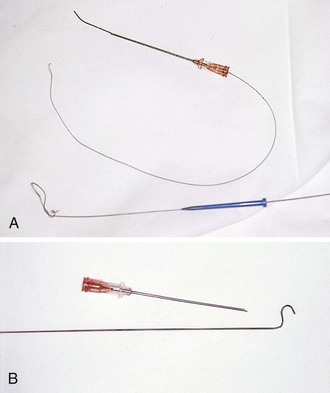
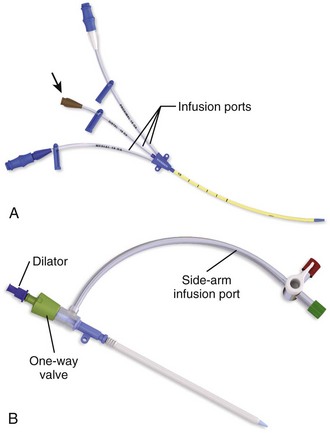
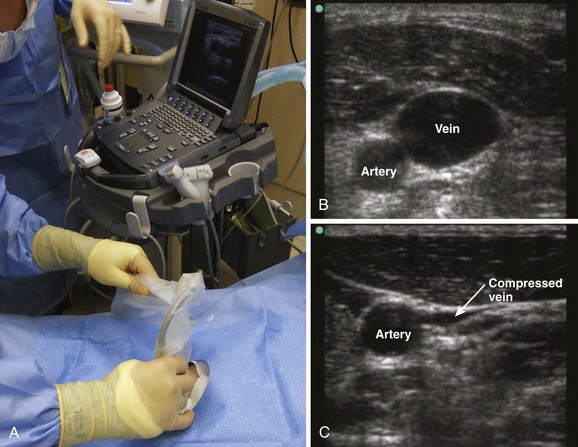
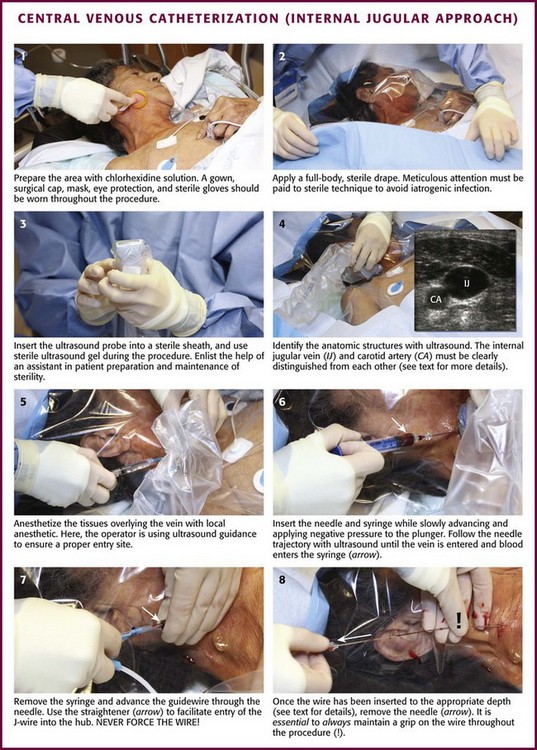
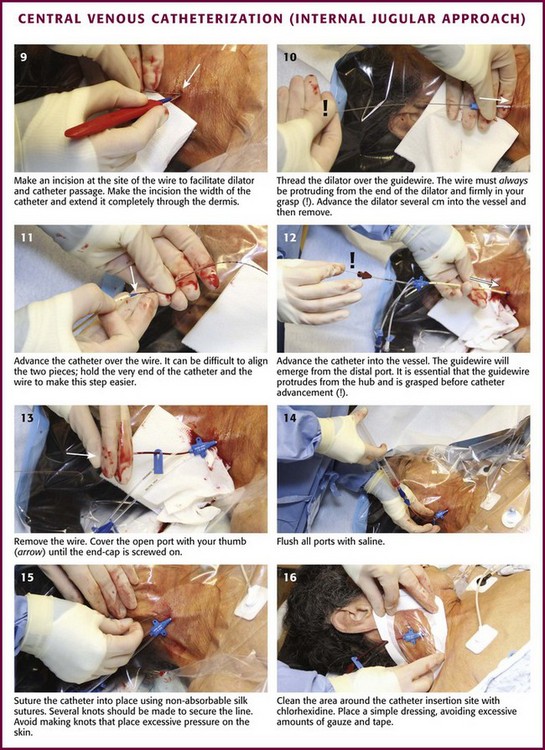
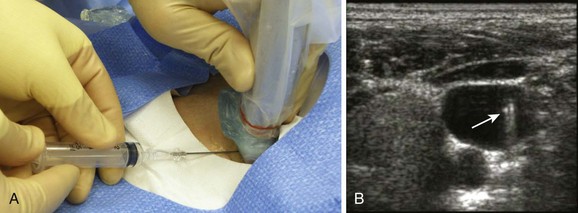
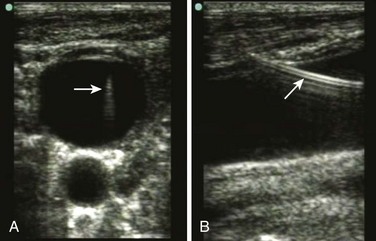
 -inch angiocatheter) in an adult. Smaller-diameter devices, such as 20-gauge catheters, may be easier to pass but provide slower infusion rates. Attach the needle to a syringe, and slowly advance it into the vein with steady negative pressure applied to the syringe. This may be difficult because of the longer length of the needle relative to the catheter. When using bedside ultrasound, follow the trajectory of the needle into the soft tissues and visualize penetration of the vessel. With over-the-needle catheters, the needle extends a few millimeters past the tip of the catheter. Return of blood will be obtained when the tip of the needle is in the vein, although the catheter may actually be outside the lumen. If the needle is withdrawn before the catheter is advanced, the tip of the catheter will remain outside the vein. It is therefore important to advance the needle a few millimeters after the venous flash is seen and then hold it steadily while advancing the catheter into the vein. Secure the catheter and verify its placement as detailed later in this chapter.