Arterial Puncture and Cannulation
Arterial puncture is the most accurate blood sampling technique for true arterial blood gas (ABG) and acid-base determination. The absence of arterial blood pressure defines cardiac arrest and serves as a definitive end point for resuscitative efforts. Intraarterial cannulation with continuous blood pressure measurement remains an accepted standard in critically ill patients. Intraarterial monitoring of blood pressure better reflects the force of systemic perfusion and is one of the most important determinants of cardiac work. In recent years, noninvasive technologies have achieved an accuracy that is nearly equal to that of invasive monitoring, but these techniques also have limitations.1,2 Invasive modalities require specific expertise and support to perform.3
Historical Perspective
Hippocrates suggested that the blood and arteries deliver life-giving energy to the body. Building on these ideas, the ancient Greek physician Galen first noted that arteries carry blood from the heart although he wrongly asserted that the heart constantly produced new blood. The concept of circulating blood volume generating pulse and pressure was not recognized until the Age of Enlightenment. The Spanish physician Severetus was among the first to accurately describe the circulation in 1580, but most of his writings were destroyed when he was executed for his teachings. Soon thereafter in 1616, William Harvey described a circulatory system with a finite amount of blood and the heart at its center. Stephen Hales first recorded blood pressure measurement in 1733 using a brass pipe. He inserted a pipe into a horse’s artery and connected it to a glass conduit in which he observed blood rising and falling.1,4
The first measurement of human blood pressure was accomplished in 1847 with the kymograph. It was developed by the German physiologist Carl Ludwig and involved the insertion of catheters directly into the artery. In 1949, Peterson and colleagues illustrated continuous recording of pulse waves and blood pressure with a catheter percutaneously inserted into the brachial artery. Soon thereafter, percutaneous femoral artery cannulation with a polyethylene catheter through a large-bore needle was described by Peirce. Barr described radial artery cannulation with a Teflon catheter in 1961.5
An important accomplishment in vascular access occurred in 1953 when Seldinger presented a technique in which percutaneous catheterization could be achieved over a guidewire.5,6 In the 1960s, the introduction of electrical monitoring of arterial pressure with transducers and recorders allowed mathematical waveform analysis in addition to visual analysis. More recent advances have included continuous, invasive monitoring of ABG values.7 Currently, there are a growing number of noninvasive devices and methods for accurate monitoring of arterial blood pressure; however, none match the proven accuracy of intraarterial monitoring.
Indications and Contraindications
Indications for and contraindications to arterial puncture and cannulation are listed in Review Box 20-1. The use of arterial lines for continuous monitoring is generally reserved for the intensive care setting; however, arterial cannulation may be initiated in the emergency department (ED). The indications for placement of an arterial catheter fall into three major categories8,9:
1. Repetitive and direct arterial blood sampling. Catheter access removes the need for multiple arterial punctures and allows either repeated sampling or placement of sensors for continuous monitoring of blood gas and other chemistry values.
2. Continuous real-time monitoring of blood pressure. Catheter access allows superior monitoring and moment-to-moment detection of changes. Intraoperative and intensive care unit (ICU) management is often facilitated by placement of an arterial line.
3. Failure or inability to use indirect blood pressure monitoring. Some patients such as those with severe burns, dialysis grafts or shunts, or morbid obesity may need ongoing monitoring of perfusion, which can best be accomplished by arterial catheterization.
Although acute respiratory decompensation and metabolic emergencies are the most common reasons for ABG sampling, all blood tests performed on venous blood are also possible on an arterial sample. Cultures performed on blood obtained from an indwelling arterial line have a sensitivity and specificity similar to that of cultures performed on blood obtained from a venipuncture site.10,11 Patients with moderate respiratory decompensation may be managed without arterial puncture by using continuous, noninvasive pulse oximetry, end-tidal or transcutaneous carbon dioxide monitoring, carboxyhemoglobin and methemoglobin monitoring, or any combination thereof.12 Nonetheless, a role still exists for arterial blood sampling. The initial correlation between noninvasive values and acid-base status via arterial sampling is often important in critical illness to set a baseline or verify a trend. Some authors use ABG sampling in the initial evaluation of critically ill trauma patients.13 Vasoactive drugs (e.g., nitroprusside and norepinephrine) are best administered with continuous monitoring of arterial pressure to guide titration. The response of trauma and post-cardiac arrest patients to acute resuscitative efforts may also be more easily monitored with the use of arterial catheterization.
There are reports of patients with bleeding complications who require transfusion. Some patients have suffered compression neuropathies secondary to hematomas at the puncture site.14 Repeated arterial sampling in such patients should be accomplished by insertion of an indwelling cannula to minimize trauma to the arterial wall.
The presence of severe arteriosclerosis, with or without diminution in flow, is a relative contraindication to arterial puncture. In hemodynamically unstable patients with advanced cardiovascular disease, the benefits of invasive monitoring may nonetheless outweigh its risks.9 Consider an alternative site if an isolated, decreased palpable pulse or bruit is felt over the site selected. Consider an alternative site if there is evidence of decreased or absent collateral flow in areas where flow normally exists, such as in Raynaud’s syndrome or an abnormal result on the modified Allen test (discussed later in the section “Techniques”). Avoid puncturing a specific arterial site when infection, burn, or other damage to cutaneous defenses exists in the overlying skin. In addition, avoid performing an arterial puncture through or distal to a surgical shunt.
Arterial versus Venous Analysis
Arterial sampling has been the traditional approach to evaluating acid-base abnormalities in critically ill patients, especially those being maintained on a ventilator. In most ED settings, however, venous blood gas analysis may suffice. Studies have demonstrated that analysis of venous blood (especially central venous blood) for pH, bicarbonate, lactate, base excess, and carbon dioxide pressure (Pco2) are within 95% limits of agreement with arterial sampling and can safely supplant it.15–17 On the other hand, arterial blood sampling is still required for accurate analysis of oxygen pressure (Po2).18–20
Equipment: Arterial Puncture
Arterial Puncture with a Needle/Syringe
Precoated blood gas plastic syringes (with dry lithium heparin) are commonly used and allow a longer shelf life and ready use (Fig. 20-1). Such devices are designed to minimize sampling error as a result of heparin.21 If necessary, prepare a regular syringe with 1 or 2 mL of a heparinized saline solution (1000 IU/mL) drawn into the syringe to coat the barrel and needle. Fully eject the heparin through the needle immediately before skin puncture to minimize heparin-related errors. Although the syringe may appear devoid of heparin, enough heparin remains in the needle and syringe to provide anticoagulation. Even dry heparin may produce abnormalities in ABG results because of a heparin-induced dilutional effect.
Stored heparin solution has higher Po2 and lower Pco2 values than blood does.22 A dilutional effect from heparin would mean that the addition of 0.4 mL of heparin solution to a 2-mL sample of blood (dilution of 20%) will lower Pco2 by 16%.21 Proper technique with dry lithium heparin-prefilled syringes or full ejection of excess heparin will prevent such problems if more than 2 mL of blood is collected. A falsely low Pco2 is the most clinically significant change caused by excess heparin.21,22 Neither Po2 nor pH levels are significantly altered by the addition of heparin in most instances, although a slight increase in Po2 and a minimal decrease in pH may occur if high concentrations of heparin (25,000 IU/mL) are used.23 If 2 to 3 mL of blood is collected, heparin-related effects are likely to be clinically inconsequential.
Continuous Monitoring via Arterial Catheter
The fluid-filled recording systems used with arterial cannulation have a great influence on the accuracy of pressure measurements. The frequency responses of tubing, transducers, and other components of the monitoring system influence the accuracy of systolic and diastolic pressure measurement. Failure to recognize recording system artifacts will lead to errors in interpretation of the pressure.3
Various catheter types have demonstrated similar frequency-response characteristics, but some studies have found different complication rates. Teflon catheters may carry an increased rate of thrombosis.24,25 Another contributing element leading to thrombosis is catheter diameter; the incidence of thrombosis is inversely related to the ratio of vessel lumen to catheter diameter.26,27 Thus, the risk for thrombosis increases as the diameter of the catheter decreases. The incidence of thrombosis also increases with increased duration of catheter placement. In contrast, a higher risk for thrombosis was seen in the femoral artery than in the radial artery in a study involving a pediatric population.28 Catheters coated with a combination of chlorhexidine and silver sulfadiazine have produced lower infection rates.29
Preparation for Arterial Cannulation
Box 20-1 lists the usual equipment for arterial cannulation, although the majority of prepackaged kits contain the supplies most needed (see Review Box 20-1). Shorter catheters are ideal for peripheral artery cannulation, whereas use of a longer catheter and the Seldinger technique is preferable for the femoral artery.
For arterial cannulation in adults, use a 16- to 18-gauge catheter for the femoral artery and a 20-gauge catheter for the radial artery (Fig. 20-2). Small children and infants require a 22- to 24-gauge catheter, which may need to be inserted percutaneously via the Seldinger technique or through a femoral cutdown. Based on patient size, older pediatric patients usually require 20- to 22-gauge catheters.
The tubing that connects the catheter to the pressure transducer has a significant effect on accuracy of the monitoring system. The higher the frequency response of the entire system, the more accurate the determination of systolic and diastolic pressure; however, artifact also becomes more of a problem.8,30 Use stiff, low-capacitance plastic tubing for arterial catheterization and monitoring. Place the electronic pressure transducer connection as close as possible to the patient and zero it appropriately because the frequency response of a tube is inversely related to its length.30–32
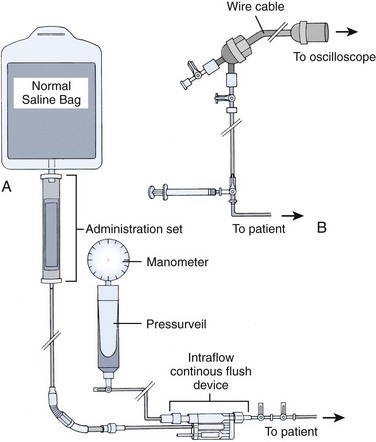
The pressure wave produced with each contraction is transmitted from the artery through the catheter and connecting tubing to a measuring device. The arterial fluid wave is received by an electromechanical transducer that changes the mechanical pressure wave into an electrical signal that can be displayed on the monitor. The most basic technique for obtaining blood pressure values involves the use of a simple manometer.33 This system can be assembled quickly if the material is available.
A continuous method of flushing the pressure tubing is required to maintain patency of the catheter lumen during intraarterial pressure monitoring. A three-way stopcock through which the tubing is intermittently flushed (a minimum of every 15 to 30 minutes) with saline is a simple, effective method. Continuous flush devices push a set amount of fluid (usually 2 to 3 mL/hr) through the line.9 A typical monitoring system that includes this device is shown in Figure 20-3. The pressure transducer must be mounted at the level of the patient’s heart. Current pressure-monitoring setups include not only built-in stopcocks but also in-line flushing plungers to facilitate clearance of blood after sampling.
Intravascular transducers were initially seen as an improvement over the external electromechanical transducers in use since the mid-1970s. Many of the numerous brands are fragile, temperature sensitive, of variable quality, and much more difficult to place in vessels than catheters are. Despite anecdotal reports of fibrin deposition on these devices, no increased incidence of thrombus formation has been noted. The most important advantages of intravascular transducers are the ability to continuously monitor ABG values and elimination of the potential error induced by catheters, stopcocks, and connecting tubing.34,35
Techniques
Palpate the arterial pulse to ascertain the location of the vessel and prepare the overlying skin with an antiseptic solution (Fig. 20-4, step 1). Anesthetize the patient’s skin with a wheal of local anesthetic (e.g., 1% lidocaine without epinephrine) through a small needle (25 or 27 gauge) (see Fig. 20-4, step 2). If local anesthesia is to be performed, take care to use only a small amount of local anesthetic because a large wheal may obscure the pulse. One study found no significant alterations in Pco2 or pH from the pain or anxiety of an unanesthetized arterial puncture (Table 20-1).36 If the patient is in extremis or unresponsive to pain in the area to be punctured, the anesthetic infiltration step may be omitted.
TABLE 20-1
Parameters That Affect Interpretation of Arterial Blood Gases
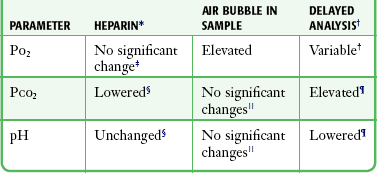
*Use only a 1000-IU/mL concentration. Fill the dead space of the needle and syringe only and collect 3 mL of blood.
†Changes unpredictable at 20 minutes regardless of the storage method.
‡There are reports of slight increases in Po2 with excessive heparin.
§The falsely lowered Pco2 that occurs with added heparin is the most clinically significant change noted. pH may be decreased if a large volume of concentrated heparin (25,000 IU/mL) is used.

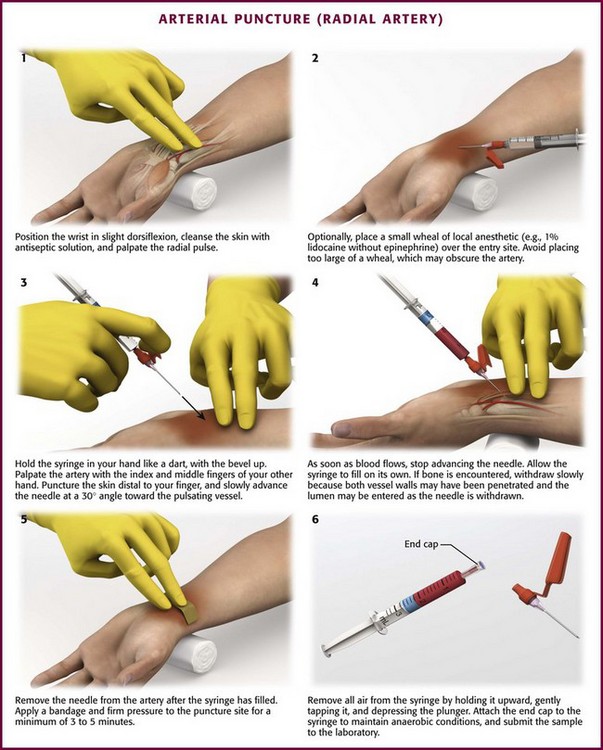
Figure 20-4 Arterial puncture (radial artery).
Isolate the arterial pulsation with the index and middle fingers of the gloved, nondominant hand and identify the course of the vessel. Puncture the skin through the anesthetic wheal, immediately distal to the palpated pulse under the index finger (Fig. 20-4, step 3). The older technique of placing the needle between the index and middle finger risks self-puncture and is no longer advised. Hold the syringe like a dart with the bevel up and the syringe kept in view so that blood flow can be seen immediately. Advance the needle slowly toward the pulsating vessel at an approximately 30-degree angle. A larger angle is required to puncture the deeper femoral artery. Once the needle enters the arterial lumen, allow the syringe plunger to rise with the arterial pressure on its own to discriminate between arterial and venous sampling (see Fig. 20-4, step 4). As soon as blood flows, stop advancing the needle and allow the syringe to fill. If no blood flow is obtained or if bone has been hit, withdraw the needle slowly because both walls of the vessel may have been punctured and the lumen may be entered as the needle is withdrawn. Redirect the needle only when the needle has been retracted to a location just deep to the dermis. After at least 1 to 2 mL of blood has been obtained, remove the needle from the artery. Apply firm pressure at the puncture site for a minimum of 3 to 5 minutes (see Fig. 20-4, step 5). If the patient is anticoagulated or has a coagulopathy, 10 to 15 minutes of pressure is required.
Use of ultrasound is rapidly becoming a standard in procedures involving central vascular access. The same ultrasound-guided techniques are also being applied to arterial cannulation (see Ultrasound Box.)
 Ultrasound
Arterial Punctureby Christine Butts, MD
The target vessel should first be identified with ultrasound. A high-frequency transducer (10 to 12 mHz) should be used to ensure proper resolution. The target vessel is typically easiest to identify in the transverse plane (with the indicator pointing toward the patient’s right side) (Fig. 20-US1). Arteries usually appear as rounded structures with thick walls, as opposed to veins. Depending on the size of the vessel, pulsations may be noted. Application of color flow Doppler to a suspected artery will frequently demonstrate a pattern of pulsatile flow (Fig. 20-US2). Although arteries are usually thought to resist collapse from outside pressure (such as from applying pressure to the overlying transducer), smaller arteries in the periphery may show a degree of collapse. When seeking to identify the target vessel, multiple means of identification should be used before an attempt at cannulation.
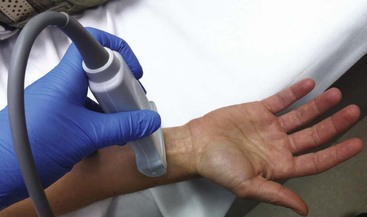
Figure 20-US1 Placement of the transducer over the distal end of the arm in the transverse plane to localize the radial artery.
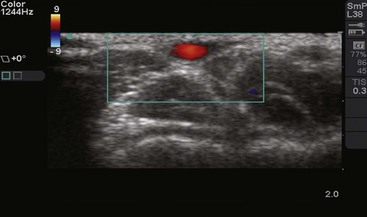
Figure 20-US2 Image of the radial artery with color flow. Applying color flow will enable the operator to correctly identify the artery.
Once the vessel has been identified, ultrasound can also be used to directly guide cannulation. Sterile technique should be maintained, particularly when accessing central arteries such as the femoral artery. A full description of the technique of ultrasound-guided venous access can be found in both the general ultrasound chapter (Chapter 66) and the central venous access chapter (Chapter 22) in this textbook. The principles of these procedures also apply to arterial cannulation, although a few points should be emphasized. When guiding access to the radial artery, a transverse approach is typically used because the vessel is small and difficult to visualize in the longitudinal approach. Additionally, it may be difficult to keep the image of the longitudinal vessel centered on the screen, especially when one physician is directing both the ultrasound and the needle.
In their review of the current literature, Shiloh and colleagues reported 71% improvement in the likelihood of success at the first attempt when using ultrasound guidance.37 Vascular Doppler can also be used to improve success rates. Hold the probe over the artery just proximal to the puncture site. An important indication of vessel identification is the loss of audible pulsations with compression.
Proper handling of the sample and rapid analysis are very important. When the needle is withdrawn, expel any air bubbles present in the syringe to avoid a false elevation in Po2.38 Remove the air neatly and easily by tapping the inverted syringe (needle pointing upward) to force any air to the top; then carefully and slowly depress the syringe plunger to push out the remaining air (see Fig. 20-4, step 6). A gauze pad or alcohol wipe may be used to collect any excess blood expelled with the syringe held upright and the plunger side down. Remove the needle and cap the syringe to ensure anaerobic conditions. Alternatively, many of the commercially available arterial blood gas kits come with an air bubble removal device (Filter-Pro) that allows the clinician to expel air bubbles from the sample and reduce potential exposure from the blood product.
Air in the sample will significantly increase Po2 (mean increase, 11 mm Hg) after 20 minutes of storage, even if kept at 4°C. pH and Pco2 are not significantly altered by air bubbles if the blood is stored at 4°C for 20 minutes and no significant deterioration has occurred.23,38 If blood is stored at room temperature for longer than 20 minutes, Pco2 will increase and the pH will decrease, probably as a result of leukocyte metabolism. In a stored sample, Po2 varies to such an extent that the change is unpredictable for chemical interpretation at 30 minutes, regardless of the storage method. High leukocyte or platelet counts, such as those seen in leukemic patients, may shorten acceptable storage intervals.39,40
Percutaneous Technique for Arterial Cannulation
Direct Over-the-Needle Catheter Cannulation
Take time to ensure proper alignment of the desired site. Delays, complications, and inability to successfully cannulate an artery often occur as a result of failure to properly prepare the desired site and involved limb. An important preparatory step is to ensure that the target limb is secured flat and not rotated; any rotation could result in the desired artery being shifted from the expected anatomic position and make it more difficult to cannulate. For example, to adequately prepare the radial artery, immobilize the wrist and hand in mild dorsiflexion with some padding for support underneath the wrist (Fig. 20-5, step 1). Prepare the skin with sterile technique. Inject local anesthetic with a 25-gauge or smaller needle and achieve sufficient infiltration to ensure a painless procedure. Subcutaneous infiltration of lidocaine or a similar anesthetic may also reduce vessel spasm at the time of arterial puncture.
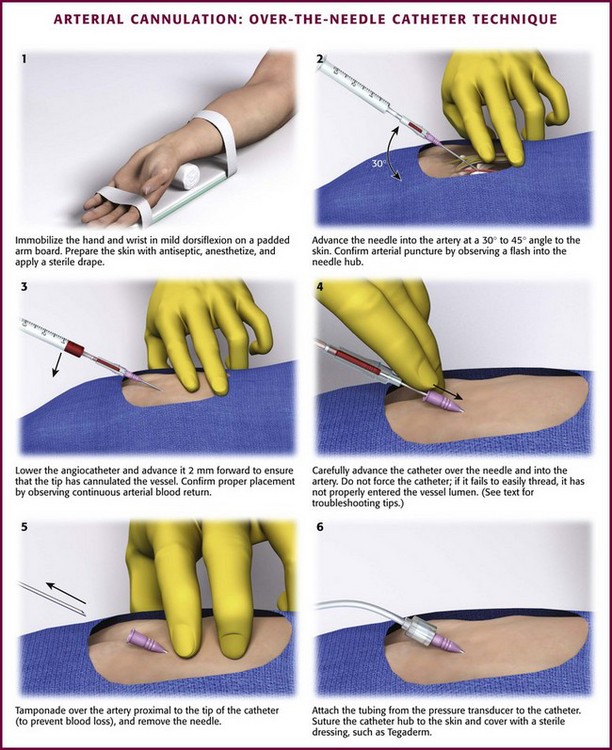
Check the catheter assembly for proper movement and function. Alternatively, a 3-mL syringe with the plunger removed can be used as a blood reservoir. Advance the catheter toward the palpated artery at a comfortable angle for the operator, generally 30 to 45 degrees from the skin (see Fig. 20-5, step 2). Make a small incision with a No. 11 scalpel blade or a larger-bore needle to eliminate the problem of damage to the catheter from kinking on the skin. The tip of the needle is often perceived to pierce the artery, but successful puncture is confirmed by identifying a “flash” of arterial blood flow into the needle hub and reservoir. As the needle-catheter assembly advances through the skin toward the artery, the initial flash of arterial blood is obtained by the needle alone, which protrudes beyond the catheter. For this reason, the needle-catheter assembly should be lowered and advanced 2 mm forward to ensure that the tip of the catheter has cannulated the vessel, along with the needle (see Fig. 20-5, step 3). The position of the catheter within the vessel lumen is confirmed by continuous return of arterial blood. The catheter alone can now be advanced with care over the needle into the artery (see Fig. 20-5, step 4). If the catheter fails to thread, it has not properly entered the vessel lumen and should not be forced to advance without confirmation of placement by active blood return.
When blood flow into the needle-catheter assembly has ceased, it may have pierced the backside of the arterial wall. This double-puncture method is useful for cannulating small vessels, yet it is not recommended as a routine procedure for inexperienced clinicians.5 If double puncture has occurred and blood has ceased to flow into the collection reservoir, do not remove the entire needle-catheter assembly. Instead, simply retract the needle slightly to determine whether blood flow into the catheter can be reestablished. If blood flow occurs, gently advance the catheter. If not, slowly withdraw the catheter until pulsatile blood flow reappears and then advance the catheter into the artery. It is important for the clinician to be aware of whether the tip of the needle or the catheter is the leading edge within the vessel.8
Once the catheter is fully advanced into the vessel lumen, maintain occlusive pressure on the proximal end of the artery to limit blood loss, and then remove the needle (see Fig. 20-5, step 5). Next attach narrow-bore, low-compliance pressure tubing to the catheter (see Fig. 20-5, step 6). Apply an appropriate sterile dressing after the apparatus has been securely sutured to the wrist.
Occasionally, one will encounter difficulty advancing the catheter into the lumen. The “liquid stylet” method may aid further passage of the catheter.41 Fill a 10-mL syringe with about 5-mL of sterile normal saline. Attach the syringe to the catheter hub, and aspirate 1 to 2 mL of blood to confirm intraluminal position. Then slowly inject the fluid from the syringe and advance the catheter behind the fluid wave.
Ultrasound guidance is now routinely used for both peripheral and central venous access and can also assist in arterial cannulation (see Ultrasound Box). When compared with the palpation technique, ultrasound-guided arterial cannulation significantly improves the likelihood of success on the first attempt.42 With B-mode ultrasound, the targeted artery can be visualized in real-time by using a 7.5- to 10-MHz linear-array transducer. Differentiate the target artery from the adjacent vessel by its pulsatility and noncompressibility with mild pressure by the transducer. Use color Doppler to further assist in distinguishing between arteries and veins. Either transverse or longitudinal views can be applied during arterial cannulation, but the transverse view is often more useful in smaller arteries. Once the catheter has entered the artery and it is confirmed by blood flow, place the ultrasound transducer on the field to free up the nondominant hand.42,43
The number of attempts with additional arterial punctures increases the size of the developing hematoma and the real risk for vessel wall damage, thrombosis, and even loss of arterial flow through the vessel. Despite the added trauma, there is no reported increase in complications when both walls, rather than one, are punctured in a single cannulation attempt.44–46
Guidewire Techniques for Arterial Cannulation
A modified Seldinger technique can often rescue a failed direct cannulation attempt with an over-the-needle catheter (Fig. 20-6). If the catheter has been placed in the arterial lumen with blood return, pass a properly sized guidewire through the catheter into the artery. Advance the catheter fully into the vessel over the guidewire. The clinician is cautioned that stiffer guidewires, unlike most prepackaged ones, do not have a softer, more flexible end tip and that the vessel wall may be damaged or even perforated with excessive force. Alternatively, catheter sets are available with an attachable, catheter-contained, wire stylet that permits a modified Seldinger technique for placement of the catheter. The over-the-needle catheter follows the self-contained guidewire during cannulation. Numerous commercially available sets feature styles of guidewire and reservoir attachments that are different from an over-the-needle catheter assembly. Most resemble the Arrow Arterial Catheterization Kit (Arrow International, Inc., Reading, PA) (Fig. 20-7; also see Fig. 20-2). These kits are extremely practical for smaller vessels, especially the radial, brachial, and axillary arteries, and have excellent success rates for first-time placement. Although some authors have suggested that guidewire-based techniques will improve arterial cannulation success rates in certain patients,47 it appears that success is more a function of operator experience and personal preference.48

Figure 20-6 Arterial cannulation: guidewire technique.

Seldinger Technique
The Seldinger technique6 for venipuncture is described in detail in Chapter 22. Overall success rates with the Seldinger, guidewire-directed technique are superior to those with direct arterial cannulation.48 A few available kits are designed specifically for cannulation of larger arteries, but single-lumen venous catheters with guidewires may be used if catheter size and length are appropriate for specific arteries (see the following section for guidelines). The guidewire technique should be used initially for critical patients.
Cutdown Technique for Arterial Cannulation
Use a No. 10 or 15 scalpel blade to incise the skin along the anesthetic wheal. Spread the underlying tissues parallel to the artery with a mosquito hemostat. Palpate the pulse repeatedly throughout the procedure to ensure proper positioning. Once the surrounding soft tissue has been retracted and after exposing approximately 1 cm of the artery, isolate the artery by passing two silk sutures underneath it with the hemostat. Strip away only enough perivascular tissue to expose the artery. Perivascular tissue will help limit bleeding at the time of catheter removal. Introduce an over-the-needle catheter device, such as the kind used in the percutaneous method, and introduce it through the skin just distal to the incision. Advance it into the surgical site (Fig. 20-8).41 Alternatively, use a modified Seldinger guidewire setup to catheterize the artery. Puncture the arterial wall with the tip of the needle, and thread the catheter into the vessel lumen. When this has been accomplished, remove the two silk sutures, which have been used only to control the vessel, and close the skin incision. Do not tie off the artery the way that a vein is tied off during a venous cutdown. Apply firm pressure, as used after arterial puncture, over the cutdown site. Separation of the soft tissues during the procedure may allow considerable hemorrhage into the tissue if pressure is not applied.

Local Puncture Site and Catheter Care
Once the catheter has been placed successfully, advance it until the hub is in contact with the skin. Secure the catheter by fastening it to the skin with suture material. Silk (2-0) or nylon (4-0) sutures provide the best anchoring. To accomplish this, take a moderate bite of skin with the needle, and tie a knot in the suture while leaving both tails of the suture long. Care should be taken to avoid pinching the skin too tightly. Tie the loose ends of the suture around the catheter at its hub. Then, after laying two ties, place a second set of knots on the back portion without occluding the lumen by constriction (Fig. 20-9).

Another option to secure these lines is to apply commercially available sutureless securement devices. According to one study, sutured lines are associated with a 10% rate of catheter-related bloodstream infection. In comparison, lines that were secured with a sutureless method had an infection rate of less than 1% and eliminated the potential for accidental needlestick from suturing.49
After tying the catheter in place, apply a drop of antibiotic ointment to the puncture site50 and a self-adhesive dressing over the area. Further secure the catheter and its connecting tubing with sterile sponges and adhesive tape. Make sure that all tubing connections are tight and secure. If the tubing becomes disconnected inadvertently, the patient can exsanguinate rapidly.
Fluid-Pressurized Systems
When successful arterial cannulation has been performed, attach the catheter to a pressurized fluid-filled system. A three-way stopcock can be interposed between the patient and the transducer for blood gas sampling and to allow flushing of the system. Flushing can be periodic or continuous at a rate of 3 to 4 mL/hr through a continuous-flow device. Most institutions use normal saline in place of heparinized solution to maintain patency. Use of a heparinized flush solution in pressurized arterial lines may result in greater long-term accuracy of pressure monitoring, but no real difference in catheter blockage has been reported, and this approach avoids heparin-related complications such as drug incompatibility, thrombosis, local tissue damage, and hemorrhage.51–55 For short-term setups as in the ED, saline is sufficient.
Blood samples are obtained easily from the arterial catheter system. Attach a syringe to the three-way stopcock and aspirate and discard the blood to clear the line. Studies examining the necessary discard volume of flushed blood solution have found considerable variation, depending on the volume of the system.56,57 Short lengths of tubing between the catheter and the aspiration port minimize the necessary discard volume. For a tubing length of 91 cm (36 inches), aspirate 4 to 5 mL57; for a tubing length of 213 cm (84 inches), aspirate 8 mL.56 Attach a second syringe that has been heparinized, and aspirate 3 mL of blood to send for ABG analysis. If the blood is to be used for other tests, the second syringe does not need to be heparinized. Self-contained, nondetachable, blood sample–withdrawing systems allow less blood wasting for sampling. Flush the stopcock and line to avoid clotting.
Selection of Arteries for Cannulation
The radial artery is most frequently used for prolonged cannulation. Widespread collateral flow is present in the wrist because of two major palmar anastomoses known as arches (Fig. 20-10). The superficial palmar arch lies between the aponeurosis palmaris and the tendons of the flexor digitorum sublimis. The arch is formed mainly by the terminal ulnar artery and the superficial palmar branch of the radial artery. The other major communication of these two vessels, the deep palmar arch, is formed by connections of the terminal radial artery with the deep palmar branches of the ulnar artery.58 Some collateral flow is almost always present at the wrist, with the deep arch alone being complete in 97% of 650 hand dissections at autopsy.59 Despite these findings, Friedman60 noted the absence of palpable ulnar pulses in 10 of 290 (3.4%) healthy children and young adults. Interestingly, this was always a bilateral finding. Radial pulses were present in all subjects, however.

Figure 20-10 Arterial anatomy of the hand and wrist.
Before attempting radial artery cannulation, one may assess the adequacy of collateral flow to the hand by performing a bedside examination. This examination was originally described by E. V. Allen in 192961 and is used to assess arterial stenosis in the hands of patients with thromboangiitis obliterans. The Allen test identifies patients at increased risk for ischemic complications from radial artery catheterization. The procedure has seen many modifications62,63 since originally being described in a cooperative patient. The modified Allen test is performed as follows: occlude both the radial and ulnar arteries with digital pressure and then ask the patient to tightly clench the fist repeatedly to exsanguinate the hand. Then open the hand and release the occlusion of the ulnar artery (Fig. 20-11). After 2 minutes, repeat the test in the same manner with release of the radial artery. Rubor should return rapidly to the hand following the release of pressure from either vessel.

An abnormal (positive) Allen test result, suggestive of inadequate collateralization, is defined as the continued presence of pallor 5 to 15 seconds after release of the artery.6,26,63,64 If return of color takes longer than 5 to 10 seconds, do not perform radial artery puncture. Be careful to avoid overextension of the hand with wide separation of the digits, which may compress the palmar arches between fascial planes and yield a false-positive result.65 Time permitting, performance of some variation of the Allen test is desirable before ulnar or radial puncture for prolonged cannulation. This test is not considered mandatory or standard for one-time radial artery puncture for blood gas sampling. Moreover, the utility of the Allen test is still questioned because of numerous reports of permanent ischemic sequelae after cannulation even after a normal Allen test result.63,66,67 Notably, other studies have found no ischemic complications following radial artery catheterization and abnormal results on the Allen test.45,68 Although there are no guarantees against digital ischemia after radial artery cannulation,69 the finding of an abnormal Allen test result should be documented and lead one to search for an alternative site for the procedure.
At the wrist, the radial artery rests on the flexor digitorum superficialis, flexor pollicis longus, and pronator quadratus and against the radius.59 Isolate the pulsation of the artery on the palmar surface of the wrist. The radial artery is more superficial as it moves closer to the wrist. In this location it provides a more consistent site for cannulation because of its fixation and decreased mobility. Dorsiflexing the wrist at about a 60-degree angle over a towel or sandbag and preferably fixing the wrist to an arm board will also considerably help isolate the artery. This degree of preparation should be considered standard when time for setup permits (see Fig. 20-5, step 1).44,45
Antegrade radial artery cannulation may be accomplished in infants and children when the radial arteries are obstructed and retrograde blood flow is observed during a failed cutdown attempt at standard retrograde arterial cannulation.70 In addition, displacement of perivascular interstitial fluid in neonates and bright light make the course of the artery visible so that under direct vision, cannulation of the artery becomes as easy as venous cannulation.71 Doppler ultrasound on selected patients with poor peripheral pulses may facilitate percutaneous radial artery cannulation and minimize the number of punctures needed for placement.72
The ulnar artery is seldom used because its smaller size makes it more difficult to puncture than the radial artery. At the wrist, the ulnar artery runs along the palmar margin of the flexor carpi ulnaris in the space between it and the flexor digitorum sublimis.59 Use caution because the artery runs next to the ulnar nerve as both pass into the hand just radial to the pisiform bone. Minimize any potential injury by approaching the ulnar artery from the radial side.73 Make the ulnar artery more accessible with dorsiflexion of the wrist.
Brachial
Although it appears safe for arterial puncture, the brachial artery does not have the anatomic benefit of the collateral circulation that is found in the wrist. The brachial artery begins as the continuation of the axillary artery and ends at the head of the radius, where it splits into the ulnar and radial arteries. The preferred puncture site of the brachial artery is in or just proximal to the antecubital fossa. In this region the artery lies on top of the brachialis muscle and enters the fossa underneath the bicipital aponeurosis with the median nerve on the medial side of the artery (Fig. 20-12). Both the radial and the axillary arteries are preferred over the brachial artery in the upper extremity. There is increased risk for ischemic complications from the reduced collateral circulation, as well as the need to maintain the arm in extension for puncture and for prolonged cannulation. Nonetheless, safe cannulation of the brachial artery has been demonstrated by some investigators.74 Bazaral and coworkers75 found only one minor thrombotic occurrence in more than 3000 brachial artery catheterizations over a 3-year period in cardiac surgery patients. A longer catheter (10 cm) is required for the brachial artery so that sufficient length is available to traverse the elbow joint.

Figure 20-12 Brachial artery anatomy.
Dorsalis Pedis
The dorsalis pedis artery continues from the anterior tibial artery and runs from approximately midway between the malleoli to the posterior end of the first metatarsal space, where it forms the dorsal metatarsal and deep plantar arteries. The lateral plantar artery, a branch of the posterior tibial artery, passes obliquely across the foot to the base of the fifth metatarsal. The plantar arch is completed at the point where the lateral plantar artery joins the deep plantar artery between the first and second metatarsals. On the dorsum of the foot, the dorsalis pedis artery lies in the subcutaneous tissue parallel to the extensor hallucis longus tendon and between it and the extensor digitorum longus (Fig. 20-13).76

Figure 20-13 Dorsalis pedis artery anatomy.
Cannulate the artery in the midfoot region. Although this vessel is amenable to cutdown, the vascular anatomy of the foot is quite variable. This is of no consequence if a pulse can be palpated, but Huber,77 in his dissection of 200 feet, noted that the dorsalis pedis artery was absent in 12% of patients. In 16% of patients the dorsalis pedis artery provides the main blood supply to the toes.78 Although the dorsal pedis and posterior tibial arteries form similar collateral foot circulation as in the hand, the nature of advancing vascular disease makes this a more difficult cannulation, with higher complication rates than in the wrist. This site has its major utility in pediatric monitoring cases. Attempts to predetermine collateral flow with a modified Allen test using the posterior tibial and dorsalis pedis arteries is not as easily performed in the foot as in the hand, nor are there good data to prove its validity. Monitoring problems also exist with this artery. The pressure wave obtained with an electronic transducer attached to the dorsalis pedis artery will be 5 to 20 mm Hg higher than that of the radial artery and, in addition, will be delayed by 0.1 to 0.2 second.76
Femoral
The femoral artery is the second most commonly used vessel for arterial cannulation. Based on its ease of cannulation and low record of complications, it has been called the vessel of choice for arterial access.79–81 Along with the axillary artery, the femoral artery more closely resembles aortic pressure waveforms than those from any other peripheral site.7 The femoral artery is the direct continuation of the iliac artery and enters the thigh after passing below the inguinal ligament. Arterial puncture must always occur distal to the ligament to prevent uncontrolled hemorrhage into the pelvis or peritoneum.82 The artery may be palpable easily midway between the public symphysis and the anterior superior iliac spine. The advantage of cannulating the artery at a site just distal to the inguinal ligament is that the artery can be compressed against the femoral head. Cannulation becomes more difficult the more distal the puncture site is from the inguinal ligament because the femoral artery splits into the superficial femoral and the deep femoral arteries. These arteries, especially the deep femoral, can be challenging to compress if bleeding needs to be controlled. One method of locating an appropriate arterial puncture site is to place the thumb and fifth finger on the pubis symphysis and the anterior iliac spine and locate the artery underneath the middle knuckle. When puncturing this vessel, be careful to avoid the femoral nerve and vein, which form the lateral and medial borders, respectively (Fig. 20-14).

Figure 20-14 Femoral artery anatomy.
The extremely large ratio of arterial diameter to catheter diameter is thought to reduce the incidence of thrombosis, particularly total occlusion. However, occlusion has been reported with femoral cannulation for monitoring purposes.83 A commonly perceived disadvantage of this site is the increased possibility of bacterial contamination because of its proximity to the warm, moist groin and perineum; however, no studies have confirmed this hypothesis.84 The femoral area is inconvenient for any patient who is awake and mobile or for a patient who is able to sit in a chair. If the patient is that mobile, reconsider the risk-benefit ratio of invasive monitoring. Despite theoretical difficulties, some hospitals use femoral arterial lines almost exclusively, and the ICU nursing staff is often more comfortable caring for these lines than those at other sites.
Umbilical and Temporal
In neonates, arterial access can be accomplished for a short time through the umbilical artery (see Chapter 19). After this artery closes, the temporal artery provides a safe alternative. Prian described use of the temporal artery and noted its accessibility and lack of clinical sequelae if it undergoes thrombosis.85 Use the cutdown method with a 22-gauge catheter after the artery’s course has been traced with an ultrasonic flow detector. Because of the increasing accuracy of ear oximeters and the use of capillary blood gas samples for determination of pH, prolonged arterial cannulation will become less frequent during infant care.
Complications of Arterial Cannulation
It is difficult to compare complication rates at various sites because most published studies have primarily used only the radial artery. No studies have compared the approach and complication rates of arterial catheters in the ED with those placed in the ICU or operating room. In a large study spanning 24 months, 2119 ICU patients had arterial catheters placed at admission: 52% at the radial site and 45% at the femoral site. The most common complication was vascular insufficiency (4%), followed by bleeding (2.1%) and infection (0.6%). No difference was reported in infection rates at femoral versus radial sites.86 There are reports of complications from arterial puncture for procedures unrelated to cannulation, such as arteriography or simple puncture for blood sampling as routinely performed in the ED. In a study of 2400 consecutive cardiac catheterizations over a 12-month period, complications occurred in 1.6% of patients, including 17 needing vascular repair and 28 requiring transfusion.87
Hematoma formation at the puncture site is common. Zorab reported this complication in 50% of all catheterizations.88 Bruising was of minimal clinical significance in this report, but leakage can be dangerous when it occurs around the catheter or from the puncture site after the catheter is removed (Fig. 20-15). Compression neuropathies requiring surgical decompression have been reported after arterial puncture secondary to hematoma formation.14,89,90 The large amount of soft tissue surrounding the femoral artery makes bleeding in this area difficult to control. Large hematomas are not uncommon after femoral artery catheterization; indeed, Soderstrom and colleagues80 reported two cases of bleeding that required transfusion after femoral puncture. Though uncommon, a clinician should be aware of the potential development of a retroperitoneal hematoma, a morbid complication, following femoral artery cannulation. Suspect this complication in patients in whom hypovolemic shock with a falling hematocrit develops following the procedure.91,92 Another serious complication is the formation of a pseudoaneurysm as the walls of the punctured artery fail to seal properly. Although most pseudoaneurysms can be managed conservatively, they are susceptible to both rupture and infection. Several treatment options are now available, and identification of a pseudoaneurysm should prompt referral to a vascular surgeon.93,94 More commonly, hematomas are painful, slow to resolve, and prone to infection. Multiple-site punctures and inadequate pressure applied for insufficient time account for most hematomas. Multiple punctures can be avoided in most instances by experienced operators and the use ultrasound-aided techniques.

Thrombotic occlusion after radial arterial cannulation occurs in nearly 50% of infants and small children; however, ischemia from occlusion is rare because of collateral blood supply from the ulnar artery.95 Insertion sites closest to the bend of the wrist increase the chance of maintaining patency. Nonpatency is four times more likely with insertion at sites 3 cm or more proximal to the bend in the wrist.96 Slogoff and associates68 described 1700 cardiovascular surgery patients who underwent radial artery cannulation without any long-term ischemic complications despite evidence of radial artery occlusion after decannulation in more than 25% of the patients. Serious complications after radial artery cannulation are extremely rare in the absence of contributing factors such as preexisting vasospastic arterial disease, previous arterial injury, protracted shock, high-dose vasopressor administration, prolonged cannulation, or infection.67,97
Meticulous attention to aseptic technique is necessary during insertion and catheter maintenance to minimize the risk for catheter-related infections.98,99 Serious infections rarely complicate arterial cannulation. Simple interventions can reduce the risk for serious catheter-related infection. Evidence supports the use of full-barrier precautions during catheter insertion, specialized nursing care, and newer-generation catheters with antiseptic hubs or antimicrobial agent–impregnated catheters.98 The incidence of catheter-related infections increases with prolonged cannulation.84 Catheters placed via sterile technique have an extremely low rate of infection in the first 96 hours after placement. Catheters changed over a guidewire every 96 hours have an infection rate of about 10% at the radial and femoral sites.81
Most infections begin locally at the puncture site and remain localized, although systemic sepsis has been reported.97 The radial and femoral sites have a similar incidence of complications, but axillary cannulation seems to have a much higher incidence of infection (although no large studies of cannulation at this site exist).85,100 Arterial cannulas are more prone than other vascular catheters to infectious complications. Many mechanisms have been proposed for this increased incidence.99,101 The arterial pressure–monitoring system usually consists of a long column of fairly stagnant fluid and is subject to frequent manipulation. Stamm and coworkers100 found that patients were at greater risk for systemic infection if they had an arterial line and required frequent blood gas determinations than if they had the cannula alone. The sampling stopcock is a site of frequent bacterial contamination.
The risk for infection also increases as the duration of cannulation is prolonged. Older studies recommend that catheters be changed after 4 days if continued monitoring is necessary.100,101 In addition, Makai and Hassemer101 recommended changing the entire fluid-filled system, including the transducer chamber domes and continuous flow devices, every 48 hours.. However, the risk for noninfectious complications increases with more frequent catheter and site changes. Therefore, daily evaluation of the site is advised, and catheter change should not be mandatory until 7 to 8 days if the site remains clean.
Shinozaki and colleagues102 demonstrated a marked reduction in equipment contamination when the continuous flush device was located just distal to the transducer, as opposed to closer to the three-way stopcock used for sampling. This setup reduces the length of the static column of fluid between the sampling stopcock and the transducer. As mentioned previously, a drop of iodophor or antibiotic ointment applied to the puncture site decreases the incidence of local wound infection.51 This technique has drawn a great deal of criticism, however. The current standard is a clean, nonocclusive, dry dressing. An antibiotic- or silver-impregnated catheter is recommended for long-term placement.
Thrombosis of the vessel in which the cannula is placed is another frequently encountered problem. The incidence of thrombosis varies with the method used to determine the presence of clots. Bedford and Wollman25 found a greater than 40% occlusion rate when radial artery catheters were left in place for longer than 20 hours. All these occluded vessels eventually recanalized. Angiographic studies show deposition of fibrin on 100% of catheters left in place for longer than 1 day, although clinical evidence of ischemia secondary to occlusion by such thrombi is seen in less than 1% of cases in most studies.103 Most reports of nonangiographic catheterization involve the radial artery. Therefore, it is difficult to compare the incidence of thrombosis at other sites, although during the 176 femoral catheterizations reported by Soderstrom and colleagues80 and Ersoz and associates,104 dorsalis pedis pulses were decreased in only two patients and no clinical signs of ischemia were noted. Larger catheter sizes, trauma during cannulation, and the presence of atherosclerosis have all been postulated to increase the incidence of thrombosis; however, conflicting studies abound.
Arterial spasm after puncture (usually following multiple attempts) can predispose to thrombus formation and can even lead to ischemic changes without fibrin deposition. Successful reversal of spasm with intraarterial lidocaine, reserpine, and phentolamine has been reported, but no reliable studies of their efficacy in this clinical situation have been published.105
Thrombosis can result in occlusion of the catheter. Time until occlusion of radial and femoral artery catheters has been compared. Radial cannulas became occluded at an average of 3.8 days, whereas femoral cannulas became occluded after 7.3 days.81 The importance of this comparison is minimal if the clinician follows infection prophylaxis guidelines and changes arterial catheters after 4 days.
Skin necrosis is a complication of radial artery cannulation that involves an area of the volar surface of the forearm proximal to the cannula.106,107 Wyatt and colleagues108 believed this to be secondary to the poor blood supply in this area and thought that proper technique would decrease the incidence of necrosis.
One feared complication of indwelling radial and brachial arterial catheters is the occurrence of a cerebrovascular accident secondary to embolization from flushing of the catheters.27,106 As little as 3 to 12 mL of flush solution has been shown to reflux to the junction of the subclavian and vertebral arteries.80 A fatality caused by air embolism from a radial artery catheter has been reported and was re-created in a primate model.109 Although these animals were much smaller (7 kg) than an adult human, as little as 2.5 mL of air introduced at a relatively low flush rate was found to embolize in retrograde fashion to the brain. Cerebral embolization can be prevented with the use of continuous flush systems (3 mL/hr) and by ensuring the integrity of the tubing and transducer systems to prevent entry of air. In addition, small volumes (<2 mL) of intermittent flush solution should be used.
Complication rates also vary according to the method of arterial cannulation. Mortensen110 studied the three main techniques (discussed earlier in “Techniques”), but unfortunately, most of his arterial cannulations were for angiographic purposes. The complications associated with prolonged cannulation time are therefore underrepresented. In Mortensen’s series,110 cutdown arteriotomy exhibited the lowest incidence of complications (7.7%), whereas the Seldinger technique had a 17.7% incidence of complications. The complication rate with percutaneous cannulation was 11.3%. False passage of the guidewire, the catheter, or both was associated with increased intimal damage and complications. It is imperative that the wire or catheter be advanced only if no resistance is met.
Interpretation
An indwelling arterial catheter provides continuous blood pressure monitoring. The trend of a patient’s pressure facilitates assessment of the effect of various therapeutic interventions. The absolute systolic and diastolic pressure measured will vary at different catheter sites, with higher peak systolic pressure measured at the periphery. The pressure will also be higher when measured at the distal end of the lower limb.30,80 A wide variance between direct arterial pressure and the pressure measured with a standard pneumatic cuff will always exist in some patients. Oscillometric blood pressure measurement can significantly underestimate arterial blood pressure.111 For this reason, regularly compare a cuff pressure with that obtained via invasive monitoring. Moreover, a change in their relationship may be the first indication of difficulty with the direct measuring system.
Waveform analysis may also provide an early indication of thrombosis in the arterial catheter. Many variables affect the waveform, including cardiac valvular disease and arteriosclerosis.112 Waveforms may vary tremendously among patients, but after an adequate monitoring system has been established, a change in an individual’s pressure wave is usually indicative of thrombosis or a malfunction in the monitoring system. A change in waveform may also indicate a change in the patient’s cardiovascular status, such as a papillary muscle rupture. Before making a therapeutic decision based on an electronically generated number, recheck the patient’s blood pressure with a pneumatic cuff. This device is less fallible than the electromechanical system.
Radial systolic arterial pressure poorly estimates the actual ascending aortic pressure, with more than 50% of cases reporting a difference in values of 10 to 35 mm Hg. Mean arterial pressure and diastolic pressure, in contrast, are highly accurate with greater than 90% of the values being within 3 mm Hg of aortic values.113 Longer catheters have also been used successfully from radial sites to more accurately reflect central aortic pressure for cardiac surgery patients.114
An indwelling arterial cannula can provide valuable information about the hemodynamic status of a patient (through continuous pressure monitoring) and about the patient’s respiratory and metabolic status (through intermittent sampling for ABG analysis and other blood tests). The Pco2 and pH of the blood can be used to define four major groups of metabolic derangement: respiratory acidosis or alkalosis and metabolic acidosis or alkalosis. Rarely will a disorder be strictly classified into one of these groups; however, a simple chart such as that provided in the Appendix helps determine the relative effects of metabolic and respiratory influence on blood pH. (See also discussion in Appendix 1.)
Adequacy of blood oxygenation can be determined from the measured Po2 of arterial blood and the known concentration of oxygen that the patient is inspiring. To avoid iatrogenic complications of intensive care, one must be absolutely certain that the data are from an arterial sample that has been properly analyzed before basing one’s treatment decisions on the numbers obtained. Not uncommonly, a venous sample is interpreted as though it were arterial. Furthermore, false readings may result if the sample is not free of air bubbles, not promptly chilled, or not analyzed within 20 to 30 minutes. Though still controversial, blood gas values that are not corrected for body temperature appear to be more appropriate for guiding therapy in hypothermic patients.115,116
Conclusion
As intensive care knowledge and technology grow and develop, cannulation of the arterial system may decrease in frequency. Oximeters can determine the quality of blood oxygenation transcutaneously and are becoming more accurate and sophisticated. Electronic sphygmomanometers are being refined for continuous indirect blood pressure monitoring. As these devices improve and noninvasive sampling methods for clinically relevant electrolytes and physiologic markers are refined, the indwelling arterial cannula may in time become considered overly invasive. Despite improvements in noninvasive monitoring devices, the current need for frequent blood sampling for chemical and hematologic analysis remains an indication for its use in selected critically ill patients. Overzealous blood gas analysis may lead to iatrogenic anemia in the ICU. Multiple reports have documented the advantages of limiting frequent blood sampling.117–119
References
1. Guyton, A, Hall, J. Medical physics of pressure, flow and resistance. In: Guyton A, Hall J, eds. Textbook of Medical Physiology. 10th ed. Philadelphia: Saunders; 2000:144.
2. Anderson, JS. Arterial cannulation: how to do it. Br J Hosp Med. 1997;57:497.
3. Roediger, R, Beck-Schimmer, B, Theusinger, OM, et al. The revised digital transcutaneous PCO 2/SpO 2 ear sensor is a reliable noninvasive monitoring tool in patients after cardiac surgery. J Cardiothorac Vasc Anesth. 2011;25:243.
4. Geddes LA, ed. The Direct and Indirect Measurement of Blood Pressure. Chicago: Year Book Medical, 1970.
5. Brzezinski, M, Luisetti, T, London, MJ. Radial artery cannulation: a comprehensive review of recent anatomic and physiologic investigations. Anesth Analg. 2009;109:9.
6. Seldinger, SI. Catheter replacement of the needle in percutaneous angiography: a new technique. Acta Radiol. 1953;39:368.
7. Roupie, EE, Brochard, L, Lemaire, FJ. Clinical evaluation of a continuous blood gas system in critically ill patients. Intensive Care Med. 1996;22:935.
8. Mark, JB. Arterial blood pressure monitoring. In: Miller RD, Miller ED, Jr., Reves JG, et al, eds. Anesthesia. 5th ed. New York: Churchill Livingstone; 2005:1121.
9. Marino, PL. Arterial blood pressure. In: Marino PL, ed. The ICU Book. Baltimore: Williams & Wilkins; 1998:147.
10. Thomas, F, Orme, JF, Clemmer, TP, et al. A prospective comparison of arterial catheter blood and catheter-tip cultures in critically ill patients. Crit Care Med. 1984;12:860.
11. Zaret, PH, Crump, JM, Van Raalte, BA, et al. Accuracy of blood cultures drawn through indwelling arterial lines. Crit Care Med. 1986;14:353.
12. Barker, SJ, Curry, J, Redford, D, et al. Measurement of carboxyhemoglobin and methemoglobin by pulse oximetry: a human volunteer study. Anesthesiology. 2006;105:892.
13. Rudkin, SE, Kahn, CA, Oman, JA, et al. Prospective correlation of arterial vs venous blood gas measurements in trauma patients. Am J Emerg Med. 2012;30:1371.
14. Luce, EA, Futrell, JW, Wilgis, EF, et al. Compression neuropathy following brachial arterial puncture in anticoagulated patients. J Trauma. 1976;16:717.
15. Brandenburg, M, Dire, DJ. Comparison of arterial and venous blood gas values in the initial emergency department evaluation of patients with diabetic ketoacidosis. Ann Emerg Med. 1998;31:459.
16. Treger, R, Pirouz, S, Kamangar, N, et al. Agreement between central venous and arterial blood gas measurements in the intensive care unit. Clin J Am Soc Nephrol. 2010;5:390.
17. Walkey, AJ, Farber, HW, Donnell, C, et al. The accuracy of the central venous blood gas for acid-base monitoring. J Intensive Care Med. 2010;25:104.
18. Middleton, P, Kelly, AM, Brown, J, et al. Agreement between arterial and central venous values for pH, bicarbonate, base excess, and lactate. Emerg Med J. 2006;23:622.
19. Malatesha, G, Singh, NK, Bharija, A, et al. Comparison of arterial and venous pH, bicarbonate, Pco2 and Po2 in initial emergency department assessment. Emerg Med J. 2007;24:569.
20. Kelly, AM. The case for venous rather than arterial blood gases in diabetic ketoacidosis. Emerg Med Australas. 2006;18:64.
21. Dake, MD, Peters, J, Teague, R. The effect of heparin dilution on arterial blood gas analysis. West J Med. 1984;140:792.
22. Goodwin, NM, Schreiber, MT. Effects of anticoagulants on acid-base and blood gas estimations. Crit Care Med. 1979;7:473.
23. Beetham, R. A review of blood pH and blood gas analysis. Ann Clin Biochem. 1982;19:198.
24. Formanek, G, Frech, RS, Amplatz, K. Arterial thrombus formation during clinical percutaneous catheterization. Circulation. 1970;41:833.
25. Bedford, RF, Wollman, H. Complications of percutaneous radial-artery cannulation: an objective prospective study in man. Anesthesiology. 1973;38:228.
26. Bedford, RF. Radial arterial function following percutaneous cannulation with 18- and 20-gauge catheters. Anesthesiology. 1977;47:37.
27. Downs, JB, Rackstein, AD, Klein, EF, et al. Hazards of radial-artery catheterization. Anesthesiology. 1973;38:283.
28. Brotschi, B, Hug, MI, Latal, B, et al. Incidence and predictors of indwelling arterial catheter-related thrombosis in children. J Thromb Haemost. 2011;9:1157.
29. Veenstra, D, Saint, S, Saha, S, et al. Efficacy of antiseptic-impregnated central venous catheters in preventing catheter-related blood stream infection: a meta-analysis. JAMA. 1999;281:261.
30. Bruner, JM, Krenis, LJ, Kunsman, JM, et al. Comparison of direct and indirect methods of measuring arterial blood pressure. Parts I, II, III. Med Instrum. 1981;15:11.
31. Mark, JB. Arterial blood pressure. Direct vs. indirect measurement. In: Mark JB, ed. Atlas of Cardiovascular Monitoring. New York: Churchill Livingstone; 1998:81.
32. Rothe, CF, Kim, KC. Measuring systolic arterial blood pressure. Possible errors from extension tubes or disposable transducer domes. Crit Care Med. 1980;18:683.
33. Guyton, AC, Greganti, FP. A physiologic reference point for measuring circulation pressures in the dog. Am J Physiol. 1956;185:137.
34. Haller, M, Kilger, E, Briegel, J, et al. Continuous intra-arterial blood gas and pH monitoring in critically ill patients with severe respiratory failure: a prospective, criterion standard study. Crit Care Med. 1994;22:589.
35. Larson, CP, Vender, J, Siver, A. Multisite evaluation of a continuous intra-arterial blood gas monitoring system. Anesthesia. 1994;81:543.
36. Morgan, EJ. The effects of unanesthetized arterial puncture on Pco2 and pH. Am Rev Respir Dis. 1979;120:795.
37. Shiloh, AL, Savel, RH, Paulin, LM. Ultrasound-guided catheterization of the radial artery. A systematic review and meta-analysis of randomized controlled trials. Chest. 2011;139:524.
38. Madiedo, G, Sciacca, R, Hause, L. Air bubbles and temperatures effect on blood gas analysis. J Clin Pathol. 1980;33:864.
39. Hess, CE, Nichols, AB, Hunt, WB, et al. Pseudohypoxemia secondary to leukemia and thrombocytosis. N Engl J Med. 1979;301:361.
40. Shohat, M, Schonfield, T, Zaizoz, R, et al. Determination of blood gases in children with extreme leucocytosis. Crit Care Med. 1988;16:787.
41. Stirt, JA. “Liquid stylet” for percutaneous radial artery cannulation. Can Anaesth Soc J. 1982;29:492.
42. Shiloh, AL, Eisen, LA. Ultrasound-guided arterial catheterization: a narrative review. Intensive Care Med. 2010;36:214.
43. Haynes, JM, Mitchell, H. Teaching case of the month: ultrasound-guided arterial puncture. Respir Care. 2010;55:1754.
44. Jones, RM, Hill, AB, Nahrwold, ML, et al. The effect of method of radial artery cannulation on post-cannulation blood flow and thrombus formation. Anesthesiology. 1981;55:76.
45. Davis, FM, Stewart, JM. Radial artery cannulation: a prospective study in patients undergoing cardiothoracic surgery. Br J Anaesth. 1980;52:42.
46. Cederholm, I, Sorensoen, J, Calsson, C. Thrombosis following percutaneous radial artery cannulation. Acta Anaesthesiol Scand. 1986;30:227.
47. Mangar, D, Thrush, D, Connell, G, et al. Direct or modified Seldinger guide wire-directed technique for arterial catheter insertion. Anesth Analg. 1993;76:714.
48. Gerber, DR, Zeifman, WE, Khouli, HI, et al. Comparison of wire-guided and nonwire-guided radial artery catheters. Chest. 1996;109:761.
49. Crnich, CJ, Maki, DG. The promise of novel technology for the prevention of intravascular device-related bloodstream infection. I. Pathogenesis and short-term devices. Healthc Epidemiol. 2002;34:1232.
50. Kulkarni, M, Elsner, C, Ouellet, D, et al. Heparinized saline versus normal saline in maintaining patency of the radial artery catheter. Can J Surg. 1994;37:37.
51. Makai, DG, Bank, JD. A comparative study of polyantibiotic and iodophor ointments in prevention of vascular catheter-related infection. Am J Med. 1981;70:739.
52. Randolph, AG, Cook, DJ, Gonzales, CA, et al. Benefit of heparin in peripheral venous and arterial catheters: systemic review and meta-analysis of randomized controlled trials. BMJ. 1998;316:969.
53. Bradley, MN. A technique for prolonged intra-arterial catheterization. Surg Gynecol Obstet. 1964;119:117.
54. Clifton, GD, Branson, P, Kelly, HJ, et al. Comparison of NS and heparin solutions for maintenance of arterial catheter patency. Heart Lung. 1991;20:316.
55. Del Cotillo, M, Grane, N, Llavore, M, et al. Heparinized solution vs. saline solution in the maintenance of arterial catheters: a double blind randomized clinical trial. Intensive Care Med. 2008;34:339.
56. Dennis, RC, Ng, R, Yeston, NS, et al. Effect of sample dilutions on arterial blood gas determinations. Crit Care Med. 1985;13:1067.
57. Al-Ameri, MW, Kruse, JA, Carlson, RW. Blood sampling from arterial catheters: minimum discard volume to achieve accurate laboratory results. Crit Care Med. 1986;14:399.
58. Ramanathan, S, Chalon, J, Trundorf, H. Determining patency of palmar arches by retrograde radial pulsation. Anesthesiology. 1975;42:756.
59. Coleman, SS, Anson, JJ. Arterial patterns in the hand based upon a study of 650 specimens. Surg Gynecol Obstet. 1961;113:409.
60. Friedman, SA. Prevalence of palpable wrist pulses. Br Heart J. 1970;32:316.
61. Barber, JD, Wright, DJ, Ellis, RH. Radial artery puncture: a simple screening test of the ulnar anastomotic circulation. Anaesthesia. 1973;2:291.
62. Ryan, JF, Raines, J, Dalton, BC, et al. Arterial dynamics of radial artery cannulation. Anesth Analg. 1973;52:1017.
63. Thomson, SR, Hirschberg, A. Allen’s test re-examined. Crit Care Med. 1988;16:915.
64. Greenhow, DE. Incorrect performance of Allen’s test: ulnar artery flow erroneously presumed inadequate. Anesthesiology. 1972;37:356.
65. Palm, T. Evaluation of peripheral arterial pressure on the thumb following radial artery cannulation. Br J Anaesth. 1977;49:819.
66. Wilkins, RG. Radial artery cannulation and ischaemic damage: a review. Anaesthesia. 1985;40:896.
67. Mangano, DT, Hickey, FR. Ischemic injury following uncomplicated radial artery catheterization. Anesth Analg. 1979;58:55.
68. Slogoff, S, Keats, AS, Arlund, C. On the safety of radial artery cannulation. Anesthesiology. 1983;59:42.
69. Baker, RJ, Chunprapaph, B, Nyhus, LM. Severe ischemia of the hand following radial artery catheterization. Surgery. 1976;80:449.
70. Rhee, KH, Berg, R. Antegrade cannulation of radial artery in infants and children. Chest. 1995;107:182.
71. Raichr, D. Radial artery cannulation in neonates. Indian J Pediatr. 2000;67:843.
72. Maher, JJ, Dougherty, JM. Radial artery cannulation guided by Doppler ultrasound. Am J Emerg Med. 1989;7:260.
73. Karacalar, S, Ture, H, Baris, S, et al. Ulnar artery versus radial artery approach for arterial cannulation: a prospective, comparative study. J Clin Anesth. 2007;19:200.
74. Moran, KT, Halpin, DP, Zide, RS, et al. Long-term brachial artery catheterization: ischemic complications. J Vasc Surg. 1988;8:76.
75. Bazaral, MG, Welch, M, Golding, LAR, et al. Comparison of brachial and radial arterial pressure monitoring in patients undergoing coronary artery bypass surgery. Anesthesiology. 1990;73:38.
76. Johnstone, RE, Greenhow, DE. Catheterization of the dorsalis pedis artery. Anesthesiology. 1973;39:654.
77. Huber, JF. The arterial network supplying the dorsum of the foot. Anat Rec. 1941;80:373.
78. Spoerel, WE, Deimling, P, Aitkin, R. Direct arterial pressure monitoring from the dorsalis pedis artery. Can Anaesth Soc J. 1975;22:91.
79. Gurman, GM, Kriemerman, S. Cannulation of big arteries in critically ill patients. Crit Care Med. 1985;13:217.
80. Soderstrom, CA, Wasserman, DH, Dunham, CM, et al. Superiority of the femoral artery for monitoring: a prospective study. Am J Surg. 1982;144:309.
81. Russell, JA, Joel, M, Hudson, RJ, et al. Prospective evaluation of radial and femoral artery catheterization sites in critically ill adults. Crit Care Med. 1983;11:936.
82. Sim, EKW, Beynen, FA, Danielson, GK. Intraperitoneal hemorrhage following femoral artery cannulation for intraoperative monitoring: an unusual complication. J Clin Monit. 1993;9:295.
83. Sessler, CN, Alford, P. Arterial occlusion after femoral artery cannulation. Crit Care Med. 1986;14:520.
84. Norwood, SH, Cornier, B, McMahon, NG, et al. Prospective study of catheter-related infection during prolonged arterial catheterization. Crit Care Med. 1988;16:836.
85. Prian, GW. Temporal artery catheterization for arterial access in the high-risk newborn. Surgery. 1977;82:734.
86. Frezza, E, Mezghebe, H. Indications and complications of arterial catheter use in surgical or medical ICU: analysis of 4932 patients. Am Surg. 1998;64:127.
87. Muller, DE, Shamir, KJ, Ellis, SG, et al. Peripheral vascular complications after conventional and complex percutaneous coronary interventional procedures. J Cardiol. 1992;69:63.
88. Zorab, JSM. Continuous display of the arterial pressure: a simple manometric technique. Anaesthesia. 1969;24:431.
89. Ikeda, K, Osamura, N. Median nerve palsy: a complication of brachial artery cardiac catheterization. Hand Surg. 2011;16:343.
90. Tran, DD, Andersen, CA. Axillary sheath hematomas causing neurologic complications following arterial access. Ann Vasc Surg. 2011;25:697.
91. Sreeram, S, Lumsden, AB, Miller, JS, et al. Retroperitoneal hematoma following femoral arterial catheterization: a serious and often fatal complication. Am Surg. 1993;59:94.
92. Trimarchi, S, Smith, DE, Share, D, et al. Retroperitoneal hematoma after percutaneous coronary intervention: prevalence, risk factors, management, outcomes, and predictors of mortality. JACC Cardiovasc Interv. 2010;3:845–850.
93. Ahmad, F, Turner, S, Torrie, P, et al. Iatrogenic femoral artery pseudoaneurysms—a review of current methods of diagnosis and treatment. Clin Radiol. 2008;63:1310.
94. Truong, AT, Thakar, DR. A rare complication with serious risk to life and limb. Anesthesiology. 2013;118(1):188.
95. Chameides, L. Arterial cannulation in vascular access. In: Chameides L, ed. Textbook of PALS. Dallas: American Heart Association; 1988:45.
96. Kaye, J, Heald, G, Morton, J, et al. Patency of radial arterial catheters. Am J Crit Care. 2001;10:104.
97. Clark, VL, Kruse, JA. Arterial catheterization. Crit Care Clin. 1992;8:687.
98. Mermel, LA. Prevention of intravascular catheter–related infections. Ann Intern Med. 2000;132:391.
99. Damen, J, Verhoef, J, Bolton, DT, et al. Microbiologic risk of invasive hemodynamic monitoring in patients undergoing open-heart operations. Crit Care Med. 1985;13:548.
100. Stamm, WE, Colella, JJ, Anderson, RL, et al. Indwelling arterial catheters as a source of nosocomial bacteremia: an outbreak caused by Flavobacterium species. N Engl J Med. 1975;292:1099.
101. Makai, DG, Hassemer, CA. Endemic rate of fluid contamination and related septicemia in arterial pressure monitoring. Am J Med. 1981;70:733.
102. Shinozaki, T, Deane, RS, Mazuzan, JE, et al. Bacterial contamination of arterial lines. A prospective study. JAMA. 1983;249:223.
103. Scheer, B. Clinical review: complications and risk factors of peripheral arterial catheters used for hemodynamic monitoring in anesthesia and intensive care medicine. Crit Care. 2002;6:199.
104. Ersoz, CJ, Hedden, M, Lain, L. Prolonged femoral arterial catheterization for intensive care. Anesth Analg. 1970;49:160.
105. Dalton, B, Laver, M. Vasospasm with an indwelling radial artery cannula. Anesthesiology. 1971;34:194.
106. Johnson, RW. A complication of radial-artery cannulation. Anesthesiology. 1974;40:598.
107. Lowenstein, E, Little, JW, Lo, HH. Prevention of cerebral embolization from flushing radial-artery cannulas. N Engl J Med. 1971;285:414.
108. Wyatt, R, Glaves, I, Cooper, DJ. Proximal skin necrosis after radial-artery cannulation. Lancet. 1974;1:1135.
109. Chang, C, Dughi, J, Shitabata, P, et al. Air embolism and the radial arterial line. Crit Care Med. 1988;16:141.
110. Mortensen, JD. Clinical sequelae from arterial needle puncture, cannulation, and incision. Circulation. 1967;35:1118.
111. Safar, ME, Smulyan, H. The blood pressure measurement—revisited. Am Heart J. 2006;152:417.
112. O’Rourke, MF, Yaginuma, T. Wave reflections and the arterial pulse. Arch Intern Med. 1984;144:366.
113. Pauca, AL, Wallenhaupt, SL, Kon, ND, et al. Does radial artery pressure accurately reflect aortic pressure? Chest. 1992;102:1193.
114. Clementi, G. Hemodynamic monitoring using a long radial catheter. Minerva Anestesiol. 2002;68:231.
115. Swain, JA. Hypothermia and blood pH: a review. Arch Intern Med. 1988;148:1643.
116. Danzl, DF, Pozos, RS, Hamlet, MP. Accidental hypothermia. In: Auerbach PS, Geehr EC, eds. Management of Wilderness and Environmental Emergencies. 2nd ed. St. Louis: Mosby; 1989:44.
117. Greenwood, M. Blood gas analysis may lead to iatrogenic anaemia in intensive care. Aust Crit Care. 2000;13:30.
118. Sullivan, G, Ropper, M. Laboratory testing guidelines in the ICU: less red and more green. Crit Care Med. 2008;36:3102.
119. Herbert, PC, Well, G, Blajchman, MA, et al. A multi-center randomized controlled clinical trial of transfusion requirement in critical care. N Engl J Med. 1999;340:409.