[level-membership-for-emergency-medicine-category]
6 Ultrasound-Guided Vascular Access
 Key Points
Introduction
Emergency physician expertise in the use of ultrasound for obtaining vascular access is widespread because of its clinical benefit. Patients may not have accessible superficial veins. Obesity and decreased intravascular volume further increase the challenges. Central venous access has known complications that include pneumothorax and injury to great vessels. Bedside ultrasound may decrease the complication rate by allowing direct, real-time visualization of vascular targets, decreasing the need for multiple attempts, and avoiding arterial injury.1,2 The application of ultrasound for invasive and therapeutic procedures has become standard as reflected in the 2006 policy statement of the American College of Emergency Physicians on emergency ultrasound.3 Over the past decade, wide acceptance of the benefits of ultrasound-guided vascular access has led to the recommendation that ultrasound guidance be used routinely in obtaining central vascular access.4,5 Debate regarding the role of ultrasound has shifted to a focus on implementation of these recommendations and their cost-effectiveness.6–9 Research is now largely focused on improving education and training techniques or documenting the adoption of ultrasound to augment central venous access in a wider variety of settings.10,11
How to Scan and Scanning Protocols
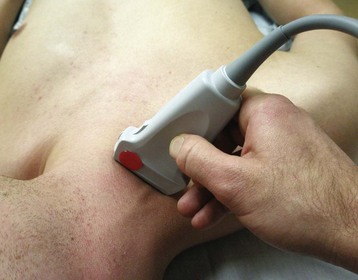
Either a two- or single-operator technique is acceptable.12 A single operator will use the dominant hand to advance and aspirate the needle while manipulating the transducer with the opposite hand. In a two-operator procedure, the cannulating operator will concentrate on the needle and syringe, and the probe will be held steady by the second operator.
Two techniques are commonly accepted for achieving ultrasound-guided vascular access. In the static technique, ultrasound is used to identify vascular structures in relation to external landmarks, and then the ultrasound device is set aside and cannulation performed in the usual manner. The dynamic technique involves real-time, direct visualization of entry of the needle into the vein by ultrasound and seems to be preferable, particularly when the venous structures are small.13 In this case, once the vein has been accessed (or a “flash” of blood is seen), the ultrasound device is set aside.
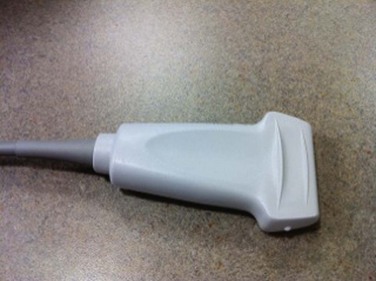
The probe most conducive to central venous access is a linear-array high-frequency (5- to 12-MHz) probe (Fig. 6.1). Care should be taken to identify the side of the probe bearing the indicator mark that corresponds to the on-screen indicator. This will allow the most intuitive positioning of the probe during venous access such that medial on the patient is medial on the screen of the machine as viewed by the operator when attempting cannulation (Fig. 6.2).
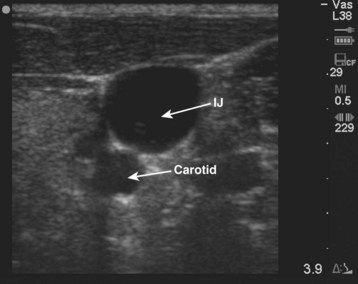
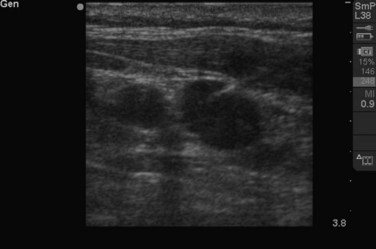
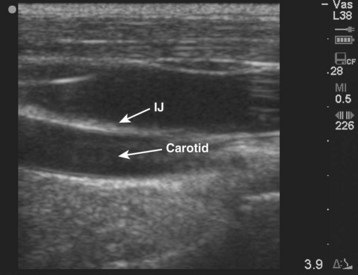
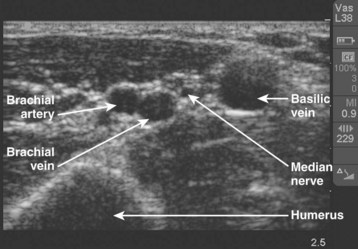
Once a site has been chosen, usually the internal jugular or femoral, it should be evaluated with ultrasound to identify the artery and the vein (Fig. 6.3). When compared with their accompanying veins, arteries appear thick walled, more circular, and pulsatile on ultrasound. Arteries do not compress with light pressure. Veins are more irregular in shape, sometimes appearing triangular rather than round, and compress with light pressure (see Videos 1 and 2). Use of color Doppler can also aid in identification (see Video 3).
 Videos 1, 2, and 3 can be found on Expert Consult @ www.expertconsult.com.
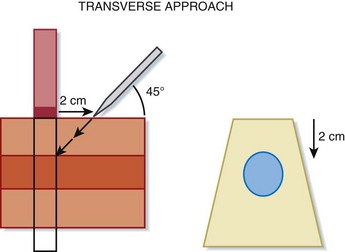
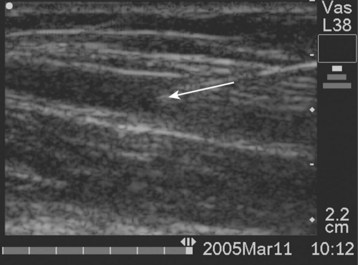
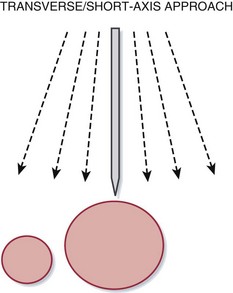
It is often easiest to begin with the probe in a transverse orientation. In this view, the vessels appear in cross section as round or oval structures (see Fig. 6.3). The depth of the target vessel and its relationship to surrounding structures can be determined. The vein should then be centered on the screen. This allows an external landmark, the center of the transducer, to be established. Pressure over this area with a blunt object, such as a fingertip, can confirm the correct location. The needle should then be inserted at a 45-degree angle to the skin at a distance from the probe equal to the depth of the target vessel (Fig. 6.4). Immediately after entering the skin, the needle tip should be identified on the screen. It will appear as a hyperechoic (white) object within subcutaneous tissue. The needle tip should be followed with the transducer as it advances toward the vein. As the needle tip reaches the vein, the wall of the vessel will be seen to deform (see Video 4). A flash of blood in the syringe confirms that the needle has entered the vein (Fig. 6.5).
 Video 4 can be found on Expert Consult @ www.expertconsult.com.
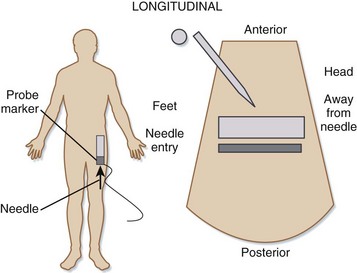
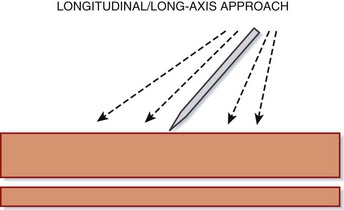
The longitudinal approach is somewhat more challenging to master but allows better visualization of the needle along its entire length. The longitudinal view is obtained by rotating the probe 90 degrees from the transverse position to line up in parallel with the course of the vein (Fig. 6.6). Extra care should be taken to differentiate venous from arterial vessels in this view and to avoid accidental migration of the probe. In this approach the needle should enter the skin at one end of the probe (Fig. 6.7)—and therefore the ultrasound screen—and be advanced in plane toward the underlying vein along the long axis (Fig. 6.8). Similar pressure deformity and indentation of the vessel wall should be noted before it is punctured, and a flash of blood should again be sought (see Video 5).
 Video 5 can be found on Expert Consult @ www.expertconsult.com.
An oblique approach has been described in which the vessels are imaged with an orientation inbetween the transverse and longitudinal views.14 The probe is aligned obliquely over the vessel so that it appears between the structure typically seen in the transverse and longitudinal views. The needle can then be introduced from the end of the transducer and followed in plane as it advances toward the vessel.15 The oblique approach combines the familiar view of the vessel with the reassurance of being able to view the length of the needle (see Videos 6 and 7).
 Videos 6 and 7 can be found on Expert Consult @ www.expertconsult.com.
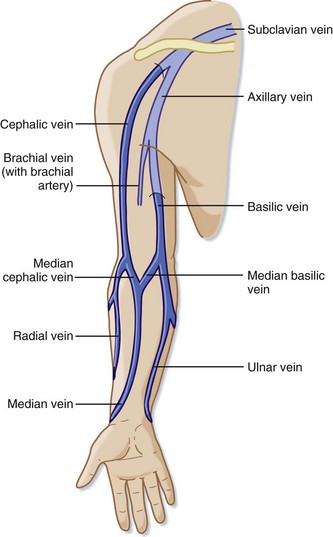
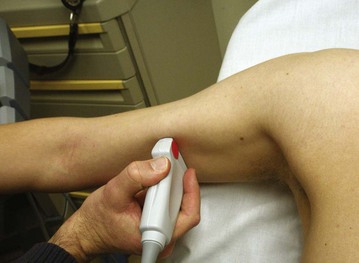
Ultrasonography is also commonly used for peripheral approaches to intravenous access, particularly in patients with difficult access, such as those undergoing dialysis or chemotherapy.16 The basilic vein is a usually a good option, even when other peripheral veins are unusable (Fig. 6.9). The extremity chosen should be positioned comfortably and a tourniquet applied to facilitate an initial ultrasound survey to identify candidate veins (Fig. 6.10). The operator localizes the vein (Fig. 6-11) and performs cannulation via the transverse or longitudinal approach, as described for central access. Because peripheral veins requiring ultrasound guidance for cannulation are often deeper structures, the use of longer catheters should be considered. It should also be appreciated that peripheral veins are much more likely to collapse with even light pressure from the ultrasound transducer.
Red Flags 
When viewing vessels in the transverse orientation, only a small part of the needle can be visualized. Identifying and following the needle tip immediately after it enters the skin will avoid inadvertent arterial puncture. In the longitudinal orientation, the vein and artery are very closely opposed (see Fig. 6.4). Extra care should be taken to ensure that the vessel on screen is the target vessel.
Both the transverse and longitudinal orientations have limitations in localizing the needle tip. In the transverse orientation, the medial-to-lateral position of the tip can best be determined (Fig. 6.12), but the slope of the needle path may be difficult to appreciate. Conversely, in the longitudinal orientation, the slope can be appreciated, but the medial-to-lateral position may not be apparent (Fig. 6.13). A combination of these two approaches, or the oblique approach, may minimize these potential shortcomings.
Even though visualization of the anatomy does make successful cannulation more likely, it is no guarantee. Inadvertent carotid puncture while using ultrasound guidance is well described, in particular as a result of a through-and-through venous puncture.17,18 Prudence and careful technique are always appropriate.
Video demonstrating the use of color Doppler to identify vessels in the neck.
The needle tip is seen as a hyperechoic (bright white) object moving toward the wall of the vessel.
Video demonstrating the oblique approach for placement of a central line.
Video further demonstrating the oblique approach for central line placement.
In this video the needle can be seen within the lumen of the vessel.
1 Keyes LE, Frazee BW, Snoey ER, et al. Ultrasound-guided brachial and basilic vein cannulation in emergency department patients with difficult intravenous access. Ann Emerg Med. 1999;34:711–714.
2 Leung J, Duffy M, Finckh A. Real-time ultrasonographically-guided internal jugular vein catheterization in the emergency department increases success rates and reduces complications: a randomized, prospective study. Ann Emerg Med. 2006;48:540–547.
3 Phelan M, Hagerty D. The oblique view: an alternative approach for ultrasound-guided central line placement. J Emerg Med. 2009;37:403–408.
4 Moon CH, Blehar D, Shear MA, et al. Incidence of posterior vessel wall puncture during ultrasound-guided vessel cannulation in a simulated model. Acad Emerg Med. 2010;17:1138–1141.
1 Leung J, Duffy M, Finckh A. Real-time ultrasonographically-guided internal jugular vein catheterization in the emergency department increases success rates and reduces complications: a randomized, prospective study. Ann Emerg Med. 2006;48:540–547.
2 Hind D, Calvert N, McWilliams R, et al. Ultrasonic locating devices for central venous cannulation: meta-analysis. BMJ. 2003;327(7411):361.
3 ACEP Board of Directors. ACEP policy statement: emergency ultrasound imaging criteria and compendium. http://www.acep.org/policystatements/, April 2006. Available at
4 Rothschild JM. Ultrasound guidance of central vein catheterization. In: Shojania KG, Duncan BW, McDonald KM, et al. Making health care safer: a critical analysis of patient safety practices. Agency for Healthcare Research and Quality, 2001. Available at http://archive.ahrq.gov/clinic/ptsafety/chap21.htm/ Accessed Jan 3, 2011
5 National Institute for Clinical Excellence. Guidance on the use of ultrasound locating devices for placing central venous catheters. London: National Health Service; 2011. Issue date: September 2002, Review date: August 2005. Technology Appraisal No. 49. Available at http://www.nice.org.uk/nicemedia/pdf/Ultrasound_49_GUIDANCE.pdf Accessed Jan 2
6 Neustein SM. Mandating ultrasound usage for internal jugular vein cannulation. Can J Anaesth. 2010;57:868. author reply 868-9
7 Chalmers N. Ultrasound guided central venous access. NICE has taken sledgehammer to crack nut. BMJ. 2003;326(7391):712.
8 Matera JT, Egerton-Warburton D, Meek R. Ultrasound guidance for central venous catheter placement in Australasian emergency departments: potential barriers to more widespread use. Emerg Med Australas. 2010;22:514–523.
9 Keenan SP. Use of ultrasound to place central lines. J Crit Care. 2002;17:126–137.
10 Wells M, Goldstein L. The polony phantom: a cost-effective aid for teaching emergency ultrasound procedures. Int J Emerg Med. 2010;3:115–118.
11 Agarwal A, Singh DK, Singh AP. Ultrasonography: a novel approach to central venous cannulation. Indian J Crit Care Med.. 2009;13:213–216.
12 Milling T, Holden C, Melniker L, et al. Randomized controlled trial of single-operator vs. two-operator ultrasound guidance for internal jugular central venous cannulation. Acad Emerg Med. 2006;13:245–247.
13 Milling TJ, Jr., Rose J, Briggs WM, et al. Randomized, controlled clinical trial of point-of-care limited ultrasonography assistance of central venous cannulation: the Third Sonography Outcomes Assessment Program (SOAP-3) Trial. Crit Care Med. 2005;33:1764–1769.
14 Phelan M, Hagerty D. The oblique view: an alternative approach for ultrasound-guided central line placement. J Emerg Med. 2009;37:403–408.
15 Schofer JM, Nomura JT, Bauman MJ, et al. The “ski lift”: a technique to maximize needle visualization with the long-axis approach for ultrasound-guided vascular access. Acad Emerg Med. 2010;17(7):e83–e84.
16 Keyes LE, Frazee BW, Snoey ER, et al. Ultrasound-guided brachial and basilic vein cannulation in emergency department patients with difficult intravenous access. Ann Emerg Med. 1999;34:711–714.
17 Moon CH, Blehar D, Shear MA, et al. Incidence of posterior vessel wall puncture during ultrasound-guided vessel cannulation in a simulated model. Acad Emerg Med. 2010;17:1138–1141.
18 Blaivas M. Video analysis of accidental arterial cannulation with dynamic ultrasound guidance for central venous access. J Ultrasound Med. 2009;28:1239–1244.
[/level-membership-for-emergency-medicine-category][not-level-membership-for-emergency-medicine-category]
6 Ultrasound-Guided Vascular Access
Introduction
Emergency physician expertise in the use of ultrasound for obtaining vascular access is widespread because of its clinical benefit. Patients may not have accessible superficial veins. Obesity and decreased intravascular volume further increase the challenges. Central venous access has known complications that include pneumothorax and injury to great vessels. Bedside ultrasound may decrease the complication rate by allowing direct, real-time visualization of vascular targets, decreasing the need for multiple attempts, and avoiding arterial injury.1,2 The application of ultrasound for invasive and therapeutic procedures has become standard as reflected in the 2006 policy statement of the American College of Emergency Physicians on emergency ultrasound.3 Over the past decade, wide acceptance of the benefits of ultrasound-guided vascular access has led to the recommendation that ultrasound guidance be used routinely in obtaining central vascular access.4,5 Debate regarding the role of ultrasound has shifted to a focus on implementation of these recommendations and their cost-effectiveness.6–9 Research is now largely focused on improving education and training techniques or documenting the adoption of ultrasound to augment central venous access in a wider variety of settings.10,11
How to Scan and Scanning Protocols
Either a two- or single-operator technique is acceptable.12 A single operator will use the dominant hand to advance and aspirate the needle while manipulating the transducer with the opposite hand. In a two-operator procedure, the cannulating operator will concentrate on the needle and syringe, and the probe will be held steady by the second operator.
Two techniques are commonly accepted for achieving ultrasound-guided vascular access. In the static technique, ultrasound is used to identify vascular structures in relation to external landmarks, and then the ultrasound device is set aside and cannulation performed in the usual manner. The dynamic technique involves real-time, direct visualization of entry of the needle into the vein by ultrasound and seems to be preferable, particularly when the venous structures are small.13 In this case, once the vein has been accessed (or a “flash” of blood is seen), the ultrasound device is set aside.
The probe most conducive to central venous access is a linear-array high-frequency (5- to 12-MHz) probe (Fig. 6.1). Care should be taken to identify the side of the probe bearing the indicator mark that corresponds to the on-screen indicator. This will allow the most intuitive positioning of the probe during venous access such that medial on the patient is medial on the screen of the machine as viewed by the operator when attempting cannulation (Fig. 6.2).
Once a site has been chosen, usually the internal jugular or femoral, it should be evaluated with ultrasound to identify the artery and the vein (Fig. 6.3). When compared with their accompanying veins, arteries appear thick walled, more circular, and pulsatile on ultrasound. Arteries do not compress with light pressure. Veins are more irregular in shape, sometimes appearing triangular rather than round, and compress with light pressure (see Videos 1 and 2). Use of color Doppler can also aid in identification (see Video 3).
Videos 1, 2, and 3 can be found on Expert Consult @ www.expertconsult.com.
It is often easiest to begin with the probe in a transverse orientation. In this view, the vessels appear in cross section as round or oval structures (see Fig. 6.3). The depth of the target vessel and its relationship to surrounding structures can be determined. The vein should then be centered on the screen. This allows an external landmark, the center of the transducer, to be established. Pressure over this area with a blunt object, such as a fingertip, can confirm the correct location. The needle should then be inserted at a 45-degree angle to the skin at a distance from the probe equal to the depth of the target vessel (Fig. 6.4). Immediately after entering the skin, the needle tip should be identified on the screen. It will appear as a hyperechoic (white) object within subcutaneous tissue. The needle tip should be followed with the transducer as it advances toward the vein. As the needle tip reaches the vein, the wall of the vessel will be seen to deform (see Video 4). A flash of blood in the syringe confirms that the needle has entered the vein (Fig. 6.5).
