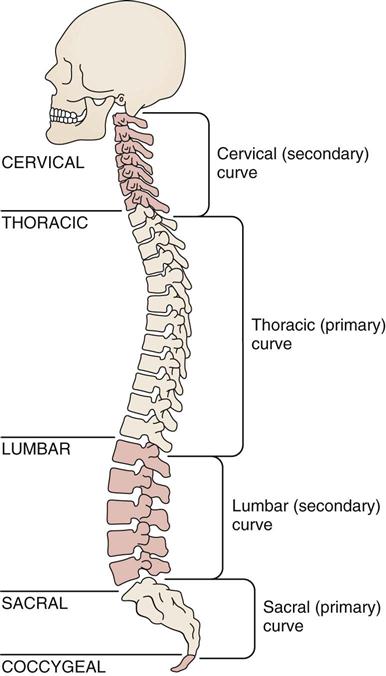
Thoracic (Dorsal) Spine
Assessment of the thoracic spine involves examination of the part of the spine that is most rigid because of the associated rib cage. The rib cage in turn provides protection for the heart and lungs. Normally, the thoracic spine, being one of the primary curves, exhibits a mild kyphosis (posterior curvature); the cervical and lumbar sections, being secondary curves, exhibit a mild lordosis (anterior curvature). When the examiner assesses the thoracic spine, it is essential that the cervical and/or lumbar spines be evaluated at the same time (Figure 8-1; see Figure 3-7).
Applied Anatomy
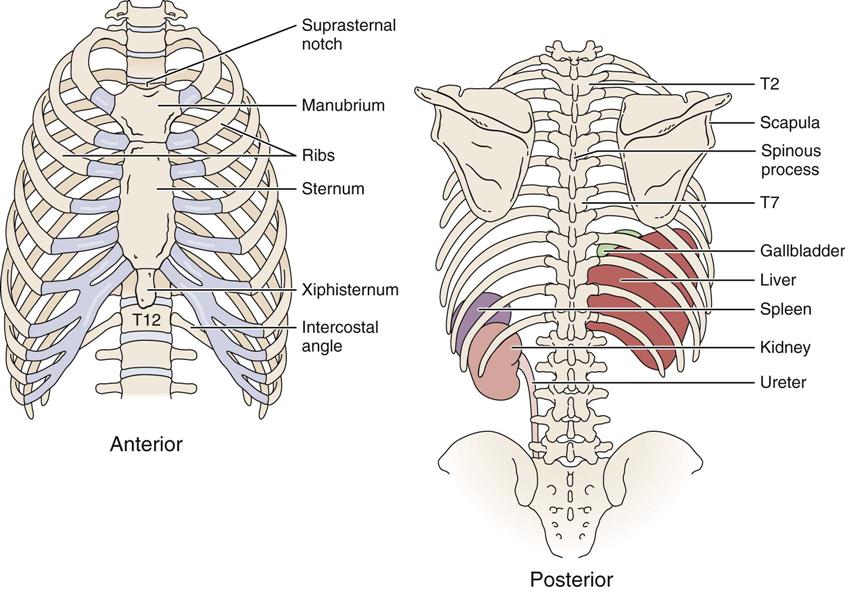
The costovertebral joints are synovial plane joints located between the ribs and the vertebral bodies (Figure 8-2). There are 24 of these joints, and they are divided into two parts. Ribs 1, 10, 11, and 12 articulate with a single vertebra. The other articulations have no intra-articular ligament that divides the joint into two parts, so each of ribs 2 through 9 articulates with two adjacent vertebrae and the intervening intervertebral disc. The main ligament of the costovertebral joint is the radiate ligament, which joins the anterior aspect of the head of the rib radiating to the sides of the vertebral bodies and disc in between. For ribs 10, 11, and 12, it attaches only to the adjacent vertebral body. The intra-articular ligament divides the joint and attaches to the disc.
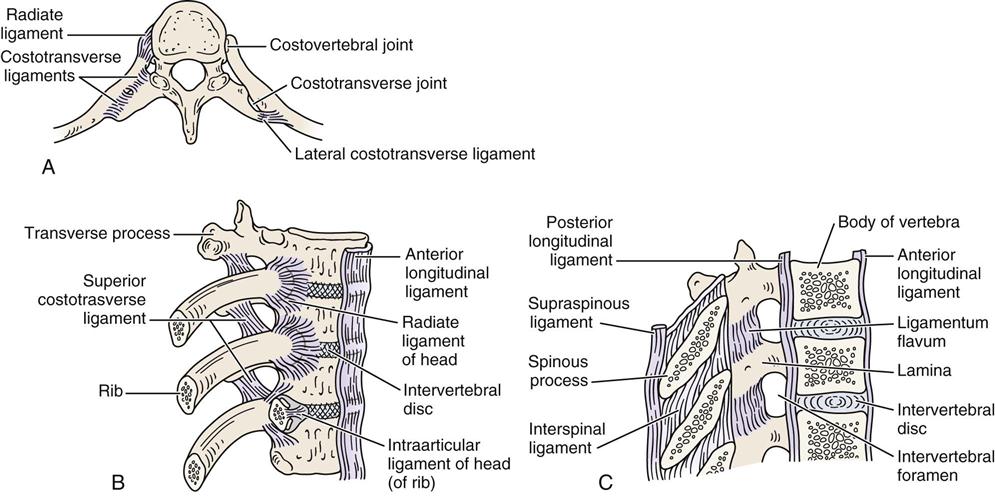
A, Superior view. B, Anterolateral aspect. C, Median section through vertebra.
The costotransverse joints are synovial joints found between the ribs and the transverse processes of the vertebra of the same level for ribs 1 through 10 (see Figure 8-2). Because ribs 11 and 12 do not articulate with the transverse processes, this joint does not exist for these two levels. The costotransverse joints are supported by three ligaments. The superior costotransverse ligament runs from the lower border of the transverse process above to the upper border of the rib and its neck. The costotransverse ligament runs between the neck of the rib and the transverse process at the same level. The lateral costotransverse ligament runs from the tip of the transverse process to the adjacent rib.
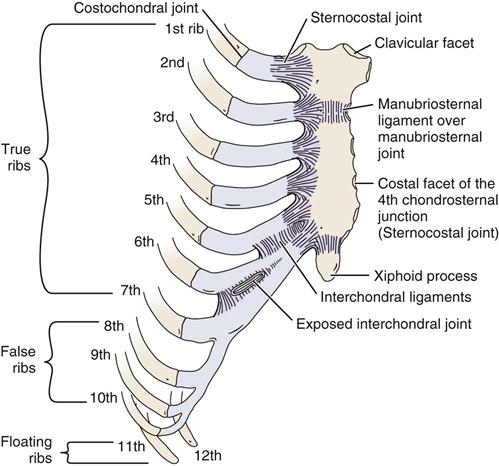
The costochondral joints lie between the ribs and the costal cartilage (Figure 8-3). The sternocostal joints are found between the costal cartilage and the sternum. Joints 2 through 6 are synovial, whereas the first costal cartilage is united with the sternum by a synchondrosis. Where a rib articulates with an adjacent rib or costal cartilage (ribs 5 through 9), a synovial interchondral joint exists.
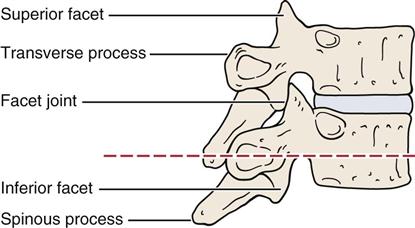
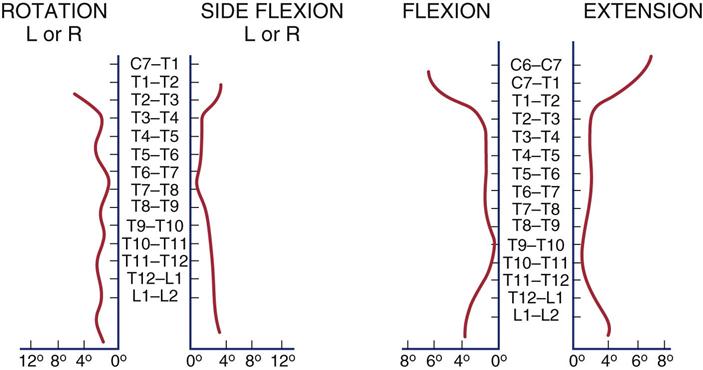
As in the cervical and lumbar spines, the two apophyseal or facet joints make up the main tri-joint complex along with the disc between the vertebrae. The superior facet of the T1 vertebra is similar to a facet of the cervical spine. Because of this, T1 is classified as a transitional vertebra. The superior facet faces up and back; the inferior facet faces down and forward. The T2 to T11 superior facets face up, back, and slightly laterally; the inferior facets face down, forward, and slightly medially (Figure 8-4). This shape enables slight rotation in the thoracic spine. Thoracic vertebrae T11 and T12 are classified as transitional, and the facets of these vertebrae become positioned in a way similar to those of the lumbar facets. The superior facets of these two vertebrae face up, back, and more medially; the inferior facets face forward and slightly laterally. The ligaments between the vertebral bodies include the ligamentum flavum, the anterior and posterior longitudinal ligaments, the interspinous and supraspinous ligaments, and the intertransverse ligament. These ligaments are found in the cervical, thoracic, and lumbar spine. The close packed position of the facet joints in the thoracic spine is extension.
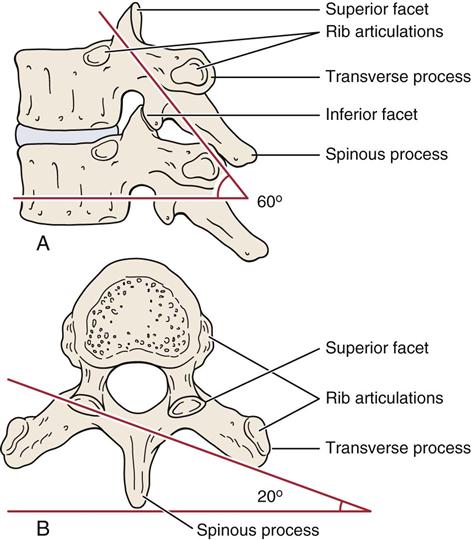
Within the thoracic spine, there are 12 vertebrae, which diminish in size from T1 to T3 and then increase progressively in size to T12. These vertebrae are distinctive in having facets on the body and transverse processes for articulation with the ribs. The spinous processes of these vertebrae face obliquely downward (Figure 8-5 ). T7 has the greatest spinous process angulation, whereas the upper three thoracic vertebrae have spinous processes that project directly posteriorly. In other words, the spinous process of these vertebrae is on the same plane as the transverse processes of the same vertebrae.
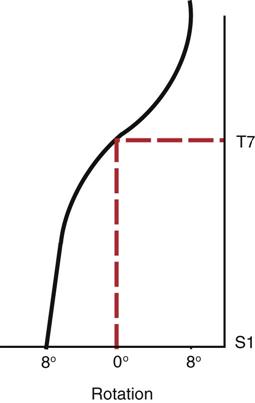
T4 to T6 vertebrae have spinous processes that project downward slightly. In this case, the tips of the spinous processes are on a plane halfway between their own transverse processes and the transverse processes of the vertebrae below. For T7, T8, and T9 vertebrae, the spinous processes project downward, the tip of the spinous processes being on a plane of the transverse processes of the vertebrae below. For the T10 spinous process, the arrangement is similar to that of the T9 spinous process (i.e., the spinous process is level with the transverse process of the vertebra below). For T11, the arrangement is similar to that of T6 (i.e., the spinous process is halfway between the two transverse processes of the vertebra), and T12 is similar to T3 (i.e., the spinous process is level with the transverse process of the same vertebra). The location of the spinous processes becomes important if the examiner wishes to perform posteroanterior central vertebral pressures (PACVPs). For example, if the examiner pushes on the spinous process of T8, the body of T9 also moves. In fact, the vertebral body of T8 probably arcs backwards slightly, whereas T9 will move in an anterior direction. T7 is sometimes classified as a transitional vertebra, because it is the point at which the lower limb axial rotation alternates with the upper limb axial rotation (Figure 8-6).
The ribs, which help to stiffen the thoracic spine, articulate with the demifacets on vertebrae T2 to T9. For T1 and T10, there is a whole facet for ribs 1 and 10, respectively. The first rib articulates with T1 only, the second rib articulates with T1 and T2, the third rib articulates with T2 and T3, and so on. Ribs 1 through 7 articulate with the sternum directly and are classified as true ribs (see Figure 8-3). Ribs 8 through 10 join directly with the costocartilage of the rib above and are classified as false ribs. Ribs 11 and 12 are classified as floating ribs, because they do not attach to either the sternum or the costal cartilage at their distal ends. Ribs 11 and 12 articulate only with the bodies of the T11 and T12 vertebrae, not with the transverse processes of the vertebrae, nor with the costocartilage of the rib above. The ribs are held by ligaments to the body of the vertebra and to the transverse processes of the same vertebrae. Some of these ligaments also bind the rib to the vertebra above.
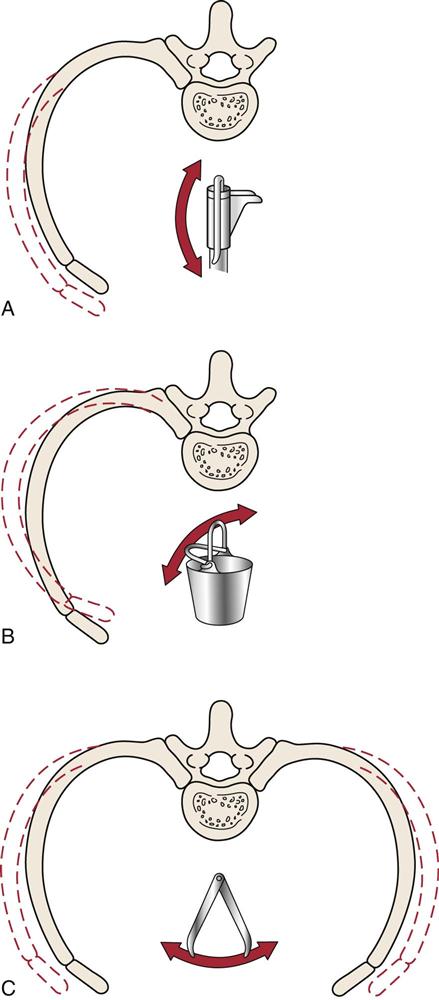
At the top of the rib cage, the ribs are relatively horizontal. As the rib cage descends, they run more and more obliquely downward. By the 12th rib, the ribs are more vertical than horizontal. With inspiration, the ribs are pulled up and forward; this increases the anteroposterior diameter of the ribs. The first six ribs increase the anteroposterior dimension of the chest, mainly by rotating around their long axes. Rotation downward of the rib neck is associated with depression, whereas rotation upward of the same portion is associated with elevation. These movements are known as a pump handle action and are accompanied by elevation of the manubrium sternum upward and forward (Figure 8-7, A).1–3 Ribs 7 through 10 mainly increase in lateral, or transverse, dimension. To accomplish this, the ribs move upward, backward, and medially to increase the infrasternal angle, or they move downward, forward, and laterally to decrease the angle. These movements are known as a bucket handle action. This action is also performed by ribs 2 through 6 but to a much lesser degree (Figure 8-7, B). The lower ribs (ribs 8 through 12) move laterally, in what is known as a caliper action, to increase lateral diameter (Figure 8-7, C).2 The ribs are quite elastic in children, but they become increasingly brittle with age. In the anterior half of the chest, the ribs are subcutaneous; in the posterior half, they are covered by muscles.
Patient History
A thorough and complete history should include past and present problems. By listening carefully, the examiner is often able to identify the patient’s problem, develop a working diagnosis, and then use the observation and examination to confirm or refute the impressions established from the history. All information concerning the present pain and its site, nature, and behavior is important. If any part of the history implicates the cervical or lumbar spine, the examiner must include these areas in the assessment as well.
In addition to the questions listed under the “Patient History” section in Chapter 1, the examiner should obtain the following information from the patient:
2. What was the mechanism of injury? Most commonly, rib injuries are caused by trauma. Thoracic spine problems may result from disease processes (e.g., scoliosis) and may have an insidious onset. Pain from true thoracic trauma tends to be localized to the area of injury. Facet syndromes present as stiffness and local pain, which can be referred.4,5
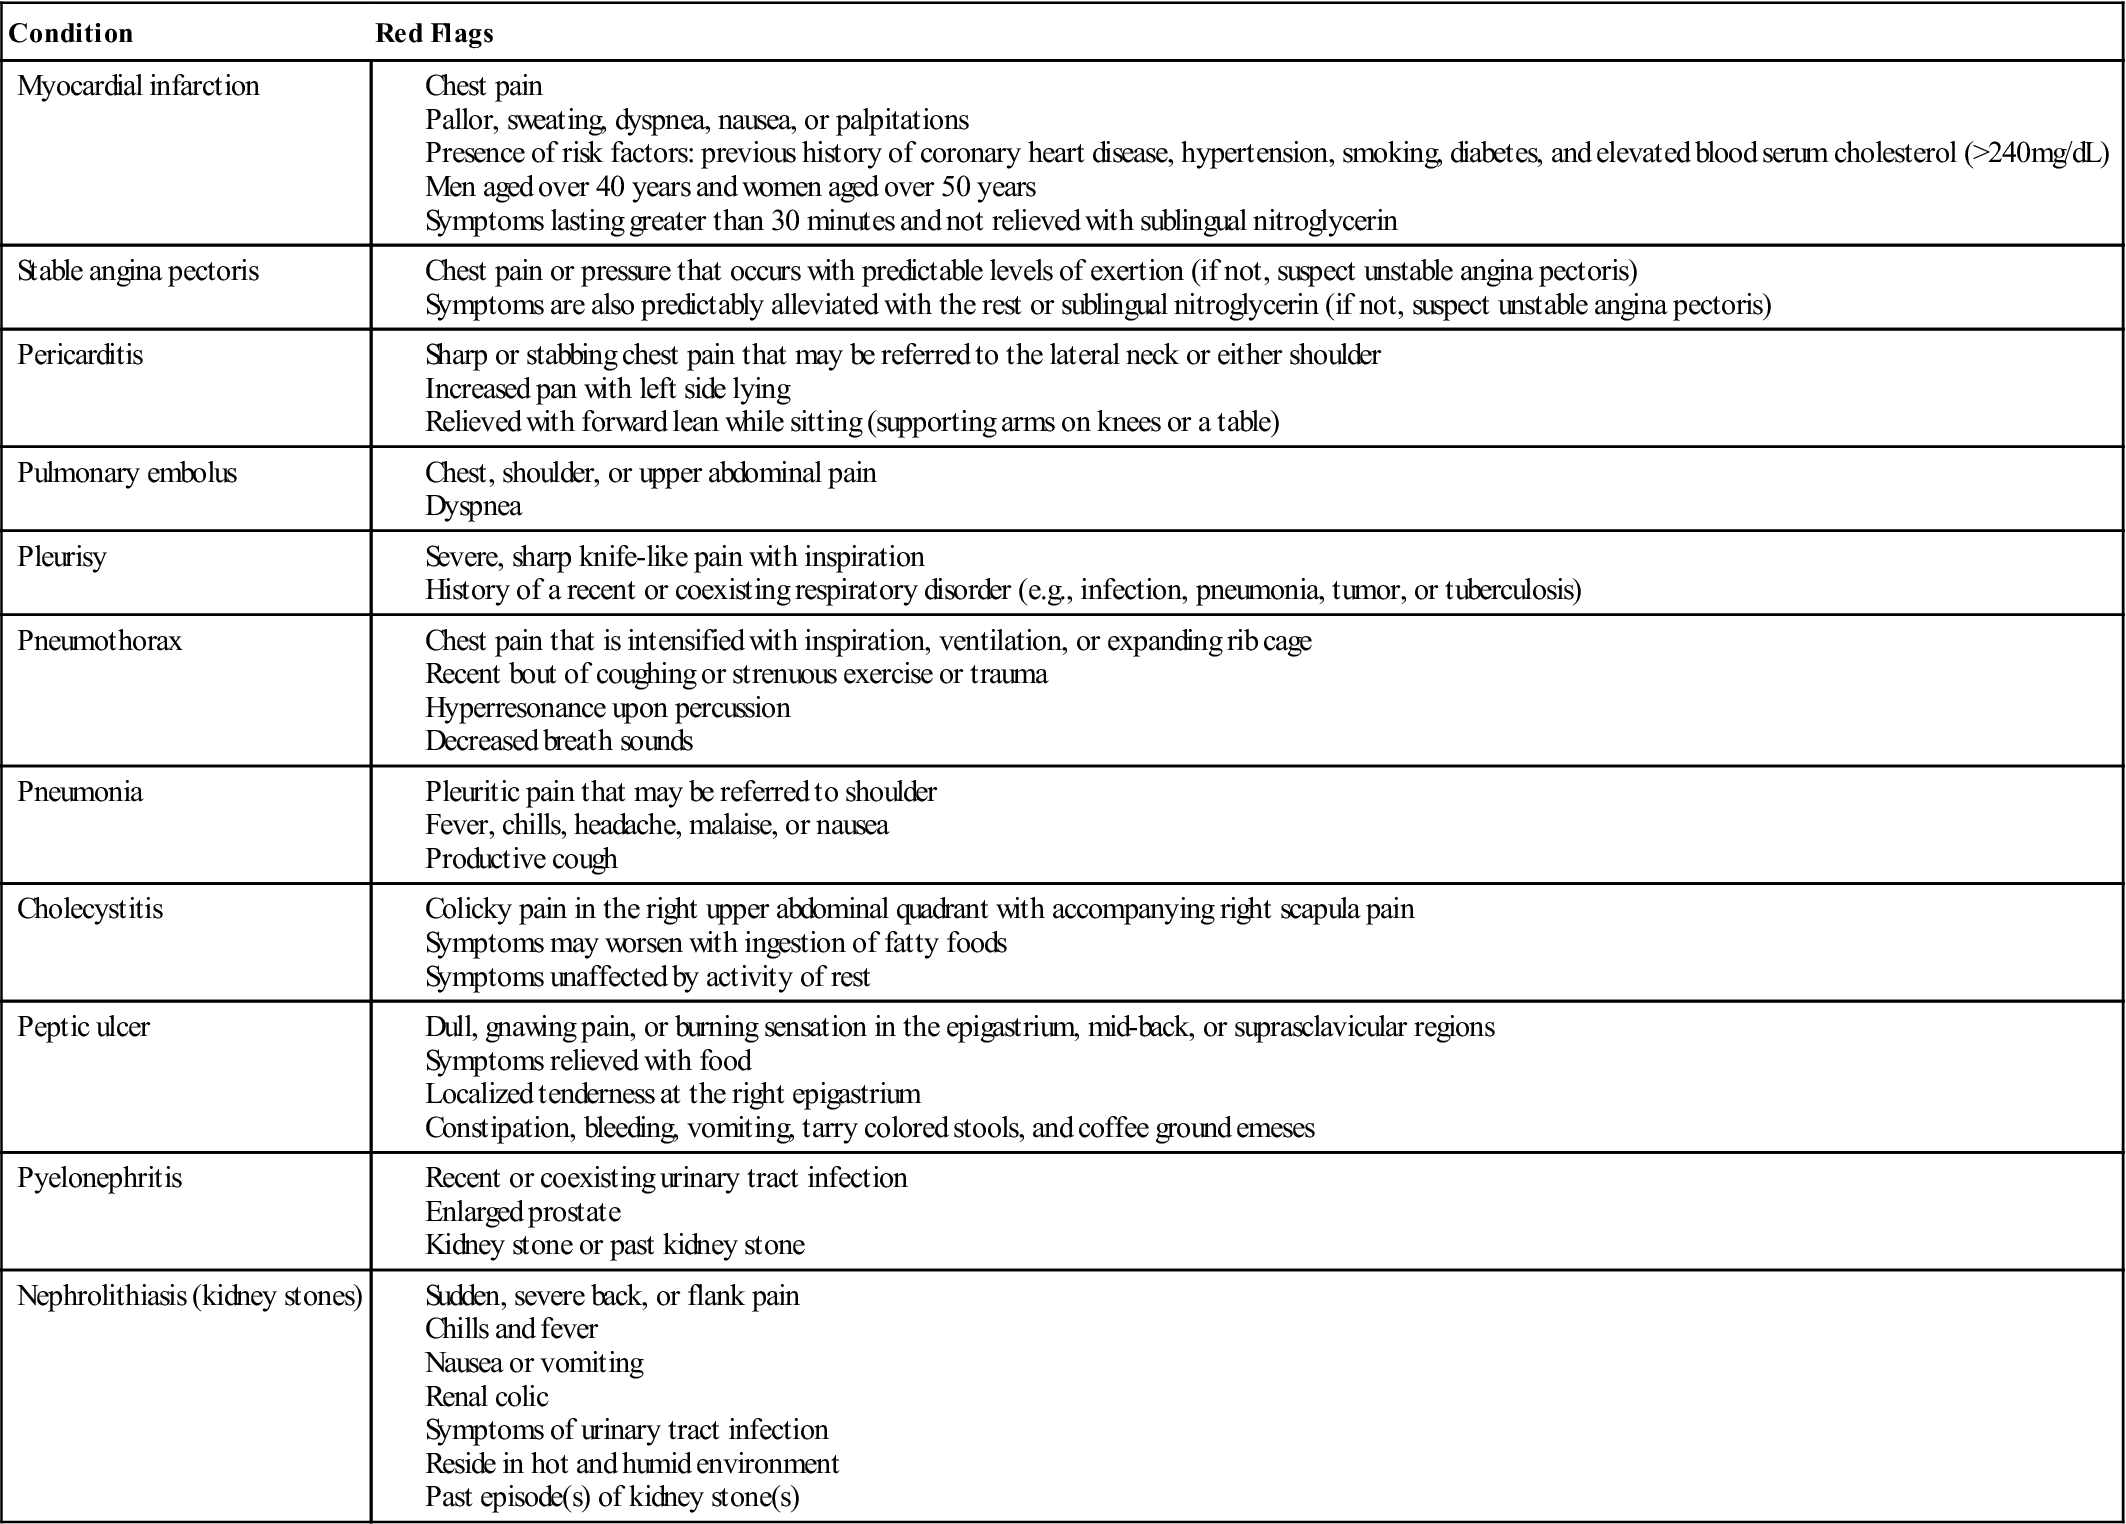
3. What are the details of the present pain and other symptoms? What are the sites and boundaries of the pain? Have the patient point to the location or locations. Is there any radiation of pain? The examiner should remember that many of the abdominal structures, such as the stomach, liver, and pancreas, may refer pain to the thoracic region (Tables 8-1 and 8-2 for thoracic spine and rib cage red flags and chest pain patterns). With thoracic disc lesions, because of the rigidity of the thoracic spine, active movements do not often show the characteristic pain pattern, and sensory and strength deficits are difficult if not impossible to detect.6 Thoracic root involvement or spondylosis usually causes pain that follows the path of the ribs or a deep, “through-the-chest” pain.
5. Is the pain deep, superficial, shooting, burning, or aching? Thoracic nerve root pain is often severe and is referred in a sloping band along an intercostal space. Pain between the scapulae may be the result of a cervical lesion. It has been reported that any symptoms above a line joining the inferior angles of the scapula should be considered of cervical origin until proven otherwise, especially if there is no history of trauma.7
9. Is the condition improving, becoming worse, or staying the same?
10. Does any particular posture bother the patient?
13. Does the patient have any problems with digestion? Pain may be referred to the thoracic spine or ribs from pathological conditions within the thorax or abdomen. Visceral pain tends to be vague, dull, and indiscrete and may be accompanied by nausea and sweating. It tends to follow dermatome patterns in its referral. For example, cardiac pain is referred to the shoulder (C4) and posteriorly to T2. Stomach pain is referred to T6–T8 posteriorly. Ulcers may be referred to T4–T6 posteriorly.4
14. Is the skin in the thorax area normal? Conditions, such as herpes zoster, can cause unilateral, spontaneous pain. In the observation, the examiner should watch for erythema and grouped vesicles.6
 TABLE 8-1
Thoracic Spine and Rib Cage Red Flags
From Dutton M: Dutton’s orthopedic examination, evaluation and intervention, ed 3, New York, 2012, McGraw Hill, p. 1247.
 TABLE 8-2
| Origin of Pain | Site of Referred Pain | Type of Disorder |
| Substernal or retrosternal | Neck, jaw, back, left shoulder and arm, and abdomen | Angina |
| Substernal, anterior chest | Neck, jaw, back, and bilateral arms | Myocardial infarction |
| Substernal or above the sternum | Neck, upper back, upper trapezius, supraclavicular area, left arm, and costal margin | Pericarditis |
| Anterior chest (thoracic aneurysm); abdomen (abdominal aneurysm) | Posterior thoracic, chest, neck, shoulders, interscapular, or lumbar region | Dissecting aortic aneurysm |
| Variable | Variable, depending on structures involved | Musculoskeletal |
| Costochondritis (inflammation of the costal cartilage): sternum and rib margins | Abdominal oblique trigger points: pain referred up into the chest area | |
| Upper rectus abdominis trigger points (left side), pectoralis, serratus anterior, and sternalis muscles: precordial pain | Pectoralis trigger points: pain referred down medial bilateral arms along ulnar nerve distribution (fourth and fifth fingers) | |
| Precordium region (upper central abdomen and diaphragm) | Sternum, axillary lines, and either side of vertebrae; lateral and anterior chest wall; occasionally to one or both arms | Neurological |
| Substernal, epigastric, and upper abdominal quadrants | Around chest area, shoulders, and upper back region | Gastrointestinal |
| Within breast tissue; may be localized in pectoral and supraclavicular regions | Chest area, axilla, mid-back, and neck and posterior shoulder girdle | Breast pain |
| Commonly substernal and anterior chest region | No referred pain | Anxiety |
From Dutton M: Dutton’s orthopedic examination, evaluation and intervention, ed 3, New York, 2012, McGraw Hill, p. 1246.
Observation
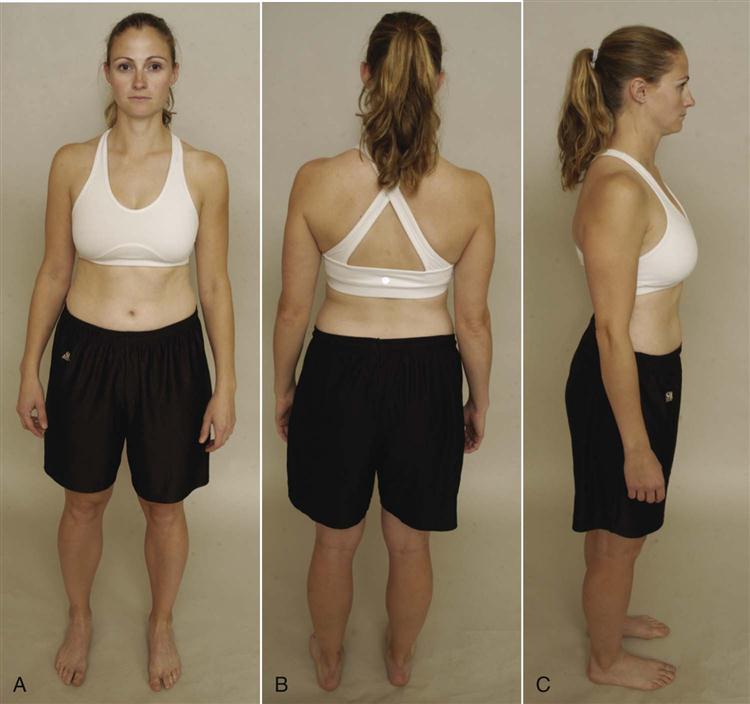
The patient must be suitably undressed so that the body is exposed as much as possible. In the case of a female, the bra is often removed to provide a better view of the spine and rib cage. The patient is usually observed first standing and then sitting.
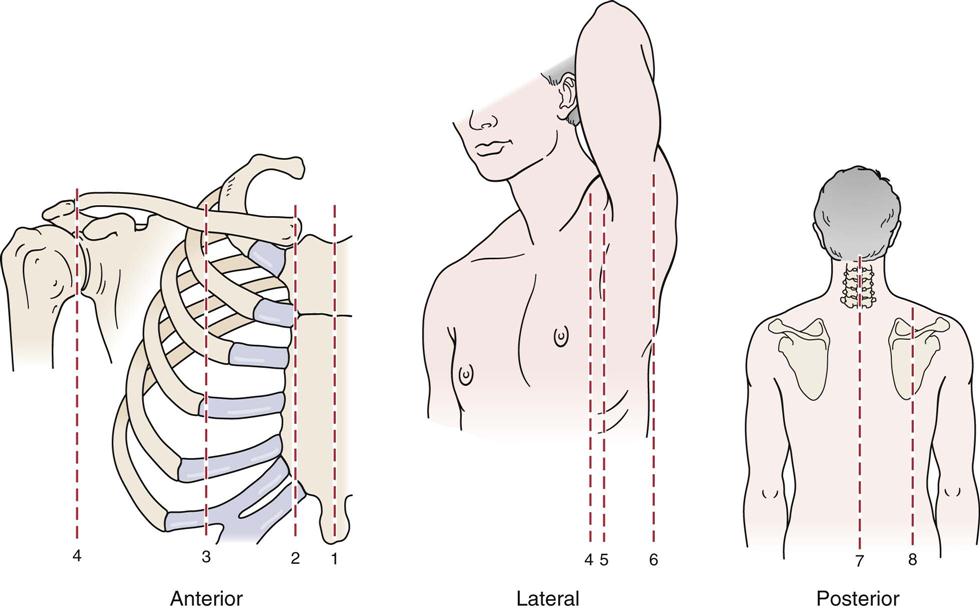
As with any observation, the examiner should note any alteration in the overall spinal posture (see Chapter 15), because it may lead to problems in the thoracic spine. It is important to observe the total body posture from the head to the toes and look for any deviation from normal (Figure 8-8). Posteriorly, the medial edge of the spine of the scapula should be level with the T3 spinous process, whereas the inferior angle of the scapula is level with the T7–T9 spinous process, depending on the size of the scapula. The medial border of the scapula is parallel to the spine and approximately 5 cm lateral to the spinous processes.
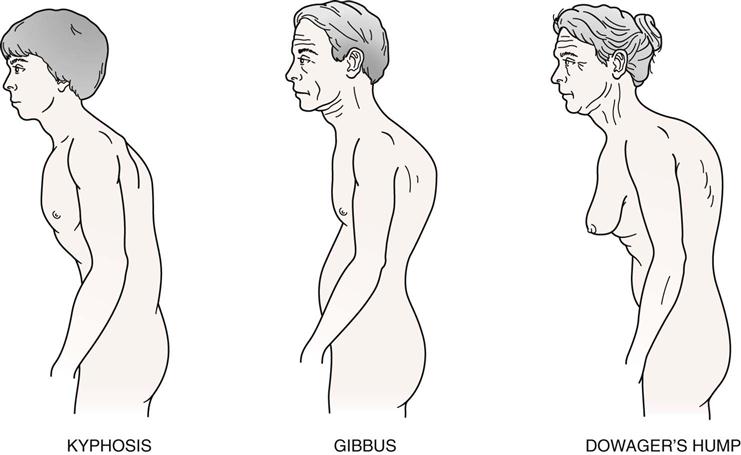
Kyphosis
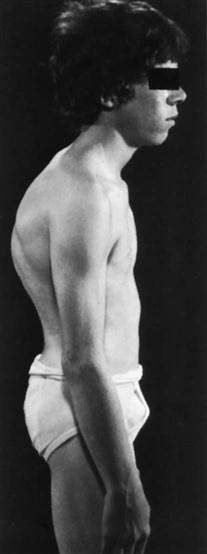
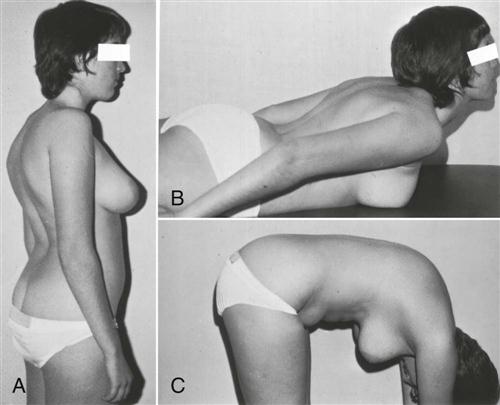
Kyphosis is a condition that is most prevalent in the thoracic spine (Figure 8-9). The examiner must ensure that a kyphosis is actually present, remembering that a slight kyphosis, or posterior curvature, is normal and is found in every individual. Hyperkyphosis is a kyphotic angle of greater than 40° commonly measured by the Cobb method (see Figure 8-53) on a lateral x-ray measuring between T4 and T12.8 After age 40, the thoracic kyphosis tends to increase.8 In addition, some people have “flat” scapulae, which give the appearance of an excessive kyphosis, as does winging of the scapulae. The examiner must ensure that it is actually the spine that has the excessive curvature. Types of kyphotic deformities are shown in Figure 8-10 and listed below9:
1. Round back is decreased pelvic inclination (20°) with a thoracolumbar or thoracic kyphosis (Figure 8-11). Most forms of kyphosis seen show a decreased pelvic inclination. To compensate and maintain the body’s center of gravity, a structural kyphosis, usually caused by tight soft tissues from prolonged postural change or by a growth disturbance results, causing a round back deformity.
2. Scheuermann’s disease is the most common structural kyphosis in adolescents but can occur in adults. Its etiology is unknown.10
3. Hump back is a localized, sharp, posterior angulation called a gibbus.8 This kyphotic deformity is usually structural and often results from an anterior wedging of the body of one or two thoracic vertebrae. The wedging may be caused by a fracture, tumor, or bone disease. The pelvic inclination is usually normal (30°).
5. Dowager’s hump8 results from postmenopausal osteoporosis. Because of the osteoporosis, anterior wedge fractures occur to several vertebrae, usually in the upper to middle thoracic spine, causing a structural scoliosis that also contributes to a decrease in height.
Scoliosis
Scoliosis is a deformity in which there are one or more lateral curvatures of the lumbar or thoracic spine; it is this spinal deformity that was suffered by the “Hunchback of Notre Dame.” (In the cervical spine, the condition is called torticollis.) The curvature may occur in the thoracic spine alone, in the thoracolumbar area, or in the lumbar spine alone (Figure 8-12). Scoliosis may be nonstructural (i.e., relatively easily correctable once the cause is determined) or structural. Poor posture, hysteria, nerve root irritation, inflammation in the spine area, leg length discrepancy, or hip contracture can cause nonstructural scoliosis. Structural changes may be genetic, idiopathic, or caused by some congenital problem, such as a wedge vertebra, hemivertebra, or failure of vertebral segmentation. In other words, there is a structural change in the bone, and normal flexibility of the spine is lost.11
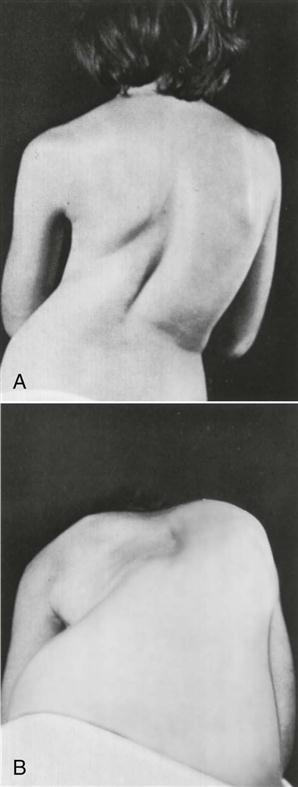
A, Postural deformity caused by idiopathic thoracolumbar scoliosis. B, Asymmetry of posterior thorax accentuated with patient flexed. Note “hump” on the right and “hollow” on the left. (From Gartland JJ: Fundamentals of orthopedics, Philadelphia, 1979, WB Saunders, p. 341.)
A number of curve patterns may be present with scoliosis (Figure 8-13).11 The curve patterns are designated according to the level of the apex of the curve (Table 8-3). A right thoracic curve has a convexity toward the right, and the apex of the curve is in the thoracic spine. With a cervical scoliosis, or torticollis, the apex is between C1 and C6. For a cervicothoracic curve, the apex is at C7 or T1. For a thoracic curve, the apex is between T2 and T11. The thoracolumbar curve has its apex at T12 or L1. The lumbar curve has an apex between L2 and L4, and a lumbosacral scoliosis has an apex at L5 or S1. The involvement of the thoracic spine results in a very poor cosmetic appearance or greater visual defect as a result of deformation of the ribs along with the spine. The deformity can vary from a mild rib hump to a severe rotation of the vertebrae, causing a rib deformity called a razorback spine.
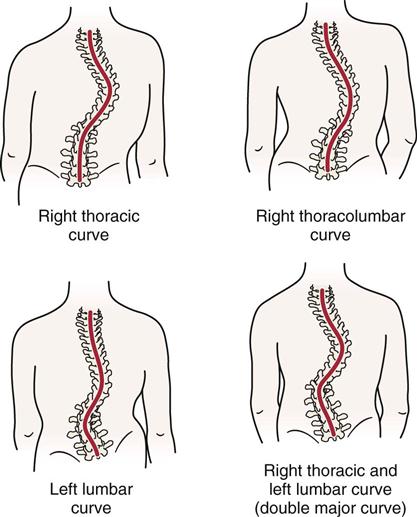
TABLE 8-3
Curve Patterns and Prognosis in Idiopathic Scoliosis
| CURVE PATTERN | |||||
| Primary Lumbar | Thoracolumbar | Combined Thoracic and Lumbar | Primary Thoracic | Cervicothoracic | |
| Incidence (%) | 23.6 | 16 | 37 | 22.1 | 31.3 |
| Average age curve noted (year) | 13.25 | 14 | 12.3 | 11.1 | 15.3 |
| Average age curve stabilized (year) | 14.5 | 16 | 15.5 | 16.1 | 16.3 |
| Extent of curve | T11–L3 | T6 or T7–L1 or L1, L2 | Thoracic, T6–T10 Lumbar, T11–L4 |
T6–T11 | C7 or T1–T4 or T5 |
| Apex of curve | L1 or L2 | T11 or L2 | Thoracic, T7 or T8 Lumbar, L2 |
T8 or T9 (rotation extreme, convexity usually to right) | T3 |
| Average angular value at maturity (degrees) | |||||
| Standing | 36.8 | 42.7 | Thoracic, 51.9; Lumbar, 41.4 | 81.4 | 34.6 |
| Supine | 29.1 | 35 | Thoracic, 41.4; Lumbar, 37.7 | 73.8 | 32.2 |
| Prognosis | Most benign and least deforming of all idiopathic curves | Not severely deforming Intermediate between thoracic and lumbar curves |
Good Body usually well aligned, curves even if severe tend to compensate each other High percentage of very severe scoliosis if onset before age of 10 years |
Worst Progresses more rapidly, becomes more severe, and produces greater clinical deformity than any other pattern Five years of active growth during which curve could increase |
Deformity unsightly Poorly disguised because of high shoulder, elevated scapula, and deformed thoracic cage |
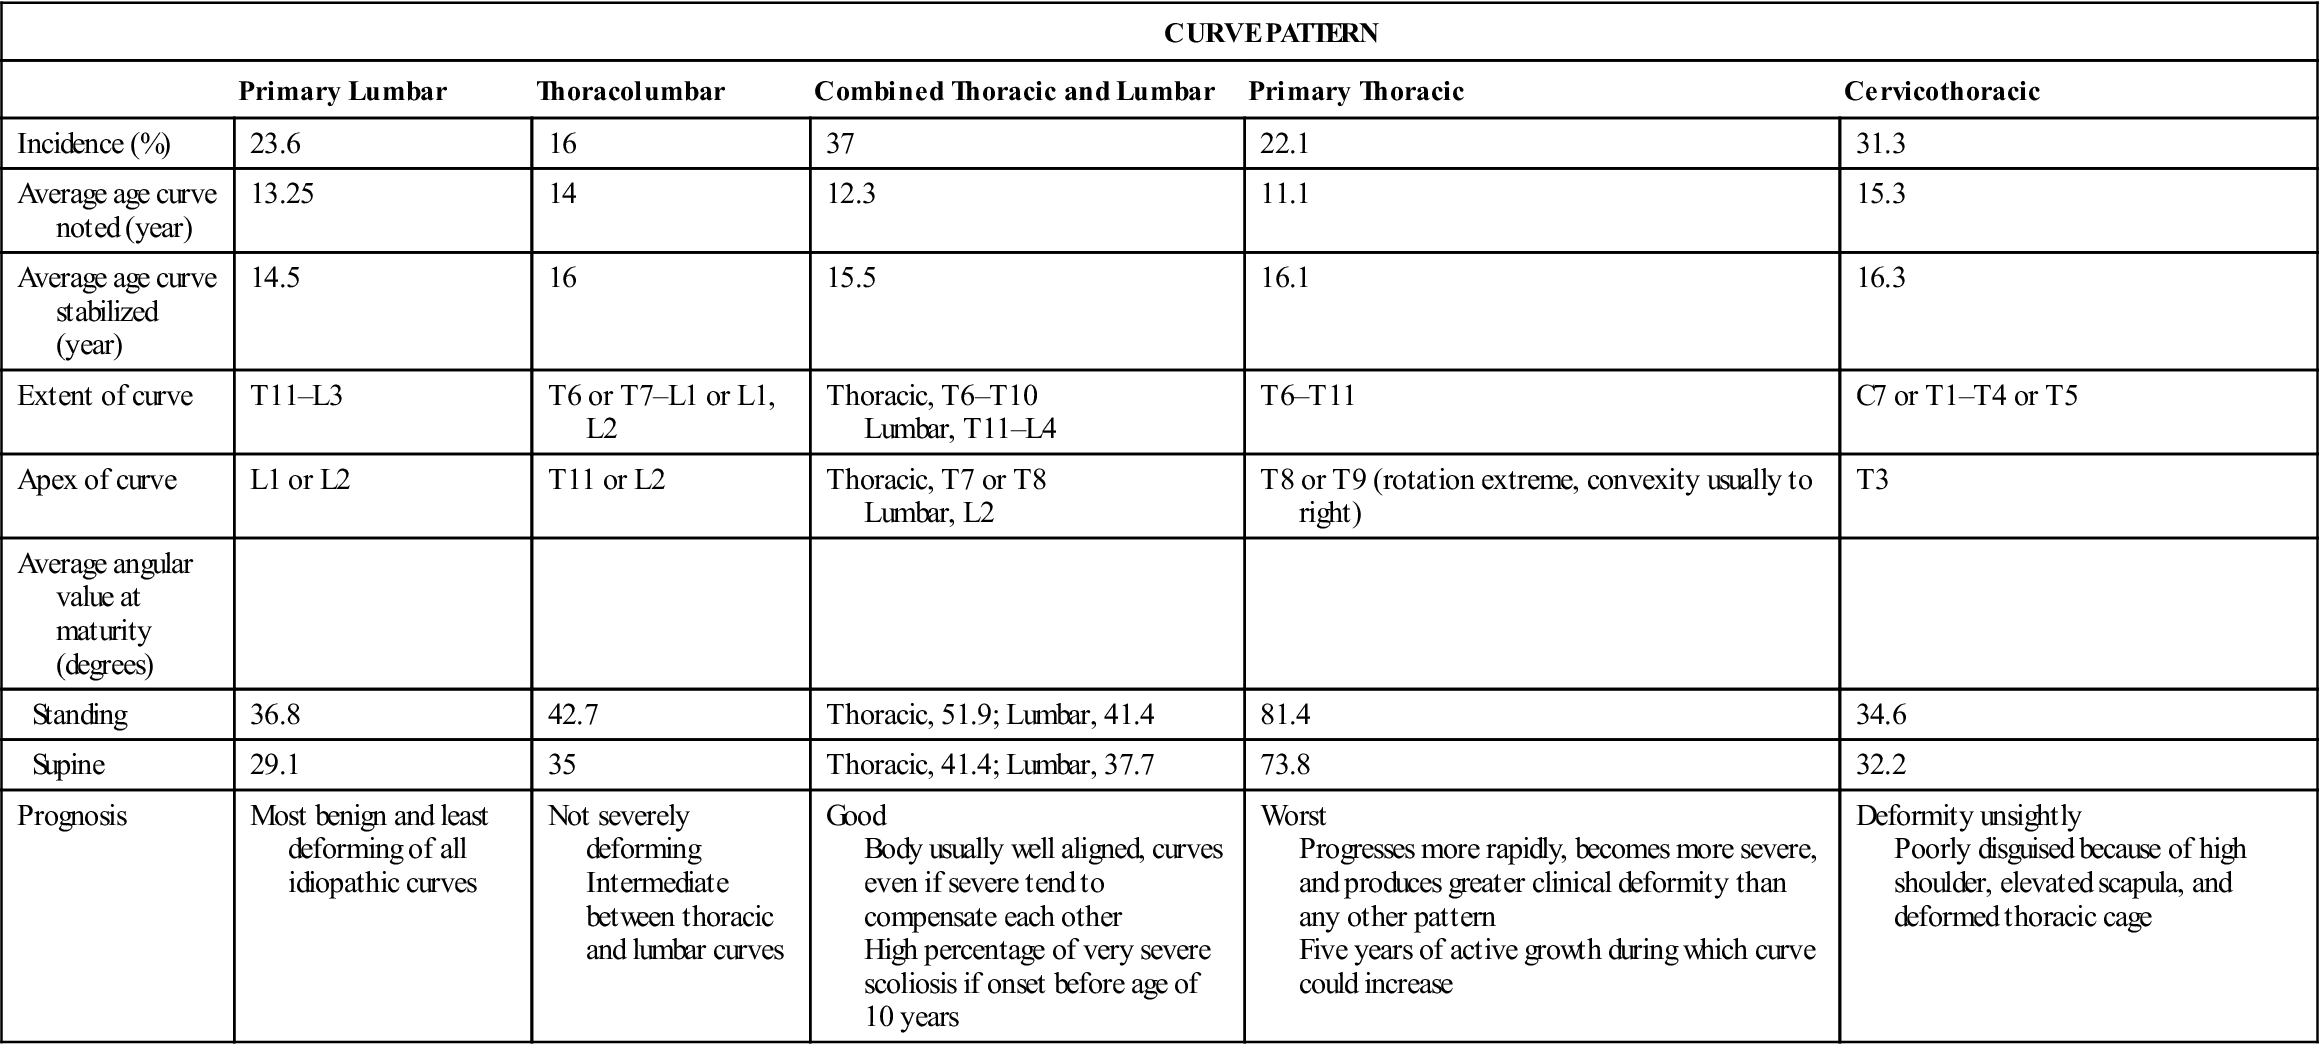
Adapted from Ponseti IV, Friedman B: Prognosis in idiopathic scoliosis. J Bone Joint Surg Am 32:382, 1950.
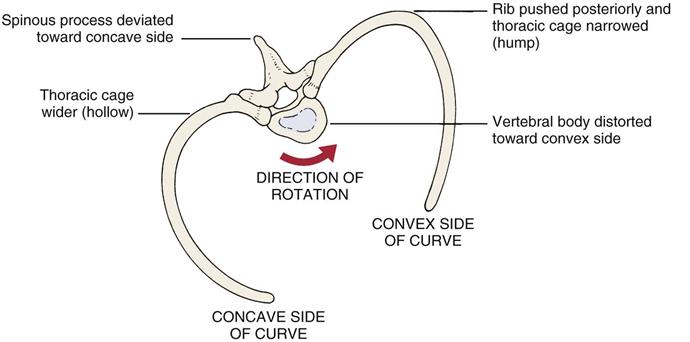
With a structural scoliosis, the vertebral bodies rotate to the convexity of the curve and become distorted.12 If the thoracic spine is involved, this rotation causes the ribs on the convex side of the curve to push posteriorly, causing a rib “hump” and narrowing the thoracic cage on the convex side. As the vertebral body rotates to the convex side of the curve, the spinous process deviates toward the concave side. The ribs on the concave side move anteriorly, causing a “hollow” and a widening of the thoracic cage on the concave side (Figure 8-14). Lateral deviation may be more evident if the examiner uses a plumb bob (plumbline) from the C7 spinous process or external occipital protuberance (Figure 8-15).
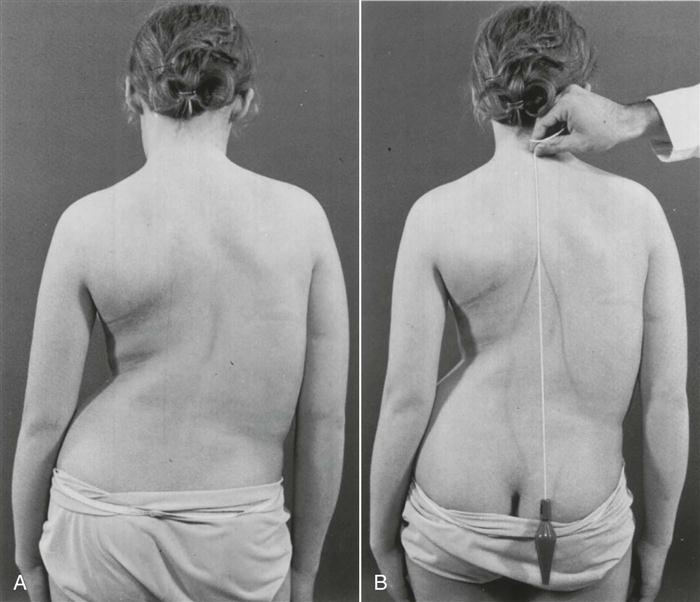
A, The left shoulder is lower, and the right scapula is more prominent. Note the decreased distance between the right arm and the thorax with the shift of the thorax to the right. The left iliac crest appears higher, but this results from the shift of the thorax with fullness on the right and elimination of the waistline; the “high” hip is only apparent, not real. B, Plumbline dropped from the prominent vertebra of C7 (vertebra prominens) measures the decompensation of the thorax over the pelvis. The distance from the vertical plumbline to the gluteal cleft is measured in centimeters and is recorded along with the direction of deviation. If there is a cervical or cervicothoracic curve, the plumb should fall from the occipital protuberance (inion). (From Moe JH, Winter RB, Bradford DS, et al: Scoliosis and other spinal deformities, Philadelphia, 1978, WB Saunders, p. 14.)
The examiner should note whether the ribs are symmetric and whether the rib contours are normal and equal on the two sides. In idiopathic scoliosis, the rib contours are not normal, and there is asymmetry of the ribs. Muscle spasm resulting from injury may also be evident. The bony and soft-tissue contours should be observed for equality on both sides or for any noticeable difference.
The examiner should note whether the patient sits up properly with the normal spinal curves present (Figure 8-16, A); whether the tip of the ear, tip of the acromion process, and high point of the iliac crest are in a straight line as they should be; and whether the patient sits in a slumped position (i.e., sag sitting, as in Figure 8-16, B).
The skin should be observed for any abnormality or scars (Figure 8-17). If there are scars, are they a result of surgery or trauma? Are they new or old scars? If from surgery, what was the purpose of the surgery?
Breathing
As part of the observation, the examiner should note the patient’s breathing pattern. Children tend to breathe abdominally, whereas women tend to do upper thoracic breathing. Men tend to be upper and lower thoracic breathers. In the aged, breathing tends to be in the lower thoracic and abdominal regions (Figure 8-18). The examiner should note the quality of the respiratory movements as well as the rate, rhythm, and effort required to inhale and exhale. The examiner should also note whether the patient is using the primary muscles of respiration and/or the accessory muscles of respiration, because this will help indicate the ease of the patient’s breathing (Table 8-4). In addition, the presence of any coughing or noisy or abnormal breathing patterns should be noted. Because the chest wall movement that occurs during breathing displaces the pleural surfaces, thoracic muscles, nerve, and ribs, pain is accentuated by breathing and coughing if any one of these structures is injured.
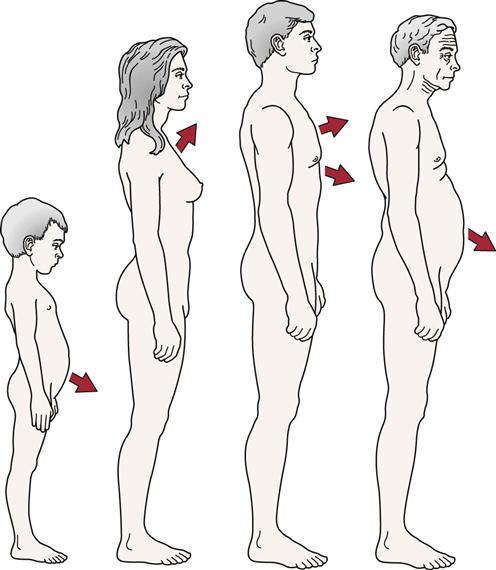
TABLE 8-4
| Primary | Secondary | |
| Inspiration | Diaphragm Levator costorum External intercostals Internal intercostals (anterior) |
Scaleni Sternocleidomastoid Trapezius Serratus anterior and posterior Pectoralis major Pectoralis minor Subclavius |
| Both | Latissimus dorsi | |
| Expiration | Internal obliques External obliques Rectus abdominus Transverse abdominus Transversus thoracis Transverse intercostals Internal intercostals (posterior) |
Serratus posterior inferior Quadratus lumborum Iliocostalis lumborum |
Chest Deformities
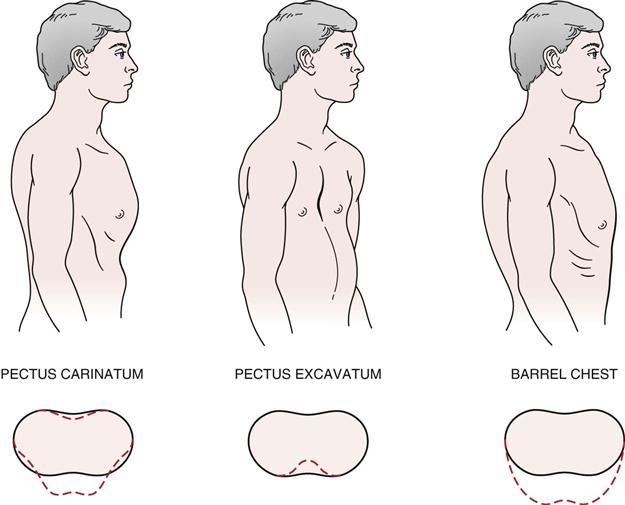
In addition to rib movements during breathing, the examiner should note the presence of any chest deformities. The more common deformities are shown in Figure 8-19 and are listed below:
2. The funnel chest (pectus excavatum) is a congenital deformity that results from the sternum’s being pushed posteriorly by an overgrowth of the ribs.13 The anteroposterior dimension of the chest is decreased, and the heart may be displaced. On inspiration, this deformity causes a depression of the sternum that affects respiration and may result in kyphosis.
Examination
Although the assessment is primarily of the thorax and thoracic spine, if the history, observation, or examination indicates symptoms into or from the neck, upper limb, or lumbar spine and lower limb, these structures must be examined as well using an upper or lower scanning examination. If any signs or symptoms are elicited in the scanning exam, more detailed examination of the cervical or lumbar spine may be performed. Therefore, the examination of the thoracic spine may be an extensive one. Unless there is a history of specific trauma or injury to the thoracic spine or ribs, the examiner must be prepared to assess more than that area alone. If a problem is suspected above the thoracic spine, the scanning examination of the cervical spine and upper limb (as described in Chapter 3) should be performed. If a problem is suspected below the thoracic spine, the scanning examination of the lumbar spine and lower limb (as described in Chapter 9) should be performed. Only examination of the thoracic spine is described here.
Active Movements
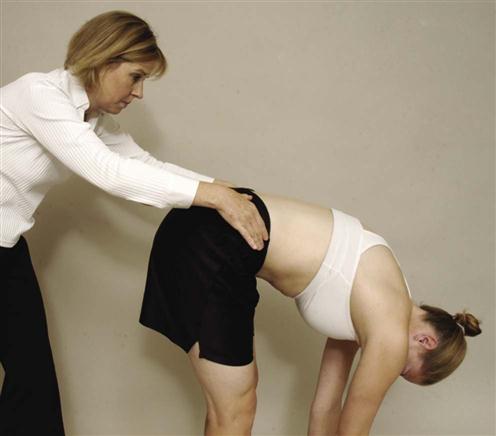
The active movements of the thoracic spine are usually done with the patient standing. Movement in the thoracic spine is limited by the rib cage and the long spinous processes of the thoracic spine. When assessing the thoracic spine, the examiner should be sure to note whether the movement occurs in the spine or in the hips. A patient can touch the toes with a completely rigid spine if there is sufficient range of motion (ROM) in the hip joints. Likewise, tight hamstrings may alter the results. The movements may be done with the patient sitting, in which case the effect of hip movement is eliminated or decreased. Similarly, shoulder motion may be restricted if the upper thoracic segments or ribs are hypomobile.14 As with any examination, the most painful movements are done last. The active movements to be carried out in the thoracic spine are shown in Figure 8-20.
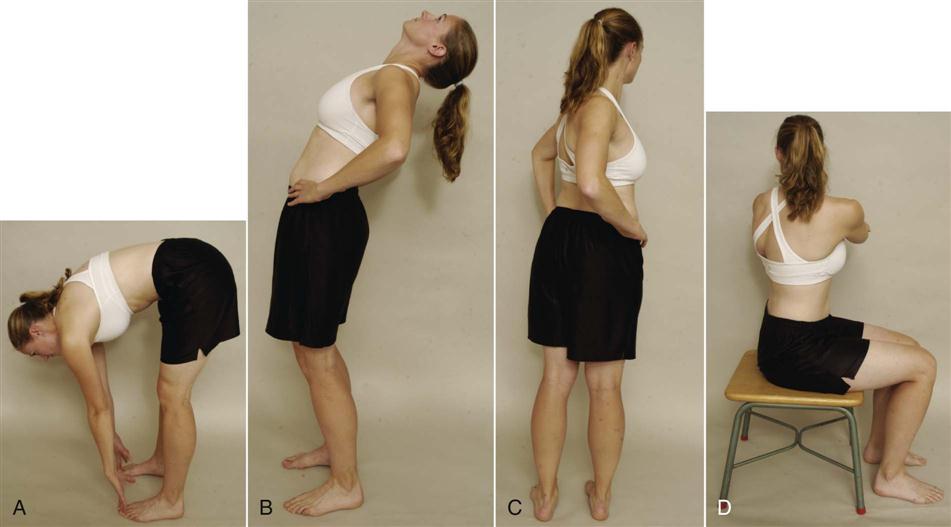
 Figure 8-20 Active movements.
A, Forward flexion. B, Extension. C, Rotation (standing). D, Rotation (sitting).
Forward Flexion
The normal ROM of forward flexion (forward bending) in the thoracic spine is 20° to 45° (Figure 8-21). Because the ROM at each vertebra is difficult to measure, the examiner can use a tape measure to derive an indication of overall movement (Figure 8-22). The examiner first measures the length of the spine from the C7 spinous process to the T12 spinous process with the patient in the normal standing posture. The patient is then asked to bend forward and the spine is again measured. A 2.7-cm (1.1-inch) difference in tape measure length is considered normal.
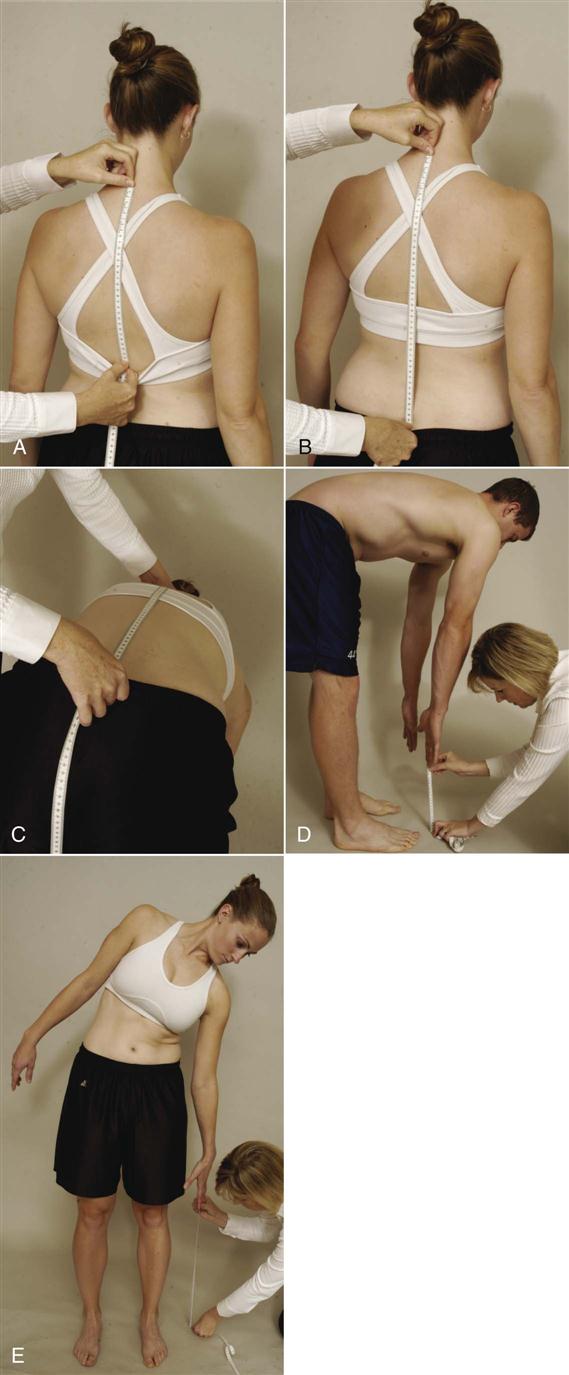
A, Positioning of tape measure for determining flexion and extension in the thoracic spine. B, Positioning of tape measure for determining flexion or extension in the thoracic and lumbar spines combined. C, Forward flexion measurement of thoracic and lumbar spines. D, Forward flexion measurement of thoracic and lumbar spines and hips (fingertips to floor). E, Side flexion measurement (fingertips to floor).
If the examiner wishes, the spine may be measured from the C7 to S1 spinous process with the patient in the normal standing position. The patient is then asked to bend forward, and the spine is again measured. A 10-cm (4-inch) difference in tape measure length is considered normal. In this case, the examiner is measuring movement in the lumbar spine as well as in the thoracic spine; most movement, approximately 7.5 cm (3 inches), occurs between T12 and S1.
A third method of measuring spinal flexion is to ask the patient to bend forward and try to touch the toes while keeping the knees straight. The examiner then measures from the fingertips to the floor and records the distance. The examiner must keep in mind that with this method, in addition to the thoracic spine movement, the movement may also occur in the lumbar spine and hips; in fact, movement could occur totally in the hips.
Each of these methods is indirect. To measure the ROM at each vertebral segment, a series of radiographs would be necessary. The examiner can decide which method to use. It is of primary importance, however, to note on the patient’s chart how the measuring was done and which reference points were used.
While the patient is flexed forward, the examiner can observe the spine from the “skyline” view (Figure 8-23). With nonstructural scoliosis, the scoliotic curve disappears on forward flexion; with structural scoliosis, it remains. With the skyline view, the examiner is looking for a hump on one side (convex side of curve) and a hollow (concave side of curve) on the other. This “hump and hollow” sequence is caused by vertebral rotation in idiopathic scoliosis, which pushes the ribs and muscles out on one side and causes the paravertebral valley on the opposite side. The vertebral rotation is most evident in the flexed position.
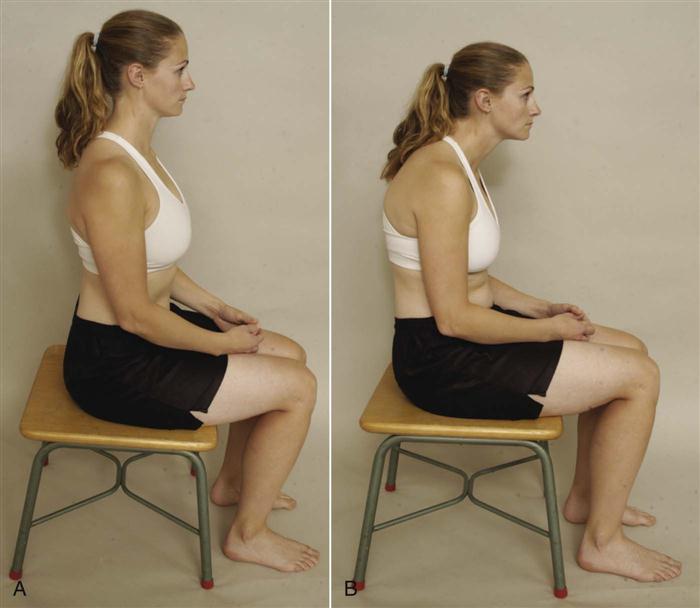
When the patient flexes forward, the thoracic spine should curve forward in a smooth, even manner with no rotation or side flexion (Figure 8-24). The examiner should look for any apparent tightness or sharp angulation, such as a gibbus, when the movement is performed. If the patient has an excessive kyphosis to begin with, very little forward flexion movement occurs in the thoracic spine. McKenzie7 advocates doing flexion while sitting to decrease pelvic and hip movements. The patient then slouches forward flexing the thoracic spine. The patient can put the hands around the neck to apply overpressure at the end of flexion. If symptoms arise from forward flexion on the spine with the neck flexed by the hands, the examiner should repeat the movement with the neck slightly extended and the hands removed. This will help differentiate between cervical and thoracic pain.
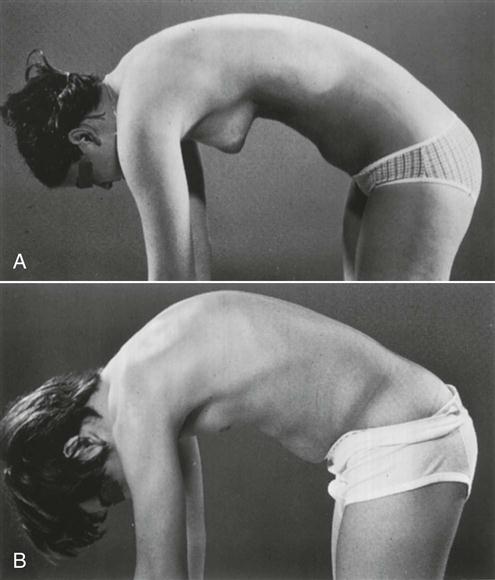
A, Normal thoracic roundness is demonstrated with a gentle curve to the whole spine. B, An area of increased bending is seen in the thoracic spine, indicating structural changes—Scheuermann disease, in this example. (From Moe JH, Winter RB, Bradford DS, et al: Scoliosis and other spinal deformities, Philadelphia, 1978, WB Saunders, p. 18.)
Extension
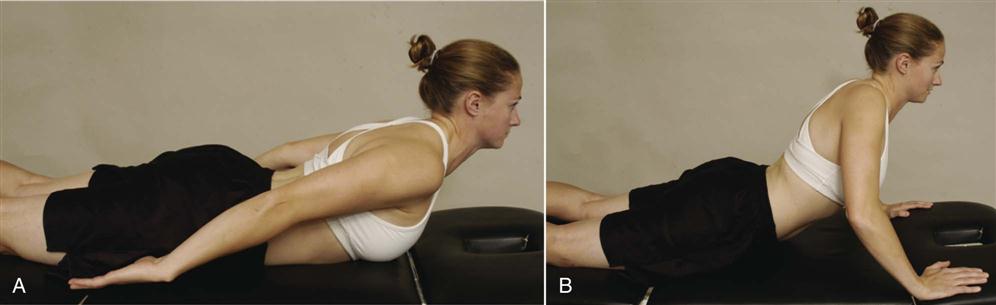
Extension (backward bending) in the thoracic spine is normally 25° to 45°. Because this movement occurs over twelve vertebrae, the movement between the individual vertebrae is difficult to detect visually. As with flexion, the examiner can use a tape measure and obtain the distance between the same two points (the C7 and T12 spinous processes). Again, a 2.5-cm (1-inch) difference in tape measure length between standing and extension is considered normal. McKenzie7 advocates having the patient place the hands in the small of the back to add stability while performing the backward movement or to do extension while sitting or prone lying (sphinx position).
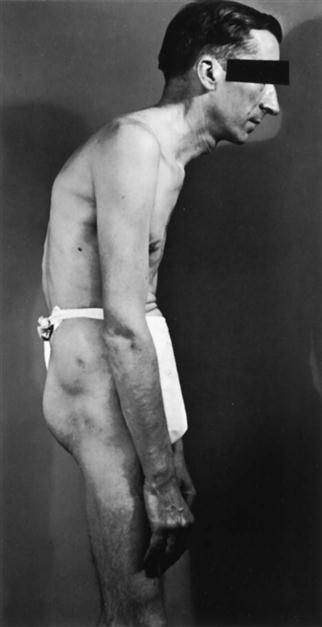
As the patient extends, the thoracic curve should curve backward or at least straighten in a smooth, even manner with no rotation or side flexion. Lee15 advocates asking the patient to fully forward flex the arms during extension to facilitate extension. The examiner should look for any apparent tightness or angulation when the movement is performed. If the patient shows excessive kyphosis (Figure 8-25), the kyphotic curvature remains on extension; that is, the thoracic spine remains flexed, whether the movement is tested while the patient is standing or lying prone (see Figure 8-25).
A, On physical examination, definite increases in thoracic kyphosis and lumbar lordosis are visualized. B, Thoracic kyphosis does not fully correct on thoracic extension. C, Lumbar lordosis, on the other hand, usually corrects on forward bending; in this case, some lordosis remains. (From Moe JH, Winter RB, Bradford DS, et al: Scoliosis and other spinal deformities, Philadelphia, 1978, WB Saunders, p. 339.)
If extension is tested in prone lying, the normal thoracic kyphosis should, for the most part, disappear. If there is a structural kyphosis, the kyphotic curve will remain on extension. McKenzie7 advocates doing prone extension by using a modified push up straightening the arms and allowing the spine to “sag down” toward the bed (Figure 8-26).
Side Flexion
Side (lateral) flexion is approximately 20° to 40° to the right and left in the thoracic spine. The patient is asked to run the hand down the side of the leg as far as possible without bending forward or backward. The examiner can then estimate the angle of side flexion or use a tape measure to determine the length from the fingertips to the floor and compare it with that of the other side (see Figure 8-22, E). Normally, the distances should be equal. In either case, the examiner must remember that movement in the lumbar spine as well as in the thoracic spine is being measured. As the patient bends sideways, the spine should curve sideways in a smooth, even, sequential manner. The examiner should look for any tightness or abnormal angulation, which may indicate hypomobility or hypermobility at a specific segment when the movement is performed. If, on side flexion, the ipsilateral paraspinal muscles tighten or their contracture is evident (Forestier’s bowstring sign), ankylosing spondylitis or pathology causing muscle spasm should be considered.16
Rotation
Rotation in the thoracic spine is approximately 35° to 50°. The patient is asked to cross the arms in front or place the hands on opposite shoulders and then rotate to the right and left while the examiner looks at the amount of rotation, comparing both ways. Again, the examiner must remember that movement in the lumbar spine and hips as well as in the thoracic spine is occurring. To eliminate or decrease the amount of the hip movement, rotation may be done in sitting.
If the history indicated that repetitive motion, sustained postures, or combined movements caused aggravation of symptoms, then these movements should also be tested, but only after the original movements of flexion, extension, side flexion, and rotation have been completed. Combined movements that may be tested in the thoracic spine include forward flexion and side bending, backward bending and side flexion, and lateral bending with flexion and lateral bending with extension. Any restriction of motion, excessive movement (hypermobility) or curve abnormality should be noted. These movements would be similar to the H and I test described in the lumbar spine (see Chapter 9).
Costovertebral Expansion
Costovertebral joint movement is usually determined by measuring chest expansion (Figure 8-27). The examiner places the tape measure around the chest at the level of the fourth intercostal space. The patient is asked to exhale as much as possible, and the examiner takes a measurement. The patient is then asked to inhale as much as possible and hold the breath while the second measurement is taken. The normal difference between inspiration and expiration is 3 to 7.5 cm (1 to 3 inches).
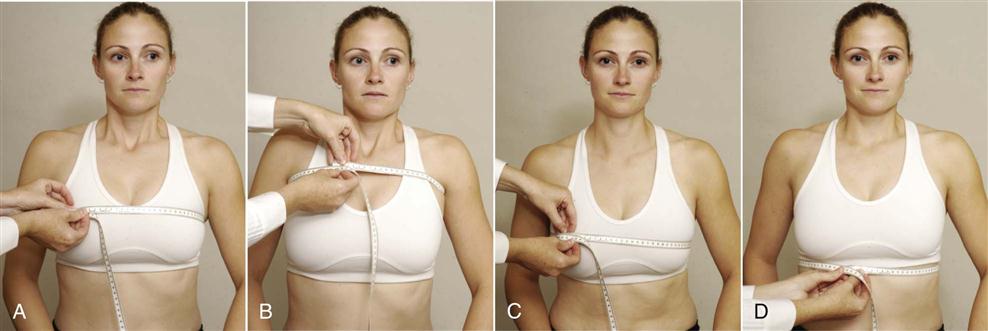
 Figure 8-27 Measuring chest expansion.
A, Fourth lateral intercostal space. B, Axilla. C, Nipple line. D, Tenth rib.
A second method of measuring chest expansion is to measure at three different levels. If this method is used, the examiner must take care to ensure that the levels of measurement are noted for consistency. The levels are (1) under the axillae for apical expansion, (2) at the nipple line or xiphisternal junction for midthoracic expansion, and (3) at the T10 rib level for lower thoracic expansion. As before, the measurements are taken after expiration and inspiration.
After the measurement of chest expansion, it is worthwhile for the patient to take a deep breath and cough so that the examiner can determine whether this action causes or alters any pain. If it does, the examiner may suspect a respiratory-related problem or a problem increasing intrathecal pressure in the spine.
Evjenth and Gloeck17 have noted a way to differentiate thoracic spine and rib pain during movement. If the patient has pain on flexion, the patient is returned to neutral and is asked to take a deep breath and hold it. While holding the breath, the patient flexes until pain is felt. At this point, the patient stops flexing and exhales. If further flexion can be accomplished after exhaling, the problem is more likely to be the ribs than the thoracic spine. Extension can be tested in a similar fashion.
Rib Motion
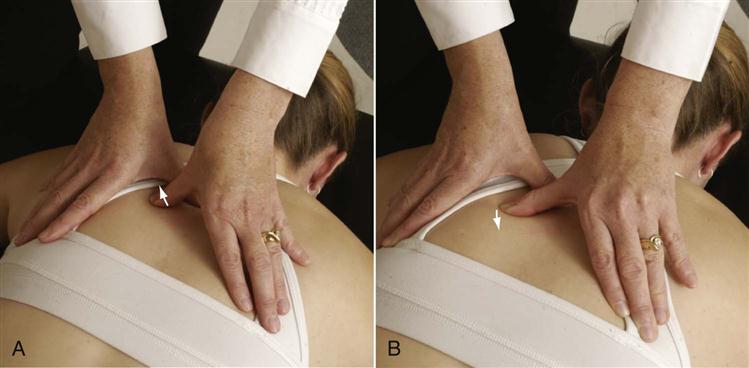
The patient is asked to lie supine. The examiner’s hands are placed in a relaxed fashion over the upper chest. In this position, the examiner is feeling anteroposterior movement of the ribs (Figure 8-28). As the patient inhales and exhales, the examiner should compare both sides to see whether the movement is equal. Any restriction or difference in motion should be noted. If a rib stops moving relative to the other ribs on inhalation, it is classified as a depressed rib. If a rib stops moving relative to the other ribs on exhalation, it is classified as an elevated rib. It must be remembered that restriction of one rib affects the adjacent ribs. If a depressed rib is implicated, it is usually the highest restricted rib that causes the greatest problem. If an elevated rib is present, it is usually the lowest restricted rib that causes the greatest problem although for both depressed and elevated rib the opposite may be true.3,18 Rib springing or the presence of pain on stressing the rib joints will help to confirm the level that is hypomobile. The examiner then moves his or her hands down the patient’s chest, testing the movement in the middle and lower ribs in a similar fashion.

 Figure 8-28
To test lateral movement of the ribs, the examiner’s hands are placed around the sides of the rib cage approximately 45° to the vertical axis of the patient’s body. The examiner begins at the level of the axilla and works down the lateral aspect of the ribs, feeling the movement of the ribs during inspiration and expiration and noting any restriction.
Rib dysfunctions may be divided into structural, torsional, and respiratory (Table 8-5).19 Structural rib dysfunctions are due to joint subluxation or dislocation. Torsional rib dysfunctions are due to thoracic vertebra dysfunction as a result of hypomobility or hypermobility. Respiratory rib dysfunctions are due to either hypomobility between the ribs (e.g., intercostal shortening) or hypomobility at the costotransverse or costovertebral joints.19
TABLE 8-5
| STRUCTURAL RIB DYSFUNCTION | ||||
| Dysfunction | Rib Angle | Midaxillary Line | Intercostal Space | Anterior Rib |
| Anterior subluxation | Less prominent | Symmetric | Tender, often with intercostal neuralgia | More prominent |
| Posterior subluxation | More prominent | Symmetric | Tender, often with intercostal neuralgia | Less prominent |
| Superior first rib subluxation | Superior aspect of first rib elevated (5 mm) | Hypertonicity of the scalene muscles on the same side | — | Marked tenderness of the superior aspect |
| Anterior-posterior rib compression | Less prominent | Prominent | Tender, often with intercostal neuralgia | Less prominent |
| Lateral compression | More prominent | Less prominent | Tender | More prominent |
| Laterally elevated | Tender | Prominent | Narrow above, wide below | Exquisitely tender at pectoral minor |
| TORSIONAL RIB DYSFUNCTION | |||
| Dysfunction | Rib Angle | Midaxillary Line | Intercostal Space |
| External rib torsion | Superior border prominent and tender | Symmetric | Wide above, narrow below |
| Internal rib torsion | Inferior border prominent and tender | Symmetric | Narrow above, wide below |
| RESPIRATORY RIB FUNCTION | ||
| Dysfunction | Rib Angle | Key Rib |
| Inhalation restriction | During inspiration the rib or group of ribs that cease rising | Top or superior rib |
| Exhalation restriction | During exhalation the rib or group of ribs that stop falling | Bottom or inferior rib |
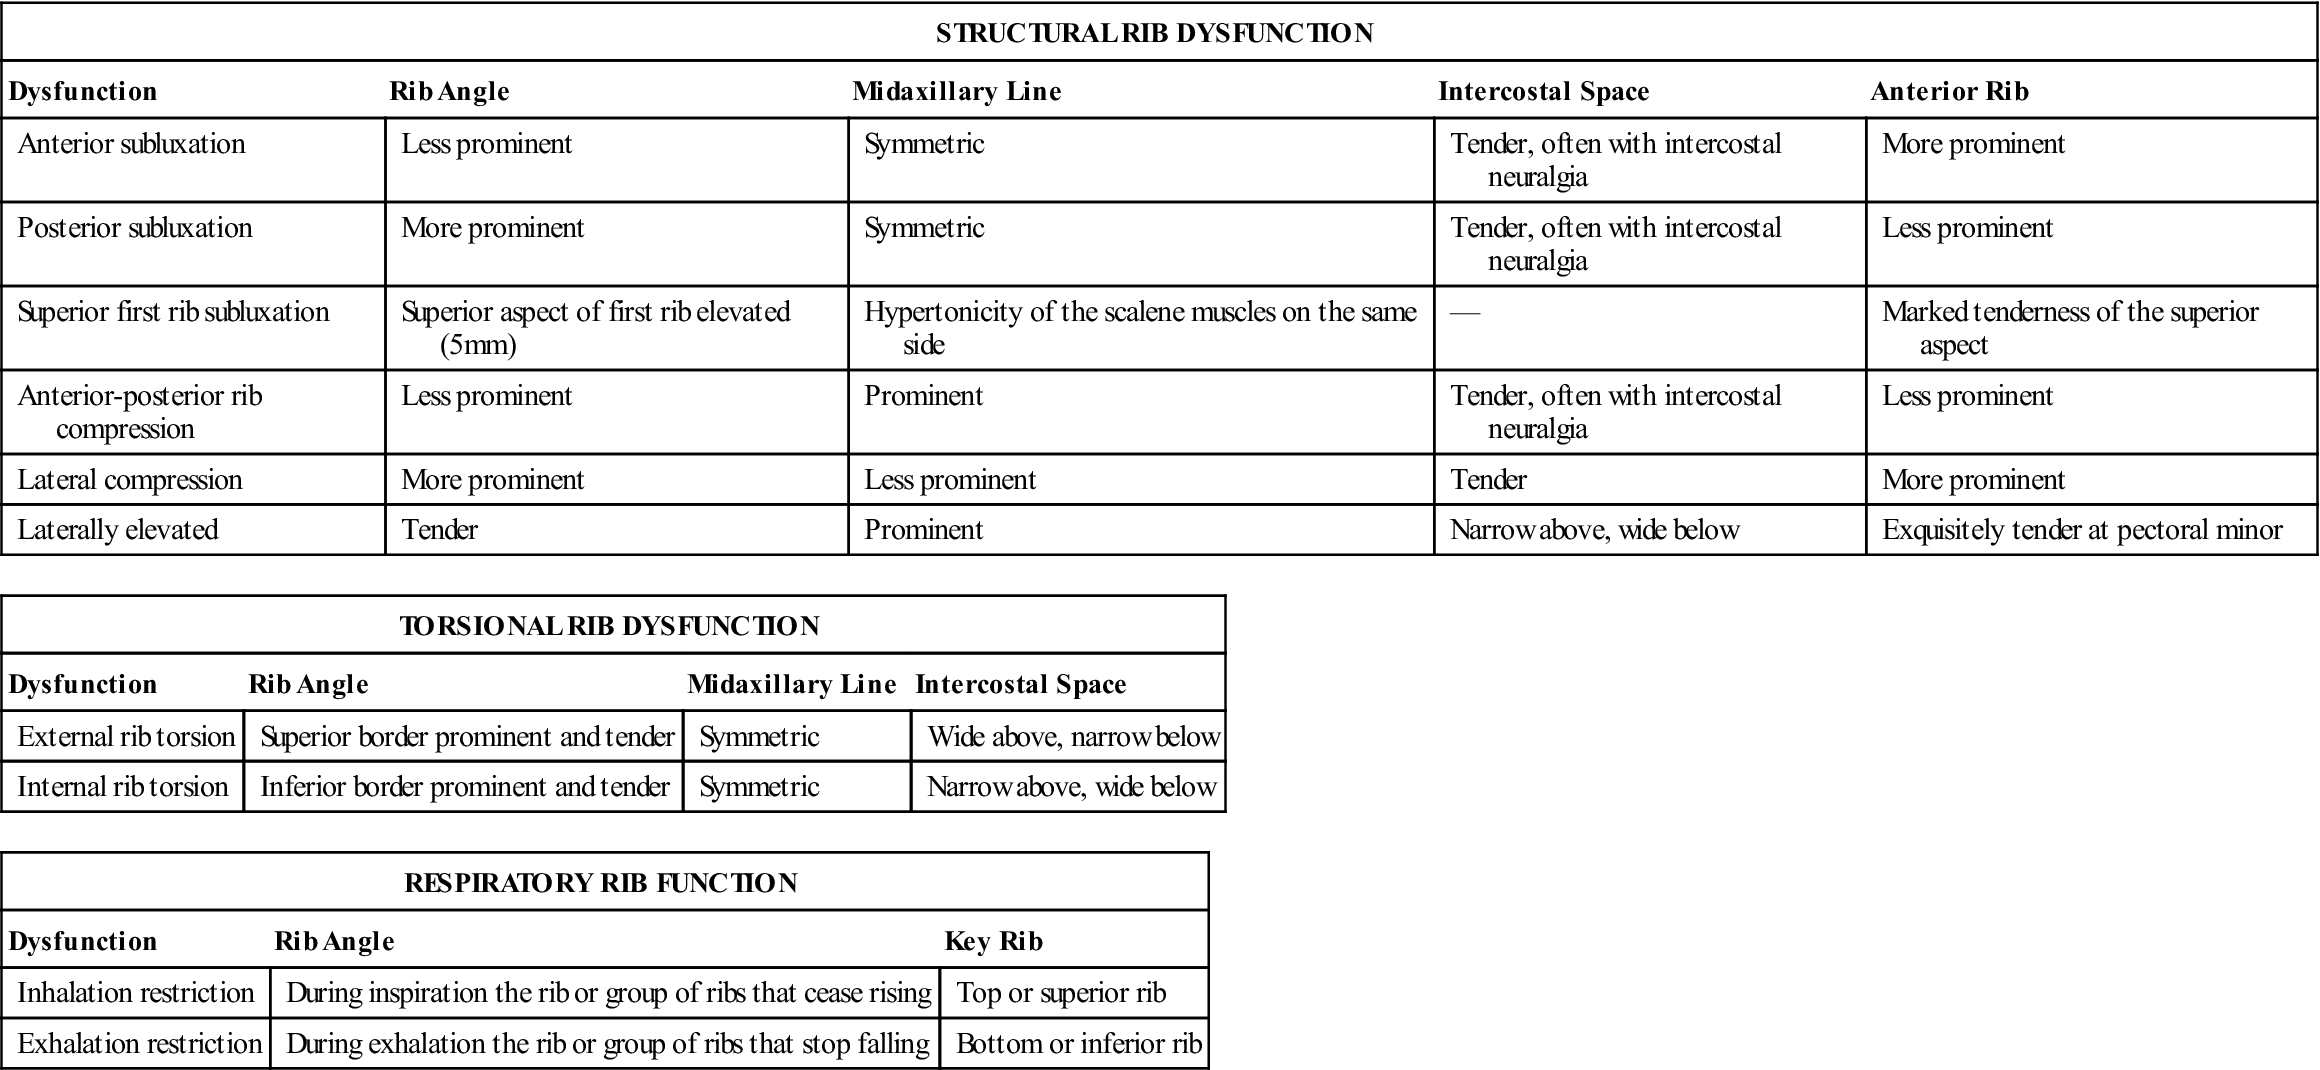
Modified from Bookhout MR: Evaluation of the thoracic spine and rib cage. In Flynn TW, editor: The thoracic spine and rib cage, Boston, 1996, Butterworth-Heinemann, pp. 163, 165, 166.
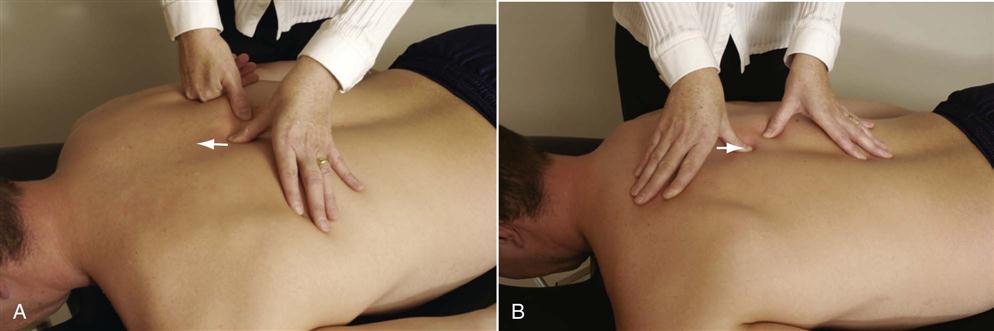
To test the movement of the ribs relative to the thoracic spine, the patient is placed in a sitting position. The examiner places one thumb or finger on the transverse process and the thumb of the other hand just lateral to the tubercle of the rib. The patient is asked to forward flex the head (for the upper thoracic spine) and thorax (for lower thoracic spine) while the examiner feels the movement of the rib (Figure 8-29). Normally, the rib rotates anteriorly and the rib tubercle stays at the same level as the transverse process on the forward movement. If the rib is hypermobile, the rib elevates relative to the transverse process. If the rib is hypomobile, its motion stops before the thoracic spine.15 Extension may also be tested in a similar fashion, but the rib rotates posteriorly.
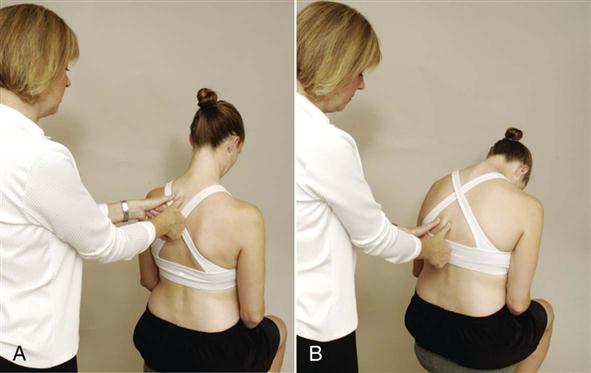
 Figure 8-29
Passive Movements
Because passive movements in the thoracic spine are difficult to perform in a gross fashion, the movement between each pair of vertebrae may be assessed. With the patient sitting, the examiner places one hand on the patient’s forehead or on top of the head (Figure 8-30). With the other hand, the examiner palpates over and between the spinous processes of the lower cervical and upper thoracic spines (C5–T3) and feels for movement between the spinous processes while flexing (move apart) and extending (move together) the patient’s head. Rotation (one side moves forward, the other moves back) and side flexion (one side moves apart, one side moves together) may be tested by rotating and side flexing the patient’s head. To test the movement properly, the examiner places the middle finger over the spinous process of the vertebra being tested and the index and ring fingers on each side of it, between the spinous processes of the two adjacent vertebrae. The examiner should feel the movement occurring, assess its quality, and note whether the movement is hypomobile or hypermobile relative to the adjacent vertebrae. The hypomobility or hypermobility may be indicative of pathology.18
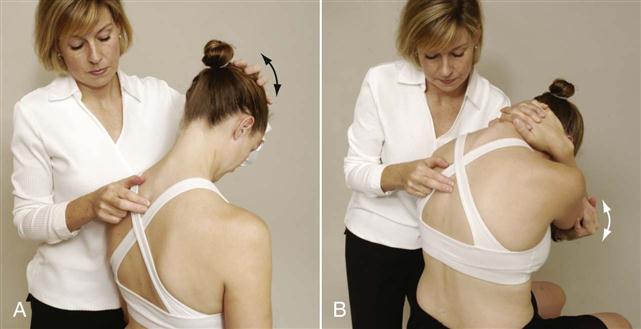
 Figure 8-30 Passive flexion/extension movement of the thoracic spine.
A, Upper thoracic spine. B, Middle and lower thoracic spine.
If, when the spinous processes are palpated, one process appears to be out of alignment, the examiner can then palpate the transverse processes on each side and compare them with the levels above and below to determine whether the vertebrae is truly rotated or side flexed. For example, if the spinous process of T5 is shifted to the right and if rotation has occurred at that level, the left transverse process would be more superficial posteriorly, whereas the right one would appear deeper. If the spinous process rotation was an anomaly, the transverse processes would be equal as would the ribs. Passive or active movement of the spine while palpating the transverse processes also helps to indicate abnormal movement when comparing both sides or when comparing one level to another. If the alignment is normal to begin with and becomes abnormal with movement, or if it is abnormal to begin with and becomes normal with movement, it indicates a functional asymmetry rather than a structural one. Generally, a structural asymmetry would be evident if it remains through all movements.19
To test the movement of the vertebrae between T3 and T11, the patient sits with the fingers clasped behind the neck and the elbows together in front. The examiner places one hand and arm around the patient’s elbows while palpating over and between the spinous processes, as previously described. The examiner then flexes and extends the spine by lifting and lowering the patient’s elbows.
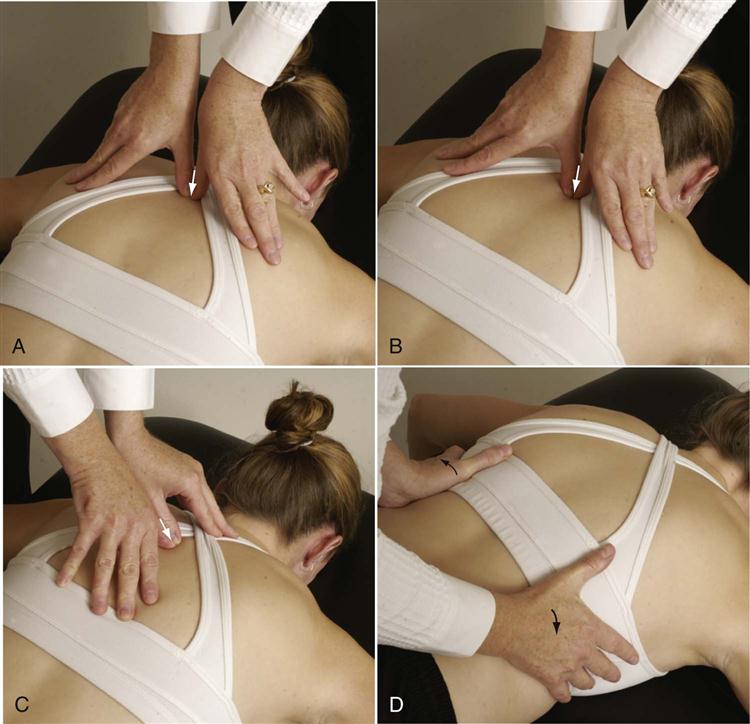
Side flexion and rotation of the trunk may be performed in a similar fashion to test these movements. The patient sits with the hands clasped behind the head. The examiner uses the thumb on one side of the spinous process and/or the index finger and/or the middle finger on the other side to palpate just lateral to the interspinous space. For side flexion, the examiner moves the patient into right side flexion and then left side flexion and by palpation compares the amount and quality of right and left movement including adjacent segments (Figure 8-31, A). For rotation, the examiner rotates the patient’s shoulders to the right or left, comparing by palpation the amount and quality of movement of each segment as well as that of adjacent segments (Figure 8-31, B).18
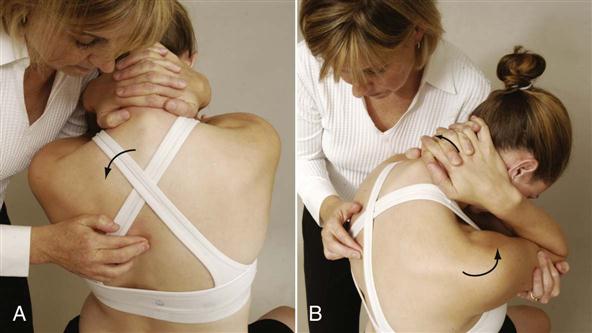
 Figure 8-31
Resisted Isometric Movements
Resisted isometric movements are performed with the patient in the sitting position. The examiner places one leg behind the patient’s buttocks and the upper limbs around the patient’s chest and back (Figure 8-32). The examiner then instructs the patient, “Don’t let me move you,” and isometrically tests the movements, noting any alteration in strength and occurrence of pain.
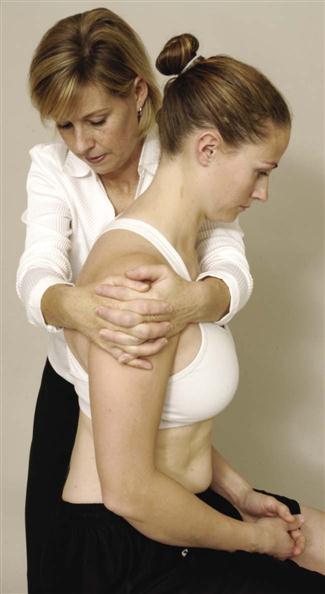
The thoracic spine should be tested in a neutral position, and the most painful movements are done last. Table 8-6 lists the muscles of the thoracic spine, their actions, and their innervations. It must be remembered that the resisted isometric testing of the spine is in reality a very gross test, and subtle alterations in strength are almost impossible to detect. However, if the muscles being tested have been strained (1° or 2°), contraction of the muscle commonly produces pain. In some cases, however, the spine and thorax may have to be repositioned to isolate a particular muscle.
TABLE 8-6
| Action | Muscles Acting | Nerve Root Derivation |
| Flexion of thoracic spine | 1. Rectus abdominis | T6–T12 |
| 2. External abdominal oblique (both sides acting together) | T7–T12 | |
| 3. Internal abdominal oblique (both sides acting together) | T7–T12, L1 | |
| Extension of thoracic spine | 1. Spinalis thoracis | T1–T12 |
| 2. Iliocostalis thoracis (both sides acting together) | T1–T12 | |
| 3. Longissimus thoracis (both sides acting together) | T1–T12 | |
| 4. Semispinalis thoracis (both sides acting together) | T1–T12 | |
| 5. Multifidus (both sides acting together) | T1–T12 | |
| 6. Rotatores (both sides acting together) | T1–T12 | |
| 7. Interspinalis | T1–T12 | |
| Rotation and side flexion of thoracic spine | 1. Iliocostalis thoracis (to same side) | T1–T12 |
| 2. Longissimus thoracis (to same side) | T1–T12 | |
| 3. Intertransverse (to same side) | T1–T12 | |
| 4. Internal abdominal oblique (to same side) | T7–T12, L1 | |
| 5. Semispinalis thoracis (to opposite side) | T1–T12 | |
| 6. Multifidus (to opposite side) | T1–T12 | |
| 7. Rotatores (to opposite side) | T1–T12 | |
| 8. External abdominal oblique (to opposite side) | T7–T12 | |
| 9. Transverse abdominis (to opposite side) | T7–T12, L1 | |
| Elevation of ribs | 1. Scalenus anterior (first rib) | C4–C6 |
| 2. Scalenus medius (first rib) | C3–C8 | |
| 3. Scalenus posterior (second rib) | C6–C8 | |
| 4. Serratus posterior superior (second to fifth ribs) | 2 to 5 intercostal | |
| 5. Iliocostalis cervicis (first to sixth rib) | C6–C8 | |
| 6. Levatores costarum (all ribs) | T1–T12 | |
| 7. Pectoralis major (if arm fixed) | Lateral pectoral (C6, C7) Medial pectoral (C7, C8, T1) |
|
| 8. Serratus anterior (lower ribs if scapula fixed) | Long thoracic (C5–C7) | |
| 9. Pectoralis minor (second to fifth ribs if scapula fixed) | Lateral pectoral (C6, C7) Medial pectoral (C7, C8) |
|
| 10. Sternocleidomastoid (if head fixed) | Accessory C2, C3 | |
| Depression of ribs | 1. Serratus posterior inferior (lower four ribs) | T9–T12 |
| 2. Iliocostalis lumborum (lower six ribs) | L1–L3 | |
| 3. Longissimus thoracis | T1–T12 | |
| 4. Rectus abdominis | T6–T12 | |
| 5. External abdominal oblique (lower five to six ribs) | T7–T12 | |
| 6. Internal abdominal oblique (lower five to six ribs) | T7–T12, L1 | |
| 7. Transverse abdominal (all acting to depress lower ribs) | T7–T12, L1 | |
| 8. Quadratus lumborum (twelfth rib) | T12, L1–L4 | |
| 9. Transverse thoracis | T1–T12 | |
| Approximation of ribs | 1. Iliocostalis thoracis | T1–T12 |
| 2. Intercostals (internal and external) | 1 to 11 intercostal | |
| 3. Diaphragm | Phrenic | |
| Inspiration | 1. External intercostals | 1 to 11 intercostal |
| 2. Transverse thoracis (sternocostalis) | 1 to 11 intercostal | |
| 3. Diaphragm | Phrenic | |
| 4. Sternocleidomastoid | Accessory C2, C3 | |
| 5. Scalenus anterior | C4–C6 | |
| 6. Scalenus medius | C3–C8 | |
| 7. Scalenus posterior | C6–C8 | |
| 8. Pectoralis major | Lateral pectoral (C5, C6) Medial pectoral (C7, C8, T1) |
|
| 9. Pectoralis minor | Lateral pectoral (C6, C7) Medial pectoral (C7, C8) |
|
| 10. Serratus anterior | Long thoracic (C5–C7) | |
| 11. Latissimus dorsi | Thoracodorsal (C6–C8) | |
| 12. Serratus posterior superior | 2 to 5 intercostal | |
| 13. Iliocostalis thoracis | T1–T12 | |
| Expiration | 1. Internal intercostals | 1 to 11 intercostal |
| 2. Rectus abdominis | T6–T12 | |
| 3. External abdominal oblique | T7–T12 | |
| 4. Internal abdominal oblique | T7–T12, L1 | |
| 5. Iliocostalis lumborum | L1–L3 | |
| 6. Longissimus | T1–L3 | |
| 7. Serratus posterior inferior | T9–T12 | |
| 8. Quadratus lumborum | T12, L1–L4 |
Functional Assessment
When doing specific activities, the thoracic spine primarily plays a stabilization role. Therefore, activities involving the cervical spine, lumbar spine, and shoulder may be impaired as a result of thoracic lesions. Functional activities involving these three areas should be reviewed or considered if functional impairment appears to be related to the thoracic spine or ribs. Activities such as lifting, rotating the thorax, doing heavy work, any activity requiring stabilization of the thorax, or any activity increasing cardiopulmonary output are most likely to provoke thoracic symptoms.
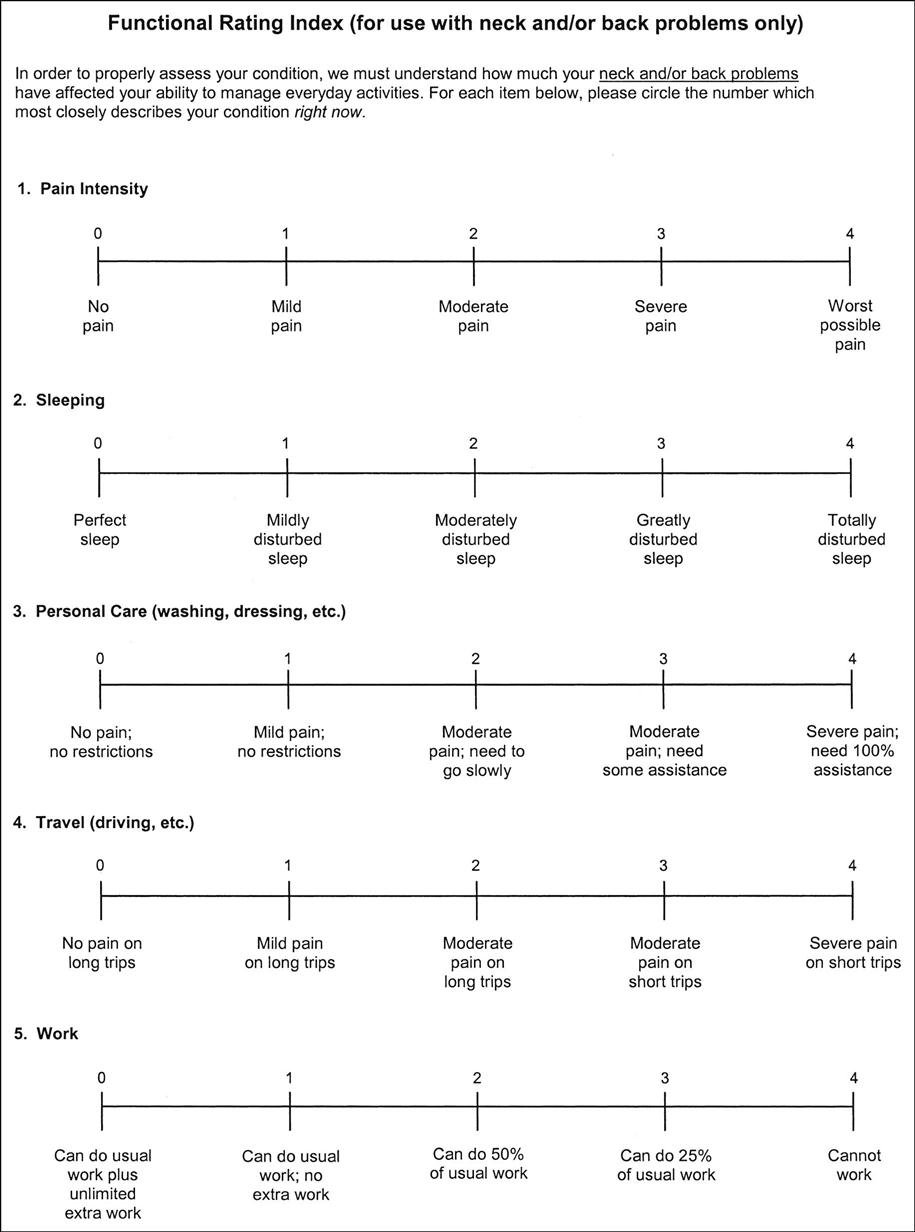
Functional disability scales, such as the Oswestry Disability Questionnaire20 (see Chapter 9), although designed for the lumbar spine, could be used to test functional capacity in the thoracic spine as well.20–22 The Oswestry Disability Questionnaire is better suited for persistent severe disability.21 The Functional Rating Index (Figure 8-33) has been designed to show clinical change in conditions affecting the spine, whether cervical, thoracic, or lumbar.23
Special Tests
For the reader who would like to review them, the reliability, validity, specificity, sensitivity, and odds ratios of some of the special tests used in the thoracic spine are available in Appendix 8-1 on the Evolve website.
APPENDIX 8-1

k, Kappa; r, rate; SF, short form.
Key Tests Performed on the Thoracic Spine Depending on Suspected Pathology*24,25
 Slump test
 Upper limb neurodynamic (tension) tests (ULNT)
 Adson’s test
 Costoclavicular maneuver
 Hyperabduction (EAST) test
 Roos test
 First rib mobility
 Rib springing
 Prone arm lift (PAL) test
 Sitting arm lift (SAL) test
Tests for Neurological Involvement
If the examiner suspects a problem with movement of the spinal cord, any of the neurodynamic tests that stretch the cord may be performed. These include the straight leg raising test and the Kernig sign (see Chapter 9). Either neck flexion from above or straight leg raising from below stretches the spinal cord within the thoracic spine. The following tests should be performed only if the examiner believes they are relevant.
 First Thoracic Nerve Root Stretch.
The patient abducts the arm to 90° and flexes the pronated forearm to 90°. No symptoms should appear in this position. The patient then fully flexes the elbow, putting the hand behind the neck. This action stretches the ulnar nerve and T1 nerve root. Pain into the scapular area or arm is indicative of a positive test for T1 nerve root.26
If the patient has upper limb symptoms that have become evident at the same time as thoracic symptoms, upper limb tension tests should also be considered to rule out referral of neurological symptoms from the thoracic spine.27
 Passive Scapular Approximation.
The patient lies prone while the examiner passively approximates the scapulae by lifting the shoulders up and back. Pain in the scapular area may be indicative of a T1 or T2 nerve root problem on the side on which the pain is being experienced.26
 Slump Test (Sitting Dural Stretch Test).
The patient sits on the examining table and is asked to “slump” so that the spine flexes and the shoulders sag forward while the examiner holds the chin and head erect. The patient is asked if any symptoms are produced. If no symptoms are produced, the examiner flexes the patient’s neck and holds the head down and shoulders slumped to see if symptoms are produced. If no symptoms are produced, the examiner passively extends one of the patient’s knees to see if symptoms are produced. If no symptoms are produced, the examiner then passively dorsiflexes the foot of the same leg to see if symptoms are produced (Figure 8-34). The process is repeated with the other leg. Symptoms of sciatic pain or reproduction of the patient’s symptoms indicates a positive test, implicating impingement of the dura and spinal cord or nerve roots.28 Butler29 suggested that when testing the thoracic spine while the patient is in the slump position that trunk rotation left and right should be added. He felt this maneuver increased the stress on the intercostal nerves. The pain is usually produced at the site of the lesion in a positive test.
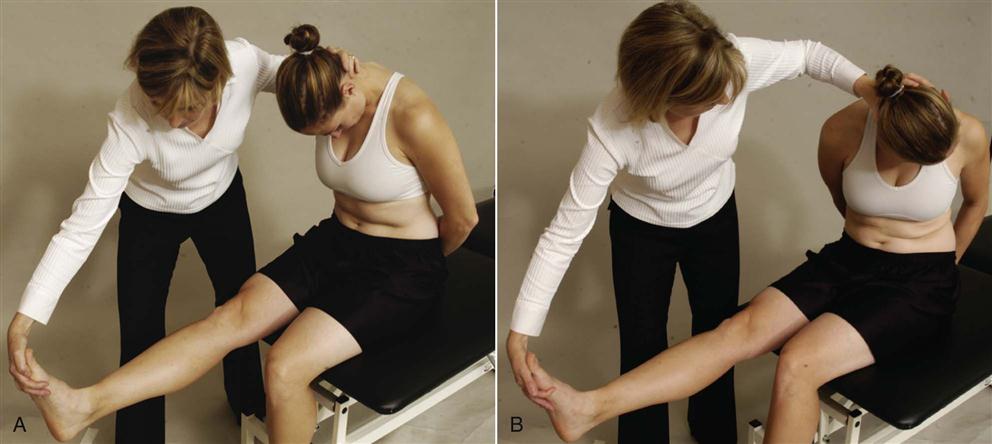
 Figure 8-34
 Upper Limb Neurodynamic (Tension) Test.
See Chapter 3 for a description of the upper limb neurodynamic (tension) test (ULNT4).
Tests for Thoracic Outlet Syndrome
There are several special tests that the examiner may consider if thoracic outlet syndrome is suspected. As all of the tests have questionable statistical value in terms of their reliability, the examiner should listen to the patient and use the test that best replicates the position or positions in which the patient has symptoms.
 Adson Maneuver.
See Chapter 5 for a description of the test.
 Costoclavicular Syndrome (Military Brace) Test.
See Chapter 5 for a description of the test.
 Cyriax Release Test.
The patient is sitting with elbows flexed. The examiner stands behind the patient and grasps under the patient’s forearms while the patient’s forearms, wrists, and hands are in neutral (Figure 8-35). The examiner then leans the patient’s trunk backwards about 15o and lifts the patient’s shoulder girdle to end range holding the position for 3 minutes. The production of symptoms or the disappearance of neurological signs (release phenomenon) indicates a positive test.

 Halstead Maneuver.
See Chapter 5 for a description of the test.
 Roos Test (Elevated Arm Stress Test).
See Chapter 5 for a description of the test. The Roos test may also be used to test the arterial portion of thoracic outlet syndrome (testing the radial artery) by positioning the patient in the same position but while looking for neurological signs, the radial pulse is also taken. If the pulse decreases when the patient is in the test position (called the hyperabduction test or elevated arm stress test [EAST] ), it is considered a positive test for thoracic outlet syndrome.
 Wright Test or Maneuver.
See Chapter 5 for a description of the test.
Tests for Rib Mobility
See Chapter 3.
Tests for Failed Load Transfer (Kinetic Chain Instability or Loss of Movement Control)
These tests have been designed to demonstrate the transfer of load through the thoracic spine as part of the kinetic chain. The tests identify the site within the thorax where there are load transfer problems and where in the thoracic area stabilization does not occur during movement.
 Prone Arm Lift Test.30
The prone arm lift (PAL) test is a modification of the sitting arm lift (SAL) test. It assesses the ability of the arm to take a load in a higher angle of shoulder flexion. This test is especially useful in people who do overhead activities or who complain of problems when they try to lift heavy loads or try to move the arm too quickly. The patient lies prone with the arms overhead at approximately 140° of flexion and fully supported on the bed. The patient is then asked to lift one arm 2 cm and then lower it. This is repeated with the other side. If one arm is heavier than the other, it is considered the positive side. The examiner can then proceed to do an assessment like the second part of the SAL test, palpating the ribs for abnormal translation, watching the movement of the scapula for scapular dyskinesia, ensuring that the head of the humerus remains centralized in the glenoid, and palpating the cervical spine for abnormal translation.
 Sitting Arm Lift Test.30
The patient sits on the bed with the hands resting on the thighs. The examiner asks the patient to lift one arm (the unaffected side first) into elevation through shoulder flexion with the arm straight and the thumb up. The patient then does the same movement with the opposite side. The examiner asks the patient whether one arm feels heavier to lift than the other. The examiner notes whether any symptoms are produced and which arm requires more effort to lift. If one arm is heavier and requires more effort to lift, the first part of the test is considered positive. The patient is then asked to repeat the movement several times while the examiner palpates the ribs individually by placing the thumb on the spinous process and index finger along the rib, noting whether there is any translation of the rib, especially in the first 90° of movement. Normally, when the patient lifts the arm, the muscles of the thorax are activated, stabilizing the thoracic spine so that there is no translation. A positive test for the second part of the test would be indicated by one or more of the thoracic rings (i.e., ribs or vertebrae) translating along any axis or rotating in any plane during the test. The examiner should note the level and direction of the loss of control. Normally what is seen is loss of rotational control with concurrent lateral translation either to the same side as the arm lift or to the contralateral side. This loss of control is usually seen between 0° and 90° of forward flexion.
The SAL test may also be used to demonstrate stability in the scapula, glenohumeral joint, and cervical spine. For the scapula, the examiner should watch the movement of the scapula to determine if there is any scapular dyskinesia indicating a loss of control. For the glenohumeral joint, the head of the humerus should remain centered in the glenoid fossa throughout the full forward flexion into elevation movement. To test the cervical spine, the examiner palpates the lateral aspect of the articular pillars of the cervical spine vertebra bilaterally while the patient does the movement. If there is translation of one vertebra relative to another when the patient does the SAL test, it indicates a lack of control of that individual segment.
Reflexes and Cutaneous Distribution
Within the thoracic spine, there is a great deal of overlap of the dermatomes (Figure 8-36). The dermatomes tend to follow the ribs, and the absence of only one dermatome may lead to no loss of sensation. Pain may be referred to the thoracic spine from various abdominal organs (Figure 8-37; Table 8-7). Although there are no reflexes to test in conjunction with the thoracic spine, the examiner would be wise to test the lumbar reflexes—the patellar reflex (L3–L4), the medial hamstrings reflex (L5–S1), and the Achilles reflex (S1–S2)—because pathology in the thoracic spine can affect these reflexes.
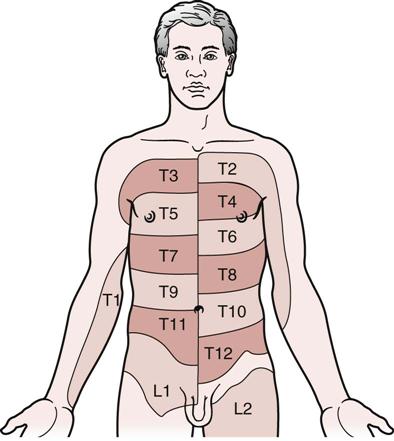
By comparing both sides, the degree of overlapping and the area of exclusive supply of any individual nerve root may be estimated. (Adapted from Williams P, Warwick R, editors: Gray’s anatomy, ed 37 British, Edinburgh, 1989, Churchill Livingstone, p. 1150.)
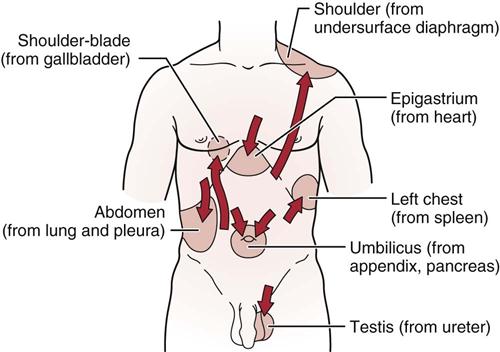
TABLE 8-7
Differences in Pain Perception
| Structure | Effective Stimulus* | Conscious Pain Perception |
| Skin | Discrete touch, prick, heat, cold | Precisely localized, superficial, burning, sharp |
| Chest wall (muscles, ribs, ligaments, parietal pleura) | Movement, deep pressure | Intermediate in localization and depth; aching, sharp, or dull |
| Thoracic viscera | Ischemia, distension, muscle spasm | Vague, diffuse, deep, aching, usually dull |
*The effectiveness of a stimuli is heightened by the presence of inflammation.
From Levene D.: Chest pain: an integrated diagnostic approach, Philadelphia, 1977, Lea & Febiger.
Thoracic nerve root symptoms tend to follow the course of the ribs and may be referred as follows31:
• T10 to T11: Pain in epigastric area
• T7 to T8: Pain in epigastric area
Muscles of the thoracic spine may also refer pain into adjacent areas (Table 8-8).
TABLE 8-8
Thoracic Muscles and Referral of Pain
| Muscles | Referral Pattern |
| Levator scapulae | Neck shoulder angle to posterior shoulder and along medial edge of scapula |
| Latissimus dorsi | Inferior angle of scapula to posterior shoulder; iliac crest |
| Rhomboids | Medial border of scapula |
| Trapezius | Upper thoracic spine to medial border of scapula |
| Serratus anterior | Lateral chest wall to lower medial border of scapula |
| Serratus posterior | Medial border of arm to medial two fingers |
| Serratus superior | Scapular area to posterior and anterior arm down to little finger |
| Multifidus | Adjacent to spinal column |
| Iliocostalis | Spinal column to line along medial border of scapula |
Joint Play Movements
The joint play movements performed on the thoracic spine are specific ones that were developed by Maitland.31 They are sometimes called passive accessory intervertebral movements (PAIVMs). When testing joint play movements, the examiner should note any decreased ROM, muscle spasm, pain, or difference in end feel. The normal end feel is tissue stretch.
For the vertebral movements, the patient lies prone. The examiner palpates the thoracic spinous processes, starting at C6 and working down to L1 or L2. The occurrence of muscle spasm and/or pain on application of the vertebral pressure gives the examiner an indication of where the pathology may lie. The examiner must take care, however, because the pain and/or muscle spasm at one level may be the result of compensation for a lesion at another level. For example, if one level is hypomobile as a result of trauma, another level may become hypermobile to compensate for the decreased movement at the traumatized level. It is probable that both the hypomobile and the hypermobile segments will cause pain and/or muscle spasm. It is then important to determine which joint complex is hypomobile and which is hypermobile, because the treatment for each is different.
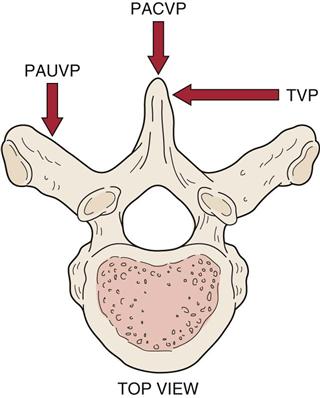
Posteroanterior Central Vertebral Pressure
The examiner’s hands, fingers, and thumbs are positioned as in Figure 8-38, A. The examiner then applies pressure to the spinous process through the thumbs, pushing the vertebra forward. Care must be taken to apply pressure slowly and with careful control, so that the movement, which is minimal, can be felt. This springing test may be repeated several times to determine the quality of the movement. The load applied to the spinous process is primarily taken up by the thoracic spine, although part of it is taken up by the rib cage.32 Each spinous process is done in turn, starting at C6 and working down to L1 or L2. When doing this test, the examiner must keep in mind that the thoracic spinous processes are not always at the level of the same vertebral body. For example, the spinous processes of T1, T2, T3, and T12 are at the same levels as the T1, T2, T3, and T12 vertebral bodies, but the spinous processes of T7, T8, T9, and T10 are at the same levels as the T8, T9, T10, and T11 vertebral bodies, respectively.
Posteroanterior Unilateral Vertebral Pressure
The examiner’s fingers are moved laterally away from the tip of the spinous process so that the thumbs rest on the appropriate lamina or transverse process of the thoracic vertebra (see Figure 8-38, B; Figure 8-39). The same anterior springing pressure is applied as in the PACVP technique. Again, each vertebra is done in turn. The two sides should be examined and compared. It must be remembered that in the thoracic area, the spinous process is not necessarily at the same level as the transverse process on the same vertebra. For example, the T9 spinous process is at the level of the T10 transverse process. Therefore, it is necessary to move the fingers up and out from the tip of the T9 spinous process to the T9 transverse process, which is at the level of the T8 spinous process. This difference does not hold true for the entire thoracic spine. It is also important to realize that a posteroanterior unilateral vertebral pressure (PAUVP) applies a rotary force to the vertebra; it therefore places a greater stress at the costotransverse joints, because the ribs are also stressed where they attach to the vertebrae. A PAUVP applied to the right transverse process causes the vertebral body to rotate to the left.
Transverse Vertebral Pressure
The examiner’s fingers are placed along the side of the spinous process, as shown in Figures 8-38, C and 8-39. The examiner then applies a transverse springing pressure to the side of the spinous process, feeling for the quality of movement. As before, each vertebra is assessed in turn, starting at C6 and working down to L1 or L2. Pressure should be applied to both sides of the spinous process to compare the movement. This technique also applies a rotary force to the vertebra, but in the opposite direction to that caused by the PAUVP. A transverse vertebral pressure (TVP) applied to the right side of the spinous process causes the spinous process to rotate to the left and the vertebral body to rotate to the right.
The individual apophyseal joints may also be tested (Figure 8-40). The patient is placed in a prone lying position with the thoracic spine in neutral. To test the superior glide at the apophyseal joint (i.e., to test the ability of the inferior articular process of the superior vertebra [e.g., T6] to glide superiorly on the superior articular process of the inferior vertebra [e.g., T7]), the examiner stabilizes the transverse process of the inferior vertebra (e.g., T7) with one thumb while the other thumb glides the inferior articular process of the superior vertebra (e.g., T6) superoanteriorly, noting the end feel and quality of the motion (see Figure 8-40, A).15
To test the inferior glide at the apophyseal joint (i.e., to test the ability of the inferior articular process of the superior vertebra [e.g., T6] to glide inferiorly on the superior articular process of the inferior vertebra [e.g., T7]), the examiner stabilizes the transverse process of the inferior vertebra (e.g., T7) with one thumb while the other thumb glides the inferior articular process of the superior vertebra (e.g., T6) inferiorly, noting the end feel and quality of the movement (see Figure 8-40, B).15
To test the costotransverse joints, the patient is placed in a prone lying position with the spine in neutral. The examiner stabilizes the thoracic vertebra by placing one thumb along or against the side of the transverse process. The other thumb is placed over the posterior and/or superior aspect of the rib just lateral to the tubercle. Some examiners may find it easier to cross thumbs. An anterior or inferior glide is applied to the rib, causing an anterior or inferior movement (Figure 8-41).
Rib Springing
The patient lies prone or on the side while the examiner’s hands are placed around the posterolateral aspect of the rib cage (see Figure 8-38, D). The examiner’s hands are approximately 45° to the vertical axis of the patient’s body. The examination begins at the top of the rib cage and extends inferiorly, springing the ribs by pushing in with the hands on each side in turn and then quickly releasing. The amount and quality of movement occurring on both sides should be noted. If one rib appears hypomobile or hypermobile in relation to the others being tested, it or all the ribs can be tested individually by compressing them individually anteriorly and/or posteriorly.
See Chapter 3 for first rib mobility.
Palpation
As with any palpation technique, the examiner is looking for tenderness, muscle spasm, temperature alteration, swelling, or other signs that may indicate disease. Palpation should begin on the anterior chest wall, move around the lateral chest wall, and finish with the posterior structures (Figure 8-42). Palpation is usually done with the patient sitting, although it may be done by combining the supine and prone lying positions. At the same time, the thorax may be divided into sections (Figure 8-43) to give some idea, in charting, where the pathology may lie.
Anterior Aspect
Sternum.
In the midline of the chest, the manubrium sternum, body of the sternum, and xiphoid process should be palpated for any abnormality or tenderness.
Ribs and Costal Cartilage.
Adjacent to the sternum, the examiner should palpate the sternocostal and costochondral articulations, noting any swelling, tenderness, or abnormality. These “articulations” are sometimes sprained or subluxed, or a costochondritis (e.g., Tietze syndrome) may be evident. The ribs should be palpated as they extend around the chest wall with any potential pathology or crepitations (e.g., subcutaneous emphysema) noted.
Clavicle.
The clavicle should be palpated along its length for abnormal bumps (e.g., fracture, callus) or tenderness.
Abdomen.
The abdomen should be palpated for tenderness or other signs indicating pathology. The palpation is done in a systematic fashion, using the fingers of one hand to feel the tissues while the other hand is used to apply pressure. Palpation is carried out to a depth of 1 to 3 cm (0.5 to 1.5 inches) to reveal areas of tenderness and abnormal masses. Palpation is usually carried out using the four quadrant or the nine-region system (Figure 8-44).
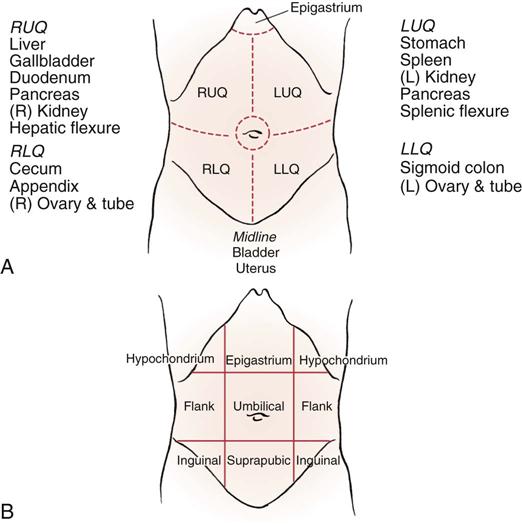
A, Four-quadrant system. RUQ, Right upper quadrant; RLQ, right lower quadrant; LUQ, left upper quadrant; LLQ, left lower quadrant. B, Nine-regions system. (From Judge RD, Zuidema GD, Fitzgerald FT: Clinical diagnosis: a physiologic approach, Boston, 1982, Little Brown, p. 284.)
Posterior Aspect
Scapula.
The medial, lateral, and superior borders of the scapula should be palpated for any swelling or tenderness. The scapula normally extends from the spinous process of T2 to that of T7–T9. After the borders of the scapula have been palpated, the examiner palpates the posterior surface of the scapula. Structures palpated are the supraspinatus and infraspinatus muscles and the spine of the scapula.
Spinous Processes of the Thoracic Spine.
In the midline, the examiner may posteriorly palpate the thoracic spinous processes for abnormality. The examiner then moves laterally approximately 2 to 3 cm (0.8 to 1.2 inches) to palpate the thoracic facet joints. Because of the overlying muscles, it is usually very difficult to palpate these joints, although the examiner may be able to palpate for muscle spasm and tenderness. Muscle spasm may also be elicited if some internal structures are injured. For example, pathology affecting the following structures can cause muscle spasm in the surrounding area: gallbladder (spasm on the right side in the area of the eighth and ninth costal cartilages), spleen (spasm at the level of ribs 9 through 11 on the left side), and kidneys (spasm at the level of ribs 11 and 12 on both sides at the level of the L3 vertebra). Evidence of positive findings with no comparable history of musculoskeletal origin could lead the examiner to believe the problem was not of a musculoskeletal origin.
Diagnostic Imaging
Plain Film Radiography
Common X-Ray Views of the Thoracic Spine
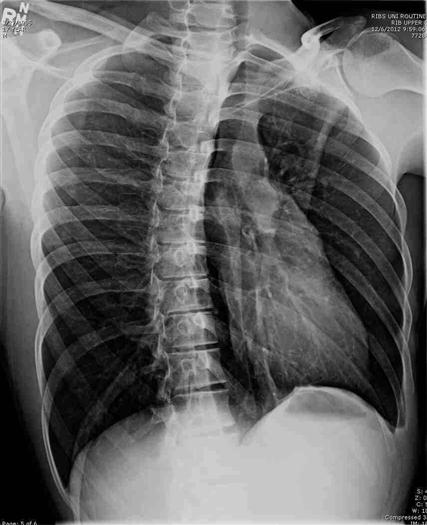
• Anteroposterior view (routine) (Figure 8-46)
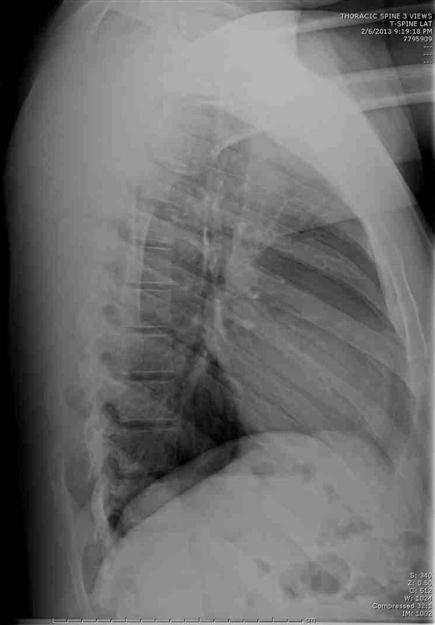
• Lateral view (include ribs and sternum) (routine) (Figure 8-49)
A, Left midlumbar and right lumbosacral hemivertebrae in a 3-year-old child (example of hemimetameric shift). B, A first cousin also demonstrates a midlumbar hemivertebra as well as asymmetric development of the upper sacrum. C, This girl has a semisegmented hemivertebra (arrow) in the midlumbar spine with a mild 12° curve. D, Her identical twin sister showed no congenital anomalies of the spine. (From Moe JH, Winter RB, Bradford DS, et al: Scoliosis and other spinal deformities, Philadelphia, 1978, WB Saunders, p. 134.)
Note the bony encasement of vertebral bodies on the lateral view (A) and the bamboo effect on the anteroposterior view (B). (From Gartland JJ: Fundamentals of orthopedics, Philadelphia, 1979, WB Saunders, p. 147.)
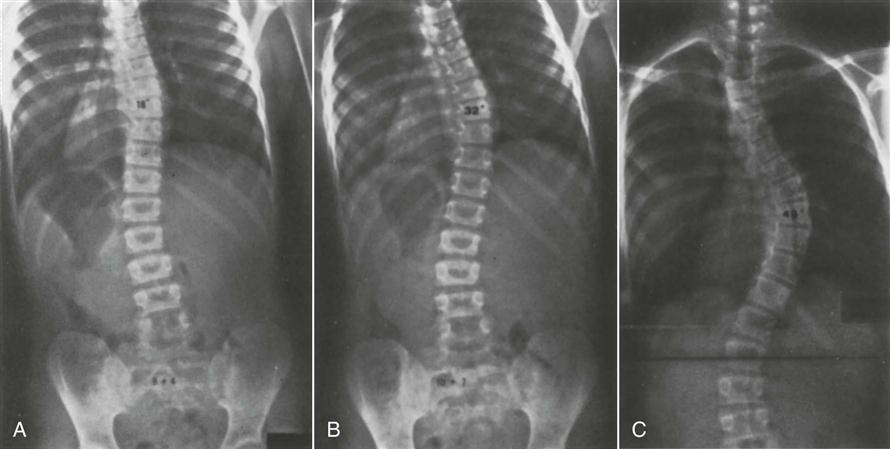
A, Note the mild degree of vertebral rotation and curvature and the imbalance of the upper torso. B, Note the rather dramatic increase in curvature and the increased rotation of the apical vertebrae 1 year later. C, Further progression of the curvature has occurred, and the opportunity for brace treatment has been missed. (From Bunnel WP: Treatment of idiopathic scoliosis. Orthop Clin North Am 10:817, 1979.)
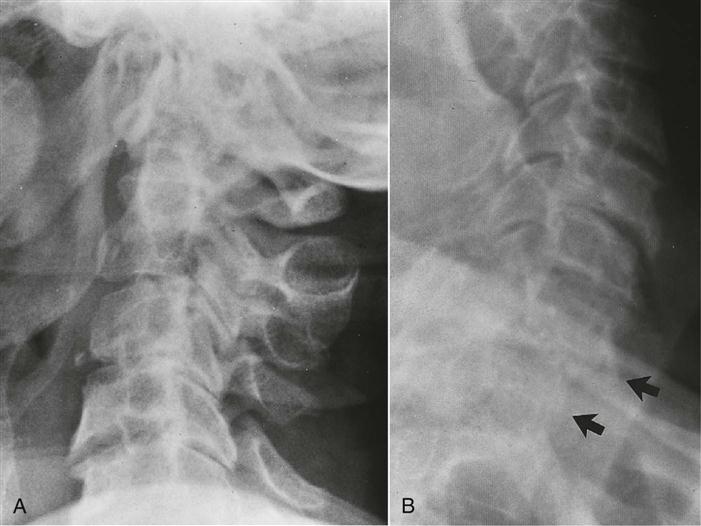
A, Initial lateral radiograph includes only the first five cervical vertebrae. There is a small fracture from the anterior inferior margin of C3. B, A swimmer’s projection clearly demonstrates dislocation at C7–T1 (arrows). (From Adam A, Dixon AK, editors: Grainger & Allison’s diagnostic radiology: a textbook of medical imaging, ed 5, Edinburgh, 2008, Churchill Livingstone/Elsevier.)
Anteroposterior View.
With this view (Figure 8-45), the examiner should note the following:
Lateral View.
The examiner should note the following:
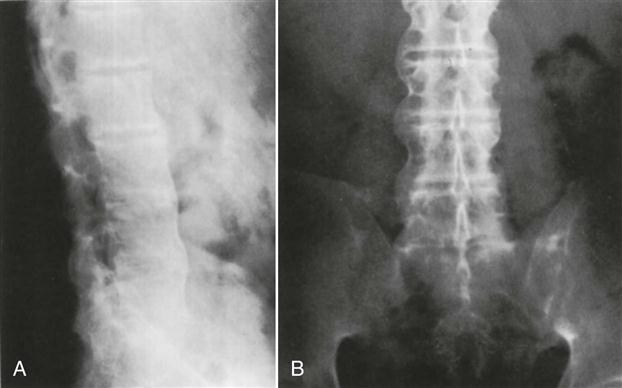
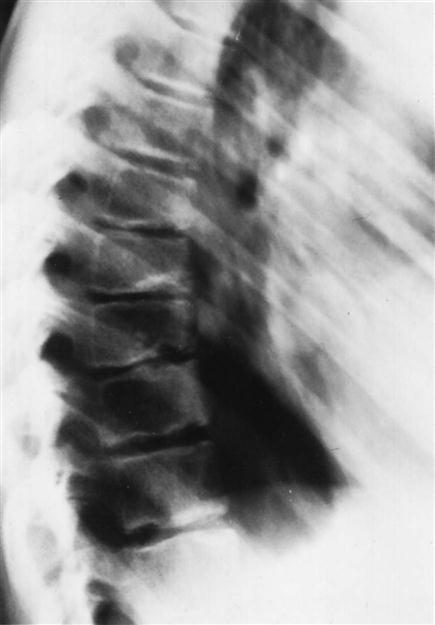
2. Any wedging of the vertebrae, which may be an indication of structural kyphosis resulting from conditions, such as Scheuermann’s disease or wedge fracture from trauma or osteoporosis (Figure 8-50). Scheuermann’s disease is radiologically defined as an anterior kyphosis in which there is a 5° or greater anterior wedging of at least three consecutive vertebral bodies.10
3. Whether the disc spaces appear normal
Diffuse Idiopathic Skeletal Hyperostosis (DISH).
This condition of unknown etiology is indicated by ossification along the anterolateral aspect of at least four continguous vertebrae leading to back pain and spinal stiffness. It is most common in the thoracic spine followed by cervical and lumbar spines. It does not involve the sacroiliac joints.
Measurement of Spinal Curvature for Scoliosis.
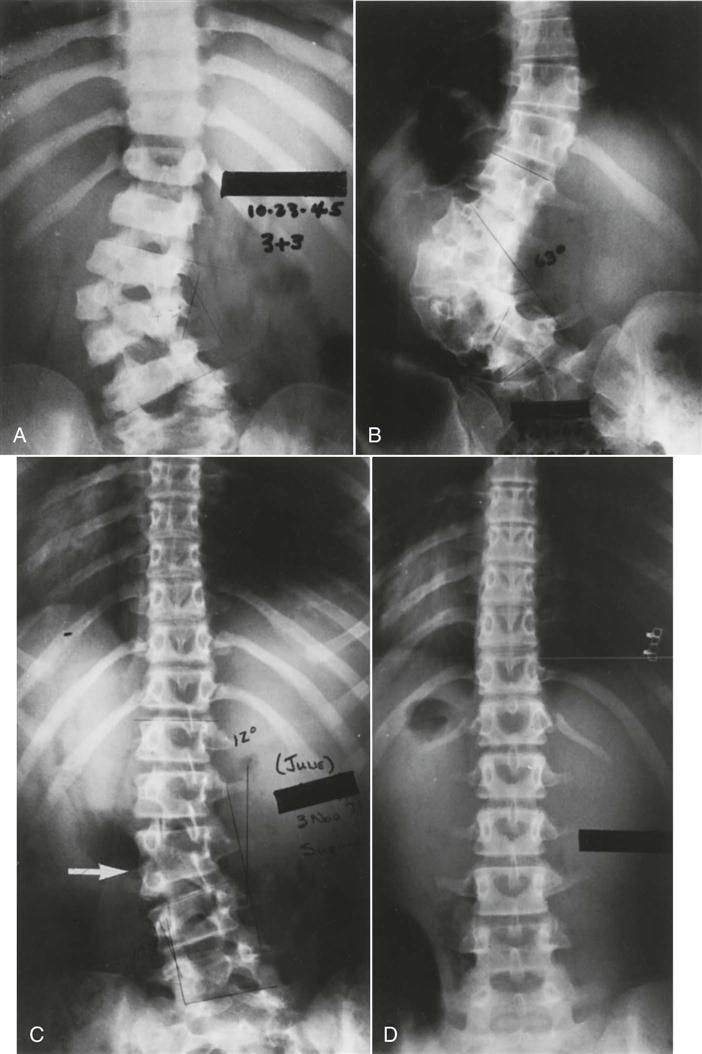
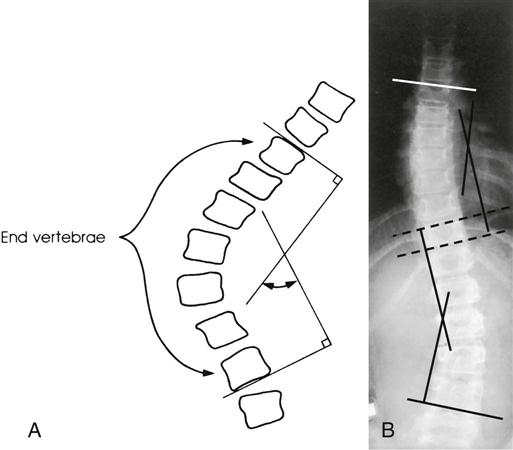
With the Cobb method (Figure 8-53), an anteroposterior view is used.11,33,34 A line is drawn parallel to the superior cortical plate of the proximal end vertebra and to the inferior cortical plate of the distal end vertebra. A perpendicular line is erected to each of these lines, and the angle of intersection of the perpendicular lines is the angle of spinal curvature resulting from scoliosis. Such techniques have led the Scoliosis Research Society to classify all forms of scoliosis according to the degree of curvature: group 1, 0° to 20°; group 2, 21° to 30°; group 3, 31° to 50°; group 4, 51° to 75°; group 5, 76° to 100°; group 6, 101° to 125°; and group 7, 126° or greater.12 Other noninvasive methods of measuring the curve have been advocated. However, the examiner should use the same method each time for consistency and reliability.35,36
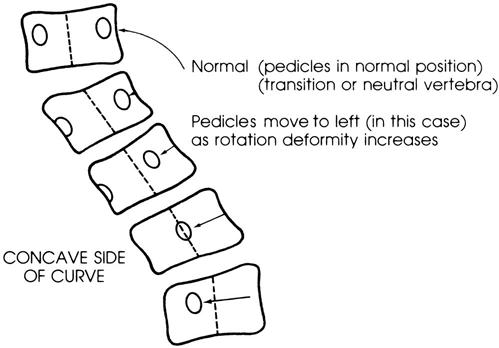
The rotation of the vertebrae may also be estimated from an anteroposterior view (Figure 8-54). This estimation is best done by the pedicle method, in which the examiner determines the relation of the pedicles to the lateral margins of the vertebral bodies. The vertebra is in neutral position when the pedicles appear to be at equal distance from the lateral margin of the peripheral bodies on the film. If rotation is evident, the pedicles appear to move laterally toward the concavity of the curve.
Computed Tomography
Computed tomography is of primary use in evaluating the bony spine, the spinal contents, and the surrounding soft tissues in cross-sectional views.
Magnetic Resonance Imaging
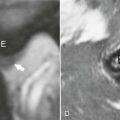
Magnetic resonance imaging (MRI) is a noninvasive technique that is useful for delineating soft tissue, including herniated discs and intrinsic spinal cord lesions, as well as bony tissue (Figure 8-55). However, MRI should be used only to confirm a clinical diagnosis, because conditions, such as disc herniation, have been demonstrated on MRI in the absence of clinical symptoms.37,38
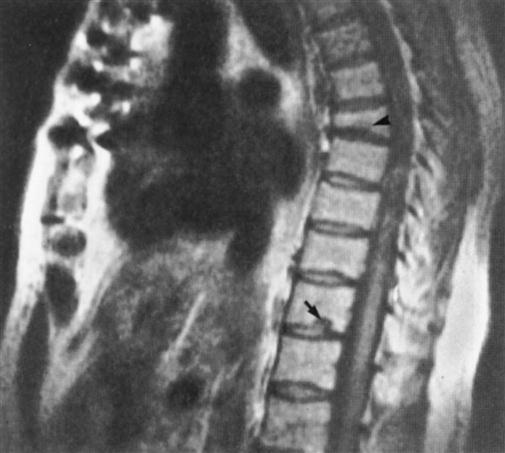
Midline sagittal T1-weighted magnetic resonance image (SE 500/30) shows compression fracture of upper thoracic vertebral body (arrowhead), indicated by anterior wedging. Marrow signal intensity is maintained (arrowhead). Schmorl nodule is incidentally noted at a lower level (arrow). (From Bassett LW, Gold RH, Seeger LL: MRI atlas of the musculoskeletal system, London, 1989, Martin Dunitz, p. 49.)