[level-membership-for-neurosurgery-category]
8 STA-MCA Microanastomosis
Surgical Technique
Introduction
The first successful direct extracranial-intracranial (EC-IC) bypass surgery was performed by Yasargil in 1967.1 Since then, many operative techniques for direct cerebral revascularization have been described (see chapters 7 through 14). The most commonly used EC-IC procedure to revascularize the anterior circulation is the superficial temporay artery (STA)–middle cerebral artery (MCA) bypass between one branch of the STA and a cortical MCA branch (M4). It has the advantage of being a safe, simple, and readily available technique, and the disadvantage of supplying low flow rates. In this chapter we will describe the technical aspects of the STA-MCA bypass as well as the pitfalls and lessons learned by the authors based on their longstanding experience.
Perioperative considerations and surgical technique
Preoperative Period
Antiplatelet treatment with low-dose anesthetic is begun three days preoperatively and continued daily thereafter in order to optimize microanastomosis patency rates (>95%). Variability in individual response to antiplatelet therapy exists, and 4% to 20% of patients are resistant to low-dose treatment.2,3
Surgical Technique
Preparation of the STA
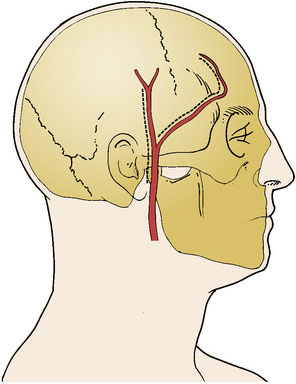
The STA and its branches are mapped with a Doppler ultrasound probe and serve as a guideline for the skin incision (Figure 8–1). Using the operative microscope, a linear skin incision is made directly over the course of the parietal branch of the STA all the way to the zygoma and an 8-cm length of the STA is dissected out. In the event that the frontal branch of the STA is to be used, a curvilinear frontotemporal skin flap behind the hairline allows for a clean dissection of the frontal branch from the underside of the scalp flap. This can be tedious since the dissection from under the flap may require additional skin retraction and dissection through the fat plane.
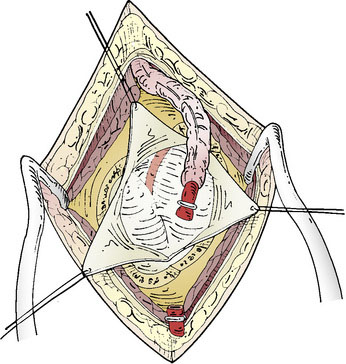
The STA is then dissected out from the galeal tissue, ensuring that a small cuff (2 to 3 mm) of soft tissue surrounding it remains. Bipolar electrocoagulation of the arterial side branches is performed at a distance of several millimeters to avoid thermal injury to the STA. The isolated STA must be long enough so that no traction occurs during the bypass. The distal end of the artery can then be clipped and divided after temporary clamping at the proximal end, or left intact until after the craniotomy and just prior to the anastomosis (Figure 8–2). After the STA is divided, meticulous care must be taken to irrigate it with heparinized saline and then place it protected in moist gauze at the proximal end of the incision.
Performance of the craniotomy: Location and size
The craniotomy is planned so as to expose at least one adequate recipient cortical MCA branch. Numerous modifications for the identification of the site have been proposed in the literature.4 Considerations by Chater et al.5 to locate the craniotomy are recommended: “[P]erform the craniotomy at a point 6 cm above the external auditory meatus on a line perpendicular to the base of the skull.” To approximate the base of the skull, “a horizontal line from the external auditory canal to the lateral canthus of the eye” is the most suitable as shown by Pena-Tapia et al.4 The temporalis muscle is divided in a linear incision and mobilized in order to expose the region of the planned craniotomy. After placing a temporal burr hole, a 3×3-cm craniotomy is performed. The size of craniotomy varies depending on the indication or need for revascularization. For Moyamoya angiopathy, a larger craniotomy is usually preferable, allowing for a wider selection of suitable cortical vessels as well as for a larger surface area for additional indirect revascularization as needed.
Preparation of the recipient vessel and completion of the microanastomosis
The dural opening can be performed in a Y-fashion to allow for three triangular dural flaps, or the opening can be further extended into several flaps, depending on the location of the preferred cortical M4 branch (Figure 8–3). These are retracted with tag-up sutures, and the cortex is inspected to locate the most suitable M4 recipient artery. The ideal recipient artery is the one located at the cortical surface, has a straight segment without significant side branches, and usually is the largest in diameter (ideally 1.5 mm). Cortical vessel length of 1 to 1.5 cm is adequate. The M4 recipient cortical vessels that can be used include suprasylvian: precentral, central, anterior parietal, posterior parietal, and angular branches; and infrasylvian: anterior temporal, middle temporal, and posterior temporal. With extension of the craniotomy in the anterior and posterior directions, the prefrontal branch anteriorly and the temporo-occipital branch posteriorly can also be visualized.

Postoperative Care
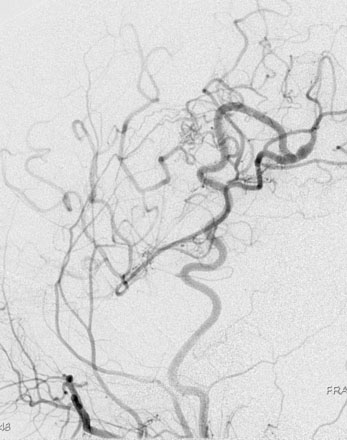
Patients should spend the first night in an intensive or intermediate care bed for close monitoring of neurological and hemodynamic parameters. Blood pressure control is important to prevent hypotension and the risk of graft thrombosis or hypertension and the risk of hyperperfusion. Graft patency can be checked by Doppler ultrasound, while always avoiding compression of the graft. We like to perform an imaging of the bypass (preferably a CTA) between 24 and 48 hours after the surgery as a baseline exam for future follow-up. A six-vessel cerebral angiogram is performed usually at 6 months (Figure 8–4).
Special considerations and pitfalls
Intraoperative Tests for Anastomosis Patency
Patency of the anastomosis can be evaluated using a micro-Doppler probe. However, we prefer to use intraoperative quantitative blood-flow measurements with calculation of the cut flow index (CFI). The CFI is calculated by dividing the bypass flow by the cut STA flow (free flow through the cut STA). This index has been shown to be a predictor of bypass patency: CFI > 0.5, permeability of 92%; CFI < 0.5, permeability 50%.6
Near-infrared indocyanine green fluorescence angiography to visualize graft, cortical, and pial filling is also a useful technique, allowing direct visualization of the anastomosis patency and dynamic distribution of flow.7 Fluorescence angiography does not indicate quantitative blood flow, and we recommend using it in combination with a quantitative measurement.
Less-Invasive Technique for STA-MCA Bypass
Preoperative identification of the STA and a sizable recipient artery on CTA is easy: the larger STA branch is chosen as the donor vessel. The choice of the recipient vessel is based on the size and superficial cortical location. Using 3-D CTA reconstructions, a small craniotomy (2 to 2.5 cm in diameter) can be ideally located to expose the recipient vessel. Using CTA-based neuronavigation, the craniotomy and a short linear incision (5 cm) over the STA can be planned to overlie the recipient and the donor vessel. The precise localization of the target point allows the procedure to be less invasive.8,9
1 Yasargil M.G. Microsurgery Applied to Neurosurgery. Stuttgart: Georg Thieme-Verlag, 1969.
2 Blais N., et al. Response to aspirin in healthy individuals. Cross-comparison of light transmission aggregometry, VerifyNow system, platelet count drop, thromboelastography (TEG) and urinary 11-dehydrothromboxane B(2). Thromb Haemost. 2009;102(2):404-411.
3 Collet J.P., Montalescot G. Platelet function testing and implications for clinical practice. J Cardiovasc Pharmacol Ther. 2009;14(3):157-169.
4 Pena-Tapia P.G., et al. Identification of the optimal cortical target point for extracranial-intracranial bypass surgery in patients with hemodynamic cerebrovascular insufficiency. J Neurosurg. 2008;108(4):655-661.
5 Chater N., et al. Microvascular bypass surgery. Part 1: anatomical studies. J Neurosurg. 1976;44(6):712-714.
6 Amin-Hanjani S., et al. The cut flow index: an intraoperative predictor of the success of extracranial-intracranial bypass for occlusive cerebrovascular disease. Neurosurgery. 2005;56(Suppl 1):75-85.
7 Woitzik J., et al. Intraoperative control of extracranial-intracranial bypass patency by near-infrared indocyanine green videoangiography. J Neurosurg. 2005;102(4):692-698.
8 Coppens J.R., Cantando J.D., Abdulrauf S.I. Minimally invasive superficial temporal artery to middle cerebral artery bypass through an enlarged bur hole: the use of computed tomography angiography neuronavigation in surgical planning. J Neurosurg. 2008;109(3):553-558.
9 Kaku Y., et al. Less invasive technique for EC-IC bypass. Acta Neurochir Suppl. 2008;103:83-86.
[/level-membership-for-neurosurgery-category][not-level-membership-for-neurosurgery-category]
8 STA-MCA Microanastomosis
Surgical Technique
Introduction
The first successful direct extracranial-intracranial (EC-IC) bypass surgery was performed by Yasargil in 1967.1 Since then, many operative techniques for direct cerebral revascularization have been described (see chapters 7 through 14). The most commonly used EC-IC procedure to revascularize the anterior circulation is the superficial temporay artery (STA)–middle cerebral artery (MCA) bypass between one branch of the STA and a cortical MCA branch (M4). It has the advantage of being a safe, simple, and readily available technique, and the disadvantage of supplying low flow rates. In this chapter we will describe the technical aspects of the STA-MCA bypass as well as the pitfalls and lessons learned by the authors based on their longstanding experience.
Perioperative considerations and surgical technique
Preoperative Period
Antiplatelet treatment with low-dose anesthetic is begun three days preoperatively and continued daily thereafter in order to optimize microanastomosis patency rates (>95%). Variability in individual response to antiplatelet therapy exists, and 4% to 20% of patients are resistant to low-dose treatment.2,3
Surgical Technique
Preparation of the STA
The STA and its branches are mapped with a Doppler ultrasound probe and serve as a guideline for the skin incision (Figure 8–1). Using the operative microscope, a linear skin incision is made directly over the course of the parietal branch of the STA all the way to the zygoma and an 8-cm length of the STA is dissected out. In the event that the frontal branch of the STA is to be used, a curvilinear frontotemporal skin flap behind the hairline allows for a clean dissection of the frontal branch from the underside of the scalp flap. This can be tedious since the dissection from under the flap may require additional skin retraction and dissection through the fat plane.
The STA is then dissected out from the galeal tissue, ensuring that a small cuff (2 to 3 mm) of soft tissue surrounding it remains. Bipolar electrocoagulation of the arterial side branches is performed at a distance of several millimeters to avoid thermal injury to the STA. The isolated STA must be long enough so that no traction occurs during the bypass. The distal end of the artery can then be clipped and divided after temporary clamping at the proximal end, or left intact until after the craniotomy and just prior to the anastomosis (Figure 8–2
[/not-level-membership-for-neurosurgery-category]
