[level-membership-for-neurosurgery-category]
Chapter 42 Sacral Tumor Resection and Reconstruction
Introduction
Most tumors of the sacrum are benign aggressive lesions (e.g., aneurysmal bone cysts, osteoblastomas, and giant cell tumors) or low-grade malignancies (e.g., chordoma or chondrosarcoma). Intralesional resections in the form of curettage provide a complete cure for benign lesions. In contrast, wide resections are necessary for complete disease control in malignant tumors. Surgical procedures for sacral tumors are classified into four types on the basis of extension of tumors and the level of sacral resection (Fig. 42-1).
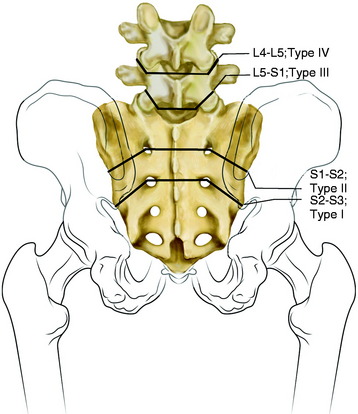
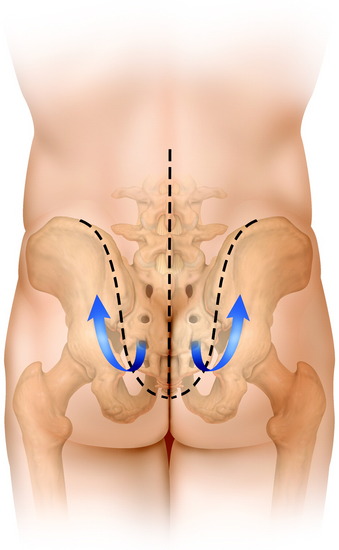
Low sacral tumors, neoplasms affecting levels inferior to the S2, are approached posteriorly, whereas high sacral tumors, neoplasms affecting the S1 and S2, are approached by combined anterior and posterior incisions.1
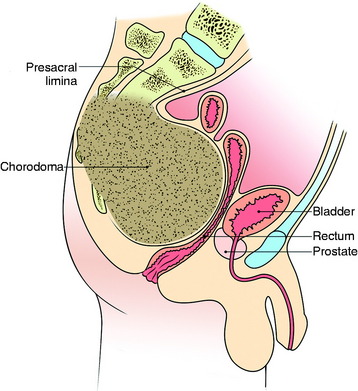
Tumors Involving S3 And Below Posterior Approach2
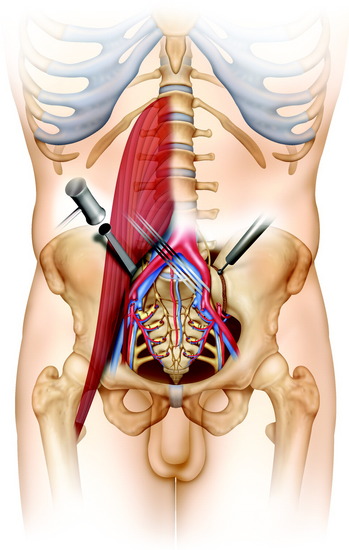
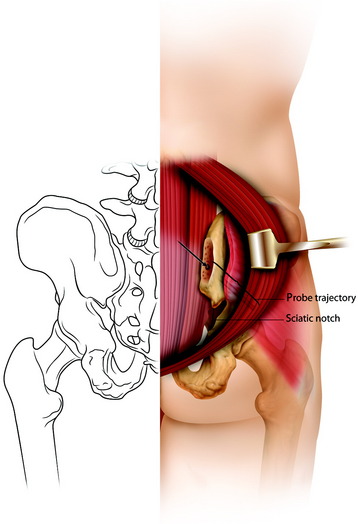
This approach is suitable for lower sacral tumors whose superior limit can be reached on digital rectal examination (Fig. 42-2). A purse-string suture is performed around the anus. A modified knee-chest position is set, and a midline skin incision is made. The skin and subcutaneous tissue are prepared and reflected, exposing the sacrum, the sacroiliac ligament, the origin of the gluteus maximus, and the medial attachment of the sacrotuberous ligament. The sacral periosteum should not be incised or dissected.3 These ligaments and muscles are divided on both sides close to their sacral attachment. The insertion of the gluteus maximus muscle is cut up to the edge of the sacroiliac joint (Fig. 42-3).

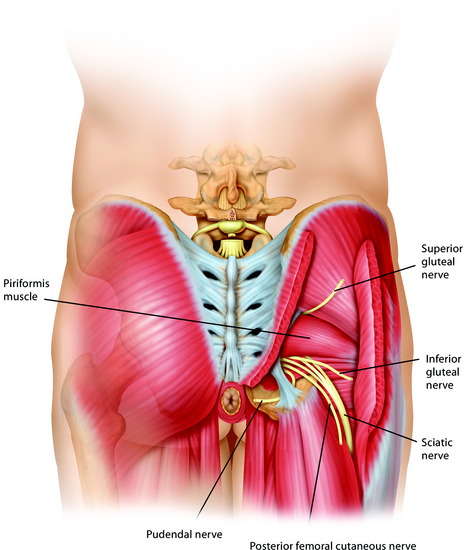
This allows exposure of the inferior roots of the sciatic nerves, the piriformis muscles, and the posterior margin of the pelvic portion of the tumor.2
At the deeper level, the piriformis muscle and the sacrospinous and anococcygeal ligaments are found and divided. The rectum is gently detached from the presacral lamina and from the tumor, which always protrudes anteriorly. The upper level section of the sacrum is decided on the basis of radiological findings. At the chosen level, a careful digital dissection of the anterior soft tissue is performed on both sides through the greater sciatic notch below the lower margins of the ilium and alae of the sacrum. The bulky tumor usually remains well covered by the periosteum, and careful finger dissection prevents dramatic injury to the gluteal vessels (Fig. 42-4). The pudendal nerves exiting the greater sciatic foramen and reentering the lesser foramen also should be identified and protected, except when they are too intimate with the tumor to be spared (see Fig. 42-4).
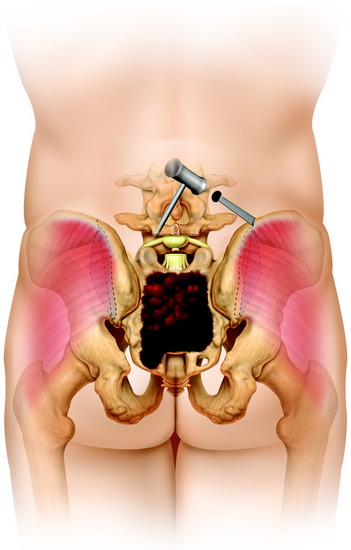
The lower roots, including S3, are removed en bloc with the tumor mass. The removed specimen includes the sacrum, coccyx, lower sacral roots, and resected surrounding soft tissue. An osteotomy is performed between the S2 and S3 dorsal foramina.4
The tumor mass is freed circumferentially and can be removed en bloc. Bleeding from the sacral stump is controlled with bone wax. Bleeding in the presacral soft tissue may be severe. The median and lateral sacral arteries and veins are usually the main sources of this bleeding. In these types of resection, reconstruction is not necessary because the sacroiliac joints are not excised. For smaller lesions of the mid-sacrum and distal sacrum, the resection of the sacroiliac joint is not required.3 Wound closure generally can be achieved without a rotational flap or other reconstructive procedures.
Tumors Involving Proximal Sacrum (Combined Anterior and Posterior Approach)
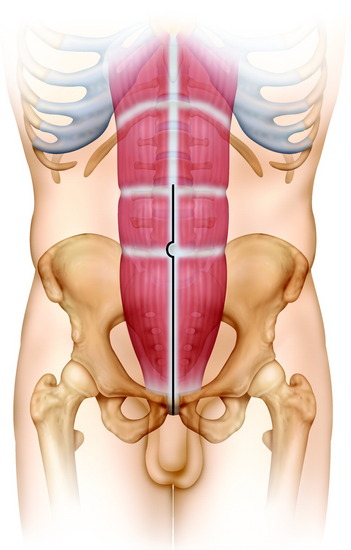
VENTRAL SACRECTOMY3
With the patient supine, the anterior aspect of the sacrum is exposed through a midline vertical incision along the rectus abdominis muscle through all the layers of the abdominal wall except the peritoneum (Fig. 42-5). The internal iliac artery along with the medial, lateral sacral vessel are ligated and divided on both sides. The ligation of the internal iliac vein can cause congestion of the pelvic and epidural venous plexus. Currently, instead of ligating the internal iliac vein, the segmental veins entering the sacral foramina are ligated while exposing the anterior surface of the sacrum.5
The presacral fascia is not opened.1 The L5–S1 disc is incised and reamed. The mobilized vessels and iliopsoas muscle are retracted, and the nerve root of L5 and the iliolumbar trunk are identified. A chisel cut is made through the internal lamina of the iliac wing 1 cm lateral to the sacroiliac joint bilaterally, marking the level of resection (Fig. 42-6). The lumbosacral nerve trunks from L4 and L5 should be preserved. The S1 through S4 nerve roots are cut on both sides away from the tumor. The rectum is mobilized by blunt finger dissection in the presacral space.
POSTERIOR SACRECTOMY
The patient is set in a prone position. A three-limbed, star-shaped skin incision is used and a lumbosacral flap is lifted from the sacrum and retracted rostrally (Fig. 42-7). The posterior iliac crest, greater sciatic foramina, and sciatic nerves are exposed bilaterally, as well as the L3–5 spinous process, facet joints, and transverse process. The sacral nerve roots are divided after the L5, S1 laminectomy. The dural sac is transected caudal to the L5 nerve roots and ligated with nonabsorbable sutures. The detachment of the L5–S1 disc from the L5 endplate is completed via a posterior approach (Fig. 42-8). The L5–S1 facet joints are disarticulated. The sacrospinalis muscles are transected transversely. The gluteus maximus and piriformis muscles are divided. The dorsal sacroiliac, sacrotuberous, and sacrospinous ligaments are detached or transected. The superior gluteal vessels and nerves, inferior gluteal vessels and nerves, sciatic nerve, pudendal nerve, and posterior femoral cutaneous nerve should be preserved.

In a posterior sacral osteotomy, the sacroiliac joints or ilium are cut with an osteotome or drill from behind (Fig. 42-9). Bone resection with an osteotome or drill proceeds to meet the ventral osteotomy previously made. For easier cutting, a threadwire saw can be used. If indicated, the resection margin can be extended to the iliac bone. The extent of ilium resection is determined by a sagittal Computed tomography (CT) or magnetic resonance imaging (MRI). A shallow groove is cut through the internal cortex of the iliac wing lateral to the sacroiliac joint to mark the level of resection (Fig. 42-10).6 In cases of an iliac bone resection, the iliac vessel dissection should be complete when a ventral sacrectomy is performed.
CASE ILLUSTRATION
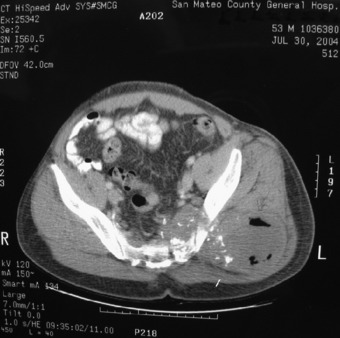
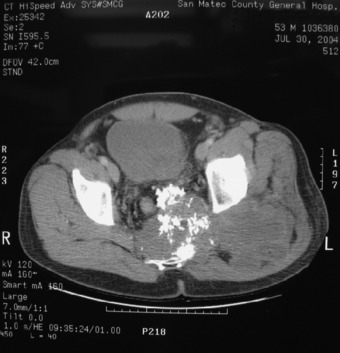
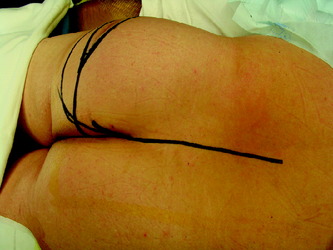
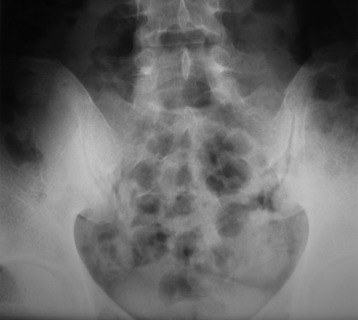
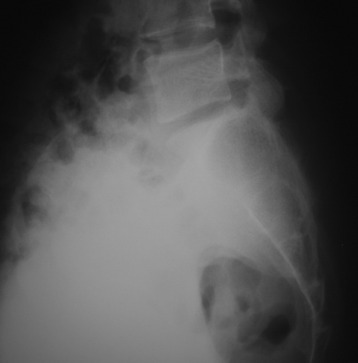
A 55-year-old woman presented with a left buttock painful mass. A CT scan showed that the mass was destroying the lower sacrum and left iliac bone (Fig. 42-11). The mass extended below the sacral level to the coccyx area (Fig. 42-12). The operation was performed with a lateral decubitus position (Fig. 42-13). The skin incision was started from the midline as a vertical shape and extended to the left buttock as a horizontal shape (see Fig. 42-13).
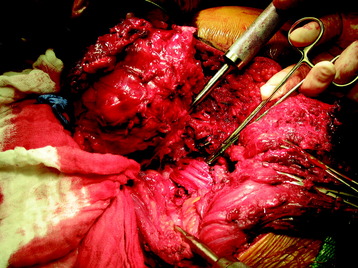
After the skin incision, the skin and subcutaneous tissue were reflected. In the next layer, the gluteus maximus muscle layer, the muscle was divided from the midline and reflected lateral side (Fig. 42-14). Next, the piriformis muscle was divided. After the gluteus maximus muscle was retracted, the underlying mass was exposed. The tumor mass originated from the lower sacral bone and adjacent iliac bone. The mass was dissected from the surrounding muscle and underlying vascular structures. After the mass was dissected away, the underlying neural structures were found. They were the sciatic nerve, inferior gluteal nerve, and lateral femoral cutaneous nerve (Fig. 42-15). The mass was removed, including the destroyed left iliac bone (Fig. 42-16).


SACRAL RECONSTRUCTION
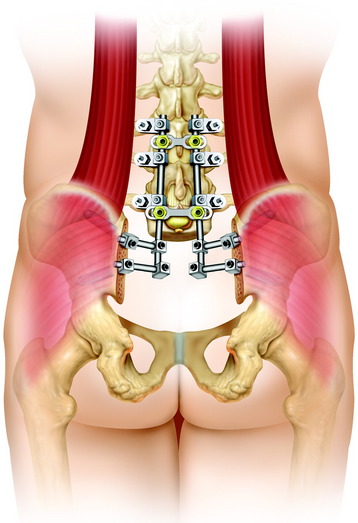
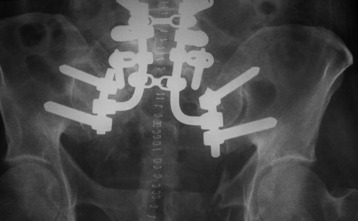
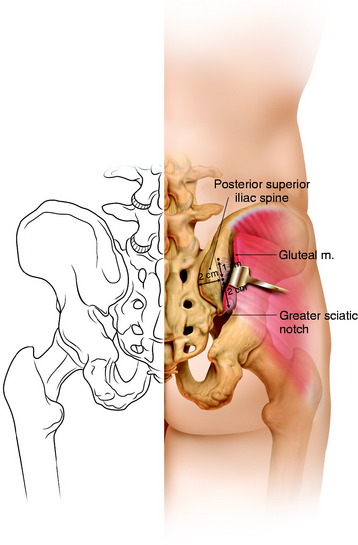
MODIFIED GALVESTON TECHNIQUE7,8
A bilateral pedicle screw fixation is first performed at L3–5. The portal of entry is the posterior superior iliac spine (PSIS), which is directly lateral to the second dorsal foramen of the sacrum. The PSIS is removed with a large rongeur to the level of the sacrum (Fig. 42-17). The probe insertion is directed to a point 1.5 cm above the sciatic notch and between the two cortices of the ilium, and it is tapped into place with a mallet to a depth of 6–9 cm (Fig. 42-18). A finger on the outer table palpating the sciatic notch provides tactile landmarks to develop an intracortical path in the thick supra-acetabular bone of the ilium. The probe is advanced by rotating into the thick bone (Fig. 42-19).
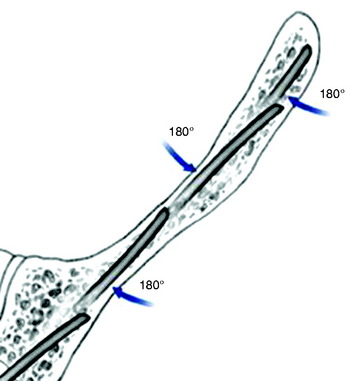
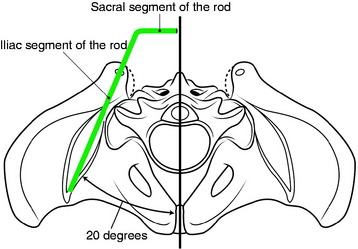
The angle of insertion is usually 20 degrees lateral from the midline on the transverse plane and 30–35 degrees caudal to a horizontal plane (Fig. 42-20). A malleable template rod (wire) is inserted with rod contouring.
Rod Contouring
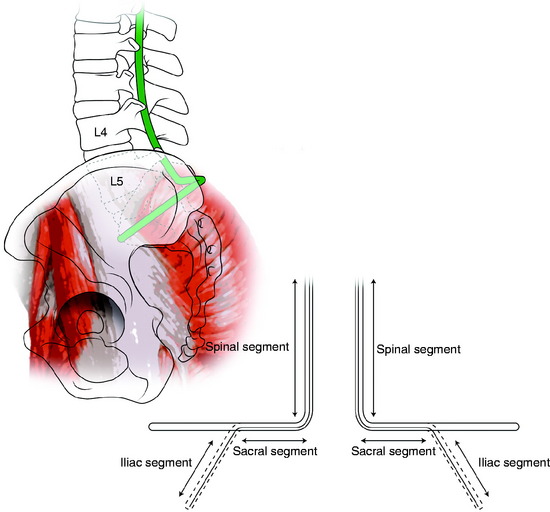
The Galveston rod is composed of three parts: spinal, sacral, and iliac segments.9 Using the tube benders, a 90-degree bend is made between the spinal and sacral segments. The second bending at the sacroiliac junction in the transverse plane depends on the left- or right-side orientation to the rod, matching the angle of the ilium, and sagittal plane contouring of the spinal segment of the rod. A 6-mm titanium rod is contoured to match the template rod (Fig. 42-21). The rod is inserted into the ilium to a depth of about 4–5 cm and attached to the lumbar pedicle screws; cross-links are then placed.
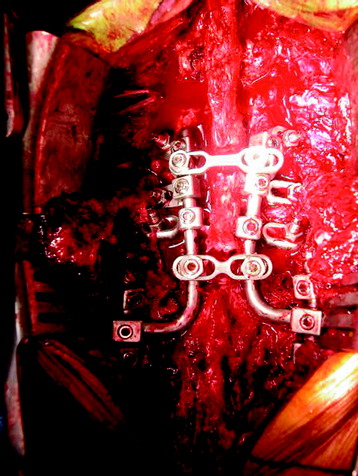
DOUBLE ILIAC SCREW FIXATION WITH LUMBAR SEGMENTAL FIXATION10
The iliac screw entry points are identified by resecting the posterior superior iliac spine with a curved osteotome (Fig. 42-22). The posterior superior iliac crest should be flush with the sacrum, which places the iliac foundation more anteriorly and improves the soft tissue coverage over the ilium. The resection results in an oval-shaped cancellous starting point for both the superior and inferior iliac screws. With the fingertip of the opposite hand in the superior aspect of the sciatic notch, the iliac starter probe is introduced into the inferior portion of the oval cancellous area and inserted between the two cortical plates of the ilium. The iliac probe is then advanced further between the two cortical plates of the ilium to just above the sciatic notch. The inferior iliac screw path is tapped and the iliac screw is inserted into the inferior ilium. The inferior iliac screw must be long enough to endure weight loading, which is 70–75 mm in length. The second iliac screw insertion site is identified at the superior end of the oval cancellous area. An iliac starter probe is inserted into the superior end of the oval cancellous regions with a slight cephalad inclination. The iliac probe is then inserted to widen the path in the ilium. The superior iliac screw path is tapped and the iliac screw is inserted into the superior ilium with a slight cephalad inclination.
CASE ILLUSTRATION
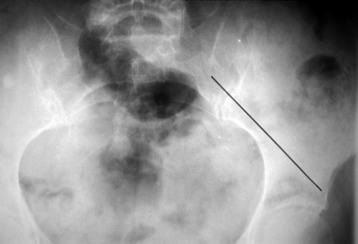
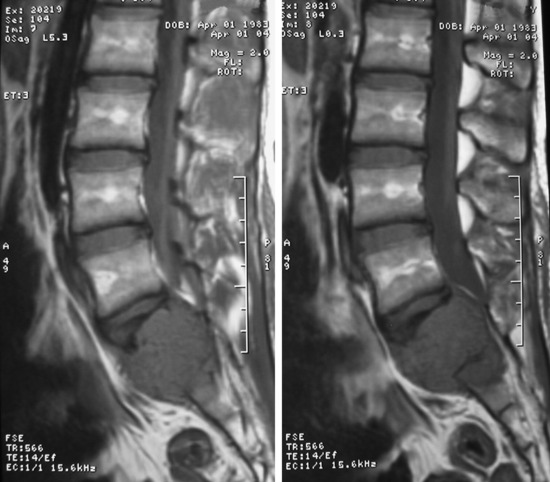
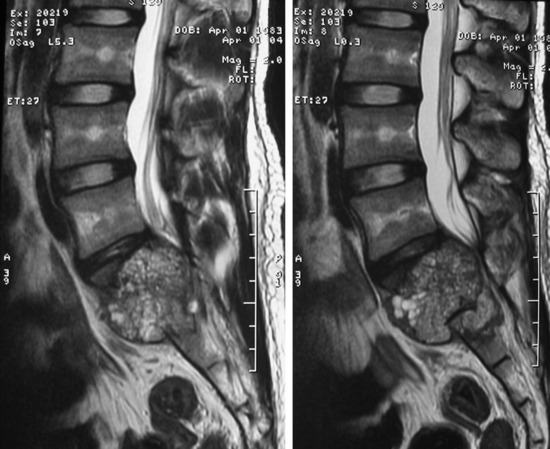
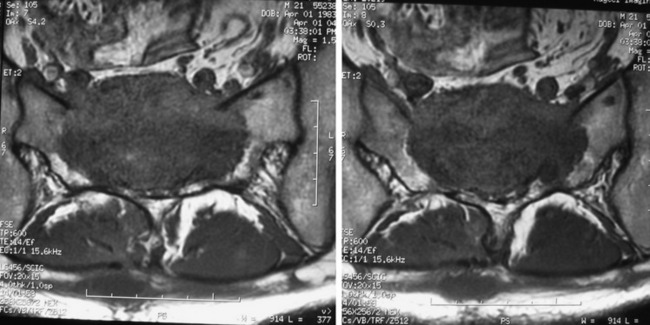
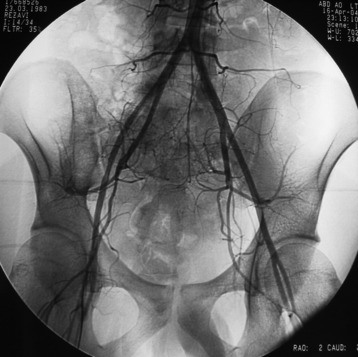
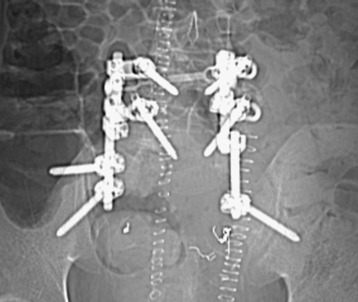
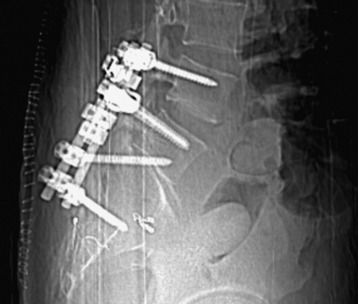
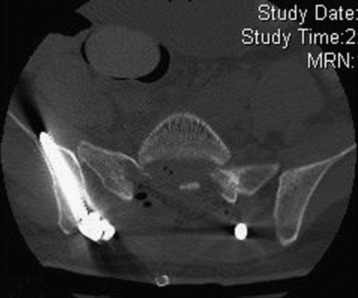
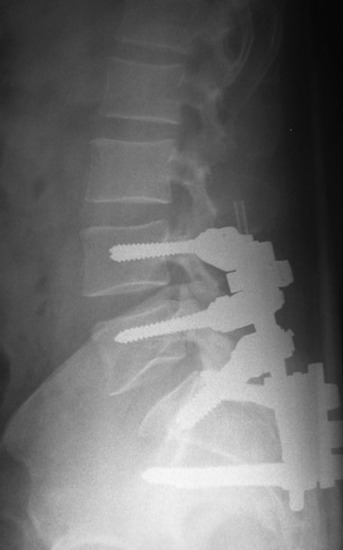
A sacral chordoma patient presented with back pain and bilateral leg pain. An x-ray was taken at initial examination. The osteolytic lesion was seen on the S1 vertebral body (Figs. 42-23 and 42-24). The tumor mass showed low signal intensity on T1-weighted image and high intensity on T2-weighted image (Figs. 42-25 and 42-26). It grew circumferentially to compress the cauda equina (Fig. 42-27). On angiography, feeding vessels were seen from both iliac arteries (Fig. 42-28).
After a ventral removal of the tumor mass, double iliac screw fixation was performed posteriorly (Figs. 42-29 and 42-30). Pedicle screws were inserted in bilateral L4 and L5. Two iliac screws were inserted to the right ilium and one to the left ilium (Figs. 42-31 and 42-32).

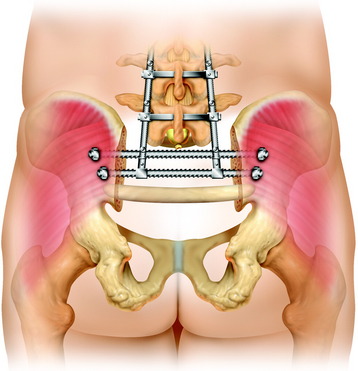
TRIANGULAR FRAME RECONSTRUCTION
After placement of pedicle screws into the L3–5 vertebral bodies, the spinal column is pulled down and the L5 is affixed to the bilateral ilium with sacral rods into the L5 vertebral body and by spinal instrumentation connecting the spine and the pelvis (Fig. 42-36).10 This procedure is followed by massive bone grafts, using autogenous fibulae and bone chips or cancellous allografts.
TRANSILIAC ROD PLACEMENT11
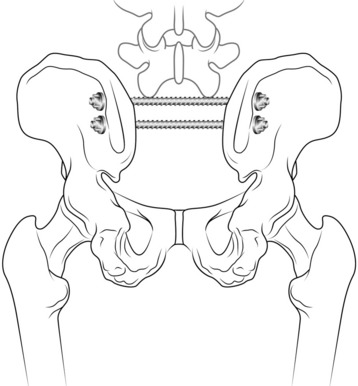
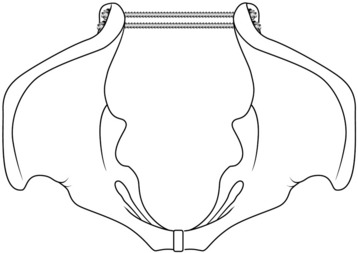
Posterior transiliac rod insertion requires the exposure of both outer tables of the ilia (Fig. 42-37). The thoracolumbar fascia is incised along the posterior iliac crest and over the posterior spine. The gluteus maximus is released from the more medial aspect of the posterior iliac spine and thoracolumbar fascia and is reflected laterally. The entry point of the rod is approximately 2 cm lateral to the tip of the PSIS at the thickest part of the ilium and 2 cm above the greater sciatic notch. A hand drill is used to pass the bar through both iliac wings. The rod must be visualized as it passes dorsal to the sacral lamina (Fig. 42-38). Posterior transiliac bar fixation requires two large rods to be placed through each posterior tubercle. The superior one is at the L5–S1 junction, and the inferior one is at the S2 level. The threaded sacral bars from the Harrington rod system (6.3-mm thick) are the most commonly used implant. After the rod is safely passed through both ilia, washers and nuts are applied to secure the rod in place. The rods are then cut in situ (Fig. 42-39).
POSTERIOR ILIOSACRAL PLATING
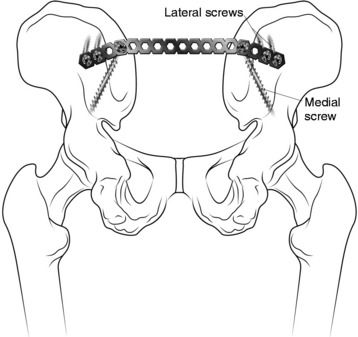
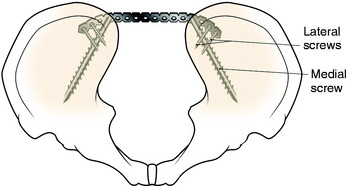
Posterior iliosacral plating requires the same approach and exposure as for the placement of transiliac bars. A straight, 10- to 12-hole, 4.5- or 3.5-mm reconstruction plate is used (Fig. 42-40). The plate is secured to each iliac wing with the most medial screw placed obliquely between the two tables. A 6.5-mm cortical screw (>80 mm) between the iliac tables provides excellent purchase. Two more screws are added on each side of the plate, further securing the plate to the ilium (Fig. 42-41). The screws on each side should be left loose and then sequentially tightened. The plate contoured across the posterior aspect of the sacrum is anchored to the iliac wings through the posterior tubercles in a tension band configuration. The optimal position of the plate is just below the posterior spine and just above the greater sciatic notch. The reconstruction plate is contoured in situ to the outer table of the iliac crest with the use of a pointed ball pusher and mallet. This plate can be used as a support for transiliac rods.
[/level-membership-for-neurosurgery-category][not-level-membership-for-neurosurgery-category]
Chapter 42 Sacral Tumor Resection and Reconstruction
Introduction
Most tumors of the sacrum are benign aggressive lesions (e.g., aneurysmal bone cysts, osteoblastomas, and giant cell tumors) or low-grade malignancies (e.g., chordoma or chondrosarcoma). Intralesional resections in the form of curettage provide a complete cure for benign lesions. In contrast, wide resections are necessary for complete disease control in malignant tumors. Surgical procedures for sacral tumors are classified into four types on the basis of extension of tumors and the level of sacral resection (Fig. 42-1).
Low sacral tumors, neoplasms affecting levels inferior to the S2, are approached posteriorly, whereas high sacral tumors, neoplasms affecting the S1 and S2, are approached by combined anterior and posterior incisions.1
Tumors Involving S3 And Below Posterior Approach2
This approach is suitable for lower sacral tumors whose superior limit can be reached on digital rectal examination (Fig. 42-2). A purse-string suture is performed around the anus. A modified knee-chest position is set, and a midline skin incision is made. The skin and subcutaneous tissue are prepared and reflected, exposing the sacrum, the sacroiliac ligament, the origin of the gluteus maximus, and the medial attachment of the sacrotuberous ligament. The sacral periosteum should not be incised or dissected.3 These ligaments and muscles are divided on both sides close to their sacral attachment. The insertion of the gluteus maximus muscle is cut up to the edge of the sacroiliac joint (Fig. 42-3).
This allows exposure of the inferior roots of the sciatic nerves, the piriformis muscles, and the posterior margin of the pelvic portion of the tumor.2
At the deeper level, the piriformis muscle and the sacrospinous and anococcygeal ligaments are found and divided. The rectum is gently detached from the presacral lamina and from the tumor, which always protrudes anteriorly. The upper level section of the sacrum is decided on the basis of radiological findings. At the chosen level, a careful digital dissection of the anterior soft tissue is performed on both sides through the greater sciatic notch below the lower margins of the ilium and alae of the sacrum. The bulky tumor usually remains well covered by the periosteum, and careful finger dissection prevents dramatic injury to the gluteal vessels (Fig. 42-4). The pudendal nerves exiting the greater sciatic foramen and reentering the lesser foramen also should be identified and protected, except when they are too intimate with the tumor to be spared (see Fig. 42-4).
The lower roots, including S3, are removed en bloc with the tumor mass. The removed specimen includes the sacrum, coccyx, lower sacral roots, and resected surrounding soft tissue. An osteotomy is performed between the S2 and S3 dorsal foramina.4
The tumor mass is freed circumferentially and can be removed en bloc. Bleeding from the sacral stump is controlled with bone wax. Bleeding in the presacral soft tissue may be severe. The median and lateral sacral arteries and veins are usually the main sources of this bleeding. In these types of resection, reconstruction is not necessary because the sacroiliac joints are not excised. For smaller lesions of the mid-sacrum and distal sacrum, the resection of the sacroiliac joint is not required.3 Wound closure generally can be achieved without a rotational flap or other reconstructive procedures.
Tumors Involving Proximal Sacrum (Combined Anterior and Posterior Approach)
VENTRAL SACRECTOMY3
With the patient supine, the anterior aspect of the sacrum is exposed through a midline vertical incision along the rectus abdominis muscle through all the layers of the abdominal wall except the peritoneum (Fig. 42-5). The internal iliac artery along with the medial, lateral sacral vessel are ligated and divided on both sides. The ligation of the internal iliac vein can cause congestion of the pelvic and epidural venous plexus. Currently, instead of ligating the internal iliac vein, the segmental veins entering the sacral foramina are ligated while exposing the anterior surface of the sacrum.5
The presacral fascia is not opened.1 The L5–S1 disc is incised and reamed. The mobilized vessels and iliopsoas muscle are retracted, and the nerve root of L5 and the iliolumbar trunk are identified. A chisel cut is made through the internal lamina of the iliac wing 1 cm lateral to the sacroiliac joint bilaterally, marking the level of resection (Fig. 42-6). The lumbosacral nerve trunks from L4 and L5 should be preserved. The S1 through S4 nerve roots are cut on both sides away from the tumor. The rectum is mobilized by blunt finger dissection in the presacral space.
POSTERIOR SACRECTOMY
The patient is set in a prone position. A three-limbed, star-shaped skin incision is used and a lumbosacral flap is lifted from the sacrum and retracted rostrally (Fig. 42-7). The posterior iliac crest, greater sciatic foramina, and sciatic nerves are exposed bilaterally, as well as the L3–5 spinous process, facet joints, and transverse process. The sacral nerve roots are divided after the L5, S1 laminectomy. The dural sac is transected caudal to the L5 nerve roots and ligated with nonabsorbable sutures. The detachment of the L5–S1 disc from the L5 endplate is completed via a posterior approach (Fig. 42-8). The L5–S1 facet joints are disarticulated. The sacrospinalis muscles are transected transversely. The gluteus maximus and piriformis muscles are divided. The dorsal sacroiliac, sacrotuberous, and sacrospinous ligaments are detached or transected. The superior gluteal vessels and nerves, inferior gluteal vessels and nerves, sciatic nerve, pudendal nerve, and posterior femoral cutaneous nerve should be preserved.
In a posterior sacral osteotomy, the sacroiliac joints or ilium are cut with an osteotome or drill from behind (Fig. 42-9
[/not-level-membership-for-neurosurgery-category]
