Chapter 40 Procedures
In this chapter, the common and life-preserving procedures that are performed in the cardiothoracic intensive care unit (ICU) are described. For most procedures there are many acceptable techniques, but for the sake of simplicity and brevity a didactic description of one approach for each procedure is described. All of the procedures described have appreciable learning curves. Therefore, to increase the chance of success and minimize the likelihood of complications, experienced clinicians should always supervise novices.
CONSENT AND DOCUMENTATION
Consent
There is considerable heterogeneity among countries, states, and institutions and even within institutions regarding obtaining consent for procedures. Blanket consent may be obtained at the time of hospital admission or prior to surgery or, alternatively, specific consent may be obtained for individual procedures. Consent may be verbal or written. In a survey of North American practices, blanket consent was obtained in 64% of surgical ICUs but in only 22% of medical ICUs.1 Of the units that obtained consent for individual procedures, most (>80%) obtained consent for central venous and pulmonary arterial catheterization, thoracocentesis, bronchoscopy, gastrointestinal endoscopy, and blood transfusion; most (>80%) did not obtain consent for nasogastric or urinary catheterization. There are few national standards that address the issue of procedural consent. One that does is the U.S. Veterans Health Administration policy on informed consent for clinical treatments and procedures (available from www.publichealth.va.gov/documents/vha_handbook_ 1004.1.pdf), which makes explicit which procedures require signature consent.
SEDATION AND ANALGESIA FOR BEDSIDE PROCEDURES
Sedation and anesthesia are part of a continuum, and the point at which one becomes the other is indistinct. The goal of sedation is that the patient be relaxed and comfortable but remain conscious (“conscious sedation”), that the patient’s airway be maintained and protected, and that the patient breathe regularly. Anesthesia implies loss of consciousness and is commonly associated with airway obstruction and apnea. For patients who are mechanically ventilated via an endotracheal tube, this distinction may not be critical. However, in nonintubated, spontaneously breathing patients, inadvertent induction of anesthesia in the absence of the necessary skills or equipment for resuscitation is potentially fatal. Thus, whenever intravenous sedation is used, the equipment and skilled personnel necessary to secure and control the airway should be immediately available. Reversal agents (flumazenil for benzodiazepines and naloxone for opioids; see Chapter 4) should also be available. Patients should be monitored by electrocardiogram (ECG), blood pressure cuff, pulse oximeter, and capnograph. Prior to administering intravenous sedation, patients should fast for 6 hours. If this is not possible, rapid-sequence endotracheal intubation (see subsequent material) should be considered. If a nasogastric tube is in situ, it should be aspirated prior to administering sedative drugs. Patients with cardiac dysfunction may develop marked hypotension with intravenous sedation. Thus, secure intravenous access, along with fluids and a vasopressor, should be available. A clinician other than the proceduralist must be designated to perform sedation and monitor the patient. Only a suitably trained clinician, such as an anesthesiologist, intensivist, or nurse anesthetist, should perform general anesthesia.
Sedation for Patients who Are Extubated and Breathing Spontaneously
Supplemental oxygen should be administered by a face mask. For conscious sedation, small intravenous bolus doses of midazolam (1 to 2 mg) may be administered every 1 to 5 minutes until a satisfactory degree of sedation has been achieved. This may be supplemented with a small dose of fentanyl (0.25 to 0.5 μg/kg). Fentanyl is particularly helpful in facilitating instrumentation of the airway or upper gastrointestinal tract, but it substantially increases the risk for apnea. As sedation is established, the clinician should constantly assess the patient’s level of consciousness (see Chapter 4) and be prepared to support the airway and breathing.
BASIC AIRWAY MANAGEMENT
Basic airway management involves (1) maintaining a patent airway and (2) bag-mask ventilation.
Maintaining a Patent Airway
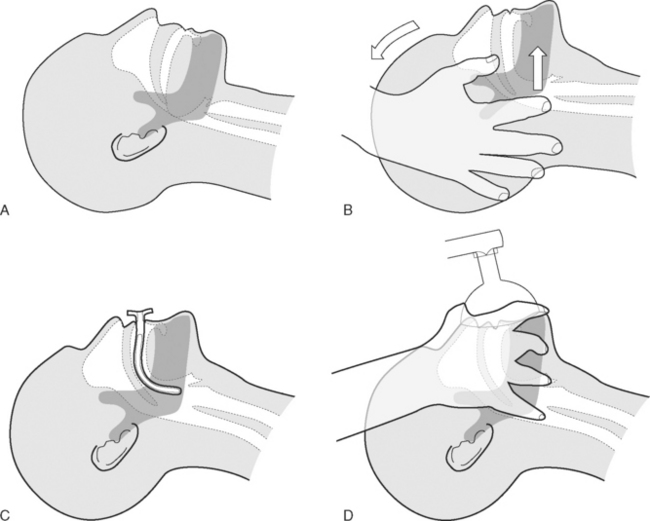
Patients who are unconscious (Glasgow Coma Score <8; see Chapter 37) or who have a reduced level of consciousness may develop partial or complete upper airway obstruction due to prolapse of the base of the tongue into the oropharynx (Fig. 40-1A). Treatment involves the head-tilt, chin-lift maneuver, in which the neck is extended at the atlantooccipital joint and the mandible is thrust forward (Fig. 40-1B). An oropharyngeal airway may also be inserted (Fig. 40-1C). A correctly sized oropharyngeal airway should extend from the patient’s lips to the ear; a size 3 (green) or 4 (orange) is suitable for most adults. If the patient is partially conscious, an oropharyngeal airway may precipitate coughing, vomiting, and laryngospasm.
Bag-Mask Ventilation
In patients who are apneic, bag-mask ventilation should be performed using a self-inflating manual resuscitator with an oxygen reservoir bag (see Fig. 28-1). To ensure that the reservoir bag remains filled, an oxygen flow of 15 l/min is typically required. Ventilation via mask requires a tight fit. The correct position of the operator’s hand is shown in Figure 40-1D. It may be possible to achieve a patent airway and a good mask seal with a single hand; if not, two hands should be used, and an assistant should perform the bag compressions. The bag should be inflated 12 to 16 times per minute, and the chest should be seen to rise and fall, while using the lowest effective pressure to minimize the risk of gas insufflation of the stomach.
ENDOTRACHEAL INTUBATION
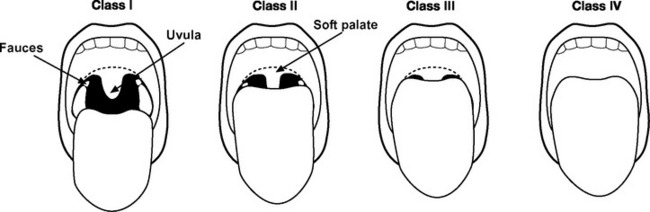
The airway should be assessed to gauge the likelihood of difficulty with laryngoscopy and intubation (Fig. 40-2 and see Table 40-1).2 Reports of previous intubations should be reviewed. If difficulty is anticipated, awake fiberoptic intubation should be considered (see subsequent material).
| Sign | Notes |
|---|---|
| Reduced mouth opening | Patient has an interincisor distance of <4 cm. |
| Reduced thyromental distance | Measured with the neck extended; less than 6.0 cm is abnormal; 6.0 to 6.5 cm is borderline. |
| Mallampati score 3 or 4 | See Fig. 40-2. |
| Limited neck movement | Patient is unable to extend the neck at the atlantooccipital junction or flex the neck. |
| Reduced mandibular subluxation | The mandible is normally able to be protruded so that the lower incisors are in front of the upper incisors. |
| Large incisor teeth | Difficulty intubating an edentulous patient is very rare. |
| Large upper incisor teeth are associated with difficulty. |
Necessary equipment and drugs are listed in Tables 40-2 and 40-3, respectively. An 8.5-mm (internal diameter) endotracheal tube is suitable for most adult males and a 7.5-mm tube is suitable for most adult females.
Table 40-2 Equipment for Endotracheal Intubation
| Selection of face masks |
| Selection of oropharyngeal airways |
| Self-inflating manual resuscitator with oxygen reservoir |
| Two laryngoscopes with a variety of curved and straight blades |
| Selection of endotracheal tubes, one opened with its cuff checked |
| Oxygen source and tubing |
| High-pressure suction with Yankauer connector |
| Intubating bougie |
| Endotracheal tube stylet |
| Magill forceps |
| A syringe for cuff inflation |
| Tape or ties for securing the endotracheal tube |
| Head support |
| Equipment for managing difficult intubation, for example: |
| Laryngeal mask airway |
| Fiberoptic bronchoscope |
| Monitoring |
| Pulse oximeter |
| Capnography |
| Electrocardiogram |
| Blood pressure |
| Adequate venous access |
| Drugs for induction of general anesthesia (see Table 40-3) |
Table 40-3 Drugs That Should Be Drawn Up Prior to Rapid-Sequence Endotracheal Intubation
| Hypnotic |
| e.g., etomidate 0.1 to 0.2 mg/kg |
| e.g., ketamine 1 to 2 mg/kg |
| e.g., propofol 0.5 to 2 mg/kg |
| Opioid with rapid onset |
| e.g., fentanyl 0.5 to 5 μg/kg |
| Suxamethonium |
| 1.5 mg/kg |
| Nondepolarizing neuromuscular blocking drug |
| e.g., pancuronium 0.1 mg/kg |
| e.g., vecuronium 0.1 mg/kg |
| Atropine |
| 600 μg/dose |
| Vasopressor |
| e.g., phenylephrine 50 to 100 μg/dose |
| e.g., metaraminol 0.5 to 1 mg/dose |
| Saline flush |
Three staff members are required for the procedure: (1) an operator who stands at the head of the bed and performs preoxygenation, laryngoscopy, and intubation; (2) an assistant on the operator’s left who performs cricoid pressure; (3) an assistant on the operator’s right who administers drugs, retracts the upper lip, and hands the endotracheal tube to the operator.
Rapid-Sequence Intubation
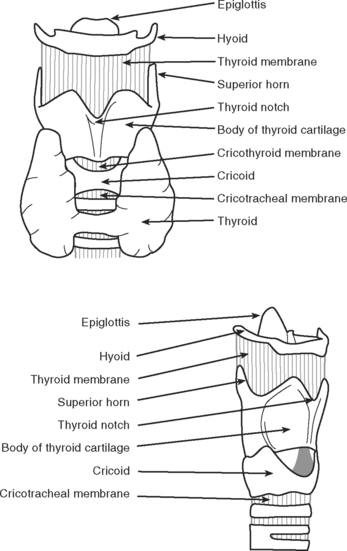
Rapid-sequence intubation involves the induction of general anesthesia and neuromuscular paralysis, followed promptly by endotracheal intubation. The risk of regurgitating and aspirating gastric contents is minimized by the application of cricoid pressure and avoiding bag-mask ventilation.3 The cricoid cartilage (Fig. 40-3) is the only complete cartilaginous ring. Firm pressure on the cricoid cartilage compresses the underlying esophagus and helps to prevent regurgitation of gastric contents.
The technique is performed as follows:
Technique of Direct Laryngoscopy and Intubation
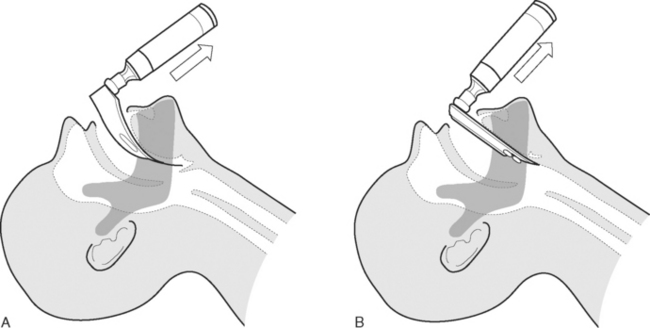
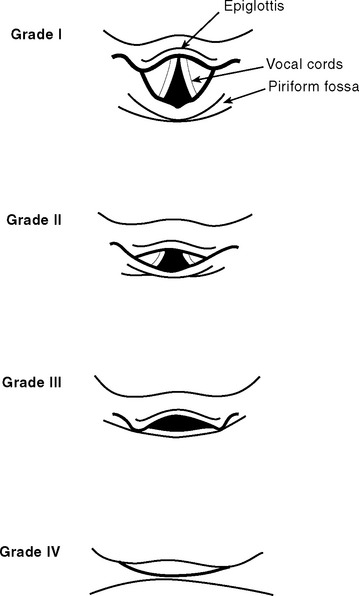
Direct laryngoscopy is usually performed using a curved (MacIntosh) size 3 or 4 laryngoscope. Alternatively, a straight (Miller) blade may be used. Once the patient has been anesthetized, the mouth is held open by the operator’s right hand. Dentures are removed. With the laryngoscope held in the operator’s left hand, the blade is passed down the right side of the tongue and into the oropharynx until the epiglottis comes into view. The correct positions of curved and straight laryngoscope blades are shown in Figure 40-4. The larynx is visualized by lifting (not pivoting) the laryngoscope blade anteriorly, thereby elevating the tongue and epiglottis. The potential views obtained at laryngoscopy are shown in Figure 40-5. The assistant on the operator’s right retracts the patient’s upper lip and passes the endotracheal tube to the operator’s right hand. The endotracheal tube is inserted through the larynx under direct vision. A distance of 21 to 23 cm from the lips for males and 20 to 22 cm from the lips for females is usually appropriate.
Complications
Respiratory
Mild hypoxemia is reasonably common during urgent intubations performed in the ICU. If the patient’s oxygen saturation (SPo2) falls significantly (<90%) during attempted intubation, bag-mask ventilation should be commenced while maintaining cricoid pressure. Further attempts at intubation should be delayed until the SPo2 has recovered. Persistent unsuccessful attempts at intubation will lead to profound hypoxemia and even death. If intubation is not successful after three attempts (with bag-mask ventilation in between), the procedure should be abandoned, and the patient ventilated by bag-mask until the drugs have worn off, usually in about 10 minutes. If bag-mask ventilation is difficult, an oropharyngeal airway should be inserted. If problems persist, cricoid pressure should be relaxed. Failing this, emergency help should be sought from a senior clinician. Insertion of a laryngeal mask airway may be lifesaving.
Unrecognized esophageal intubation can also lead to profound hypoxemia and even death. It is essential to check that the endotracheal tube is correctly positioned, as described earlier. If a characteristic capnograph trace (see Fig. 8-13A) is not seen within two to three breaths, the tube should be removed and bag-mask ventilation commenced. Even with successful tube placement, the patient’s SPo2 may continue to fall for the first few breaths.
INSERTION OF A DOUBLE-LUMEN ENDOTRACHEAL TUBE
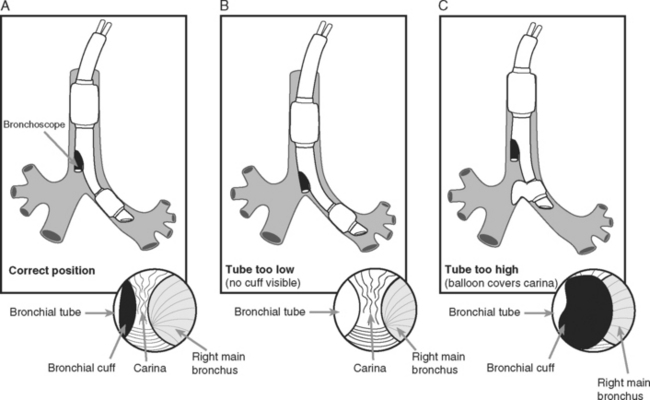
A double-lumen endotracheal tube is occasionally required for differential lung ventilation following single lung transplantation or for lung isolation in cases of massive hemoptysis or bronchopleural fistula. Because of the short length of the right main bronchus (Fig. 40-6), right-sided tubes are more difficult to position and are prone to occluding the origin of the right upper lobe bronchus.4 Thus, a left-sided tube should be used in almost all circumstances, including selective ventilation of the right lung. For adult males, a 41F or 39F tube is usually appropriate; for adult females, a 39F or 37F tube is usually appropriate.
Technique of Insertion
Assessment of Correct Tube Position
Following “blind” insertion, as described earlier, approximately 25% of double-lumen tubes are incorrectly positioned and cannot be used to ventilate the lungs selectively.5 Furthermore, when examined bronchoscopically, a significant proportion (15% in one study5) of “functioning” tubes are critically malpositioned. Thus, careful clinical and bronchoscopic assessment is indicated.
Clinical Assessment
Bronchoscopic Assessment
The fiberoptic bronchoscope is passed down the tracheal lumen. With correct positioning, the carina and right main bronchus should be clearly visualized. The origin of the left main bronchus is obscured by the endobronchial lumen, but the proximal margin of the (blue) endobronchial cuff should be just visible (see Fig. 40-6A). The bronchoscopic findings when the tube has been advanced too far or not far enough are shown in Figure 40-6B and C, respectively).
FIBEROPTIC LARYNGOSCOPY AND BRONCHOSCOPY
Fiberoptic laryngoscopy is usually indicated to facilitate tracheal intubation in patients who are known to be difficult to intubate by direct laryngoscopy. The indications for bronchoscopy in the ICU are listed in Table 40-4. Relative contraindications to bronchoscopy include severe coagulopathy, pulmonary arterial hypertension, and bronchospasm. In general, diagnostic bronchoscopy should be avoided in patients with severely impaired gas exchange because it may cause further respiratory embarrassment. By contrast, therapeutic bronchoscopy—for instance, for treating lobar collapse due to mucus plugging—may significantly improve gas exchange.
Table 40-4 Indications for Fiberoptic Bronchoscopy in the ICU
| Diagnostic |
| Diagnosis of pneumonia |
| Diagnosis of bronchopleural fistula |
| Identification of a bleeding site |
| Identification of injury following airway trauma |
| Therapeutic |
| Relief of mucus plugging |
| Removal of foreign body |
| Identification of the correct placement of double-lumen endotracheal tube |
| Lung isolation to treat massive hemoptysis or bronchopleural fistula |
| Placement of fibrin glue to treat bronchopleural fistula |
ICU, intensive care unit.
Awake Fiberoptic Laryngoscopy and Intubation
Technique of Awake Orotracheal Fiberoptic Laryngoscopy and Intubation
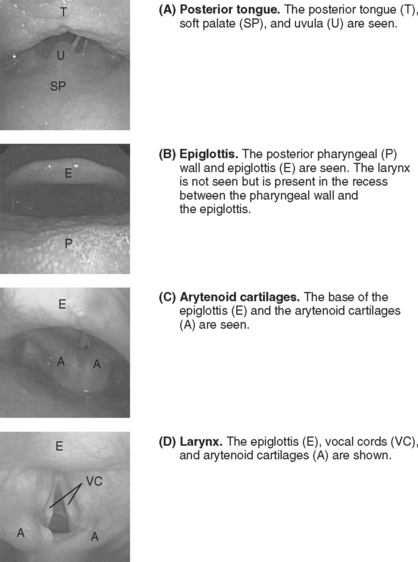
The patient is asked to open his or her mouth and protrude the tongue. An assistant grasps the tongue and pulls it gently outward, holding it with gauze. The operator holds the scope 12 to 15 cm from the tip (so as not to have to reposition the grip before the trachea is entered). The bronchoscope is inserted into the patient’s mouth in the midline. As the bronchoscope is anteflexed over the base of the tongue, first the uvula (Fig. 40-7A) and then the epiglottis (Fig. 40-7B) should be seen. If the epiglottis is in contact with the posterior pharyngeal wall, pulling on the tongue and elevating the mandible opens the airspace. The bronchoscope is advanced under the epiglottis until the larynx (Fig. 40-7C) comes into view. Anteflexion should be maintained as the larynx is approached, but to advance the bronchoscope through the vocal cords (Fig. 40-7D), retroflexion is required so the tip of the bronchoscope can be passed over the arytenoid cartilages. The bronchoscope is advanced into the trachea until the carina is seen. An assistant then railroads the endotracheal tube over the bronchoscope and into the trachea. The tip of the tube may catch on the arytenoid cartilages; twisting the tube as it is advanced usually solves this problem. The tube is positioned 2 to 4 cm above the carina under bronchoscopic guidance. The bronchoscope is withdrawn and, once a characteristic capnograph trace is seen, the patient is connected to the ventilator, and additional sedation is given as required.
Fiberoptic Bronchoscopy
Bronchoscopes vary in size but may have an external diameter up to 6 mm. To accommodate a 6-mm bronchoscope—and still allow effective ventilation—an 8-mm (or larger) internal diameter endotracheal tube should be used. If a large bronchoscope is used with a small endotracheal tube, ventilation may be inadequate and gas trapping, leading to dynamic lung hyperinflation (see Chapter 20), can occur. If significant hypoxemia (Sao2 <90%) or hypotension develops, the bronchoscope should be withdrawn until the patient has recovered.
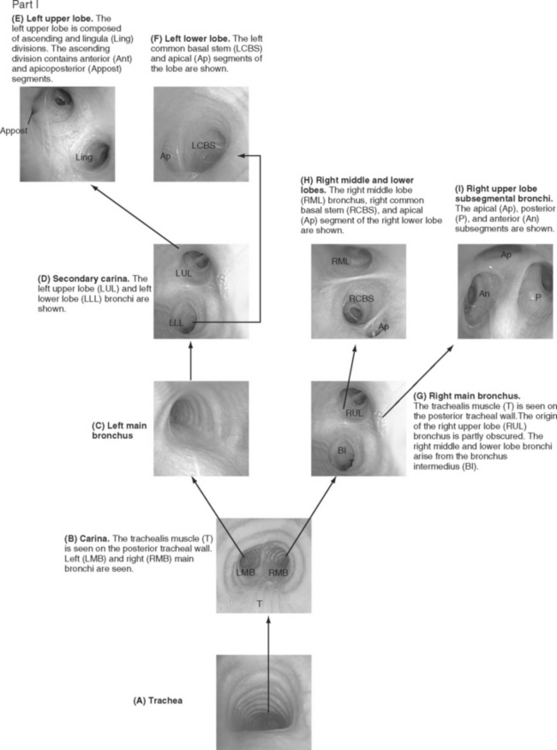
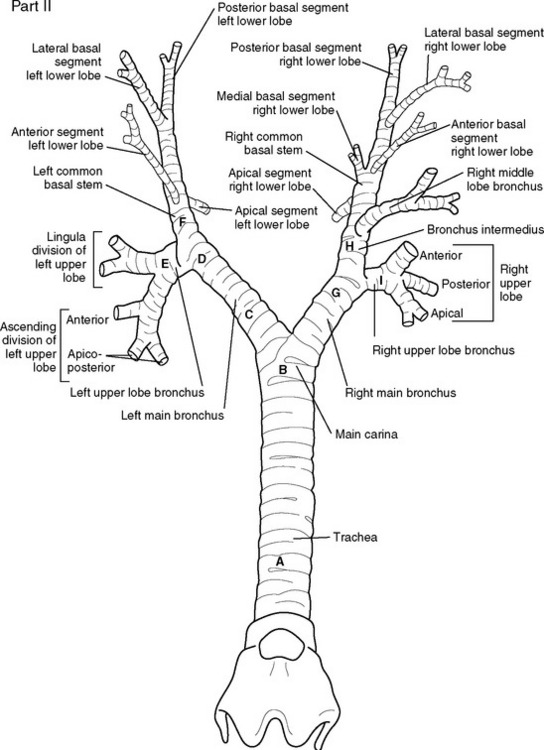
Bronchoscopic examinations performed in the ICU are targeted studies, and complete examination of all of the subsegmental bronchi is not usually performed. However, the operator must be able to navigate to specific lobes of the lung, so it is important to be able to recognize standard bronchoscopic landmarks (Fig. 40-8). When obtaining microbiologic samples, the bronchoscope should be navigated into the bronchus of the target lobe and the tip wedged as distally as possible. To avoid contamination by the large airways, the suction port should not be used until samples have been obtained. If quantitative culture is planned, either broncho-alveolar lavage or protected specimen brush samples should be obtained (see Chapter 35). For a broncho-alveolar lavage, 50 to 150 ml of sterile saline should be instilled, with at least 50% of the volume aspirated into the specimen container.6 For nonquantitative culture, a bronchial washing, in which 10 ml of saline is instilled, is adequate.
PERCUTANEOUS TRACHEOTOMY
The indications for tracheotomy are outlined in Chapter 29. Percutaneous insertion is at least as safe as open surgical placement7 and has the advantage of being able to be performed rapidly at the bedside. A number of techniques have been described8; only the percutaneous dilational method is discussed here.
Knowledge of the anatomy of the larynx and trachea is essential. In particular, the operator should be able to accurately identify the surface landmarks of the thyroid cartilage, the cricoid cartilage, and the tracheal rings (see Fig. 40-3). Table 40-5 lists the equipment that should be available in the patient’s bed space before proceeding. For adult males, a 9-mm internal diameter tracheotomy tube is usually appropriate; for adult females, an 8-mm tube is usually appropriate. In the first instance, a cuffed, nonfenestrated tube should be inserted (see Chapter 29). For obese patients (in whom percutaneous tracheotomy is commonly unsuitable), long tubes with adjustable flanges are available.
| Equipment for endotracheal intubation (see Table 40-2) |
| Fiberoptic bronchoscope |
| Two high-pressure suctions: (1) oropharynx; (2) suction port of the bronchoscope |
| Percutaneous tracheotomy kit |
| Tracheotomy tubes (intended size + one size smaller) |
| Lidocaine with epinephrine 1:200,000 |
| Syringes and needles for infiltration of local anesthesia |
| Sterile catheter mount |
| Sterile drapes |
| Sterile gloves and gowns (two sets) |
| Surgical masks |
| Capnography |
| Sterile dissection forceps, clamp, scalpel blade, and scissors |
| Adequate lighting |
| Surgical diathermy (optional) |
Technique
PLEURAL DRAINAGE
Pleural drains are inserted to evacuate air or fluid from the pleural space.9 Small-bore tubes (10F to 14F) may be used for pleural effusions; medium-bore tubes (20F to 28F) for pneumothoraces; large-bore tubes (>28F) for hemothoraces. Fine- and medium-bore tubes, up to about 24F, can be inserted by using a Seldinger technique. Large tubes should be inserted via blunt dissection into the pleural space (tube thoracostomy). Life-threatening tension pneumothoraces should be treated by needle thoracocentesis followed by tube thoracostomy. Apart from emergency needle thoracocentesis, full sterile precautions should always be observed.
Seldinger Technique
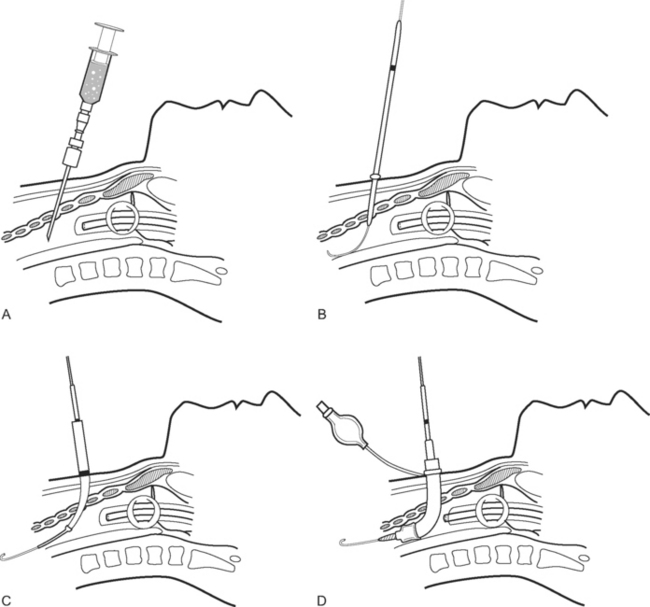
To perform the Seldinger technique, a kit containing all the necessary components, including 10F to 24F tubes, should be used. The skin and subcutaneous tissues are infiltrated with local anesthetic (5 to 10 ml lidocaine with epinephrine 1:200,000). The needle is inserted over the superior border of the rib (to avoid the neurovascular bundle) and into the pleural space, using the landmarks described subsequently. A guide wire is inserted into the hub of the needle and advanced into the pleural space. The needle is removed and the track enlarged by a dilator. The tube is advanced over the guide wire into the pleural space. The guide wire is removed and the tube is connected to an underwater seal. A chest radiograph should be obtained.
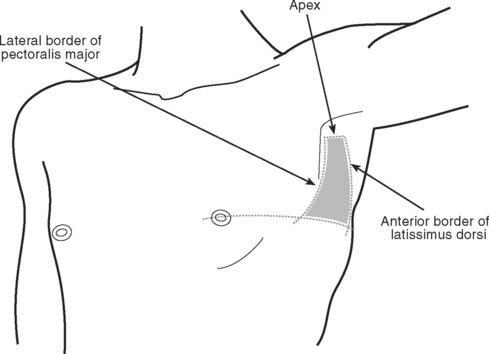
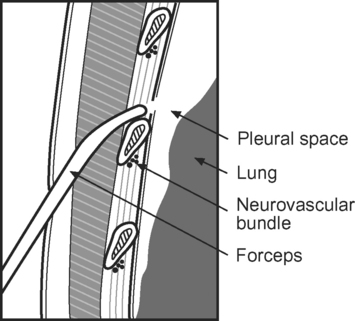
Technique of Thoracostomy Using Tubes 24F or Larger
ARTERIAL CANNULATION
Technique of Radial Arterial Cannulation
Radial arterial cannulation is performed as follows.10
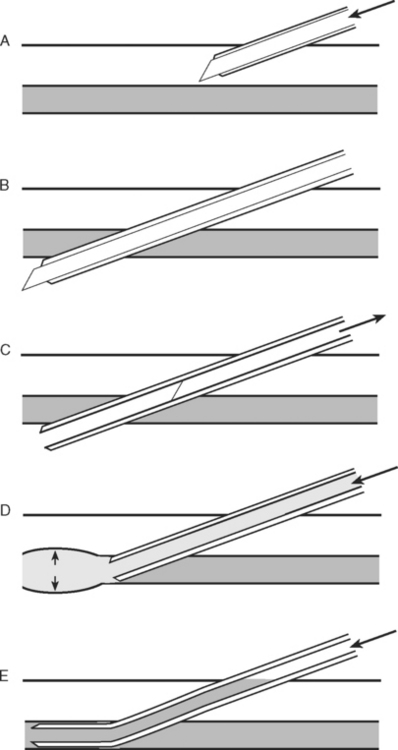
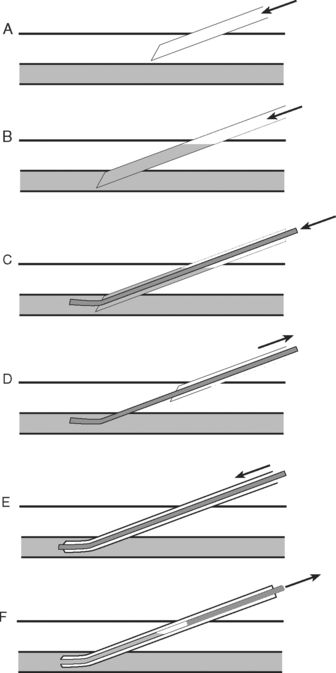
The wrist is positioned and stabilized in mild dorsiflexion using a wrist board or roll. Once positioned, the wrist is cleaned with 2% chlorhexidine and sterile drapes are applied. The operator should wear sterile gloves. In conscious patients, local anesthetic (1 to 2 ml lidocaine 1% without epinephrine) should be infiltrated over the insertion site using a fine (25-gauge) needle. A 20-gauge, 5-cm cannula is suitable for cannulation. A direct (cannula over needle), transfixion or Seldinger (cannula over wire) insertion technique may be used, as shown in Figs. 40-12, 40-13, and 40-14. The cannula should be connected to a continuous flushing system (which need not be heparinized) and the waveform transduced. The cannula is secured—preferably by a suture—and the insertion site covered by a clear dressing. The cannula should be clearly labeled “arterial” so as to avoid inadvertent drug injection. At the completion of the procedure, distal perfusion should be checked.

Complications in Arterial Cannulation
Complications in arterial cannulation include air embolization, hematoma, arterial insufficiency, and infection. Even very small volumes of air can, if injected intraarterially, cause distal ischemia. If there are signs of inadequate perfusion, the cannula should be removed. Infection of arterial cannulas is uncommon. In one study, the incidence of exit-site and blood stream infections were 1.17/1000 catheter-days and 0.59/1000 catheter-days, respectively, with the incidence of both types of infection being higher with femoral than with radial cannulation.11
CENTRAL VENOUS CATHETERIZATION
Choice of Vein
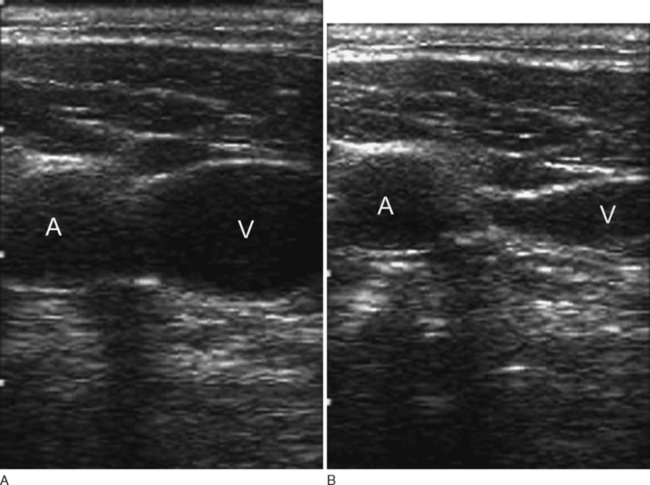
Sites of insertion include the internal jugular, subclavian, peripheral, and femoral veins. The right internal jugular is the most commonly used site in patients undergoing cardiac surgery. The internal jugular vein is relatively easy to cannulate, is well visualized with ultrasound imaging, is compressible in the event of bleeding, has a low incidence of acute complications, and is accessible during surgery. However, in conscious patients, central venous catheters (CVCs) at this site can cause discomfort during movement. Also, tensing of the sternomastoid muscle creates difficulties during insertion. The subclavian vein is the preferred site for long-stay ICU patients because it is more comfortable for the patient and is associated with a reduced incidence of infection compared with the internal jugular vein or femoral sites.12 However, the subclavian site is associated with a higher rate of acute complications— particularly pneumothorax—than are other sites, and CVCs are more technically demanding to insert in this location. The femoral vein is a good choice for temporary dialysis catheters in sedated patients because it is associated with excellent flow characteristics and, like the internal jugular vein, is compressible in the event of bleeding. The disadvantages of the femoral site include unreliable central venous pressure recordings, a high rate of infection,12 limited patient mobility, and the inability to obtain a superior vena cava oxygen saturation. Peripherally inserted central venous catheters (PICCs) are suitable for patients who require long-term antimicrobial therapy. They cause few acute life-threatening complications, have low infection rates, and require a simple insertion technique. However, PICCs are unable to be positioned centrally in 25% to 40% of cases13; in these cases, it may not be possible to aspirate blood from the lumens so the incidence of infectious and thrombotic complications rises (see subsequent material).
General Comments on Technique
Preparation
All CVCs should be inserted using full sterile precautions. Skin should be cleaned with 2% aqueous chlorhexidine (as opposed to 70% alcohol or 10% povidone-iodine),14 and the operator should don a mask, sterile gloves, and a sterile gown. In conscious patients, local anesthetic (lidocaine 5 to 10 ml with epinephrine 1:200,000) should be infiltrated over the insertion site.
Localization of the Vein
The operator should have a thorough knowledge of the anatomy of the vein and its relationship to other structures. Traditionally, venipuncture has been guided by surface landmarks, but over the past decade there has been increasing use of real-time ultrasound imaging to guide needle placement. A metaanalysis of randomized trials demonstrated that ultrasound-guided internal jugular CVC placement resulted in a higher success rate, a shorter time to cannulation, and a reduced incidence of complications than did the landmark method.15 Thus, if available, ultrasound imaging should be used to guide catheterization at this site.
Catheter Insertion
All CVCs should be inserted using a Seldinger (a catheter over a wire) technique.16 Once blood is freely aspirated, the guide wire is inserted into the hub of the needle (or through the hub of the syringe, depending on the kit) and advanced into the vein. If there is any concern that the guide wire is intraarterial, an 18-gauge single-lumen catheter—included in most CVC kits—can be inserted over the wire without dilating the track and then transduced to exclude the possibility of this complication.
Position of the Catheter Tip
A chest radiograph should be obtained after placement of all CVCs (except femoral catheters) to assess the position of the catheter and to rule out a complication such as pneumothorax or hemothorax. The tip of a CVC should lie in the superior vena cava outside the pericardium. On the chest radiograph, the tip of the catheter should lie outside the angle between the right main bronchus and the trachea.17 CVCs that appear kinked or curved into the wall of a vein on the chest radiograph may cause perforation and should be repositioned.
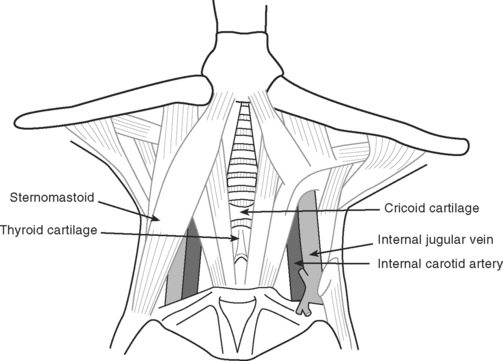
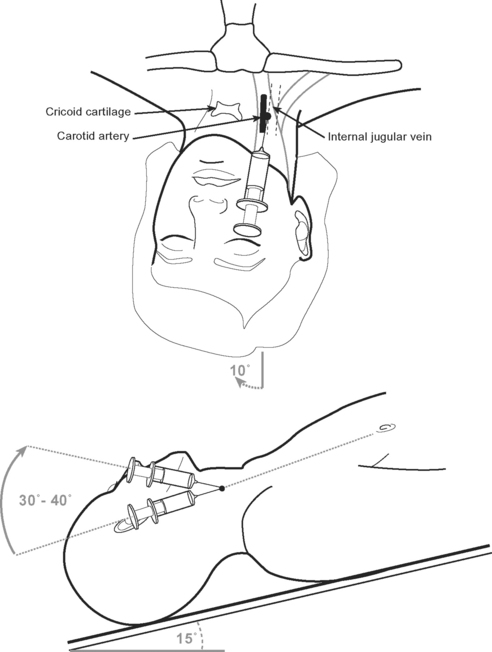
Internal Jugular Vein Cannulation
The internal jugular vein usually, but not always, lies lateral to the carotid artery and deep to the body of sternomastoid muscle in the neck (Fig. 40-15). A middle approach to the internal jugular vein is described here.
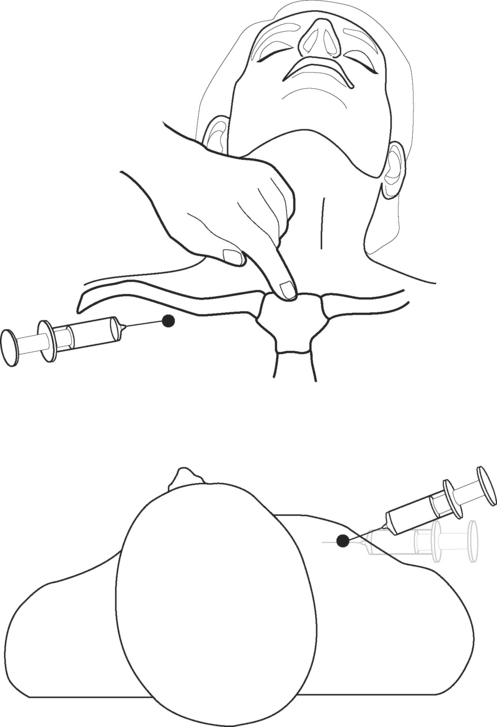
Subclavian Vein Cannulation
The relevant anatomy of the subclavian vein is shown in Figure 40-18. An infraclavicular approach to the vein is described here.

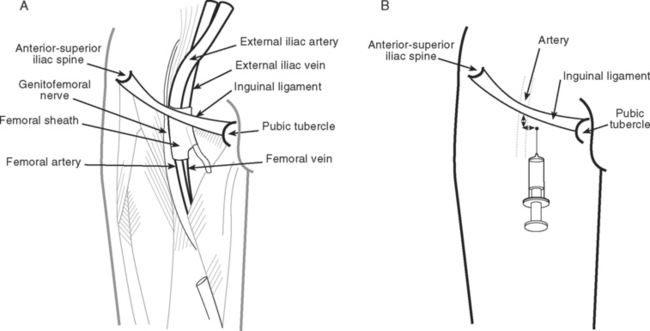
Femoral Vein Cannulation
Peripheral Vein Cannulation
Complications
Complications12,18,19 involved with CVCs may be mechanical, thrombotic, or infectious. Infectious complications are discussed in Chapter 35. The most common mechanical complications are arterial puncture, hematoma, hemothorax, and pneumothorax (Table 40-6). The likelihood of complications is determined by the insertion site, the operator’s experience, and patient factors, such obesity, coagulopathy, and anatomic abnormalities. The incidence of complications increases greatly when the number of needle passes exceeds three.20
Table 40-6 Frequency of Mechanical Complications of Central Venous Catheterization According to Route of Insertion
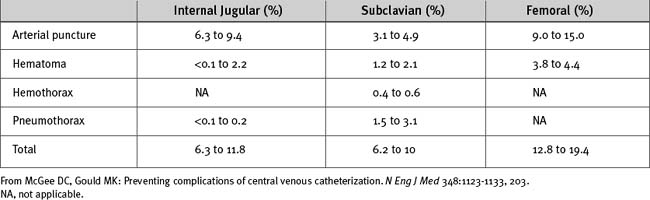
Some complications, such as hematoma, arterial puncture, air embolism, guide wire or catheter embolization, thrombosis, and infection, can occur at all insertion sites. Arrhythmias and pericardial tamponade can occur when catheters are inserted at all sites except the femoral vein. Arrhythmias commonly result from atrial or ventricular irritation caused by the guide wire during catheter insertion. They are usually of nuisance value only. Tamponade that occurs shortly after insertion is likely to be due to trauma caused by the guide wire. Late tamponade occurs usually because of movements of the catheter tip with changes in the arm or head position. Ensuring that the tip of the catheter lies outside the pericardial reflection (see earlier material) and that it is well secured minimizes the problem.
The following site-specific complications can occur.
Complications of Internal Jugular Cannulation
Carotid arterial puncture is common (see Table 40-6). Puncture of the subclavian, vertebral, or thyroid vessels can also occur. Usually the problem is easily managed by firm compression over the site. Rarely, a large hematoma forms, potentially causing airway obstruction. Stroke is also possible due to dislodgment of carotid atheroma or carotid compression resulting from a hematoma. Pneumothorax is uncommon with the technique described, but it can occur when a low approach is used. Damage to the cervical sympathetic chain and injury to the phrenic, vagus, and recurrent laryngeal nerves is also possible.21–23
Complications of PICCs
Thrombosis and thrombophlebitis are common complications of PICCs, particularly when the catheter tip lies in the axillary, subclavian, or brachiocephalic vein. In one study, the incidence of thrombosis was 21% when the tip was in the superior vena cava compared with 60% when it was in more proximal positions.13
PULMONARY ARTERY CATHETERIZATION
The use of pulmonary artery catheters (PACs) is described in Chapter 8. Contraindications to pulmonary artery catheterization are listed in Table 40-7. Prior to floating a PAC, an introducer sheath must be inserted into a central vein. The internal jugular site is the preferred site because obstruction between the first rib and clavicle (see earlier material) can occur at the subclavian site. Pulmonary artery catheterization involves the following steps.
Table 40-7 Contraindications to Pulmonary Artery Catheterization
| Absolute |
| Mechanical tricuspid valve |
| Relative |
| Ventricular septal defect |
| Atrial septal defect |
| Left bundle branch block |
| Significant ventricular arrhythmias |
| Bioprosthetic tricuspid valve |
| Pneumonectomy |
| Ventricular pacing wire dependence |
| Tricuspid valve endocarditis |
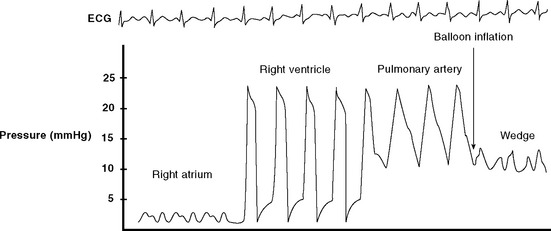
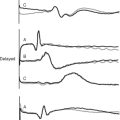
Figure 40.21 Pressure tracing seen during flotation of a pulmonary artery catheter. See text for details.
The catheter should be advanced only with the balloon inflated and withdrawn only with the balloon deflated. Unless advancing the catheter or measuring a wedge pressure, the balloon should be deflated. The pulmonary arterial trace must be continuously displayed so inadvertent wedging of the catheter tip can be rapidly identified—persistent or overwedging of the catheter tip can cause pulmonary arterial rupture. On a chest radiograph, the tip of the catheter should be just proximal to the edge of the pulmonary hilum. A more distal position may increase the risk for pulmonary arterial rupture.
Complications
In addition to complications of central venous catheterization, complications of PACs include arrhythmias, knotting or entrapment of the catheter, damage to the tricuspid or pulmonary valves, and pulmonary arterial rupture. Arrhythmias usually occur during manipulation of the catheter, particularly as it is advanced or withdrawn through the right ventricle. Arrhythmias are usually benign but ventricular tachycardia or fibrillation can occur. There is a small risk of causing right bundle branch block with catheter manipulations, which in a patient with left bundle branch block will result in complete heart block. Pulmonary arterial rupture is rare, occurring in 0.02% to 0.03% of insertions.24,25 Management of this condition is described in Chapter 26.
INSERTION OF AN INTRAAORTIC BALLOON PUMP CATHETER
The use of intraaortic balloon pumps (IABPs) is described in Chapter 22. Insertion is usually via a femoral artery using either a sheath (described here) or a sheathless technique. The advantage of an introducer sheath is that repositioning of the catheter is relatively easy; the disadvantage is that a larger caliber arterial puncture is required. Balloon catheters are sized according to the patient’s height and on the basis of the manufacturer’s recommendations. Relevant anatomy is discussed in the earlier material under the heading Femoral Vein Cannulation. Insertion of an IABP catheter involves the following steps.
Complications
The main complications of IABPs relate to arterial injury. Bleeding at the insertion site can cause localized or retroperitoneal hematoma and result in distal ischemia. A pseudoaneurysm or arteriovenous fistula can develop and require surgical correction. There is a potential for dislodgment of atheroma or dissection within the aorta and iliac arteries, which may compromise perfusion to the splanchnic organs and the lower limbs. The adequacy of lower limb perfusion should be checked and documented regularly. Rupture of the helium-filled balloon causes a gas embolism. If this occurs, the patient should be immediately placed in the head-down position to minimize the chance of cerebral embolization. Over several days, intraaortic balloon counterpulsation can lead to thrombocytopenia.
REMOVAL OF AN INTRAAORTIC BALLOON PUMP CATHETER
Prior to the removal of an IABP, the patient’s coagulation status and platelet count should be checked and significant abnormalities treated by blood component therapy (see Chapter 30). Eye protection, an apron, and sterile gloves should be worn to protect the operator against blood splashes. Securing sutures should be cut and the device placed in standby mode. The insertion site should be cleaned with 2% chlorhexidine. The balloon catheter should be disconnected from the driveline, but it is not necessary to evacuate the balloon manually with a syringe because the aortic pressure compresses it. The catheter is slowly withdrawn until the tail of the balloon engages the sheath, and firm pressure is applied over the artery distal to the insertion site. The catheter and sheath introducer are then slowly withdrawn together. Proximal bleeding from the insertion site should be allowed for 1 to 2 seconds to encourage extravascular loss of any thromboembolic material. Distal pressure is released and pressure is applied proximal to the insertion site to allow back-bleeding from the leg for 1 to 2 seconds. Then firm manual pressure over wadded sterile gauze should be applied to the wound just proximal to the skin insertion site (i.e., directly over the arterial puncture site) for at least 10 minutes. Further pressure is then applied for 20 to 30 minutes with either an inflated compression device (e.g., Femstop) or a 2.5- to 5-kg weighted sandbag. The patient should be kept flat for a further 2 hours. Regular checks of distal perfusion and the insertion site should be made during this time.
PERICARDIOCENTESIS
Pericardiocentesis is indicated for draining pericardial fluid collections that are causing hemodynamic compromise. It is not recommended for the draining of pericardial blood that has accumulated following cardiac surgery; surgical reexploration is indicated in that circumstance (see Chapter 20).
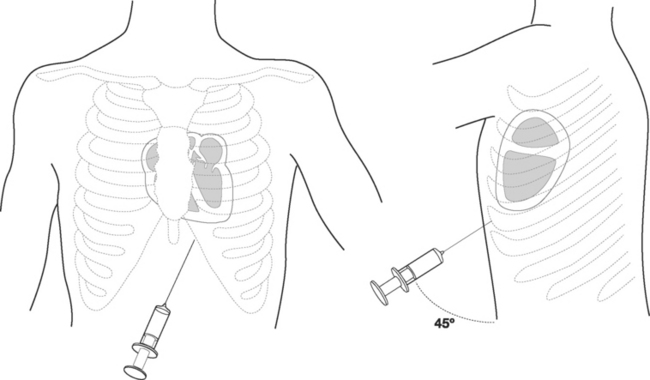
The patient should be supine with the head of the bed raised to 30 to 45 degrees. A full sterile technique should be employed as described earlier, including placing a sterile sheath over the echocardiography probe. Between 5 and 10 ml of lidocaine (1% with epinephrine 1:200,000) is infiltrated into the patient’s left subxiphoid region. The echocardiography transducer is placed in the apical position and a four-chamber view is obtained (see Fig. 7-4D). The needle should be inserted 0.5 cm to the left of the xiphoid process and 1 cm below the costal margin (Fig. 40-22). The needle should be angled at 45 degrees to the plane of the skin and directed toward the patient’s left shoulder. Once the tip of the needle has passed underneath the costal margin, the angle is reduced to 15 degrees. As the needle is advanced, continuous negative pressure should be applied to the syringe. The approximate distance from the skin to the pericardial sac varies with body habitus but is typically 6 to 8 cm. With echocardiography, the needle may be seen entering the pericardial sac. When fluid is aspirated, the syringe is removed and the guide wire inserted into the hub of the needle and advanced into the pericardium. The track is dilated and a pigtail catheter is advanced into the pericardium for a distance of 15 to 20 cm. The catheter should be sutured in place and connected to a fluid collection bag. A chest radiograph should then be obtained to confirm the position of the catheter and exclude a pneumothorax.
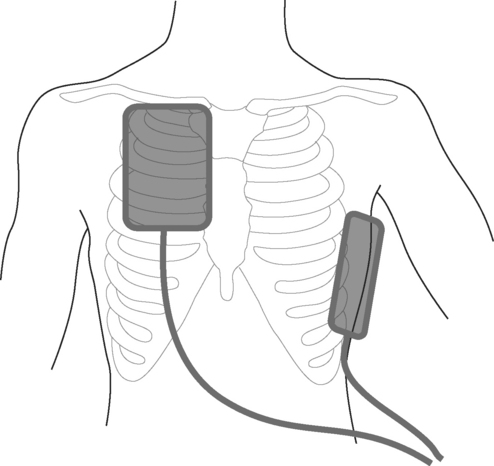
DEFIBRILLATION AND CARDIOVERSION
The word “defibrillation” refers to the use of unsynchronized electric shocks; it is used to treat ventricular fibrillation and polymorphic ventricular tachycardia (see Chapter 20). The word “cardioversion” refers to the use of shocks timed to the R wave of the ECG; they are used to treat many organized arrhythmias (see Chapter 21). Delivery of an electric shock during ventricular repolarization (i.e., on the T wave of the ECG) can induce ventricular fibrillation. Thus, for organized rhythms, synchronized shocks must always be delivered.
Modern cardioverter/defibrillators deliver shocks that have biphasic waveforms, which increases the likelihood of success over older monophasic machines. Devices may be automatic or manual. Automatic devices analyze the patient’s rhythm and, if defibrillation is indicated, deliver an unsynchronized shock. They are suitable for use by the public, by paramedics, and in general hospital wards for treating ventricular fibrillation. They are unsuitable for use in intensive or coronary care units. Manual cardioverter/defibrillators can deliver both synchronized and unsynchronized shocks; the operator interprets the cardiac rhythm and determines the appropriate intervention. Appropriate energies for defibrillation and cardioversion are outlined in Chapters 20 and Chapter 21, respectively. The following steps are involved in delivering an electric shock:
Complications
A brief period of asystole or pulseless electric activity may follow successful cardioversion or defibrillation. If pacing wires are in situ, bradycardia or heart block should be treated by epicardial pacing. The risk of inducing ventricular fibrillation by means of unsynchronized shocks is outlined in the foregoing material. Synchronized shocks can also induce ventricular fibrillation if low energies are used for rapid heart rates (see Chapter 21); this problem may be avoided by always using high-energy shocks (200 joules biphasic energy). If multiple shocks are delivered, particularly if pads or paddles have been inappropriately applied and have poor skin contact because of inadequate conducting gel, a burn may develop. If a patient is inadequately anesthetized, he or she may suffer severe discomfort and distress.
1 Manthous CA, DeGirolamo A, Haddad C, et al. Informed consent for medical procedures: local and national practices. Chest. 2003;124:1978-1984.
2 Yentis SM. Predicting difficult intubation—worthwhile exercise or pointless ritual ? Anaesthesia. 2002;57:105-109.
3 Sellick BA. Cricoid pressure to control regurgitation of stomach contents during induction of anaesthesia. Lancet. 1961;2:404-406.
4 Benumof JL, Partridge BL, Salvatierra C, et al. Margin of safety in positioning modern double-lumen endotracheal tubes. Anesthesiology. 1987;67:729-738.
5 Klein U, Karzai W, Bloos F, et al. Role of fiberoptic bronchoscopy in conjunction with the use of double-lumen tubes for thoracic anesthesia: a prospective study. Anesthesiology. 1998;88:346-350.
6 Torres A, El-Ebiary M. Bronchoscopic BAL in the diagnosis of ventilator-associated pneumonia. Chest. 2000;117:198S-202S.
7 Freeman BD, Isabella K, Lin N, et al. A meta-analysis of prospective trials comparing percutaneous and surgical tracheostomy in critically ill patients. Chest. 2000;118:1412-1418.
8 Powell DM, Price PD, Forrest LA. Review of percutaneous tracheostomy. Laryngoscope. 1998;108:170-177.
9 Laws D, Neville E, Duffy J. BTS guidelines for the insertion of a chest drain. Thorax. 2003;58(suppl 2):ii53-ii59.
10 Tegtmeyer K, Brady G, Lai S, et al. Placement of an arterial line (videos in clinical medicine). N Engl J Med. 2006;354:e13.
11 Lorente L, Santacreu R, Martin MM, et al. Arterial catheter-related infection of 2,949 catheters. Crit Care. 2006;10:R83.
12 Polderman KH, Girbes AR. Central venous catheter use. Part 2: infectious complications. Intens Care Med. 2002;28:18-28.
13 Kearns PJ, Coleman S, Wehner JH. Complications of long arm-catheters: a randomized trial of central vs peripheral tip location. J Parenter Enter Nutr. 1996;20:20-24.
14 Maki DG, Ringer M, Alvarado CJ. Prospective randomised trial of povidone-iodine, alcohol, and chlorhexidine for prevention of infection associated with central venous and arterial catheters. Lancet. 1991;338:339-343.
15 Hind D, Calvert N, McWilliams R, et al. Ultrasonic locating devices for central venous cannulation: meta-analysis. BMJ. 2003;327:361.
16 Seldinger SI. Catheter replacement of the needle in percutaneous arteriography; a new technique. Acta Radiologica. 1953;39:368-376.
17 Rutherford JS, Merry AF, Occleshaw CJ. Depth of central venous catheterization: an audit of practice in a cardiac surgical unit. Anaesth Intens Care. 1994;22:267-271.
18 Polderman KH, Girbes AJ. Central venous catheter use. Part 1: mechanical complications. Intens Care Med. 2002;28:1-17.
19 McGee DC, Gould MK. Preventing complications of central venous catheterization. N Engl J Med. 2003;348:1123-1133.
20 Mansfield PF, Hohn DC, Fornage BD, et al. Complications and failures of subclavian-vein catheterization. N Engl J Med. 1994;331:1735-1738.
21 Parikh RK. Horner’s syndrome: a complication of percutaneous catheterisation of internal jugular vein. Anaesthesia. 1972;27:327-329.
22 Vest JV, Pereira MB, Senior RM. Phrenic nerve injury associated with venipuncture of the internal jugular vein. Chest. 1980;78:777-779.
23 Martin-Hirsch DP, Newbegin CJ. Right vocal fold paralysis as a result of central venous catheterization. J Laryngol Otol. 1995;109:1107-1108.
24 Procaccini B, Clementi G. Pulmonary artery catheterization in 9071 cardiac surgery patients: a review of complications.. Ital Heart J. 2004;suppl 5:891-899.
25 Kearney TJ, Shabot MM. Pulmonary artery rupture associated with the Swan-Ganz catheter. Chest. 1995;108:1349-13452.
26 Samsoon GL, Young JR. Difficult tracheal intubation: a retrospective study. Anaesthesia. 1987;42:487-490.
27 Ellis H, Feldman SA, Harrop-Griffiths AW. Anatomy for Anesthetists, ed 8, Oxford, U.K.: Blackwell Publishing, 2004.
28 Cormack RS, Lehane J. Difficult tracheal intubation in obstetrics. Anaesthesia. 1984;39:1105-1111.
29 Latto IP, Ng WS, Jones PL, et al. Percutaneous Central Venous and Arterial. Catheterization, ed 3. WB Saunders, Philadelphia, 2000.
30 Willeford KL, Reitan JA. Neutral head position for placement of internal jugular vein catheters. Anaesthesia. 1994;49:202-204.