[level-membership-for-emergency-medicine-category]Chapter 34
Principles of Wound Management
1. Preserve viable tissue and remove nonviable tissue
2. Restore tissue continuity and function
3. Optimize conditions for the development of wound strength
4. Prevent excessive or prolonged inflammation
Patients who seek care in the emergency department (ED) because of acute wounds report that their top priorities include prevention of infection, return to normal function, a good cosmetic outcome, and minimal pain during repair.1,2 This chapter reviews the current strategies for attaining these goals.
Background: Wound Healing
For centuries, victims of wounds commonly experienced inflammation, infection, and extreme scarring; in fact, these processes were considered part of normal wound repair. Only in the late 19th century did surgeons first realize that sepsis could be separated from healing.3 Emergency clinicians should have a basic understanding of the process of wound healing. Highlights of this complex phenomenon as they relate to clinical decision making are presented here (Fig. 34-1).
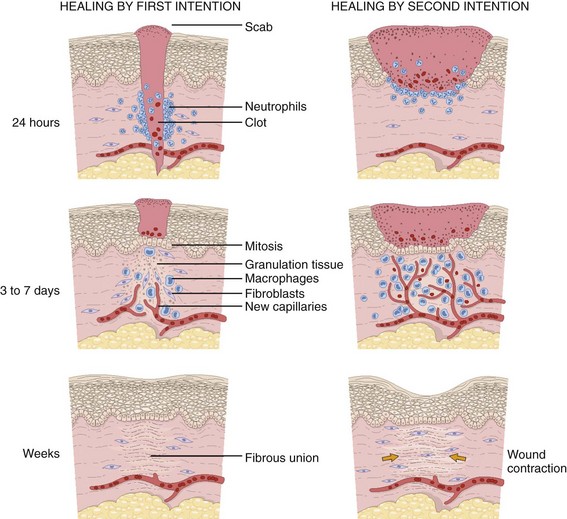
Wounds extending beneath the epithelium heal by forming scar tissue. Inflammation, epithelialization, fibroplasia, contraction, and scar maturation constitute the five stages of this natural repair process.3–5 Inflammation is a beneficial response that removes bacteria, foreign debris, and devitalized tissue, essentially a biologic débridement. Polymorphonuclear and mononuclear leukocytes concentrate at the site of injury and phagocytose dead and dying tissue, foreign material, and bacteria in the wound.6
As white blood cells die, their intracellular contents are released into the wound. When in excessive amount, the contents form the purulence characteristic of infected wounds. Some exudate is expected even in the absence of bacterial invasion, but infection with accumulation of pus interferes with epithelialization and fibroplasia and impairs wound healing. Wounds contaminated with significant numbers of bacteria or foreign material may undergo a prolonged or persistent inflammatory response and not heal. Granuloma formation surrounding retained sutures is an example of chronic inflammation.7
Significant gains in tensile strength do not begin until approximately the fifth day after the injury. Strength increases rapidly for 6 to 17 days, more slowly for an additional 10 to 14 days, and almost imperceptibly for as long as 2 years (Fig. 34-2). The strength of scar tissue never quite reaches that of unwounded skin. Although the process of collagen formation is essentially completed within 21 to 28 days, the scar widens for another month, and collagen continues to remodel and strengthen the wound for up to 1 year.3,7
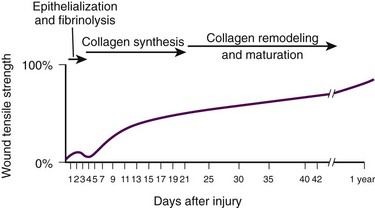
Decisions regarding the optimal time for suture removal and the need for continued support of the wound with tape are influenced by (1) the tensile strength of the wound, (2) the period of scar widening, and (3) the cosmetically unacceptable effect of epithelialization along the suture track. Scars are quite red and noticeable at 3 to 8 weeks after closure. The appearance of a scar should not be judged before the scar is well into its remodeling phase. The cosmetic appearance of wounds 6 to 9 months after injury cannot be predicted at the time of suture removal.8 Therefore, scar revision, if necessary, should be postponed until 6 to 12 months after injury.
One of the most important factors in predicting the cosmetic result of a wound is its location.9 In general, wounds on concave surfaces heal with better cosmetic results than do wounds on convex surfaces. Other factors that affect cosmesis include wound size, wound depth, and skin color.10 Small, superficial wounds in lax, light-colored skin, especially areas where the skin is thin, result in less noticeable scars. Wounds on convex surfaces look better after primary closure than after secondary healing. Static and dynamic forces, along with the propensity toward keloid formation, may influence the long-term cosmetic appearance of wounds more than the surgical skills of the clinician who repaired the wound.8 Repigmentation occurs over a period of 3 to 5 years, even in large wounds that heal by secondary intention.10 In the patient care instructions it is important to emphasize the need for wearing sunscreen over the scar, especially during the early years, because unprotected exposure to the sun can alter the pigmentation as the wound heals and result in noticeably darker pigmentation than the surrounding skin.
Initial Evaluation
The approach to management of a particular wound and the decision to close a wound immediately or after a period of observation are based primarily on factors that affect the risk for infection and secondarily on cosmesis and long-term functionality. The history and physical examination should be directed toward identifying these factors. Some wounds may appear benign but conceal extensive and devastating underlying tissue damage. The discovery that an extremity wound was produced by a roller or wringer device, a high-pressure injection gun, high-voltage electricity, heavy and prolonged compressive force, or the bite of a human or a potentially rabid animal radically alters the overall management of the patient. The American College of Emergency Physicians’ “Clinical Policy for the Initial Approach to Patients Presenting with Penetrating Extremity Trauma” provides a useful approach to the evaluation of all wounds.11
History
Wound Age
In general, the likelihood of a wound infection increases with time from the injury to definitive wound care.12 Definitive wound care does not necessarily mean suturing. Some wounds should never be sutured, such as small contaminated lacerations on the bottom of the foot, whereas others can be sutured many hours after the injury without increasing infection rates. A delay in wound cleaning is the most important factor and may allow bacteria contaminating the wound to proliferate. A delay of only a few hours in the treatment of a heavily contaminated wound can increase the risk for infection. Although no scientific data exist to fully answer the question and there is no definitively accepted standard, it appears reasonable that most wounds that are not grossly contaminated can probably be closed safely 6 to 8 hours after injury if the wound can be adequately cleaned. In contrast, some evidence suggests that wounds in highly vascular regions such as the face and scalp can be closed without increased risk for as long as 24 hours after injury.13 Contrary to popular belief, the “golden period”—the maximum time after injury that a wound may be closed safely without significant risk for infection—is not a fixed number of hours.14
Many factors affect risk for infection, and closure decisions should not be based solely on time considerations. Delayed primary closure is a reasonable alternative when there is clinical concern regarding closure at initial assessment. All data accumulated in the initial evaluation, both historical and physical, must be considered when making the decision to close a wound in a particular patient.12 In addition, the techniques of wound care may extend the period; with skillful cleaning and débridement, a clinician may be able to convert a contaminated wound to a clean wound that can be safely closed in the ED.5 In summary, any time frames offered are suggestions, and clinical judgment and the potential for wound infection should be incorporated into the final decision making.
Other Historical Factors
Other factors that affect wound healing or the risk for infection include the patient’s age and state of health. Patient age appears to be an important factor in host resistance to infection, and individuals who are at the extremes of age, such as young children and the elderly, have the greatest risk for infection.12,15 Infection rates are reported to be higher in patients with concurrent medical conditions, such as diabetes mellitus, immunologic deficiencies, malnutrition, anemia, uremia, congestive heart failure, cirrhosis, malignancy, alcoholism, arteriosclerosis, arteritis, collagen vascular disease, chronic granulomatous disease, smoking, chronic hypoxia, renal failure, liver failure, and morbid obesity, as well as in patients who are taking steroids or immunosuppressive drugs or undergoing radiation therapy. Shock, remote trauma, distant infection, bacteremia, retained foreign bodies, denervation, and peripheral vascular disease also increase wound infection rates and slow the healing process.6,12,15–17
Additional information pertinent to decision making in wound management includes the following:
• Current medications (specifically, anticoagulants and immunosuppressive drugs)
• Allergies (especially to local anesthetics, antiseptics, analgesics, antibiotics, and tape)
• Potential exposure to rabies (in bite wounds and mucosal exposures)
• Potential foreign bodies embedded in the wound, especially when the mechanism of injury is unknown or the injury was associated with breaking glass or vegetative matter18
• Previous injuries and deformities (especially with extremity and facial injuries)
• Associated injuries (underlying fracture, joint penetration)
• Other factors (availability for follow-up, patient understanding of wound care, compliance)
Physical Examination
Mechanism of Injury and Classification of Wounds
1. Abrasions. Wounds caused by forces applied in opposite directions result in the loss of epidermis and possibly dermis (e.g., grinding of skin against a road surface).
2. Lacerations. Wounds caused by shear forces produce a tear in tissues. Little energy is required to produce a wound by shear forces (e.g., a knife cut). Consequently, little tissue damage occurs at the wound edge, the margins are sharp, and the wound appears “tidy.” Tensile and compressive forces also cause separation of the tissues. The energy required to disrupt tissue by tensile or compressive forces (e.g., forehead hitting a dashboard) is considerably greater than that required for tissue disruption by shear forces because the energy is distributed over a larger volume. These lacerations often have jagged, contused, “untidy” edges, which have a higher risk for infection.15
3. Crush wounds. Wounds caused by the impact of an object against tissue, particularly over a bony surface, compress the tissue. These wounds may contain contused or partially devitalized tissue.
4. Puncture wounds. Wounds with a small opening whose depth cannot be entirely visualized are caused by a combination of forces. They are particularly prone to infection.
5. Avulsions. Avulsions are wounds in which a portion of tissue is completely separated from its base, which is lost, or left with a narrow base of attachment (a flap). Shear and tensile forces cause avulsions.19 Skin tear avulsions often result from low-force friction or shearing forces that separate the layers of the skin (epidermis and dermis) from the underlying tissue. These wounds often occur in older adults as a result of minimal impact and vulnerable skin.
6. Combination wounds. Wounds can also have a combination of configurations. For example, a stellate laceration caused by compression of soft tissue against underlying bone can create wounds with elements of both crush injury and tissue separation. Missile wounds involve a combination of shear, tensile, and compressive forces that puncture, crush, and sometimes avulse tissue.20
Contaminants (Bacteria and Foreign Material): Infection rates in studies of traumatic wounds range from 1% to 38%. Numerous factors affect the risk for wound infection, but the primary determinants of infection are the amount of bacteria and dead tissue remaining in the wound,21 the patient’s immune response, and local tissue perfusion.
Essentially all traumatic wounds are contaminated with bacteria to some extent. The number of bacteria remaining in the wound at the time of closure is directly related to the risk for infection. A critical number of bacteria must be present in a wound before a soft tissue infection develops. In experimental wounds, fewer bacteria are required to infect wounds caused by a compressive force (≥104 bacteria/g of tissue) than by a shear force (≥106).22
The nature and amount of foreign material contaminating the wound often determine the type and quantity of bacteria implanted. In general, visible contamination of a wound increases the risk for infection.15 The presence of undetected, reactive foreign bodies in sutured wounds almost guarantees an infection. Although bullet or glass fragments by themselves rarely produce wound infection, these foreign bodies may carry particles of clothing, gun wadding, or soil into the wound. Minute amounts of organic or vegetative matter, feces, or saliva carry highly infective doses of bacteria. The bacterial inoculum from human bites often contains 100 million or more organisms per milliliter of saliva.23 Inorganic particulate matter, such as sand or road surface grease, usually introduces few bacteria into a wound and has little chemical reactivity. These contaminants are relatively innocuous. Soil that contains a large proportion of clay particles or a high organic content (such as that found in swamps, bogs, and marshes), however, has a high risk for infection.24
In industrialized countries, most wounds encountered in the practice of emergency medicine have low initial bacterial counts. If wound cleaning and removal of devitalized tissue are instituted before bacteria within the wound enter their accelerated growth phase (3 to 12 hours after the injury), bacterial counts will generally remain below the threshold needed to initiate infection.11,25
Wound Location
The anatomic location of the wound has considerable importance in the risk for infection. Bacterial densities on the surface of the skin range from a few thousand to millions per square centimeter.24 Distal extremity wounds are more at risk for the development of wound infections than are injuries on most other parts of the body.12,26 The high vascularity in areas such as the scalp or perineum appears to offset the risk posed by the large numbers of endogenous microflora, whereas wounds in ischemic tissue are notoriously susceptible to infection.27
Underlying Structures
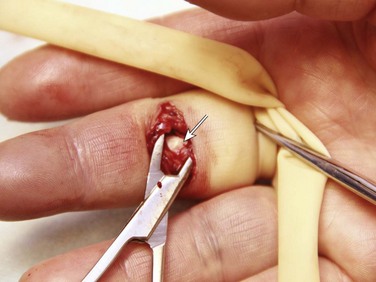
If injury to underlying structures such as nerves, vessels, tendons, joints, bones, or ducts is found, the clinician may choose to forego wound closure and consult a surgical specialist (Fig. 34-3). Procedures such as joint space irrigation, reduction and débridement of compound fractures, neurorrhaphy, vascular anastomosis, and flexor tendon repair are best accomplished in the controlled setting of the operating room, where optimal lighting, proper instruments, and assistance are available.20
Cleaning
Clean the wound as soon as possible after evaluation. Although most wounds are initially contaminated with less than an infective dose of bacteria, given time and the appropriate wound environment, bacterial counts may quickly rise to infective levels. The goals of wound cleaning and débridement are (1) to remove bacteria and reduce their numbers below the level associated with infection and (2) to remove particulate matter and tissue debris that would lengthen the inflammatory stage of healing or allow the growth of bacteria beyond the critical threshold.17 There are two general wound-cleansing techniques—compression and irrigation. Compression involves gently pressing premoistened gauze to the wound to remove surface debris. If necessary, this can be followed by gentle and judicious scrubbing. Irrigation is recommended for most wounds and involves a steady flow of solution across the surface of the wound. This important step in wound management provides hydration to the wound, removes deeper debris, and aids in visual examination while reducing the risk for infection. Normal saline or tap water is often used as the irrigation fluid.
Soaking a wound in a saline or antiseptic solution before the clinician arrives is of little value and may actually increase bacterial counts, so it is not recommended as a routine practice.28
Patient Preparation
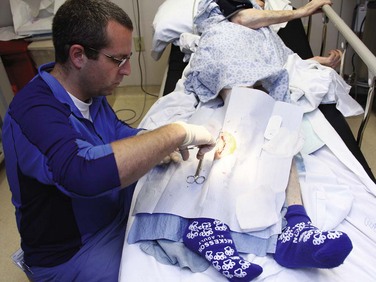
Before examining, cleaning, exploring, or repairing a wound, explain the procedure to the patient to allay fears and encourage cooperation. In general, all wound care should be performed with the patient in a supine position because fainting is a common occurrence during wound preparation and repair (Fig. 34-4). Relatives and friends can be allowed to stay with the patient, but they should be cautioned to report any dizziness or nausea, and they should remain seated throughout the procedure.
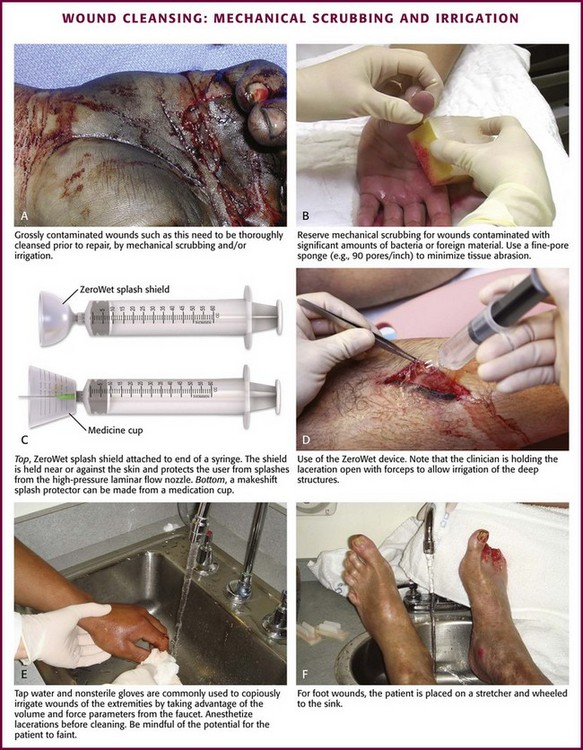
Mechanical Scrubbing
Initially, scrub a wide area of skin surface surrounding the wound with an antiseptic solution to remove contaminants that might be transferred into the wound by instruments, suture material, dressings, or the clinician’s gloved hand during wound management. Minimal aseptic technique requires the use of gloves during the cleaning procedure. It is important to remove all nonabsorbable particulate matter; any such material left in the dermis may be retained in the healed tissue and result in a disfiguring “tattoo” effect.7 Scrubbing the internal surface of a wound is controversial. Although scrubbing a wound with an antiseptic-soaked sponge does remove foreign particulates, bacteria, and tissue debris, an abrasive sponge may inflict more damage on the tissue and become a portal for inflammation and infection.29,30
Mechanical scrubbing should be reserved for wounds contaminated with significant amounts of bacteria or foreign material (Fig. 34-5A and B). If irrigation alone is ineffective in removing visible contaminants from a wound, scrub the wound. Because the amount of damage inflicted on tissues by scrubbing correlates with the porosity of the sponge, a fine-pore sponge (e.g., 90 pores/inch) should be used to minimize tissue abrasion.29,31 Detergents have an advantage over saline in that they minimize friction between the sponge and tissue, thereby limiting damage to tissue during scrubbing. Detergents also dissolve particles and thus help dislodge them from the surface of the wound. Unfortunately, many of the detergents available are toxic to tissues.29,32 Use caution when considering detergents.
Antiseptics during Cleaning
For many years, antiseptic solutions have been used for their antimicrobial properties in and around wounds (Table 34-1). Studies of the use of antiseptics in wounds demonstrate that there is a delicate balance between killing bacteria and injuring tissue.33 Intact skin can withstand strong microbicidal agents, whereas leukocytes and the exposed cells of skin and soft tissue can be damaged by these agents.32 Many antiseptic solutions have been used for cleaning wounds, but the true final benefit or harm from the multiple products introduced during ED wound preparation is difficult to assess or quantify.
TABLE 34-1
Summary of Agents Used for Wound Care
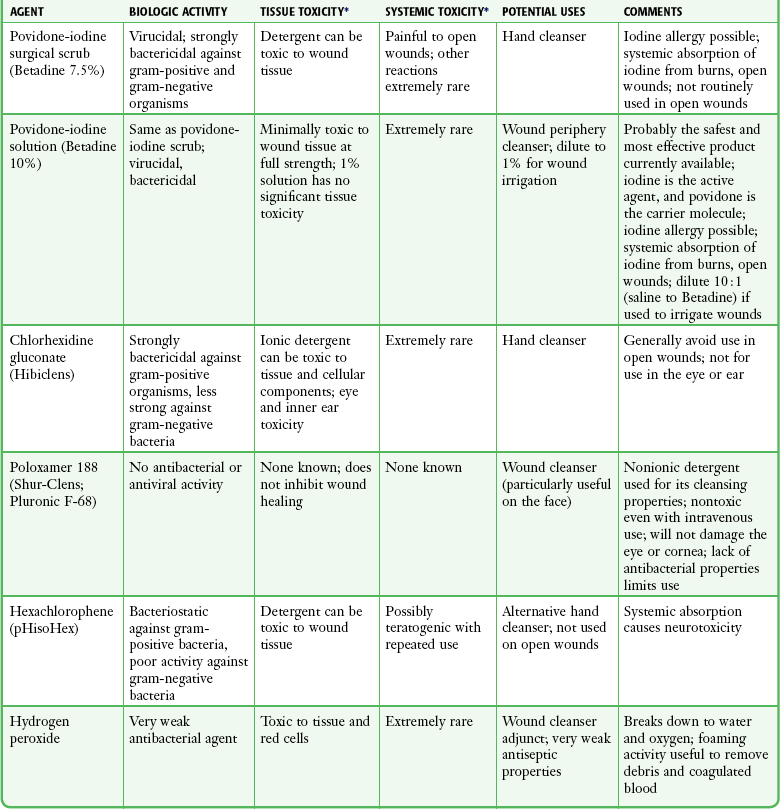
*Based largely on in vitro studies and animal data. The true harm (or benefit) of these products for routine use in the emergency department is theoretical and probably of minimal clinical consequence for most wounds.
Povidone-iodine (Betadine) is widely available as a 10% stock solution. Although the undiluted solution may be used to prepare the skin surrounding a wound, it may be harmful to some tissue; therefore, it should not be placed within the interior of the wound. Diluted povidone-iodine solution in concentrations of less than 1% appears to be safe and effective for cleaning contaminated traumatic wounds, but the precise concentration that provides the most benefit is unclear. In contrast, povidone-iodine surgical scrub (Betadine scrub) and hexachlorophene (pHisoHex) both contain anionic detergents that are harmful to tissues. In vitro studies have demonstrated that chlorhexidine gluconate–alcohol (Hibiclens) is toxic to the cellular components of blood,34 but its effect on wound infection rates is unknown. Many potentially harmful solutions (such as peroxide, alcohol, or commercial cleaning products) are commonly used by patients at home on their own wounds, usually without serious consequence. Hydrogen peroxide is hemolytic, and there is little reason to use it except to clean surrounding skin encrusted with blood and coagulum or to soak off adherent blood-saturated dressings. Peroxide should not be used on granulation tissue because oxygen bubbles lift newly formed epithelium off the wound surface.35 Ethyl alcohol gel solutions are now used commonly as hand sanitizer agents, but their use as a wound antiseptic requires further study.
Nonantiseptic, nonionic surfactants are attractive alternatives to these toxic cleansing agents. In contrast to antiseptic solutions, these preparations cause no tissue or cellular damage, leukocyte inhibition, or impairment of wound healing. The solutions cause no corneal injury, conjunctival irritation, or pain on contact with the wound.34,36 Poloxamer 188 (Pluronic F-68, Shur-Clens, and Pharma Clens) is nontoxic and nonallergenic.29,32 This Pluronic polyol has no antibacterial activity, but scrubbing experimental wounds with poloxamer reduced infection rates, thus proving its ability to cleanse a wound effectively and atraumatically.29 Pluronic polyols may be considered, especially if the wound is near mucous membranes. Even dilute povidone-iodine may be particularly irritating when used for scrubbing contaminated wounds. The use of antiseptic preparations in wounds remains controversial.
Irrigation
Properly performed irrigation is effective in removing particulate matter, bacteria, and devitalized tissue that is loosely adherent to the edges of the wound and trapped within its depths. The effectiveness of irrigation is determined primarily by the hydraulic pressure at which the irrigation fluid is delivered.37–39 Although some investigators have used port devices spiked into plastic intravenous bags and squeezed by hand to deliver a stream of fluid,40,41 other studies have shown that such activities and bulb syringes or gravity flow irrigation devices deliver fluid at low pressure and are ineffective in ridding wounds of small particulate matter or lowering wound bacterial counts.38 In an uncontrolled study, Hollander and coworkers42 found comparable infection rates and cosmetic outcomes in facial and scalp wounds repaired with and without irrigation. Although irrigation may not be required for low-risk, highly vascular uncontaminated facial and scalp wounds, randomized, prospective trials are needed to answer this question.
The pressure that can be delivered with a syringe varies with the force exerted on the plunger and the internal diameter of the attached needle. A simple irrigation assembly consisting of a 19-gauge plastic catheter or needle attached to a 35-mL syringe produces 25 to 40 psi when the barrel of the syringe is pushed with both hands.39 This high-pressure irrigation system removes significant numbers of bacteria and a substantial amount of particulate matter from the wound surface.
Wound irrigation is best achieved with a large-volume syringe and a 18- or 19-gauge catheter or needle to deliver irrigation volumes of at least 250 mL. Irrigation should continue until all visible, loose particulate matter has been removed. Warmed irrigant solutions are comfortable for patients, even after the wound is anesthetized.43
A potential complication of wound irrigation is that infectious material can be splashed into the face of the clinician, even when the tip of the irrigation device is held below the surface of the wound. Several commercial devices are available to contain the splatter, including devices that fit on the end of a syringe (see Fig. 34-5C and D) and devices that fit on the screw top of saline bottles (for this particular device the company reported variable pressure from 4 to 15 psi). An alternative strategy is to pierce the base of a small medicine cup with a large-bore needle. The cup can be placed upside down to cover the area to be irrigated and the syringe with the 19-gauge needle can be inserted through the base of the cup (see Fig. 34-5C). The wound should be positioned to allow continuous drainage of fluid during irrigation by any method.
Antibiotic Solutions for Irrigation
A variety of antibiotic solutions have been instilled directly into wounds or used as irrigation solutions, including ampicillin, a neomycin-bacitracin-polymyxin combination, tetracycline, penicillin, kanamycin, and cephalothin. Although there have been no reports of topical sensitization or toxic tissue levels of the antibiotic, studies have found inconsistent effectiveness in reducing infection rates.44–47 The indications for using antibiotic solutions to clean wounds have not been defined, and this practice is not considered standard.
Recommendations for Cleaning the Wound
A sterile bottle of saline solution can be used to irrigate the wounds of multiple patients until the bottle is empty, but once the bottle is opened, bacterial contamination occurs quite rapidly.48 Use bottles opened only within the past 24 hours to irrigate wounds.48,49 Patients frequently irrigate their wounds with tap water before going to the ED. Many clinicians routinely irrigate wounds, especially extremity wounds, with tap water instead of sterile saline, and infection rates have been found to be comparable to that of saline irrigation50–53 (see Fig. 34-5E and F). The advantage of using tap water is that large volumes of irrigant can be quickly applied to an open wound. The disadvantages of this technique are that irrigation pressures are difficult to control and the patient may faint if allowed to stand at a sink. If tap water is used to irrigate wounds, deliver it through a syringe at the bedside.
Preparation for Wound Closure
Before débridement or wound closure, prepare and drape the wound. Avoid shaving body hair because preoperative wounds that were shaved demonstrated higher infection rates.16,54–56 For wounds in hair-bearing areas, hair can be removed by clipping if it interferes with the procedure.55 Stubborn hairs that repeatedly invade the wound during suturing can be coated with petrolatum jelly or a water-soluble ointment to keep them out of the field. Do not shave eyebrows because critical landmarks for exact approximation of the wound edges would be lost. Although shaved eyebrows will grow back eventually, shaving produces an undesirable cosmetic effect as well. Clip hair rather than shaving it. Use a petrolatum- or water-based ointment to keep the hair out of the wound field.
Disinfect the skin surface adjacent to the wound (not the wound itself) with a standard 10% povidone-iodine or chlorhexidine gluconate (Hibiclens) solution. Paint the solution widely on the skin surrounding the wound, but do not allow it to seep into the interior of the wound itself (Fig. 34-6A).
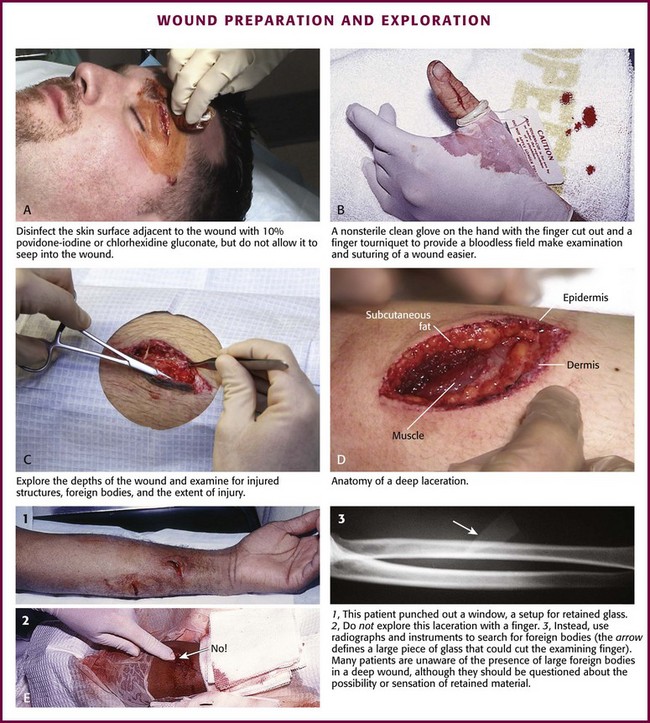
Figure 34-6 A-D, Wound preparation and exploration.
After hand washing, the clinician and any assistants involved in the procedure must wear sterile or nonsterile but clean gloves.57 Sterile gloves are not required, and their use does not decrease infection rates. Wear face masks, especially if you have a upper respiratory bacterial infection. Because droplets of saliva may leak even from around the edges of a face mask, avoid talking in proximity to the wound.58 Use a single fenestrated drape or multiple folded drapes around the wound site. Place a sterile glove on a patient who has a hand wound to provide a sterile field in lieu of a fenestrated drape (see Fig. 34-6B). The area to be sutured can then be exposed by cutting the glove, and the extremity can be placed on a sterile towel. This technique provides a clean field without the need to continually adjust the drape or to operate through a small opening.
Explore the entire depth and the full extent of every wound to locate hidden foreign bodies, particulate matter, bone fragments, or any injuries to underlying structures that may require repair (see Fig. 34-6C). Avoid the temptation to initially explore wounds and assess their characteristics with a finger in search of a foreign body because (see Fig. 34-6E) embedded glass, metal fragments, or sharp pieces of bone may cut the clinician and cause exposure to blood-borne infections. Visualize directly with good lighting in a bloodless field, explore the wound with a metal probe, and use radiographs as safer approaches to wound exploration. Despite these measures, lacerations through thick subcutaneous adipose tissue are treacherous because large amounts of particulate matter can be completely obscured in deep folds of tissue. Unless a careful search is undertaken, these contaminants may be left in the depths of a sutured wound, and infection usually follows. Some clinicians are reluctant to extend lacerations to properly clean or explore them; however, opening the wound to permit adequate visualization may be necessary for successful wound exploration.
Débridement
If the wound is already clean and the edges are viable, sharp débridement may not improve the outcome. Irregular wounds have greater surface areas than do linear lacerations. Because skin tension is distributed over a greater length, the width of the scar is usually less with jagged wounds than if the wound is converted to an elliptical defect with tidy edges. If the edges are devitalized or contaminated, though, the wound edges must be débrided (Fig. 34-7A and B). To avoid a wide scar in this situation, undermine the wound.
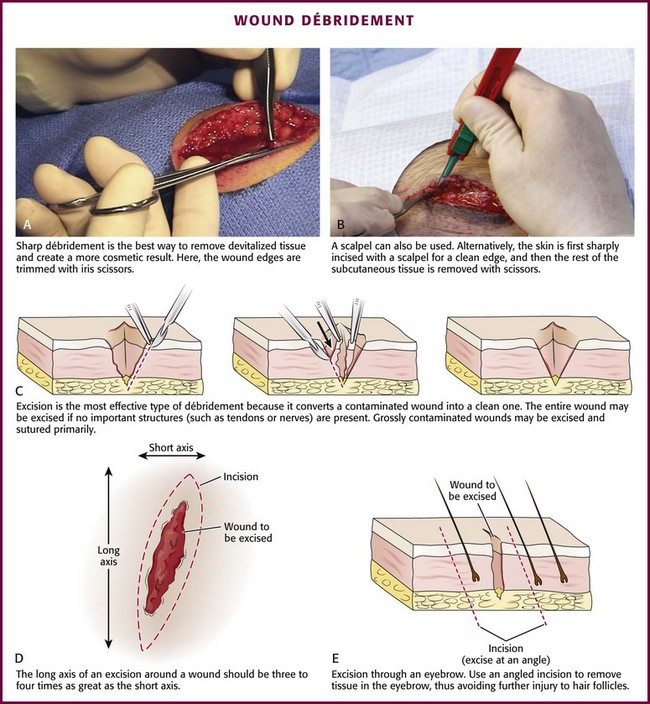
Figure 34-7 A-E, Wound débridement.
Excision: Excision is the most effective type of débridement because it converts a contaminated traumatic wound into a clean wound. If significant contamination occurs in areas in which there is laxity of tissues and if no important structures, such as tendons or nerves, lie within the wound, the entire wound may be excised5 (see Fig. 34-7C). Complete excision of grossly contaminated wounds such as animal bites allows primary closure of such wounds with no greater risk for infection than occurs with relatively uncontaminated lacerations.31
When a puncture wound is excised, make the axis of the excision parallel to a wrinkle, a skin line, or a line of dependency or facial expression. Make the long axis of this lenticular excision three to four times as great as the short axis (see Fig. 34-7D). Premark the skin with a surgical marking pen or by making a superficial “scoring” mark (cutting only down to the epidermis) around the wound with a No. 15 scalpel blade. Place tension on the surrounding skin with a finger or a skin hook. While steadying your hand on the table or on the patient, use the No. 15 blade and cut through the skin at right angles or at slightly oblique angles to the surface of the skin. If complete excision of the entire depth of the wound is not necessary, use tissue scissors to cut the edge of the wound by following the path premarked in the epidermis with the scalpel blade. If complete excision is desired, incise each wound edge past the deepest part of the wound. Excise and remove the wedge of tissue carefully without contaminating the fresh wound surface.
Plan the excision carefully because excessive removal of tissue can create a defect that is too large to close. Wounds on the trunk, the gluteal region, or the thigh are amenable to excision. In contrast, simple excision of a wound on the palm or the dorsum of the nose will make approximation of the resulting surgical wound edges difficult. In hair-bearing areas of the face, particularly through the eyebrows, angle the incision parallel to the angle of the hair follicles to avoid linear alopecia (see Fig. 34-7E).
Selective Débridement: Complete excision is impossible for most wounds because of insufficient skin elasticity, so selective débridement must be used.5,21 Stellate wounds and wounds with an irregular, meandering course have greater surface area and less skin tension per unit length than do linear lacerations. In some cases, excision of an entire wound would result in the loss of too much tissue (i.e., produce a gaping defect and excessive tension on the edges of the wound when closed). Avoid this problem by selective débridement and approximation of the irregular wound edges. This technique involves sharp débridement of devitalized or heavily contaminated tissue in the wound piece by piece and eventual matching of one edge of the wound to the other. Selective débridement is time-consuming but preserves more surrounding tissue.
In heavily contaminated wounds, especially those with abundant adipose tissue, remove all exposed fat and all fat impregnated with particulate matter. The subcutaneous adipose tissue attached to large flaps or to avulsed viable skin should be débrided before reapproximation of the wound; removal of this fatty layer allows better perfusion of the flap or the graft. Contaminated bone fragments, nerves, and tendons are almost never removed. Every effort should be made to clean these structures and return them to their place of origin because they may be functional later.59 Fascia and tendons perform important functions despite potential loss of viability. If they can be cleaned adequately, these tissues should not be débrided. They may be left in wounds as free grafts and be covered by viable flaps of tissue.60
Control of Hemorrhage
Although simply crushing and twisting the end of a small vessel with a hemostat avoids the introduction of suture material into the wound, this method provides unreliable hemostasis. Ligation of the vessel with fine absorbable suture material is preferred. Clamp the bleeding ends of vessels with fine-point hemostats to provide immediate hemostasis. Because nerves often course with these vessels, clamp them only under direct visualization. The tip of the hemostat should project beyond the vessel to hold a loop of a ligature in place (Fig. 34-8A). With an assistant lifting the handle of the hemostat, pass a synthetic 5-0 or 6-0 absorbable suture around the hemostat from one hand to the other. Tie the first knot beyond the tip of the hemostat. Once the suture is securely anchored on the vessel, release the hemostat.61,62 Three knots are sufficient to hold the ligature in place. Cut the ends of the suture close to the knot to minimize the amount of suture material left in the wound.
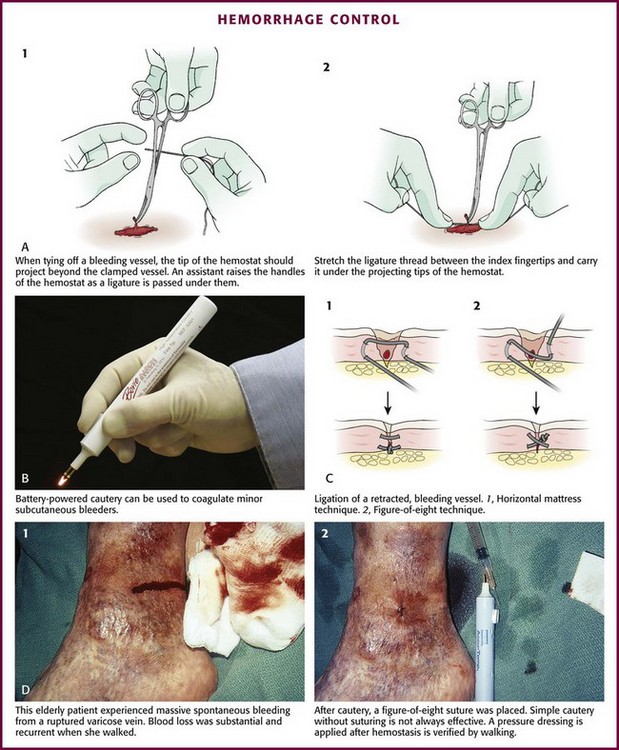
Figure 34-8 A-D, Hemorrhage control.
Ligate vessels with diameters greater than 2 mm. Vessels smaller than 2 mm that bleed despite direct pressure can be controlled by pinpoint, bipolar electrocautery. A dry field is required for an effective electrical current to pass through the tissues. If sponging does not dry the field, use a suction-tipped catheter. Minimize trauma by using fine-tipped electrodes to touch the vessel or touch the active electrode of the electrocautery unit to a small hemostat or fine-tipped forceps while gripping the vessel.3 Keep the power of the unit to the minimum level required for thrombosis of the vessel. Self-contained, sterilizable, battery-powered coagulation units are alternatives to electrocautery. These devices cauterize vessels by the direct application of a heated wire filament. Although these units may damage more surrounding tissue than electrocautery units do, they are compact, simple, and well suited for use in the ED (see Fig. 34-8B).
A cut vessel that retracts into the wall of the wound may frustrate attempts at clamping, ligation, or cauterization. First, control bleeding by downward compression on the tissue. Pass a suture through the tissue twice via a figure-of-eight or horizontal mattress stitch, and then tie it. This stitch will constrict the tissue containing the cut vessel (see Fig. 34-8C).
Large superficial varicosities may bleed spontaneously or from minor trauma. They may bleed profusely, especially when the patient stands up and increases venous pressure. Use a simple figure-of-eight suture to halt the bleeding (see Fig. 34-8D).
Fibrin foam, gelatin foam, and microcrystalline collagen may be used as hemostatic agents. Their utility is limited in that vigorous bleeding will wash the agent away from the bleeding site. Their greatest value may be in packing small cavities from which there is constant oozing of blood.61
Do not spend excessive time attempting to tie off several small bleeding vessels while the patient slowly exsanguinates (Fig. 34-9). In highly vascular areas such as the scalp, it is sometimes best to suture the laceration after exploration and irrigation of the wound despite active bleeding; the pressure exerted by the closure will usually stop the bleeding (Fig. 34-10). If bleeding is too brisk to permit adequate wound evaluation and irrigation, control hemorrhage by clamping and everting the galea or dermis of each wound edge with hemostats. Raney clamps or a large hemostat is an excellent way to stop scalp bleeding; they are used during neurosurgical procedures. If the edge of the entire scalp is compressed, the bleeding will generally stop (see Fig. 34-10C). In the majority of simple wounds with persistent but minor capillary bleeding, apposition of the wound edges with sutures, followed by a compression dressing, provides adequate hemostasis.


Tourniquets
1. They can produce ischemia in an extremity.
2. They can compress and damage underlying blood vessels and nerves.
3. They can jeopardize the survival of marginally viable tissue.
A single-cuff tourniquet (sphygmomanometer cuff) placed around an arm or a leg stops most distal venous or arterial bleeding without crushing any underlying structures. The length of time that a tourniquet may remain in place is limited by the development of pain underneath and distal to the tourniquet. This occurs within 30 to 45 minutes in a conscious patient, which is well within the limits of safety.15
Before application of the tourniquet, elevate the injured extremity and manually exsanguinate it to prevent persistent venous oozing (Fig. 34-11A). Wrap an elastic bandage (e.g., Ace wrap or Esmarch) circumferentially around the extremity, starting distally and moving in a proximal direction. Place a cuff that is 20% wider than the diameter of the limb around the arm proximal to the wound, inflate it to 250 to 300 mm Hg or 70 mm Hg higher than the patient’s systolic blood pressure, and then clamp the tubing. Remove the bandage and lower the extremity. Because tourniquets impair the circulation and may produce neurapraxia, limit their use in the ED to a maximum of 1 hour.

Figure 34-11 A-D, Hemorrhage control: use of tourniquets.
Tourniquets on digits have a greater potential for complications. The maximum tourniquet time that is safe for a finger may easily be exceeded. Also, finger tourniquets can exert excessive pressure over a small surface area at the base of the finger and injure digital nerves or cause pressure necrosis of digital vessels. For this reason, standard rubber bands should not be used as tourniquets. Instead, place a 0.5-inch Penrose drain around the base of the finger and stretch it to no more than two thirds of its circumference (see Fig. 34-11B). This will provide safe and effective hemostasis. The pressure under a Penrose drain ranges between 100 and 650 mm Hg, but it can easily be controlled.63 A few millimeters of difference in total stretch makes a large difference in the pressure applied by this type of tourniquet.64 In digits, tourniquet pressures of only 150 mm Hg are needed for hemostasis.
A surgical glove placed over a patient’s cleaned hand can also serve as a finger tourniquet (see Fig. 34-11C). Remove the tip of the glove covering the injured digit, and then roll it proximally along the patient’s finger to form a constricting band at the base. Another advantage of this technique is that contamination of the wound during closure is less likely. Rolled surgical gloves produce pressures ranging from 113 to 363 mm Hg, depending on the thickness, the amount of glove finger removed, the number of rolls, and the size of the glove in relation to the size of the patient’s hand.64 Ring-shaped exsanguinating digit tourniquets are available commercially (Tourni-Cot, Mar-Med Company) (see Fig. 34-11D). There is a real danger of forgetting to remove such a small tourniquet and accidentally incorporating it into the dressing.
These techniques provide bloodless fields in which to examine, clean, and close extremity wounds. Maximum tourniquet time should not exceed 30 to 45 minutes on a finger.63,64 Débridement of questionably devitalized tissue in a wound is best accomplished without a tourniquet or pharmacologic vasoconstriction because bleeding from tissues is often an indication of their viability.59
Closure
The various techniques for wound closure are presented in Chapter 35. The remainder of this chapter addresses issues related to wound management (e.g., secondary closure, wound dressings, use of antibiotics, aftercare instructions, and suture removal).
Open versus Closed Wound Management
Wounds that heal spontaneously (i.e., by secondary intention) undergo much more inflammation, fibroplasia, and contraction than do those whose edges are reapproximated by wound closure techniques.7,65 During wound healing, contraction covers the defect, but it may result in a deformity (contracture) or loss of function. Left to itself, the healing process may be unable to close a defect completely in areas in which the surrounding skin is immobile, such as on the scalp or in the pretibial area7 (Fig. 34-12). Exposed tendons, bone, nerves, or vessels may desiccate in an open wound. If the patient is careless with an otherwise adequate dressing that covers an open wound, the wound may be further contaminated.66 Surgical closure of wounds minimizes inflammation, fibroplasia, contracture, scar width, and contamination.

Figure 34-12 In areas in which the skin is immobile, as in the scalp, wounds left open may not heal.
Sutures in themselves are potentially detrimental to healing and can increase the risk for infection.67 Each suture inflicts a small intradermal incision that damages the surface epithelium, dermis, subcutaneous fat, blood vessels, small nerves, lymphatics, and epithelial appendages such as hair follicles, sweat glands, and ducts. Once divided and separated by a stitch, these appendages usually undergo inflammation and resorption.68 Each suture is another piece of foreign material that can provoke inflammation.7 When a suture is removed, bacteria that have settled on the exposed portion of the suture are pulled into the suture track and deposited there.68
Delayed Primary or Secondary Closure
There is a common misconception that all wounds must be either sutured within a few hours or left open and relegated to slow healing and an unsightly scar. If there is a substantial risk that closure of a particular wound might result in infection, the decision to close or to leave the wound open can be postponed. After cleaning, wounds left unsutured appear to have higher resistance to infection than do closed wounds. The condition of the wound after 3 to 5 days will then determine the best strategy (Fig. 34-13).

Although cleaning and débridement should be accomplished as rapidly as possible, there is no urgency in closing a wound. Edlich and associates20 pointed out that “the fundamental basis for delayed primary closure is that the healing open wound gradually gains sufficient resistance to infection to permit an uncomplicated closure.” Despite its effectiveness, delayed primary closure is a technique that remains largely unappreciated and probably underused by many clinicians (Fig. 34-14). It is a highly effective means of managing wounds that have a sufficient risk for infection. After 4 to 5 days, a well-irrigated and cleaned wound may be closed primarily with very good results.

Figure 34-14 Delayed primary closure.
Certain wounds should almost always be managed open or by delayed closure (Fig. 34-15). Such wounds include those that are already infected and those heavily contaminated by soil, organic matter, or feces. Also included in this category are wounds associated with extensive tissue damage, such as high-velocity missile injuries, explosion injuries involving the hand, complex crush injuries, and most bite wounds. Deep or contaminated lacerations on the bottom of the foot, such as those occurring when the patient steps on an unknown object while wading in a stream or running through a field, or wounds that are deep punctures are ideal candidates for delayed closure. Some are never sutured but left open for primary healing. Human bite wounds (extending past the dermis) should probably never be closed and are often opened or extended further for cleaning. Clinicians disagree about which animal bite wounds may be closed initially. Most would suture cosmetically deforming injuries, including facial bites and bite wounds that can be excised completely.69 Others would suture dog bites not involving an extremity.70 In severe soft tissue injuries, delayed closure allows time for nonviable tissue to become demarcated from uninjured tissue. Débridement can then be accomplished with maximal preservation of tissue.66

Protection
Function of Dressings
Dressings serve various functions. They protect the wound from contamination and trauma, absorb excess exudate from the wound, immobilize the wound and surrounding area, exert downward pressure on the wound, and improve the patient’s comfort.14,71,72 Occlusive dressings on burns or abrasions maintain a moist environment and prevent painful exposure of the wound to air and dehydration of the wound’s surface.73 Sutured wounds are particularly susceptible to infection from surface contamination during the first 2 days after wound repair. Dressings protect the wound from contamination during this vulnerable period.
One of the primary functions of a gauze dressing is to absorb the serosanguineous drainage that exudes from all wounds. Absorbent dressings also reduce the development of stitch abscesses to some extent. Surface sutures produce small indentations at their points of entrance; tiny blood clots and debris overlie these indentations and allow bacterial growth at the site. Small “stitch abscesses” can develop; they are initially undetectable but are nevertheless destructive to epithelium. Stitch abscesses rarely infect the entire wound but can slightly increase the width of the scar and produce noticeable, punctate suture marks.14
The most common type of dressing is constructed in three layers: a nonadherent contact layer, an absorbent layer, and an outer wrap (Fig. 34-16A).74 Ideally, this dressing provides nonadherence without maceration. The optimal appearance of an abrasion or an open wound under a dressing is a moist red surface with capillary and epithelial growth.

Figure 34-16 A-D, Wound dressings.
Contact Layer: Dry, Semiocclusive, and Occlusive Dressings
Wounds covered with permeable dressings such as plain gauze tend to dry out. Although this is acceptable for dressing sutured wounds, drying of the wound surface damages a shallow layer of exposed dermis, which impedes epidermal resurfacing of abrasions, burns, and incisions.72 Wound desiccation results in further epidermal necrosis, crust formation, and increased inflammation.75,76 Coarse weaves of gauze, usually available in the form of multilayered pads, absorb blood and exudate, but the dressing will adhere if the interstices of the fabric are relatively large. Capillaries, fibrin, and granulation tissue will penetrate and become enmeshed in the material. If the proteinaceous exudate from the wound dries by evaporation, the scab usually clings to the dressing.74,75 Some clinicians use this effect to “débride” the wound when the gauze is removed. However, it may also destroy healing tissue, particularly the new epithelium. Even though débridement of the wound with wet-to-dry dressings is quick, careful débridement with surgical instruments is more controlled and less traumatic.
Adherence to the wound can be prevented if the dressing is nonabsorbent, occlusive, or finely woven. If the wound is kept moist by covering it with an occlusive film or nonadherent covering soon after wound management and if the film is left in place for at least 48 hours, the epidermis will migrate over the surface of the dermis faster than when a dry scab is allowed to form.77–79 Protection of wounds that are healing by secondary intention with occlusive or semiocclusive dressings has several advantages,10 including more rapid healing, less pain from exposure to air, better cosmetic result, few dressing changes, and protection from bacteria.
Petrolatum gauze (e.g., Adaptic, Xeroform, Betadine, Aquaflo) is commonly applied next to the surface of the wound to prevent the wound from sticking to the dry gauze in the absorbent layer and to protect the regenerating epithelium (Box 34-1). Always use nonadherent material to cover skin grafts. Some clinicians use fine-mesh gauze (41 to 47 warp threads/inch2) rather than petrolatum gauze on abrasions, especially on wounds that are heavily contaminated, because removal of this type of dressing débrides only the small tufts of granulation tissue that become fixed in the mesh pores and leaves a clean, even surface. Once a healthy, granulating surface is present and reepithelialization is proceeding, nonporous dressings can be used.75 Fine-mesh gauze is also used next to exposed tissue in wounds being considered for delayed primary closure; a protective and absorptive bulky dressing is placed on top of the wound.
Various polyurethane-derived membranes provide an occlusive effect, including Epi-Lock (Derma-Lock Medical Corporation), Op-Site (Smith and Nephew, Ltd.), Tegaderm (3M), Bioclusive (Johnson & Johnson), and Primaderm (ACCO, Inc.); those with soluble collagen or gelatin backing, such as DuoDERM (ConvaTec) and Biobrane (Woodroof Laboratories); products with hydrogels, such as Vigilon75; and other occlusive dressings such as Dermicel (Johnson & Johnson) and Telfa (Kendall). Silicon-based dressings (Mepitel Mölnlycke Health Care, Newton, PA) can be used for the treatment of skin tears.
One fear of using occlusive dressings is that microorganisms will proliferate in the moist environment beneath the occlusive film and increase wound infection rates.72,80 However, occlusive dressings such as DuoDERM actually serve more as a barrier to external pathogenic bacteria.81 Although skin bacteria under occlusive dressings can multiply,82 even chronic wounds contaminated with large numbers of bacteria are routinely treated with occlusive dressings successfully.83
Adhesive-backed dressings (e.g., DuoDERM and Op-Site) may adhere to an open wound and remove new epidermis, macerate skin, or produce a thick eschar. The wound must then epithelialize underneath the eschar.84 These dressings do not allow exudate to drain out the edges of the dressing. Between dressing changes, coat the wound with petrolatum or an antibiotic ointment before applying these products.10 Epi-Lock has the advantage of thermally insulating the wound by virtue of its thickness, but unlike Tegaderm and Op-Site, it is opaque and does not allow inspection of the underlying wound surface.85 Because Epi-Lock allows drainage of exudate, it is better tolerated by patients if the overlying gauze bandage is changed daily. Wounds covered with certain occlusive dressings or with silver sulfadiazine (Silvadene, Marion Laboratories) appear to be blanketed with pus; this exudate actually represents the beneficial proliferation of macrophages and polymorphonuclear leukocytes.79,85
Absorbent Layer
When dressing wounds with considerable drainage, use sufficient gauze to cover the wound and absorb all the drainage. Change the dressing whenever it becomes soiled, wet, or saturated with drainage. Once a dressing becomes moist, pathogens can pass through it to the underlying wound.72 Consequently, a dressing that is used to absorb exudate or débride the wound must be changed more frequently than one designed solely to occlude. Absorbant dressings on draining wounds can be changed daily to avoid bacterial overgrowth beneath the dressing.7,75 Aspirate fluid accumulating under an occlusive dressing or change the dressing every 1 to 2 days during the first week or until the exudate no longer accumulates.86
Outer Layer
Bandages over the forearm and the lower extremities are particularly prone to slippage because of the constant motion of these parts and the marked changes in diameter of the extremity over a short distance. To help prevent this problem, rotate the roll of bandage 180 degrees after each circular turn to produce a reverse spiral and reduce the bandage’s mobility (Fig. 34-16B). A simple dressing for a single digit is to use tube gauze or cover it with a finger cut from a surgical glove (see Fig. 34-16C and D).
Certain chemically treated wide-mesh weaves have the properties of cling and stretch, which holds it snugly in place but expands if edema develops.74 An elastic cotton roll (Kerlix) allows the bandage to conform to body contours, provides some mobility to bandaged joints, and permits the wound to swell without the circumferential bandage constricting the extremity. An inelastic Kling bandage better immobilizes the part. Use rigid immobilization with plaster splints or braces to protect wounds in mobile areas, such as around large joints.
Dressings vary in their absorbency, adhesiveness, occlusiveness, opacity, and insulating properties. Further research may identify types of dressings that are best suited for different phases of the healing wound. Currently, a two- or three-layer dressing is used for most traumatic wounds. Base the choice of material for the contact layer on the characteristics of the individual wound.87
Splinting and Elevation
Wounds and sutured lacerations may be immobilized to enhance healing and to provide patient comfort (Fig. 34-17). Immobilization of an injured extremity promotes healing by protecting the closure and by limiting the spread of contamination and infection along lymphatic channels. Wounds overlying joints are subjected to repeated stretching and movement, which delays healing, widens the scar, and potentially disrupts the sutures.20 Short-term splints are almost always beneficial for lacerations that overlie joints and are frequently necessary for the protection of wounds involving the fingers, hands, wrists, volar aspect of the forearms, extensor surface of the elbows, posterior aspect of the legs, plantar surface of the feet, and the extremities when skin grafts have been applied. A plaster or aluminum splint may be incorporated into a bandage to reduce the mobility of the part.

Elevate injured extremities in all but the most trivial injuries. Elevation limits edema formation, allows more rapid healing,20 and reduces throbbing pain. Patients given this information are often more motivated to elevate the extremity as instructed. Use slings to elevate wounds involving the forearm or the hand. The patient can also wrap a pillow around an injured hand to promote elevation at home (see Fig. 34-17A). With severe injuries, begin elevation in the ED (see Fig. 34-17B).
Ointments
The safety and efficacy of topical antibiotic preparations used on wound surfaces are unproven, and no universal standard exists. Many clinicians routinely suggest the use of antibiotic ointments over sutured wounds, whereas others opt for a simple dry dressing. Use of a triple-antibiotic preparation containing neomycin, bacitracin, and polymyxin provides a broad spectrum of protection against infection in abrasions without systemic absorption, toxicity, or the emergence of resistant strains of bacteria. There is some evidence that Neosporin ointment, Silvadene cream, and mupirocin (Bactroban, GlaxoSmithKline, London), as well as their inert bases and vehicles, either improve wound healing or slightly reduce infection rates.88 Although there is a risk for allergic sensitization or contact dermatitis with preparations containing neomycin, allergic reactions are uncommon unless the ointment is used repeatedly (Fig. 34-18).

One obvious benefit from the use of topical antibiotics is that ointments prevent adherence of the wound surface to the dressing. Use ointments to reduce the formation of a crust that covers and separates the edges of the wound. Lacerations surrounded by abraded skin are especially predisposed to coagulum formation. In such cases, instruct the patient to cleanse the wound frequently and to follow the cleansing with an application of ointment during the first few days.20
Strong topical corticosteroids have detrimental effects on healing. Application of 0.1% triamcinolone acetonide in an ointment retards healing in wounds by as much as 60%, whereas hydrocortisone probably does not interfere with epithelialization.89 Some clinicians believe that single and low doses of oral corticosteroids probably have no effect on wound healing but that repeated, large doses of steroids (≤40 mg of prednisone per day) inhibit healing, particularly if used before the injury or during the first 3 days of the healing phase.90 There is some evidence that topical vitamin A may reverse some of the antiinflammatory and immunosuppressive effects of corticosteroids.91
Systemic Antibiotics
Most traumatic soft tissue injuries sustain a low level of bacterial contamination.56 Uncomplicated wound infection rates in ED patients range from 2% to 5%, regardless of clinician intervention. In a number of clinical studies of relatively uncontaminated and uncomplicated traumatic wounds (which represent the majority of wounds managed in the ED), prophylactic antibiotics administered in various routes and regimens did not reduce the incidence of infection.92–98 Studies of antibiotic prophylaxis for animal bite wounds have produced variable results, and no large study providing stratification of the many prognostic factors has been conducted.99
Even after multiple studies on the use of prophylactic antibiotics for wounds treated in the ED, there is no clear practice standard.100 Because no benefit has been established after multiple attempts with numerous antibiotic regimens, one would intuit that they have no benefit. In most soft tissue wounds in which the level of bacterial contamination after cleaning and débridement is low, antibiotics are not recommended. Heavily contaminated wounds (such as wounds in contact with pus or feces) often become infected despite antibiotic treatment. Nevertheless, antibiotics may have marginal benefit when the level of contamination is overwhelming or if the amount of questionably viable tissue left in the wound is considerable (e.g., with crush wounds). Antibiotics may be considered for extremity bite wounds, puncture-type bite wounds in any location, intraoral lacerations that are sutured, orocutaneous lip wounds, wounds that cannot be cleaned or débrided satisfactorily, and highly contaminated wounds (e.g., those contaminated with soil, organic matter, purulence, feces, saliva, or vaginal secretions). They may also be considered for wounds involving tendons, bones, or joints; for wounds requiring extensive débridement in the operating room; for wounds in lymphedematous tissue; for distal extremity wounds when treatment is delayed for 12 to 24 hours; for patients with orthopedic prostheses; and for patients at risk for the development of infective endocarditis.20
Many patients have difficulty determining whether their wounds are infected and mistake the normal healing process for infection; therefore, in high-risk patients (a clinical judgment), mandatory follow-up would appear to be the best tactic.101
The choice of antibiotic, particularly for bite wound prophylaxis, is as controversial as the indications for use.102 Many species of bacteria cause animal bite wound infections, thus making complete coverage impossible.103 Antibiotic regimens vary with the species of the biter and with evolving bacterial resistance. The duration of antibiotic prophylaxis is also in question. It is common practice to provide antibiotics for 72 hours. (See additional comments on animal bites at the end of this chapter.)
Immunoprophylaxis
Although tetanus is rare, it still occurs in the United States and is a preventable disease. Therefore, any wound should be assessed for its potential to cause tetanus, and prophylaxis should be considered in the ED. About 70% of Americans older than 6 years have protective levels of tetanus antibodies, but levels decline as age increases, with elderly women having the lowest levels of protection. Hispanics (and probably other immigrants) were most likely to have inadequate immunity. Hence, efforts at preventing tetanus should especially be addressed in immigrants and the elderly. The recommendations of the Centers for Disease Control and Prevention for tetanus prophylaxis are listed in Figure 34-19.104

Figure 34-19 Tetanus immunization guidelines. ACEP, American College of Emergency Physicians; ACS, American College of Surgeons.
When questioning patients about their tetanus immunization status, ask whether they ever completed the primary immunization series and, if not, how many doses were given. Patients who have not completed a full primary series of injections may require both tetanus toxoid and passive immunization with tetanus immune globulin. Tetanus immune globulin will decrease, but not totally eliminate the subsequent development of clinical tetanus. Tetanus and diphtheria immunizations are often given together. The preferred preparation for active tetanus immunization in patients 7 years of age and older is 0.5 mL of tetanus toxoid (plus the lower, adult dose of diphtheria toxoid); the dose of tetanus immune globulin is 250 to 500 units given intramuscularly.105
Mild local reactions consisting of erythema and induration are common (≈20%) after tetanus toxoid injections; occasionally, they are accompanied by fever and mild systemic symptoms. Reactions are about twice as common if diphtheria immunization is coupled with tetanus immunization. This is a hypersensitivity reaction, not an infection, and does not represent an absolute contraindication to further immunizations. A minor febrile illness, such as an upper respiratory infection, is not a reason to delay immunization. Although serious reactions are rare, a hypersensitivity reaction consisting of tenderness, erythema, and swelling or serum sickness develops in some patients with high antibody levels. Generalized urticarial reactions and peripheral neuropathy have also been reported.106 The only absolute contraindication to tetanus toxoid is a history of anaphylaxis or a neurologic event. In such cases, tetanus immune globulin can be given safely. Pregnancy is not a contraindication to either toxoid or immune globulin, although some suggest that the toxoid be used with caution during the first trimester. Given the excellent amnestic response to the toxoid, it is likely that the primary immunization series, coupled with intermittent boosters, conveys immunity for most of one’s life. However, a significant percentage of elderly patients fail to develop protective antitoxin antibody titers after 14 days when given tetanus toxoid boosters.
Tetanus can develop despite prior immunization, and it can result from chronic skin lesions and apparently minor or clean wounds.107 In 10% to 20% of cases, no previous wound can be identified. Patients’ recall of past immunizations is imperfect, and immunity may be, on rare occasion, inadequate after a complete series of tetanus toxoid.108 Tetanus boosters given more frequently than advised increase the incidence of adverse reactions to subsequent injections. However, the benefits of overtreatment seem to outweigh the risks.
Patient Instructions
Successful wound healing is partly dependent on the care given to the wound once the patient leaves the ED. Patient satisfaction depends not only on the cosmetic result but also on the expectation of that result.10 Both are reasons why patients should receive thorough and clear instructions.
Inform the patient that no matter how skillful the repair, any wound of significance produces a scar. Most scars deepen in color and become more prominent before they mature and fade. The final appearance of the scar cannot be judged before 6 to 12 months after the repair.8 Some wounds heal with wide, unattractive scars despite ideal management and closure. Wounds more likely to have significant scars are those that cross perpendicular to joints, wrinkle lines, or lines of minimum tension (Kraissel lines) and those that retract more than 5 mm. Wound that are likely to scar are those that are located over convexities or in certain anatomic locations (e.g., anterior upper part of the chest, back, shoulders) where hypertrophic scars are common. A wound crossing a concave surface may result in a bowstring deformity; one crossing a convexity may leave a scar depression. To avoid these complications, a Z-plasty procedure can be performed at the time of initial wound management, or the scar can be revised later. Tell the patient to expect suboptimal outcomes in these situations.24
Patients may experience dysesthesia in or around a scar, particularly about the midface. Gentle rubbing or pressing on the skin may relieve the symptoms. If wounds extending to subcutaneous levels lacerate cutaneous nerves, patients may be bothered by hypoesthesia distal to the wound. The dysesthesia and anesthesia usually resolve in 6 months to 1 year.10
After 48 hours the patient may remove the dressing on uncomplicated wounds and check for evidence of infection: redness, warmth, increasing pain, swelling, purulent drainage, or the “red streaks” of lymphangitis. Not all patients are able to identify these signs and often overlook an early infection or overcall an infection in the presence of normal healing. Patients with complicated or infection-prone wounds should be examined in 2 to 3 days by a clinician or nurse.109 Inform patients that a painful wound is often a sign of infection or suture reaction, and pain should prompt inspection of the wound. If no sign of infection is present after 48 to 72 hours, the patient can care for the wound until it is time for removal of the sutures.
Because the edges of a wound are sealed by coagulum and bridged by epithelial cells within 48 hours, the wound is essentially impermeable to bacteria after 2 days.14,110 Instruct the patient to protect the wound and keep the dressing clean and dry for 24 to 48 hours. In this initial period, change the dressing only if it becomes externally soiled or soaked by exudate from the wound. If possible, keep the injured part elevated.
Daily gentle washing with mild soap and water to remove dried blood and exudate is probably beneficial, especially in areas such as the face or the scalp,109–111 but vigorous scrubbing of wounds should be discouraged. Patients may bathe with sutures in place but should not immerse the wound for a prolonged time. Although diluted hydrogen peroxide can be used to remove blood from the skin surface, it should not be repeatedly used as a cleaning agent on the healing wound itself.35 Generally, a wound should be protected with a dressing during the first week and the dressing changed daily. If the wound is unlikely to be contaminated or traumatized, leave it uncovered. Sutured scalp lacerations are usually left open, and showering is encouraged.
Secondary Wound Care
Patients with simple sutured wounds may be released with appropriate instructions for home care and be told to return for removal of the sutures at an appropriate time. Examine high-risk wounds, such as bite wounds and other infection-prone wounds, in 2 to 3 days for signs of infection. Inspect the wound if the patient experiences increasing discomfort, a fever develops, or the patient believes that the wound is infected.71 Evaluate wounds being considered for delayed primary closure in 4 to 5 days.65
Wounds in which extensive dissection of subcutaneous tissue has been performed may develop an intense inflammation similar in appearance to low-grade, localized cellulitis. It is rarely necessary to open these wounds. Remove one or two stitches to relieve some of the tension caused by mild swelling, if necessary. Cleanse daily with water and a mild soap and apply warm compresses, and this type of wound reaction should subside within 24 to 48 hours.71
If a wound becomes infected, evaluate for the presence of a retained foreign body as the nidus of the infection (Fig. 34-20). Also, in most sutured wounds that become infected, remove the sutures to allow drainage. If a wound exhibits a minor infection, remove a few sutures or all of them. Pack grossly infected wounds open to allow further drainage. Infection around a suture can lead to the formation of a stitch mark.112 Treat infected wounds with daily cleansing, warm compresses, and antibiotics. Leave wounds that have been opened to heal by secondary intention, which involves wound contraction, granulation tissue formation, and epithelialization.

Suture Removal
The optimal time for suture removal varies with the location of the wound, the rate of wound healing, and the amount of tension on the wound. Certain areas of the body, such as the back of the hand, heal slowly, whereas facial or scalp wounds heal rapidly. The speed of wound healing is affected by systemic factors such as malnutrition, neoplasia, and immunosuppression. Therefore, only general guidelines can be given for the timing of suture removal. At the time that suture removal is being considered, one or two sutures may be cut to determine whether the edges of the skin are sufficiently adherent to allow removal of all the sutures.5 Removing sutures too early invites wound dehiscence and widening of the scar, whereas leaving sutures in longer than necessary may result in epithelial tracks, infection, and unsightly scarring.113
Percutaneous sutures stimulate an inflammatory reaction along the suture track. Factors that determine the severity of stitch marks include the length of time that stitches are left in place, skin tension, the relationship of the suture to the edge of the wound, the region of the body, infection, and the patient’s tendency for keloid formation.112,114 The skin of the eyelids, palms, and soles and the mucous membranes seldom show stitch marks. In contrast, oily skin and the skin of the back, the sternal area, the upper part of the arms, the lower extremities, the dorsum of the nose, and the forehead are likely to exhibit the permanent imprints of suture material on the skin surface.112
If sutures are removed within 7 days, generally no discernible needle puncture or stitch marks will persist.114 However, at 6 days the wound is held together by a small amount of fibrin and cells and has minimal strength.68 The tensile strength of most wounds at this time is adequate to hold the wound edges together, but only if there is no appreciable dynamic or static skin force pulling the wound apart.5 Minimal trauma to an unsupported wound at this point could cause dehiscence. The clinician should decide on the proper time to remove the sutures after weighing these various factors. If early suture removal is necessary (such as on the face), wound repair can be maintained with strips of surgical skin tape. The key to wound tensile strength after suture removal is an adequate deep tissue layered closure.
Some general guidelines exist for suture removal. Remove sutures on the face on the fifth day after the injury or remove alternate sutures on the third day and the remainder on the fifth day. On the extremities and the anterior aspect of the trunk, leave sutures in place for approximately 7 days to prevent disruption of the wound. Leave sutures on the scalp, back, feet, hands, and joints in place for 10 to 14 days, even though permanent stitch marks may result.112 Some clinicians recommend removal of the sutures used to repair eyelid lacerations as early as 72 hours to avoid epithelialization along the suture track along with subsequent cyst formation.115
Removing sutures is usually relatively simple. Cleanse the wound and any remaining crust overlying the surface of the wound or surrounding the sutures. Wipe the skin with an alcohol swab. Cut each stitch with scissors or the tip of a No. 11 scalpel blade at a point close to the surface of the skin on one side. Grasp the suture on the opposite side with forceps and pull it across the wound (Fig. 34-21). The amount of exposed suture dragged through the suture track is thereby minimized. It is difficult to remove sutures with very short ends. At the time of suture placement, cut the length of the suture ends so they generally equal the distance between sutures. This makes it easier to grasp the suture during subsequent removal while avoiding entanglement during the knotting of adjacent sutures.

Once the skin sutures are removed, the width of the scar increases gradually over the next 3 to 5 weeks unless it is supported. Support is provided by previously placed subcutaneous stitches that bring the edges of the skin into apposition or by the application of skin tape. A nonabsorbable subcuticular suture can be left in place for 2 to 3 weeks to provide continued support for the wound. Although complications such as closed epithelial sinuses, cysts, or internal tracts can occur from prolonged use of this stitch, they are unusual and can be avoided by placement of a buried subcuticular stitch with an absorbable suture.14
If time and effort have been invested in cosmetic closure of the face, protect the repair with skin tape after the skin sutures have been removed. Wound contraction and scar widening continue for 42 days after the injury.68 Because the desired result is a scar of minimal width, the tape can be used for as long as 5 weeks after removal of the sutures. With exposure to sunlight, scars in their first 4 months redden to a greater extent than the surrounding skin does. In exposed cosmetic areas and when prolonged exposure to the sun is anticipated, appropriate sun protection and avoidance strategies should be used (e.g., a hat and sunscreen). Sunscreen may have a role in protecting scars from the sun, but more studies are needed to better understand its impact.
Complications
Miscellaneous Aspects of Wound Care
The ED Approach to Puncture Wounds
Puncture wounds are common, yet there are no universal treatment standards or prospective studies to identify the most effective and most appropriate way to manage puncture wounds in the ED. Aside from evaluating tetanus immunization status and considering the possibility of a foreign body, the clinician has few proven options to prevent infection in a puncture wound (Fig. 34-22). Clinical experience suggests that the course of a puncture wound is likely to be determined at the time of the injury. Scrubbing the surface of the puncture, evaluating the opening for retained foreign matter, and trimming jagged skin and tissue edges are suggested. The value or appropriateness of coring, probing, or irrigating the puncture track has not been established. Forcing an irrigation catheter into a small puncture wound is counterproductive and discouraged. Deep irrigation is impossible without extending the puncture site into a larger laceration, and there are theoretical risks of delayed healing and dissemination of contamination unless the full depth of the puncture is accessible and irrigated. In general, aggressive irrigation and routine enlargement of the puncture track are not recommended. For through-and-through punctures, the track can often be débrided by pulling gauze through the wound.

It is impossible to accurately predict the final outcome of a puncture wound, although most do well. No prospective randomized trials have evaluated the role of prophylactic antibiotic administration to prevent infection in puncture wounds. Hence there are no standards on the use, type, or duration of prophylactic antibiotic therapy, even in high-risk patients. Most clinicians take a conservative approach, forego routine antibiotics, and opt for simple cleaning and appropriate follow-up. Puncture wounds in immunocompromised patients are assessed individually and may receive alternative or more aggressive care. If a puncture is grossly contaminated or harbors foreign material, antibiotics will not prevent an infection; however, this scenario may not be appreciated for a number of days and does not mandate inappropriate aggressive interventions. Puncture wounds of the bottom of the foot may be an exception and are discussed in more detail in Chapter 51.
Gunshot Wounds
A subset of gunshot wounds may be definitively handled in the ED with outpatient follow-up. Studies by Ordog and colleagues116,117 documented a very low infection rate in gunshot wounds treated with standard wound care on an outpatient basis, even when the missile was left in place and minor fractures were present. Because most gunshot wounds are puncture wounds, only minimal deep wound cleaning is possible. Superficial soft tissue wounds with entrance and exit wounds in proximity may be débrided by passing sterile gauze back and forth through the wound track (Fig. 34-23). Though prescribed frequently, no data support the routine use of antibiotics following gunshot wounds.

Animal Bites
Many aspects of the treatment of animal bites are controversial, and no universal standards exist. Most bites are caused by dogs or cats that are family pets. Numerous organisms can be cultured from an infected bite wound caused by a dog or cat, and cultures may guide antibiotic therapy in infected wounds.103 Wound material taken for culture at the time of an animal bite is worthless. The predominant pathogens in animal bites are the oral flora of the biting animal and human skin flora. About 85% of bites harbor potential pathogens, and the average wound yields five types of bacterial isolates; 60% have mixed aerobic and anaerobic bacteria. Skin flora such as staphylococci and streptococci are isolated in about 40% of bites. The gram-negative rod Pasteurella multocida, S. aureus, and Streptococcus viridans are common culprits in bite wound infections. Pasteurella species are isolated from 50% of dog bite wounds and 75% of cat bite wounds. Cat bites are usually puncture wounds that cannot be completely cleaned. When compared with dog bites, cat bites may become infected rather quickly after the bite (within 24 hours), thus suggesting Pasteurella infection (Fig. 34-24). Cat bite wounds tend to penetrate deeply, with a higher risk for associated osteomyelitis, tenosynovitis, and septic arthritis than with dog bites, which are more likely to have associated crush injury and wound trauma. Capnocytophaga canimorsus, a fastidious gram-negative rod, can cause bacteremia and fatal sepsis after animal bites, especially in asplenic patients or those with underlying hepatic disease. Anaerobes isolated from dog and cat bite wounds include Bacteroides, fusobacteria, Porphyromonas, Prevotella, propionibacteria, and peptostreptococci. Puncture wounds from a dog can be problematic since they are difficult to clean unless they are through-and-through wounds (Fig. 34-25) The incidence of infection after thoroughly cleaned dog bite lacerations may not be significantly greater than the incidence of infection in lacerations in general. Consequently, some clinicians have advocated primary closure of large dog bite lacerations that are centrally located on the body; however, markedly contused lacerations are good candidates for delayed primary closure (see Fig. 34-15B).

Figure 34-24 Cat bite. Cat bites are puncture wounds that become infected rather quickly. See text for discussion of antibiotics.

Treat infected animal bites with antibiotics, but the use of prophylactic antibiotics for animal bites is controversial (see earlier discussion). Prophylactic amoxicillin-clavulanate (875/125 mg twice daily) given for 3 to 5 days may reduce infection rates after cat or dog bites, especially for a puncture wound or if the patient is seen more than 8 hours after the bite and wound cleaning has been inadequate. Antibiotics given sooner seem to offer no benefit. Some clinicians administer prophylactic antibiotics for all cat bites, for a dog bite that has been sutured, for hand wounds, for wounds close to a bone or joint, or for bites associated with deep tissue or crush injury. Although this is a reasonable and common approach, there are no data strongly supporting this practice. Alternative antibiotics include metronidazole (500 mg three times daily) plus moxifloxacin (400 mg daily), doxycycline (100 mg twice daily), or trimethoprim-sulfamethoxazole (1 double-strength tablet twice daily). Antibiotics lacking in vitro activity against P. multocida should be avoided; such antibiotics include first-generation cephalosporins (such as cephalexin), penicillinase-resistant penicillins (such as dicloxacillin), macrolides (such as erythromycin), and clindamycin. However, clindamycin may be used for anaerobic coverage if it is administered in conjunction with an additional agent that is active against P. multocida. The best way to approach bite wounds is simply to adhere to the basic principles of wound care. No specific intervention has been demonstrated to be superior for the preparation of bite wounds. Take care to search for underlying fractures or tooth fragments with deep animal bites. When a wound results from the bite or scratch of either a wild or a domestic animal, give rabies prophylaxis if indicated (Tables 34-2 and 34-3).
TABLE 34-2
Rabies Postexposure Prophylaxis Guide—July 1999

*All bites and wounds should be immediately cleansed thoroughly with soap and water. If antirabies treatment is indicated, both rabies immune globulin (RIG) and human diploid cell rabies vaccine (HDCV) should be given as soon as possible, regardless of the interval after exposure. Local reactions to vaccines are common and do not contraindicate continuing treatment. Discontinue vaccine if fluorescent antibody tests of the animal are negative.
†During the usual holding period of 10 days, begin treatment with RIG and HDCV at the first sign of rabies in a dog or cat that has bitten someone. The symptomatic animal should be killed immediately and tested.
‡If RIG is not available, use antirabies serum, equine. Do not use more than the recommended dosage.
§The animal should be killed and tested as soon as possible. Holding for observation is not recommended. Vaccination may be discontinued if immunofluorescence tests of the animal are negative.
From Human rabies prevention—United States, 1999. Recommendations of the Advisory Committee on Immunization Practices (ACIP). MMWR Recomm Rep. 1999;48(RR-1):1. Available at http://www.cdc.gov/mmwr/preview/mmwrhtml/00056176.htm.
TABLE 34-3
Rabies Postexposure Prophylaxis Schedule, United States

*These regimens are applicable for all age groups, including children.
†The deltoid area is the only acceptable site of vaccination for adults and older children. For younger children, the outer aspect of the thigh may be used. The vaccine should never be administered in the gluteal area.
‡Any person with a history of preexposure vaccination with HDCV or RVA, previous postexposure prophylaxis with HDCV or RVA, or prior vaccination with any other type of rabies vaccine and a documented history of antibody response to the previous vaccination.
From Human rabies prevention—United States, 1999 recommendations of the Immunization Practices Advisory Committee. MMWR Recomm Rep. 1991;40(RR-3):1.
Human Bites
Clenched fist injuries, caused by contact with another person’s teeth during a fight, are the most serious human bite wounds. Lacerations typically occur over the third and fourth metacarpophalangeal or proximal interphalangeal joints of the dominant hand. Even small lacerations or punctures are highly prone to infection. Joint penetration is not uncommon. Relaxation of the fist may disseminate organisms into the deep compartments and the deep tendon spaces of the hand and predispose the patient to deep soft tissue infection, septic arthritis, and osteomyelitis. Many patients ignore these wounds until the onset of pain, swelling, or purulent discharge; as a result, these injuries are often complicated by established infection at the initial ED visit. In addition, some patients are not truthful about the origin of the wound, thereby leading to incorrect ED treatment of a seemingly minor injury (Fig. 34-26).

Serious Wound Infections
Most wound infections are easily recognized and can be treated in the outpatient setting with oral antibiotics, suture removal, consideration for a retained foreign body, and a commonsense follow-up schedule. Consider impatient treatment for a patient with systemic complaints (fever, malaise, nausea), worsening infection at follow-up, an unreliable patient, or an immunocompromised patient. Some infections, such as a subgaleal infection in a scalp laceration, can be quite serious and will require prompt aggressive treatment (Fig. 34-27).

Accidental Soft Tissue Injection with an EpiPen
An EpiPen provides self-injected subcutaneous epinephrine (0.3 or 0.15 mg) for emergency treatment of anaphylaxis (Fig. 34-28).

Occasionally, the device is inadvertently discharged, usually into a finger, and intense distal vasospasm is produced (Fig. 34-29). The patient has a blanched finger and minor sensory disturbances. The natural history of untreated vasospasm is unknown, and although ischemia may last for an hour or two, it is probably self-limited given the pharmacology of epinephrine. Digit amputation from this event has not been reported. Nonetheless, clinicians may be faced with an obviously ischemic finger, and intervention is considered. Local heat and nitroglycerin ointment have been tried but are of no proven benefit. Placing a pulse oximeter on the fingertip can indicate the degree of resultant hypoxia, an indirect quantification of ischemia, and can likewise be used to assess reversal therapy.

Injecting the digit with the α-adrenergic antagonist phentolamine (Regitine) will immediately and permanently reverse the ischemia and can be safely initiated in the ED (see Fig. 34-29D-F). A 5-mg vial of phentolamine is reconstituted and diluted at a 1% plain lidocaine– or saline-to-phentolamine ratio of 1 : 1. Inject a small aliquot of the mixture with a 25- to 27-gauge needle. Both a digital block and direct injection of the reversal agent into the site of epinephrine injection have been described. Injecting the actual site of penetration is intuitively the best option, but no studies have been performed. Within 5 to 10 minutes, the ischemia is reversed, and no further action is required.118,119
References
1. Quinn, JV. Clinical wound evaluation. Acad Emerg Med. 1996;3:298.
2. Singer, AJ, Mach, C, Thode, HC, et al. Patient priorities with traumatic lacerations. Am J Emerg Med. 2000;18:683.
3. Hunt, JK, Van Winkle, W. Wound healing: normal repair. In: Hunt JK, Van Winkle W, eds. Fundamentals of Wound Management in Surgery. South Plainfield, NJ: Chirurgecom, Inc., 1976.
4. Edlich, RF, Custer, J, Madden, J, et al. Studies in the management of the contaminated wound III. Assessment of the effectiveness of irrigation with antiseptic agents. Am J Surg. 1969;118:21.
5. Peacock, EE. Wound healing and wound care. In Schwartz SI, ed.: Principles of Surgery, 3rd ed, New York: McGraw-Hill, 1979.
6. Timberlake, GA. Wound healing: the physiology of scar formation. Curr Concepts Wound Care. 1986;9:4.
7. Bryant, WM. Wound healing. Clin Symp. 1977;29:1.
8. Hollander, JE, Blasko, B, Singer, AJ, et al. Poor correlation of short- and long-term cosmetic appearance of repaired lacerations. Acad Emerg Med. 1995;2:983.
9. Lowe, T, Paoloni, R. Sutured wounds: factors associated with patient-related cosmetic scores. Emerg Med Australas. 2006;18:259.
10. Zitelli, JA. Secondary intention healing: an alternative to surgical repair. Clin Dermatol. 1984;2:92.
11. American College of Emergency Physicians. Clinical policy for the initial approach to patients presenting with penetrating extremity trauma. Ann Emerg Med. 1994;23:1147.
12. Lammers, RL, Hudson, DL, Seaman, JE. Prediction of traumatic wound infection with a neural network–derived decision model. Am J Emerg Med. 2003;21:1.
13. Berk, WA, Osbourne, DD, Taylor, DD. Evaluation of the “golden period” for wound repair: 204 cases from a third world emergency department. Ann Emerg Med. 1988;17:496.
14. Peacock EE, Van Winkle W, eds. Surgery and Biology of Wound Repair. Philadelphia: Saunders, 1970.
15. Hollander, JE, Singer, AJ, Valentine, SM, et al. Risk factors for infection in patients with traumatic lacerations. Acad Emerg Med. 2001;8:716.
16. Cruse, PJE, Foord, R. A five-year prospective study of 23,649 surgical wounds. Arch Surg. 1973;107:206.
17. Viljanto, J. Disinfection of surgical wounds without inhibition of normal wound healing. Arch Surg. 1980;115:253.
18. Lammers, RL. Soft tissue foreign bodies. Ann Emerg Med. 1988;17:1336.
19. Trott, A. Mechanisms of surface soft tissue trauma. Ann Emerg Med. 1988;17:1279.
20. Edlich, RF, Thacker, JG, Buchanan, L, et al. Modern concepts of treatment of traumatic wounds. Adv Surg. 1979;13:169.
21. Haury, B, Rodeheaver, G, Vensko, J, Jr., et al. Debridement: an essential component of traumatic wound care. Am J Surg. 1978;135:238.
22. Krizek, TJ, Robson, MC. Evolution of quantitative bacteriology in wound management. Am J Surg. 1975;130:579.
23. Mann, RJ, Hoffeld, TA, Former, CB. Human bites of the hand: twenty years of experience. J Hand Surg [Am]. 1977;2:97.
24. Edlich, RF, Rodeheaver, GT, Morgan, RF, et al. Principles of emergency wound management. Ann Emerg Med. 1988;17:1284.
25. Robson, MC, Duke, WF, Krizek, TJ. Rapid bacterial screening in the treatment of civilian wounds. J Surg Res. 1973;14:426.
26. Singer, AJ, Quinn, JV, Thode, HC, Jr., et al. Determinants of poor outcome after laceration and surgical incision repair. Plast Reconstr Surg. 2002;110:429.
27. Robson, MC. Disturbances of wound healing. Ann Emerg Med. 1988;17:1274.
28. Lammers, RL, Fourre, M, Callaham, ML, et al. Effect of povidone-iodine and saline soaking on bacterial counts in acute, traumatic contaminated wounds. Ann Emerg Med. 1990;19:709.
29. Rodeheaver, GT, Smith, SL, Thacker, JG. Mechanical cleansing of contaminated wounds with a surfactant. Am J Surg. 1975;129:241.
30. Custer, J, Edlich, RF, Prusak, M, et al. Studies in the management of the contaminated wound: V. An assessment of the effectiveness of pHisoHex and Betadine surgical scrub solutions. Am J Surg. 1971;121:572.
31. Edlich, RF, Rodeheaver, GT, Thacker, JG, et al. Technical factors in wound management. In: Edlich RF, Rodeheaver GT, Thacker JG, et al, eds. Fundamentals of Wound Management in Surgery. South Plainfield, NJ: Chirurgecom, 1977.
32. Rodeheaver, G, Turnbull, V, Edgerton, MT, et al. Pharmacokinetics of a new skin wound cleanser. Am J Surg. 1976;132:67.
33. Van Den Broek, PJ, Buys, LFM, Van Furth, R. Interaction of povidone-iodine compounds, phagocytic cells, and microorganisms. Antimicrob Agents Chemother. 1982;22:593.
34. Rodeheaver, GT, Kurtz, L, Kircher, BJ, et al. Pluronic F-68: a promising new skin wound cleanser. Ann Emerg Med. 1980;9:572.
35. Gruber, RP, Vistnes, L, Pardoe, R. The effect of commonly used antiseptics on wound healing. Plast Reconstr Surg. 1975;55:472.
36. Bryant, CA, Rodeheaver, GT, Reem, EM, et al. Search for a nontoxic surgical scrub solution for periorbital lacerations. Ann Emerg Med. 1984;13:317.
37. Rodeheaver, GT, Pettry, D, Thacker, JG, et al. Wound cleansing in high-pressure irrigation. Surg Gynecol Obstet. 1975;141:357.
38. Madden, J, Edlich, RF, Schauerhamer, R, et al. Application of principles of fluid dynamics to surgical wound irrigation. Curr Top Surg Res. 1971;3:85.
39. Singer, AJ, Hollander, JE, Subramanian, S, et al. Pressure dynamics of various irrigation techniques commonly used in the emergency department. Ann Emerg Med. 1994;24:36.
40. Morse, JW, Babson, T, Camasso, C, et al. Wound infection rate and irrigation pressure of two potential new wound irrigation devices: the port and the cap. Am J Emerg Med. 1998;16:37.
41. Pronchik, D, Barber, C, Rittenhouse, S. Low- versus high-pressure irrigation techniques in Staphylococcus aureus–inoculated wounds. Am J Emerg Med. 1999;17:121.
42. Hollander, JE, Rickman, PB, Werblud, M, et al. Irrigation in facial and scalp lacerations: does it alter outcome? Ann Emerg Med. 1998;31:73.
43. Ernst, AA, Gershoff, L, Miller, P, et al. Warmed versus room temperature saline for laceration irrigation: a randomized clinical trial. South Med J. 2003;96:436.
44. Halasz, NA. Wound infection and topical antibiotics: the surgeon’s dilemma. Arch Surg. 1977;112:1240.
45. Sher, KS. Prevention of wound infection: the comparative effectiveness of topical and systemic cefazolin and povidone-iodine. Am Surg. 1982;48:268.
46. Lindsey, D, Nava, C, Marti, M. Effectiveness of penicillin irrigation in control of infection in sutured lacerations. J Trauma. 1982;22:186.
47. Lammers, RL, Henry, C, Howell, J. Bacterial counts in experimental, contaminated crush wounds irrigated with various concentrations of cefazolin and penicillin. Am J Emerg Med. 2001;19:1.
48. Kaczmarek, ER, Sula, JA, Hutchinson, RA. Sterility of partially used irrigating solutions. Am J Hosp Pharm. 1982;39:1534.
49. Brown, DG, Skylis, TP, Sulisz, CA, et al. Sterile water and saline solution: potential reservoirs of nosocomial infection. Am J Infect Control. 1985;13:35.
50. Moscati, R, Mayrose, J, Fincher, L, et al. Comparison of normal saline with tap water for wound irrigation. Am J Emerg Med. 1998;16:379.
51. Bansal, BC, Wiebe, RA, Perkins, SD, et al. Tap water for irrigation of lacerations. Am J Emerg Med. 2002;20:469.
52. Valente, JH, Forti, RJ, Freundlich, LF, et al. Wound irrigation in children: saline solution or tap water? Ann Emerg Med. 2003;41:609.
53. Angeras, MH, Brandberg, A, Falk, A, et al. Comparison between sterile saline and tap water for the cleaning of acute traumatic soft tissue wounds. Eur J Surg. 1992;158:347.
54. Seropian, R, Reynolds, BM. Wound infections after preoperative depilatory versus razor preparation. Am J Surg. 1971;121:251.
55. Howell, JM, Morgan, JA. Scalp laceration repair without prior hair removal. Am J Emerg Med. 1988;6:7.
56. Alexander, JW, Fischer, JE, Boyajian, M, et al. The influence of hair-removal methods on wound infections. Arch Surg. 1983;118:347.
57. Perelman, VS, Francis, GJ, Rutledge, T, et al. Sterile versus nonsterile gloves for repair of uncomplicated lacerations in the emergency department: a randomized controlled trial. Ann Emerg Med. 2004;43:362.
58. Ha’eri, GB, Wiley, AM. The efficacy of standard surgical face masks: an investigation using tracer particles. Clin Orthop. 1980;148:160.
59. Brown, PW. The hand. In: Hill GJ, II., eds. Outpatient Surgery. Philadelphia: Saunders; 1980:643.
60. Westaby, S. Wound closure and drainage. In: Westaby S, ed. Wound Care. St. Louis: Mosby; 1986:32.
61. Kirk RM, ed. Basic Surgical Techniques. Edinburgh: Churchill Livingstone, 1978.
62. Lemos, MJ, Clark, DE. Scalp lacerations resulting in hemorrhagic shock: case reports and recommended management. J Emerg Med. 1988;6:377.
63. Lubahn, JD, Koeneman, J, Kosar, K. The digital tourniquet: how safe is it? J Hand Surg [Am]. 1985;10:664.
64. Shaw, JA, DeMuth, WW, Gillespy, AW. Guidelines for the use of digital tourniquets based on physiological pressure measurements. J Bone Joint Surg Am. 1985;67:1086.
65. Edlich, RF, Rogers, W, Kasper, G, et al. Studies in the management of the contaminated wound: I. Optimal time for closure of contaminated open wounds: II. Comparison of resistance to infection of open and closed wounds during healing. Am J Surg. 1969;117:323.
66. Marshall, KA, Edgerton, MT, Rodeheaver, GT, et al. Quantitative microbiology: its application to hand injuries. Am J Surg. 1976;131:730.
67. Edlich, RF, Panek, PH, Rodeheaver, GT, et al. Physical and chemical configuration of sutures in the development of surgical infection. Ann Surg. 1973;177:679.
68. Ordman, LJ, Gillman, T. Studies in the healing of cutaneous wounds I. The healing of incisions through the skin of pigs. Arch Surg. 1966;93:857.
69. Chen, E, Hornig, S, Shepherd, SM, et al. Primary closure of mammalian bites. Acad Emerg Med. 2000;7:157.
70. Callaham, ML. Human and animal bites. Top Emerg Med. 1982;4:1.
71. Wolcott, MW. Dressings and bandages; and Wolcott MW. Hands and fingers: part I—soft tissues. In: Wolcott MW, ed. Ferguson’s Surgery of the Ambulatory Patient. 5th ed. Philadelphia: Lippincott; 1974:35.
72. Lawrence, JC. What materials for dressings? Injury. 1982;13:500.
73. McGrath, MH. How topical dressings salvage questionable flaps: experimental study. Plast Reconstr Surg. 1981;67:653.
74. Noe, JM, Kalish, S. The problem of adherence in dressed wounds. Surg Gynecol Obstet. 1978;147:185.
75. Eaglstein, WH, Mertz, PM, Falanga, V. Occlusive dressings. Am Fam Physician. 1987;35:211.
76. Rovee, DT, Kurowsky, CA, Labun, J. Local wound environment and epidermal healing: mitotic response. Arch Dermatol. 1972;106:330.
77. Winter, GD. Formation of scab and the rate of epithelialization of superficial wounds in the skin of the young domestic pig. Nature. 1962;193:293.
78. Hinman, CD, Maibach, H. Effect of air exposure and occlusion on experimental human skin wounds. Nature. 1963;200:377.
79. Wayne, MA. Clinical evaluation of Epi-Lock—a semiocclusive dressing. Ann Emerg Med. 1985;14:20.
80. Bothwell, JW, Rovee, DT. The effect of dressings on the repair of cutaneous wounds in humans. In: Harkiss KJ, ed. Surgical Dressings and Wound Healing. London: Crosby-Lockwood; 1971:78.
81. Mertz, PM, Marshall, DA, Eaglstein, WH. Occlusive wound dressings to prevent bacterial invasion and wound infection. J Am Acad Dermatol. 1985;12:662.
82. Katz, S, McGinley, K, Leyden, JJ. Semipermeable occlusive dressings: effects on growth of pathogenic bacteria and reepithelialization of superficial wounds. Arch Dermatol. 1986;122:58.
83. Eaglstein, WH. Effect of occlusive dressings on wound healing. Clin Dermatol. 1984;2:107.
84. Chvapil, M, Chvapil, TA, Owen, JA. Comparative study of four wound dressings on epithelialization of partial-thickness wounds in pigs. J Trauma. 1987;27:278.
85. Stair, TO, D’Orta, J, Altieri, MF, et al. Polyurethane and silver sulfadiazine dressings in treatment of partial-thickness burns and abrasions. Am J Emerg Med. 1986;4:214.
86. Falanga, V. Occlusive wound dressings: why, when, which? Arch Dermatol. 1988;124:872.
87. Turner, TD. Which dressings and why? In: Westaby S, ed. Wound Care. St. Louis: Mosby; 1986:58.
88. Dire, DJ, Coppola, M, Dwyer, DA, et al. Prospective evaluation of topical antibiotics for preventing infections in uncomplicated soft-tissue wounds repaired in the ED. Acad Emerg Med. 1995;2:4.
89. Eaglstein, WH, Mertz, PM. New method for assessing epidermal wound healing: the effects of triamcinolone acetonide and polyethylene film occlusion. J Invest Dermatol. 1978;71:382.
90. Pollack, SV. Systemic drugs and nutritional aspects of wound healing. Clin Dermatol. 1984;2:68.
91. Hunt, TK, Ehrlich, HP, Garcia, JA, et al. Effect of vitamin A on reversing the inhibitory effect of cortisone on healing of open wounds in animals and man. Ann Surg. 1969;170:633.
92. Haughey, RE, Lammers, RL, Wagner, DK. Use of antibiotics in the initial management of soft tissue hand wounds. Ann Emerg Med. 1981;10:187.
93. Grossman, JAI, Adams, JP, Kunec, J. Prophylactic antibiotics in simple hand injuries. JAMA. 1981;245:1055.
94. Thirlby, RC, Blair, AJ, Thal, ER. The value of prophylactic antibiotics for simple lacerations. Surg Gynecol Obstet. 1983;156:212.
95. Roberts, AHN, Teddy, PJ. A prospective trial of prophylactic antibiotics in hand lacerations. Br J Surg. 1977;64:394.
96. Day, TK. Controlled trial of prophylactic antibiotics in minor wounds requiring suture. Lancet. 1975;4:1174.
97. Morgan, WJ, Hutchison, D, Johnson, HM. The delayed treatment of wounds of the hand and forearm under antibiotic cover. Br J Surg. 1980;67:140.
98. Hutton, PAN, Jones, BM, Low, DJW. Depot penicillin as prophylaxis in accidental wounds. Br J Surg. 1978;65:549.
99. Cummings, P. Antibiotics to prevent infection in patients with dog bite wounds: a meta-analysis of randomized trials. Ann Emerg Med. 1994;23:535.
100. Waldrop, RD, Prejean, C, Singleton, R. Overuse of parental antibiotics for wound care in an urban emergency department. Am J Emerg Med. 1998;16:343.
101. Cummings, P, Del Beccaro, MA. Antibiotics to prevent infection of simple wounds: a meta-analysis of randomized studies. Am J Emerg Med. 1995;13:396.
102. Turner, TWS. Do mammalian bites require antibiotic prophylaxis? Ann Emerg Med. 2004;44:274.
103. Talan, DA, Citron, DM, Abrahamian, FM, et al. for the Emergency Medicine Animal Bite Infection Study Group. Bacteriologic analysis of infected dog and cat bites. N Engl J Med. 1999;340:85.
104. Diphtheria, tetanus, and pertussis: recommendations for vaccine use and other preventive measures recommendations of the Immunization Practices Advisory Committee (ACIP). MMWR Recomm Rep. 1991;40(RR-10):1.
105. Gergen, PJ, McQuillan, GM, Kiely, M, et al. A population-based serologic survey of immunity to tetanus in the United States. N Engl J Med. 1995;332:761.
106. Jacobs, RL, Lowe, RS, Lanier, BQ. Adverse reactions to tetanus toxoid. JAMA. 1982;247:40.
107. Passen, EL, Anderson, BR. Clinical tetanus despite a protective level of toxin-neutralizing antibody. JAMA. 1986;255:1171.
108. Stair, TO, Lippe, MA, Russell, H, et al. Tetanus immunity in emergency department patients. Am J Emerg Med. 1989;7:563.
109. Seaman, M, Lammers, R. Inability of patients to self-diagnose wound infections. J Emerg Med. 1990;9:215.
110. Goldberg, HM, Rosenthal, SAE, Nemetz, JC. Effect of washing closed head and neck wounds on wound healing and infection. Am J Surg. 1981;141:358.
111. Recommendations of the Immunization Practices Advisory Committee. Rabies prevention—United States, 1984. JAMA. 1984;252:883.
112. Grabb, WC. Basic techniques of plastic surgery. In: Grabb WC, Smith JW, eds. Plastic Surgery: A Concise Guide to Clinical Practice. Boston: Little, Brown; 1979:3.
113. Peacock, EE. Control of wound healing and scar formation in surgical patients. Arch Surg. 1981;116:1325.
114. Crikelair, CT. Skin suture marks. Am J Surg. 1958;96:631.
115. Converse, JM, Smith, B, The eyelids and their adnexa. Reconstructive Plastic Surgery: Principles and Procedures in Correction, Reconstruction, and Transplantation, 2nd ed. Converse, JM, eds. Reconstructive Plastic Surgery: Principles and Procedures in Correction, Reconstruction, and Transplantation, Philadelphia, Saunders, 1977;Vol 2:858.
116. Ordog, GI, Wasserberger, J, Balasubramanium, S, et al. Civilian gunshot wounds—outpatient management. J Trauma. 1994;36:106.
117. Ordog, G, Sheppard, GF, Wasserberger, JS, et al. Infection in minor gunshot wounds. J Trauma. 1993;34:358.
118. Velissarious, I. Management of adrenaline (epinephrine)-induced digital ischemia in children after accidental injection from an EpiPen. Emerg Med J. 2004;21:287.
119. Roberts, JR. Epinephrine in the ED: accidental digit injection from an EpiPen. Emerg Med News. 2005;27:49.
[/level-membership-for-emergency-medicine-category][not-level-membership-for-emergency-medicine-category]Chapter 34
Principles of Wound Management
1. Preserve viable tissue and remove nonviable tissue
2. Restore tissue continuity and function
3. Optimize conditions for the development of wound strength
4. Prevent excessive or prolonged inflammation
Patients who seek care in the emergency department (ED) because of acute wounds report that their top priorities include prevention of infection, return to normal function, a good cosmetic outcome, and minimal pain during repair.1,2 This chapter reviews the current strategies for attaining these goals.
Background: Wound Healing
For centuries, victims of wounds commonly experienced inflammation, infection, and extreme scarring; in fact, these processes were considered part of normal wound repair. Only in the late 19th century did surgeons first realize that sepsis could be separated from healing.3 Emergency clinicians should have a basic understanding of the process of wound healing. Highlights of this complex phenomenon as they relate to clinical decision making are presented here (Fig. 34-1).
Wounds extending beneath the epithelium heal by forming scar tissue. Inflammation, epithelialization, fibroplasia, contraction, and scar maturation constitute the five stages of this natural repair process.3–5 Inflammation is a beneficial response that removes bacteria, foreign debris, and devitalized tissue, essentially a biologic débridement. Polymorphonuclear and mononuclear leukocytes concentrate at the site of injury and phagocytose dead and dying tissue, foreign material, and bacteria in the wound.6
As white blood cells die, their intracellular contents are released into the wound. When in excessive amount, the contents form the purulence characteristic of infected wounds. Some exudate is expected even in the absence of bacterial invasion, but infection with accumulation of pus interferes with epithelialization and fibroplasia and impairs wound healing. Wounds contaminated with significant numbers of bacteria or foreign material may undergo a prolonged or persistent inflammatory response and not heal. Granuloma formation surrounding retained sutures is an example of chronic inflammation.7
Significant gains in tensile strength do not begin until approximately the fifth day after the injury. Strength increases rapidly for 6 to 17 days, more slowly for an additional 10 to 14 days, and almost imperceptibly for as long as 2 years (Fig. 34-2). The strength of scar tissue never quite reaches that of unwounded skin. Although the process of collagen formation is essentially completed within 21 to 28 days, the scar widens for another month, and collagen continues to remodel and strengthen the wound for up to 1 year.3,7
Decisions regarding the optimal time for suture removal and the need for continued support of the wound with tape are influenced by (1) the tensile strength of the wound, (2) the period of scar widening, and (3) the cosmetically unacceptable effect of epithelialization along the suture track. Scars are quite red and noticeable at 3 to 8 weeks after closure. The appearance of a scar should not be judged before the scar is well into its remodeling phase. The cosmetic appearance of wounds 6 to 9 months after injury cannot be predicted at the time of suture removal.8 Therefore, scar revision, if necessary, should be postponed until 6 to 12 months after injury.
One of the most important factors in predicting the cosmetic result of a wound is its location.9 In general, wounds on concave surfaces heal with better cosmetic results than do wounds on convex surfaces. Other factors that affect cosmesis include wound size, wound depth, and skin color.10 Small, superficial wounds in lax, light-colored skin, especially areas where the skin is thin, result in less noticeable scars. Wounds on convex surfaces look better after primary closure than after secondary healing. Static and dynamic forces, along with the propensity toward keloid formation, may influence the long-term cosmetic appearance of wounds more than the surgical skills of the clinician who repaired the wound.8 Repigmentation occurs over a period of 3 to 5 years, even in large wounds that heal by secondary intention.10 In the patient care instructions it is important to emphasize the need for wearing sunscreen over the scar, especially during the early years, because unprotected exposure to the sun can alter the pigmentation as the wound heals and result in noticeably darker pigmentation than the surrounding skin.
Initial Evaluation
The approach to management of a particular wound and the decision to close a wound immediately or after a period of observation are based primarily on factors that affect the risk for infection and secondarily on cosmesis and long-term functionality. The history and physical examination should be directed toward identifying these factors. Some wounds may appear benign but conceal extensive and devastating underlying tissue damage. The discovery that an extremity wound was produced by a roller or wringer device, a high-pressure injection gun, high-voltage electricity, heavy and prolonged compressive force, or the bite of a human or a potentially rabid animal radically alters the overall management of the patient. The American College of Emergency Physicians’ “Clinical Policy for the Initial Approach to Patients Presenting with Penetrating Extremity Trauma” provides a useful approach to the evaluation of all wounds.11
History
Wound Age
In general, the likelihood of a wound infection increases with time from the injury to definitive wound care.12 Definitive wound care does not necessarily mean suturing. Some wounds should never be sutured, such as small contaminated lacerations on the bottom of the foot, whereas others can be sutured many hours after the injury without increasing infection rates. A delay in wound cleaning is the most important factor and may allow bacteria contaminating the wound to proliferate. A delay of only a few hours in the treatment of a heavily contaminated wound can increase the risk for infection. Although no scientific data exist to fully answer the question and there is no definitively accepted standard, it appears reasonable that most wounds that are not grossly contaminated can probably be closed safely 6 to 8 hours after injury if the wound can be adequately cleaned. In contrast, some evidence suggests that wounds in highly vascular regions such as the face and scalp can be closed without increased risk for as long as 24 hours after injury.13 Contrary to popular belief, the “golden period”—the maximum time after injury that a wound may be closed safely without significant risk for infection—is not a fixed number of hours.14
Many factors affect risk for infection, and closure decisions should not be based solely on time considerations. Delayed primary closure is a reasonable alternative when there is clinical concern regarding closure at initial assessment. All data accumulated in the initial evaluation, both historical and physical, must be considered when making the decision to close a wound in a particular patient.12 In addition, the techniques of wound care may extend the period; with skillful cleaning and débridement, a clinician may be able to convert a contaminated wound to a clean wound that can be safely closed in the ED.5 In summary, any time frames offered are suggestions, and clinical judgment and the potential for wound infection should be incorporated into the final decision making.
Other Historical Factors
Other factors that affect wound healing or the risk for infection include the patient’s age and state of health. Patient age appears to be an important factor in host resistance to infection, and individuals who are at the extremes of age, such as young children and the elderly, have the greatest risk for infection.12,15 Infection rates are reported to be higher in patients with concurrent medical conditions, such as diabetes mellitus, immunologic deficiencies, malnutrition, anemia, uremia, congestive heart failure, cirrhosis, malignancy, alcoholism, arteriosclerosis, arteritis, collagen vascular disease, chronic granulomatous disease, smoking, chronic hypoxia, renal failure, liver failure, and morbid obesity, as well as in patients who are taking steroids or immunosuppressive drugs or undergoing radiation therapy. Shock, remote trauma, distant infection, bacteremia, retained foreign bodies, denervation, and peripheral vascular disease also increase wound infection rates and slow the healing process.6,12,15–17
Additional information pertinent to decision making in wound management includes the following:
• Current medications (specifically, anticoagulants and immunosuppressive drugs)
• Allergies (especially to local anesthetics, antiseptics, analgesics, antibiotics, and tape)
• Potential exposure to rabies (in bite wounds and mucosal exposures)
• Potential foreign bodies embedded in the wound, especially when the mechanism of injury is unknown or the injury was associated with breaking glass or vegetative matter18
• Previous injuries and deformities (especially with extremity and facial injuries)
• Associated injuries (underlying fracture, joint penetration)
• Other factors (availability for follow-up, patient understanding of wound care, compliance)
Physical Examination
Mechanism of Injury and Classification of Wounds
1. Abrasions. Wounds caused by forces applied in opposite directions result in the loss of epidermis and possibly dermis (e.g., grinding of skin against a road surface).
2. Lacerations. Wounds caused by shear forces produce a tear in tissues. Little energy is required to produce a wound by shear forces (e.g., a knife cut). Consequently, little tissue damage occurs at the wound edge, the margins are sharp, and the wound appears “tidy.” Tensile and compressive forces also cause separation of the tissues. The energy required to disrupt tissue by tensile or compressive forces (e.g., forehead hitting a dashboard) is considerably greater than that required for tissue disruption by shear forces because the energy is distributed over a larger volume. These lacerations often have jagged, contused, “untidy” edges, which have a higher risk for infection.15
3. Crush wounds. Wounds caused by the impact of an object against tissue, particularly over a bony surface, compress the tissue. These wounds may contain contused or partially devitalized tissue.
4. Puncture wounds. Wounds with a small opening whose depth cannot be entirely visualized are caused by a combination of forces. They are particularly prone to infection.
5. Avulsions. Avulsions are wounds in which a portion of tissue is completely separated from its base, which is lost, or left with a narrow base of attachment (a flap). Shear and tensile forces cause avulsions.19 Skin tear avulsions often result from low-force friction or shearing forces that separate the layers of the skin (epidermis and dermis) from the underlying tissue. These wounds often occur in older adults as a result of minimal impact and vulnerable skin.
6. Combination wounds. Wounds can also have a combination of configurations. For example, a stellate laceration caused by compression of soft tissue against underlying bone can create wounds with elements of both crush injury and tissue separation. Missile wounds involve a combination of shear, tensile, and compressive forces that puncture, crush, and sometimes avulse tissue.20
Contaminants (Bacteria and Foreign Material): Infection rates in studies of traumatic wounds range from 1% to 38%. Numerous factors affect the risk for wound infection, but the primary determinants of infection are the amount of bacteria and dead tissue remaining in the wound,21 the patient’s immune response, and local tissue perfusion.
Essentially all traumatic wounds are contaminated with bacteria to some extent. The number of bacteria remaining in the wound at the time of closure is directly related to the risk for infection. A critical number of bacteria must be present in a wound before a soft tissue infection develops. In experimental wounds, fewer bacteria are required to infect wounds caused by a compressive force (≥104 bacteria/g of tissue) than by a shear force (≥106).22
The nature and amount of foreign material contaminating the wound often determine the type and quantity of bacteria implanted. In general, visible contamination of a wound increases the risk for infection.15 The presence of undetected, reactive foreign bodies in sutured wounds almost guarantees an infection. Although bullet or glass fragments by themselves rarely produce wound infection, these foreign bodies may carry particles of clothing, gun wadding, or soil into the wound. Minute amounts of organic or vegetative matter, feces, or saliva carry highly infective doses of bacteria. The bacterial inoculum from human bites often contains 100 million or more organisms per milliliter of saliva.23 Inorganic particulate matter, such as sand or road surface grease, usually introduces few bacteria into a wound and has little chemical reactivity. These contaminants are relatively innocuous. Soil that contains a large proportion of clay particles or a high organic content (such as that found in swamps, bogs, and marshes), however, has a high risk for infection.24
In industrialized countries, most wounds encountered in the practice of emergency medicine have low initial bacterial counts. If wound cleaning and removal of devitalized tissue are instituted before bacteria within the wound enter their accelerated growth phase (3 to 12 hours after the injury), bacterial counts will generally remain below the threshold needed to initiate infection.11,25
Wound Location
The anatomic location of the wound has considerable importance in the risk for infection. Bacterial densities on the surface of the skin range from a few thousand to millions per square centimeter.24 Distal extremity wounds are more at risk for the development of wound infections than are injuries on most other parts of the body.12,26 The high vascularity in areas such as the scalp or perineum appears to offset the risk posed by the large numbers of endogenous microflora, whereas wounds in ischemic tissue are notoriously susceptible to infection.27
Underlying Structures
If injury to underlying structures such as nerves, vessels, tendons, joints, bones, or ducts is found, the clinician may choose to forego wound closure and consult a surgical specialist (Fig. 34-3). Procedures such as joint space irrigation, reduction and débridement of compound fractures, neurorrhaphy, vascular anastomosis, and flexor tendon repair are best accomplished in the controlled setting of the operating room, where optimal lighting, proper instruments, and assistance are available.20
Cleaning
Clean the wound as soon as possible after evaluation. Although most wounds are initially contaminated with less than an infective dose of bacteria, given time and the appropriate wound environment, bacterial counts may quickly rise to infective levels. The goals of wound cleaning and débridement are (1) to remove bacteria and reduce their numbers below the level associated with infection and (2) to remove particulate matter and tissue debris that would lengthen the inflammatory stage of healing or allow the growth of bacteria beyond the critical threshold.17 There are two general wound-cleansing techniques—compression and irrigation. Compression involves gently pressing premoistened gauze to the wound to remove surface debris. If necessary, this can be followed by gentle and judicious scrubbing. Irrigation is recommended for most wounds and involves a steady flow of solution across the surface of the wound. This important step in wound management provides hydration to the wound, removes deeper debris, and aids in visual examination while reducing the risk for infection. Normal saline or tap water is often used as the irrigation fluid.
Soaking a wound in a saline or antiseptic solution before the clinician arrives is of little value and may actually increase bacterial counts, so it is not recommended as a routine practice.28
Patient Preparation
Before examining, cleaning, exploring, or repairing a wound, explain the procedure to the patient to allay fears and encourage cooperation. In general, all wound care should be performed with the patient in a supine position because fainting is a common occurrence during wound preparation and repair (Fig. 34-4). Relatives and friends can be allowed to stay with the patient, but they should be cautioned to report any dizziness or nausea, and they should remain seated throughout the procedure.
Mechanical Scrubbing
Initially, scrub a wide area of skin surface surrounding the wound with an antiseptic solution to remove contaminants that might be transferred into the wound by instruments, suture material, dressings, or the clinician’s gloved hand during wound management. Minimal aseptic technique requires the use of gloves during the cleaning procedure. It is important to remove all nonabsorbable particulate matter; any such material left in the dermis may be retained in the healed tissue and result in a disfiguring “tattoo” effect.7 Scrubbing the internal surface of a wound is controversial. Although scrubbing a wound with an antiseptic-soaked sponge does remove foreign particulates, bacteria, and tissue debris, an abrasive sponge may inflict more damage on the tissue and become a portal for inflammation and infection.29,30
Mechanical scrubbing should be reserved for wounds contaminated with significant amounts of bacteria or foreign material (Fig. 34-5A and B). If irrigation alone is ineffective in removing visible contaminants from a wound, scrub the wound. Because the amount of damage inflicted on tissues by scrubbing correlates with the porosity of the sponge, a fine-pore sponge (e.g., 90 pores/inch) should be used to minimize tissue abrasion.29,31 Detergents have an advantage over saline in that they minimize friction between the sponge and tissue, thereby limiting damage to tissue during scrubbing. Detergents also dissolve particles and thus help dislodge them from the surface of the wound. Unfortunately, many of the detergents available are toxic to tissues.29,32 Use caution when considering detergents.
Antiseptics during Cleaning
For many years, antiseptic solutions have been used for their antimicrobial properties in and around wounds (Table 34-1). Studies of the use of antiseptics in wounds demonstrate that there is a delicate balance between killing bacteria and injuring tissue.33 Intact skin can withstand strong microbicidal agents, whereas leukocytes and the exposed cells of skin and soft tissue can be damaged by these agents.32 Many antiseptic solutions have been used for cleaning wounds, but the true final benefit or harm from the multiple products introduced during ED wound preparation is difficult to assess or quantify.
TABLE 34-1
Summary of Agents Used for Wound Care
*Based largely on in vitro studies and animal data. The true harm (or benefit) of these products for routine use in the emergency department is theoretical and probably of minimal clinical consequence for most wounds.
Povidone-iodine (Betadine) is widely available as a 10% stock solution. Although the undiluted solution may be used to prepare the skin surrounding a wound, it may be harmful to some tissue; therefore, it should not be placed within the interior of the wound. Diluted povidone-iodine solution in concentrations of less than 1% appears to be safe and effective for cleaning contaminated traumatic wounds, but the precise concentration that provides the most benefit is unclear. In contrast, povidone-iodine surgical scrub (Betadine scrub) and hexachlorophene (pHisoHex) both contain anionic detergents that are harmful to tissues. In vitro studies have demonstrated that chlorhexidine gluconate–alcohol (Hibiclens) is toxic to the cellular components of blood,34 but its effect on wound infection rates is unknown. Many potentially harmful solutions (such as peroxide, alcohol, or commercial cleaning products) are commonly used by patients at home on their own wounds, usually without serious consequence. Hydrogen peroxide is hemolytic, and there is little reason to use it except to clean surrounding skin encrusted with blood and coagulum or to soak off adherent blood-saturated dressings. Peroxide should not be used on granulation tissue because oxygen bubbles lift newly formed epithelium off the wound surface.35 Ethyl alcohol gel solutions are now used commonly as hand sanitizer agents, but their use as a wound antiseptic requires further study.
Nonantiseptic, nonionic surfactants are attractive alternatives to these toxic cleansing agents. In contrast to antiseptic solutions, these preparations cause no tissue or cellular damage, leukocyte inhibition, or impairment of wound healing. The solutions cause no corneal injury, conjunctival irritation, or pain on contact with the wound.34,36 Poloxamer 188 (Pluronic F-68, Shur-Clens, and Pharma Clens) is nontoxic and nonallergenic.29,32 This Pluronic polyol has no antibacterial activity, but scrubbing experimental wounds with poloxamer reduced infection rates, thus proving its ability to cleanse a wound effectively and atraumatically.29 Pluronic polyols may be considered, especially if the wound is near mucous membranes. Even dilute povidone-iodine may be particularly irritating when used for scrubbing contaminated wounds. The use of antiseptic preparations in wounds remains controversial.
Irrigation
Properly performed irrigation is effective in removing particulate matter, bacteria, and devitalized tissue that is loosely adherent to the edges of the wound and trapped within its depths. The effectiveness of irrigation is determined primarily by the hydraulic pressure at which the irrigation fluid is delivered.37–39 Although some investigators have used port devices spiked into plastic intravenous bags and squeezed by hand to deliver a stream of fluid,40,41 other studies have shown that such activities and bulb syringes or gravity flow irrigation devices deliver fluid at low pressure and are ineffective in ridding wounds of small particulate matter or lowering wound bacterial counts.38 In an uncontrolled study, Hollander and coworkers42 found comparable infection rates and cosmetic outcomes in facial and scalp wounds repaired with and without irrigation. Although irrigation may not be required for low-risk, highly vascular uncontaminated facial and scalp wounds, randomized, prospective trials are needed to answer this question.
The pressure that can be delivered with a syringe varies with the force exerted on the plunger and the internal diameter of the attached needle. A simple irrigation assembly consisting of a 19-gauge plastic catheter or needle attached to a 35-mL syringe produces 25 to 40 psi when the barrel of the syringe is pushed with both hands.39 This high-pressure irrigation system removes significant numbers of bacteria and a substantial amount of particulate matter from the wound surface.
Wound irrigation is best achieved with a large-volume syringe and a 18- or 19-gauge catheter or needle to deliver irrigation volumes of at least 250 mL. Irrigation should continue until all visible, loose particulate matter has been removed. Warmed irrigant solutions are comfortable for patients, even after the wound is anesthetized.43
A potential complication of wound irrigation is that infectious material can be splashed into the face of the clinician, even when the tip of the irrigation device is held below the surface of the wound. Several commercial devices are available to contain the splatter, including devices that fit on the end of a syringe (see Fig. 34-5C and D) and devices that fit on the screw top of saline bottles (for this particular device the company reported variable pressure from 4 to 15 psi). An alternative strategy is to pierce the base of a small medicine cup with a large-bore needle. The cup can be placed upside down to cover the area to be irrigated and the syringe with the 19-gauge needle can be inserted through the base of the cup (see Fig. 34-5C). The wound should be positioned to allow continuous drainage of fluid during irrigation by any method.
Antibiotic Solutions for Irrigation
A variety of antibiotic solutions have been instilled directly into wounds or used as irrigation solutions, including ampicillin, a neomycin-bacitracin-polymyxin combination, tetracycline, penicillin, kanamycin, and cephalothin. Although there have been no reports of topical sensitization or toxic tissue levels of the antibiotic, studies have found inconsistent effectiveness in reducing infection rates.44–47 The indications for using antibiotic solutions to clean wounds have not been defined, and this practice is not considered standard.
Recommendations for Cleaning the Wound
A sterile bottle of saline solution can be used to irrigate the wounds of multiple patients until the bottle is empty, but once the bottle is opened, bacterial contamination occurs quite rapidly.48 Use bottles opened only within the past 24 hours to irrigate wounds.48,49 Patients frequently irrigate their wounds with tap water before going to the ED. Many clinicians routinely irrigate wounds, especially extremity wounds, with tap water instead of sterile saline, and infection rates have been found to be comparable to that of saline irrigation50–53 (see Fig. 34-5E and F). The advantage of using tap water is that large volumes of irrigant can be quickly applied to an open wound. The disadvantages of this technique are that irrigation pressures are difficult to control and the patient may faint if allowed to stand at a sink. If tap water is used to irrigate wounds, deliver it through a syringe at the bedside.
Preparation for Wound Closure
Before débridement or wound closure, prepare and drape the wound. Avoid shaving body hair because preoperative wounds that were shaved demonstrated higher infection rates.16,54–56 For wounds in hair-bearing areas, hair can be removed by clipping if it interferes with the procedure.55 Stubborn hairs that repeatedly invade the wound during suturing can be coated with petrolatum jelly or a water-soluble ointment to keep them out of the field. Do not shave eyebrows because critical landmarks for exact approximation of the wound edges would be lost. Although shaved eyebrows will grow back eventually, shaving produces an undesirable cosmetic effect as well. Clip hair rather than shaving it. Use a petrolatum- or water-based ointment to keep the hair out of the wound field.
Disinfect the skin surface adjacent to the wound (not the wound itself) with a standard 10% povidone-iodine or chlorhexidine gluconate (Hibiclens) solution. Paint the solution widely on the skin surrounding the wound, but do not allow it to seep into the interior of the wound itself (Fig. 34-6A).
Figure 34-6 A-D, Wound preparation and exploration.
After hand washing, the clinician and any assistants involved in the procedure must wear sterile or nonsterile but clean gloves.57 Sterile gloves are not required, and their use does not decrease infection rates. Wear face masks, especially if you have a upper respiratory bacterial infection. Because droplets of saliva may leak even from around the edges of a face mask, avoid talking in proximity to the wound.58 Use a single fenestrated drape or multiple folded drapes around the wound site. Place a sterile glove on a patient who has a hand wound to provide a sterile field in lieu of a fenestrated drape (see Fig. 34-6B). The area to be sutured can then be exposed by cutting the glove, and the extremity can be placed on a sterile towel. This technique provides a clean field without the need to continually adjust the drape or to operate through a small opening.
Explore the entire depth and the full extent of every wound to locate hidden foreign bodies, particulate matter, bone fragments, or any injuries to underlying structures that may require repair (see Fig. 34-6C). Avoid the temptation to initially explore wounds and assess their characteristics with a finger in search of a foreign body because (see Fig. 34-6E) embedded glass, metal fragments, or sharp pieces of bone may cut the clinician and cause exposure to blood-borne infections. Visualize directly with good lighting in a bloodless field, explore the wound with a metal probe, and use radiographs as safer approaches to wound exploration. Despite these measures, lacerations through thick subcutaneous adipose tissue are treacherous because large amounts of particulate matter can be completely obscured in deep folds of tissue. Unless a careful search is undertaken, these contaminants may be left in the depths of a sutured wound, and infection usually follows. Some clinicians are reluctant to extend lacerations to properly clean or explore them; however, opening the wound to permit adequate visualization may be necessary for successful wound exploration.
Débridement
If the wound is already clean and the edges are viable, sharp débridement may not improve the outcome. Irregular wounds have greater surface areas than do linear lacerations. Because skin tension is distributed over a greater length, the width of the scar is usually less with jagged wounds than if the wound is converted to an elliptical defect with tidy edges. If the edges are devitalized or contaminated, though, the wound edges must be débrided (Fig. 34-7A and B). To avoid a wide scar in this situation, undermine the wound.
Figure 34-7 A-E, Wound débridement.
Excision: Excision is the most effective type of débridement because it converts a contaminated traumatic wound into a clean wound. If significant contamination occurs in areas in which there is laxity of tissues and if no important structures, such as tendons or nerves, lie within the wound, the entire wound may be excised5 (see Fig. 34-7C). Complete excision of grossly contaminated wounds such as animal bites allows primary closure of such wounds with no greater risk for infection than occurs with relatively uncontaminated lacerations.31
When a puncture wound is excised, make the axis of the excision parallel to a wrinkle, a skin line, or a line of dependency or facial expression. Make the long axis of this lenticular excision three to four times as great as the short axis (see Fig. 34-7D). Premark the skin with a surgical marking pen or by making a superficial “scoring” mark (cutting only down to the epidermis) around the wound with a No. 15 scalpel blade. Place tension on the surrounding skin with a finger or a skin hook. While steadying your hand on the table or on the patient, use the No. 15 blade and cut through the skin at right angles or at slightly oblique angles to the surface of the skin. If complete excision of the entire depth of the wound is not necessary, use tissue scissors to cut the edge of the wound by following the path premarked in the epidermis with the scalpel blade. If complete excision is desired, incise each wound edge past the deepest part of the wound. Excise and remove the wedge of tissue carefully without contaminating the fresh wound surface.
Plan the excision carefully because excessive removal of tissue can create a defect that is too large to close. Wounds on the trunk, the gluteal region, or the thigh are amenable to excision. In contrast, simple excision of a wound on the palm or the dorsum of the nose will make approximation of the resulting surgical wound edges difficult. In hair-bearing areas of the face, particularly through the eyebrows, angle the incision parallel to the angle of the hair follicles to avoid linear alopecia (see Fig. 34-7E).
Selective Débridement: Complete excision is impossible for most wounds because of insufficient skin elasticity, so selective débridement must be used.5,21 Stellate wounds and wounds with an irregular, meandering course have greater surface area and less skin tension per unit length than do linear lacerations. In some cases, excision of an entire wound would result in the loss of too much tissue (i.e., produce a gaping defect and excessive tension on the edges of the wound when closed). Avoid this problem by selective débridement and approximation of the irregular wound edges. This technique involves sharp débridement of devitalized or heavily contaminated tissue in the wound piece by piece and eventual matching of one edge of the wound to the other. Selective débridement is time-consuming but preserves more surrounding tissue.
In heavily contaminated wounds, especially those with abundant adipose tissue, remove all exposed fat and all fat impregnated with particulate matter. The subcutaneous adipose tissue attached to large flaps or to avulsed viable skin should be débrided before reapproximation of the wound; removal of this fatty layer allows better perfusion of the flap or the graft. Contaminated bone fragments, nerves, and tendons are almost never removed. Every effort should be made to clean these structures and return them to their place of origin because they may be functional later.59 Fascia and tendons perform important functions despite potential loss of viability. If they can be cleaned adequately, these tissues should not be débrided. They may be left in wounds as free grafts and be covered by viable flaps of tissue.60
Control of Hemorrhage
Although simply crushing and twisting the end of a small vessel with a hemostat avoids the introduction of suture material into the wound, this method provides unreliable hemostasis. Ligation of the vessel with fine absorbable suture material is preferred. Clamp the bleeding ends of vessels with fine-point hemostats to provide immediate hemostasis. Because nerves often course with these vessels, clamp them only under direct visualization. The tip of the hemostat should project beyond the vessel to hold a loop of a ligature in place (Fig. 34-8A). With an assistant lifting the handle of the hemostat, pass a synthetic 5-0 or 6-0 absorbable suture around the hemostat from one hand to the other. Tie the first knot beyond the tip of the hemostat. Once the suture is securely anchored on the vessel, release the hemostat.61,62 Three knots are sufficient to hold the ligature in place. Cut the ends of the suture close to the knot to minimize the amount of suture material left in the wound.
Figure 34-8 A-D, Hemorrhage control.
Ligate vessels with diameters greater than 2 mm. Vessels smaller than 2 mm that bleed despite direct pressure can be controlled by pinpoint, bipolar electrocautery. A dry field is required for an effective electrical current to pass through the tissues. If sponging does not dry the field, use a suction-tipped catheter. Minimize trauma by using fine-tipped electrodes to touch the vessel or touch the active electrode of the electrocautery unit to a small hemostat or fine-tipped forceps while gripping the vessel.3 Keep the power of the unit to the minimum level required for thrombosis of the vessel. Self-contained, sterilizable, battery-powered coagulation units are alternatives to electrocautery. These devices cauterize vessels by the direct application of a heated wire filament. Although these units may damage more surrounding tissue than electrocautery units do, they are compact, simple, and well suited for use in the ED (see Fig. 34-8B).
A cut vessel that retracts into the wall of the wound may frustrate attempts at clamping, ligation, or cauterization. First, control bleeding by downward compression on the tissue. Pass a suture through the tissue twice via a figure-of-eight or horizontal mattress stitch, and then tie it. This stitch will constrict the tissue containing the cut vessel (see Fig. 34-8C).
Large superficial varicosities may bleed spontaneously or from minor trauma. They may bleed profusely, especially when the patient stands up and increases venous pressure. Use a simple figure-of-eight suture to halt the bleeding (see Fig. 34-8D).
[/not-level-membership-for-emergency-medicine-category]
