CHAPTER 19 Phaco complications
Local anesthesia
Peribulbar hemorrhage
This can occur with any type of infiltrative anesthesia and is usually fairly immediate but can occasionally be delayed until later during surgery. The orbit becomes tense and incompressible but will usually soften fairly quickly over 10–20 minutes if it is due to the far more common venous bleed. The lids can become tight and difficult to open but again will usually settle down given a little time and some direct orbital pressure. An oculopressive balloon can help limit bleeding and lower the orbital tension. Occasionally the orbit will remain tense, in which case surgery should be abandoned because the risk of chamber collapse, iris prolapse, posterior capsule rupture, and vitreous loss is high. Most patients are relieved that you are putting safety first, once they have understood the risks of continuing. In practice only a small minority (around 5%) of patients with peri- or retrobulbar hemorrhage will need to have their surgery rescheduled1.
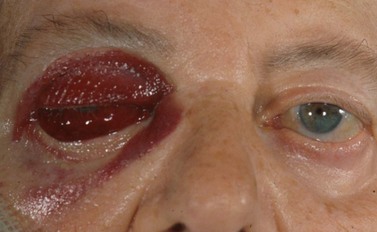
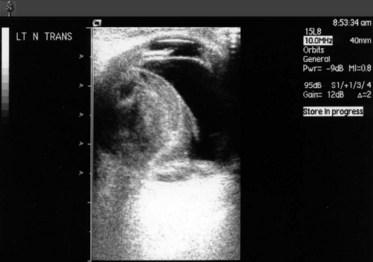
Very rarely an orbital arterial bleed may occur. This has happened to the author only once in 20 years of eye surgery. In this case there is rapid and dramatic proptosis accompanied by a rock hard orbit and infiltrative staining of skin and conjunctiva by pressurized blood (Fig. 19.1). Despite intravenous acetazolamide and mannitol plus lateral canthotomy/cantholysis the visual prognosis following arterial orbital hemorrhage is often poor.
Needle injury
Any needle can damage an extraocular muscle, perforate the globe or, if it is long enough, enter the optic nerve via the intraconal space. High risk orbital apex injections have now largely been abandoned and superceded by safer topical, peribulbar, and subTenon’s anesthesia. Consequently subarachnoid infiltration and brainstem anesthesia are almost unheard of today. The incidence of single penetration or double perforation with peribulbar anesthesia is less than 1 in 20002 but increases to around 1 in 150 with larger myopic eyes3. If a short disposable sharp 25 mm needle is used and the surgeon is familiar with the anatomy of the orbit then it is difficult to inadvertently enter a normally sized eye without adequate warning signs. First, you will meet with a significant increase in resistance to the passage of the needle as you tangentially catch the sclera. This is often associated with some pain. However the key sign is that the impaled eye rotates with advancement of the needle. If any of these three things happen then stop, withdraw, and enter more peripherally with the needle directed parallel with the orbital wall.
Incisions
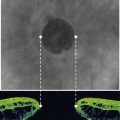
A small dehiscence of Descemet’s membrane related to the internal front edge of the main wound is fairly common. This produces a hinged flap which spontaneously falls back into place and is of no consequence. A larger flap can, on most occasions, be persuaded to lie flat again. If not then an air bubble, SF6 gas, viscoelastic, or rarely suturing have all been used to successfully re-attach hanging flaps. The problem arises when a sizeable flap is stripped off and then completely detaches, never to be seen again. This is rare. The defect is usually triangular in shape with its base the width of the incision and its apex towards the center of the cornea (Fig. 19.2). Nothing to do here except wait and see how well the remaining endothelial cells respond to the greater demand on them. If over one fifth of the endothelium is gone then grafting is likely to be needed. Wait at least 3 months before considering endothelial grafting since slow recovery is the usual course with smaller defects.
Capsulorrhexis
Anterior capsule tears can be either primary (a tear-out of the rhexis happening as it is being performed) or secondary (when an intact rhexis is subsequently torn). The main practical difference between the two is that with a secondary tear the hydrodissection has already been done and the nucleus is mobile, making life a lot easier. With a primary radial tear-out the first priority is to try and retrieve it before it has gone too far out. This is best achieved using the rhexis rescue maneuver, which comprises firstly overfilling the chamber with a cohesive OVD, unfolding the flap to lie flat on the surface of the nucleus, grasping the free edge of the flap with forceps close to the apex of the tear and pulling it circumferentially backwards and then centrally in order to re-direct the tear inwards4. You may have to make a second stab incision positioned so that you can apply the forceps and exert traction from the most advantageous angle. If this works (and it does more often than not) then your troubles are over. If not then you have to complete the phaco without extending the tear out through the zonules and round to the posterior capsule.
You have four options to choose from, and you must select the one that is safest in your hands:
Hydrodissection
The most serious complication of hydrodissection is posterior capsular rupture. The cycle of events leading to this is clearly understood. Firstly capsular block is created by the initial posterior fluid wave. This is associated with a nuclear lift characterized by the lens bulging through the rhexis as it is pushed forwards by the accumulating fluid behind. The capsular block should be decompressed at this stage. It this is not done then continued injection of fluid leads to overinflation of the capsular bag and explosive rupture of the posterior capsule. The sudden rupture of the posterior capsule is accompanied by a rapid deepening of the chamber and narrowing of the pupil as the fluid escapes and the nucleus falls back. This is the so-called pupil ‘snap’ sign that is pathognomonic of PC rupture during hydrodissection6. It happens very quickly and is easily missed or ignored. If you see it then you should stop and decide what best to do. If you are a less experienced surgeon then closing the eye and handing over to an experienced colleague or vitreoretinal surgeon is safest, more so because these cases often involve dense large cataracts and a relatively small rhexis, which makes anterior dislocation and removal of the lens more hazardous. If the pupil snap is unrecognized and the case continues then the nucleus invariably drops into the back of the eye and then there is no choice but to involve the vitroretinal surgeons.
Phacoemulsification
Zonular dialysis
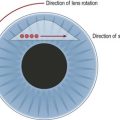
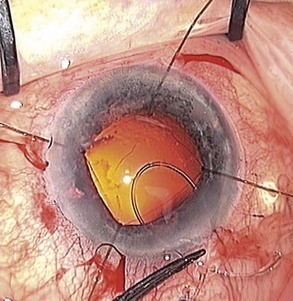
Regardless of the stage of surgery in which it happens, the first step is to support the remaining zonules with the insertion of a capsule tension ring (CTR). The vitreous face may or may not have been breached. Use a cohesive OVD to tamponade the defect and minimize the risk of vitreous prolapse. Then inflate the bag and open up the subcapsular space using OVD. Insert the ring in the subcapsular plane in order to minimize trapping of cortical material against the equator of the bag. Insert the leading end of the ring towards the zonular defect to support it whenever practically possible. Using an injector to introduce the ring is a lot easier than freehand bimanual insertion. For the more challenging situations when the bag is either empty or already contains an implant, the ‘fish-tail’ technique is a useful method that avoids the need to linearly dial the ring into the bag (Fig. 19.3). Next check for vitreous prolapse using triamcinolone acetonide and, if present, perform an anterior vitrectomy before continuing. If the zonular defect is diffuse or extensive then additional intraoperative zonular support in the form of capsule anchors can be useful. These effectively stabilize the bag/CTR complex to the sclera and thereby protect the remaining zonules from excessive traction throughout the remainder of the operation.
Posterior capsule tear
Using a 3-piece IOL with flexible prolene haptics the optic can be posteriorly captured in the rhexis so is effectively in the same plane as if in the bag. If the optic remains in the sulcus then a suitable reduction in spherical power has to be made, which is 1.0 diopter for IOLs between +17.00 to +28.00 D, but the reduction varies between zero and 1.50 D according to the power of the IOL, assuming the central corneal power is in the normal range (ref: www.doctor-hill.com/iol-main/bag-sulcus.htm).
Vitreous loss
These points are dealt with individually below.
Visualize it with triamcinolone
The technique for using triamcinolone acetate suspension (40 mg/ml) to visualize vitreous for anterior vitrectomy was first described by Scott Burke and colleagues in 2003 and is probably one of the most significant advances in surgical technique over the last decade7. It is safe and effective and is the only method by which a surgeon can meticulously and confidently remove all prolapsed vitreous from the anterior segment to ensure that none remains to become incarcerated in any of the wounds or occlude the drainage angle at a later date. It is now available commercially in unpreserved formulation from a number of companies so every cataract surgeon should eventually become familiar with this technique as there is none better for visualizing vitreous in order to ensure its complete removal. This minimizes the risk of wound incarceration, vitreous wick, endophthalmitis, and cystoid macular edema.
Remove it
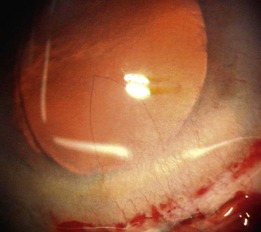
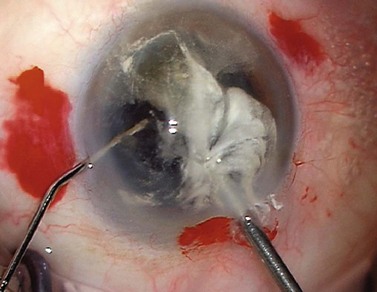
If there are nuclear fragments remaining in the anterior segment then any surrounding vitreous needs to be removed first under triamcinolone guidance before attempting their extraction from the eye. The technique of ‘dry’ vitrectomy is useful for this purpose. There is no irrigation in the eye in order to avoid excessive vitreous hydration and further prolapse. The cutter is used through one side-port and simultaneously OVD is injected through a second side-port to replace the volume of fluid aspirated through the cutter (Fig. 19.4). Once the surrounding vitreous has been cleared then the incision should be enlarged to avoid undue force and distortion of the globe during removal of the fragments. To use phaco for their removal has a high risk of vitreous aspiration and vitreoretinal traction.
Summary
It is easy to forget that modern cataract surgery is a very safe and successful procedure with an uncomplicated outcome in greater than 95% of cases8. However we still encounter complications that are potentially sight-threatening, but nearly all of these are thankfully very rare and, more importantly, avoidable.
1 Cionni R, Osher R. Retrobulbar hemorrhage. Ophthalmology. 1991;98:1153-1155.
2 Duker J, Belmont J, Benson W, et al. Inadvertent globe perforation during retrobulbar and peribulbar anesthesia: Patient characteristics, surgical management and visual outcome. Ophthalmology. 1991;98:519.
3 Edge R, Navon S. Scleral perforation during retrobulbar and peribulbar anesthesia: Risk factors and outcome in 50,000 consecutive injections. J Cataract Refract Surg. 1999;25:1237.
4 Little B, Smith J, Packer M. Little capsulorhexis tear-out rescue. J Cataract Refract Surg. 2006;32(9):1420-1422.
5 Alio J, Mulet M, Shalaby A, et al. Phacoemulsification in the anterior chamber. J Cataract Refract Surg. 2002;28(1):67-75.
6 Yeoh R. The ‘pupil snap’ sign of posterior capsule rupture with hydrodissection in phacoemulsification. Br J Ophthalmol. 1996;80(5):486.
7 Burk SE, Da Mata AP, Snyder ME, et al. Visualizing vitreous using Kenalog suspension. J Cataract Refract Surg. 2003;29:645-651.
8 Jaycock P, Johnston R, Taylor H, et al. The Cataract National Dataset electronic multi-center audit of 55,567 operations: updating benchmark standards of care in the United Kingdom and internationally. Eye Lond. 2009;23(1):38-49.