13 Pediatric Resuscitation
 Key Points
• Correct positioning is imperative for successful management of the anterior and cephalad pediatric airway.
• Outside the newborn period, use of a cuffed endotracheal tube in a child is acceptable.
• Children in full cardiorespiratory arrest who have an advanced airway should not receive more than 8 to 10 breaths per minute during resuscitation.
• “Push hard, push fast” with minimal interruptions between compressions is the recommendation for cardiopulmonary resuscitation.
Basic Principles of Cardiopulmonary Resuscitation
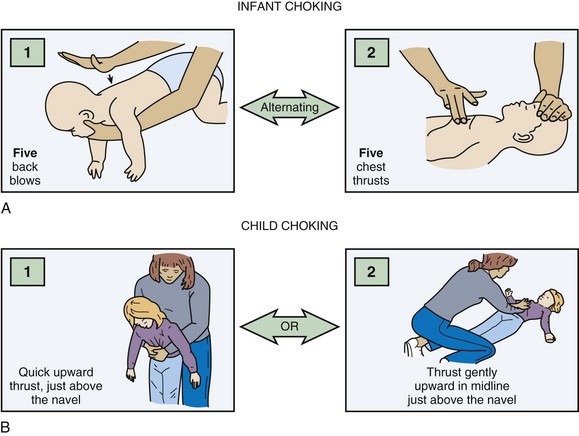
Foreign body removal maneuvers consist of a sequence of five back blows and five chest thrusts for infants and the Heimlich maneuver for children (Fig. 13.1). Blind finger sweeps should not be performed in children because a partial obstruction can be turned into a full obstruction if the foreign body is pushed further into the airway. Because of the pliability of the esophageal wall, foreign bodies in the esophagus can impinge on the trachea and result in airway obstruction. If the foreign body cannot be removed with basic life support maneuvers and the patient decompensates, the clinician can attempt to remove any visible foreign body with Magill forceps. Intubation may be required, and it may be possible to push the foreign body into a mainstem bronchus, most commonly on the right side. If this maneuver fails and the patient cannot be intubated, the last resort is either needle cricothyrotomy or a surgical airway. In a stable patient, bronchoscopy with maintenance of the patient’s position of comfort is the treatment of choice.
Airway Management
Airway management in children can be anxiety provoking; the same preparation guidelines outlined in Chapter 1 should be followed. Signs of respiratory failure include an increased or decreased respiratory rate, nasal flaring, grunting, retractions, cyanosis, apnea, or altered mental status. Hypoxia, compromised airway protection, altered mental status, and impending respiratory failure are common indications for pediatric airway intervention. Because most pediatric cardiac arrests are secondary to respiratory failure, early airway intervention is crucial.
Anatomy
The pediatric airway differs significantly from the adult airway (Box 13.1), and some special techniques are helpful when intubating a child. An oral or nasal airway can assist in maintaining airway patency. Because of the large occiput in a young child, typically those younger than 1 year, a towel roll placed beneath the patient’s shoulders often improves airway alignment. To visualize the very anterior pediatric airway, the operator must look up during intubation and may need to squat or raise the bed for adequate viewing. To see the glottic opening, a straight blade is recommended to lift up an infant’s floppy omega-shaped epiglottis. Because of infants’ small mouths, an assistant may need to pull the baby’s cheek to the side to allow passage of the laryngoscope and endotracheal tube.1,2
Box 13.1 Ways in Which a Child’s Airway Differs Anatomically from an Adult’s Airway
The prominent occiput can cause airway obstruction and impede glottic visualization during intubation; a 1-inch towel roll should be placed below the shoulders
Dependence on nasopharynx patency; nasal airways should be avoided in children younger than 1 year because their larger adenoidal tissue can bleed
The relatively larger tongues can obstruct the airway and often necessitate an oral or nasal airway
The epiglottis is omega (Ω) shaped and floppy; a straight laryngoscope blade is used to lift the epiglottis out of view
The larynx is more anterior and cephalad
The cricoid is the narrowest portion of the airway
Small tracheal diameter and distance between rings, which makes tracheostomy or cricothyrotomy more difficult; the American Heart Association recommends needle cricothyrotomy for difficult airways (see text discussion of this modality)
Much shorter tracheal length (newborn, 4 to 5 cm; 18-month-old child, 7 to 8 cm)
The endotracheal tube may easily be dislodged; frequently reassess position of the tube
Rapid-Sequence Intubation in Children
The intubating time line and drugs of choice are listed in Tables 13.1 and 13.2. Postintubation assessment includes confirmation that the endotracheal tube is in correct position. First listen over the stomach and then over the axillae for breath sounds. A confirmatory device such as an end-tidal carbon dioxide monitor, a carbon dioxide chart (e.g., Pedi-Cap, which should change from purple to yellow with proper tube placement), or an esophageal detector should be used.3,4 A nasogastric or orogastric tube should also be placed as soon as possible because any amount of gastric distention can make ventilation and oxygenation of a child difficult. A rough rule of thumb for nasogastric and orogastric tube size is two times the endotracheal tube size.
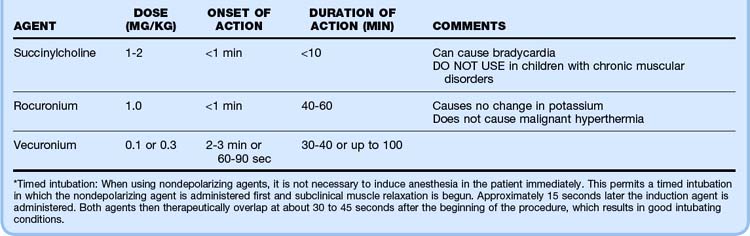

Pharmacologic Agents for Rapid-Sequence Intubation in Children
Potential combinations of agents for rapid-sequence intubation are listed in Table 13.3. Pretreatment with multiple agents is not recommended because placement of an advanced airway may be delayed. Atropine has recently been called into question for routine use in pediatric intubation, but it is recommended in infants younger than 1 year to avoid the bradycardia associated with airway manipulation in this population. The dose of atropine ranges from 0.01 to 0.02 mg/kg (minimum dose, 0.1 mg).
Table 13.3 Clinical Scenarios for Intubation and Recommended Induction Agents
| CLINICAL SCENARIO | INDUCTION AGENTS |
|---|---|
| Isolated head injury | |
| Status epilepticus |
* Several intensive care unit studies have shown that in intubated patients, ketamine does not increase intracranial pressure and may help maintain cerebral perfusion pressure. However, no emergency department studies have been performed to date.
Adapted from a presentation by Sacchetti A. Boston: American College of Emergency Physicians Scientific Assembly; 2003.
Principles of Endotracheal Intubation
Recommended endotracheal tube sizes are listed in Box 13.2. With the advent of high-volume, low-pressure cuffed endotracheal tubes, the dictum of using only uncuffed endotracheal tubes in children younger than 8 years has changed. It is not only acceptable but at times preferable (high peak pressure) to use a cuffed endotracheal tube in children. For an approximate guide to tube size, use 4 + (age ÷ 4) for uncuffed tubes and 3.5 + (age ÷ 4) for cuffed tubes. Cuff inflation pressure should be kept less than 20 to 25 cm H2O. Cuffed endotracheal tubes are not recommended for use in neonates.5,6
Box 13.2 Ways of Choosing Endotracheal Tube Size
Table 13.4 summarizes the procedure for rapid-sequence intubation in children.
Table 13.4 Procedure for Rapid-Sequence Intubation in Children
| Time to intubation 5 min | Start preoxygenation |
| Time to intubation 3 min | Give any premedication (atropine, lidocaine) |
| Intubation time | Push induction and paralytic agents |
| After the patient is relaxed | Intubate: |
| Apply cricoid pressure | |
| Use the BURP (backward, upward, and rightward pressure) technique* | |
| Immediately after intubation | Release cricoid pressure |
| Secure the endotracheal tube | |
| Place a nasogastric tube |
* Too much pressure can occlude the airway.
3 × endotracheal tube size; for example, a 4.0-mm tube placed with the 12-cm mark at the gum line
10 + age in years = number of centimeters of the tube to the lips
For premature infants, the following estimations of tube depth based on body weight are helpful:
Approximate laryngoscope sizes are listed in Table 13.5. The Broselow-Luten resuscitation tape can also be used to select the weight-based appropriate size. It is important to remember that the actual blade size needed is determined by the individual patient’s weight, body habitus, and anatomic variability. Preparation is essential; having laryngoscope blades available that are one size smaller and one size larger than anticipated prevents costly delays.
Table 13.5 Choosing Laryngoscope Size and Type for a Child
| AGE OR WEIGHT | LARYNGOSCOPE SIZE | LARYNGOSCOPE TYPE |
|---|---|---|
| 2.5 kg | 0 | Straight |
| 0-3 mo | 1.0 | Straight |
| 3 mo-3 yr | 1.5-2.0 or 1.5 | Straight or curved |
| Wisconsin | ||
| 3-12 yr | 2.0-4.0 | Straight or curved |
Breathing
Initial Ventilator Settings
Rate: 20 to 60 breaths/min (goal PaCO2, 35 to 45 mm Hg)
Fraction of inspired oxygen (FIO2): 100% (wean slowly based on pulse oximetry)
Positive end-expiratory pressure (PEEP): 3 to 5 cm H2O
Peak inspiratory pressure: 15 to 35 cm H2O (or sufficient to produce discernible chest wall movement)
Inspiratory time–to–expiratory time (I/E) ratio: 1 : 2 (inspiratory time of 0.4 to 0.7 second)
The Difficult Pediatric Airway
Failed Intubation
| PATIENT AGE AND WEIGHT | SIZE |
|---|---|
| Neonates to 5 kg | 1 |
| Infants/children | |
| 5-10 kg |  |
| 10-20 kg | 2 |
| 20-30 kg |  |
| 30-50 kg | 3 |
| Adults | |
| 50-70 kg | 4 |
| 70-100 kg | 5 |
| >100 kg | 6 |
Needle Cricothyrotomy (Jet Ventilation)
1. Identify the cricothyroid membrane; prepare with povidone-iodine solution if possible.
2. Use a 12- to 14-gauge angiocatheter attached to a syringe to puncture the cricothyroid membrane.
3. Direct the catheter at a 45-degree angle caudally (toward the patient’s feet). Placement of normal saline in the syringe helps demonstrate when air is aspirated.
With these methods the child can be oxygenated, but ventilation (CO2 exhalation) is limited.
Methods of Ventilation
Once the angiocatheter is placed, one of the following methods may be chosen for ventilation:
• Attach the following items to the angiocatheter: a 3-mL syringe barrel, a 7.0 French (F) endotracheal tube adapter, and a bag-valve-mask ventilator. Turn the wall oxygen (O2) up to 15 L and attempt to administer ventilation with the bag through the angiocatheter.
• Attach a 3.0 F endotracheal tube adapter directly to the angiocatheter and then a bag-valve-mask ventilator; turn the wall O2 up to 15 L and attempt to administer ventilation with the bag and through the angiocatheter.
• Attach one prong of a nasal cannula to the angiocatheter and use the other prong for oxygen flow (1 second on for inspiration, 4 seconds off for expiration).
• Use an Enk Oxygen Flow Modulator Kit (Cook Medical).
• The QuickTrach kit (Rusch, Inc.) can also be used for cricothyrotomy.
Circulation
Shock results from inadequate blood flow and delivery of oxygen to meet the metabolic needs of the body. In children, the most common type of shock is hypovolemic. Compensated shock is defined by the presence of tachycardia, cool extremities, prolonged capillary refill time, and weak peripheral pulses with normal systolic blood pressure. Decompensated shock occurs when hypotension, weak central pulses, and weak or absent peripheral pulses develop. Table 13.7 lists the most commonly used medications for maintaining cardiac output and for postresuscitation stabilization.
| MEDICATION | DOSE RANGE |
|---|---|
| Inamrinone | 0.75-1 mg/kg IV/IO over 5-min period; may repeat twice, then 5-10 mcg/kg/min |
| Dobutamine | 2-20 mcg/kg/min IV/IO |
| Dopamine | 2-20 mcg/kg/min IV/IO |
| Epinephrine | 0.1-1 mcg/kg/min IV/IO |
| Milrinone | Loading dose: 50 mcg/kg IV/IO over 10- to 60-min period, then 0.25-0.75 mcg/kg/min |
| Norepinephrine | 0.1-2 mcg/kg/min |
| Sodium nitroprusside | Initially, 0.5-1 mcg/kg/min; titrate to effect up to 8 mcg/kg/min |
IO, Intraosseously; IV, intravenously.
Intraosseous Access
The procedure for establishing intraosseous access in the anterior part of the tibia is as follows:
1. The skin over the anterior surface of the tibia is sterilized.
2. Starting 1 to 3 cm below the tibial tuberosity (to avoid damaging the growth plate), the needle is directed at a 90-degree angle to the medial surface of the tibia.
3. Once the cortex is passed, the operator must stop pushing to avoid forcing the needle through the other side of the bone.
The following signs help confirm that the needle is in the marrow cavity:
• A sudden decrease in resistance is felt as the needle passes through the cortex.
• The needle stands upright without support.
• When a syringe is attached to the needle, bone marrow may be aspirated. If this is not possible, an infusion flush should be used because it is common to be unable to aspirate marrow.
• Fluid infuses freely without signs of subcutaneous infiltration.
Central Venous Access
1. The leg is slightly externally rotated and the area prepared and draped in sterile fashion.
2. The femoral vein is located medial to the femoral artery. In conscious patients, the area below the inguinal ligament, medial to the femoral artery, should be infiltrated with 1% lidocaine.
3. In children, the introducer needle is directed at a 30- to 40-degree angle to the skin, starting about 1 cm below the inguinal ligament and aiming toward the contralateral shoulder or umbilicus.
4. Once a flash of blood is obtained, the guidewire is threaded through the introducer.
5. The Seldinger technique is then followed to complete line placement.
Resuscitative Drugs
Epinephrine
The initial intravenous or intraosseous dose of epinephrine for patients in pulseless arrest who are older than neonates is 0.01 mg/kg (0.1 mL/kg) of a 1 : 10,000 standard epinephrine solution. All endotracheal doses are 0.1 mg (0.1 mL/kg) of a 1 : 1000 solution for pulseless arrest. Note that intravenous epinephrine and endotracheal epinephrine doses have the same number of milliliters; only the concentration of the drug changes. Little evidence exists that endotracheal administration improves outcomes. Though reasonable to perform when alternative access is not available, endotracheal administration should not delay establishing intravenous or intraosseous access. These doses may be administered every 3 to 5 minutes during arrest. Evidence suggests that high-dose epinephrine may worsen outcomes; consequently, PALS guidelines no longer recommend high-dose epinephrine except for special circumstances such as beta-blocker overdose.7 For bradycardia, epinephrine may be given intravenously or intraosseously at 0.01 mg/kg (0.1 mL/kg) of a 1 : 10,000 solution or 0.1 mg/kg (0.1 mL/kg) of a 1 : 1000 solution via endotracheal tube.
Vasopressin
Although some adult studies have investigated the use of vasopressin for cardiac arrest, the pediatric literature to date does not provide clear evidence for its use in children. One pediatric study revealed that the use of vasopressin was associated with lower return of spontaneous circulation and a trend toward lower 24-hour and discharge survival.7
Interventions
Synchronized cardioversion energy levels for SVT and unstable tachyarrhythmias are 0.5 to 1.0 J/kg, whereas unsynchronized cardioversion (defibrillation) for VF or pulseless VT starts at 2 J/kg. Figure 13.2 illustrates an algorithm for potentially lethal arrhythmias. The new 2010 AHA guidelines recommend that the second and subsequent defibrillation attempts use 4 J/kg. A maximum of 10 J/kg may be attempted if the provider believes it to be warranted.
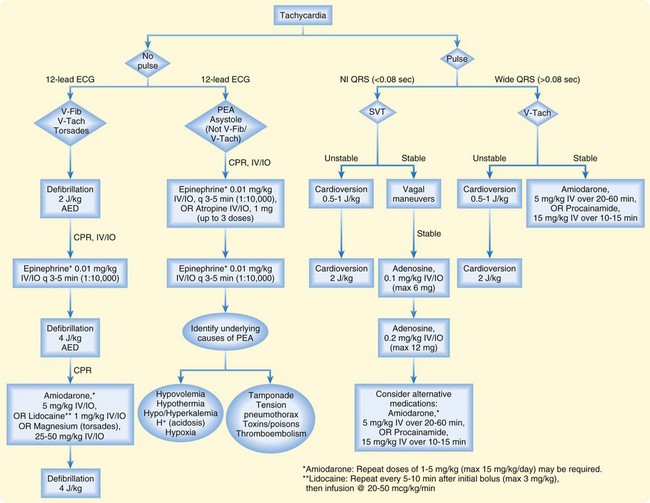
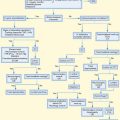
Fig. 13.2 Tachycardia algorithm.
(Adapted from American Heart Association 2010 guidelines. Courtesy of Stephanie Doniger, MD, Children’s Hospital, Oakland, CA.)
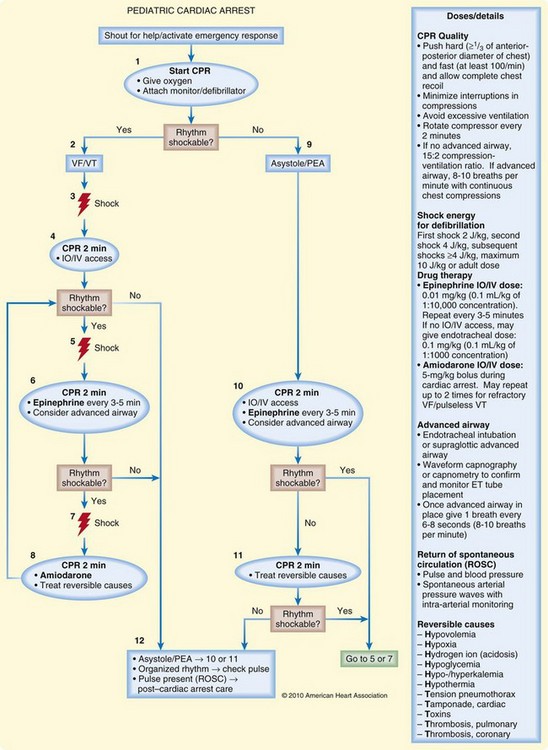
Management of pulseless electrical activity in children is similar to that in adults. The airway should be controlled, intravenous access obtained, and CPR initiated. Specific, treatable causes of pulseless electrical activity should be sought, including hypovolemia, hypoxemia, acidosis, hypothermia, hyperkalemia, tension pneumothorax, cardiac tamponade, ingestion of toxic substances, pulmonary embolism, and myocardial infarction. Figure 13.3 outlines the cardiac arrest algorithm.
1 Luten R. Approach to the pediatric airway. In: Walls R, Luten R, Murphy M, et al. Manual of airway management. 3rd ed. Philadelphia: Lippincott Williams & Wilkins; 2008:263–281.
2 Luten R. The difficult paediatrics airway. In: Walls R, Luten R, Murphy M, et al. Manual of airway management. 3rd ed. Philadelphia: Lippincott Williams & Wilkins; 2008:291–302.
3 Sharieff GQ, Rodarte A, Wilton N, et al. The self-inflating bulb as an esophageal detector device in children weighing more than twenty kilograms: a comparison of two techniques. Ann Emerg Med. 2003;41:623–629.
4 Sharieff GQ, Rodarte A, Wilton N, et al. The self-inflating bulb as an airway adjunct: is it reliable in children weighing less than 20 kilograms? Acad Emerg Med. 2003;10:303–308.
5 Newth CJ, Rachman B, Patel N, et al. The use of cuffed versus uncuffed endotracheal tubes in pediatric intensive care. J Pediatr. 2004;144:333–337.
6 Ralston M, Hazinski M, Zaritsky A, et al. Pediatric assessment. In: Pediatric advanced life support, provider manual. Dallas: American Heart Association; 2006:1–32.
7 American Heart Association. 2010 American Heart Association Guidelines for Cardiopulmonary Resuscitation and Emergency Cardiovascular Care Science. Part 14: pediatric advanced life support. Circulation. 2010;122:S876–S908.