[level-membership-for-emergency-medicine-category]Chapter 63
Otolaryngologic Procedures
Pharynx and Larynx
Anatomy
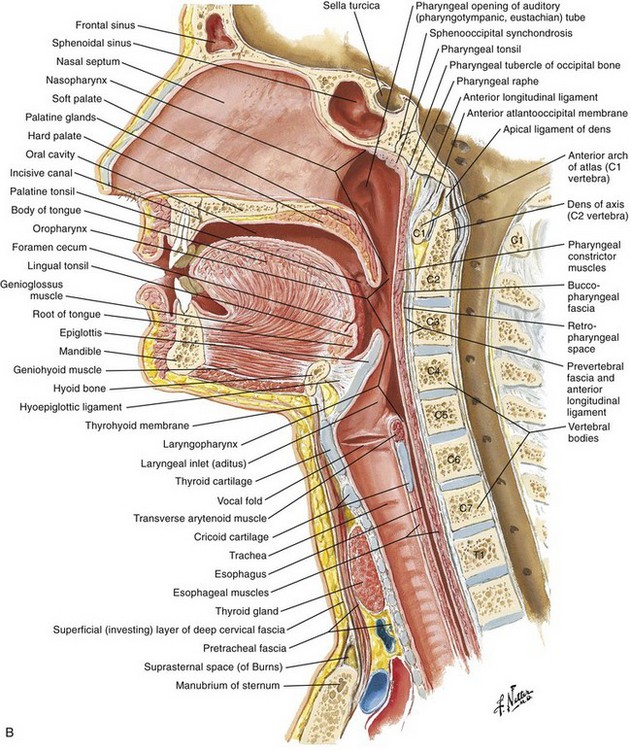
The larynx in adults is located in the anterior part of the neck at the level of the C3-C6 vertebrae. It connects the inferior portion of the pharynx (hypopharynx) with the trachea. The larynx extends vertically from the tip of the epiglottis to the inferior border of the cricoid cartilage. It consists of nine cartilages. The larynx is innervated by branches of the vagus nerve, the superior laryngeal nerve, and the recurrent laryngeal nerve. The relevant anatomy is depicted in Figure 63-1.
Indications and Contraindications
Laryngoscopy is indicated for the evaluation of patients with complaints of dysphagia or odynophagia. More specifically, it should be performed in patients complaining of dysphagia, hoarseness, FB ingestion or sensation in the throat, and angioedema and in patients who require assessment of their airway status. In general, laryngoscopy can be used to evaluate a problem and to exclude airway compromise, as well as to diagnose several other diseases such as gastroesophageal reflux, cancer, and allergy.1
Equipment
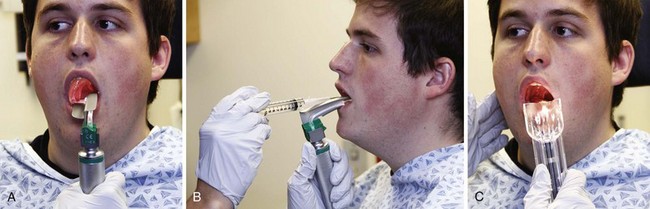
The equipment required depends on the type of laryngoscopic procedure performed. For flexible laryngoscopy you will need a standard flexible nasopharyngolaryngoscope, a light source, gloves, a nasal speculum, surgical lubricant, antifogging solution, decongestant spray, anesthetic spray, and a wall suction setup with a Frazier suction tip catheter (Fig. 63-2, plate 1). Many choices of decongestant are available; however, 0.05% oxymetazoline (Afrin) or 0.1% to 1% phenylephrine is commonly used. Lidocaine (4%) is typically used as the anesthetic. A 5% cocaine solution serves as both an anesthetic and decongestant. If nasal spray formulations are not available, medication-soaked cotton pledgets, an atomizer bottle, or a syringe atomizer (Mucosal Atomization Device, MAD Nasal, Wolf Torry Medical, Inc.) may be used.
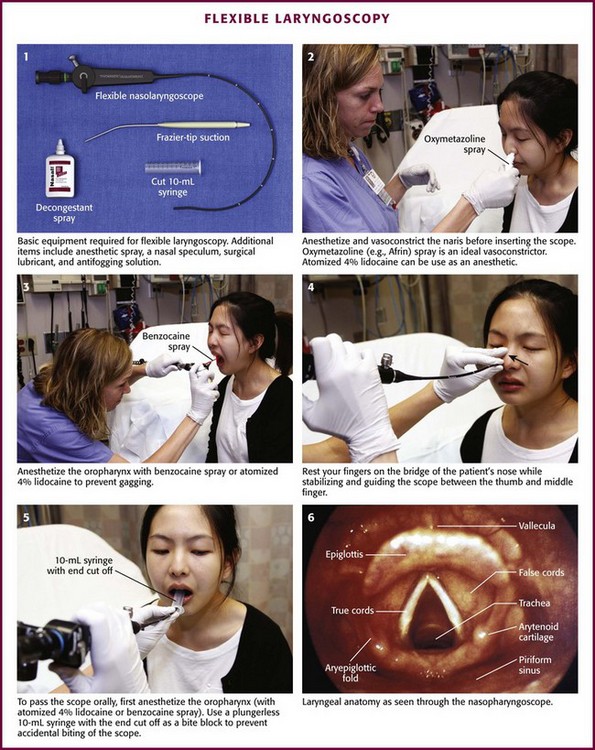
Figure 63-2 Flexible laryngoscopy.
Procedure
Attach the nasopharyngolaryngoscope to its light source and the suction tubing to its port (if available). Ensure that both are functioning properly before beginning. Before inserting the scope, adjust the eyepiece to your visual acuity; it is helpful to check the focus on newsprint or a small object. Review the scope’s directional controls. Examine both nares and choose the more patent one to enter. Anesthetize and vasoconstrict the naris (see Fig. 63-2, plate 2). Because this procedure is irritating, allow enough time for these medications to become effective. You may also anesthetize the pharynx to minimize gagging (see Fig. 63-2, plate 3). Warm the end of the scope in warm water to help prevent fogging. Place the patient in the seated position with the head placed against a head rest in the sniffing position. Insert the tip of the lubricated scope just inside the naris. (Some authors recommend a series of soft nasal trumpets to gradually dilate the nasal cavity and allow easier passage of the scope.) Movement of the scope against the inside of the nasal passage may be irritating to the patient. Minimize this sensation by resting your fourth and fifth fingers on the bridge of the patient’s nose while stabilizing and guiding the scope between your thumb and index finger (see Fig. 63-2, plate 4).
While looking through the eyepiece, slowly advance the endoscope past the middle turbinate into the nasopharynx or through the lumen of a nasal trumpet. To clear fogging or mucus off the lens, ask the patient to swallow, wipe the lens against the pharyngeal mucosa, or use the suction. Once the scope is in the nasopharynx, direct the tip inferiorly by using the thumb control near the eyepiece. Use the thumb control to accomplish up and down movements of the scope. Rotate the scope about its axis and then apply thumb control to provide lateral movement and visualization. At this point the base of the tongue and the tonsils will come into view. Slide the scope farther caudad to bring the larynx into focus. Once again, systematically view the patient’s anatomy and function during both respiration and phonation (see Fig. 63-2, plate 6).
If the nasopharyngeal scope will not pass through either naris, pass it through the oropharynx. Properly anesthetize the oropharynx and avoid contacting the posterior portion of the tongue to prevent gagging. A plastic bite block can be used. Alternatively, cut a 10-mL syringe (without the plunger) in half and ask the patient to hold it in the mouth between the incisors (see Fig. 63-2, plate 5). Pass the fragile endoscope through this tube into the oropharynx to prevent accidental biting of the scope.
Mirror Laryngoscopy
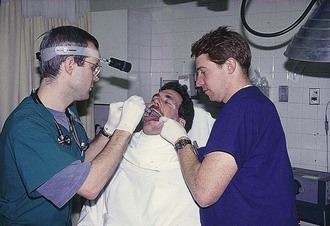
Establish rapport with the patient by explaining how the examination will be performed. Have the patient sit erect in the “sniffing position” with the feet flat on the floor and leaning slightly forward. Attach your head lamp and adjust the beam of light (Fig. 63-3). Warm the mirror with warm water to prevent fogging, but check the temperature of the mirror with your hand before placing it into the oropharynx so that the patient is not burned. Alternatively, apply an antifogging solution to the mirrored side. Wrap the patient’s tongue with gauze to prevent it from slipping or being injured by the lower incisors and then grasp it with the nondominant hand (Fig. 63-4). Apply gentle traction on the tongue with your thumb and index finger and lift the patient’s upper lip with your middle finger. Slide the mirror into the oropharynx with the glass surface parallel to the tongue but not touching it. Place the back of the mirror against the uvula and soft palate and smoothly lift until the larynx is visualized. Although this should not induce gagging, try to make only slight changes in the mirror’s position to inspect the appropriate structures.
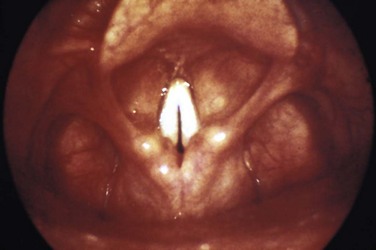
Once the patient is anesthetized, repeat the steps described earlier and position the mirror against the soft palate. Rotate the angle of the mirror and systematically inspect the base of the tongue, valleculae, epiglottis, piriform recess, arytenoids, false and true vocal cords, and if possible, the superior aspect of the trachea (see Fig. 63-2, plate 6). Observe for masses, evidence of infection, asymmetry, or FBs. Further evaluate the anterior structure of the larynx and function of the vocal cords by having the patient say “eeee” in a high-pitched voice. This should move the epiglottis away from blocking the view of the larynx and bring the true cords together at the midline (Fig. 63-5).
Tonsil: PTA
Anatomy
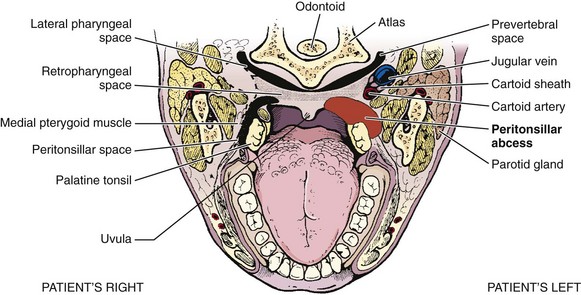
Understanding the relative anatomy before attempting to treat PTA is important (Fig. 63-6). The palatine tonsils are located between the anterior and posterior pillars of the throat, bound in a capsule, and covered by mucosa. The lateral wall of the tonsil is defined by the superior pharyngeal constrictor muscle. Of great importance is the internal carotid artery, which lies approximately 2.5 cm posterolateral to the tonsil.
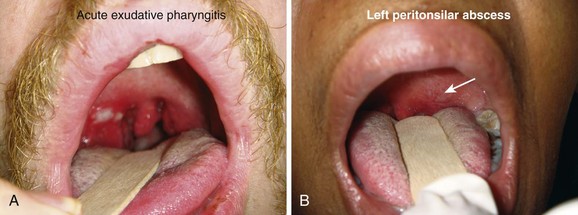
The abscess is defined as a collection of pus between the tonsillar capsule, the superior constrictor muscle, and the palatopharyngeus muscle (Fig. 63-7). The abscess is not within the tonsil itself. PTA is believed to arise from spread of infection from the tonsil or from the mucous glands of Weber located in the superior tonsillar pole. The abscess is most commonly initiated from the upper pole of the tonsil. However, it can also spread from the middle or inferior poles.
Pathophysiology and Clinical Findings
PTAs can occur in patients with inadequately treated tonsillitis and in those with recurrent tonsillitis, but in some patients it arises de novo. There are no data proving that antibiotics, even the correct ones in proper doses, invariably prevent the progression of tonsillitis to abscess formation. The abscess is generally unilateral, and bilateral involvement is rare.2
The differential diagnosis for this acute process includes unilateral tonsillitis, peritonsillar cellulitis, retropharyngeal abscess, infectious mononucleosis, epiglottitis, herpes simplex tonsillitis, retromolar abscess, neoplasm, FB, and internal carotid artery aneurysm. Chronic conditions include leukemia, carcinoma, and tumor in the parapharyngeal space. Differentiation of PTA from peritonsillar cellulitis may be difficult, especially in the early stages of an abscess. The history and time course of the two disease processes are quite similar. Trismus and uvular deviation are uncommon with peritonsillar cellulitis.3
Indications and Contraindications
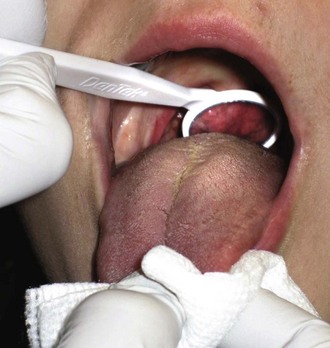
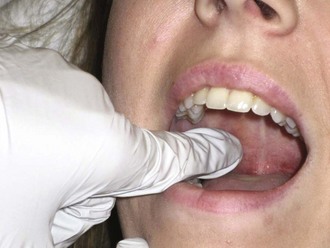
To diagnose PTA, in addition to visualization, place a gloved index finger into the mouth to feel for hardness or fluctuance in the peritonsillar region (Fig. 63-8).
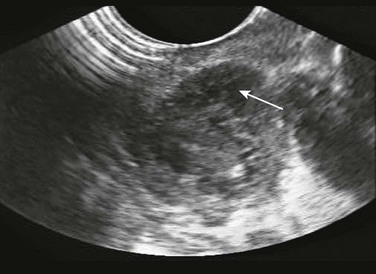
Intraoral sonography may augment diagnostic accuracy and direct localization for drainage (Fig. 63-9; see Chapter 37). It is performed with an intracavitary probe. Blaivis and coworkers2 found that ED ultrasound was effective in diagnosing and aiding drainage in five cases of PTA. Ultrasound excluded the diagnosis in one. If there is still a question regarding the diagnosis or actual location of the abscess, computed tomography (CT) may be helpful but is not regularly performed and is not standard before a drainage procedure in straightforward cases.
Equipment
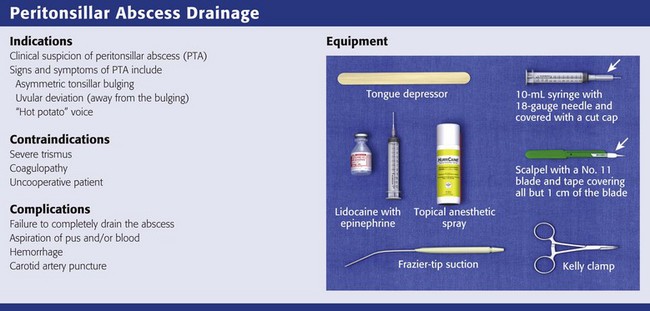
The equipment required depends on the technique that is going to be used to drain the PTA. For needle aspiration, you will need a light source, tongue blade, injectable (1% lidocaine with 1 : 100,000 epinephrine) or topical (Cetacaine spray or 4% lidocaine) anesthetic, 3- to 5-mL syringe with a long 25-gauge needle for injection of anesthetic, and a standard or long 18- to 20-gauge needle (spinal needle) on a 10-mL syringe for aspiration (see Review Box 63-1). Long needles and small syringes will not obscure the operator’s view of the anatomy. It is also helpful to have wall suction with a Frazier or Yankauer suction tip device available.
For either procedure, the patient should be given intravenous pain medication and may require mild sedation or even procedural sedation. One should administer parenteral narcotic analgesia, mild sedation, or both, before attempting aspiration. Fentanyl, 1 to 3 µg/kg administered intravenously a few minutes before the procedure, is often ideal. Midazolam may be used judiciously, but the patient should not be overly sedated. The combination of midazolam, ketamine, and glycopyrrolate is reported to be safe and effective for outpatient peritonsillar drainage in children.4
Procedure
Needle aspiration is relatively simple, can be performed by emergency clinicians, does not require special equipment, and is relatively inexpensive. Other benefits of needle aspiration over incision and drainage include decreased pain and trauma. Many believe that this should be the initial surgical drainage procedure for adults and children. The recurrence rate after aspiration is 10%,3 and its cure rate is 93% to 95%.5 Approximately 4% to 10% of patients require repeated aspiration.3,5,6 One drawback is that needle aspiration may miss the PTA and therefore allow misdiagnosis as peritonsillar cellulitis. For this reason, some authors propose admission of patients with negative aspirations and the presumed diagnosis of peritonsillar cellulitis for intravenous antibiotics and observation to prevent further morbidity. Although most studies involved hospitalization and intravenous antibiotics, selected outpatient treatment with oral antibiotics has also been successful and is usually the option chosen unless the patient appears to be in a septic state.6
The incision and drainage procedure is commonly done on an outpatient basis under local anesthesia. It is usually performed after pus is obtained by needle aspiration, but occasionally it is the primary procedure. It seems most logical to first attempt aspiration and follow with incision and drainage only if additional pus is suspected or other extenuating circumstances are present. The success rare for incision and drainage is high with a recurrence rate similar to or lower than that with aspiration alone.5
Treatment guidelines based on a review of the literature3,5–7 suggest that patients with PTA should initially be treated by needle aspiration. Incision and drainage and immediate tonsillectomy should be reserved for treatment failures or recurrences. These procedures can be performed in conjunction with hospital admission and administration of intravenous antibiotics or as outpatient treatment with oral antibiotics. One evidence-based review analyzed 42 articles, 5 of which were clinical studies on surgical technique.5 All three techniques were found to be effective in treating PTA, and the recurrence rate was low (grade C recommendation). The approach depends on the patient’s clinical status and medical history. Decisions about the treatment of PTA in the ED are often made by the emergency clinician, but as local protocols dictate, consultation with an otolaryngologist is also appropriate.
Needle Aspiration
Have the patient sit upright with a support behind the head. This is best done as a two-person procedure. Ask an assistant to retract the cheek laterally to maximize visibility. A head lamp provides optimal lighting; a double–tongue blade setup aids in visualization of the operative area (see Fig. 63-3). If required, administer a parenteral narcotic analgesic, a mild sedative, or both before attempting aspiration.
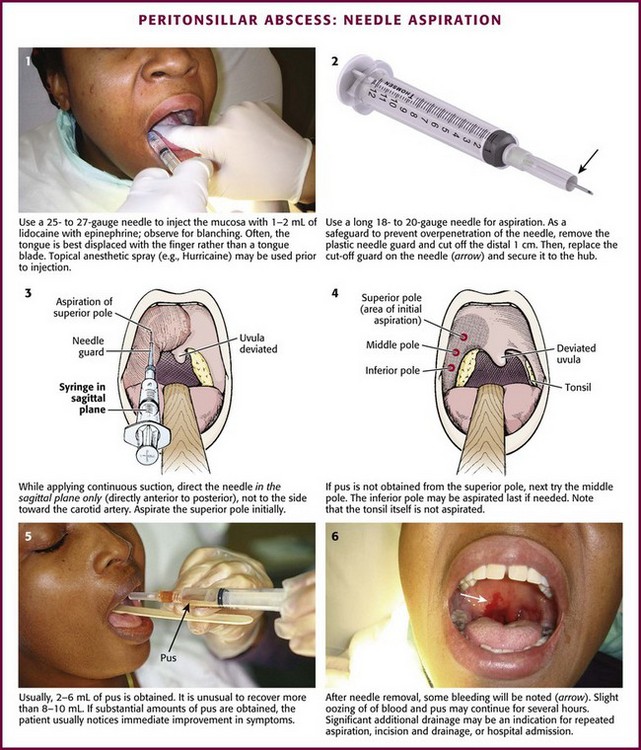
Use manual palpation to locate the fluctuant area of the abscess. Anesthetize the area topically or with local infiltration. Infiltration should be done with 2 to 3 mL of 1% lidocaine with epinephrine via a 25- to 27-gauge needle. Use a 3- to 5-mL syringe with a long needle to be able to visualize the area to be injected (Fig. 63-10, step 1). A large syringe can block the operator’s view. Displacing the tongue with a finger rather than a tongue blade may provide a better view. Infiltrate the lidocaine intramucosally for the best results, but be careful to not increase the size of the abscess by direct injection into the abscess cavity. The area should blanch. With proper local infiltration, the patient will not feel the penetration of the aspirating needle. If the trismus is so pronounced that it prevents adequate anesthesia, it will probably be too difficult to aspirate or incise the abscess properly.
Novel techniques to assist in the drainage procedure have recently been described. Afarian and Lin described the use of a laryngoscope with a curved blade (Fig. 63-11A and B).8 The blade is inserted into the patient’s mouth as far posteriorly as the patient can tolerate. The blade shines light from inside the mouth onto the posterior aspect of the pharynx. In addition, the laryngoscope provides better exposure of the area because the handle is below the patient’s mouth and the holding hand does not obscure the view. Moreover, the curved blade sweeps the tongue out of the way and the weight of the handle will help overcome trismus. Braude and Shalit described a similar process involving the use of a disassembled disposable vaginal speculum with a fiberoptic light (see Fig 63-11C).9 One advantage of both techniques is that an assistant can hold either light source without getting in the way of the operator. Finally, Chang and Hamilton reported that performing the procedure with the patient in the Trendelenburg position and the operator seated behind the patient’s head provides comparable success rates and patient comfort.10
For aspiration, attach a long 18- to 20-gauge needle to a 10-mL syringe. Fashion a needle guard by cutting off the distal 1 cm of the plastic needle cover, replace the cover on the needle, and securely attach this guard to the needle and syringe with tape to prevent inadvertent displacement (see Fig. 63-10, step 2). Ensure that the needle protrudes only 1 cm beyond the cover to limit the depth of needle penetration and lessen the risk of entering any major vascular structures. If pus is not obtained at a 1-cm depth, deeper penetration is discouraged. Insert the needle into the most fluctuant (or prominent) area as previously determined, which is most commonly the superior pole of the tonsil (see Fig. 63-10, step 3). Importantly, advance the syringe and needle in the sagittal plane only; do not angle to the side toward the carotid artery. Do not aspirate the tonsil itself because the abscess develops in the peritonsillar space surrounding the tonsil. Continually aspirate while advancing the needle in the sagittal plane and do not direct it laterally, where it could injure the carotid artery. If the aspirate is positive for pus, remove as much purulent material as possible. If the aspirate is negative, attempt aspiration again in the middle pole of the peritonsillar space, approximately 1 cm caudal to the first aspiration. If still negative, perform a third and final attempt at the inferior pole (see Fig. 63-10, step 4). Up to 30% of abscesses will be missed if only the superior pole is aspirated. It must be stressed that a negative aspirate does not rule out a PTA.
Usually, 2 to 6 mL of pus is obtained. It is unusual to recover more than 8 to 10 mL (Fig. 63-10, step 5). Although culture is recommended, the results rarely alter subsequent therapy. When significant amounts of pus are aspirated, the patient usually feels immediate improvement in pain and dysphagia. After the needle is removed, some bleeding will be noted (see Fig. 63-10, step 6). Slight oozing may occur for a few hours, especially if warm water rinses are used. Drainage of pus may continue and is often sensed as a foul taste by the patient. Significant additional drainage of pus may be an indication for repeated aspiration, incision and drainage, or hospital admission.
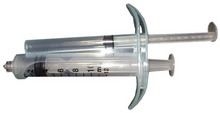
Recently, a new device, the Reciprocating Procedure Device (RPD; AVANCA Medical Devices, Inc.), has been developed that allows one-handed aspiration of the abscess (Fig. 63-12).11 The RPD consists of two syringe barrels and plungers. The plungers are linked by a pulley system in opposing fashion, which results in a set of reciprocating plungers. When one plunger is pressed with the thumb, the syringe injects; when the accessory plunger is depressed, the syringe aspirates. The RPD allows stable finger positioning and finer control of the needle and syringe. To use the RPD, attach a needle to the RPD. Press the injection plunger with the thumb while advancing the RPD simultaneously in the oral cavity until the needle penetrates the abscess. Once the mucosal surface has been penetrated, depress the aspiration plunger to provide a vacuum for aspiration without moving the needle tip. Studies have shown that the RPD allows enhanced needle control, safer and more accurate aspiration procedures, and decreased complications by 35% to 60%.12–14
Incision and Drainage
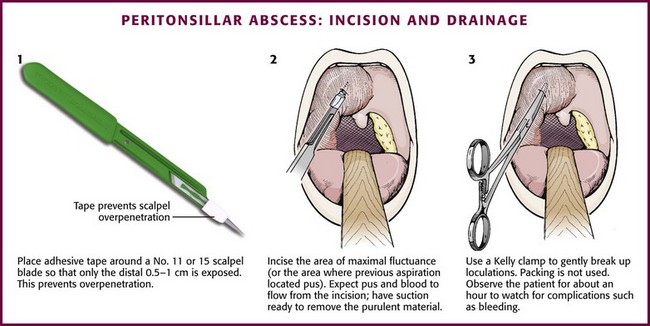
To incise a PTA, anesthetize the area as described earlier. Prepare a No. 11 or 15 scalpel blade by taping over all but the distal 0.5 cm of the blade to prevent deeper penetration (Fig. 63-13, step 1). Incise the area of maximal fluctuance or the area where a preceding aspiration (if one was performed) located pus. Do not incise the tonsil itself; instead, incise the peritonsillar area where pus accumulates. Incise the mucosa in an area 0.5 cm long in a posterior-to-anterior direction. A stab incision with a No. 11 blade usually suffices (see Fig. 63-13, step 2). Warn the patient that the pus will flow posteriorly and must be expectorated. Expect bleeding because this is a vascular area. Suction the incised area with a No. 9 or 10 Frazier suction tip or a tonsil suction tip to aid in removal of the purulent material. Place a closed Kelly clamp into the opening and gently open it to break up the loculations (see Fig. 63-13, step 3). Allow the patient to rinse and gargle with a saline or dilute peroxide-saline solution. Packing is not used in the drainage of this abscess. After aspiration or incision, it is prudent to observe the patient for about an hour to watch for complications (e.g., bleeding) and to ensure that the patient is able to tolerate oral fluids. Most patients can be discharged with 24-hour follow-up. Toxic patients, those with excessive volumes of aspirate, those with persistent bleeding, and those unable to take oral antibiotics are candidates for admission or more prolonged observation. Frequent rinses with warm saline are quite helpful in relieving postaspiration symptoms.
Complications of Surgical Drainage
Needle aspiration is an accepted, safe, and effective technique for treatment of PTA in the ED. There is an approximate 10% failure rate and need for subsequent drainage.3,5,6 Complications can include aspiration of pus or blood and hemorrhage. If the patient has cellulitis, the aspiration will be of no help, but it will not worsen morbidity. Failure to obtain pus should prompt high-dose antibiotics and follow-up in 24 hours. Many clinicians will opt for admission in such instances. Though often feared, injury to the carotid artery has not been reported as a complication of needle aspiration of PTA. Catastrophic hemorrhage may result from the extremely rare and largely theoretical aspiration of a pseudoaneurysm mimicking a PTA or similarly rare necrosis of the carotid artery. In addition, incisions that are too large or too small may lead to poor healing or an inability to completely evacuate the abscess, respectively.
Ear
The ear consists of three sections, the outer, middle, and inner ear. The outer ear includes the pinna (auricle), the external auditory canal (EAC), and the tympanic membrane (TM) (Fig. 63-14A). For the purpose of this chapter, only the parts of the external ear will be discussed. The pinna is flesh-covered cartilage and serves both hearing and cosmetic functions. The EAC extends from the head to the external auditory meatus in the skull and measures approximately 2.5 cm in adults. It is relatively short and straight in early infancy but begins to take on its adult S shape and overall anterocaudal orientation at 2 years of age. Initially, the EAC is almost entirely cartilaginous, but by adulthood its medial two thirds is composed of bony support with an overlying thin, stratified squamous epithelium. The lateral third has a less sensitive, thicker hairy epithelium that produces cerumen and retains its cartilage as support. The arterial supply to the EAC originates from the external carotid artery via the posterior auricular, maxillary, and superficial temporal branches. The mandibular branch of the fifth cranial nerve (V3) and the vagus nerve innervate the ear.
Anesthesia of the External Ear
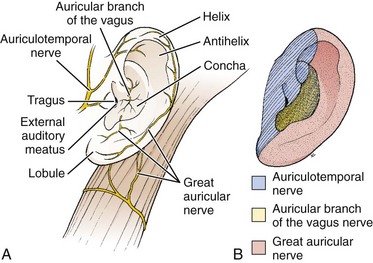
Indications for local anesthesia of the auricle include closure of extensive lacerations or performance of other painful procedures such as incision and drainage of hematomas (Fig. 63-15). Four nerve branches supply the external ear; knowledge of their anatomy is required to understand the location for injection of anesthetic (see Fig. 63-14B). The great auricular nerve (branch of the cervical plexus) innervates most of the posteromedial, posterolateral, and inferior aspect of the auricle. A few branches of the lesser occipital nerve may contribute to this area. The auricular branch of the vagus supplies the concha and most of the area around the auditory meatus. The auriculotemporal nerve (from the mandibular branch of the trigeminal nerve) supplies the anterosuperior and anteromedial aspects of the auricle.
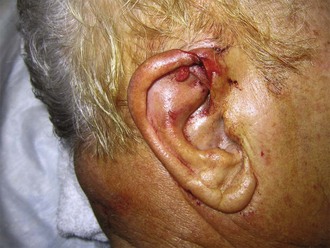
Figure 63-15 Closure of extensive lacerations of the ear such as this require a nerve block of the auricle.
Procedure: Fill a 10-mL syringe with either 1% lidocaine or 0.25% bupivacaine. Mix with epinephrine if a regional block is planned in an area without evidence of traumatized vascularity. Attach the syringe to a 25- or 27-gauge needle (5 to 7 cm in length). One of several methods may be used to induce partial or complete anesthesia, depending on the area of concern. To anesthetize the nerve branches of the great auricular and lesser occipital nerve branches, inject between 3 and 4 mL of anesthetic into the posterior sulcus (Fig. 63-16, plate 1). Insert the needle behind the inferior pole of the auricle and gradually aspirate and inject toward the superior pole along the crescent-shaped contour of the posterior aspect of the auricle. Anesthetize the auriculotemporal nerve anteriorly by placing 3 to 4 mL of anesthetic just superior and anterior to the cartilaginous tragus. Provide anesthesia to the auricular branch of the vagus nerve and the more central areas of the auricle by using the technique shown in Figure 63-16, plates 3 and 4.
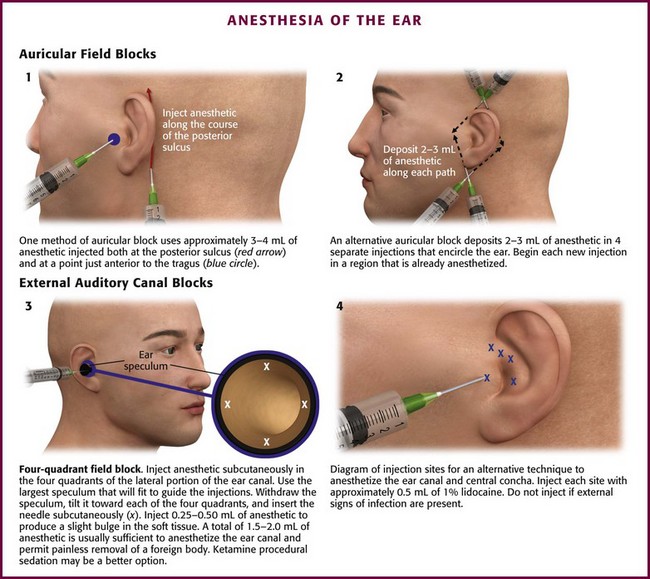
Figure 63-16 Anesthesia of the ear.
Another and possibly more effective option is the regional block shown in Figure 63-16, plate 2. Insert the needle subcutaneously approximately 1 cm above the superior pole of the auricle and direct it to a point just anterior to the tragus. Be sure to inject the skin of the scalp while avoiding the auricular cartilage. Aspirate and then slowly withdraw the needle while injecting anesthetic until the needle is almost to the puncture site. Redirect the needle posteriorly and repeat the process while aiming at the skin just behind the midauricular area. Remove the needle and perform the same procedure, but insert the needle just inferior to the insertion of the ear lobule and anesthetize it in a superior direction. Again, block the auricular branch of the vagus as described in Figure 63-16, plates 3 and 4, if additional anesthesia of the concha is required.
EAC and TM
Procedure: Local anesthesia is achieved with a 25- or 27-gauge needle (3 to 5 cm in length) attached to a syringe containing 1% lidocaine with epinephrine. A 1 : 10 mixture of 8.4% sodium bicarbonate to lidocaine helps reduce pain during injection in this sensitive area. Place a speculum just inside the auditory meatus, inject 0.3 to 0.5 mL of the anesthetic into subcutaneous tissue, and stop after a small bulge is raised in the skin. Inject all four quadrants in this manner by moving the speculum after each injection (see Fig. 63-16, plate 3). If additional anesthesia is necessary, give two more small injections. Inject the same amount slightly farther into the canal, once along the anterior wall and again at the posterior wall at the bone-cartilage junction.
Another similar technique involves depositing the anesthetic just lateral, or exterior, to the external auditory meatus. Using the same size of needle and type of anesthetic solution as just described, inject approximately 0.5 to 1.0 mL into each of five points around the auditory meatus and tragus (see Fig. 63-16, plate 4).
Examination
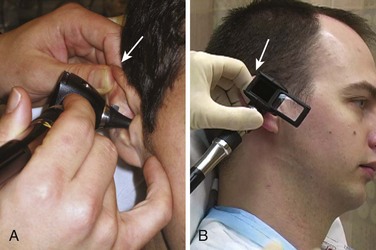
Several methods can be used to examine the EAC and TM. In all methods, grasp the superior aspect of the pinna and pull cephalad and posterior to straighten the slightly tortuous EAC. Examination is most commonly done with a fiberoptic otoscope (Fig. 63-17). Place a plastic or metal speculum into the auditory meatus for examination and use a head lamp or head mirror/light bulb as a light source. After inspection, the operating hand can be used to pass instruments into the EAC and to maneuver them more easily. Although this technique provides excellent illumination, the use of magnifying loupes can improve visualization during procedures. The ideal setup for removal of cerumen or an FB consists of an operating microscope and a speculum. This provides binocular vision and frees the examiner’s hands for instrumentation. Unfortunately, this equipment is seldom found outside the otolaryngology clinic setting. If using a standard otoscope, stabilize the hand holding the otoscope against the temporal part of the patient’s skull to prevent inadvertent injury to the canal if the patient moves unexpectedly.
Removal of Impacted Cerumen
Excretions from the ceruminous or apocrine and sebaceous glands together with cells exfoliated from the EAC combine to form cerumen. One study found that cerumen is composed of lipids, complex proteins, and simple sugars.15 Cerumen repels water, has documented antimicrobial activity, and forms a protective barrier against infection. Cerumen often becomes impacted, which results in complaints of a “blocked” ear, impaired hearing, or dizziness.
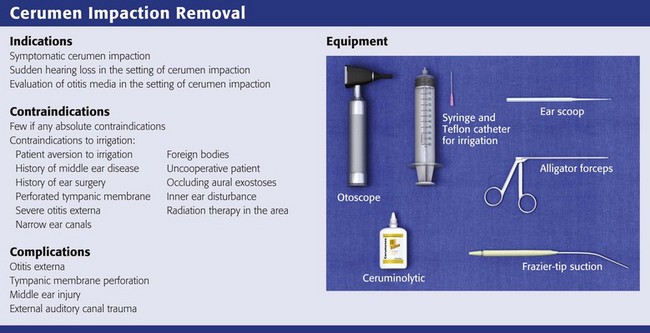
Indications and Contraindications
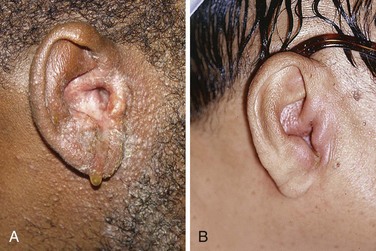
There are few if any true contraindications to removal of impacted cerumen. Cerumen is usually impacted for prolonged periods, and vigorous attempts to remove it may precipitate otitis externa. It is reasonable to instill antiseptics (Vol Sol and others) or antibiotic eardrops for a few days after removal of the cerumen to prevent otitis externa. Neomycin-containing eardrops are best avoided because of precipitation of a contact dermatitis (Fig. 63-18A). Caution should be used in removing impacted cerumen in diabetic patients. Diabetics commonly experience otitis externa after seemingly minor manipulation of the ear canal (see Fig. 63-18B).
Contraindications to irrigation include the following16:
l. Patient aversion to or a history of injury from previous syringe irrigation
l. History of middle ear disease
l. Known or suspected perforated TM
l. FBs, especially sharp objects and vegetable matter
l. Known inner ear disturbance, especially if the patient has severe vertigo
l. History of radiation therapy encompassing the external or middle ear, base of the skull, or mastoid
Procedure
Removal of cerumen can be accomplished by irrigation, manual extraction, or a combination of both. Generally, the procedures used to remove cerumen are safe; however, otologic injury has occurred after this “minor” procedure and has even resulted in litigation.17
Irrigation is an effective approach for removal of cerumen and has the advantage of being painless and simple to perform. It is usually most successful after the instillation of a ceruminolytic (see later). Because the patient does not have to remain completely still, it is ideal for the pediatric population. It is estimated that 150,000 ears are irrigated in the United States each week.17 Though usually more time-consuming and messy than manual extraction, irrigation is an appropriate initial method to attempt and can be performed by technicians with guidance from the clinician.
A recent evidence-based review concluded that the current evidence suggests little difference in the efficacy of water-based and oil-based preparations for removing cerumen.18 Non–water-, non–oil-based preparations appear to be most effective in clearing cerumen and improving syringing, but further research is needed.18 Whichever of the following techniques are used, some tips for successful removal of cerumen include proper lighting, attention to patient comfort, and abrupt cessation when the patient’s comfort level is breached.
Ceruminolytics: These products may soften hardened or impacted cerumen. They are used as adjuncts to other procedures—simply instilling ceruminolytics into the canal will not remove enough cerumen to aid the emergency clinician. If irrigation fails, continued outpatient use of ceruminolytics is often prescribed, usually combined with home irrigation via a bulb syringe or a repeated visit in a few days. Although many products are available as ceruminolytics, a 5% or 10% solution of sodium bicarbonate disintegrates cerumen much more quickly and efficiently than do commercially prepared ceruminolytics and other products.19 Cerumenex, Cerumol, Auralgan, Buro-Sol, alcohol, and oils were all tested and took more than 18 hours to disintegrate cerumen versus approximately 90 minutes for the sodium bicarbonate solutions.19 Hydrogen peroxide is another commonly used ceruminolytic, but its use has not been systematically studied. One study found that the liquid preparation of the stool softener docusate sodium (Colace) was much more effective than Cerumenex as a ceruminolytic.20 An evidence-based review of agents found that docusate sodium administered 15 minutes before irrigation was most effective in facilitating removal of cerumen. Triethanolamine (Cerumenex) and olive oil were the next most effective treatments.21
Place the patient in the supine position with the affected ear up, instill the solution, and wait at least 15 to 30 minutes before attempts at removal (Fig. 63-19, step 1). Repeat the instillation between attempts at manual extraction or irrigation.
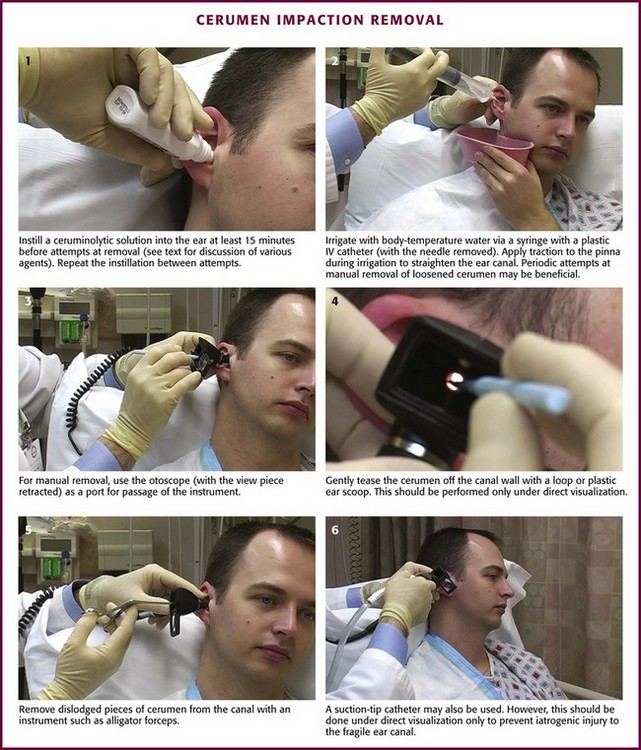
Irrigation (Ear Syringing): After a ceruminolytic has been instilled and left in the canal for 15 to 30 minutes, irrigation of the canal is often effective in flushing out impacted cerumen. Ask the patient to sit upright and hold an emesis or ear irrigation basin flush tightly against the skin just below the earlobe. Insert the irrigation tip into the EAC only as far as the cartilage-bone junction, and direct the stream of water superiorly to wash the impacted cerumen away from the TM (see Fig. 63-19, step 2). Warm the water to body temperature to prevent caloric stimulation. Multiple attempts may be necessary, and intermittent attempts at manual removal of loosened cerumen may help hasten the process. During the irrigation, ask an assistant to apply traction to the pinna to straighten the canal for more efficient irrigation. Patients usually feel some discomfort with forceful irrigation, but not severe pain.
Manual Instrumentation: Manual instrumentation is more advantageous because it is usually quicker and the examiner may more easily remove hardened or larger concretions of cerumen under direct visualization. However, it is difficult to manually remove cerumen without causing significant pain, so irrigation is preferred. Manual removal may be the initial procedure in some cases, followed by irrigation when the cerumen is partially disrupted. Place the diagnostic or operating head of the fiberoptic otoscope or a speculum as a protective port through which instruments are passed and manipulated (see Fig. 63-19, step 3). An operating microscope works best in this situation but, again, is not usually available. To prevent startling or agitating an already anxious patient, allow the patient to experience the sensation of an instrument in the canal by first placing it softly against the wall of the ear canal.
Instruments used for removal of cerumen include flexible plastic or wire loops, right-angle hooks, suction-tipped catheters, or plastic scoops (see Review Box 63-2 and Fig. 63-19, steps 4 to 6). The spoonlike instruments and irrigation are both more effective in removing softer cerumen. Firm cerumen is ordinarily more easily withdrawn with loops or right-angle hooks. Gently tease the cerumen off of the canal wall with loops and then pass hooks or loops around the cerumen and withdraw it slowly. Take care to keep both hands in contact with the patient’s head because any sudden movement may cause trauma to the canal or the TM.
Ear Canal Débridement and Wick Placement
Débridement of the ear canal and wick placement are essential components in the management and treatment of otitis externa or “swimmer’s ear,” an acute inflammation of the skin of the EAC. This is essentially a cellulitis of the ear canal. Precipitants of otitis externa include water exposure and trauma. Excessive moisture in the canal raises the pH and removes the cerumen. Keratin cannot absorb water, thereby creating a medium for bacterial growth. Trauma, especially self-manipulation with FBs (e.g., cotton swabs, fingernails), causes abrasions in the ear canal and introduces infection. Removal of cerumen by water irrigation is a well-recognized risk factor for the development of otitis externa.19
Diabetics and other immunocompromised patients, especially human immunodeficiency virus–positive patients, are susceptible to malignant (necrotizing) otitis externa, a life-threatening form of otitis externa caused by Pseudomonas (see Fig. 63-18B). Deep tissue necrosis, osteomyelitis, intracranial extension, and systemic toxicity are hallmark features. Malignant otitis externa is difficult to treat and the mortality rate can be as high as 53%.19 The diagnosis of malignant otitis externa should be considered in a diabetic or immunocompromised patient with significant symptoms who fails to respond to initial outpatient treatment.
Procedure
Because of patient discomfort and canal swelling, small swabs (e.g., urethral swabs) should be used to gently remove debris. The canal can be gently irrigated, but realize that many patients will be cured without extensive débridement. Irrigation should be performed only in the absence of TM perforation.16,22 Because the inflamed canal is susceptible to trauma, removal of debris by suctioning under direct visualization with the open or operating otoscope head and a 5- or 7-Fr Frazier suction tip may be a better option (see Fig. 63-19, step 6). For more advanced cases with significant exudate and edema, removal of debris is necessary but intensely painful. One approach is to use a local block of the EAC (see Fig. 63-16) as long as the cellulitis has not extended to the tragus or concha. Administer parenteral analgesics if additional control of pain is required.
When edema, debris, and exudate are marked enough to impede antibiotic drops from contacting the skin of the canal, use an ear wick. The wick works as a conduit to deliver the antibiotic solutions to the ear canal. The true benefit of wick implantation is unknown and it is often not performed because it is painful. One approach is to place a 0.25-inch strip of Nu-Gauze dressing covered with an antibiotic and steroid cream (Cortisporin Otic cream) into the external acoustic canal in a fashion similar to the technique used for anterior nasal packing. Using an otoscope and alligator forceps, place the leading edge of the gauze deeply in the canal until it is fully packed. Withdraw the otoscope and finish by also packing the lateral aspect of the canal. Cotton may be used as well (Fig. 63-20A).
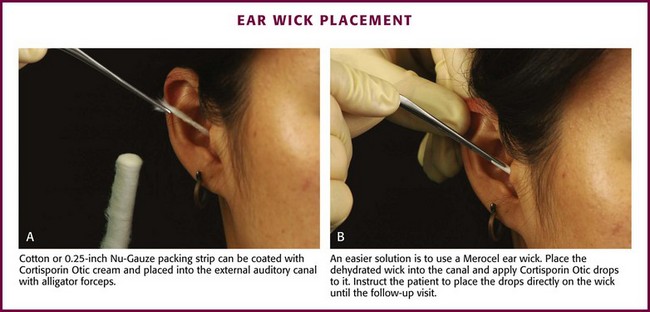
An easier alternative is to use commercially available ear wicks, such as the Pope Merocel ear wick. Place this dehydrated and trimmed wick into an edematous canal and apply antibiotic/hydrocortisone drops onto it (see Fig. 63-20B). The wick swells and helps reduce edema by the antimicrobial and antiinflammatory effects of the solution and through pressure exerted against the walls as it expands. Keep the wick moist with drops and leave it in place until the patient is seen again in 24 to 48 hours for removal and further evaluation. Though relatively safe to use, the ear wick is designed for short-term use. Generally, these wicks will fall out of the canal as the edema subsides. However, wicks can harbor bacteria with prolonged retention and cause tissue ingrowth, which results in long-term problems for the patient.23
FBs in the Ear Canal
Despite its small size, the EAC may play host to numerous types of FBs.24,25 Living insects account for most FBs found in adults. Children frequently place food (e.g., peas, beans), organic matter (e.g., grass, leaves, flowers), and inorganic objects (e.g., beads, rocks, dirt) into their ear canals during play, and they often fail to admit this to parents. Button batteries may cause significant tissue destruction in a matter of hours, and it is vital to immediately obtain otolaryngologic consultation for removal if the button battery is not easily extracted. Symptoms of FB retention usually consist of ear pain, fullness, or impaired hearing in adults; pediatric patients may not be encountered until an associated otitis externa with a purulent discharge has developed.
Some authorities claim that local anesthesia makes extracting FBs even more difficult because of soft tissue distortion, although swelling should be minimal if proper amounts of anesthetic are used. Anesthesia of the EAC may be difficult to achieve. Topical anesthetics have a partial effect, and a four-quadrant technique may not produce complete anesthesia, especially of the TM (see Fig. 63-16, step 3).24,25 Procedural sedation (preferably an analgesic-sedative combination or dissociative anesthetic) can aid in the removal of FBs in a distraught child by preventing further struggling and potential canal trauma. Ketamine is an excellent anesthetic for simple FB removal in the outpatient setting. The care provider must weigh the inherent risks related to procedural sedation against those of general anesthesia and the cost of hospital admission.
Adequate visualization of the object is needed for successful removal. One study showed that canal lacerations occurred in 48% of patients in whom removal was attempted without a microscope and in 4% when it was used.25 The otoscope is the traditional ED instrument for viewing FBs in the ear canal. It is less likely to be useful for retrieval because it is difficult to insert the instrument through or around the end of the speculum. A specialized ENT speculum allows more space for instrumentation. A head lamp provides a good light source and leaves both hands free. Magnifying loupes also provide hands-free magnification.
Procedures
Irrigation is the least invasive method; the techniques were explained in detail earlier in this chapter (see “Removal of Impacted Cerumen” and Fig. 63-19). Irrigation works particularly well with small rocks, dirt, or sand that lie deep in the canal next to the TM.
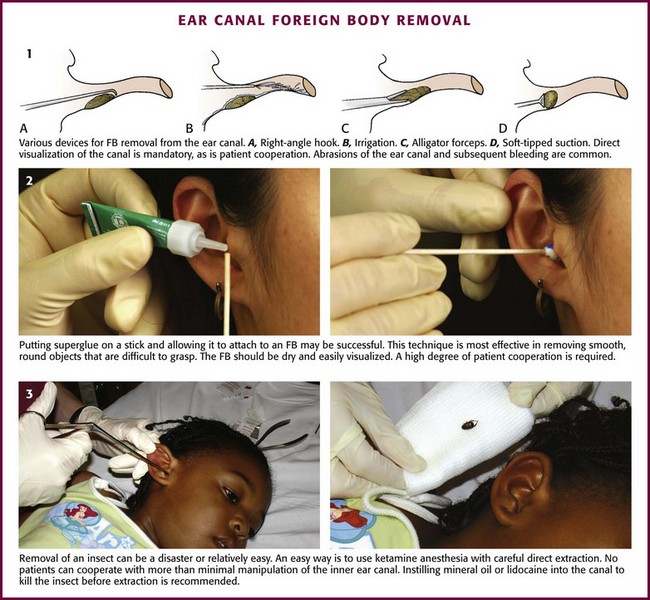
Suction-Tipped Catheters: This technique works well with objects that are round and difficult to grasp. Suction is readily available in the ED but should provide 100 to 140 mm Hg of negative pressure to be useful. To avoid iatrogenic injury, inform the patient of the impending noise to prevent sudden movements caused by a startle reflex. Place either the blunt or the soft plastic tip against the object and withdraw it slowly. If using a suction instrument with a thumb-controlled release valve (as with the Frazier suction tip), remember to cover the port to activate the suction.
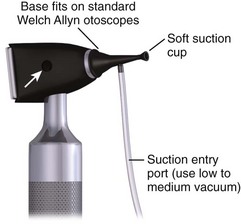
The Hognose (IQDr, Inc.), a commercially available device designed by an emergency clinician, aids in the removal of FBs in the auditory canal. It is used in combination with an otoscope and suction setup. It is essentially an otoscope speculum with suction attachment and a soft self-molding tip that can attach to objects. The flange comes in three color-coded sizes: 4, 5, and 6 mm. To use, first attach the Hognose to the otoscope and set the standard wall suction at a low to medium vacuum setting (Fig. 63-21). Next, under direct visualization, approach the FB with the otoscope. Finally, engage suction by applying finger pressure on the open insufflation port and withdraw.
Manual Instrumentation: This approach can be attempted with various instruments (Fig. 63-22, plate 1). Use the diagnostic or operating head of a fiberoptic otoscope for illumination and magnification. Ask an assistant to hold the pinna back and out so that you can hold the otoscope with one hand and manipulate the instrument with the other. A speculum and either a head lamp or a head mirror/light source can also provide illumination; magnifying loupes are usually required for adequate visualization. Use small alligator forceps to remove objects with edges that can be grasped, but avoid trying to encircle an impacted round FB because this may cause trauma to the canal wall. A small right-angle hook is another choice. Place the tip past the object, rotate it 90 degrees, and then pull the object from the canal. Fine tissue or Adson forceps, curets, and skin hooks are other instruments used occasionally. Use of these instruments is commonly associated with abrasions and bleeding of the ear canal.24,25 Instruments should be used only on compliant, cooperative patients. Direct visualization of the object is essential.
Fogarty Catheters: Small Fogarty catheters (biliary or vascular) may be used in a manner similar to that described later in this chapter in the section “Nasal FB Removal.” Attach the tip of the catheter to a 3-mL syringe. Pass the catheter beyond the FB. Once the tip is past the object, gradually inflate the balloon and drag the FB out along with the balloon. Immediately deflate the balloon if pain suddenly occurs because rupture of the TM is a potential complication.
Cyanoacrylate (Superglue): The use of glue to remove FBs was first reported in India in 1977.25,26 Glue is most effective in removing smooth, round objects that are difficult to grasp (see Fig. 63-22, plate 2). The FB should be dry and easily visualized. Apply a small amount of glue to the tip of a thin paintbrush, a straightened paper clip, or the blunt end of a wooden cotton-tipped applicator. Allow the glue to become tacky. Place the tip against the object, allow it to dry, and then carefully withdraw the FB. Minor complications are possible if the tip dries against the canal wall (abrasion, excoriation) or if the glue spills or drips onto the wall (thereby creating a new FB). This technique may be more useful in adults because cooperation is required.26
Removal of Insects: Cockroaches are the most commonly found live insects in the ear (Fig. 63-22, plate 3). A suggested treatment is to instill various substances into the ear canal to immobilize or kill the insect before removing it. This helps in retrieval by allowing a stationary target and also halts the disturbing and painful movement of the insect. Controversy exists about which agent can most effectively accomplish this task. Mineral oil has traditionally been used, but lidocaine has been reported to paralyze insects and allow easier extraction than with the more viscous mineral oil. An in vitro comparative study showed that immersion in microscope oil versus 2% or 4% lidocaine solution killed roaches in less than 60 seconds (≈27 and 41 seconds, respectively).27 The roaches struggled less in the viscous oil than in the lidocaine, which did not appear to cause paralysis. Other substances (Auralgan, isopropanol, water, succinylcholine, hydrogen peroxide) were shown to be ineffective in killing the roaches in a reasonable amount of time. Once disabled, insects are removed by mechanical extraction as described previously; pieces can be suctioned out if fragmentation occurs.
Drainage of Auricular Hematomas
Indications and Contraindications
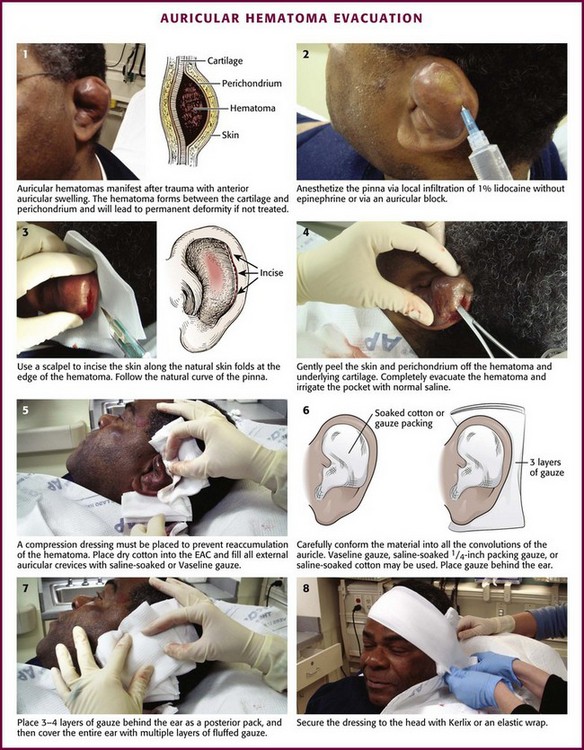
Diagnosis of an auricular hematoma is based on the history and physical examination (Fig. 63-23). The presence of tender, anterior auricular swelling following trauma that deforms the anatomy of the pinna should prompt drainage of the hematoma. The goal is to prevent cartilage damage and deformation of the pinna.
Procedure
Needle Aspiration: Though used widely, this technique is no longer recommended by most authorities because of the high risk for reaccumulation of the hematoma. Aspiration is often inadequate and other management is required. Other sources recommend needle aspiration followed by incision and drainage if reaccumulation occurs.28
Aspiration of an auricular hematoma is performed by perforating the hematoma with a 20-gauge needle. “Milk” the hematoma between the thumb and forefinger until the entire hematoma is evacuated. Apply a pressure dressing. Reexamine the ear frequently for reaccumulation of the hematoma. Reaccumulation of blood requires reaspiration. For small hematomas that are acute, needle aspiration alone with a bolster dressing is adequate therapy.28
Incision (see Fig. 63-23): An auricular hematoma may be incised along the natural skin folds. Anesthetize the pinna by local infiltration of 1% lidocaine (without epinephrine) or with an auricular block (described earlier). Incise the skin with a No. 15 blade at the edge of the hematoma, and follow the curvature of the pinna. Gently peel the skin and perichondrium off the hematoma and underlying cartilage. Completely evacuate the hematoma and irrigate the remaining pocket with normal saline.
Nose
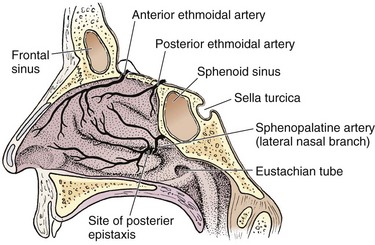
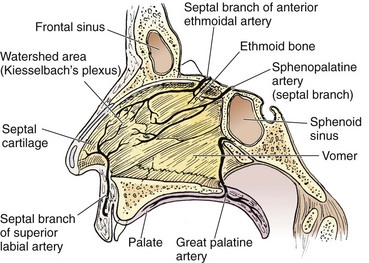
Three major arteries supply the nose and conjoin via anastomoses. The sphenopalatine artery emerges from the sphenopalatine foramen, which is located at the posterior aspect of the middle turbinate (Fig. 63-24). This is the most common source of posterior epistaxis. This artery supplies the lateral turbinates and the posterior septum. The anterior and posterior ethmoidal arteries branch off the ophthalmic artery and penetrate the cribriform plate to supply the superior nasal mucosa. The superior labial branch of the facial artery completes the triad and supplies the nasal septum and vestibule. The watershed area on the anterior septum, also known as Kiesselbach’s plexus, is the most common source of anterior epistaxis (Fig. 63-25).
Anesthesia of the Nose
Most nasal anesthesia can be accomplished topically. Numerous preparations are available. Cocaine (4% solution) is the preferred agent for both vasoconstriction and anesthesia. Unfortunately, cocaine is not routinely stocked. Alternatively, 2% lidocaine with epinephrine (local anesthetic solution) may be used but is less effective. Be aware of the total amount of cocaine being administered and stay within recommendations for the maximum safe dosage. This is an issue only with elderly patients who have cardiovascular disease. Lidocaine 4% is also quite effective for anesthesia of the nose. A solution of 1% tetracaine and 0.05% oxymetazoline (Afrin) is an effective topical anesthetic and vasoconstrictor.29
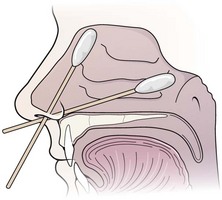
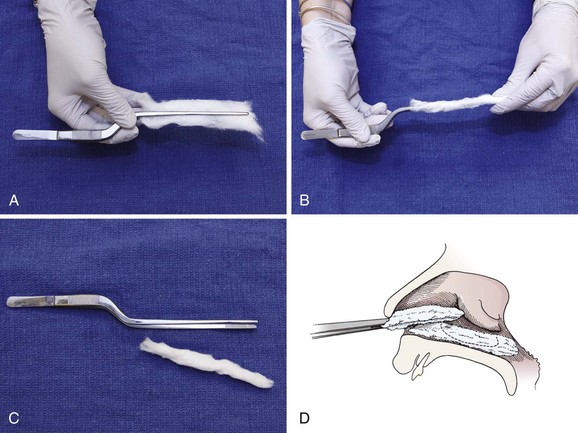
Apply the local anesthetic and vasoconstrictor to cotton swabs (Fig. 63-26). If a larger area of anesthesia is needed, use cotton pledgets. Figure 63-27 describes the procedure of making pledgets. Soak each pledget in an anesthetic or vasoconstrictor and then squeeze the excess fluid out of the pledget. Place each pledget horizontally on the floor of the nasal cavity and stack the next pledget on top. Three pledgets are usually required to pack the nasal cavity. They can be replaced with new pledgets in 5 minutes if the desired anesthetic effect is not achieved. Benzocaine (Hurricaine) spray may also be used as a topical anesthetic. Remind the patient that excess anesthetic may numb the throat but will not inhibit swallowing.
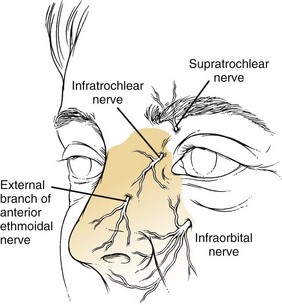
A local nasal block can be performed for more painful and prolonged procedures. The sensory innervation of the nose is illustrated in Figure 63-28. It begins with topical anesthetic as just described. Next, 1% lidocaine with 1 : 100,000 epinephrine is injected along the septum, lateral walls, and nasopalatine nerves. A thin 25- or 27-gauge needle should be used. Depending on the procedure, it may be necessary to anesthetize both sides. First, inject along and beneath the soft tissue of the nasal dorsum (infratrochlear nerve). Next, inject in the area of the infraorbital foramen to anesthetize the infraorbital nerve. Finally, inject at the base of the columella (base of the nose between the nasal septa) and along the floor of the nasal cavity. Interestingly, studies have shown that the use of EMLA (eutectic mixture of local anesthetics) cream applied over the nose 1 hour before reduction, in combination with topical intranasal anesthetic, provides similar nasal anesthesia for reduction of nasal fractures with less discomfort than occurs with needle infiltration.30
Examination
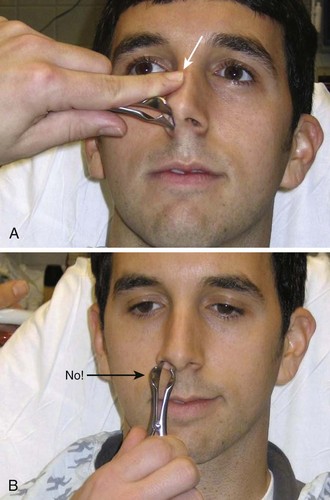
Examination of the nares is relatively straightforward, albeit often quite stressful to the patient. When using a nasal speculum, insert it into the naris with the handle parallel to the floor and slowly open the blades in a superior-to-inferior direction. Stabilize your hand on the patient’s nose to prevent damage to the mucosa from unexpected movement (Fig. 63-29). When attempting to visualize the nasal passageway, remember to have the patient keep the floor of the nose parallel to the ground. Tilting the head allows a view of only the anterosuperior area. A nasopharyngoscope may be used to view the nasal passageways as well, and its use is described in the previous section on examination of the pharynx.
Management of Epistaxis
Patients with nasal hemorrhage are commonly seen in the ED and account for about 1 in 200 visits.31 Epistaxis occurs more frequently in the young (<10 years) and old (70 to 79 years). Most cases are traumatic and occur in the winter months. Approximately 6% require hospitalization.32
Identification of the source of bleeding and subsequent control are paramount to the treatment of epistaxis. Although this can be frightening to both the clinician and patient, a systematic approach with the proper equipment will lessen the anxiety associated with the situation (Fig 63-30). The goal of the procedure is to tamponade or cauterize the bleeding site. If the source is anterior, this may be the final treatment. For posterior bleeding, temporizing maneuvers are generally used until the process stops or a consultant can complete a definitive hemostatic procedure. The procedures can be performed in the ED with proper lighting and the equipment listed later in this section. Controlling epistaxis may be a time-consuming process without proper equipment or patient cooperation.
In preparation for any procedure to treat epistaxis, evaluate the patient’s hemodynamic status by assessing vital signs and orthostatic symptoms and by quantifying the amount of blood lost. If the patient is symptomatic in any of these areas or if the blood loss is deemed significant, consider starting a large-bore intravenous line for administration of fluid boluses. Hematologic testing is rarely useful and not required for most patients, but in extenuating circumstances, obtain a complete blood count and consider a type and screen. Coagulation studies are not routinely indicated but should be undertaken in patients taking anticoagulants, those with underlying hematologic abnormalities, or individuals with recurrent or prolonged epistaxis.32
Anticoagulated Patients with Epistaxis
Anticoagulated patients are at high risk for nosebleeds. However, the need for cessation of warfarin, dabigatran, or other anticoagulant or attempts at reversal of the action of warfarin are controversial and not well studied. It is reasonable to continue warfarin when hemostasis is achieved and the international normalized ratio (INR) is in the intended therapeutic range. An excessive INR calls for temporary cessation of warfarin and reversal if markedly abnormal (see Chapter 28). There is no known way to correct the anticoagulation from dabigatran, rivaroxaban, and other newer anticoagulants, but withholding use of the drug is appropriate. Dabigatran levels drop quickly and anticoagulation is almost immediate when reinstituted. Specific factor replacement will be required in patients with hemophilia.
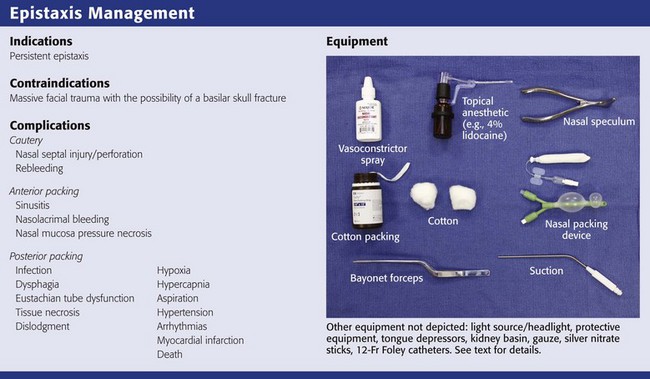
Indications and for Contraindications to Treatment of Epistaxis
Any continuing episode of epistaxis can be treated with the techniques listed in the section “Procedure.” Massive facial trauma with the possibility of a basilar skull fracture would preclude the use of an intranasal balloon or packing because it may travel into the skull cavity.
Equipment
Preparation is the key to successful management of a patient with epistaxis. The following list of equipment should be readily available to the emergency clinician (see Review Box 63-3):
l. Chair with a head rest or gurney with an inclinable back
l. Headlight with a light source and head mirror
l. Wall suction with multiple suction catheters
l. Gloves, mask, and gown for the clinician
l. Gown or drapes for the patient
l. Gauze (4 × 4 inch, 2 × 2 inch), dental rolls or cotton, No. 2 surgical silk ties
l. 1.2-cm-wide Vaseline gauze or 0.5-inch-wide Nu-Gauze packing
l. Silver nitrate sticks or electrocautery
Procedure
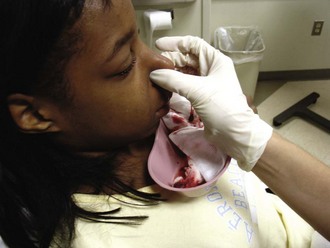
Ask the patient to sit upright in the sniffing position with the neck flexed and the head extended (Fig. 63-31). The base of the nose should remain parallel to the floor. After putting on a face shield, gown, and protective gloves, position yourself in front of the patient, level with the patient’s nose. Have the patient blow the nose to remove clots or suction the nasal passageway carefully. Suction from front to back along the nasal septum and then laterally. If the bleeding is minimal, attempt to locate the specific bleeding source. If the bleeding is too profuse for visualization of the source, administer a topical anesthetic and vasoconstrictor. Ask the patient to clamp the nostrils to limit bleeding and promote contact with the mucosa. If a discrete bleeding site is initially identified, an effective way to provide hemostasis and anesthesia is to inject the mucosa at the base of the bleeder with 2% lidocaine with epinephrine via a tuberculin needle and syringe device.
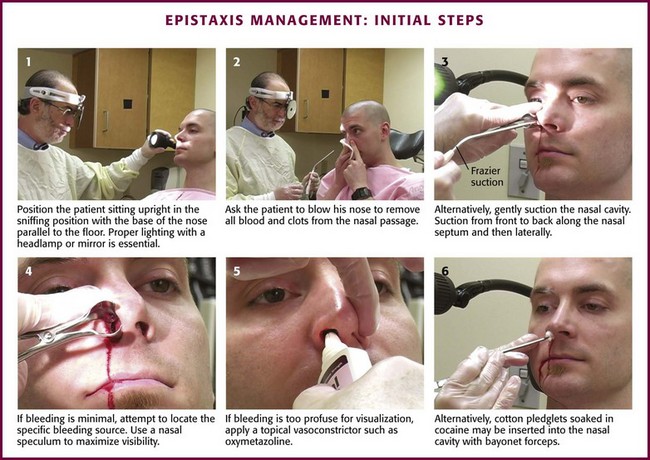
Figure 63-31 Management of epistaxis: initial steps.
Cautery
After an anterior source of bleeding is identified, cautery may be used to achieve hemostasis (Fig. 63-32). Silver nitrate sticks may be used to cauterize but will not work on an actively bleeding source; hemostasis must be achieved first. Silver nitrate works well for a small, circumscribed area of bleeding. To apply, hold the tip of the silver nitrate stick against the site for 4 to 5 seconds. Apply again if necessary. Wipe away any excess silver nitrate to prevent inadvertent cautery of other areas of the nose. Most patient will sneeze after the application of silver nitrate, so be careful of blood splatter. If bleeding restarts, the initial cautery was insufficient and should be applied again. The cauterized area immediately turns white or gray. Electrocautery works in the same manner but will penetrate more quickly than silver nitrate does. With either cautery technique, be careful to not cause septal perforation with overaggressive or repeated cautery. If cautery has not been successful after two attempts, use another technique.
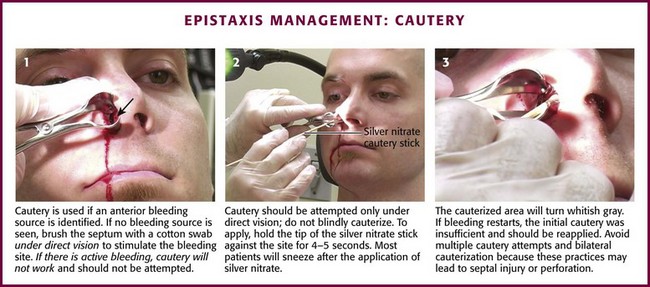
Figure 63-32 Management of epistaxis: cautery.
Multiple attempts at cautery can significantly injure the nasal septum, and bilateral cautery should not be performed. If this is the initial bleeding and hemostasis is achieved, no packing is necessary. If it is recurrent bleeding within 72 hours of another or if cautery does not provide hemostasis, pack the anterior cavity. If hemostasis is accomplished, apply petroleum jelly or antibiotic ointment to the area to prevent desiccation. Loughran and coworkers33 found antimicrobial ointment to be better than petroleum jelly in preventing bleeding. Do not administer aspirin or nonsteroidal antiinflammatory drugs for 4 days after epistaxis. If bleeding recurs at home, instruct the patient to pinch the nostrils closed for 20 minutes. Instruct the patient to return to the ED if this maneuver is unsuccessful or the bleeding is profuse.
Anterior Nasal Packing
Traditional petrolatum gauze has largely been supplanted by easier-to-use commercial devices. Packing is applied in an “accordion” fashion so that each layer extends the entire length of the nasal cavity (Fig. 63-33A). Place the speculum properly to allow visualization of the floor of the nasal cavity. Lay a strip of petrolatum gauze 1.2 cm across the nasal floor, with the starting end of the gauze at the naris. Gently pack the gauze strip into the floor of the nose. Measure the gauze so that it is twice the length of the nasal cavity. Grasp the gauze at the midpoint and insert this point all the way back to the posterior aspect of the nasal cavity. Attempt to place this layer of gauze without movement of the underlying layer. Continue this pattern, with replacement of the speculum after each layer, until the cavity is filled.
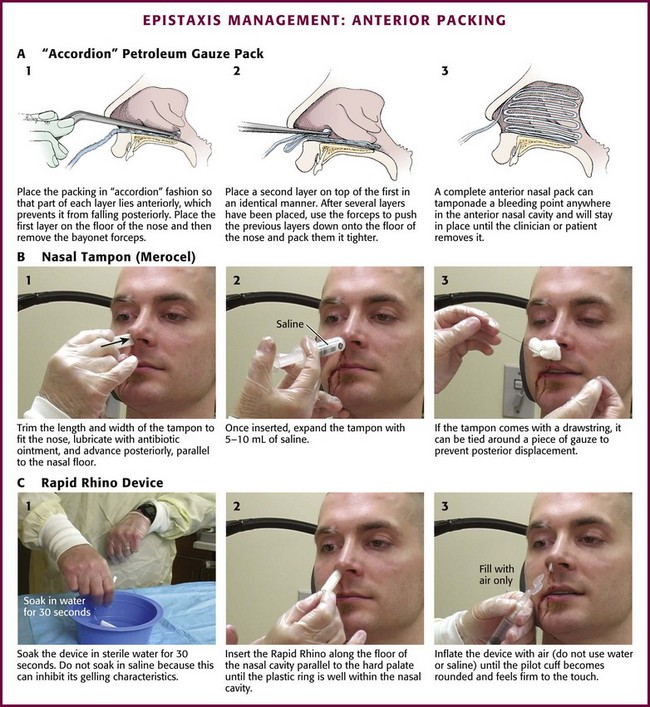
Figure 63-33 Management of epistaxis: anterior packing.
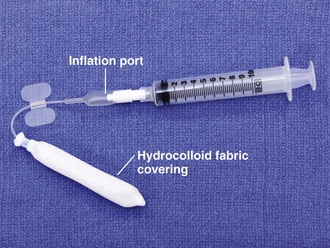
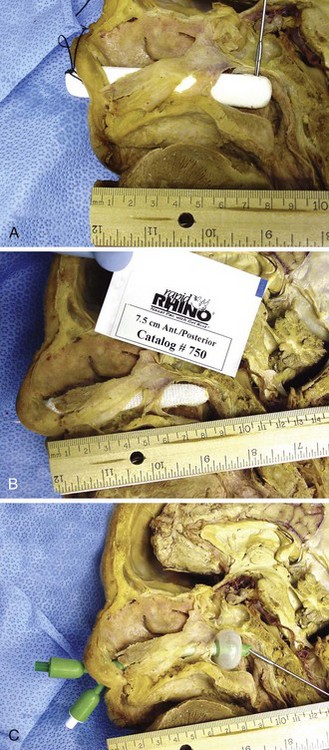
When compared with gauze packing, compression devices are easier to place, better tolerated, and very successful. Preformed nasal packing products are convenient alternatives to anterior nasal packing (Figs. 63-34 and 63-35). The Merocel packing consists of compressed polyvinyl acetate with or without a drawstring that markedly expands on contact with fluid and thereby exerts pressure on the bleeding site. The pack can be trimmed with scissors or a scalpel before insertion. The Merocel Doyle nasal pack has an airway tube in the center of the compressed material and a more anatomic shape. Each is available in various sizes, but usually an 8- × 1.5- × 2-cm standard Merocel or 8- × 1.5- × 3-cm Doyle will suffice. The Rapid Rhino Stat Pac (ArthroCare Corporation, Austin, TX; see Fig. 63-34A) is a high-volume, low-pressure balloon device with an open lumen air passage, a pilot cuff to check pressure, and a specialized Gel-Knit (carboxymethyl cellulose) covering designed to promote platelet aggregation. Numerous variations for anterior, posterior, and combination packs are available.
The easily applied nasal tampon is a reasonable first choice for most anterior bleeding (see Fig. 63-33B). Lubricate the tampon generously with antibiotic ointment and trim the length and width carefully to minimize trauma to the nose. Using bayonet forceps, advance the packing carefully along the floor of the nose. Remember to direct it parallel to the floor, not upward toward the top of the nose. Insertion may be painful, so use a single rapid movement. Once the packing is in the nasal cavity, expand it with 5 to 10 mL of saline, although contact with the moisture of the nose will often cause it to swell spontaneously. It is sometimes necessary to place two tampons side by side before inserting them to fill the nasal cavity and provide better pressure on the areas of bleeding.34,35 Observe for 10 minutes after anterior packing to identify continued bleeding either anteriorly from the naris or running down the posterior aspect of the pharynx. Advantages of the Merocel tampon include rapid insertion, little discomfort, ease of use even by inexperienced personnel, and possible inhibition of bacterial growth.
The Rapid Rhino device is first soaked in sterile water for 30 seconds (see Fig 63-33C). Saline should not be used because it can inhibit its gelling characteristics. In addition, lubricants or antibacterial ointments are not needed. The device is then inserted along the nasal septal floor parallel to the hard palate until the plastic ring is well within the nasal cavity. Use a 20-mL syringe to inflate the device with air only. Stop inflating when the pilot cuff becomes rounded and feels firm to the touch.
Corbridge and colleagues34 found no significant difference in efficacy, patient tolerance, or complications between commercial products and gauze packing. Singer and associates36 found that the Rapid Rhino nasal tampon is less painful to insert and easier to remove than the Rhino Rocket and that both were similarly effective in stopping nosebleeds.
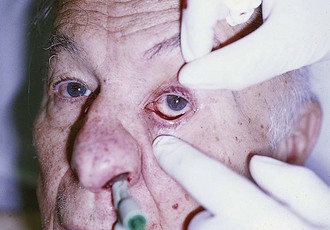
Complications: Minor oozing of blood can be expected. Any packing in the anterior nasal cavity may obstruct drainage of the paranasal sinuses or block the nasolacrimal ducts and lead to sinusitis. Occasionally, blood will exit the nasolacrimal duct and be noted in the eye (Fig. 63-36). Other complications can include nasal mucosal pressure necrosis from the packing, balloon migration, and aspiration of the packing. Hollis37 reported massive pneumocephalus after insertion of a Merocel nasal tampon in an elderly woman, presumably from fracture of the ethmoid plate. There have been case reports of ethmoid fracture after anterior nasal gauze packing and with the use of an intranasal balloon.
Posterior Nasal Packing
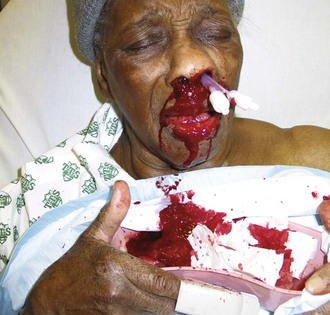
If no bleeding source is found anteriorly and the patient continues to hemorrhage down the posterior aspect of the pharynx, the patient most likely has a posterior source of epistaxis (Fig. 63-37). Posterior epistaxis may respond to topical vasoconstrictors. However, anterior nasal packing will not provide hemostasis for posterior bleeding because it will not cover the source of the bleeding. A posterior pack directly compresses the sphenopalatine artery and prevents the passage of blood or anterior packing into the nasopharynx.
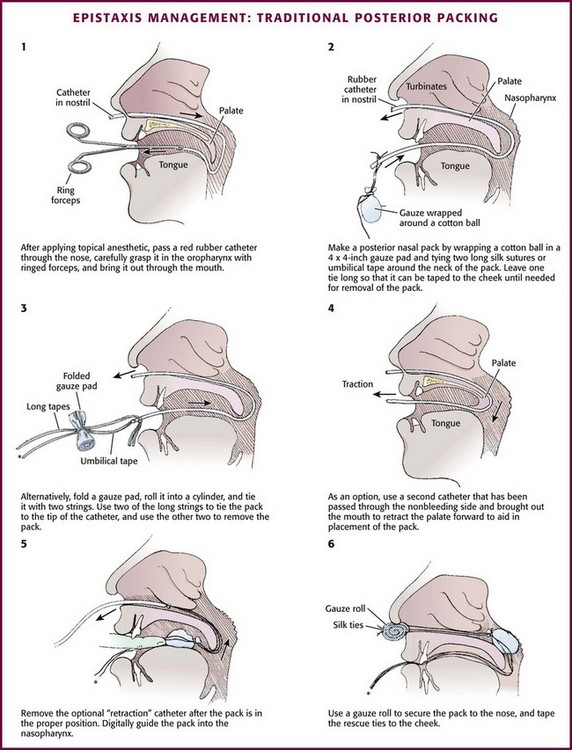
Posterior Gauze Pack: A posterior nasal gauze pack is the classic method of treating posterior epistaxis (Fig. 63-38). However, because balloon devices are easier to use and less distressing to the patient, formal posterior nasal packing is less commonly used. To place a formal traditional posterior nasal gauze pack, anesthetize the patient’s nares and posterior pharynx with topical anesthetic. Prepare a roll of gauze with two silk ties (2-0) secured around the middle and extending in opposite directions. One set of ends will be used to place the posterior pack and the second will remain extruding from the oral cavity to remove the pack. Place a No. 10 red rubber catheter through the bleeding nostril. When it is seen in the posterior of the pharynx, grasp it with forceps and guide it out of the mouth. Attach it to one set of the ends of silk ties secured to the gauze pack. Retract the red rubber catheter, thus carrying the No. 2 silk tie through the nasopharynx and out of the nose. Grasp the suture and pull the pack into the nasopharynx. Guide the pack swiftly into the oral cavity and nasopharynx with the other hand. Attach the silk tie that remains in the oropharynx to the patient’s cheek to aid in removal or rescue of the posterior pack. Use the silk ties exiting the nostril to maintain the position of the posterior pack. Pack the anterior passage as described for anterior epistaxis. Secure the silk ties over a gauze pad or dental roll. In the past, patients with traditional posterior packing were often admitted to the hospital for the duration of the posterior packing. Administering humidified air or oxygen often makes this pack more comfortable.
Inflatable Balloon Packs: Inflatable balloons come in two varieties. A Foley catheter is often used as a posterior pack because of its availability, ease of use, and successful tamponading effect (Fig. 63-39A). Insert a 12-Fr Foley catheter through the bleeding naris into the posterior aspect of the pharynx. Inflate the balloon halfway with about 5 to 7 mL of normal saline or water. Slowly pull the Foley catheter into the posterior part of the nasopharynx and secure it against the posterior aspect of the middle turbinate. Finish inflating the balloon with another 5 to 7 mL of normal saline or water. If pain or inferior displacement of the soft palate occurs, deflate the balloon until the pain resolves. Ensure proper placement before completely inflating the balloon because the balloon will remain too posterior in the nasopharynx and fail to achieve hemostasis. While maintaining constant gentle anterior tension on the Foley catheter, place anterior nasal packing of layered petrolatum gauze. Pack the opposite nasal cavity to counteract septal deviation. Finally, place a short section of plastic tubing over the catheter and secure it with a nasogastric tube clamp or umbilical clamp. Be careful to not exert undue pressure on the nasal alae to avoid causing necrosis.
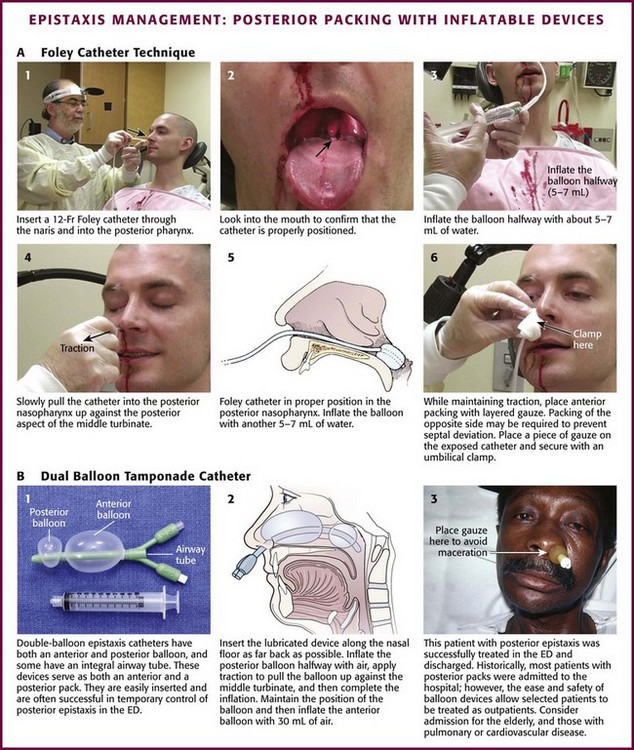
Figure 63-39 Management of epistaxis: posterior packing with inflatable devices. ED, emergency department.
The second type of inflatable balloon pack is the premade dual-balloon tamponading system (see Fig. 63-39B). These devices have been a significant advance in the treatment of epistaxis. Several balloon devices are available (Goitschach Nasostat [Sparta Surgical Corp, Hayward, CA], Xomed Epistat [Xomed, Inc., Jacksonville, FL], and Epi-Max Balloon Catheter [Shippert Medical, Centennial, CO]). The dual-balloon pack has a posterior balloon that inflates with about 10 mL of air and an anterior balloon that inflates with about 30 mL of air. Each device may vary slightly. After appropriately anesthetizing the naris, place the lubricated pack along the floor of the affected naris as far back as possible. Inflate the posterior balloon about halfway with air, and then, with traction, pull the balloon into place up against the posterior aspect of the middle turbinate. Complete the inflation of the posterior balloon with air. Some clinicians prefer to inflate all balloons with saline instead of air because air may deflate slowly. Inflate slowly, and stop if pain is felt. This is usually an uncomfortable sensation to the patient. If the patient complains of pain or if the posterior soft palate deviates downward, deflate the balloon until the symptoms are relieved. Maintain the position of the balloon and inflate the anterior balloon with up to 30 mL of air. Again, halt inflation if the patient experiences increasing pain or deviation of the nasal septum. Some authors suggest packing the opposite naris to prevent such lateral deviation. Place a small piece of gauze between the nose and the external catheter hub to decrease skin irritation.
Other Techniques: ENT consultation may be required for posterior nosebleeds that do not respond to the posterior packing techniques. Other treatment options that consultants may consider include ligation or embolization of the internal maxillary artery and posterior endoscopic cautery.
Complications: Posterior nasal packing is uncomfortable and often painful, but serious medical complications from posterior packing are rare. Complications associated with posterior packing include infection, dysphagia, dysfunction of the eustachian tube, tissue necrosis, and dislodgment. Other serious complications rarely and often anecdotally associated with posterior packing are hypoxia, hypercapnia, aspiration, hypertension, bradycardia, arrhythmias, myocardial infarction, and death.38 It is questionable whether packing alone is the cause of these associated complications. Rebleeding may also be seen with early pack removal; one series found that removal of the packing within 48 hours increased the risk for rebleeding.39 Most posterior packs are left in place for 72 to 96 hours.
A decrease in the arterial partial pressure of oxygen (Pao2; 7.5 to 11 mm Hg) and an increase in the arterial partial pressure of carbon dioxide (Paco2; 7 to 13 mm Hg) can be seen in patients with nasal packing who are treated with sedation.38 However, despite traditional theoretical concerns, such altered pulmonary physiology cannot be attributed to posterior packing alone. Although it has been hypothesized that a posterior pack will cause vagal stimulation and thereby result in varying degrees of bradycardia and bronchoconstriction because of the so-called nasopulmonary reflex, studies have failed to substantiate substantial physiologic changes attributed to posterior packing. Observe patients with significant cardiopulmonary disease and posterior nasal packs in a monitored setting.
Antibiotics Following Nasal Packing: Posterior packing is associated with a risk for infection, including nasopharyngitis, sinusitis, and rarely, TSS.35,40 Packing blocks the sinus ostia, which prevents proper drainage of the sinuses. TSS has been described rarely with nasal packing and is estimated to occur in about 16 per 100,000 packings. The syndrome is caused by a toxin released by S. aureus infection of the packing. A sudden onset of vomiting and diarrhea with high fever, as well as the development of an erythrodermic rash, heralds the onset of the disease. There are no data elucidating the effect of systemic antibiotics for prevention of TSS after nasal packing, and no recommendation can be made. Awareness of the condition is paramount. Antibiotics will not eradicate the carrier state of MRSA or other nasopharyngeal flora. It does not appear reasonable to provide antibiotic prophylaxis for fear of TSS.
Patient Disposition following Nasal Packing: After successful cautery or a simple anterior pack, patients can be discharged with follow-up in 48 to 72 hours. The packing is removed at this time and the condition reassessed. Aspirin is avoided. Packs should be left in place. Merocel packs should be moistened three times a day with saline or water. If no packing is used, the patient can coat the cauterized area four times a day with antibiotic ointment or Vaseline and avoid the urge to pick the nose or remove any debris. If minimal bleeding recurs, oxymetazoline spray is usually effective.
Septal Hematoma
Trauma to the anterior portion of the nasal septum may cause a hematoma to form. A buckling stress tears the submucosal blood vessels. If the mucosa remains intact, the blood will accumulate between the mucoperichondrium and the septal cartilage. Stagnant blood is an excellent medium for bacterial growth and the formation of an abscess. Common bacteria include S. aureus, Streptococcus pneumoniae, and group A β-hemolytic streptococci. Other complications of an untreated hematoma include septal perforation and cartilage destruction with a resultant saddle nose deformity. Septal hematomas may occur immediately after the trauma or, more commonly, in the first 24 to 72 hours after the injury.41 The hematoma can cause significant destruction of the nasal cartilage and result in a cosmetic deformity.
Indications and Contraindications
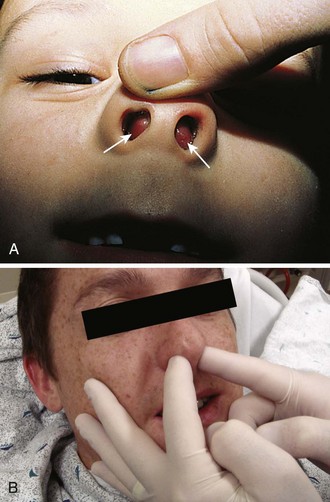
The presence of a nasal septal hematoma requires drainage to prevent a cosmetic defect. The most common symptoms of a septal hematoma are nasal obstruction, pain, rhinorrhea, and fever. Most patients will complain of an inability to breathe through the affected side, but the absence of nasal obstruction does not rule out a septal hematoma. It is usually possible to diagnose a septal hematoma by inspecting the nasal septum with a speculum for swelling, pain, and a fluctuant area (Fig. 63-40). The presence of septal asymmetry with a bluish or reddish hue of the mucosa is suggestive of a septal hematoma. Inspect both sides because bilateral hematomas are possible. Direct palpation may be necessary since newly formed hematomas may not yet be ecchymotic. Palpation can further differentiate septal hematoma from septal deviation, which may appear to be similar because of asymmetry. The best way to palpate for a septal hematoma is to insert the gloved small fingers in each side of the nose and palpate the entire septum to feel for swelling, fluctuance, or widening of the septal space.
Procedure
Treatment of a septal hematoma consists of evacuation of the clot with subsequent reapproximation of the perichondrium to the cartilage (Fig. 63-41). To drain the hematoma, incise the mucosa over the hematoma horizontally after adequate anesthesia is achieved. Suction out all of the clot and then irrigate with normal saline. Excise a small amount of mucosa to prevent premature closure of the incision and place a section of a sterile rubber band to act as a drain. Pack the nostril, as for anterior epistaxis, to reapproximate the perichondrium to the cartilage.
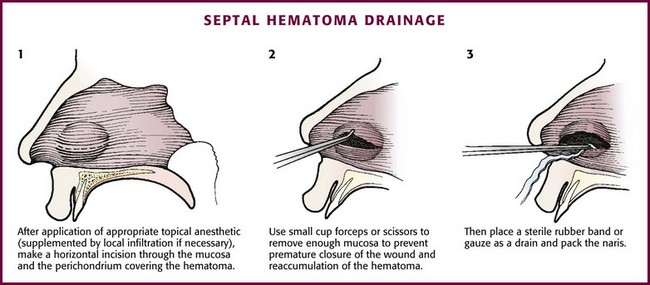
Figure 63-41 Drainage of a septal hematoma.
Reduction of Nasal Fractures
A nasal fracture is the most common facial fracture. Nasal fractures are accompanied by a broad range of symptoms, including mild swelling, epistaxis, and periorbital ecchymosis with obvious deformity. As with any trauma involving the head, evaluate for coexistent intracranial injury or neck injury. In the evaluation of nasal trauma, rule out the existence of a septal hematoma or cerebrospinal fluid rhinorrhea. In most cases the swelling and soft tissue deformity prevent adequate evaluation, treatment, or both. Evaluation of a patient with a suspected nasal fracture includes a thorough history, external nasal examination, and internal nasal examination using a nasal speculum with or without the use of a rigid nasal endoscope. Nasal radiographs are not routinely needed because they will not alter the course of treatment or injury.42 Ask the patient to apply ice to the area and keep the head elevated to reduce soft tissue swelling. Refer the patient to an otolaryngologist or plastic surgeon for reexamination and definitive treatment in 3 to 5 days. Stress the importance of reevaluation within 10 days so that the bones do not set in a malaligned state.
Procedure
Most fractures and patients with significant soft tissue swelling should be seen in follow-up for definitive evaluation and possible reduction of the fracture. Complicated fractures and septal injuries are usually referred for follow-up. Simple fractures with minimal local swelling can be treated by closed reduction (Fig. 63-42). Some patients prefer immediate correction, are not concerned with aesthetics, or are unable to comply with follow-up, so ED intervention may be an option. To minimize potential litigation, obtain written consent and take prereduction and postreduction photographs. Inform the patient that the outcome is not guaranteed because impacted fractures may not reduce and greenstick fractures may deform again after reduction. Acute swelling may obscure the extent of the injury.
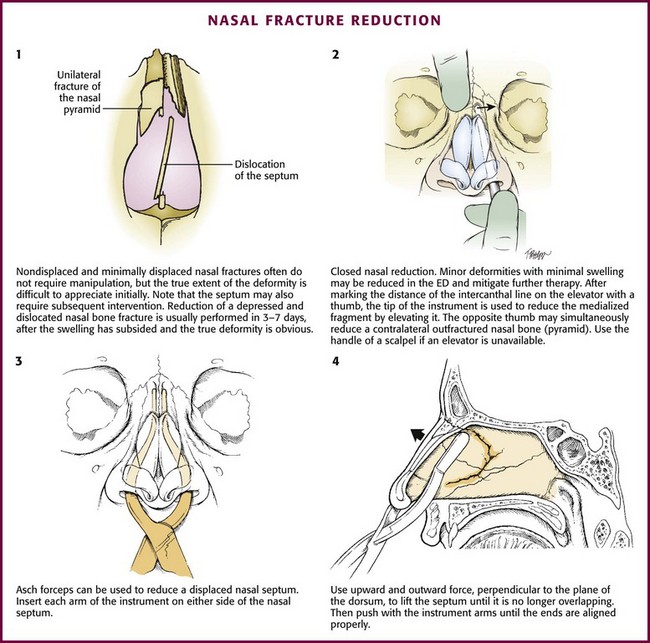
Use Asch forceps to reduce the nasal septum (see Fig 63-42, plates 3 and 4). Insert each arm of the instrument on either side of the nasal septum and position it. Use an upward and outward force perpendicular to the plane of the dorsum to lift the septum until it is no longer overlapping. Then push the arms of the instrument until the ends are aligned properly.
Nasal FB Removal
Nasal FBs most frequently occur in pediatric patients, but it is not uncommon to find them in psychiatric or cognitively impaired patients as well. Usually, a family member has witnessed the event or the patient complains of discomfort from the FB. Patients may also have unilateral purulent or bloody nasal discharge, unilateral sinusitis, or recurrent unilateral epistaxis. Retained FBs, especially plastic ones, often initially fail to cause pain or other symptoms.43 The lack of a history of FB insertion is of little value in children because many will not admit it. Therefore, emergency clinicians need to maintain a high level of suspicion for nasal FBs.
Types of nasal FBs vary widely and include food (e.g., meat, nuts, beans), rubber erasers, paper wads, pebbles, marbles, sponges, beads, jewelry, hardware (e.g., nuts, screws), and even certain living larvae or worms.43,44
Alkaline button batteries pose a unique problem because they may cause significant nasal injury within hours to days.45,46 They are composed of heavy metals such as mercury, zinc, silver, nickel, cadmium, and lithium. Injuries can occur and include mucosal burns, ulcerations, liquefaction necrosis, septal perforation, synechiae, and stenosis of the nasal cavity.45,46 It is imperative that these batteries be removed promptly before tissue damage occurs as a result of leakage of the battery contents, electrical currents, or direct pressure. A relatively new and interesting nasal FB is the magnetic nose ring. These small, commercially available earth magnets are usually worn on either side of the alar cartilage and give the appearance of a pierced nasal stud. The magnets can be displaced and become polarized across the nasal septum. The magnetic attraction can be quite strong and may lead to pressure necrosis of the nasal mucosa and possibly septal perforation. This attraction can also make removal difficult, as well as painful for the patient.46,47 Suggested techniques include using polarized or nonferromagnetic tools.48
Procedure
Manual Instrumentation: Use alligator forceps or bayonet forceps to retrieve anteriorly lodged FBs that have edges amenable to grasping (Fig. 63-43, plate 1). For harder or larger objects, carefully pass a wire loop, right-angle hook, or even a properly bent paper clip beyond the object and rotate it to allow the FB to be pulled from the naris. Direct mucosal trauma and epistaxis may occur with any of these methods. For a nasal FB with smooth, round edges that are difficult to grasp or get behind, attempt to extract it with a suction-tipped catheter in a manner similar to that described earlier for FBs in the EAC. The Hognose catheter described earlier also works well for nasal FBs (see Fig. 63-21). Local vasoconstriction and anesthesia are helpful, and 2% lidocaine with epinephrine (local anesthetic) may be used.
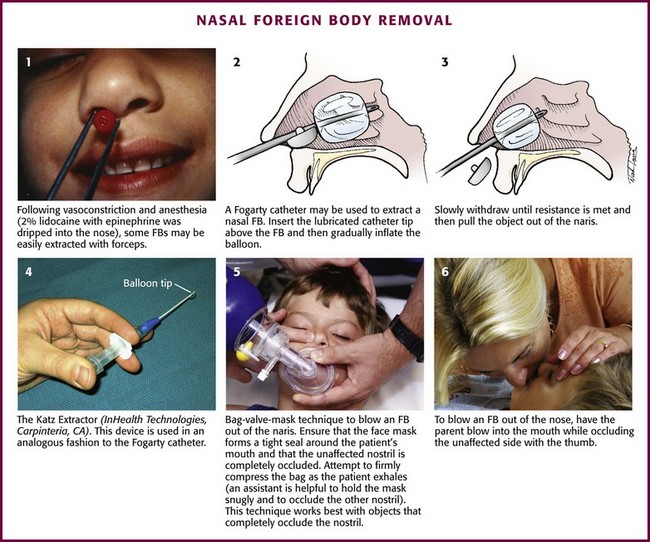
Figure 63-43 Removal of a nasal foreign body (FB).
Balloon Catheter: For an object that cannot be removed with anterior instrumentation, one consideration is to attempt removal with a balloon catheter. A Fogarty catheter can be highly effective in removing a nasal FB (see Fig. 63-43, plates 2 and 3). A No. 4 or 5 vascular Fogarty catheter, a 12-Fr Foley catheter, and a No. 6 biliary Fogarty catheter have all been described in the literature for this use. A biliary catheter is reportedly less apt to rupture. Place the patient in the supine position and apply a vasoconstrictor and anesthetic to the nasal mucosa. With a 5-mL syringe attached and the catheter lubricated with lidocaine gel, pass the tip above the object and into the nasopharynx. Inflate the balloon with air or water (≈2 mL in small children and 3 mL in older children) and control the syringe plunger and balloon size with your thumb. Withdraw the catheter until resistance is felt, and then slowly pull the object out. The Katz Extractor otorhinologic FB remover (InHealth Technologies, Carpinteria, CA; Fig. 63-43, plate 4) is a disposable, single unit composed of a flexible catheter with a balloon tip attached to a syringe. The procedure is similar to that for the Fogarty catheter. Complications mentioned in the literature include mild posttraumatic bleeding, as well as the theoretical risk for airway obstruction by the balloon or aspiration from further displacement of the object.
Positive Pressure: Another approach to a posteriorly placed nasal FB is to blow the object out with positive air pressure. The simplest way is to ask patients to blow their nose while occluding the unaffected nostril. This is really effective only in older children and adults. Alternatively, place a bag-valve-mask device44,49 over the child’s mouth to provide positive pressure (see Fig. 63-43, plate 5). Occlude the opposite nostril and apply the Sellick maneuver to prevent passage of air into the esophagus. This technique often requires restraint and can also be threatening to a young child.
The “parent’s kiss” technique may be used in children.44,50,51 First gain the child’s cooperation by saying that parent is going to “give them a big kiss.” The technique is performed by having the child lie supine. Ask the parent to occlude the child’s unaffected nostril with the thumb (see Fig. 63-43, plate 6). Next, as in mouth-to-mouth resuscitation, ask the parent to make a firm seal with his or her mouth over the child’s open mouth and then give a short, sharp puff of air briskly into the mouth to produce outward pressure behind the object. Keep the opposite nostril occluded throughout the procedure. The object should move within grasping reach of an instrument or pop completely out of the naris. If it fails, the technique can be repeated. Studies of the parent’s kiss technique have found it to be highly effective, nontraumatic, and preferable to restraint or instrumentation.50,51
Another similar technique may be successful.52 After a nasal decongestant is instilled into the affected side, place a ¼- or  -inch section of rubber or soft vinyl tubing (6 to 10 inches) into or at the contralateral nostril and hold the tubing in place with the fingers of one hand. Place the free hand gently over the child’s mouth, take a good-sized breath, and blow forcefully through the tubing. This step may be repeated up to four times. In one study, success was reported in 40 of 41 cases.52 Navitsky and colleagues modified this technique to reduce the risk for transmission of disease.53 Turn a wall oxygen source to a flow of 10 to 15 L/min. Use a male-to-male adapter at the end of oxygen tubing to direct the flow of oxygen into the contralateral (nonobstructed) nostril.
Mandible
Mandibular dislocation is more properly known as temporomandibular joint (TMJ) dislocation. It is actually the mandibular condyles that dislocate. It may result from trauma but more commonly follows extreme opening of the mouth such as may occur while eating, laughing, or yawning. It may also be seen with dystonic reactions to medications. Patients with a previous history of TMJ dislocation are more prone to repeated dislocations. The condition can be unilateral or bilateral (Fig. 63-44).
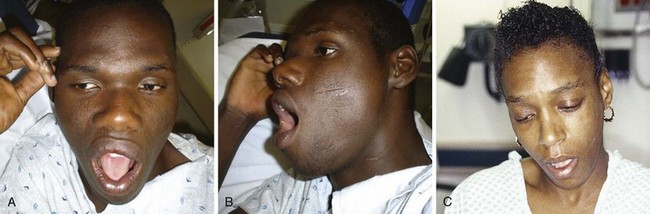
Indications and Contraindications
In the absence of a fracture, there are no real contraindications to reduction.
Procedure
Reduction of a TMJ dislocation is fairly straightforward. Because anterior dislocations are far more common, these techniques will be discussed here. The key to reduction is to direct the mandibular condyle out of its displaced location anterior to the articular eminence54 (Fig. 63-45A). Procedural sedation is usually required for easy and successful reduction. Local anesthetics can be injected into the TMJ space or directly into the lateral pterygoid muscle. For TMJ injection, prepare the skin anterior to the ear, and introduce the needle into the TMJ space at the palpable depression caused by the dislocated condyle. The needle is directed anteriorly and superiorly onto the inferior surface of the glenoid fossa, where 2 mL of local anesthetic is injected. For the pterygoid muscle, 2 to 3 mL of anesthetic is injected into the muscle posterior to the maxillary tuberosity.
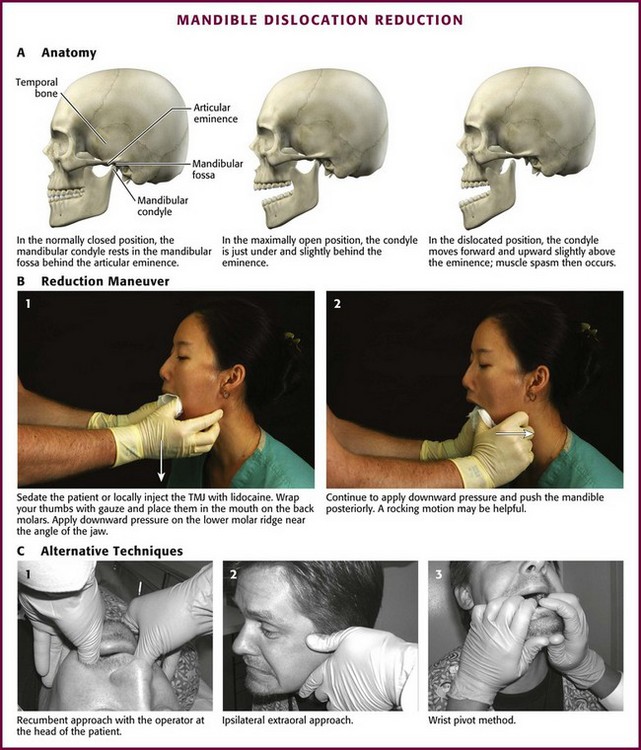
Classic Technique (see Fig 63-45B): With the patient seated and the head stabilized against the head rest, place a bite block in the mouth to prevent injury to the clinician. Wear gloves to protect your thumbs. Stand and face the patient and place your thumbs on the patient’s lower molar teeth. The level of the mandible should not be higher than the operator’s elbow. Once the thumbs are positioned on the molars as far posteriorly as possible, curve the fingers and hand around the angle and body of the mandible along the jaw and chin. Then exert steady, constant downward pressure on the lower molar region, and direct the mandible inferiorly and posteriorly back into the temporal fossa. Be careful because once reduced, reflex spasm of the jaw muscles can suddenly snap the mandible shut and injure your thumbs. Alternatively, place the thumbs on the mandibular ridge instead of the molars. For bilateral dislocations, both sides can be reduced simultaneously, but it is easier to do one side at a time.
Recumbent Approach (see Fig 63-45C): With the patient lying recumbent, stand in front of the patient. Apply caudal and posterior force on the mandible as for the classic technique. Alternatively, stand behind the patient’s head and place your thumbs on the molars. Apply downward and backward pressure for reduction.
Posterior Approach: With the patient seated, stand behind the patient. Place your thumbs posterior to the last molar on the retromolar gum and along the ramus of the mandible. Exert downward force in this position. This procedure carries less risk of the fingers being bitten, but proper positioning of the thumbs may be difficult to accomplish.
Ipsilateral Approach (see Fig 63-45C): The ipsilateral approach involves three routes, extraoral, intraoral, and combined, which are conducted in sequential fashion. With this technique one side at a time is reduced. Stand at the patient’s side. Attempt the extraoral route first. Use the thumb of your dominant hand to apply downward pressure on the displaced condyle just inferior to the zygomatic arch. Use the other hand to stabilize the patient’s head.
Alternative Manual Method: This is similar to the extraoral technique described earlier. Place your fingers directly over the preauricular prominence of the dislocated condyle. Massage the condyle in a posterior and inferior direction to induce relaxation of the muscles and guide the condylar head back into the fossa. This pressure on the condyle may be uncomfortable for patients.
Wrist Pivot Method (see Fig. 63-45C): Face the patient and place your thumbs at the apex of the mentum of the mandible. Wrap the other fingers laterally around the mandible and onto the occlusal surface of the inferior molars. Apply an upward force on the chin with your thumbs, and apply a downward force on the mandible with your fingers. Move the wrists in the direction of ulnar deviation. With these maneuvers, rotate the condyles inferiorly and posteriorly into the fossa.
Gag Reflex Method: The gag reflex method uses a component of jaw relaxation and transient descent of the mandible inferiorly. Induction of the gag reflex has been described as a successful method for reduction of mandibular dislocations. Provide tactile stimulation of the soft palate with a dental mirror or tongue blade in an awake patient. Muscle relaxation occurs and the mandible descends caudally so that the condyle moves inferiorly and relocates back into place.
Uvulitis/Angioedema of the Uvula
Most cases of acute angioedema of the uvula (uvula hydrops), also known as Quincke’s disease, are spontaneous and no cause can be found. Affected patients wake up with a lump in their throat or a fullness when swallowing, look in the mirror, and see an enlarged uvula (Fig. 63-46). It appears as an edematous, pale, and watery-filled structure.55 It is not painful. Most patients are young and otherwise healthy.
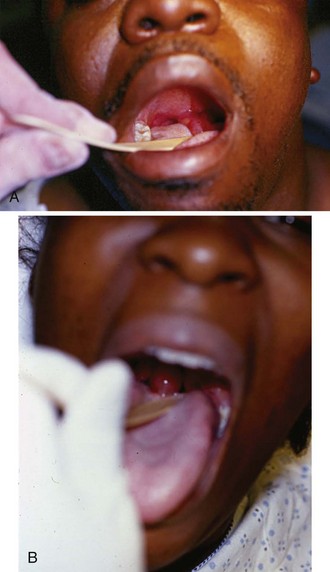
There are no controlled studies evaluating therapy, but numerous antiangioedema interventions have been used. Treatment includes topical epinephrine (applied with a cotton swab), subcutaneous epinephrine, intravenous H1 and H2 histamine blockers, and parenteral or oral corticosteroids.56 Inhalation of nebulized vasoconstrictors (such as epinephrine or racemic epinephrine) is an attractive, yet unproven intervention. For severe cases, otolaryngology consultation is warranted, and invasive techniques such as needle decompression (scoring the uvula with a needle to drain fluid has been described) and uvulectomy may be necessary. In an acute airway emergency when intubation is not possible, clamp the base of the uvula with a hemostat and amputate the distal portion.
Posttonsillectomy Bleeding
Hemorrhage is the most serious complication of adenotonsillectomy, with reported rates of 0.5% to 10%, depending on the technique (Fig. 63-47).57 Bleeding is categorized as intraoperative, primary (within 24 hours), and secondary (between 24 hours and 10 days). Bleeding is serious at all times and must be evaluated and controlled quickly if active. The most common time for patients to be seen in the ED with delayed bleeding is between the fifth and seventh postoperative days. Although some bleeding is minor, sudden severe hemorrhage can be fatal if not managed appropriately. If active bleeding is confirmed by physical examination, consult otolaryngology. Minor bleeding 5 to 10 days postoperatively secondary to eschar separation may be evaluated and treated in the ED. However, multiple bleeding episodes are common in those who bleed, and minor bleeding may herald more significant subsequent hemorrhage. A severely bleeding patient should be taken to the operating room immediately for hemostasis. Up to 50% of patients who have major postoperative bleeding require control in the operating room. It is difficult and occasionally impossible to even initially control severe hemorrhage in the ED. Do not hesitate to intubate a massively bleeding patient to protect the airway and more easily perform local hemostatic maneuvers. Until the surgeon arrives, apply pressure directly on the bleeding area with a sponge on a long clamp (Fig. 63-48). The sponge may be dipped in epinephrine or thrombin powder if available. The bleeding area can also be infiltrated with lidocaine with epinephrine.
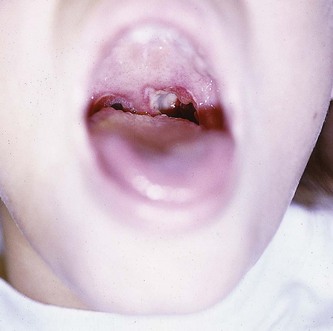
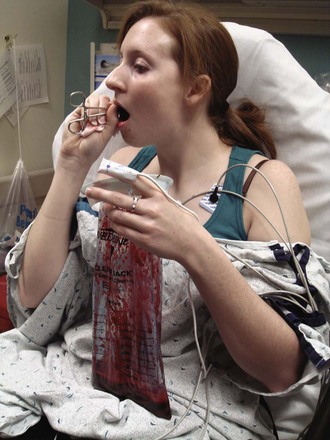
References
1. Holsinger, FC, Kies, MS, Weinstock, E, et al. Examination of the larynx and pharynx. N Engl J Med. 2008;358:e2.
2. Blaivis, M, Theodoro, D, Duggal, S. Ultrasound-guided drainage of peritonsillar abscess by the emergency physician. Am J Emerg Med. 2003;21:155.
3. Herzon, FS. Peritonsillar abscess: incidence, current management practices, and a proposal for treatment guidelines. Laryngoscope. 1995;105(suppl 74):1.
4. Bauer, PW, Lieu, JE, Suskind, DL, et al. The safety of conscious sedation in peritonsillar abscess drainage. Arch Otolaryngol Head Neck Surg. 2001;127:1477.
5. Johnson, RF, Stewart, MG, Wright, CC. An evidence-based review of the treatment of peritonsillar abscess. Otolaryngol Head Neck Surg. 2003;128:332.
6. Khayr, W, Taepke, J. Management of peritonsillar abscess: needle aspiration versus incision and drainage versus tonsillectomy. Am J Ther. 2005;12:344.
7. Johnson, RF, Stewart, MG. The contemporary approach to diagnosis and management of peritonsillar abscess. Curr Opin Otolaryngol Head Neck Surg. 2005;13:157.
8. Afarian, H, Lin, M. Tricks of the trade: say “Ah!”—needle aspiration of peritonsillar abscess. ACEP News. 2008;27(5):35.
9. Braude, DA, Shalit, M. A novel approach to enhance visualization during drainage of peritonsillar abscess. J Emerg Med. 2008;35:297–298.
10. Chang, EH, Hamilton, GS. Novel technique for peritonsillar abscess drainage. Ann Otol Rhinol Laryngol. 2008;117:637–640.
11. Sibbitt, RR, Sibbitt, WL, Palmer, DJ, et al. Needle aspiration of peritonsillar abscess with the new safety technology: the reciprocating procedure device. Otolaryngol Head Neck Surg. 2008;139:307–309.
12. Sibbitt, WL, Sibbitt, RR, Michael, AA, et al. Physician control of needle and syringe during traditional aspiration-injection procedures with the new reciprocating syringe. J Rheumatol. 2006;33:771–778.
13. Sibbitt, RR, Sibbitt, WL, Nunez, SE, et al. Control and performance characteristics of eight different suction biopsy devices. J Vasc Interv Radiol. 2006;17:1657–1669.
14. Moorjani, GR, Michael, AA, Peisjovich, A, et al. Patient pain and tissue trauma during syringe procedures: a randomized controlled trial. J Rheumatol. 2008;35:1124–1129.
15. Burkhart, CN, Burkhart, CG, Williams, S, et al. In pursuit of ceruminolytic agents: a study of earwax composition. Am J Otol. 2000;21:157.
16. Blake, P, Matthews, R, Hornibrook, J. When not to syringe an ear. N Z Med J. 1998;111:422.
17. Grossan, M. Cerumen removal—current challenges. Ear Nose Throat J. 1998;77:541.
18. Hand, C, Harvey, I. The effectiveness of topical preparations for the treatment of earwax: a systematic review. Br J Gen Pract. 2004;54:862.
19. Robinson, AC, Hawke, M. The efficacy of ceruminolytic: everything old is new again. J Otolaryngol. 1989;18:263.
20. Singer, AJ, Sauris, E, Viccellio, AW. Ceruminolytic effects of docusate sodium: a randomized, controlled trial. Am J Emerg Med. 2000;36:228.
21. Wilson, SA, Lopez, R. What is the best treatment for impacted cerumen? J Fam Pract. 2002;51:117.
22. Sander, R. Otitis externa: a practical guide to treatment and prevention. Am Fam Physician. 2001;63:927.
23. Hogg, RP, Corcoran, M, Johnson, AP. Long-term morbidity from Pope ear wicks. J R Soc Med. 1998;91:649.
24. Fritz, S, Kelen, GD, Sivertson, KT. Foreign bodies of the external auditory canal. Emerg Med Clin North Am. 1987;5:183.
25. Davies, PH, Benger, JR. Foreign bodies in the nose and ear: a review of techniques for removal in the emergency department. J Accid Emerg Med. 2000;17:91.
26. Benger, JR, Davies, PH. A useful form of glue ear. J Accid Emerg Med. 2000;17:149–150.
27. Leffler, S, Cheney, P, Tandberg, D. Chemical immobilization and killing of intra-aural roaches: an in vitro study. Ann Emerg Med. 1993;22:1795.
28. Ghanem, T, Rasamny, JK, Park, SS. Rethinking auricular trauma. Laryngoscope. 2005;115:1251.
29. Noorily, AD, Noorily, SH, Otto, RA. Cocaine, lidocaine, tetracaine: which is best for topical nasal anesthesia? Anesth Analg. 1995;81:724.
30. Jones, TM, Nandapalan, V. Manipulation of the fractured nose: a comparison of local infiltration anaesthesia and topical local anaesthesia. Clin Otolaryngol. 1999;24:443.
31. Pallin, DJ, Chng, YM, McKay, MP, et al. Epidemiology of epistaxis in US emergency departments, 1992–2001. Ann Emerg Med. 2005;46:77.
32. Thaha, MA, Nilssen, ELK, Holland, S, et al. Routine coagulation screening in the management of emergency admission for epistaxis—is it necessary? J Laryngol Otol. 2000;114:38.
33. Loughran, S, Spinou, E, Clement, WA, et al. A prospective, single-blind, randomized controlled trial of petroleum jelly/Vaseline for recurrent paediatric epistaxis. Clin Otolaryngol. 2004;29:266.
34. Corbridge, RJ, Djazaeri, B, Hellier, WPL, et al. A prospective randomized controlled trial comparing the use of Merocel nasal tampons and BIPP in the control of acute epistaxis. Clin Otolaryngol. 1995;20:305.
35. Frazee, TA, Hauser, MS. Nonsurgical treatment of epistaxis. J Oral Maxillofac Surg. 2000;58:419.
36. Singer, AJ, Blanda, M, Cronin, K, et al. Comparison of nasal tampons for the treatment of epistaxis in the emergency department: a randomized controlled trial. Ann Emerg Med. 2005;45:134.
37. Hollis, GJ. Massive pneumocephalus following Merocel nasal tamponade for epistaxis. Acad Emerg Med. 2000;7:1073.
38. Fairbanks, DN. Complications of nasal packing. Otolaryngol Head Neck Surg. 1986;94:412.
39. Viducich, RA, Blanda, MP, Gerson, LW. Posterior epistaxis: clinical features and acute complications. Ann Emerg Med. 1995;25:592.
40. Tag, AR, Mitchell, FB, Harell, M, et al. Toxic shock syndrome: otolaryngologic presentations. Laryngoscope. 1982;92:1070.
41. Lopez, MA, Liu, JH, Hartley, BE, et al. Septal hematoma and abscess after nasal trauma. Clin Pediatr (Phila). 2000;39:609.
42. Rohrich, RJ, Adams, WP. Nasal fracture management: minimizing secondary nasal deformities. Plast Reconstr Surg. 2000;106:266.
43. Kalan, A, Tariq, M. Foreign bodies in the nasal cavities: a comprehensive review of the aetiology, diagnostic pointers, and therapeutic measures. Postgrad Med J. 2000;76:484.
44. Kiger, JR, Brenkert, TE, Losek, JD. Nasal foreign body removal in children. Pediatr Emerg Care. 2008;24:785–789.
45. Dane, S, Smally, AJ, Peredy, TR. A truly emergent problem: button battery in the nose. Acad Emerg Med. 2000;7:204.
46. Lancaster, J, Mathews, J, Sherman, IW. Magnetic nasal foreign bodies. Injury. 2000;31:123.
47. Ward, VMM, Selvadurai, D. A magnetic nasal attraction. J Accid Emerg Med. 2000;17:53.
48. Bledsoe, RD. Case report: magnetically adherent nasal foreign bodies: a novel method of removal and case series. Am J Emerg Med. 2008;26:839.e1–839.e2.
49. Backlin, SA. Positive-pressure technique for foreign body removal in children. Ann Emerg Med. 1995;25:554.
50. Botma, M, Bader, R, Kubba, H. “A parent’s kiss”: evaluating an unusual method for removing nasal foreign bodies in children. J Laryngol Otol. 2000;114:598.
51. Purohit, N, Ray, S, Wilson, T, et al. The “parent’s kiss”: an effective way to remove paediatric nasal foreign bodies. Ann R Coll Surg Engl. 2008;90:420–422.
52. Sorrels, WF. Simple noninvasive effective method for removal of nasal foreign bodies in infants and children [letter]. Clin Pediatr (Phila). 2002;41:133.
53. Navitsky, RC, Beamsley, A, McLaughlin, S. Nasal positive-pressure technique for nasal foreign body removal in children. Am J Emerg Med. 2002;20:103–104.
54. Chan, TC, Harrigan, RA, Ufberg, J, et al. Mandibular reduction. J Emerg Med. 2008;34:435–440.
55. Mohseni, M, Lopez, MD. Images in emergency medicine. Uvular angioedema (Quincke’s disease). Ann Emerg Med. 2008;51:8.
56. Peghini, PL, Salcedo, JA, Al-Kawas, FH. Traumatic uvulitis: a rare complication of upper GI endoscopy. Gastrointest Endosc. 2001;53:818.
57. Wiatrak, BJ, Wooley, AL. Pharyngitis and adenotonsillar disease. In: Cummings CW, Flint PW, Haughey BH, et al, eds. Otolaryngology: Head and Neck Surgery. Philadelphia: Mosby; 2005:4150.
[/level-membership-for-emergency-medicine-category][not-level-membership-for-emergency-medicine-category]Chapter 63
Otolaryngologic Procedures
Pharynx and Larynx
Anatomy
The larynx in adults is located in the anterior part of the neck at the level of the C3-C6 vertebrae. It connects the inferior portion of the pharynx (hypopharynx) with the trachea. The larynx extends vertically from the tip of the epiglottis to the inferior border of the cricoid cartilage. It consists of nine cartilages. The larynx is innervated by branches of the vagus nerve, the superior laryngeal nerve, and the recurrent laryngeal nerve. The relevant anatomy is depicted in Figure 63-1.
Indications and Contraindications
Laryngoscopy is indicated for the evaluation of patients with complaints of dysphagia or odynophagia. More specifically, it should be performed in patients complaining of dysphagia, hoarseness, FB ingestion or sensation in the throat, and angioedema and in patients who require assessment of their airway status. In general, laryngoscopy can be used to evaluate a problem and to exclude airway compromise, as well as to diagnose several other diseases such as gastroesophageal reflux, cancer, and allergy.1
Equipment
The equipment required depends on the type of laryngoscopic procedure performed. For flexible laryngoscopy you will need a standard flexible nasopharyngolaryngoscope, a light source, gloves, a nasal speculum, surgical lubricant, antifogging solution, decongestant spray, anesthetic spray, and a wall suction setup with a Frazier suction tip catheter (Fig. 63-2, plate 1). Many choices of decongestant are available; however, 0.05% oxymetazoline (Afrin) or 0.1% to 1% phenylephrine is commonly used. Lidocaine (4%) is typically used as the anesthetic. A 5% cocaine solution serves as both an anesthetic and decongestant. If nasal spray formulations are not available, medication-soaked cotton pledgets, an atomizer bottle, or a syringe atomizer (Mucosal Atomization Device, MAD Nasal, Wolf Torry Medical, Inc.) may be used.
Figure 63-2 Flexible laryngoscopy.
Procedure
Attach the nasopharyngolaryngoscope to its light source and the suction tubing to its port (if available). Ensure that both are functioning properly before beginning. Before inserting the scope, adjust the eyepiece to your visual acuity; it is helpful to check the focus on newsprint or a small object. Review the scope’s directional controls. Examine both nares and choose the more patent one to enter. Anesthetize and vasoconstrict the naris (see Fig. 63-2, plate 2). Because this procedure is irritating, allow enough time for these medications to become effective. You may also anesthetize the pharynx to minimize gagging (see Fig. 63-2, plate 3). Warm the end of the scope in warm water to help prevent fogging. Place the patient in the seated position with the head placed against a head rest in the sniffing position. Insert the tip of the lubricated scope just inside the naris. (Some authors recommend a series of soft nasal trumpets to gradually dilate the nasal cavity and allow easier passage of the scope.) Movement of the scope against the inside of the nasal passage may be irritating to the patient. Minimize this sensation by resting your fourth and fifth fingers on the bridge of the patient’s nose while stabilizing and guiding the scope between your thumb and index finger (see Fig. 63-2, plate 4).
While looking through the eyepiece, slowly advance the endoscope past the middle turbinate into the nasopharynx or through the lumen of a nasal trumpet. To clear fogging or mucus off the lens, ask the patient to swallow, wipe the lens against the pharyngeal mucosa, or use the suction. Once the scope is in the nasopharynx, direct the tip inferiorly by using the thumb control near the eyepiece. Use the thumb control to accomplish up and down movements of the scope. Rotate the scope about its axis and then apply thumb control to provide lateral movement and visualization. At this point the base of the tongue and the tonsils will come into view. Slide the scope farther caudad to bring the larynx into focus. Once again, systematically view the patient’s anatomy and function during both respiration and phonation (see Fig. 63-2, plate 6).
If the nasopharyngeal scope will not pass through either naris, pass it through the oropharynx. Properly anesthetize the oropharynx and avoid contacting the posterior portion of the tongue to prevent gagging. A plastic bite block can be used. Alternatively, cut a 10-mL syringe (without the plunger) in half and ask the patient to hold it in the mouth between the incisors (see Fig. 63-2, plate 5). Pass the fragile endoscope through this tube into the oropharynx to prevent accidental biting of the scope.
Mirror Laryngoscopy
Establish rapport with the patient by explaining how the examination will be performed. Have the patient sit erect in the “sniffing position” with the feet flat on the floor and leaning slightly forward. Attach your head lamp and adjust the beam of light (Fig. 63-3). Warm the mirror with warm water to prevent fogging, but check the temperature of the mirror with your hand before placing it into the oropharynx so that the patient is not burned. Alternatively, apply an antifogging solution to the mirrored side. Wrap the patient’s tongue with gauze to prevent it from slipping or being injured by the lower incisors and then grasp it with the nondominant hand (Fig. 63-4). Apply gentle traction on the tongue with your thumb and index finger and lift the patient’s upper lip with your middle finger. Slide the mirror into the oropharynx with the glass surface parallel to the tongue but not touching it. Place the back of the mirror against the uvula and soft palate and smoothly lift until the larynx is visualized. Although this should not induce gagging, try to make only slight changes in the mirror’s position to inspect the appropriate structures.
Once the patient is anesthetized, repeat the steps described earlier and position the mirror against the soft palate. Rotate the angle of the mirror and systematically inspect the base of the tongue, valleculae, epiglottis, piriform recess, arytenoids, false and true vocal cords, and if possible, the superior aspect of the trachea (see Fig. 63-2, plate 6). Observe for masses, evidence of infection, asymmetry, or FBs. Further evaluate the anterior structure of the larynx and function of the vocal cords by having the patient say “eeee” in a high-pitched voice. This should move the epiglottis away from blocking the view of the larynx and bring the true cords together at the midline (Fig. 63-5).
Tonsil: PTA
Anatomy
Understanding the relative anatomy before attempting to treat PTA is important (Fig. 63-6). The palatine tonsils are located between the anterior and posterior pillars of the throat, bound in a capsule, and covered by mucosa. The lateral wall of the tonsil is defined by the superior pharyngeal constrictor muscle. Of great importance is the internal carotid artery, which lies approximately 2.5 cm posterolateral to the tonsil.
The abscess is defined as a collection of pus between the tonsillar capsule, the superior constrictor muscle, and the palatopharyngeus muscle (Fig. 63-7). The abscess is not within the tonsil itself. PTA is believed to arise from spread of infection from the tonsil or from the mucous glands of Weber located in the superior tonsillar pole. The abscess is most commonly initiated from the upper pole of the tonsil. However, it can also spread from the middle or inferior poles.
Pathophysiology and Clinical Findings
PTAs can occur in patients with inadequately treated tonsillitis and in those with recurrent tonsillitis, but in some patients it arises de novo. There are no data proving that antibiotics, even the correct ones in proper doses, invariably prevent the progression of tonsillitis to abscess formation. The abscess is generally unilateral, and bilateral involvement is rare.2
The differential diagnosis for this acute process includes unilateral tonsillitis, peritonsillar cellulitis, retropharyngeal abscess, infectious mononucleosis, epiglottitis, herpes simplex tonsillitis, retromolar abscess, neoplasm, FB, and internal carotid artery aneurysm. Chronic conditions include leukemia, carcinoma, and tumor in the parapharyngeal space. Differentiation of PTA from peritonsillar cellulitis may be difficult, especially in the early stages of an abscess. The history and time course of the two disease processes are quite similar. Trismus and uvular deviation are uncommon with peritonsillar cellulitis.3
Indications and Contraindications
To diagnose PTA, in addition to visualization, place a gloved index finger into the mouth to feel for hardness or fluctuance in the peritonsillar region (Fig. 63-8).
Intraoral sonography may augment diagnostic accuracy and direct localization for drainage (Fig. 63-9; see Chapter 37). It is performed with an intracavitary probe. Blaivis and coworkers2 found that ED ultrasound was effective in diagnosing and aiding drainage in five cases of PTA. Ultrasound excluded the diagnosis in one. If there is still a question regarding the diagnosis or actual location of the abscess, computed tomography (CT) may be helpful but is not regularly performed and is not standard before a drainage procedure in straightforward cases.
Equipment
The equipment required depends on the technique that is going to be used to drain the PTA. For needle aspiration, you will need a light source, tongue blade, injectable (1% lidocaine with 1 : 100,000 epinephrine) or topical (Cetacaine spray or 4% lidocaine) anesthetic, 3- to 5-mL syringe with a long 25-gauge needle for injection of anesthetic, and a standard or long 18- to 20-gauge needle (spinal needle) on a 10-mL syringe for aspiration (see Review Box 63-1). Long needles and small syringes will not obscure the operator’s view of the anatomy. It is also helpful to have wall suction with a Frazier or Yankauer suction tip device available.
For either procedure, the patient should be given intravenous pain medication and may require mild sedation or even procedural sedation. One should administer parenteral narcotic analgesia, mild sedation, or both, before attempting aspiration. Fentanyl, 1 to 3 µg/kg administered intravenously a few minutes before the procedure, is often ideal. Midazolam may be used judiciously, but the patient should not be overly sedated. The combination of midazolam, ketamine, and glycopyrrolate is reported to be safe and effective for outpatient peritonsillar drainage in children.4
Procedure
Needle aspiration is relatively simple, can be performed by emergency clinicians, does not require special equipment, and is relatively inexpensive. Other benefits of needle aspiration over incision and drainage include decreased pain and trauma. Many believe that this should be the initial surgical drainage procedure for adults and children. The recurrence rate after aspiration is 10%,3 and its cure rate is 93% to 95%.5 Approximately 4% to 10% of patients require repeated aspiration.3,5,6 One drawback is that needle aspiration may miss the PTA and therefore allow misdiagnosis as peritonsillar cellulitis. For this reason, some authors propose admission of patients with negative aspirations and the presumed diagnosis of peritonsillar cellulitis for intravenous antibiotics and observation to prevent further morbidity. Although most studies involved hospitalization and intravenous antibiotics, selected outpatient treatment with oral antibiotics has also been successful and is usually the option chosen unless the patient appears to be in a septic state.6
The incision and drainage procedure is commonly done on an outpatient basis under local anesthesia. It is usually performed after pus is obtained by needle aspiration, but occasionally it is the primary procedure. It seems most logical to first attempt aspiration and follow with incision and drainage only if additional pus is suspected or other extenuating circumstances are present. The success rare for incision and drainage is high with a recurrence rate similar to or lower than that with aspiration alone.5
Treatment guidelines based on a review of the literature3,5–7 suggest that patients with PTA should initially be treated by needle aspiration. Incision and drainage and immediate tonsillectomy should be reserved for treatment failures or recurrences. These procedures can be performed in conjunction with hospital admission and administration of intravenous antibiotics or as outpatient treatment with oral antibiotics. One evidence-based review analyzed 42 articles, 5 of which were clinical studies on surgical technique.5 All three techniques were found to be effective in treating PTA, and the recurrence rate was low (grade C recommendation). The approach depends on the patient’s clinical status and medical history. Decisions about the treatment of PTA in the ED are often made by the emergency clinician, but as local protocols dictate, consultation with an otolaryngologist is also appropriate.
Needle Aspiration
Have the patient sit upright with a support behind the head. This is best done as a two-person procedure. Ask an assistant to retract the cheek laterally to maximize visibility. A head lamp provides optimal lighting; a double–tongue blade setup aids in visualization of the operative area (see Fig. 63-3). If required, administer a parenteral narcotic analgesic, a mild sedative, or both before attempting aspiration.
Use manual palpation to locate the fluctuant area of the abscess. Anesthetize the area topically or with local infiltration. Infiltration should be done with 2 to 3 mL of 1% lidocaine with epinephrine via a 25- to 27-gauge needle. Use a 3- to 5-mL syringe with a long needle to be able to visualize the area to be injected (Fig. 63-10, step 1). A large syringe can block the operator’s view. Displacing the tongue with a finger rather than a tongue blade may provide a better view. Infiltrate the lidocaine intramucosally for the best results, but be careful to not increase the size of the abscess by direct injection into the abscess cavity. The area should blanch. With proper local infiltration, the patient will not feel the penetration of the aspirating needle. If the trismus is so pronounced that it prevents adequate anesthesia, it will probably be too difficult to aspirate or incise the abscess properly.
Novel techniques to assist in the drainage procedure have recently been described. Afarian and Lin described the use of a laryngoscope with a curved blade (Fig. 63-11A and B).8 The blade is inserted into the patient’s mouth as far posteriorly as the patient can tolerate. The blade shines light from inside the mouth onto the posterior aspect of the pharynx. In addition, the laryngoscope provides better exposure of the area because the handle is below the patient’s mouth and the holding hand does not obscure the view. Moreover, the curved blade sweeps the tongue out of the way and the weight of the handle will help overcome trismus. Braude and Shalit described a similar process involving the use of a disassembled disposable vaginal speculum with a fiberoptic light (see Fig 63-11C).9 One advantage of both techniques is that an assistant can hold either light source without getting in the way of the operator. Finally, Chang and Hamilton reported that performing the procedure with the patient in the Trendelenburg position and the operator seated behind the patient’s head provides comparable success rates and patient comfort.10
For aspiration, attach a long 18- to 20-gauge needle to a 10-mL syringe. Fashion a needle guard by cutting off the distal 1 cm of the plastic needle cover, replace the cover on the needle, and securely attach this guard to the needle and syringe with tape to prevent inadvertent displacement (see Fig. 63-10, step 2). Ensure that the needle protrudes only 1 cm beyond the cover to limit the depth of needle penetration and lessen the risk of entering any major vascular structures. If pus is not obtained at a 1-cm depth, deeper penetration is discouraged. Insert the needle into the most fluctuant (or prominent) area as previously determined, which is most commonly the superior pole of the tonsil (see Fig. 63-10, step 3). Importantly, advance the syringe and needle in the sagittal plane only; do not angle to the side toward the carotid artery. Do not aspirate the tonsil itself because the abscess develops in the peritonsillar space surrounding the tonsil. Continually aspirate while advancing the needle in the sagittal plane and do not direct it laterally, where it could injure the carotid artery. If the aspirate is positive for pus, remove as much purulent material as possible. If the aspirate is negative, attempt aspiration again in the middle pole of the peritonsillar space, approximately 1 cm caudal to the first aspiration. If still negative, perform a third and final attempt at the inferior pole (see Fig. 63-10, step 4). Up to 30% of abscesses will be missed if only the superior pole is aspirated. It must be stressed that a negative aspirate does not rule out a PTA.
Usually, 2 to 6 mL of pus is obtained. It is unusual to recover more than 8 to 10 mL (Fig. 63-10, step 5). Although culture is recommended, the results rarely alter subsequent therapy. When significant amounts of pus are aspirated, the patient usually feels immediate improvement in pain and dysphagia. After the needle is removed, some bleeding will be noted (see Fig. 63-10, step 6). Slight oozing may occur for a few hours, especially if warm water rinses are used. Drainage of pus may continue and is often sensed as a foul taste by the patient. Significant additional drainage of pus may be an indication for repeated aspiration, incision and drainage, or hospital admission.
Recently, a new device, the Reciprocating Procedure Device (RPD; AVANCA Medical Devices, Inc.), has been developed that allows one-handed aspiration of the abscess (Fig. 63-12).11 The RPD consists of two syringe barrels and plungers. The plungers are linked by a pulley system in opposing fashion, which results in a set of reciprocating plungers. When one plunger is pressed with the thumb, the syringe injects; when the accessory plunger is depressed, the syringe aspirates. The RPD allows stable finger positioning and finer control of the needle and syringe. To use the RPD, attach a needle to the RPD. Press the injection plunger with the thumb while advancing the RPD simultaneously in the oral cavity until the needle penetrates the abscess. Once the mucosal surface has been penetrated, depress the aspiration plunger to provide a vacuum for aspiration without moving the needle tip. Studies have shown that the RPD allows enhanced needle control, safer and more accurate aspiration procedures, and decreased complications by 35% to 60%.12–14
Incision and Drainage
To incise a PTA, anesthetize the area as described earlier. Prepare a No. 11 or 15 scalpel blade by taping over all but the distal 0.5 cm of the blade to prevent deeper penetration (Fig. 63-13, step 1). Incise the area of maximal fluctuance or the area where a preceding aspiration (if one was performed) located pus. Do not incise the tonsil itself; instead, incise the peritonsillar area where pus accumulates. Incise the mucosa in an area 0.5 cm long in a posterior-to-anterior direction. A stab incision with a No. 11 blade usually suffices (see Fig. 63-13, step 2). Warn the patient that the pus will flow posteriorly and must be expectorated. Expect bleeding because this is a vascular area. Suction the incised area with a No. 9 or 10 Frazier suction tip or a tonsil suction tip to aid in removal of the purulent material. Place a closed Kelly clamp into the opening and gently open it to break up the loculations (see Fig. 63-13, step 3). Allow the patient to rinse and gargle with a saline or dilute peroxide-saline solution. Packing is not used in the drainage of this abscess. After aspiration or incision, it is prudent to observe the patient for about an hour to watch for complications (e.g., bleeding) and to ensure that the patient is able to tolerate oral fluids. Most patients can be discharged with 24-hour follow-up. Toxic patients, those with excessive volumes of aspirate, those with persistent bleeding, and those unable to take oral antibiotics are candidates for admission or more prolonged observation. Frequent rinses with warm saline are quite helpful in relieving postaspiration symptoms.
Complications of Surgical Drainage
Needle aspiration is an accepted, safe, and effective technique for treatment of PTA in the ED. There is an approximate 10% failure rate and need for subsequent drainage.3,5,6 Complications can include aspiration of pus or blood and hemorrhage. If the patient has cellulitis, the aspiration will be of no help, but it will not worsen morbidity. Failure to obtain pus should prompt high-dose antibiotics and follow-up in 24 hours. Many clinicians will opt for admission in such instances. Though often feared, injury to the carotid artery has not been reported as a complication of needle aspiration of PTA. Catastrophic hemorrhage may result from the extremely rare and largely theoretical aspiration of a pseudoaneurysm mimicking a PTA or similarly rare necrosis of the carotid artery. In addition, incisions that are too large or too small may lead to poor healing or an inability to completely evacuate the abscess, respectively.
Ear
The ear consists of three sections, the outer, middle, and inner ear. The outer ear includes the pinna (auricle), the external auditory canal (EAC), and the tympanic membrane (TM) (Fig. 63-14A). For the purpose of this chapter, only the parts of the external ear will be discussed. The pinna is flesh-covered cartilage and serves both hearing and cosmetic functions. The EAC extends from the head to the external auditory meatus in the skull and measures approximately 2.5 cm in adults. It is relatively short and straight in early infancy but begins to take on its adult S shape and overall anterocaudal orientation at 2 years of age. Initially, the EAC is almost entirely cartilaginous, but by adulthood its medial two thirds is composed of bony support with an overlying thin, stratified squamous epithelium. The lateral third has a less sensitive, thicker hairy epithelium that produces cerumen and retains its cartilage as support. The arterial supply to the EAC originates from the external carotid artery via the posterior auricular, maxillary, and superficial temporal branches. The mandibular branch of the fifth cranial nerve (V3) and the vagus nerve innervate the ear.
Anesthesia of the External Ear
Indications for local anesthesia of the auricle include closure of extensive lacerations or performance of other painful procedures such as incision and drainage of hematomas (Fig. 63-15). Four nerve branches supply the external ear; knowledge of their anatomy is required to understand the location for injection of anesthetic (see Fig. 63-14B). The great auricular nerve (branch of the cervical plexus) innervates most of the posteromedial, posterolateral, and inferior aspect of the auricle. A few branches of the lesser occipital nerve may contribute to this area. The auricular branch of the vagus supplies the concha and most of the area around the auditory meatus. The auriculotemporal nerve (from the mandibular branch of the trigeminal nerve) supplies the anterosuperior and anteromedial aspects of the auricle.
Figure 63-15 Closure of extensive lacerations of the ear such as this require a nerve block of the auricle.
Procedure: Fill a 10-mL syringe with either 1% lidocaine or 0.25% bupivacaine. Mix with epinephrine if a regional block is planned in an area without evidence of traumatized vascularity. Attach the syringe to a 25- or 27-gauge needle (5 to 7 cm in length). One of several methods may be used to induce partial or complete anesthesia, depending on the area of concern. To anesthetize the nerve branches of the great auricular and lesser occipital nerve branches, inject between 3 and 4 mL of anesthetic into the posterior sulcus (Fig. 63-16, plate 1). Insert the needle behind the inferior pole of the auricle and gradually aspirate and inject toward the superior pole along the crescent-shaped contour of the posterior aspect of the auricle. Anesthetize the auriculotemporal nerve anteriorly by placing 3 to 4 mL of anesthetic just superior and anterior to the cartilaginous tragus. Provide anesthesia to the auricular branch of the vagus nerve and the more central areas of the auricle by using the technique shown in Figure 63-16, plates 3 and 4.
Figure 63-16 Anesthesia of the ear.
Another and possibly more effective option is the regional block shown in Figure 63-16, plate 2. Insert the needle subcutaneously approximately 1 cm above the superior pole of the auricle and direct it to a point just anterior to the tragus. Be sure to inject the skin of the scalp while avoiding the auricular cartilage. Aspirate and then slowly withdraw the needle while injecting anesthetic until the needle is almost to the puncture site. Redirect the needle posteriorly and repeat the process while aiming at the skin just behind the midauricular area. Remove the needle and perform the same procedure, but insert the needle just inferior to the insertion of the ear lobule and anesthetize it in a superior direction. Again, block the auricular branch of the vagus as described in Figure 63-16, plates 3 and 4, if additional anesthesia of the concha is required.
EAC and TM
Procedure: Local anesthesia is achieved with a 25- or 27-gauge needle (3 to 5 cm in length) attached to a syringe containing 1% lidocaine with epinephrine. A 1 : 10 mixture of 8.4% sodium bicarbonate to lidocaine helps reduce pain during injection in this sensitive area. Place a speculum just inside the auditory meatus, inject 0.3 to 0.5 mL of the anesthetic into subcutaneous tissue, and stop after a small bulge is raised in the skin. Inject all four quadrants in this manner by moving the speculum after each injection (see Fig. 63-16, plate 3). If additional anesthesia is necessary, give two more small injections. Inject the same amount slightly farther into the canal, once along the anterior wall and again at the posterior wall at the bone-cartilage junction.
Another similar technique involves depositing the anesthetic just lateral, or exterior, to the external auditory meatus. Using the same size of needle and type of anesthetic solution as just described, inject approximately 0.5 to 1.0 mL into each of five points around the auditory meatus and tragus (see Fig. 63-16, plate 4).
Examination
Several methods can be used to examine the EAC and TM. In all methods, grasp the superior aspect of the pinna and pull cephalad and posterior to straighten the slightly tortuous EAC. Examination is most commonly done with a fiberoptic otoscope (Fig. 63-17). Place a plastic or metal speculum into the auditory meatus for examination and use a head lamp or head mirror/light bulb as a light source. After inspection, the operating hand can be used to pass instruments into the EAC and to maneuver them more easily. Although this technique provides excellent illumination, the use of magnifying loupes can improve visualization during procedures. The ideal setup for removal of cerumen or an FB consists of an operating microscope and a speculum. This provides binocular vision and frees the examiner’s hands for instrumentation. Unfortunately, this equipment is seldom found outside the otolaryngology clinic setting. If using a standard otoscope, stabilize the hand holding the otoscope against the temporal part of the patient’s skull to prevent inadvertent injury to the canal if the patient moves unexpectedly.
Removal of Impacted Cerumen
Excretions from the ceruminous or apocrine and sebaceous glands together with cells exfoliated from the EAC combine to form cerumen. One study found that cerumen is composed of lipids, complex proteins, and simple sugars.15 Cerumen repels water, has documented antimicrobial activity, and forms a protective barrier against infection. Cerumen often becomes impacted, which results in complaints of a “blocked” ear, impaired hearing, or dizziness.
Indications and Contraindications
There are few if any true contraindications to removal of impacted cerumen. Cerumen is usually impacted for prolonged periods, and vigorous attempts to remove it may precipitate otitis externa. It is reasonable to instill antiseptics (Vol Sol and others) or antibiotic eardrops for a few days after removal of the cerumen to prevent otitis externa. Neomycin-containing eardrops are best avoided because of precipitation of a contact dermatitis (Fig. 63-18A). Caution should be used in removing impacted cerumen in diabetic patients. Diabetics commonly experience otitis externa after seemingly minor manipulation of the ear canal (see Fig. 63-18B).
Contraindications to irrigation include the following16:
l. Patient aversion to or a history of injury from previous syringe irrigation
l. History of middle ear disease
l. Known or suspected perforated TM
l. FBs, especially sharp objects and vegetable matter
l. Known inner ear disturbance, especially if the patient has severe vertigo
l. History of radiation therapy encompassing the external or middle ear, base of the skull, or mastoid
Procedure
Removal of cerumen can be accomplished by irrigation, manual extraction, or a combination of both. Generally, the procedures used to remove cerumen are safe; however, otologic injury has occurred after this “minor” procedure and has even resulted in litigation.17
Irrigation is an effective approach for removal of cerumen and has the advantage of being painless and simple to perform. It is usually most successful after the instillation of a ceruminolytic (see later). Because the patient does not have to remain completely still, it is ideal for the pediatric population. It is estimated that 150,000 ears are irrigated in the United States each week.17 Though usually more time-consuming and messy than manual extraction, irrigation is an appropriate initial method to attempt and can be performed by technicians with guidance from the clinician.
A recent evidence-based review concluded that the current evidence suggests little difference in the efficacy of water-based and oil-based preparations for removing cerumen.18 Non–water-, non–oil-based preparations appear to be most effective in clearing cerumen and improving syringing, but further research is needed.18 Whichever of the following techniques are used, some tips for successful removal of cerumen include proper lighting, attention to patient comfort, and abrupt cessation when the patient’s comfort level is breached.
Ceruminolytics: These products may soften hardened or impacted cerumen. They are used as adjuncts to other procedures—simply instilling ceruminolytics into the canal will not remove enough cerumen to aid the emergency clinician. If irrigation fails, continued outpatient use of ceruminolytics is often prescribed, usually combined with home irrigation via a bulb syringe or a repeated visit in a few days. Although many products are available as ceruminolytics, a 5% or 10% solution of sodium bicarbonate disintegrates cerumen much more quickly and efficiently than do commercially prepared ceruminolytics and other products.19 Cerumenex, Cerumol, Auralgan, Buro-Sol, alcohol, and oils were all tested and took more than 18 hours to disintegrate cerumen versus approximately 90 minutes for the sodium bicarbonate solutions.19 Hydrogen peroxide is another commonly used ceruminolytic, but its use has not been systematically studied. One study found that the liquid preparation of the stool softener docusate sodium (Colace) was much more effective than Cerumenex as a ceruminolytic.20 An evidence-based review of agents found that docusate sodium administered 15 minutes before irrigation was most effective in facilitating removal of cerumen. Triethanolamine (Cerumenex) and olive oil were the next most effective treatments.21
Place the patient in the supine position with the affected ear up, instill the solution, and wait at least 15 to 30 minutes before attempts at removal (Fig. 63-19, step 1). Repeat the instillation between attempts at manual extraction or irrigation.
Irrigation (Ear Syringing): After a ceruminolytic has been instilled and left in the canal for 15 to 30 minutes, irrigation of the canal is often effective in flushing out impacted cerumen. Ask the patient to sit upright and hold an emesis or ear irrigation basin flush tightly against the skin just below the earlobe. Insert the irrigation tip into the EAC only as far as the cartilage-bone junction, and direct the stream of water superiorly to wash the impacted cerumen away from the TM (see Fig. 63-19, step 2). Warm the water to body temperature to prevent caloric stimulation. Multiple attempts may be necessary, and intermittent attempts at manual removal of loosened cerumen may help hasten the process. During the irrigation, ask an assistant to apply traction to the pinna to straighten the canal for more efficient irrigation. Patients usually feel some discomfort with forceful irrigation, but not severe pain.
[/not-level-membership-for-emergency-medicine-category]
