Ophthalmologic Procedures
Assessment of Visual Acuity
Indications
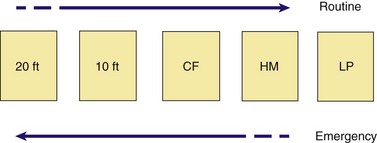
Visual acuity should be assessed as soon as practicable and before the patient is examined with bright lights. In the event of blepharospasm from an injury (e.g., abrasion, chemical exposure), a topical anesthetic may facilitate the examination. Patients are often encountered in the context of an eye complaint and say that they “can’t see.” In these instances, emergency visual acuity assessment should be performed first, beginning with evaluation of light perception, then hand motion, and finally counting fingers at 3 ft (Fig. 62-1). If the patient succeeds in performing these assessments, a near vision card may then be used or distant visual acuity assessed. In emergency circumstances, detailed formal vision testing is not essential; however, some form of visual acuity assessment is needed. In this situation, the ability to count fingers or read newsprint gives some indication of gross visual function. Formal visual acuity testing should never delay important therapeutic interventions such as eye irrigation.1
Distant Visual Acuity Procedure
For formal vision testing, ask the patient to face a well-lit standard Snellen or similar eye chart from a premeasured distance of 20 ft. Use a card or the palm of the hand to occlude one eye at a time. If possible, examine all patients while wearing their current lens correction to obtain the best corrected distant visual acuity. If not available, measure visual acuity first without correction and then with a pinhole device, and note any improvement in visual acuity. This device functions as a corrective lens by reducing corneal refractive error. In general, visual acuity is improved with the pinhole device. Decreased visual acuity that is not improved with this device suggests that corneal refractive error is not the cause. Construct a pinhole device by punching one to several holes in the center of a card (3- × 5-inch index card) with an 18-gauge needle. Devices with one or more pinholes drilled into an eye cover are available commercially (Fig. 62-2A and B) or can be constructed from readily available material in the ED, such as the index card with holes just mentioned. Figure 62-2C presents a chart for testing visual acuity while the patient is on a stretcher or in a chair. The chart can be used directly from this text if held 14 inches from the eye. Begin by testing the affected eye or the one presumed to have the worst visual acuity. First, instruct the patient to read the smallest letters on the chart that can easily be seen. Then ask the patient to read letters that can just barely be made out (i.e., they do not have to be clear). If the patient is unable to read the largest letter on the chart, move the patient to half the distance from the chart (10 ft), or if using the figure in this text, move it 7 inches closer to the eye and repeat the procedure. Record the results reflecting the change in distance (e.g., 10/200). The numerator in the vision ratio is the distance of the patient from the chart and the denominator is the distance at which a patient with normal vision can read the line of letters. For patients who still cannot read the letters on the chart, test vision progressively as follows: the ability to count fingers, detect hand motion, and perceive light (with or without projection—the ability to perceive the direction of light), and finally, the inability to perceive light.2

Near Visual Acuity Procedure
Perform near visual acuity assessment in the ED at the bedside or at triage. Hold a pocket near vision card (see Fig. 62-2C) or any printed material in good light at a distance of approximately 14 inches in front of the patient and occlude each eye alternately as described earlier. When using available printed material in lieu of a near vision card, measure the size of the letters that are discerned by the patient. At a later time compare these letters with the size of the letters on the near vision card to deduce the patient’s actual visual acuity. When near vision is decreased, it is usually caused by either loss of visual function or poor accommodation as a result of advancing age (presbyopia). Less commonly, it is caused by traumatic mydriasis. Thus, examine patients with presbyopia with their reading correction in place to obtain the best corrected near visual acuity.
For patients who cannot communicate or in whom factitious blindness or malingering is suspected, check for optokinetic nystagmus (OKN) to determine whether the visual pathway is intact. To test for OKN, pass a regularly sequenced pattern in front of the eyes. If an optokinetic drum is available, rotate the drum in front of the patient (Fig. 62-3). This is not available in many EDs, however. In place of the drum, substitute a printed piece of paper such as newsprint (without photographs or large areas with no print) or a standard tape measure. Pass it in front of the patient’s eye at reading distance while instructing the patient to look at it as it moves rapidly by. Evaluate for tracking as demonstrated by nystagmus-like eye movements seen when the test object is moved from side to side in front of the patient. Such movement indicates an intact visual pathway. Finally, another effective method is to hold a mirror in front of the patient and slowly rotate the mirror to either side of the patient. Patients with an intact visual pathway will maintain eye contact with themselves as demonstrated by eye movement as the mirror is moved. A large mirror that reflects the patient’s entire face is most effective for this purpose.
Dilating the Eye
Cycloplegic agents were used cosmetically as early as Galen’s time. Beginning in the early 1800s, extracts from the plants Hyoscyamus and belladonna were used in ophthalmology. Atropine was first isolated in 1833. Epinephrine was used on eyes in 1900 as the first sympathomimetic agent.3
Indications and Contraindications
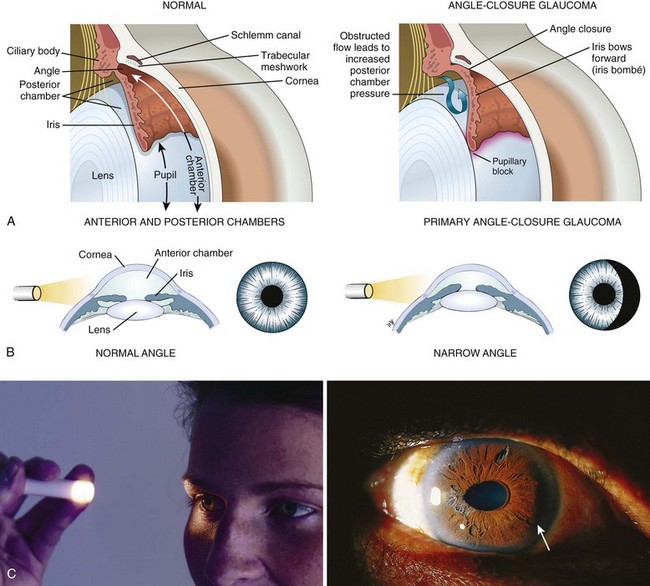
Dilation is discouraged in patients with head injury who are at risk for herniation when it is necessary to monitor pupil findings. Dilation is contraindicated in the presence of narrow anterior chamber angles. Patients predisposed to having narrow angles may be unaware of this condition. Evaluate the depth of the anterior chamber before this procedure, and do not dilate the eye if there is any question of a narrow angle. To estimate the depth of the anterior chamber, shine a penlight tangentially from the lateral side of the eye. When the depth of the anterior chamber is normal, uniform illumination of the iris is seen. However, when the iris has a forward convexity as in the case of a narrow anterior chamber, only a sector of iris is illuminated and there will be a shadow on the medial (nasal) side of the iris (Fig. 62-4). With a slit lamp, the depth of the anterior chamber angle can be assessed directly. The definitive test for assessing the anterior chamber angle is gonioscopy, in which the anterior chamber angle structures are viewed directly by means of a special mirrored contact lens and a slit lamp. Gonioscopy is not a technique normally performed by emergency clinicians.
Systemic effects can develop after the application of eyedrops.4–10 Review the following sections on agents and complications before using these drugs in patients with compromised cardiovascular function.
Agents
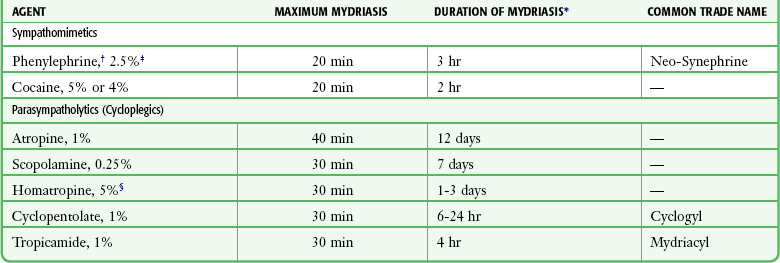
Only two dilating agents are really needed in the ED. Phenylephrine (Neo-Synephrine) 2.5%, a potent sympathomimetic, is used for diagnostic dilation of the pupil and visualization of the fundus. The drug is short acting, and because accommodation is not affected, the patient’s vision is not altered. Phenylephrine 10% should not be used routinely because it can be absorbed systemically and, in rare cases, has caused hypertensive crisis, myocardial infarction, and death.8,9
For therapeutic cycloplegia in patients with iritis, 5% homatropine works well. Even though Table 62-1 indicates a maximum duration of 3 days, 24 hours is more common. Therefore, 5% homatropine is a useful therapeutic agent for traumatic iritis. Atropine should not be used for traumatic iritis because the undesirable effects of pupillary dilation and blurred vision persist for a week or longer after the associated corneal abrasions have healed. Atropine drops may be prescribed as part of the therapy for nontraumatic iritis after appropriate ophthalmologic consultation. Individuals with lightly pigmented irides tend to have greater sensitivity to cycloplegic agents than do individuals with greater pigmentation; the cycloplegic effect might therefore be more prolonged in people with light eyes. It might be difficult to dilate some patients with deeply pigmented irides, however, and numerous applications of drops might be required.
TABLE 62-1
*The duration of effect shows considerable individual variation. These are general estimates.
†Preferred for funduscopic examination.
‡A 10% solution may produce cardiovascular reaction and hence should not be used.
A fixed and dilated pupil from a pharmacologic cause may be encountered after both nasotracheal and orotracheal intubation (Fig. 62-5). In such ill or injured patients, cerebral herniation must be considered. When phenylephrine is used to constrict the nasal mucosa before nasal intubation (endotracheal tube, nasogastric tube), inadvertent spread to the eye can result in a fixed and dilated pupil. The same scenario may occur during resuscitation when endotracheal epinephrine has been instilled into the lungs and cardiopulmonary resuscitation has expelled epinephrine into the eye. In such scenarios, the affected pupil will not constrict after intraocular pilocarpine administration. Finally, a fixed and dilated pupil might occur as a result of inadvertent contamination of the eye with scopolamine after the application of a scopolamine patch.
Complications
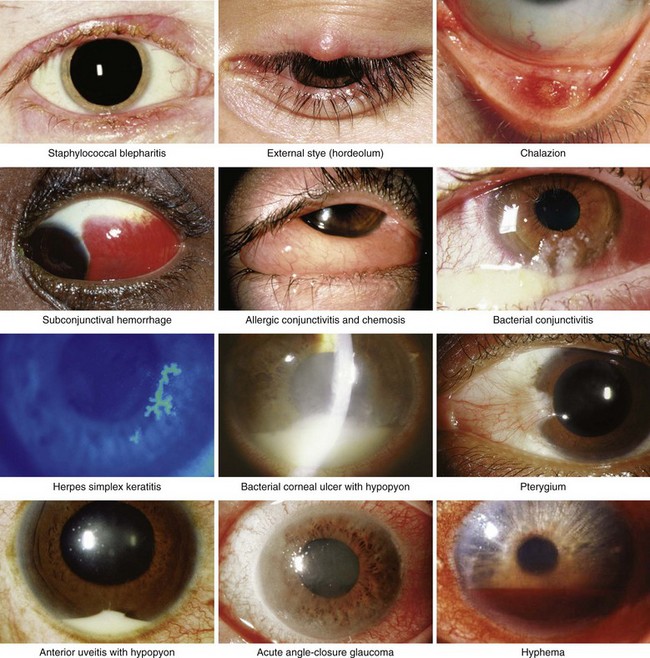
Any dilator can precipitate an attack of angle-closure glaucoma in susceptible patients.10 In the case of angle-closure glaucoma, it may take several hours before symptoms become evident. The patient often complains of smoky vision with “halos” around lights, as well as an aching pain that is sometimes severe. Nausea and vomiting may occur. If the affected eye becomes injected in association with a hazy cornea, elevated pressure on tonometry, and an oval, fixed pupil, consult an ophthalmologist immediately. Place the patient supine and administer analgesics and antiemetics. Treatment usually includes the agents suggested in Box 62-1, and later, definitive laser or surgical procedures.
Be aware that if contaminated, an eye medication can introduce infection. Most solutions contain bactericidal ingredients, but contamination of the tips of droppers can still occur (Fig. 62-6A).11 Use only newly opened bottles of eye medication or single-use vials, particularly if the patient has a deep corneal injury or has recently undergone eye surgery. Promptly discard out-of-date drops and those in which crust or other material is found around the nozzle.
Systemic reactions may rarely be induced by sympathomimetic and cycloplegic eyedrops.4–10 In one report of 33 cases of adverse reactions associated with 10% phenylephrine, there were 15 myocardial infarctions (11 deaths), 7 cases of precipitation of angle-closure glaucoma, and a variety of systemic cardiovascular or neurologic reactions.9
After instillation of eyedrops into the conjunctival sac, systemic absorption can occur through the conjunctival capillaries, as well as by way of the nasal mucosa, the oral pharynx, and the gastrointestinal tract after passage through the lacrimal drainage system. Mucosal hyperemia enhances absorption. Symptoms can often be avoided by maintaining digital pressure on the nasal canthus to occlude the puncta for several minutes after administration (Fig. 62-6B).4
The Fluorescein Examination
Perform fluorescein staining of the eye as part of the evaluation of all patients with eye trauma and infection. It is a quick and easy technique that is crucial for the proper diagnosis and management of common eye emergencies. View the fluorescein-stained cornea and conjunctiva under a “blue” light and ideally in conjunction with slit lamp magnification (see “Slit Lamp Examination,” later in this chapter).
Sodium fluorescein is a water-soluble chemical that fluoresces. It absorbs light in the blue wavelengths and emits the energy in the longer green wavelengths. It fluoresces in an alkaline environment (such as in Bowman’s membrane, which is located below the corneal epithelium) but not in an acidic environment (such as in the tear film over intact corneal epithelium).12 Thus it is useful in revealing even minute abrasions on the cornea.
Fluorescein was initially used in ophthalmology in the 1880s.13 It was first used as a drop, but when the danger of contamination by bacteria (especially Pseudomonas) was recognized in the 1950s,14 paper strips impregnated with fluorescein were developed. These strips are now supplied in individual sterile wrappers and should be used instead of the premixed solution.
Indications and Contraindications
Fluorescein staining is indicated for the evaluation of suspected abrasions, foreign bodies (FBs), and infections of the eye,15 including “simple” cases of conjunctivitis, which may actually be herpetic keratitis. Exposure of the face to pepper spray has been associated with corneal abrasions, and such patients should undergo fluorescein staining and be evaluated with a slit lamp or Wood’s lamp.16 Corneal defects may be seen after even a few seconds of unprotected viewing of a welder’s arc flame.
Fluorescein permanently stains soft contact lenses. Therefore, when fluorescein is used, remove soft contact lenses before instilling the fluorescein and caution the patient to not put the lenses back into the eye for several hours. Topically administered fluorescein is considered nontoxic, although reactions to a fluorescein-containing solution (not impregnated strips) have been described.17 These reports, which consist of vagal reactions18 and generalized convulsions,19 are rare, not rigorously supported, and believed to be caused by agents other than fluorescein in the solution. If using one of these fluorescein-containing solutions rather than the fluorescein-impregnated strips, be aware of these potential, yet scientifically suspect idiosyncratic reactions.
Procedure
Theoretically, one should not use topical anesthetics before fluorescein staining because a superficial punctate keratitis may develop in some patients from the anesthetic,12 which can confuse the diagnosis. However, in patients who are tearing profusely and squeezing their eyes shut from an abrasion or an FB, the examination is often impossible if a topical anesthetic is not first used. Theoretical downsides notwithstanding, it is common practice to apply a local anesthetic before instilling fluorescein.
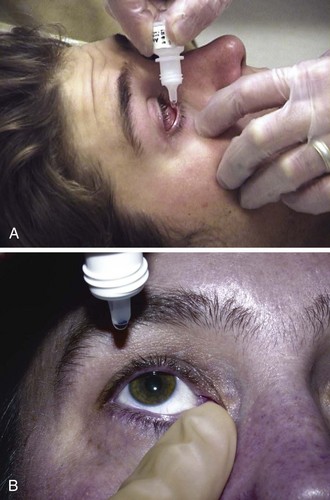
Grasp the fluorescein strip by the nonorange end and wet the orange end with 1 drop of saline. Several convenient forms are available, including a small bottle of artificial tears or a 5-mL “bullet” or “fish” of normal saline commonly used for nebulizer treatments. Alternatively, wet the strip with tap water or the recently used local anesthetic drops. Once the strip is moistened, place it gently on the inside of the patient’s lower lid (Fig. 62-7, step 1). Withdraw the strip and ask the patient to blink, which spreads the fluorescein over the surface of the eye. The key to a good examination is to have a thin layer of fluorescein over the corneal and conjunctival surfaces. If the strip is too heavily moistened before placing it in the lower fornix, the eye may become flooded with the solution, which makes evaluation difficult. If too much dye accumulates, the patient can remove the excess dye by blotting the closed eye with a tissue. Conversely, placing a dry strip in an unanesthetized eye may be irritating. Next, use a Wood lamp (4× magnification), the blue filter of a slit lamp, or simply a penlight with a blue filter to examine the eye in a darkened room (see Fig. 62-7, step 2). Check for areas of bright green fluorescence on the corneal and conjunctival surfaces. The naked eye may not be able to see small defects. Ideally, use a slit lamp with 10× or 25× magnification to examine the stained cornea before ruling out a pathologic process. A new handheld magnification device, the Eidolon Bluminator ophthalmic illuminator, produces an intense blue light from a light-emitting diode with 7× magnification (see Fig. 62-7, step 3). After completion of the fluorescein examination, irrigate excess dye from the eye to minimize damage to the patient’s clothing from dye-stained tears.
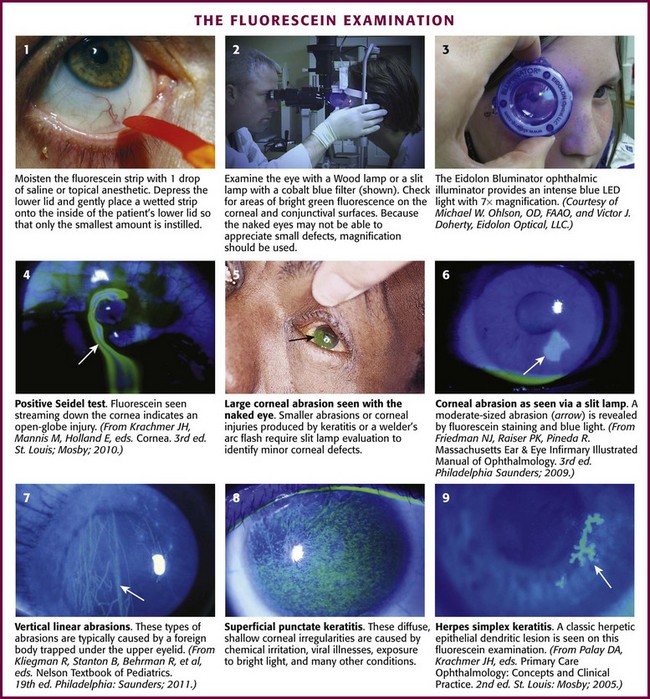
The Seidel test uses fluorescein to detect perforation of the eye.20 To perform this test, instill a large amount of fluorescein onto the eye by profusely wetting the strip. Examine the eye for a small stream of fluid leaking from the globe (see Fig. 62-7, plate 4). This stream will fluoresce blue or green, in contrast to the orange appearance of the rest of the globe flooded with fluorescein.12
Interpretation
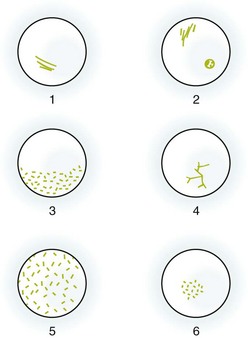
Corneal staining patterns are illustrated in Figures 62-7 and 62-8. Abrasions usually occur in the central part of the cornea because of the limited protection of closure of the patient’s eyelids. The margins of the abrasions are usually sharp and linear if seen in the first 24 hours (see Fig. 62-7, plate 6). Circular defects are seen about embedded FBs and may persist for up to 48 hours after removal of a superficial foreign object. Deeply embedded objects may be associated with defects persisting for longer than 48 hours. Objects under the upper lid (including some chalazia) often produce vertical linear lesions on the upper surface of the cornea (see Fig. 62-7, plate 7). When vertical lesions are noted, search diligently for a retained FB under the upper lid. Overuse of hard contact lenses diminishes the nutrient supply to the cornea. The central part of the cornea sustains the most injury and thus fluoresces brightly when stained. Excessive exposure to ultraviolet light as a result of sunlamp abuse, snow blindness, or welding flashes produces a superficial punctate keratitis, which in its mildest form may not be visible without a slit lamp (see Fig. 62-7, plate 8). The central part of the cornea is the least protected by the lids, and a central, horizontal band–like keratitis can result. Herpetic lesions may develop anywhere on the cornea. Classically, these lesions are dendritic, although ulcers may also be punctate or stellate (see Fig. 62-7, plate 9).21,22
Any area of corneal staining with an infiltrate or opacification beneath or around the lesion should alert the practitioner to the possibility of a viral,21,22 bacterial,23 or fungal24 keratitis. Obtain urgent ophthalmologic consultation so that cultures of the possible etiologic agents can be procured and appropriate treatment initiated.
Many Pseudomonas organisms fluoresce when exposed to ultraviolet light25; therefore, the presence of fluorescence before the instillation of fluorescein in a red eye should suggest the possibility of infection with this organism.
Eye Irrigation
The crucial first step in the treatment of chemical injuries to the eye is irrigation. Irrigate as clinically appropriate for the severity, length of exposure, and causative agent. Serious chemical injury to the eye requires irrigation at the site of the injury, even before the patient is brought to the ED.15 Corneal injury can occur within seconds of contact with an alkaline substance. Continue eye irrigation in the ED.
Equipment
The following equipment is necessary for eye irrigation:
Topical anesthetic, such as 0.5% proparacaine
Sterile irrigating solution (warmed intravenous saline or lactated Ringer’s [LR] solution in a bag with tubing)*
Gauze pads to help hold the patient’s lids open
Irrigating device (e.g., Morgan Therapeutic Lens, modified central venous catheter, or Eye Irrigator) for prolonged irrigation
Optimal: 10 mL of 1% lidocaine added to a liter of irrigating fluid
Procedure
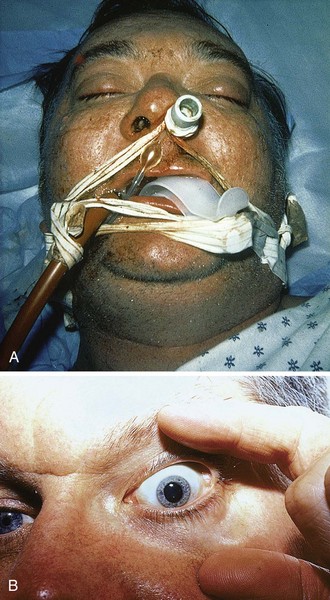
First, instill a topical anesthetic into the eye (Fig. 62-9, step 1). Evert the eyelid and sweep out any particulate matter in the conjunctival fornices with a moistened, cotton-tipped applicator15 (see “Ocular FB Removal,” later in this chapter, and Fig. 62-9, step 2). Hold the eyelids open during irrigation (see Fig. 62-9, step 3). The easiest method is to use gauze pads to grasp the wet, slippery lids and hold them open. If the patient has severe blepharospasm, consider using lid retractors (Desmarres or paper clip retractors; Fig. 62-10). When lid retractors are used, be certain that the eye is well anesthetized, that the retractors do not injure the globe or the lids, and that chemicals are not harbored under the retractors. Be aware that simple retractors fashioned from metal paper clips (especially those that are nickel plated and shiny) may have surface chipping, which can create an ocular FB.26 Exercise caution to avoid ocular injury when using such a makeshift retractor.


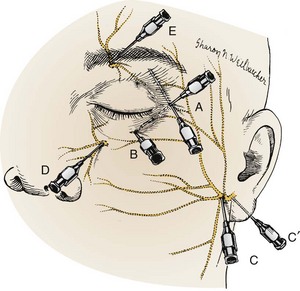
Deutsch and Feller15 recommended an ipsilateral facial nerve block for severe blepharospasm (Fig. 62-11). To avoid swelling of periorbital tissue, block the facial nerve just anterior to the condyloid process of the ipsilateral mandible. Place a subcutaneous line of anesthetic (2% lidocaine) to temporarily paralyze the orbicularis muscle.
Irrigate with normal saline or LR solution directed over the globe and into the upper and lower fornices (see Fig. 62-9, step 4). The choice of fluid initially is less important than initiating irrigation as rapidly as possible. If tap water is available at the scene of the injury, begin irrigation immediately with copious amounts of fluid before transporting the patient to the hospital. Teach out-of-hospital care providers to irrigate all acid injuries of the eye for at least 5 minutes at the scene and to irrigate all alkali injuries for at least 15 minutes.27,28 LR or normal saline solution is preferred over tap water or 5% dextrose in water for eye irrigation because these solutions are isotonic and do not contain dextrose. Dextrose can be quite sticky if spilled and might serve as a nutrient for an opportunistic bacterial infection. Although one clinical trial found a balanced salt solution less painful in patients with a chemical eye injury,29 another volunteer study on uninjured eyes found that LR solution is better tolerated than normal saline and balanced saline solution when used with a Morgan lens.30 Warmed fluids are also better tolerated than fluids at room temperature.31 Warmed LR solution should be considered when both it and normal saline are available for eye irrigation.
Be careful to direct the irrigating stream onto the conjunctiva and then across the cornea without letting the stream splash directly onto the cornea because striking the eye with the solution can in itself be harmful and cause mechanical injury (see Fig. 62-9, step 5). Direct irrigation of the cornea can result in the development of a superficial punctate epithelial keratopathy.
Duration of Irrigation
Although Deutsch and Feller15 recommended that a full liter of irrigating solution be used in every case of caustic injury, the duration of irrigation is best determined by the extent of the exposure and the causative agent. Acids are quickly neutralized by proteins in the surface tissues of the eye and, once irrigated out, cause no further damage. The only exceptions are hydrofluoric and heavy metal acids, which can penetrate through the cornea. Alkalis can penetrate rapidly and, if not removed, will continue to produce damage for days because of slow dissociation of the cation from combination with proteins.15 Therefore, prolonged irrigation is indicated and at least 2 L of solution should be used. Although rapid flushing with the first 500 mL is prudent, slow continuous irrigation, as discussed later, at a rate sufficient to generate a continuous trickle is often more effective and better tolerated than continued high-volume flushing. If the nature of the offending agent is unknown or in question, use prolonged irrigation.
Consult ophthalmology for all alkaline, hydrofluoric acid, and heavy metal acid injuries. Irrigation on an inpatient basis may be required for a period of 24 hours or longer, especially when the cornea is hazy or obviously thickened. Note that the magnesium contained in sparklers combines with water from tears to produce magnesium hydroxide.32 Treat such fireworks injuries as alkaline injuries rather than as thermal injuries. Treat eye damage from hair straighteners,33 phosphate-free detergents,34 and automobile air bags35 as alkaline injuries also.
Measure the pH of the conjunctival fornices with a pH paper strip to check the effectiveness of irrigation (see Fig. 62-9, step 6). In addition to litmus paper, the pH indicator on urine multi-indicator sticks can be used. The pH indicator on urine dipsticks is conveniently closest to the handle; all the distal indicator squares can be cut off with scissors. Normal tear film pH is 7.4. Use the noninjured eye as a control if the results are equivocal. If the pH measured in the conjunctival fornices is still abnormal after the initial irrigation, continue to irrigate. If the pH is normal after irrigation, wait 20 minutes and check it again to make sure that it remains normal, especially if alkaline contamination has occurred. Delayed changes in pH are usually the result of incomplete irrigation and inadequate swabbing of the fornices. In anticipation of this deficiency, measure the pH deep in the fornices. Consider double-lid eversion with a lid elevator to expose the upper fornix for swabbing, irrigation, and pH testing.
Prolonged Irrigation
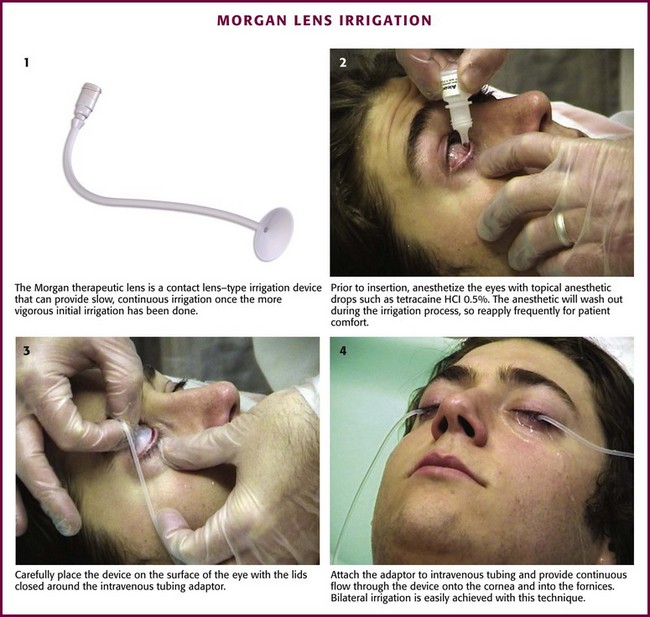
Alkaline burns may require prolonged irrigation, and it is essential to consult ophthalmology in such cases. The Morgan Therapeutic Lens is a contact lens–type irrigation device that can provide slow, continuous irrigation once the more vigorous initial irrigation has been completed (Fig. 62-12). First, anesthetize the eye with topical anesthetic drops. Then place the device carefully on the surface of the eye with the lids closed around the intravenous tubing adaptor. Attach the intravenous tubing to the adaptor and provide continuous flow through the device onto the cornea and into the fornices. As the local anesthetic agents wash out during the irrigation process, the device can become uncomfortable, so reapply the anesthetic drops frequently during irrigation for patient comfort. Such short-term use of local anesthetics will not inhibit healing of the cornea.
Complications
The only significant complication from irrigation is abrasion of the cornea or the conjunctiva. This can be a mechanical injury from trying to keep the lids open in an uncooperative patient, a small corneal epithelial defect from a Morgan irrigating lens, or fine punctate keratitis from the irrigation itself.36 For this reason, do not direct the stream directly onto the cornea. If a superficial corneal defect occurs, treat it in the usual manner. Deep or penetrating corneal injuries are likely to be a result of the caustic chemical and require emergency ophthalmologic consultation. Continue to provide slow continuous irrigation pending arrival of the ophthalmologist. Some experimental evidence suggests that massive parenteral or oral ascorbic acid supplementation may prevent the development of deep corneal injury,37 but such treatment has not gained universal acceptance.
Ocular FB Removal
Indications and Contraindications
Extraocular FBs must always be removed. The timing of removal and the technique required vary according to the patient’s clinical status and the type of injury. For the most part the emergency clinician can proceed directly to removal of the object via the techniques described in this section. When the patient is extremely uncooperative (e.g., an intoxicated patient, a mentally deficient patient, or a young child) or when the injury is complicated (e.g., deeply embedded object, multiple foreign objects from a blast injury, or possible globe penetration), consult ophthalmology immediately. A patient with a suspected FB or abrasion after exposure to a projectile (e.g., grinding wheel, hammering, metal objects colliding) should be rigorously evaluated for the presence of a deep intraocular FB. See further discussion later in this chapter. A penetrating injury of the cornea is of particular concern because the iris tissue may prolapse and have an appearance similar to a corneal FB (Fig. 62-13). Hence, in addition to the history of projectile exposure, an irregular pupil, especially a pear-shaped pupil, should alert the clinician that a penetrating injury might have occurred.

Globe Protection
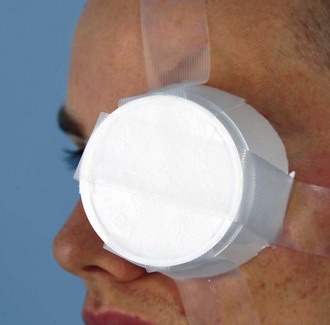
In the evaluation of a patient in whom a penetrating injury to the globe is suspected, perform a careful expeditious examination of the eye, preferably with a slit lamp. Avoid any pressure on the eye or rapid eye movements. If perforation is obvious (e.g., teardrop pupil, flaccid globe, flat anterior chamber, prolapsed iris) or confirmed by slit lamp (positive Seidel test; see Fig. 62-7, plate 4), do not perform any procedures (except perhaps irrigation) and consult ophthalmology early for definitive diagnosis and care. Until the ophthalmologist arrives, protect the eye from further harm by keeping the patient quiet, elevating the head of the bed, and placing a protective shield over the eye. Commercial shields are available for this purpose. When a metal shield is not available, construct a makeshift protective shield with the material available (e.g., paper, plastic, or Styrofoam cups; Fig. 62-14). The protective shield helps avoid pressure on the globe and overlying tissue and assists in preventing extrusion of vitreous and other ocular contents. Extend the edges of the shield up to or beyond the bony orbital rim for this purpose. Apply adhesive tape over the shield from the forehead to the cheek to secure the shield in position.
Equipment
The following equipment is necessary for removal of an extraocular FB:
Topical anesthetic, such as 0.5% proparacaine
Sterile cotton-tipped applicators
Magnification: loupes plus a Wood lamp, Eidolon Bluminator ophthalmic illuminator, or slit lamp
Eye spud or 25-gauge needle attached to a 1- or 3-mL syringe or to the tip of a cotton-tipped applicator
Consideration of an Intraocular FB
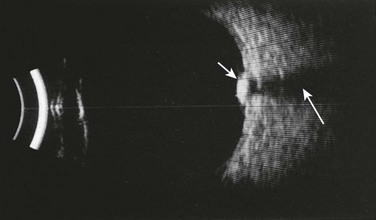
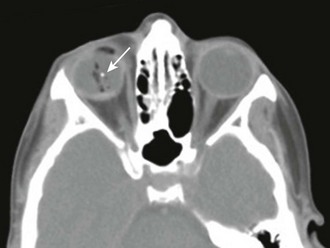
When examining a patient with an ocular “FB” sensation, always remain cognizant of the potential for an intraorbital or intraocular FB. Penetrating injuries represent a greater threat to visual loss than an extraocular FB does and can be disastrous if overlooked. Note that an intraocular FB can be deceptively subtle on initial evaluation. Bedside ED ultrasound is a useful adjunct for identification of intraocular FBs (Fig. 62-15).
An intraocular FB is often not visible on direct ophthalmoscopy. Although orbital radiography for radiopaque objects and ultrasonography of the globe have been used for indirect FB localization,15,38 computed tomography of the orbit is now considered the most useful technique (Fig. 62-16).39,40 When plain orbital radiography is performed to look for an intraocular FB, be aware that an eyelid FB may mimic an intraocular FB.41 Patients with a suspected metallic FB should not undergo magnetic resonance imaging if the FB may be intraocular. Therapy for intraocular and intraorbital FBs must be individualized. Frequently, an ophthalmologist can localize an intraocular FB (if the vitreous is clear) with indirect ophthalmoscopy. The role of the emergency clinician is to suspect the diagnosis, protect the eye from further harm, and obtain ophthalmologic consultation. The remainder of this section addresses the problem of extraocular FBs.
Procedure
The first step is to locate the FB. Apply a drop of topical anesthetic to the inside of the lower lid (see Fig. 62-6A). The presence of vertical corneal abrasions from FBs under the lids is helpful in localizing these hidden foreign objects (see Fig. 62-7, plate 7). Use a penlight and loupes or a slit lamp to examine the bulbar conjunctiva by having the patient look in all directions. Examine the inside of the lower lid by pulling it down with the thumb while asking the patient to look up. Evert the upper lid by asking the patient to look down as the end of an applicator stick is pressed against the superior edge of the tarsal plate of the upper lid. Meanwhile, grasp the lashes and pull down, out, and then up to flip the eyelid over (Fig. 62-17).
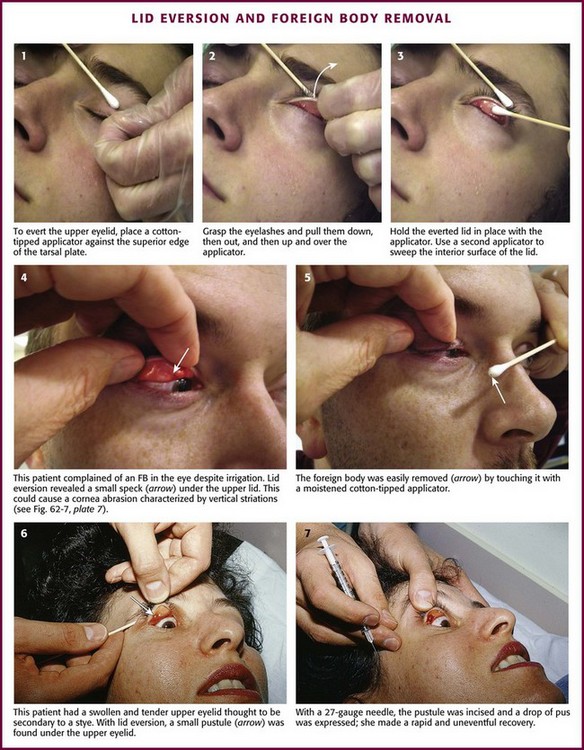
Figure 62-17 Lid eversion and foreign body (FB) removal.
Reexamine the cornea. Most corneal FBs have an area of fluorescein staining around them. Use a slit lamp or other magnification device such as the Bluminator to make the examination easier. If the clinician is limited to loupes and a penlight, shine the light diagonally on the cornea to locate the FB. With a history of a high-speed projectile hitting the eye, rule out an intraocular FB. In the case of a blast injury, multiple FBs may penetrate the eye. If an FB cannot be found on the surface despite a suggestive history, examine the eye for physical evidence of penetration, as discussed earlier. Dilate the pupil and examine the fundus. Though not foolproof, bedside ultrasonography may identify the presence of a metallic FB (sensitivity of 87.5%, specificity of 95.8%, and positive and negative predictive values of 96.5% and 85.2%, respectively).42 If in doubt regarding an intraocular FB, consider computed tomography and ophthalmologic consultation.
FB Removal
To remove embedded corneal FBs (Fig. 62-18), use a commercial spud device, a bur drill, a short 25- or 27-gauge needle on a small-diameter syringe (e.g., insulin or tuberculin syringe), or a cotton-tipped applicator. Use the applicator or syringe as a handle for the attached needle. Contrary to what one might expect, it is difficult to penetrate the sclera or the cornea with a needle, especially when it is applied tangentially to the cornea.31 As with removal of conjunctival FBs, anesthetize the eye. Position the patient so that the head is well secured (preferably in a slit lamp frame). At this point, provide a simple explanation of the procedure, which usually ensures excellent compliance on the part of the patient. Rest your hand on the patient’s cheek so that unexpected movements by the patient will not result in large movements of the removal device. Instruct the patient to gaze at an object in the distance (e.g., the practitioner’s ear when a slit lamp is used) to further stabilize the eye. Bring the removal device close to the eye under direct vision; then while it is in focus, manipulate it under the magnification device (e.g., Wood’s lamp, Eidolon Bluminator ophthalmic illuminator [see Fig. 62-7], or slit lamp) to remove the FB. Hold the device tangential to the globe, and pick up or scoop out the foreign object. If a bur drill is used, press the side of the drill against the FB until removal is accomplished.
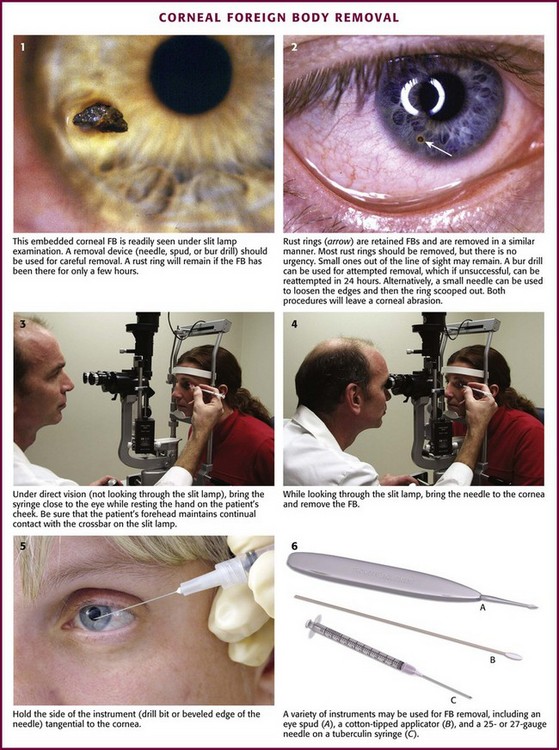
Figure 62-18 Corneal foreign body (FB) removal.
Rust Rings
A common problem with metallic FBs is that rust rings can develop (see Fig. 62-18, plate 2). They can develop within hours because of oxidation of the iron in the FB. There are two preferred techniques for removal of a rust ring. The most direct technique is to remove the ring at the same time as the FB, either with repeated picking away with a spud device or with a rotating bur. The second approach is to let the iron of the rust ring oxidize and kill the surrounding epithelial cells during a 24- to 48-hour period. After that, the rust ring will be soft and often comes out in one solid plug.43 Generally, a small rust ring produces little visual difficulty unless it is directly in the line of sight. If large, a rust ring may delay corneal healing. Close follow-up is important to ensure healing of the cornea and total removal of the rust ring and FB.
Aftercare
After removing the FB, an antibiotic ointment is frequently instilled. Though commonly used, the value of the ointment for superficial corneal defects after removal of an FB is unproved, and no specific standard of care is supported by scientific evidence. Conjunctival and corneal abrasions do not need patching. Data suggest that eye patching offers no benefit in healing corneal abrasions secondary to FBs.44 If a superficial injury is sustained from the FB, instruct the patient to return only if the eye does not feel completely normal or if there is any blurred vision. The majority of superficial injuries heal without difficulty. The patient should be warned that the FB sensation might return temporarily when the anesthetic agent wears off. One animal study involving direct ocular exposure to Clostridium tetani organisms suggested that nonpenetrating ocular injuries are unlikely to lead to tetanus.45 Tetanus prophylaxis after corneal FB removal is not standard, but it should be considered. However, tetanus prophylaxis appears to be essential for injuries that penetrate through the cornea or sclera.
Use of Ophthalmic Anesthetic Agents
Application of topical anesthetic agents can be both diagnostic and therapeutic. Relief of discomfort with a topical anesthetic often suggests, but does not ensure a conjunctival or corneal injury. An ocular irritant may also be masked by the use of these agents. Classic teaching is that patients should not self-administer anesthetic preparations. It is thought that they delay wound healing by disrupting surface microvilli and causing a decrease in the tear film layer and tear break-up time.46 Although self-administered topical anesthetic agents are now routinely used after photorefractive keratectomy for the first 3 or 4 postoperative days, this has not become a part of ED practice.47 The absence of protective reflexes while the patient is under the effect of the medication may encourage use of the eye and result in further corneal injury from the FB or corneal infection. Though not advised for outpatient use, topical anesthetic drops can be used safely for a few days without documented adverse effects.
Bartfield and coworkers48 found that pain with the instillation of 0.5% proparacaine was significantly less than that with 0.5% tetracaine. As evident from Table 62-2, the anesthetic solutions commonly used have a duration of action of less than 20 minutes. Patients with a large corneal lesion may need a more extended period of pain relief. The discomfort associated with a large healing corneal lesion is usually made tolerable by bed rest, opioid analgesics, and appropriate sedatives. Even in the absence of infection or a retained FB, long-term repeated use of ophthalmic anesthetic ointments might be detrimental to corneal healing.49

Use of Ophthalmic NSAIDs
Ophthalmic nonsteroidal antiinflammatory drugs (NSAIDs) have been evaluated for their effectiveness in the treatment of traumatic corneal abrasions. Examples include ketorolac tromethamine, diclofenac, and flurbiprofen. These agents are safe to use and effective for the relief of pain associated with corneal abrasions.50–53 Topical ophthalmic NSAIDs have also been shown to be safe and effective when used for the treatment of corneal abrasions in conjunction with bandage contact lenses.54
Eye Patching
Patching the lids shut has traditionally been the last step in the treatment of a number of common eye emergencies; however, multiple studies have shown that eye patching offers no benefit in pain relief or healing rates in patients with conjunctival or corneal abrasions.44,55–57 A metaanalysis of studies on eye patching and corneal abrasions or ulcers showed that patching might actually slow healing rates and patients might actually have worsening of their pain. This was found to be true in children as well.58–60 Patching is also contraindicated in contact lens wearers and in situations in which the abrasion or ulcer may be infected.56 In summary, eye patching is no longer indicated and might actually worsen the ophthalmologic process that it once was thought to help. Application of a therapeutic bandage contact lens directly to the cornea has been recommended as a possible treatment of corneal epithelial defects. Evidence from several small studies suggests that a bandage contact lens is safe, effective, and well tolerated and allows a significant number of patients to immediately resume their regular activities while maintaining baseline visual acuity. Further study on the application of this modality in the ED setting is needed.54,61–63
Contact Lens Procedures
An estimated 24 million Americans wear a form of contact lenses.64 Removal of these lenses in the ED may be required to permit further evaluation of the eye or to prevent injury from prolonged wear. Emergency clinicians also evaluate patients for “lost” contact lenses, which may be trapped under the upper lid. At times patients may request that the clinician remove a lens that they have failed to extract from the cornea. Corneal ulcers can occur in patients who wear contact lenses and may require prompt treatment. This section on contact lens procedures addresses these concerns and discusses injuries associated with attempts at removal, the mechanism of injury from prolonged wear, and instructions to be given to patients at discharge. Furthermore, this section introduces the use of bandage contact lenses for the treatment of acute corneal abrasions.
The first contact lenses were scleral lenses made of glass. These lenses, which covered the cornea as well as much of the surrounding sclera, are reported to have been in use from 1888 to 1948.65 Glass corneal lenses (sitting entirely on the cornea) made by the Carl Zeiss Optical Works of Jena were first described in 1912. A practical synthetic scleral lens using methylmethacrylate rather than glass was discussed by Obrig and Mullen in 1938.66,67 In 1947, Tuohy redeveloped the corneal lens with methylmethacrylate.68 This was the forerunner of the current hard contact lens.68 The development of lenses made of soft gas-permeable polymers was reported in Czechoslovakia in 1960.69 These hydrogel (hydrophilic gelatinous–like) lenses have evolved into today’s soft contact lenses. Soft contact lenses now come in a variety of types, including extended and daily wear. The majority of soft contact lenses in use are now disposable. Soft contact lenses have been used therapeutically by ophthalmologists for decades.70
Mechanism of Corneal Injury from Contact Lens Wear
Oxygenation of the cornea is dependent on the movement of oxygen-rich tears under hard contact lenses during blinking. During the “adaptation” phase of early wear, a wearer of hard contact lenses produces hypotonic tears as a result of mechanical irritation from the lens.66 This results in corneal edema, which reduces subsequent tear flow under the lens during blinking. Overwearing a lens at this time leads to corneal ischemia, with superficial epithelial defects found predominantly in the central corneal area (see Fig. 62-8), where the least tear flow occurs. With adaptation, the tears become isotonic and the blinking rate normalizes, thus permitting increased wearing time. During early adaptation, blinking is more rapid than normal and then slows to a subnormal rate during late adaptation. Mucus delivery to the cornea in the tear film may also play an important role in maintaining corneal lubrication. Tight-fitting contact lenses may never permit good tear flow despite an adaptation phase; individuals with tightly fitted lenses may never be able to wear their original contact lenses for longer than 6 to 8 hours. Lenses that are excessively loose can also cause irritation by moving during blinking. Rough or cracked edges can cause corneal abrasions.
A patient with overwear syndrome usually awakens a few hours after removing the lenses. The patient experiences intense pain and tearing similar to that caused by an FB. The delay in onset of the symptoms until after removal of the lenses is caused by a temporary corneal anesthesia produced by the anoxic metabolic by-products that build up during extended lens wear.71 A second factor is the slow passage of microcysts of edema, which are pushed up to the corneal surface by mitosis of the underlying cells. When the cysts break open on the surface, the corneal nerve endings are exposed.72
Soft Contact Lenses
Although the cornea is also oxygenated by way of the tear film with soft contact lenses, only approximately one tenth of the flow behind the lens that occurs with a hard lens is present during soft contact wear.65 The high degree of lens gas permeability permits the majority of oxygenation to occur directly through the lens. A hydrogel lens is more comfortable than a hard contact lens because lid motion over the lens is smooth. The minimization of lid and corneal irritation allows a more rapid adaptation phase because the initial reflex-induced changes in tearing and blinking are reduced. Nonetheless, the lenses may still lead to corneal edema and secondary hypoxic epithelial changes if worn for an excessive period when blinking is inhibited. Some individuals can tolerate the lenses for extended periods and may on occasion sleep with the contact lenses in place, although this practice is not encouraged. Newer extended-wear hydrogel lenses permit wear for up to 1 week without injury. These lenses are not discernible from standard soft lenses on examination.
1. Corneal neovascularization (Fig. 62-19A). Frequently, the patient is asymptomatic, but on slit lamp examination, fine vessels are seen invading the periphery of the cornea. Refer the patient to an ophthalmologist for refitting with looser or thinner lenses or with contact lenses that are more gas permeable.
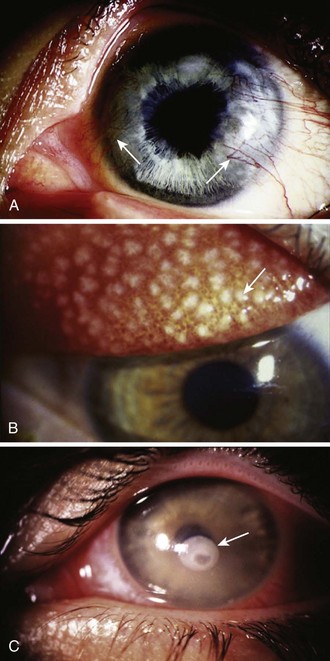
2. Giant papillary conjunctivitis (see Fig. 62-19B).73 The patient notes decreased lens tolerance and increased mucus production. On examination of the tarsal conjunctiva (best seen with eversion of the upper lid), large papillae are seen. These papillae appear grossly as a cobblestoned surface. Instruct the patient to discontinue wearing the lenses until the process reverses and to see an ophthalmologist to have the lenses refitted.
3. Sensitivity reaction to contact lens solutions (usually thimerosal or chlorhexidine).74,75 Diffuse conjunctival injection and sometimes superficial keratitis develop. Advise the patient to switch to preservative-free saline with the use of heat sterilization. Frequently, the contact lenses will need to be replaced before lens wear can be resumed.
All these problems with soft lenses have a bilateral, subacute onset and do not require emergency treatment. The only form of ocular damage associated with soft contact lenses that is a true emergency is a bacterial or fungal corneal ulcer (often Pseudomonas or Acanthamoeba with soft contact lenses) (see Fig. 62-19C).76–78 Because the nature of soft contact lenses is to absorb water, they can also absorb pathogens, which then can invade the cornea, especially if the soft lens is worn continuously for extended periods. The patient has a painful, red eye with associated discharge and a white infiltrate on the cornea. Immediately consult an ophthalmologist for appropriate culturing and antimicrobial treatment. These infections can permanently affect the patient’s visual acuity.
Indications for Removal
Remove a contact lens in the following situations:
1. Contact lens wearer with an altered state of consciousness. The emergency clinician should always be aware that a patient with a depressed or acutely agitated sensorium might be unable to express the need to have the contact lenses removed. Furthermore, it is likely that patients with a depressed sensorium will have decreased lid motion. During the secondary survey of these patients, identify the presence of the lenses and arrange for their removal and storage to prevent harm from excessive wear or possible accidental dislodgment at a later time. Without magnification, soft contact lenses may be difficult to see. Examine the eye with an obliquely directed penlight to reveal the edge of the soft lens 1 to 2 mm from the limbus on the bulbar conjunctiva.
2. Eye trauma with lenses in place. After measurement of visual acuity with the patient’s lenses in place, remove them and perform a more detailed examination of the cornea. Fluorescein may discolor hydrogel lenses; when possible, remove extended-wear lenses before using this chemical. After the dye is instilled, flush the eyes with normal saline. Advise the patient to wait at least 1 hour before reinserting the lenses.54 The availability of single-use droppers of 0.35% fluorexon (Fluoresoft) has permitted safe staining of eyes when soft lenses are to be worn immediately after the examination. Limited eye irrigation after the use of fluorexon drops is still recommended before the reinsertion of soft contact lenses.
3. Inability of the patient to remove the contact lens. A patient may have a hard contact lens that cannot be removed because of corneal edema from prolonged wear. Alternatively, the patient may have a “lost” contact lens believed to be located behind the upper lid. Because there is no urgency for removal of the contact lens in the out-of-hospital setting, it can wait until the patient has been evaluated by a clinician.
Procedure
In a unresponsive patient in the supine position, modify the technique. Take a more active role in lid movement by using the following procedure (Fig 62-20A). Place one thumb on the upper eyelid and the other on the lower eyelid near the margin of each lid. With the lens centered over the cornea, open the eyelids until the margins of the lid are beyond the edges of the lens. Then press both eyelids gently but firmly on the globe of the eye and move the lids so that they are barely touching the edges of the lens. Press slightly harder on the lower lid to move it under the bottom edge of the lens. As the lower edge of the lens begins to tip away from the eye, move the lids together, which allows the lens to slide out sufficiently so that it can be grasped. Remember to use clean hands (and preferably wear examination gloves that have been rinsed in tap water or saline) when removing the lens.
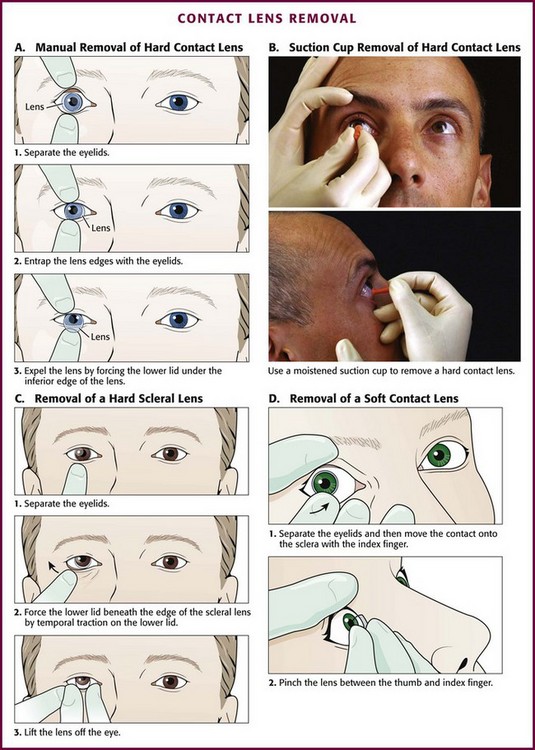
Alternatively, move the lens gently off the cornea with a cotton-tipped applicator to guide the lens onto the sclera. Force the tip of the applicator under an edge of the lens and flip the contact loose. Apply topical anesthetic when using an applicator if the patient is awake. Take care with this technique to avoid contact of the applicator with the cornea when the lens is moved off the eye. Perhaps the easiest technique is to use a moistened suction-tipped device and simply lift the lens off the cornea (Fig. 62-20B).
Scleral lenses (hard contact lenses that cover both the cornea and an amount of the sclera) can be removed by an exaggeration of the manual technique described earlier (Fig. 62-20C). Elevation of the lens with a cotton-tipped applicator or a suction-tipped device is also an effective technique. Soft contact lenses should not be removed with a suction-tipped device because tearing or splitting of the lens might occur.
Soft Contact Lens Removal
With clean hands (preferably using gloves rinsed in saline or tap water), pull down the lower eyelid with the middle finger. Place the tip of the index finger on the lower edge of the lens. Slide the lens down onto the sclera and compress it slightly between the thumb and index finger. This pinching motion folds the lens so it can be removed from the eye (Fig. 62-20D). Alternatively, use a cotton-tipped applicator (e.g., Q-Tip) instead of a gloved hand. Occasionally, a tight-fitting lens will be difficult to remove. One potential method is the use of topical anesthetic drops, lubricating eyedrops (e.g., Refresh Celluvisc lubricant eye drops), and a cotton-tipped applicator to lift the edge of the lens from the limbus. This breaks the seal of the lens on the cornea and allows removal.
Evaluation of a “Lost” Contact Lens
If the contact lens is not evident on initial inspection, evert the lids as discussed in the section “Ocular FB Removal” (double eversion of the upper lid). If the lens is still not visible, place a drop of topical anesthetic in the eye. Gently sweep the upper fornix with a moistened cotton-tipped applicator while the patient looks toward the chin. If the lens is still not evident even though the patient remains insistent that it is in the eye, perform a fluorescein examination after explaining that the dye will color the lens (permanently). Evert the upper lid again and examine with an ultraviolet light source.
Bandage Contect Lenses for Treatment of Corneal Abrasions
Acute corneal abrasions can cause significant pain, limit function, and result in lost days of work. Several studies have shown that bandage contact lenses are very effective in reducing pain without a requirement for narcotic analgesia, in decreasing time away from work, and in returning to baseline functioning when used for uncomplicated acute corneal abrasions.79–81 Yet bandage contact lenses are seldom used in the ED. An immediate benefit is gained when the emergency practitioner selectively uses this treatment modality.
Indications and Contraindications
Bandage contact lenses are contraindicated when the cause of the corneal epithelial defect is suspected to be due to infection. Ensure that a corneal ulcer is not present. The hallmark fluorescein stain pattern consistent with a corneal ulcer is a round stain with blurred margins, commonly in the central visual axis (midpupil region) (see Fig. 62-19C). Pain is disproportionate to the findings. An intense ciliary flush and anterior chamber reaction (cells and flare) may also be present. Avoid the use of bandage contact lenses in patients with a history of soft contact lens use and a nontraumatic abrasion in the central part of the cornea. Follow-up for removal of the bandage contact lenses and reevaluation of the eye are required to confirm improvement and identify complications. Unreliable patients who are not likely to be compliant with follow-up are at increased risk for infection and thus not good candidates for this modality.
Infectious Keratitis
Patients with herpes simplex keratitis often give a history of previous episodes of the disease. Patients who undergo almost any form of corneal stress may sustain an activation of preexisting corneal disease. Herpes simplex keratitis is classically recognized by its dendritic pattern on fluorescein staining (see Fig. 62-7, plate 9).
Bacterial keratitis occurs in a variety of settings. Organisms range from the relatively common Staphylococcus (including methicillin-resistant Staphylococcus aureus) or Streptococcus to Mycobacterium, which can be difficult to identify. A variety of antibiotics are used against bacterial agents. Ciprofloxacin is a quinolone that has demonstrated efficacy against most of the common causative agents. Bacterial organisms in the cornea can develop resistance to any antibiotic, and resistance to fluoroquinolones has also been observed.82 Ideally, treatment follows acquisition of material from the ulcer for culture.
Tonometry
Ophthalmologists depended on tactile estimation of eye pressure until the 1860s, when von Graefe developed the first mechanical tonometer.3,13 Applanation tonometry was introduced in 1885 by Maklakoff83 but was not popularized until Goldmann84 improved the instrument. Schiøtz85 developed an impression tonometer in 1905 and modified it in the 1920s; this form is still in use today. Aside from modifications in configuration, current tonometers closely resemble the devices popularized by Schiøtz85 and Goldmann.84 The most dramatic variations are the Mackay-Marg tonometer,86 which permits a continuous tonographic recording, and the noncontact tonometer, a pneumatic applanation tonometer.87 Pocket-sized tonometers using the principle of the MacKay-Marg tonometer are available. One such device is the Tono-Pen XL (Reichert, Inc, Depew, NY).88 These devices are portable, lightweight, and relatively accurate, with built-in provisions for calibration. They have the advantage of a one-time-use replaceable cover that eliminates concern about the possible transmission of an infectious agent. Although numerous devices are available, the Schiøtz and Tono-Pen XL tonometers are the standard devices for measuring IOP in the ED.
Tonometric Techniques
Three tonometric techniques are reliable and clinically useful for estimating IOP:
1. The impression method uses a plunger (3 mm in diameter) to deform the cornea, and the “indentation” is then measured. This technique was popularized by Schiøtz85 and commonly bears his name.
2. The MacKay-Marg method86 is a refined version of the impression technique in which smaller amounts of cornea are indented.
3. In the applanation method, a planar surface is pressed against the cornea.
The Schiøtz tonometer actually measures total IOP (initial pressure plus the pressure added by the weight of the tonometer and the plunger). Friedenwald89 empirically found that a “rigidity coefficient” could be introduced to allow an estimation of the true IOP. One must be aware, however, that calculated conversion tables for Schiøtz tonometers use an average estimate of the rigidity coefficient and hence are not accurate when eye rigidity is altered (e.g., after scleral buckle procedures for retinal detachment or with extreme myopia).
l. Confirmation of a clinical diagnosis of acute angle-closure glaucoma. A middle-aged or elderly patient with acute aching pain in one eye, blurred vision (including “halos” around lights), and a red eye with a smoky cornea and a fixed midposition pupil obviously needs a pressure reading (Fig. 62-21A). Sometimes the findings are less dramatic, and sometimes the patient complains mostly of nausea and vomiting, which suggests “flu” rather than an eye disorder.
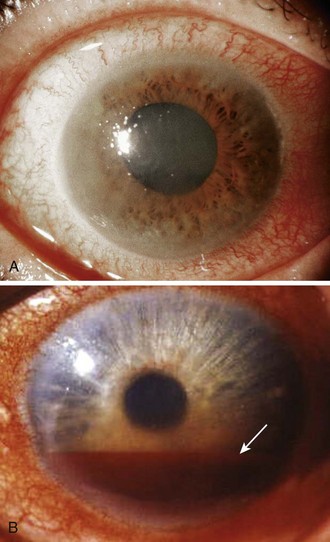
l. Determination of a baseline ocular pressure after blunt ocular injury. Patients with hyphema often have acute rises in IOP because of blood obstructing the trabecular meshwork (see Fig. 62-21B).90 Later, angle recession can cause a permanent form of open-angle glaucoma. Arts and colleagues91 suggested that an IOP greater than 22 mm Hg or a difference of 3 mm Hg or greater between the eyes is a good marker of “ocular injury” in the setting of an orbital fracture.
Tonometry may also be considered in the following scenarios:
l. Determination of a baseline ocular pressure in a patient with iritis. Both open- and closed-angle glaucoma, as well as corticosteroid-induced glaucoma, can develop in patients with iritis. Because most cases of iritis are referred, tonometry may also be deferred unless signs of increased IOP are present.
• Documentation of ocular pressure in a patient at risk for open-angle glaucoma. All patients older than 40 years with a family history of open-angle glaucoma, optic disc changes, visual field defects, and pressure of 21 mm Hg or higher should be referred to an ophthalmologist for further workup. Referral should also be made for patients with suspiciously cupped discs who have normal pressure; some of these patients may have “low-pressure” glaucoma associated with visual field defects. This is usually part of an ophthalmologist’s examination.
Contraindications to Tonometry
Tonometry is relatively contraindicated in eyes that are infected unless one is using a device such as the Tono-Pen XL, which uses a sterilized cover.2 Sterilize a tonometer before and after applying it to a potentially infected eye. Measure infected eyes with either a noncontact tonometer or a device with a covered tip (e.g., Tono-Pen). Swab the contact portions of any device with alcohol and allow it to dry before use on another eye. Not all viruses are destroyed by cleansing with alcohol. Hydrogen peroxide is effective in deactivating the human immunodeficiency virus responsible for acquired immunodeficiency syndrome (AIDS). Ultraviolet sterilization, cold sterilizer bathing of the footplate and plunger, and ethylene oxide sterilization have all been advocated as alternatives to sterilizing the tip of the Schiøtz tonometer. The Schiøtz tonometer may also be used with sterile disposable coverings (marketed as Tonofilm). Nonetheless, defer measurement of IOP in an obviously infected eye until a subsequent visit to the ED or private clinician unless the red eye demands an immediate determination of IOP.
The presence of corneal defects also represents a relative contraindication to tonometry.3,13 Use of a tonometer on an abraded cornea may lead to further injury and is commonly deferred until a subsequent visit. Patients who cannot maintain a relaxed position (e.g., because of significant apprehension, blepharospasm, uncontrolled coughing, nystagmus, or uncontrolled hiccups) are unlikely to permit an adequate examination and can sustain a corneal injury when sudden movements occur during an examination. Furthermore, tonometric examination, with the exception of the palpation technique (through the lids) and the noncontact method, should not be performed on a cornea without complete anesthesia.
Tonometry should not be performed on a patient with a suspected penetrating ocular injury.2 Globe perforation may be exacerbated by pressure on the globe with resultant extrusion of intraocular contents. Slit lamp examination can be used for detection of a possible perforation.
Procedure
All forms of tonometry are essentially ways of determining the ease of deforming the eye; an eye that is easily deformed has low pressure. The most direct way to do this is simply to press on the sclera through the lids and grossly compare one eye with the other. One can easily distinguish the rock-hard eye of acute glaucoma from the normal opposite eye by this method. Direct the patient to look down without closing the lids. Rest both hands on the patient’s forehead and apply just enough digital pressure on the involved eye to indent it slightly with one index finger. With the other index finger, alternately feel and compare the compliance of the other eye (Fig. 62-22, plate 1). An experienced examiner is able to estimate IOP within 3 to 5 mm Hg of the actual IOP with the palpation technique, but most emergency clinicians do not have enough experience to trust this method.31
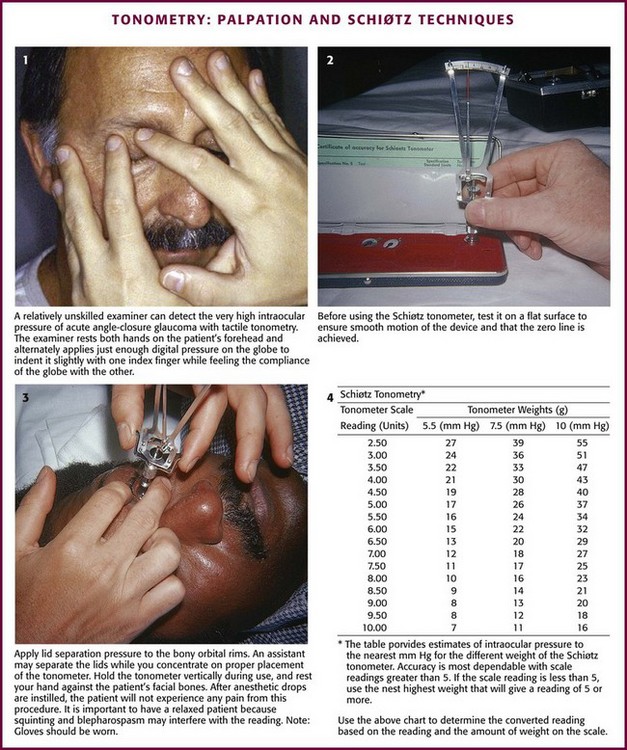
Figure 62-22 Tonometry: palpation and Schiøtz techniques.
Impression (Schiøtz) Technique
Ask the patient to keep both eyes wide open and fixed on an object. Separate the eyelids on the side that you are standing. Test the tonometer on a flat surface to confirm smooth movement of the device (see Fig. 62-22, plate 2). Take care to direct pressure onto the orbital rims rather than the orbit because pressure directed into the orbit falsely raises the reading. Hold the tonometer momentarily over the open eye, and inform the patient that the instrument will block vision in the one eye. Instruct the patient to continue to gaze at the fixation point as though the instrument were not there. After the patient relaxes the involuntary muscle contraction that occurs when the instrument is first placed in the line of sight, gently lower the instrument onto the middle portion of the cornea (see Fig. 62-22, plate 3). This is a painless experience for patients with an anesthetized cornea. Vertically align the instrument with the footplate resting on the cornea; the reading should be in midscale. Should the reading be on the low end of the scale (<5 units), place additional weight on the plunger after the instrument has been removed. Repeat the process as before with the additional weight.
Measure the opposite eye in the same fashion. Use the chart provided to determine the converted reading based on the reading and amount of weight on the scale. Refer to ophthalmology if the converted scale reading is higher than 21 mm Hg (see Fig. 62-22, plate 4). Patients with elevations in IOP of 30 mm Hg or greater require more urgent consultation and initiation of therapy. Associated symptoms or signs of angle-closure glaucoma (primary or secondary) represent an ophthalmologic emergency.92
Errors with Impression Tonometry: Inaccurate readings can occur with the Schiøtz tonometer for a variety of reasons. Falsely low readings may occur if the plunger is sticky. Check plunger motion and the zero point of the tonometer on a firm test button before use. If the plunger is sticky, clean it with isopropyl alcohol and dry it with a tissue. Inadvertently directing pressure onto the orbit when the lids are held open may elevate IOP and provide a falsely elevated reading. The following eye movements have been found to elevate IOP: closing the lids (increases by 5 mm Hg), blinking (increases by 5 to 10 mm Hg), accommodation (increases by 2 mm Hg), and looking toward the nose (increases by 5 to 10 mm Hg).93 Repeated or prolonged measurements have been found to lower IOP approximately 2 mm Hg and may also lower pressure in the opposite eye.94 As mentioned in the introduction to this section, calibration of the Schiøtz tonometer is based on a mean rigidity coefficient. Factors that produce a reduction in ocular rigidity falsely lower the measured pressure. Such factors include high myopia, anticholinesterase drugs, overhydration (e.g., four large cups of coffee or six cans of beer), and scleral buckle operations.95,96
Ocular pressure measurements can vary with ocular perfusion. When measured after a premature ventricular contraction, IOP may be reduced as much as 8 mm Hg.93 Similarly, decreased venous return as produced by breath holding, the Valsalva maneuver, or a tight collar can increase IOP.93
Impression (Tono-Pen XL) Technique (Fig. 62-23)
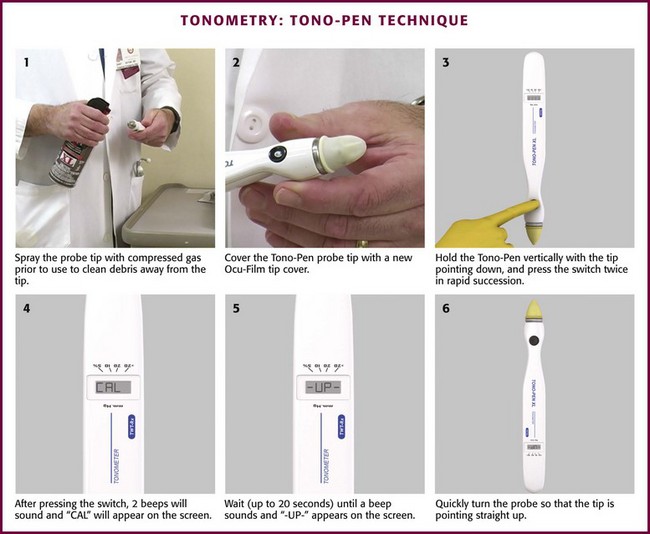
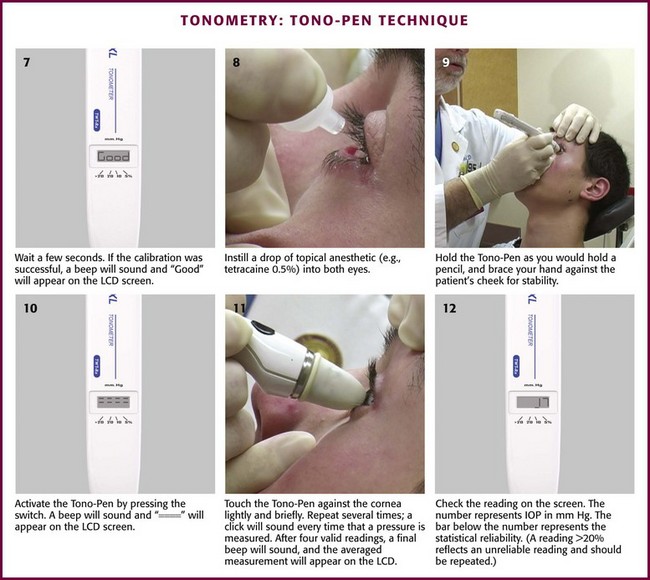
Ideally, the complete instructions provided with the device should be consulted before each use; however, the following synopsis is provided to help in circumstances in which instructions are unavailable (Box 62-2).
Perform calibration before use at least once each day (see Box 62-2). Depress and release the activation switch momentarily. The liquid crystal display (LCD) should show “—.” If the device beeps and “= = = =” appears on the LCD, push the activation switch again so that “—” reappears. If the previous calibration shows “bAd” on the LCD, a long beep sounds, followed by “CAL” on the LCD. A short beep follows and then the desired “—” is displayed. Once “—” is displayed, hold the probe vertically with the tip pointing straight down. Press and release the activation switch twice in rapid succession. Two beeps will then sound and “CAL” will appear on the LCD. Hold the probe in this position (up to 20 seconds) until a beep sounds and “-UP-“ appears on the LCD. Immediately turn the probe 180 degrees so that the tip points straight up. In a few seconds another beep occurs and the LCD changes. If the LCD reads “Good,” the calibration was successful. If the LCD reads “bAd,” the calibration was unsuccessful.
With an unsuccessful calibration, repeat the calibration steps described earlier until two consecutive “Good” readings are obtained. If further attempts are unsuccessful, loosen the Ocu-Film tip cover and repeat the calibration process. If attempts are still unsuccessful, press the reset button and repeat the process. If still unsuccessful, use compressed air to clean the tip of the probe and repeat the process. If still unsuccessful, the battery should be replaced and the process repeated. Continued failure warrants a call to Reichert Technical Support (http://www.reicherttonopen.com/ss.html) at 1-888-849-8955.
Slit Lamp Examination
Indications and Contraindications
The slit lamp can be used in the majority of eye examinations. It is especially useful in the ED for the diagnosis of corneal abrasions, FBs, and iritis.31 The slit lamp facilitates FB removal and is also used in conjunction with most applanation tonometers. Portable slit lamp instruments are readily available (Fig. 62-24) but seldom used in the ED; thus emergency practitioners generally have access only to a stationary, upright device. Therefore, in the absence of a portable device, a slit lamp examination is contraindicated in patients who cannot tolerate an upright sitting position (e.g., those with orthostatic syncope).

Equipment
The slit lamp has three essential components: a binocular microscope mounted horizontally, a light source that can create a beam of variable width, and a mechanical assembly to immobilize the patient’s head and manipulate the microscope and light source. The location and arrangement of the knobs that control these components vary in devices made by different manufacturers. Usually, by simply turning each knob and watching the results, one can quickly master a new machine. Figure 62-25 illustrates the location of the functional controls on one particular instrument.

Figure 62-25 Slit lamp (BM 900, Haag-Streit, Mason, OH).
Procedure
There are three setups that every slit lamp operator must know.97 The first is for an overall screening of the anterior segment of the eye. For examination of the patient’s right eye, swing the light source to your left at a 45-degree angle while the microscope is directly in front of the patient’s eye. Set the slit beam to the maximum height and the minimum width using the white light. To scan across the patient’s cornea, first focus the beam on the cornea by moving the entire base of the slit lamp forward and backward. Then move the whole base left and right to scan across the cornea. The 45-degree angle between the microscope and the light source is the default position. The most common mistake is to try to scan by swinging the arm of the light source in an arc; this does not work because the light beam will remain centered on the same point of the patient’s eye. Scan across at the level of the conjunctiva and the cornea and then push slightly forward on the base or joystick and scan at the level of the iris. The depth of the anterior chamber is easily appreciated with this low-magnification setup (Fig. 62-26). When the depth of the anterior chamber is reduced, suspect a corneal perforation or a predisposition to angle-closure glaucoma.
Use this basic setup to examine the conjunctiva for traumatic lesions, inflammation, and FBs. Examine the eyelids for hordeolum, blepharitis, or trichiasis. Completely evert the lids (as described earlier in the section “Ocular FB Removal”) in conjunction with the slit lamp examination to permit evaluation of the undersurface of the upper lid for FB retention.
The purpose of the third setup is to search for cells in the anterior chamber—either the white cells of iritis or the red cells of a microscopic hyphema. Shorten the height of the beam to 3 or 4 mm and make it as narrow as possible. Switch the microscope to high power. Focus the beam on the center of the cornea and then push forward slightly so that it is focused on the anterior surface of the lens. Pull the joystick back again to a focus point midway between the cornea and the lens, where it will be focused on the anterior chamber (Fig. 62-27). Keep the beam centered over the pupil so that there is a black background. Normally, the aqueous humor of the anterior chamber is totally clear. Small particles seen floating up or down through the beam are usually circulating cells. If the beam lights up the aqueous like a searchlight in the fog, the examiner has found the protein flare that accompanies iritis. Note that fluorescein can penetrate an abraded cornea and produce a fluorescein flare on slit lamp evaluation. To avoid confusion, some clinicians prefer to examine for anterior chamber flare before the stain is used. A variety of conditions evaluated by the slit lamp are pictured in Figure 62-28.
Unilateral Loss of Vision
Although discussion of all the potential causes of unilateral loss of vision is beyond the scope of this text, amaurosis fugax deserves special mention. Amaurosis fugax is a transient loss of vision that is most commonly due to cholesterol or platelet emboli from atherosclerotic carotid occlusive disease. When plaques are visualized in the retinal vasculature, auscultate the neck for carotid bruits and refer the patient for ultrasound examination of the carotid artery.98,99
Central Renal Artery Occlusion
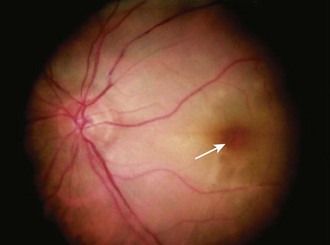
A patient with central retinal artery occlusion (CRAO) has generally experienced a recent sudden painless (complete or nearly complete) unilateral loss of vision. On examination there is an afferent pupillary defect (i.e., sluggish or nonreactive pupil in the affected eye with direct illumination and a normal consensual response) and reduced visual acuity. Immediately after the event the fundus may appear nearly normal; however, it soon becomes pale and a classic “cherry-red spot” in the macula may be evident as a result of patent choroidal vessels showing through the transparent fovea (Fig. 62-29).
Therapy
Visual recovery has been noted to occur up to 3 days after CRAO. Start treatment if the patient is seen within 24 hours after the onset of symptoms.100 Consult ophthalmology while initiating therapy. In many centers, CRAO is considered an ischemic event and neurology as well as ophthalmology are often involved in acute management. In some stroke centers, patients with CRAO are admitted to neurology on confirmation of the diagnosis.
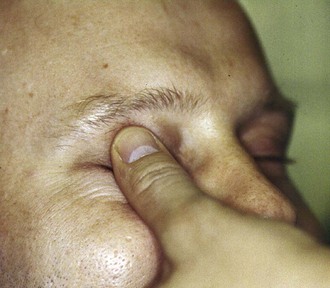
Slow rebreathing into a paper bag is believed to increase the arterial carbon dioxide level, thus aiding vasodilation, permitting the occlusion to move more peripherally, and possibly reducing the ischemic area. At the same time, initiate digital globe massage. With the patient lying supine, apply firm steady pressure with the thumbs to the affected globe through the patient’s closed lids. Apply pressure for 5 seconds and then abruptly release it (Fig. 62-30). Immediately repeat this maneuver several more times for up to 20 minutes. The objective of this technique is to help break up the occlusion and encourage movement of it more peripherally.
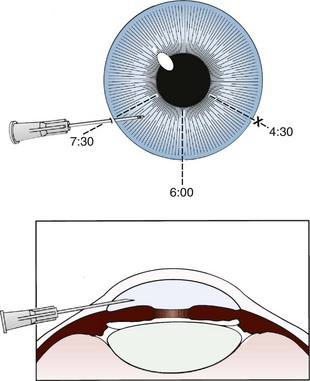
A more aggressive therapy, generally performed only by ophthalmologists, is anterior chamber paracentesis. In the absence of available consultation, consider this technique when CRAO is recent and unresponsive to the previously described therapeutic approaches. For this procedure, keep the patient supine with the head and eyelids secured. Anesthetize the cornea with topical anesthetic drops (e.g., 0.5% proparacaine drops). Inject the conjunctiva adjacent to the limbus with a 27- or 30-gauge needle until the entire perilimbal area is infiltrated and has the appearance of chemosis in all quadrants. During the remainder of the procedure, ask an assistant to firmly grasp the conjunctiva with toothless forceps at the 3- and 9-o’clock positions to stabilize the eye. Insert a 30-gauge needle on a tuberculin syringe obliquely just adjacent to the limbus at either the 4:30- or the 7:30-o’clock position, and direct it toward the 6-o’clock position to avoid the lens (Fig. 62-31). Apply gentle pressure on the globe and, after 1 to 2 drops of aqueous are expressed, withdraw the needle.101,102
One study described a systematic approach in which ocular massage, sublingual isosorbide dinitrate, 10 mg, acetazolamide, 500 mg intravenously, 20% mannitol (1 mg/kg) or oral 50% glycerol (1 mg/kg), anterior chamber paracentesis, methylprednisolone, 500 mg intravenously, streptokinase, 750 kIU, and retrobulbar tolazoline, 50 mg, were given until the visual symptoms improved or all steps were complete.103 Of the 11 patients in this arm of the study, 8 had improved visual acuity. In those who improved, all had their symptoms improved in 12 hours or less. The presumed cause was either a platelet-derived or cholesterol embolus from atheroma or glaucoma.96 Although this study is small, it supports emergency ophthalmology consultation and aggressive treatment of patients seen within 12 to 24 hours of the onset of symptoms.
Complications
Overzealous globe massage has the potential to produce intraocular trauma, including retinal detachment and intraocular hemorrhage. Anterior chamber paracentesis may produce hemorrhage, infection, or mechanical injury to the cornea, iris, or lens.104 Although these complications are rare, ophthalmologic consultation for assistance with the underlying CRAO and surveillance for these potential complications should be initiated on an emergency basis.
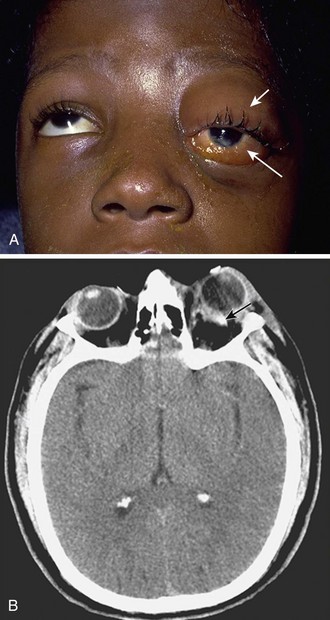
Orbital Compartment Syndrome
Acute facial trauma or recent retrobulbar anesthesia may produce retrobulbar hemorrhage with sufficient pressure to compromise the ophthalmic artery and result in an orbital compartment syndrome (Fig. 62-32). A form of posttraumatic glaucoma may also occur when the retrobulbar hematoma forces the globe against the eyelids. In this case, IOP rises precipitously because the globe is in a relatively closed space as a result of the firm attachment of the eyelids to the orbital rim by the medial and lateral canthal ligaments. The optic nerve and its vascular supply and the central retinal artery are compressed, which can result in ischemia and subsequent visual loss. In this situation, emergency lateral canthotomy may be considered for relief of the pressure on the eye. It would not be considered a standard of care for most emergency clinicians to possess the skills for this procedure, but in the proper scenario, it may be a prudent intervention.
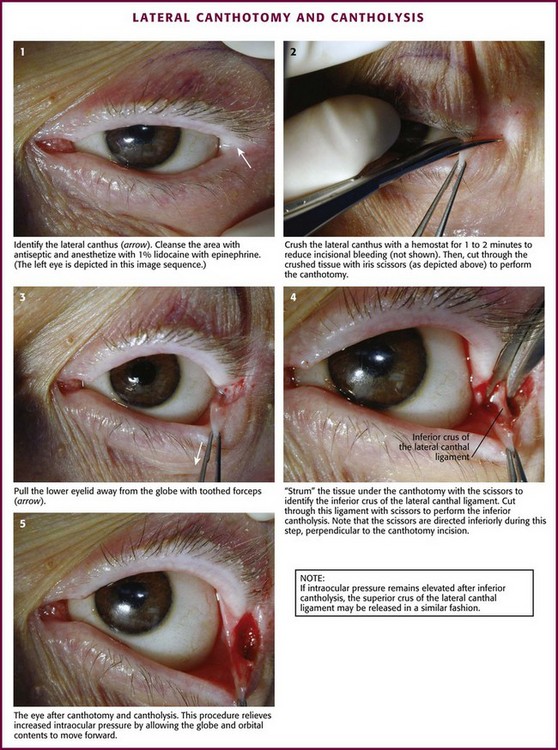
Technique: Lateral Canthotomy and Cantholysis (Fig. 62-33)
The goals of the procedure are to release pressure on the globe and decrease IOP sufficiently to reinstitute retinal artery blood flow. Because retinal recovery is unlikely to occur if rapid relief of ischemia is not accomplished, taking time to clean the eye beyond simple saline cleansing of the lids and lateral canthus is ill advised. Stabilize the patient’s head and lids and anesthetize the lateral canthus by injecting 1% to 2% lidocaine with epinephrine. Before incising, crush the lateral canthus with a small hemostat for 1 to 2 minutes to minimize bleeding. Incise the canthus with iris or Steven’s scissors. Take precautions to avoid injury to the protruding globe. Begin the incision at the lateral canthus and extend it toward the orbital rim. Find the superior and inferior crura of the lateral canthal tendon and release them from the orbital rim. Some operators prefer to release the inferior crus and reassess IOP before considering release of the superior crus. An instructional video of the procedure can be found at www.brown.edu/Administration/Emergency_Medicine/eye.htm.105
Reduction of Globe Luxation
Although luxation of the globe is uncommon, the emergency clinician should be aware of the condition and its mechanisms, know how to reduce the globe, and know when to prioritize ophthalmologic consultation. With luxation of the globe there is extreme proptosis, which permits the lids to slip behind the globe equator (Fig. 62-34). Subsequent spasm of the orbicularis oculi muscles sustains the luxation and limits extraocular movement. Traction on the optic nerve and retinal vessels may produce direct or indirect injury to the optic nerve and retina.
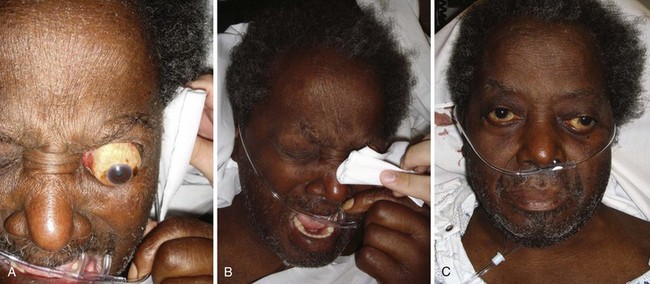
Technique
Before globe reduction, perform a rapid eye examination to document visual acuity, range of eye motion, pupillary reactivity, and any evidence of globe rupture (see earlier discussion).106 Place the patient in a recumbent position and administer a topical ocular anesthetic agent (e.g., 0.5% proparacaine). When the lashes are visible, ask an assistant to apply steady outward and upward traction while the globe is gently pushed behind the lids. Use gloved fingers to apply steady scleral pressure and to manipulate the globe back into the orbit. When the lashes cannot be grasped, introduce a lid retractor behind the lid to provide countertraction. Others recommend placing a suture through the anesthetized skin of each lid to provide countertraction.
Stye
A stye, or hordeolum, is an acute purulent inflammation (bacterial infection) of the eyelid characterized by pain, swelling, and redness. It can be quite annoying and painful to the touch. A small nodule or abscess first develops in an eyelid hair follicle or a modified sebaceous gland at the margin of the eyelid. This may be external (pointing at the lid margin) or internal (pointing under the conjunctival lid; Fig. 62-35). An obvious pustule may be seen, and if so, incising it with a small needle and expressing pus produce a faster cure. The lid may be inverted to find a small pustule on the inner surface of the lid that can be nicked with a 25-gauge needle (see Fig. 62-17, plates 6 and 7). S. aureus is the organism most frequently isolated from the infection.1 Treat with warm compresses on the eyelid as frequently as possible. One method is to fill a sink with very hot water and alternate wet washcloths for 15 to 20 minutes. Topical ophthalmic antibiotics (drops every 2 hours or ointment five to six times a day) are usually prescribed. Erythromycin ointment is often suggested. Topical treatment is generally sufficient, but antistaphylococcal oral antibiotics (dicloxacillin, cephalosporins) might occasionally be needed, especially if in patients with significant surrounding lid cellulitis. More formal incision and drainage may be necessary if the infection is unresponsive to conservative therapy.107 Spread of the infection can lead to preseptal cellulitis.
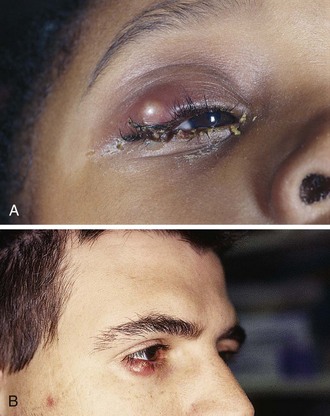
APD or Marcus Gunn Pupil
An afferent pupillary defect (APD), or Marcus Gunn pupil, is caused by a variety of diseases of the afferent, or “in-going,” pathways of the eye. It is produced by a unilateral lesion of the retina or optic nerve. Causes include optic neuritis (as seen with multiple sclerosis), ischemic optic neuropathy, optic tumor, and retrobulbar hematoma (an indication for lateral canthotomy). To evaluate for an APD, the swinging flashlight test may be used (Fig. 62-36).108 Normally, shining a light in either eye causes bilateral pupil constriction. To evaluate for an APD (no light reaching the brain via the optic nerve on the affected side), record the pupil size at baseline. Shine a light into the affected eye. Record the direct response (constriction of the illuminated pupil in response to light) and the indirect or consensual response (constriction of the opposite pupil in response to light). Next, shine the light into the other eye and record the direct and indirect responses. Repeat this procedure back and forth until the pattern of response to light is identified. With an APD, there is a decreased direct response to light along the afferent or “in-going” pathways, whereas the efferent or “out-going” pathways to the opposite eye are preserved. Thus, light shined into the affected eye will cause neither a direct nor a consensual response, but light shined into the unaffected eye will cause bilateral pupillary constriction.
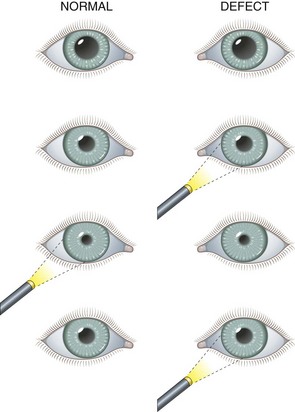
Subconjunctival Hemorrhage
Subconjunctival hemorrhage may occur spontaneously (often noticed on awakening) or after straining, vomiting, or severe coughing. The patient notices a painless bright red hemorrhage in the eye (sclera). It may be bilateral (Fig. 62-37). Vision is not affected. Although this is concerning to the patient, it is benign. No laboratory evaluation is required unless the patient has taken anticoagulants, in which case clotting studies should be considered. The hemorrhage will disappear spontaneously over a few weeks and turn various colors as it recedes. No treatment will hasten resolution.
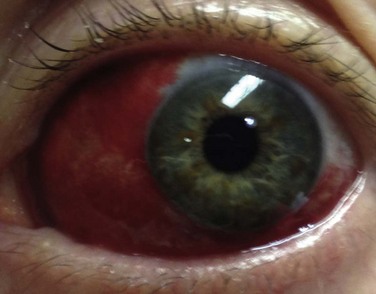
References
1. Knoop, K, Trott, A. Ophthalmologic procedures in the emergency department: II. Routine evaluation procedures. Acad Emerg Med. 1995;2:144.
2. Keeney, AH, Ocular Examination: Basis and Technique. Vol 26, St. Louis, Mosby, 1970.
3. Duke-Elder, S, System of Ophthalmology. Vol III, St. Louis, Mosby, 1962.
4. Adler, AG, McElwain, GE, Merli, GJ, et al. Systemic effects of eye drops. Arch Intern Med. 1982;142:2293.
5. Adler, AG, McElwain, GE, Martin, JH, et al. Coronary artery spasm induced by phenylephrine eye drops. Arch Intern Med. 1981;141:1384.
6. Fraunfelder, FT. Interim report: National Registry of Possible Drug-Induced Ocular Side Effects. Ophthalmology. 1979;86:126.
7. Hoefnagel, D. Toxic effects of atropine and homatropine eye drops in children. N Engl J Med. 1961;264:168.
8. Lanscke, RK. Systemic reactions to topical epinephrine and phenylephrine. Am J Ophthalmol. 1966;61:95.
9. Fraunfelder, FT, Scafidi, AF. Possible adverse effects from topical ocular 10% phenylephrine. Am J Ophthalmol. 1978;85:447.
10. Bresler, MJ, Hoffman, TLS. Prevention of iatrogenic acute narrow-angle glaucoma. Ann Emerg Med. 1981;10:535.
11. Hovding, G, Sjursen, H. Bacterial contamination of drops and dropper tips of in-use multidose bottles. Acta Ophthalmol. 1982;60:213.
12. Havener, WA, Ocular Pharmacology. Vol 70, St. Louis, Mosby, 1978.
13. Duke-Elder, S, System of Ophthalmology. Vol VII, St. Louis, CV Mosby, 1962.
14. Vaughn, DG. The contamination of fluorescein solutions. Am J Ophthalmol. 1955;39:55.
15. Deutsch TA, Feller DB, eds. Paton and Goldberg’s Management of Ocular Injuries, 2nd ed, Philadelphia, Saunders, 1985:61.
16. Brown, L, Takeuchi, D, Challoner, K. Corneal abrasions associated with pepper spray exposure. Am J Emerg Med. 2000;18:271.
17. Grant, MW. Toxicology of the Eye. Springfield, IL: Charles C Thomas; 1974.
18. National Registry of Drug-Induced Ocular Side Effects. Case Reports 404a, 404b, 421. Portland, OR: University of Oregon Health Sciences Center; 1979.
19. Cohn, HC, Jocson, VL. A unique case of grand mal seizures after Fluress. Ann Ophthalmol. 1981;13:1379.
20. Cain, W, Jr., Sinskey, RM. Detection of anterior chamber leakage with Seidel’s test. Arch Ophthalmol. 1981;99:2013.
21. Sexton, RR. Herpes simplex keratitis. In: Wilson LA, ed. External Diseases of the Eye. Hagerstown, MD: Harper & Row; 1979:235.
22. Sexton, RR. Superficial keratitis. In: Wilson LA, ed. External Diseases of the Eye. Hagerstown, MD: Harper & Row; 1979:203.
23. Wilson, LA. Bacterial corneal ulcers. In: Wilson LA, ed. External Diseases of the Eye. Hagerstown, MD: Harper & Row; 1979:215.
24. Jones, DB. Fungal keratitis. In: Wilson LA, ed. External Diseases of the Eye. Hagerstown, MD: Harper & Row; 1979:265.
25. Weiss, JN, Kreter, JK, Dalton, HP, et al. Detection of Pseudomonas aeruginosa eye infections by ultraviolet light. Ann Ophthalmol. 1982;14:242.
26. Vesserill, FR, O’Connor, RE. Corneal abrasion during eyelid retraction [letter]. Ann Emerg Med. 1995;26:756.
27. American Academy of Orthopedic Surgeons. Emergency Care and Transportation of the Sick and Injured, 3rd ed. Menasha, WI: George Banta; 1981.
28. Grant, HD, Murray, RH, Bergeron, JF. Emergency Care, 3rd ed. Bowie, MD: RJ Brady; 1982.
29. Herr, RD, White, GL, Bernhisel, K, et al. Clinical comparison of ocular irrigation fluids following chemical injury. Am J Emerg Med. 1991;9:228.
30. Jones, JB, Schoenleber, DB, Gillen, JP. The tolerability of lactated Ringer’s solution and BS plus for ocular irrigation with and without the Morgan therapeutic lens. Acad Emerg Med. 1998;5:1150.
31. Ernst, AA, Thomson, T, Haynes, M, et al. Warmed versus room temperature saline solution for ocular irrigation. Ann Emerg Med. 1998;32:676.
32. Harris, LS, Cohn, K, Galin, MA. Alkali injury from fireworks. Ann Ophthalmol. 1971;3:849.
33. Smith, RS, Shear, G. Corneal alkali burns arising from accidental instillation of a hair straightener. Am J Ophthalmol. 1975;79:602.
34. Scharpf, LG, Jr., Hill, ID, Kelly, RE. Relative eye-injury potential of heavy-duty phosphate and non-phosphate laundry detergents. Food Chem Toxicol. 1972;10:829.
35. Smally, AJ, Binzer, A, Dolin, S, et al. Alkaline chemical keratitis: eye injury from airbags. Ann Emerg Med. 1992;21:1400.
36. Rost, KM, Jaeger, RW, deCastro, FJ. Eye contamination: a poison center protocol for management. Clin Toxicol. 1979;14:295.
37. Levinson, RA. Ascorbic acid prevents corneal ulceration and perforation following experimental alkali burns. Invest Ophthalmol. 1976;15:986.
38. Blaivas, M, Theodoro, D, Sierzenski, PR. A study of bedside ocular ultrasonography in the emergency department. Acad Emerg Med. 2002;9:791–799.
39. Grove, AS, New, PFJ, Momose, KJ. Computerized tomographic (CT) scanning for orbital evaluation. Trans Am Acad Ophthalmol Otolaryngol. 1975;79:137.
40. Lobes, LA, Jr., Grand, MG, Reece, J, et al. Computerized axial tomography in the detection of intraocular foreign bodies. Ophthalmology. 1981;88:26.
41. Newman, DK. Eyelid foreign body mimics an intraocular foreign body on plain orbital radiography. Am J Emerg Med. 1999;17:283.
42. Shiver, SA, Lyon, M, Blaivas, M. Detection of metallic ocular bodies with handheld sonography in a porcine model. J Ultrasound Med. 2005;24:1341.
43. Newell, FW. Ophthalmology Principles and Concepts. St. Louis: Mosby; 1978.
44. Hulbert, MF. Efficacy of eye pad in corneal healing after corneal foreign body removal. Lancet. 1991;337:643.
45. Benson, WH, Snyder, IS, Granus, V, et al. Tetanus prophylaxis following ocular injuries. J Emerg Med. 1993;11:677.
46. Rosenwasser, GOD. Complications of topical ocular anesthetics. Int Ophthalmol Clin. 1989;29:157.
47. Brilakis, HS, Deutsch, TA. Topical tetracaine with bandage soft contact lens pain control after photorefractive keratectomy. J Refract Surg. 2000;16:444.
48. Bartfield, JM, Holmes, TJ, Raccio-Robak, N. A comparison of proparacaine and tetracaine eye anesthetics. Acad Emerg Med. 1994;1:364.
49. Zagelbaum, BM, Tostanoski, JR, Hochman, MA, et al. Topical lidocaine and proparacaine abuse. Am J Emerg Med. 1994;12:96.
50. Brahma, AK, Shah, S, Hillier, VF, et al. Topical analgesia for superficial corneal injuries. J Accid Emerg Med. 1996;13:186.
51. Szucs, PA, Nashed, AH, Allegra, FR, et al. Safety and efficacy of diclofenac ophthalmic solution in the treatment of corneal abrasions. Ann Emerg Med. 2000;35:131.
52. Salz, JJ, Reader, AL, III., Schwartz, LJ, et al. Treatment of corneal abrasions with soft contact lenses and topical diclofenac. J Refract Corneal Surg. 1994;10:640.
53. Kaiser, PK, Pineda, R, Corneal Abrasion Patching Study Group. A study of topical nonsteroidal anti-inflammatory drops and no pressure patching in the treatment of corneal abrasions. Ophthalmology. 1997;104:1353.
54. Donnenfeld, ED, Selkin, BA, Perry, HD, et al. Controlled evaluation of a bandage contact lens and a topical nonsteroidal anti-inflammatory drug in treating traumatic corneal abrasions. Ophthalmology. 1995;102:979–984.
55. Le Sage, N, Verreault, R, Rochette, L. Efficacy of eye patching for traumatic corneal abrasions: a controlled clinical trial. Ann Emerg Med. 2001;38:129.
56. Campanile, TM, St. Clair, DA, Benaim, M. The evaluation of eye patching in the treatment of traumatic corneal epithelial defects. J Emerg Med. 1997;15:769.
57. Flynn, CA, D’Amico, F, Smith, G. Should we patch corneal abrasions? A meta-analysis. J Fam Pract. 1998;47:264.
58. Michael, JG, Hug, D, Dowd, MD. Management of corneal abrasion in children: a randomized clinical trial. Ann Emerg Med. 2002;40:67.
59. Wilson, SA, Last, A. Management of corneal abrasions. Am Fam Physician. 2004;70:123.
60. Turner, A, Rabiu, M. Patching for corneal abrasion. Cochrane Database Syst Rev. (2):2006. [CD004764].
61. Vandorselaer, T, Youssfi, H, Caspers-Valu, LE, et al. Treatment of traumatic corneal abrasion with contact lens associated with topical nonsteroid anti-inflammatory agent (NSAID) and antibiotic: a safe, effective and comfortable solution. J Fr Ophtalmol. 2001;24:1025.
62. Acheson, JF, Joseph, J, Spalton, DJ. Use of soft contact lenses in an eye casualty department for the primary treatment of traumatic corneal abrasions. Br J Ophthalmol. 1987;71:285.
63. Gilad, E, Bahar, I, Rotberg, B, et al. Therapeutic contact lens as the primary treatment for traumatic corneal erosions. Isr Med Assoc J. 2004;6:28.
64. Forstot, SL, Ellis, PP. Identifying and managing contact lens emergencies. ER Rep. 1982;3:35.
65. Mandell, RB, Contact Lens Practice. Vol 11, Springfield, IL, Charles C Thomas, 1981.
66. Obrig, T, Salvatori, P. Contact Lenses, 3rd ed. New York: Obrig Laboratories; 1957.
67. Mullen JE. Contact Lens. U.S. Patent No. 2,237,744. 1948.
68. Nugent, MW. The corneal lens, a preliminary report. Ann West Med Surg. 1948;2:241.
69. Dreifus, M, Wichtenle, O, Lim, D. Intercameral lenses of hydrocolloid acrylates. Cesk Oftalmol. 1960;16:154.
70. Gruber, E. The Acuvue disposable contact lens as a therapeutic bandage lens. Ann Ophthalmol. 1991;23:446–447.
71. Krezanoski, JZ. Physiology and biochemistry of contact lens wearing. In: Haynes P, ed. Encyclopedia of Contact Lens Practice. South Bend, IN: International Optic; 1959:18.
72. Cogger, TJ. Correction with hard contact lenses. In: Duane TD, ed. Clinical Ophthalmology. New York: Harper & Row; 1982:17.
73. Fowler, SA, Allansmith, MR. Evolution of soft contact lens coatings. Arch Ophthalmol. 1980;98:95.
74. Mondino, BJ, Gorden, LR. Conjunctival hyperemia and corneal infiltrates with chemically disinfected soft contact lenses. Arch Ophthalmol. 1980;98:1767.
75. Shaw, EL. Allergies induced by contact lens solutions. Contact Intraocular Lens Med J. 1980;6:273.
76. Krachmer, JH, Purcell, JJ, Jr. Bacterial corneal ulcers in cosmetic soft contact lens wearers. Arch Ophthalmol. 1978;96:57.
77. Bohigian, GM. Management of infections associated with soft contact lenses. Ophthalmology. 1979;86:1138.
78. Binder, PS. Complications associated with extended wear of soft contact lenses. Ophthalmology. 1979;86:1093.
79. Vandorselaer, T, Youssfi, H, Caspers-Valu, LE, et al. [Treatment of traumatic corneal abrasion with contact lens associated with topical nonsteroid anti-inflammatory agent (NSAID) and antibiotic: a safe, effective and comfortable solution.]. J Fr Ophtalmol. 2001;24:1025–1233.
80. Acheson, JF, Joseph, J, Spalton, DJ. Use of soft contact lenses in an eye casualty department for the primary treatment of traumatic corneal abrasions. Br J Ophthalmol. 1987;71:285–289.
81. Buglisi, JA, Knoop, KJ, Levsky, ME, et al. Experience with bandage contact lenses for the treatment of corneal abrasions in a combat environment. Mil Med. 2007;172:411–413.
82. Snyder, ME, Katz, HR. Ciprofloxacin-resistant bacterial keratitis. Am J Ophthalmol. 1992;114:336.
83. Maklakoff, C. L’ophthalmotonometrie. Arch Ophthalmol (Paris). 1885;5:159.
84. Goldmann, H. Un nouveau tonometre? Applanation. Bull Soc Fr Ophthalmol. 1955;67:474.
85. Schiøtz, H. Tonometry. Br J Ophthalmol. 1920;4:201.
86. Mackay, RS, Marg, E. Fast automatic electronic tonometers based on an exact theory. Acta Ophthalmol. 1959;37:495.
87. Grolman, B. A new tonometer system. Am J Ophthalmol. 1972;49:646.
88. Boothe, WA, Lee, DA, Panek, WC, et al. The Tono-Pen: a manometric and clinical study. Arch Ophthalmol. 1988;106:1214.
89. Friedenwald, JS. Tonometer calibration: an attempt to remove discrepancies found in the 1954 calibration used for the Schiøtz tonometers. Trans Am Acad Ophthalmol Otolaryngol. 1957;61:108.
90. Wilensky, JT. Blood induced secondary glaucomas. Ann Ophthalmol. 1979;11:1659.
91. Arts, HA, Eisele, DW, Duckert, LG. Intraocular pressure as an index of ocular injury in orbital fractures. Arch Otolaryngol Head Neck Surg. 1989;115:213.
92. Hillman, JS. Acute closed-angle glaucoma: an investigation into the effect of delay in treatment. Br J Ophthalmol. 1979;63:817.
93. Gorin, G. Clinical Glaucoma. New York: Marcel Dekker; 1977.
94. Wilke, K. Effects of repeated tonometry: genuine and sham measurements. Acta Ophthalmol. 1972;50:574.
95. Harbin, TS, Laikam, SE, Lipsitt, K, et al. Applanation-Schiøtz disparity after retinal detachment surgery utilizing cryopexy. Ophthalmology. 1979;86:1609.
96. Lichter, PR, Bergstrom, TJ. Premature ventricular systole detection by applanation tonometry. Am J Ophthalmol. 1976;81:797.
97. Keeney, AH. Ocular Examination: Basis and Technique. St. Louis: Mosby; 1976.
98. Muller, M, Wessel, K, Mehdorn, E, et al. Carotid artery disease in vascular ocular syndromes. J Clin Neuroophthalmol. 1993;13:175.
99. O’Farrell, CM, Fitzgerald, DE. Prognostic value of carotid ultrasound lesion morphology in retinal ischemia: result of a long-term follow-up. Br J Ophthalmol. 1983;77:781.
100. Sharma, S, Brown, M, Brown, GC. Retinal artery occlusions. Ophthalmol Clin North Am. 1998;11:591.
101. Knoop, K, Trott, A. Ophthalmologic procedures in the emergency department: I. Immediate sight-saving procedures. Acad Emerg Med. 1994;1:408.
102. Vaughn D, Asbury T, Tabbara K, eds. General Ophthalmology, 12th ed, East Norwalk, CT, Appleton & Lange, 1989:166.
103. Rumelt, S. Aggressive systematic treatment for central retinal artery occlusion. Am J Ophthalmol. 1999;128:733.
104. Joondeph, BC, Joondeph, HC. Purulent anterior segment endophthalmitis following paracentesis. Ophthalmic Surg. 1986;17:91.
105. Suner, S, Simmons, W, Savitt, DL. A porcine model for instruction of lateral canthotomy. Acad Emerg Med. 2000;7:837.
106. Love, JN, Bertram-Love, JE. Luxation of the globe. Am J Emerg Med. 1993;11:61.
107. Brunette, D. Ophthalmology. In: Marx JA, Hockberger RS, Walls RM, eds. Rosen’s Emergency Medicine Concepts and Clinical Practice. 6th ed. Philadelphia: Mosby; 2006:1054.
108. Enyedi, LB, Dev, S, Cox, TA. A comparison of the Marcus Gunn and alternating light tests for afferent pupillary defects. Ophthalmology. 1998;105:871.