Chapter 162 Minimally Invasive Lumbar Microdiscectomy
Indications and Techniques
Since Mixter and Barr first elucidated the pathophysiology of lumbar radiculopathy in 1934, each subsequent generation of spine surgeons has made contributions to the surgical treatment of lumbar radiculopathy to lessen the trauma to the paraspinous muscles, optimize visualization of the neural elements, and minimize the incision.1,2 Dandy first described a complete laminectomy and transdural removal of the disc fragment.1 Thereafter, Scoville and Williams made significant refinements that eventually yielded the current technique of a laminoforaminotomy and microdiscectomy.3 The introduction of the operating microscope in 1977 by Caspar and Yasargil optimized visualization and further reduced the exposure needed to safely perform the operation.4,5 In 1997, Foley took the next step in refining microdiscectomy and introduced a muscle-splitting approach employing a series of concentric dilators to access the lumbar spine.6 This technique avoids the midline structures and the muscle-stripping technique and minimizes the size of the incision needed to expose the requisite anatomy. The principle of a table-mounted tubular retractor, as opposed to a self-retaining retractor, decreases the pressure at the muscle-retractor interface, which can lessen postoperative discomfort and subsequent muscle atrophy.7,8
Patient Positioning and Room Setup
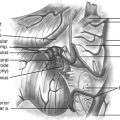
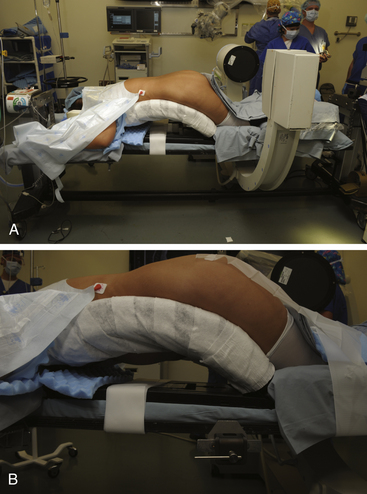
The setup for a minimally invasive lumbar microdiscectomy requires an adequately sized room that can comfortably accommodate the operating table, the fluoroscopic unit and monitor, and the operating microscope. Any operating table may be used, but we prefer a Jackson table with a Wilson frame. The Jackson table allows free passage of the fluoroscopic unit, without the hindrance of the pedestal. Regardless of the table used, the patient should be positioned prone with the spine flexed to optimally open the interlaminar space. The various minimally invasive sets have a table-mounted clamp, which should be placed opposite to the side being operated upon. For example, for a right L4–5 microdiscectomy, the clamp should be placed on the left at the base of the Wilson frame. This facilitates placement of the retractor arm, which is used to secure the tubular retractor (Fig. 162-1).
Technique
Incision
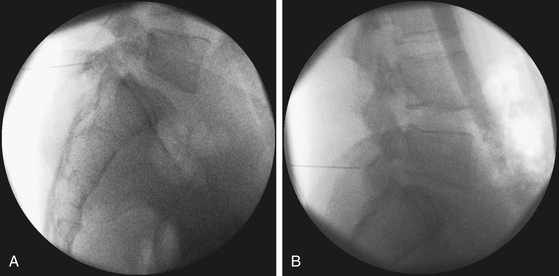
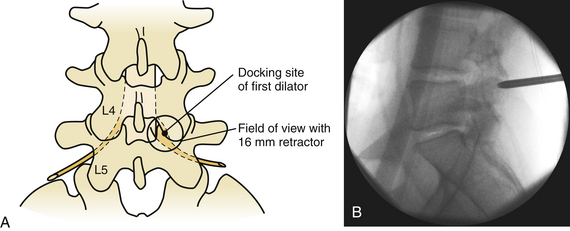
To work through a small incision, precise planning is essential given the limited field of view through the tubular retractor. A critical component of this planning is the trajectory of the tube. The optimal location of the incision is at a point where the tubular retractor lies in a trajectory parallel to the disc space (Fig. 162-2).
Dilator Insertion
Despite the numerous publications that detail the use of a K-wire for puncturing the fascia and docking onto the laminofacet complex, we refrain from using this technique out of concern that the wire might advance into the interlaminar space and enter the canal. Nevertheless, several publications have reported the safe use of this technique.6,9 Instead, we prefer to sharply divide the fascia with either Metzenbaum scissors or Bovie cautery. Once the fascia has been divided, the first dilator may be safely passed and docked onto the laminofacet junction (Fig. 162-3).
To optimize the position of the first dilator, we palpate the bony anatomy in the immediate vicinity with the dilator itself. Once fluoroscopic guidance has been used to confirm the level, the inferior aspect of the lamina is determined with careful probing and, in a similar fashion, the medial aspect of the facet is identified. It is important to keep in mind while probing with the first dilator that it is small enough to enter the canal when the spine is flexed. Once the position of the first dilator is anchored into position with one hand, sequential dilators of increasing size are passed until the desired diameter is reached (Fig. 162-4). As each dilator is passed, the risk of inadvertently entering the canal with the dilator decreases.
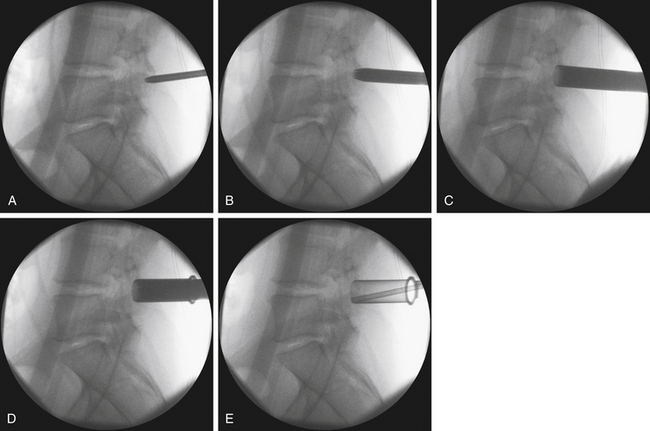
FIGURE 162-4 Sequential dilation of the paraspinous muscles. Gentle wanding of the dilator minimizes the subsequent need for tissue resection. The retractor is secured with downward pressure (see Fig. 162-5), and a final fluoroscopic image is obtain to ensure the trajectory has remained unchanged.
The term wanding has been used in the minimally invasive vernacular to describe the use of the dilator to expand the field of view for the tubular retractor. This involves placing the dilator against the lamina and clearing the muscle from the bone. With each sequential dilator, we attempt to wand only in the vicinity of the surgical site, that is, the inferior aspect of the rostral lamina and the medial facet. Excessive wanding outside of the operative field, namely, the lateral facet or superior to the lamina, can result in increased postoperative discomfort for the patient. Conversely, inadequate wanding results in the need for excessive tissue resection for adequate visualization of the requisite anatomy. The depth of the working channel is determined by a scale on the outside of the final dilator, and the tubular retractor is selected. We prefer a 14-mm diameter retractor when the depth of the working channel is less than 5 cm. For working depths greater than 5 cm, a 16-mm diameter tube is more appropriate. All reoperations are performed through an 18-mm diameter tube.
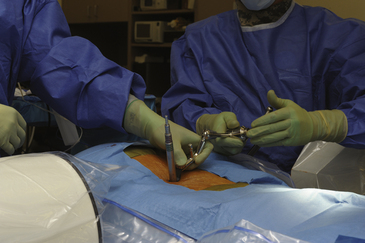
When anchoring the tubular retractor, it is helpful to exert a downward pressure against the lamina while securing the retractor to the table-mounted arm because this will minimize migration of the retractor off of the lamina (Fig. 162-5). A final fluoroscopic image is taken to confirm that the trajectory of the tube is parallel to the disc space. The fluoroscopic unit is then moved to the head of the bed and the operating microscope is brought into the field.
Orientation and Landmark Identification
The tubular retractor is secured so that the stem of the retractor is orthogonal to the spine. This will aid in rostral-caudal orientation when under the microscope. With the microscope in position, part of the inferior aspect of the lamina should be immediately visualized with the appropriate amount of wanding. If not, a large straight bayoneted curette is used to palpate the inferior aspect of the lamina and medial facet. At this point, it is crucial to be oriented with the anatomy, either with direct visualization or with palpation of the bony elements. A straight curette may be used to scrape the underside of the rostral lamina and to again confirm the medial extent of the facet. With certain knowledge of the bony anatomy, Bovie or bipolar cautery may be used to clearly expose the inferior aspect of the lamina and the medial facet (Fig. 162-6). Particular care is taken to prevent entry into the facet joint and any significant disruption of the facet capsule. Now, with the bony anatomy clearly exposed, the inferior aspect of the rostral lamina and the medial facet are removed with a drill and cutting bur until the ligamentum flavum is encountered.
Ligamentum Flavum Removal
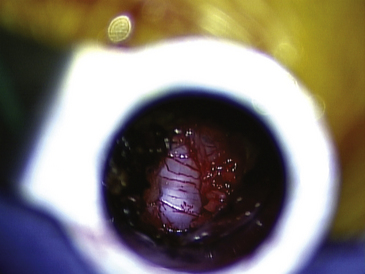
The fibers of the ligamentum flavum are divided longitudinally with a Penfield 4 dissector until the canal is entered, evidenced by visualization of epidural fat and the thecal sac. A right-angle nerve hook is then passed on the underside of the ligamentum to ensure that the dura is adequately freed from the ligamentum. The ligamentum flavum is then resected by passing a 1-mm or 2-mm Kerrison rongeur into the divided ligamentum and undercutting the lamina. Using this technique, the ligamentum is resected caudally to the extent of the field of view provided by the tubular retractor. The ligamentum flavum should be resected laterally until the lateral border of the thecal sac is clearly visualized (Fig. 162-7).
Nerve Root Exploration and Discectomy
Once the shoulder of the nerve root is adequately exposed and mobilized, any variations of retractors may be used. All minimally invasive sets contain either a bayoneted form of the Love nerve root retractor or a suction retractor. The combination of suction and retraction in one instrument minimizes the number of instruments in a limited field of view. For this reason, it may be preferable to use a suction-retractor to retract the nerve root. By retracting the nerve root medially, the disc space is exposed. There may be a significant number of engorged epidural veins, making preemptive cauterization with bipolar forceps advantageous.
Complication Avoidance and Lessons Learned
Because the minimally invasive technique is distinct from the traditional midline approach, there are nuances to this technique that help the surgeon avoid complications. Nevertheless, the complications of a minimally invasive microdiscectomy are similar to the open approach and can include dural tears, recurrent disc herniation, and wound infections. Infections may be less of a risk in the minimally invasive approach.10–12
In our estimation, the initial placement of the K-wire (as described in some techniques) is where the greatest risk of cerebrospinal fluid leak lies.6,9 Although several authors have described the safe implementation of this technique, forgoing this step eliminates this risk. After exposing the neural elements, it is vital to use the bayoneted instruments in a manner that optimizes the line of sight and thereby minimizes the risk of dural tears and injury to the neural elements. In the event of a dural tear, repairing it primarily may be challenging given the constraints of the tubular retractor. In light of the absence of a potential space with the minimally invasive technique, some authors have advocated the placement of dural graft matrices and fibrin glue or other sealants in lieu of primary repair.13 Nevertheless, we prefer to repair a dural tear primarily whenever possible. Under these circumstances, we have modified a small needle (on 6-0 Prolene) into the shape of a check mark. This needle is then pushed through the dural defect with a Castroviejo needle driver. This prevents the need to rotate the needle, which is untenable in a constrained cylindrical opening. The suture is secured with the assistance of a knot pusher. The use of a self-closing clip for managing incidental durotomies has also been described.14
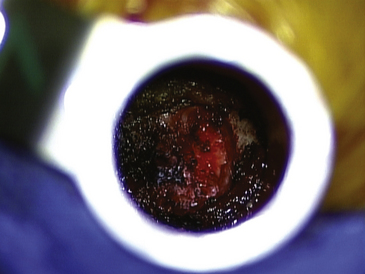
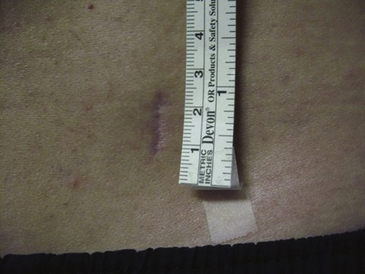
There is a learning curve that appears to plateau after 15 to 20 cases. Review of the operative records in our first 100 cases demonstrates a marked decline in surgery times after 20 cases. The first 20 cases averaged 132 minutes, and our last 20 cases averaged only 54 minutes (unpublished data). A similar trend has been identified by other authors.15,16 During the initial part of the learning curve, it is best to start with at least an 18-mm tube. A larger aperture allows greater ease in establishing the bony landmarks. As greater facility develops with the anatomy from a paramedian approach and with working through a narrow and more-limited field of view, the size of the retractor may be incrementally decreased. The vast majority of our cases are performed through either a 14-mm or 16-mm tubular retractor (Fig. 162-8).
Conclusion
The minimally invasive microdiscectomy is a safe and effective technique for the management of a unilateral radiculopathy secondary to a herniated lumbar disc. With precise surgical planning and optimal placement of the retractor over the relevant anatomy, a smaller paramedian incision does not compromise the exposure needed to safely accomplish the operation. The minimally invasive microdiscectomy represents the next advancement in limiting the disruption of the normal anatomy for removing a disc fragment and decompressing a nerve root.
Caspar W. A new surgical procedure for lumbar disc herniation causing less tissue damage through a microsurgical approach. Adv Neurosurg. 1977;4:74-80.
Chou D., Wang V.Y., Khan A.S. Primary dural repair during minimally invasive microdiscectomy using standard operating room instruments. Neurosurgery. 2009;64:356-358. discussion 358-359
Ferroli P., Franzini A., Messina G., et al. Use of self-closing U-clips for dural repair in mini-invasive surgery for herniated disc. Acta Neurochir (Wien). 2008;150:1103-1105.
Foley K., Smith M. Microendoscopic discectomy. Tech Neurosurg. 1997;3:301-307.
German J.W., Adamo M.A., Hoppenot R.G., et al. Perioperative results following lumbar discectomy: comparison of minimally invasive discectomy and standard microdiscectomy. Neurosurg Focus. 2008;25:E20.
Koebbe C.J., Maroon J.C., Abla A., et al. Lumbar microdiscectomy: a historical perspective and current technical considerations. Neurosurg Focus. 2002;13:E3.
McLoughlin G.S., Fourney D.R. The learning curve of minimally-invasive lumbar microdiscectomy. Can J Neurol Sci. 2008;35:75-78.
Mixter W., Barr J. Rupture of the intervertebral disc with involvement of the spinal canal. N Engl J Med. 1934;211:210-215.
Nowitzke A.M. Assessment of the learning curve for lumbar microendoscopic discectomy. Neurosurgery. 2005;56:755-762. discussion 755-762
O’Toole J., Eichholz K., Fessler R. Surgical site infection rates after minimally invasive spinal surgery. J Neurosurg Spine. 2009;11:471-476.
Perez-Cruet M.J., Fessler R.G., Perin N.I. Review: complications of minimally invasive spinal surgery. Neurosurgery. 2002;51:S26-S36.
Perez-Cruet M.J., Foley K.T., Isaacs R.E., et al. Microendoscopic lumbar discectomy: technical note. Neurosurgery. 2002;51:S129-136.
Shin D.A., Kim K.N., Shin H.C., Yoon do H. The efficacy of microendoscopic discectomy in reducing iatrogenic muscle injury. J Neurosurg Spine. 2008;8:39-43.
Than K.D., Wang A.C., Etame A.B., et al. Postoperative management of incidental durotomy in minimally invasive lumbar spinal surgery. Minim Invasive Neurosurg. 2008;51:263-266.
Williams R.W. Microlumbar discectomy: a conservative surgical approach to the virgin herniated lumbar disc. Spine (Phila Pa 1976). 1978;3:175-182.
Yasargil M. Microsurgical operation of herniated lumbar disc. Adv Neurosurg. 1977;4:81-82.
1. Koebbe C.J., Maroon J.C., Abla A., et al. Lumbar microdiscectomy: a historical perspective and current technical considerations. Neurosurg Focus. 2002;13:E3.
2. Mixter W., Barr J. Rupture of the intervertebral disc with involvement of the spinal canal. N Engl J Med. 1934;211:210-215.
3. Williams R.W. Microlumbar discectomy: a conservative surgical approach to the virgin herniated lumbar disc. Spine (Phila Pa 1976). 1978;3:175-182.
4. Caspar W. A new surgical procedure for lumbar disc herniation causing less tissue damage through a microsurgical approach. Adv Neurosurg. 1977;4:74-80.
5. Yasargil M. Microsurgical operation of herniated lumbar disc. Adv Neurosurg. 1977;4:81-82.
6. Foley K., Smith M. Microendoscopic discectomy. Tech Neurosurg. 1997;3:301-307.
7. German J.W., Adamo M.A., Hoppenot R.G., et al. Perioperative results following lumbar discectomy: comparison of minimally invasive discectomy and standard microdiscectomy. Neurosurg Focus. 2008;25:E20.
8. Shin D.A., Kim K.N., Shin H.C., Yoon do H. The efficacy of microendoscopic discectomy in reducing iatrogenic muscle injury. J Neurosurg Spine. 2008;8:39-43.
9. Perez-Cruet M.J., Foley K.T., Isaacs R.E., et al. Microendoscopic lumbar discectomy: technical note. Neurosurgery. 2002;51:S129-136.
10. Chou D., Wang V.Y., Khan A.S. Primary dural repair during minimally invasive microdiscectomy using standard operating room instruments. Neurosurgery. 2009;64:356-358. discussion 358-359
11. O’Toole J., Eichholz K., Fessler R. Surgical site infection rates after minimally invasive spinal surgery. J Neurosurg Spine. 2009;11:471-476.
12. Perez-Cruet M.J., Fessler R.G., Perin N.I. Review: complications of minimally invasive spinal surgery. Neurosurgery. 2002;51:S26-S36.
13. Than K.D., Wang A.C., Etame A.B., et al. Postoperative management of incidental durotomy in minimally invasive lumbar spinal surgery. Minim Invasive Neurosurg. 2008;51:263-266.
14. Ferroli P., Franzini A., Messina G., et al. Use of self-closing U-clips for dural repair in mini-invasive surgery for herniated disc. Acta Neurochir (Wien). 2008;150:1103-1105.
15. McLoughlin G.S., Fourney D.R. The learning curve of minimally-invasive lumbar microdiscectomy. Can J Neurol Sci. 2008;35:75-78.
16. Nowitzke A.M. Assessment of the learning curve for lumbar microendoscopic discectomy. Neurosurgery. 2005;56:755-762. discussion 755-762