[level-membership-for-neurosurgery-category]
Chapter 81 Minimal Access and Percutaneous Lumbar Discectomy
Minimal Access Lumbar Discectomy
Lumbar discectomy has become the most common neurosurgical procedure in the United States, with nearly 300,000 procedures performed each year. Herniated lumbar discs and resultant radiculopathy lead to approximately 15 million physician visits per year and have created a financial burden on society exceeding $50 billion annually.1–3
Historical Review
The operative treatment of lumbar disc disease has challenged spine surgeons since the first reported case of Dandy in 1929.4 The operating microscope revolutionized the operation. It improved the ability to visualize the neural elements and disc material, decreased surgical morbidity, and decreased incision size.5 Yasargil popularized the operating microscope in the mid-1960s, although it was not until the 1970s that the first publications by Yasargil6 and Caspar began to appear separately.7 In 1978 Williams reported on 532 patients who had undergone lumbar microdiscectomy through an intralaminar approach.8 These publications detailed the usefulness of the microscope and the appearance of lumbar microdiscectomy.
Since these early descriptions, surgeons have sought to decrease the incision size and iatrogenic morbidity associated with the operation. Faubert and Caspar in 1991 reported the use of a muscular retractor system9 rather than subperiosteal dissection to facilitate visualization of smaller operative corridors. The endoscope was also applied for the treatment of spine pathology.10
True minimally invasive lumbar microdiscectomy was first described by Foley and Smith11 in 1997. They reported the use of a microendoscopic discectomy system that entailed the use of tubular dilators to facilitate muscle sparing, a tubular retractor system, and an endoscope coupled with microsurgical techniques and instrumentation. This approach (microendoscopic discectomy) revolutionized minimal access spine surgery and paved the way for minimally invasive surgery (MIS) laminectomy and fusion techniques. The goal of these MIS approaches is to achieve clinical outcomes similar to those of standard approaches yet minimize the iatrogenic injury encountered during the approach to the spine.
Microsurgical (Microlumbar) Discectomy
General Principles
The technique requires a blunt paravertebral muscle-splitting approach. Recent evidence has suggested that the approach is characterized by less postoperative pain, shorter hospitalization, and faster return to work.12 The subperiosteal approach, by contrast, requires a larger incision and the detachment of the tendinous insertions of the paraspinal muscles and their retraction from the spinous process. The paravertebral muscles are rich in proprioceptors and may be injured when retracted. There are reports on the correlation between denervation and retraction-ischemia of the muscles and postoperative pain.12
The microsurgical approach to a herniated lumbar disc entails several modifications of the standard approach: surgical planning, positioning of the patient, and intraoperative imaging. Some of these modifications may appear as disadvantages to those surgeons not experienced with microsurgery. The surgical corridor to the target area is very limited, so the localization of the skin incision has to be determined very precisely. Once the skin incision has been placed, there is no way of altering the approach other than by enlarging the incision. The approach uses the same instruments that are used in standard lumbar discectomy but have been modified for use through small tubular retractors. The instruments are usually bayoneted and are of a dark color to reduce glare from the light source. A high-speed drill with a long, tapered, and gradually bent tip is designed to be used through these tubular retractors.
Surgical Technique
Step 2: Dilator Insertion
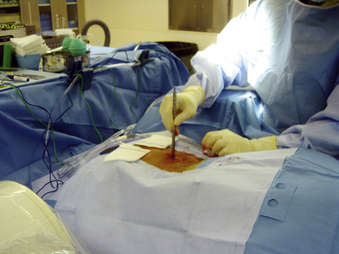
The smallest dilator is then inserted through the incision and is docked on the inferior aspect of the cranial lamina (Fig. 81-1). That is the L4 lamina for an L4-5 disc herniation. This is confirmed with lateral fluoroscopy. Remember that the edge of the lamina is caudal to the disc space. The anatomy should be palpated with the dilator, and a three-dimensional image of the anatomy should be formed in the surgeon’s mind. The inferior edge of the lamina is determined as well as the facet/lamina junction. The dilator may then be used to clear soft tissue from the lamina and medial facet. Care should be taken not to allow the dilator to slip into the intralaminar space.
Step 3: Sequential Dilator and Tubular Retraction Insertion
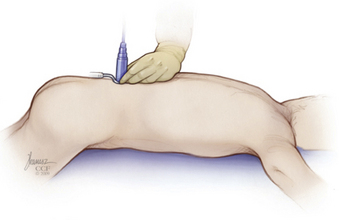
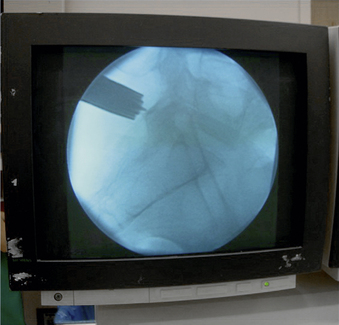
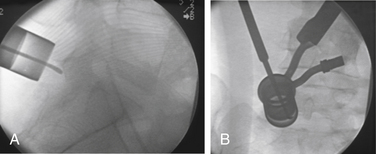
Sequentially place the second, third, and fourth dilators over the initial dilator down to the lamina, and then place the working channel (tubular retractor) over the final dilator (Fig. 81-2). We do not check fluoroscopy after each dilator placed but do so after the last is secured. Continued soft tissue is dissected from the lamina during subsequent dilator placement. The length of the final working tubular retractor is determined from markings on the largest dilator. The length and width of the tube are determined, and the tube is placed over the dilator to dock on the edge of the lamina. Fluoroscopy is used to verify placement of the tube (Fig. 81-3). We then direct the distal end of the tube somewhat medially.
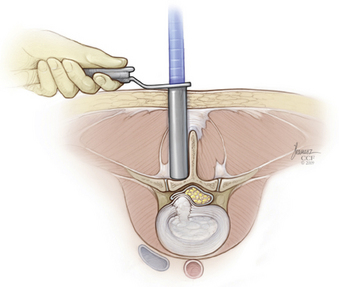
The tube is then fixed to an arm, which is then attached to the operating table (Fig. 81-4). Once it has been attached, the dilators are removed and a corridor is established percutanously to the lamina and interlaminar space. We place a Penfield no. 4 under the edge of the lamina to confirm correct level localization on the lateral image (Fig. 81-5) and also confirm medial-lateral position on the anteroposterior image.
Step 4: Soft Tissue Removal and Laminar Identification
At this point, the operating room microscope or endoscope is brought into the field to provide illumination and magnification. Soft tissue usually will need to be removed from the laminae by using a Bovie with an extended tip and rongeur. The inferior (caudal) edge of the lamina should be identified as well as the medial facet joint (Fig. 81-6). Visualization of the fibers of the facet capsule ensure that one does not inadvertently enter the joint or remove too much of the joint and cause potential instability.
Step 7: Discectomy and Root Decompression
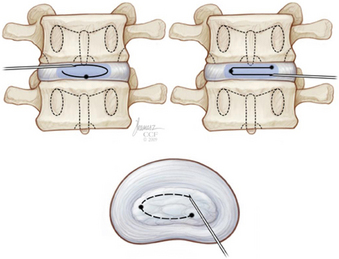
Once the disc space is visualized, the disc material is removed as for any standard discectomy. We prefer to only remove herniated disc material. If an anulotomy is required, a small one is made in a horizontal fashion (medial/lateral) with a no. 11 blade or a sheathed microknife (Fig. 81-7).

Microendoscopic Discectomy for Extraforaminal Lumbar Disc Herniations
General Principles
Extraforaminal lumbar disc herniations (EFDH), otherwise known as far lateral lumbar disc herniations, are relatively rare and make up 1% to 12% of all lumbar disc herniations.13,14 The surgical treatment of EFDH is more complex than that of the more common dorsolateral or central disc herniation, owing to an increased risk of nerve root injury, postoperative instability from extensive facetectomy, and/or inadequate decompression.
The microendoscopic approach for EFDH can further reduce surgical morbidity by preserving the facet joint stability, providing less chance of nerve root injury while still achieving similar or better outcomes. Despite these advantages, the surgeon faces new challenges. The technique takes surgery from direct line of sight with an open retractor system to one in which surgery is performed through a tubular retractor with visualization of the operative bed on a video monitor placed in front of the surgeon. This requires specialized training and had resulted in a shallow learning curve that must be overcome for proficiency with the procedure.11,15
Surgical Technique
Step 5: Focus and Image Orientation
Surgical focusing and orientation are extremely important. To help in this regard, the endoscopic image orientation should be adjusted such that the medial anatomy will be on the top of the video monitor (12 o’clock) and the lateral anatomy on the bottom (6 o’clock). A sucker tip can be place laterally inside the tube to help guide the surgeon regarding lateral and medial orientation.
Percutaneous Discectomy
Historical Review
Percutaneous discectomy promised to change the field of lumbar spine surgery when it was introduced in the late 1970s. Kambin et al.16,17 and Hijikata18 separately reported the efficacy of this procedure, that is, percutaneous nucleotomy.
In 1985, Onik et al.19 reported the technique of automated percutaneous discectomy (APD). This procedure consisted of the insertion of a 2-mm probe into the disc. The device was then able to mechanically facilitate the removal of disc material.
Shortly thereafter, in the late 1980s, Choy et al.20 introduced percutaneous laser discectomy (PLD). This modification utilized an approach similar to that of APD but used laser energy to remove disc material.
In the 1990s, the intradiscal electrothermal anuloplasty (IDET) procedure was developed by Saal and Saal.21,22
Evidence of the superiority of such minimally invasive techniques compared with microdiscectomy remains unclear; this is attributed to the lack of high-quality studies.23
Patient Selection
Radiographic criteria are extremely important in considering percutaneous discectomy. These procedures are appropriate only for patients with a contained disc demonstrated on MRI. This is defined as disc material that is contained by either the anulus fibrosus or the posterior longitudinal ligament. An unfavorable outcome will likely be seen if the procedure is performed on patients with free or extruded discs. In addition, patients with disc herniations compromising more than 50% of the spinal canal with significant thecal sac compression should not be treated by those procedures.
Surgical Technique
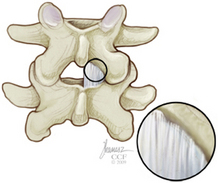
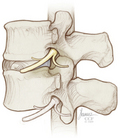
The needle is aimed at the Kambin safe triangle. This triangular working zone is bordered ventrally by the exiting root, inferiorly by the proximal end plate of the lower lumbar segment, and medially by the traversing root and the dural sac. The floor of the triangular working zone is occupied by the intervertebral disc, the vertebral end plate, and the dorsal boundary of the adjacent vertebra24 (Fig. 81-8).
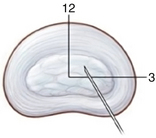
The patient may report transient localized back pain as the needle penetrates the anulus. Radicular symptoms are not expected and may indicate a needle position that is too close to the transversing root. The needle position is checked in the posteroanterior projection, confirming the tip position just inside the anulus. Under lateral fluoroscopy, the introducer needle is then advanced minimally to achieve positioning in the nucleus pulposus in the ventral half of the disc. Optimal positioning is with the needle tip between a 12 o’clock and a 3 o’clock position (Fig. 81-9).
Intradiscal Electrothermal Therapy
The thermal energy is applied into the intradiscal space by means of either a coiled or linear radiofrequency catheter. The catheter with a temperature-controlled thermal resistive coil is inserted through the needle and coiled within the disc space to rest along the inner dorsal anulus under biplanar fluoroscopy (Fig. 81-10). The catheter is then heated to 90 degrees and maintained there for 4 minutes.
Automated Percutaneous Lumbar Discectomy
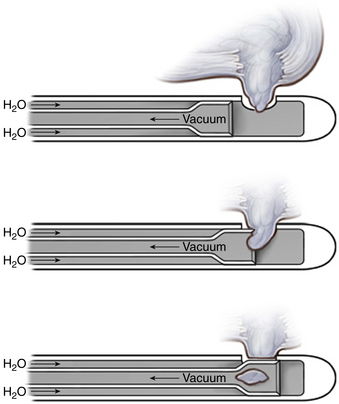
Automated percutaneous lumbar discectomy (APLD) works by the theory that if the central disc volume is decreased, the pressure transmitted though a rent in the anulus and a bulging disc may be decreased, thereby decreasing pressure on an irritated nerve root.
The APLD probe is inserted by using the percutaneous technique detailed previously. The device is able to decompress the nucleus pulposus by using both a sucking and a cutting action of a side port of the nucleotome. The disc material is then carried away in a saline solution (Fig. 81-11).
Outcomes
Both retrospective and prospective studies have demonstrated that these MIS procedures are safe and probably at least as effective as their open counterparts. None have demonstrated a significant benefit to the MIS techniques in terms of long-term outcome of leg and back pain. Ryang et al. in 2008 published a prospective randomized study to compare efficiency, safety, and outcome of standard open microsurgical discectomy for lumbar disc herniation utilizing minimal access trocar microsurgical discectomy. They reported that both procedures result in a significant improvement of pain and neurologic deficits, while the differences in operative time, blood loss, and complication rates were statistically not significant in MIS compared to open microdiscectomy.25 Some studies, however, have shown at least some short-term benefit utilizing MIS techniques. German et al. published a retrospective study that compared the perioperative results following MIS and conventional open lumbar discectomy. No significant difference was seen with regard to leg pain; however, there was a statistically significant difference in length of stay, estimated blood loss, postanesthesia care unit narcotic use, and need for admission to the hospital. These differences were thought to be of only modest significance.26 Righesso et al. published a prospective randomized study to compare the clinical outcome of open discectomy versus the microendoscopic discectomy. They found a small statistically significant difference between the groups (incision size, length of hospitalization, operative time, and visual analogue scale at 12 hours), but the overall patient outcomes were not affected.27 Others have demonstrated similar conclusions.15,28–31
Conclusion
Minimal access lumbar microdiscectomy is both safe and effective. Studies have shown that the efficacy of the procedure is high, with reported success rates of 75% to 80%. Studies to date have not demonstrated a significant benefit with regard to pain and neurologic outcomes, although some studies have demonstrated a difference in length of stay, estimated blood loss, postanesthesia care unit narcotic use, and need for admission to the hospital. These differences may be of only marginal significance. The percutaneous procedures are highly dependent on patient selection, which limits the more widespread use of these procedures. Increased experience with minimal access procedures will minimize complications and optimize patient outcomes.
Foley K.T., Smith M.M. Microendoscopic discectomy. Tech Neurosurg. 1997;3:301-307.
Kambin P., Brager M.D. Percutaneous posterolateral discectomy: anatomy and mechanism. Clin Orthop Relat Res. 1987;223:145-154.
Mayer H.M., Brock M. Percutaneous endoscopic discectomy: surgical technique and preliminary results compared to microsurgical discectomy. J Neurosurg. 1993;78:216-225.
Ryang Y.M., Oertel M.F., Mayfrank L., et al. Standard open microdiscectomy versus minimal access trocar microdiscectomy: results of a prospective randomized study. Neurosurgery. 2008;62(1):174-181.
1. Bruske-Hohlfeld I., Merritt J.L., Onofrio B.M., et al. Incidence of lumbar disc surgery. A population-based study in Olmsted County, Minnesota, 1950–1979. Spine (Phila Pa 1976). 1990;15:31-35.
2. Frymoyer J.W., Cats-Baril W.L. An overview of the incidences and costs of low back pain. Orthop Clin North Am. 1991;22:263-271.
3. Hart L.G., Deyo R.A., Cherkin D.C. Physician office visits for low back pain: frequency, clinical evaluation, and treatment patterns from a U.S. national survey. Spine (Phila Pa 1976). 1995;20:11-19.
4. Maroon J.C. Current concepts in minimally invasive discectomy. Neurosurgery. 2002;51(Suppl 5):S137-S145.
5. Imhof H.G., von Ammon K., Yasargil M.G. Use of the microscope in surgery of the lumbar disk hernia. Aktuelle Probl Chir Orthop. 1994;44:15-20.
6. Yasargil M.G. Microsurgical operations for herniated lumbar disc. Adv Neurosurg. 1977;4:81-82.
7. Caspar W. A new surgical procedure for lumbar disc herniation causing less tissue damage through a microsurgical approach. Adv Neurosurg. 1977;4:74-80.
8. Williams R.W. Microlumbar discectomy: a conservative surgical approach to the virgin herniated lumbar disc. Spine (Phila Pa 1976). 1978;3:175-182.
9. Faubert C., Caspar W. Lumbar percutaneous discectomy: initial experience in 28 cases. Neuroradiology. 1991;33:407-410.
10. Mayer H.M., Brock M. Percutaneous endoscopic discectomy: surgical technique and preliminary results compared to microsurgical discectomy. J Neurosurg. 1993;78:216-225.
11. Foley K.T., Smith M.M. Microendoscopic discectomy. Tech Neurosurg. 1997;3:301-307.
12. Lu K., Liang C.L., Cho C.L., et al. Oxidative stress and heat shock protein response in human paraspinal muscles during retraction. J Neurosurg. 2002;97(Suppl 1):75-81.
13. Abdullah A.F., Wolber P.G., Warfield J.R., et al. Surgical management of extreme lateral lumbar disc herniations: review of 138 cases. Neurosurgery. 1988;22:648-653.
14. Cervellini P., De Luca G.P., Mazzetto M., et al. Micro-endoscopic discectomy (MED) for far lateral disc herniation in the lumbar spine. Technical note. Acta Neurochir Suppl (Wien). 2005;92:99-101.
15. Perez-Cruet M.J., Foley K.T., Isaacs R.E., et al. Microendoscopic lumbar discectomy: technical note. Neurosurgery. 2002;51:129-136.
16. Kambin P., Sampson S. Posterolateral percutaneous suction-excision of herniated lumbar intervertebral discs: report of interim results. Clin Orthop Relat Res. 1986;207:37-43.
17. Kambin P., Gellman H. Percutaneous lateral discectomy of the lumbar spine: a preliminary report. Clin Orthop Relat Res. 1983;174:127-132.
18. Hijikata S. Percutaneous nucleotomy: a new concept technique and 12 years’ experience. Clin Orthop Relat Res. 1989;238:9-23.
19. Onik G., Helms C.A., Ginsberg L., et al. Percutaneous lumbar discectomy using a new aspiration probe. AJR Am J Roentgenol. 1985;15(144):1137-1140.
20. Choy D.S., Case R.B., Fielding W., et al. Percutaneous laser nucleolysis of lumbar disks. N Engl J Med. 1987;317:771-772.
21. Saal J.A., Saal J.S. Intradiscal electrothermal treatment for chronic discogenic low back pain. Spine (Phila Pa 1976). 2000;25:2622-2627.
22. Saal J.S., Saal J.A. Management of chronic discogenic low back pain with a thermal intradiscal catheter: a preliminary report. Spine (Phila Pa 1976). 2000;25:382-388.
23. Gibson J., Waddell G. Surgical interventions for lumbar disc prolapse. Cochrane Database Syst Rev. 2007;2:CD001350.
24. Kambin P., Brager M.D. Percutaneous posterolateral discectomy: anatomy and mechanism. Clin Orthop Relat Res. 1987;223:145-154.
25. Ryang Y.M., Oertel M.F., Mayfrank L., et al. Standard open microdiscectomy versus minimal access trocar microdiscectomy: results of a prospective randomized study. Neurosurgery. 2008;62(1):174-181.
26. German J.W., Adamo M.A., Hoppenot R.G., et al. Perioperative results following lumbar discectomy: comparison of minimally invasive discectomy and standard microdiscectomy. Neurosurg Focus. 2008;25(2):E20.
27. Righesso O., Falavigna A., Avanzi O. Comparison of open discectomy with microendoscopic discectomy in lumbar disc herniations: results of a randomized controlled trial. Neurosurgery. 2007;61:545-549.
28. Schizas C., Tsiridis E., Saksena J. Microendoscopic discectomy compared with standard microsurgical discectomy for treatment of uncontained or large contained disc herniations. Neurosurgery. 2005;57(4):357-360.
29. Asch H.L., Lewis P.J., Moreland D.B., et al. Prospective multiple outcomes study of outpatient lumbar microdiscectomy: should 75 to 80% success rates be the norm? J Neurosurg. 2002;96(Suppl 1):34-44.
30. Lew S.M., Mehalic T.F., Fagone K.L. Transforaminal percutaneous endoscopic discectomy in the treatment of far-lateral and foraminal lumbar disc herniations. J Neurosurg. 2001;94(Suppl 2):216-220.
31. Ruetten S., Komp M., Merk H., et al. Use of newly developed instruments and endoscopes: full-endoscopic resection of lumbar disc herniations via the interlaminar and lateral transforaminal approach. J Neurosurg Spine. 2007;6(6):521-530.
[/level-membership-for-neurosurgery-category][not-level-membership-for-neurosurgery-category]
Chapter 81 Minimal Access and Percutaneous Lumbar Discectomy
Minimal Access Lumbar Discectomy
Lumbar discectomy has become the most common neurosurgical procedure in the United States, with nearly 300,000 procedures performed each year. Herniated lumbar discs and resultant radiculopathy lead to approximately 15 million physician visits per year and have created a financial burden on society exceeding $50 billion annually.1–3
Historical Review
The operative treatment of lumbar disc disease has challenged spine surgeons since the first reported case of Dandy in 1929.4 The operating microscope revolutionized the operation. It improved the ability to visualize the neural elements and disc material, decreased surgical morbidity, and decreased incision size.5 Yasargil popularized the operating microscope in the mid-1960s, although it was not until the 1970s that the first publications by Yasargil6 and Caspar began to appear separately.7 In 1978 Williams reported on 532 patients who had undergone lumbar microdiscectomy through an intralaminar approach.8 These publications detailed the usefulness of the microscope and the appearance of lumbar microdiscectomy.
Since these early descriptions, surgeons have sought to decrease the incision size and iatrogenic morbidity associated with the operation. Faubert and Caspar in 1991 reported the use of a muscular retractor system9 rather than subperiosteal dissection to facilitate visualization of smaller operative corridors. The endoscope was also applied for the treatment of spine pathology.10
True minimally invasive lumbar microdiscectomy was first described by Foley and Smith11 in 1997. They reported the use of a microendoscopic discectomy system that entailed the use of tubular dilators to facilitate muscle sparing, a tubular retractor system, and an endoscope coupled with microsurgical techniques and instrumentation. This approach (microendoscopic discectomy) revolutionized minimal access spine surgery and paved the way for minimally invasive surgery (MIS) laminectomy and fusion techniques. The goal of these MIS approaches is to achieve clinical outcomes similar to those of standard approaches yet minimize the iatrogenic injury encountered during the approach to the spine.
Microsurgical (Microlumbar) Discectomy
General Principles
The technique requires a blunt paravertebral muscle-splitting approach. Recent evidence has suggested that the approach is characterized by less postoperative pain, shorter hospitalization, and faster return to work.12 The subperiosteal approach, by contrast, requires a larger incision and the detachment of the tendinous insertions of the paraspinal muscles and their retraction from the spinous process. The paravertebral muscles are rich in proprioceptors and may be injured when retracted. There are reports on the correlation between denervation and retraction-ischemia of the muscles and postoperative pain.12
The microsurgical approach to a herniated lumbar disc entails several modifications of the standard approach: surgical planning, positioning of the patient, and intraoperative imaging. Some of these modifications may appear as disadvantages to those surgeons not experienced with microsurgery. The surgical corridor to the target area is very limited, so the localization of the skin incision has to be determined very precisely. Once the skin incision has been placed, there is no way of altering the approach other than by enlarging the incision. The approach uses the same instruments that are used in standard lumbar discectomy but have been modified for use through small tubular retractors. The instruments are usually bayoneted and are of a dark color to reduce glare from the light source. A high-speed drill with a long, tapered, and gradually bent tip is designed to be used through these tubular retractors.
Surgical Technique
Step 2: Dilator Insertion
The smallest dilator is then inserted through the incision and is docked on the inferior aspect of the cranial lamina (Fig. 81-1). That is the L4 lamina for an L4-5 disc herniation. This is confirmed with lateral fluoroscopy. Remember that the edge of the lamina is caudal to the disc space. The anatomy should be palpated with the dilator, and a three-dimensional image of the anatomy should be formed in the surgeon’s mind. The inferior edge of the lamina is determined as well as the facet/lamina junction. The dilator may then be used to clear soft tissue from the lamina and medial facet. Care should be taken not to allow the dilator to slip into the intralaminar space.
Step 3: Sequential Dilator and Tubular Retraction Insertion
Sequentially place the second, third, and fourth dilators over the initial dilator down to the lamina, and then place the working channel (tubular retractor) over the final dilator (Fig. 81-2). We do not check fluoroscopy after each dilator placed but do so after the last is secured. Continued soft tissue is dissected from the lamina during subsequent dilator placement. The length of the final working tubular retractor is determined from markings on the largest dilator. The length and width of the tube are determined, and the tube is placed over the dilator to dock on the edge of the lamina. Fluoroscopy is used to verify placement of the tube (Fig. 81-3). We then direct the distal end of the tube somewhat medially.
The tube is then fixed to an arm, which is then attached to the operating table (Fig. 81-4). Once it has been attached, the dilators are removed and a corridor is established percutanously to the lamina and interlaminar space. We place a Penfield no. 4 under the edge of the lamina to confirm correct level localization on the lateral image (Fig. 81-5) and also confirm medial-lateral position on the anteroposterior image.
Step 4: Soft Tissue Removal and Laminar Identification
At this point, the operating room microscope or endoscope is brought into the field to provide illumination and magnification. Soft tissue usually will need to be removed from the laminae by using a Bovie with an extended tip and rongeur. The inferior (caudal) edge of the lamina should be identified as well as the medial facet joint (Fig. 81-6). Visualization of the fibers of the facet capsule ensure that one does not inadvertently enter the joint or remove too much of the joint and cause potential instability.
Step 7: Discectomy and Root Decompression
Once the disc space is visualized, the disc material is removed as for any standard discectomy. We prefer to only remove herniated disc material. If an anulotomy is required, a small one is made in a horizontal fashion (medial/lateral) with a no. 11 blade or a sheathed microknife (Fig. 81-7).
Microendoscopic Discectomy for Extraforaminal Lumbar Disc Herniations
General Principles
Extraforaminal lumbar disc herniations (EFDH), otherwise known as far lateral lumbar disc herniations, are relatively rare and make up 1% to 12% of all lumbar disc herniations.13,14
[/not-level-membership-for-neurosurgery-category]
