[level-membership-for-emergency-medicine-category]Chapter 35
Methods of Wound Closure
Not all wounds require definitive closure at the first emergency department (ED) encounter; however, once the decision to close a wound has been made, the clinician must select the closure technique best suited for the location and configuration of the wound. The most commonly used techniques include tape, tissue adhesive, metal staples, and sutures. All traumatic wounds should be cleaned, and wounds containing devitalized tissue should be débrided before closure (see Chapter 34).
Wound Tape
Surgical tape strips are now routinely used to close simple wounds. Tape strips can be applied by health care personnel in many settings, including EDs, operating rooms, clinics, and first aid stations. Advantages include ease of application, reduced need for local anesthesia, evenly distributed wound tension, no residual suture marks, minimal skin reaction, no need for suture removal, superiority for some grafts and flaps, and suitability for use under plaster casts. One main advantage of wound tape over standard sutures and wound staples is its greater resistance to wound infection.1–4
Background and Tape Comparisons
Currently, several brands of tape with different porosity, flexibility, strength, and configuration are available. Steri-Strips (3M Corporation, St. Paul, MN) are microporous tapes with ribbed backing (Fig. 35-1). They are porous to air and water, and the ribbed backing provides extra strength. Cover-Strips (Beiersdorf, South Norwalk, CT) are woven in texture and have a high degree of porosity. They allow not only air and water but also wound exudates to pass through the tape. Shur-Strip (Deknatel, Inc, Floral Park, NY) is a nonwoven microporous tape. Clearon (Ethicon, Inc, Somerville, NJ) is a synthetic plastic tape whose backing contains longitudinal parallel serrations to permit gas and fluid permeability. An iodoform-impregnated Steri-Strip (3M Corporation) is intended to further retard infection without sensitization to iodine.3 Other tape products include Curi-Strip (Kendall, Boston), Nichi-Strip (Nichiban Co., Ltd, Tokyo), Cicagraf (Smith & Nephew, London), and Suture Strip (Genetic Laboratories, St. Paul, MN).
Scientific studies of wound closure tapes provide some comparisons of products. Koehn5 showed that Steri-Strip tape maintains adhesiveness about 50% longer than Clearon tape does. Rodeheaver and coworkers6 compared Shur-Strip, Steri-Strip, and Clearon tape in terms of breaking strength, elongation, shear adhesion, and air porosity. The tapes were tested in both dry and wet conditions. Steri-Strip tape had about twice the breaking strength of the other two tapes in both dry and wet conditions; there was minimal loss of strength in all tapes when wetted. Shur-Strip tape showed approximately two to three times the elongation of the other tapes at the breaking point, whether dry or wet. Shear adhesion (amount of force required to dislodge the tape when a load is applied at the place of contact) was slightly better for the Shur-Strip tape than for the Steri-Strip tape and approximately 50% better than for the Clearon tape. Of these three wound tapes, the investigators considered Shur-Strips to be superior for wound closure.
One comprehensive study of wound tapes compared Curi-Strip, Steri-Strip, Nichi-Strip, Cicagraf, Suture Strip, and Suture Strip Plus.7 All tapes were 12 mm wide except for Nichi-Strip, which was 15 mm. Each tape was compared for breaking strength, elongation under stress, air porosity, and adhesiveness. Curi-Strip, Cicagraf, and Steri-Strip exhibited equivalent dry breaking strength. However, when wet (a condition that can occur in the clinical setting), Cicagraf outperformed all tapes. All the tapes tested had similar elongation-under-stress profiles with the exception of Suture Strip Plus. This tape did not resist elongation under low or high force. Excessive elongation may allow wound dehiscence. Nichi-Strip was the most porous to air, and Cicagraf was almost vapor impermeable. Nichi-Strip and Curi-Strip had the best adherence to untreated skin. When the skin was treated with tincture of benzoin, however, Steri-Strip dramatically outperformed all other products. When all study parameters were considered, Nichi-Strip, Curi-Strip, and Steri-Strip achieved the highest overall performance rankings.
Indications
In experimental wounds inoculated with Staphylococcus aureus, tape-closed wounds resisted infection better than did wounds closed with nylon sutures.2 Tape closure works well under plaster casts when superficial suture removal would be delayed. Tape closure effectively holds flaps and grafts in place, particularly over the fingers, the flat areas of the extremities, and the trunk (Fig. 35-2).3,4 Wounds on the pretibial area are difficult to close, especially in the elderly because of tissue atrophy. Wound tape provides an alternative to suture closure in this situation. Tape closure can also be applied to wounds after early suture removal, particularly on the face, to maintain approximation of the wound edges while reducing the chance of permanent suture mark scarring. Finally, because of the minimal skin tension created by tape, it can be used on skin that has been compromised by vascular insufficiency or altered by prolonged use of steroids.
Contraindications
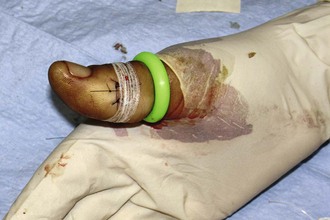
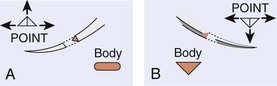
Do not place tape tightly and circumferentially around digits because it has insufficient ability to stretch or lengthen (Fig. 35-3). If placed circumferentially, the natural wound edema of an injured digit can make the tape act like a constricting band, which can lead to ischemia and possible necrosis of the digit. Use semicircular or spiral placement techniques if digits are to be taped.
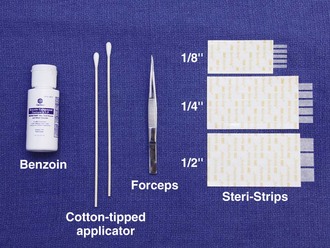
Equipment
For simple tape closure, the equipment required includes forceps and tape of the proper size (see Fig. 35-1). Most taping can be done in the ED with  × 3-inch strips. For wounds larger than 4 cm, however,
  strips provide greater strength. Most companies manufacture strips up to 1 inch wide and 4 inches long.
Procedure
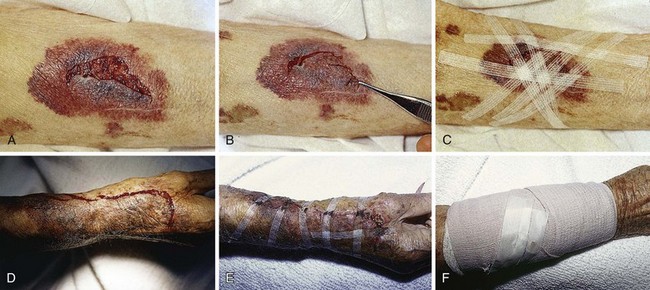
Proper wound preparation, irrigation, débridement, and hemostasis must precede tape closure. Fine hair may be cut short. Dry the area of tape application thoroughly to ensure proper adhesion. Do not attempt to apply tape to a wet area or over a wound that is slowly oozing blood because it will usually result in failure of the tape to stick to the skin. On fingers, tape can be applied to a wound that is kept dry by temporarily placing a tourniquet at the base of the finger (see Fig. 35-3).
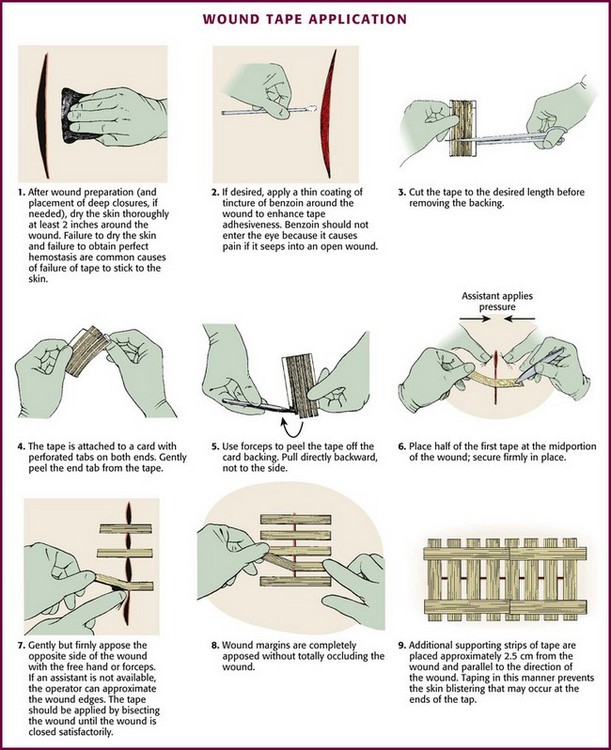
The technique of applying tape is shown in Figure 35-4. After the wound has been dried, apply a liquid adhesive such as tincture of benzoin or Mastisol to the skin adjacent to the wound to increase adhesion of the tape.2 All tape comes in presterilized packages. Open them directly onto the operating field. Handle tape with gloved hands. With the backing still attached, cut the tape to the desired length or long enough to allow approximately 2 to 3 cm of overlap on each side of the wound. After the end tab is removed, gently remove the tape from its backing with forceps by pulling straight back. Do not pull to the side because the tape will curl and be difficult to apply to the wound. Place half of the tape securely at the midportion of the wound. Gently but firmly appose the opposite wound edge to its counterpart. Apply the second half of the tape next. Hold the wound edges as close together as possible and at equal height to prevent the development of a linear, pitted scar. Apply additional tape by bisecting the remainder of the wound. Place a sufficient number of tape strips so that the wound is completely apposed without totally covering the entire length of the wound. Finally, place additional cross tapes to add support and prevent blistering caused by unsupported tape ends.1
Complications
Complications are uncommon with tape closure. The wound infection rate in clean wounds closed with tape compares favorably with rates for other standard closures.1 However, some investigators believe that tape closure leads to inferior cosmetic results.8 Premature tape separation occurs in approximately 3% of cases.6 Other complications include (1) skin blistering, which occurs if the tape is not properly anchored with cross-strips or the tape is stretched too tightly across the wound, and (2) wound hematoma, which results if hemostasis is inadequate. Tape may loosen prematurely over shaved areas as hair grows back.
When tincture of benzoin is used, apply it carefully to the surrounding, uninjured skin. Be careful because if spillage into the wound occurs, there is a higher risk for infection.9 Benzoin vapor can cause pain when applied near an open wound that has not been anesthetized. Benzoin can also injure the conjunctival and corneal membranes of the eye.
Summary
Modern tape products and techniques serve a valuable role in the management of minor wounds in the ED. In selected wounds, tape closure is as successful as suture closure.1,10 Closure tape should be considered for superficial wounds in cosmetically unimportant areas and for wounds on relatively flat surfaces that are too wide for simple dressings but do not require sutures.
Tissue Adhesive (Tissue Glue)
Tissue adhesive (also called tissue “glue”) provides a simple, rapid method of wound closure. Tissue adhesive has been approved for use in the United States since 1998. Two types of tissue adhesive are available: N-2-octylcyanoacrylate (Dermabond, Ethicon, Inc.) and N-butyl-2-cyanoacrylate (Indermil, Tyco Healthcare Group LP). Animal studies have shown octylcyanoacrylate-based adhesive to have significantly greater strength and flexibility than butylcyanoacrylate-based adhesive. Dermabond and Indermil are packaged in sterile, single-use ampules (Fig. 35-5). These bonding agents can be used on superficial wounds, even in hair-bearing areas. Tissue adhesives polymerize on contact with water. These substances are biodegradable but remain in the wound until well after healing.11,12
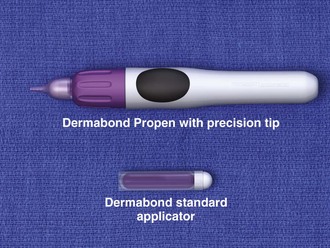
Figure 35-5 Tissue adhesive, 2-octylcyanoacrylate, comes in a variety of commercially available dispensers.
Procedure
Tissue adhesive can be used to approximate wounds that do not require deep-layer closure and do not have significant tension on the edges of the wound (Fig. 35-6). In preparation for closure, clean and anesthetize the wound. Débride the wound if necessary. Control bleeding of the wound.
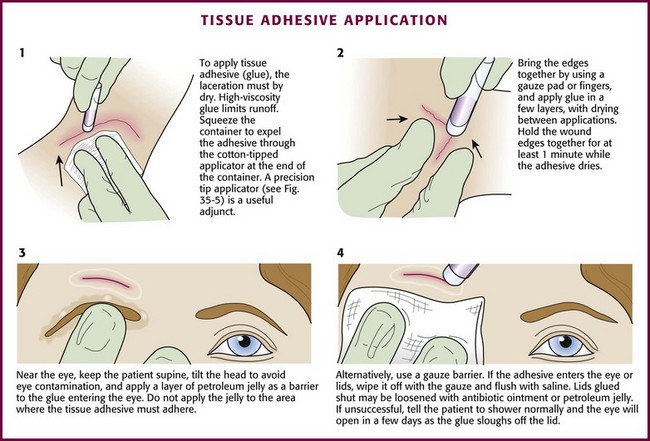
Hold the wound edges together with forceps, gauze pads, or fingers. Squeeze the small, cylindrical plastic container to expel droplets of tissue adhesive through the cotton-tipped applicator at the end of the container. Apply the adhesive in at least three to four thin layers along the length of the wound’s surface and extend it approximately 5 to 10 mm from each side of the wound. Alternatively, place the adhesive in strips perpendicular to the laceration (analogous to the placement of closure tape). The purple color of the solution facilitates placement of the droplets. Support and hold the edges of the wound together for at least 1 minute while the adhesive dries. Low-viscosity tissue adhesives may seep into the wound or trickle off rounded surfaces during application. This tendency toward migration or “runoff” can be minimized by using high-viscosity adhesives13 (e.g., Dermabond HV Topical Skin Adhesive, Ethicon, Inc.), positioning the wound horizontally, or applying the adhesive slowly. Contain runoff with wet gauze or by creating a barrier of petrolatum.
Tissue adhesives can also be used to treat superficial skin tears that do not extend past the dermis. After the wound and skin flap are cleaned, lay the flap over the base of the wound and approximate the edges of the wound. Any remaining blood and serum are expressed from under the flap, and the entire area is dried. A thin layer of adhesive is applied over the wound margins and 1 to 2 cm beyond the margin. After the first layer dries, a second layer of adhesive is applied. A dressing is not required unless there is a reason to protect the wound from repeated injury.”14,15
The primary advantage of tissue adhesive is the speed of closure. Wounds can be closed in as little as one sixth the time required for repair with sutures. Application is rapid and painless. Use of tissue adhesive avoids suture marks adjacent to the wound and reduces the risk for needlestick injuries to health care personnel. Wounds closed with tissue adhesive have less tensile strength in the first 4 days than do sutured wounds,16,17 but 1 week after closure, the tensile strength and overall degree of inflammation in wounds closed with tissue adhesive are equivalent to those closed with sutures.12,18 Cosmetic results are similar to those obtained with suture repair.17,19–25 Tissue adhesive serves as its own wound dressing and has an antimicrobial effect against gram-positive organisms.26,27 The material sloughs off in 5 to 10 days, thereby saving the patient from a clinician visit. Do not apply ointments or occlusive bandages on wounds closed with tissue adhesive.
Complications
Although tissue adhesive is classified as nontoxic and does not cause a significant foreign body reaction, some authors warn against placing it within the wound cavity.17,18 However, various investigators have applied specially formulated octyl-2-cyanoacrylate (“liquid adhesive bandage”) directly to open minor lacerations, abrasions, and partial-thickness wounds. When compared with adhesive bandages, wounds covered with this tissue adhesive had equivalent rates of healing and complications.”28,29
If hemostasis is inadequate or an excessive amount of adhesive is applied too quickly, the patient can experience a burning sensation or sustain a local burn from the heat of polymerization. After polymerizing, tissue adhesive can fracture with excessive or repetitive movement. Although gentle rinsing is permitted, if the adhesive is washed or soaked, it will peel off in a few days, before the wound is healed.17
If the clinician’s gloved fingers, gauze, or plastic instruments contact the tissue adhesive during application, the glove may adhere to the patient’s skin. Tissue adhesive can be removed with antibiotic ointment or petrolatum jelly or more rapidly with acetone.25 Indermil must be stored under refrigeration.
One risk involving the use of tissue adhesive is its ease of use—clinicians may fail to adequately clean wounds before closure with tissue adhesive.30 Tissue adhesive should not be used to close infected wounds. There is a slightly higher risk for wound dehiscence in closures with tissue glue than with sutures.31,32
If the edges of the wound cannot be held together without considerable tension, tissue adhesive should not be used.25 Percutaneous sutures provide a more secure immediate closure than tissue adhesive does.12 Tissue adhesive should not be used near the eyes, over or near joints, on moist or mucosal surfaces, or on wounds under significant static or dynamic skin tension. See Figure 35-6 for information on managing eyelids that are accidentally glued shut.
Wound Staples
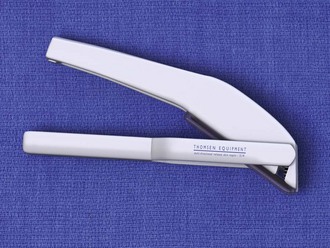
Automatic stapling devices have become commonplace for closure of surgical incisions and traumatic wounds (Fig. 35-7). Clinical studies of patients with stapled surgical incisions have found no significant difference between stapling and suturing when infection rates, healing outcome, and patient acceptance are compared.33–37 Wound stapling and nylon suture closure of skin compared favorably in wound tensile strength, complication rates, patient tolerance, efficiency of closure, scar width, color, general appearance, suture or staple marks, infection rates, and cost. In animal models, staples caused less wound inflammation and offered more resistance to infection with contaminated wounds.38–41
The most significant advantage of wound stapling over suturing is speed of closure. The most significant downside is loss of the cosmetic effect that can be achieved with meticulous suture closure. On average, stapling is three to four times faster than suturing traumatic wounds.42–44 When clinician time and cost of instruments are considered, the difference in cost between stapling and suturing is minimal43 or favors stapling.42,45
Procedure
Before stapling, sometimes it is necessary to place deep, absorbable sutures to close deep fascia and reduce tension in the superficial fascia and dermal layers. To facilitate the stapling process, the edges of the wound should be everted, preferably by a second operator (Fig. 35-8, step 1). The assistant precedes the operator along the wound and everts the edges of the wound with forceps or pinches the skin with the thumb and forefinger. Stapling flattened wound edges may place the staple precisely but results in inversion of the wound. Once the edges are held in eversion, the staple points are gently placed across the wound. It is imperative to place the center of the staple device over the center of the wound to ensure the best closure and to avoid overriding or misaligned edges (difficult in an uncooperative patient). When the stapler handle or trigger is squeezed, the staple is advanced automatically into the wound and bent to the proper configuration (see Fig. 35-8, steps 2 and 3). The operator should not press too hard on the skin surface to prevent placing the staple too deeply and causing ischemia within the staple loop. When placed properly, the crossbar of the staple is elevated a few millimeters above the surface of the skin (see Fig. 35-8, step 4). A sufficient number of staples should be placed to provide proper apposition of the edges of the wound along its entire length. (One suggested method is to place a staple in the midpoint of the length of the wound and then bisect either side of the wound with additional staples. Continue the process until the edges of the wound are well opposed.) After the wound is stapled, an antibiotic ointment may be applied to minimize adherence of the dressing, and a sterile dressing is applied. If necessary, the patient can remove the dressing and gently clean the wound in 24 to 48 hours. Scalp lacerations can be cleansed by showering within a few hours.
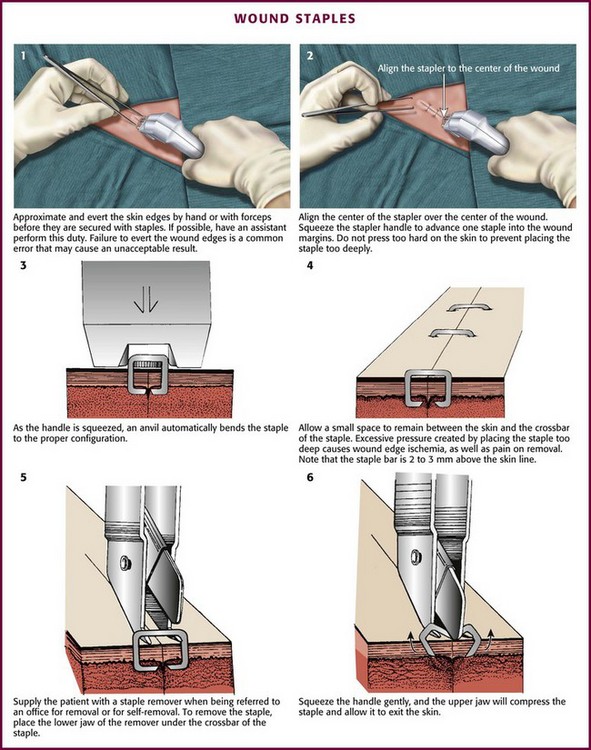
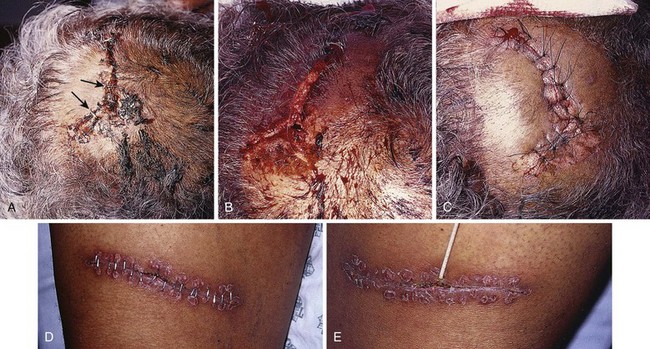
Removal of staples requires a special instrument made available by each manufacturer of stapling devices. The lower jaw of the staple remover is placed under the crossbar, and the handle is squeezed (see Fig. 35-8, steps 5 and 6). This action compresses the crossbar and bends the staple outward, thereby releasing the points of the staple from the skin. Many primary care physicians do not routinely stock the instrument. If referred for office removal of staples, the patient can be given a disposable staple removal device. Motivated patients can remove their own staples if given the removal device. The interval between staple application and removal is the same as that for standard suture placement and removal. Staples can cause significant scarring if left in place too long (Fig. 35-9).
Complications
A common error during insertion of staples is failure to evert the edges of the skin before stapling (see Fig. 35-9). Eversion avoids the natural tendency of the device to invert the closure. Eversion may be accomplished with forceps or by pinching the skin with the thumb and index finger, a procedure that requires some practice. Another common error is to fail to align the middle of the staple exactly in the midline of the wound. Staples do cause marks in the skin similar to sutures. In patients who tend to scar more easily, the scar resulting from staples may be more pronounced than that produced by sutures, especially if the staples are left in place for prolonged periods.
Wound stapling achieves results that are generally comparable to those of sutures for the closure of traumatic, linear lacerations in noncosmetic areas, such as the scalp, trunk, and extremities. Stapling is much faster than suturing. Wound stapling does not differ significantly from suturing in terms of cost, infection rates, wound healing, and patient acceptance. Cosmesis does, however, suffer, especially if the staples are left in too long (see Fig. 35-9D and E).
Sutures
In the United States, most traumatic wounds are closed by suturing.
Equipment
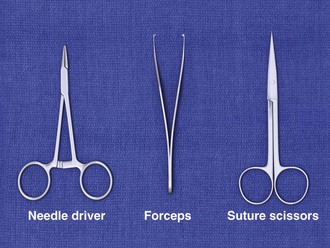
In addition to the instruments used for débridement, a needle holder and suture scissors are required for suturing (Fig. 35-10). The mechanical performance of disposable needle holders distributed by different surgical instrument companies varies considerably.46 The size of the needle holder should match the size of the needle selected for suturing—that is, the needle holder should be large enough to hold the needle securely as it is passed through tissue, yet not so large that the needle is crushed or bent by the instrument.
In addition, 2.5 loupe magnification may improve inspection of wounds and facilitate the repair of facial and hand wounds.47
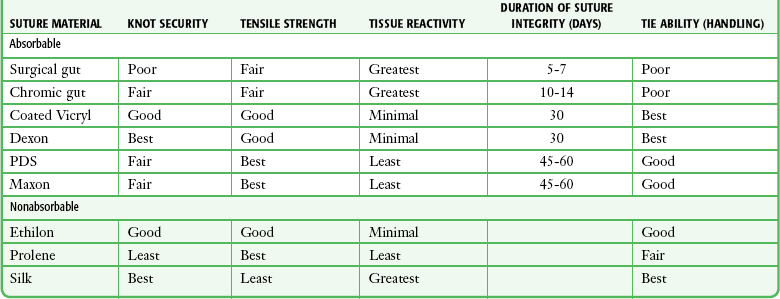
Suture Material
A wide variety of suture material is available (Fig. 35-11). Clinician preference varies widely, and there are no definitive standards on which to base the use of suture material for a particular wound or particular site. For most wounds that require closure of more than one layer of tissue, the clinician must choose sutures from two general categories: an absorbable suture for the deeper, subcutaneous (SQ) layer and a nonabsorbable suture for surface (percutaneous) closure.
Sutures can be described in terms of four characteristics:
1. Composition (i.e., chemical and physical properties)
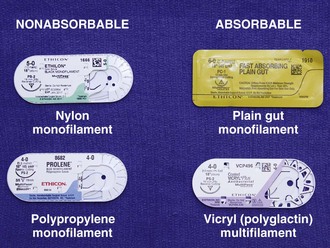
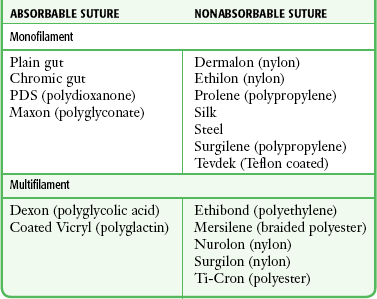
Composition: Sutures are made from natural fibers (cotton, silk), from sheep submucosa or beef serosa (plain gut, chromic gut), or from synthetic material such as nylon (Dermalon, Ethilon, Nurolon, Surgilon), Dacron (Ethiflex, Mersilene), polyester (Ti-Cron), polyethylene (Ethibond), polypropylene (Prolene, Surgilene), polyglycolic acid (Dexon), and polyglactin (Vicryl, coated Vicryl). Stainless steel sutures are rarely, if ever useful in wound closure in the ED setting because of handling difficulty and fragmentation. Some sutures are made of a single filament (monofilament); others consist of multiple fibers braided together (Table 35-1).48
Handling and Performance: Desirable handling characteristics in a suture include smooth passage through tissue, ease in knot tying, and stability of the knot once tied (Table 35-2). Smooth sutures pull through tissue easily, but knots slip more readily. Conversely, sutures with a high coefficient of friction have better knot-holding capacity but are difficult to slide through tissue. Smooth sutures will loosen after the first throw of a knot is made, and thus a second throw is needed to secure the first in place. However, the clinician may want to tighten a knot further after the first throw is made. This is difficult with rougher types of suture.
TABLE 35-2
Characteristics of Suture Material
Modified with permission from Hollander J, Singer A. Laceration management. Ann Emerg Med. 1999;34:351.
Multifilament sutures have the best handling characteristics of all sutures, whereas steel sutures have the worst. In terms of performance and handling, significant improvements have been made in the newer absorbable sutures. Gut sutures have many shortcomings, including relatively low and variable strength, a tendency to fray when handled, and stiffness despite being packaged in a softening fluid.49,50 Multifilament synthetic absorbable sutures are soft and easy to tie and have few problems with knot slippage. Polyglactin 910 (coated Vicryl) sutures have an absorbable lubricant coating. The “frictional drag” of these coated sutures as they are pulled through tissue is less than that of uncoated multifilament materials, and resetting of knots after the initial throw is much easier. This characteristic allows retightening of a ligature without knotting or breakage and with smooth, even adjustment of suture line tension in running subcuticular stitches.51 Synthetic monofilament sutures have the troublesome property of “memory”—a tendency of the filament to spring back to its original shape, which causes the knot to slip and unravel. Some nonabsorbable monofilament sutures are coated with polytetrafluoroethylene (Teflon) or silicone to reduce their friction. This coating improves the handling characteristics of these monofilaments but results in poorer knot security.42
Three square knots will secure a stitch made with silk or other braided, nonabsorbable material, and four knots are sufficient for synthetic, absorbable, and nonabsorbable monofilament sutures.52 Five knots are needed for the Teflon-coated synthetic Tevdek.53 When coated synthetic suture material is used, attention to basic principles of knot tying is even more important. An excessive number of throws in a knot weakens the suture at the knot. If the clinician uses square knots (or a surgeon’s knot on the initial throw, followed by square knots) that lie down flat and are tied securely, knots will rarely unravel.54
Absorption and Reactivity: Sutures that are rapidly degraded in tissue are termed absorbable; those that maintain their tensile strength for longer than 60 days are considered nonabsorbable (see Table 35-1). Plain gut may be digested by white blood cell lysozymes in 10 to 40 days; chromic gut will last 15 to 60 days. Remnants of both types of suture, however, have been seen in wounds more than 2 years after placement.49,52,55 Ethicon catgut is rapidly absorbed within 10 to 14 days and is associated with less inflammation than chromic catgut is.56 Vicryl is absorbed from the wound site within 60 to 90 days49,52 and Dexon, within 120 to 210 days.57,58 When placed in the oral cavity, plain gut disappears after 3 to 5 days, chromic gut after 7 to 10 days, and polyglycolic acid after 16 to 20 days.59 In contrast, SQ silk may not be completely absorbed for as long as 2 years.52 The rate of absorption of synthetic absorbable sutures is independent of suture size.57
Sutures may lose strength and function before they are completely absorbed in tissues. Braided synthetic absorbable sutures lose nearly all their strength after about 21 days. In contrast, monofilament absorbable sutures (modified polyglycolic acid [Maxon, Davis & Geck] and polydioxanone [PDS, Ethicon]) retain 60% of their strength after 28 days.60,61 Gut sutures treated with chromium salts (chromic gut) have prolonged tensile strength; however, all gut sutures retain tensile strength erratically.49,52 Of the absorbable types of suture, a wet and knotted polyglycolic acid suture is stronger than a plain or chromic gut suture subjected to the same conditions.50,62
Polypropylene remains unchanged in tissue for longer than 2 years after implantation.63 In comparison testing, sutures made of natural fibers such as silk, cotton, and gut were the weakest; sutures made of Dacron, nylon, polyethylene, and polypropylene were intermediate in tensile strength; and metallic sutures were the strongest.50 Comparison of suture strength versus wound strength is a measure of the usefulness of a suture. Catgut is stronger than the soft tissue of a wound for no more than 7 days; chromic catgut, Dexon, and Vicryl are stronger for 10 to 21 days; and nylon, wire, and silk are stronger for 20 to 30 days.64
All sutures placed within tissue will damage host defenses and provoke inflammation. Even the least reactive suture impairs the ability of the wound to resist infection.63 The magnitude of the reaction provoked by a suture is related to the quantity of suture material (diameter × total length) placed in the tissue and to the chemical composition of the suture. Among absorbable sutures, polyglycolic acid and polyglactin sutures are the least reactive, followed by chromic gut. Nonabsorbable polypropylene is less reactive than nylon or Dacron.50,65,66 Significant tissue reaction is associated with catgut, silk, and cotton sutures. Absorbable polyglycolic acid sutures are less reactive than those made of nonabsorbable silk.67 Highly reactive material should be avoided in contaminated wounds.
The chemical composition of sutures is a factor in early infection. The infection rate in experimentally contaminated wounds closed with polyglycolic acid sutures is lower than the rate when gut sutures are used.63 However, other authors have compared plain gut and nonabsorbable nylon sutures for skin closure in children and found comparable cosmetic results and infection rates.68 Lubricant coatings on sutures do not alter suture reactivity, absorption characteristics, breaking strength, or the risk for infection.51,63 Multifilament sutures provoke more inflammation and are more likely than monofilament sutures to produce infection if left in place for prolonged periods.69,70 Monofilament sutures elicit less tissue reaction than do multifilament sutures, and multifilament materials tend to wick up fluid by capillary action. Bacteria that adhere to and colonize sutures can envelop themselves in a glycocalix that protects them from host defenses,71 or they can “hide” in the interstices of a multifilament suture and, as a result, be inaccessible to leukocytes.69 PDS provides the advantages of a monofilament suture in an absorbable form, thus making it a good choice as a subcuticular stitch. Polypropylene sutures have a low coefficient of friction, and subcuticular stitches with this material are easy to pull out.72
Size and Strength: The size of suture material (thread diameter) is related to the tensile strength of the suture; threads with greater diameter are stronger. The strength of the suture is proportional to the square of the diameter of the thread. Therefore, a 4-0 suture of any type is larger and stronger than a 6-0 suture. The correct suture size for approximation of a layer of tissue depends on the tensile strength of that tissue. The tensile strength of the suture material should be only slightly greater than that of the tissue because the magnitude of damage to local tissue defenses is proportional to the amount of suture material placed in the wound.52,73
Synthetic absorbable sutures have made the older, natural suture material unnecessary for most wound closures. Polyglycolic acid (Dexon) and polyglactin 910 (coated Vicryl) have improved handling characteristics, knot security, and tensile strength. Their absorption rates are predictable, and tissue reactivity is minimal.74,75 The distinct advantages of synthetic nonabsorbable sutures over silk sutures are their greater tensile strength, low coefficient of friction, and minimal tissue reactivity.63,74 They are extensible and elongate without breaking as the edges of the wound swell in the early postoperative period.73,74 In contrast to silk sutures, synthetics can easily and painlessly be removed once the wound has healed. The monofilament synthetic suture Novafil has elasticity that allows a stitch to enlarge with wound edema and to return to its original length once the edema subsides. Stiffer materials lacerate the encircled tissue as the wound swells.76
Needles
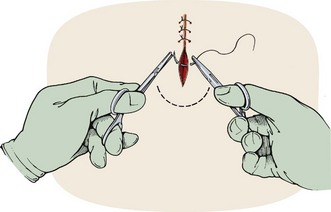
The eyeless, or “swaged,” needle is used for wound closure in most emergency centers (Fig. 35-12). Selection of the appropriate needle size and curvature is based on the dimensions of the wound and the characteristics of the tissue to be sutured. The needle should be large enough to pass through tissue to the desired depth and then to exit the tissue or skin surface far enough that the needle holder can be repositioned on the distal end of the needle at a safe distance from the tip of the needle (Fig. 35-13). Although it is tempting to use the fingers to grasp the tip of the needle to pull it through the skin, this practice risks a needlestick. The clinician should either reposition the needle holder or use forceps to disengage the needle from the laceration.
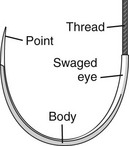
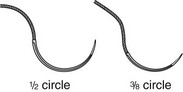
In wound repair, needles must penetrate tough, fibrous tissue—skin, SQ tissue, and fascia—yet should slice through this tissue with minimal resistance or trauma and without bending. The type of needle best suited for closure of SQ tissue is a conventional cutting needle in a three-eighths or one-half circle (Fig. 35-14). Double-curvature needles (coated Vicryl with PS-4-C cutting needles, Ethicon) may be easier to maneuver in narrow, deep wounds. For surface closure, a conventional cutting-edge needle permits more precise needle placement and requires less penetration force (Fig. 35-15).77,78
Suturing Techniques (Figs. 35-16 and 35-17)
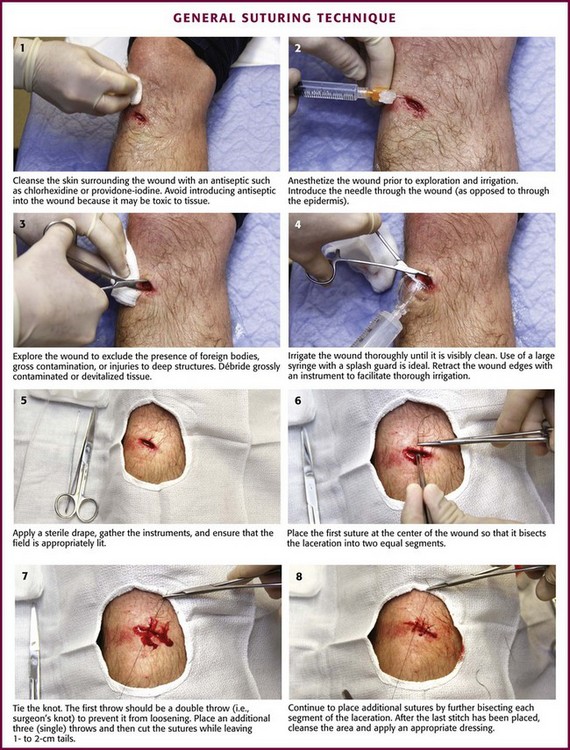
Figure 35-16 General suturing technique.
Closure Principles
Clinician preference varies widely, and there are no definitive standards on the exact method of wound preparation, manipulation of tissue, or closure technique that is preferred for any given wound. There is a tendency to overuse sutures for minor lacerations that will heal nicely with no intervention. Therefore, before suturing, one must assess the need for the procedure (Fig. 35-18).
Minimizing Tissue Trauma: The importance of careful handling of tissue has been emphasized since the early days of surgery. Skin and SQ tissue that has been stretched, twisted, or crushed by an instrument or strangled by a suture that is tied too tightly may undergo necrosis, and increased scarring and infection may result. When the edges of a wound must be manipulated, the SQ tissues should be lifted gently with toothed forceps or a skin hook while avoiding the surface of the skin.
When choosing suture size, the clinician should select the smallest size that will hold the tissues in place. Skin stitches should incorporate no more tissue than is needed to coapt the wound edges with little or no tension. Knots should be tied securely enough to approximate the edges of the wound but without blanching or indenting the skin surface.79
Relieving Tension: Many forces can produce tension on the suture line of a reapproximated wound. Static skin forces that stretch the skin over bones cause the edges of a new wound to gape, and they also continuously pull on the edges of the wound once it has been closed. Traumatic loss of tissue or wide excision of a wound may have the same effect. The best cosmetic result occurs when the long axis of a wound happens to be parallel to the direction of maximal skin tension; such alignment brings the edges of the wound together.76
Muscles pulling at right angles to the axis of the wound impose dynamic stress. Swelling after an injury creates additional tension within the circle of each suture.79 Skin suture marks result not only from tying sutures too tightly but also from failing to eliminate any underlying forces distorting the wound. Tension can be reduced during wound closure in two ways: undermining of the wound edges and layered closure.
Undermining.: The force required to reapproximate the edges of a wound correlates with the subsequent width of the scar.80 Wounds subject to significant static tension require the undermining of at least one tissue plane on both sides of the wound to achieve a tension-free closure. To undermine a wound, the clinician frees a flap of tissue from its base at a distance from the edge of the wound approximately equal to the width of the gap that the laceration presents at its widest point (Fig. 35-19).

The depth of the incision can be modified, depending on the orientation of the laceration to skin tension lines and the laxity of skin in the area. A No. 15 scalpel blade held parallel to the surface of the skin is used to incise the adipose layer or the dermal layer of the wound. The clinician can also accomplish this technique by spreading scissors in the appropriate tissue plane. Undermining allows the edges of the skin to be lifted and brought together with gentle traction.81 Potential complications of this procedure include injury to cutaneous nerves and creation of a hematoma under the flap. Because undermining may harm the underlying blood supply, this technique should be reserved for relatively uncontaminated wounds when no other methods adequately relieve wound tension.77
Layered Closure.: The structure of skin and soft tissue varies with the location on the body (Fig. 35-20). Most wounds handled in an ED require approximation of no more than three layers: fascia (and associated muscle), SQ tissue, and skin surface (papillary layer of the dermis and epidermis).82 Any “dead space” (or unapposed edges) within a wound may fill with blood or exudate and enhance the development of infection. Closure of individual layers obliterates this dead space (Fig. 35-21).
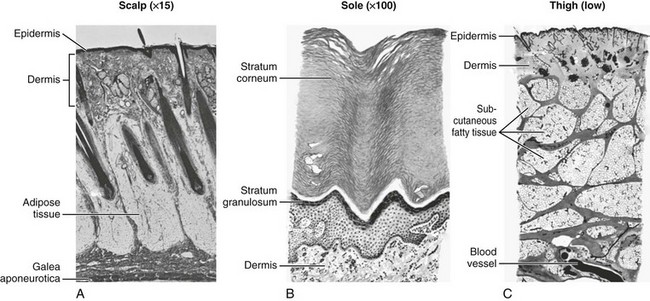
Several exceptions exist to the general rule of multilayered closure. The adipose layer of soft tissue should not be closed separately. A “fat stitch” is not necessary because little support is provided by closure of the adipose layer and additional suture material may increase the possibility of infection.2,83 Scalp wounds are generally closed in a single layer. For lacerations penetrating the dermis in the fingers, hands, toes, and feet and the sebaceous skin of the nasal tip, the amount of SQ tissue is too small to warrant layered closure; in fact, SQ stitches may leave tender nodules in these sensitive locations. Layered closure is not recommended for wounds without tension, those with poor vascularity, and those with a moderate or high risk for infection. With single-layer closure, the surface stitch should be placed more deeply.64
Suture Placement
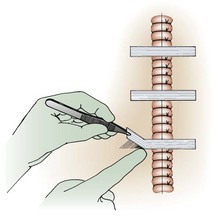
SQ Layer Closure: Once the fascial structures have been reapproximated, the SQ layer is sutured. Although histologically the fatty and fibrous SQ tissue (hypodermis) is an extension of (and continuous with) the reticular layer of the dermis,84 suturing of these layers is traditionally referred to as a SQ closure. One approach is to close the length of this layer in segments by placing the first stitch in the middle of the wound and bisecting each subsequent segment until closure of the layer has been completed.48 This technique is useful for the closure of wounds that are long or sinuous, and it is particularly effective for wounds with one elliptical and one linear side. The needle is grasped with the needle holder close to the end of the suture. The clinician can suture more rapidly if the fingers are placed on the midshaft of the needle holder rather than in the rings of the instrument (Fig. 35-22).

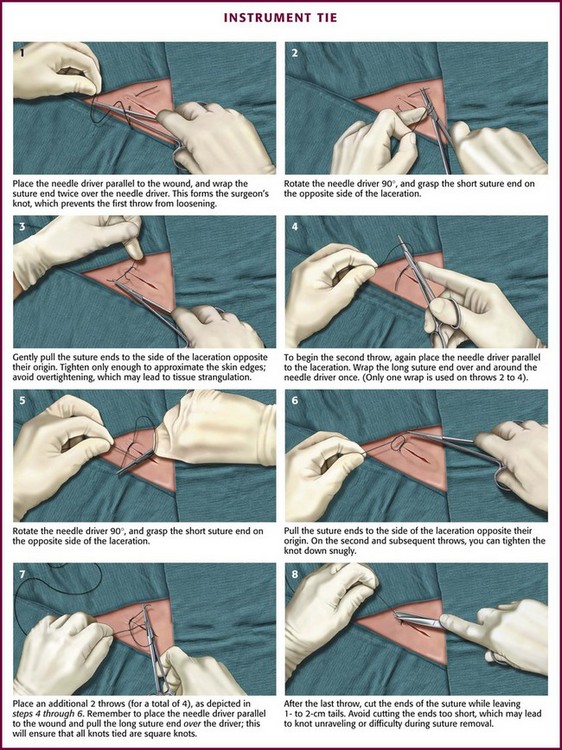
The suture enters the SQ layer at the bottom of the wound (Fig. 35-23A) or, if the wound has been undermined, at the base of the flap (see Fig. 35-23B) and exits in the dermis. Once the suture has been placed on one side of the wound, it can be pulled across the wound to the opposite side (or the edges of the wound pushed together) to determine the matching point on the opposite side. The needle is then advanced into this point. The needle should enter the dermis at the same depth as it exited from the opposite side, pass through the tissue, and exit at the bottom of the wound (or the base of the flap). The edges of the wound can be closely apposed by pulling the two tails of the suture in the same direction along the axis of the wound (see Fig. 35-23C). Some clinicians place their SQ suture obliquely rather than vertically to facilitate knot tying. When the knot in this SQ stitch is tied, it will remain inverted, or “buried,” at the bottom of the wound. Burying the knot of the SQ stitch avoids a painful, palpable nodule beneath the epidermis and keeps the bulk of this foreign material away from the surface of the skin. Most emergency clinicians construct knots with the instrument tie technique (see Fig. 35-17). Hand and instrument knot-tying techniques are described and illustrated in wound care texts.85,86
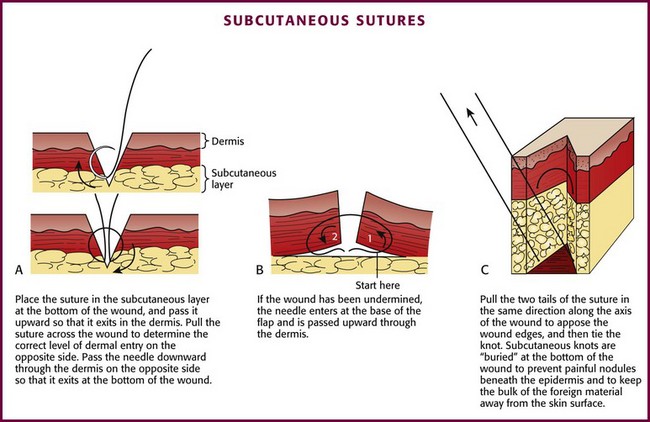
Figure 35-23 Subcutaneous sutures.
Once the knot has been secured, the tails of the suture should be pulled taut for cutting. The scissors are held with the index finger on the junction of the two blades. The blade of the scissors is slid down the tail of the suture until the knot is reached. With the cutting edge of the blade tilted away from the knot, the tails are cut. This technique prevents the scissors from cutting the knot itself and leaves a 3-mm tail, which protects the knot from unraveling.87 The entire SQ layer is sutured in this manner.
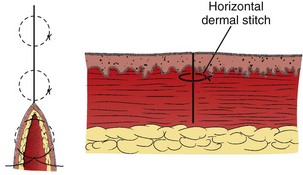
After the SQ layer has been closed, the distance between the skin edges determines the approximate width of the scar in its final form. If this width is acceptable, surface sutures can be inserted.88 Despite undermining and placement of a sufficient number of SQ sutures, on occasion a large gap between the edges of the wound may persist. In such cases, a horizontal dermal stitch may be used to bridge this gap (see Fig. 35-29).
Surface Closure: The epidermis and the superficial layer of dermis are sutured in a single layer with nonabsorbable synthetic suture. The choice of suture size, the number of sutures used, and the depth of suture placement depend on the amount of skin tension remaining after SQ closure.
The number of sutures used in closing any wound will vary with the wound’s location, the amount of tension on the wound, and the degree of accuracy required by the clinician and patient. For example, sutures on the face would probably be placed between 1 and 3 mm apart.69 Unless the edges of the wound are uneven, sutures should be placed in a mirror-image fashion such that the depth and width are the same on both sides of the wound.52 In general, the distance between each suture should be approximately equal to the distance from the exit of the stitch to the edge of the wound.48,85
Skin closure may be accomplished by placing the appropriate number of sutures in segments (Fig. 35-24). When suturing the skin, right-handed operators should pass the needle from the right side of the wound to the left. The needle should be driven through tissue by flexing the wrist and supinating the forearm; the course taken by the needle should result in a curve identical to the curvature of the needle itself (see Fig. 35-24, steps 1 and 2, and Fig 35-25). The angle of exit for the needle should be the same as its angle of entrance so that an identical volume of tissue is contained within the stitch on each side of the wound (see Fig. 35-24, steps 3 and 4).
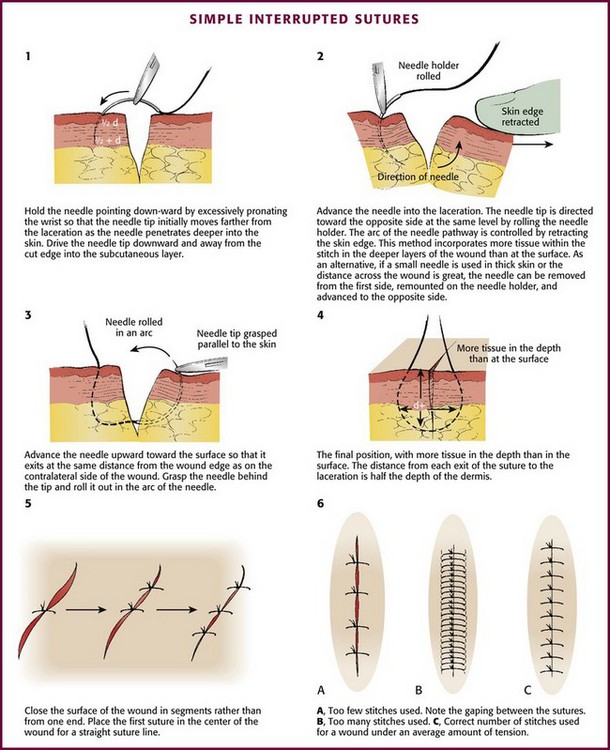
Figure 35-24 Simple interrupted sutures. See also Figures 35-16 and 35-17. (1-4, Redrawn from Kaplan EN, Hentz VR. Emergency Management of Skin and Soft Tissue Wounds: An Illustrated Guide. Boston: Little, Brown; 1984:86. Reproduced by permission.)

Complications: Sutures act as foreign bodies in a wound, and any stitch may damage a blood vessel or strangulate tissue. Therefore, the clinician should use the smallest size and the least number of sutures that will adequately close the wound.63 However, if spaced too widely, surface stitches will leave a “crosshatch” pattern of marks.
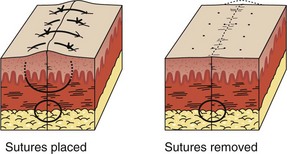
If sutures are tied too tightly around the edges of the wound or if individual stitches are under excessive tension, blood supply to the wound may be impeded, thereby increasing the chance of infection, and suture marks may form even after 24 hours.52,89
Eversion Techniques: If the edges of a wound invert or if one edge rolls under the opposite side, a poorly formed, deep, noticeable scar will result. Excessive eversion that exposes the dermis on both sides will also result in a larger scar than if the edges of the skin are perfectly apposed, but inversion produces a more visible scar than eversion does. Because most scars undergo some flattening with contraction, optimal results are achieved when the epidermis is slightly everted without excessive suture tension (Fig. 35-26). Wounds over mobile surfaces, such as the extensor surfaces of joints, should be everted. In time, the scar will be flattened by the dynamic forces acting in the area.
Numerous techniques can be used to avoid inversion of the edges of the wound. If the clinician angles the needle obliquely away from the laceration, a surface stitch can be placed so that it is deeper than it is wide81 and the stitch encircles more tissue in the SQ layer than at the surface. If this “bottle-shaped stitch” is intended to produce some eversion of the wound edges, the stitch must include a sufficient amount of SQ tissue (see Fig. 35-24, step 4).
Eversion can be accomplished by lifting and turning the edge of the wound outward with a skin hook or fine-toothed forceps before insertion of the needle on each side (Fig. 35-27, plate 1). Eversion can also be achieved simply by pressing on the skin adjacent to the wound with closed forceps (or a thumb and finger as long as a needlestick is avoided) (see Fig. 35-27, plate 2).
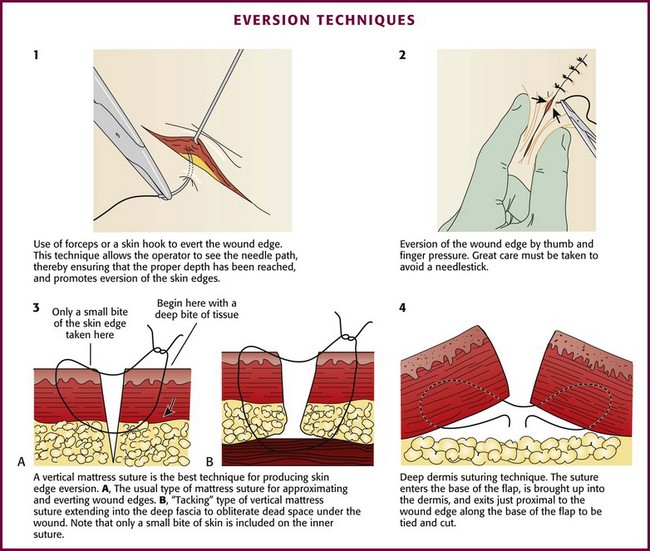
Vertical mattress sutures are particularly effective in everting the edges of the wound, and they can be used exclusively or alternated with simple interrupted sutures (see Fig. 35-27, plate 3).90 In wounds that have been undermined, an SQ stitch placed at the base of the flap on each side can in itself evert the wound (Fig. 35-27, plate 4).
Interrupted Stitch: The simple interrupted stitch is the most frequently used technique for closure of skin. It consists of separate loops of suture tied individually. Although tying plus cutting each stitch is time-consuming, the advantage of this method is that if one stitch in the closure fails, the remaining stitches continue to hold the wound together (see Fig. 35-24).
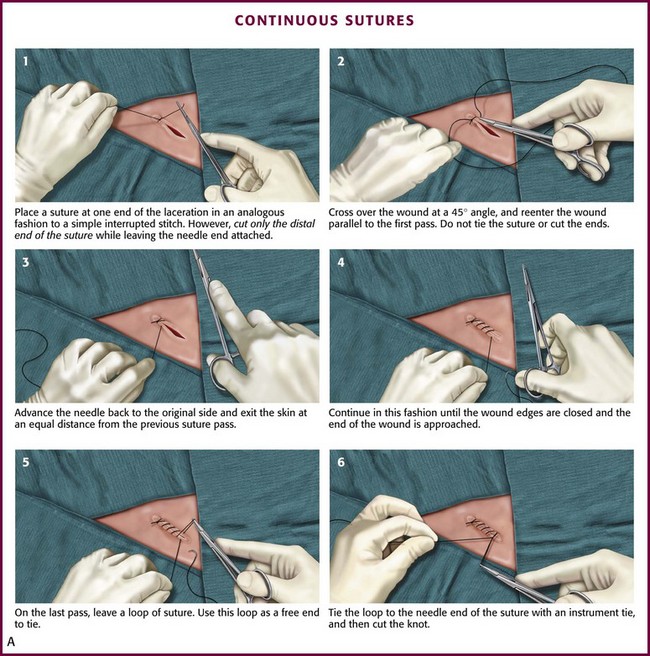
Continuous Stitch: A continuous stitch is an effective method for closing relatively clean, low-risk wounds that are under little or no tension and are on flat, immobile skin surfaces. In a continuous, or “running,” stitch, the loops are the exposed portions of a helical coil tied at each end of the wound. A continuous suture line can be placed more rapidly than a series of interrupted stitches. A continuous stitch has the additional advantages of strength (with tension being evenly distributed along its entire length), fewer knots (which are the weak points of stitches), and more effective hemostasis. This stitch will accommodate mild wound swelling. The continuous technique is useful as an epithelial or “surface” stitch in cosmetic closures; however, if the underlying SQ layer is not stabilized in a separate closure, a continuous surface stitch tends to invert the edges of the wound.
The continuous suture technique has some disadvantages. This technique should not be used to close wounds overlying joints. If a loop breaks at one point, the entire stitch may unravel. Likewise, if infection develops and the incision must be opened at one point, cutting a single loop may allow the entire wound to fall open. A simple continuous stitch has a tendency to produce suture marks if used for the closure of large wounds and if left in place for more than 5 days.79 However, if all tension on the wound can be removed with SQ sutures, stitch marks are seldom a problem.
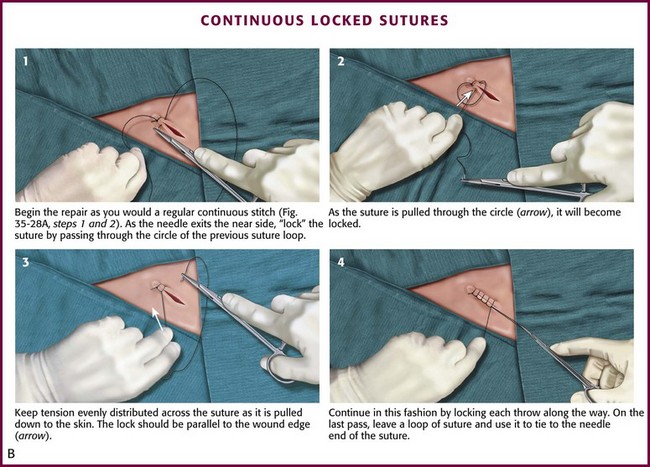
Among the variations of the continuous technique, the simple continuous stitch is the most useful to emergency clinicians (Fig. 35-28A). An interrupted stitch is placed at one end of the wound, and only the free tail of the suture is cut. As suturing proceeds, the stitch encircles the tissue in a spiral pattern. After each passage of the needle, the loop is tightened slightly, and the thread is held taut in the clinician’s nondominant hand. The needle should travel perpendicularly across the wound on each pass. The last loop is placed just beyond the end of the wound and the suture is tied, with the last loop being used as a “tail” in the process of tying the knot. A locking loop may be used with continuous suturing to prevent slippage of loops as the suturing proceeds (Fig. 35-28B). The interlocking technique allows use of the continuous stitch along an irregular laceration.81
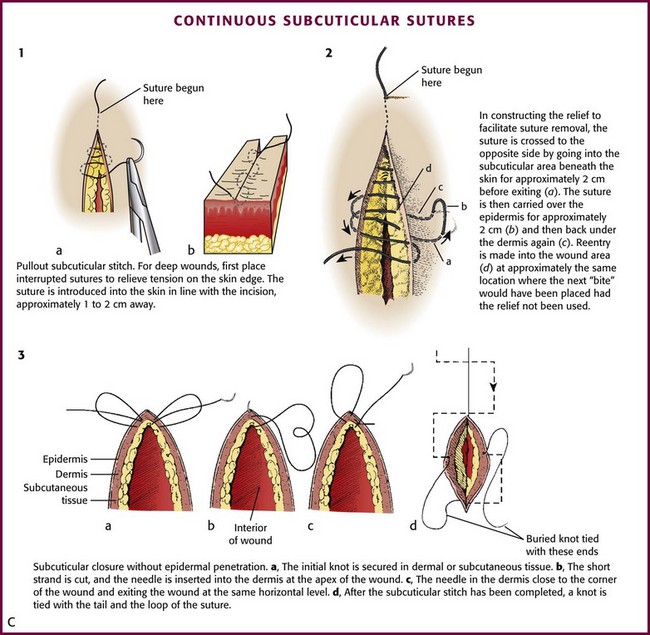
Continuous Subcuticular Stitch: Nonabsorbable sutures used for surface closure outlast their usefulness and must be removed. On occasion, wounds require an extended period of support, longer than that provided by surface stitches. Some patients with wounds that require skin closure are unlikely or unwilling to return for removal of the sutures. Some sutured wounds are covered by plaster casts. On occasion, the patient (child or adult) is likely to be as frightened by and uncooperative with suture removal as for suture placement. Surface sutures are more likely to produce stitch marks in children because the wounds are under greater tension than those in adults. The continuous subcuticular (or “dermal”) suture technique is ideal for these situations; the wound can be closed with an absorbable subcuticular stitch, thereby obviating the need for later suture removal. In patients prone to keloid formation, the subcuticular technique can be used in lieu of surface stitches to avoid disfiguring stitch marks. Buried, absorbable subcuticular stitches do not appear to provoke more inflammation than percutaneous running stitches with monofilament nylon.78 Because stitch marks are not a problem, a nonabsorbable subcuticular suture can be left in place for a longer period than a surface suture can.90
Although this technique is commonly used for cosmetic closures, closure of the subcuticular layer alone may not alter the width of the scar.91 This technique does not allow perfect approximation of the vertical height of the two edges of a wound,92 and in cosmetic closures it is often followed by a surface stitch. The subcuticular stitch requires a 4-0 or 5-0 suture made of either absorbable material or nonabsorbable synthetic monofilament. An absorbable suture can be “buried” within the wound, whereas a nonabsorbable suture is used for a “pullout” stitch. The absorbable synthetic monofilament suture PDS (Ethicon) is designed for subcuticular closure. It passes through tissues as easily as nonabsorbable monofilament sutures do and is absorbed if left in the wound.
Before the subcuticular stitch is begun, the SQ layer should be approximated with interrupted sutures to minimize tension on the wound. The pullout subcuticular stitch is started at the skin surface approximately 1 to 2 cm away from one end of the wound. The needle enters and exits the dermis at the apices of the wound (Fig. 35-28C, plate 1). Bites through tissue are taken in a horizontal direction, with the needle penetrating the dermis 1 to 2 mm from the skin surface. These intradermal bites should be small, of equal size, and at the same level on each side of the wound.75,90 Each successive bite should be placed 1 to 2 mm behind the exit point on the opposite side of the wound so that when the wound is closed, the entrance and exit points on either side are not directly apposed. Small bites should be taken to avoid puckering of the skin surface, and the stitch should not be accidentally interlocked. Some clinicians prefer to place a fine (6-0) running skin suture on the surface, in addition to the subcuticular suture, for meticulous skin approximation. The skin suture is removed in 3 to 4 days to avoid suture marks.
If a subcuticular stitch is used on lengthy lacerations, it is difficult to remove. Placement of “reliefs” consisting of periodic loops through the skin every 4 to 5 cm along the length of the stitch facilitates later removal (see Fig. 35-28C, plate 2). The suture is crossed to the opposite side, and the needle is passed from SQ tissue to the surface of the skin. The suture is carried over the surface for approximately 2 cm before reentering the skin and SQ tissue. The subcuticular stitch is then continued at approximately the point at which the next bite would have been placed had the relief not been used.
Subcuticular closure can be accomplished with absorbable sutures that do not penetrate the skin. Closure is begun with a dermal or SQ suture placed at one end of the wound and secured with a knot. After placement of the continuous subcuticular stitch from apex to apex, the suture is pulled taut, and a knot is tied with a tail and a loop of suture (see Fig. 35-28C, plate 3). The final knot can be buried by inserting the needle into deeper tissue; the needle exits several millimeters from the edge of the wound. By pulling on the end of the needle, the knot disappears into the wound.74 The advantage of this technique is that there are no suture marks on the skin.
Nonabsorbable subcuticular sutures can be left in place for 2 to 3 weeks, thus providing a longer period of support than with surface sutures and without the problem of stitch marks.79 If skin sutures are used in conjunction with a subcuticular stitch, they are removed in 3 to 4 days. A subcuticular closure in itself is stronger than a tape closure. If the subcuticular technique is used exclusively to approximate the skin surface, skin tape can be applied to correct surface unevenness and to provide more accurate apposition of the epidermis.
The primary disadvantage of the subcuticular stitch is that it is time-consuming, especially when supporting surface stitches are used. Another, faster method that avoids penetrating the skin is the interrupted subcuticular stitch (Fig. 35-29). Wounds with strong static skin tension may benefit from a few interrupted dermal stitches placed horizontal to the skin surface instead of a continuous subcuticular stitch.
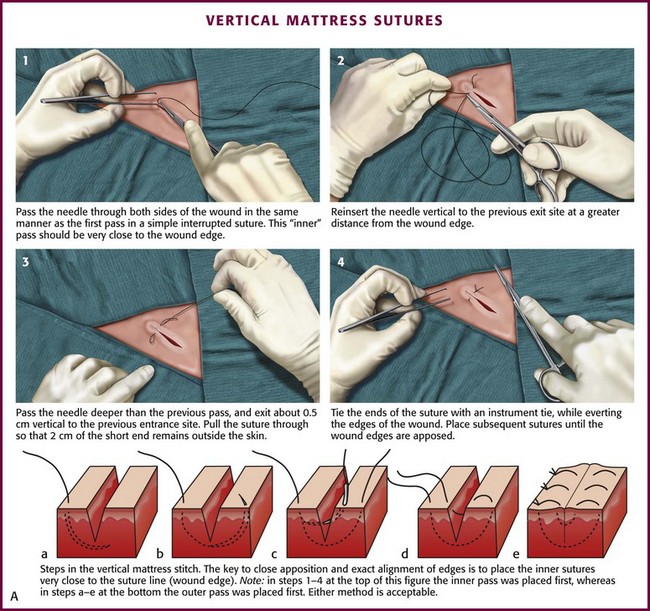
Mattress Stitch: The various types of mattress stitches are all interrupted stitches. The vertical mattress stitch is an effective method of everting skin edges (Fig. 35-30A; see also Fig. 35-27, plate 3). A vertical mattress stitch may be used to take a deep bite of skin, thereby eliminating the need for layered closure in areas where excessive tension does not result. If the superficial loop is placed first, the tails can be pulled upward while the deep loop is placed; this technique ensures eversion of the wound in less time than needed with the traditional technique.93
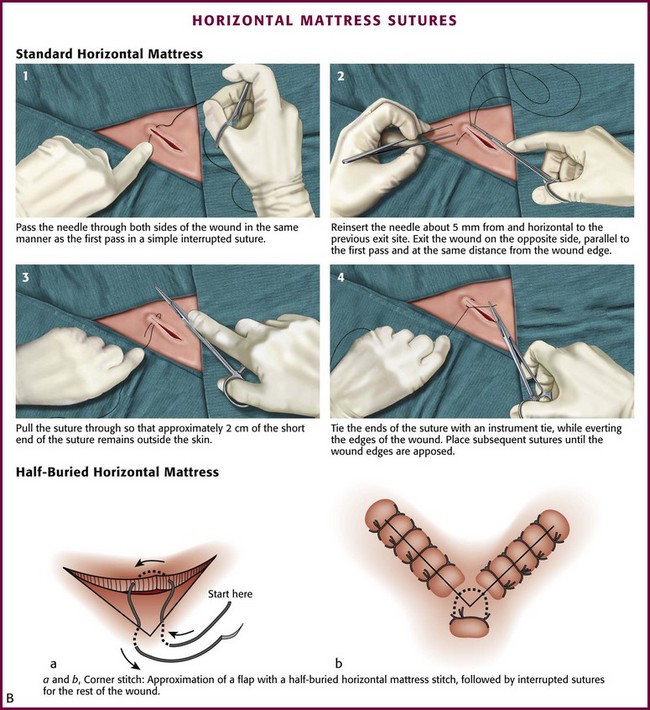
The horizontal mattress stitch is an SQ stitch that is oriented 90 degrees to the interrupted SQ stitch described previously (Fig. 35-30B). The horizontal mattress stitch apposes the skin edges closely while providing some degree of eversion.79 A horizontal mattress suture may be ideal for areas where eversion is desirable but there is little SQ tissue.
The half-buried horizontal mattress stitch is particularly useful in suturing the easily damaged apex of a V-shaped flap (see Fig. 35-30B). In performing the “corner stitch,” the suture needle penetrates the skin at a point beyond the apex of the wound and exits through the dermis. The corner of the flap is elevated, and the suture is passed through the dermis of the flap. The needle is then placed in the dermis at the base of the wound and returned to the surface of the skin. All dermal bites should be placed at the same level. The suture is tied with sufficient tension to pull the flap snugly into the corner without blanching the flap.79,94 If the tip of a large flap with questionable viability may be further jeopardized by postoperative swelling, a cotton stent can be placed underneath the knot of the corner stitch. The cotton absorbs the tension produced by swelling.
The only disadvantage of the horizontal and vertical mattress stitches is that they cause more ischemia and necrosis inside their loops than do either simple or continuous stitches.95
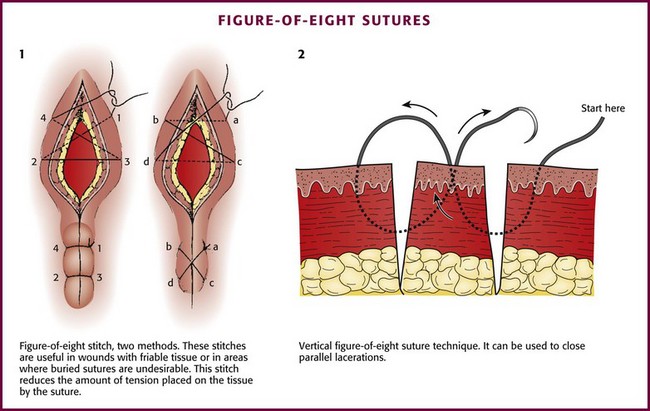
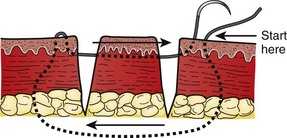
Figure-of-Eight Stitch: A figure-of-eight stitch is useful for wounds with friable tissue, on the eyelids where the skin is too thin for buried sutures, or in areas in which buried sutures are undesirable (Fig. 35-31, plate 1).96 This stitch reduces the amount of tension placed on the tissue by the suture, which allows the stitch to hold in place when a simple stitch would tear through the tissue. The disadvantage of this technique is that more suture material is left in the wound. A vertical variation of the figure-of-eight stitch is sometimes used to approximate close, parallel lacerations (see Fig. 35-31, plate 2).97 Another technique involves a vertical mattress stitch (Fig. 35-32).
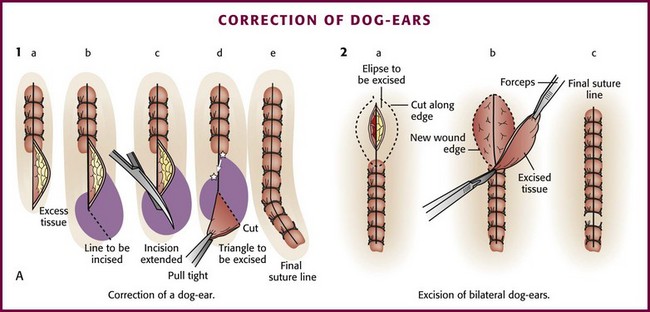
Correction of Dog-Ears: When the edges of a wound are not precisely aligned horizontally, there will be excess tissue on one or both ends. This small flap of excess skin that bunches up at the end of a sutured wound is commonly called a dog-ear. This effect also occurs when one side of the wound is more elliptical than the opposite side or when excision of a wound is not sufficiently elliptical because it is either too straight or too nearly circular.48,90
If a dog-ear is present, it can be eliminated on one side of the wound in the following manner. The flap of excess skin is elevated with forceps or a skin hook, and an incision is made at an oblique angle from the apex of the wound toward the side with the excess skin. The flap is then undermined and laid flat. The resulting triangle of skin is trimmed, and the closure is completed (Fig. 35-33, plate 1).88,94 An alternative method consists of carrying the incision directly from the apex in line with the wound. The flap of excess tissue is pulled over the incision while skin hooks are used to retract the extended apex of the wound. Excess tissue is excised, and the remainder of the wound is sutured.90 If dog-ears are present on both sides of one end of the wound, the bulge of excess tissue can be excised in an elliptical fashion and the wound closed (see Fig. 35-33, plate 2).94
Stellate Lacerations: Repair of a stellate laceration is a challenging problem. Usually a result of compression and shear forces, these injuries contain large amounts of partially devitalized tissue. The surrounding soft tissue is often swollen and contused. Much of this contused tissue cannot be débrided without creating a large tissue defect. Sometimes tissue is lost, yet the amount is not apparent until key sutures are placed. In repairing what often resembles a jigsaw puzzle, the clinician can remove small flaps of necrotic tissue with iris scissors; large, viable flaps can be repositioned in their beds and carefully secured with half-buried mattress stitches. If interrupted stitches are used to approximate a thin flap, small bites should be taken in the flap and larger, deeper bites in the base of the wound. A modification of the corner stitch can be used to approximate multiple flaps to a base (Fig. 35-34). Thin flaps of tissue in a stellate laceration with beveled edges may be more easily repositioned and stabilized with a firm dressing.79
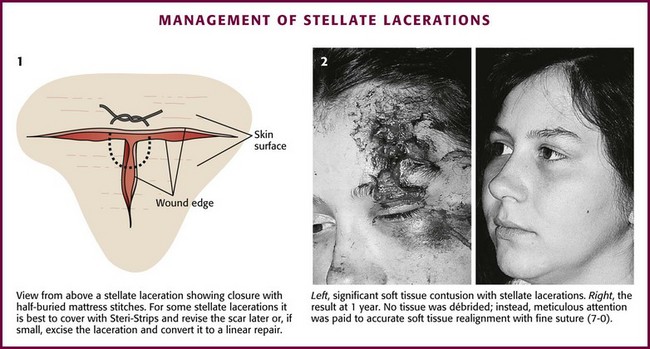
Figure 35-34 Management of stellate lacerations.
Repair of Special Structures
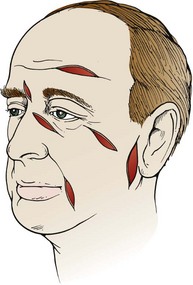
Facial Wounds (General Features)
The ideal result in the repair of a facial laceration is an extremely narrow, flat, and inapparent scar. Facial and forehead lacerations that follow natural skin creases or lines will heal with a less noticeable scar than those that are oblique or perpendicular to the natural wrinkles of the skin (Fig. 35-35). In addition to basic wound management, a few additional techniques can be used to achieve satisfactory cosmetic results.
Although necrosis of partially devitalized wound edges contributes to wide scars, facial skin with apparently marginal circulation may survive because of excellent vascularity. SQ fat, which in other locations may be débrided thoroughly, should be preserved if possible in facial wounds to prevent eventual sinking of the scar and to preserve normal facial contours. Therefore, débridement of most facial wounds should be conservative82 (Fig. 35-36).
A layered closure has long been considered essential in the cosmetic repair of many facial wounds. However, the importance of layered closure in facial wounds was called into question by Singer and associates.98 These investigators found similar cosmetic outcomes and scar widths in facial wounds less than 3 cm in length and 10 mm in width that were repaired with and without deep dermal sutures. Further confirmation of these results is needed.
If a layered closure is undertaken, approximation of the dermis with an SQ stitch or with a combination of SQ and subcuticular stitches should bring the edges of the wound together or to within 1 to 2 mm of apposition—close enough that the use of additional sutures seems almost unnecessary.88 If an SQ stitch is the only stitch used to close the deeper layers, it should pass through the dermal-epidermal junction, or within 1 to 2 mm of the surface of the skin, without causing a dimpling effect. The stitch should be tied snugly by pulling the two ends of the suture in the same direction (see Fig. 35-23C).
If the skin edges are apposed closely by the SQ stitch or a subcuticular stitch, a small, shallow “epithelial” stitch can be used in lieu of the standard, deeper, surface stitch to correct discrepancies in vertical alignment (Fig. 35-37).81 Precise alignment of wound edges is achieved by inserting the needle as close to the edge as possible without tearing through the tissue. A 6-0 synthetic nonabsorbable suture is an excellent material for this stitch. A continuous stitch is preferable because it can be placed quickly, but interrupted stitches are acceptable. Epithelial stitches should be spaced no more than 2 to 3 mm apart and should encompass no more than 2 to 4 mm of tissue.81 Once skin closure is complete, final adjustments in the tension on a continuous suture line are made before the end of the stitch is tied. If any discrepancies in level persist, interrupted sutures or tape can be used to flatten these few irregularities. The disadvantages of epithelial stitches are that they are time-consuming and add more suture material to the wound. Discrepancies in level can often be corrected with surgical tape.
Surgical tape is useful as a secondary support to protect the surface stitch from the stress produced by normal skin movement (Fig. 35-38). Facial wounds have a tendency to swell and place excessive stretch on a surface stitch. This can be minimized by applying a pressure dressing and cold compresses to the wound after closure. Surgical tape can serve to a limited extent as a small pressure dressing. In simple, low-tension facial wounds, wound closure with surgical tape provides results that are equivalent to closure with tissue adhesive.99
Forehead
Superficial lacerations may be closed with skin stitches alone, but deep forehead lacerations must be closed in layers. Significant periosteal defects should be approximated before the closure of more superficial layers (Fig. 35-39). If skin is directly exposed to bone, adhesions might develop that in time may limit the movement of skin during facial expressions. The frontalis muscle fascia and adjacent fibrous tissue should be closed as a distinct layer; if left unsutured, the retracted ends of this muscle may bulge beneath the skin. If the gap in a muscle belly is later filled with scar tissue, movement of the muscle may pull on the entire scar and make it more apparent.82
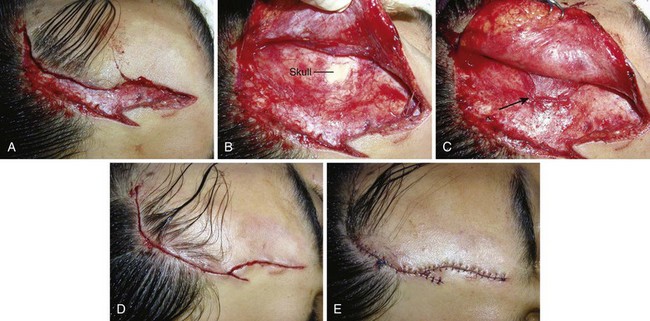
A U-shaped flap laceration with a superiorly oriented base poses a difficult problem. Immediate vascular congestion and later scar contraction within the flap produce the “trapdoor” effect, with the flap becoming prominently elevated (Fig. 35-40, plates 1 and 2). This effect can be minimized by approximation of the bulk of the SQ tissue of the flap to a deeper level on the base side of the wound; the skin surfaces of the two sides are apposed at the same level (see Fig. 35-40, plate 3). A firm compression dressing helps eliminate dead space and hematoma formation within the wound. Despite these efforts, secondary revision is sometimes necessary.79 Frequently, swelling of the flap resolves over a 6- to 12-month period. Because flap elevation can be quite disconcerting, the clinician should forewarn the patient and family about a possible trapdoor effect.
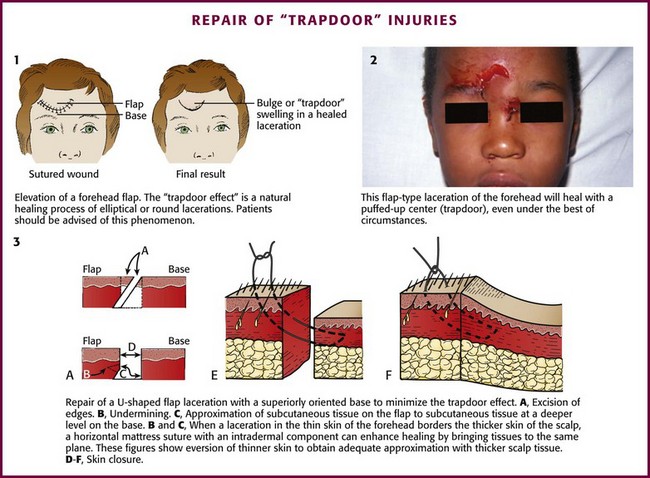
When a forehead laceration borders the scalp and the thick scalp tissue must be sutured to thinner forehead skin, a horizontal or vertical mattress stitch with an intradermal component can be used (see Fig. 35-40, plates 3E and 3F).90
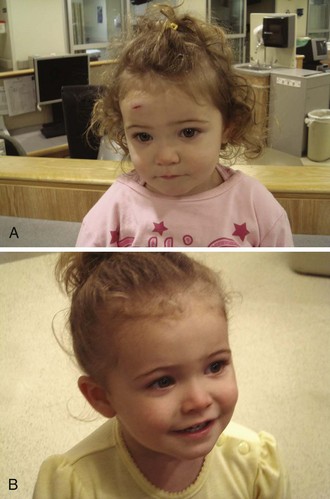
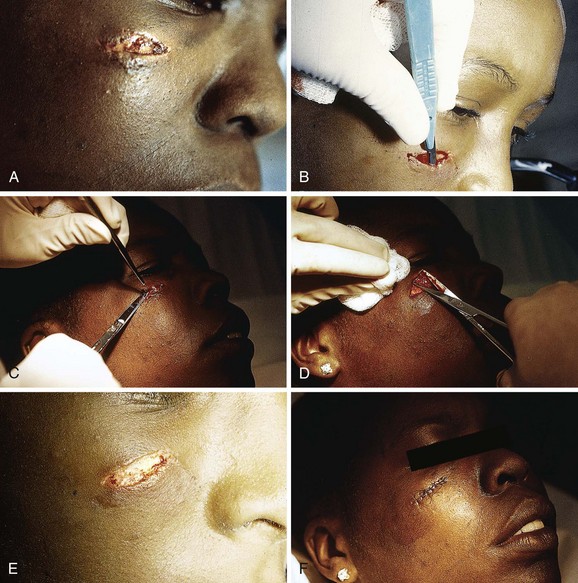
Note that even a minor forehead contusion or laceration may bleed subcutaneously and, in a few days, produce blackness around the eyes (Fig. 35-41). Patients should be forewarned about this. So-called raccoon eyes were once thought to represent a fracture, and although associated with fractures, this is usually a common benign finding, albeit occasionally a striking one.
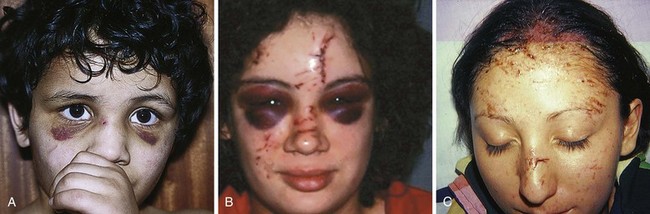
Windshield injuries involving the forehead can be problematic (see Fig. 35-41C) to the extent that multiple superficial cuts harbor small glass particles and the injuries do readily not lend themselves to closure with suture. Supraorbital blocks can be used to anesthetize the forehead while the clinician meticulously looks for glass in each skin defect, often feeling pieces only with forceps or a small hemostat. Some pieces of glass are best felt; others are appreciated as shining objects under a good light source.
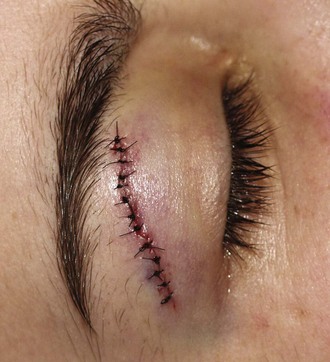
Eyebrow and Eyelid Lacerations
Points on each side of the lacerated eyebrow should be aligned precisely; a single percutaneous stitch on each margin of the eyebrow should precede SQ closure. The edges of the eyebrow serve as landmarks for reapproximation; therefore, the eyebrow must not be shaved because these landmarks will be lost. Shaved eyebrows grow back slowly and sometimes incompletely, and shaving them often results in more deformity than caused by the injury itself. Care must be taken to not invert hair-bearing skin into the wound.92
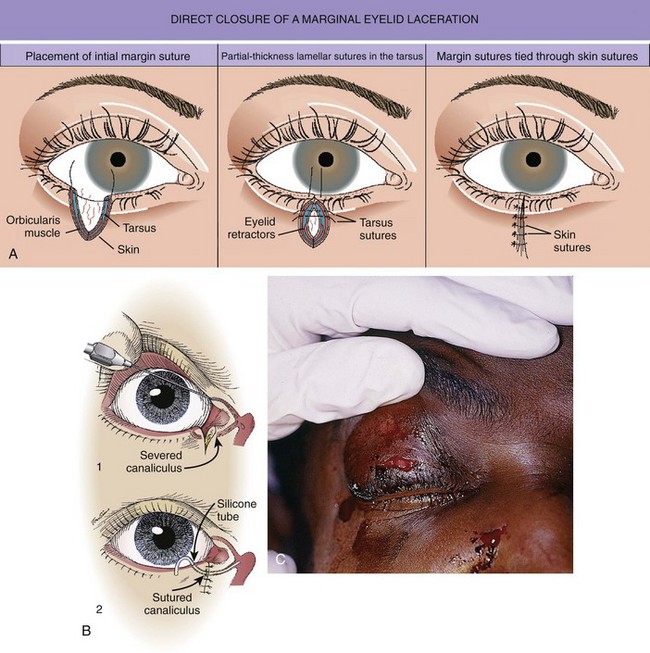
The emergency clinician must recognize complicated eyelid lacerations that require the expertise of an ophthalmologist with experience in ocular plastic surgery. Lacerations that traverse the lid margin require exact realignment to avoid entropion or ectropion. Injuries penetrating the tarsal plate frequently cause damage to the globe (Fig. 35-42A). A deep horizontal laceration through the upper lid that divides the thin levator palpebrae muscle or its tendinous attachment to the tarsal plate can result in ptosis. In most cases an ophthalmologist should repair the injury primarily. A laceration through the portion of the upper or lower lid medial to the punctum frequently damages the lacrimal duct or the medial canthal ligament and requires specialized techniques for repair (see Fig. 35-42B). Adipose tissue seen within any periorbital laceration may be retrobulbar fat herniating through the wound, and further evaluation is required (see Fig. 35-42C). Repair of lid avulsions, extensive lid lacerations with loss of tissue, and complex types of lid lacerations should be left to ophthalmologists.
Ear Lacerations
The primary goals in the management of lacerations of the pinna are expedient coverage of exposed cartilage and prevention of wound hematoma (see Fig. 35-43). Cartilage is an avascular tissue, and when ear cartilage is denuded of its protective, nutrient-providing skin, progressive erosive chondritis ensues. The initial step in the repair of an ear injury involves trimming away jagged or devitalized cartilage and skin. If the skin cannot be stretched to cover the defect, additional cartilage along the wound margin can be removed. Depending on the location, as much as 5 mm of cartilage can be removed without significant deformity. Cartilage should be approximated with 4-0 or 5-0 absorbable sutures initially placed at folds or ridges in the pinna representing major landmarks. Sutures tear through cartilage; therefore, the anterior and posterior perichondrium should be included in the stitch. No more tension should be applied than is needed to touch the edges together.
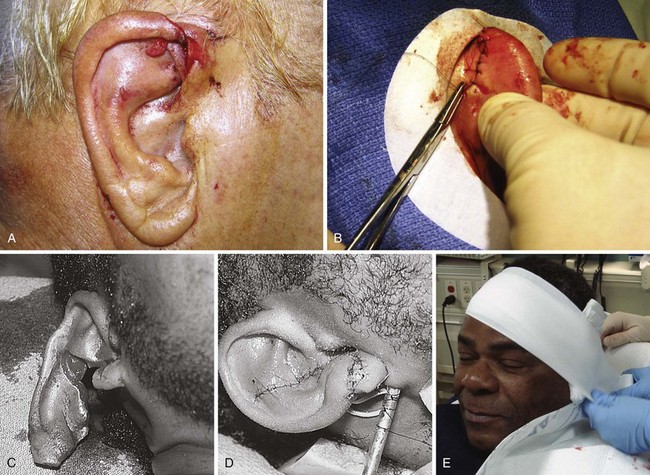
Figure 35-43 A, Lacerations of the ear require a special repair aimed at covering cartilage and preventing hematoma formation. With this through-and-through laceration of the margin of the pinna, the cartilage is trimmed just enough to allow the skin to be approximated to cover all exposed cartilage. Sutures are not used in the cartilage itself for this laceration, but the edges are approximated by skin sutures that incorporate the perichondrium. B, The repair is easiest if the posterior pinna is sutured first. C and D, Lacerations of the helical rim that traverse the two skin surfaces and the cartilage require a three-layer repair with accurate reapproximation of the auricular cartilage, as is done for the nose, to avoid notching. The cartilage is repaired by placing 5-0 or 6-0 clear monofilament through the perichondrium and cartilage. The skin is repaired with 6-0 or 7-0 monofilament. E, An ear compression dressing should be used to prevent hematoma (see Chapter 63 for discussion of anesthesia and dressing for this injury).
In through-and-through ear lacerations, the posterior skin surface should be approximated next with 5-0 nonabsorbable synthetic suture. Once closure of the posterior surface is completed, the convoluted anterior surface of the ear can be approximated with 5-0 or 6-0 nonabsorbable synthetic suture, with landmarks joined point by point (see Fig. 35-43C and D). On the free rim, the skin should be everted to avoid later notching. Care should be taken to cover all exposed cartilage. In heavily contaminated wounds of the ear (e.g., bite wounds) that already show evidence of inflammation, the necrotic tissue should be débrided, the cartilage covered by a loose approximation of skin, and the patient given antibiotics.79,100 After a lacerated ear has been sutured, it should be enclosed in a compression dressing (see Chapter 63).
Nose Lacerations
Lacerations involving the margin of the nostril are complicated and should be repaired accurately to ensure that unsightly notching does not occur (Fig. 35-44). In the medial portion of the nostril and superior columella, the lower lateral cartilages are quite close to the margin and relatively superficial. If the extent of the laceration is not recognized and not repaired, wound healing may cause superior retraction of the margin of the nostril. Secondary repair of complications is difficult.
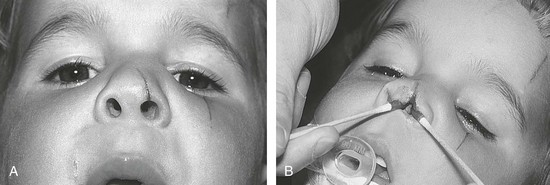
The free rim of the nostril must be aligned precisely to avoid unsightly notching. Many clinicians recommend early removal of stitches to avoid stitch marks, yet the oily nature of skin in this area makes it difficult to keep the wound closed with tape. If the wound is gaping before closure, a subcuticular stitch is recommended to provide support for a prolonged period.101 If there is significant tissue injury, consultation with a facial plastic surgeon may be warranted.
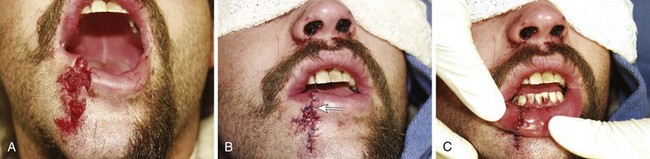
Lip and Intraoral Lacerations
The contamination of all intraoral and lip wounds is considerable, and they must be thoroughly irrigated. Regional nerve blocks are preferred over local anesthetic injection because the latter method distends tissue, distorts the anatomy of the lip, and obscures the vermilion border. Loss of less than 25% of the lip permits primary closure with little deformity. The following types of wounds require initial surgical consultation or later reconstructive surgery: loss of more than 25% of the lip, extensive lacerations directly through the commissure of the mouth,100 and deep scars in the vermilion of the upper lip (which can later result in a redundancy of tissue).100
Small puncture-type lacerations heal well only if the skin is closed and the small intraoral laceration is left open (Fig. 35-45A). Such injuries commonly occur as a result of a punch in the face when the victim’s tooth lacerates the lip. Check all lip lacerations for retained tooth fragments. In general, small lacerations of the oral mucosa heal well without sutures. If a mucosal laceration creates a flap of tissue that falls between the occlusal surfaces of the teeth or if a laceration is extensive enough to trap food particles (e.g., ≥2 to 3 cm in length), it should be closed. Small flaps may be excised. Closure is easily accomplished with 4-0 Dexon or Vicryl in a simple interrupted suturing technique. These materials are soft and less abrasive than gut sutures, which become hard and traumatize adjacent mucosa. Nylon sutures have sharp ends that are annoying and painful; thus, this suture material should be avoided inside the mouth. Muscle and mucosal layers should be closed separately. Sutures in the oral cavity easily become untied by the constant motion of the tongue. Each suture should be tied with at least four square knots. These sutures need not be removed; they either loosen and fall out within 1 week or are rapidly absorbed.82,102,103
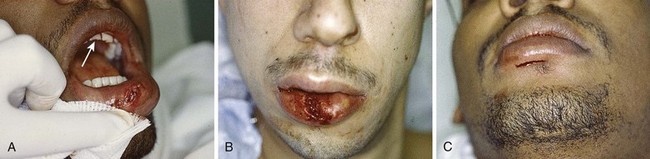
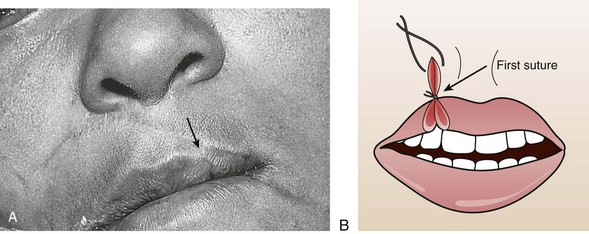
Small through-and-through lacerations can be thoroughly cleaned and closed in two layers (skin and mucosa). It is acceptable to leave the mucosal side open if the defect is small (see Fig. 35-45C). Large through-and-through lacerations of the lip should be closed in three layers. With a multilayer closure, the muscle layer is approximated with a 4-0 or 5-0 absorbable suture securely anchored in the fibrous tissue located anterior and posterior to the muscle. The vermilion-cutaneous junction of the lip is a critical landmark that if divided, must be repositioned with precision; a 1-mm step-off is apparent and cosmetically unacceptable. The vermilion border should be approximated with a 5-0 or 6-0 nonabsorbable guide suture before any further closure to ensure proper alignment throughout the remainder of the repair (Fig. 35-46A). The vermilion surface of the lip and the buccal mucosa are then closed with interrupted stitches of 4-0 or 5-0 absorbable suture. Finally, the skin is closed with 6-0 nonabsorbable suture (Fig. 35-47).102
Tongue Lacerations
Some controversy exists regarding when to suture tongue lacerations. Simple, linear lacerations, especially those in the central portion of the tongue, heal quickly with minimal risk for infection. Many small tongue lacerations that occur in children or from falls or seizures do not require sutures. In general, lacerations that involve the edge or pass completely through the tongue, flap lacerations, and all lacerations bisecting the tongue need to be sutured102 (Fig. 35-48). Small flaps on the edge of the tongue may be excised, but large flaps should be sutured. When dilute peroxide mouth rinses and a soft diet are used for a few days, healing can be rapid. Persistent bleeding from minor lacerations brings most patients to the ED, and closure with deep sutures may be necessary to prevent further bleeding.
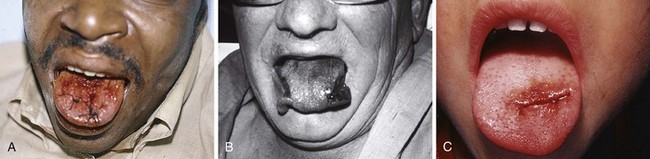
Size 4-0 absorbable sutures should be used to close all three layers—inferior mucosa, muscle, and superior mucosa—in a single stitch, or the stitch should include half the thickness of the tongue, with sutures placed on the superior and inferior surfaces, as well as on the edge of the tongue. Sutures on the tongue frequently become untied. This problem can be prevented if the stitches are buried. Nylon sutures should be avoided because the sharp edges are uncomfortable.82 Closure of the lingual muscle layer with a deep absorbable suture alone may be sufficient to control bleeding and return motor function to the lacerated tongue; mucosal healing is rapid.
Scalp Lacerations
The scalp extends from the supraorbital ridges anteriorly to the external occipital protuberances posteriorly and blends with temporalis fascia laterally. The scalp has five anatomic layers: skin, superficial fascia, galea aponeurotica, subaponeurotic areolar connective tissue, and periosteum (Fig. 35-49); however, clinically, the scalp may be divided into three distinct layers. The outer layer consists of the skin, superficial fascia, and galea (the aponeurosis of the frontalis and occipitalis muscles), which are firmly adherent and surgically considered as one layer. The subaponeurotic layer and the periosteum form the second and third layers. The integrity of the outer layer is maintained by inelastic, tough, fibrous septa, which keep wounds from gaping open unless all three portions have been traversed. Wounds that gape open signify a laceration extending beneath the galea layer (Fig. 35-50). The galea itself is loosely adherent to the periosteum by means of the slack areolar tissue of the subaponeurotic layer. The galea is firmly attached to the underside of the SQ fascia and is rarely identified as a distinct layer in the depths of a wound. The periosteum covers the skull. The tissue-thin periosteum is often mistakenly identified as the galea, but the periosteum is flimsy and adherent to the skull and cannot be sutured.
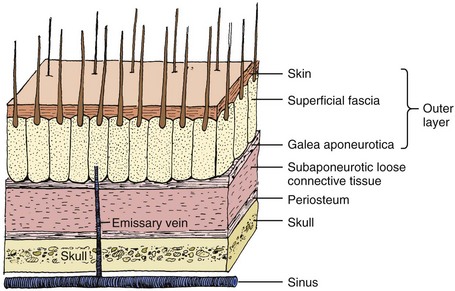
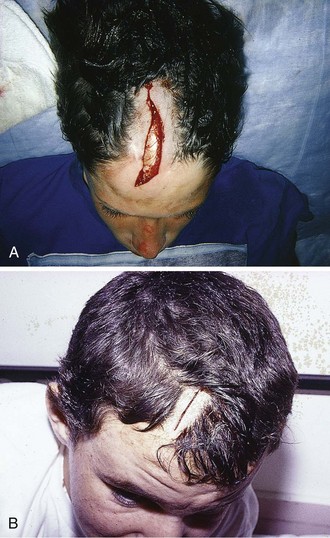
The presence of a rich vascular network in the superficial fascia results in profuse bleeding from scalp wounds. Severed scalp vessels tend to remain patent because the fibrous SQ fascia hinders the normal retraction of blood vessels that have been cut and allows persistent or massive hemorrhage with simple lacerations. The subgaleal layer of loose connective tissue contains “emissary veins” that drain through diploic vessels of the skull into the venous sinuses of the cranial hemispheres. In scalp wounds that penetrate this layer, bacteria may be carried by these vessels to the meninges and the intracranial sinuses. Thus, a scalp wound infection can result in osteomyelitis, meningitis, or a brain abscess.101 Closure of galeal lacerations not only ensures control of bleeding but also protects against the spread of infection.
Profuse bleeding, especially from extensive scalp lacerations, is best controlled by suturing94 (see also Chapter 34). Unless the vessels are large or few, ligation of multiple scalp vessels seldom provides effective hemostasis, and considerable blood loss can occur during the attempt. Ask an assistant to maintain compression around the wound while you complete closure of the wound. A simple procedure that often provides hemostasis of scalp wounds is to place a wide, tight rubber band or Penrose drain around the scalp from the forehead to the occiput. You can also control bleeding temporarily in some cases by grasping the galea and the dermis with a hemostat and everting the instrument over the edge of the skin (see Fig. 35-51). The disadvantage of this technique is that tissue grasped by the hemostat may be crushed and devitalized.94 If the SQ tissue is also everted for a prolonged period, necrosis can occur.
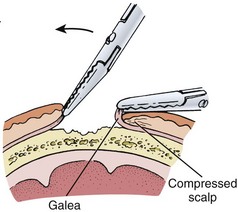
Figure 35-51 To temporarily control bleeding from vessels in the fascia, the galea can be everted to compress the fascia.
Before wound closure, visually examine the underlying skull and palpate it for skull fractures (Fig. 35-52). In wounds that can be visualized or explored, more small skull fractures are detected with the clinician’s eyes and gloved finger than with radiographs. However, a common error is to mistake a tear in the galea or the periosteum for a fracture during palpation inside the wound. Direct visualization of the area should resolve the issue. Of particular importance are stab or puncture wounds in the scalp and forehead, such as from a nail, spike, screwdriver, knife, or ice pick. Without a laceration to explore, such wounds may seem benign, and the patient can initially appear relatively asymptomatic, yet the skull or brain has been penetrated. When evaluating a puncture or stab wound to the head, a computed tomography scan may provide unexpected findings of a skull fracture, linear or depressed, or an underlying brain injury or early hemorrhage. In wounds that expose bone but do not penetrate the skull, prolonged exposure may leave a nidus of dead bone in which osteomyelitis could develop. If exposed bone is visibly necrosed, remove the bone with rongeurs until active bleeding appears.94 Clip hair surrounding the scalp wound far enough from the edge of the wound so that suturing can proceed without entangling the hair or burying it in the wound. If hairs along the wound edges become embedded in the wound, they will stimulate excessive granulation tissue and delay healing.104 Place Vaseline or tape on stubborn hairs that persistently fall into the wound to help hold them back. Although clipping scalp hair is not popular with some patients, failure to adequately expose an area is a common cause of improper cleaning and closure of scalp wounds. Because of the extensive collateral blood supply of the scalp, most lacerations in this area heal without problem, even after delayed treatment. Nonetheless, wound cleaning must be sufficient to avoid the devastating complication of scalp infection.

Unlike most wounds involving multiple layers of tissue, scalp wounds can usually be closed with a single layer of sutures that incorporate skin, SQ fascia, and the galea (see Fig. 35-53). The periosteum does not need to be sutured; in fact, sutures will not hold in this tissue. Separate closure of the galea introduces additional suture material into the wound and may increase the risk for infection. However, in extremely large wounds, separate closure may be necessary to provide a more secure approximation of the galea than can be obtained with a large-needle, single-layer closure. In this situation, an inverted stitch (with an absorbable 3-0 or 4-0 suture) will “bury” the knot beneath the galea.
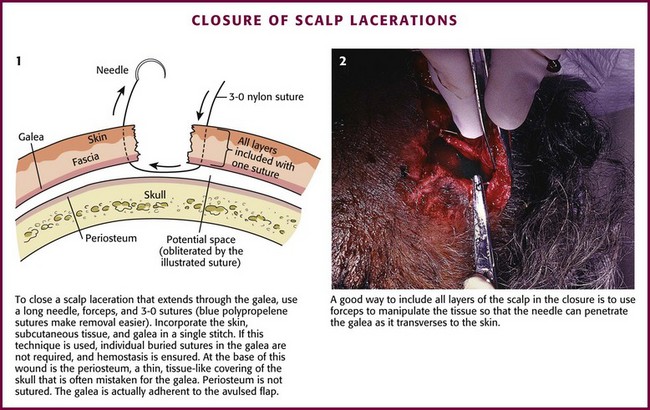
Figure 35-53 Closure of scalp lacerations.
With microvascular techniques, large sections of skin avulsed from the scalp can be reimplanted. Use the same techniques in salvaging avulsed scalp as those used for amputated extremities.105
Sutured scalp lacerations need not be bandaged. Instruct patients that they can wash their hair in 2 hours (Fig. 35-54). If bleeding persists, use an elastic bandage as a compression dressing. Place gauze sponges over the laceration to provide direct local pressure beneath the elastic bandage.
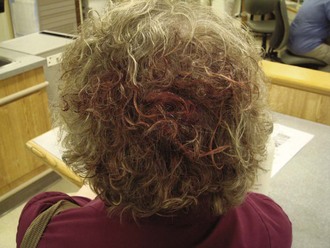
Nail Bed Lacerations
Injuries to the nail and nail bed (also called the nail matrix) are common problems in emergency medicine, yet controversy exists over proper management (Fig. 35-55). As a general rule, repair nail bed lacerations unless they are well approximated. An exception is a nail bed laceration that causes a simple subungual hematoma.
Subungual Hematomas: Subungual hematomas develop from a nail bed laceration. Some nail bed lacerations are minor and of no consequence, whereas others portend a poor outcome unless the bed is repaired.106,107 A simple subungual hematoma (even in the presence of a tuft fracture) in which the nail is firmly adherent and disruption of the surrounding tissue is minimal is not an indication to remove the nail to search for nail bed lacerations (Fig. 35-56).108 Despite the presence of a nail bed laceration, a good result can be expected as long as the tissue is held in anatomic approximation by the intact fingernail. Nail trephination is discussed in Chapter 37.
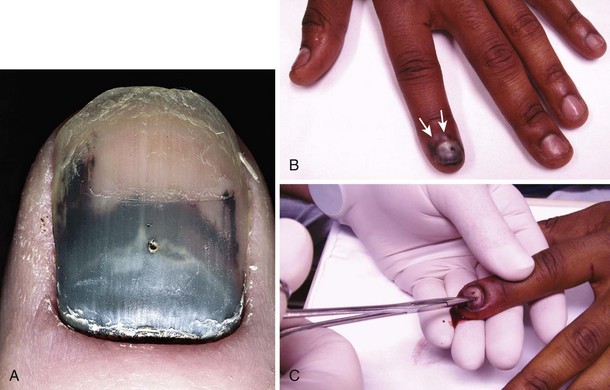
Suture the nail bed if a large subungual hematoma is associated with an unstable or avulsed nail. Remove the nail completely and repair the nail bed under a bloodless field (Fig. 35-57). Always use absorbable sutures in the nail bed so they do not have to be removed. A good outcome depends on maintaining the space under the eponychium (cuticle) as the laceration heals and the new nail grows out, which is a slow process.
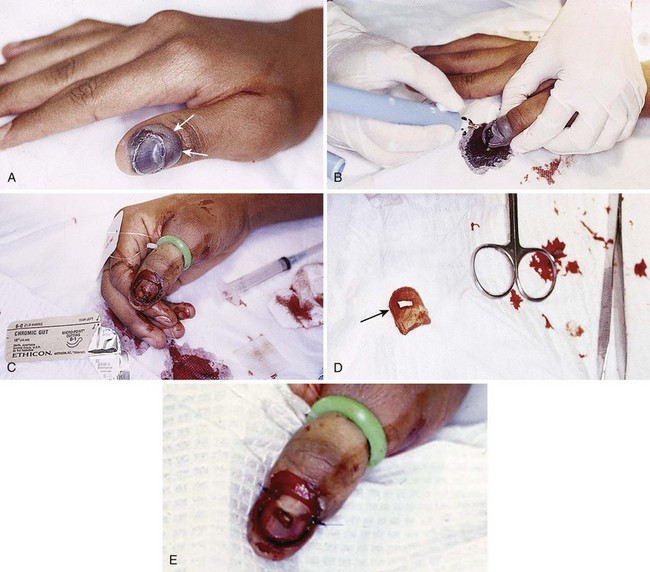
Partial Nail Avulsions: If the nail is partly avulsed (especially at the base) or loose, lift the nail to assess and potentially repair the nail bed. If the nail is intact, it is best to leave it in place if the nail bed laceration can be repaired (Fig. 35-58). The method for atraumatically removing a nail is demonstrated in Figure 35-60.
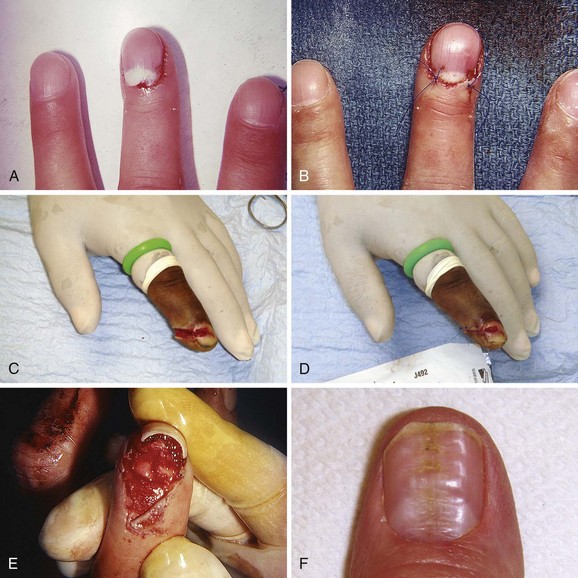
Figure 35-58 A, This fingernail was avulsed at the base, a common result of having a door slam on the digit. The nail is tightly adherent to the nail bed, so it is not removed but simply replaced under the eponychium to its former position. B, Sutures are placed in the nail to keep it stable. This nail may simply start to grow on its own. C, A saw-induced laceration of the fingertip with an open fracture, nail bed laceration, and skin laceration. D, Only part of the nail was removed and the nail bed repaired through the window. The skin is closely approximated. Such injuries usually heal well with attention to detail, and infection is unusual despite the open fracture. Oral antibiotic therapy for 5 to 7 days is reasonable. E, Because this avulsed nail is unstable and subungual bleeding is present, the nail can be removed and the nail bed inspected. Any large nail bed laceration should be repaired meticulously with absorbable suture (6-0). After repair of the nail bed, a drainage hole is placed in the nail, and the nail is replaced under the eponychium (cuticle) and fixed in place with sutures that incorporate the nail edge and the skin bilaterally. In 2 to 3 weeds, the new nail will begin to push out the old nail (usually growing under it while maintaining the eponychium), and the old nail is removed. The exposed nail bed will be sensitive for a while. See Figure 35-60 for a simple technique to remove the fingernail. F, This nail is permanently deformed with ridges. Although crush injury to the nail bed is probably responsible for this deformity, repair of the nail bed might have minimized the resultant deformity.
Nail Bed Repair: When the integrity of the nail bed is significantly disrupted, a rippled nail may develop (see Fig. 35-58F). Anatomic repair of the nail bed may minimize subsequent nail deformity. Approximate a simple nail bed laceration with 6-0 or 7-0 absorbable suture (to obviate the need for suture removal). If available, use loupe magnification and a finger tourniquet to maintain a bloodless field (Fig. 35-59). Repair the proximal and lateral nail (onychial) folds first. Attach a sturdy needle to a 4-0 thread for suturing lacerated nails. Insert the needle tangentially to the nail because the needle penetrates most easily in this position. The point of the needle carves a rigid path through the nail. Unless the entire length of the needle is allowed to follow this path as it passes through the nail, the needle is likely to bend or break. Alternatively, use an electrical cautery instrument or a heated paper clip to perforate the nail and permit easy passage of the needle.
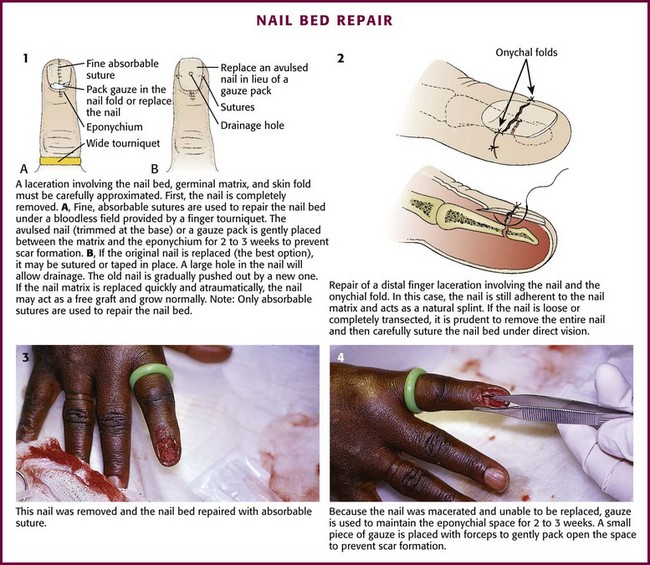
Figure 35-59 Nail bed repair. (2, from Dushoff IM. Handling the hand. Emerg Med. 1976;8:111. Reproduced by permission.)
Protect the exposed nail bed by reapplying the avulsed nail (best choice) or by applying a nonadherent dressing, Silastic sheet, or gauze packing for approximately 2 to 3 weeks. Reinsertion of the nail occasionally results in infection, so clean the nail carefully. After cleaning, suture the avulsed nail in place or secure it with wound closure tape. If only the distal portion of the nail has been avulsed, it can still be used as a temporary splint or “dressing” to protect and maintain the integrity of the underlying nail bed (see Fig. 35-59).
Complete Nail Avulsions: If the entire nail is avulsed but intact, replace it after repairing the nail bed laceration for three reasons: (1) it acts as a splint or mold to maintain the normal anatomy of the nail bed, (2) it covers a sensitive area and facilitates dressing changes, and (3) it maintains the fold for new nail growth. If the proximal portion of the nail is not replaced, either of two complications may result: (1) longitudinal scar bands may form between the proximal nail fold and the germinal matrix and cause a permanent split or deformity of the nail, or (2) the space between the proximal nail fold and the germinal matrix of the nail bed may be obliterated within a few days.109 Consequently, splint for 2 to 3 weeks. The proximal portion of the traumatized nail often needs to be trimmed so that it will fit more easily into the nail fold. It is usually necessary to suture the nail in place. A replaced nail may grow normally and act as a free graft, but it is often dislodged by a new nail. If the nail was lost or irreparably destroyed, insert a piece of nonadherent, petrolatum-impregnated gauze (such as Adaptic or Xeroform) between the proximal nail fold and the germinal matrix. Nails grow at a rate of 0.1 mm/day, and approximately 6 months is required for a new nail to reach to the fingertip.
Complicated Nail Bed Injuries: If the germinal matrix of the nail bed is avulsed but intact, reimplant the nail with a 5-0 or 6-0 absorbable suture via a mattress stitch.82,110 If an open fracture exists, allow the matrix to remain trapped in the fracture line.111
If the nail bed is found to be extensively lacerated, it may be prudent to refer the patient to a hand surgeon, who can raise a flap of tissue extending from the proximal nail fold, explore the wound for foreign bodies, and clean under the nail bed. A fingertip avulsion that involves the nail bed or an isolated nail bed avulsion should not be allowed to heal on its own (i.e., by secondary intention). If the exposed nail bed is left open to granulate, it will form scar tissue that could produce a distorted and sensitive digit. Therefore, if part of the nail bed has been lost, refer the patient to a surgical consultant for a matrix graft.82,112,113
Removal of a Nail: If a partially avulsed or intact nail requires removal, take care to not injure the nail bed. The nail is usually firmly attached to the bed but can be separated by advancing and opening small scissors in the plane between the nail and the bed. Once loosened, pull the nail from its base with a hemostat (Fig. 35-60).
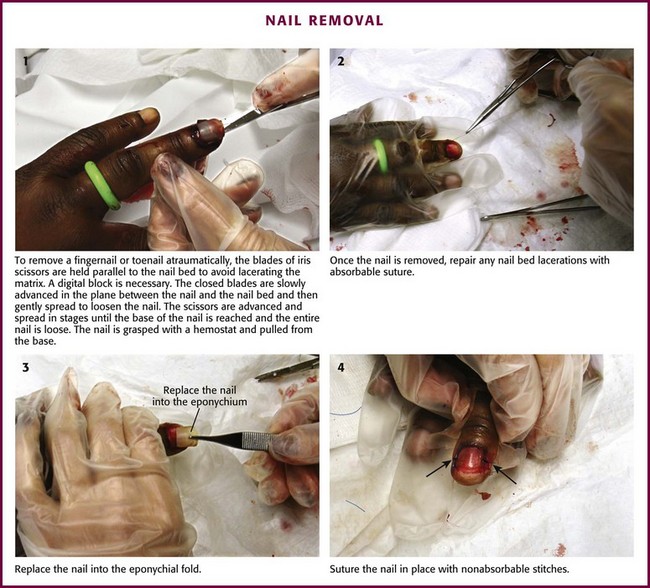
Figure 35-60 Nail removal.
Tuft Fractures: Once the nail bed has been lacerated, a tuft fracture is considered an open fracture. The use of antibiotics for nail bed laceration is open for discussion, and no rigid standards exist. Most do well with good wound care and reasonable follow-up. Antibiotics are usually eschewed after nail trephination, even in the presence of a tuft fracture. Infection is rare, but antibiotics may be considered for significant crush or highly contaminated injuries. A tuft fracture, technically an open fracture, generally heals well. The approach to an open tuft fracture varies from formal operating room débridement and intravenous antibiotics to thorough ED cleaning and oral antibiotics with close follow-up. Splinting is protective. Search for a traumatic mallet finger with flexion (door slam) injuries.
Drains in Sutured Wounds
Drains are used primarily to keep wounds open for drainage of existing purulence or blood that may otherwise collect in the wound. Drains do not prevent infection. When no infection exists, the use of drains in soft tissue wounds “prophylactically” is controversial in the ED setting. Drains in uninfected wounds may wick surface bacteria into the wound and impair resistance of the wound to infection.73 Drains placed in experimental wounds contaminated with subinfective doses of bacteria behave as foreign bodies by enhancing the rate of infection, regardless of whether the drain is placed entirely within the wound or brought out through the wound.114
Lacerations over Joints
Lacerations over joints may enter the joint itself or injure tendons or muscle groups. It may be difficult to determine whether the joint has been violated. If so, greater attention to cleaning is required, occasionally with open débridement, but the approach varies with the joint involved. In the knee, for example, a plain radiograph may demonstrate air in the knee joint, which is evidence of joint penetration (Fig. 35-61).
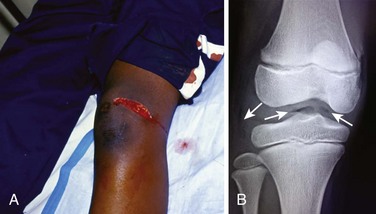
Figure 35-61 A, This laceration looks benign but may involve the knee joint or quadriceps tendon. A radiograph to look for air in the joint or a saline arthrogram (see Chapter 53) should be performed. B, Air in the joint space (arrows) on a plain radiograph proved joint space violation.
Fingertip Amputations
Treatment of fingertip amputations has undergone evolution from complicated grafts and flaps to nonsurgical conservative follow-up and primary healing (Figs. 35-62 and 35-63). If bone is not involved, a good result can be expected with attentive wound care, occasional minimal débridement, and protective dressing changes. It may take 6 to 12 weeks for healing to occur, but acceptable length, function, and sensation can be expected. A motivated patient and good follow-up are required. There is no standard that mandates long-term antibiotics for such injuries, and recommendations vary or are nonexistent. It is reasonable to provide gram-positive antibiotic coverage for 7 to 10 days, but no helpful data exist.
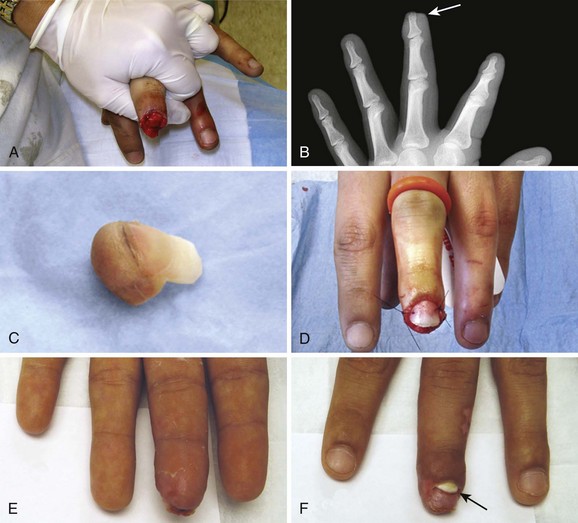
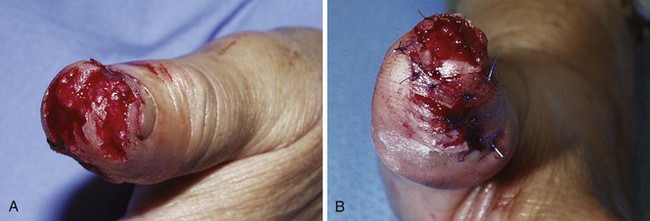
Distally and Proximally Based Flap Lacerations
There are few data in the literature concerning the care of minor flap lacerations in the ED. Large flaps, such as scalping lacerations, are best handled by a consultant, but many proximally and distally based flaps are treated primarily in the ED. It is important to note that these are not always simple lacerations and general wound healing principles may not apply. The major issue is vascularity, both perfusion pressure and venous drainage at the end of the flap and the potential for ischemic necrosis. The body has the ability to augment the circulation in some flaps (Fig. 35-64A). Contrary to common belief, the length-to-width ratio of the flap is not the main variable in survival of the flap (see Fig. 35-64B). Perfusion pressure is the most critical factor. Intravascular perfusion pressure decreases along the length of the flap. At the distal end of the flap, intravascular perfusion pressure will become less than interstitial pressure, thereby causing the capillaries to collapse (the critical closing pressure). As edema is generated by ischemia and inflammation, interstitial pressure increases, which results in a decrease in tissue survival.
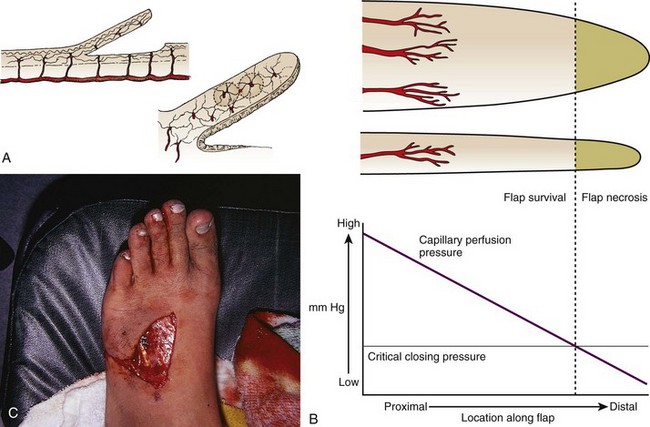
Many proximally and distally based flaps (see Fig. 35-64C) may be closed in the ED and monitored on an outpatient basis. Healing of a distally based flap is hampered by loss of venous and lymphatic drainage and subsequent edema of the flap causing decreased capillary flow. Warn the patient about the possibility of flap necrosis and the need for revision or even skin grafting at a later date. Partial take is better than total loss of the flap, and seemingly nonviable flaps should not be removed. Flaps are similar to free skin grafts, and the keys to a more successful outcome include undermining the flap to relieve tension, limiting buildup of fluid under the flap with a compression dressing, and decreasing movement of the flap as it heals. Minor defatting may be performed on the underside of the flap. Tissue adhesive instead of multiple sutures can be helpful.
Self-inflicted wounds with a vague or inaccurate history may be encountered in the ED. Characteristic self-mutilation patterns are depicted in Figure 35-65. No specific treatment is required other than recognizing these patterns of injury.
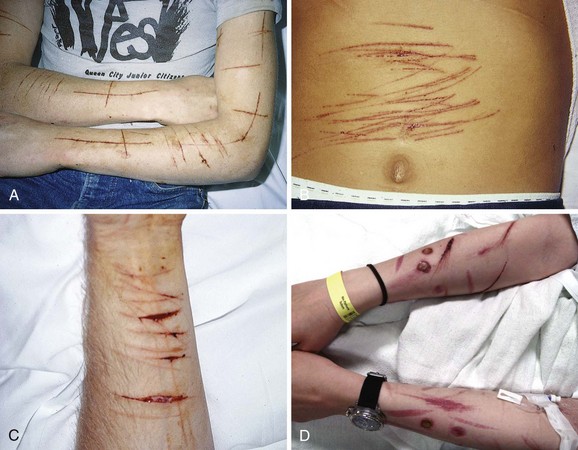
References
1. Connolly, WB, Hunt, TK, Zederfeldt, B, et al. Clinical comparison of surgical wounds closed by suture and adhesive tape. Am J Surg. 1969;117:318.
2. Edlich, RF, Rodeheaver, GT, Kuphal, J, et al. Technique of closure: contaminated wounds. JACEP. 1974;3:375.
3. Efron, G, Ger, R. Use of adhesive tape (Steri-Strips) to secure skin grafts. Am J Surg. 1968;116:474.
4. Weisman, PA. Microporous surgical tape in wound closure and skin grafting. Br J Plast Surg. 1963;16:379.
5. Koehn, GG. A comparison of the duration of adhesion of Steri-Strips and Clearon. Cutis. 1980;26:620.
6. Rodeheaver, GT, Halverson, JM, Edlich, RF. Mechanical performance of wound closure tapes. Ann Emerg Med. 1983;12:203.
7. Rodeheaver, GT, Spengler, MD, Edlich, RF. Performance of new wound closure tapes. J Emerg Med. 1987;5:451.
8. Ellenberg, AH. Surgical tape wound closure: a disenchantment. J Plast Reconstr Surg. 1967;39:625.
9. Panek, PH, Prusak, MP, Bolt, D, et al. Potentiation of wound infection by adhesive adjuncts. Am Surg. 1972;38:343.
10. Emmett, AJJ, Barron, JN. Adhesive suture strip closure of wounds in plastic surgery. Br J Plast Surg. 1964;17:175.
11. Singer, AJ, Perry, LC, Allen, RL. In vitro study of wound bursting strength and compliance of topical skin adhesives. Acad Emerg Med. 2008;15:1290–1294.
12. Noordzij, JP, Foresman, PA, Rodeheaver, GT, et al. Tissue adhesive wound repair revisited. J Emerg Med. 1994;12:645.
13. Singer, AJ, Giordano, P, Fitch, JL, et al. Evaluation of a new high-viscosity octylcyanoacrylate tissue adhesive for laceration repair: a randomized clinical trial. Acad Emerg Med. 2003;10:1134.
14. Xu, X, Lau, K, Taira, BR, et al. The current management of skin tears. Am J Emerg Med. 2009;27:729–733.
15. Milne, CT, Corbett, LQ. A new option in the treatment of skin tears for the institutionalized resident: formulated 2-octylcyanoacrylate topical bandage. Geriatr Nurs. 2005;26:321–325.
16. Bresnahan, KA, Howell, JM, Wizorek, J. Comparison of tensile strength of cyanoacrylate tissue adhesive closure of lacerations versus suture closure. Acad Emerg Med. 1995;26:575.
17. Quinn, JV, Wells, GA, Sutcliffe, T, et al. A randomized trial comparing octylcyanoacrylate tissue adhesive and sutures in the management of traumatic lacerations. JAMA. 1997;277:1527.
18. Yaron, M, Halperin, M, Huffer, W, et al. Efficacy of tissue glue for laceration repair in an animal model. Acad Emerg Med. 1995;2:259.
19. Quinn, JV, Drzewiecki, A, Li, MM, et al. A randomized, controlled trial comparing a tissue adhesive with suturing in the repair of pediatric facial lacerations. Ann Emerg Med. 1993;22:1130.
20. Bruns, TB, McLario, DJ, Simon, HK, et al. Laceration repair using a tissue adhesive in a children’s emergency department [abstract]. Acad Emerg Med. 1995;2:427.
21. Simon, HK, McLario, DJ, Bruns, TB, et al. Long-term appearance of lacerations repaired using tissue adhesive. Pediatrics. 1997;99:193.
22. Maw, JL, Quinn, JV, Wells, GA, et al. A prospective comparison of octylcyanoacrylate tissue adhesive and suture for the closure of head and neck incisions. J Otolaryngol. 1997;26:26.
23. Simon, HK, Zempsky, WT, Bruns, TB, et al. Lacerations against Langer’s lines: to glue or suture? J Emerg Med. 1998;16:185.
24. Singer, AJ, Hollander, JE, Valentine, SM, et al. Prospective randomized controlled trial of tissue adhesive (2-octylcyanoacrylate) vs. standard wound closure techniques for laceration repair. Acad Emerg Med. 1998;5:94.
25. Hollander, JE, Singer, AJ. Laceration management. Ann Emerg Med. 1999;34:356.
26. Quinn, JV, Osmond, MH, Yrack, JA, et al. N-2-Butylcyanoacrylate: risk of bacterial contamination with an appraisal of its antimicrobial effects. J Emerg Med. 1995;13:581.
27. Quinn, JV, Maw, JL, Ramotar, K, et al. Octylcyanoacrylate tissue adhesive wound repair versus suture wound repair in a contaminated wound model. Surgery. 1997;122:69.
28. Eaglstein, WH, Sullivan, TP, Giordano, PA, et al. A liquid adhesive bandage for the treatment of minor cuts and abrasions. Dermatol Surg. 2002;28:263–267.
29. Singer, AJ, Nable, M, Cameau, P, et al. Evaluation of a new liquid occlusive dressing for excisional wounds. Wound Repair Regen. 2003;11:181–187.
30. Singer, AJ, Hollander, JE. Tissue adhesives for laceration closure. JAMA. 1997;278:703.
31. Farion, KJ, Osmond, MH, Hartling, L, et al. Tissue adhesives for traumatic lacerations: a systematic review of randomized controlled trials. Acad Emerg Med. 2003;10:110–118.
32. Singer, AJ, Quinn, JV, Hollander, JE. The cyanoacrylate topical skin adhesives. Am J Emerg Med. 2008;26:490–496.
33. Meiring, L, Cilliers, K, Barry, R, et al. A comparison of a disposable skin stapler and nylon sutures for wound closure. S Afr Med J. 1982;62:371.
34. Lennihan, R, Macereth, M. A comparison of staples and nylon closure in varicose vein surgery. Vasc Surg. 1975;9:200.
35. Steele, RJC, Chetty, V, Forrest, APM. Staples or sutures for mastectomy wounds? A randomized trial. J R Coll Surg Edinb. 1983;28:17.
36. Harvey, CF, Hume, CJ. A prospective trial of skin staples and sutures in skin closure. Ir J Med Sci. 1986;155:194.
37. Khan, AN, Dayan, PS, Miller, S, et al. Cosmetic outcome of scalp wound closure with staples in the pediatric emergency department: a prospective, randomized trial. Pediatr Emerg Care. 2002;18:171.
38. Windle, BH, Roth, JH. Comparison of staple-closed and sutured skin incisions in a pig model. Surg Forum. 1984;35:546.
39. Johnson, A, Rodeheaver, GT, Durand, LS, et al. Automatic disposable stapling devices for wound closure. Ann Emerg Med. 1981;10:631.
40. Stillman, RM, Marino, CA, Seligman, SJ. Skin staples in potentially contaminated wounds. Arch Surg. 1984;119:821.
41. Roth, JH, Windle, BH. Staple versus suture closure of skin incisions in a pig model. Can J Surg. 1988;31:19.
42. Kanegaye, JT, Vance, CW, Chan, L, et al. Comparison of skin stapling devices and standard sutures for pediatric scalp lacerations: a randomized study of cost and time benefits. J Pediatr. 1997;130:808.
43. Shuster, M. Comparing skin staples to sutures in an emergency department. Can Fam Physician. 1989;35:505.
44. George, TK, Simpson, DC. Skin wound closure with staples in the accident and emergency department. J R Coll Surg Edinb. 1985;30:54.
45. Orlinsky, M, Goldberg, RM, Chan, L, et al. Cost analysis of stapling versus suturing for skin closure. Am J Emerg Med. 1995;13:77.
46. Francis, EH, Towler, MA, Moody, FP, et al. Mechanical performance of disposable surgical needle holders. J Emerg Med. 1992;10:63.
47. Hart, RG, Hall, J. The value of loupe magnification: an underused tool in emergency medicine. Am J Emerg Med. 2007;25:704–707.
48. Grossman, JA. The repair of surface trauma. Emerg Med. 1982;14:220.
49. Laufman, H, Rubel, T. Synthetic absorbable sutures. Surg Gynecol Obstet. 1977;145:597.
50. Herrmann, JB. Tensile strength and knot security of surgical suture materials. Am Surg. 1971;37:209.
51. Conn, J, Beal, JM. Coated Vicryl synthetic absorbable sutures. Surg Gynecol Obstet. 1980;150:843.
52. Macht, SD, Krizek, TJ. Sutures and suturing—current concepts. J Oral Surg. 1978;35:710.
53. Thacker, JG, Rodeheaver, G, Moore, JW, et al. Mechanical performance of surgical sutures. Am J Surg. 1975;130:374.
54. Westreich, M, Kapetansky, DI. Avoiding the slippery knot syndrome [letter]. JAMA. 1976;236:2487.
55. Postlethwait, RW, Willigan, DA, Ulin, AW. Human tissue reaction to sutures. Ann Surg. 1975;181:144.
56. Webster, RC, McCollough, G, Giandello, PR, et al. Skin wound approximation with new absorbable suture material. Arch Otolaryngol. 1985;111:517.
57. Craig, PH, Williams, JA, Davis, KW, et al. A biologic comparison of polyglactin 910 and polyglycolic acid synthetic absorbable sutures. Surg Gynecol Obstet. 1975;141:1.
58. Katz, AR, Mukherjee, DP, Kaganov, AL, et al. A new synthetic monofilament absorbable suture made from polytrimethylene carbonate. Surg Gynecol Obstet. 1985;161:213.
59. Wallace, WR, Maxwell, GR, Cavalaris, CJ. Comparison of polyglycolic acid suture to black silk, chromic, and plain catgut in human oral tissues. J Oral Surg. 1970;28:739.
60. Rodeheaver, GT, Powell, TA, Thacker, JG, et al. Mechanical performance of monofilament synthetic absorbable sutures. Am J Surg. 1987;154:544.
61. Bourne, RB. In-vivo comparison of four absorbable sutures: Vicryl, Dexon Plus, Maxon and PDS. Can J Surg. 1988;31:43.
62. Howes, EL. Strength studies of polyglycolic acid versus catgut sutures of the same size. Surg Gynecol Obstet. 1973;137:15.
63. Edlich, RF, Panek, PH, Rodeheaver, GT, et al. Physical and chemical configuration of sutures in the development of surgical infection. Ann Surg. 1973;177:679.
64. Kaplan EN, Hentz VR, eds. Emergency Management of Skin and Soft Tissue Wounds: An Illustrated Guide. Boston: Little, Brown, 1984.
65. Postlethwait, RW. Further study of polyglycolic acid suture. Am J Surg. 1974;127:617.
66. Stone, IK, Von Fraunhofer, JA, Masterson, BJ. Mechanical properties of coated absorbable multifilament suture materials. Obstet Gynecol. 1986;67:737.
67. Adams, IW. A comparative trial of polyglycolic acid and silk as suture materials for accidental wounds. Lancet. 1977;2:1216.
68. Karounis, H, Gouin, S, Eisman, H, et al. A randomized, controlled trial comparing long-term cosmetic outcomes of traumatic pediatric lacerations repaired with absorbable plain gut versus nonabsorbable nylon sutures. Acad Emerg Med. 2004;11:730.
69. Grabb, WC. Basic techniques of plastic surgery. In: Grabb WC, Smith JW, eds. Plastic Surgery: A Concise Guide to Clinical Practice. Boston: Little, Brown; 1979:3.
70. Sharp, WV, Belden, TA, King, PH, et al. Suture resistance to infection. Surgery. 1982;91:61.
71. Gristina, AG, Price, JL, Hobgood, CD, et al. Bacterial colonization of percutaneous sutures. Surgery. 1985;98:12.
72. Pham, S, Rodeheaver, GT, Dang, MC, et al. Ease of continuous dermal suture removal. J Emerg Med. 1990;8:539.
73. Edlich, RF, Thacker, JG, Buchanan, L, et al. Modern concepts of treatment of traumatic wounds. Adv Surg. 1979;13:169.
74. Stillman, RM. Wound closure: choosing optimal materials and methods. ER Rep. 1981;2:41.
75. Laufman, H. Is catgut obsolete? Surg Gynecol Obstet. 1977;145:587.
76. Edlich, RF, Rodeheaver, GT, Morgan, RF, et al. Principles of emergency wound management. Ann Emerg Med. 1988;17:1284.
77. Towler, MA, McGregor, W, Rodeheaver, GT, et al. Influence of cutting edge configuration on surgical needle penetration forces. J Emerg Med. 1988;6:475.
78. Bernstein, G. Needle basics. J Dermatol Surg Oncol. 1985;11:1177.
79. Osterberg, B, Blomstedt, B. Effect of suture materials on bacterial survival in infected wounds: an experimental study. Acta Chir Scand. 1979;145:431.
80. Wray, RC. Force required for wound closure and scar appearance. Plast Reconstr Surg. 1983;72:380.
81. Walike, JW. Suturing technique in facial soft tissue injuries. Otolaryngol Clin North Am. 1979;12:425.
82. Grabb WC, Klainert HE, eds. Techniques in Surgery: Facial and Hand Injuries. Somerville, NJ: Ethicon, Inc., 1980.
83. DeHoll, D, Rodeheaver, G, Edgerton, MT, et al. Potentiation of infection by suture closure of dead space. Am J Surg. 1974;127:716.
84. Bloom W, Fawcett DW, eds. A Textbook of Histology, 10th ed, Philadelphia, Saunders, 1975:564.
85. Kirk, RM. Basic Surgical Techniques. Edinburgh: Churchill Livingstone; 1978.
86. Trott, AL. Wounds and Lacerations: Emergency Care and Closure, 2nd ed. St. Louis: Mosby–Year Book; 1991.
87. Gant, TD. Suturing techniques for everyday use. Patient Care. 1979;13(14):45.
88. Peacock, EE, Van Winkle, W. Surgery and Biology of Wound Repair. Philadelphia: Saunders; 1970.
89. Edlich, RF, Rodeheaver, GT, Thacker, JG, et al. Technical factors in wound management. In: Hunt TK, Dunphy JE, eds. Fundamentals of Wound Management. New York: Appleton-Century-Crofts; 1979:364.
90. Converse, JM, Introduction to plastic surgery. Reconstructive Plastic Surgery: Principles and Procedures in Correction, Reconstruction, and Transplantation, 2nd ed. Converse, JM, eds. Reconstructive Plastic Surgery: Principles and Procedures in Correction, Reconstruction, and Transplantation, Philadelphia, Saunders, 1977;Vol 1:3.
91. Winn, HR, Jane, JA, Rodeheaver, G. Influence of subcuticular sutures on scar formation. Am J Surg. 1977;133:257.
92. Rodeheaver, GT, Rye, DG, Rust, R, et al. Mechanisms by which proteolytic enzymes prolong the golden period of antibiotic action. Am J Surg. 1978;136:379.
93. Jones, JS, Gartner, M, Drew, G, et al. The shorthand vertical mattress stitch: evaluation of a new suture technique. Am J Emerg Med. 1993;11:483.
94. Rosen P, Sternbach G, eds. Atlas of Emergency Medicine. Williams & Wilkins: Baltimore, 1979:125.
95. Myers, MB, Cherry, G. Functional and angiographic vasculature in healing wounds. Am Surg. 1970;35:750.
96. Bernstein, G. The far-near/near-far suture. J Dermatol Surg Oncol. 1985;11:470.
97. Mitchell, GC. Repair of parallel lacerations [letter]. Ann Emerg Med. 1987;16:924.
98. Singer, AJ, Gulla, J, Hein, M, et al. Single-layer versus double-layer closure of facial lacerations: a randomized controlled trial. Plast Reconstr Surg. 2005;116:353.
99. Zempsky, WT, Parrotti, D, Grem, C, et al. Randomized controlled comparison of cosmetic outcomes of simple facial lacerations closed with Steri-Strip skin closures or Dermabond tissue adhesive. Pediatr Emerg Care. 2004;20:519.
100. Weatherley-White, RCA, Lesavoy, MA. The integument. In: Hill GJ, II., eds. Outpatient Surgery. Philadelphia: Saunders; 1980:334.
101. Snyder, CC. Scalp, face and salivary glands. In: Wolcott MW, ed. Ferguson’s Surgery of the Ambulatory Patient. 5th ed. Philadelphia: Lippincott; 1974:153.
102. Heintz, WD. Traumatic injuries: dealing with dental injuries. Postgrad Med. 1977;61:261.
103. Horton, CE, Adamson, JE, Mladick, RA, et al. Vicryl synthetic absorbable sutures. Am Surg. 1974;40:729.
104. Zitelli, JA. Secondary intention healing: an alternative to surgical repair. Clin Dermatol. 1984;2:92.
105. Weinstein, PR, Wilson, CB. The skull and nervous system. In: Hill GJ, II., eds. Outpatient Surgery. Philadelphia: Saunders; 1980:298.
106. Simon, RR, Wolgin, M. Subungual hematoma: association with occult laceration requiring repair. Am J Emerg Med. 1987;5:302.
107. Seaburg, DC, Paris, PM, Angelos, WJ. Treatment of subungual hematomas with nail trephination: a prospective study. Am J Emerg Med. 1991;9:206.
108. Roser, SE, Gellman, H. Comparison of nail bed repair versus nail trephination for subungual hematomas in children. J Hand Surg [Am]. 1999;24:1166.
109. Kleinert, HE, Putcha, SM, Ashbell, TS, et al. The deformed finger nail, a frequent result of failure to repair nail bed injuries. J Trauma. 1967;7:177.
110. Wolcott, MW. Hands and fingers: part I—soft tissues. In: Wolcott MW, ed. Ferguson’s Surgery of the Ambulatory Patient. 5th ed. Philadelphia: Lippincott; 1974:396.
111. Matthews, P. A simple method for the treatment of finger tip injuries involving the nail bed. Hand. 1982;14:30.
112. Brown, PW. The hand. In: Hill GJ, II., eds. Outpatient Surgery. Philadelphia: Saunders; 1980:643.
113. Shepard, GH. Treatment of nail bed avulsions with split-thickness nail bed grafts. J Hand Surg [Am]. 1983;8:49.
114. Magee, C, Rodeheaver, GT, Golden, GT, et al. Potentiation of wound infection by surgical drains. Am J Surg. 1976;131:547.
[/level-membership-for-emergency-medicine-category][not-level-membership-for-emergency-medicine-category]Chapter 35
Methods of Wound Closure
Not all wounds require definitive closure at the first emergency department (ED) encounter; however, once the decision to close a wound has been made, the clinician must select the closure technique best suited for the location and configuration of the wound. The most commonly used techniques include tape, tissue adhesive, metal staples, and sutures. All traumatic wounds should be cleaned, and wounds containing devitalized tissue should be débrided before closure (see Chapter 34).
Wound Tape
Surgical tape strips are now routinely used to close simple wounds. Tape strips can be applied by health care personnel in many settings, including EDs, operating rooms, clinics, and first aid stations. Advantages include ease of application, reduced need for local anesthesia, evenly distributed wound tension, no residual suture marks, minimal skin reaction, no need for suture removal, superiority for some grafts and flaps, and suitability for use under plaster casts. One main advantage of wound tape over standard sutures and wound staples is its greater resistance to wound infection.1–4
Background and Tape Comparisons
Currently, several brands of tape with different porosity, flexibility, strength, and configuration are available. Steri-Strips (3M Corporation, St. Paul, MN) are microporous tapes with ribbed backing (Fig. 35-1). They are porous to air and water, and the ribbed backing provides extra strength. Cover-Strips (Beiersdorf, South Norwalk, CT) are woven in texture and have a high degree of porosity. They allow not only air and water but also wound exudates to pass through the tape. Shur-Strip (Deknatel, Inc, Floral Park, NY) is a nonwoven microporous tape. Clearon (Ethicon, Inc, Somerville, NJ) is a synthetic plastic tape whose backing contains longitudinal parallel serrations to permit gas and fluid permeability. An iodoform-impregnated Steri-Strip (3M Corporation) is intended to further retard infection without sensitization to iodine.3 Other tape products include Curi-Strip (Kendall, Boston), Nichi-Strip (Nichiban Co., Ltd, Tokyo), Cicagraf (Smith & Nephew, London), and Suture Strip (Genetic Laboratories, St. Paul, MN).
Scientific studies of wound closure tapes provide some comparisons of products. Koehn5 showed that Steri-Strip tape maintains adhesiveness about 50% longer than Clearon tape does. Rodeheaver and coworkers6 compared Shur-Strip, Steri-Strip, and Clearon tape in terms of breaking strength, elongation, shear adhesion, and air porosity. The tapes were tested in both dry and wet conditions. Steri-Strip tape had about twice the breaking strength of the other two tapes in both dry and wet conditions; there was minimal loss of strength in all tapes when wetted. Shur-Strip tape showed approximately two to three times the elongation of the other tapes at the breaking point, whether dry or wet. Shear adhesion (amount of force required to dislodge the tape when a load is applied at the place of contact) was slightly better for the Shur-Strip tape than for the Steri-Strip tape and approximately 50% better than for the Clearon tape. Of these three wound tapes, the investigators considered Shur-Strips to be superior for wound closure.
One comprehensive study of wound tapes compared Curi-Strip, Steri-Strip, Nichi-Strip, Cicagraf, Suture Strip, and Suture Strip Plus.7 All tapes were 12 mm wide except for Nichi-Strip, which was 15 mm. Each tape was compared for breaking strength, elongation under stress, air porosity, and adhesiveness. Curi-Strip, Cicagraf, and Steri-Strip exhibited equivalent dry breaking strength. However, when wet (a condition that can occur in the clinical setting), Cicagraf outperformed all tapes. All the tapes tested had similar elongation-under-stress profiles with the exception of Suture Strip Plus. This tape did not resist elongation under low or high force. Excessive elongation may allow wound dehiscence. Nichi-Strip was the most porous to air, and Cicagraf was almost vapor impermeable. Nichi-Strip and Curi-Strip had the best adherence to untreated skin. When the skin was treated with tincture of benzoin, however, Steri-Strip dramatically outperformed all other products. When all study parameters were considered, Nichi-Strip, Curi-Strip, and Steri-Strip achieved the highest overall performance rankings.
Indications
In experimental wounds inoculated with Staphylococcus aureus, tape-closed wounds resisted infection better than did wounds closed with nylon sutures.2 Tape closure works well under plaster casts when superficial suture removal would be delayed. Tape closure effectively holds flaps and grafts in place, particularly over the fingers, the flat areas of the extremities, and the trunk (Fig. 35-2).3,4 Wounds on the pretibial area are difficult to close, especially in the elderly because of tissue atrophy. Wound tape provides an alternative to suture closure in this situation. Tape closure can also be applied to wounds after early suture removal, particularly on the face, to maintain approximation of the wound edges while reducing the chance of permanent suture mark scarring. Finally, because of the minimal skin tension created by tape, it can be used on skin that has been compromised by vascular insufficiency or altered by prolonged use of steroids.
Contraindications
Do not place tape tightly and circumferentially around digits because it has insufficient ability to stretch or lengthen (Fig. 35-3). If placed circumferentially, the natural wound edema of an injured digit can make the tape act like a constricting band, which can lead to ischemia and possible necrosis of the digit. Use semicircular or spiral placement techniques if digits are to be taped.
Equipment
For simple tape closure, the equipment required includes forceps and tape of the proper size (see Fig. 35-1). Most taping can be done in the ED with × 3-inch strips. For wounds larger than 4 cm, however, strips provide greater strength. Most companies manufacture strips up to 1 inch wide and 4 inches long.
Procedure
Proper wound preparation, irrigation, débridement, and hemostasis must precede tape closure. Fine hair may be cut short. Dry the area of tape application thoroughly to ensure proper adhesion. Do not attempt to apply tape to a wet area or over a wound that is slowly oozing blood because it will usually result in failure of the tape to stick to the skin. On fingers, tape can be applied to a wound that is kept dry by temporarily placing a tourniquet at the base of the finger (see Fig. 35-3).
The technique of applying tape is shown in Figure 35-4. After the wound has been dried, apply a liquid adhesive such as tincture of benzoin or Mastisol to the skin adjacent to the wound to increase adhesion of the tape.2 All tape comes in presterilized packages. Open them directly onto the operating field. Handle tape with gloved hands. With the backing still attached, cut the tape to the desired length or long enough to allow approximately 2 to 3 cm of overlap on each side of the wound. After the end tab is removed, gently remove the tape from its backing with forceps by pulling straight back. Do not pull to the side because the tape will curl and be difficult to apply to the wound. Place half of the tape securely at the midportion of the wound. Gently but firmly appose the opposite wound edge to its counterpart. Apply the second half of the tape next. Hold the wound edges as close together as possible and at equal height to prevent the development of a linear, pitted scar. Apply additional tape by bisecting the remainder of the wound. Place a sufficient number of tape strips so that the wound is completely apposed without totally covering the entire length of the wound. Finally, place additional cross tapes to add support and prevent blistering caused by unsupported tape ends.1
Complications
Complications are uncommon with tape closure. The wound infection rate in clean wounds closed with tape compares favorably with rates for other standard closures.1 However, some investigators believe that tape closure leads to inferior cosmetic results.8 Premature tape separation occurs in approximately 3% of cases.6 Other complications include (1) skin blistering, which occurs if the tape is not properly anchored with cross-strips or the tape is stretched too tightly across the wound, and (2) wound hematoma, which results if hemostasis is inadequate. Tape may loosen prematurely over shaved areas as hair grows back.
When tincture of benzoin is used, apply it carefully to the surrounding, uninjured skin. Be careful because if spillage into the wound occurs, there is a higher risk for infection.9 Benzoin vapor can cause pain when applied near an open wound that has not been anesthetized. Benzoin can also injure the conjunctival and corneal membranes of the eye.
Summary
Modern tape products and techniques serve a valuable role in the management of minor wounds in the ED. In selected wounds, tape closure is as successful as suture closure.1,10 Closure tape should be considered for superficial wounds in cosmetically unimportant areas and for wounds on relatively flat surfaces that are too wide for simple dressings but do not require sutures.
Tissue Adhesive (Tissue Glue)
Tissue adhesive (also called tissue “glue”) provides a simple, rapid method of wound closure. Tissue adhesive has been approved for use in the United States since 1998. Two types of tissue adhesive are available: N-2-octylcyanoacrylate (Dermabond, Ethicon, Inc.) and N-butyl-2-cyanoacrylate (Indermil, Tyco Healthcare Group LP). Animal studies have shown octylcyanoacrylate-based adhesive to have significantly greater strength and flexibility than butylcyanoacrylate-based adhesive. Dermabond and Indermil are packaged in sterile, single-use ampules (Fig. 35-5). These bonding agents can be used on superficial wounds, even in hair-bearing areas. Tissue adhesives polymerize on contact with water. These substances are biodegradable but remain in the wound until well after healing.11,12
Figure 35-5 Tissue adhesive, 2-octylcyanoacrylate, comes in a variety of commercially available dispensers.
Procedure
Tissue adhesive can be used to approximate wounds that do not require deep-layer closure and do not have significant tension on the edges of the wound (Fig. 35-6). In preparation for closure, clean and anesthetize the wound. Débride the wound if necessary. Control bleeding of the wound.
Hold the wound edges together with forceps, gauze pads, or fingers. Squeeze the small, cylindrical plastic container to expel droplets of tissue adhesive through the cotton-tipped applicator at the end of the container. Apply the adhesive in at least three to four thin layers along the length of the wound’s surface and extend it approximately 5 to 10 mm from each side of the wound. Alternatively, place the adhesive in strips perpendicular to the laceration (analogous to the placement of closure tape). The purple color of the solution facilitates placement of the droplets. Support and hold the edges of the wound together for at least 1 minute while the adhesive dries. Low-viscosity tissue adhesives may seep into the wound or trickle off rounded surfaces during application. This tendency toward migration or “runoff” can be minimized by using high-viscosity adhesives13 (e.g., Dermabond HV Topical Skin Adhesive, Ethicon, Inc.), positioning the wound horizontally, or applying the adhesive slowly. Contain runoff with wet gauze or by creating a barrier of petrolatum.
Tissue adhesives can also be used to treat superficial skin tears that do not extend past the dermis. After the wound and skin flap are cleaned, lay the flap over the base of the wound and approximate the edges of the wound. Any remaining blood and serum are expressed from under the flap, and the entire area is dried. A thin layer of adhesive is applied over the wound margins and 1 to 2 cm beyond the margin. After the first layer dries, a second layer of adhesive is applied. A dressing is not required unless there is a reason to protect the wound from repeated injury.”14,15
The primary advantage of tissue adhesive is the speed of closure. Wounds can be closed in as little as one sixth the time required for repair with sutures. Application is rapid and painless. Use of tissue adhesive avoids suture marks adjacent to the wound and reduces the risk for needlestick injuries to health care personnel. Wounds closed with tissue adhesive have less tensile strength in the first 4 days than do sutured wounds,16,17 but 1 week after closure, the tensile strength and overall degree of inflammation in wounds closed with tissue adhesive are equivalent to those closed with sutures.12,18 Cosmetic results are similar to those obtained with suture repair.17,19–25 Tissue adhesive serves as its own wound dressing and has an antimicrobial effect against gram-positive organisms.26,27 The material sloughs off in 5 to 10 days, thereby saving the patient from a clinician visit. Do not apply ointments or occlusive bandages on wounds closed with tissue adhesive.
Complications
Although tissue adhesive is classified as nontoxic and does not cause a significant foreign body reaction, some authors warn against placing it within the wound cavity.17,18 However, various investigators have applied specially formulated octyl-2-cyanoacrylate (“liquid adhesive bandage”) directly to open minor lacerations, abrasions, and partial-thickness wounds. When compared with adhesive bandages, wounds covered with this tissue adhesive had equivalent rates of healing and complications.”28,29
If hemostasis is inadequate or an excessive amount of adhesive is applied too quickly, the patient can experience a burning sensation or sustain a local burn from the heat of polymerization. After polymerizing, tissue adhesive can fracture with excessive or repetitive movement. Although gentle rinsing is permitted, if the adhesive is washed or soaked, it will peel off in a few days, before the wound is healed.17
If the clinician’s gloved fingers, gauze, or plastic instruments contact the tissue adhesive during application, the glove may adhere to the patient’s skin. Tissue adhesive can be removed with antibiotic ointment or petrolatum jelly or more rapidly with acetone.25 Indermil must be stored under refrigeration.
One risk involving the use of tissue adhesive is its ease of use—clinicians may fail to adequately clean wounds before closure with tissue adhesive.30 Tissue adhesive should not be used to close infected wounds. There is a slightly higher risk for wound dehiscence in closures with tissue glue than with sutures.31,32
If the edges of the wound cannot be held together without considerable tension, tissue adhesive should not be used.25 Percutaneous sutures provide a more secure immediate closure than tissue adhesive does.12 Tissue adhesive should not be used near the eyes, over or near joints, on moist or mucosal surfaces, or on wounds under significant static or dynamic skin tension. See Figure 35-6 for information on managing eyelids that are accidentally glued shut.
Wound Staples
Automatic stapling devices have become commonplace for closure of surgical incisions and traumatic wounds (Fig. 35-7). Clinical studies of patients with stapled surgical incisions have found no significant difference between stapling and suturing when infection rates, healing outcome, and patient acceptance are compared.33–37 Wound stapling and nylon suture closure of skin compared favorably in wound tensile strength, complication rates, patient tolerance, efficiency of closure, scar width, color, general appearance, suture or staple marks, infection rates, and cost. In animal models, staples caused less wound inflammation and offered more resistance to infection with contaminated wounds.38–41
The most significant advantage of wound stapling over suturing is speed of closure. The most significant downside is loss of the cosmetic effect that can be achieved with meticulous suture closure. On average, stapling is three to four times faster than suturing traumatic wounds.42–44 When clinician time and cost of instruments are considered, the difference in cost between stapling and suturing is minimal43 or favors stapling.42,45
Procedure
Before stapling, sometimes it is necessary to place deep, absorbable sutures to close deep fascia and reduce tension in the superficial fascia and dermal layers. To facilitate the stapling process, the edges of the wound should be everted, preferably by a second operator (Fig. 35-8, step 1). The assistant precedes the operator along the wound and everts the edges of the wound with forceps or pinches the skin with the thumb and forefinger. Stapling flattened wound edges may place the staple precisely but results in inversion of the wound. Once the edges are held in eversion, the staple points are gently placed across the wound. It is imperative to place the center of the staple device over the center of the wound to ensure the best closure and to avoid overriding or misaligned edges (difficult in an uncooperative patient). When the stapler handle or trigger is squeezed, the staple is advanced automatically into the wound and bent to the proper configuration (see Fig. 35-8, steps 2 and 3). The operator should not press too hard on the skin surface to prevent placing the staple too deeply and causing ischemia within the staple loop. When placed properly, the crossbar of the staple is elevated a few millimeters above the surface of the skin (see Fig. 35-8, step 4). A sufficient number of staples should be placed to provide proper apposition of the edges of the wound along its entire length. (One suggested method is to place a staple in the midpoint of the length of the wound and then bisect either side of the wound with additional staples. Continue the process until the edges of the wound are well opposed.) After the wound is stapled, an antibiotic ointment may be applied to minimize adherence of the dressing, and a sterile dressing is applied. If necessary, the patient can remove the dressing and gently clean the wound in 24 to 48 hours. Scalp lacerations can be cleansed by showering within a few hours.
Removal of staples requires a special instrument made available by each manufacturer of stapling devices. The lower jaw of the staple remover is placed under the crossbar, and the handle is squeezed (see Fig. 35-8, steps 5 and 6). This action compresses the crossbar and bends the staple outward, thereby releasing the points of the staple from the skin. Many primary care physicians do not routinely stock the instrument. If referred for office removal of staples, the patient can be given a disposable staple removal device. Motivated patients can remove their own staples if given the removal device. The interval between staple application and removal is the same as that for standard suture placement and removal. Staples can cause significant scarring if left in place too long (Fig. 35-9).
Complications
A common error during insertion of staples is failure to evert the edges of the skin before stapling (see Fig. 35-9). Eversion avoids the natural tendency of the device to invert the closure. Eversion may be accomplished with forceps or by pinching the skin with the thumb and index finger, a procedure that requires some practice. Another common error is to fail to align the middle of the staple exactly in the midline of the wound. Staples do cause marks in the skin similar to sutures. In patients who tend to scar more easily, the scar resulting from staples may be more pronounced than that produced by sutures, especially if the staples are left in place for prolonged periods.
Wound stapling achieves results that are generally comparable to those of sutures for the closure of traumatic, linear lacerations in noncosmetic areas, such as the scalp, trunk, and extremities. Stapling is much faster than suturing. Wound stapling does not differ significantly from suturing in terms of cost, infection rates, wound healing, and patient acceptance. Cosmesis does, however, suffer, especially if the staples are left in too long (see Fig. 35-9D and E).
Sutures
In the United States, most traumatic wounds are closed by suturing.
Equipment
In addition to the instruments used for débridement, a needle holder and suture scissors are required for suturing (Fig. 35-10). The mechanical performance of disposable needle holders distributed by different surgical instrument companies varies considerably.46 The size of the needle holder should match the size of the needle selected for suturing—that is, the needle holder should be large enough to hold the needle securely as it is passed through tissue, yet not so large that the needle is crushed or bent by the instrument.
In addition, 2.5 loupe magnification may improve inspection of wounds and facilitate the repair of facial and hand wounds.47
Suture Material
A wide variety of suture material is available (Fig. 35-11). Clinician preference varies widely, and there are no definitive standards on which to base the use of suture material for a particular wound or particular site. For most wounds that require closure of more than one layer of tissue, the clinician must choose sutures from two general categories: an absorbable suture for the deeper, subcutaneous (SQ) layer and a nonabsorbable suture for surface (percutaneous) closure.
Sutures can be described in terms of four characteristics:
1. Composition (i.e., chemical and physical properties)
Composition: Sutures are made from natural fibers (cotton, silk), from sheep submucosa or beef serosa (plain gut, chromic gut), or from synthetic material such as nylon (Dermalon, Ethilon, Nurolon, Surgilon), Dacron (Ethiflex, Mersilene), polyester (Ti-Cron), polyethylene (Ethibond), polypropylene (Prolene, Surgilene), polyglycolic acid (Dexon), and polyglactin (Vicryl, coated Vicryl). Stainless steel sutures are rarely, if ever useful in wound closure in the ED setting because of handling difficulty and fragmentation. Some sutures are made of a single filament (monofilament); others consist of multiple fibers braided together (Table 35-1).48
Handling and Performance: Desirable handling characteristics in a suture include smooth passage through tissue, ease in knot tying, and stability of the knot once tied (Table 35-2). Smooth sutures pull through tissue easily, but knots slip more readily. Conversely, sutures with a high coefficient of friction have better knot-holding capacity but are difficult to slide through tissue. Smooth sutures will loosen after the first throw of a knot is made, and thus a second throw is needed to secure the first in place. However, the clinician may want to tighten a knot further after the first throw is made. This is difficult with rougher types of suture.
TABLE 35-2
Characteristics of Suture Material
Modified with permission from Hollander J, Singer A. Laceration management. Ann Emerg Med. 1999;34:351.
Multifilament sutures have the best handling characteristics of all sutures, whereas steel sutures have the worst. In terms of performance and handling, significant improvements have been made in the newer absorbable sutures. Gut sutures have many shortcomings, including relatively low and variable strength, a tendency to fray when handled, and stiffness despite being packaged in a softening fluid.49,50 Multifilament synthetic absorbable sutures are soft and easy to tie and have few problems with knot slippage. Polyglactin 910 (coated Vicryl) sutures have an absorbable lubricant coating. The “frictional drag” of these coated sutures as they are pulled through tissue is less than that of uncoated multifilament materials, and resetting of knots after the initial throw is much easier. This characteristic allows retightening of a ligature without knotting or breakage and with smooth, even adjustment of suture line tension in running subcuticular stitches.51 Synthetic monofilament sutures have the troublesome property of “memory”—a tendency of the filament to spring back to its original shape, which causes the knot to slip and unravel. Some nonabsorbable monofilament sutures are coated with polytetrafluoroethylene (Teflon) or silicone to reduce their friction. This coating improves the handling characteristics of these monofilaments but results in poorer knot security.42
Three square knots will secure a stitch made with silk or other braided, nonabsorbable material, and four knots are sufficient for synthetic, absorbable, and nonabsorbable monofilament sutures.52 Five knots are needed for the Teflon-coated synthetic Tevdek.53 When coated synthetic suture material is used, attention to basic principles of knot tying is even more important. An excessive number of throws in a knot weakens the suture at the knot. If the clinician uses square knots (or a surgeon’s knot on the initial throw, followed by square knots) that lie down flat and are tied securely, knots will rarely unravel.54
Absorption and Reactivity: Sutures that are rapidly degraded in tissue are termed absorbable; those that maintain their tensile strength for longer than 60 days are considered nonabsorbable (see Table 35-1). Plain gut may be digested by white blood cell lysozymes in 10 to 40 days; chromic gut will last 15 to 60 days. Remnants of both types of suture, however, have been seen in wounds more than 2 years after placement.49,52,55 Ethicon catgut is rapidly absorbed within 10 to 14 days and is associated with less inflammation than chromic catgut is.56 Vicryl is absorbed from the wound site within 60 to 90 days49,52 and Dexon, within 120 to 210 days.57,58 When placed in the oral cavity, plain gut disappears after 3 to 5 days, chromic gut after 7 to 10 days, and polyglycolic acid after 16 to 20 days.59 In contrast, SQ silk may not be completely absorbed for as long as 2 years.52 The rate of absorption of synthetic absorbable sutures is independent of suture size.57
Sutures may lose strength and function before they are completely absorbed in tissues. Braided synthetic absorbable sutures lose nearly all their strength after about 21 days. In contrast, monofilament absorbable sutures (modified polyglycolic acid [Maxon, Davis & Geck] and polydioxanone [PDS, Ethicon]) retain 60% of their strength after 28 days.60,61 Gut sutures treated with chromium salts (chromic gut) have prolonged tensile strength; however, all gut sutures retain tensile strength erratically.49,52 Of the absorbable types of suture, a wet and knotted polyglycolic acid suture is stronger than a plain or chromic gut suture subjected to the same conditions.50,62
Polypropylene remains unchanged in tissue for longer than 2 years after implantation.63 In comparison testing, sutures made of natural fibers such as silk, cotton, and gut were the weakest; sutures made of Dacron, nylon, polyethylene, and polypropylene were intermediate in tensile strength; and metallic sutures were the strongest.50 Comparison of suture strength versus wound strength is a measure of the usefulness of a suture. Catgut is stronger than the soft tissue of a wound for no more than 7 days; chromic catgut, Dexon, and Vicryl are stronger for 10 to 21 days; and nylon, wire, and silk are stronger for 20 to 30 days.64
All sutures placed within tissue will damage host defenses and provoke inflammation. Even the least reactive suture impairs the ability of the wound to resist infection.63 The magnitude of the reaction provoked by a suture is related to the quantity of suture material (diameter × total length) placed in the tissue and to the chemical composition of the suture. Among absorbable sutures, polyglycolic acid and polyglactin sutures are the least reactive, followed by chromic gut. Nonabsorbable polypropylene is less reactive than nylon or Dacron.50,65,66 Significant tissue reaction is associated with catgut, silk, and cotton sutures. Absorbable polyglycolic acid sutures are less reactive than those made of nonabsorbable silk.67 Highly reactive material should be avoided in contaminated wounds.
The chemical composition of sutures is a factor in early infection. The infection rate in experimentally contaminated wounds closed with polyglycolic acid sutures is lower than the rate when gut sutures are used.63 However, other authors have compared plain gut and nonabsorbable nylon sutures for skin closure in children and found comparable cosmetic results and infection rates.68 Lubricant coatings on sutures do not alter suture reactivity, absorption characteristics, breaking strength, or the risk for infection.51,63 Multifilament sutures provoke more inflammation and are more likely than monofilament sutures to produce infection if left in place for prolonged periods.69,70 Monofilament sutures elicit less tissue reaction than do multifilament sutures, and multifilament materials tend to wick up fluid by capillary action. Bacteria that adhere to and colonize sutures can envelop themselves in a glycocalix that protects them from host defenses,71 or they can “hide” in the interstices of a multifilament suture and, as a result, be inaccessible to leukocytes.69 PDS provides the advantages of a monofilament suture in an absorbable form, thus making it a good choice as a subcuticular stitch. Polypropylene sutures have a low coefficient of friction, and subcuticular stitches with this material are easy to pull out.72
Size and Strength: The size of suture material (thread diameter) is related to the tensile strength of the suture; threads with greater diameter are stronger. The strength of the suture is proportional to the square of the diameter of the thread. Therefore, a 4-0 suture of any type is larger and stronger than a 6-0 suture. The correct suture size for approximation of a layer of tissue depends on the tensile strength of that tissue. The tensile strength of the suture material should be only slightly greater than that of the tissue because the magnitude of damage to local tissue defenses is proportional to the amount of suture material placed in the wound.52,73
Synthetic absorbable sutures have made the older, natural suture material unnecessary for most wound closures. Polyglycolic acid (Dexon) and polyglactin 910 (coated Vicryl) have improved handling characteristics, knot security, and tensile strength. Their absorption rates are predictable, and tissue reactivity is minimal.74,75 The distinct advantages of synthetic nonabsorbable sutures over silk sutures are their greater tensile strength, low coefficient of friction, and minimal tissue reactivity.63,74 They are extensible and elongate without breaking as the edges of the wound swell in the early postoperative period.73,74 In contrast to silk sutures, synthetics can easily and painlessly be removed once the wound has healed. The monofilament synthetic suture Novafil has elasticity that allows a stitch to enlarge with wound edema and to return to its original length once the edema subsides. Stiffer materials lacerate the encircled tissue as the wound swells.76
Needles
The eyeless, or “swaged,” needle is used for wound closure in most emergency centers (Fig. 35-12). Selection of the appropriate needle size and curvature is based on the dimensions of the wound and the characteristics of the tissue to be sutured. The needle should be large enough to pass through tissue to the desired depth and then to exit the tissue or skin surface far enough that the needle holder can be repositioned on the distal end of the needle at a safe distance from the tip of the needle (Fig. 35-13). Although it is tempting to use the fingers to grasp the tip of the needle to pull it through the skin, this practice risks a needlestick. The clinician should either reposition the needle holder or use forceps to disengage the needle from the laceration.
In wound repair, needles must penetrate tough, fibrous tissue—skin, SQ tissue, and fascia—yet should slice through this tissue with minimal resistance or trauma and without bending. The type of needle best suited for closure of SQ tissue is a conventional cutting needle in a three-eighths or one-half circle (Fig. 35-14). Double-curvature needles (coated Vicryl with PS-4-C cutting needles, Ethicon) may be easier to maneuver in narrow, deep wounds. For surface closure, a conventional cutting-edge needle permits more precise needle placement and requires less penetration force (Fig. 35-15).77,78
Suturing Techniques (Figs. 35-16 and 35-17)
Figure 35-16 General suturing technique.
Closure Principles
Clinician preference varies widely, and there are no definitive standards on the exact method of wound preparation, manipulation of tissue, or closure technique that is preferred for any given wound. There is a tendency to overuse sutures for minor lacerations that will heal nicely with no intervention. Therefore, before suturing, one must assess the need for the procedure (Fig. 35-18).
Minimizing Tissue Trauma: The importance of careful handling of tissue has been emphasized since the early days of surgery. Skin and SQ tissue that has been stretched, twisted, or crushed by an instrument or strangled by a suture that is tied too tightly may undergo necrosis, and increased scarring and infection may result. When the edges of a wound must be manipulated, the SQ tissues should be lifted gently with toothed forceps or a skin hook while avoiding the surface of the skin.
When choosing suture size, the clinician should select the smallest size that will hold the tissues in place. Skin stitches should incorporate no more tissue than is needed to coapt the wound edges with little or no tension. Knots should be tied securely enough to approximate the edges of the wound but without blanching or indenting the skin surface.79
Relieving Tension: Many forces can produce tension on the suture line of a reapproximated wound. Static skin forces that stretch the skin over bones cause the edges of a new wound to gape, and they also continuously pull on the edges of the wound once it has been closed. Traumatic loss of tissue or wide excision of a wound may have the same effect. The best cosmetic result occurs when the long axis of a wound happens to be parallel to the direction of maximal skin tension; such alignment brings the edges of the wound together.76
Muscles pulling at right angles to the axis of the wound impose dynamic stress. Swelling after an injury creates additional tension within the circle of each suture.79 Skin suture marks result not only from tying sutures too tightly but also from failing to eliminate any underlying forces distorting the wound. Tension can be reduced during wound closure in two ways: undermining of the wound edges and layered closure.
Undermining.: The force required to reapproximate the edges of a wound correlates with the subsequent width of the scar.80 Wounds subject to significant static tension require the undermining of at least one tissue plane on both sides of the wound to achieve a tension-free closure. To undermine a wound, the clinician frees a flap of tissue from its base at a distance from the edge of the wound approximately equal to the width of the gap that the laceration presents at its widest point (Fig. 35-19).
The depth of the incision can be modified, depending on the orientation of the laceration to skin tension lines and the laxity of skin in the area. A No. 15 scalpel blade held parallel to the surface of the skin is used to incise the adipose layer or the dermal layer of the wound. The clinician can also accomplish this technique by spreading scissors in the appropriate tissue plane. Undermining allows the edges of the skin to be lifted and brought together with gentle traction.81 Potential complications of this procedure include injury to cutaneous nerves and creation of a hematoma under the flap. Because undermining may harm the underlying blood supply, this technique should be reserved for relatively uncontaminated wounds when no other methods adequately relieve wound tension.77
Layered Closure.: The structure of skin and soft tissue varies with the location on the body (Fig. 35-20). Most wounds handled in an ED require approximation of no more than three layers: fascia (and associated muscle), SQ tissue, and skin surface (papillary layer of the dermis and epidermis).82 Any “dead space” (or unapposed edges) within a wound may fill with blood or exudate and enhance the development of infection. Closure of individual layers obliterates this dead space (Fig. 35-21).
[/not-level-membership-for-emergency-medicine-category]
