[level-membership-for-anesthesiology-category]
CHAPTER 8 Upper limb blocks
Interscalene block
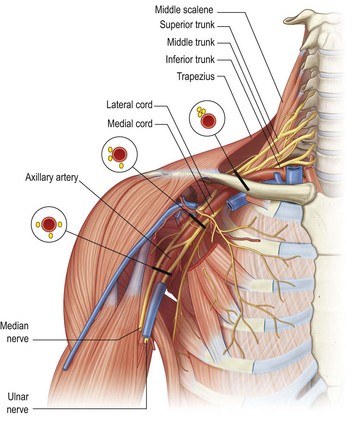
Use this block for anaesthesia/analgesia of the shoulder joint (dislocation reduction), arm, elbow, and proximal forearm injuries or amputations (Fig. 8.1).
Landmark technique
The interscalene approach to brachial plexus blockade results in anaesthesia of the shoulder, arm, and elbow. It is not consistently reliable for anaesthesia of the hand because the C8 and T1 nerve roots are frequently not blocked, and more distal approaches to the brachial plexus, such as the supraclavicular, infraclavicular or axillary blocks, are more appropriate. The traditional interscalene block relies on the injection and dispersion of a large volume of local anaesthetic within the fascial envelope bordered by the anterior and middle scalene muscles to accomplish blockade of the brachial plexus. This block can be performed at the level of the cricoid cartilage (C6) or slightly more inferiorly, closer to the clavicle. With the more inferior approach, the interscalene groove is shallower and easier to identify and the needle insertion point is much more lateral, which makes vascular puncture rare. This approach is also more suited to those not performing the block regularly.
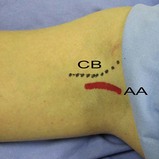
Preparation
•
Position the patient supine or in semi-Fowler’s position with the head facing away from the side to be blocked. Position the patient’s arm comfortably by their side and ask them to hold their shoulder down, as though they are reaching for their knee.
•
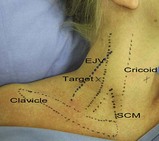
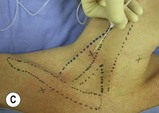
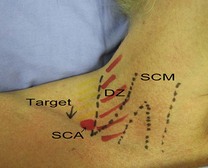
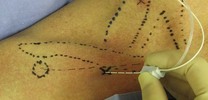
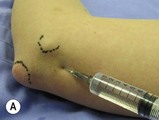
Mark the important landmarks with a skin marker (
Fig. 8.2):
•
The posterior border of the clavicular head of the sternocleidomastoid muscle. Ask the patient to turn their head away from the side to be blocked because this tenses the sternocleidomastoid muscles and makes it more prominent. Then ask the patient to lift their head off the table while facing away. This also helps to identify the posterior border of the clavicular head of the sternocleidomastoid muscle.
•
The external jugular vein. Ask the patient to try to sit up (or sit forward). This manoeuvre flattens the skin of the neck and helps to identify the interscalene groove, and the Valsalva manoeuvre distends the external jugular vein.
•
The interscalene groove. While palpating the posterior border of sternocleidomastoid, ask the patient to forcefully sniff. This tenses the scalene muscles and the interscalene groove becomes more prominent.
Technique
•
Prepare the field by cleaning the skin with an antiseptic solution and positioning sterile drapes.
•
Identify the target area for the initial needle insertion – the interscalene groove, at about the level of the cricoid cartilage, or slightly inferiorly. The most common error is inserting the needle too far anteriorly. Examine the anatomical landmarks carefully.
•
Raise a superficial weal of local anaesthetic at the needle insertion site.
•
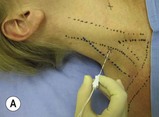
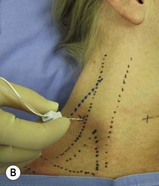
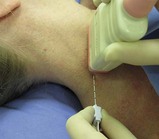
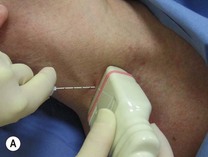
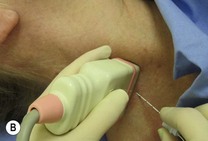
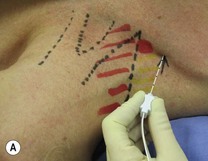
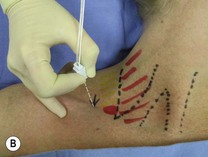
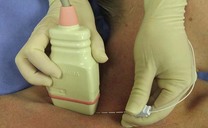
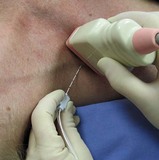
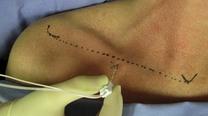
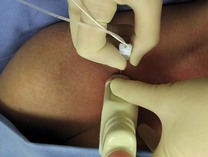
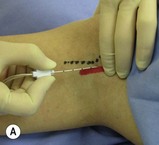
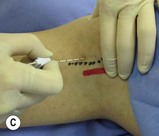
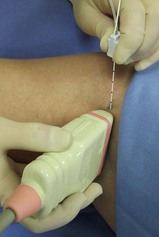
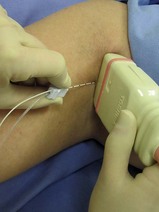
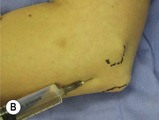
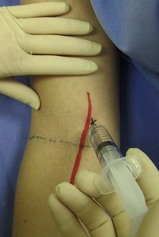
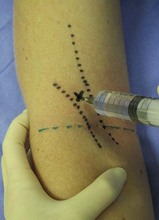
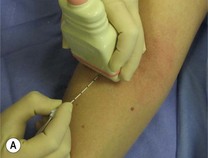
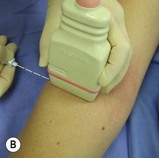
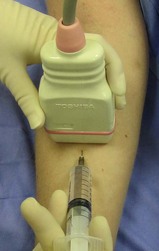
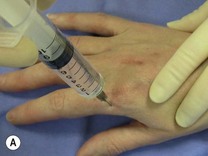
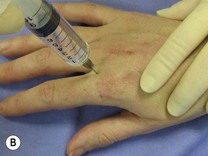
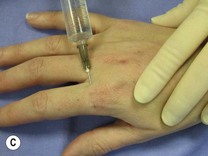
Puncture the skin at the target point with a 25 mm to 50 mm nerve-block needle (
Fig. 8.3A–C). Direct the needle perpendicular to the skin surface – slightly medially, inferiorly 30° to 45° and posteriorly aiming at the transverse process of C6. If you are using a more inferior puncture site (25 mm above the clavicle), insert the needle perpendicular to the skin surface taking care not to aim superiorly. The inferior angle of the needle is important to decrease the risk of inadvertent entry into one of the neural foramina.
•
Advance the needle 10 to 20 mm until paraesthesias are elicited.
•
An alternative method is to use a parasagittal approach with the needle held parallel to the scalene muscles and aimed inferiorly towards the midpoint of the clavicle.
•
If you are using a nerve stimulator, insert the needle using the same technique. Appropriate twitches include pectoralis, deltoid, triceps, biceps or any muscle of hand or forearm, but not the trapezius.
•
Aspirate. If no flashback of blood is obtained, inject 30 to 40 mL of local anaesthetic slowly with intermittent aspiration to rule out intravascular injection. Slow injection increases block success and decreases complications. If resistance to injection, severe paraesthesias or cramping pain sensations occur with initial injection, then the needle should be withdrawn by 1 to 2 mm to avoid intraneural injection. Use the higher end of the volume range if C8/T1 anaesthesia is desired (remembering that larger volumes are associated with more undesirable effects for this particular block).
•
The onset of anaesthesia with lidocaine is from 5 to 15 minutes and with bupivacaine is from 10 to 20 minutes; duration of anaesthesia is 3 to 6 hours and 8 to 10 hours, respectively; duration of analgesia is 5 to 8 hours and 16 to 18 hours, respectively.
Precautions
The interscalene block is very safe if used appropriately and carefully. Avoid using this block in patients who have significant chronic respiratory disease or patients with respiratory distress, as well as in patients with contralateral phrenic nerve or recurrent laryngeal nerve paralysis.
Complications
•
Inadvertent total spinal anaesthesia is a potentially serious complication resulting from incorrect needle placement or from local anaesthetic tracking proximally within the nerve root sheath.
•
Vertebral artery injection can result in a rapid onset of central nervous system toxicity.
•
Phrenic nerve block occurs frequently, so do not use this block bilaterally or in patients with respiratory compromise.
•
Recurrent laryngeal, vagus, and cervical sympathetic nerves are often blocked.
•
Pneumothorax can occur as the cupola of the lung may be pierced by a poorly directed needle.
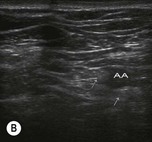
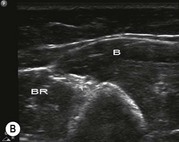
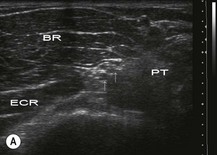
Ultrasound technique
This technique is a simple, easy-to-use method, does not require a nerve stimulator, and allows for smaller volumes of local anaesthetic to be used. It allows precise visualisation of the significant structures and avoids misadventures from misplacement of the needle. It is a useful technique for the ED.
Preparation
•
Position the patient supine or in semi-Fowler’s position with the head facing away from the side to be blocked.
•
Rest the arm comfortably by the patient’s side or across the abdomen.
•
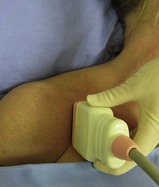
Use a linear high-frequency probe (10 to 15 MHz is ideal) and select an appropriate pre-set application.
•
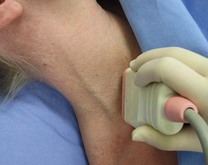
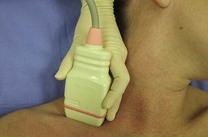
Identify the area to begin the scan – either the midline of the neck or the supraclavicular fossa, depending upon which scan strategy is employed (
Fig. 8.4).
•
Prepare the field by cleaning the skin with an antiseptic solution and positioning sterile drapes. Cover the probe with a sterile probe-sheath and apply sterile ultrasound gel to the area of the interscalene groove.
Technique
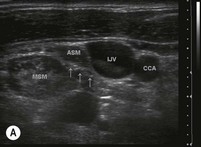
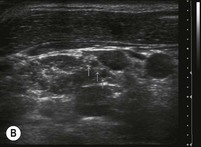
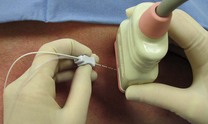
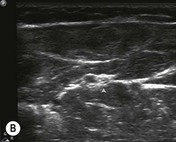
In-plane approach (Fig. 8.6)
•
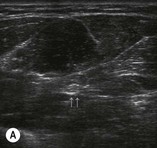
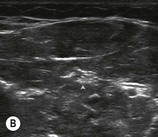
Identify the hypoechoic nerve roots in their transverse axis in an area convenient to block.
•
Raise a weal of local anaesthetic at the needle insertion target with a 27G needle.
•
Insert a 25 mm to 50 mm 22G nerve-block needle on the lateral end of the ultrasound probe.
•
Advance the needle towards the edge of the nerves while visualising the entire length of the needle in real time.
•
Aim to contact nerve roots in the centre of the interscalene groove from the lateral side; avoid injection close to the neural foramina.
•
Track real-time needle movement to prevent inadvertent entry through the neural foramina.
Out-of-plane approach (Fig. 8.7A&B)
•
Identify the hypoechoic nerve roots in their transverse axis in an area convenient to block.
•
Line up the nerve target at the midpoint of the screen. The needle insertion point will correspond to the exact centre of the transducer.
•
Raise a weal of local anaesthetic at the needle insertion target with a 27G needle.
•
Insert a 25 mm to 50 mm 22G nerve-block needle on the superior or inferior side of the ultrasound probe.
•
Observe tissue and needle movement as the needle is advanced towards the target. Aiming for the side of the nerve bundle rather than the centre makes needle placement more accurate.
•
Clear identification of the needle tip may require the probe to be angled back and forth.
The injection process
•
Slowly inject local anaesthetic around the nerve roots by positioning the needle in the centre of the interscalene groove, adjacent to the nerve sheath. Aspirate frequently to avoid inadvertent intravascular injection. If resistance to injection, severe paraesthesias or severe cramping pain are provoked in the limb during injection, immediately withdraw the needle by 1 to 2 mm to avoid intraneural injection.
•
Observe the local anaesthetic spread during injection. A hypoechoic collection will appear adjacent to and then spread around the nerves.
•
An expansion of the tissue in the interscalene groove indicates a correct positioning of the local anaesthetic injection; expansion within the scalene muscle indicates intramuscular injection and the needle should be repositioned.
•
Reposition the needle at least once to ensure complete circumferential local anaesthetic spread around the nerve roots.
•
The volume of local anaesthesia introduced appears to be directly related to side effects and complications of the interscalene block. Phrenic nerve blockade is more frequent when volumes greater than 10 mL are injected. The use of ultrasound allows for smaller volumes to be placed accurately and effectively. Inject 10 mL of local anaesthetic or just enough that the nerve roots are visualised to be completely surrounded by hypoechoic fluid. Injection of as little as 5 mL of local anaesthetic within (rather than around) the nerve sheath itself can produce an effective block.
Supraclavicular block
Landmark technique
The supraclavicular block is performed below the level of the nerve roots at a point where the brachial plexus trunks have formed and are contained within a neural sheath. This approach produces a rapid-onset block with a predictable, dense anaesthesia. The supraclavicular block can be used to provide anaesthesia and analgesia for the upper limb distal to the shoulder.
Preparation
•
Position the patient supine or in semi-Fowler’s position with the head facing away from the side to be blocked. Rest the patient’s arm comfortably across their abdomen.
•
Mark the important landmarks with a skin marker (
Fig. 8.8):
•
The posterior border of the clavicular head of the sternocleidomastoid muscle at the point of insertion onto the clavicle (ask the patient to lift their head off the table while facing away, as this helps to define this landmark).
•
Draw a line on the neck parallel to the midline through this point to demarcate the lateral extension of the cupola of the lung. The area medial to this line is a danger area because of the risk of pneumothorax.
•
The point of pulsation of the subclavian artery should be marked.
•
The target point for needle insertion is approximately 25 mm lateral to the line (as a margin of safety) and should be marked on the skin.
Technique
•
Prepare the field by cleaning the skin with an antiseptic solution and positioning sterile drapes.
•
Identify the target area for needle insertion – about 25 mm lateral to the posterior border of sternocleidomastoid and 15 mm (one fingerbreadth) superior to the clavicle. This should be immediately posterolateral to the pulsation of the subclavian artery superior to the clavicle.
•
Raise a superficial weal of local anaesthetic at the needle insertion site with a 27G needle.
•
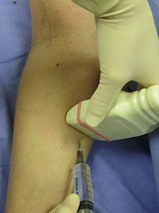
Puncture the skin at the target point with a 25 mm to 50 mm nerve-block needle. Insert the needle perpendicularly to the skin and advance it 2 to 5 mm (
Fig. 8.9A&B). Redirect the needle inferiorly, keeping it parallel to the scalene muscles (in a slightly lateral direction) until paraesthesias are elicited. The insertion depth is unlikely to be more than 25 mm. Once the rib is contacted the needle can be ‘walked’ anteriorly and posteriorly while keeping the syringe parallel to the interscalene groove until the brachial plexus is located. If the rib is not found, the needle should be carefully redirected first laterally and then medially until it is contacted or paraesthesias or nerve twitches are elicited.
•
If you are using a nerve stimulator, insert the needle using the same technique. The needle is advanced slowly until flexion or extension twitches of the fingers are obtained.
•
Aspirate. If no flashback of blood is obtained, inject 30 to 40 mL of local anaesthetic slowly with intermittent aspiration to rule out intravascular injection. Slow injection increases block success and decreases complications. If resistance to injection, severe paraesthesias or cramping pain sensations occur with initial injection, the needle should be withdrawn by 1 to 2 mm to avoid intraneural injection.
•
The onset of anaesthesia with lidocaine is from 5 to 15 minutes and with bupivacaine is from 10 to 20 minutes; duration of anaesthesia is 3 to 6 hours and 8 to 10 hours, respectively; duration of analgesia is 5 to 8 hours and 16 to 18 hours, respectively.
Precautions
This block is very safe if used appropriately and carefully. Avoid using this block in patients who have significant chronic respiratory disease or patients with respiratory distress, as well as in patients with contralateral phrenic nerve or recurrent laryngeal nerve paralysis.
Complications
Common side effects associated with this technique include phrenic nerve block with diaphragmatic paralysis and sympathetic nerve block with development of Horner’s syndrome. This usually only requires reassurance for the patient. Phrenic nerve block occurs in about 50% of cases and is not associated with respiratory dysfunction in healthy volunteers.
Pneumothorax associated with supraclavicular block is not common, is generally small requiring conservative treatment only, and develops within a few hours following the procedure. In rare instances its presentation can be delayed up to 12 hours.
Complications similar to those occurring with other peripheral blocks, such as intravascular injection with development of systemic local anaesthetic toxicity, as well as haematoma formation, may occur. Neurapraxias and neurologic injury are similarly possible, but rarely reported.
Ultrasound technique
This technique is a simple, easy-to-use method, does not require a nerve stimulator, and allows for smaller volumes of local anaesthetic to be used. It also virtually abolishes the likelihood of inadvertent vascular and pleural puncture.
Preparation
•
Position the patient supine or in semi-Fowler’s position with the head facing away from the side to be blocked.
•
Rest the arm comfortably by the patient’s side or across the abdomen.
•
Use a linear high-frequency probe (10 to 15 MHz is ideal) and select an appropriate pre-set application.
•
Identify the area to begin the scan – either the midline of the neck or the supraclavicular fossa.
•
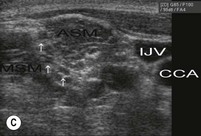
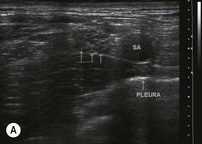
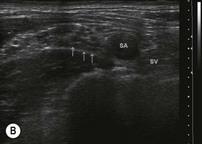
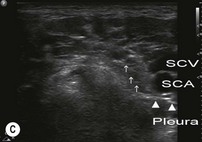
Perform a preliminary non-sterile survey scan to identify the relevant anatomy and optimise the image by adjusting depth of field (20 to 30 mm), focus point, and gain. Mark the best probe position on the skin with a pen, if required. Position the probe over the supraclavicular fossa in the transverse plane to obtain the best possible cross-sectional view of the subclavian artery and brachial plexus (
Figs 8.10,
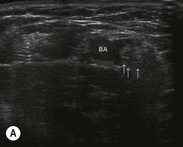
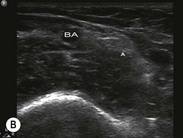
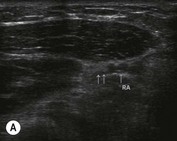
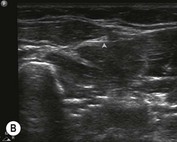
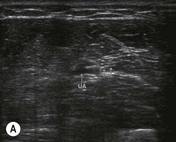
8.11A–C). Scan proximally and distally to observe the nerve roots and nerve trunks. The nerves in this region are round or oval, are hypoechoic, and can be found lateral and superficial to the subclavian artery (which can be identified with the assistance of colour Doppler if necessary) and superior to the first rib. The subclavian vein is medial to the artery. Visualise the pleura (check for the pleural sliding sign and comet tails) and note the relation to the brachial plexus and the planned needle track. Also take note of the distance from the skin to the rib and the skin-to-pleura distance.
•
Prepare the field by cleaning the skin with an antiseptic solution and positioning sterile drapes. Cover the probe with a sterile probe-sheath and apply sterile ultrasound gel to the area of the supraclavicular fossa.
Technique
In-plane approach (lateral to medial)
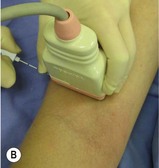
This approach is considerably different from the conventional supraclavicular techniques. The block needle is inserted in a very lateral position and advanced in a lateral to medial direction starting from the lateral edge of the probe. The in-plane approach enables the physician to track the needle tip in real time in order to minimise the risk of accidental pleural or vascular puncture.
•
Identify the hypoechoic nerve roots in their transverse axis in the supraclavicular fossa.
•
Raise a weal of local anaesthetic at the needle insertion target with a 27G needle.
•
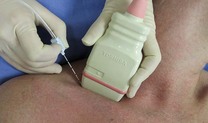
Insert a 25 mm to 50 mm 22G nerve-block needle on the lateral end of the ultrasound probe.
•
Advance the needle towards the edge of the nerve bundle while visualising the entire length of the needle in real time and avoiding pleural or vascular puncture (
Fig. 8.12).
An alternative in-plane approach (medial to lateral)
The advantage of ultrasound guidance is that any approach can be used and the needle tip can be positioned next to the nerves under direct vision (Fig. 8.13). While this approach has the advantage of advancing the needle away from the artery and the pleura, it also makes it more difficult to position the needle close to the nerves if they lie deep or directly lateral to the artery.
Out-of-plane approach
This is similar to the traditional blind landmark approach. The needle is introduced and advanced into the proximity of the nerve (Fig. 8.14).
•
Identify the subclavian artery and the round hypoechoic nerve trunks of the brachial plexus located lateral to the artery, with the probe in the transverse plane in the supraclavicular fossa.
•
Raise a weal of local anaesthetic with a 27G needle at the needle insertion point on the superior side of the transducer.
•
Introduce a 25 mm to 50 mm 22G nerve-block needle perpendicular to the superior aspect of the probe.
•
Advance the needle carefully towards the edge of the nerve trunks. While the needle itself might not be visible, its progress can be assessed by local tissue movement and the tip can be followed by angling the probe back and forth in order to avoid pleural or vascular puncture.
The injection process
•
Slowly inject local anaesthetic around the nerve roots by positioning the needle adjacent to the nerve sheath. Aspirate frequently to avoid inadvertent intravascular injection. If resistance to injection, severe paraesthesias or severe cramping pain are provoked in the limb during injection, immediately withdraw the needle by 1 to 2 mm to avoid intraneural injection.
•
Observe the local anaesthetic spread during injection. A hypoechoic collection will appear adjacent to and then spread around the nerves. If no fluid collection develops, then ensure that intravascular injection has not occurred.
•
Observe the pattern of local anaesthetic spread around the target nerves during injection. Inject most of the local anaesthetic immediately superior to the first rib and next to the subclavian artery if anaesthesia to the distal forearm and hand is desired, because the ulnar nerve often lies in this position, posterior to the subclavian artery.
•
Reposition the needle at least once to ensure complete circumferential local anaesthetic spread around the nerve roots.
Infraclavicular block
Landmark technique
The infraclavicular block is a blockade of the brachial plexus in the region of the coracoid process. This provides good anaesthesia for the hand, wrist, forearm, elbow, and distal arm, but is not a good choice for anaesthesia or analgesia for the shoulder, the axilla and the proximal medial arm. The coverage is similar to that of the supraclavicular block.
This block may be the one of most useful of the brachial plexus blocks in the acute trauma patient when there is limited access to the neck and it is an advantage not to have to move the limb to allow the block to be administered.
Preparation
•
Position the patient supine with the head facing away from the side to be blocked.
•
The arm can be kept at the patient’s side or across their abdomen, but ideally the arm should be abducted at the shoulder and flexed at the elbow to keep the relationship of the landmarks to the brachial plexus constant. Make sure that you can visualise the twitches of the hand.
•
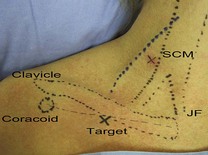
With a pen, mark the important landmarks for the infraclavicular block (
Fig. 8.15):
•
The medial end of clavicle.
•
The coracoid process – as the arm is elevated and lowered the coracoid process can be felt medial to the shoulder.
•
The midpoint of a line connecting the medial end of clavicle and the coracoid.
•
The needle insertion point – 30 mm inferior and perpendicular to the midpoint of the line between the medial end of the clavicle and the coracoid.
•
For the mid-clavicular ‘vertical needle’ approach, mark the following landmarks (
Fig. 8.16):
•
The jugular fossa (suprasternal fossa).
•
The most anterior part of the acromion.
•
The midpoint of a line connecting the jugular fossa and the acromion.
•
The needle insertion point – immediately inferior to the clavicle at the midpoint of the line between the jugular fossa and the acromion. This should be exactly one fingerbreadth (10 mm) medial to the infraclavicular fossa.
•
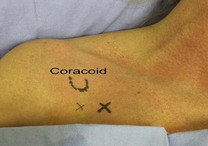
For the sub-coracoid ‘vertical needle’ approach, mark the following landmarks (
Fig. 8.17):
•
A point 20 mm inferior and 20 mm medial to the coracoid process.
Technique
•
Prepare the field by cleaning the skin with an antiseptic solution and positioning sterile drapes.
•
Identify the target area for needle insertion – about 30 mm inferior to the midpoint of a line joining the medial end of the clavicle and the coracoid process.
•
Raise a superficial weal of local anaesthetic at the needle insertion site with a 27G needle.
•
Puncture the skin at the target point with a 100 mm nerve-block needle. Advance the needle laterally at a 45° angle to the skin, parallel to the line connecting the medial clavicular head with the coracoid process (
Fig. 8.18).
•
The brachial plexus is normally encountered at a needle depth 50 to 80 mm. If paraesthesias or appropriate muscle twitches are not obtained, angle the needle more inferiorly away from the clavicle.
•
Twitches from the pectoralis, biceps or deltoid muscles are not necessarily indicative of proximity to the brachial plexus trunks since the musculocutaneous and axillary nerves may depart the nerve sheath more proximally.
•
Aspirate. If no flashback of blood is obtained, inject 30 to 40 mL of local anaesthetic slowly with intermittent aspiration to rule out intravascular injection. Slow injection increases block success and decreases complications. If resistance to injection, severe paraesthesias or cramping pain sensations occur with initial injection, the needle should be withdrawn by 1 to 2 mm to avoid intraneural injection.
•
The mid-clavicular vertical needle technique (
Fig. 8.19): Puncture the skin at the target point (immediately inferior to the clavicle at the midpoint of a line joining the jugular fossa and the acromion) with a 50 mm to 75 mm nerve-block needle positioned vertically (not perpendicular to the skin, but truly vertical). Advance the needle directly posteriorly until paraesthesias or appropriate nerve twitches are elicited. Avoid medial direction of the needle as this may result in vascular or pleural puncture. The brachial plexus is seldom deeper than 50 mm from the skin surface even in very large patients, and a penetration depth of greater than 60 mm increases the risk of complications.
•
The sub-coracoid vertical needle technique (
Fig. 8.20): The puncture site is 20 mm inferior and 20 mm medial to the coracoid process. This point is lateral to the ribs (and therefore the lung) and a needle advanced directly posteriorly should pass in proximity to the nerves at a depth of 50 to 100 mm. If no paraesthesias (or muscle twitches) are obtained before the scapula is contacted, the needle should be withdrawn and directed slightly inferiorly. This technique has the advantages of being simple, safe and reliable.
Ultrasound technique
In the vicinity of the coracoid process (the infraclavicular region) the trunks of the brachial plexus are arranged around the axillary artery. The trunks lie predominantly superiorly and posteriorly to the axillary artery. Since the trunks lie deeply under the skin surface, this block may work with a lower-frequency curvilinear probe.
Preparation
•
Position the patient supine with the head facing away from the side to be blocked.
•
Rest the arm comfortably by the patient’s side or across the abdomen.
•
Use a linear high-frequency probe (10 to 15 MHz is ideal) or a curvilinear probe (2 to 6 MHz) and select an appropriate pre-set application.
•
Identify the area to begin the scan – the chest wall just below the clavicle and immediately medial to the coracoid process. Perform a preliminary non-sterile survey scan to identify the relevant anatomy and optimise the image by adjusting depth of field (40 to 60 mm), focus point, and gain. Position the probe in the longitudinal plane to visualise the brachial plexus and axillary vessels in a cross-sectional view (
Figs 8.21,
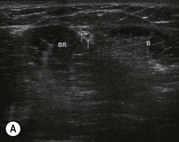
8.22A–C). Nerves in this region are normally hyperechoic. The lateral cord is most commonly superior to the axillary artery (9 o’clock position) and the posterior cord posterior to the artery (6 o’clock). When visible, the medial cord is inferior to the artery (3–6 o’clock). Mark the best probe position on the skin with a pen, if required.
•
Prepare the field by cleaning the skin with an antiseptic solution and positioning sterile drapes. Cover the probe with a sterile probe-sheath and apply sterile ultrasound gel to the area of the coracoid process.
Technique
In-plane approach (superior to inferior direction) (Fig. 8.23)
•
Identify the hyperechoic nerve roots in their transverse axis in the infraclavicular region and plan the approach.
•
Raise a weal of local anaesthetic at the needle insertion target with a 27G needle.
•
Insert a 50 mm to 75 mm 20G nerve-block needle at the superior end of the ultrasound probe. A thicker needle is better because it is easier to see on ultrasound with deeper penetration, and because it is deflected less during deep tissue penetration and therefore easier to control.
•
Advance the needle at a 45° to 60° angle posteriorly and inferiorly towards the edge of the nerve bundle while visualising the entire length of the needle in real time to avoid pleural or vascular puncture.
•
Aim to direct the needle so that local anaesthetic can be injected posterior and superior to the axillary artery.
Out-of-plane approach (Fig. 8.24)
•
Identify the hyperechoic nerve roots in their transverse axis in the infraclavicular region and plan the approach.
•
Raise a weal of local anaesthetic at the needle insertion target with a 27G needle.
•
Insert a 50 mm to 75 mm 20G nerve-block needle at the medial side of the ultrasound probe. Line up the nerve target at the midpoint of the screen and then insert the block needle aligned with the centre of the probe.
•
Advance the needle, as with the landmark technique, from medial to lateral at a 45° angle to the skin. The passage of the needle can be inferred from local tissue movement.
•
Visualisation of the needle tip can be difficult because of the depth and angle of penetration and the probe may need to be angled back and forth to identify the tip of the needle.
The injection process
•
Slowly inject local anaesthetic around the nerve cords by positioning the needle posterior and then superior to the axillary artery. Aspirate frequently to avoid inadvertent intravascular injection. If resistance to injection, severe paraesthesias or severe cramping pain are provoked in the limb during injection, immediately withdraw the needle by 1 to 2 mm to avoid intraneural injection.
•
Observe the local anaesthetic spread during injection. A hypoechoic collection will appear adjacent to and then spread around the nerves.
•
Observe the pattern of local anaesthetic spread around the target nerves during injection. Inject most of the local anaesthetic posterior to the subclavian artery.
•
Reposition the needle at least once (from posterior to superior to the artery) to ensure complete circumferential local anaesthetic spread around the nerve roots. Local anaesthetic spread immediately posterior to the pectoral muscles or anterior to the axillary artery is commonly associated with block failure.
Axillary block
Landmark method
An axillary block is an excellent choice for anaesthesia of the forearm and hand, and is easily performed without the use of a nerve stimulator. However, because the musculocutaneous nerve leaves the brachial plexus sheath proximal to the site of injection, blind axillary brachial plexus block often results in a lack of anaesthesia of the volar aspect of the forearm below the elbow onto the thenar eminence.
Preparation
•
Position the patient supine with the head facing away from the side to be blocked.
•
Abduct the arm at the shoulder to 90° and flex the elbow to 90° and rest it comfortably. Do not abduct the shoulder joint by more than 90° because it makes palpation of the axillary artery pulse difficult and increases the risk of damage to the nerves during needle movement.
•
With a pen, mark the significant landmarks (
Fig. 8.25):
•
The axillary artery. If the location of the artery is not immediately apparent, ask the patient to adduct the arm against resistance. This tenses the pectoralis and coracobrachialis muscles and the pulse of the axillary artery can be found in the groove between these muscles.
•
The coracobrachialis muscle.
Technique
•
Prepare the field by cleaning the skin with an antiseptic solution and positioning sterile drapes.
•
Identify the target area for needle insertion – just anterior to the pulsation of the axillary artery in the midaxillary fossa (the highest point of the axilla).
•
Raise a superficial weal of local anaesthetic at the needle insertion site with a 27G needle.
•
Press the axillary artery at the midaxillary fossa level with the index and middle fingers of the palpating hand and apply firm pressure. This shortens the distance between the skin and the brachial plexus and also stabilises the position of the artery during the needle advancement. This hand should not be moved during the block procedure, to allow for precise redirection of the needle if required.
•
Puncture the skin at the target point (just anterior to the fingers of the palpating hand) with a 25 mm to 50 mm nerve-block needle. Advance the needle medially, slightly superiorly and slightly posteriorly at a 30° to 45° angle to the skin (
Fig. 8.26A&B). The nerves will be found at a depth of 10–20 mm. The needle is advanced slowly until paraesthesias or appropriate muscle twitches are obtained or arterial puncture occurs.
•
If the axillary artery is punctured before the plexus is encountered, then proceed with the transarterial technique: advance the needle through the axillary artery until blood can no longer be aspirated; inject one-third of the total volume of the local anaesthetic posterior and one-third anterior to the axillary artery on withdrawal of the needle.
•
Aspirate. If no flashback of blood is obtained, inject 30 to 40 mL of local anaesthetic slowly with intermittent aspiration to rule out intravascular injection. Slow injection increases block success and decreases complications. If resistance to injection, severe paraesthesias or cramping pain sensations occur with initial injection, the needle should be withdrawn by 1 to 2 mm to avoid intraneural injection.
•
The musculocutaneous nerve is often not blocked with the blind technique because it leaves the brachial plexus sheath proximal to the axilla. A block of the musculocutaneous nerve can be achieved with a separate injection by inserting the needle anterior to the artery into the substance of the coracobrachialis muscle (
Fig. 8.26C). Twitches of the biceps indicate proximity to the nerve and 5 mL of local anaesthetic can be injected. In the absence of a nerve stimulator, a fan-technique injection of 5 mL of local anaesthetic may produce a successful block.
Ultrasound technique
The axillary approach can be used to block the terminal branches of the brachial plexus (the median, ulnar and radial nerves). The musculocutaneous nerve, which often leaves the brachial plexus proximal to the axilla, is commonly missed by the axillary approach but is easily blocked under ultrasound guidance.
Preparation
•
Position the patient supine with the head facing away from the side to be blocked.
•
Abduct the arm at the shoulder to 90° and flex the elbow to 90° and rest it comfortably.
•
Use a linear high-frequency probe (10 to 15 MHz is ideal) and select an appropriate pre-set application.
•
Identify the area to begin the scan – the midaxillary fossa. Perform a preliminary non-sterile survey scan to identify the relevant anatomy and optimise the image by adjusting depth of field (20 to 30 mm), focus point, and gain. Position the probe in the longitudinal plane (at right angles to the limb axis) to visualise the brachial plexus and axillary artery in a cross-sectional view (
Fig. 8.27). Nerves in this region are predominantly hyperechoic but with a mixed echogenicity (honeycomb appearance) (
Fig. 8.28A&B). The median and ulnar nerves lie superficial to the axillary artery and the radial nerve lies deep to the artery. The musculocutaneous nerve lies within the coracobrachialis muscle or in the fascia between biceps and coracobrachialis. Mark the best probe position on the skin with a pen, if required.
•
Prepare the field by cleaning the skin with an antiseptic solution and positioning sterile drapes. Cover the probe with a sterile probe-sheath and apply sterile ultrasound gel to the area of the midaxillary fossa.
Technique
In-plane approach
•
Identify the round or oval honeycomb nerves in their transverse axis in the axillary region and plan the approach: aim to block each nerve individually. Avoid excessive pressure on the probe as that will cause the axillary vein to collapse.
•
Raise a weal of local anaesthetic at the needle insertion target with a 27G needle.
•
Insert a 50 mm 22G nerve-block needle at the anterior end of the ultrasound probe (
Fig. 8.29).
•
Advance the needle at a shallow angle because the nerves are very superficial in the axilla. The passage of the needle can be visualised in real time as it approaches the target nerves, while avoiding the axillary artery and vein.
•
Manoeuvre the needle to the side of each nerve and aim to inject local anaesthetic around each nerve individually. Nerves can occupy a variable position in the axilla, but as long as each nerve is blocked, the procedure will be successful.
•
Block the musculocutaneous nerve separately as it runs in the plane between the biceps and coracobrachialis muscles or within the substance of the coracobrachialis muscle.
Out-of-plane approach
•
Identify the round or oval honeycomb nerves in their transverse axis in the axillary region and plan the approach: aim to block each nerve individually. Avoid excessive pressure on the probe as that will cause the axillary vein to collapse.
•
Raise a weal of local anaesthetic at the needle insertion target with a 27G needle.
•
Line up the target nerve in the centre of the screen and insert a 50 mm 22G nerve-block needle at the centre of the distal side of the ultrasound probe (
Fig. 8.30).
•
Block each of the four nerves separately – this may require significant repositioning of the needle or a completely separate insertion point.
•
Position the needle next to the nerve rather than head-on to it. It is easier to judge the needle position and has less risk of intraneural injection.
The injection process
•
Slowly inject local anaesthetic around the nerve cords by positioning the needle adjacent to the nerve. Aspirate frequently to avoid inadvertent intravascular injection. If resistance to injection, severe paraesthesias or severe cramping pain are provoked in the limb during injection, then immediately withdraw the needle by 1 to 2 mm to avoid intraneural injection.
•
Observe the local anaesthetic spread during injection. A hypoechoic collection will appear adjacent to and then spread around the nerves. If tissue expansion is not visible, this may represent an intravascular injection. Recheck the needle tip location relative to the axillary artery and vein before further injection.
•
Inject 10 to 15 mL of local anaesthetic for each of the nerve locations.
•
Reposition the needle at least once for each nerve to ensure complete circumferential local anaesthetic spread around the nerve.
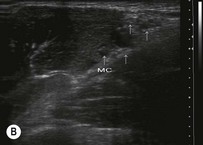
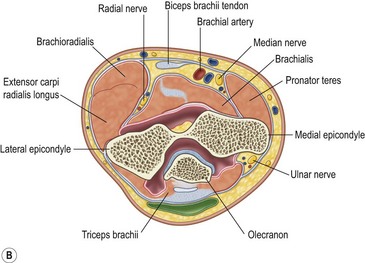
Nerve blocks around the elbow
The nerves at the level of the elbow are shown in Fig. 8.31.
Landmark technique
The radial, median and ulnar nerves can be easily blocked just above or below the elbow. This will produce anaesthesia of the distal forearm, wrist and hand. These blocks can be used as ‘rescue blocks’ for incomplete brachial plexus blocks, or used on their own for anaesthesia of the forearm and hand.
Preparation
•
Position the patient supine or in semi-Fowler’s position.
•
Keep the forearm loosely at the patient’s side or comfortably on a side-table. The elbow may need to be flexed and elevated above the patient’s head for the ulnar nerve block.
•
With a pen, mark the important landmarks:
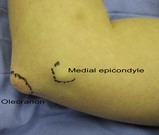
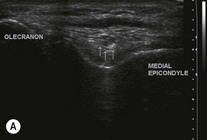
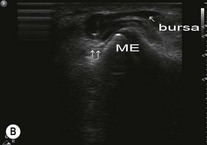
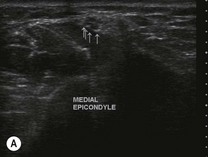
Ulnar nerve (
Fig. 8.32):
•
The medial epicondyle of the humerus.
•
The medial edge of the olecranon.
Median nerve (
Fig. 8.33):
•
A line joining the medial and lateral epicondyles of the humerus, across the antecubital fossa.
•
The brachial artery pulsation 20 mm proximal to this line.
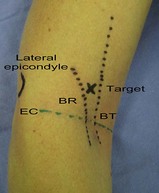
Radial nerve (
Fig. 8.34):
•
The lateral epicondyle.
•
The groove between the biceps tendon (medially) and the brachioradialis muscle (laterally) just above the level of the elbow joint (the biceps tendon can be accentuated by asking the patient to flex the elbow against resistance with the forearm supinated, and the brachioradialis with the forearm in 90° of pronation).
Technique
•
Prepare the field by cleaning the skin with an antiseptic solution and positioning sterile drapes.
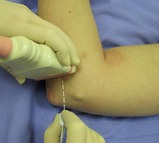
Ulnar nerve block at the elbow
•
Position the patient’s arm on the stretcher above their head, with the elbow flexed to 90°.
•
Identify the target area for needle insertion – 10 to 20 mm proximal to the ulnar groove,
not in the ulnar groove itself (there is a high risk of nerve penetration with the needle, as well as ischaemia from compartment syndrome) (
Fig. 8.35A).
•
Raise a superficial weal of local anaesthetic at the needle insertion site with a 27G needle.
•
Advance the needle parallel to the long axis of the humerus through the subcutaneous tissue towards the ulnar groove. If paraesthesias or appropriate muscle twitches (in the hand) are produced then the position of the needle is confirmed.
•
If the bone is contacted, withdraw the needle by 2 to 3 mm and proceed with the injection.
•
Aspirate. If no flashback of blood is obtained, inject 3 to 5 mL of local anaesthetic slowly with intermittent aspiration to rule out intravascular injection. If blood is withdrawn, reposition the needle slightly and re-aspirate.
•
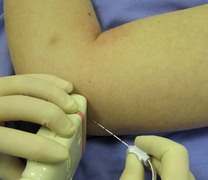
Alternatively, the ulnar nerve may be blocked 10 to 20 mm distal to the ulnar groove, with the needle orientated either proximally or distally along the long axis of the forearm (
Fig. 8.35B).
Median nerve block at the elbow
•
Identify the target area for needle insertion – immediately medial to the pulsation of the brachial artery, 20 mm proximal to the intercondylar line (the proximal elbow crease) (
Fig. 8.36).
•
Raise a superficial weal of local anaesthetic at the needle insertion site with a 27G needle.
•
Advance the needle posteriorly until the biceps fascia is punctured (5 to 10 mm depth).
•
Aspirate. If no flashback of blood is obtained, inject 5 mL of local anaesthetic slowly with intermittent aspiration to rule out intravascular injection. If blood is aspirated, reposition the needle slightly and re-aspirate.
•
Perform a block of the medial cutaneous nerve of the forearm at the same time. Withdraw the needle to the subcutaneous tissue and redirect it proximally in the subcutaneous plane between the head of the pronator teres muscle and the medial border of the biceps tendon. Aspirate. If no flashback of blood is obtained, inject 5 mL of local anaesthetic with a fan technique, slowly with intermittent aspiration to rule out intravascular injection.
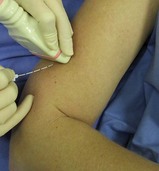
Radial nerve block at the elbow
•
Identify the target area for needle insertion – the groove between the biceps tendon and brachioradialis, 20 mm proximal to the flexor crease (the intercondylar line) (
Fig. 8.37).
•
Raise a superficial weal of local anaesthetic at the needle insertion site with a 27G needle.
•
Puncture the skin and then advance the needle posteriorly and superiorly (proximally) towards the lateral aspect of the lateral epicondyle until bone is contacted (place a finger on the epicondyle and aim for that finger).
•
Withdraw the needle 1 mm, and aspirate. If no flashback of blood is obtained, inject 3 to 5 mL of local anaesthetic. Withdraw the needle slightly and redirect it 10 to 30 mm superiorly to contact the humerus again; pull back 5 mm and aspirate. If no flashback of blood is obtained, inject another 3 to 5 mL of local anaesthetic. If the aspiration is positive at any stage, reposition the needle slightly and re-aspirate before injecting.
•
If a nerve stimulator is used, advance the needle until twitches causing dorsiflexion of the wrist are observed. Aspirate. If no flashback of blood is obtained, inject 5 to 10 mL of local anaesthetic.
•
Perform a block of the lateral cutaneous nerve of the forearm at the same time as the radial nerve block at the elbow. Inject a fan of anaesthetic between the brachioradialis muscle and the lateral side of the biceps tendon.
•
Also perform a block of the posterior cutaneous nerve of the forearm by injecting a weal of local anaesthetic solution subcutaneously from the lateral epicondyle to the olecranon.
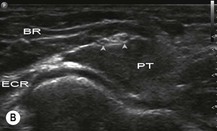
Ultrasound techniques
The peripheral nerves of the brachial plexus at the level of the elbow are generally easy to visualise. They frequently have a heterogeneous echogenicity (honeycomb appearance) or are hyperechoic. They are also superficial (often within 10–20 mm from the skin surface) except in unusually muscular or obese patients.
If the nerve proves hard to locate, trace the course of the nerve by moving the probe proximally and distally. This is particularly relevant in the wrist or distal forearm where the nerves are surrounded by tendons. It may be possible to visualise the peripheral nerves in a long-axis view as well. Nerves in the forearm may exhibit a high degree of anisotropy and they may be hard to visualise on ultrasound unless the beam is at 90° to the nerve. If they are not easily visualised, it may be necessary to angle the probe proximally or distally in order to locate the nerves. Firm pressure applied by the ultrasound probe may also make the nerve stand out more prominently.
The easiest and most reliable method of performing the forearm block under ultrasound guidance is the mid-forearm ultrasound nerve block (FUN block). Performing the block procedure of the median and ulnar nerves at the level of the elbow is relatively straightforward, but the radial nerve procedure is more demanding and less successful. The radial nerve is more easily blocked in the mid-arm or the mid-forearm.
Ultrasound-guided blocks around the elbow
Preparation
•
Position the patient supine or in semi-Fowler’s position.
•
Keep the forearm loosely at the patient’s side or comfortably on a side-table. The elbow may need to be flexed and elevated above the patient’s head for the ulnar nerve block.
•
Use a linear high-frequency probe (10 to 15 MHz is ideal) and select an appropriate pre-set application.
•
Identify the area to begin the scan for each nerve. Perform a preliminary non-sterile survey scan to identify the relevant anatomy and optimise the image by adjusting depth of field (20 to 30 mm), focus point, and gain. Position the probe in the longitudinal plane (at right angles to the limb axis) to visualise each nerve in a cross-sectional view. Nerves in this region are predominantly hyperechoic but with a mixed echogenicity (honeycomb appearance). Mark the best probe position on the skin with a pen, if required.
•
Prepare the field by cleaning the skin with an antiseptic solution and positioning sterile drapes. Cover the probe with a sterile probe-sheath and apply sterile ultrasound gel to the area of the antecubital fossa.
Techniques
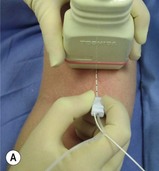
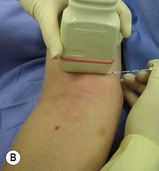
Ulnar nerve block at the elbow (Figs 8.38–8.41)
•
Position the patient supine or in semi-Fowler’s position and position the arm above the patient’s head, with the elbow flexed at 90°.
•
Locate the ulnar nerve in the distal arm and proximal forearm (proximal or distal to the ulnar groove) with the ultrasound probe in the transverse plane to obtain a cross-sectional view of the ulnar nerve. It often has heterogeneous echogenicity at the level of the elbow. Align the nerve in the centre of the screen.
•
Raise a weal of local anaesthetic subcutaneously at the target needle insertion site with a very fine needle (27G) on either the proximal or distal midpoint of the probe (the out-of-plane approach is more appropriate for this block, although the in-plane approach may be used).
•
Advance the needle until it is in proximity to the nerve, aspirate, and then inject 3 to 5 mL of local anaesthetic slowly (with intermittent aspiration to rule out intravascular injection) while confirming that there is circumferential spread around the nerve. Insert the needle adjacent to the nerve rather than head-on and reposition the needle at least once in the injection process.
•
If a nerve stimulator is used, look for twitches in the hand.
•
Position the patient supine or in semi-Fowler’s position and abduct the arm slightly and support it on the stretcher or a hand-table.
•
Locate the median nerve in the distal arm and proximal forearm where it is superficial, heterogeneous in echogenicity, and lies immediately medial to the brachial artery.
•
First locate the brachial artery (using colour Doppler if necessary), then identify the nerve medial to the artery.
•
Scan proximally and distally to find a point where it is convenient to visualise and block the median nerve (normally just proximal to the elbow is most convenient). The median nerve can readily be traced from the axilla to the wrist. Align the nerve in the centre of the screen.
•
Raise a weal of local anaesthetic subcutaneously at the target needle insertion site with a very fine needle (27G) on the distal midpoint of the probe (the out-of-plane approach is more appropriate for this block, although the in-plane approach may be used).
•
Advance the needle until it is in proximity to the nerve, aspirate, and then inject 3 to 5 mL of local anaesthetic slowly (with intermittent aspiration to rule out intravascular injection) while confirming that there is circumferential spread around the nerve. Insert the needle adjacent to the nerve rather than head-on and reposition the needle at least once in the injection process.
•
If a nerve stimulator is used, look for twitches causing flexion of the fingers.
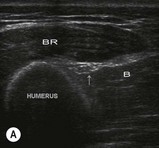
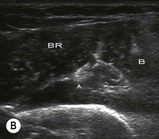
Radial nerve block at the elbow (Figs 8.44–8.47)
•
Position the patient supine or in semi-Fowler’s position and abduct the arm slightly and support it on the stretcher or a hand-table.
•
Locate the radial nerve in the distal arm and proximal forearm between the brachialis and brachioradialis muscles where it has already divided into smaller superficial and deep branches. When traced proximally the nerve is larger, becomes deeper and then posterior to the humerus.
•
The radial nerve can be blocked just above or just below the elbow at a point where it is convenient to visualise the nerves and perform the procedure.
•
Align the radial nerve branches in the centre of the screen.
•
Raise a weal of local anaesthetic subcutaneously at the target needle insertion site with a very fine needle (27G) on the distal midpoint of the probe (the out-of-plane approach is more appropriate for this block, although the in-plane approach may be used).
•
Advance the needle until it is in the same tissue plane as the nerves between the brachialis and brachioradialis muscles (above the elbow) or between brachioradialis and pronator teres (below the elbow). Aspirate and then inject 3 to 5 mL of local anaesthetic slowly (with intermittent aspiration to rule out intravascular injection) while confirming that there is tissue expansion within the correct plane and circumferential spread around the nerve. Insert the needle adjacent to the nerve rather than head-on and reposition the needle at least once in the injection process.
•
If a nerve stimulator is used, look for twitches causing dorsiflexion of the hand.
Alternative radial nerve block in the mid-arm
The radial nerve can also easily be blocked in the distal third of the arm as it emerges from posterior to the humerus to run anterior to the lateral epicondyle between brachialis and brachioradialis.
Either internally rotate the arm and place the hand across the abdomen, or position the arm on the bed next to the patient with the elbow extended. Place the linear high-frequency transducer over the lateral aspect of the arm, about 100 mm proximal to the lateral epicondyle. The radial nerve can easily be identified as a hyperechoic oval structure lying close to the humerus posterior to the brachialis muscle and anterior to the triceps muscle. It can easily be blocked using either an in-plane or out-of-plane approach (Figs 8.48, 8.49A&B).
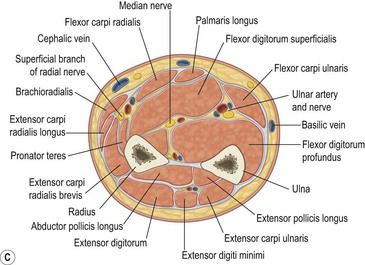
Forearm ultrasound nerve blocks (FUN block or mid-forearm block)
The radial, median, and ulnar nerves can reliably be blocked in the mid-forearm using ultrasound guidance. This produces anaesthesia of the hand, wrist and distal forearm (depending on how high the block is performed). This technique is somewhat easier than nerve blocks at the elbow and causes less discomfort to the patient than a wrist block.
Preparation
•
Position the patient comfortably with their forearm by their side on the trolley or supported on a hand-table.
•
Clean the entire forearm and apply sterile ultrasound gel from wrist to mid-forearm.
•
Use a linear high-frequency probe with a sterile probe-cover for this block.
Techniques
•
Locate the radial artery in the wrist, with the assistance of colour Doppler if necessary. It lies very superficially in this region, normally less than 10 mm deep.
•
Trace the artery proximally into the mid-forearm (about 150 mm) and the radial nerve can be seen as a hyperechoic, honeycomb structure lying on the lateral (radial) aspect of the artery. It is usually immediately adjacent to the artery, but may also be situated slightly more laterally.
•
Find a convenient position to perform the block.
•
Block the nerve using either the out-of-plane or in-plane approach.
•
Raise a weal of local anaesthetic subcutaneously at the target needle insertion site with a very fine needle (27G).
•
Advance the needle until it is in proximity to the nerve, aspirate, and then inject 3 to 5 mL of local anaesthetic while confirming that there is circumferential spread around the nerve.
•
This block is the mirror-image of the radial nerve FUN block.
•
Locate the ulnar artery in the wrist, with the assistance of colour Doppler if necessary. It lies very superficially in this region, normally less than 10 mm deep.
•
Trace the artery proximally into the mid-forearm (about 150 mm) and the ulnar nerve can be seen as a hyperechoic, honeycomb structure lying on the medial (ulnar) aspect of the artery. It is usually immediately adjacent to the artery, but may also be as much as 10 mm more medially situated in the same tissue plane.
•
Block the nerve using the out-of-plane approach.
•
Raise a weal of local anaesthetic subcutaneously at the target needle insertion site with a very fine needle (27G).
•
Advance the needle until it is in proximity to the nerve, aspirate, and then inject 3 to 5 mL of local anaesthetic while confirming that there is circumferential spread around the nerve.
•
Position the transducer transversely across the centre of the mid-forearm.
•
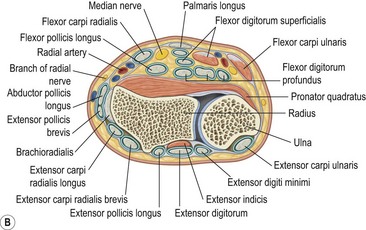
The median nerve can be identified as an oval, hyperechoic structure lying between the muscle bellies of flexor digitorum superficialis (superficial), flexor pollicis longus (deep lateral) and flexor digitorum profundus (deep medial) in the midline of the mid-forearm. It is deeper than the radial and ulnar nerves and is not associated with an adjacent vessel.
•
Block the nerve using the out-of-plane approach.
•
Raise a weal of local anaesthetic subcutaneously at the target needle insertion site with a very fine needle (27G).
•
Advance the needle until it is in proximity to the nerve, aspirate, and then inject 3 to 5 mL of local anaesthetic while confirming that there is circumferential spread around the nerve.
Wrist block
The nerves at the level of the wrist are shown in Fig. 8.56.
Landmark technique
Regional blocks at the wrist are easy to perform with a blind landmark technique, do not require the use of a nerve stimulator, and are no simpler to perform with the assistance of ultrasound (tendons and nerves can be confusing at the level of the wrist)! It is important to be aware of potential compartment syndrome affecting the median and ulnar nerves.
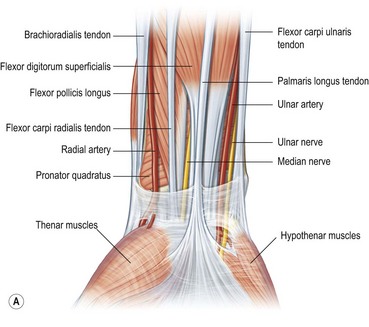
The superficial branch of the radial nerve runs from the medial aspect of brachioradialis to pass between the tendon of the brachioradialis and radius to pierce the fascia on the dorsal aspect of the wrist. Just above the styloid process of the radius it gives digital branches to the dorsal skin of the thumb, index finger, and lateral half of the middle finger. Several of its branches pass superficially over the anatomic snuff box. The median nerve is located between the tendons of the palmaris longus and the flexor carpi radialis. The palmaris longus tendon is usually the more prominent of the two (although it may be absent in 10% of people) and the median nerve passes just lateral to it. The ulnar nerve passes between the ulnar artery and tendon of the flexor carpi ulnaris. The tendon of the flexor carpi ulnaris is superficial to the ulnar nerve.
A wrist block is useful for:
•
rescue blocks for incomplete proximal blocks
•
minor procedures (foreign body removal, laceration repair, fracture reduction) or dressings on the hand and fingers
•
analgesia for injuries such as burns or more serious crushing injuries of the hand or fingers, until the patient can receive definitive surgery.
Preparation
•
Position the patient supine with the arm positioned comfortably, slightly abducted and the wrist in slight extension (place a rolled-up towel under the wrist).
•
Mark the important landmarks with a pen:
•
The radial styloid and the radial artery.
•
The tendons of palmaris longus and flexor carpi radialis. These can be accentuated by getting the patient to flex the wrist against resistance; or have the patient oppose the thumb and the little finger – this causes the tendon of palmaris longus to stand out.
•
The tendon of flexor carpi ulnaris and the ulnar artery. The flexor carpi ulnaris can be identified by asking the patient to flex the little finger at the metacarpophalangeal joint – the flexor carpi ulnaris becomes more prominent as it stabilises the pisiform bone during this manoeuvre.
Technique
•
Prepare the field by cleaning the skin with an antiseptic solution and positioning sterile drapes.
Ulnar nerve block
•
The ulnar nerve is anaesthetised by injecting local anaesthetic posteriorly and laterally to the tendon of the flexor carpi ulnaris muscle close to its distal attachment to the pisiform.
•
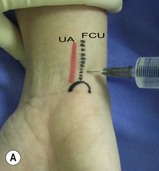
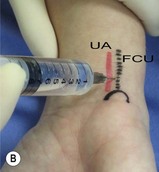
The target point for needle insertion is either from the medial aspect of the wrist – the needle is inserted posterior to the tendon and advanced 5 to 10 mm to just past the tendon of the flexor carpi ulnaris – or, alternatively, the needle can be inserted on the volar aspect of the wrist just lateral to the tendon (between the tendon medially and the ulnar artery laterally) (
Fig. 8.57A&B).
•
Aspirate. If no flashback of blood is obtained, inject 3 to 5 mL of local anaesthetic slowly with intermittent aspiration to rule out intravascular injection.
•
Inject 2 to 3 mL of local anaesthetic subcutaneously just superficial to the tendon of the flexor carpi ulnaris to block the cutaneous branches of the ulnar nerve which often innervate the hypothenar area.
Median nerve block
•
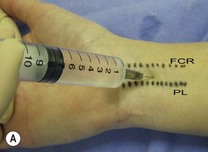
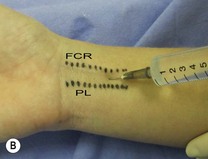
The target point for needle insertion is between the tendons of the palmaris longus medially and flexor carpi radialis laterally, on the volar aspect of the wrist, 20 to 30 mm proximal to the wrist crease (
Fig. 8.58A&B).
•
Advance the needle until it contacts the bone (usually at 5 to 15 mm depth), then withdraw the needle 2 to 3 mm.
•
An alternative method is to advance the needle until the flexor retinaculum is penetrated with a ‘pop’. The local anaesthetic can then be injected. Injections that are too superficial are less successful than those too deep as the retinaculum will prevent the local anaesthetic from penetrating to the nerve.
•
Aspirate. If no flashback of blood is obtained, inject 3 to 5 mL of local anaesthetic slowly with intermittent aspiration to rule out intravascular injection.
•
Use a fan technique to increase the success rate of the median nerve block. Withdraw the needle to the subcutaneous tissue without removing it, redirect it 30° laterally, and advance again to contact the bone. After pulling back 1 to 2 mm off the bone, inject an additional 2 mL of local anaesthetic. Repeat the procedure with a medial redirection of the needle.
Radial nerve block
•
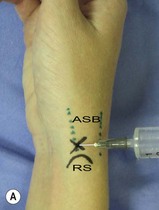
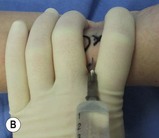
This is essentially a field block and requires extensive subcutaneous infiltration because of the variable anatomic location of the distal radial nerve and its division into multiple, smaller, cutaneous branches (
Fig. 8.59A&B).
•
The target point for needle insertion is just proximal to the radial styloid (about 10 mm lateral to the radial artery).
•
Inject 3 to 5 mL of local anaesthetic subcutaneously, aiming medially. Repeat the infiltration then aiming laterally, using an additional 3 to 5 mL of local anaesthetic.
Metacarpal block
The fingers are supplied by the common digital nerves (derived from the ulnar and median nerves), which travel along the metacarpals to the metacarpophalangeal joint, where they divide into the volar and dorsal digital nerves.
A metacarpal block will provide complete anaesthesia to the digit, allowing for pain relief or procedures to be performed. There are three possible approaches:
•
the palmar approach (painful)
•
the dorsal webspace approach (less painful)
•
the dorsal proximal approach (least painful).
Onset of anaesthesia occurs in 10 to 15 minutes; the duration of anaesthesia with lidocaine is 60 to 90 minutes and with bupivacaine is 3 to 6 hours. Do not use local anaesthetics that contain a vasoconstrictor – adrenaline (epinephrine) or noradrenaline (norepinephrine) – for fear of vascular spasm and necrosis of the fingertip. (This is not an evidence-based recommendation, but is common practice.)
Preparation
•
Position the patient supine or in semi-Fowler’s position with the arm slightly abducted. Support the forearm on an appropriate surface.
•
Clean the entire hand with an appropriate antiseptic solution.
Technique
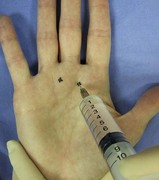
The palmar approach
•
Insert the needle about 5 mm through the palmar skin just medial or lateral to the metacarpal neck (
Fig. 8.60).
•
Aspirate. If no flashback of blood is obtained, inject 1 to 2 mL of local anaesthetic slowly with intermittent aspiration to rule out intravascular injection.
•
Repeat on the other side.
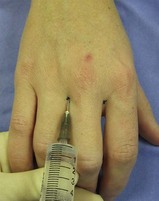
The dorsal webspace approach
•
Hold the finger to be blocked with your thumb on the dorsal proximal phalanx and index finger on the volar aspect of the proximal phalanx.
•
Insert the needle on the medial or lateral aspect of the webspace, aiming towards the palmar skin – the needle should tent the skin, but not penetrate it (be careful of your finger!) (
Fig. 8.61).
•
Aspirate. If no flashback of blood is obtained, inject 1 to 2 mL of local anaesthetic slowly with intermittent aspiration to rule out intravascular injection.
•
Repeat on the other side.
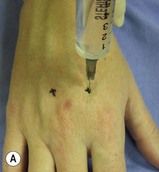
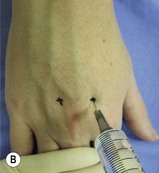
The dorsal proximal approach
•
Position the patient’s hand comfortable for the injection: stand either at the patient’s side with the fingers pointing away, or facing the patient with the fingers pointed towards you.
•
The target point for injection is approximately 25 mm proximal to the metacarpal head (
Fig. 8.62A&B).
•
Insert the needle at a slight angle distally until the deep fascia (the interosseus membrane) is penetrated (15 to 25 mm).
•
Aspirate. If no flashback of blood is obtained, inject 2 to 4 mL of local anaesthetic slowly with intermittent aspiration to rule out intravascular injection.
•
Repeat on the other side.
•
This technique has less likelihood of causing raised compartment pressures in the hand because of the proximal injection site.
Digital nerve block (ring block)
A digital or ring block, as the name implies, is a technique of blocking the digital nerves in the finger or toe (where a ring would be) to achieve anaesthesia of the finger or toe. This technique is simple to perform and has very few complications. It is a commonly used and effective method of anaesthesia employed in the ED for a wide variety of procedures on the digits. Several different techniques of digital block are described, and most are extremely effective.
Preparation
•
Position the patient supine or in semi-Fowler’s position.
•
Abduct the arm slightly, pronate the hand and support it on a hand-table, or have it held by an assistant.
•
Clean the entire hand with a chlorhexidine in alcohol disinfectant solution.
•
Insert a small (25G 35 mm) needle at a point on the dorsolateral aspect of the base of the proximal phalanx and raise a small skin weal of local anaesthetic.
•
Advance the needle towards the phalanx until the bone is contacted; withdraw the needle 1 to 2 mm.
•
Aspirate. If no flashback of blood is obtained, inject 1 mL of local anaesthetic slowly with intermittent aspiration to rule out intravascular injection.
•
Inject an additional 1 mL of local anaesthetic as the needle is withdrawn.
•
Repeat this procedure on the other side.
•
A small weal of local anaesthetic over the dorsal aspect of the proximal phalanx may be needed to provide anaesthesia to the dorsal skin of the proximal and middle phalanges.
•
Onset of local anaesthesia is from 5 to 20 minutes, depending on the type and volume of local anaesthetic used.
[/level-membership-for-anesthesiology-category][not-level-membership-for-anesthesiology-category]
CHAPTER 8 Upper limb blocks
Interscalene block
Use this block for anaesthesia/analgesia of the shoulder joint (dislocation reduction), arm, elbow, and proximal forearm injuries or amputations (Fig. 8.1).
Fig. 8.1 Anatomical diagram of the brachial plexus in the neck and proximal upper limb. The insets show the relative positions of the artery and the nerves in the supraclavicular, infraclavicular and axillary regions as seen on ultrasound.
Landmark technique
The interscalene approach to brachial plexus blockade results in anaesthesia of the shoulder, arm, and elbow. It is not consistently reliable for anaesthesia of the hand because the C8 and T1 nerve roots are frequently not blocked, and more distal approaches to the brachial plexus, such as the supraclavicular, infraclavicular or axillary blocks, are more appropriate. The traditional interscalene block relies on the injection and dispersion of a large volume of local anaesthetic within the fascial envelope bordered by the anterior and middle scalene muscles to accomplish blockade of the brachial plexus. This block can be performed at the level of the cricoid cartilage (C6) or slightly more inferiorly, closer to the clavicle. With the more inferior approach, the interscalene groove is shallower and easier to identify and the needle insertion point is much more lateral, which makes vascular puncture rare. This approach is also more suited to those not performing the block regularly.
Preparation
•
Position the patient supine or in semi-Fowler’s position with the head facing away from the side to be blocked. Position the patient’s arm comfortably by their side and ask them to hold their shoulder down, as though they are reaching for their knee.
•
Mark the important landmarks with a skin marker (
Fig. 8.2):
•
The posterior border of the clavicular head of the sternocleidomastoid muscle. Ask the patient to turn their head away from the side to be blocked because this tenses the sternocleidomastoid muscles and makes it more prominent. Then ask the patient to lift their head off the table while facing away. This also helps to identify the posterior border of the clavicular head of the sternocleidomastoid muscle.
•
The external jugular vein. Ask the patient to try to sit up (or sit forward). This manoeuvre flattens the skin of the neck and helps to identify the interscalene groove, and the Valsalva manoeuvre distends the external jugular vein.
•
The interscalene groove. While palpating the posterior border of sternocleidomastoid, ask the patient to forcefully sniff. This tenses the scalene muscles and the interscalene groove becomes more prominent.
Technique
•
Prepare the field by cleaning the skin with an antiseptic solution and positioning sterile drapes.
•
Identify the target area for the initial needle insertion – the interscalene groove, at about the level of the cricoid cartilage, or slightly inferiorly. The most common error is inserting the needle too far anteriorly. Examine the anatomical landmarks carefully.
•
Raise a superficial weal of local anaesthetic at the needle insertion site.
•
Puncture the skin at the target point with a 25 mm to 50 mm nerve-block needle (
Fig. 8.3A–C). Direct the needle perpendicular to the skin surface – slightly medially, inferiorly 30° to 45° and posteriorly aiming at the transverse process of C6. If you are using a more inferior puncture site (25 mm above the clavicle), insert the needle perpendicular to the skin surface taking care not to aim superiorly. The inferior angle of the needle is important to decrease the risk of inadvertent entry into one of the neural foramina.
•
Advance the needle 10 to 20 mm until paraesthesias are elicited.
•
An alternative method is to use a parasagittal approach with the needle held parallel to the scalene muscles and aimed inferiorly towards the midpoint of the clavicle.
•
If you are using a nerve stimulator, insert the needle using the same technique. Appropriate twitches include pectoralis, deltoid, triceps, biceps or any muscle of hand or forearm, but not the trapezius.
•
Aspirate. If no flashback of blood is obtained, inject 30 to 40 mL of local anaesthetic slowly with intermittent aspiration to rule out intravascular injection. Slow injection increases block success and decreases complications. If resistance to injection, severe paraesthesias or cramping pain sensations occur with initial injection, then the needle should be withdrawn by 1 to 2 mm to avoid intraneural injection. Use the higher end of the volume range if C8/T1 anaesthesia is desired (remembering that larger volumes are associated with more undesirable effects for this particular block).
•
The onset of anaesthesia with lidocaine is from 5 to 15 minutes and with bupivacaine is from 10 to 20 minutes; duration of anaesthesia is 3 to 6 hours and 8 to 10 hours, respectively; duration of analgesia is 5 to 8 hours and 16 to 18 hours, respectively.
Precautions
The interscalene block is very safe if used appropriately and carefully. Avoid using this block in patients who have significant chronic respiratory disease or patients with respiratory distress, as well as in patients with contralateral phrenic nerve or recurrent laryngeal nerve paralysis.
Complications
•
Inadvertent total spinal anaesthesia is a potentially serious complication resulting from incorrect needle placement or from local anaesthetic tracking proximally within the nerve root sheath.
•
Vertebral artery injection can result in a rapid onset of central nervous system toxicity.
•
Phrenic nerve block occurs frequently, so do not use this block bilaterally or in patients with respiratory compromise.
•
Recurrent laryngeal, vagus, and cervical sympathetic nerves are often blocked.
•
Pneumothorax can occur as the cupola of the lung may be pierced by a poorly directed needle.
Ultrasound technique
This technique is a simple, easy-to-use method, does not require a nerve stimulator, and allows for smaller volumes of local anaesthetic to be used. It allows precise visualisation of the significant structures and avoids misadventures from misplacement of the needle. It is a useful technique for the ED.
Preparation
•
Position the patient supine or in semi-Fowler’s position with the head facing away from the side to be blocked.
•
Rest the arm comfortably by the patient’s side or across the abdomen.
•
Use a linear high-frequency probe (10 to 15 MHz is ideal) and select an appropriate pre-set application.
•
Identify the area to begin the scan – either the midline of the neck or the supraclavicular fossa, depending upon which scan strategy is employed (
Fig. 8.4).
•
Prepare the field by cleaning the skin with an antiseptic solution and positioning sterile drapes. Cover the probe with a sterile probe-sheath and apply sterile ultrasound gel to the area of the interscalene groove.
Technique
In-plane approach (Fig. 8.6)
•
Identify the hypoechoic nerve roots in their transverse axis in an area convenient to block.
•
Raise a weal of local anaesthetic at the needle insertion target with a 27G needle.
•
Insert a 25 mm to 50 mm 22G nerve-block needle on the lateral end of the ultrasound probe.
•
Advance the needle towards the edge of the nerves while visualising the entire length of the needle in real time.
•
Aim to contact nerve roots in the centre of the interscalene groove from the lateral side; avoid injection close to the neural foramina.
•
Track real-time needle movement to prevent inadvertent entry through the neural foramina.
Out-of-plane approach (Fig. 8.7A&B)
•
Identify the hypoechoic nerve roots in their transverse axis in an area convenient to block.
•
Line up the nerve target at the midpoint of the screen. The needle insertion point will correspond to the exact centre of the transducer.
•
Raise a weal of local anaesthetic at the needle insertion target with a 27G needle.
•
Insert a 25 mm to 50 mm 22G nerve-block needle on the superior or inferior side of the ultrasound probe.
•
Observe tissue and needle movement as the needle is advanced towards the target. Aiming for the side of the nerve bundle rather than the centre makes needle placement more accurate.
•
Clear identification of the needle tip may require the probe to be angled back and forth.
The injection process
•
Slowly inject local anaesthetic around the nerve roots by positioning the needle in the centre of the interscalene groove, adjacent to the nerve sheath. Aspirate frequently to avoid inadvertent intravascular injection. If resistance to injection, severe paraesthesias or severe cramping pain are provoked in the limb during injection, immediately withdraw the needle by 1 to 2 mm to avoid intraneural injection.
•
Observe the local anaesthetic spread during injection. A hypoechoic collection will appear adjacent to and then spread around the nerves.
•
An expansion of the tissue in the interscalene groove indicates a correct positioning of the local anaesthetic injection; expansion within the scalene muscle indicates intramuscular injection and the needle should be repositioned.
•
Reposition the needle at least once to ensure complete circumferential local anaesthetic spread around the nerve roots.
•
The volume of local anaesthesia introduced appears to be directly related to side effects and complications of the interscalene block. Phrenic nerve blockade is more frequent when volumes greater than 10 mL are injected. The use of ultrasound allows for smaller volumes to be placed accurately and effectively. Inject 10 mL of local anaesthetic or just enough that the nerve roots are visualised to be completely surrounded by hypoechoic fluid. Injection of as little as 5 mL of local anaesthetic within (rather than around) the nerve sheath itself can produce an effective block.
Supraclavicular block
Landmark technique
The supraclavicular block is performed below the level of the nerve roots at a point where the brachial plexus trunks have formed and are contained within a neural sheath. This approach produces a rapid-onset block with a predictable, dense anaesthesia. The supraclavicular block can be used to provide anaesthesia and analgesia for the upper limb distal to the shoulder.
Preparation
•
Position the patient supine or in semi-Fowler’s position with the head facing away from the side to be blocked. Rest the patient’s arm comfortably across their abdomen.
•
Mark the important landmarks with a skin marker (
Fig. 8.8):
•
The posterior border of the clavicular head of the sternocleidomastoid muscle at the point of insertion onto the clavicle (ask the patient to lift their head off the table while facing away, as this helps to define this landmark).
•
Draw a line on the neck parallel to the midline through this point to demarcate the lateral extension of the cupola of the lung. The area medial to this line is a danger area because of the risk of pneumothorax.
•
The point of pulsation of the subclavian artery should be marked.
•
The target point for needle insertion is approximately 25 mm lateral to the line (as a margin of safety) and should be marked on the skin.
Technique
•
Prepare the field by cleaning the skin with an antiseptic solution and positioning sterile drapes.
•
Identify the target area for needle insertion – about 25 mm lateral to the posterior border of sternocleidomastoid and 15 mm (one fingerbreadth) superior to the clavicle. This should be immediately posterolateral to the pulsation of the subclavian artery superior to the clavicle.
•
Raise a superficial weal of local anaesthetic at the needle insertion site with a 27G needle.
•
Puncture the skin at the target point with a 25 mm to 50 mm nerve-block needle. Insert the needle perpendicularly to the skin and advance it 2 to 5 mm (
Fig. 8.9A&B). Redirect the needle inferiorly, keeping it parallel to the scalene muscles (in a slightly lateral direction) until paraesthesias are elicited. The insertion depth is unlikely to be more than 25 mm. Once the rib is contacted the needle can be ‘walked’ anteriorly and posteriorly while keeping the syringe parallel to the interscalene groove until the brachial plexus is located. If the rib is not found, the needle should be carefully redirected first laterally and then medially until it is contacted or paraesthesias or nerve twitches are elicited.
•
If you are using a nerve stimulator, insert the needle using the same technique. The needle is advanced slowly until flexion or extension twitches of the fingers are obtained.
•
Aspirate. If no flashback of blood is obtained, inject 30 to 40 mL of local anaesthetic slowly with intermittent aspiration to rule out intravascular injection. Slow injection increases block success and decreases complications. If resistance to injection, severe paraesthesias or cramping pain sensations occur with initial injection, the needle should be withdrawn by 1 to 2 mm to avoid intraneural injection.
•
The onset of anaesthesia with lidocaine is from 5 to 15 minutes and with bupivacaine is from 10 to 20 minutes; duration of anaesthesia is 3 to 6 hours and 8 to 10 hours, respectively; duration of analgesia is 5 to 8 hours and 16 to 18 hours, respectively.
Precautions
This block is very safe if used appropriately and carefully. Avoid using this block in patients who have significant chronic respiratory disease or patients with respiratory distress, as well as in patients with contralateral phrenic nerve or recurrent laryngeal nerve paralysis.
Complications
Common side effects associated with this technique include phrenic nerve block with diaphragmatic paralysis and sympathetic nerve block with development of Horner’s syndrome. This usually only requires reassurance for the patient. Phrenic nerve block occurs in about 50% of cases and is not associated with respiratory dysfunction in healthy volunteers.
Pneumothorax associated with supraclavicular block is not common, is generally small requiring conservative treatment only, and develops within a few hours following the procedure. In rare instances its presentation can be delayed up to 12 hours.
Complications similar to those occurring with other peripheral blocks, such as intravascular injection with development of systemic local anaesthetic toxicity, as well as haematoma formation, may occur. Neurapraxias and neurologic injury are similarly possible, but rarely reported.
Ultrasound technique
This technique is a simple, easy-to-use method, does not require a nerve stimulator, and allows for smaller volumes of local anaesthetic to be used. It also virtually abolishes the likelihood of inadvertent vascular and pleural puncture.
Preparation
•
Position the patient supine or in semi-Fowler’s position with the head facing away from the side to be blocked.
•
Rest the arm comfortably by the patient’s side or across the abdomen.
•
Use a linear high-frequency probe (10 to 15 MHz is ideal) and select an appropriate pre-set application.
•
Identify the area to begin the scan – either the midline of the neck or the supraclavicular fossa.
•
Perform a preliminary non-sterile survey scan to identify the relevant anatomy and optimise the image by adjusting depth of field (20 to 30 mm), focus point, and gain. Mark the best probe position on the skin with a pen, if required. Position the probe over the supraclavicular fossa in the transverse plane to obtain the best possible cross-sectional view of the subclavian artery and brachial plexus (
Figs 8.10,
8.11A–C). Scan proximally and distally to observe the nerve roots and nerve trunks. The nerves in this region are round or oval, are hypoechoic, and can be found lateral and superficial to the subclavian artery (which can be identified with the assistance of colour Doppler if necessary) and superior to the first rib. The subclavian vein is medial to the artery. Visualise the pleura (check for the pleural sliding sign and comet tails) and note the relation to the brachial plexus and the planned needle track. Also take note of the distance from the skin to the rib and the skin-to-pleura distance.
•
Prepare the field by cleaning the skin with an antiseptic solution and positioning sterile drapes. Cover the probe with a sterile probe-sheath and apply sterile ultrasound gel to the area of the supraclavicular fossa.
Technique
In-plane approach (lateral to medial)
This approach is considerably different from the conventional supraclavicular techniques. The block needle is inserted in a very lateral position and advanced in a lateral to medial direction starting from the lateral edge of the probe. The in-plane approach enables the physician to track the needle tip in real time in order to minimise the risk of accidental pleural or vascular puncture.
•
Identify the hypoechoic nerve roots in their transverse axis in the supraclavicular fossa.
•
Raise a weal of local anaesthetic at the needle insertion target with a 27G needle.
•
Insert a 25 mm to 50 mm 22G nerve-block needle on the lateral end of the ultrasound probe.
•
Advance the needle towards the edge of the nerve bundle while visualising the entire length of the needle in real time and avoiding pleural or vascular puncture (
Fig. 8.12).
An alternative in-plane approach (medial to lateral)
The advantage of ultrasound guidance is that any approach can be used and the needle tip can be positioned next to the nerves under direct vision (Fig. 8.13). While this approach has the advantage of advancing the needle away from the artery and the pleura, it also makes it more difficult to position the needle close to the nerves if they lie deep or directly lateral to the artery.
Out-of-plane approach
This is similar to the traditional blind landmark approach. The needle is introduced and advanced into the proximity of the nerve (Fig. 8.14).
•
Identify the subclavian artery and the round hypoechoic nerve trunks of the brachial plexus located lateral to the artery, with the probe in the transverse plane in the supraclavicular fossa.
•
Raise a weal of local anaesthetic with a 27G needle at the needle insertion point on the superior side of the transducer.
•
Introduce a 25 mm to 50 mm 22G nerve-block needle perpendicular to the superior aspect of the probe.
•
Advance the needle carefully towards the edge of the nerve trunks. While the needle itself might not be visible, its progress can be assessed by local tissue movement and the tip can be followed by angling the probe back and forth in order to avoid pleural or vascular puncture.
The injection process
•
Slowly inject local anaesthetic around the nerve roots by positioning the needle adjacent to the nerve sheath. Aspirate frequently to avoid inadvertent intravascular injection. If resistance to injection, severe paraesthesias or severe cramping pain are provoked in the limb during injection, immediately withdraw the needle by 1 to 2 mm to avoid intraneural injection.
•
Observe the local anaesthetic spread during injection. A hypoechoic collection will appear adjacent to and then spread around the nerves. If no fluid collection develops, then ensure that intravascular injection has not occurred.
•
Observe the pattern of local anaesthetic spread around the target nerves during injection. Inject most of the local anaesthetic immediately superior to the first rib and next to the subclavian artery if anaesthesia to the distal forearm and hand is desired, because the ulnar nerve often lies in this position, posterior to the subclavian artery.
•
Reposition the needle at least once to ensure complete circumferential local anaesthetic spread around the nerve roots.
Infraclavicular block
Landmark technique
The infraclavicular block is a blockade of the brachial plexus in the region of the coracoid process. This provides good anaesthesia for the hand, wrist, forearm, elbow, and distal arm, but is not a good choice for anaesthesia or analgesia for the shoulder, the axilla and the proximal medial arm. The coverage is similar to that of the supraclavicular block.
This block may be the one of most useful of the brachial plexus blocks in the acute trauma patient when there is limited access to the neck and it is an advantage not to have to move the limb to allow the block to be administered.
Preparation
•
Position the patient supine with the head facing away from the side to be blocked.
•
The arm can be kept at the patient’s side or across their abdomen, but ideally the arm should be abducted at the shoulder and flexed at the elbow to keep the relationship of the landmarks to the brachial plexus constant. Make sure that you can visualise the twitches of the hand.
•
With a pen, mark the important landmarks for the infraclavicular block (
Fig. 8.15):
•
The medial end of clavicle.
•
The coracoid process – as the arm is elevated and lowered the coracoid process can be felt medial to the shoulder.
•
The midpoint of a line connecting the medial end of clavicle and the coracoid.
•
The needle insertion point – 30 mm inferior and perpendicular to the midpoint of the line between the medial end of the clavicle and the coracoid.
•
For the mid-clavicular ‘vertical needle’ approach, mark the following landmarks (
Fig. 8.16):
•
The jugular fossa (suprasternal fossa).
•
The most anterior part of the acromion.
•
The midpoint of a line connecting the jugular fossa and the acromion.
•
The needle insertion point – immediately inferior to the clavicle at the midpoint of the line between the jugular fossa and the acromion. This should be exactly one fingerbreadth (10 mm) medial to the infraclavicular fossa.
•
For the sub-coracoid ‘vertical needle’ approach, mark the following landmarks (
Fig. 8.17):
•
A point 20 mm inferior and 20 mm medial to the coracoid process.
Technique
•
Prepare the field by cleaning the skin with an antiseptic solution and positioning sterile drapes.
•
Identify the target area for needle insertion – about 30 mm inferior to the midpoint of a line joining the medial end of the clavicle and the coracoid process.
•
Raise a superficial weal of local anaesthetic at the needle insertion site with a 27G needle.
Buy Membership for Anesthesiology Category to continue reading.
Learn more here
[/not-level-membership-for-anesthesiology-category]
Local and Regional Anaesthesia in the Emergency Department Made