CHAPTER 9 Lower limb blocks
Femoral nerve block (3-in-1 block)
Landmark technique
A femoral nerve block is easy to master and has a very high success rate even in relatively inexperienced hands. It has a low risk of complications and has a significant clinical applicability in the ED for post-traumatic pain management of injuries of the femur, anterior thigh and knee. When a femoral nerve block is used in combination with a sciatic nerve block, anaesthesia of almost the entire lower limb distal to the mid-thigh can be achieved. The 3-in-1 block refers to the simultaneous blockade of the anterior branch of the obturator nerve, the lateral femoral cutaneous nerve and the femoral nerve with a single injection. This results from the medial and lateral spread of local anaesthetic injected around the femoral nerve.
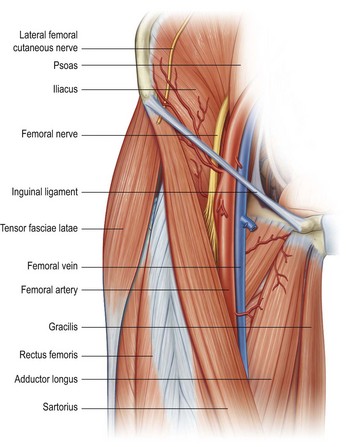
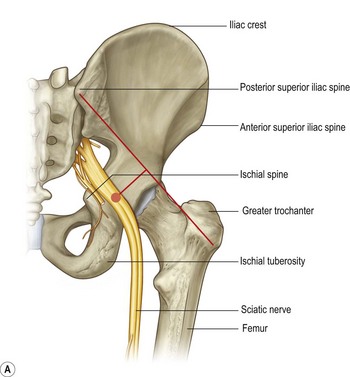
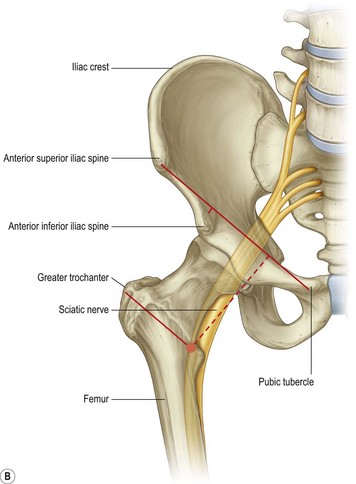
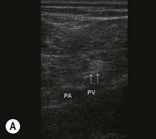
The femoral nerve arises from the L2, L3 and L4 nerve roots. The nerve descends between the psoas and the iliacus muscles and passes deep to the inguinal ligament into the thigh (Fig. 9.1). At this point the femoral nerve is positioned immediately lateral to and slightly deeper than the femoral artery. The acronym NAVY is a useful reminder of the arrangement of structures from lateral to medial: Nerve, Artery, and Vein, with Y representing the midline.
A femoral block produces anaesthesia of the entire anterior thigh and most of the femur and knee joint, as well as to the skin on the medial aspect of the leg below the knee joint via the saphenous nerve.
Preparation
•
Position the patient supine, with the hips and knees extended.
•
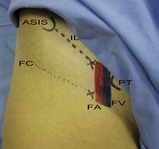
Mark with a pen the important landmarks that are used to determine the target point for the needle insertion (
Fig. 9.2):
•
The inguinal ligament – extending from the anterior superior iliac spine to the pubic tubercle.
•
The femoral skin crease.
•
The femoral artery pulsation at the femoral crease and inguinal ligament.
•
The needle insertion point – immediately lateral to the femoral artery at the level of the inguinal ligament or femoral crease.
Technique
•
Prepare the field by cleaning the skin with an antiseptic solution and positioning sterile drapes.
•
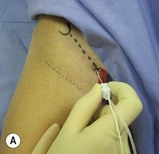
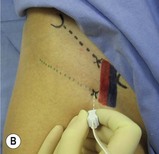
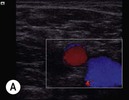
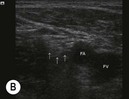
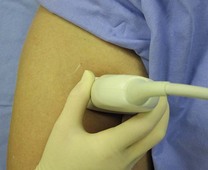
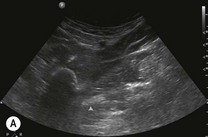
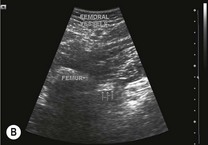
Identify the target area for the initial needle insertion – a point immediately lateral to the arterial pulsation either at the level of the femoral crease or at the level of the inguinal ligament (
Fig. 9.3A&B).
•
Raise a superficial weal of local anaesthetic at the needle insertion site.
•
Puncture the skin at the target point with a 25 mm to 50 mm nerve-block needle. Advance the needle posteriorly and slightly superiorly.
•
If you are using a nerve stimulator, insert the needle using the same technique. Appropriate nerve stimulation must cause quadriceps contraction with movement of the patella. If the patella does not move, the sartorius muscle might have been stimulated.
•
Aspirate. If no flashback of blood is obtained, inject 20 to 30 mL of local anaesthetic slowly with intermittent aspiration to rule out intravascular injection. Slow injection increases block success and decreases complications. If resistance to injection, severe paraesthesias or cramping pain sensations occur with initial injection, then the needle should be withdrawn by 1 to 2 mm to avoid intraneural injection. Use the higher end of the volume range if the 3-in-1 block is desired.
•
Firm digital pressure applied distal to the injection site during injection and for several minutes thereafter increases the proximal, medial and lateral spread of local anaesthetic and increases the chances of achieving a 3-in-1 block.
•
This block works well with smaller volumes of local anaesthetic, but larger volumes increase the likelihood of securing a block of the lateral femoral cutaneous nerve with resultant anaesthesia of the anterolateral aspect of the thigh.
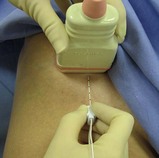
Ultrasound technique
The use of ultrasound assistance for the femoral nerve block increases the success rate from 80% with the blind and nerve stimulator techniques to 95%. If ultrasound is used, then it is not necessary to use a nerve stimulator as well.
Preparation
•
Position the patient supine with the hips and knees extended.
•
Use a linear high-frequency probe (10 to 15 MHz is ideal) and select an appropriate pre-set application.
•
Identify the area to begin the scan – the area between the inguinal ligament and the femoral crease.
•
Prepare the field by cleaning the skin with an antiseptic solution and positioning sterile drapes. Cover the probe with a sterile probe-sheath and apply sterile ultrasound gel to the area between the inguinal ligament and the femoral crease.
Technique
In-plane approach
•
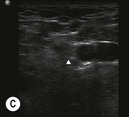
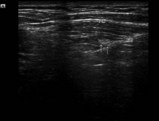
Identify the position of the femoral nerve in its transverse axis in an area convenient to block.
•
Raise a weal of local anaesthetic at the needle insertion target with a 27G needle.
•
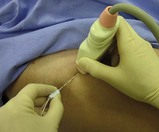
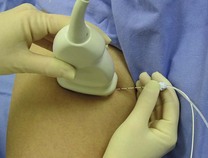
Insert a 25 mm to 50 mm 22G nerve-block needle on the lateral end of the ultrasound probe.
•
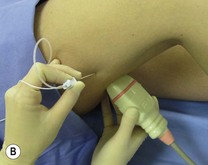
Advance the needle parallel to the probe towards the edge of the nerve while visualising the entire length of the needle in real time (
Fig. 9.6).
•
The lateral femoral cutaneous nerve may be blocked separately once the femoral nerve has been blocked.
Out-of-plane approach
•
Identify the position of the femoral nerve in its transverse axis in an area convenient to block.
•
Line up the nerve target at the midpoint of the screen. The needle insertion point will correspond to the exact centre of the transducer.
•
Raise a weal of local anaesthetic at the needle insertion target with a 27G needle.
•
Insert a 25 mm to 50 mm 22G nerve-block needle on the inferior (distal) side of the ultrasound probe.
•
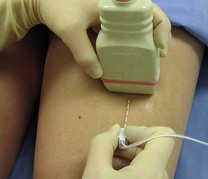
Observe local tissue and needle movement as the needle is advanced towards the target. Aiming for the side of the nerve bundle rather than the centre makes needle placement more accurate (
Fig. 9.7).
•
Clear identification of the needle tip may require the probe to be angled back and forth.
•
The femoral cutaneous nerve of the thigh may be blocked separately once the femoral nerve has been blocked.
The injection process
•
Slowly inject local anaesthetic around the femoral nerve by positioning the needle adjacent to the nerve. Aspirate frequently to avoid inadvertent intravascular injection. If resistance to injection, severe paraesthesias or severe cramping pain are provoked in the limb during injection, then immediately withdraw the needle by 1 to 2 mm to avoid intraneural injection.
•
Observe the local anaesthetic spread during injection. A hypoechoic collection will appear adjacent to and then spread around the nerve. Observe sheath distension and the formation of a hypoechoic ring of local anaesthetic solution around the hyperechoic nerve structures. Check to see if the local anaesthetic has spread around the lateral femoral cutaneous nerve – if not, it may need to be blocked separately.
•
A lack of expansion of the tissue may indicate intravascular injection – aspirate and reposition the needle if necessary.
•
Reposition the needle at least once to ensure complete circumferential local anaesthetic spread around the nerve roots.
•
Scan proximally and distally to assess the extent of local anaesthetic spread.
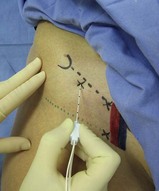
Lateral femoral cutaneous nerve block
The lateral femoral cutaneous nerve arises from the L2 and L3 nerve roots and provides sensation to the lateral aspect of the thigh. It enters the thigh a variable distance medial to the anterior superior iliac spine (most commonly 10 to 15 mm, but as much as 50 mm) and deep to the inguinal ligament between the layers of the fascia lata and the fascia of the iliacus muscle. This block may be performed on its own or to complement a femoral nerve block.
Preparation
•
Position the patient supine with the hips and knees extended.
•
Mark with a pen the important landmarks that are used to determine the target point for the needle insertion (
Figs 9.8,
9.9):
•
The anterior superior iliac spine.
•
The needle insertion point – 20 mm medial and 20 mm inferior (distal) to the anterior superior iliac spine.
Technique
•
Prepare the field by cleaning the skin with an antiseptic solution and positioning sterile drapes.
•
Identify the target area for the initial needle insertion – 20 mm medial and 20 mm inferior to the anterior superior iliac spine.
•
Raise a superficial weal of local anaesthetic at the needle insertion site with a 27G needle.
•
Puncture the skin at the target point with a 25 mm to 50 mm needle. Advance the needle posteriorly and slightly laterally until a ‘pop’ is felt as the nerve-block needle penetrates the fascia lata.
•
Use a fan technique to inject 10 mL of local anaesthetic lateral and medial to the needle insertion point, both deep and superficial to the fascia lata. Aspirate intermittently to avoid intravascular injection.
Sciatic nerve block
Sciatic blockade (via the posterior, anterior or popliteal approach) has the potential to be one of the most commonly used regional anaesthetic techniques in the ED and can be invaluable for pain management following trauma to the lower limb (Fig. 9.10). This block is relatively easy and is associated with a high success rate when properly performed. It is particularly well suited for injuries to the leg, ankle, and foot. It provides complete anaesthesia of the leg below the knee with the exception of a medial strip of skin which is innervated by the saphenous nerve. When combined with a femoral nerve block or 3-in-1 block, anaesthesia of almost the entire lower limb distal to the mid-thigh is achieved. If spinal immobilisation procedures are required, rather use the anterior or the popliteal approach, which require less movement of the patient and the injured limb.
Posterior approach landmark technique
The traditional posterior approach to sciatic nerve blockade is relatively simple and successful but it has the disadvantage of requiring a significant repositioning of the patient, which might be difficult with an injured limb.
Preparation
•
Position the patient in the lateral decubitus position with the side to be blocked uppermost. Flex the hip and knee to 90°.
•
It is important that the patient remain in the same position once the landmarks have been marked. Small positional changes can result in a significant shift of the landmarks due to the movement of the skin, which can lead to difficulty in localising the sciatic nerve.
•
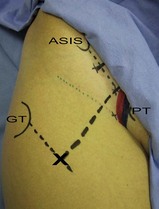
Draw a line from the greater trochanter to the posterior superior iliac spine; mark the midpoint of this line; the target point for needle insertion is 30 to 50 mm distal to this midpoint mark, perpendicular to the line (
Fig. 9.11).
Technique
•
Prepare the field by cleaning the skin with an antiseptic solution and positioning sterile drapes.
•
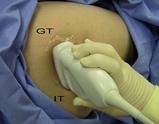
Identify the target area for the initial needle insertion – a point 30 to 50 mm distal and perpendicular to the midpoint of a line joining the inner aspects of the greater trochanter and the posterior superior iliac spine.
•
Raise a superficial weal of local anaesthetic at the needle insertion site with a 27G needle.
•
Puncture the skin at the target point with a 75 mm to 100 mm nerve-block needle at a perpendicular angle to the spherical skin plane. Keep the needle at this angle while advancing it. The sciatic nerve should be encountered at 50 to 80 mm depth (
Fig. 9.12).
•
If you are using a nerve stimulator, use the same needle insertion technique and, once the target depth has been reached, look for twitches of the hamstrings, calf, foot, or toes. Gluteal twitches indicate that the needle is still too superficial. The use of nerve stimulation for the sciatic nerve can at times be misleading as the sciatic nerve is predominantly composed of sensory fibres. The needle may completely penetrate the nerve without producing muscle twitches!
•
Aspirate. If no flashback of blood is obtained, inject 20 to 30 mL of local anaesthetic slowly with intermittent aspiration to rule out intravascular injection. Slow injection increases block success and decreases complications. If resistance to injection, severe paraesthesias or cramping pain sensations occur with initial injection, then the needle should be withdrawn by 1 to 2 mm to avoid intraneural injection.
•
Onset of anaesthesia should occur in 15 to 30 minutes.
Posterior approach ultrasound technique
This block is one of the more difficult of the ultrasound-guided nerve blocks. Although the sciatic nerve is one of the largest peripheral nerves, it is often difficult to visualise because of the depth from the skin and because of the overlying adipose tissue.
Preparation
•
Position the patient in the lateral decubitus position with the hip and knee flexed.
•
Use a curvilinear probe (2 to 6 MHz) and select an appropriate pre-set application.
•
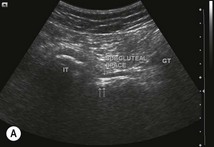
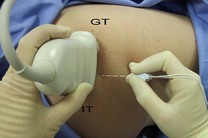
Identify the area to begin the scan – the area between the ischial tuberosity and the greater trochanter (
Fig. 9.13). The landmarks are easy to identify in most patients, but take care to visualise them carefully when excess adipose causes a poor image.
•
Prepare the field by cleaning the skin with an antiseptic solution and positioning sterile drapes. Cover the probe with a sterile probe-sheath and apply sterile ultrasound gel to the area to be scanned.
Technique
In-plane approach
•
Identify the position of the sciatic nerve in its transverse axis in an area convenient to block between the ischial tuberosity and the greater trochanter.
•
Raise a weal of local anaesthetic at the needle insertion target point (the lateral edge of the probe) with a 27G needle.
•
Insert a 75 mm to 100 mm 22G nerve-block needle on the lateral end of the ultrasound probe.
•
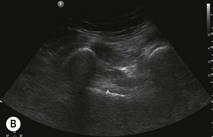
Advance the needle parallel to the probe towards the edge of the nerve (rather than attempting to hit the nerve head-on) while visualising the entire length of the needle in real time (
Fig. 9.15). Nerve movement may be noticed as the needle approaches the target.
Out-of-plane approach
•
Identify the position of the sciatic nerve in its transverse axis in an area convenient to block between the ischial tuberosity and the greater trochanter.
•
Line up the nerve target at the midpoint of the screen. The needle insertion point will correspond to the exact centre of the transducer.
•
Raise a weal of local anaesthetic at the needle insertion target with a 27G needle.
•
Insert a 75 mm to 100 mm 22G nerve-block needle on the inferior (distal) side of the ultrasound probe.
•
Observe local tissue and needle movement as the needle is advanced towards the target. Aiming for the side of the nerve bundle rather than the centre makes needle placement more accurate.
•
Clear identification of the needle tip may require the probe to be angled back and forth (
Fig. 9.16).
The injection process
•
Slowly inject local anaesthetic around the sciatic nerve by positioning the needle adjacent to the nerve. Aspirate frequently to avoid inadvertent intravascular injection. If resistance to injection, severe paraesthesias or severe cramping pain are provoked in the limb during injection, then immediately withdraw the needle by 1 to 2 mm to avoid intraneural injection.
•
Observe the local anaesthetic spread during injection. A hypoechoic collection will appear adjacent to and then spread around the nerve. Observe sheath distension and the formation of a hypoechoic ring of local anaesthetic solution around the hyperechoic nerve structures.
•
Reposition the needle at least once to ensure complete circumferential local anaesthetic spread around the nerve roots.
•
Scan proximally and distally to assess the extent of local anaesthetic spread. This is best achieved by rotating the probe by 90° to view the nerve in longitudinal section. Hypoechogenic local anaesthetic on both sides of the nerve will confirm correct placement and guarantee success of the block.
Anterior approach landmark technique
This approach has the advantage that it can be performed with the patient supine and does not require the repositioning of an injured limb.
Preparation
•
Position the patient supine with the limb to be blocked in 45° of internal rotation if possible (this reduces the likelihood of needle contact with the lesser trochanter).
•
Mark the important landmarks (
Fig. 9.17):
•
The anterior superior iliac spine.
•
The greater trochanter.
•
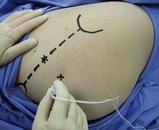
Draw a line from the pubic tubercle to the anterior superior iliac spine; divide this line into thirds and drop a perpendicular line from the junction of the middle and medial thirds; draw a parallel line medially from the greater trochanter to intersect with the perpendicular. This marks the site of needle insertion.
Technique
•
Prepare the field by cleaning the skin with an antiseptic solution and positioning sterile drapes.
•
Identify the target area for the initial needle insertion – the junction of lines as described above.
•
Raise a superficial weal of local anaesthetic at the needle insertion site with a 27G needle.
•
Puncture the skin at the target point with a 75 mm to 100 mm nerve-block needle and advance the needle posteriorly and at a slight lateral angle.
•
Advance the needle until contact is made with the femur. Retract the needle and redirect it medially until it deflects off the femur. Carefully advance the needle a further 5 to 10 mm (
Fig. 9.18).
•
The nerve stimulator should produce twitches of the calf, ankle or foot when the needle is positioned correctly.
•
Aspirate. If no flashback of blood is obtained, inject 20 to 30 mL of local anaesthetic slowly with intermittent aspiration to rule out intravascular injection. Slow injection increases block success and decreases complications. If resistance to injection, severe paraesthesias or cramping pain sensations occur with initial injection, the needle should be withdrawn by 1 to 2 mm to avoid intraneural injection.
•
Onset of anaesthesia should occur in 15 to 30 minutes.
Anterior approach ultrasound technique
This technique is in some ways easier than the posterior ultrasound sciatic nerve block. It is performed with the patient supine without any repositioning necessary, the sciatic nerve is readily identifiable on ultrasound, and it may be performed from the same region as the femoral nerve block in the same sterile field (although a different probe needs to be used). The anterior approach to sciatic nerve blockade results in a lower incidence of blockade of the posterior cutaneous nerve of the thigh, however, and this should be considered when planning the block. The use of ultrasound for direct visualisation, and the medial needle insertion point (which avoids needle contact with the lesser trochanter), make this block much more successful than the landmark technique.
Preparation
•
Position the patient supine. It may be necessary to abduct the opposite thigh to make space for the probe and to facilitate needle insertion and injection.
•
Use a low-frequency curvilinear probe (2 to 6 MHz) as the nerve is often 80 to 100 mm below the skin and select an appropriate pre-set application.
•
Identify the area to begin the scan – position the transducer over the medial thigh as proximal as possible (
Fig. 9.19).
•
Prepare the field by cleaning the skin with an antiseptic solution and positioning sterile drapes. Cover the probe with a sterile probe-sheath and apply sterile ultrasound gel to the anteromedial thigh.
Technique
In-plane approach
The in-plane approach should be used for this block. Although the out-of-plane approach may be used, the depth of needle insertion makes this approach much more difficult.
•
Identify the position of the sciatic nerve in its transverse axis in an area convenient to block in the proximal thigh. Plan the needle insertion point and path so that the femoral vessels and nerve are not pierced.
•
Raise a weal of local anaesthetic at the needle insertion target point (the medial edge of the probe) with a 27G needle.
•
Insert a 120 mm to 150 mm 22G nerve-block needle on the medial end of the ultrasound probe.
•
Advance the needle parallel to the probe towards the edge of the sciatic nerve (rather than attempting to hit the nerve head-on) while visualising the entire length of the needle in real time (
Fig. 9.21). Nerve movement may be noticed as the needle approaches the target.
•
A distinct ‘pop’ should be felt as the needle penetrates each fascial layer, including the posterior fascia of adductor magnus which lies immediately anterior to the nerve.
The injection process
•
Slowly inject 20 to 30 mL of local anaesthetic around the sciatic nerve by positioning the needle adjacent to the nerve. Aspirate frequently to avoid inadvertent intravascular injection. If resistance to injection, severe paraesthesias or severe cramping pain are provoked in the limb during injection, then immediately withdraw the needle by 1 to 2 mm to avoid intraneural injection.
•
Observe the local anaesthetic spread during injection. A hypoechoic collection will appear adjacent to and then spread around the nerve. Observe sheath distension and the formation of a hypoechoic ring of local anaesthetic solution around the hyperechoic nerve structures.
•
Reposition the needle at least once to ensure complete circumferential local anaesthetic spread around the nerve roots.
•
Scan proximally and distally to assess the extent of local anaesthetic spread. This is best achieved by rotating the probe by 90° to view the nerve in longitudinal section. Hypoechogenic local anaesthetic on both sides of the nerve will confirm correct placement and guarantee success of the block.
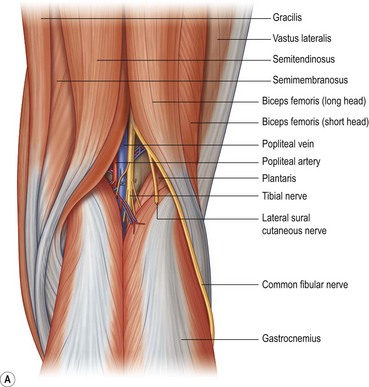
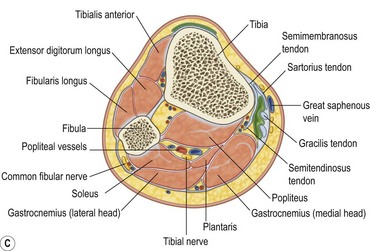
Nerve blocks at knee level
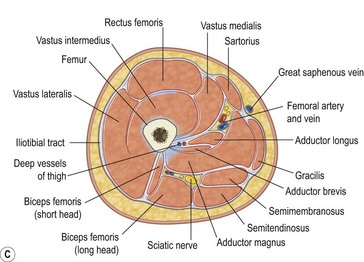
There are three nerves that may be blocked at the level of the knee or the popliteal fossa: the saphenous nerve, the common fibular nerve (the common peroneal nerve) and the tibial nerve (Fig. 9.22). They may be blocked at the knee or alternatively the popliteal sciatic nerve may be blocked more proximally (the sciatic nerve branches into the common fibular nerve and the tibial nerve in the thigh, but they run together to the level of the knee). These nerve blocks will produce anaesthesia of the leg, ankle and foot.
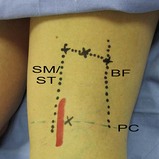
Saphenous nerve block
This block should always be performed as distally as possible when done below the knee, as the saphenous nerve sends off numerous branches as soon as it becomes subcutaneous at the level of the knee. It innervates the skin over the medial, anteromedial and posteromedial aspects of the leg, from the knee to the medial aspect of the hallux. In combination with a common fibular nerve and tibial nerve block this will produce anaesthesia of the leg, ankle and foot.
Preparation
•
Position the patient supine on the trolley with the knee slightly flexed and elevated off the bed.
•
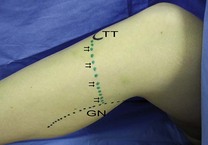
Mark the important landmarks for this block (
Fig. 9.23):
•
The medial head of gastrocnemius.
•
The groove between sartorius and vastus medialis (for the above-knee approach).
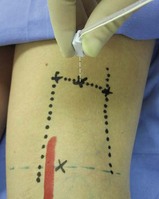
Technique
•
Prepare the field (the entire knee, proximal leg and distal thigh) by cleaning the skin with an antiseptic solution and positioning sterile drapes.
•
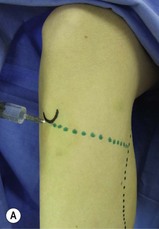
Identify the target point for needle insertion – just medial to the tibial tuberosity.
•
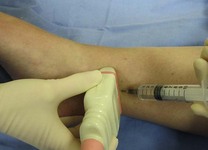
Inject 5 to 10 mL of local anaesthetic as a deep subcutaneous line from the medial edge of the tibial tuberosity towards the posteromedial aspect of the calf (the medial head of gastrocnemius) (
Fig. 9.24A&B). Inject slowly with intermittent aspiration to avoid inadvertent intravascular injection.
•
An alternative technique is the paravenous approach (the saphenous nerve runs next to the saphenous vein at the level of the knee). Apply a tourniquet to the distal thigh to cause engorgement of the saphenous vein. Inject 3 to 5 mL of local anaesthetic around the vein on the medial aspect of the leg just distal to the patella. Aspirate frequently to prevent intravenous administration.
•
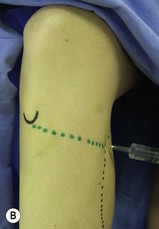
A second alternative technique is to block the saphenous nerve above the knee in the groove between sartorius and vastus medialis. Position the patient supine with the knee extended. The groove, and the site for needle insertion, can best be identified 40 mm proximal to the superior aspect of the patella, and 40 mm medial to the midline. Insert the needle perpendicular to the skin to a depth of about 20 mm. Inject 5 to 10 mL of local anaesthetic using a fan technique, with frequent aspiration to prevent inadvertent intravascular injection.
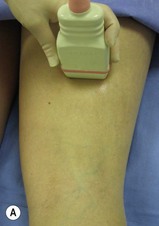
Ultrasound technique
The saphenous nerve is readily blocked under ultrasound guidance even if the nerve itself cannot be visualised. This block is useful in the ED to provide anaesthesia for the management and repair of wounds over the anterior and medial aspect of the shin.
Preparation
•
Position the patient supine with the limb slightly externally rotated.
•
Use a linear high-frequency probe (10 to 15 MHz) and select an appropriate pre-set application.
•
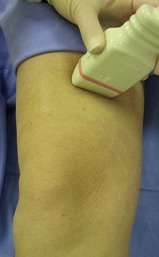
Identify the area to begin the scan – position the transducer over the anteromedial aspect of the distal thigh, about 50 mm proximal to the patella.
•
Prepare the field by cleaning the skin with an antiseptic solution and positioning sterile drapes. Cover the probe with a sterile probe-sheath and apply sterile ultrasound gel to the distal medial thigh.
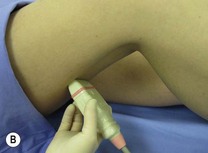
Technique
Out-of-plane approach
The out-of-plane approach is most convenient for this procedure (Fig. 9.27).
•
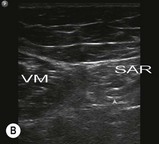
Identify the groove between sartorius and vastus medialis and the saphenous nerve within the groove.
•
Line up the nerve target at the midpoint of the screen. The needle insertion point will correspond to the exact centre of the transducer.
•
Raise a weal of local anaesthetic at the needle insertion target with a 27G needle.
•
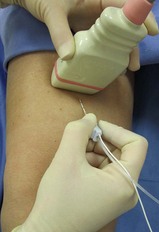
Insert a 25 mm to 50 mm 22G nerve-block needle on the inferior (distal) side of the ultrasound probe.
•
Observe local tissue and needle movement as the needle is advanced towards the target. Aim for the side of the nerve or the centre of the groove if the nerve is not visualised.
•
Clear identification of the needle tip may require the probe to be angled back and forth.
The injection process
•
Slowly inject 5 to 10 mL of local anaesthetic around the saphenous nerve by positioning the needle adjacent to the nerve. Aspirate frequently to avoid inadvertent intravascular injection. If resistance to injection, severe paraesthesias or severe cramping pain are provoked in the limb during injection, then immediately withdraw the needle by 1 to 2 mm to avoid intraneural injection.
•
Observe the local anaesthetic spread during injection. A hypoechoic collection will appear adjacent to and then spread around the nerve. Observe distension within the groove and the formation of a hypoechoic ring of local anaesthetic.
•
Reposition the needle at least once to ensure complete circumferential local anaesthetic spread around the nerve roots.
Alternative ultrasound technique (paravenous technique)
•
Position a linear high-frequency 10–15 MHz transducer over the course of the saphenous vein in the proximal medial aspect of the leg, using sterile techniques.
•
Optimise the scan image.
•
Introduce a needle to each side of the saphenous nerve and inject 3 to 5 mL of local anaesthetic, with intermittent aspiration to avoid intravascular injection.
Common fibular nerve block
This nerve provides sensation to the lateral aspect of the leg, the dorsal aspect of the foot, and the first webspace. In combination with a tibial nerve and saphenous nerve block this will produce anaesthesia of the leg, ankle and foot.
Preparation
•
Position the patient supine on the trolley with the knee slightly flexed and elevated off the bed.
•
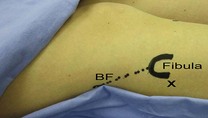
Mark the important landmarks for this block (
Fig. 9.28):
•
The head of the fibula.
•
The biceps femoris tendon and insertion.
Technique
•
Prepare the field (the entire knee, proximal leg and distal thigh) by cleaning the skin with an antiseptic solution and positioning sterile drapes.
•
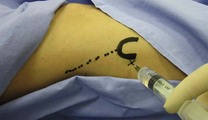
Identify the target point for needle insertion – immediately posterior to the head of the fibula, approximately 20 mm distal to the knee joint line.
•
Insert the needle perpendicular to the skin and advance it approximately 10 mm, aiming under the tendon of biceps femoris (
Fig. 9.29).
•
If a nerve stimulator is used, look for twitches of the foot (dorsiflexion).
•
Aspirate. If no flashback of blood is obtained, inject 5 to 10 mL of local anaesthetic slowly with intermittent aspiration to rule out intravascular injection. Slow injection increases block success and decreases complications. If resistance to injection, severe paraesthesias or cramping pain sensations occur with initial injection, then the needle should be withdrawn by 1 to 2 mm to avoid intraneural injection.
Tibial nerve block
The tibial nerve provides sensation to the sole of the foot. In combination with a common fibular nerve and saphenous nerve block this will produce anaesthesia of the leg, ankle and foot.
Preparation
•
Position the patient prone on the trolley.
•
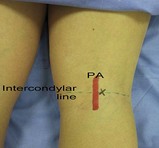
Mark the important landmarks for this block (
Fig. 9.30):
•
A line joining the medial and lateral condyles of the femur.
•
The midpoint of this line.
•
The pulsation of the popliteal artery.
Technique
•
Prepare the field (the entire knee, proximal leg and distal thigh) by cleaning the skin with an antiseptic solution and positioning sterile drapes.
•
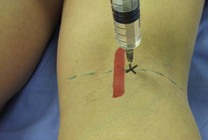
Identify the target point for needle insertion – the midpoint of the line joining the femoral condyles and just lateral to the pulsation of the popliteal artery (
Fig. 9.31).
•
Advance the needle perpendicular to the skin to a depth of 15 to 30 mm in the average patient.
•
If a nerve stimulator is used, look for twitches of the foot or toes.
•
Aspirate. If no flashback of blood is obtained, inject 5 to 10 mL of local anaesthetic slowly with intermittent aspiration to rule out intravascular injection. Slow injection increases block success and decreases complications. If resistance to injection, severe paraesthesias or cramping pain sensations occur with initial injection, then the needle should be withdrawn by 1 to 2 mm to avoid intraneural injection.
If an ultrasound is available, the popliteal sciatic block plus the saphenous block is a better option than attempting to block the tibial nerve at the level of the knee.
Popliteal sciatic nerve block
Since this procedure blocks the tibial nerve and the common fibular nerve as they run together in the thigh, it will produce anaesthesia of the entire foot, ankle and leg, with the exception of a strip of skin on the medial aspect of the leg. A saphenous nerve block will be required to complete the anaesthesia of the leg.
Landmark technique
Preparation
•
Position the patient prone, with the feet hanging over the edge of the bed.
•
Mark the important landmarks for this block (
Fig. 9.32):
•
The proximal popliteal crease.
•
The tendons of semitendinosus and semimembranosus medially.
•
The tendon of biceps femoris laterally (these landmarks can be accentuated by asking the patient to flex the knee).
•
Draw a line parallel to the popliteal crease from the medial tendons to the lateral tendons, 70 mm proximal to the crease.
•
The midpoint of this line.
Technique
•
Prepare the field (the entire knee, proximal leg and thigh) by cleaning the skin with an antiseptic solution and positioning sterile drapes.
•
Identify the target point for needle insertion – the midpoint of the line from medial to lateral tendons, 70 mm proximal to the popliteal crease.
•
Advance the needle perpendicular to the skin to a depth of 20 to 40 mm in the average patient (
Fig. 9.33).
•
If a nerve stimulator is used, look for twitches of the foot or toes.
•
Aspirate. If no flashback of blood is obtained, inject 5 to 10 mL of local anaesthetic slowly with intermittent aspiration to rule out intravascular injection. Slow injection increases block success and decreases complications. If resistance to injection, severe paraesthesias or cramping pain sensations occur with initial injection, then the needle should be withdrawn by 1 to 2 mm to avoid intraneural injection.
Ultrasound technique
The ultrasound-guided popliteal sciatic nerve block is a moderately difficult block as the popliteal sciatic nerve can be deceptively difficult to find for the novice ultrasonographer. It has the advantage that it can be performed in the prone patient and in the supine patient from the lateral side, or the medial side if required.
Preparation
•
Position the patient prone with the feet hanging over the edge of the bed (or supine with the knee flexed to 90° and the foot flat on the bed for the supine approach).
•
Use a linear high-frequency probe (10 to 15 MHz) and select an appropriate pre-set application.
•
Identify the area to begin the scan – position the transducer over the posterior midline of the distal thigh, at least 70 mm proximal to the popliteal crease (
Fig. 9.34A&B). The probe position is the same for both the prone and supine approaches.
•
Prepare the field by cleaning the skin with an antiseptic solution and positioning sterile drapes. Cover the probe with a sterile probe-sheath and apply sterile ultrasound gel to the distal posterior thigh.
Technique
In-plane approach
This approach may be used with the patient prone and the knee extended or supine with the knee flexed and elevated off the bed.
•
Identify the position of the sciatic nerve in its transverse axis in an area convenient to block, proximal to the division of the nerve (70 to 100 mm proximal to the popliteal crease).
•
Raise a weal of local anaesthetic at the needle insertion target point (the lateral edge of the probe or a point away from the probe, more anterior on the lateral aspect of the thigh) with a 27G needle.
•
Insert a 50 mm to 75 mm 22G nerve-block needle on the lateral end of the ultrasound probe.
•
Advance the needle parallel to the probe towards the edge of the nerve (rather than attempting to hit the nerve head-on) while visualising the entire length of the needle in real time (
Fig. 9.36A&B). Nerve movement may be noticed as the needle approaches the target.
Out-of-plane approach
This approach can only be attempted with the patient in the prone position (Fig. 9.37).
•
Identify the position of the sciatic nerve in its transverse axis in an area convenient to block, proximal to the division of the nerve (70 to 100 mm proximal to the popliteal crease).
•
Line up the nerve target at the midpoint of the screen. The needle insertion point will correspond to the exact centre of the transducer.
•
Raise a weal of local anaesthetic at the needle insertion target with a 27G needle.
•
Insert a 50 mm to 75 mm 22G nerve-block needle on the inferior (distal) side of the ultrasound probe.
•
Observe local tissue and needle movement as the needle is advanced towards the target. Aiming for the side of the nerve bundle rather than the centre makes needle placement more accurate.
•
Clear identification of the needle tip may require the probe to be angled back and forth.
The injection process
•
Slowly inject 20 to 40 mL of local anaesthetic around the sciatic nerve by positioning the needle adjacent to the nerve. Aspirate frequently to avoid inadvertent intravascular injection. If resistance to injection, severe paraesthesias or severe cramping pain are provoked in the limb during injection, then immediately withdraw the needle by 1 to 2 mm to avoid intraneural injection.
•
Observe the local anaesthetic spread during injection. A hypoechoic collection will appear adjacent to and then spread around the nerve. Observe sheath distension and the formation of a hypoechoic ring of local anaesthetic solution around the hyperechoic nerve structures.
•
Reposition the needle at least once to ensure complete circumferential local anaesthetic spread around the nerve roots.
•
Scan proximally and distally to assess the extent of local anaesthetic spread. This is best achieved by rotating the probe by 90° to view the nerve in longitudinal section. Hypoechogenic local anaesthetic on both sides of the nerve will confirm correct placement and guarantee success of the block.
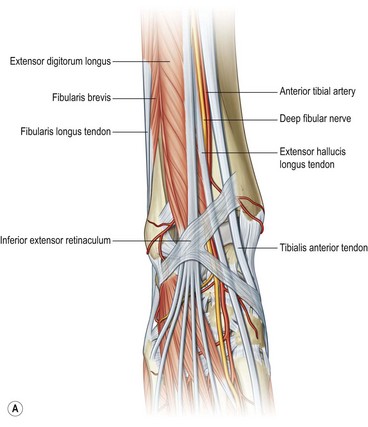
Ankle block
This block is straightforward to perform and produces anaesthesia of the superficial and deep structures of the foot distal to the ankle joint. It is highly successful using only the landmark technique, but is fairly uncomfortable for the patient because of the five injections required. The nerves that are blocked are the posterior tibial nerve, the deep fibular nerve (deep structures, bones, and cutaneous coverage of the sole and web between the first and second toes), and the superficial fibular, sural and saphenous nerves (cutaneous innervation of the foot) (Fig. 9.38). All superficial nerves of the foot are blocked by subcutaneous infiltration because they are no longer discrete nerves that can be blocked at the level of the ankle.
This is an important block for laceration repair to the sole of the foot because infiltration local anaesthesia is painful and ineffective.
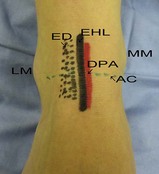
Deep fibular nerve block
Preparation
•
Position the patient supine with the foot supported on pillows or rolled-up towels or with the knee flexed and the foot flat on the bed.
•
Mark the important landmarks for this block (
Fig. 9.39):
•
The tendon of extensor hallucis longus (EHL); do not confuse the tendon of tibialis anterior with that of EHL (EHL lies laterally to tibialis anterior).
•
The tendons of extensor digitorum longus (ask the patient to dorsiflex the toes but not the foot to identify these tendons).
•
The dorsalis pedis pulse.
•
The proximal ankle crease.
•
Prepare the field (the foot, ankle and distal leg) by cleaning the skin with an antiseptic solution and positioning sterile drapes.
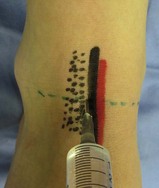
Technique
•
Identify the target area for needle insertion – between extensor hallucis longus and extensor digitorum longus, immediately lateral to the pulse of the dorsalis pedis artery at the level of the ankle crease in the anterior midline of the ankle.
•
Raise a weal of local anaesthetic subcutaneously over the target area with a 27G needle.
•
Insert a 22G needle in the groove just lateral to the extensor hallucis longus and advance until stopped by the bone (
Fig. 9.40). Withdraw the needle 1 to 2 mm and inject 5 mL of local anaesthetic after aspirating to avoid intravascular injection.
•
This block is a blind procedure, and a fan technique is recommended to increase the success rate. Withdraw the needle to the skin, redirect it 30° laterally and repeat the injection procedure. Repeat this with a medial redirection of the needle.
•
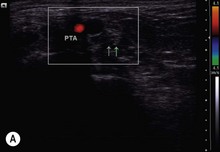
Ultrasound technique: The fibular nerve is small at the level of the ankle, but can often be visualised in cross-section using ultrasound with a linear high-frequency probe positioned transversely across the ankle (
Fig. 9.41). The nerve is to be found immediately lateral to the dorsalis pedis artery (
Fig. 9.42A&B). It is hypoechoic at the level of the ankle. Block this nerve using the out-of-plane approach by injecting 2 to 3 mL of local anaesthetic on each side of the nerve after aspirating to avoid intravascular injection. If the nerve cannot be identified, inject 2 to 3 mL of local anaesthetic on each side of the artery after aspirating to avoid intravascular injection.
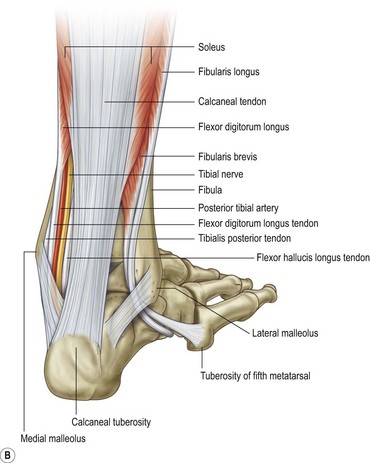
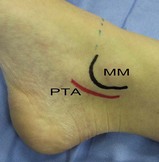
Deep (posterior) tibial nerve block
Preparation
•
Position the patient supine with the foot externally rotated and supported on pillows or rolled-up towels.
•
Mark the important landmarks for this block (
Fig. 9.43):
•
The pulse of the posterior tibial artery.
•
Prepare the field (the foot, ankle and distal leg) by cleaning the skin with an antiseptic solution and positioning sterile drapes.
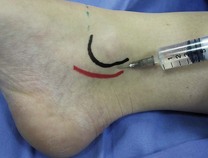
Technique
•
Identify the target point for needle insertion – the deep tibial nerve is located just posterior and distal to the medial malleolus, posterior to the pulse of the posterior tibial artery.
•
Insert the needle in the groove posterior to the medial malleolus and advance it until contact with the bone. Withdraw the needle 1 to 2 mm and inject 5 mL of local anaesthetic after aspirating to avoid intravascular injection (
Fig. 9.44).
•
Use a fan technique to increase the success rate. Inject two additional boluses of 2 mL of local anaesthetic after anterior and posterior needle reinsertions, always after aspirating to avoid intravascular injection.
•
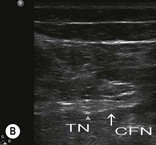
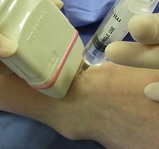
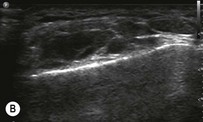
Ultrasound technique: Position a linear high-frequency probe transversely just proximal to the medial malleolus to visualise the tibial nerve in cross-section (
Fig. 9.45). The nerve lies immediately posterior to the posterior tibial artery (
Fig. 9.46A&B). Either the in-plane or out-of-plane technique can be used to guide the needle to the side of the nerve, where 5 mL of local anaesthetic can be injected after aspirating to avoid intravascular injection. Observe the spread of local anaesthetic around the nerve.
Superficial fibular, sural and saphenous nerve blocks
Blocks of the superficial fibular, sural and saphenous nerves, actually their distal superficial branches, are achieved using a simple circumferential injection of subcutaneous local anaesthetic (to all intents and purposes, a ring block around the ankle).
Preparation
•
Position the patient supine with the foot supported on pillows or rolled-up towels – this will make access much easier.
•
Make sure that you have access to both sides of the foot – bending over to block the other side can be very uncomfortable.
•
Prepare the field (the foot, ankle and distal leg) by cleaning the skin with an antiseptic solution and positioning sterile drapes.
Technique
•
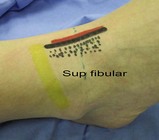
Superficial fibular nerve block (
Fig. 9.47): Insert the needle at the anterior tibial ridge and advance it laterally toward the lateral malleolus. Raise a subcutaneous weal during withdrawal of the needle with about 5 mL of local anaesthetic.
•
Saphenous nerve block (
Fig. 9.48): Insert a needle at the level of the medial malleolus and raise a ring of local anaesthetic from the point of needle entry to the Achilles tendon and then anteriorly to the tibial ridge. Inject 5 mL of local anaesthetic during needle withdrawal.
•
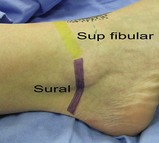
Sural nerve block (
Fig. 9.49): Insert a needle at the level of the lateral malleolus and raise a weal of local anaesthetic posteriorly towards the Achilles tendon.
Metatarsal block
Anaesthesia of the toes can be achieved by means of a ring-block technique, in exactly the same way as for the fingers. A metatarsal block is an alternative that is less painful and more effective. This block may be performed with access through the webspace, or from the dorsal aspect of the foot, which is less painful.
Preparation
Position the patient supine, with the foot supported on a pillow or rolled-up towel – this will make for easier access.
Technique
•
Clean the entire foot with a chlorhexidine in alcohol disinfectant solution.
•
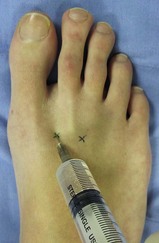
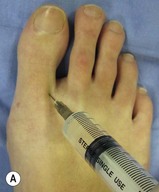
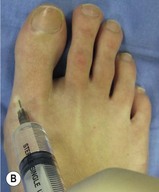
Identify the target points for needle insertion – immediately medial and lateral to the metatarsal of the digit to be anaesthetised, approximately two-thirds of the way from the base of the metatarsal to the head.
•
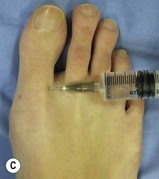
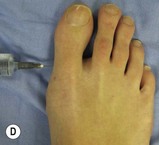
Insert the needle close to the bone and advance it until near the plantar skin (tenting but not penetrating the skin) (
Fig. 9.50).
•
Aspirate. If no flashback of blood is obtained, inject 3 to 5 mL of local anaesthetic slowly as the needle is slowly withdrawn towards the skin.
•
Repeat this procedure on the opposite side of the metatarsal.
Digital nerve block (ring block) of the toes
A digital or ring block can be used to achieve anaesthesia of the toe. It is performed in much the same manner as a digital nerve block in the hand.
Preparation
•
Position the patient supine or in semi-Fowler’s position.
•
Position the foot comfortably in such a way that you have good access to the toes.
•
Clean the entire foot with a chlorhexidine in alcohol disinfectant solution.
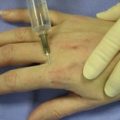
•
Insert a small (25G 35 mm) needle at a point on the dorsolateral aspect of the base of the proximal phalanx and raise a small skin weal of local anaesthetic.
•
Advance the needle towards the plantar aspect of the toe.
•
Aspirate. If no flashback of blood is obtained, inject 1 mL of local anaesthetic slowly with intermittent aspiration to rule out intravascular injection.
•
Inject an additional 1 mL of local anaesthetic as the needle is withdrawn.
•
Repeat this procedure on the other side.
•
A small weal of local anaesthetic over the dorsal aspect of the proximal phalanx may be needed to provide anaesthesia to the dorsal skin of the proximal and middle phalanges.
•
The hallux requires an additional weal of local anaesthetic on the plantar aspect of the toe.
•
Onset of local anaesthesia is from 5 to 20 minutes, depending on the type and volume of local anaesthetic used.