[level-membership-for-emergency-medicine-category]Chapter 56
Emergency Childbirth
Background
Of the more than 4.1 million births in the United States in 2009, 99% were delivered in a hospital setting. The percentage of these births that occur in the emergency department (ED) setting is unknown.1 Childbirth is a relatively rare occurrence in the ED and is not identified as a specific diagnosis by the Centers for Disease Control and Prevention. It is instead categorized in the “supplemental classification,” along with other miscellaneous and noncodable diagnoses.2 Emergency delivery of an infant continues to be one of the most challenging and stress-inducing procedures facing emergency physicians (EPs). The clinician needs to assess the mother and fetus, prepare for delivery, and anticipate potential difficulties or complications during and after the birthing process.
Anatomy and Physiology
Labor is the process by which the fetus is expelled from the uterus. It begins with a sequence of regular and effective uterine contractions that result in effacement and dilation of the cervix.3 Identification of true labor versus false labor is best determined in a dedicated obstetric unit, often with external uterine monitoring. Labor can also be divided into phases. The latent phase of labor is the period between its onset and when labor becomes active, which generally requires 80% effacement and cervical dilation of greater than 4 cm.4 Active labor is normally divided into three generally progressive stages. The first stage begins with cervical effacement and dilation and ends when the cervix is completed dilated. In multiparous women this stage of labor typically lasts about 5 to 8 hours, as opposed to 7 to 13 hours in nulliparous women, but with much individual variation.3,4 The second stage of labor begins when dilation of the cervix is complete and ends with delivery of the infant. The duration of this stage is also variable, with a median of 50 to 60 minutes in nulliparas and 15 to 20 minutes in multiparas.3,4 The third stage of labor begins after delivery of the infant and ends with delivery of the placenta. The fourth stage of labor refers to the 1 hour immediately after delivery, the period in which postpartum hemorrhage is most likely to occur.3 It is recommended that maternal blood pressure and pulse be recorded immediately after delivery and every 15 minutes for the first hour to rapidly detect any ongoing hemorrhage.3
Identification of Labor
Show or bloody show is a sign of approaching labor. The normal mucous plug sealing the cervix discharges as the cervix dilates. Show consists of a small amount of blood-tinged mucus discharged from the vagina and indicates that labor is already in progress or will probably occur during the next several hours to a few days. The coloring of the mucus can become pink or brown tinged as a result of minor bleeding. However, if more than a small amount of blood escapes with the mucous plug, an abnormal cause such as abruption of the placenta or placenta previa should be considered. Digital vaginal examination under these circumstances is generally contraindicated.3
Spontaneous rupture of membranes can occur during the course of active labor, typically evident by a sudden gush or continuous leakage of a variable amount of clear or slightly turbid vaginal fluid. Rupture of membranes before the onset of labor at any stage of gestation is referred to as premature rupture of membranes (PROM). Term PROM, which occurs before the onset of labor, complicates approximately 8% of pregnancies.5 In the majority of cases it is followed by the onset of labor and delivery within 5 hours.5 The most significant maternal risk associated with term PROM is intrauterine infection. Fetal risks associated with PROM include umbilical cord compression and ascending infection.5 The ideal management of PROM should be deferred to the consulting obstetrician.6
Membrane rupture occurring before 37 weeks of gestation is called preterm premature rupture of membranes (pPROM). Birth within 1 week generally occurs regardless of management or the clinical findings. The most significant maternal risk related to pPROM is intrauterine infection. The most significant risks to the fetus are complications related to prematurity. Preterm delivery occurs in approximately 12% of all births in the United States.5
Accurate diagnosis of PROM will be helpful in further management. Suspected PROM should be confirmed by an examination that minimizes the risk of introducing infection. Avoid digital cervical examination unless the patient is in active labor or delivery is imminent.5 A sterile speculum examination can be performed to look for amniotic fluid extruding from the cervical os or pooling in the posterior fornix, as well as to inspect for fetal or umbilical cord prolapse and assess cervical effacement and dilation.3,5
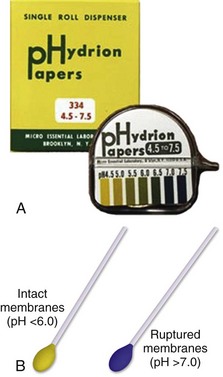
Amniotic fluid may be differentiated from vaginal fluid by testing the pH of the fluid with Nitrazine paper or similar swab devices (Fig. 56-1). The pH of vaginal fluid is generally 4.5 to 6.0, whereas amniotic fluid has a pH of 7.0 to 7.5. The yellow testing paper turns blue-green to deep blue in the presence of amniotic fluid. With vaginal secretions the Nitrazine paper remains yellow.3,5 False-positive results may occur with blood, semen, bacterial vaginosis, or alkaline urine. If rupture of membranes is documented in the ED, notify the patient’s obstetrician and plan for hospital admission or possible transfer.
Evaluation of Labor
When a woman is initially seen with contractions, the general condition of both the fetus and mother should be assessed quickly. Under the federal Emergency Medical Treatment and Labor Act (EMTALA), hospitals with an ED must conduct an appropriate screening examination to rule out true labor. In addition, under EMTALA, a woman in labor is considered unstable for interhospital transfer unless done so at the direction of the patient or a physician who certifies that the benefits outweigh the risks of transfer.3 A brief obstetric history, including the onset and frequency of contractions, the presence or absence of bleeding, possible loss of amniotic fluid, previous prenatal care, and due date, should be obtained. In the absence of active vaginal bleeding, a sterile vaginal examination should be performed in addition to maternal abdominal palpation to determine the stage of labor, as well as the position, presentation, and lie of the fetus. Monitor fetal well-being by evaluation of the fetal heart rate, particularly immediately after a uterine contraction. In an ED setting, fetal assessment is increasingly done via bedside ultrasonography, which can assess fetal movement and heart rate (Fig. 56-2). The traditional approaches of using external Doppler or auscultation are also acceptable. The normal baseline fetal heart rate is 110 to 160 beats per minute.

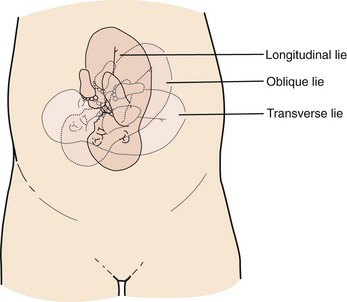
Lie refers to the relationship of the long axis of the fetus to the long axis of the uterus. It is either longitudinal, transverse, or oblique (Fig. 56-3). Oblique lies are unstable and will convert to a longitudinal or transverse lie during labor. Longitudinal lies occur in more than 99% of pregnancies at term.3 Transverse lies generally cannot be safely delivered vaginally.4
The presentation, or presenting part, refers to the portion of the body of the fetus nearest to or foremost in the birth canal. The presenting part can be felt through the cervix on sterile vaginal examination. In longitudinal lies, the presenting part is the fetal head, the buttocks (breech), or the feet (footling breech). With a transverse lie, the presenting part is the shoulder. The presentation can be cephalic, breech, shoulder, or compound. All presentations except cephalic are considered malpresentations.7
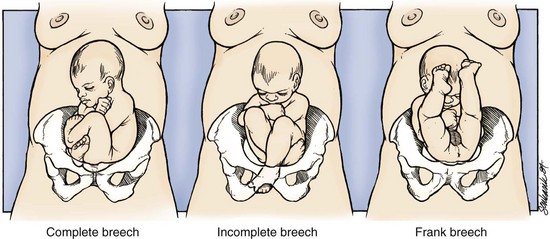
Breech presentations are classified as frank, complete, or incomplete (Fig. 56-4). A fetus presenting with the buttocks and hips flexed and the legs extended is termed a frank breech. Presentation of the buttocks with flexion of the fetal hips and knees results in a complete breech presentation. When one or both of the feet or knees are lowermost in the canal, an incomplete or footling breech results.
At or near term, 97% of fetuses will be vertex and 3% will be breech.3 The incidence of breech delivery is approximately 25% at 28 weeks, 17% at 30 weeks, and 11% at 32 weeks.3,8,9
Labor Movements: Vertex
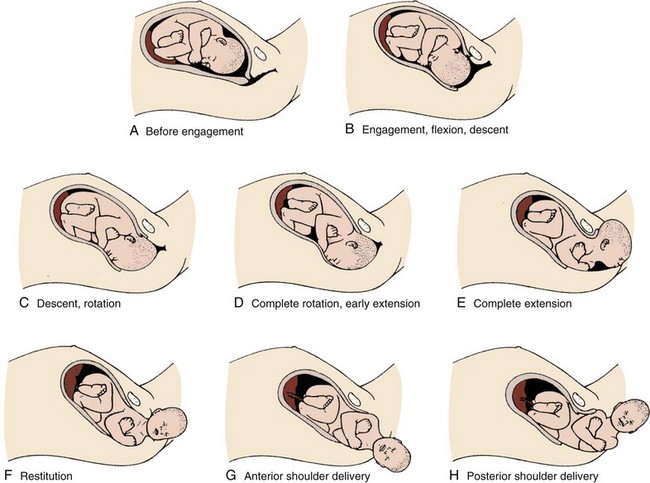
The mechanism of labor in vertex presentations consists of engagement of the presenting part, flexion, descent, internal rotation, extension, external rotation or restitution, and expulsion (Fig. 56-5).3 These are often referred to as cardinal movements. The mechanism of labor is determined by the pelvic dimensions and configuration, the size of the fetus, and the strength of the uterine contractions. Essentially, the fetus will follow the path of least resistance by adaptation of the smallest achievable diameter of the presenting part to the most favorable dimensions and contours of the birth canal.
The sequence of movements in vertex presentations is as follows:
1. Engagement refers to the mechanism by which the greatest transverse diameter of the head, the biparietal diameter in occiput presentations, passes through the pelvic inlet. A fetus is engaged when the presenting part is at 0 station. In a primiparous patient, it usually occurs in the last 2 weeks of pregnancy; in a multiparous patient, it can occur at the onset of labor.
2. Flexion of the head is necessary to minimize the presenting cross-sectional diameter of the head during passage through the smallest diameter of the bony pelvis. In most cases, flexion is necessary for both engagement and descent and occurs passively.
3. Descent is the downward passage of the fetal presenting part. It is gradually progressive but is not necessarily continuous. Descent is affected by uterine and abdominal contractions, as well as by straightening and extension of the fetal body.
4. Internal rotation occurs with descent and is necessary for the head or presenting part to traverse the ischial spines. This movement essentially turns the head such that the occiput gradually moves from its original, more transverse position anteriorly toward the symphysis pubis or, less commonly, posteriorly toward the hollow of the sacrum. This is known as occiput anterior or occiput posterior, respectively.
5. Extension occurs as the flexed head reaches the anteriorly directed vaginal introitus. The occiput reaches the inferior aspect of the pubic symphysis. The head is born by further extension as it rotates around the pubic symphysis and the occiput, bregma, forehead, nose, mouth, and finally, the chin pass successively over the anterior margin of the perineum. Immediately after its birth, the head drops downward such that the chin lies over the maternal anal region.
6. External rotation or restitution is return of the head to the correct anatomic position with respect to the fetal torso. It follows delivery of the head as it rotates to the transverse position that it occupied at engagement. This is also a passive movement.
7. Expulsion of the remainder of the fetal body then occurs. The shoulders descend in a path similar to that traced by the head (i.e., rotating anteroposteriorly for delivery). First, the anterior shoulder is delivered beneath the symphysis pubis followed by the posterior shoulder across the perineum.
Labor Movements: Breech
The mechanism of labor for breech presentations varies (see Fig. 56-4). The widest diameter that is engaged is the bitrochanteric diameter. Usually, the hips engage in one of the oblique diameters of the pelvic inlet. As descent occurs, the anterior hip generally descends more rapidly than the posterior hip. Internal rotation occurs as the bitrochanteric diameter assumes the anteroposterior (AP) position. Lateral flexion takes place as the anterior hip catches beneath the symphysis pubis, which allows the posterior hip to be born first. The infant’s body then rotates to allow engagement of the shoulders in an oblique orientation. Gradual descent occurs, with the anterior shoulder rotating to bring the shoulders into the AP diameter of the outlet. The anterior shoulder follows lateral flexion to appear beneath the symphysis, with the posterior shoulder being delivered first as the body is supported. The head tends to engage in the same diameter as the shoulders. Subsequent flexion, descent, and rotation of the head occur to bring the posterior portion of the neck under the symphysis pubis. The head is then born in flexion. Breech delivery is associated with a greater incidence of prematurity, prolapsed cord, and increased perinatal morbidity and mortality.3,10–12
The increased use of cesarean section has greatly decreased the morbidity and mortality associated with breech delivery. Although cesarean is the preferred method of delivery, vaginal delivery may be the method of choice in carefully selected cases.10,13,14 The emergency clinician should be cognizant of the imminent vaginal delivery of a breech infant in any presentation, frank, complete, or footling. However, a breech presentation is always problematic for any clinician, even under the best of circumstances. It is not expected that the EP will always be able to successfully deliver a breech presentation.
Types
To perform any vaginal breech delivery, the birth canal must be sufficiently large to allow passage of the fetus without trauma and the cervix must be completely effaced and dilated. If these conditions do not exist, cesarean section is indicated. To ensure full cervical dilation in a footling or complete breech, it is important that the feet, legs, and buttocks advance through the introitus to the level of the fetal umbilicus before the clinician intervenes and further delivery is attempted. The mere appearance of the feet through the vulva is not in itself an indication to proceed with delivery. This may be a footling presentation through a cervix that is not completely dilated. In this case there may be time to transfer the patient to the labor and delivery suite, preferably in the knee-chest position to minimize the risk for cord compression.15 Similarly, if the breech is frank, cervical dilation and outcome are improved if the infant is allowed to deliver to the level of the umbilicus. Before this, as with complete and footling presentations, there may be time to safely transfer the mother to the labor and delivery area. Tocolytics such as subcutaneous terbutaline may be used to inhibit labor until such patients can be safely transferred.15
Vaginal Examination
Cleanse the perineum with an antiseptic and use a sterile lubricant to decrease potential contamination. A sterile vaginal (not speculum) examination is performed to identify the fetal presentation and position and assess the progress of labor, except in cases of suspected bleeding. Take care to avoid the anal region and potential fecal contamination during the digital examination. Assess cervical effacement and dilation, as well as fetal station, presentation, and position.3 The finger should not be withdrawn from the vagina until the examination is complete. The number of vaginal examinations during labor correlates with infectious morbidity, especially in cases of early membrane rupture.3
Cervical effacement refers to the process of cervical thinning that occurs before and during the first stage of labor as the cervical canal shortens from a length of about 2 cm to a circular opening with almost no length remaining (Fig. 56-6). Effacement is expressed as a percentage from 0% (uneffaced and thick) to 100% (completely effaced). Assess the degree of cervical effacement by palpation and determine the palpated length of the cervical canal in comparison to that of an uneffaced, or normal, cervical canal.

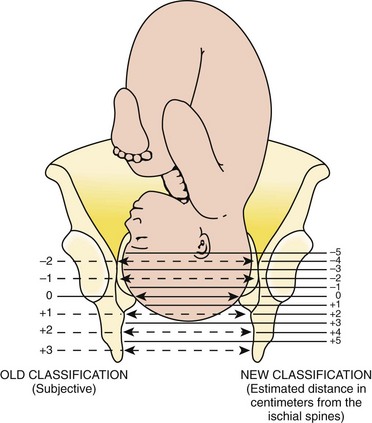
Station refers to the level of the presenting fetal part in the birth canal relative to the ischial spines, which lie halfway between the pelvic inlet and the pelvic outlet (Fig. 56-7). Zero station is used to denote that the presenting part is at the level of the ischial spines. When the presenting part lies above the spines, the distance, estimated in centimeters ranging from 1 to 5, is stated in negative figures (−5, −4, −3, −2, −1). Below the ischial spines, the presenting fetal part passes +1, +2, +3, +4, and +5 stations to delivery. This measurement is made by simple palpation.3 The ischial spines can be palpated at roughly the 8- and 4-o’clock positions on the vaginal examination.
Fetal Well-Being
The normal baseline fetal heart rate is 110 to 160 beats/min and varies considerably from a baseline measured for a minimum of 2 minutes in a 10-minute segment of time.16 Rates above or below this range may indicate fetal distress. Accelerations in the fetal heart rate lasting longer than 10 seconds and less than 2 minutes commonly occur during labor and are probably a physiologic response to fetal movement.3,16,17 Persistent fetal tachycardia occurs most frequently in response to maternal fever or amnionitis but may also indicate fetal compromise.3,16
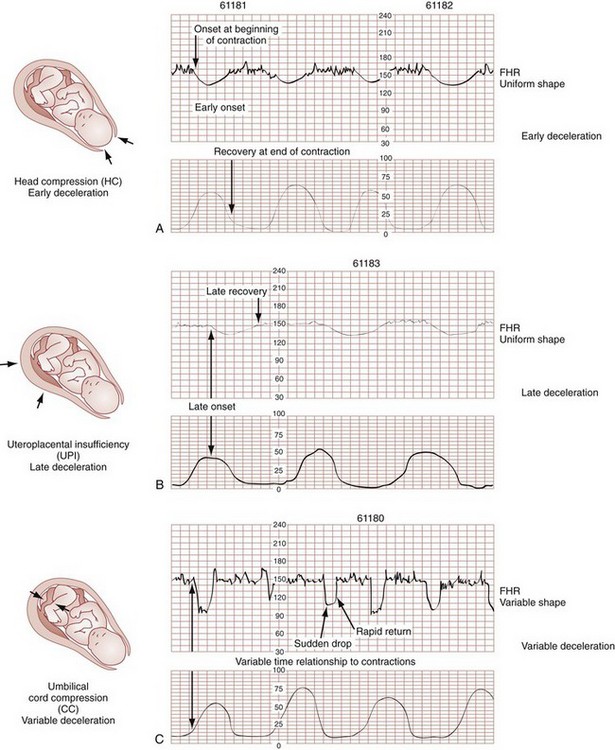
As with brief accelerations in the fetal heart rate, a gradual decrease in the fetal heart rate in association with a uterine contraction with an onset to nadir of 30 seconds or more (with the nadir coinciding with the peak of contraction) is termed an early deceleration. Decelerations are physiologic and probably the result of vagal nerve stimulation secondary to compression of the fetal head. Decelerations that occur independently of uterine contractions, are abrupt, or last between 15 seconds and 2 minutes are known as variable decelerations. Late decelerations are those that are delayed in timing with respect to a contraction, with the nadir of the deceleration occurring after the peak of the contraction. Variable decelerations are relatively common and can be further classified according to their severity. Variable decelerations may be temporarily corrected by maternal repositioning. Late decelerations can be an ominous sign and may represent cord compression and uteroplacental insufficiency.3,16,17 It may necessitate emergency delivery.
Changes in the fetal heart rate indicating fetal distress are usually evident immediately after a uterine contraction, and therefore the fetal heart rate is optimally assessed at this time. Formal monitoring of labor should be performed in an obstetrics unit. Fetal monitoring is not performed in the ED, but examples of various fetal heart rate patterns are included for completeness in Figure 56-8.3,16
Management of Fetal Distress
If fetal distress is suspected on the basis of the resting fetal heart rate or changes after contractions, change the maternal position, typically into the left lateral decubitus position, and reevaluate. Administer supplemental oxygen to the mother to optimize fetal oxygenation. In the absence of bleeding, perform a vaginal examination to rule out the possibility of umbilical cord prolapse.16,18 Cord prolapse usually occurs at the same time as rupture of the membranes and is diagnosed by palpation of the umbilical cord on vaginal examination or by visualization of the cord protruding through the introitus. Cord prolapse is frequently encountered with breech presentations, multiple pregnancies, and prematurity.19–21
Management of cord prolapse is directed at sustaining fetal life until delivery is accomplished. Unless immediate delivery is feasible or the fetus is known to be dead, prepare for an emergency cesarean section. If immediate obstetric services are not available, four temporizing measures can be undertaken. (1) Place the patient in the knee-chest or deep Trendelenburg position, and keep the patient in this position until delivery.18,21,22 (2) Minimize compression of the umbilical cord by inserting a sterile gloved hand and exerting manual pressure in the vagina to lift and maintain the presenting part away from the prolapsed cord. (3) After manual elevation of the presenting part, instill 500 to 700 mL of saline into the bladder to raise the presenting part and maintain cord decompression. Once the bladder is filled, remove the vaginal hand.22,23 (4) Tocolytic therapy can be administered to decrease uterine contractions and improve fetoplacental perfusion.22,23 Unfortunately and realistically speaking, outcomes of true obstetric emergencies managed solely in the ED are often bleak and essentially out of the hands of the EP.
Tocolytic Therapy
Tocolytic therapy is rarely instituted in the ED, and there is no standard mandating its use by the EP. However, under dire circumstances and preferably under obstetric guidance, this intervention may be initiated in the ED. Before instituting pharmacologic tocolytic therapy for either preterm labor or fetal distress, initiate basic maneuvers to improve maternal and fetal status. Because uterine hypoxia may induce uterine contractions, administer supplemental oxygen and infuse 500 mL of crystalloid intravenously. Place the mother in the left lateral decubitus position to improve uterine perfusion.3,18,24 Because uterine, cervical, or urinary tract infections account for 20% to 40% of cases of preterm labor, search for a specific cause and treat infections appropriately.18,25,26 If the contractions persist and cervical changes are documented despite these basic interventions, consider pharmacologic therapy.3,18,24 Although tocolytic agents are commonly used and have been shown to prolong pregnancy by 2 to 7 days, there are few data to suggest that tocolysis improves long-term perinatal or neonatal outcome.3,24,27,28 In addition, none of the commonly used tocolytic medications are approved for use by the U.S. Food and Drug Administration (FDA) as a tocolytic agent. The principal benefit of pharmacologic therapy may be only to prolong pregnancy to allow maternal transfer to a tertiary care facility or to delay delivery sufficiently to improve fetal maturation with corticosteroids.3,24–26,29 General contraindications to tocolytic therapy include severe preeclampsia, placental abruption, intrauterine infection, advanced cervical dilation, and evidence of fetal compromise or placental insufficiency.24
There are no clear “first-line” tocolytic agents to manage preterm labor (Table 56-1). Clinical circumstances and preferences should dictate treatment. Agents such as calcium channel blockers and the prostaglandin inhibitor indomethacin have shown varying efficacy in clinical trials.3,16,24,25,27 The most commonly used tocolytic agents in the United States are the calcium channel blocker nifedipine, magnesium sulfate, and the β2-receptor agonist terbutaline. Calcium channel blockers are the preferred tocolytics by the World Health Organization.30

β2-Receptor Agonists
The most commonly used β2-adrenergic tocolytic agent is terbutaline. The β-mimetic agents react with adrenergic receptors to reduce intracellular ionized calcium levels and prevent the activation of myometrial contractile proteins.3 Although terbutaline stimulates β2-receptors primarily, it has some β1-activity, which is responsible for its cardiovascular side effects. Another β-mimetic agent, ritodrine, was the only agent approved for tocolysis in the United States but has been withdrawn from the market.
Terbutaline is commonly used for the treatment of preterm labor.3,25,31 When given subcutaneously, administer terbutaline in a 0.25-mg dose and repeat it every 20 to 60 minutes until contractions cease or intolerable maternal side effects occur.18,24,32,33 In 2011 the FDA required the addition of a Boxed Warning and Contraindication (“black box warning”) against the use of injectable terbutaline for the prevention or prolonged treatment of preterm labor beyond 48 to 72 hours because of adverse effects, including maternal death.34 Use terbutaline with caution in patients with cardiovascular disease, hypertension, hyperthyroidism, diabetes, and seizures and in those taking other sympathomimetic amines.24,35 The general clinical side effects of arrhythmias, myocardial ischemia, and pulmonary edema are related to its inherent activity as a β-mimetic drug. Treatment of the majority of side effects is supportive; severe cardiovascular effects may be treated with β-blocking agents.32,35
Magnesium Sulfate
Magnesium sulfate (MgSO4) is not approved in the United States for use as a tocolytic agent. Nevertheless, some perinatal centers prefer MgSO4 over the β-mimetic agents because of its lower incidence of side effects.18,36,37 Even though the use of MgSO4 as a tocolytic has fallen out of favor, findings of fetal neuroprotective effects have resulted in its ongoing use.38–41 Although its mechanism of action is not fully understood, magnesium probably decreases myometrial contractility through its role as a calcium antagonist.3 Its fetoprotective effects probably result from noncompetitive antagonism of the N-methyl-d-aspartate receptor or through antiapoptosis and prevention of neuronal cell loss.42
MgSO4 is generally administered at a dose of 4 to 6 g intravenously over a period of 20 to 30 minutes, followed by a maintenance intravenous infusion beginning at 1 to 3 g/hr.24,43 Infusion of MgSO4 often produces sweating, warmth, and flushing. Rapid parenteral administration may cause transient nausea, vomiting, headache, or palpitations.24,25,37 The major side effect of magnesium therapy is impairment of the muscles of respiration with subsequent respiratory arrest, an effect not usually seen until the serum magnesium level exceeds 10 mEq/L. At levels of 12 mEq/L or greater, respiratory arrest may occur.35
The first sign of magnesium toxicity, a decrease in the patellar reflex, typically occurs as serum magnesium levels exceed 4 mEq/L, with loss of the reflex as levels increase further. The dosing and ongoing maintenance of magnesium therapy should be guided by the clinical status of the patient rather than by laboratory values. Monitor the patellar reflex throughout therapy. Because magnesium is almost totally excreted by the kidney, it is contraindicated in the presence of renal failure. Monitor urinary output and renal function throughout therapy. If respiratory depression develops, inject 10 mL of a 10% solution of calcium gluconate or calcium chloride over a 3-minute period as an antidote. For severe respiratory depression or arrest, prompt endotracheal intubation may be lifesaving.3
Calcium Channel Blockers
Calcium antagonists inhibit the influx of calcium ions through the muscle cell membrane and reduce uterine vascular resistance. The decrease in intracellular calcium also results in decreased myometrial activity. Although dosing regimens vary, nifedipine is frequently given as an initial loading dose of 30 mg orally and then 10 to 20 mg every 4 to 6 hours.24,32 When oral nicardipine (Cardene) was compared with MgSO4, less time was required to achieve tocolysis, 3.3 versus 5.3 hours, respectively. Preterm labor also recurred less frequently with nicardipine.44 The calcium channel blocker–induced decreased vascular resistance can lead to maternal hypotension and thus decreased uteroplacental perfusion.
Prostaglandin Inhibitors
Prostaglandins are smooth muscle stimulants. Prostaglandin synthetase inhibitors inhibit cyclooxygenase and thereby prevent the conversion of free arachidonic acid to prostaglandin. Because the prostaglandin E and F series are mediators of uterine contractions, a decrease in production results in decreased contractile activity.32 Indomethacin is administered as an initial oral or rectal dose of 50 to 100 mg followed by 25- to 50-mg doses every 6 hours for a total of 48 hours.24 Ketorolac can be used as an alternative with a 60-mg intramuscular loading dose, followed by 30 mg intramuscularly every 6 hours for 48 hours.24 Side effects include oligohydramnios and premature closure of the ductus arteriosus.
Steroids
In addition to tocolytics, patients in preterm labor and less than 34 weeks’ gestation are candidates for antenatal steroid administration. This may reduce the incidence of neonatal respiratory distress syndrome, intraventricular hemorrhage, and necrotizing enterocolitis.24 Appropriate patients should receive betamethasone, 12 mg intramuscularly every 24 hours for a total of two doses, or dexamethasone, 6 mg intramuscularly every 12 hours for a total of four doses.
Vaginal Bleeding during the Third Trimester
Bleeding during the third trimester should always be considered an emergency because shock may occur within minutes. Prepare for the most typical causes of bleeding in late gestation, placenta previa and placental abruption (Fig. 56-9). Placenta previa refers to implantation of the placenta in the lower uterine segment with varying degrees of encroachment on the cervical os. Placenta previa is classically characterized by vaginal bleeding with little or no abdominal or pelvic pain. Premature separation of the placenta, or abruptio placentae, refers to separation of the placenta from its site of implantation in the uterus before delivery of the fetus. Although the clinical signs and symptoms with placental abruption can vary considerably, abruptio placentae is typically associated with varying degrees of abdominal pain and uterine irritability or contractions.3
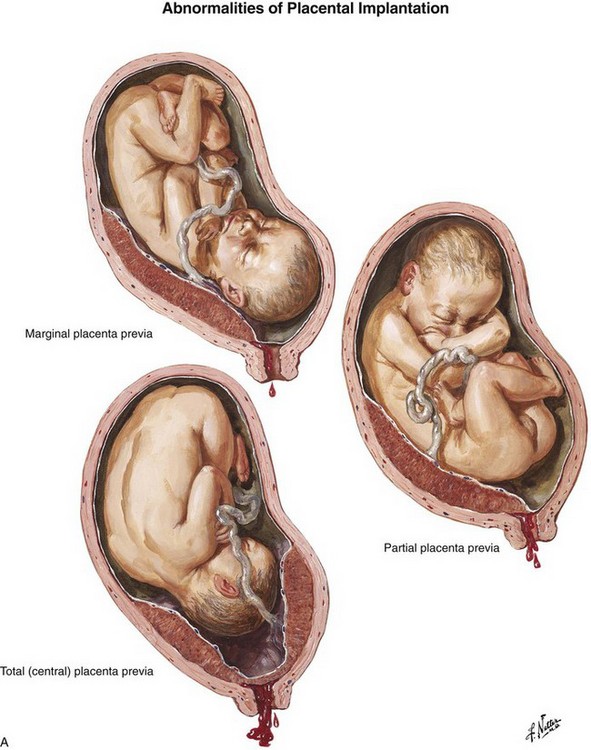
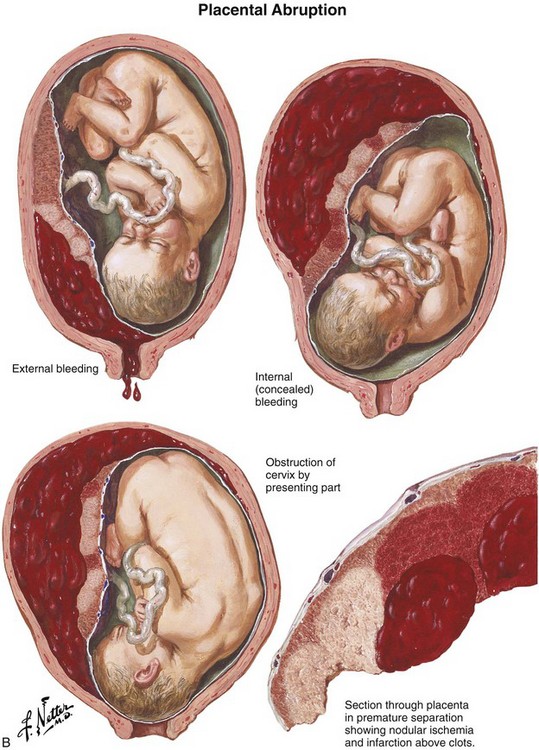
Figure 56-9 A, Placenta previa. B, Abruptio placentae. (Netter illustrations from www.netterimages.com. © Elsevier Inc. All rights reserved.)
Stabilization of a patient with third-trimester bleeding should be initiated with large-bore intravenous access. Blood should be drawn for a complete blood count with platelets and a type and crossmatch. If abruption is suspected, clotting studies, including a fibrinogen level and a toxicology screen for cocaine, may be indicated because of the association of abruption with disseminated intravascular coagulation and cocaine abuse, respectively. Until the diagnosis of placenta previa is excluded, digital vaginal examination is contraindicated because of the possibility of tearing or dislodging a placenta previa, which may result in profuse, potentially fatal hemorrhage.3 The simplest and most precise method of placental localization is by transabdominal ultrasound, which has an accuracy in locating placenta previa of about 96%. In contrast, ultrasonography has limited sensitivity in detecting abruptio placenta, with a reported negative predictive value of between 63% and 88%.3 Therefore, negative findings on ultrasound should not be used to exclude placental abruption. Immediately transfer the patient to the care of an obstetrician for further evaluation.
Procedure
Technique for Uncomplicated Delivery
Ideally, place the patient on a delivery table in the dorsal lithotomy position to increase the diameter of the pelvic outlet (Fig. 56-10, step 1). Alternatively, position the patient on a stretcher with her hips and knees partially flexed, her thighs abducted, and the soles of her feet placed firmly on the stretcher. Additional personnel may assist in keeping the patient in this position. If the foot of the bed cannot be removed, enhance the delivery position by placing the underside of a bedpan under the patient’s buttocks to provide additional space between the bed and the perineum.
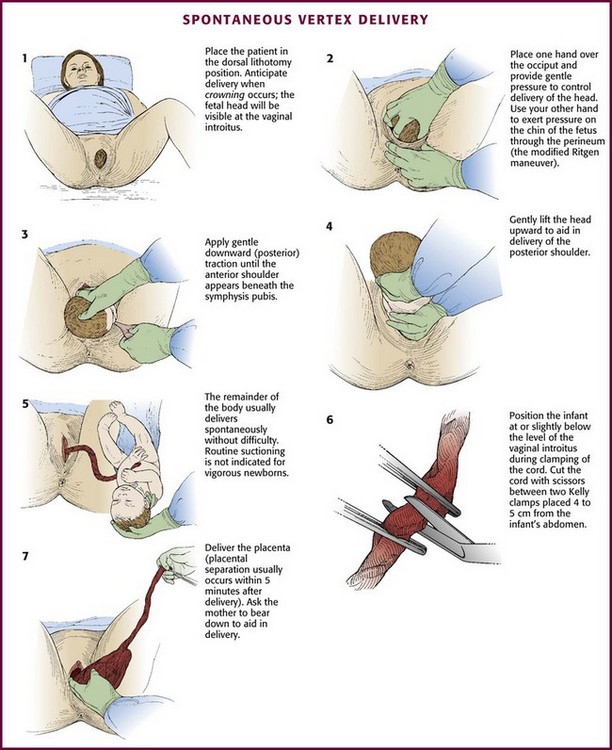
Spontaneous Vertex Delivery
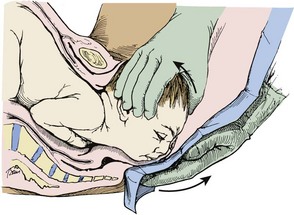
Delivery of the Head
Gentle, gradual, controlled delivery is desirable. Avoid explosive delivery of the head. Once the fetal head distends the vaginal introitus to 5 cm or more during a contraction, place the palm of one hand over the occipital area and provide gentle pressure to control delivery of the head (see Fig. 56-10, step 2). With the other hand, preferably draped with a sterile towel to prevent contamination from the anus, exert upward pressure on the chin of the fetus through the perineum just in front of the coccyx in a modified Ritgen maneuver (Fig. 56-11). This maneuver extends the neck at the proper time such that the smallest diameter of the head passes through the introitus and over the perineum to protect the maternal perineal musculature. It is not uncommon for the vagina and perineum to tear with expulsive maternal effort during delivery of the head. If maternal expulsive efforts are insufficient to allow delivery of the head, an episiotomy should be considered at this time.3
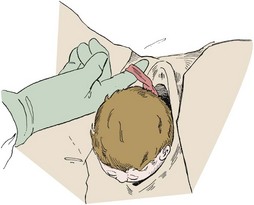
Gently support the head during subsequent delivery of the forehead, face, chin, and neck. With delivery of the neck, pass a finger around the infant’s neck to determine whether it is encircled by one or more coils of the umbilical cord. If a loop of cord is felt, loosen it carefully and gently slip it over the infant’s head (Fig. 56-12). If this cannot be done easily, clamp the cord doubly, cut the cord between the clamps and promptly deliver the infant.
Delivery of the Shoulders
Just before external rotation the head usually falls posteriorly, almost bringing it into contact with the mother’s anus. If maternal defecation occurs, avoid fecal contamination of the fetus. As rotation takes place, the head assumes a transverse position and the transverse diameter of the thorax rotates into the AP diameter of the pelvis. In most cases the shoulders are born spontaneously. Aid delivery by grasping the sides of the head and exerting gentle downward (posterior) traction until the anterior shoulder appears beneath the symphysis pubis (see Fig. 56-10, step 3). Gently lift the head upward to aid in delivery of the posterior shoulder (see Fig. 56-10, step 4). The remainder of the body usually follows without difficulty.
If delivery of the body is delayed after the shoulders have been freed, assist by providing moderate traction on the exposed fetal body. To avoid injury to the brachial plexus, do not hook the fingers in the axilla during delivery. Always exert traction in the direction of the long axis of the infant. If traction is applied obliquely, bending of the neck and excessive stretching of the brachial plexus may occur.3,15
Clearing the Airway
Once the head has been delivered, quickly wipe the infant’s face and mouth. Routine suctioning is not indicated for vigorous newborns. Current recommendations also no longer advise routine oropharyngeal and nasopharyngeal suctioning of infants with meconium staining by amniotic fluid. Studies have shown that this practice offers no benefit if the infant is vigorous. A vigorous infant is one who has strong respiratory effort, good muscle tone, and a heart rate greater than 100 beats/min.45 Perform endotracheal suctioning immediately after birth for infants with meconium staining who are not vigorous.45 The benefit of the routine use of 100% oxygen, rather than room air, for infant resuscitation has also recently been questioned by the American Heart Association, but this area of research is ongoing and not yet fully elucidated. For a more complete discussion of the possible harm of excessive supplemental oxygen for infant resuscitation, see Chapter 3.
Clamping the Cord
The infant should be positioned at or slightly below the level of the vaginal introitus during clamping of the cord.15 Cut the umbilical cord with scissors between two Kelly clamps placed 4 to 5 cm from the infant’s abdomen (see Fig. 56-10, step 6). Delayed clamping of the umbilical cord for at least 2 minutes after birth consistently improves the short- and long-term hematologic and iron status of full-term infants.46 Later, apply an umbilical cord clamp 2 to 3 cm from the infant’s abdomen. Collect blood samples from the placental end of the cord for infant serology, including Rh determination.15
If the answer to these questions is “yes,” the baby will probably not need resuscitation.45
Delivery of the Placenta
1. The uterus becomes globular and firmer as it contracts.
2. There is a sudden gush of blood as the placenta separates from the uterine wall.
3. The umbilical cord lengthens and protrudes further out of the vagina.
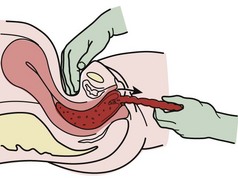
Ask the mother to bear down; the increased intraabdominal pressure produced by this maneuver may be enough to effect complete expulsion of the placenta (see Fig. 56-10, step 7). If maternal force alone is insufficient, aid in delivery of the placenta. After ensuring that the uterus is firmly contracted and placental separation has occurred, use one hand to exert gentle pressure through the abdominal wall to lift the uterine fundus cephalad while keeping the umbilical cord slightly taut with the other hand (Fig. 56-13). Repeat this maneuver until the placenta reaches the introitus. At this time, stop uterine pressure and gently lift the placenta upward and out of the vagina. Never force expulsion of the placenta before placental separation has occurred, and never use forceful traction to pull the placenta out of the uterus. Such maneuvers may result in separation of the cord from the placenta or uterine inversion with potentially catastrophic hemodynamic consequences. The placenta should be examined for completeness and saved for later evaluation by the obstetrician.3,15,18
Oxytocin (Pitocin, Syntocinon) is the most commonly used oxytocic drug and is usually given by continuous intravenous infusion. Add 20 units of oxytocin to 1 L of normal saline and administer the solution at a rate of 10 mL/min for several minutes until the uterus remains firmly contracted and bleeding is controlled. At this point, reduce the infusion rate to 1 to 2 mL/min.3,15,18 Alternatively, ergot derivatives such as methylergonovine maleate (Methergine), 0.2 mg, or ergonovine maleate (Ergotrate), 0.2 mg, may be given intramuscularly.3,18 Because of their vasoconstrictive properties, ergot preparations are relatively contraindicated in patients with hypertension, including pregnancy-associated hypertension or preeclampsia.3 The synthetic prostaglandin misoprostol (Cytotec) can also be given as an 800- to 1000-µg rectal dose. In the United States, oxytocic agents are not generally administered before delivery of the placenta because of concerns that the resultant uterine contraction may entrap the placenta or trap an undiagnosed twin within the uterus.3,15 Even when oxytocics are administered, the hour after delivery of the placenta is the time during which postpartum hemorrhage secondary to uterine atony is most likely to occur. For this reason, palpate the uterus frequently to ensure that it is well contracted. A normally contracted uterus will feel firm with its upper margin just below the maternal umbilicus. If the uterus is flaccid or bleeding, gently massage the uterus through the abdominal wall. Occasionally, the placenta may fail to separate completely and result in a retained placenta or placental fragments with persistent uterine bleeding. Support the patient with intravenous fluids and blood transfusions as indicated until definitive therapy is available. Constant firm uterine massage can lessen hemorrhage and may be lifesaving.
Complications
Shoulder Dystocia
Shoulder dystocia refers to impaction of the fetal shoulders in the pelvic outlet after delivery of the head and occurs in 0.6% to 1.4% of deliveries (Fig. 56-14).47 Shoulder dystocia is associated with several risk factors, including fetal macrosomia, maternal diabetes, obesity, multiparity, and postterm pregnancy.
Impaction of the fetal shoulders and thorax in the maternal pelvis prohibits adequate respiration, and compression of the umbilical cord frequently compromises the fetal circulation. For these reasons, shoulder dystocia is a serious and potentially fatal complication of delivery.15,48 Fetal complications include brachial plexus injury, clavicular and humeral fractures, and rarely, death.44–49
Management: The techniques used to treat shoulder dystocia frequently require an assistant, and delivery can result in fetal injury or hypoxia, as well as increased rates of postpartum hemorrhage.51 Call for emergency assistance from a pediatrician, an obstetrician, and an anesthesiologist. An episiotomy may be performed to reduce the incidence of major perineal lacerations and provide additional space for manipulation. A fetal fracture or nerve injury is not unusual with shoulder dystocia during any delivery technique.
Although a variety of techniques have been described to free the anterior shoulder from its impacted position beneath the symphysis pubis, the initial technique of choice is the McRoberts maneuver because of its ease and potential for success (Fig. 56-15A). In one study, approximately 40% of shoulder dystocias were relieved with the McRoberts maneuver alone.50 To perform the McRoberts maneuver, place the mother in the extreme lithotomy position with her hips completely flexed so that her knees rest alongside her chest. This causes a flattening of the lumbar lordosis, rotates the maternal pelvis cephalad, and frequently frees the impacted anterior fetal shoulder.3,47–51 If the McRoberts maneuver fails to effect delivery, ask an assistant to apply moderate suprapubic, not fundal, pressure to the maternal abdomen while providing gentle downward traction on the fetal head (see Fig. 56-16B).47–49
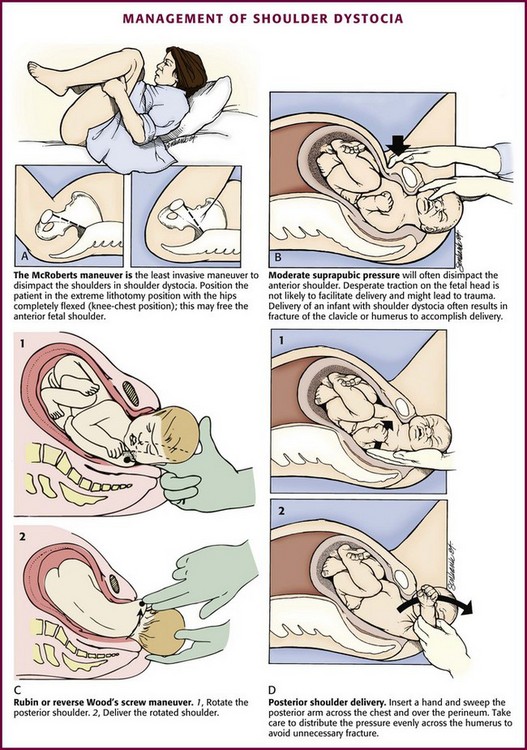
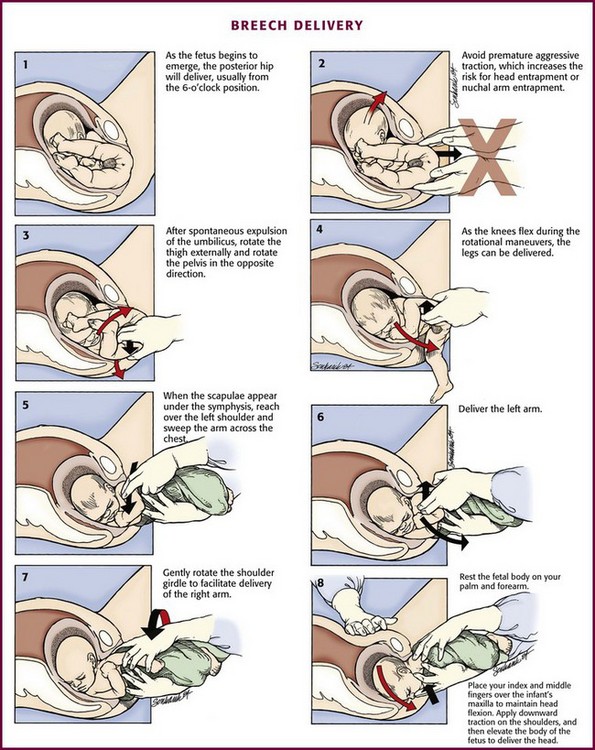
Figure 56-16 Breech delivery.
If these initial maneuvers fail to effect delivery, several other techniques exist, the choice of which will depend on clinician preference and experience. In the first maneuver, place two fingers in the vagina and exert pressure on the fetal scapula to rotate the posterior shoulder 180 degrees in a clockwise or counterclockwise fashion, depending on the orientation of the torso (“reverse Wood’s screw”), to free the entrapped anterior shoulder (see Fig. 56-15C). Other maneuvers include the Rubin maneuver, in which rotation is achieved by applying pressure on the posterior aspect of the anterior shoulder, or the Wood’s screw maneuver, in which pressure is placed on the anterior aspect of the posterior shoulder. This may cause release of the impacted anterior shoulder and result in progression of delivery.48,52 Alternatively, attempt to deliver the posterior arm (see Fig. 56-15D). In this maneuver, insert the hand along the hollow of the maternal sacrum to the level of the fetus’ posterior elbow. Exert pressure at the antecubital fossa, flex the posterior forearm of the fetus, and grasp the hand or forearm. Next, carefully sweep the posterior arm of the fetus across its chest to effect delivery of the posterior arm and shoulder. Rotate the shoulder girdle into one of the oblique diameters of the pelvis and subsequently deliver the anterior shoulder.3,49 If all these strategies fail, it may be necessary to perform a controlled destructive procedure, such as fracture of the fetal clavicle, or the cephalic replacement maneuver (Zavanelli) with subsequent cesarean delivery.3,15 The Zavanelli maneuver should be a last resort.
Breech Delivery
Technique: If a breech delivery becomes necessary in the ED, an episiotomy may need to be performed, especially with a term gestation, unless there is considerable perineal relaxation. As the breech progressively distends the perineum, the posterior hip will be delivered, usually from the 6-o’clock position (Fig. 56-16, step 1). The anterior hip will then be delivered, followed by external rotation to the sacrum-anterior position. Ideally, two attendants should be available for a breech delivery.
Delivery of the Presenting Part and Body.: Continued descent of the fetus will allow delivery of the legs, which may be aided by splinting the medial part of the thighs of the fetus with the fingers positioned parallel to the femur and exerting pressure laterally to sweep the legs away from the midline (see Fig. 56-16, steps 2 to 4). After delivery of the legs, grasp the fetal bony pelvis with both hands with the fingers resting on the anterior superior iliac crests and the thumbs on the sacrum. Because the fetal body is slippery and difficult to hold, wrap it in a towel to assist delivery. Use the maternal expulsive efforts in conjunction with gentle downward traction. Rotate the fetal pelvis to bring the fetal sacrum into the transverse position to effect delivery of the scapulae. Two methods of shoulder delivery are commonly used (see Fig. 56-16, steps 5 to 7). In the first, with the scapulae visible, rotate the trunk so that the anterior arm and shoulder appear at the vulva and can easily be released and delivered. Next, rotate the body of the fetus in the reverse direction to deliver the other shoulder and arm beneath the symphysis pubis. In the second method, if trunk rotation is unsuccessful, deliver the posterior shoulder. Grasp the feet in one hand and draw them upward over the mother’s groin. Exert leverage on the posterior shoulder, which will slide out over the perineal margin, usually followed by the arm and hand. Deliver the anterior shoulder, arm, and hand beneath the symphysis pubis by downward traction on the fetal body.
Delivery of the Head.: After the shoulders appear, the head usually occupies one of the oblique diameters of the pelvis, with the chin directed posteriorly. Extract the head by using the Mauriceau maneuver as follows. With the fetal body resting on the clinician’s palm and forearm, place the index and middle fingers of one hand over the infant’s maxilla, not the mandible, to maintain flexion of the fetal head (see Fig. 56-16, step 8). Hook two fingers of the other hand over the fetal neck and, while grasping the shoulders, apply downward traction until the suboccipital region appears under the symphysis pubis. Elevate the body of the fetus toward the mother’s abdomen, and the fetal mouth, nose, brow, and eventually the occiput will emerge over the perineum. Avoid excessive elevation of the fetal torso to prevent hyperextension of the neck. If available, have an assistant apply suprapubic pressure to help in delivery of the head. If delivery of the head is not affected by the Mauriceau maneuver, forceps delivery may be necessary but is beyond the scope of this text and most ED practitioners. Once the breech baby is delivered, further management proceeds as for a normal vertex delivery.
Episiotomy
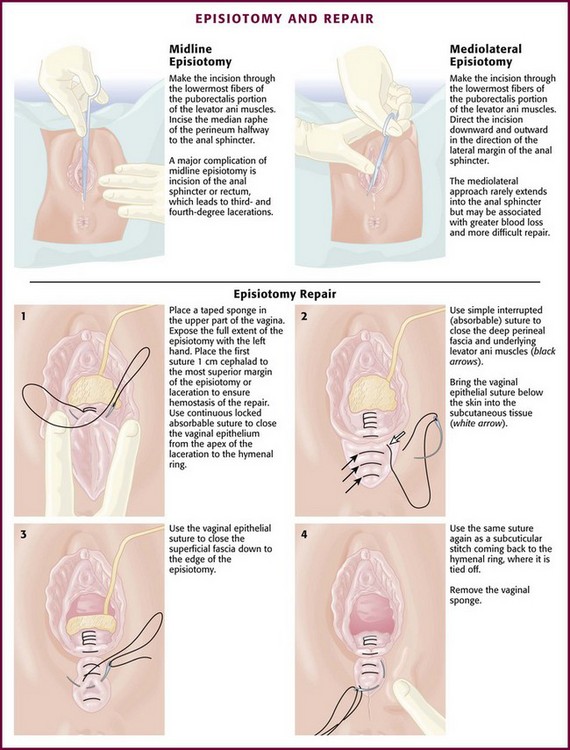
Routine use of episiotomy is no longer recommended, but it is still performed with some frequency.53 Selected indications include breech delivery, shoulder dystocia, occiput-posterior presentations, and imminent perineal tear (Box 56-1). It may also be necessary to expedite delivery in situations of fetal distress. Two types of episiotomy are used: median (midline) and mediolateral (Fig. 56-17). The median approach is the easiest type to perform and repair, results in the least amount of blood loss, heals more rapidly with minimal discomfort, and is generally more common in the United States. A major complication of median episiotomy is potential inadvertent extension of the incision into the anal sphincter or rectum, which results in third- and fourth-degree lacerations, respectively.3,15,54,55 A mediolateral episiotomy seldom results in extension into the anal sphincter, but blood loss is greater, repair is more difficult, and healing may be more painful.3,15
Technique
With vertex presentations, perform the episiotomy during the second stage of labor, when the fetal head begins to distend the perineum and becomes visible to a diameter of 3 to 4 cm during a contraction.3 Anesthesia for episiotomy in the ED is usually limited to local infiltration of the perineum with 1% or 2% lidocaine.
The incision is made with Mayo scissors through the skin and subcutaneous tissue, the vaginal mucosa, the urogenital septum, and the superior fascia of the pelvic diaphragm (see Fig. 56-17). Make the incision up to one half the length of the perineum, and extend it 2 to 3 cm upward into the vaginal mucosa. If the incision is in the midline, extend the incision through the lowermost fibers of the puborectalis portion of the levator ani muscles. As the head crowns, place the index and middle fingers inside the vaginal introitus to expose the mucosa, posterior fourchette, and perineal body. Use tissue scissors to incise the median raphe of the perineum halfway to the anal sphincter. For a mediolateral episiotomy, direct the incision downward and outward in the direction of the lateral margin of the anal sphincter either to the right or to the left.
The episiotomy should be repaired after delivery of the infant and placenta. Repairs are usually performed by the obstetric consultant in the delivery suite but can be done by an EP experienced in the procedure (Fig. 56-17). The goals of episiotomy repair are to restore both anatomy and hemostasis with a minimal amount of suture material. Perform the closure after delivery of the placenta and following inspection and repair of the cervix and upper vaginal canal if indicated. The principles of repair are the same regardless of the type of episiotomy.
Because there is minimal tension on the closed wound, use 2-0 or 3-0 absorbable suture, such as chromic catgut or polyglycolic acid, on a large atraumatic needle. The first step is to close the vaginal mucosa with a continuous suture from just above the apex of the incision to the mucocutaneous junction to reapproximate the margins of the hymenal ring (see Fig. 56-17, step 1). Ligate large actively bleeding vessels during closure with separate absorbable sutures. Next, reapproximate the perineal musculature with three or four interrupted sutures (see Fig. 56-17, step 2). Close the superficial layers by one of two methods. In the first method, use a continuous suture to close the superficial mucosa from the mucocutaneous junction outward and then continue it upward as a subcuticular skin closure, with the suture returning to and ending at the mucocutaneous junction (see Fig. 56-17, steps 3 and 4). Alternatively, place several interrupted sutures through the skin and subcutaneous fascia and tie them loosely. This last method of skin closure avoids burying two layers of suture in the more superficial layers of the perineum.3,15
Immediate Postpartum Hemorrhage
The average blood loss with a vaginal delivery is estimated to be approximately 500 mL.56 There is no exact definition of postpartum hemorrhage, but a general guide is maternal blood loss greater than 500 mL or bleeding that exceeds a clinician’s estimate of “normal.”4 Postpartum hemorrhage is divided into early hemorrhage, which occurs within 24 hours of delivery, and late hemorrhage, which occurs more than 24 hours and up to 6 weeks after delivery.
Postpartum hemorrhage is not necessarily sudden and massive. It is frequently characterized by persistent moderate bleeding until serious hypovolemia develops. Observe carefully for blood loss, including evaluation of uterine size and consistency, during the early postpartum period. The most common cause of early postpartum hemorrhage is uterine atony, which is involved in up to 80% of cases.57 Less common causes include lacerations of the lower genital tract, retained placenta or placental fragments, coagulation disorders, uterine rupture, uterine inversion, and placental site bleeding.4
Management
Uterine atony is initially managed with firm manual massage of the uterine fundus through the abdominal wall in conjunction with the administration of oxytocic agents (Table 56-2). If bleeding persists, bimanual uterine compression is indicated. Use one hand to compress and massage the uterus through the abdominal wall while using the fist of the other hand to gently massage the anterior aspect of the uterus through the vagina (Fig. 56-18). Avoid vigorous downward massage, which can result in acute uterine inversion or can injure the blood vessels in the broad ligament.
TABLE 56-2
Drugs for the Management of Immediate Postpartum Hemorrhage
| DRUG | DOSE | COMMENTS |
| Oxytocin* | 20-40 units in 1 L of crystalloid initially infused at 200-500 mL/hr and then titrate to sustain uterine contractions and control hemorrhage | Do not administer as an IV bolus. First-line therapy. If IV access is unavailable, may use 10 units IM |
| Methylergonovine maleate or ergonovine maleate | 0.2 mg IM | Avoid in patients with hypertensive disease, including preeclampsia |
| Carboprost tromethamine | 0.25 mg IM Repeat q15min until uterine hemorrhage is controlled or a maximum dose of 2 mg |
Concurrent use of antiemetics and antidiarrheals recommended to control side effects |
| Misoprostol (Cytotec) | 800-1000 µg PR | Single dose; can give PO. May cause tachycardia |
IM, intramuscularly; IV, intravenous; PO, orally.
*Note the increased concentration of oxytocin when used for the treatment of postpartum hemorrhage versus that given to stimulate uterine contractions after uncomplicated delivery.
Oxytocics: Oxytocin (Pitocin) is the usual first-line drug for postpartum hemorrhage secondary to uterine atony. Administer oxytocin as an intravenous infusion. A typical initial dose is 20 to 40 units in 1 L of crystalloid infused at a rate of 200 to 500 mL/hr, although higher doses of up to 80 units have been used. Titrate to sustain uterine contractions and control uterine hemorrhage. Slowing of hemorrhage should be observed within minutes of administration. If an intravenous line is not available, administer 10 units of intramuscular or intrauterine oxytocin.35 Because severe hypotension may occur if oxytocin is administered as an intravenous bolus, this should generally be avoided.58
If bleeding and poor uterine tone persist despite oxytocin therapy, consider additional therapy. Second-line therapy includes ergot derivatives such as methylergonovine or a prostaglandin. Give methylergonovine (Methergine) as a 0.2-mg dose intramuscularly every 2 to 4 hours, with uterine contractions occurring within 2 to 5 minutes of administration and lasting regularly for several hours.59 Though not the route of choice, methylergonovine can also be given via the oral route. Because of their tendency to cause severe hypertension, avoid administering ergot preparations to women with hypertensive disease, including preclampsia.59,60 Alternatively, give 15-methylprostaglandin F2α (carboprost tromethamine [Hemabate]) to stimulate uterine contractions.59–61 Administer carboprost at a dose of 0.25 mg intramuscularly repeated at 15 to 90-minute intervals as determined by the clinical course, but not to exceed 2 mg.59,62 Misoprostol (Cytotec), a synthetic prostaglandin E1 analogue, can also be given as an 800- to 1000-µg rectal dose.
If bleeding continues despite these measures, consider uterine tamponade with sterile gauze packing or insertion of a Foley catheter into the atonic uterine cavity until surgical intervention or arterial embolization can be performed.59
If vaginal bleeding persists despite a firmly contracted uterus, search for additional causes of bleeding. The lower genital tract should be inspected for lacerations. Control bleeding by direct pressure or by the gentle application of ring forceps to bleeding cervical lacerations. Use absorbable suture to control bleeding from accessible lacerations. Adequate visualization of the upper part of the vagina and cervix can be difficult, and repair of lacerations may require general anesthesia and obstetric intervention regardless of the location. Genital tract hematomas may also be a significant cause of hemorrhage but are not generally recognized until several hours after delivery.47 Also consider retained placental fragments and coagulopathy.
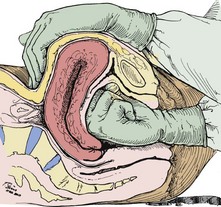
Rarely, postpartum hemorrhage is due to uterine inversion, with an estimated incidence of one in several thousand deliveries.63 Uterine inversion should be especially considered when there is severe pelvic pain, absence of a palpable fundus, brisk excessive postpartum hemorrhage, and maternal hemodynamic instability. Shock develops in up to 40% of patients.60,64–66 The diagnosis is made by visualization or palpation of the uterine fundus in the vaginal vault or protruding through the introitus. On abdominal examination, no mass representing the uterus may be palpated, or when palpated, the uterus may have a cuplike dimpling of the fundus.60,62,65,66 Treat with crystalloid intravenous fluids to maintain cardiovascular stability. Reposition the uterus immediately (Fig. 56-19). Conscious sedation and general anesthesia may be necessary. Use tocolytic agents such as terbutaline or magnesium sulfate for uterine relaxation and repositioning.3,59,60,66
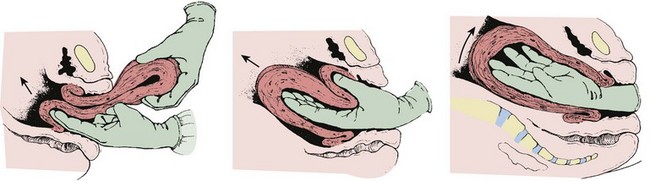
To reposition the uterus, insert one hand into the vagina with the tips of the fingers at the uterocervical junction and hold the uterine fundus firmly in the palm of the hand. Gently apply pressure to the uterine fundus in the direction of the umbilicus. Do not initially exert pressure centrally on the fundus because this will cause the uterus to become compressed and force more “layers” of the uterus to lie within the relatively tight cervical ring.64–66 General anesthesia and laparotomy may be necessary for uterine positioning.
PCS
Perimortem cesarean section (PCS) is a dramatic surgical procedure with the potential to save the fetus from an otherwise certain demise.67 Its origin can be traced to antiquity when King Numa Pompilius of Rome decreed that the child be excised from the womb of any woman who died late in pregnancy. When enforced by the emperors of Rome, it became known as Lex Caesare, hence the name cesarean section.68
Fortunately, the need to perform this procedure is rare because maternal cardiac arrest is reported to occur in only 1 in 30,000 pregnancies.69 From 1879 until 1985 there were 188 reports of PCS resulting in delivery of a live infant.70 An updated review through 2004 found only an additional 38 cases with an overall survival rate of 89%.71 Before this review, reported infant survival rates ranged from 11% to 70%.68,70,72 Because of the small numbers of cases in the literature and probably underreporting of those with unfavorable outcomes, definitive conclusions about the incidence and success of this procedure cannot be made. However, given that the anecdotal potential for survival of a normal infant exists, PCS may be considered in any woman who suffers a cardiac arrest after 24 weeks’ gestation and is unresponsive to brief resuscitation.70,73
PCS is a complicated and emotional procedure, with limited success. Similar to ED thoracotomy, it is a heroic procedure whose use is not mandated but can be supported. In most circumstances PCS will not be aggressively pursued by the EP. Given the time-sensitive nature of any favorable outcome for the fetus, the decision to proceed with PCS may rest solely on the EP. There is currently no standard of care regarding PCS in the ED that would mandate action or inaction by the EP. Regarding medicolegal concerns, there have been no reported judgments against a physician for performing PCS.74
Indications
Although the lower limit of fetal viability varies among institutions, performance of PCS before approximately 24 weeks is not generally indicated.18 If the duration of gestation is not known from the history, estimate fetal maturity quickly by calculating gestational age on the basis of the date of the patient’s last normal menstrual period or by measuring the height of the uterine fundus. Between 18 and 30 weeks’ gestation, the age of the fetus in weeks will correspond to the distance in centimeters from the uterine fundus to the symphysis pubis (e.g., at 28 weeks’ gestation the fundus lies approximately 28 cm above the symphysis pubis or halfway between the umbilicus and the costal margin).75 Establish criteria for intervention prospectively at each institution in accordance with the institution’s neonatal care policies.18,75
Survival of the infant is directly related to the time elapsed from maternal cardiac arrest to delivery, prompt performance of cardiopulmonary resuscitation (CPR) on the mother, the maturity of the fetus, pre-arrest health status of the mother, and in certain circumstances, the availability of neonatal intensive care facilities.68,70,73 In accordance with advanced cardiac life support guidelines, initiate CPR immediately on recognition of maternal arrest and continue it until the infant has been delivered. The anatomic and physiologic changes of pregnancy will inhibit the effectiveness of CPR on the mother. Aortocaval occlusion by the gravid uterus may occur after 20 weeks’ gestation. It can reduce venous return and compromise maternal cardiac output, especially in the supine position. For this reason, it is advisable to perform CPR in the left lateral, head-down position or to have an assistant manually displace the uterus away from the inferior vena cava.71 In addition, the decreased functional residual capacity of the lungs may impede ventilation efforts. Under these conditions, CPR generates only 30% to 40% of normal cardiac output, which severely compromises placental perfusion. The potential for infant survival decreases and the chance of neurologic damage increases as the time from maternal cardiac arrest to PCS rises (Table 56-3). When PCS is performed within 5 minutes, neonatal outcome is best, but not guaranteed; from 5 to 10 minutes, good; from 10 to 15 minutes, fair; and from 15 to 20 minutes, poor. Make every attempt to begin PCS within 4 minutes of cardiopulmonary arrest and complete the procedure within 5 minutes of arrest.18,70,73,75 Fetal prognosis is generally better in the later stages of pregnancy and after the sudden death of a previously healthy mother rather than death secondary to chronic illness.68,70,75
TABLE 56-3
Outcome of Infants Who Survived PCS as a Function of Time from Maternal Death to Delivery

PCS, postmortem cesarean section.
From Katz VL, Dotters DJ, Droegemueller W. Perimortem cesarean delivery. Obstet Gynecol. 1986;68:571.
In addition to fetal benefits, PCS may improve maternal outcome. Emptying the uterus by PCS removes the aortocaval compression, thereby resulting in a 30% increase in cardiac output, which increases the likelihood of maternal survival.76,77 CPR should continue during and after the procedure. PCS in itself may represent the most important variable for successful maternal resuscitation.68,70,78
Technique
Extract the infant rapidly while avoiding fetal and maternal injury (Fig. 56-20). Hence, do not waste time preparing a sterile operating field or transporting the patient to an operating suite outside the ED. Use a large (e.g., No. 10) blade and make a midline vertical incision through the abdominal wall that extends from the symphysis pubis to the umbilicus. Carry the incision through all abdominal layers and into the peritoneal cavity. In most gravid women the hyperpigmented “linea nigra” is apparent, and when present, use this as a guide for the incision. If available, place retractors in the abdominal wound and draw them laterally to expose the anterior surface of the uterus. Reflect the bladder inferiorly. If full, aspirate the bladder to evacuate it and permit better access to the uterus. While avoiding injury to fetal parts, make a small (≈5-cm) vertical incision through the uterus until amniotic fluid is obtained or the uterine cavity is clearly entered. Insert the index and long fingers into the incision and use them to lift the uterine wall away from the fetus. Use bandage scissors to extend the incision vertically to the fundus until a wide exposure is obtained. Gently deliver the infant, suction the mouth and nose, and clamp and cut the cord. Because the incision is relatively high in the uterus, the infant’s head may not be readily accessible to the clinician. In this case, grasp the infant’s feet and deliver the infant through maneuvers similar to those used for a breech delivery.
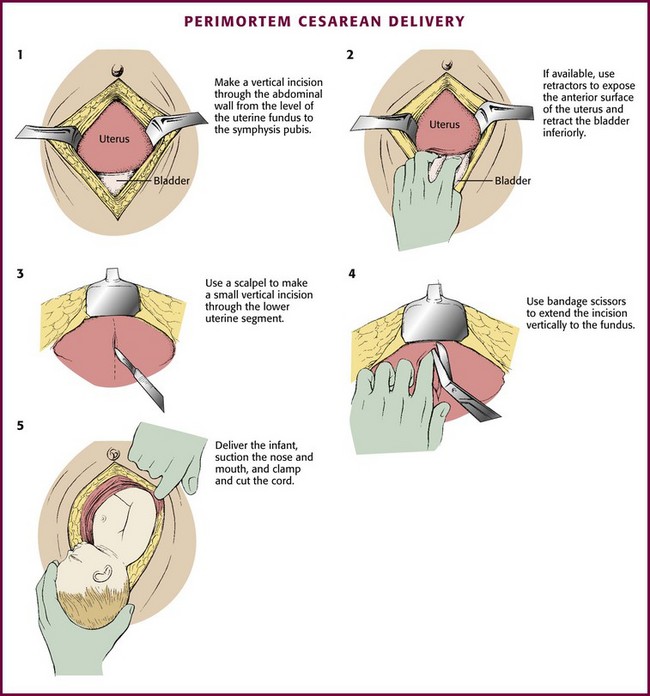
Figure 56-20 Perimortem cesarean delivery.
The Newborn
Approximately 10% of newborns require some degree of assistance to begin breathing at birth (e.g., some sort of stimulation to breathe), but less than 1% require extensive resuscitation.45 Evaluation of the newborn begins before delivery with assessment of maternal well-being and identification of risk factors for fetal distress: multiple pregnancy of less than 35 weeks, maternal infection or hypertension, oligohydramnios, preterm delivery at less than 36 weeks, breech presentation, meconium-stained amniotic fluid, nonreassuring fetal heart rate, emergency caesarean section, shoulder dystocia, and opiate use in normal labor.79
Newborn resuscitation can be divided into four categories of action: (1) initial assessment and stabilization; (2) ventilation, including bag-valve-mask or bag-tube ventilation; (3) chest compressions; and (4) administration of medications or fluids. Although most newborns require no resuscitation or only basic steps such as warming, drying, and stimulation, others will require further intervention. The most crucial action of neonatal resuscitation is establishment of adequate ventilation.45
Evaluation
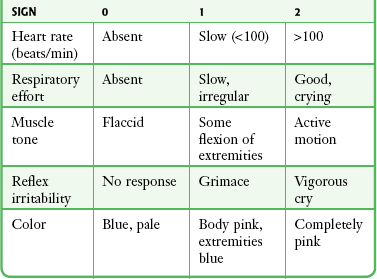
Traditionally, the Apgar scoring system, applied at 1 and 5 minutes after birth, has been the standard of newborn evaluation (Table 56-4).3,80 In general, the higher the score, the better the condition of the infant. Waiting for the traditional 1-minute Apgar score to indicate the need for resuscitation has been replaced by the concept of “the golden minute.” Begin basic resuscitation maneuvers, reevaluation, and positive pressure ventilation (PPV), if required, by the first 60 seconds after birth. Use the heart rate and respiratory effort to guide resuscitation efforts because skin color does not reliably predict oxygenation status in the newborn period.45
Respiration
Normally, the newborn begins to breath and cry almost immediately after birth.3 After initial respiratory efforts, the newborn should be able to establish regular respirations sufficient to improve color and should be able to maintain a heart rate higher than 100 beats/min. Generally, drying and stimulation (rubbing the back or flicking the soles of the feet) are enough to induce effective respirations in the newborn.81 Gasping and apnea after 30 seconds of stimulation are signs indicating the need for assisted ventilation and continuous pulse oximetry monitoring.45,80 It is important to note that even in healthy newborns, blood oxygen saturation does not reach extrauterine levels until 10 minutes after birth. Recent studies have demonstrated potential harmful effects from both excessive and insufficient supplemental oxygen versus room air during neonatal resuscitation. This is an area of ongoing research, and controversy exists (see Chapter 3 for current recommendation by the American Heart Association). Therefore, the application of supplemental oxygen should be guided by normal newborn oxygen saturation ranges (Table 56-5). Establishing adequate ventilation and oxygenation will restore vital signs in the vast majority of newborns.45
Table 56-5
Targeted Preductal Spo2 After Birth
| 1 min | 60-65% |
| 2 min | 65-70% |
| 3 min | 70-75% |
| 4 min | 75-80% |
| 5 min | 80-85% |
| 10 min | 85-95% |
From Kattwinkel J, Perlman JM, Aziz K, et al. Neonatal resuscitation: 2010 American Heart Association Guidelines for Cardiopulmonary Resuscitation and Emergency Cardiovascular Care. Pediatrics. 2010;126:e1400-e1413.
Heart Rate
The heart rate may be determined by auscultation or palpation of the pulse at the base of the umbilical cord. The heart rate should consistently be greater than 100 beats/min in an uncompromised newborn. If after 30 seconds the heart rate is less than 100 beats/min, initiate PPV with supplemental oxygen. If the heart rate is less than 60 beats/min despite adequate ventilation and oxygenation for 30 seconds, commence chest compressions. Because chest compressions may diminish the effectiveness of ventilation, do not initiate them until lung inflation and ventilation have been established.81
Color
An uncompromised newborn will be able to maintain a pink color of the mucous membranes without supplemental oxygenation. Central cyanosis is determined by examining the face, trunk, and mucous membranes, but it is not a reliable method of determining oxygen saturation in the immediate neonatal period. Acrocyanosis is usually a normal finding in the newborn and not a reliable indicator of hypoxemia. It may, however, indicate other conditions such as cold stress.80,81
Stabilization Technique
Following delivery of the infant and cutting of the umbilical cord, place the newborn on the side in the sniffing position and the neck in a neutral or slightly extended position.81 Place a rolled blanket or towel under the back and shoulders of the supine infant to elevate the torso 2 to 2.5 cm because this may help maintain head position.80,81 Prevent heat loss in the newborn because cold stress can increase oxygen consumption and impede effective resuscitation.81 Avoid hyperthermia, however, because it is associated with perinatal respiratory depression.81,82 Place the infant under a radiant warmer, rapidly dry the skin, and wrap the infant in warmed blankets to reduce heat loss.45,80,81 Alternatively, use the mother’s body as a heat source for the newborn. If initial evaluation indicates that the infant is stable, dry and place the infant skin to skin on the mother’s chest or abdomen, and cover both with blankets.80,81
Vigorous newborns should not be routinely suctioned after delivery, even those delivered through meconium-stained fluid.45,83 Reserve suctioning (including suctioning with a bulb syringe) immediately after birth for babies who exhibit obvious obstruction to spontaneous breathing or require PPV. Despite a paucity of data to support the practice, endotracheal suctioning is still recommended for nonvigorous babies born through meconium-stained amniotic fluid.45 If suctioning is necessary, first clear secretions from the mouth and nose with a bulb syringe or suction catheter (8 or 10 Fr). Aggressive pharyngeal suctioning can cause laryngeal spasm and vagal bradycardia, so limit the depth and duration of suctioning and do not exceed a negative pressure of 100 mm Hg.81
For newborns who do not quickly respond to conservative measures, PPV is indicated. Most newborns who require PPV can be adequately ventilated with a bag and mask. Perform assisted ventilations at a rate of 40 to 60/min (30 breaths/min if mechanical compressions are being performed). Typically, higher inflation pressures (≥30 to 40 cm H2O) and longer inflation times are required for the first several breaths than for subsequent breaths. Visible chest expansion is a more reliable indicator of appropriate inflation pressure than a specific manometer reading.80,81 Because bag-valve-mask ventilation can produce gastric distention and impede respiration, insert an orogastric tube (8 Fr) in infants undergoing prolonged PPV.81
Endotracheal intubation may be indicated when bag-valve-mask ventilation is ineffective, when tracheal suctioning for meconium is required, when chest compressions are performed, or when prolonged PPV is required.45,80 Alternatively, a neonatal laryngeal mask airway may provide effective airway management, especially in the case of ineffective bag-valve-mask ventilation or failed endotracheal intubation.45 Use of the laryngeal mask airway, however, has not been adequately studied in preterm infants and those with deliveries complicated by meconium-stained fluid. Its use, therefore, cannot be recommended in these situations.45
Monitor the heart rate during the course of neonatal evaluation and stabilization by either direct auscultation over the chest or palpation of the pulse at the base of the umbilical cord. A readily discernible heartbeat of 100 beats/min or greater is acceptable. If the heart rate is less than 60 beats/min despite adequate ventilation and oxygenation for 30 seconds, institute chest compressions while continuing to ventilate.45 Deliver chest compressions on the lower third of the sternum and not over the xiphoid to avoid damage to the liver.80 There are two techniques for performing chest compressions in the newborn. In the preferred method, two thumbs of the resuscitator’s hands are positioned side by side over the lower third of the sternum just below the nipple line. If the infant is large or the resuscitator’s hands are too small to encircle the chest, two-finger compressions with the ring and middle fingers may be used.45,80 The depth of compression should be approximately one third to one half the AP diameter of the newborn’s chest such that a palpable pulse is generated.45 Coordinate compressions and ventilations to avoid simultaneous delivery, which may compromise the efficacy of ventilation. The compression-to-ventilation ratio should be 3 : 1 with 90 compressions and 30 breaths to achieve approximately 120 events/min.45 If the heart rate remains less than 60 beats/min despite these interventions,45 establish an umbilical or intravenous line and initiate appropriate drug therapy. Alternatively, use intraosseous access, but this may not be as effective in a preterm infant.81 The medications most commonly used during neonatal resuscitation are listed in Table 56-6.45,81
TABLE 56-6
Medications Commonly Used in Neonatal Resuscitation
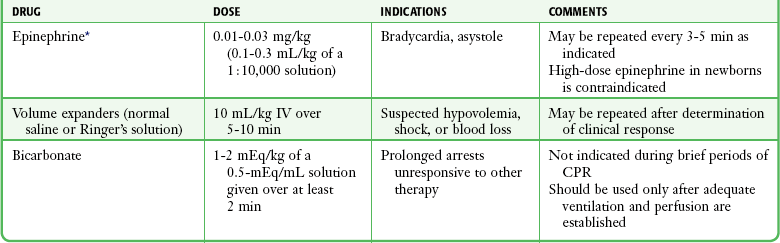
CPR, cardiopulmonary resuscitation.
*The intravenous route is now strongly preferred, but one can consider administering epinephrine via an endotracheal tube in doses of 0.05 to 0.1 mg/kg while obtaining intravenous access.
From Kattwinkel J, Perlman JM, Aziz K, et al. Neonatal resuscitation: 2010 American Heart Association Guidelines for Cardiopulmonary Resuscitation and Emergency Cardiovascular Care. Pediatrics. 2010;126(5):e1400-e1413; and Pediatric Working Group of the International Liaison Committee on Resuscitation. Neonatal resuscitation. Circulation. 2000;102:343.
References
1. Hamilton, BE, Martin, JA, Ventura, S. Births: preliminary data for 2009. Natl Vital Stat Rep. 2010;59:3.
2. National Hospital Ambulatory Medical Care Survey. 2008 Emergency Department Summary Tables. Atlanta: Centers for Disease Control and Prevention; 2008.
3. Cunningham FG, Leveno KJ, Bloom SL, et al, eds. Williams Obstetrics, 23rd ed, New York: McGraw-Hill, 2010.
4. Kilpatrick, S, Garrison, E. Normal labor and delivery. In Gabbe SG, Niebyl JR, Simpson JL, eds.: Obstetrics: Normal and Problem Pregnancies, 5th ed, Philadelphia: Churchill Livingstone, 2007.
5. American College of Obstetricians and Gynecologists (ACOG). Technical Bulletin No. 80. Premature rupture of membranes. Obstet Gynecol. 2007;109:1007–1019.
6. Guidelines for Perinatal Care, 7th ed. Elk Grove Village, IL, and Washington, DC, American Academy of Pediatrics and the American College of Obstetricians and Gynecologists, 2012.
7. Lanni, SM, Seeds, JW. Malpresentations. In Gabbe SG, Niebyl JR, Simpson JL, eds.: Obstetrics: Normal and Problem Pregnancies, 5th ed, Philadelphia: Churchill Livingstone, 2007.
8. Tunde-Byass, MO, Hannah, ME. Breech vaginal delivery at or near term. Semin Perinatol. 2003;27:34–45.
9. Hannah, ME, Hannah, WJ, Hewson, SA, et al. Planned caesarean section versus vaginal birth from breech presentation at term: a randomised multicentre trial. Term Breech trial Collaborative group. Lancet. 2000;356:1375–1383.
10. Brown, L, Karrison, T, Cibils, LA. Mode of delivery and perinatal results in breech presentation. Am J Obstet Gynecol. 1994;171:28.
11. Cruikshank, DP. Breech presentation. Clin Obstet Gynecol. 1986;29:255.
12. Rayl, J, Gibson, PJ, Hickok, DE. Fetus-placenta-newborn: a population-based case-control study of risk factors for breech presentation. Am J Obstet Gynecol. 1996;174:28.
13. Diro, M, Puangsricharern, A, Royer, L, et al. Singleton term breech deliveries in nulliparous and multiparous women: a 5-year experience at the University of Miami/Jackson Memorial Hospital. Am J Obstet Gynecol. 1999;181:247.
14. Ismail, M, Nagib, N, Ismail, T, et al. Comparison of vaginal and cesarean section delivery for fetuses of breech presentation. J Perinat Med. 1999;27:339.
15. Delke, I. Delivery in the emergency department. In: Benrubi GI, ed. Handbook of Obstetric and Gynecologic Emergencies. Philadelphia: Lippincott, Williams & Wilkins; 2010:160.
16. American College of Obstetricians and Gynecologists (ACOG). Practice Bulletin No 116. Management of intrapartum fetal heart rate tracings. Obstet Gynecol. 2010;116:1232–1240.
17. Penning, S, Garite, TJ. Management of fetal distress. Obstet Gynecol Clin. 1999;26:259.
18. Gianopoulos, J. Emergency complications of labor and delivery. Emerg Med Clin North Am. 1994;12:201.
19. Dilbaz, B, Ozturkoglu, E, Dilbaz, S, et al. Risk factors and perinatal outcomes associated with umbilical cord prolapse. Arch Gynecol Obstet. 2006;274:104–107.
20. Murphy, DJ. The mortality and morbidity associated with cord prolapse. Br J Obstet Gynaecol. 1995;102:826.
21. Panter, K. Umbilical cord prolapse: so far so good. Lancet. 1996;347:74.
22. Barnett, WM. Umbilical cord prolapse: a true obstetrical emergency. J Emerg Med. 1988;7:149.
23. Katz, A, Shoham, Z, Lancet, M, et al. Management of labor with umbilical cord prolapse: a 5-year study. Obstet Gynecol. 1988;72:278.
24. American College of Obstetricians and Gynecologists (ACOG). Practice Bulletin No 43. Management of preterm labor. Obstet Gynecol. 2003;101:1039–1047. [(reaffirmed 2011)].
25. Mercer, BM, Lewis, R. Preterm labor and premature rupture of the membranes. Infect Dis Clin North Am. 1997;11:177.
26. Sawdy, RJ, Bennett, PR. Recent advances in the therapeutic management of preterm labour. Curr Opin Obstet Gynecol. 1999;11:131.
27. Gyetvai, K, Hannah, ME, Donetee, ED, et al. Tocolytics for preterm labor: a systematic review. Obstet Gynecol. 1999;94:869.
28. Berkman, ND, Thorp, JM, Lohr, KN, et al. Tocolytic treatment for the management of preterm labor: a review of the evidence. Am J Obstet Gynecol. 2003;188:1648.
29. Keirse, MJ. New perspectives for the effective treatment of preterm labor. Am J Obstet Gynecol. 1995;173:618.
30. Ozmen, S. Tocolytics for Preterm Labour: RHL Commentary. Geneva: World Health Organization Reproductive Health Library; 2006.
31. Guinn, DA, Goepfert, AR, Owen, J, et al. Management options in women with preterm uterine contractions: a randomized clinical trial. Am J Obstet Gynecol. 1997;177:814.
32. Hearne, AE, Nagey, DA. Therapeutic agents in preterm labor: tocolytic agents. Clin Obstet Gynecol. 2000;43:787.
33. Stubblefield, PG, Heyl, PS. Treatment of premature labor with subcutaneous terbutaline. Obstet Gynecol. 1982;59:457.
34. FDA Drug Safety Communication. New warnings against use of terbutaline to treat preterm labor. 02-17-2011 safety announcement.
35. Schrefer J, Nissen D, eds. Mosby’s GenRx, 11th ed, St. Louis: Mosby, 2001.
36. Terrone, DA, Rinehart, BK, Kimmel, EF, et al. A prospective, randomized, controlled trial of high and low maintenance doses of magnesium sulfate for acute tocolysis. Am J Obstet Gynecol. 2000;182:1477.
37. Elliott, JP. Magnesium sulfate as a tocolytic agent. Am J Obstet Gynecol. 1983;147:277.
38. Grimes, DA, Nanda, K. Magnesium sulfate tocolysis: time to quit. Obstet Gynecol. 2006;108:986–989.
39. Barbieri, RL. Is the end of an era here for magnesium sulfate tocolysis [editorial]? OBG Manage. 2007;19:6–10.
40. Pryde, PG, Mittendorf, R. Contemporary usage of obstetric magnesium sulfate: indication, contraindication, and relevance of dose. Obstet Gynecol. 2009;114:669–673.
41. Costantine, MM, Weiner, SJ. Effects of antenatal exposure to magnesium sulfate on neuroprotection and mortality in preterm infants: a meta-analysis. Obstet Gynecol. 2009;114:354–364.
42. Burd, I, Breen, K, Friedman, A, et al. Magnesium sulfate reduces inflammation-associated brain injury in fetal mice. Am J Obstet Gynecol. 2010;202:292e1–292e9.
43. American College of Obstetricians and Gynecologists (ACOG). Practice Committee Opinion No 455: magnesium sulfate before anticipated preterm birth for neuroprotection. Obstet Gynecol. 2010;115:669–671.
44. Larmon, JE, Ross, BS, May, WL, et al. Oral nicardipine versus intravenous magnesium sulfate for the treatment of preterm labor. Am J Obstet Gynecol. 1999;181:1432.
45. Kattwinkel, J, Perlman, JM, Aziz, K, et al. Neonatal resuscitation: 2010 American Heart Association Guidelines for Cardiopulmonary Resuscitation and Emergency Cardiovascular Care. Pediatrics. 2010;126:e1400–e1413.
46. Hutton, EK, Hassan, ES. Late vs. early clamping of the umbilical cord in full-term neonates. JAMA. 2007;297:1241.
47. American College of Obstetricians and Gynecologists (ACOG). Practice Bulletin No 40. Shoulder dystocia. Obstet Gynecol. 2002;100:1045–1050. [(reaffirmed 2010)].
48. Bennett, BB. Shoulder dystocia: an obstetric emergency. Obstet Gynecol Clin North Am. 1999;26:445.
49. Gherman, RB, Ouzounian, JG, Goodwin, TM. Obstetric maneuvers for shoulder dystocia and associated fetal morbidity. Am J Obstet Gynecol. 1998;178:1126.
50. Gherman, RB, Goodwin, TM, Souter, I, et al. The McRoberts’ maneuver for the alleviation of shoulder dystocia: how successful is it? Am J Obstet Gynecol. 1997;176:656.
51. Gonik, G, Stringer, CA, Held, B. An alternative maneuver for management of shoulder dystocia. Am J Obstet Gynecol. 1983;145:882.
52. Ramsey, PS, Ramin, KD, Field, CS, et al. Shoulder dystocia: rotational maneuvers revisited. J Reprod Med. 2000;45:85.
53. American College of Obstetricians and Gynecologists (ACOG). Practice Bulletin No 7. Episiotomy. Obstet Gynecol. 2006;107:957–962. [(reaffirmed 2008)].
54. Labrecque, M, Baillargeon, L, Dallaire, M, et al. Association between median episiotomy and severe perineal lacerations in primiparous women. CMAJ. 1997;156:797.
55. Shiono, P, Klebanoff, MA, Carey, JC. Midline episiotomies: more harm than good? Obstet Gynecol. 1990;75:765.
56. Pritchard, JA, Bladwin, RM, Dickey, JC, et al. Blood volume changes in the pregnancy and the puerperium. II. Red blood cell loss and changes in apparent blood volume during and following vaginal delivery, cesarean section, and cesarean section plus total hysterectomy. Am J Obstet Gynecol. 1962;84:1271.
57. Combs, CA, Murphy, EL, Laros, RK, Jr. Factors associated with postpartum hemorrhage with vaginal birth. Obstet Gynecol. 1991;77:69–76.
58. Sartain, JB, Barry, JJ, Howat, PW, et al. Intravenous oxytocin bolus of 2 units is superior to 5 units during elective caesarean section. Br J Anaesth. 2008;101:822–826.
59. American College of Obstetricians and Gynecologists (ACOG). Practice Bulletin No 76. Postpartum hemorrhage. Obstet Gynecol. 2006;108:1039–1047. [(reaffirmed 2008)].
60. Alamia, V, Meyer, BA. Peripartum hemorrhage. Obstet Gynecol Clin North Am. 1999;26:385.
61. Jones, DC. Postpartum emergencies. In: Benrubi GI, ed. Handbook of Obstetric and Gynecologic Emergencies. Philadelphia: Lippincott, Williams & Wilkins; 2010:199.
62. Ripley, DL. Uterine emergencies: atony, inversion, and rupture. Obstet Gynecol Clin North Am. 1999;26:419.
63. Baskett, TF. Acute uterine inversion: a review of 40 cases. J Obstet Gynaecol Can. 2002;24:953–956.
64. Watson, P, Besch, N, Bowes, WA. Management of acute and subacute puerperal inversion of the uterus. Obstet Gynecol. 1980;55:12.
65. Lago, JD. Presentation of acute uterine inversion in the emergency department. Am J Emerg Med. 1989;9:239.
66. Wendel, PJ, Cox, SM. Emergent obstetric management of uterine inversion. Obstet Gynecol Clin North Am. 1995;22:261.
67. Lattuada, HP. Postmortem cesarean section: surgical and legal aspects. Am J Surg. 1952;84:212.
68. Whitten, M, Irvine, LM. Postmortem and perimortem caesarean section: what are the indications? J R Soc Med. 2000;93:6.
69. Morris, S, Stacey, M. Resuscitation in pregnancy. BMJ. 2003;327:1277–1279.
70. Katz, VL, Dotters, DJ, Droegemueller, W. Perimortem cesarean delivery. Obstet Gynecol. 1986;68:571.
71. Katz, VL, Balderston, K, DeFreest, M. Perimortem cesarean delivery: were our assumptions correct? Am J Obstet Gynecol. 2005;192:1916–1920.
72. Arthur, RK. Postmortem cesarean section. Am J Obstet Gynecol. 1978;132:175.
73. Lanoix, R, Akkapeddi, V, Goldfeder, B. Perimortem cesarean section: case reports and recommendations. Acad Emerg Med. 1995;2:1063.
74. Royal College of Obstetricians and Gynaecologists. Managing Obstetrics Emergencies and Trauma. (MOET) Manual, 2nd ed. London: RCOG Press; 2007.
75. Strong, TH, Lowe, RA. Perimortem cesarean section. Am J Emerg Med. 1989;7:489.
76. Hill, CC, Pickinpaugh, J. Trauma and surgical emergencies in the obstetric patient. Surg Clin North Am. 2008;88:421–440.
77. Warraich, Q, Esen, U. Perimortem caesarean section. J Obstet Gynaecol. 2009;29:690–693.
78. DePace, NL, Betesh, JS, Kotler, MN. Postmortem cesarean section with recovery of both mother and offspring. JAMA. 1982;248:971.
79. Aziz, K, Chadwick, M, Baker, M, et al. Ante- and intra-partum factors that predict increased need for neonatal resuscitation. Resuscitation. 2008;79:444–452.
80. Newborn resuscitation. In: Chameides L, Hazinski MF, eds. Pediatric Advanced Life Support. Dallas: American Heart Association; 1997:9.
81. Pediatric Working Group of the International Liaison Committee on Resuscitation. Neonatal resuscitation. Circulation. 2000;102:343.
82. Niermeyer, S, Reempts, PV, Kattwinkel, J, et al. Resuscitation of newborns. Ann Emerg Med. 2001;37:S110.
83. Wiswell, TE, Gannon, CM, Jacob, J. Delivery room management of the apparently vigorous meconium-stained neonate: results of the multicenter, international collaborative trial. Pediatrics. 2000;105:1.
[/level-membership-for-emergency-medicine-category][not-level-membership-for-emergency-medicine-category]Chapter 56
Emergency Childbirth
Background
Of the more than 4.1 million births in the United States in 2009, 99% were delivered in a hospital setting. The percentage of these births that occur in the emergency department (ED) setting is unknown.1 Childbirth is a relatively rare occurrence in the ED and is not identified as a specific diagnosis by the Centers for Disease Control and Prevention. It is instead categorized in the “supplemental classification,” along with other miscellaneous and noncodable diagnoses.2 Emergency delivery of an infant continues to be one of the most challenging and stress-inducing procedures facing emergency physicians (EPs). The clinician needs to assess the mother and fetus, prepare for delivery, and anticipate potential difficulties or complications during and after the birthing process.
Anatomy and Physiology
Labor is the process by which the fetus is expelled from the uterus. It begins with a sequence of regular and effective uterine contractions that result in effacement and dilation of the cervix.3 Identification of true labor versus false labor is best determined in a dedicated obstetric unit, often with external uterine monitoring. Labor can also be divided into phases. The latent phase of labor is the period between its onset and when labor becomes active, which generally requires 80% effacement and cervical dilation of greater than 4 cm.4 Active labor is normally divided into three generally progressive stages. The first stage begins with cervical effacement and dilation and ends when the cervix is completed dilated. In multiparous women this stage of labor typically lasts about 5 to 8 hours, as opposed to 7 to 13 hours in nulliparous women, but with much individual variation.3,4 The second stage of labor begins when dilation of the cervix is complete and ends with delivery of the infant. The duration of this stage is also variable, with a median of 50 to 60 minutes in nulliparas and 15 to 20 minutes in multiparas.3,4 The third stage of labor begins after delivery of the infant and ends with delivery of the placenta. The fourth stage of labor refers to the 1 hour immediately after delivery, the period in which postpartum hemorrhage is most likely to occur.3 It is recommended that maternal blood pressure and pulse be recorded immediately after delivery and every 15 minutes for the first hour to rapidly detect any ongoing hemorrhage.3
Identification of Labor
Show or bloody show is a sign of approaching labor. The normal mucous plug sealing the cervix discharges as the cervix dilates. Show consists of a small amount of blood-tinged mucus discharged from the vagina and indicates that labor is already in progress or will probably occur during the next several hours to a few days. The coloring of the mucus can become pink or brown tinged as a result of minor bleeding. However, if more than a small amount of blood escapes with the mucous plug, an abnormal cause such as abruption of the placenta or placenta previa should be considered. Digital vaginal examination under these circumstances is generally contraindicated.3
Spontaneous rupture of membranes can occur during the course of active labor, typically evident by a sudden gush or continuous leakage of a variable amount of clear or slightly turbid vaginal fluid. Rupture of membranes before the onset of labor at any stage of gestation is referred to as premature rupture of membranes (PROM). Term PROM, which occurs before the onset of labor, complicates approximately 8% of pregnancies.5 In the majority of cases it is followed by the onset of labor and delivery within 5 hours.5 The most significant maternal risk associated with term PROM is intrauterine infection. Fetal risks associated with PROM include umbilical cord compression and ascending infection.5 The ideal management of PROM should be deferred to the consulting obstetrician.6
Membrane rupture occurring before 37 weeks of gestation is called preterm premature rupture of membranes (pPROM). Birth within 1 week generally occurs regardless of management or the clinical findings. The most significant maternal risk related to pPROM is intrauterine infection. The most significant risks to the fetus are complications related to prematurity. Preterm delivery occurs in approximately 12% of all births in the United States.5
Accurate diagnosis of PROM will be helpful in further management. Suspected PROM should be confirmed by an examination that minimizes the risk of introducing infection. Avoid digital cervical examination unless the patient is in active labor or delivery is imminent.5 A sterile speculum examination can be performed to look for amniotic fluid extruding from the cervical os or pooling in the posterior fornix, as well as to inspect for fetal or umbilical cord prolapse and assess cervical effacement and dilation.3,5
Amniotic fluid may be differentiated from vaginal fluid by testing the pH of the fluid with Nitrazine paper or similar swab devices (Fig. 56-1). The pH of vaginal fluid is generally 4.5 to 6.0, whereas amniotic fluid has a pH of 7.0 to 7.5. The yellow testing paper turns blue-green to deep blue in the presence of amniotic fluid. With vaginal secretions the Nitrazine paper remains yellow.3,5 False-positive results may occur with blood, semen, bacterial vaginosis, or alkaline urine. If rupture of membranes is documented in the ED, notify the patient’s obstetrician and plan for hospital admission or possible transfer.
Evaluation of Labor
When a woman is initially seen with contractions, the general condition of both the fetus and mother should be assessed quickly. Under the federal Emergency Medical Treatment and Labor Act (EMTALA), hospitals with an ED must conduct an appropriate screening examination to rule out true labor. In addition, under EMTALA, a woman in labor is considered unstable for interhospital transfer unless done so at the direction of the patient or a physician who certifies that the benefits outweigh the risks of transfer.3 A brief obstetric history, including the onset and frequency of contractions, the presence or absence of bleeding, possible loss of amniotic fluid, previous prenatal care, and due date, should be obtained. In the absence of active vaginal bleeding, a sterile vaginal examination should be performed in addition to maternal abdominal palpation to determine the stage of labor, as well as the position, presentation, and lie of the fetus. Monitor fetal well-being by evaluation of the fetal heart rate, particularly immediately after a uterine contraction. In an ED setting, fetal assessment is increasingly done via bedside ultrasonography, which can assess fetal movement and heart rate (Fig. 56-2). The traditional approaches of using external Doppler or auscultation are also acceptable. The normal baseline fetal heart rate is 110 to 160 beats per minute.
Lie refers to the relationship of the long axis of the fetus to the long axis of the uterus. It is either longitudinal, transverse, or oblique (Fig. 56-3). Oblique lies are unstable and will convert to a longitudinal or transverse lie during labor. Longitudinal lies occur in more than 99% of pregnancies at term.3 Transverse lies generally cannot be safely delivered vaginally.4
The presentation, or presenting part, refers to the portion of the body of the fetus nearest to or foremost in the birth canal. The presenting part can be felt through the cervix on sterile vaginal examination. In longitudinal lies, the presenting part is the fetal head, the buttocks (breech), or the feet (footling breech). With a transverse lie, the presenting part is the shoulder. The presentation can be cephalic, breech, shoulder, or compound. All presentations except cephalic are considered malpresentations.7
Breech presentations are classified as frank, complete, or incomplete (Fig. 56-4). A fetus presenting with the buttocks and hips flexed and the legs extended is termed a frank breech. Presentation of the buttocks with flexion of the fetal hips and knees results in a complete breech presentation. When one or both of the feet or knees are lowermost in the canal, an incomplete or footling breech results.
At or near term, 97% of fetuses will be vertex and 3% will be breech.3 The incidence of breech delivery is approximately 25% at 28 weeks, 17% at 30 weeks, and 11% at 32 weeks.3,8,9
Labor Movements: Vertex
The mechanism of labor in vertex presentations consists of engagement of the presenting part, flexion, descent, internal rotation, extension, external rotation or restitution, and expulsion (Fig. 56-5).3 These are often referred to as cardinal movements. The mechanism of labor is determined by the pelvic dimensions and configuration, the size of the fetus, and the strength of the uterine contractions. Essentially, the fetus will follow the path of least resistance by adaptation of the smallest achievable diameter of the presenting part to the most favorable dimensions and contours of the birth canal.
The sequence of movements in vertex presentations is as follows:
1. Engagement refers to the mechanism by which the greatest transverse diameter of the head, the biparietal diameter in occiput presentations, passes through the pelvic inlet. A fetus is engaged when the presenting part is at 0 station. In a primiparous patient, it usually occurs in the last 2 weeks of pregnancy; in a multiparous patient, it can occur at the onset of labor.
2. Flexion of the head is necessary to minimize the presenting cross-sectional diameter of the head during passage through the smallest diameter of the bony pelvis. In most cases, flexion is necessary for both engagement and descent and occurs passively.
3. Descent is the downward passage of the fetal presenting part. It is gradually progressive but is not necessarily continuous. Descent is affected by uterine and abdominal contractions, as well as by straightening and extension of the fetal body.
4. Internal rotation occurs with descent and is necessary for the head or presenting part to traverse the ischial spines. This movement essentially turns the head such that the occiput gradually moves from its original, more transverse position anteriorly toward the symphysis pubis or, less commonly, posteriorly toward the hollow of the sacrum. This is known as occiput anterior or occiput posterior, respectively.
5. Extension occurs as the flexed head reaches the anteriorly directed vaginal introitus. The occiput reaches the inferior aspect of the pubic symphysis. The head is born by further extension as it rotates around the pubic symphysis and the occiput, bregma, forehead, nose, mouth, and finally, the chin pass successively over the anterior margin of the perineum. Immediately after its birth, the head drops downward such that the chin lies over the maternal anal region.
6. External rotation or restitution is return of the head to the correct anatomic position with respect to the fetal torso. It follows delivery of the head as it rotates to the transverse position that it occupied at engagement. This is also a passive movement.
7. Expulsion of the remainder of the fetal body then occurs. The shoulders descend in a path similar to that traced by the head (i.e., rotating anteroposteriorly for delivery). First, the anterior shoulder is delivered beneath the symphysis pubis followed by the posterior shoulder across the perineum.
Labor Movements: Breech
The mechanism of labor for breech presentations varies (see Fig. 56-4). The widest diameter that is engaged is the bitrochanteric diameter. Usually, the hips engage in one of the oblique diameters of the pelvic inlet. As descent occurs, the anterior hip generally descends more rapidly than the posterior hip. Internal rotation occurs as the bitrochanteric diameter assumes the anteroposterior (AP) position. Lateral flexion takes place as the anterior hip catches beneath the symphysis pubis, which allows the posterior hip to be born first. The infant’s body then rotates to allow engagement of the shoulders in an oblique orientation. Gradual descent occurs, with the anterior shoulder rotating to bring the shoulders into the AP diameter of the outlet. The anterior shoulder follows lateral flexion to appear beneath the symphysis, with the posterior shoulder being delivered first as the body is supported. The head tends to engage in the same diameter as the shoulders. Subsequent flexion, descent, and rotation of the head occur to bring the posterior portion of the neck under the symphysis pubis. The head is then born in flexion. Breech delivery is associated with a greater incidence of prematurity, prolapsed cord, and increased perinatal morbidity and mortality.3,10–12
The increased use of cesarean section has greatly decreased the morbidity and mortality associated with breech delivery. Although cesarean is the preferred method of delivery, vaginal delivery may be the method of choice in carefully selected cases.10,13,14 The emergency clinician should be cognizant of the imminent vaginal delivery of a breech infant in any presentation, frank, complete, or footling. However, a breech presentation is always problematic for any clinician, even under the best of circumstances. It is not expected that the EP will always be able to successfully deliver a breech presentation.
Types
To perform any vaginal breech delivery, the birth canal must be sufficiently large to allow passage of the fetus without trauma and the cervix must be completely effaced and dilated. If these conditions do not exist, cesarean section is indicated. To ensure full cervical dilation in a footling or complete breech, it is important that the feet, legs, and buttocks advance through the introitus to the level of the fetal umbilicus before the clinician intervenes and further delivery is attempted. The mere appearance of the feet through the vulva is not in itself an indication to proceed with delivery. This may be a footling presentation through a cervix that is not completely dilated. In this case there may be time to transfer the patient to the labor and delivery suite, preferably in the knee-chest position to minimize the risk for cord compression.15 Similarly, if the breech is frank, cervical dilation and outcome are improved if the infant is allowed to deliver to the level of the umbilicus. Before this, as with complete and footling presentations, there may be time to safely transfer the mother to the labor and delivery area. Tocolytics such as subcutaneous terbutaline may be used to inhibit labor until such patients can be safely transferred.15
Vaginal Examination
Cleanse the perineum with an antiseptic and use a sterile lubricant to decrease potential contamination. A sterile vaginal (not speculum) examination is performed to identify the fetal presentation and position and assess the progress of labor, except in cases of suspected bleeding. Take care to avoid the anal region and potential fecal contamination during the digital examination. Assess cervical effacement and dilation, as well as fetal station, presentation, and position.3 The finger should not be withdrawn from the vagina until the examination is complete. The number of vaginal examinations during labor correlates with infectious morbidity, especially in cases of early membrane rupture.3
Cervical effacement refers to the process of cervical thinning that occurs before and during the first stage of labor as the cervical canal shortens from a length of about 2 cm to a circular opening with almost no length remaining (Fig. 56-6). Effacement is expressed as a percentage from 0% (uneffaced and thick) to 100% (completely effaced). Assess the degree of cervical effacement by palpation and determine the palpated length of the cervical canal in comparison to that of an uneffaced, or normal, cervical canal.
Station refers to the level of the presenting fetal part in the birth canal relative to the ischial spines, which lie halfway between the pelvic inlet and the pelvic outlet (Fig. 56-7). Zero station is used to denote that the presenting part is at the level of the ischial spines. When the presenting part lies above the spines, the distance, estimated in centimeters ranging from 1 to 5, is stated in negative figures (−5, −4, −3, −2, −1). Below the ischial spines, the presenting fetal part passes +1, +2, +3, +4, and +5 stations to delivery. This measurement is made by simple palpation.3 The ischial spines can be palpated at roughly the 8- and 4-o’clock positions on the vaginal examination.
Fetal Well-Being
The normal baseline fetal heart rate is 110 to 160 beats/min and varies considerably from a baseline measured for a minimum of 2 minutes in a 10-minute segment of time.16 Rates above or below this range may indicate fetal distress. Accelerations in the fetal heart rate lasting longer than 10 seconds and less than 2 minutes commonly occur during labor and are probably a physiologic response to fetal movement.3,16,17 Persistent fetal tachycardia occurs most frequently in response to maternal fever or amnionitis but may also indicate fetal compromise.3,16
As with brief accelerations in the fetal heart rate, a gradual decrease in the fetal heart rate in association with a uterine contraction with an onset to nadir of 30 seconds or more (with the nadir coinciding with the peak of contraction) is termed an early deceleration. Decelerations are physiologic and probably the result of vagal nerve stimulation secondary to compression of the fetal head. Decelerations that occur independently of uterine contractions, are abrupt, or last between 15 seconds and 2 minutes are known as variable decelerations. Late decelerations are those that are delayed in timing with respect to a contraction, with the nadir of the deceleration occurring after the peak of the contraction. Variable decelerations are relatively common and can be further classified according to their severity. Variable decelerations may be temporarily corrected by maternal repositioning. Late decelerations can be an ominous sign and may represent cord compression and uteroplacental insufficiency.3,16,17 It may necessitate emergency delivery.
Changes in the fetal heart rate indicating fetal distress are usually evident immediately after a uterine contraction, and therefore the fetal heart rate is optimally assessed at this time. Formal monitoring of labor should be performed in an obstetrics unit. Fetal monitoring is not performed in the ED, but examples of various fetal heart rate patterns are included for completeness in Figure 56-8.3,16
Management of Fetal Distress
If fetal distress is suspected on the basis of the resting fetal heart rate or changes after contractions, change the maternal position, typically into the left lateral decubitus position, and reevaluate. Administer supplemental oxygen to the mother to optimize fetal oxygenation. In the absence of bleeding, perform a vaginal examination to rule out the possibility of umbilical cord prolapse.16,18 Cord prolapse usually occurs at the same time as rupture of the membranes and is diagnosed by palpation of the umbilical cord on vaginal examination or by visualization of the cord protruding through the introitus. Cord prolapse is frequently encountered with breech presentations, multiple pregnancies, and prematurity.19–21
Management of cord prolapse is directed at sustaining fetal life until delivery is accomplished. Unless immediate delivery is feasible or the fetus is known to be dead, prepare for an emergency cesarean section. If immediate obstetric services are not available, four temporizing measures can be undertaken. (1) Place the patient in the knee-chest or deep Trendelenburg position, and keep the patient in this position until delivery.18,21,22 (2) Minimize compression of the umbilical cord by inserting a sterile gloved hand and exerting manual pressure in the vagina to lift and maintain the presenting part away from the prolapsed cord. (3) After manual elevation of the presenting part, instill 500 to 700 mL of saline into the bladder to raise the presenting part and maintain cord decompression. Once the bladder is filled, remove the vaginal hand.22,23 (4) Tocolytic therapy can be administered to decrease uterine contractions and improve fetoplacental perfusion.22,23 Unfortunately and realistically speaking, outcomes of true obstetric emergencies managed solely in the ED are often bleak and essentially out of the hands of the EP.
Tocolytic Therapy
Tocolytic therapy is rarely instituted in the ED, and there is no standard mandating its use by the EP. However, under dire circumstances and preferably under obstetric guidance, this intervention may be initiated in the ED. Before instituting pharmacologic tocolytic therapy for either preterm labor or fetal distress, initiate basic maneuvers to improve maternal and fetal status. Because uterine hypoxia may induce uterine contractions, administer supplemental oxygen and infuse 500 mL of crystalloid intravenously. Place the mother in the left lateral decubitus position to improve uterine perfusion.3,18,24 Because uterine, cervical, or urinary tract infections account for 20% to 40% of cases of preterm labor, search for a specific cause and treat infections appropriately.18,25,26 If the contractions persist and cervical changes are documented despite these basic interventions, consider pharmacologic therapy.3,18,24 Although tocolytic agents are commonly used and have been shown to prolong pregnancy by 2 to 7 days, there are few data to suggest that tocolysis improves long-term perinatal or neonatal outcome.3,24,27,28 In addition, none of the commonly used tocolytic medications are approved for use by the U.S. Food and Drug Administration (FDA) as a tocolytic agent. The principal benefit of pharmacologic therapy may be only to prolong pregnancy to allow maternal transfer to a tertiary care facility or to delay delivery sufficiently to improve fetal maturation with corticosteroids.3,24–26,29 General contraindications to tocolytic therapy include severe preeclampsia, placental abruption, intrauterine infection, advanced cervical dilation, and evidence of fetal compromise or placental insufficiency.24
There are no clear “first-line” tocolytic agents to manage preterm labor (Table 56-1). Clinical circumstances and preferences should dictate treatment. Agents such as calcium channel blockers and the prostaglandin inhibitor indomethacin have shown varying efficacy in clinical trials.3,16,24,25,27 The most commonly used tocolytic agents in the United States are the calcium channel blocker nifedipine, magnesium sulfate, and the β2-receptor agonist terbutaline. Calcium channel blockers are the preferred tocolytics by the World Health Organization.30
β2-Receptor Agonists
The most commonly used β2-adrenergic tocolytic agent is terbutaline. The β-mimetic agents react with adrenergic receptors to reduce intracellular ionized calcium levels and prevent the activation of myometrial contractile proteins.3 Although terbutaline stimulates β2-receptors primarily, it has some β1-activity, which is responsible for its cardiovascular side effects. Another β-mimetic agent, ritodrine, was the only agent approved for tocolysis in the United States but has been withdrawn from the market.
Terbutaline is commonly used for the treatment of preterm labor.3,25,31 When given subcutaneously, administer terbutaline in a 0.25-mg dose and repeat it every 20 to 60 minutes until contractions cease or intolerable maternal side effects occur.18,24,32,33 In 2011 the FDA required the addition of a Boxed Warning and Contraindication (“black box warning”) against the use of injectable terbutaline for the prevention or prolonged treatment of preterm labor beyond 48 to 72 hours because of adverse effects, including maternal death.34 Use terbutaline with caution in patients with cardiovascular disease, hypertension, hyperthyroidism, diabetes, and seizures and in those taking other sympathomimetic amines.24,35 The general clinical side effects of arrhythmias, myocardial ischemia, and pulmonary edema are related to its inherent activity as a β-mimetic drug. Treatment of the majority of side effects is supportive; severe cardiovascular effects may be treated with β-blocking agents.32,35
Magnesium Sulfate
Magnesium sulfate (MgSO4) is not approved in the United States for use as a tocolytic agent. Nevertheless, some perinatal centers prefer MgSO4 over the β-mimetic agents because of its lower incidence of side effects.18,36,37 Even though the use of MgSO4 as a tocolytic has fallen out of favor, findings of fetal neuroprotective effects have resulted in its ongoing use.38–41 Although its mechanism of action is not fully understood, magnesium probably decreases myometrial contractility through its role as a calcium antagonist.3 Its fetoprotective effects probably result from noncompetitive antagonism of the N-methyl-d-aspartate receptor or through antiapoptosis and prevention of neuronal cell loss.42
MgSO4 is generally administered at a dose of 4 to 6 g intravenously over a period of 20 to 30 minutes, followed by a maintenance intravenous infusion beginning at 1 to 3 g/hr.24,43 Infusion of MgSO4 often produces sweating, warmth, and flushing. Rapid parenteral administration may cause transient nausea, vomiting, headache, or palpitations.24,25,37 The major side effect of magnesium therapy is impairment of the muscles of respiration with subsequent respiratory arrest, an effect not usually seen until the serum magnesium level exceeds 10 mEq/L. At levels of 12 mEq/L or greater, respiratory arrest may occur.35
The first sign of magnesium toxicity, a decrease in the patellar reflex, typically occurs as serum magnesium levels exceed 4 mEq/L, with loss of the reflex as levels increase further. The dosing and ongoing maintenance of magnesium therapy should be guided by the clinical status of the patient rather than by laboratory values. Monitor the patellar reflex throughout therapy. Because magnesium is almost totally excreted by the kidney, it is contraindicated in the presence of renal failure. Monitor urinary output and renal function throughout therapy. If respiratory depression develops, inject 10 mL of a 10% solution of calcium gluconate or calcium chloride over a 3-minute period as an antidote. For severe respiratory depression or arrest, prompt endotracheal intubation may be lifesaving.3
