[level-membership-for-opthalmology-category]
CHAPTER 12 Capsulorrhexis and hydrodissection

Capsulorrhexis
Background
Continuous curvilinear capsulorrhexis (CCC) is the most reliable way of creating a secure and resilient opening in the lens capsule and was originally developed for use in phacoemulsification surgery where it has now been universally adopted1,2. It has more recently gained widespread popularity in the developing world for use in manual small incision cataract surgery (MSICS)3. The ‘three Cs’ also conveniently represent the three principal technical challenges, which require the rhexis to be Circular, Central, and the Correct size.
Instruments
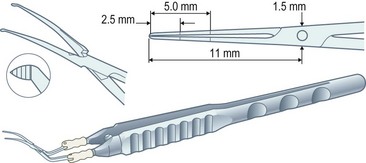
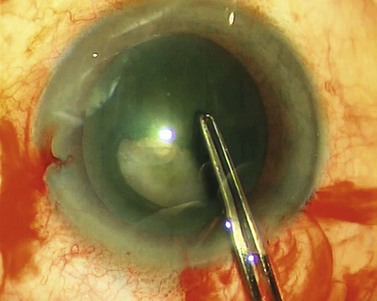
Capsulorrhexis forceps, on the other hand, allow you to apply traction in any chosen direction but are relatively bulky (particularly the early parallel-action Utratta designs) and are more likely to cause wound gape and chamber collapse than a needle. However the newer designs are greatly refined and include hinged ‘cross-action’ and coaxial designs that cause minimal wound gape and give exquisite control of the tear through incisions down to sub-2 mm (Fig. 12.1). The high outlay cost, difficulty in cleaning, and susceptibility to damage of capsulorrhexis forceps all ensure that the bent needle is here to stay.
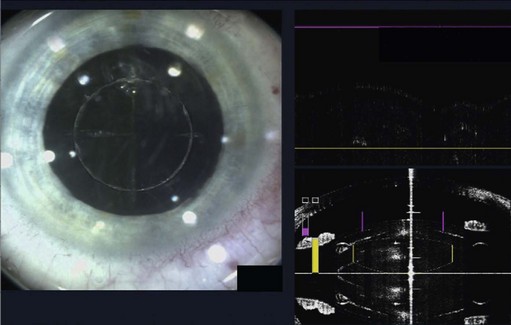
The role of lasers in surgery is assuming an ever-increasing importance and, at the time of writing, the femtosecond laser has recently been used successfully on human eyes to create high precision incisions and accurate capsulorrhexis (Fig. 12.2).
Capsulorrhexis technique
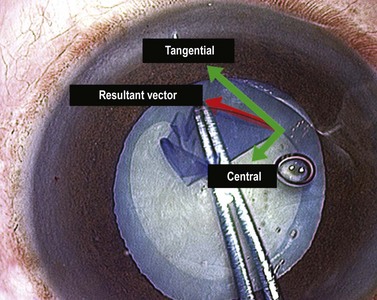
The force vector that tears the capsule in the intended direction is the resolution of two components: a centrally directed vector and a circumferentially tangential element. Ideally no vertical element is used. Some surgeons appreciate this issue of vector resolution much more intuitively than others, but everyone is capable of learning it. It is almost impossible to teach from a book and is much easier to understand in practice (Fig. 12.3). Another fact to appreciate is that capsulorrhexis is guided entirely visually as there is no tangible force feedback during capsular tearing.
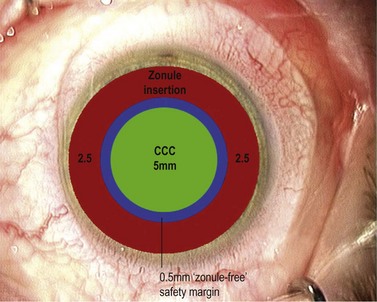
If you’ve managed to control the tear and keep it parallel to and a fixed distance from the pupil margin then your rhexis should fulfil two of the three ‘Cs’ by being Central and Circular. It may not however fulfil the criterion of the third ‘C’ which is for Correct Size. This is the most difficult one to get consistently right and is an inexact science. Have you ever seen any surgeon actually measure a capsulorhexis or use a template? As a novice, and often well beyond, the surgeon is too preoccupied during the rhexis with avoiding disaster to worry about the size of the resultant hole (which, early on, is almost universally undersized from being over-cautious). Preoccupation with size is the preserve of the experienced surgeon with sufficient confidence and skill to control it. If you shoot for a diameter of 5 mm this will give you an edge overlap of 0.25 mm for a 5.5 mm optic and 0.5 mm for a 6 mm optic (Fig. 12.4). Around 4 mm is the lower acceptable limit for the rhexis diameter: below this the risk increases of complications such as capsule block and anterior capsule tear, which are discussed below. This concentric overlap combined with a square edged optic appears to provide a mechanical barrier to lens epithelial cell migration across the posterior capsule and thereby reduce the incidence of posterior capsule opacification.
So how can you reliably judge the 5 mm diameter that you need? Well you have to resist the obvious temptation to use the pupil as your reference because its diameter is so variable. However, the vertical diameter of the cornea is fairly fixed at around 10 mm so you can use this as your reference. Think of the cornea as the optic disc and the rhexis as the cup and create a mental image a 0.5 cup/disc ratio. This should help you to get within the right range but only surgical experience will refine and hone your judgement. Some forceps have markings on the top surface of the jaws to assist with sizing the rhexis, which can be helpful (see Fig. 12.1).
The subincisional part of the rhexis is the most awkward segment to keep under control because of wound distortion, mechanical discomfort, and instrumental obscuration of the tear. The easiest part of the rhexis is the first 90° from wherever you start. So why not start with the subincisional sector first and turn the most difficult part into the easiest part? This sounds disarmingly simple but it really does work (Fig. 12.5). However, in practice it is counter-intuitive and requires the self-discipline to withstand the temptation to tread the path of least resistance and begin the rhexis diametrically opposite the incision, or off to one side.
Hydrodissection
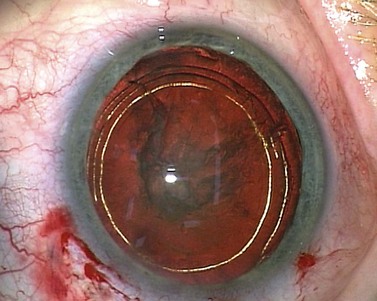
Dr Howard Fine first described this subcapsular, cortical-cleaving hydrodissection technique in 1992, and today it is generally referred to simply as hydrodissection4. This is distinct from the term ‘hydrodelineation’ that refers to a deeper hydrodissection which separates the harder endonucleus form the softer overlying epinucleus and was first described by Dr Anis in 19915. The refractile fluid interface between the two zones produces the proverbial ‘golden ring’ sign of hydrodelineation (Fig. 12.6). In this way the endonucleus can be winkled out and removed whilst retaining an outer cushion of epinucleus. This provides extra insurance as a safety net for the less experienced phaco surgeon.
Technique
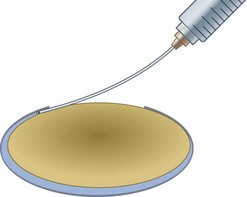
A brisk pulsed injection of fluid is usually needed to initiate the fluid wave. As you continue to steadily inject fluid the wave usually becomes visible, silhouetted by the red reflex, as it passes behind the nucleus (Fig. 12.7).

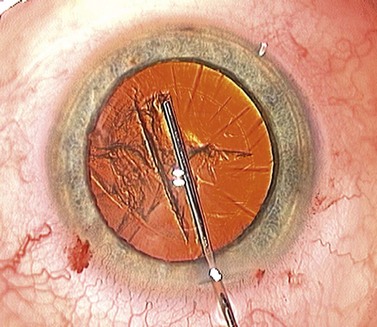
During this first phase of hydrodissection the fluid accumulates behind the nucleus, filling the bag and pushing the nucleus forward, creating a ‘mini capsular block’. This is seen by the surgeon as an early ‘nuclear lift’ (Fig. 12.8) and is often accompanied by central splitting of the anterior cortex and epinucleus, or ‘cortical split’ (see Fig. 12.7).
At this point the surgeon has to press down on the bulging nucleus in order for the trapped fluid to propagate forwards as a subcapsular fluid wave that breaks the anterior cortico-capsular adhesions in its wake (Fig. 12.9). The nucleus then drops back and fine radial striations appear in the anterior cortex, created by the fluid making slit-like channels in the cortex as it is forced forwards (Fig 12.10).

1 Gimbel HV, Neuhann T. Continuous curvilinear capsulorhexis. J Cataract Refract Surg. 1991;17:110-111.
2 Neuhann T. Theory and surgical technique of capsulorhexis (in German). Klin Monatsbl Augenheilkol. 1987;190:542-545.
3 Gogate PM, Kulkarni SR, Krishnaiah S, et al. Safety and efficacy of phacoemulsification compared with manual small-incision cataract surgery by a randomised controlled trial: six-week results. Ophthalmology. 2005;112(5):869-874.
4 Fine IH. Cortical cleaving hydrodissection. J Cataract Refract Surg. 1992;18(5):508-512.
5 Anis AY. Understanding hydrodelineation: The term and the procedure. Doc Ophthalmol. 1994;87(2):123-137.
[/level-membership-for-opthalmology-category][not-level-membership-for-opthalmology-category]
CHAPTER 12 Capsulorrhexis and hydrodissection
Capsulorrhexis
Background
Continuous curvilinear capsulorrhexis (CCC) is the most reliable way of creating a secure and resilient opening in the lens capsule and was originally developed for use in phacoemulsification surgery where it has now been universally adopted1,2. It has more recently gained widespread popularity in the developing world for use in manual small incision cataract surgery (MSICS)3. The ‘three Cs’ also conveniently represent the three principal technical challenges, which require the rhexis to be Circular, Central, and the Correct size.
Instruments
Capsulorrhexis forceps, on the other hand, allow you to apply traction in any chosen direction but are relatively bulky (particularly the early parallel-action Utratta designs) and are more likely to cause wound gape and chamber collapse than a needle. However the newer designs are greatly refined and include hinged ‘cross-action’ and coaxial designs that cause minimal wound gape and give exquisite control of the tear through incisions down to sub-2 mm (Fig. 12.1). The high outlay cost, difficulty in cleaning, and susceptibility to damage of capsulorrhexis forceps all ensure that the bent needle is here to stay.
The role of lasers in surgery is assuming an ever-increasing importance and, at the time of writing, the femtosecond laser has recently been used successfully on human eyes to create high precision incisions and accurate capsulorrhexis (Fig. 12.2).
