[level-membership-for-cardiovascular-category]
Body Mechanics
Positioning and Moving Patients
Body mechanics can be defined as the efficient use of one’s body as a machine and locomotive entity. When working with critically ill or chronically dependent patients, physical therapists frequently change patients’ body positioning before and during treatments to facilitate ventilatory potential and improve patient outcomes. Therapists and nurses attempting to position or move dependent patients need to understand and use proper body mechanics.1–5 This knowledge is necessary to maximize treatment outcomes and to reduce biomechanical stress and trauma for the patient and for those working directly with the patient. Low back pain is the most common cause of work-related disability among employees younger than 46 years, and nurses and physical therapists account for over half of the annual prevalence of low back pain among health care personnel.6,7 Positioning and moving dependent patients is an art that is quite different from working with a patient who can move independently and assume any given position with ease. In this chapter, the principles of body positioning and moving dependent patients are discussed.
Positioning for Optimal Ventilation
Because of the three-dimensional nature of breathing, one of the therapist’s most important goals is to facilitate chest excursion in all three planes of ventilation: anterior-posterior, superior-inferior, and lateral.8 This can be accomplished by improving the length-tension relationships of the muscles used in inspiration.9,10 Massery8 reasons that proper positioning to enhance inspiratory muscles will accomplish the following:
1. Improve the length-tension relationship of the accessory ventilatory muscles involved in that posture.
2. Incorporate a passive stretch of the chest wall.
3. Use the natural coordination of the trunk-chest wall movement with inspiration and exhalation patterns to maximize movement.
The following are some common improvements that can be incorporated into normal positioning.
Supine Position
Upper chest expansion can be increased by removing pillows from under the patient’s head to increase thoracic extension. This will increase the length-tension relationship of the neck accessory muscles (scalene and sternocleidomastoid muscles). Increased movement will be noted in the upper chest in the superior and anterior planes.8 Further anterior expansion may be achieved with a towel roll placed longitudinally at the vertebral spine to open the anterior chest of a patient who tends toward excessive flexion of the trunk (Figure 42-1, A).
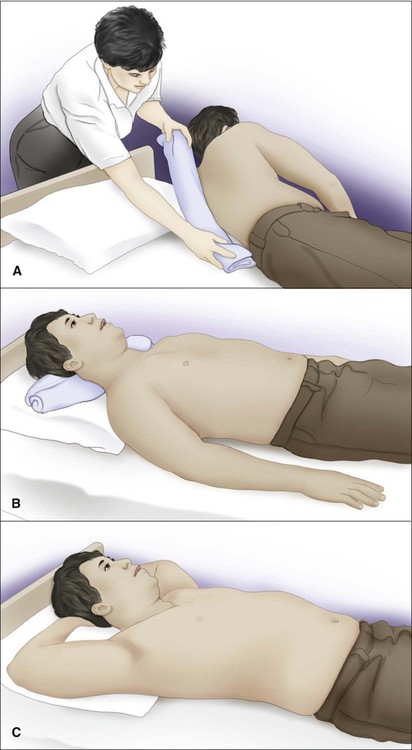
If the patient needs support under the head to achieve a neutral chin tuck to protect swallowing ability, a thin pillow or horizontal towel roll under the occiput can be used (Figure 42-1, B).
External rotation of the shoulders with the scapulae in a neutral or retracted position will stretch the pectoralis and intercostal muscles. This may improve lateral and anterior chest wall movements.10,11 If a patient has full range of motion (ROM) and is comfortable with the arms placed overhead or in full flexion/abduction/external rotation for maximal stretch, this is the optimal position for potential maximal excursion of the anterior chest wall (Figure 42-1, C). If there are major shoulder limitations, moderate shoulder abduction with forearm supination may be the best position available to facilitate chest excursion. Whenever significant limitations are found, the therapist should try to modify the position to accommodate the patient’s needs and achieve optimal ventilation.
Side-Lying Position
Side-lying is an optimal position that may improve breathing patterns. At the same time, medical professionals should continue to heed the need for prescriptive rather than routine patient positioning. In side-lying, gravity is eliminated for anterior expansion and the diaphragm moves freely, particularly the upper hemi-diaphragm, which is not having to shift the abdominal contents as much as the lower hemi-diaphragm. Such a position may be optimal for preterm infants who, when placed in a side-lying or prone position, have been shown to have fewer stress behaviors, resulting in longer periods of sleep with less fussiness and crying.12 However, side-lying positions can also result in decreased forced vital capacity and forced expiratory volume lung measurements and may not be optimal for patients with risks for cardiopulmonary compromise.13 A specific example of the need for prescriptive rather than routine positioning of a patient in side-lying involves a patient with pneumonia or atelectasis. If a patient has right lower lobe pneumonia or atelectasis, side-lying on the unaffected left side will improve oxygenation. Conversely, side-lying with the affected side down will cause a decrease in oxygenation (differential shunt) because a patient with decreased ventilation receives more perfusion to the down lung with more shunting.
Prone Position
Prone positioning can improve oxygenation with minimal untoward effects in several patient populations, including those who are critically ill and medically unstable, such as preterm infants, patients with acute respiratory distress syndrome (ARDS), and patients with hypoxemic acute respiratory failure.12,14–23 Oxygenation is improved with prone positioning when compared with supine positioning via more homogenous lung inflation and alveolar ventilation,24 but some cases with concomitant difficulties have been reported. One instance of severe hypotension was noted in a child with scoliosis, pectus excavatum, and neurofibromatosis who presented for a spinal fusion. It is recommended that sternal pressure be avoided in patients with chest wall deformities.25 Early enteral nutrition is poorly tolerated in critically ill patients receiving invasive mechanical ventilation in the prone position. Medication can be given to enhance gastric emptying and prevent vomiting. Feeding the patient in the prone position becomes challenging if the patient is mechanically ventilated as well.26
When a patient is mechanically ventilated and has numerous tubes and monitors, turning him or her to the prone position takes planning and is staff intensive. Although turning a patient prone may be difficult, reviews of related studies report that prone positioning may reduce the absolute mortality of severely hypoxemic ARDS patients by approximately 10% in addition to improving their oxygenation by 27%-39%. However, the reviews also suggest that long-term prone positioning can expose patients with less severe ARDS to unnecessary increased risks for pressure ulcers, endotracheal tube obstruction, and chest tube dislodgement.24,27 Thus body positioning requires careful prescription of not only the specific positions, but also the time the patient spends in those positions, which is largely response dependent.
Upright Postures
Pelvic alignment is a key component to optimal posture. A relatively anterior tilted pelvis in healthy, flexible adults may reduce the kyphotic curve in the thoracic spine, adduct the scapulae toward a neutral position, produce a more neutral or externally rotated upper-extremity position, and pull the head back into a neutral chin tuck.28,29 The anterior tilt of the pelvis may improve upper-extremity ROM and ventilation. Attending to this one consideration may be all that is needed to improve the breathing capacity of some patients, allowing them to continue to advance in their exercise programs or rehabilitation. Further benefit may be achieved with a lumbar roll.
Another simple means of attaining an anterior pelvic tilt in sitting is to have the patient lean forward over his or her legs, then slide a towel roll horizontally just behind the ischial tuberosities, which can prevent the pelvis from tilting posteriorly (Figure 42-2).30 This can be well tolerated by patients with intact sensation and a pelvis that is at least minimally mobile. For patients with neurological impairment who have impaired sensation or less pelvic mobility, a wedge can be substituted; however, some sliding may occur.
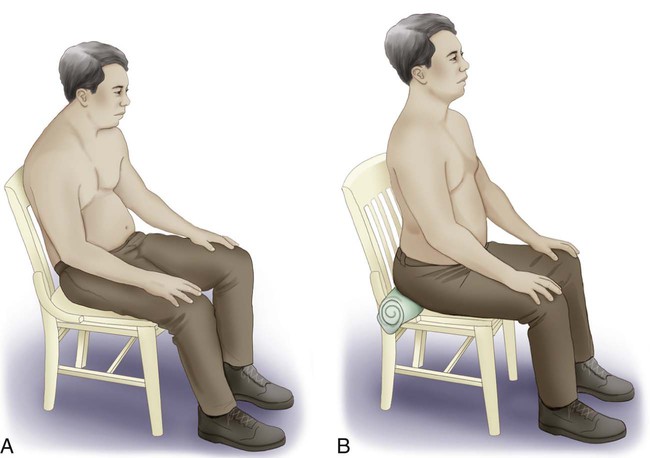
In addition to a relatively anteriorly tilted pelvis, a posture of anterior trunk inclination (forward-lean) with arm bracing has been shown to increase ventilatory capacity.31 Such positioning has resulted in higher values of maximal respiratory pressures and respiratory muscle endurance in patients with chronic obstructive pulmonary disease.32 This forward-lean position with arm bracing posture (as in sitting with elbows on knees or a table) improves diaphragmatic function by reducing abdominal tension,33 facilitating expiratory muscle action (such as that of the external oblique abdominis), and enabling arm and shoulder girdle muscles (such as the pectorals and serratus anterior) to act more effectively as accessory muscles of inspiration.34
Neutral Alignment of the Head and Shoulders
A neutral head and neck position is important for patients with impaired speech volume or endurance and for patients with swallowing or aspiration impairments. A neutral chin tuck may optimize the length-tension relationship of the vocal folds, minimize vocal strain, and improve protective airway reflexes.8 Vertical head alignment may also help to reduce airway resistance and maintain normal breathing rates, thereby helping to ensure optimal contribution from the diaphragm without compensation from chest wall inspiratory muscles.35
It is vital to evaluate the positioning of the patient’s shoulders. Internal rotation of the shoulders and scapular protraction may restrict expansion of the upper chest. On the other hand, external rotation of the shoulders may increase upper chest wall movement and thoracic extension.11 Clinically, lung volumes may improve when patient positioning is carefully considered. Often small, seemingly insignificant changes may augment the patient’s clinical outcomes in conjunction with other therapeutic activities. If unattended, these small factors may impede patient outcomes. Body positioning is vital to improving ventilation as well as functional skills.
Lifting and Moving Dependent Patients
There have been changes in the concepts and principles of lifting. As discussed, the body was historically thought of in terms of a machine. Improper mechanics of lifting was thought to place disproportionate load on the discs. The key components of lifting were to “keep it close,” “bend the knees,” and “lift with the legs.” Over 20 years ago, a shift in thought occurred, and since then spinal posture has been the focus of safe lifting.36
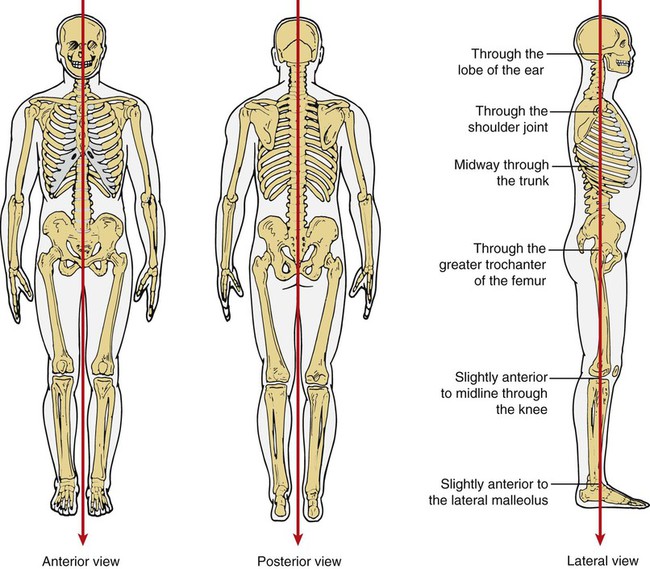
A primary consideration when applying appropriate body mechanics during lifting is proper posture and balance (body stability), specifically with respect to the relationship between gravity, posture, and body stability (Figure 42-3). Gravitational force is exerted in a vertical direction down toward the earth’s center. In addition, that point in a patient or object at which all of its mass is centered is called the center of gravity (the point at which the patient’s maximum weight is concentrated). When standing, the body’s center of gravity is located at approximately 55% of the body’s total height from the ground: in the pelvic cavity, slightly anterior to the upper part of the sacrum. The lower a person’s center of gravity, the greater his or her body stability. Consequently, when the body lifts a patient or an object, muscular effort needs to increase sufficiently to maintain stability and lift against the force of gravity because the lifter’s center of gravity is displaced toward the object. Therefore the therapist can conserve energy and maintain stability by bearing the weight of the patient (or object) as close to his or her own center of gravity as possible. This allows the lifter maximum concentration of energy toward movement of the patient and minimal stress or injury. To facilitate a lift, the bed should be adjusted so that the lifter can reach the patient comfortably. Usually, adjusting the bed to the lifter’s hip level is adequate. This places the patient close to the lifter’s center of gravity.
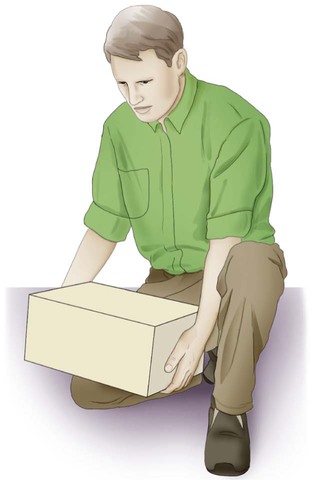
Most lifting should be done with the legs (knees) as opposed to lifting with the arms and back to minimize biomechanical strain (Figure 42-4). Whenever there is a question about a single therapist’s ability to lift a patient alone, assistance should be obtained either from another health care professional or by an assistive device such as a mechanical lift.37
Another consideration in lifting is the base of support of the lifter. The base of support is defined as the area between the feet, which provides the body’s stability. The wider the base of support, the greater the body’s stability. To expand on this point, it is necessary to define the line of gravity and its relationship to body stability. The line of gravity is an imaginary line passing through the center of gravity of an object and perpendicular to the surface on which the object (body) rests (see Figure 42-3). The closer the line of gravity passes to the center of the base of support, the greater the body’s (object’s) stability. Muscular effort is directly related to the distance that the line of gravity is shifted from the base of support.38
The guidelines for patient lifting are summarized below.
 The lower your center of gravity, the wider your base of support, and the nearer the line of gravity falls to the center of your base of support, the greater your body’s stability. When lifting, stand with your feet apart, knees slightly flexed, and one foot forward. Keep your head and trunk aligned.


 Other general tips for lifting are as follows (see Figure 42-4):
– Lift with your legs. Keep legs in a position that permits them to supply most of the force for shifting your trunk.
– Do not attempt to lift with your arms and back.
– When lifting, avoid rotation of the spine. Shift your feet into a position that supports the patient’s weight shift when moving or lifting the patient.
– Stabilize your body against a stationary object whenever possible.
– For efficiency, coordinate the move by using a synchronized verbal expression that is understood by therapists and patient—for instance, “one, two, three, lift.”
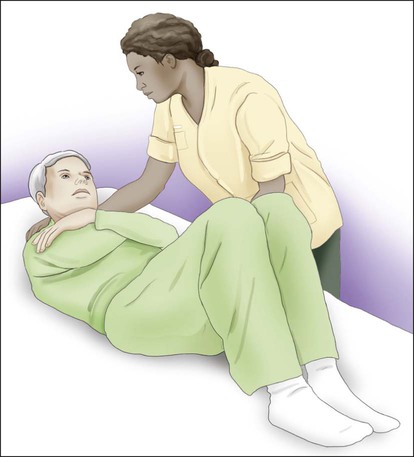
When moving a patient side to side or up and down in bed, the therapist or nurse attempts to reduce the contact between the patient’s body surface and the bed. The use of a turning sheet placed just above the patient’s shoulders and extending to just below the patient’s hips will help reduce such friction. Strategies for shifting a patient in bed include crossing the patient’s arms over his or her chest or abdomen, having the patient flex the knees and hips, and asking the patient to flex the neck and raise the head as he or she is lifted (if the patient is unable to do this, the therapist or nurse can assist) (Figure 42-5).
Moving Dependent Patients
I Moving the patient up or down.39–40
A Using a turning sheet (Figures 42-6).
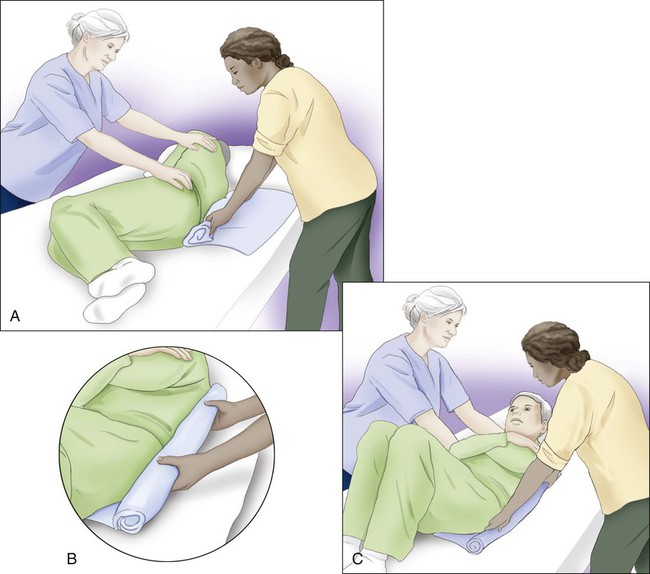
1. Sheet should cover the patient from shoulders to hips.
2. Gather sheet material as close to the patient’s body as possible.
3. Hold at shoulders and hips with a flexion pattern (see Figure 42-6, B).
4. Cross patient’s arms over his or her chest; have the patient flex knees and hips.
5. Ask the patient to raise his or her head if possible.
6. Synchronize action by counting “one, two, three, lift.”
7. Shift weight from one leg to the other rather than lifting up and pulling on back.
B Without a turning sheet (up or down), more than one lifter may be needed.
II Moving the patient to the side of the bed.
III Turning the patient onto his or her side.
A With turning sheet (to right side) (Figure 42-7).
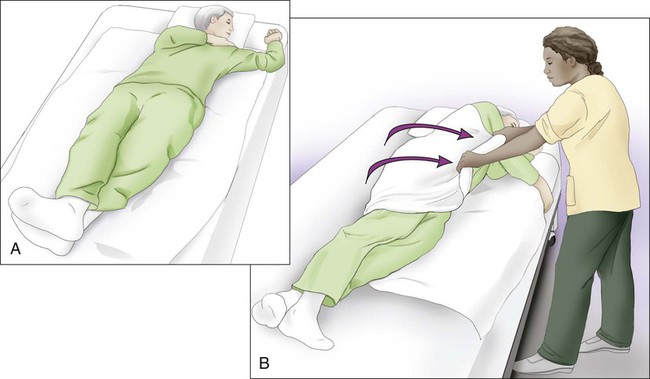
1. Move the patient supine to the opposite side of the turn (e.g., if turning onto right side, move the patient to the left side of the bed).
2. Bring the patient’s right arm to the side at a 90-degree angle up and away from the body.
3. Place the patient’s left arm across the chest.
IV Turning the patient prone (e.g., roll to right side) (Figure 42-8).
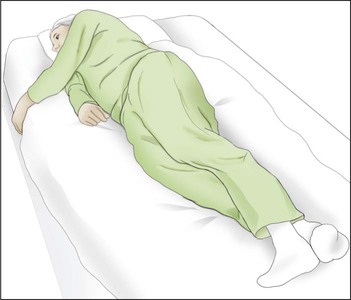
A With or without turning sheet.
1. Move the patient to the opposite side of the bed from the side toward which he or she is turning.
2. Cross the patient’s left arm and left leg over the body.
3. Tuck in patient’s right hand and arm at the body side as close as possible.
4. Push or pull on the patient’s hips and shoulders to turn.
5. Free both arms; do not allow the patient to lie on the arm or hand.
6. A pillow may be placed under the patient’s hips and lower legs to bend the knee and relieve strain of the patient’s back at the lumbar spine.
[/level-membership-for-cardiovascular-category][not-level-membership-for-cardiovascular-category]
Body Mechanics
Positioning and Moving Patients
Body mechanics can be defined as the efficient use of one’s body as a machine and locomotive entity. When working with critically ill or chronically dependent patients, physical therapists frequently change patients’ body positioning before and during treatments to facilitate ventilatory potential and improve patient outcomes. Therapists and nurses attempting to position or move dependent patients need to understand and use proper body mechanics.1–5 This knowledge is necessary to maximize treatment outcomes and to reduce biomechanical stress and trauma for the patient and for those working directly with the patient. Low back pain is the most common cause of work-related disability among employees younger than 46 years, and nurses and physical therapists account for over half of the annual prevalence of low back pain among health care personnel.6,7 Positioning and moving dependent patients is an art that is quite different from working with a patient who can move independently and assume any given position with ease. In this chapter, the principles of body positioning and moving dependent patients are discussed.
Positioning for Optimal Ventilation
Because of the three-dimensional nature of breathing, one of the therapist’s most important goals is to facilitate chest excursion in all three planes of ventilation: anterior-posterior, superior-inferior, and lateral.8 This can be accomplished by improving the length-tension relationships of the muscles used in inspiration.9,10 Massery8 reasons that proper positioning to enhance inspiratory muscles will accomplish the following:
1. Improve the length-tension relationship of the accessory ventilatory muscles involved in that posture.
2. Incorporate a passive stretch of the chest wall.
3. Use the natural coordination of the trunk-chest wall movement with inspiration and exhalation patterns to maximize movement.
The following are some common improvements that can be incorporated into normal positioning.
Supine Position
Upper chest expansion can be increased by removing pillows from under the patient’s head to increase thoracic extension. This will increase the length-tension relationship of the neck accessory muscles (scalene and sternocleidomastoid muscles). Increased movement will be noted in the upper chest in the superior and anterior planes.8 Further anterior expansion may be achieved with a towel roll placed longitudinally at the vertebral spine to open the anterior chest of a patient who tends toward excessive flexion of the trunk (Figure 42-1, A).
If the patient needs support under the head to achieve a neutral chin tuck to protect swallowing ability, a thin pillow or horizontal towel roll under the occiput can be used (Figure 42-1, B).
External rotation of the shoulders with the scapulae in a neutral or retracted position will stretch the pectoralis and intercostal muscles. This may improve lateral and anterior chest wall movements.10,11 If a patient has full range of motion (ROM) and is comfortable with the arms placed overhead or in full flexion/abduction/external rotation for maximal stretch, this is the optimal position for potential maximal excursion of the anterior chest wall (Figure 42-1, C). If there are major shoulder limitations, moderate shoulder abduction with forearm supination may be the best position available to facilitate chest excursion. Whenever significant limitations are found, the therapist should try to modify the position to accommodate the patient’s needs and achieve optimal ventilation.
Side-Lying Position
Side-lying is an optimal position that may improve breathing patterns. At the same time, medical professionals should continue to heed the need for prescriptive rather than routine patient positioning. In side-lying, gravity is eliminated for anterior expansion and the diaphragm moves freely, particularly the upper hemi-diaphragm, which is not having to shift the abdominal contents as much as the lower hemi-diaphragm. Such a position may be optimal for preterm infants who, when placed in a side-lying or prone position, have been shown to have fewer stress behaviors, resulting in longer periods of sleep with less fussiness and crying.12 However, side-lying positions can also result in decreased forced vital capacity and forced expiratory volume lung measurements and may not be optimal for patients with risks for cardiopulmonary compromise.13 A specific example of the need for prescriptive rather than routine positioning of a patient in side-lying involves a patient with pneumonia or atelectasis. If a patient has right lower lobe pneumonia or atelectasis, side-lying on the unaffected left side will improve oxygenation. Conversely, side-lying with the affected side down will cause a decrease in oxygenation (differential shunt) because a patient with decreased ventilation receives more perfusion to the down lung with more shunting.
Prone Position
Prone positioning can improve oxygenation with minimal untoward effects in several patient populations, including those who are critically ill and medically unstable, such as preterm infants, patients with acute respiratory distress syndrome (ARDS), and patients with hypoxemic acute respiratory failure.12,14–23 Oxygenation is improved with prone positioning when compared with supine positioning via more homogenous lung inflation and alveolar ventilation,24 but some cases with concomitant difficulties have been reported. One instance of severe hypotension was noted in a child with scoliosis, pectus excavatum, and neurofibromatosis who presented for a spinal fusion. It is recommended that sternal pressure be avoided in patients with chest wall deformities.25 Early enteral nutrition is poorly tolerated in critically ill patients receiving invasive mechanical ventilation in the prone position. Medication can be given to enhance gastric emptying and prevent vomiting. Feeding the patient in the prone position becomes challenging if the patient is mechanically ventilated as well.26
When a patient is mechanically ventilated and has numerous tubes and monitors, turning him or her to the prone position takes planning and is staff intensive. Although turning a patient prone may be difficult, reviews of related studies report that prone positioning may reduce the absolute mortality of severely hypoxemic ARDS patients by approximately 10% in addition to improving their oxygenation by 27%-39%. However, the reviews also suggest that long-term prone positioning can expose patients with less severe ARDS to unnecessary increased risks for pressure ulcers, endotracheal tube obstruction, and chest tube dislodgement.24,27 Thus body positioning requires careful prescription of not only the specific positions, but also the time the patient spends in those positions, which is largely response dependent.
Upright Postures
Pelvic alignment is a key component to optimal posture. A relatively anterior tilted pelvis in healthy, flexible adults may reduce the kyphotic curve in the thoracic spine, adduct the scapulae toward a neutral position, produce a more neutral or externally rotated upper-extremity position, and pull the head back into a neutral chin tuck.28,29 The anterior tilt of the pelvis may improve upper-extremity ROM and ventilation. Attending to this one consideration may be all that is needed to improve the breathing capacity of some patients, allowing them to continue to advance in their exercise programs or rehabilitation. Further benefit may be achieved with a lumbar roll.
Another simple means of attaining an anterior pelvic tilt in sitting is to have the patient lean forward over his or her legs, then slide a towel roll horizontally just behind the ischial tuberosities, which can prevent the pelvis from tilting posteriorly (Figure 42-2).30 This can be well tolerated by patients with intact sensation and a pelvis that is at least minimally mobile. For patients with neurological impairment who have impaired sensation or less pelvic mobility, a wedge can be substituted; however, some sliding may occur.
In addition to a relatively anteriorly tilted pelvis, a posture of anterior trunk inclination (forward-lean) with arm bracing has been shown to increase ventilatory capacity.31 Such positioning has resulted in higher values of maximal respiratory pressures and respiratory muscle endurance in patients with chronic obstructive pulmonary disease.32
[/not-level-membership-for-cardiovascular-category]
