CHAPTER 10 Miscellaneous blocks
Intercostal nerve block
This technique may be used to ease the pain of rib fractures, to allow the insertion of an intercostal drain or for other thoracic procedures. It can be a very easy procedure in relatively thin patients, but in patients with a muscular chest well and obese patients it can be challenging with a high risk of pneumothorax. It should be avoided in patients with poor underlying respiratory function and those with coagulopathies.
Preparation
•
Position the patient prone, in the lateral decubitus position (with the side to be blocked uppermost) or in a sitting position. Position the patient’s arms in such a way as to pull the scapulae laterally.
•
Mark the inferior margins of the ribs to be blocked just lateral to the paraspinal muscles (about 60 to 80 mm lateral to the midline for the inferior ribs and 40 to 70 mm for the superior ribs).
•
The ribs can be counted from the 12
th rib, or from the 7
th rib, which is the most inferior rib covered by the inferior angle of the scapula.
Technique
•
Prepare the field by cleaning the skin with an antiseptic solution and positioning sterile drapes.
•
Identify the target points for needle insertion – the inferior margin of the rib, just lateral to the paraspinal muscles.
•
Raise a weal of local anaesthetic at each anticipated needle insertion point with a 25G needle.
•
Pull the skin about 10 mm superiorly and puncture the skin with the needle parallel to the sagittal plane.
•
Angle the needle 20° to 30° superiorly. The needle may be grasped with an artery forceps or a needle holder for better control (be careful not to crush the needle).
•
Advance the needle until the rib is contacted (about 10 mm in the average patient, more in muscular or obese patients).
•
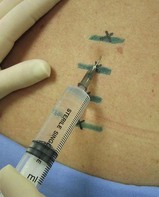
Release the retracted skin and ‘walk’ the needle inferiorly while maintaining the superior angulation of the needle (
Fig. 10.1).
•
Once the inferior edge of the rib has been reached, advance the needle about 3 mm – you might feel a ‘pop’ as the fascia is penetrated. The average distance from the posterior aspect of the rib to the pleura is 8 mm, so be careful not to advance the needle too far.
•
Aspirate. If no flashback of blood is obtained, inject 3 to 5 mL of local anaesthetic slowly with intermittent aspiration to rule out intravascular injection.
•
Repeat the procedure with the other ribs to be blocked and one rib above and one rib below these levels.
•
Local anaesthetic is rapidly absorbed after these blocks because of the high vascularity, so the toxic potential is high. Do not use more than 30 mL of bupivacaine for all the blocks combined.
Ultrasound technique
Preparation
•
Position the patient prone, in the lateral decubitus position (with the side to be blocked uppermost) or in a sitting position.
•
Position the patient’s arms in such a way as to pull the scapulae laterally.
•
Use a linear high-frequency probe (10 to 15 MHz is ideal) and select an appropriate pre-set application.
•
Identify the area to begin the scan – the appropriate ribs to be blocked plus one rib above and one rib below.
•
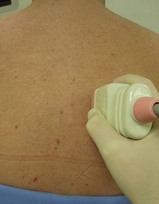
Perform a preliminary non-sterile survey scan to identify the relevant anatomy and optimise the image by adjusting depth of field (about 20 to 30 mm), focus point, and gain (
Fig. 10.2). Mark the best probe position on the skin with a pen, if required.
•
Place the probe between the posterior axillary line and the paraspinal muscles in the longitudinal plane in a suitable position to obtain a transverse view of the rib to be blocked, the intercostal space and the rib below. Position the probe with the index marker superiorly so that the needle will be seen coming from right to left on the screen.
•
Prepare the field by cleaning the skin with an antiseptic solution and positioning sterile drapes. Cover the probe with a sterile probe-sheath and apply sterile ultrasound gel to the appropriate area.
Technique
This block should only be performed using the in-plane approach so that the movement of the needle can be visualised in real time in order to avoid accidental pleural puncture.
In-plane approach
•
Identify the rib to be blocked in its transverse section, along with the rib below and the intercostal space in an area convenient to block.
•
Ensure that the pleura is clearly visible (look for pleural sliding and comet tails).
•
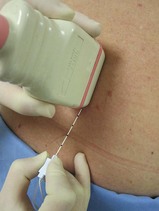
Identify the target point for needle insertion – the superior border of the rib inferior to the one to be blocked. Position the inferior edge of the probe at the superior edge of the rib below the one to be blocked (
Fig. 10.3).
•
Raise a weal of local anaesthetic at the needle insertion target with a 27G needle.
•
Insert a 25 mm to 50 mm 22G nerve-block needle at the inferior end of the ultrasound probe.
•
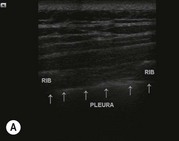
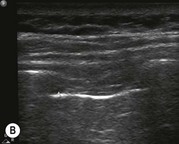
Visualise the movement of the needle as it is advanced superiorly towards the intercostal groove (the nerve itself is not visible) (
Fig. 10.4A&B). Ensure that the tip of the needle is visible at all times in order to avoid penetrating the pleura.
•
Once the tip of the needle is in the costal groove, aspirate. If no flashback of blood is obtained, inject 3 to 5 mL of local anaesthetic slowly with intermittent aspiration to rule out intravascular injection.
•
After the procedure is complete, confirm the absence of pneumothorax on the side of the procedure with standard ultrasound techniques.
Intrapleural block
An intrapleural block may be administered in two ways – through direct injection via a needle or catheter into the pleural space (which is rarely used in the ED) or through an intercostal drain (ICD) (thoracostomy tube) to relieve pain and discomfort from the ICD and from contused or fractured ribs. Rib pain and irritation of the parietal pleura from the ICD can cause significant symptoms, and delay re-expansion of a collapsed lung. This technique should not be used with a significant haemothorax if auto-transfusion may be considered, because of possible toxic side effects when the local anaesthetic is administered with the blood.
Technique
•
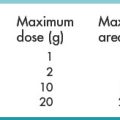
Mix 10 mL of bupivacaine 0.5%, 10 mL of lidocaine 2% and 30 mL of normal saline. Ensure that these doses do not exceed the maximum dose for the patient’s weight.
•
Disconnect the intercostal drain from the bottle connection and inject the anaesthetic through the drain (during inspiration, to avoid it splashing in your face!).
•
Clamp the ICD, reconnect the bottle and ask the patient to lie supine for 2 to 3 minutes, prone for 2 to 3 minutes and on each side for 2 to 3 minutes, then unclamp the drain.
•
Unclamp the drain immediately at any stage if the patient becomes distressed.
•
This block may be repeated after 12 hours if necessary.
•
An alternative method is to insert a sealed butterfly needle through the ICD tube and tape it down. The local anaesthetic can be introduced through this needle without disconnecting the tube. Clamp the tube and reposition the patient as described above.
Penile block
This is a very useful technique to provide anaesthesia to the penis for circumcision, the dorsal slit procedure for paraphimosis, the management of priapism, laceration repair and for other penile trauma (entrapment in zippers, genital rings). There are several techniques described for the penile block and the two most common techniques are described below. The nerve block technique has the advantages of being less painful, easier to perform, and avoids the potential complications of penetrating the dorsal vessels of the penis with resultant haematoma. If adequate volumes are injected, both the dorsal and ventral nerves of the penis are blocked.
The modified ring-block technique
•
Position the patient supine – explain the procedure carefully!
•
Clean the penis, scrotum and perineum with a chlorhexidine in alcohol solution.
•
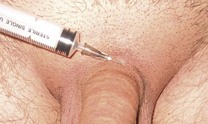
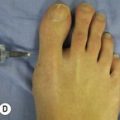
Raise three deep subcutaneous weals with about 2 mL of local anaesthetic solution (
without adrenaline [epinephrine]): one on each side of the posterior midline at the base of the penis (
Fig. 10.5) and one crossing the anterior median raphe at the junction of the penis and scrotum (
Fig. 10.6).
•
Join these weals with subcutaneous and intradermal rings of local anaesthesia.
Dorsal nerve of penis block
•
Position the patient supine – explain the procedure carefully!
•
Clean the penis, scrotum and perineum with a chlorhexidine in alcohol solution.
•
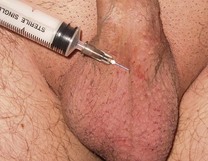
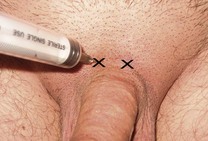
Identify the target point for needle insertion – a point about 5 mm lateral to the midline at the level of the base of the penis (
Fig. 10.7).
•
Insert the needle perpendicular to the skin and advance it until the pubic symphysis is contacted. Withdraw the needle slightly and advance it approximately 5 mm, slightly laterally and inferiorly to the symphysis.
•
Aspirate. If no flashback of blood is obtained, inject 5 to 8 mL of local anaesthetic slowly with intermittent aspiration to rule out intravascular injection.
•
Repeat this technique on the opposite side.
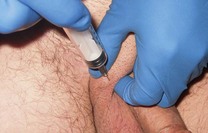
Spermatic cord block
This block may be used to provide analgesia for injuries to the testes or to relieve the pain of the acute scrotum (after due consideration of the risks and benefits) to facilitate clinical examination.
Technique
•
Position the patient supine – explain the procedure carefully!
•
Clean the penis, scrotum and perineum with a chlorhexidine in alcohol solution.
•
Identify the spermatic cord as it emerges from the external ring: grasp the cord and infiltrate 5 to 10 mL of local anaesthetic without adrenaline around the cord (
Fig. 10.8). Aspirate frequently to exclude intravascular injection.
•
Repeat on the opposite side if necessary.
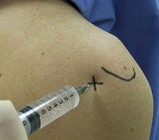
Intra-articular local anaesthesia
Injections of corticosteroids with local anaesthetic into the knee, ankle, shoulder or wrist have long been used for the treatment of inflammatory conditions. There is some suggestion that injection of local anaesthetic in the ED may benefit patients with painful injuries in these areas. There is as yet little published evidence about these techniques. There is good evidence, however, that the use of intra-articular local anaesthesia in anterior shoulder dislocation reductions is as good as conventional techniques of intravenous sedation and analgesia, but with a shorter stay in the ED as well as a lower cost.
Technique
•
Sit the patient with their legs hanging over the side of the bed and their injured arm cradled in their lap. If this is not possible, let the patient lie on the uninjured side, facing away from you.
•
Position yourself behind the patient.
•
With a marking pen, mark the posterior aspect of the acromion as far as its lateral extension.
•
Palpate the hollow area immediately inferior to the posterior edge of the acromion and mark the target area for needle insertion – 10 mm inferior to the acromion and 20 mm medial to the lateral edge (
Fig. 10.9).
•
Adhere to strict aseptic conditions: clean the area with chlorhexidine in alcohol, and use a gloved sterile technique.
•
Insert the needle at the target area, aiming anteriorly and slightly inferiorly, under the acromion but superior to the head of the humerus. Insert the needle from 25 to 40 mm depending on the body habitus of the patient.
•
Aspirate. If there is no flashback of blood into the syringe, inject the local anaesthetic. There should be very low resistance to injection. If resistance is encountered, reposition the needle.
•
Inject 20 mL of lidocaine 2% or 20 mL of bupivacaine 0.5% for a longer duration of analgesia.
•
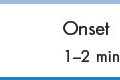
Onset of analgesia is from 10 to 30 minutes.
Haematoma block
This is a simple technique for producing anaesthesia to enable the reduction of a fracture. It may be used for many fractures but is most commonly used for distal radius fractures. It is safe and reliable both in adults and in children, with a low incidence of adverse events. Septic complications have not been commonplace following a haematoma block. It does not generate the density of anaesthesia as IVRA, but is much simpler and easier to use and gives enough analgesia for an adequate reduction in most cases.
Technique for distal radius haematoma block
•
Use a sterile technique: clean the dorsal aspect of the distal forearm and wrist with an antiseptic solution. A sterile gloved technique should be used thereafter.
•
Locate the fracture with gentle palpation, and correlate this with the findings from the lateral X-ray: it is often more proximal than expected.
•
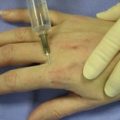
Identify the target area for needle insertion – the dorsal aspect of the radius 10 to 20 mm proximal to the fracture site.
•
Raise a subcutaneous weal of local anaesthetic at the injection site.
•
Puncture the skin with a 20G needle and advance it at a 45° angle towards the fracture.
•
Angle the needle slightly more at the fracture site and advance it until an area of no resistance is encountered – the fracture haematoma.
•
Aspirate – flashback of blood into the syringe confirms that the needle is in the haematoma.
•
Use the intravenous lidocaine formulation for this block – introduction into the intraosseous space may cause systemic dissemination of the agent. The block is administrated by infiltrating 5 to 10 mL of lidocaine 1% (if this does not exceed the maximum permitted dose) directly into the fracture site. Analgesia occurs within 10 to 15 minutes after infiltration and will last for 30 to 60 minutes.
•
If an ulnar styloid fracture is present, infiltrate 3 to 5 mL of lidocaine 1% into the fracture using the same sterile technique. This will further reduce the pain of reduction.
Ultrasound technique
Although the haematoma block is a fairly easy procedure to perform blind, ultrasound guidance can potentially increase the accuracy of needle placement. This will decrease the patient discomfort due to needle repositioning and decrease the incidence of failed blocks and therefore potential toxicity from repeated efforts. Ultrasound can also be used to evaluate the adequacy of the fracture reduction.
Ultrasound haematoma block for the distal radius
Preparation
•
Position the patient supine.
•
Rest the arm comfortably by the patient’s side.
•
Use a linear high-frequency probe (10 to 15 MHz is ideal) and select an appropriate pre-set application.
•
Identify the area to begin the scan – the dorsal aspect of the distal radius over the fracture site.
•
Perform a preliminary non-sterile survey scan to identify the relevant anatomy and optimise the image by adjusting depth of field (about 10 to 20 mm), focus point, and gain.
•
Place the probe longitudinally over the distal radius to identify the cortical disruption and the adjacent hypoechoic haematoma.
•
Prepare the field by cleaning the skin with an antiseptic solution and positioning sterile drapes. Cover the probe with a sterile probe-sheath and apply sterile ultrasound gel to the distal forearm.
Technique
In-plane approach
•
Identify the fracture and adjacent haematoma.
•
Identify the target site for needle insertion – 10 to 20 mm proximal to the fracture site. Position the proximal edge of the probe at the target site.
•
Raise a weal of local anaesthetic at the needle insertion target with a 27G needle.
•
Insert a 25 mm to 50 mm 22G nerve-block needle on the proximal end of the ultrasound probe.
•
Advance the needle towards the haematoma while visualising the entire length of the needle in real time.
•
Aspirate to confirm position within the haematoma, then inject 5 to 10 mL of lidocaine 1% into the haematoma.
•
Confirm expansion of the hypoechoic haematoma during the injection of the local anaesthetic.