CHAPTER 6 Nerve block regional anaesthesia
General principles
Nerve block regional anaesthesia is potentially of enormous value in the ED. It is useful both for providing an excellent quality of analgesia following traumatic injuries (e.g. a metacarpal block for a crushed finger; a femoral block for a fractured femur; a sciatic nerve block for a fractured ankle) as well as for providing anaesthesia for minor procedures (interscalene block for shoulder dislocation; ankle block for complex wound repair on the foot). There is good evidence to support the efficacy and safety of regional anaesthetic techniques in the ED both in adults and in children.
Some blocks have a high success rate with a blind technique without a nerve stimulator (e.g. femoral block, sciatic block, axillary block, supraclavicular block, interscalene block), but some blocks require a nerve stimulator (e.g. infraclavicular block), and most blocks are probably more successful with the use of nerve stimulators, although this is often debated. The use of ultrasound with or without nerve stimulators can further increase the ease and success rate of nerve plexus or peripheral nerve blockade. There is good clinical evidence to support this, and this is the technique that emergency medicine practitioners should learn and adopt. Studies have shown that ultrasound can decrease the failure rate of nerve blocks from a historical 20–30% to as little as 5% and that the speed of onset can be increased and the complications decreased.
Nerve blocks work on the principle of inducing analgesia or anaesthesia to a body region by injecting a local anaesthetic agent around the nerve or nerves innervating that region. Various techniques may be used to assist in positioning the needle tip adjacent to, but not penetrating, the nerve: the paraesthesia technique; the nerve stimulator; the ultrasound-guided block. Once the needle is located within the neural sheath, a large volume of local anaesthetic is injected (not under pressure) which spreads completely around the nerve (this can also be confirmed with ultrasound). Block success is increased if large volumes are used. Newer evidence with ultrasound-guided blocks shows that smaller volumes can be used because the local anaesthetic can be deposited circumferentially around the nerve under direct vision.
Adverse events following nerve block anaesthesia can include vasovagal reactions, systemic reactions to the local anaesthetic agent (including anaphylaxis, allergic reactions, toxic reactions and methaemoglobinaemia), local tissue pain and inflammation, as well as complications that can vary with the site being punctured. These complications can include nerve damage from intraneural injection, spinal cord damage or total spinal anaesthesia (interscalene block), phrenic or recurrent laryngeal nerve paralysis, pneumothorax or vascular puncture (interscalene or supraclavicular blocks). Fortunately these are rare and can mostly be avoided by meticulous attention to safety and the use of ultrasound techniques.
There are a few important factors to consider before embarking on a nerve block:
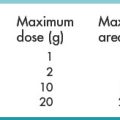
A detailed discussion of the pharmacokinetics and pharmacodynamics of local anaesthetic agents is beyond the scope of this book. In general, the choice of agents depends on the clinical setting, the required duration of anaesthesia or analgesia, the potential side effects, and, of course, availability. A sound knowledge of the pharmacology of local anaesthetics is not difficult, as there are only a handful of injectable agents readily available. The most commonly used agents for nerve block regional anaesthesia are lidocaine, bupivacaine, mepivacaine and ropivacaine, often with adrenaline (epinephrine) added in a concentration of 1:100 000 or lower. Levobupivacaine is a newer formulation, composed exclusively of the S-isomer of bupivacaine (regular bupivacaine is a mixture of the S- and D-isomers). The S-isomer has been shown to be more potent and longer acting, with a more favourable side-effect profile. This agent is much more expensive than the others, however.
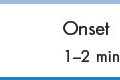
The success of the block, the time of onset and the duration of anaesthesia depend on the volume of local anaesthetic agent injected, the agent used and the accuracy of injection. It is important to emphasise that the use of lidocaine in a nerve block does not necessarily accelerate the onset of the block significantly, as part of the lag time results from local tissue diffusion which remains much the same for any agent.
Ultrasound fundamentals for nerve blocks
Conventional peripheral nerve block techniques are performed ‘blind’, without visual guidance and are completely dependent on surface anatomical landmarks for localisation of nerves or nerve bundles. Some landmark techniques are better than others, since those that rely on bony landmarks have a higher success rate than those using soft-tissue landmarks. Even though the use of nerve stimulators increases the likelihood of placing the needle in proximity to the nerve, needle positioning is still dependent on external or palpable landmarks.
It is, therefore, not surprising that regional anaesthetic techniques have a reported failure rate of up to 20% because of incorrect needle and/or local anaesthetic placement. Multiple trial-and-error attempts at needle placement lead to frustration, unwarranted patient pain and time delay. Ultrasound is a practical option for assisting in nerve blocks as it is portable and non-invasive. ED physicians are also often familiar with ultrasound-guided procedures and can make the transition to ultrasound nerve blocks with ease.
The advantages of ultrasound-guided nerve blocks include the following:
In the real world of the ED, however, visualisation of nerves may not be as easy as described in training material, and the pictures you obtain may not look like those in the book. That does not necessarily reflect on your skill – images in books are always the best available. The images in this book are average images that you might expect to obtain yourself with average equipment. Here are some hints that might help you locate the nerves as easily as possible and how to optimise the imaging capability of your equipment:
There are two kinds of needle-to-probe alignments. Each approach has advantages and disadvantages, and some nerve blocks are easier with one than the other. This is covered under the descriptions for each block.
The in-plane approach (Figs 6.1, 6.2A–D)
In this technique the nerve is centred in the display and the needle path is planned – it will enter the field of view from the top right or left. The needle is inserted beneath the long axis of the probe and manoeuvred in line with the ultrasound beam. The advantages of the in-plane approach are that it provides full visualisation of the entire needle shaft and tip when the needle and beam are correctly aligned. This is especially important when there are vital structures in the vicinity of the nerve or in the projected path of the needle (e.g. the supraclavicular block is performed close to the pleura). It also shows the distance between the tip of the needle and the nerve and the movement of the needle towards the target nerve, so that adjustments of angle and direction can be made while advancing the needle.
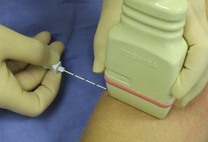
Fig. 6.1 For the in-plane approach, the needle is introduced from the edge of the probe (it does not matter from which edge as long as the operator has the probe orientated correctly) and aligned precisely with the long axis of the probe. Good hand–hand–eye (probe–needle–screen) coordination takes some time to develop. This example shows the probe on the forearm in preparation to perform a radial nerve block just below the elbow via the in-plane approach.
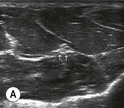
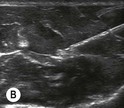
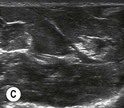

Fig. 6.2 (A) This is the in-plane approach to the median nerve FUN block on the left forearm. The median nerve is visualised in cross-section by placing the probe transversely across the mid-forearm. The nerve is indicated by the arrows. (B) The needle has been inserted from the medial aspect of the probe and the tip of the needle can be seen to be positioned immediately superficial to the nerve. This is the main advantage of the in-plane approach: the entire needle can be visualised. (C) Local anaesthetic has been injected immediately superficial (anterior) to the nerve and appears as an anechoic area that has distended the tissue around the nerve. As the injection progresses, the local anaesthetic will spread all around the nerve. If necessary, and as is often done routinely, the needle can be repositioned and additional local anaesthetic injected. (D) During and after the injection process the circumferential spread of local anaesthetic around the nerve should be confirmed. This can be done using a transverse or longitudinal view of the nerve. For this view the probe is rotated by 90° until an image such as this is obtained. The arrows point to the median nerve in longitudinal view and the arrowheads show the local anaesthetic anterior and posterior to the nerve. This will accurately predict block success.
The disadvantages of the in-plane approach are that it is technically more difficult because it requires accurate alignment of the ultrasound beam with the needle and the nerve. The needle path is not the shortest distance from the skin to the nerve, and the needle often penetrates muscle layers, which might make it more painful. It also requires a needle puncture site which is often different to the traditional nerve-block techniques.
Out-of-plane approach (Figs 6.3, 6.4A–E)
In this technique the nerve is centred in the display and the needle path is planned – it will enter from the top of the field of view. The needle is inserted precisely under the centre of the long side of the probe so that the needle and probe are perpendicular to each other. The needle is visualised by ultrasound as a hyperechoic white dot but it can be difficult to identify the tip of the needle. Slide the probe away from the needle puncture site and the hyperechoic dot that is most distant and deep represents the tip of the needle. The advantages of the out-of-plane approach are that this approach resembles the conventional nerve block approach and that by passing the needle perpendicular to the probe the shortest path to the nerve is followed. This is technically easier than the in-plane approach.

Fig. 6.3 For the out-of-plane approach, the needle is introduced from the long side of the probe closest to the operator. The position of the needle tip can be inferred from local tissue movement and from tissue expansion and the appearance of anechoic local anaesthetic during injection. The needle tip can be seen by sliding the probe away from the operator to locate the tip as the furthest part of the needle that can be visualised. This example shows the probe on the forearm in preparation to perform a radial nerve block just below the elbow via the out-of-plane approach.
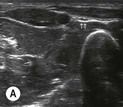
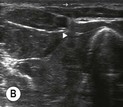
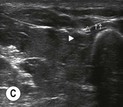
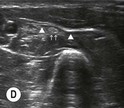
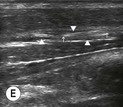
Fig. 6.4 (A) This is the out-of-plane approach to the radial nerve FUN block on the left forearm. The radial nerve is visualised in cross-section by placing the probe transversely across the mid-forearm. The nerve is indicated by the arrows and lies immediately lateral to the radial artery. The nerve is flattened between two fascia layers. (B) The needle has been inserted from the centre of the long side of the probe and the tip of the needle can be seen as a small hyperechoic dot (arrow) with an acoustic shadow (arrowhead) and is positioned superficial and slightly medial to the nerve. The path from skin to nerve is much shorter with this approach than with the in-plane approach, but the needle itself is poorly visualised. (C) Local anaesthetic has been injected immediately medial to the nerve and appears as an anechoic area (open arrowhead) that has distended the fascial planes around the nerve (arrows) and displaced the nerve laterally. As the injection progresses, the local anaesthetic will spread all around the nerve. If necessary, and as is often done routinely, the needle can be repositioned and additional local anaesthetic injected. The acoustic shadow of the needle is faintly visible (solid arrowhead). (D) Local anaesthetic (arrowhead) has spread all around the radial nerve (arrows) and the image of the nerve has become more distinct. (E) The longitudinal view of the radial nerve (arrows) confirms anterior and posterior spread of local anaesthetic (arrowhead) and promises a successful block.
The disadvantages are that it can be difficult to accurately localise the needle tip and the needle tip position can only be inferred by observing local tissue movement or tissue expansion at the time of fluid injection.
Optimising the ultrasound image for nerve blocks
The ability to locate and clearly visualise a nerve or group of nerves using ultrasound depends on the emergency physician’s knowledge of the relevant surface landmarks, the ultrasound anatomy, the ability to manipulate the probe correctly and the knowledge to optimise the image displayed by the ultrasound machine. The surface and ultrasound anatomy can be learnt from experience and standard teaching material, but the wielding of the wand and the stroking of the machine from experience only.
The important settings on the machine required for optimum visualisation are:
Ultrasound probe sterile preparation
For any procedure where the skin is breached (nerve blocks or vascular access) it is important to maintain a sterile field. For this reason, the skin should be cleaned with an appropriate agent (chlorhexidine in 70% alcohol is the most widely used solution) and then draped. Sterile gloves with or without a gown should be used by the operator.
Cover the ultrasound probe with a commercial sterile sheath. If one is not available, simply place a sterile adhesive transparent dressing over the probe surface; another option is to use a sterile glove or a sterilised condom to cover the probe (Fig. 6.5A–C). Make sure that ultrasound gel is layered generously between the probe and the inside of the sheath or glove covering it (for adhesive coverings there is no need to put any gel in between the dressing and the probe surface as long as the contact is smooth without any trapped air or wrinkles).
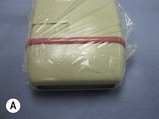
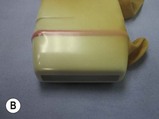
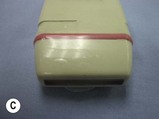
Fig. 6.5 Sterile preparation of the ultrasound transducer may be accomplished using a commercial sterile probe cover or improvised using an adhesive sterile polyurethane dressing (A), a sterile glove (B) or a sterilised condom (C).
If necessary, wrap a rubber band, or adhesive tape, around the probe to avoid probe movement inside the sheath during ultrasound scanning. Apply plenty of sterile gel onto the skin surface over the target site to avoid any trapping of air between the probe and skin.
Unless a full-sterile sheath is used, only the probe surface that contacts the patient’s skin is sterile, the probe handle and cord are not. Either keep ‘one hand clean, one hand dirty’, or take great care to handle only the part covered by the sterile dressing (the advantage of using a sterile glove as a covering), or get an assistant to manipulate the probe. A sterile drape can be wrapped around the cord if a commercial probe cover is not used.
Nerve stimulator basic operation
The use of nerve stimulators in regional anaesthesia enables the tip of the needle to be manoeuvred into proximity of the nerve before the injection of local anaesthetics, with a corresponding increase in the success rate of the block procedure.
The basic underlying principle of the nerve stimulator is that the stimulus intensity (current) required to produce a muscle twitch is directly proportional to the distance from the nerve. If the stimulating needle is far from the nerve, a very high stimulus is needed to produce a muscle twitch. Conversely, as the tip moves closer to the nerve a smaller current is required to produce a muscle twitch. With this in mind, once twitches are obtained the current is reduced and the needle manoeuvred until twitches are present at a low current. This indicates proximity of the needle to the nerve. The presence of muscle twitches at very low stimulus intensity, however, raises the concern of intraneural needle placement.
Use a nerve stimulator that is specifically made for peripheral nerve blocks (not a multifunctional unit, which can be more confusing) with the following characteristics:
Ensure that you are familiar with the machines that are available to you; it is unlikely that they will be in the ED, but will be available from theatre. Keep current with your techniques and the available technology.
Technique