CHAPTER 18 Arthroscopic Iliopsoas Release and Lengthening
Surgical technique
Iliopsoas Release at the Lesser Trochanter
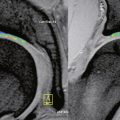
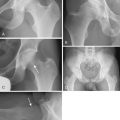
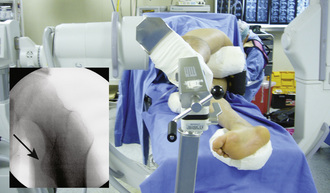
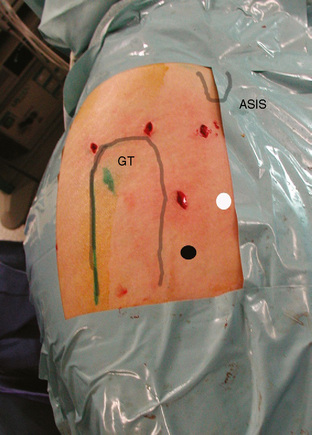
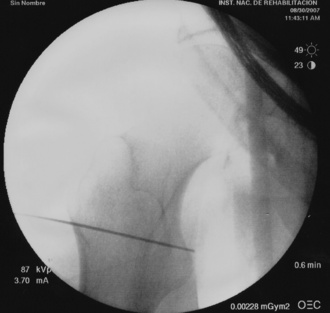
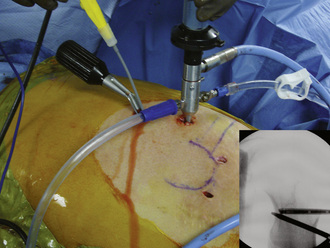
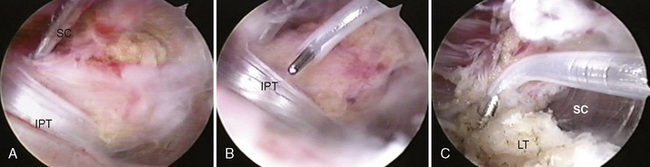
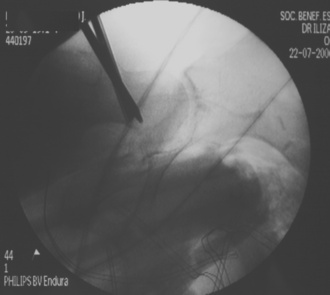
After hip arthroscopy of the central and peripheral compartments is complete, the instruments are taken out of the joint. The hip is positioned in 20 degrees of flexion and external rotation to expose the lesser trochanter at the image intensifier (Figure 18-1). A spinal needle is introduced through an accessory portal (i.e., the superior accessory portal) that is established about 2 cm distal to a horizontal line directed anteriorly from the tip of the greater trochanter and 2 cm anterior to the anterior femur (Figure 18-2). The needle is directed toward the lesser trochanter and navigated by the image intensifier (Figure 18-3). Orientation in the coronal plane is provided by the image intensifier. Orientation in the sagittal plane is provided by palpating the anterior aspect of the femur until the needle is positioned on the lesser trochanter; this will position the needle inside of the iliopsoas bursa. After the spinal needle has been successfully positioned in the iliopsoas bursa, the stylus is removed, and a flexible guidewire (Nitinol) is introduced. The needle is removed, and a cannulated switching stick is passed into the iliopsoas bursa over the flexible guidewire. A 4.5-mm, double-valve, rotatable arthroscopic cannula is passed over the switching stick, which is then removed, and then a 4-mm, 30-degree arthroscope is introduced. The fluid pump is started, and the iliopsoas tendon is identified. A second accessory portal 3 cm to 4 cm distal to the first one is established (i.e., the inferior accessory portal). A spinal needle is triangulated toward the tip of the arthroscope inside of the iliopsoas bursa. The image intensifier can be used to assist with the navigation of the needle. The tip of the needle is identified endoscopically inside of the iliopsoas bursa, and a working portal is established with the use of a flexible guidewire, a cannulated switching stick with a dilator, and a slotted cannula (Hip Access System, Smith and Nephew, Andover, MA). A shaver is introduced through the slotted cannula, which is then removed. The shaver is used to resect synovial tissue from the iliopsoas bursa and to dissect the iliopsoas tendon. The slotted cannula is reinserted with the use of the shaver as a guide. The shaver is removed, and a radiofrequency hook probe is inserted; the slotted cannula is removed, and the radiofrequency probe is used to release the iliopsoas tendon close to its insertion on the lesser trochanter (Figures 18-4 and 18-5). The image intensifier can be used to verify the position of the radiofrequency hook probe before the release of the iliopsoas tendon.
Transcapsular Iliopsoas Tendon Release
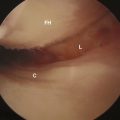
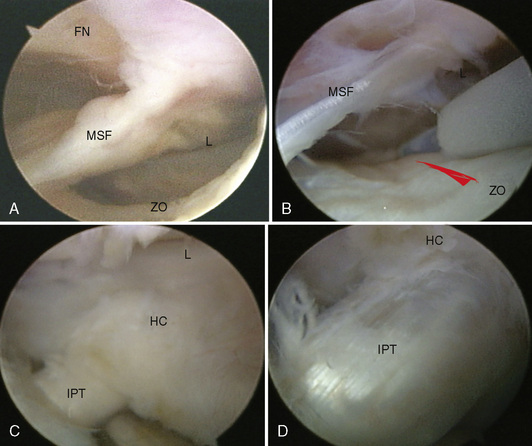
The iliopsoas tendon also can be released endoscopically at the level of the hip joint through an anterior hip capsulectomy. We perform this procedure with the patient in the lateral decubitus position, but it can also be performed with the patient in the supine position. After arthroscopy of the central compartment is complete, the instruments are taken out of the joint, and the traction is released. The hip is flexed 30 degrees and externally rotated, and the hip periphery is accessed through an accessory portal as described for the iliopsoas tendon release at the lesser trochanter. The spinal needle is directed to the hip capsule at the level of the anterior femoral neck in an angle that is almost perpendicular to the femoral neck, and cannulated instruments are used to establish a viewing portal. A second accessory portal (i.e., the working portal) is established with the use of a spinal-needle–guidewire technique and cannulated instruments by triangulating toward the tip of the arthroscope inside of the hip periphery. The working portal is usually distal to the central compartment portals (i.e., the anterolateral, posterolateral, and direct anterior portals) and between the first accessory portal and a vertical line that descends from the anterosuperior iliac spine (Figure 18-6; see also Figure 18-2). The iliopsoas tendon is located immediately anterior to the hip capsule; it is always found in the space between the anterior zona orbicularis and the anterior labrum proximal and anterior to the medial synovial fold. A communication may exist at this level between the hip capsule and the iliopsoas bursa. In most cases, the hip capsule is thinner at this region, and the iliopsoas tendon can be visualized through the thin portion of the hip capsule. A capsulectomy is performed at this level to gain access to the iliopsoas bursa and the tendon; we use a radiofrequency hook probe passed through a slotted cannula. After the capsulectomy is performed, synovial tissue from around the tendon is resected with the use of a shaver. The tendon is released with a radiofrequency hook probe (Figure 18-7). A slotted cannula is also used to introduce and interchange instruments in the iliopsoas bursa through the defect on the anterior hip capsule.
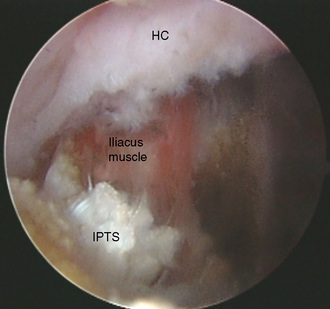
After the tendinous portion of the iliopsoas has been released, the iliacus muscle is visible behind the retracted tendon stumps. In our practice, we do not release the iliacus muscle (Figure 18-8). Partial release with both techniques is achieved by not releasing the fibers from the iliacus muscle.
Technical Pearls
Results
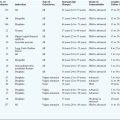
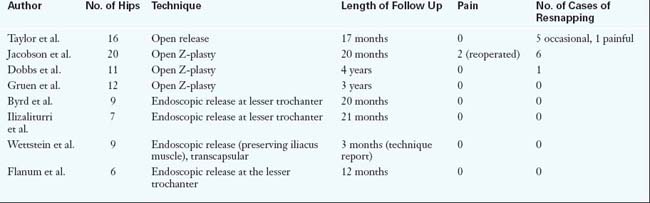
The reported results of endoscopic iliopsoas release compare favorably with those of open procedures. Regarding the effective treatment of the snapping phenomenon, there are fewer cases of resnapping reported with endoscopic techniques than with open procedures. Hip arthroscopy is also an advantage of endoscopic techniques, which are always performed in conjunction with the arthroscopic examination of the central and peripheral compartments of the hip joint. This provides access for the diagnosis and treatment of intra-articular injuries and peripheral compartment pathologies (e.g., femoroacetabular impingement, loose bodies). The results of iliopsoas tendon release are reported in Table 18-1.
Allen W.C., Cope R. Coxa saltans: the snapping hip revisited. J Am Acad Orthop Surg. 1995;3:303-308.
Byrd J.W.T. Evaluation and management of the snapping iliopsoas tendon. Tech in Orth. 2005;20:45-51.
Cardinal E., Buckwalter K.A., Capello W.N., Duval N. US of the snapping iliopsoas tendon. Radiology. 1996;198:521-522.
Dienst M., Seil R., Godde S., et al. Effects of traction, distension and joint position on distraction of the hip joint: an experimental study in cadavers. Arthroscopy. 2002;18:865-871.
Dobbs M.B., Gordon J.E., Luhmann S.J., Szymanzki D.A., Schoenecker P.L. Surgical correction of the snapping iliopsoas tendon in adolescents. J Bone Joint Surg Am. 2002;84(Am):420-424.
Dora C., Houweling M., Koch P., Sierra R.J. Iliopsoas impingement after total hip replacement. J Bone Joint Surg (Br). 2007;89(B):1031-1035.
Flanum M.E., Keene J.S., Blankenbaker D.G., Desmet A.A. Arthroscopic treatment of the painful “internal” snapping hip: results of a new endoscopic technique and imaging protocol. Am J Sports Med. 2007;35:770-779.
Gruen G.S., Scioscia T.N., Lowenstein J.E. The surgical treatment of internal snapping hip. Am J Sports Med. 2002;30:607-613.
Harper M.C., Schaberg J.E., Allen W.C. Primary iliopsoas bursography in the diagnosis of disorders of the hip. Clin Orthop Relat Res. 1987;221:238-241.
Ilizaliturri V.M.Jr, Mangino G., Valero F.S., Camacho-Galindo J. Hip arthroscopy of the central and peripheral compartment by the lateral approach. Tech Orthop. 2005;20:32-36.
Ilizaliturri V.M.Jr, Villalobos F.E., Chaidez P.A., Valero F.S., Aguilera J.M. External snapping hip syndrome: treatment by endoscopic release of the iliopsoas tendon. Arthroscopy. 2005;21:1375-1380.
Jacobson T., Allen W.C. Surgical correction of the snapping iliopsoas tendon. Am J Sports Med. 1990;18:470-474.
McCulloch P.C., Bush-Joseph C.A. Massive heterotopic ossification complicating iliopsoas tendon lengthening. Case report. Am J Sports Med. 2006;34:2022-2025.
Miller F., Cardoso Dias R., Dabney K.W., Lipton G.E., Triana M. Soft-tissue release for spastic hip subluxation in cerebral palsy. J Pediatr Orthop. 1997;17:571-584.
Tannast M., Siebenrock K.A., Anderson S.E. Femoroacetabular impingement: radiographic diagnosis—what the radiologist should know. AJR Am J Roentgen. 2007;188:1540-1552.
Taylor G.R., Clarke N.M. Surgical release of the “snapping iliopsoas tendon.”. J Bone Joint Surg Br. 1995;77(Br):881-883.
Wettstein M., Jung J., Dienst M. Arthroscopic psoas tenotomy. Arthroscopy. 2006;22:907. e1–4
Winston P., Awan R., Cassidy J.D., Bleakney R.K. Clinical examination and ultrasound of self-reported snapping hip syndrome in elite ballet dancers. Am J Sports Med. 2007;35:118-126.