[level-membership-for-radiology-category]9
Arterial system
Collins, R, Cranny, G, Burch, J, et al. A systematic review of duplex ultrasound, magnetic resonance angiography and computed tomography angiography for the diagnosis and assessment of symptomatic, lower limb peripheral arterial disease. Health Technol Assess. 2007; 11(20):iii–iv.
Kaufman JA, Lee MJ, eds. Vascular and Interventional Radiology: The Requisites. Philadelphia: Elsevier-Mosby, 2004.
Introduction to catheter techniques
The basic technique of arterial catheterization is also applicable to veins.
Patient preparation
1. The patient will need admission to hospital. Careful preparation before the procedure and observation after are required. With the introduction of smaller-diameter catheters, day-case admission may be appropriate for routine peripheral angiography and some angioplasty cases.
2. If the patient is on anticoagulant treatment, blood clotting should be within an acceptable therapeutic ‘window’.
3. The radiologist or a suitably trained person should see the patient, preferably several days prior to the procedure, in order to:
Equipment for the Seldinger technique
Guidewires
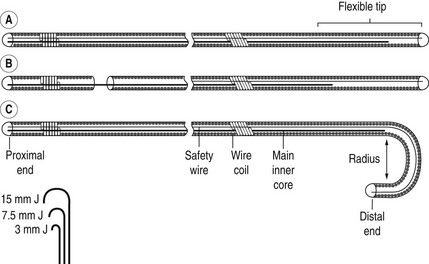
Basic guidewires consist of two central cores of straight wire around which is a tightly wound coiled wire spring (Fig. 9.1). The ends are sealed with solder. One of the central core wires is secured at both ends – a safety feature in case of fracturing. The other is anchored in solder at one end, but terminates 5 cm from the other end, leaving a soft flexible tip. Some guidewires have a movable central core so the tip can be flexible or stiff. Others have a J-shaped tip which is useful for negotiating vessels with irregular walls. The size of the J-curve is denoted by its radius in mm. Guidewires are polyethylene coated but may be coated with a thin film of Teflon to reduce friction. Teflon, however, also increases the thrombogenicity, which can be countered by using heparin-bonded Teflon. The most common sizes are 0.035 and 0.038 inch diameter. More recently hydrophilic guidewires have been developed. These frequently have a metal mandrel as their core. They are very slippery with excellent torque and are useful in negotiating narrow tortuous vessels. They require constant lubrication with saline.
Femoral artery puncture
Technique (Fig. 9.2)
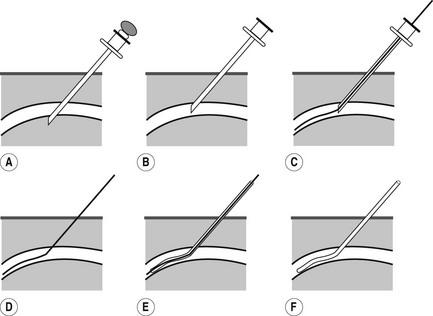
Figure 9.2 Seldinger technique. (a) Both walls of vessel punctured. (b) Stilette removed. Needle withdrawn so that bevel is within the lumen of the vessel and blood flows from the hub. (c) Guidewire inserted through needle. (d) Needle withdrawn, leaving guidewire in situ. (e) Catheter threaded over wire. (f) Guidewire withdrawn.
1. The patient lies supine on the X-ray table. Both femoral arteries are palpated and if pulsations are of similar strength the side opposite the symptomatic leg may be chosen, which gives the option to proceed to angioplasty by crossing over the aortic bifurcation. If all else is equal, then the right side is technically easier (for right-handed operators).
2. The appropriate catheter and guidewire are selected and their compatibility checked by passing the guidewire through the catheter and needle.
3. The location and point of puncture of the femoral artery must be considered. The external iliac artery arches anteriorly and laterally as it passes under the inguinal ligament and continues as the femoral artery. Attempts to puncture the artery cephalad to the ligament may result in a puncture deep in the pelvis at a point where haemostasis is difficult to achieve by manual compression and where peri-catheter and post-procedure bleeding may be obscured by preferential passage of blood into the retroperitoneum. Brief preliminary fluoroscopy of the groin can identify the centre of the femoral head with the intention of puncturing the artery at this point. This increases the likelihood of hitting the common femoral artery and facilitates haemostasis post procedure by allowing the artery to be compressed against bone. The inguinal skin fold does not reliably correlate with the position of the inguinal ligament. The entire common femoral artery lies above the skin fold in more than 75% of Western European subjects.1 Direct US guidance is increasingly routinely used for vascular puncture.
4. Using aseptic technique, local anaesthetic is infiltrated either side of the artery down to the periosteum. A 3–5-mm stab incision is made over the artery to reduce binding of soft tissues on the catheter. In thin patients the artery may be very superficial and the skin may need to be pinched-up or deflected laterally, to avoid cutting the artery.
5. The artery is immobilized by placing the index and middle fingers of the left hand on either side of the artery, and the needle is held in the right hand. The needle is advanced through the soft tissues until transmitted pulsations are felt. Either both walls of the artery are punctured through-and-through or a single wall puncture is performed depending on the needle used. If present, the stilette is removed and the needle hub is depressed so that it runs more parallel to the skin and is then withdrawn until pulsatile blood flow indicates a satisfactory puncture. Poor flow may be due to:
(a) the end of the needle lying in or against the vessel wall or within plaque
(b) aorto-iliac stenosis resulting in low femoral artery pressure
(c) hypotension – due to vasovagal reaction during the puncture
6. When good flow is obtained the guidewire is introduced through the needle and advanced gently along the artery using intermittent fluoroscopy to avoid engaging the vessel wall. When the wire is in the descending thoracic aorta the needle is withdrawn over the guidewire, keeping firm pressure on the puncture site to reduce bleeding. The free portion of guidewire is then wiped clean with a wet sponge and the catheter threaded over it. For 5F or greater diameter catheters, particularly those which are curved, a dilator is recommended matched to catheter size. The catheter is advanced up the descending aorta, under fluoroscopic control, and when in a satisfactory position the guidewire is withdrawn.
7. Catheter patency can be maintained by continuous flushing from a pressurized bag of heparinized saline (2500 units in 500 ml of 0.9% saline) attached through a three-way tap, or by intermittent manual flushing throughout the procedure. Flushing should be done rapidly otherwise the more distal catheter holes will remain unflushed.
8. At the end of the procedure the catheter is withdrawn and manual compression of the puncture site should be maintained for 5–10 min.
Aftercare
1. Bed rest – typically for 4 h, but longer at the discretion of the operator. Larger catheters, antiplatelet therapy and anticoagulation require longer observation
2. Careful observation of the puncture site for haemorrhage
3. Pulse and blood pressure observation, e.g. half-hourly for 4 h and then 4-hourly for the remainder of 24 h, if the larger catheter systems are used.
High brachial artery puncture
Technique
1. The patient lies on the X-ray table with his arm in supination. The peripheral pulses are palpated and the brachial artery localized approximately 10 cm above the elbow.
2. A small incision is made in the skin, 1–2 cm distal to the selected point of arterial puncture.
3. A single-wall puncture needle is used, with an acute angle of entry into the artery.
4. A straight, soft-tipped guidewire is introduced when good pulsatile flow is obtained.
5. A 5F pigtail catheter is introduced over the guidewire and its pigtail formed in the aorta.
6. At the end of the procedure the catheter tip is straightened using the guidewire and then removed. This reduces the risk of intimal damage and flap formation during withdrawal of the catheter.
Axillary artery puncture
Technique
1. The patient lies supine on the X-ray table with the arm fully abducted. The puncture point is just distal to the axillary fold. It is infiltrated with local anaesthetic.
2. A small incision is made in the skin 1–2 cm distal to the point of the arterial puncture.
3. The needle is directed more horizontally than the femoral approach and along the line of the humerus.
4. Following satisfactory puncture the remainder of the technique is as for femoral artery catheterization.
General complications of catheter techniques
Due to the technique
Diagnostic angiography is an invasive procedure and complications are expected. The majority of these are minor, e.g. groin haematoma. Recommended upper limits for complication rates have been produced by the Society of Interventional Radiology (SIR):1 these rates are included in the following discussion.
Local
1. Haemorrhage/haematoma – the commonest complication. Small haematomas occur in up to 20% of examinations and large haematomas in up to 4%. The SCIR threshold for haematomas requiring transfusion, surgery or delayed discharge after diagnostic angiography is 0.5%. Haematoma formation is greater with larger catheters, more frequent catheter exchanges and heparin, antiplatelet or thrombolytic agents. Haematoma formation is also greater when the femoral artery is punctured high because of inadequate compression of the artery following catheter removal.
2. Arterial thrombus may be due to:
Factors implicated in increased thrombus formation are:
The incidence is decreased by the use of:
3. Infection at the puncture site.
4. Damage to local structures; especially the brachial plexus during axillary artery puncture. Femoral nerve palsy can result from inadvertent infiltration of the nerve with local anaesthetic. It is short-lived but should prompt very cautious subsequent mobilization of the patient in case the leg ‘gives way’. More protracted femoral nerve damage can be due to excessive haematoma or pseudoaneurysm formation in the groin.
5. Pseudoaneurysm. The SIR threshold for diagnostic angiography is 0.2%. It presents as a pulsatile mass at the puncture site any time after arteriography and is due to communication between the lumen of the artery and a cavity within semi-solid or organized haematoma. Arterial puncture below the common femoral artery bifurcation increases the risk of this complication. Some may require surgical or interventional radiological repair.
6. Arteriovenous fistula – rare. SIR threshold is 0.1%. More common when puncture is below the common femoral artery bifurcation, because at this level the vein lies posterior to the artery and both are punctured in the standard double-wall technique.
Distant
1. Peripheral embolus – from stripped catheter thrombus. Emboli to small digital arteries will resolve spontaneously; emboli to large arteries may need aspiration thrombectomy through a catheter or surgical embolectomy. The SCVIR threshold is 0.5%.
2. Atheroembolism – more likely in older subjects. J-shaped guidewires are less likely to dislodge atheromatous plaques.
3. Air embolus. May be fatal in coronary or cerebral arteries. It is prevented by:
(a) ensuring that all taps and connectors are tight
(b) always sucking back when a new syringe is connected
(c) ensuring that all bubbles are excluded from the syringe before injecting
(d) keeping the syringe vertical, plunger up, when injecting.
4. Cotton fibre embolus. Occurs when syringes are filled from a bowl containing swabs or when a guidewire is wiped with a dry gauze pad. This very bad practice is prevented by:
5. Artery dissection – due to entry of the catheter, guidewire or contrast medium into the subintimal space. It is recognized by resistance to passage of the guidewire or catheter, poor back-bleeding from the catheter hub, increased resistance to injection of contrast medium or subintimal contrast medium on fluoroscopy. The risk of serious dissection is reduced by:
(a) using floppy J-shaped guidewires
(b) using catheters with multiple side holes
(c) employing a small volume manual test injection prior to a pump injection
6. Catheter knotting – more likely during the investigation of complex congenital heart disease. Non-surgical reduction of catheter knots is discussed by Thomas and Sievers.2 Withdrawal of the knotted end to the groin followed by surgical removal may be the only solution in some cases.
(a) In a coronary artery produces cardiac ischaemic pain
(b) In a mesenteric artery produces abdominal pain. There should be rapid wash-out of contrast medium after a selective injection. A sound of sucking air on removing the guidewire and poor back-bleeding from the catheter indicate an impacted (wedged) catheter tip.
8. Guidewire breakage – less common with modern guidewires and tended to occur 5 cm from the tip, where a single central core terminates.
Ascending aortography
Indications
1. Aortic aneurysm, trauma or dissection
2. Atheroma at the origin of the major vessels
3. Aortic regurgitation (echocardiography is more sensitive and less invasive if available)
4. Congenital heart disease – particularly the demonstration of congenital or iatrogenic aorto-pulmonary shunts and coarctation
5. As a preliminary to endovascular intervention, e.g. aneurysm repair.

Technique
Arteriography of the lower limb
Balloon angioplasty
Also known as percutaneous transluminal angioplasty or balloon dilation.
Indications
1. Dilation of localized vascular stenoses, mainly of the renal, iliac, lower limb and coronary arteries.
2. Recanalization of occluded segments of vessels in selected cases.
Dilation procedures are often combined with preparatory diagnostic angiography in the same session; the majority are done under local anaesthetic. The procedure is often needed after lysis of arterial thrombus: this is outlined below.
Equipment
1. Digital fluoroscopy unit with C-arm capable of angiography and preferably with ‘road mapping’ facilities
2. Arterial pressure measuring equipment (optional)
(a) Gruntzig double-lumen balloon dilation catheters. Various manufacturers offer a wide range of balloon length and diameter combinations as well as catheter-shaft lengths, depending on the site and size of the vessel to be treated
(b) van Andel dilation catheter (a tapered, straight Teflon catheter, occasionally useful)
(a) 0.035- or 0.038-inch diameter wires, typically 145 cm long; hydrophilic guidewires may be helpful for crossing tight stenoses
5. Thrombolytic agents may be infused into recently thrombosed vessels, prior to angioplasty.
Technique
Principles
1. Adequate angiograms must be obtained before proceeding to angioplasty.
2. Angioplasty is always performed with the guidewire remaining across the stenosis or occlusion until the procedure is completed.
3. Adequate vascular surgical assistance must be readily available before attempting angioplasty.
4. If the history suggests that a thrombosis has occurred within the previous 3 weeks, thrombolysis may be helpful.
5. The patient should be anticoagulated during the procedure, using 3000–5000 units of heparin.
6. The balloon diameter is selected by reference to the measured size of the normal artery on the preceding angiogram, allowing for magnification.
Renal arteries
1. The tip of a suitable guidewire is negotiated through and beyond the stenosis in the renal artery, from either the femoral or high brachial artery approach.
2. A balloon catheter of appropriate diameter is positioned across the stenosis and distended (approx. 7 atmospheres for 1 min) after injecting 3000 units of heparin. A post-dilation angiogram is then taken. If a residual stenosis remains, further dilations or implantation of a metallic stent may be necessary.
Iliac arteries
1. These are preferably dilated from a retrograde femoral puncture on the side of the lesion.
2. If the femoral pulse is absent or difficult to feel, it may be located using US guidance or road mapping from a contralateral femoral approach. Alternatively, a sidewinder catheter can be introduced from the opposite groin and a guidewire directed over the aortic bifurcation and across the lesion.
3. It can be helpful to measure the femoral artery pressure immediately after introducing the catheter, and before a guidewire is passed through the lesion. This is to assess the severity of the pressure gradient before and after angioplasty.
4. A suitable guidewire is then advanced carefully through the stenosis. If the lesion is eccentrically situated, it may be preferable to advance using a pre-shaped catheter, inject contrast medium to position the catheter, and then to advance through the patent lumen, avoiding possible intimal dissection from below. If the lesion is particularly tight, a hydrophilic wire may be useful.
5. A catheter is passed over the guidewire and into the distal aorta.
6. Heparin 3000–5000 units should be administered.
7. The guidewire is removed, to allow a pressure measurement in the aorta. It is then replaced and the catheter exchanged for a balloon catheter. After dilating the lesion, an angiogram is performed to assess the result. Pressure measurements may be checked to ensure that a significant gradient no longer exists. A wire or catheter remains across the stenosis until this is confirmed.
Femoral arteries (common, and origins of superficial femoral and profunda femoris arteries)
1. These cannot easily be approached by an antegrade puncture on the side of the lesion since there is little room to manoeuvre and exchange catheters.
2. The contralateral femoral artery is catheterized using a sidewinder catheter. The tip is positioned in the iliac artery ipsilateral to the lesion and a guidewire advanced down through the lesion. The catheter is then exchanged for a balloon catheter and, after injecting heparin 3000 units, the lesion is dilated and a check angiogram performed before the guidewire is withdrawn. A long introducer sheath placed across the bifurcation facilitates smooth tracking of catheters and permits check arteriography throughout the procedure whilst still maintaining the wire across the lesion.
Superficial femoral and popliteal arteries
1. An antegrade puncture is performed (pointing in the direction of arterial flow) aiming to hit the femoral artery as it passes over the femoral head. The skin puncture site is correspondingly higher than a retrograde puncture. US is invaluable in antegrade punctures and most experienced operators use it wherever possible.
2. A 15 mm J-guidewire can be used to select the required branch; usually the superficial femoral artery.
3. The guidewire is advanced almost down to the lesion, and a straight Teflon or polyethylene catheter is inserted over the guidewire to the same point. The wire is then gently passed across the lesion with the catheter following. Digital road mapping guidance is helpful in many instances. A van Andel dilation catheter may be useful once the lesion has been traversed by the guidewire.
4. If gentle injection of contrast medium outlines a channel parallel to the expected lumen, dissection has occurred. The catheter should be withdrawn and attempts made to regain the lumen.
5. When the lesion has been passed the catheter is exchanged for a balloon catheter (usually 5 mm in diameter), 3000 units of heparin are injected and dilation is performed. The distal ‘run-off’ should be carefully assessed on the post-angioplasty films; success is related to the adequacy of ‘run-off’ and it is necessary to ensure that there has been no distal embolization of thrombus or atheroma.
Catheter-directed arterial thrombolysis
1. Chemical thrombolysis plays a role in the treatment of acute ischaemia of the leg due to:
(a) in situ thrombosis of a stenosed vessel
(b) occluded lower-limb arterial bypass graft
(c) thrombosed popliteal aneurysm with no demonstrable distal run-off
(d) infra-inguinal embolus (sometimes iatrogenic post-angioplasty).
2. Thrombolysis should be undertaken in consultation with a vascular surgeon and should not compromise the leg unnecessarily by delaying surgical treatment. An acute episode less than 24 h old is more likely to respond to thrombolysis. After 14 days surgery is preferable to thrombolysis.1
3. Irreversible limb ischaemia requires amputation to avoid reperfusion syndrome.
4. Absolute contraindications to thrombolysis include stroke within the preceding 2 months, a recent gastrointestinal bleed and neurosurgery or head trauma. Relative contraindications are major trauma or surgery, severe hypertension, brain tumour and recent eye surgery.
5. Recombinant tissue plasminogen activator (rt-PA) is the most widely used agent in the UK. It can be used as local boluses of, for example, 5 mg at 5–10 min intervals or as a low-dose infusion at 0.5–2 mg h–1.
6. Catheter placement for thrombolysis is typically achieved by passing a guidewire alongside or through the thrombus and advancing a catheter into the proximal end. The catheter is firmly fixed to the skin to prevent dislodgement. A bolus of rt-PA followed by infusion is then administered through the catheter and the patient returned to a high-dependency ward for observation for signs of haemorrhage. Monitoring of clotting factors such as fibrinogen levels does not predict the likelihood of haemorrhagic complications.
7. Depending on the initial progress and discretion of the operator the patient returns after several hours for check angiography through the catheter. If necessary, the catheter is advanced and infusion continued until satisfactory lysis, or the procedure is discontinued if progress is poor. Successful thrombolysis often reveals underlying stenoses as the cause of the occlusion. These are angioplastied at completion.
8. There are catheters manufactured for delivering fibrinolytics as a high-pressure spray through multiple side holes over several centimetres of occluded vessel. These may be used manually or connected to a dedicated pump that measures and times the ‘pulse sprays’. This method has an added mechanical lytic effect and allows faster lysis. Other devices used in thrombolysis include hydrolyzing and mechanical thrombectomy catheters.
9. Bleeding complications are frequent, including haemorrhagic stroke in up to 2%.2
10. Thrombolysis is used widely wherever arterial and venous thrombosis occurs in the body. Many applications are not universally accepted and are off-license uses of the thrombolytic agent.
It is an important tool in the management of thrombosed haemodialysis access.
Complications
Due to technique
1. Perforation of iliac artery leading to retroperitoneal haemorrhage
2. Embolization of clot or atheroma distally down either leg. This may be removed by aspiration thrombo-embolectomy or surgical embolectomy
4. Occlusion of collateral artery
5. Major groin haematoma formation, which may suddenly develop several hours after the procedure is completed
6. False aneurysm formation at the puncture site
7. Cholesterol embolization. Catheter manipulation disrupts atheroma and releases cholesterol crystals into the arterial circulation causing occlusion at arteriolar level. Pulses may be present and arteries patent angiographically, but patients are restless and develop severe tissue ischaemia in the affected vascular territory with skin mottling, limb loss, stroke, bowel infarction and renal failure.
References
1. Ouriel, K, Shortell, CK, DeWeese, JA, et al. A comparison of thrombolytic therapy with operative revascularization in the initial treatment of acute peripheral arterial ischemia. J Vasc Surg. 1994; 19(6):1021–1030.
2. Dawson, K, Armon, A, Braithwaite, BD, et al. Stroke during intra-arterial thrombolysis: a survey of experience in the UK (abstr). Br J Surg. 1996; 83(S2):5–8.
Vascular embolization
Indications
1. To control bleeding – from the gastrointestinal and genitourinary tracts, from the lungs and after trauma
2. To infarct or reduce the blood supply to tumours or organs
3. To reduce or stop blood flow through arteriovenous malformations, aneurysms, fistulae or varicoceles
Equipment
1. Digital fluoroscopy unit with C-arm capable of angiography and preferably with ‘road mapping’ facilities.
2. Pre-shaped femoro-visceral catheters. These should not have side holes since their presence promotes clumping of particles and fibres at the catheter tip leading to blockage of the lumen. Size and shape will depend on the particular problem. Balloon occlusion catheters and co-axial catheters may also be useful.
The material used depends on the lesion, its site and the duration of the occlusion required. Use of materials other than those listed has been reported.
Technique
Principles
1. All therapeutic occlusions are potentially dangerous: the expected gain must justify the risk.
2. Adequate knowledge of the vascular anatomy must be available before commencing.
3. The operator must be an experienced angiographer.
4. The lesion must be selectively catheterized. When permanent occlusion is required, the centre of the lesion should be filled with non-absorbable material (e.g. silicone spheres, polyvinyl-alcohol, polymer) before the supplying blood vessels are occluded.
5. Reflux of embolic material is likely to occur as the blood flow slows down; injection of emboli should be done slowly with intermittent gentle injections of contrast medium to assess flow and progress.
6. It is safer to come back another day than to continue for too long.
Complications
1. Misplacement of embolic material: this may occur without the operator being aware that it has happened.
2. There may be propagation of thrombus, with embolization to the lungs or elsewhere.
3. Post-embolization syndrome results from infarcted tissue releasing toxins into the circulation. It comprises pain, fever, malaise, raised white cell count and inflammatory indices and transient impairment of renal function. Infarcted tissue can cause fever for up to 10 days. However, this tissue can become infected, and antibiotics may be required.
Vascular ultrasound
The main components of arterial vascular US studies are:
1. Grey-scale US: gives anatomical information and detailed assessment of vessel wall including areas of intimal thickening or calcification
2. Pulsed-wave Doppler: measures changes in frequency of US waves reflected by moving blood within the vessel (Doppler shift). These data are used to calculate a detailed graph of direction and velocity of flow in the vessel. The normal pattern of flow differs between various arteries and flow patterns change at sites of disease such as narrowing (i.e. increases in velocity)
3. Colour Doppler: uses the same information as pulsed-wave Doppler but displays flow as colour superimposed in the arterial lumen on grey-scale imaging. Colour encoding represents the direction and velocity of flow with red conventionally indicating flow towards the US transducer and blue representing flow away from the transducer. Rapid flow is displayed as white or yellow. This is helpful in selection of regions for detailed assessment with pulsed-wave Doppler or detection of A-V fistulae or pseudo-aneurysm
4. Power Doppler: a modification of colour Doppler which is more sensitive to slow flow or flow in small structures. However, it does not give information on direction or velocity of flow.
Computed tomographic angiography
Although CTA involves administration of iodinated contrast (see Chapter 2) and significant radiation dose, there are many advantages: imaging is very rapid – usually less than 30 s to acquire the main dataset even for extended scans including lower limbs, scanners are readily available, unstable patients can be monitored with standard equipment, and valuable information is obtained about the blood vessel wall and surrounding structures.
Peripheral (lower limb) computed tomographic angiography
Descriptions of other specific CTA methods are found in appropriate chapters.
Patient preparation
General precautions for use of ionizing radiation (Chapter 1) and iodinated contrast (Chapter 2). The nature and purpose of the examination is explained to the patient.
Technique
For optimum images a MDCT scanner with at least a 16-slice detector is used:
1. Contrast: 100–150 ml LOCM 300 mg I ml–1 (volume determined by scanner and scan protocol)
2. Contrast injection rate: 4 ml s–1 via a peripheral vein
3. Range: lower abdominal aorta to heel, or extended as upper abdominal aorta to heel
4. Slice thickness: 3 mm or less
5. Reconstruction increment: 0.6 mm
(a) Preset empirical delay, using manufacturer’s guidelines for individual scanner
(b) Bolus tracking technique, choosing a region of interest (ROI) in the aorta just above the upper range of the scan and monitoring contrast density in ROI during injection until it reaches a predetermined value (usually 100–120 Hounsfield units), which triggers the CT acquisition. This is the preferred technique.
Magnetic resonance angiography
Guidelines on MR safety and selection of patients must be followed (see Chapter 1).
MR angiography (MRA) is now in widespread clinical use and is a highly sensitive and specific tool for assessment of the arterial system. For most examinations contrast-enhanced MRA with i.v. gadolinium (see Chapter 2) is now the preferred method. Gadolinium i.v. shortens the T1 relaxation time of blood so blood appears bright when imaged with a very short RT (repetition time) and other structures on the image appear dark. Timing of the contrast injection is critical. Imaging without contrast is used infrequently, but may be either a ‘bright blood’ cine technique, to demonstrate both anatomical and functional data, or ‘black blood’ imaging, which gives useful morphological information.
Earls, JP, Edelman, RR. Magnetic resonance angiography: body applications. In: Edelman RR, Hesselink JR, Zlatkin MB, eds. Clinical Magnetic Resonance Imaging. Philadelphia: Saunders-Elsevier, 2006.
Ho, VB, Corse, WR. MR angiography of the abdominal aorta and peripheral vessels. Radiol Clin North Am. 2003; 41(1):115–144.
[/level-membership-for-radiology-category][not-level-membership-for-radiology-category]<
[/not-level-membership-for-radiology-category]
