Airway Management
After reading this chapter you will be able to:
 Describe how to perform endotracheal and nasotracheal suctioning safely.
 Describe how to obtain sputum samples properly.
 Assess the need for and select an artificial airway.
 Identify the complications and hazards associated with insertion of artificial airways.
 Describe how to perform orotracheal and nasotracheal intubation of an adult.
 Assess and confirm proper endotracheal tube placement.
 Describe the rationale and the methods for performing a tracheotomy.
 Identify the types of damage that artificial airways can cause.
 Describe how to maintain and troubleshoot artificial airways properly.
 Describe techniques for measuring and adjusting tracheal tube cuff pressures.
 Identify when and how to extubate or decannulate a patient.
 Describe how to use alternative airway devices.
 Describe how to assist a physician in setting up and performing bronchoscopy.
Suctioning
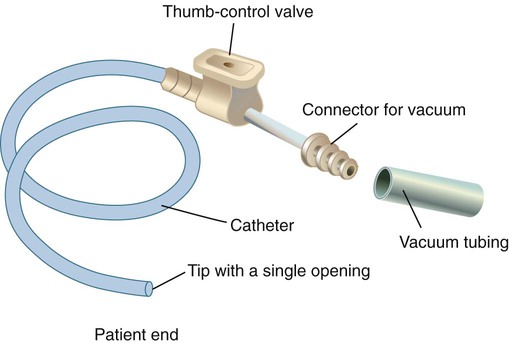
Suction can be performed in either the upper airway (oropharynx) or the lower airway (trachea and bronchi). Secretions or fluids can also be removed from the oropharynx by using a rigid tonsillar, or Yankauer, suction tip (Figure 33-1). Access to the lower airway is via introduction of a flexible suction catheter (Figure 33-2) through the nose (nasotracheal suctioning) or artificial airway (endotracheal suctioning). Tracheal suctioning through the mouth should be avoided because it causes gagging.

Endotracheal Suctioning
Clinical Practice Guideline
To guide practitioners in safe and effective application of this procedure, the American Association for Respiratory Care (AARC) has developed a clinical practice guideline on endotracheal suctioning of mechanically ventilated patients with artificial airways. Excerpts from the AARC guideline, including indications, contraindications, hazards and complications, assessment of need, assessment of outcome, and monitoring, appear in Clinical Practice Guideline 33-1.1
Equipment and Procedure
There are also two methods of suctioning based on how deep the suction catheter is inserted in the artificial airway: deep suctioning and shallow suctioning. Deep suctioning is when the catheter is inserted until resistance is met and then withdrawn approximately 1 cm before applying suction. Shallow suctioning is when the catheter is advanced to a predetermined depth, which is usually the length of the airway plus the adapter.2 Using shallow suctioning rather than deep suctioning is recommended in infants and children.3
Step 1: Assess Patient for Indications
Generally, a patient should never be suctioned according to a preset schedule. Although very thick secretions may not move with airflow and may not create any adventitious sounds, the patient should be assessed for clinical indicators, such as rhonchi heard on auscultation, which suggest the need for suctioning (see Clinical Practice Guideline 33-1).
Step 2: Assemble and Check Equipment
The equipment needed for endotracheal suctioning is listed in Box 33-1. The suction catheter, gloves, and cup are often prepackaged together in disposable sterile kits for use during the open suctioning technique. The AARC Clinical Practice Guideline suggests the closed suctioning technique to avoid disconnecting the patient from the ventilator, which interrupts ventilation and exposes the patient to infection risk. Suction pressure should always be checked by occluding the end of the suction tubing before attaching the suction catheter. The suction pressure should be set at the lowest effective level. Negative pressures of 80 to 100 mm Hg in neonates and less than 150 mm Hg in adults are generally recommended.4
Suction catheters are available in various designs, most with side ports to minimize mucosal damage. Most suction catheters for general purposes are 22 inches long (sufficient to reach the main stem bronchi) and sized in French units (external circumference). A curved-tip catheter, or catheter coudé, is available to help direct access to the left main stem bronchus. The size of the catheter may be more important than its design. A catheter that is too large can obstruct part or all of the airway by occupying too much of its opening. Too large a suction catheter combined with negative pressure quickly evacuates lung volume and can cause atelectasis and hypoxemia. To avoid this problem, the diameter of the catheter should be less than 50% of the internal diameter of the artificial airway in adults.5,6 In infants and small children, the diameter of the suction catheter should be less than 70% of the internal diameter of the artificial airway.7
 Rule of Thumb
Example: 6-mm endotracheal tube: 2 × 6 = 12; next smallest catheter is 10F
Example: 8-mm endotracheal tube: 2 × 8 = 16; next smallest catheter is 14F
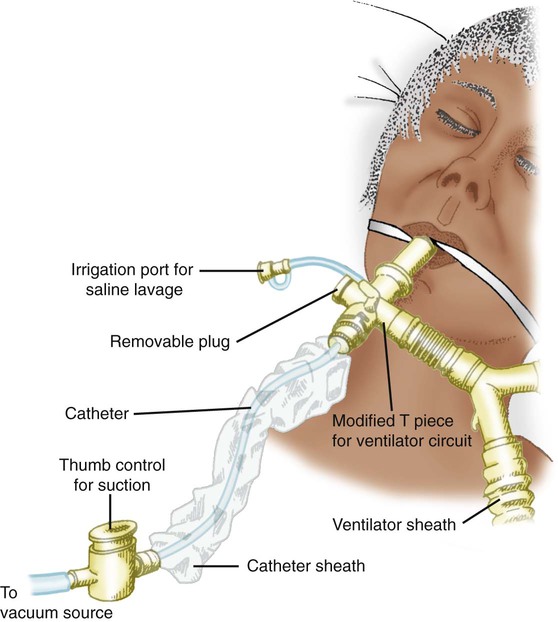
An in-line suction catheter can be used for patients receiving ventilatory support (Figure 33-3). These systems are incorporated directly into the ventilator circuit and used repeatedly. Because this system allows suctioning without disconnecting the patient from the ventilator, it is recommended for suctioning patients who require high fractional inspired oxygen (FiO2) and positive end-expiratory pressure (PEEP), who are at risk for lung derecruitment, and for neonates.8–10 In addition, cross contamination is less likely with such systems. The use of in-line suction catheters has been shown to be cost-effective because they need to be changed only if soiled or malfunctioning and not on a daily basis.11 However, in-line suction catheters have not been shown either to increase or to decrease the risk of ventilator-associated pneumonia.12 The extra weight an in-line catheter adds to a ventilator circuit may increase tension on the endotracheal tube, so care should be taken to support the ventilator tubing appropriately.
Basic indications for the use of closed suction catheters are listed in Box 33-2.13 Routine instillation of sterile normal saline to aid secretion removal before suctioning is not recommended because there is insufficient evidence that this practice is beneficial, and it may increase infection risk (see Hazards and Complications in Clinical Practice Guideline 33-1). If the secretions are extremely tenacious, instillation of acetylcysteine or sodium bicarbonate (2%) may be more effective than normal saline; this generally requires a physician’s order. The use of these medications is discussed in more detail in Chapter 32.
 Rule of Thumb
Step 3: Hyperoxygenate Patient
Before suctioning, delivery of 100% oxygen (O2) for 30 to 60 seconds to pediatric and adult patients is suggested, especially to patients who are at risk for hypoxemia. Also, the O2 concentration should be increased by 10% in neonates before suctioning14; this may be done by increasing the set FiO2 or activating the temporary 100% setting on microprocessor ventilators. Manual ventilation is not recommended because it is sometimes difficult to deliver 100% O2 this way.15 However, if there is no other alternative to hyperoxygenate the patient, PEEP should be maintained during the manual ventilation with 100% O2.
Step 5: Apply Suction and Clear Catheter
Suction is applied while withdrawing the catheter. Total suction time should be kept to less than 15 seconds.16,17 After removing the catheter, it should be cleared using the sterile cup filled with sterile water or saline. The closed suction catheter has an adapter for saline vials to be placed in line with the device. The catheter is cleared by squeezing the saline vial and applying suction at the same time. Caution must be used to ensure saline is being drawn into the catheter and not down the airway. If any untoward response occurs during suctioning, the catheter should be immediately removed, and the patient should be oxygenated.
Minimizing Complications and Adverse Responses
Careful adherence to procedure is the best way to avoid or minimize complications of endotracheal suctioning. First, preoxygenation helps minimize the incidence of hypoxemia during suctioning. Also, it is recommended to preoxygenate and suction without disconnecting the patient from the ventilator, rather than disconnecting the patient and manually ventilating.18 A manual resuscitator cannot always provide 100% O2 or deliver a consistent tidal volume, and maintaining sterile technique and PEEP levels can be difficult. As previously described, use of the closed suction technique on ventilator patients can decrease the likelihood of hypoxemia, especially in neonates and adults requiring high FiO2 or PEEP, or both, or at risk for lung derecruitment.
Increased intracranial pressure (ICP) has been reported during suctioning. These changes are transient, with values normally returning to baseline within 1 minute. However, in patients who already have an elevated ICP, these changes may be clinically significant. Should this problem occur, an aerosolized topical anesthetic given 15 minutes before suctioning may help reduce coughing and discomfort and any increase in ICP.19
 Rule of Thumb
Nasotracheal Suctioning
Clinical Practice Guideline
The AARC has developed and published a clinical practice guideline on nasotracheal suctioning to guide practitioners in safe and effective application of this procedure. Excerpts from the AARC guideline, including indications, contraindications, hazards and complications, assessment of need, assessment of outcome, and monitoring, appear in Clinical Practice Guideline 33-2.20
Equipment and Procedure
The equipment and procedure for nasotracheal suctioning are similar to the equipment and procedure for endotracheal suctioning. Only the key differences are highlighted here. In addition to the equipment and supplies used for endotracheal suctioning (see Box 33-1), sterile water-soluble lubricating jelly is needed to aid catheter passage through the nose. Use of a nasopharyngeal airway should be considered to help reduce mucosal trauma in the nose of patients who require repeated, long-term nasotracheal suctioning.
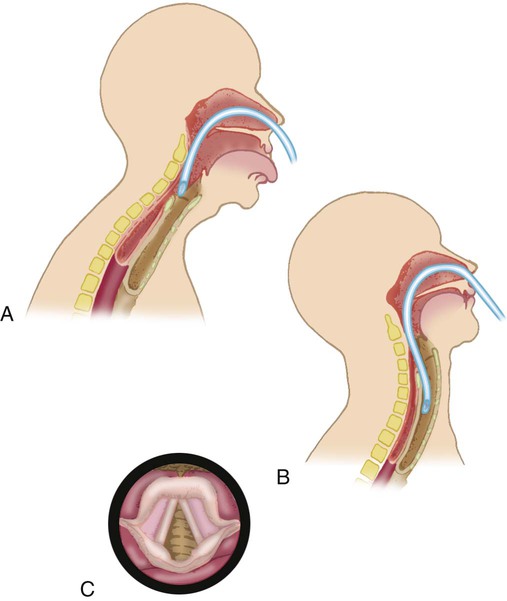
As the catheter enters the lower pharynx, the patient should assume a “sniffing” position (Figure 33-4). This position helps align the opening of the larynx with the lower pharynx, making catheter passage through the larynx more likely. The catheter is continually advanced until the patient coughs or a resistance is felt.
Sputum Sampling
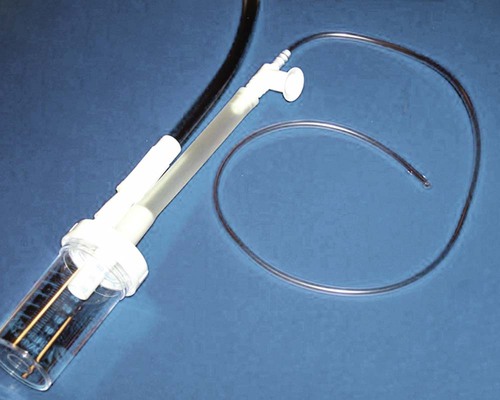
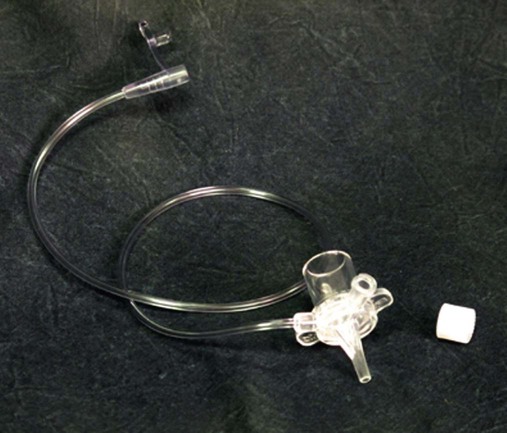
Sputum samples are often collected to identify organisms infecting the airway. To obtain the samples, the suctioning procedures described previously should be followed. In addition to the usual equipment, a sterile specimen container is needed. This device consists of a plastic tube or cup with flexible tubing on one end to attach to the suction catheter. The other outlet is a stiff plastic nozzle that connects to the suction tubing from the wall vacuum unit (Figure 33-5).
Establishing an Artificial Airway
Clinical Practice Guideline
An artificial airway is required when the patient’s natural airway can no longer perform its proper functions. To guide practitioners in the identification, assessment, and treatment of patients requiring artificial airways, the AARC has developed a clinical practice guideline on management of airway emergencies. Excerpts from the AARC guideline, including indications; contraindications; precautions, hazards, and possible complications; assessment of need and outcome; and monitoring, appear in Clinical Practice Guideline 33-3.21
Routes
Pharyngeal Airways
A nasopharyngeal airway (Figure 33-6) is most often placed in a patient who requires frequent nasotracheal suctioning. Although it does not ensure entry into the trachea, it minimizes damage to the nasal mucosa that can be caused by the suction catheter. A nasopharyngeal airway may also be placed in a patient who was recently extubated after facial surgery. The nasopharyngeal airway helps to maintain the patency of the upper airway despite swelling.
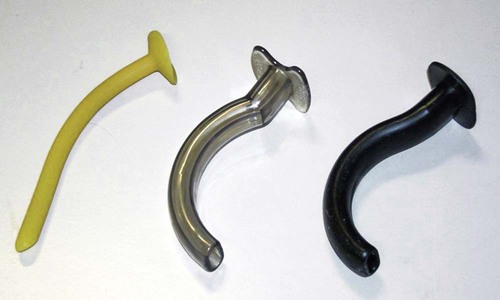
Oropharyngeal airways (see Figure 33-6) are inserted into the mouth and over the tongue. Use of oropharyngeal airways should be restricted to unconscious patients to avoid gagging and regurgitation. These airways maintain a patent airway when the tongue would otherwise obstruct the oropharynx. The airway can also be used as a bite-block for patients with oral tubes.
Pharyngeal airways are used mainly in emergency life support. Further details on their use, insertion techniques, and size selection are provided in Chapter 34.
Tracheal Airways
Tracheal airways extend beyond the pharynx into the trachea. The two basic types of tracheal airways are endotracheal (translaryngeal) tubes and tracheostomy tubes. Endotracheal tubes are inserted through either the mouth or the nose (orotracheal or nasotracheal), through the larynx, and into the trachea. Tracheostomy tubes are inserted through a surgically created opening in the neck directly into the trachea. Table 33-1 summarizes the advantages and disadvantages of each of these three approaches.
TABLE 33-1
Advantages and Disadvantages of Tracheal Airway Routes
| Route | Advantages | Disadvantages |
| Oral intubation | Insertion is faster, easier, less traumatic, and more comfortable Larger tube is tolerated Easier suctioning Less airflow resistance Decreased work of breathing Easier passage of bronchoscope Reduced risk of tube kinking Avoidance of nasal and paranasal complications, including epistaxis and sinusitis |
Esthetically displeasing, especially long-term Greater risk of self-extubation or inadvertent extubation Greater risk of main stem intubation Risk of tube occlusion by biting or trismus Risk of injury to lips, teeth, tongue, palate, and oral soft tissues May require additional use of oral airway Great risk of retching, vomiting, and aspiration Pain and discomfort, especially with inadequate preparation |
| Nasal intubation | Less retching and gagging Greater comfort in long-term use Less salivation Improved ability to swallow oral secretions Improved communication Improved mouth care and oral hygiene Avoidance of occlusion by biting or trismus Easier nursing care Avoidance of oral route complications Less posterior laryngeal ulceration Better tube anchoring, less chance of inadvertent extubation Reduced risk of main stem intubation Some patients can swallow liquids, providing a means of nutritional support Blind nasal intubation does not require muscle relaxants or sedatives May avert “crash” oral intubation |
Nasal and paranasal complications, including epistaxis, sinusitis, otitis More difficult to perform Spontaneous breathing required for blind nasal intubation Smaller tube is necessary Greater suctioning difficulty Increased airflow resistance Increased work of breathing Difficulty passing bronchoscope Smaller risk of transient bacteremia |
| Tracheotomy | Avoidance of laryngeal and upper airway complications of translaryngeal intubation Greater comfort Aids feeding, oral care, suctioning, speech Psychologic benefit (improved motivation) Easier passage of fiberoptic bronchoscope Easier reinsertion Esthetically less objectionable Facilitation of weaning from ventilator Elimination of risk of main stem intubation Reduced work of breathing Better anchoring (reduced risk of decannulation) Improved ability to place curve-tipped suction catheter in left bronchus Improved mobility (transfer out of ICU to ward or extended-care facility) |
Greater expense Requirement for use of operating room in most cases Need for general anesthesia in most cases Permanent scar More severe complications Greater mortality rate Delayed decannulation Increased frequency of aspiration Greater bacterial colonization rate Persistent open stoma after decannulation, reducing cough efficiency |
From Stauffer JL, Silvestri RC: Complications and consequences of endotrachial intubation and tracheostomy, Respir Care 27:417, 1982.
Airway Tubes
Endotracheal Tubes
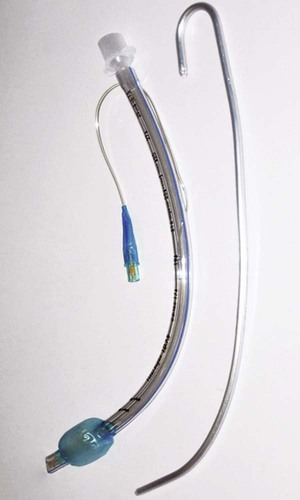
Endotracheal tubes are semirigid tubes most often composed of polyvinyl chloride or related plastic polymers.22 Specifications covering the sizing, labeling, performance requirements, and test methods for endotracheal tubes are established by the American Society for Testing and Materials (ASTM).23 Figure 33-7 shows a typical endotracheal tube, its key components, and a stylet used for insertion. The proximal end of the tube is attached to a standard adapter with a 15-mm external diameter. The curved body of the tube usually has length markings, indicating the distance (in centimeters) from the beveled tube tip. In addition to the beveled opening at the tip, there is a side port, or “Murphy eye,” which ensures gas flow if the main port should become obstructed. The angle of the bevel minimizes mucosal trauma during insertion. The tube cuff is permanently bonded to the tube body. Inflation of the cuff seals off the lower airway, either for protection from gross aspiration or to provide positive pressure ventilation. A small filling tube leads from the cuff to a pilot balloon, used to monitor cuff status and pressure when the tube is in place. Finally, a spring-loaded valve with a standard connector for a syringe allows inflation and deflation of the cuff. Although not shown in Figure 33-7, included with most modern endotracheal tubes is a radiopaque indicator that is embedded in the distal end of the tube body. This indicator allows for easy identification of tube position on the radiograph.
Specialized Endotracheal Tubes
The standard endotracheal tube has been modified for specific uses, including special ventilation methods, lung pathology, and surgical procedures. A detailed description of the various tubes is beyond the scope of this chapter but is provided elsewhere in this text. Some more common tubes, including double-lumen tubes, tubes with special adapters for jet ventilation, and tubes with subglottic suction ports, are discussed.24
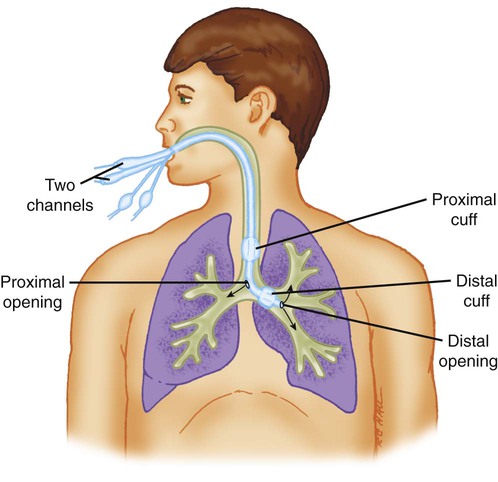
Special mechanical ventilation techniques may require unique types of endotracheal tubes. When unilateral lung disease occurs, independent lung ventilation may be needed. This ventilation requires the use of a double-lumen endotracheal tube (Figure 33-8). This tube has two proximal ventilator connectors (15-mm adapter), two inner lumens for gas flow, two cuffs, and two distal openings. The larger cuff seals the tracheal lumen and allows gas to flow into one bronchus. The smaller cuff seals the opposite bronchial lumen (Figure 33-9).

High-frequency jet ventilation uses a special endotracheal tube adapter (Figure 33-10). This adapter replaces the standard endotracheal tube adapter. There is a jet port allows for the injection of high flow pulses from the jet ventilator and a 15 minute connection for conventional ventilation. A pressure monitoring tube is also available for monitoring airway pressures.
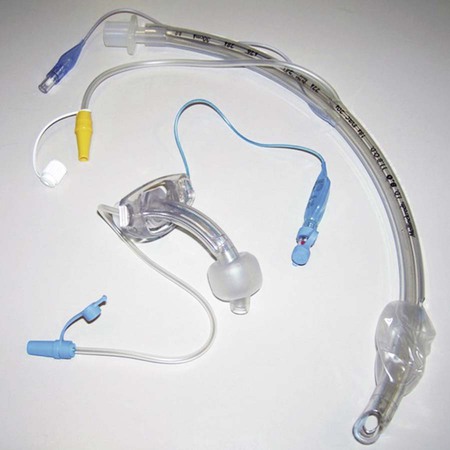
A specialized endotracheal tube with an attached subglottic suction port has been designed to allow for removal of secretions that often accumulate above the cuff (Figure 33-11). This tube has a separate channel in the wall of the tube that attaches to a wall suction source. The suction source is run continuously at negative pressures of 20 to 30 cm H2O. The aspirated material is collected in a small container, which is emptied on a regular basis. Every 4 hours, a small amount of air should be injected into the suction port to ensure the port and tubing are not clogged. Use of this tube has been reported to decrease the incidence of ventilator-associated pneumonia.25,26
Tracheostomy Tubes
Tracheostomy tubes are generally made from plastic polymers such as polyvinyl chloride or silicone, although some are still made from metal. Specifications covering the sizing, labeling, performance requirements, and test methods for tracheostomy tubes are established by the ASTM.27
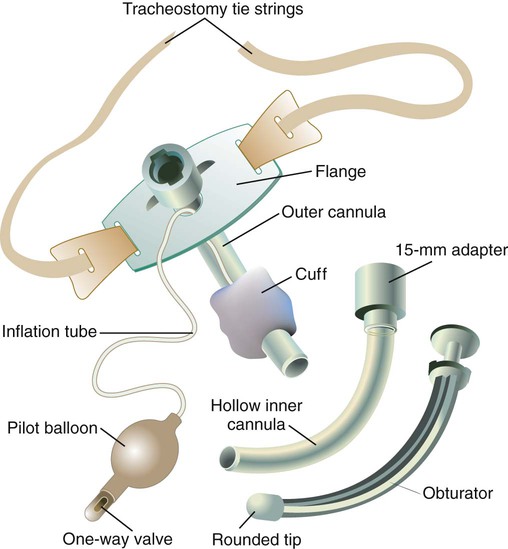
Figure 33-12 shows a typical plastic tracheostomy tube and its key components. The outer cannula forms the primary structural unit of the tube, to which the cuff and a flange are attached. The flange prevents tube slippage into the trachea and provides the means to secure the tube to the neck. There are single-cannula and double-cannula tracheostomy tubes. The double-cannula tube has a removable inner cannula with a standard 15-mm adapter. It is normally kept in place within the outer cannula but can be removed for routine cleaning or if it becomes obstructed. To prevent accidental removal, the inner cannula can be locked in place at the proximal end of the outer cannula. As with an endotracheal tube, an inflation tube leads from the cuff to a pilot balloon and spring-loaded valve. The tube is stabilized at the stoma site with cotton tape, which attaches to the flange and is tied around the neck, or a soft tracheostomy tube holder with Velcro fasteners. An obturator with a rounded tip is used for tube insertion. Before insertion, the obturator is placed within the outer cannula, with its tip extending just beyond the far end of the tube; this minimizes mucosal trauma during insertion. Finally, as with endotracheal tubes, a radiopaque indicator in the distal end of the tube helps confirm tube position on a radiograph.
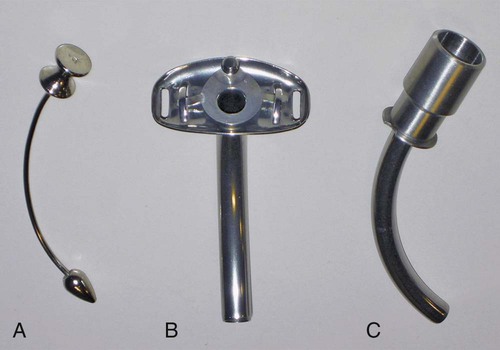
As with endotracheal tubes, various modified tracheostomy tubes are available. Extra-long tracheostomy tubes may be used in patients who require extra proximal or distal length because of anatomic considerations. The metal Jackson tracheostomy tube is made of stainless steel with an inner and outer cannula (Figure 33-13). There is no cuff at the distal end or 15-mm adapter at the proximal end. This tracheostomy tube is generally used in patients with a long-term need for an airway but who do not require a seal to protect the airway from aspiration or to facilitate positive pressure ventilation. If the patient requires manual ventilation, a 15-mm adapter should be inserted into the proximal opening. If the patient requires a sealed airway, the tube needs to be changed to the standard cuffed tube described earlier.
Procedures
Orotracheal Intubation
Orotracheal intubation is the preferred route for establishing an emergency tracheal airway because the oral passage is the quickest and easiest route in most cases. Orotracheal intubation can be safely performed by an appropriately trained physician, RT, nurse, or paramedic.28 Typically, this training involves manikin practice and application on anesthetized patients under the guidance of an anesthesiologist or other appropriately skilled individual. The basic steps in orotracheal intubation are described here.29 Proficiency in this technique can be developed only with extensive training and experience.
Step 1: Assemble and Check Equipment
Box 33-3 lists the equipment necessary for intubation. All suction equipment is assembled, and the vacuum pressure is checked before intubation because vomitus or secretions may obscure the pharynx or glottis. The appropriate-size laryngoscope blade (see Box 33-3) is attached to its handle, and the light source is checked for secure attachment and brightness. If the light does not function, the bulb first should be checked to see if it is tight. If the scope still does not light, the batteries should be checked, or the bulb should be replaced.
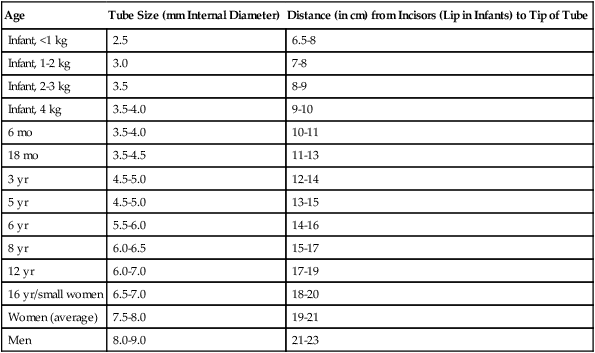
A tube that is the right size for the patient should be selected, but one should be sure to have available tubes that are at least one size larger and one size smaller. Table 33-2 lists recommended orotracheal tube sizes according to patient weight or age. Endotracheal tubes are sized by their internal diameter (in millimeters). Tube lengths given in Table 33-2 are averages after insertion, confirmed placement, and fixation (teeth to tube tip).
TABLE 33-2
Guideline for Infant, Pediatric, and Adult Oral Endotracheal Tube Sizes
| Age | Tube Size (mm Internal Diameter) | Distance (in cm) from Incisors (Lip in Infants) to Tip of Tube |
| Infant, <1 kg | 2.5 | 6.5-8 |
| Infant, 1-2 kg | 3.0 | 7-8 |
| Infant, 2-3 kg | 3.5 | 8-9 |
| Infant, 4 kg | 3.5-4.0 | 9-10 |
| 6 mo | 3.5-4.0 | 10-11 |
| 18 mo | 3.5-4.5 | 11-13 |
| 3 yr | 4.5-5.0 | 12-14 |
| 5 yr | 4.5-5.0 | 13-15 |
| 6 yr | 5.5-6.0 | 14-16 |
| 8 yr | 6.0-6.5 | 15-17 |
| 12 yr | 6.0-7.0 | 17-19 |
| 16 yr/small women | 6.5-7.0 | 18-20 |
| Women (average) | 7.5-8.0 | 19-21 |
| Men | 8.0-9.0 | 21-23 |
 Rule of Thumb
Step 2: Position Patient
To visualize the glottis and insert the tube, the RT aligns the patient’s mouth, pharynx, and larynx. This alignment is achieved by combining moderate cervical flexion with extension of the atlantooccipital joint. Placement of one or more rolled towels under the patient’s shoulders helps. Next the RT flexes the patient’s neck and tilts the head backward with his or her hand (Figure 33-14).
 Problem
Step 4: Insert Laryngoscope
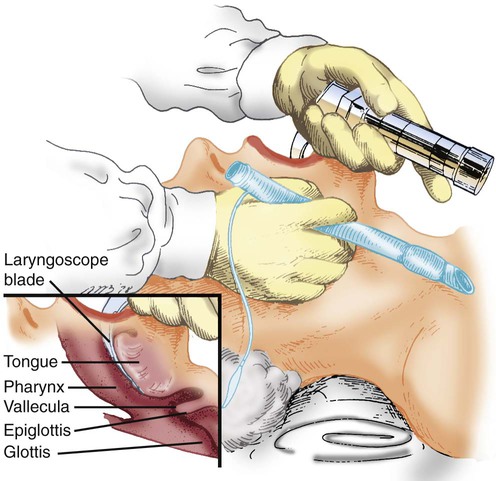
The RT should use the left hand to hold the laryngoscope and the right hand to open the mouth (Figure 33-15). The laryngoscope is inserted into the right side of the mouth and moved toward the center, displacing the tongue to the left. The tip of the blade is advanced along the curve of the tongue until the epiglottis is visualized.
 Rule of Thumb
Step 5: Visualize Glottis
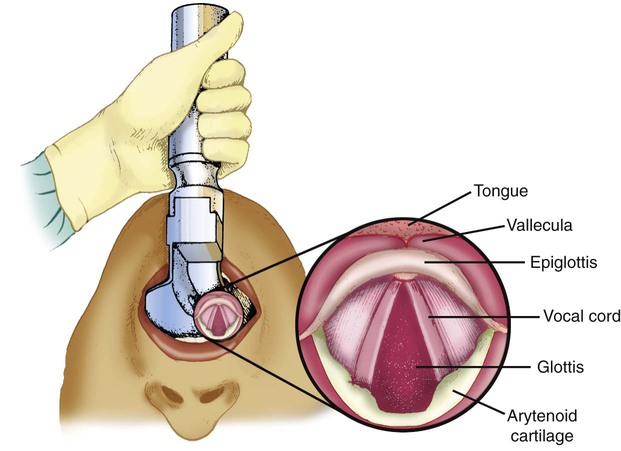
As the laryngoscope blade reaches the base of the tongue, the RT looks for the arytenoid cartilage and epiglottis (Figure 33-16). If these structures are not visible, the blade is probably advanced too far and may be in the esophagus. If this is the case, the RT should maintain upward force on the laryngoscope and slowly withdraw the blade until the larynx is seen.
Step 6: Displace Epiglottis
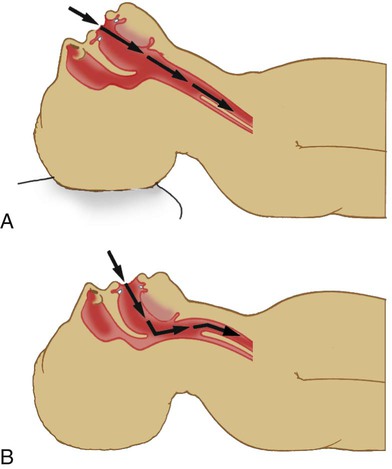
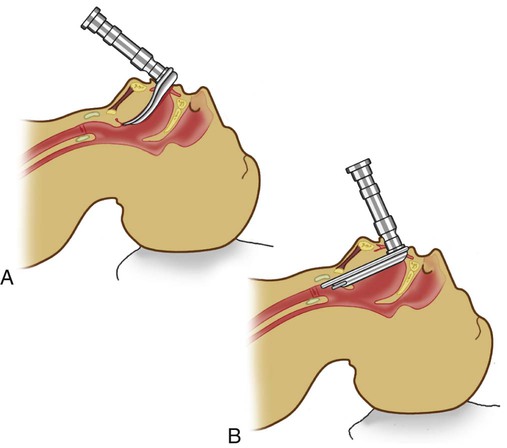
The technique used to displace the epiglottis depends on the type of blade chosen (Figure 33-17). With the curved or MacIntosh blade, the epiglottis is displaced indirectly by advancing the tip of the blade into the vallecula (at the base of the tongue), and the laryngoscope is lifted up and forward (see Figure 33-17, A). With the straight or Miller blade, the epiglottis is displaced directly by advancing the tip of the blade over its posterior surface, and the laryngoscope is lifted up and forward (see Figure 33-17, B).
Step 7: Insert Tube
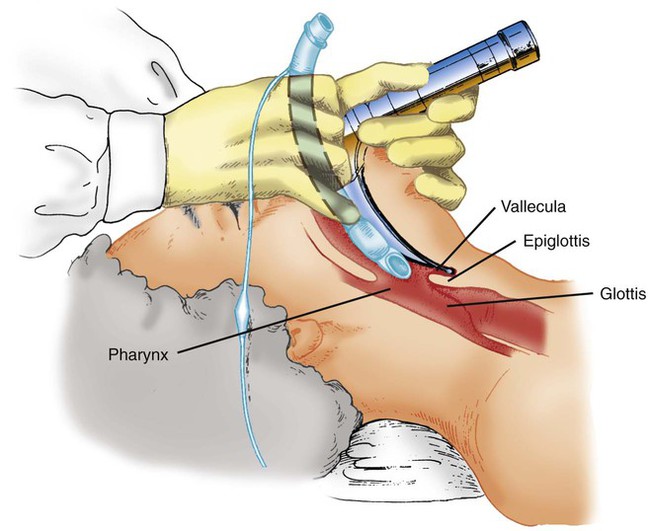
When the epiglottis is displaced and the glottis is visualized, the tube is inserted from the right side of the mouth and advanced without obscuring the glottic opening (Figure 33-18). When the tube tip is seen passing through the glottis, it is advanced until the cuff has passed the vocal cords. When the tube is in place, the RT stabilizes it with the right hand and uses the left hand to remove the laryngoscope and stylet. The cuff is inflated to seal the airway, and ventilation and oxygenation are immediately provided.
Step 8: Assess Tube Position
Ideally, the tip of an endotracheal tube should be positioned in the trachea about 3 to 6 cm above the carina.30 One or more of several bedside methods can be used to assess positioning of the endotracheal tube before stabilization (Box 33-4). With the exception of fiberoptic laryngoscopy or bronchoscopy and videolaryngoscopy, none of these methods can absolutely confirm proper tube placement.
The depth of tube insertion (length from teeth to tip) is useful to help determine tube position. As indicated in Table 33-2, the average length from the teeth (incisors) to the tip of a properly positioned oral endotracheal tube in men is 21 to 23 cm. For women, this distance is about 2 cm less. Tube length alone cannot confirm proper placement; a tube with the 23-cm mark positioned at the teeth could just as well be in the esophagus as in the trachea.
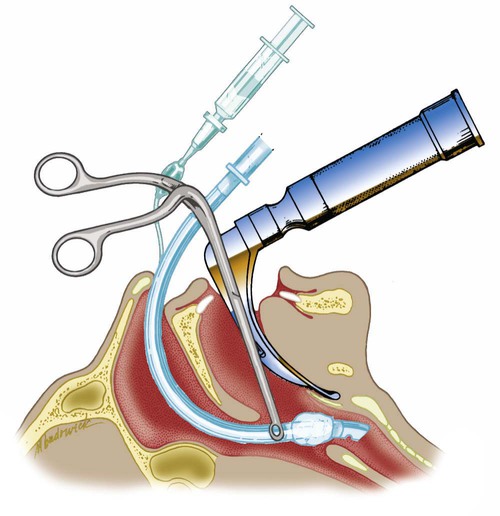
An esophageal detection device may be used to determine whether the tube is in the esophagus or trachea.31 This device is more commonly used outside the hospital setting. The original device consists of a squeeze-bulb aspirator attached to a standard 15-mm adapter. After creating a negative pressure (−80 to −90 mm Hg) by squeezing the bulb, one attaches it to the positioned endotracheal tube. If the tube is placed correctly, the bulb quickly reexpands on release because the tracheal lumen is held open by cartilaginous rings. If the tube is in the esophagus, it does not reinflate because the more pliable esophagus collapses around the tip of the endotracheal tube preventing the bulb from reinflating. Instead of a squeeze-bulb, a large syringe with a 15-mm adapter can be used. If the endotracheal tube is in the esophagus, strong resistance is noticed when aspirating air (the barrel tends to recoil if released); if the tube is in the trachea, aspirating air into the syringe is easy. In patients with copious secretions, the esophageal detection device may become occluded and not reexpand. The esophageal detection device is not recommended for detecting esophageal intubation in children younger than 1 year.31
A light wand is a flexible stylet with a lighted bulb at the tip. If a light wand is used during intubation, as the stylet and endotracheal tube pass into the larynx, a characteristic glow is seen under the skin, just above the thyroid cartilage.32 This glow is not as bright or focused if the tube is in the esophagus.
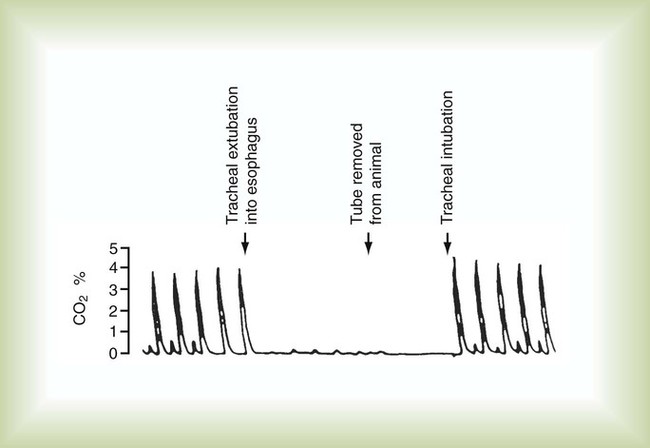
Esophageal intubation can be assessed using exhaled carbon dioxide (CO2) analysis (capnometry). Because inspired air contains only about 0.04% CO2 and end-tidal gas contains about 5% CO2, placement of an endotracheal tube in the respiratory tract causes CO2 levels to increase abruptly during expiration. This increase is evident on a capnographic display (Figure 33-19). If the tube is in the esophagus, CO2 levels remain near zero.33
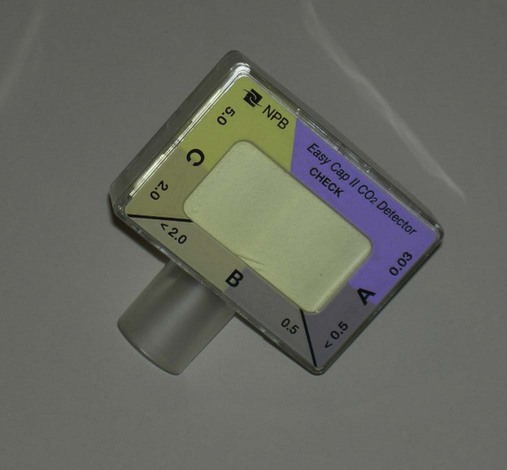
Colorimetric CO2 analysis is an inexpensive alternative to capnometry. Functioning similar to pH paper, a colorimetric system has an indicator that changes color when exposed to different CO2 levels.34 Figure 33-20 shows a disposable colorimetric system designed specifically to confirm tube placement during intubation. Colorimetric devices are portable and disposable and are commonly used in hospitals.
Both devices are effective in detecting most esophageal intubations. However, in patients with cardiac arrest, expired CO2 levels may be near zero because of poor pulmonary blood flow, yielding a false-negative result.32–34 Generally, expired CO2 levels increase with the return of spontaneous circulation. CO2 analysis is an unreliable indicator of main stem bronchial intubation.
 Rule of Thumb
Proper tube placement in the trachea can be confirmed without a chest radiograph by using a fiberoptic laryngoscope or bronchoscope.35 After ensuring patient reoxygenation, a fiberoptic laryngoscope or bronchoscope can be inserted directly into the endotracheal tube (Figure 33-21). Visualization of the carina distal to the tip of the endotracheal tube ensures proper placement in the trachea. More precise placement is possible by moving the laryngoscope from the tube tip to the carina, while measuring this distance. Also, a videolaryngoscope can be used to ensure proper placement of the endotracheal tube, especially in anticipated difficult intubations. It provides a better view of the airway, especially when there is limited mobility of the patient’s neck or mouth. Also, other clinicians can see the airway and help if needed.36
 Problem
Step 9: Stabilize Tube and Confirm Placement
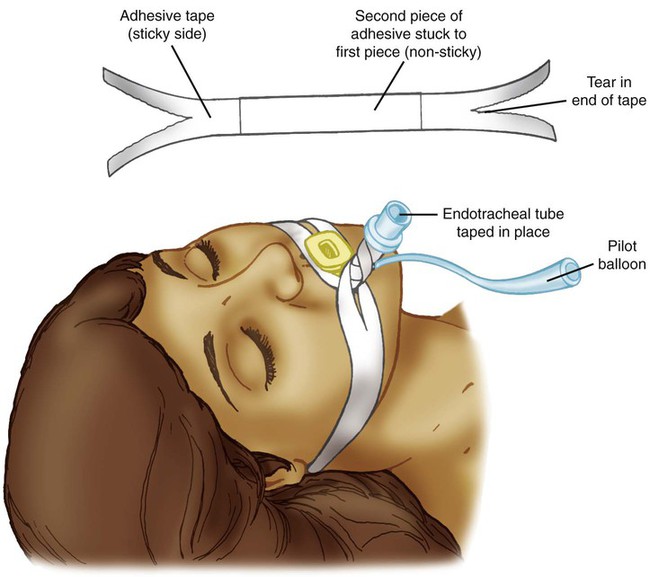
The tube should not be secured until correct placement has been assessed by using one or more of the above-mentioned methods. After assessing placement and while holding the tube in position, the RT secures the tube to the skin above the lip and on the cheeks using tape or an endotracheal tube holder. A bite-block, oropharyngeal airway, or similar device may be needed to prevent the patient from biting down on the tube (Figure 33-22). After the tube is stabilized, a chest radiograph should be taken to confirm its position.
The most common complication of emergency airway management is tissue trauma. The most serious complications are acute hypoxemia, hypercapnia, bradycardia, and cardiac arrest.37 These problems can be minimized by using proper technique, providing the patient with adequate ventilation and oxygenation (before, during, and after), and strictly adhering to intubation time limits. In addition, sedation and anesthesia can reduce complications and facilitate intubation in a semicomatose or combative patient.28 Muscle relaxing or paralyzing agents can be used in a combative patient who cannot be controlled by sedation. A paralyzed patient has no ability to compensate for hypoxemia or hypercapnia. It is imperative that the patient can be adequately ventilated by bag and mask. Rapid-sequence induction is used with the administration of a sedative-hypnotic medication and a muscle relaxing or paralyzing agent.
Difficult intubations occur because of inability to open the patient’s mouth, inability to position the patient, or unusual airway anatomy. Special intubation equipment (e.g., laryngoscope blades, videolaryngoscopy, or specialized stylets) or alternative techniques can be employed.28,37 Additional details of these techniques are beyond the scope of this chapter.
Nasotracheal Intubation
Nasotracheal intubation is performed either blindly or by direct visualization.38 The direct visualization approach requires either a standard or a fiberoptic laryngoscope. For the blind technique to work, the patient must be breathing spontaneously. Equipment assembly, patient positioning, and preoxygenation are essentially the same as with oral intubation. A mixture of 0.25% phenylephrine and 3% lidocaine may be applied to the nasal mucosa with a long cotton-tipped swab to provide local anesthesia and vasoconstriction of the nasal passage.
Direct Visualization
The equipment needed for nasal intubation by direct visualization is the same as for oral intubation, with the addition of Magill forceps. A smaller size endotracheal tube may also be needed. The tube should be prelubricated with water-soluble gel to aid passage. To insert the tube, the bevel is positioned toward the septum and advanced along the floor of the meatus (inferiorly). When the tip of the tube is in the patient’s oropharynx, the RT opens the patient’s mouth, inserts the laryngoscope (with the left hand), and visualizes the glottis. The RT uses the Magill forceps with the right hand to grasp the tube just above the cuff and direct it between the vocal cords (Figure 33-23). To help advance the tube past the vocal cords, the neck may need to be flexed. Confirmation of position and stabilization follows, as with the oral route.
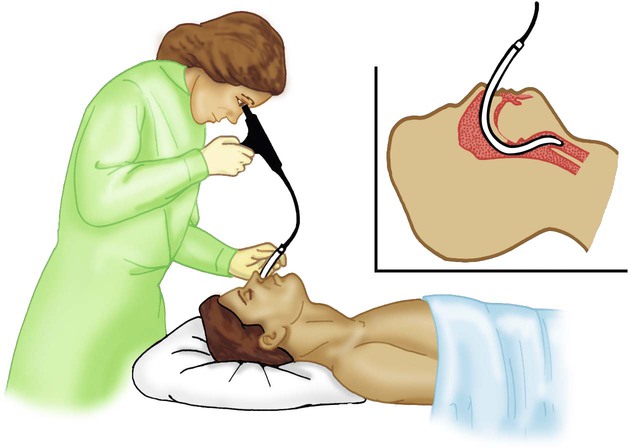
Alternatively, a fiberoptic bronchoscope or laryngoscope can be used to guide tube passage.35 With the bronchoscopic method, the distal end of the scope is passed through the endotracheal tube and directly into the trachea. When placement is ensured, the RT slides the endotracheal tube down over the scope into proper position. The procedure is similar with a fiberoptic laryngoscope. However, because directional control of the scope is limited, the RT may have to reposition the patient’s head and neck to help guide the tube.
Tracheotomy
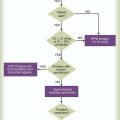
Tracheotomy is the preferred, primary route for overcoming upper airway obstruction or trauma and for patients with poor airway protective reflexes. Another indication for tracheotomy is the continuing need for an artificial airway after a prolonged period of oral or nasal intubation. The patient should be assessed daily for the continued need for intubation. If the patient still needs an artificial airway after approximately 14 days, a tracheostomy is commonly considered. The benefits of a tracheostomy versus oral or nasal intubation are less need for deep sedation, shorter weaning time, and shorter intensive care unit (ICU) and hospital stay.39 The decision when to switch from an endotracheal tube to a tracheostomy tube should be individualized. Pertinent factors that should be considered in making this decision are summarized in Box 33-5. Figure 33-24 is a decision-making algorithm useful for timing tracheotomy in critically ill patients.

Procedure
Tracheotomy should be performed as an elective procedure by a skilled physician or surgeon after the patient’s airway is stabilized. Mortality and morbidity are greater when the procedure is performed on an emergency basis. The RT may be asked to assist in tracheotomy, especially if performed at the bedside. For this reason, we briefly describe both the traditional surgical procedure and the percutaneous dilation method.39
The procedure may be performed under direct vision with a bronchoscope passed through the endotracheal tube or a laryngeal mask airway (LMA). Compared with the traditional surgical procedure, a percutaneous dilation tracheotomy is rapid with fewer complications from the surgical site and has a better cosmetic appearance after decannulation. Contraindications for percutaneous tracheotomy are listed in Box 33-6.
Generally, the tube size is correct if it occupies two-thirds to three-quarters of the internal tracheal diameter. Tracheostomy tubes come in various sizes, lengths, and shapes depending on the manufacturer. The size marked on the flange usually indicates the internal diameter, but some tracheostomy tubes with inner cannulas use Jackson sizing. Table 33-3 lists the sizes, internal diameter, external diameter, and length of commonly used brands and styles of adult tracheostomy tubes. Table 33-4 provides guidelines for selecting a tracheostomy tube according to a patient’s age. Within an age category, the exact size of tube chosen depends on the patient’s height, weight, and airway anatomy. To choose a tracheostomy tube that fits a patient properly, it is important to consider not only the internal and external diameter of the tube but also the length and shape of the tube.
TABLE 33-3
Comparison of Commonly Used Brands of Adult Tracheostomy Tubes
| Portex Flex DIC—Sized by ID; Also Available Cuffless or Fenestrated | Shiley SCT—Sized by ID; Also Available Cuffless | ||||
| ID (mm) | OD (mm) | Length (mm)* | ID (mm) | OD (mm) | Length (mm)* |
| 6.0 | 8.2 | 64 | 6.0 | 8.3 | 67 |
| 7.0 | 9.6 | 70 | 7.0 | 9.6 | 80 |
| 8.0 | 10.9 | 74 | 8.0 | 10.9 | 89 |
| Shiley Double Cannula (LPC, DC, CFS, CFN, FEN, PERC) With Disposable or Nondisposable Inner Cannula—Sized by Jackson Scale; Also Available Cuffless or Fenestrated | Jackson Double Cannula Stainless Steel Tube; Available Cuffless Only; Available Fenestrated | ||||||
| Size (Jackson) | ID (mm) | OD (mm) | Length (mm) | Size (Jackson) | ID (mm) | OD (mm) | Length (mm) |
| 4 | 5.0 | 9.4 | 65 | 4 | 5.3 | 8.0 | 62 |
| 6 | 6.4 | 10.8 | 76 (PERC 74) | 6 | 7.2 | 10.0 | 69 |
| 8 | 7.6 | 12.2 | 81 (PERC 79) | 8 | 9.2 | 12.0 | 69 |
| Extra Length Tubes: Shiley TracheoSoft XLT Proximal or Distal Extension With DIC—Sized by ID | Bivona Mid-Range Aire-Cuf Extra Length Fixed or Adjustable Neck Flange—Sized by ID | ||||
| ID (mm) | OD (mm) | Length (mm) | ID (mm) | OD (mm) | Length (mm) |
| 6.0 | 11 | 95 | 6.0 | 8.7 | 100 (adjustable 110) |
| 7.0 | 12.3 | 100 | 7.0 | 10.0 | 110 (adjustable 120) |
| 8.0 | 13.3 | 105 | 8.0 | 11.0 | 120 (adjustable 130) |
| Bivona TTS—Sized by ID; Cuff Inflated With Sterile Water Not Air | ||
| ID (mm) | OD (mm) | Length (mm) |
| 6.0 | 8.7 | 70 |
| 7.0 | 10.0 | 80 |
| 8.0 | 11.0 | 88 |
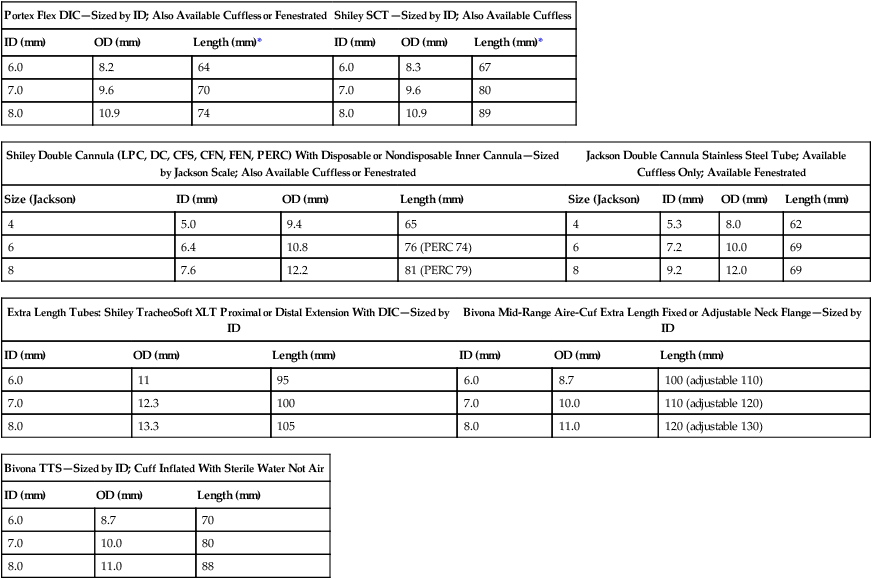
TABLE 33-4
Guideline for Infant, Pediatric, and Adult Tracheostomy Tube Sizes
| Age/Weight* | ID (mm) |
| Premature <2 kg | 2.5 cuffless neonatal |
| Infant | 3.0-3.5 cuffless neonatal |
| 6-18 mo | 3.5-4.0 neonatal or pediatric |
| 18 mo to 4-5 yr | 4.0-4.5 pediatric |
| 4-5 yr to 10 yr | 4.5-6.0 pediatric |
| 10-14 yr | 5.0-6.5 pediatric or adult |
| 14 years to adult | 6.0-9.0 adult |