Upper urinary tract
INTRODUCTION
1. Urology has developed as a separate surgical specialty over the last few decades and sub-specialization within the discipline is now common. Urological surgery requires open, laparoscopic and endoscopic skills and urologists have readily incorporated new technology into their daily practice, including the use of lasers, minimally invasive techniques and, more recently, robotic surgery.
2. It is common for core surgical trainees to rotate through a number of surgical specialties during their training, including urology, and it is therefore important to be familiar with the common urological operations. In addition to major life-saving surgery, urology offers a variety of day-case procedures, which provide ideal training opportunities for the surgeon-in-training.
3. Not all general hospitals have a urology department and general surgeons may be required to assess patients with acute urological problems or even operate to save life or prevent severe morbidity. It is important for surgeons to be aware of emergency urological procedures and how to recognize when urgent intervention is required in the absence of specialist colleagues.
4. Be aware of the potential benefits of specialist procedures.
ACUTE PYONEPHROSIS (OBSTRUCTED INFECTED KIDNEY)
Appraise
1. The treatment of an acutely obstructed infected kidney is a urological emergency as patients will become very unwell with septicaemia and can die if left untreated. Obstruction may be due to a stone, congenital pelvi-ureteric junction (PUJ) obstruction or tumour within or outside of the ureter. Diabetic and immunologically compromised patients are particularly at risk. The diagnosis is made by ultrasound or CT scanning, which will show hydronephrosis and may demonstrate the underlying cause of the obstruction. The urine contains organisms that can also be cultured from the blood.
2. Decompression of the obstructed kidney using ultrasound guided percutaneous nephrostomy is the optimum treatment. Infected urine or frank pus may be drained and should be cultured.
3. Carefully secure the nephrostomy tube to the patient’s skin. When the patient has recovered from the acute illness, address the underlying cause of obstruction. Temporary drainage with a ureteric stent inserted antegrade via the nephrostomy tract will allow definitive treatment to be planned in an elective setting with the appropriate expertise.
4. Open operation is indicated only if you are sufficiently expert and it is impossible to introduce a satisfactory percutaneous drain, or if the pus in the kidney is too thick to be aspirated through the small-calibre tube used for percutaneous nephrostomy. This is not a simple procedure, so do not undertake it lightly.
5. If you undertake open operation when the cause of obstruction is a stone in the upper ureter or renal pelvis, remove it.
OPEN NEPHROSTOMY FOR ACUTELY OBSTRUCTED KIDNEY
Prepare
1. Aggressively resuscitate the patient with intravenous fluids and broad-spectrum antibiotics. If necessary, manage a severely ill patient in an intensive care unit for monitoring, and respiratory and circulatory support.
2. Review the imaging and mark the side to be operated upon.
3. Position the patient in a lateral position with the side to be operated on uppermost.
4. Have the break in the table under the 12th rib to open the flank fully. Flex the uppermost hip and knee and place a pillow between the legs. Maintain the position using a back support behind the thorax and fix the arm to an armrest with a wide adhesive bandage.
5. Check that the lowermost arm is not compressed by the patient’s body.


Action
1. Occasionally, the pus-filled calyces ‘point’ on the surface of the kidney like ripe abscesses. Make an incision through the parenchyma at this point to release the pus.
2. More commonly, the calyces are impalpable because the overlying renal tissue is oedematous. Enter the collecting system through the renal pelvis. Follow the capsule over the convex posterior border of the kidney, keeping towards the lower pole. Find the renal sinus and gently clear away the fat by blunt dissection to reveal the posterior surface of the renal pelvis. It is not necessary to mobilize the kidney fully.
3. Make a small transverse pyelotomy (Greek: pyelos = trough, pelvis + tome = a cutting).
4. Introduce a malleable silver probe with an eyehole at the end through the pyelotomy and manoeuvre it to puncture the cortex from within a lower pole calyx.
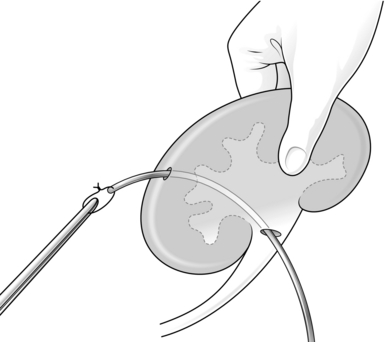
5. Tie the tip of a size 18 F tube drain or a Foley catheter to the probe with a suture and pull it back into the renal pelvis (Fig. 36.1). Use a Willschner nephrostomy tube with a built-in malleable stylet if it is available.1
6. Close the pyelotomy using 3/0 or 4/0 absorbable sutures. Tie these sutures gently and with just enough tension to approximate the edges, as there is risk of these sutures cutting through. Anchor the catheter to the capsule using absorbable sutures.


7. Bring out the nephrostomy tube through the abdominal wall with as straight a course as possible, to facilitate changing the tube if necessary.
Aftercare
1. Perform gentle saline wash-outs if the percutaneous nephrostomy does not drain adequately, or insert a larger calibre tube after dilating the track.
2. If side-holes of the nephrostomy tube slip outside the parenchyma, urinary extravasation occurs. Re-adjust it under radiographic control.
3. A nephrostomy can be left in place for weeks or months, but it has a tendency to fall out however carefully it is anchored.
4. As soon as possible, refer the patient to a urologist for definitive management.
OBSTRUCTED KIDNEY CAUSED BY A STONE
Appraise
1. Common sites for stone impaction are at the pelvi-ureteric junction, the pelvic brim or at the vesico-ureteric junction.

2. The diagnosis is usually made with a non-contrast CT scan (CT-KUB) or an intravenous urogram.
3. Renal function will become acutely impaired in patients with a solitary kidney obstructed by a stone, bilateral ureteric stones, or with unilateral ureteric obstruction in patients with pre-existing renal disease. These patients need urgent intervention.
4. In the absence of sepsis or impaired renal function, the majority of patients with a ureteric calculus can be managed with an initial period of watchful waiting to allow for spontaneous stone passage.
5. Obstruction of a kidney for a short period does not usually cause serious harm. However, if there is infection or if there is poor function in the contralateral kidney, there is an urgent need to drain the kidney.
6. Unilateral obstruction lasting for over 6 hours leads to a gradual decrease in renal blood flow and after 24 hours it is reduced to 55%. Following relief of 7 days of unilateral ureteric obstruction, full recovery of renal function occurs within 2 weeks. However, obstruction of 14 days, duration results in a permanent decline in renal function to 70% of control levels. An obstructed kidney is at risk of infection and pyonephrosis (Greek: pyon = pus + nephron = kidney + –osis = production). In cases of incomplete ureteric obstruction, watchful waiting for spontaneous stone passage is usually limited to about 4–6 weeks.
7. Relieve obstruction in patients where pain is not controlled by oral analgesia.
8. In the absence of a trained urologist, an acutely obstructed kidney is best relieved using a percutaneous nephrostomy. If you do not have an expert radiologist available, perform an open nephrostomy in an emergency.
9. When the patient is not critically ill but needs decompression of an obstructed kidney, a urologist will opt to insert a retrograde ureteric stent. This is usually performed under general anaesthesia.
CYSTOSCOPIC INSERTION OF A URETERIC STENT
Action
1. Pass a cystoscope and carefully inspect the bladder.
2. Locate the ureteric orifice on the obstructed side.
3. Pass the floppy tip of a guide-wire through the working channel of the cystoscope and direct it into the distal end of the ureter.
4. Advance the guide-wire slowly into the ureter using the image intensifier to screen the wire as it is advanced.
5. Resistance will be met when the wire reaches the obstructing stone. Gently probe the stone with the guide-wire until it slides past the stone. Advance the wire into the renal pelvis, where you will see it curl.
6. Confirm that you are in the kidney by passing a 6 Fr ureteric catheter over your guide-wire. Again, use X-ray guidance to observe the catheter advancing over your wire.
7. When the catheter is near the tip of your wire, remove the guide-wire. Attach an empty 10- or 20-ml syringe to the end of the ureteric catheter and aspirate urine. Send a sample for culture.
8. Inject radiological contrast into the ureteric catheter to outline the renal collecting system.
9. Replace the guide-wire through the ureteric catheter then remove the catheter leaving just the guide-wire in the collecting system.
10. Choose a double J stent based on the height of the patient (26 cm for tall patients, 22 cm for short patients and 24 cm for the average patient).
11. Feed the stent over the guide-wire and advance it towards the kidney. Keep the cystoscope close to the ureteric orifice as you do this and direct the radiographer to screen the stent as it passes up the ureter. Insert a stent pusher over the wire to advance the stent through the cystoscope.
12. When there is an adequate length of stent in the renal pelvis, remove the wire completely, which will allow the proximal end of the stent to curl in the renal pelvis and the distal end to curl in the bladder.
KEY POINTS
If your guide-wire is unable to advance beyond the obstructing stone:


DEFINITIVE STONE MANAGEMENT
1. Leave a stent in situ for 4–6 weeks before attempting stone removal. This will allow any infection to be treated completely and ureteric inflammation to settle. A stent will also result in ureteric paralysis and dilatation facilitating subsequent ureteroscopy.
2. Prior to stone surgery, obtain a plain KUB X-ray to locate the position of the stone alongside the stent.
3. Ureteroscopy should be performed by a urologist. A semi-rigid ureteroscope is used for ureteric stones with laser stone fragmentation. Occasionally, a ureteric stone is pushed back into the kidney during stent insertion and will require flexible ureteroscopy for fragmentation and removal.
RENAL TRAUMA
Appraise
1. Renal injuries are most commonly due to blunt trauma from falls, road traffic accidents or sporting injuries. Penetrating injuries may result from stabbings or gunshot wounds. Renal injuries are rarely isolated, as the mechanism of injury commonly results in damage to other organs, e.g. bowel and spleen.
2. Aggressive resuscitation of the patient is required and a full clinical assessment of all the injuries should be performed.
3. Blunt abdominal or loin trauma with associated visible haematuria is suggestive of a renal injury and a contrast enhanced CT scan is required (CT urogram). If that is not available, order intravenous urography (IVU), combined with angiography if you suspect involvement of the renal pedicle. Blunt trauma with associated non-visible haematuria has a low incidence of significant renal injury and imaging is only required if the patient is haemodynamically compromised, other injuries are suspected or if the mechanism of injury involves significant forces.
4. The majority of blunt renal injuries can be managed conservatively. The availability of renal angiography and selective embolization of bleeding renal vessels has positively altered the management of renal injuries so that even a severely shattered kidney can be managed initially using non-operative measures.
5. If there is parenchymal disruption associated with extravasation of contrast from the collecting system, conservative management is still possible but be ready to operate quickly if the patient’s condition deteriorates. Poor visualization, even on CT scan, suggests injury to the renal pedicle. If the patient is stable, perform angiography.
6. Massive and potentially life-threatening haemorrhage from a renal injury is an indication for immediate surgical exploration. Patients who are unstable despite a trial of conservative management will require exploration. Other indications for surgery include extensive urinary extravasation, an expanding retroperitoneal haematoma or a pulsatile haematoma.
KEY POINTS
Surgical exploration
 If the patient has not had a preoperative IVU and you discover renal trauma at exploration, perform IVU on the operating table to determine the status of the uninvolved kidney.

 Explore and complete the bowel, pancreatic, splenic and other intra-abdominal surgery (see Chapter 4) before opening the retroperitoneal space, provided there is no major bleeding.

NEPHRECTOMY FOR TRAUMA
Access
1. Place the patient in the supine position.
2. Employ a midline trans-abdominal incision, which provides complete access to abdominal organs, vasculature and kidneys.
3. Perform a careful and systematic survey of the intra-abdominal organs.
4. Mobilize the bowel and peritoneum off the aorta and vena cava.
5. Palpate the retroperitoneal structures. If you encounter a large pulsatile expanding haematoma, gain control of the renal pedicle before opening the peri-renal fascia of Gerota. Eviscerate the small intestine and incise the peritoneum over the aorta, exposing the vena cava and aorta. Isolate the renal artery(ies) and vein(s). Place vessel loops around the vessels of the injured kidney to gain control. If the vascular anatomy is obscured by a large retroperitoneal haematoma, then identify the inferior mesenteric vein and incise the retroperitoneum medial to this land mark and the aorta is located in the lower part of the incision.
6. When you have the bleeding under control, open the fascia of Gerota (Dumitru Gerota, 1867–1939, Professor of Surgery in Bucharest) and expose the kidney. If you have the necessary skill, and the parenchymal damage is not great, repair the kidney. Close the defects in the collecting system with continuous sutures of 4/0 Monocril or any other available absorbable suture. Carefully excise devitalized tissue, preserving as much capsule as possible. If the collecting system is injured, always leave a drain in the perinephric space.
7. If the contralateral kidney has been confirmed as intact, perform a nephrectomy rather than exposing the patient to unnecessary risk by attempting a difficult repair.
8. Double ligate the artery(ies) and the vein(s) with 2/0 Vicryl suture in continuity and then divide the vessels. If the right renal vein is very short, perform suture ligation using 2/0 Vicryl on a round-body needle for extra safety.
9. Carefully ligate and divide any adrenal vein and artery(ies) arising from the main renal vessels.
10. In the case of the left kidney, also ligate and divide the gonadal vein draining into the renal vein.


11. The fascia of Gerota has already been dissected off the kidney for exploration and assessment of renal injury. Complete any required remaining dissection to free the kidney from the surrounding tissues.
12. Remove the kidney by dividing the ureter between clamps. Ligate the distal ureteric stump with a 2/0 Vicryl suture.
13. After removing the kidney, carefully check the haemostasis, particularly of the hilar vessels and the adrenal area. Control any bleeding by suture ligation.
14. Place a wide bore Silastic tube drain with its tip in the most dependent point of the cavity.
15. Close the abdominal wound in a single layer using 1/0 looped monofilament PDS.
REPAIR OF A DAMAGED URETER
Assess
1. If you operate in the vicinity of the ureter, always check for damage. If you recognize inadvertent surgical ureteric injury at the operation, repair it immediately.
2. Iatrogenic ureteric injury may become apparent in the postoperative period. Clinically, this may present with loin pain or sepsis, urine might be identified in an abdominal drainage bag or occasionally leaking from an abdominal wound.
3. The mechanism of ureteric injury in cases of delayed presentation is usually a result of ischaemic injury to a segment of ureter from placement of haemostatic clips or sutures in the proximity of the ureter or inadvertent diathermy injury. Diagnosis is confirmed with either an intravenous urogram or CT urogram with delayed phase images. Where a ureteric injury is diagnosed postoperatively, consult with a urologist. Radiological placement of a nephrostomy to divert urine from the injury is usually a good holding measure whilst reconstruction is planned.
END-TO-END ANASTOMOSIS OF A DIVIDED URETER
Action
1. Consider end-to-end anastomosis for injuries of the mid and upper ureter providing the defect can be breached without tension. For injuries of the distal ureter, reimplantation with or without a psoas hitch or Boari flap (see below) is the procedure of choice.
2. Mobilize both ends of the divided ureter to make sure that they are accessible for anastomosis.
3. Place a double pigtail stent with one end in the renal pelvis and the other in the urinary bladder. If you do not have available a double pigtail stent, splint the anastomosis with a small-calibre (6F or 8F) paediatric feeding tube.
4. Open out the ends like a broad, flat-bladed spatula (Greek: spathe = broad blade) and hold the ends between stay sutures (Fig. 36.2). Anastomose them using fine interrupted sutures of 4/0 or 5/0 Monocril or any other available absorbable suture.
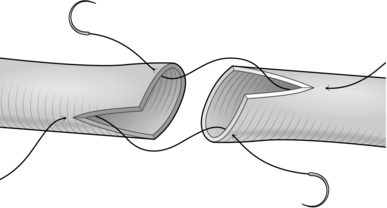
Fig. 36.2 Spatulated uretero-ureterostomy.
5. Leave a size 18F tube drain in the vicinity of the ureteric anastomosis.
BOARI FLAP (BLADDER FLAP URETEROPLASTY)
Appraise
1. The Boari flap operation (originally described in 1894 by Casati and Boari) of replacing the distal ureter with a bladder flap is used where the distal ureter is irreparably damaged or where it has been removed due to stricture or a distal ureteric tumour in a patient who is not suitable for nephro-ureterectomy.
Action
1. Position the patient in the supine position. Prepare the abdomen and genitalia and insert a urinary catheter.
2. Place a curved incision over the iliac fossa starting near the midline over the pubic tubercle and extend it over the surface marking of the linea semilunaris (Fig. 36.3).
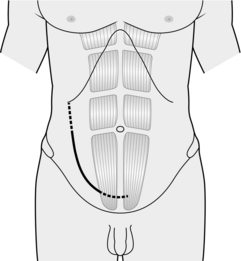
Fig. 36.3 Incision for Boari flap operation.
3. Use a muscle cutting incision using monopolar diathermy to open the rectus muscle and rectus sheath.
4. Sweep the peritoneum medially and superiorly to expose the retroperitoneal structures.
5. Locate the ureter. Remember that it crosses the pelvic brim at the bifurcation of the common iliac vessels.
6. Excise the diseased segment of ureter. If the diagnosis is a ureteric tumour, excise a small cuff of bladder with the distal ureter. Close the bladder defect in two layers with a 2/0 Vicryl suture.
7. If the procedure is being performed for a distal ureteric injury, locate the end of the ureter and debride any necrotic tissue.
8. Spatulate the distal end of the ureter by making a 2-cm longitudinal incision and place a stay suture at the apex of the spatulation.
9. Distend the bladder by instilling 200–300 ml of sterile saline via the urethral catheter.
10. Use a marker pen to draw three sides of a rectangle 10 cm long and 4 cm wide (Fig. 36.4) and incise along your mark to raise a bladder flap.
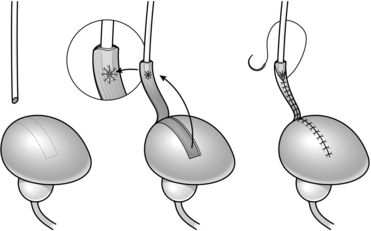
Fig. 36.4 Boari flap operation.
11. Create a submucosal tunnel using blunt dissection with scissors and create an opening about half way down the flap.
12. Pull the distal ureter through your submucosal tunnel using the stay suture and anastamose the ureter to the bladder mucosa using a fine Vicryl suture (Fig. 36.4).
13. Insert the floppy tip of a guide-wire through the distal ureter and slide a ureteric catheter over the wire.
14. Run a continuous Vicryl suture to tubularize your flap and close the bladder defect (Fig. 36.4).
15. Leave a drainage tube in the pelvis before closure.
16. A urinary catheter should be left for 2 weeks and a cystogram performed before removal of the catheter.
DRAINAGE OF A PERINEPHRIC ABSCESS


Action
1. Position the patient as for nephrectomy.
2. Make a small incision below the 12th rib or where the abscess is pointing on the surface.
3. Deepen the incision to the perinephric space. Pus usually starts to pour out as you reach the space.
4. Sweep your forefinger around in the perinephric space to break down all the septa.
5. Leave a wide-bore soft plastic tube drain in the cavity and secure it to the skin.
6. Close the wound lightly with interrupted monofilament nylon sutures.
OPERATIONS FOR PELVI-URETERIC JUNCTION OBSTRUCTION
Appraise
1. Obstruction at the level of the pelvi-ureteric junction (PUJ) causes hydronephrosis without evidence of ureteric dilatation.
2. The underlying cause can be classified according to intrinsic or extrinsic obstruction.
3. In paediatric patients, the most common cause is a functional obstruction due to a non-dynamic segment of ureter or atresia of the tissue at the PUJ.
4. Extrinsic compression can be due to a peri-ureteric fibrous band or a crossing vessel.
5. Patients may present with loin pain, urinary tract infections, abdominal mass or incidentally on abdominal imaging.
6. A MAG3 renogram will confirm an obstructed dilated system.
PYELOPLASTY
1. This procedure can be performed with an open loin incision or laparoscopically. The procedure can also be performed using robotic surgery.
2. Mobilize the proximal ureter and the renal pelvis and identify the PUJ. Take care when dissecting the ureter; leave adequate peri-ureteric tissue to preserve its blood supply.
3. Place stay sutures anteriorly though the renal pelvis and the proximal ureter to aid with orientation of the anastomosis and minimize handling of the tissues.
4. Transect the ureter at the level of the PUJ (Fig. 36.5A).
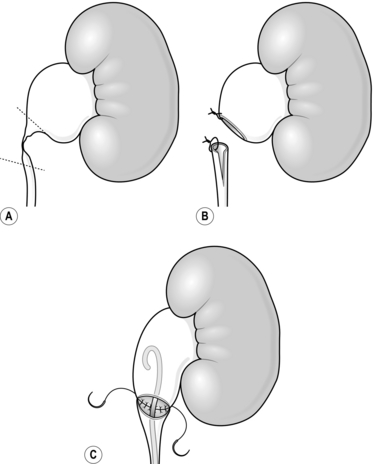
5. If the obstruction is secondary to a crossing vessel, pass the ureter around the vessel. If the obstruction is due to a stricture/scarred PUJ then excise the diseased segment.
6. Spatulate the cut end of the ureter using a 2-cm longitudinal incision on the opposite side to the stay suture. If a ureteric stent has not been placed preoperatively, insert one by placing an antegrade guide-wire to the bladder and passing a double J stent over the wire.
7. Spatulate the cut end of the renal pelvis with a 2-cm incision (Fig. 36.5B).
8. Perform the anastomosis using a fine absorbable suture. Place the first suture at the apex of the ureteric spatulation by passing the needle from outside to in and opposed to the renal pelvis by placing the suture from inside to out and tie.
9. Run a continuous suture along the posterior side of the spatulated ureter to anastamose it to the posterior spatulated edge of the renal pelvis so that the two stay sutures are aligned (Fig. 36.5C). Once one side is completed, place the proximal loop of the stent into the renal pelvis. Use a second suture starting again from the apex of the spatulated ureter to close the anterior side over the stent. The two sutures are tied together to complete the anastomosis.
10. Leave a tube drain in the area of the anastomosis.
11. Leave the stent in situ for 6 weeks and perform a MAG3 renogram 12 weeks after surgery to assess drainage.
Camunez, F., Echenagusia, A., Prieto, M.L., et al. Percutaneous nephrostomy in pyonephrosis. Urol Radiol. 1989; 11:77.
Ghali, A.M., El-Malik, E.M., Ibrahim, A.I., et al. Ureteric injuries: diagnosis, management, and outcome. J Trauma. 1999; 46:150–158.
Krane R.J., Siroky M.B., Fitzpatrick J.M., eds. Operative Urology: Surgical Skills. London: Churchill Livingstone, 2000.
Santucci, R.A., Wessells, H., Bartsch, G., et al. Evaluation and management of renal injuries: consensus statement of the Renal Trauma Subcommittee. BJU Int. 2004; 93:937–954.