Chapter 7 Transposition Flaps
RHOMBIC FLAPS
Design
The classic rhombic flap was first described by Limberg in 19631 and was designed to create a secondary defect perpendicular to the primary defect that, when closed, would not only provide tissue to close the primary defect, but would also redirect the tension vector 90°.2 This traditional flap design allows the primary defect to be closed under almost no wound tension.3 Subsequent design modifications by DuFourmental and Webster enabled more tension sharing between the primary and secondary defects because the angles and sizes of the flaps’ primary lobes were reduced.4
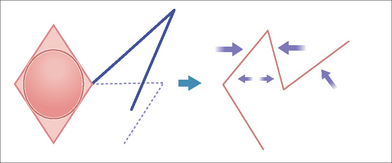
In planning a classic Limberg rhombic flap, the surgeon converts the primary defect into a four-sided parallelogram with each side of equal length and tip angles equal to 60° and 120°.5 This basic shape, the rhombus, forms the recipient site for the flap as well as the template upon which the required incisions are planned. In this classic design (Figure 7.1), the flap’s incision lines are drawn by extending a line (line AB) outward from one of the obtuse tips for a length equal to that of one side of the rhombus. From the free end of the extending line (line AB), a second line (line BC) is drawn parallel to and equal in length to one of the near sides of the rhombus. The tip angle of the flap’s primary lobe in this configuration is 60°. The incised flap is then lifted and transposed into place. The vector of maximal wound closure tension is thus redirected from that of closing the primary defect to that of closing the new secondary defect created in the execution of the flap. This allows for an effective 90° redirection of the tension vector.
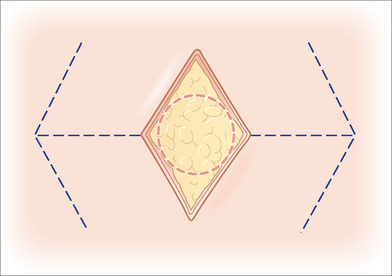
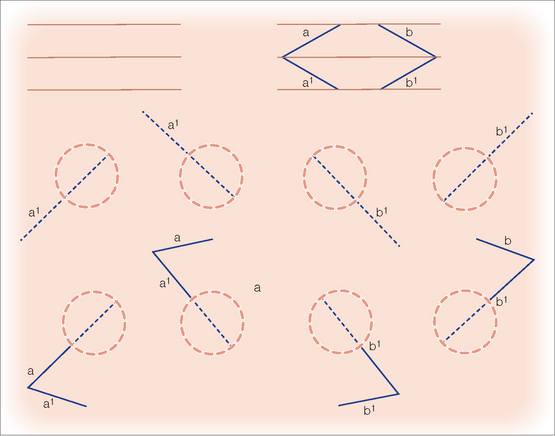
Though the classic rhombic transposition flap can be designed and executed off of the long axis of the rhombus, there are two advantages to designing it off of the short axis of the defect.6 First, this design keeps the flap as small as possible while filling the primary defect completely. Second, the design also minimizes the arc through which the flap must rotate to reach the defect.7,8 There are four possible flap designs off of the short axis for any rhombic defect (Figure 7.2). Which of these four flap configurations is chosen by the surgeon depends on several factors that affect the final outcome. These factors include the adjacent anatomic structures, the adjacent skin type, and where the resulting scar line will be best hidden.
Extrapolation of Rhombic Flap Principles to Round Defects
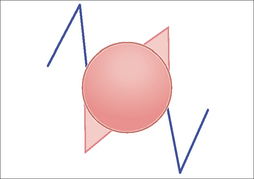
Most defects encountered in dermatologic surgery are not rhombic in shape. Rather, defects resulting from extirpation of tumors are generally round because of the radial growth patterns of most tumors. The principles described for repair of rhombic defects may also be used to reconstruct circular defects. In fact, applying these principles to a round defect affords even greater flexibility in transposition flap design and orientation.8 A rhombic design can be drawn around the round defect in a favorable orientation, keeping in mind the optimal flexibility of the surrounding tissue and adjacent anatomic structures (Figure 7.3). The optimal placement of the flap’s closure lines can also be planned according to the adjacent relaxed skin tension or cosmetic unit junction lines. Since the majority of the wound closure tension is placed on the closure of the secondary defect, the secondary defect’s closure is usually designed to be aligned with the relaxed skin tension lines.
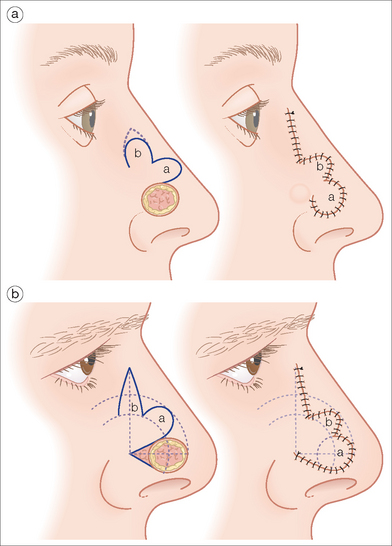
When designing the flap from a circular defect, the length of the line extending from the defect should be designed longer than the diameter of the circular wound because this diameter is actually shorter than the short axis of the rhombus that could be drawn around the circular defect (Figure 7.1). After the initial line is drawn extending from the circular wound, a second line of the same length is drawn to meet this initial line, keeping a tip angle of 60° or less to complete the flap. The tissue redundancy at the base of the primary defect created by the rotation of the transposition flap is removed with trimming of a triangle in the area of the flap’s pivot point. The tip of the transposed tissue may be rounded to fit the circular defect, or the defect may be squared off to accommodate the angular flap. This choice can be made based upon which option is likely to yield the optimal aesthetic result.
A thorough understanding of the forces of wound closure tension is essential to the planning, execution, and outcome of any closure. The primary tension component of a classic rhombic flap occurs with the closure of the secondary defect. A second set of tension forces is generated at the tip of the flap when it is moved into the primary defect. These forces are due to resistance to movement at the flap pedicle as well as effective shortening of the length of the flap during the rotation into the recipient site. Dzubow has described these forces as pivotal restraint.9 Securing the flap tip to the far end of the recipient site under inappropriately high tension can lead to tip ischemia and necrosis. There are two modifications of flap design that can be used in certain situations to minimize the shortening of the flap and reduce or eliminate the potential tension at the flap tip.
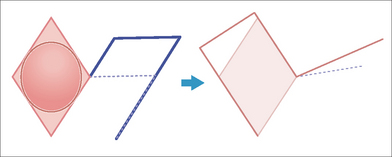
When the leading edge and the secondary limb of the flap’s primary lobe are extended/lengthened, the flap is slightly enlarged (Figure 7.4). This lengthening can compensate for the inevitable shortening that results from pivotal restraint at the flap’s base. Lengthening the flap by this method will help to ensure that flap rests in the primary defect without undue tension at its tip.
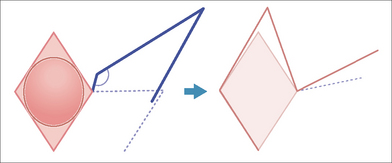
An alternate method to lengthen the flap and minimize tip tension at closure is to design the flap with a slightly more obtuse angle (greater than 120°) at the flap’s origination point (Figure 7.5). This design decreases the degree of rotation necessary during flap execution and subsequently reduces pivotal restraint. Wide undermining around the flap also assists in the redistribution of tension vectors and contractile forces during the healing phase.
Modified Rhombic Flaps
DuFourmental Flap
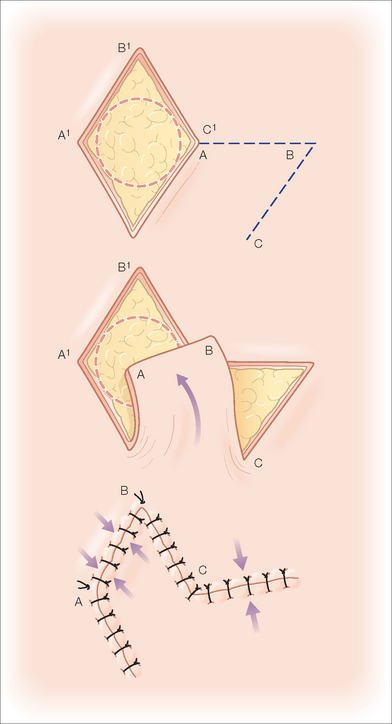
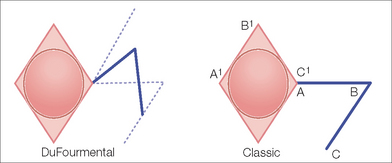
This modification of the classic rhombic transposition flap narrows the angle of the tip of the secondary defect and creates a shorter arc of rotation for the flap. This allows easier closure of the secondary defect and some sharing of the tension between the primary and secondary defects. As in the classic rhombic flap, the DuFourmental variant of the rhombic flap is designed by extending the first line from the short axis of the rhombic defect (Figure 7.6). However, the angle at which the first line is extended from the rhombus differs from the classic rhombic flap in that it bisects the angle formed by the first line of the classic rhombic flap (which extends straight from the short axis of the rhomboid defect) and the line formed by extending one of the sides of the rhomboid from the same corner. The length of the first line is equal to that of a side length of the rhomboid. The second line originates from the free end of the first line, and is drawn parallel to the long axis of the rhomboid. This second line’s orientation results in a slightly widened pedicle base, a decrease in the tip volume of the flap, a decrease in the amount of movement necessary to execute the flap, and the introduction of some degree of tissue advancement along the long axis of the rhomboid defect. In most cases, a tissue redundancy at the base of the leading edge of the flap is generated; this should be removed by excising a slightly larger “dog-ear” at the base of the flap.
Webster 30° Angle Flap
The Webster modification of the rhombic transposition flap makes the angle of the flap even more acute than the DuFourmental variant and allows for even greater tension sharing between the primary and secondary defects.10 A Webster 30° angle flap is planned similarly to the DuFourmental flap, with the exception that the distal tip of the flap is designed to have an angle of 30° (Figure 7.7). This more acute angle produces a slimmer design and narrower pedicle. The Webster design of the rhombic flap also frequently incorporates a m-plasty in the closure of the Burow’s triangle excision at the flap’s base. The flap width is approximately 50% of that of the defect, thus the flap only relieves about half of the tension from the primary defect. Closure of the flap is therefore partially dependent upon secondary motion at the site of the surgical defect. This design modification is used in situations where some laxity exists in the horizontal axis of the rhombic-shaped defect. Given that more tension is placed on the primary defect with this design, care must be taken not to distort adjacent anatomic structures.
Double 30° Angle Flap
Another variation of the rhombic transposition flap uses two flaps to borrow laxity from either side of a defect. Essentially resembling a series of Z-plasties, the double 30° angle flap is planned by drawing two 30° angle flaps, one from each short axis of the rhombus and in opposite directions (Figure 7.8).
Rhombic Flap Execution: Flap Mobilization and Key Sutures
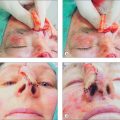
Obtaining good wound eversion and wound edge approximation is absolutely critical in achieving aesthetic results. Without these, closures have little chance of being relatively imperceptible after healing has been completed. The optimal time to obtain proper wound eversion is during the placement of the subcutaneous sutures. A properly placed buried vertical mattress suture is one of the skilled reconstructive surgeon’s best tools. It everts the closure line and takes the pressure off the healing wound edge, placing it in the dermis slightly distant to the edge. This allows the wound to heal under little tension and leaves the thinnest possible scar line. Once the wound has been everted and closed under minimal tension, cutaneous sutures are meticulously placed to keep the wound edges fully approximated during the initial healing phase. These cutaneous sutures may be fast-absorbing or nonabsorbable materials. If nonabsorbable suture material is used, the sutures, when used in areas of the head and neck, should be examined and removed at five to seven days following the procedure.
Applications of the Rhombic Flap
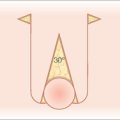
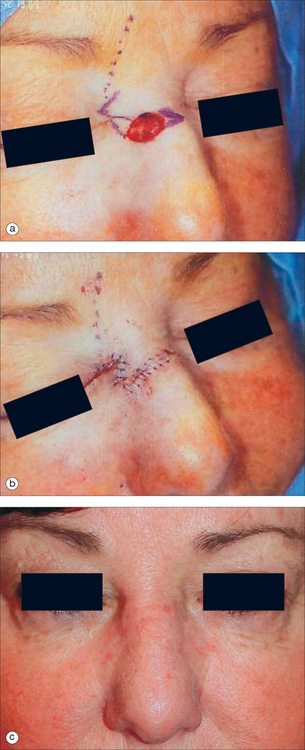
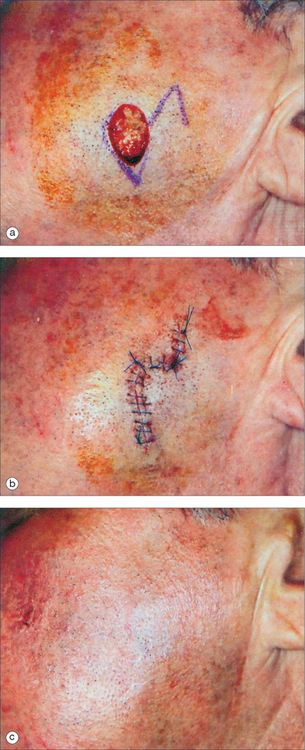
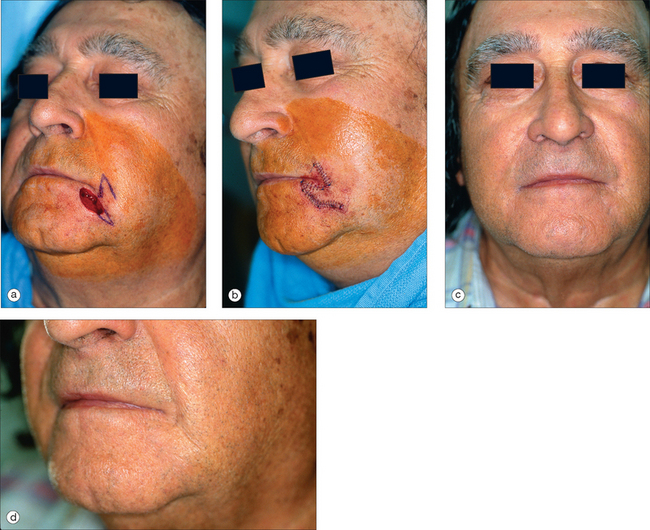
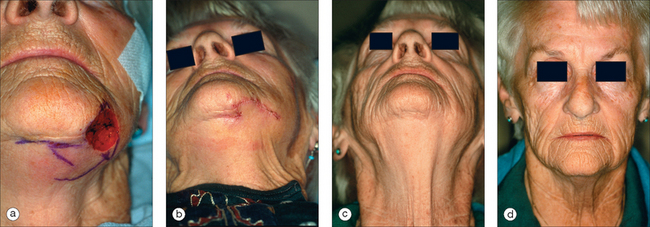
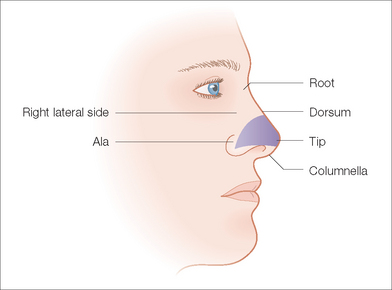
Rhombic transposition flaps are very versatile and may be used to reconstruct a variety of defects. Transposition flaps are generally used when there is insufficient laxity in the immediate surrounding area of closure or when the tension vectors need to be redirected.11 This is particularly important when repairing defects near free margins such as the eyelids and nose. The most common areas where rhombic flaps are employed include the nasal dorsum and sidewalls, the medial and lateral canthi, the lateral forehead, temple, cheek, the perioral region, the inferior chin, and the dorsal hand (Figure 7.9).
The following is a brief review of the rationale for choosing a rhombic flap in the locations.
OTHER TRANSPOSITION FLAPS
Banner Type Flaps
Banner type flaps are random pattern, finger-shaped flaps that, like other transposition flaps, tap into adjacent skin to borrow laxity and cover a defect. Banner transposition flaps produce longer, linear secondary scars typically placed at the junction of two cosmetic units, allowing the surgeon to optimally camouflage a long scar.12
The fundamental design of the banner flap consists of a finger-shaped flap drawn with a width equal to the width of the defect and a length equal to the distance from the pivot point to the far edge of the defect (Figure 7.15). The flap is transposed and rotated in an arc around the pivot point to fill the defect. Because the banner flap is a long random pattern flap with a narrow pedicle, the risk of vascular compromise may be high if the flap is too long or if it is harvested from an area of minimal vascularity. Unless the flap is based on a particular larger caliber artery, the flap is typically designed to rotate through an angle of 60°–120° instead of the originally described 180°. In either scenario, a tissue redundancy (dog-ear) is generated by the rotational motion of the flap. When removing this redundancy, the excision should be designed in a direction away from the pedicle of the flap in order to avoid narrowing the pedicle of the flap even further. This will minimize the risk of compromising the blood flow to the flap and maximize its viability.
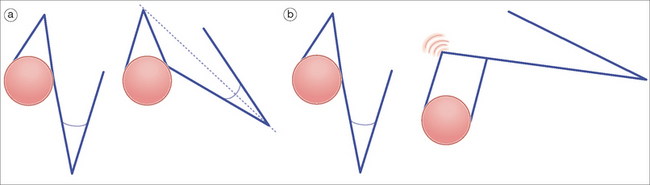
Figure 7.15 Examples of banner flaps. Note the greater redundancy at the pivot point of the flap with the larger angle.
Banner Transposition Flap Mobilization and Application
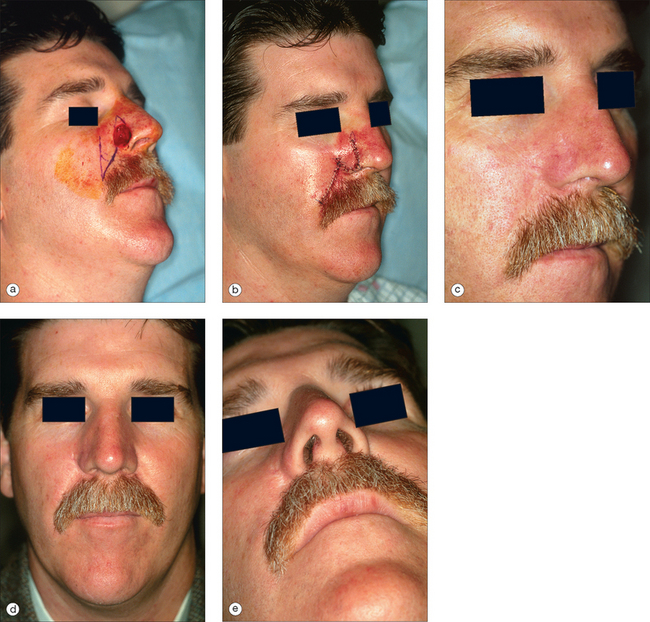
Typical locations for use of the banner flap include the nasal ala, the superior helix of the ear, and the medial anterior ear. At the nasal ala and inferior lateral side wall, a classic nasolabial transposition flap, a variant of a banner flap, can be designed, with the resulting scar hidden within the nasolabial fold (Figure 7.16). Although this flap has been maligned for blunting the nasofacial groove, when used properly in the appropriate patient, it offers an excellent reconstructive option for some nasal defects. The flap should be designed so the closure of the secondary defect is hidden in the nasolabial fold but does not come too close to the inferior lateral ala, where blunting of the isthmus (the triangle of flat skin where the upper lip, ala, and nasolabial fold meet) could occur. The redundant Burow’s triangle superior to the primary defect should be designed to leave the resultant scar on the lateral nasal sidewall. When the flap is raised, the cheek donor site should be widely undermined. Care should be taken not to harvest more adipose tissue than necessary. If too much adipose is taken while harvesting the flap, the nasolabial fold can be flattened, resulting in cheek asymmetry. When the flap is transposed into place, it should be anchored to the nasal sidewall with a periosteal suture. This will help reduce tension on the flap. In addition, a tacking suture from the underside of the flap to the area where the alar crease is located on the recipient bed helps recreate the alar groove. The flap is then appropriately trimmed and thinned to match the defect. If this is done prior to the tacking sutures, it is easy to trim too much off the end, not taking into account the extra length required to recreate the alar crease. Conversely, not trimming and thinning the flap enough may lead to pin-cushioning.
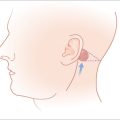
To repair defects of the superior helix, a banner flap can be taken from behind the superior aspect of the ear. The secondary defect is closed along the postauricular sulcus and the flap is transposed into place along the helix. As with any repair of the helix, it is important to remember the convex nature of the area and to allot enough tissue to recreate this. A simple flat measurement across the defect will not give the true volume of tissue required for reconstruction. By using a slightly wider (but not thicker) flap, the forces of contraction during healing will usually elevate the flap slightly in the middle and recreate the convex nature of the helix. Attaining proper wound edge eversion with well-placed buried subcutaneous mattress sutures is critical at the distal aspect of the flap where it joins the helix. If this edge is not everted properly, it will usually contract and appear as a noticeable notch on the helix.
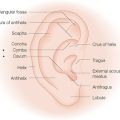
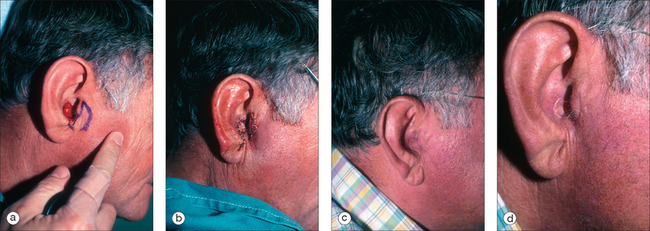
A banner flap may also be employed to correct defects of the medial anterior ear, such as the concha, tragus, or crus of the helix (Figure 7.17). Tissue is harvested from the preauricular area and transposed into the defect. This donor area typically provides ample tissue laxity. Since it is a cosmetic unit junction area (like the melolabial fold and postauricular sulcus), the preauricular area offers an excellent location for placing a minimally visible linear or curvilinear scar.
The Bilobed Flap
The bilobed flap commonly used today is a highly evolved transposition flap. Its design actually consists of two transposition flaps, used in succession, which follow the same direction of rotation over intervening tissues.13,14 The flap allows the surgeon to extend the reach of the transposition flap and borrow laxity from donor sites at a greater distance from the defect. The second lobe also decreases the degree of the arc through which the pedicle moves to borrow from the distal site.
The bilobed flap was first described for use in nasal reconstruction by Esser in 1918,15 where he designed a flap with each lobe traveling 90°, resulting in a significant dog-ear at the proximal advancing border of the primary lobe. When this type of closure is attempted in the highly sebaceous, thick zones of the lower nose, distortion of the alar rim is inevitable. The bilobed flap became a workhorse flap in nasal reconstruction after Zitelli published several design modifications to it in 1989.16 His modifications corrected the original flap’s two major drawbacks, large angles of flap transposition and the production of a dog-ear deformity that typically needs a revision procedure. This produced an excellent reconstructive option for the very unforgiving, sebaceous terrain of the lower nose. Zitelli’s modifications are illustrated in Figure 7.18.
When executed, a bilobed flap resembles the motion of a rotation flap. The modified bilobed flap is designed by drawing the two lobes along a 90° arc off of the tip of the center of the primary defect. Unlike the original bilobed flap, the pivot point of this arc extends beyond the width of the defect, incorporating the dog-ear at one side of the circular defect. This is essential to avoiding a large, tissue-distorting standing cone. With the larger radius of the arc, the lobes travel through fewer degrees of rotation, minimizing the large degree of pivotal restraint seen in the original bilobed design. The standing cone should be oriented in an attempt to place this scar in a well-hidden location, such as the alar crease.17
Application of the Bilobed Flap
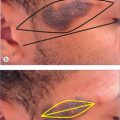
The bilobed flap is most often selected for reconstruction of defects located over the nasal tip and supra-tip, the distal nasal sidewall, the medial nasal ala, the auricular helix, and the posterior ear (Figure 7.19). These are areas with little local tissue laxity and high potential for distortion with side-to-side closure. In fact, the bilobed flap is often described as the flap of choice for repair of defects of the lower one-third of the nose. Since this is an area where skin cancers typically occur, familiarity with the bilobed flap and its modifications is essential for surgeons treating nonmelanoma skin cancers.
COMPLICATIONS
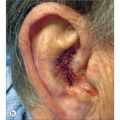
As with all repairs, a number of complications, such as postoperative hemorrhage, hematoma formation, infection, and wound dehiscence may occur when using transposition flaps for closure of cutaneous defects. Most complications can be avoided with proper patient and repair selection, appropriate flap design, and careful surgical execution. One surgical complication known as pin-cushioning, however, is seen more frequently with transposition flaps than with other reconstructive alternatives. The term pin-cushioning, also known as the trapdoor deformity, refers to the protuberance of a flap or graft above the surface of the surrounding skin.18 This can occur with all transposition flaps, and occurs more commonly with the traditional banner flap and the bilobed flap. The development of the trapdoor deformity may be due to the additional peripheral contraction that occurs with the curved edge flaps versus flaps with geometric configurations.
CONCLUSION
Transposition flaps can be powerful tools to produce excellent results in cutaneous reconstruction. As in the closure of any surgical defect, the goal should be to achieve the best possible functional and aesthetic result. This can only be accomplished by proper surgical planning. Every effort should be made to avoid distortion of the free margins of structures such as the nose and eyelids. Attempts to best camouflage incision lines within existing lines or creases, at the junction of cosmetic units, or at least parallel to lines of relaxed skin tension should be undertaken. A complete knowledge of the possible variations and modifications of these transposition flaps can help to fine-tune the execution of the flap to provide the patient with the best possible result. Good surgical technique and proper wound eversion through meticulous suture placement also help tremendously in consistently attaining aesthetically pleasing results. At the surgical bedside, an artistic eye should meet the science of cutaneous biomechanics.
1 Limberg AA. Design of local flaps. In: Gibson T, editor. Modern trends of plastic surgery. London: Butterworth-Heinemann; 1966:38-61.
2 Borges AF. The rhombic flap. Plast Reconstr Surg. 1981;67:458-466.
3 Larrabee WFJr, Trachy R, Sutton D, Cox K. Rhomboid flap dynamics. Arch Otolaryngol. 1981;107:755-757.
4 Bray DA. Clinical applications of the rhomboid flap. Arch Otolaryngol. 1983;109:37-42.
5 Rossi A, Jeffs JV. The rhomboid flap of Limberg—a simple aid to planning. Ann Plast Surg. 1980;5:494-496.
6 Borges AF. Choosing the correct Limberg flap. Plast Reconstr Surg. 1978;62:542-545.
7 Brobyn TJ, Cramer LM, Hulnick SJ. Facial resurfacing with the Limberg flap. Clin Plast Surg. 1976;3:481-490.
8 Fee WEJr, Gunter JP, Carder HM. Rhomboid flap principles and common variations. Laryngoscope. 1976;86:1706-1711.
9 Dzubow LM. The dynamics of flap movement: effect of pivotal restraint on flap rotation and transposition. J Dermatol Surg Oncol. 1987;13:1348-1353.
10 Webster RC, Davidson TM, Smith RC. The thirty degree transposition flap. Laryngoscope. 1978;88:85-94.
11 Yanai A, Ueda K, Takato T. Flexible rhombic flap. Plast Reconstr Surg. 1986;78:228-235.
12 Masson JK, Mendelson BC. The banner flap. Am J Surg. 1977;134:419-423.
13 McGregor JC, Soutar DS. A critical assessment of the bilobed flap. Br J Plast Surg. 1981;34:197-205.
14 Morgan BL, Samiian MR. Advantages of the bilobed flap for closure of small defects of the face. Plast Reconstr Surg. 1973;52:35-37.
15 Esser JSF. Gestielte locale Nasenplastik mit zwewiplifgem Lappen, Deckung des sekundaren Defektes vom ersten Zipfel durch den zweiten. Dtsch Z Chir. 1918;143:385-390.
16 Zitelli JA. The bilobed flap for nasal reconstruction. Arch Dermatol. 1989;125:957-959.
17 Cook JL. A review of the bilobed flap’s design with particular emphasis on the minimization of alar displacement. Dermatol Surg. 2000;26:354-362.
18 Koranda FC, Webster RC. Trapdoor effect in nasolabial flaps. Causes and corrections. Arch Otolaryngol. 1985;111:421-424.
19 Brodland DG, Pharis D. Flaps. In: Bolognia J, Jorizzo J, Rapini R, editors. Dermatology. London: Mosby; 2003:2287-2303.
Converse JM, editor. Reconstructive plastic surgery: General principles, 2nd ed. Philadelphia: WB Saunders. 1977:202-207.
Davidson TM, Webster RC, Gordon BR. The principles and dynamics of local skin flaps. Chicago: American Academy of Otolaryngology Head and Neck Surgery, 1983.
Grabb WC, Myers MB, editors. Skin flaps. Boston: Little Brown. 1975:111-131.
Lister GD, Gibson T. Closure of rhomboid skin defects: the flaps of Limberg and Dufourmentel. Br J Plast Surg. 1972;25:300-314.
Webster RC, Benjamin BJ, Smith RC. Closure of circular defects. Laryngoscope. 1978;88:534-538.
Webster RC, Benjamin BJ, Smith RC. Treatment of “trap door deformity”. Laryngoscope. 1978;88:707-712.
Yotsuyanagi T, Yamashita K, Urushidate S, et al. Reconstruction of large nasal defects with a combination of local flaps based on the aesthetic subunit principle. Plast Reconstr Surg. 2001;107:1358-1362.