[level-membership-for-orthopaedics-category]
Chapter 30 Tibial Fixation for Anterior Cruciate Ligament Hamstring Grafts
10 Techniques that Improve Fixation
Introduction
There are many reasons why tibial fixation is more challenging than femoral fixation. Bone mineral density (BMD) is higher in the distal femur than it is in the metaphyseal region of the tibia.1 Higher BMD provides more rigid fixation for soft tissue fixation devices such as interference screws and posts. Femoral fixation may include suspensory devices and posts that can provide more than twice the ultimate load to failure (LTF) compared with commonly used interference screws. Interference screws are more commonly used on the tibial side of the graft.2 Posts can also be used on the tibial side of the ACL graft, but this entails tying heavy sutures over the post or screw that is drilled into the tibia distal to the tunnel. The “weak link” then becomes the interface between the tendons and the sutures. When posts are used for femoral fixation, the grafts are draped over the posts and fail due to the post pulling through the cancellous bone. Tibial fixation is also more difficult because the reconstructed ACL forces are parallel to the tibial tunnel,3 requiring either a fixation point orthogonal to the tunnel (screw or WasherLoc distal to the tunnel) or an inner-tunnel fixation device that will provide enough wedge fit and compression to secure the graft from slippage and failure under cyclical loading. When inner-tunnel fixation or interference screws are used, they are inserted in a direction opposite to the tension being pulled on the ACL graft, which may squander valuable tension.4 This, coupled with management and equal tensioning of four separate whipstitched tendons, makes tibial fixation technically difficult.
Technique 1: Graft Preparation
Hamstrings can be harvested one of several ways. Many surgeons harvest the semitendinosus and gracilis tendons by making an incision between the tendons as they insert on the pes anserinus. The tendons are then retrieved proximally, where they are more distinct from each other. Extra length may be achieved by using some of the periosteum near the anterior crest of the tibia where the tendons attach.5 An equally popular way to harvest the hamstrings involves making a horizontal incision over the superior margin of the gracilis tendon, starting at the tibial crest and extending 2 to 3 cm medially. This is followed by an incision along the anterior margin of the tibia, creating a trapdoor by which the pes anserinus is reflected from the periosteum. The semitendinosus and gracilis tendons are easily visualized and dissected from the sartorius fascia. This technique better preserves the sartorius fascia that acts as a scaffold for later hamstring tendon regeneration. It also allows better visualization of the infrapatellar branch of the saphenous nerve, which is important to protect while harvesting hamstrings and performing meniscus repair.
The semitendinosus, being the broader and longer of the two tendons, is harvested first. Most surgeons harvest in this order in case the stripper accidentally damages the tendon that is not being stripped. Another potential reason for harvesting the semitendinosus first is the possibility that the semitendinosus may be long enough to be quadrupled, providing all four strands of the reconstruction. Preservation of the gracilis tendon may protect knee flexion strength; however, this is controversial.6 The gracilis is harvested in the majority of our ACL reconstructions.
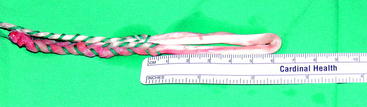
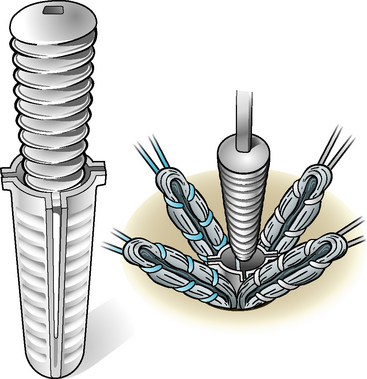
After tendon harvest, the sartorius fascia and pes anserinus are repaired to their origins using a #1 Vicryl suture. This protects the majority of the sartorius fascia from inadvertent destruction during tibial tunnel reaming. Gracilis and semitendinosus grafts are gently removed of their musculotendinous muscle attachments using a small key elevator. A #2 Ethibond or orthocord nonabsorbable suture is used to whipstitch each of the four arms of the tendon grafts. Usually, a running whipstitch up and down each side of the strand provides enough security for later tensioning. Occasionally one end of the graft may not have robust-enough tissue, and a locking whipstitch can be used as described by Krackow.7 Graft tunnels are measured accurately, and whipstitches are made along each arm of the four bundled graft such that the whipstitches will extend up the entire distance of the tibial tunnel (Fig. 30-1). By using whipstitches along the entire length of the graft that is occupying the tibial tunnel, fixation pullout is increased by approximately 15%.8 The tendons are then placed over a suture and drawn through an appropriately sized soft tissue guide or measuring device to determine the width of the tunnels.
Technique 2: Pretension and Cycling of the Grafts
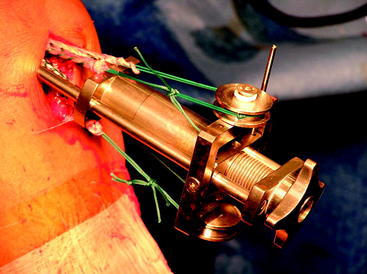
Tendons, when at rest, are in a crimped, wavy state. When tensioned, the fibers line up in a parallel fashion and the tendon elongates by 2% to 4%, depending on where the tensioning is taking place on the stress–strain curve. Once the “toe” region of the stress–strain relationship curve has been exceeded, any further stress makes the graft stiffer and therefore makes the knee tighter.9 By preloading the graft and tensioning with 30 lb over 3 dozen cycles and/or 30 minutes of time, the graft is stiffened and the relaxation that occurs immediately after fixation is reduced (Fig. 30-2) Grafts inserted after pretensioning and cycling are much stiffer than grafts that have not undergone this technique. By placing a stiffer graft and using stiffer fixation, less load can be placed on the graft, ultimately resulting in a tighter knee.10
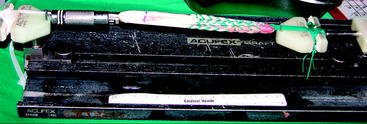
Recently, static tensioners have been developed to tension the graft while it is already fixed in the femoral tunnel. As the knee is cycled with the grafts under tension, the graft elongates and the grafts are retensioned prior to insertion of the interference screws.11 When using a static tensioner, we place no more than 15 lb on the graft, to be distributed equally among the four arms of the four-bundle graft (Fig. 30-3).
Yasuda et al tested their ACL hamstrings grafts tensioned to 20N and 80N at the time of surgery, 2 years later the grafts tensioned at 20N had significantly more laxity than the 80N group: 2.2 mm versus 0.6 mm, respectively.12 However, it is important to remember that grafts continue to elongate despite pretensioning. A recent study demonstrated that the viscoelastic properties of tendons cannot be completely eliminated. Hamstring and anterior tibialis allografts underwent no preconditioning, cyclical preconditioning, or isometric preconditioning, and the tension of the grafts was measured over 1 hour. The grafts continued to elongate for the entire 60 minutes. In all groups the grafts lost approximately 60% of their original tension over the 1-hour period.13 This has important implications for hamstring reconstruction physical therapy protocols. We recommend and the literature supports a less aggressive regimen in the first 2 months after reconstruction.
Technique 3: Maximize Length of the Tibial Tunnel
Increasing the length of the tunnel maximizes the surface area available for healing of tendons to bone. It also provides more room for a longer fixation device and therefore improved fixation. In a dog model, pullout strength of a soft tissue tendon was 153.7N in a 1-cm tunnel versus 265.5N in a 2-cm tunnel.14 However, the important healing itself occurs in the first 8 to 10 mm of the proximal tibial tunnel, and thus tibial healing is not enhanced by longer tunnels. Longer tunnels allow longer interference screws, which provide more rigid fixation when using interference screw techniques. In addition to using longer tunnels, the author’s clinic undersizes the tibial tunnel by 1 mm, allowing for a better press fit. This also enhances healing of the graft in the tunnel.
Location of the tibial tunnel is extremely important in terms of neutralizing rotation (pivot-shift) and preventing early failures due to impingement. If the tunnel is too anterior in the sagittal plane, the risk of impingement is high and the graft may stretch out because it is too tight in flexion. If the graft tunnel is too posterior, it will fail to neutralize anterior translation of the tibia when the knee is in full extension.15 We currently use a high-angle tibia guide designed by Dr. Steve Howell. The guide is designed to place the tibial tunnel into a position in which impingement on the hamstring graft cannot occur. The guide directs the guide pin into the tibia at approximately 65 degrees.16 The guide has a wide, golf club (driver)–shaped tip that is inserted into the notch, and the knee is taken into full extension. The bulky tip of the guide is forced posterior in relation to the anterosuperior edge of the femoral notch. This ensures that the graft will stay behind Blumensaat’s line when the knee is in full extension, eliminating anterior impingement on the graft. The high angle created by the guide also creates a longer tibial tunnel that will enable more surface area for fixation and healing.17
In our technique, we perform only a lateral wall notchplasty and only enough to allow safe graft passage. There must be enough room between the posterior cruciate ligament (PCL) and the lateral wall for the large diameter of the Howell guide. Once there is enough room for the tip of the guide, the knee is brought into full extension. A Kirschner wire (K wire) is placed through the arm of the guide in order to align the guide to a 45-degree angle in relation to the tibial plateau. This prevents the graft from being placed in a too-vertical position. ACL grafts that are too vertical have more rotational instability and tend to pivot-shift after reconstruction.18 After the guide pin is placed in the proximal tibia, we check its position in the posterior aspect of the ACL footprint. Other landmarks that are used to check position are the anterior horn of the lateral meniscus, the PCL, and the medial tibial intercondylar eminence.19 The most useful of these landmarks is the PCL. Our pin should be within 5 to 6 mm of the anterior border of the PCL. When using this guide, one should pay close attention to the position of the guide pin as it enters the tibia. It is usually more posterior than in traditional placement techniques that aim for the midpoint between the anterior and posteromedial aspect of the tibia. Often the guide pin is very close to the anterior border of the superficial medial collateral fibers. If the guide pin sits within the fibers of the medial collateral ligament, then a more traditional location for the tunnel should be used to avoid damaging the ligament.
Traditionally surgeons have reamed with a broad, cannulated reamer. We use a trephine bone harvesting system, also known as a coring reamer.20 This creates a long bone dowel or plug that is later used as bone graft in the tibial tunnel (discussed later). Matching the tunnel size to the graft size is very important. Steenlage et al showed that even a 0.5-mm difference in tunnel sizes could reduce ultimate LTF of tibial fixation from 308N to 221N.21 We make sure that our hamstring grafts fit snugly in their tunnels. Sometimes we even undersize the tibial tunnel by 0.5 to 1.0 mm to enhance this fit. Cain et al tested hamstring grafts in tunnels that were reamed to the correct size versus tunnels that were under-reamed by 2 mm and then dilated by smooth dilators to the same diameter as the controls. The pullout strength of the dilated group was 616N versus 453N for the reamed-alone group.22
Technique 5: Distal Tunnel Fixation
Location of the fixation device will determine the ultimate fixation strength of the ACL graft. The bone closest to the cortex of the proximal tibia has the tighter trabecular pattern and higher BMD.23 The cortex at the distal aspect of the tibial tunnel provides better fixation than the cancellous middle portion of the tibial tunnel. The very proximal part of the tunnel can provide good fixation, but the fixation device should not interfere with bone completely encompassing the graft. This must be balanced with the knowledge that fixation points farther away from the joint may produce more tunnel widening.24 In theory, this may hinder bone attachment to the hamstring tendons. Phillips et al demonstrated in human cadavers that the greatest amount of screw insertional torque was at the most distal aspect of the tibial tunnel.25 The insertional torque at the distal aspect of the tunnel measured 8.7 inches per pound versus 4.7 and 4.3 inches per pound in the middle and proximal thirds of the tibial tunnel, respectively. This relates directly to pullout strength and further justifies a fixation point close the cortex of the tibia.
Technique 6: Bone Grafting of Tibial Tunnel
The author has bone grafted the tibial tunnel using autograft and allograft bone for the past several years. By impacting bone between the tendons to the proximal portion of the tibial tunnel, the healing of the graft to the tunnel is enhanced in a circumferential way. As mentioned earlier, the trephinated reamer produces an excellent core of cancellous bone. This also increases pullout strength significantly.19 The bone graft is placed in the tibial tunnel prior to placing the interference screw (Fig. 30-4). The interference screw then further compacts the graft and pushes it into the proximal portion of the tibial tunnel. The surgeon must exercise care so as not to push bone into the joint itself. The only way to ensure that bone has not been pushed into the joint is to insert the arthroscope back into the knee and visualize the graft and notch area. If trephinated reamers are not available, one can use allograft bone chips or OBI bone substitute (Osteobiologics, San Antonio, TX).
Technique 7: Rigid Interosseous Compression with Interference Screw
The goal of any fixation should be to limit motion as much as possible. Rigid fixation creates an environment in which bone healing to the tendons is more likely to occur. Interference screws when used with a protective sleeve can provide this rigid fixation (i.e., IntraFix, Mitek, Norwood, MA). The IntraFix has several advantages over other fixation devices (Fig. 30-5). The sleeve protects the graft from laceration during insertion while at the same time pressing the four hamstring strands firmly into the cancellous bone of the tibia. If two assistants are available, we prefer to have the arms of the graft pulled in the direction of the tunnel, and then without losing tension, we lay the grafts down on the edge of the tibia in four separate directions. The tunnel is first expanded with the IntraFix expander. We then place our bone graft in the tunnel and again use the expander to ensure that there is enough room for the sleeve and screw. The grafts are again pulled in the direction parallel to the tunnel and the grafts are laid down in opposite directions on the tibia, similar to the spokes on a wheel. The sleeve is inserted, followed by the screw. The screw is advanced until it is nearly flush with the tibia. Further advancement past the cortical bone will sacrifice fixation strength, as explained earlier. The author’s clinic purposely use an interference screw that is equal to or larger than the diameter of the tunnel drilled for the graft. We typically use the shorter of the two screws to ensure that our interference screw does not “interfere” with bone healing to tendon near the joint surface.
Kousa et al tested six different tibial fixation devices in human cadavers.4 The study included two screw-and-washer fixation devices and four interference screw devices including IntraFix. Single-cycle LTF testing as well as 1500-cycle load testing were performed on the specimens. IntraFix had the highest single-cycle LTF threshold at 1332N, which was 357N stronger than the next closest device, the WasherLoc (975N). After cyclical load testing, the residual displacement of the IntraFix averaged 1.5 to 0.3 mm, which was the lowest displacement of the six devices. WasherLoc had 3.2 to 1.5 mm of residual displacement, which was the next-best recorded value.
Technique 8: Cross-Pin Fixation of Interference Screw System
Early failure of the soft tissue graft to cycling occurs when the interference screw and/or fixation device slips or loosens. The author has described and tested a bioabsorbable Interlock pin (Stryker Orthopedics, Kalamzoo, MI) that is constructed with polylactic acid (PLA).26 After the IntraFix device is deployed, a hole is drilled through the cortex of the proximal tibia and perpendicular to the long axis of the bioabsorbable interference screw. The smooth PLA pin is placed across the bone and the interference screw (Figs. 30-6 and 30-7). This prevents early slippage and improves fixation by as much as 30% when tested by cyclical pullout.27 By placing an Interlock pin perpendicular to the interference screw, the need for an extracortical fixation device is obviated. This also prevents reoperation in a significant number of cases wherein extracortical devices protrude and create palpable tenderness and/or kneeling pain (see Fig. 30-2).

Technique 9: Utilization of Bioabsorbable Materials
Although bioabsorbable screws have been well studied in patellar tendon ACL reconstructions, there is relatively less information about the devices in hamstring ACL reconstructions. Bioabsorbable screws have been compared with titanium screws human cadavers and hamstring ACL reconstructions. Brand et al demonstrated that there was no statistical difference in pullout strengths between the metal versus bioabsorbable screws.28 On the femoral side of fixation, they did observe a much higher rate of graft laceration with the titanium screws. Robinson et al evaluated bone tunnel enlargement with PLLA screws versus screws mixed with PLLA and hydroxyapatite (HA).29 Tunnel widening was observed in 29.9% of the combined PLLA/HA versus 46% in the group with PLLA alone.
Technique 10: Modified Physical Therapy for the First 2 Months After Surgery
The first 8 to 12 weeks after hamstring ACL reconstruction are the most important in terms of forming bonds between the bone and the hamstring tendons. From our knowledge of what happens to grafts in vitro, we discourage any physical therapy activity that will aggressively cycle the graft. However, we do allow early weight bearing with a hinged brace as well as full range of motion as soon as possible. Stationary bicycling is not allowed until the ninth postoperative week. In a cohort study, Hantes et al demonstrated that early motion after hamstring ACL reconstruction resulted in an average of 48.14% tunnel widening versus 24.47% widening in patients with delayed motion.30 We do not allow our patients to take antiinflammatory medications postoperatively because we believe these may disrupt healing of bone to tendon in the tibial tunnel.
1 Brand JCJr, Pienkowski D, Steenlage E, et al. Interference screw fixation strength of a quadrupled hamstring tendon graft is directly related to bone mineral density and insertional torque. Am J Sports Med. 2000;28:705-710.
2 Brown CHJr, Wilson DR, Hecker AT, et al. Graft-bone motion and tensile properties of hamstring and patellar tendon anterior cruciate ligament femoral graft fixation under cyclic loading. Arthroscopy. 2004;20:922-935.
3 Malek MM, DeLuca JV, Verch DL, et al. Arthroscopically assisted ACL reconstruction using central third patellar tendon autograft with press fit femoral fixation. Instr Course Lect. 1986;45:287-295.
4 Kousa P, Jarvinen TLN, Vihavainen M, et al. The fixation strength of six hamstring tendon graft fixation devices in anterior cruciate ligament reconstruction. Part II: tibial side. Am J Sports Med. 2003;31:182-188.
5 Pagnini MJ, Warner JP, O’Brien SO, et al. Anatomic considerations in harvesting the semitendinosus and gracilis tendons and a technique of harvest. Am J Sports Med. 1993;21:565-571.
6 Carofino B, Fulkerson J. Medial hamstring tendon regeneration following harvest for anterior cruciate ligament reconstruction: fact, myth, and clinical application. Arthroscopy. 2005;21:1257-1265.
7 Krackow KA, Thomas SC, Jones LC. A new stitch for ligament-tendon fixation. J Bone Joint Surg. 1986;68A:764-766.
8 Paulos LE, Ellis B. ACL fixation pullout studies. Orthopedic Biomechanics Institute. 1998. Salt Lake City
9 Kannus P, Jozsa L, Jarvinen M. Basic science of tendons. In: Garrett WEJr, Speer KP, Kirkendall DT, editors. Principles and practice of orthopaedic sports medicine. Philadelphia: Lippincott, Williams & Wilkins; 2000:21-37.
10 Vachtsevanos JG, Lamberson KA, Paulos LE. Anterior cruciate graft tensioning. Tech Knee Surg. 2003;21:125-136.
11 Paulos L. Personal communication. 2007.
12 Yasuda K, Tsujino J, Tanabe Y, et al. Effects of initial graft tension on clinical outcome after anterior cruciate ligament reconstruction. Autogenous double hamstring tendons connected in series with polyester tapes. Am J Sports Med. 1997;25:99-106.
13 Nurmi JT, Kannus P, Sievanen H, et al. Interference screw fixation of soft tissue grafts in anterior cruciate ligament reconstruction and after screw insertion. Part 2: effect of preconditioning on graft tension during and after screw insertion. Am J Sports Med. 2004;32:418-424.
14 Greis PE, Burks RT, Bachus K, et al. The influence of tendon length and fit on the strength of tendon-bone tunnel complex. A biomechanical and histologic study in the dog. Am J Sports Med. 2001;29:493-497.
15 Fineberg MS, Zarins B, Sherman OH. Practical considerations in anterior cruciate ligament replacement surgery. Arthroscopy. 2000;16:715-724.
16 Simmons R, Howell SM, Hull ML. Effect of the angle of the femoral and tibial tunnels in the coronal plane and incremental excision of the posterior cruciate ligament on tension of an anterior cruciate ligament graft (an in vitro study). J Bone Joint Surg. 2006;85A:1018-1029.
17 Cuomo P, Edwards A, Giron F, et al. Validation of the 65 degrees Howell guide for anterior cruciate ligament reconstruction. Arthroscopy. 2006;22:70-75.
18 Lee MC, Seong SC, Jo H, et al. Outcome of anterior cruciate ligament reconstruction using quadriceps tendon autograft. Arthroscopy. 2004;20:795-802.
19 Jackson D, Gasser S. Tibial tunnel placement in ACL reconstruction. Arthroscopy. 1994;10:124-131.
20 Howell SM, Roos P, Hull ML, et al. Compaction of a bone dowel in the tibial tunnel improves the fixation stiffness of a soft tissue anterior cruciate ligament graft: an in vitro study in calf tibia. Am J Sports Med. 2005;33:719-725.
21 Steenlage E, Brand JCJr, Johnson DL, et al. Correlation of bone tunnel diameter with quadrupled hamstring graft fixation strength using a biodegradable interference screw. Arthroscopy. 2002;18:901-907.
22 Cain EL, Phillips BB, Charlebois SJ, et al. Effect of tibial tunnel dilation on pullout strength of semitendinosis graft in anterior cruciate ligament reconstruction. Orthopedics. 2005;28:779-783.
23 Klein SA, Nyland J, Caborn DN, et al. Comparison of volumetric bone mineral density in the tibial region of interest for ACL reconstruction. Surg Radiol Anat. 2005;27:372-376.
24 Fauno P, Kaalund S. Tunnel widening after hamstring anterior cruciate ligament reconstruction is influenced by the type of graft fixation used: a prospective randomized study. Arthroscopy. 2005;21:1337-1341.
25 Phillips BB, Cain EL, Dlabach JA, et al. Correlation of interference screw insertional torque with depth of placement in the tibial tunnel using a quadrupled semitendinosus-gracilis graft in anterior cruciate ligament reconstruction. Arthroscopy. 2004;20:1026-1029.
26 Berg TL, Paulos LE. Endoscopic ACL reconstruction using Stryker Biosteon cross-pin femoral fixation and Interlock cross-pin tibial fixation. Surg Technol Int. 2004;12:239-244.
27 Stryker Endoscopy data. Study performed by Frontier Biomedical. 2002. Logan, UT
28 Brand JCJr, Nyland J, Caborn DN, et al. Soft-tissue interference fixation: bioabsorbable screw versus metal screw. Arthroscopy. 2005;21:911-916.
29 Robinson J, Huber C, Jaraj P, et al. Reduced bone tunnel enlargement post hamstring ACL reconstruction with poly-l-lactic acid/hydroxyapatite bioabsorbable screws. Knee. 2006;13:127-131.
30 Hantes ME, Mastrokalos DS, Yu J, et al. The effect of early motion on tibial tunnel widening after anterior cruciate ligament replacement using hamstring tendon grafts. Arthroscopy. 2004;20:572-580.
[/level-membership-for-orthopaedics-category][not-level-membership-for-orthopaedics-category]
Chapter 30 Tibial Fixation for Anterior Cruciate Ligament Hamstring Grafts
10 Techniques that Improve Fixation
Introduction
There are many reasons why tibial fixation is more challenging than femoral fixation. Bone mineral density (BMD) is higher in the distal femur than it is in the metaphyseal region of the tibia.1 Higher BMD provides more rigid fixation for soft tissue fixation devices such as interference screws and posts. Femoral fixation may include suspensory devices and posts that can provide more than twice the ultimate load to failure (LTF) compared with commonly used interference screws. Interference screws are more commonly used on the tibial side of the graft.2 Posts can also be used on the tibial side of the ACL graft, but this entails tying heavy sutures over the post or screw that is drilled into the tibia distal to the tunnel. The “weak link” then becomes the interface between the tendons and the sutures. When posts are used for femoral fixation, the grafts are draped over the posts and fail due to the post pulling through the cancellous bone. Tibial fixation is also more difficult because the reconstructed ACL forces are parallel to the tibial tunnel,3 requiring either a fixation point orthogonal to the tunnel (screw or WasherLoc distal to the tunnel) or an inner-tunnel fixation device that will provide enough wedge fit and compression to secure the graft from slippage and failure under cyclical loading. When inner-tunnel fixation or interference screws are used, they are inserted in a direction opposite to the tension being pulled on the ACL graft, which may squander valuable tension.4 This, coupled with management and equal tensioning of four separate whipstitched tendons, makes tibial fixation technically difficult.
Technique 1: Graft Preparation
Hamstrings can be harvested one of several ways. Many surgeons harvest the semitendinosus and gracilis tendons by making an incision between the tendons as they insert on the pes anserinus. The tendons are then retrieved proximally, where they are more distinct from each other. Extra length may be achieved by using some of the periosteum near the anterior crest of the tibia where the tendons attach.5 An equally popular way to harvest the hamstrings involves making a horizontal incision over the superior margin of the gracilis tendon, starting at the tibial crest and extending 2 to 3 cm medially. This is followed by an incision along the anterior margin of the tibia, creating a trapdoor by which the pes anserinus is reflected from the periosteum. The semitendinosus and gracilis tendons are easily visualized and dissected from the sartorius fascia. This technique better preserves the sartorius fascia that acts as a scaffold for later hamstring tendon regeneration. It also allows better visualization of the infrapatellar branch of the saphenous nerve, which is important to protect while harvesting hamstrings and performing meniscus repair.
The semitendinosus, being the broader and longer of the two tendons, is harvested first. Most surgeons harvest in this order in case the stripper accidentally damages the tendon that is not being stripped. Another potential reason for harvesting the semitendinosus first is the possibility that the semitendinosus may be long enough to be quadrupled, providing all four strands of the reconstruction. Preservation of the gracilis tendon may protect knee flexion strength; however, this is controversial.6 The gracilis is harvested in the majority of our ACL reconstructions.
After tendon harvest, the sartorius fascia and pes anserinus are repaired to their origins using a #1 Vicryl suture. This protects the majority of the sartorius fascia from inadvertent destruction during tibial tunnel reaming. Gracilis and semitendinosus grafts are gently removed of their musculotendinous muscle attachments using a small key elevator. A #2 Ethibond or orthocord nonabsorbable suture is used to whipstitch each of the four arms of the tendon grafts. Usually, a running whipstitch up and down each side of the strand provides enough security for later tensioning. Occasionally one end of the graft may not have robust-enough tissue, and a locking whipstitch can be used as described by Krackow.7 Graft tunnels are measured accurately, and whipstitches are made along each arm of the four bundled graft such that the whipstitches will extend up the entire distance of the tibial tunnel (Fig. 30-1). By using whipstitches along the entire length of the graft that is occupying the tibial tunnel, fixation pullout is increased by approximately 15%.8 The tendons are then placed over a suture and drawn through an appropriately sized soft tissue guide or measuring device to determine the width of the tunnels.
Technique 2: Pretension and Cycling of the Grafts
Tendons, when at rest, are in a crimped, wavy state. When tensioned, the fibers line up in a parallel fashion and the tendon elongates by 2% to 4%, depending on where the tensioning is taking place on the stress–strain curve. Once the “toe” region of the stress–strain relationship curve has been exceeded, any further stress makes the graft stiffer and therefore makes the knee tighter.9 By preloading the graft and tensioning with 30 lb over 3 dozen cycles and/or 30 minutes of time, the graft is stiffened and the relaxation that occurs immediately after fixation is reduced (Fig. 30-2) Grafts inserted after pretensioning and cycling are much stiffer than grafts that have not undergone this technique. By placing a stiffer graft and using stiffer fixation, less load can be placed on the graft, ultimately resulting in a tighter knee.10
Recently, static tensioners have been developed to tension the graft while it is already fixed in the femoral tunnel. As the knee is cycled with the grafts under tension, the graft elongates and the grafts are retensioned prior to insertion of the interference screws.11 When using a static tensioner, we place no more than 15 lb on the graft, to be distributed equally among the four arms of the four-bundle graft (Fig. 30-3).
Yasuda et al tested their ACL hamstrings grafts tensioned to 20N and 80N at the time of surgery, 2 years later the grafts tensioned at 20N had significantly more laxity than the 80N group: 2.2 mm versus 0.6 mm, respectively.12 However, it is important to remember that grafts continue to elongate despite pretensioning. A recent study demonstrated that the viscoelastic properties of tendons cannot be completely eliminated. Hamstring and anterior tibialis allografts underwent no preconditioning, cyclical preconditioning, or isometric preconditioning, and the tension of the grafts was measured over 1 hour. The grafts continued to elongate for the entire 60 minutes. In all groups the grafts lost approximately 60% of their original tension over the 1-hour period.13 This has important implications for hamstring reconstruction physical therapy protocols. We recommend and the literature supports a less aggressive regimen in the first 2 months after reconstruction.
