[level-membership-for-surgery-category]27
Thorax
ACCESS
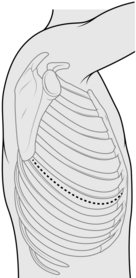
POSTEROLATERAL THORACOTOMY (Fig. 27.2)
Access
1. Operate with the patient under general anaesthetic. Ensure that a double lumen endobronchial tube is in place.

2. Position the patient in the lateral decubitus position (Fig. 27.1), arm at 90 degrees in the ‘praying’ position, back flush with edge of operating table. Support the patient with sandbags or a vacuum suction bean bag, strapped to the table for additional security if necessary. Apply padding to bony prominences, for example place a pillow between the knees.
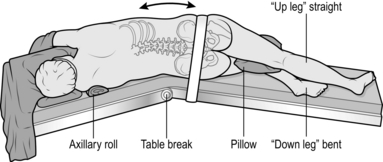
Fig. 27.1 The lateral decubitus position.
3. Break the table to increase the distance between the rib spaces.
4. If necessary shave the skin, then prepare the chest, extending down to the operating table on both sides, up to the neck and down to the umbilicus. Apply the drapes.
5. Identify the tip of the scapula. Initially, start the incision approximately 2 cm below the tip of the scapula, and approximately 5 cm anterior to it, extending along the intercostal space to between the scapula and the spine. If necessary, extend the incision during the operation. Deepen the incision down to the dermis, followed by diathermy through the superficial fat down to the latissimus dorsi fascia. Two Langenbeck retractors are used to expose the muscle and diathermy slowly through it layer by layer. Grasp with forceps and cauterize any visible blood vessels. Once through the latissimus, place a finger on the interspaces above and below the rib, and apply diathermy directly down to the rib. Pick up the anterior fascia with the cold tip of the diathermy, slide two fingers into the space and apply diathermy onto the finger. Repeat for the posterior aspect.
6. Check with the anaesthetist to ensure lung isolation – ventilation is undertaken by the single contralateral lung).
7. Count the ribs and correctly identify the interspace to incise it. The standard position is the 5th interspace (between the 5th and 6th ribs), corresponding to the line of the oblique fissure. Diathermy in a posterior to anterior direction through the intercostal muscles, to ensure that you stay on the superior border of the lower rib.
8. Visualize the pleura and puncture it with the cold tip of the diathermy. Insert your finger into the pleural space to ensure that the lung is not adherent and to protect the lung from the diathermy, and apply diathermy onto the finger.
9. Resect a small section (1 cm) of lower rib using a costotome at the most posterior aspect if you need to increase access. Insert a swab at the posterior osteotomy site to achieve haemostasis.
10. Introduce a suitable retractor, such as Finocheitto’s or two Tudor-Edwards retractors, with a medium and small blade on each.
11. Using the long tip diathermy extend the incision anteriorly and posteriorly with diathermy through the intercostal muscle.
Before closure
1. After achieving haemostasis, check for air leaks which may require attention.
2. Pour warm saline – or water in the presence of malignant disease – into the thoracic cavity and ask the anaesthetist to gently re-inflate the lung. Air leaks are revealed by bubbling.
3. After securing air leaks, insert one or two (28–32F) chest drains, through separate stab incisions anterior to the mid-axillary line.
4. Secure the drains with a purse-string suture so that the nurses can tie the purse string when the drains are removed.
Closure
1. Close the rib interspace incision with a pericostal suture such as 1 PDS. Take care not to catch the lung, intercostal vessels or drains in the sutures. Ensure that the lung inflates fully and in the correct orientation before you tie the pericostal sutures.
2. Close the muscle layer with a continuous suture such as 0 PDS.
3. Close the subcutaneous fat with a continuous suture such as 2/0 Vicryl.
4. Close the skin with a subcuticular stitch, using 3/0 Vicryl or metal clips. Cover it with an occlusive dressing.


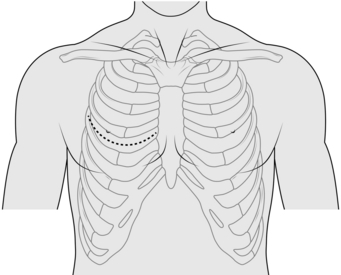
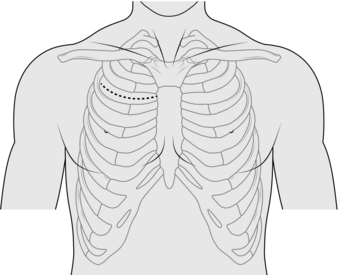
ANTERIOR THORACOTOMY (Fig. 27.3)
AXILLARY THORACOTOMY (Fig. 27.4)
Appraise
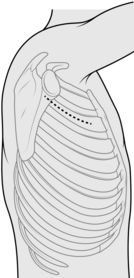
Fig. 27.4 Right axillary thoracotomy incision.


Action
1. Make the skin incision in the desired interspace, continued down to the anterior border of the latissimus dorsi.
2. Retract the latissimus dorsi posteriorly and split the serratus anterior muscle in the direction of its fibres.
3. Access the rib interspace in the same manner as a posterolateral thoracotomy.

TRANSVERSE THORACOTOMY (CLAMSHELL) (Fig. 27.5)
Appraise
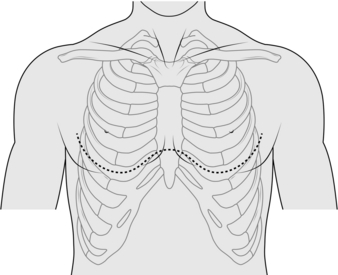
Fig. 27.5 Transverse clamshell incision.
1. This is an alternative to median sternotomy.
2. Utilize it when you require simultaneous bilateral thoracic access; for example, for penetrating chest injuries.
3. Through it, you can achieve digital control of penetrating wounds, cross-clamping of the thoracic descending aorta or pulmonary hilum, and internal cardiac massage.
Action
1. Make the incision over the 4th or 5th interspace extending to each posterior axillary line.
2. Beware of the internal thoracic vessels, each of which lies approximately 1 cm lateral to the sternal edge. Identify and ligate them.
3. Transect the sternum transversely with an oscillating or Gigli saw.
4. A midline incision in the pericardium allows access to the heart.
ANTERIOR MEDIASTINOTOMY (Fig. 27.6)
Action
1. Make a 5–6-cm transverse incision just lateral to the sternum at the 2nd or 3rd intercostal space.
2. Split the pectoralis major transversely and identify the intercostal space. A section of costal cartilage can be resected to allow better access but this is rarely necessary. Identify and attempt to preserve the internal thoracic vessels.
3. Dissect off the mediastinal pleural reflection from the sternum and retract it laterally. Use finger dissection to identify the aorta and pulmonary artery. Identify lymph nodes and assess masses for fixation to surrounding structures. Biopsy tissue under direct vision using a mediastinocope or a thoracoscope.
4. If required, open the pleura and obtain a lung biopsy: drain the chest if lung biopsy is performed.


VIDEO-ASSISTED THORACOSCOPIC SURGERY
Appraise
1. Diagnostic applications of video-assisted thoracoscopic surgery (VATS) include cancer staging, lung and pleural biopsy.
2. Therapeutic uses include drainage of fluid such as an effusion, empyema, blood, pleurodesis (Greek: desis = a binding together), pleurectomy, lung resection and sympathectomy.
Prepare
1. Position the patient as for posterolateral thoracotomy, with the operating table counter-flexed to increase the space between the ribs and to ensure that the hip does not restrict downward angulation of the camera.
2. Thoracoscopes range from 5–10 mm in diameter with varying degrees of lens angulation (0, 30 and 45 degrees). The standard scope is a 10-mm, 0 degree scope.
3. Your position depends on the site of the pathology. Place the monitor so that you, the site of pathology, and the monitor are aligned to allow you to look straight ahead when operating.
4. Vision is facilitated by white balancing of the camera and application of an anti-fog solution (e.g. FRED® – fog reduction elimination device).
Action
1. Correlate the initial port insertion with preoperative imaging. If you are undertaking VATS for a pleural effusion, you can use a needle and syringe to aspirate for fluid to ensure a safe position for entry.
2. Insert the camera port first. For indications such as pleurodesis the site of insertion is the junction between the middle and lower thirds of the chest. For indications such as management of pleural effusion place the incision a hand’s breadth above the costal margin (corresponding to the dome of the diaphragm).
3. Insert all other ports under direct vision (Fig. 27.7).

4. The length of VATS port incisions is similar to the diameter of the port (e.g. 11.5 mm). A Roberts’ forceps can be used as a retractor. Use diathermy all the way to the pleura. Ensure that the lung is isolated (see posterolateral thoracotomy above) before entry to the pleural cavity. Perform a finger sweep to confirm safe entry into the chest.
5. Instrument ports are inserted under direct vision using the scope. They are positioned to triangulate the lesion to facilitate easier dissection.
6. Rotation or tilting of the operating table can improve visualization by allowing the lung to drop away from the area to be examined.
CHEST DRAINS
1. Intercostal chest tube drainage with an underwater seal is a simple, effective and occasionally life-saving method to eliminate air or fluid in the pleural cavity.
2. Knowing when and how to insert a chest drain and its subsequent management is an important skill for all surgeons.
PERCUTANEOUS/SELDINGER CHEST DRAIN
Appraise
1. This versatile percutaneous technique involves passing the drain over a guide-wire and was devised by the Swedish radiologist Sven-Ivar Seldinger in 1953. It is relatively atraumatic compared to the open technique and is easy to learn.
2. Seldinger chest drains may be used to manage pneumothoraces (small air leak) or pleural effusions.
3. The disadvantage of Seldinger drains is that insertion is blind. You cannot use a finger sweep to ensure that there are no adhesions and so avoid lung injury. The size of drains available is smaller when compared to open chest drains. There is also the possibility of losing the guide-wire in the pleural cavity.
Prepare
1. In elective situations, have adequate imaging available (chest X-ray, ultrasound or CT) to confirm the site of drain insertion.
2. Ultrasound is particularly useful to identify a safe site for the entry point of a Seldinger drain for effusions, as it can identify the position of the diaphragm and the presence of any loculations. It is important to carry out the procedure with the patient in the same position as when the scan was performed.
3. Position the patient lying supine at 45 degrees with the arm resting on the side of the patient (Fig. 27.8), or sitting leaning forwards.
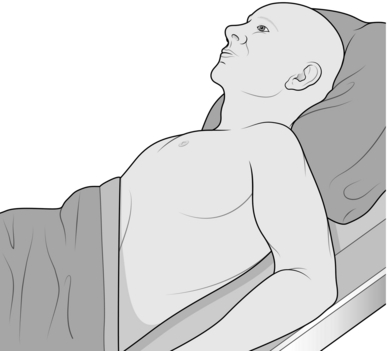
Fig. 27.8 Position for chest drain insertion.
Action
1. Ensure all equipment is present before starting. Seldinger chest drains come in pre-packaged sterile sets.
2. If possible, have a nurse or assistant helping you.
3. Before starting, confirm the site for drain insertion. Review the chest X-ray and percuss the chest to establish the fluid level.
4. Create a wheal of local anaesthetic over the point of entry. Continue deeper into the pleural space (confirmed by a flash back of fluid or bubbles) and withdraw slightly to anaesthetize the pleura.
5. Introduce the trocar attached to a syringe into the intercostal space and advance it slowly while aspirating on the syringe. A ‘give’ may be felt as the parietal pleura is punctured or fluid may be aspirated. As soon as fluid is aspirated stop advancing the needle. Remove the syringe and introduce the guide-wire.
6. Remove the needle over the guide-wire. Never let go of the guide-wire. Next, introduce the dilator over the guide-wire. If the entry point is too tight, widen it with a scalpel.
7. Remove the dilator and pass the chest drain over the guide-wire. Then remove the guide-wire, connect the drain to an underwater seal and suture the drain in place with a horizontal mattress stitch.
OPEN/SURGICAL CHEST DRAIN
Appraise
Open/surgical chest drains can be used in any situation requiring drainage of the chest cavity.
Prepare
1. Ensure that the patient has had a full explanation of the procedure and that all necessary equipment is present before embarking on the operation. If the patient is unwell arrange for adequate monitoring to be organized.
2. Position the patient lying supine at 45 degrees with the arm resting on the side of the patient.
3. Before preparing and draping the operation area, mark the position of the drain. The quadrangle of safety is bounded posteriorly by the posterior axillary line, anteriorly by the lateral border of pectoralis major muscle and overlies the 3rd to 5th intercostal spaces. Usually the 4th intercostal space is chosen just anterior to the mid-axillary line.
Action
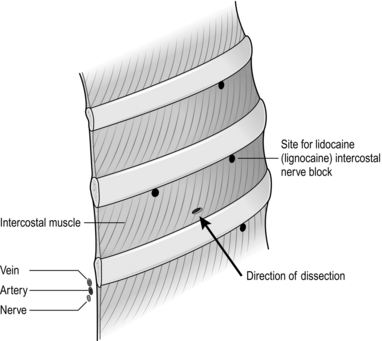
1. It is best to perform a 3-level intercostal (field) block prior to starting the procedure. Advance the needle to identify the rib immediately above the chosen intercostal space and ‘walk it’ down the rib until you feel soft tissue. Angle the needle 45 degrees upwards and infiltrate 2–3 ml of local anaesthetic. Using the same method, inject a further 2 ml in the targeted intercostal space to block the intercostal nerve anteriorly and also in the intercostal nerve of the space above and below the targeted intercostal space (Fig. 27.9).
2. Infiltrate 1–2 ml of local anaesthetic to create a wheal over the marked intercostal space. Make an incision to easily admit one finger.
3. Allow sufficient time for the anaesthetic to take effect.
4. Bluntly dissect through the subcutaneous tissue until you reach the deep fascia and intercostal space.
5. Use a Roberts’ clamp to gently spread the intercostal muscles superiorly from the lower margin of the intercostal space. This ensures that the neurovascular bundle is not damaged. Once the parietal pleural is reached a ‘pop’ or feeling of ‘giving way’ is sensed. A finger sweep is gently performed to dilate the tract and to detect any adherent lung tissue.
6. Once satisfied that there is no adherent lung tissue, introduce a 28–32F drain into the pleural space without a trocar. Direct it apically or basally. Advance it until you feel a change of resistance as the drain abuts the pleural apex of diaphragm. Patients may experience pain in the neck or shoulder as the tip of the drain hits the apex. In such cases, withdraw the drain until symptoms disappear.
7. Connect the drain to the underwater seal. Secure the drain with a horizontal mattress, using a double throw to secure the initial tie. Next, tie a knot around the tubing to secure the drain. The horizontal mattress acts as a purse string to secure the wound after drain removal (Fig. 27.10).
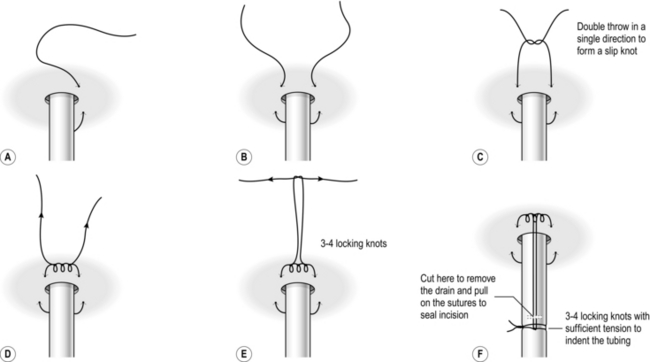
Fig. 27.10 Suggested drain securing suture method.
8. Ensure that you see fogging in the drain, bubbling or swinging of the fluid level to indicate that the drain lies in the pleural space.
MANAGEMENT OF CHEST DRAINS
1. Confirm correct tube placement within the pleural cavity by noting the three signs of fogging of the tube, respiratory swing and bubbling.
2. Obtain a chest X-ray after drain insertion to ensure correct position, lung expansion and to screen for complications such as a new effusion from bleeding. Position the drain bottle below the level of the chest, otherwise fluid will siphon into the chest.
3. Inspect chest drains daily for patency, function, air leakage, and volume and character of the drainage.
4. Assess patency by inspecting for bubbling or swinging of the fluid within the tube with respiration.
5. Air leakage is indicated by the presence of bubbling within the underwater seal. Assess air leakage with the patient disconnected from wall suction and coughing.
6. Note the amount of the fluid collected in the last 24 hours along with its character.
7. Remove drains when there is no air leak for 24 hours, the lung is fully expanded on a chest film and there is an acceptable drainage volume. Obtain a chest X-ray after removal to ensure lung expansion and no accumulation of fluid.
8. If an air leak persists, you may discharge the patient with a chest in situ that is attached to a bag with a portable flutter-valve system (Portex® ambulatory chest drain bags, Smiths Medical USA).
Complications
1. Perforation of the lung can occur with forceful insertion of the chest tube. Warning signs are bleeding and brisk air leak.
2. Lacerations to the intercostal vessels can present and bleed profusely. If this occurs, you may be required to institute fluid resuscitation and possible surgical exploration in theatre.
3. Entry in the abdominal cavity is a possibility. If you detect this, do not remove the drain. Immediately consult a general surgeon.


BRONCHOSCOPY
Bronchoscopy is the application of fibreoptic scopes to visualize the airways. It can be both diagnostic and therapeutic (Fig. 27.11).
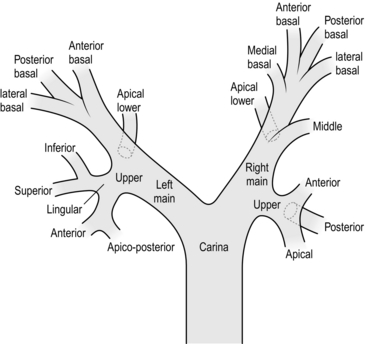
Fig. 27.11 Bronchoscopic anatomy of the airway.
Appraise
1. Bronchoscopy (Greek: bronchos = windpipe ) is a valuable tool for seeking the cause of an unresolving cough, the onset of stridor or wheeze, haemoptysis, the cytology of sputum and inspecting known or suspected airway obstruction. It allows broncho-alveolar lavage, the staging of oesophageal and air tumours and assists in elucidating abnormal findings on chest radiology.
2. Therapeutically, it permits airway clearance of sputum, the removal of foreign bodies and disobliteration of tumour using diathermy or laser.
FLEXIBLE BRONCHOSCOPY
Appraise
1. Examine the bronchial tree and vocal cords prior to surgery. It can be performed as a day-case procedure.
2. Identify endobronchial lesions and obtain biopsies and brushings of abnormal respiratory epithelium.
3. Bronchial washings produce samples for cytology in suspected malignancy. Transbronchial lymph node aspiration and lung parenchymal biopsies can be performed for staging lung cancer and diagnosis of lung disease, respectively.
Action
1. Spray topical xylocaine into the nasal passage. Wait for it to act before introducing the fibreoptic telescope into the nose. Spray further xylocaine from the side arm of the scope as it is advanced, to anaesthetize the hypopharynx, larynx and vocal cords.
2. Progressing from the trachea, visualize the entire tracheobronchial tree.
RIGID BRONCHOSCOPY
Appraise
1. This allows a wide range of therapeutic procedures to be carried out. It provides a valuable method of removing foreign bodies, treating haemoptysis, dilating strictures and for disobliterating endobronchial tumours.
2. Perform it using general anaesthetic. Teeth, mouth and airways are at risk of trauma. There is poor visualization of smaller airways and of obtaining biopsies from the upper lobe.
3. Order a chest X-ray after the procedure to screen for complications. Monitor the patient in a high dependency unit.
Action
1. Ensure the patient is pre-oxygenated and the eyes taped.
2. Place two fingers of the non-dominant hand on the hard palate with the thumb positioned above to protect the upper incisors. Introduce the rigid scope under direct vision through the mouth with the bevel facing forwards. Correctly positioned, the incisors should be ‘biting’ into your fingers and thumbs without any contact with the bronchoscope.
3. Once past the base of the tongue, gentle apply forward pressure to identify the epiglottis and elevate this with the instrument. The vocal folds are not visible until the epiglottis is adequately elevated. Rotate the bevel 90 degrees and advance the tip of the bronchoscope between the vocal folds.
4. Provide intermittent jet ventilation through the bronchoscope to maintain gas exchange. Use a straight telescope to inspect the main and lower lobe airways. To visualize the right and left upper lobe bronchi, position the bronchoscope immediately proximal to the upper lobe orifice and use a 90 degree telescope.
5. Identify and assess endobronchial masses or invasive disease of the lower trachea. Note the site and length of stenoses. Record paralysis of the vocal cords.
6. At the end of the procedure, ask the anaesthetist to take control of the airway before you withdraw the bronchoscope.
CERVICAL MEDIASTINOSCOPY
Appraise
1. This is a common diagnostic procedure for mediastinal lymph node biopsy. The nodes accessible to mediastinoscopy are the paratracheal, subcarinal and occasionally the tracheobronchial nodes.
2. Be cautious, particularly in the presence of a large goitre, an aneurysm of the brachiocephalic artery, a previous neck incision, superior vena cava obstruction and anterior mediastinal pathology due to inaccessibility.
Action
1. Make a 2–3-cm transverse midline incision, one finger’s breadth above the sternal notch. Open up the vertical plane between the strap muscles. Incise the pretracheal fascia in the midline and visualize the tracheal ring. If the isthmus of the thyroid obstructs the view it can be retracted or ligated.
2. Introduce a finger deep to the pretracheal fascia and along the anterior surface of the trachea and continued to the full length of the finger. Note the trachea is directed inferiorly and posteriorly.
3. Insert the mediastinoscope on the anterior surface of the trachea. The anatomic orientation is defined by the relationship to the trachea. Carry out blunt dissection using a specific mediastinoscopy rigid suction and diathermy device.
4. Define the edges of lymph nodes and any masses by blunt dissection, to differentiate them from vascular structures. Biopsy specimens by grasping and gently twisting them with the grasping forceps. Avoid excessive pulling. The mass may be adherent to and tear a major vessel.
5. Achieve haemostasis with diathermy and packing with a swab. Approximate the strap muscles with absorbable sutures and close the skin with a subcuticular suture.
6. Nurse the patient in a high dependency unit. Obtain a chest X-ray to screen for complications, which occur in 2% of patients. They include haemorrhage, tracheal, oesophageal or thoracic duct injury. Recurrent laryngeal nerve may ensure or pneumothorax.
LUNG RESECTION
SUBLOBAR/WEDGE RESECTION
Action
1. After entry into the chest, make a thorough inspection to ensure that you have identified all areas of disease. If the patient has multiple lesions, address each separately.
2. Perform VATS resection using an endoscopic stapler. This simultaneously seals and cuts the lung. Several stapling devices are available for wedge resections. By inserting converging staple lines on either side of the lesion, you can resect the lesions and lung as a triangular wedge of tissue, with a clear margin.
3. Undertake open resection using precision diathermy, resecting the mass as a hemisphere of lung with clear margins. Oversew and close the defect with 3/0 Prolene using a horizontal mattress suture, followed by an over-and-over layer.
4. After haemostasis, check for air leak by pouring warm saline/water into the pleural cavity and reconnect the lung to the ventilator circuit. Suture the leaking lung surface, identified by the presence of bubbling.
LOBECTOMY
Appraise
1. The principles of lobectomy are mobilization of the lobe, fissure dissection, and management of the vessels and bronchus.
2. There are minor variations, depending on the lobe for resection.
3. Obtain lung function tests prior to any lung resection to establish whether the patient has enough respiratory reserve to withstand the loss of lung tissue postoperatively.
Action
1. After entering the pleural cavity, mobilize the lobe by dividing any adhesions between the lung and chest wall: use diathermy if they are vascular or a sponge on a stick if avascular.
2. Assess if there is chest wall involvement. If so, you may need to carry out an en bloc resection including the chest wall.
3. We prefer to undertake a systematic nodal dissection. This is initially facilitated by incising the mediastinal pleura in the right paratracheal fossa, between the phrenic and vagus nerves, to access stations 2 and 4. Alternatively, incise over the left para-aortic mediastinal pleura, to access stations 5 and 6. We continue systematic nodal dissection and hilar mobilization by defining the subcarinal space – station 7 – and the para-oesophageal nodes – station 8 – then free the inferior pulmonary ligament – station 9.
4. Define, by sharp and blunt dissection, the pulmonary vein corresponding to the lobe of interest. Encircle it with a 3-mm cotton tape.
5. Now examine the fissure and locate the pulmonary artery within the fissure. On the right, the upper lobe artery usually corresponds to the posterior edge of the junction between upper and middle lobe, and the lower lobe artery usually corresponds to 1 cm anterior to the posterior junction between middle and lower lobes.
6. Once you have identified the pulmonary artery in the fissure (mild lung inflation may assist in defining the planes when the fissure is poorly developed), clearly define the anterior and posterior limits along with any branches and their destination. On the right, the posterior fissure is completed by blunt dissection from the pulmonary artery to the bifurcation of the upper lobe and bronchus intermedius. On the left, the posterior fissure is completed by dissection along the pulmonary artery. Pass a cotton tape between pulmonary artery and posterior fissure and elevate the lung. Staple it with a linear stapler. The anterior aspect of the oblique fissure is completed by dissection between the pulmonary artery and the two pulmonary veins, whilst the anterior aspect of the horizontal fissure is completed by dissection between the pulmonary artery and the bifurcation between upper and middle lobe vein.
7. If the tumour has crossed a fissure, a bilobectomy or pneumonectomy may be required.
8. The pulmonary arteries are dissected from their fibrous sheath. When an adequate length of the vessel has been exposed, pass a right-angled clamp (Lahey or O’Shaughnessy clamp, depending on size of the vessel) to encircle the vessel and to draw round it a ligature (2/0 or 3/0 Neurolon). Tie the arterial branches with two ligatures, one proximal and one distal to the point of division. Alternatively, use a vascular stapler to staple the arterial branches.
9. Clamp the pulmonary vein with two right-angled clamps (Ronald Edwards), divide it and transfix it using a 2/0 Ethibond suture, over-sewn. Alternatively, apply a vascular stapler to staple the vein.
10. Clamp the bronchus and divide it using a right-angled clamp (Ronald Edwards), and undertake bronchial closure using a 3/0 Prolene horizontal mattress sutures (to-and-fro), followed by an over-and-over layer of 3/0 Prolene. Alternatively, use a thick bronchial stapler.
11. After removing the lobe, test the integrity of the bronchial closure by filling the chest with saline and reconnecting the lung to the ventilator circuit. Over-sew sources of bubbles with sutures.
12. Before closing, insert drains through stab incisions anterior to the mid-axillary line.
13. Common branching patterns of the right pulmonary artery are truncus anterior (posterior ascending, apical and anterior), posterior ascending, middle lobe, superior segmental and common basal artery.
Right upper lobectomy
1. Begin with a systematic nodal dissection, mobilizing the lung and defining the fissures.
2. Incise the mediastinal pleura around the right hilum. Begin inferiorly to the azygos vein. Inferior to the azygocaval junction is the upper border of the right pulmonary artery. Using pledgets, dissect out the superior arterial trunk and define the apical and anterior segmental branches (a recurrent posterior branch may be present).
3. Define the azygous vein and make an incision between the vagus and phrenic nerves, over the surface of the trachea, to expose the paratracheal lymph nodes. If possible, resect them as a tissue block.
4. Rotate the lung medially and continue to incise the pleural reflection posteriorly (inferior to the azygos vein), over the right main bronchus.
5. Define the right main bronchus, upper lobe bronchus and bronchus intermedius. Usually there is an interlobar lymph node in the bifurcation between the upper lobe and bronchus intermedius. Note that the pulmonary artery is immediately anterior to this, and that the node usually lies on the posterior surface of the pulmonary artery!
6. Define the inferior border of the bronchus intermedius, which is the subcarinal fossa and remove the lymph nodes in the fossa.
7. Continue to incise the pleural reflection along the oesophagus and remove any station 8 lymph nodes.
8. Ask an assistant to use a swab on a Rampley’s forcep to retract the diaphragm, and divide the inferior pulmonary ligament, all the way to the inferior vein. Remove any lymph nodes from station 9.
9. The superior pulmonary vein lies anterior to the artery. Mobilize the vein using sharp dissection, through the fascia. Use pledgets to define the vein and to separate it from the middle vein. Define the posterior aspect using pledgets, and gently pass a blunt O’Shaughnessy clamp behind the vein with a tape to isolate the superior vein, leaving the middle lobe vein in situ.
10. Identify the pulmonary artery within the fissure. For an upper lobectomy we prefer to identify the artery at the confluence of the oblique and horizontal fissure. Once the artery is identified, define it using pledgets and also clearly define the branches to each lobe.
11. Use a finger and thumb to identify the tissue plane between the bifurcation of the airway and the surface of the artery. Pass a tape across this and apply a linear stapler to complete the posterior fissure (Fig. 27.12).
Fig. 27.12 Right upper lobectomy.
12. From the anterior surface of the pulmonary artery, carefully identify the middle lobe arterial branches and also a plane superior to the middle lobe arteries to the bifurcation between the upper and middle lobe vein. Pass a tape across this and apply a linear stapler to complete the horizontal fissure.
13. Now assess the vascular and bronchial structures to ensure that a lung resection can be undertaken with clear margins. Once a commitment to perform an upper lobectomy is made, we prefer to begin with ligation of the pulmonary arterial branches before the vein, to avoid venous engorgement.
14. Define the arterial branches to the upper lobe and doubly ligate (two proximal, one distal), using a 2/0 or a 3/0 ligature, depending on the size of the branch.
15. Divide the vein and bronchus as described above.
16. Finally, ligate the middle lobe to the lower lobe to prevent torsion.
Middle lobectomy
1. Middle lobectomy is commonly performed in association with either upper or lower lobectomy for tumours that cross fissures.
2. Proceed as described for the upper lobectomy to incise the pleural reflections.
3. Identify and tape the middle lobe vein.
4. Complete the fissure as described for the upper lobectomy. In addition, complete the anterior aspect of the oblique fissure.
5. Ligate the arterial branches (usually 1 or 2) to the middle lobe.
6. The middle lobe bronchus is usually only clearly visible after the middle lobe artery has been divided.
Right lower lobectomy
1. Proceed as described for the upper lobectomy to incise the pleural reflections and to perform a systematic nodal dissection.
2. When developing the inferior pulmonary ligament, define and tape the inferior vein.
3. When developing the fissure, note that the pulmonary artery usually lies 2 cm anterior to the confluence between the horizontal and oblique fissures.
4. Develop the posterior aspect of the oblique fissure as described for an upper lobectomy and the anterior aspect is completed.
5. Define and ligate the common basilar artery and the superior segmental artery.
6. Divide the vein and bronchus as described for a lobectomy.
Left upper lobectomy
1. Retract the upper lobe inferiorly and incise the pleural reflection on the surface of the pulmonary artery. Identify the vagus and the recurrent laryngeal nerve. Resect any lymph node in the paraortic (station 6) and aorto-pulmonary window (station 5).
2. Continue to incise the fascia posteriorly and define the posterior aspect of the pulmonary artery. Inferior to the artery lies the left main bronchus.
3. Incise the pleural reflection between the aortic arch and the bronchus to define the subcarinal fossa and resect any lymph nodes (station 7).
4. Continue to incise the fascia along the oesophagus and resect any lymph nodes (station 8).
5. Incise the inferior pulmonary ligament.
6. Define the superior pulmonary vein by sharp dissection through the fascia and pledgets. Pass a blunt O’Shaughnessy behind the vein, with a tape used to isolate the vein.
7. Develop the fissure by identifying the pulmonary artery within the fissure and clearly identify the branches to the upper and lower lobes. Completely separate the posterior and anterior fissure using a linear stapler. This may be made easier by developing the posterior aspect of the pulmonary artery (Fig. 27.13).
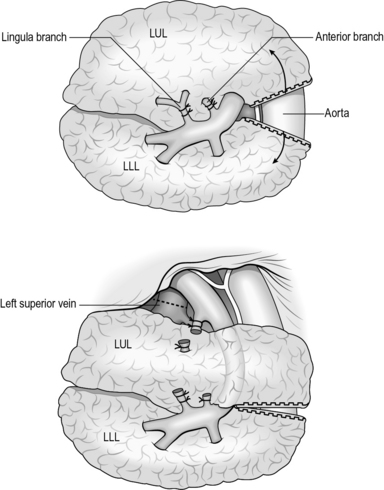
Fig. 27.13 Left upper lobectomy.
8. Now assess the vascular and bronchial structures to ensure that a lung resection can be undertaken with clear margins.
9. Define and doubly ligate the arterial branches to the upper lobe (two proximal, one distal), using a 2/0 or a 3/0 ligature depending on the size of the branch.
10. Divide the vein and bronchus as described for a right upper lobectomy.
SEGMENTECTOMY
Action
1. The hilar structures are identified and the oblique fissure dissected to reveal the vasculature.
2. Isolate the corresponding segmental bronchus and artery. Ligate vessels feeding the segment for excision only, otherwise pulmonary infarction may occur.
3. Before dividing the bronchus, deflate and inflate the segment to help delineate the intersegmental planes.
4. If you are performing segmentectomy for infection, make sure to ligate the bronchus first, to avoid contamination.
5. After ligation of the artery and bronchus, exert traction on the bronchus, and remove the segment in a retrograde manner. The pulmonary veins run in the intersegmental plane and provide a guide for dissection. Ligate these veins as you free the segment.
6. Examine the remaining raw surfaces for air leaks. If the segmentectomy has been performed accurately, air leaks are minimal.
PNEUMONECTOMY
Prepare
1. Expose using a posterolateral thoracotomy through the 5th intercostal space.
2. Make a thorough inspection of local metastatic spread of the disease into adjacent structures. If spread has occurred, pneumonectomy is futile.
3. Make a final intra-operative assessment to determine whether a lobectomy or sleeve lobectomy can be safely performed, thus preserving lung tissue. If not, then proceed to pneumonectomy.
Action
Left pneumonectomy
1. Make a circumferential incision around the mediastinal pleura to expose the hilum. Preserve the phrenic nerve if not involved with disease.
2. Use pledget dissection to identify the main pulmonary artery, and place a tape around the artery to gain control.
3. Proceed with dissection as described for a left upper lobectomy, to the point of identifying the main bronchus. Pass a tape around the main bronchus.
4. Prepare both pulmonary veins and pass a tape around each vein.
5. Now assess the vascular and bronchial structures to ensure that a lung resection can be undertaken with clear margins.
6. Clamp the main pulmonary vein with two right-angled clamps (Ronald Edwards), divided and transfixed using a 2/0 Ethibond suture and over-sewn. Alternatively, use a vascular stapler to staple the artery.
7. Clamp both pulmonary veins with two right-angled clamps (Ronald Edwards), divided and transfixed using a 2/0 Ethibond suture and over-sewn. Alternatively, use a vascular stapler to staple the veins.
8. Divide the artery and apply a 2/0 Ethibond suture ligature.
9. Dissect the bronchus, making sure to avoid removing the adventitia. This would impair healing and may lead to increased risk of fistula formation. Free the bronchus up to the level of the carnia and divide it just distally.
10. Clamp and divide the bronchus using a right-angled clamp (Ronald Edwards), and close the bronchus using 3/0 Prolene horizontal mattress to-and-fro sutures. Follow this by an over-and-over layer of 3/0 Prolene. Alternatively, use a thick bronchial stapler.
11. Achieve haemostasis, insert a chest drain that is clamped on extubation and released for 1 minute every hour. This is to assess for bleeding and to prevent mediastinal shift.
Postoperatively
1. Order regular chest X-rays to ensure that the pneumonectomy space gradually fills. Any drop in the air fluid level may indicate a bronchopleural fistula.
2. Air-fluid levels in the post-pneumonectomy space may suggest infection and require thoracocentesis (Greek: kentesis = a pricking; drainage).
PLEURODESIS AND PLEURECTOMY
1. Pleurodesis (Greek: desis = a binding) is fusion of the parietal and visceral pleura, thus obliterating the space between the lung and chest wall. Pleurodesis is commonly employed in cases of recurrent effusions secondary to malignancy and for pneumothorax. It is mainly indicated for treating a prolonged air leak, or failure of lung re-expansion, for recurrent pneumothorax. For fluid management, success from pleurodesis is not complete pleural fusion but the prevention of re-accumulation of enough pleural fluid to cause symptoms.
2. Pleurectomy is the surgical excision of the parietal pleural to promote adhesion of the lung to the chest wall.
CHEMICAL PLEURODESIS
Appraise
1. A cost-effective method of managing a symptomatic malignant pleural effusion is by instilling a sclerosing agent into the pleural cavity after drainage of fluid and re-expansion of the collapsed lung.
2. Talc slurry or powder is the most effective and commonly used sclerosing agent, achieving pleurodesis in 95% of cases.
3. Talc pleurodesis can cause a fever for up to 72 hours, be very painful and cause a rise in serum C-reactive protein. Talc pleurodesis is associated with a 1% risk of respiratory failure.
Action
1. After inserting an intercostal tube and draining all pleural fluid, obtain a chest radiograph to check the position of the chest drain and to ensure full expansion of the lung.
2. Be willing to administer analgesics and supplemental oxygen prior to talc instillation.
3. Mix 2–3 g of talc with 30 ml of normal saline. If not contraindicated, add up to 30 ml of 1% lidocaine to the slurry for analgesia.
4. Instil the talc slurry through the chest tube and clamp it for 1 hour.
5. Connect the chest drain to the wall suction to ensure approximation of the lung to the chest wall.
SURGICAL PLEURODESIS
Action
Talc insufflation
1. Access the pleural cavity by VATS. If talc insufflation is to be performed for malignant pleural effusion, first completely aspirate the effusion. If it is being performed for pneumothorax, carry out an examination for any bullae that may require excision.
2. Insert the talc insufflator into the chest and under video guidance distribute talc powder evenly to all areas of the thoracic cavity.
3. Insert two chest drains and place them on suction during the postoperative period.
PLEURAL ABRASION
1. Access the pleural cavity by VATS or mini-thoracotomy.
2. Perform the pleural abrasion with a diathermy scratch pad attached to a sponge holding forceps introduced into the chest through an incision in the 5th or 6th intercostal space on the anterior axillary line.
3. Rub the parietal pleural until it oozes. The pleural abrasion limits are the thoracic mammary artery anteriorly and the sympathetic chain posteriorly.
4. Inspect the lung for bleeding and check for air leaks. Insert two chest drains and place them on suction during the postoperative period.
PLEURECTOMY
Action
1. Access the chest using a limited thoracotomy through the 5th or 6th intercostal space.
2. Strip the pleura, commencing in the plane between the parietal pleura and the extrathoracic fascia, at the margins of the intercostal incision, before inserting the rib spreader.
3. Strip the parietal pleura circumferentially towards the mediastinum, taking care to avoid injury to the sympathetic chain, recurrent laryngeal nerve and the stellate ganglion.
4. The limits of the pleurectomy are the 3rd rib superiorly, the internal mammary artery anteriorly, the diaphragm inferiorly and the sympathetic chain posteriorly.
DECORTICATION
Appraise
1. This is performed when there is inadequate evacuation of haemothorax, empyema, or pleural effusions with incomplete expansion of the underlying lung. The result is the formation of thick fibrous tissue on the lung surface (fibrothorax).
2. Fibrothorax is managed by decortication, the peeling or stripping of a constricting membrane from the pleural surfaces. This allows the lung to fully expand and improves gas exchange.
3. Rule out mesothelioma and malignancy before proceeding to decortication.
Action
1. For decortication of the upper part of the lung, access through the 3rd/4th intercostal space provides best access. The 6th/7th intercostal space is used for decortication of the lower lobe. Evacuate the pleural cavity of debris.
2. Begin with incision of the fibrous peel and locate the plane between the fibrous peel and grey glistening visceral pleura using a spatula. Multiple layers may have to be incised before the visceral pleura is reached. Use a finger and swab to peel off the fibrous sheet.
3. If the wrong plane is dissected, excessive air leaks and bleeding will result as the visceral pleura is stripped. Re-expansion of the lung can be used to facilitate dissection.
4. Insert two intercostal drains and place them on suction postoperatively.
[/level-membership-for-surgery-category][not-level-membership-for-surgery-category]27
Thorax
ACCESS
POSTEROLATERAL THORACOTOMY (Fig. 27.2)
Access
1. Operate with the patient under general anaesthetic. Ensure that a double lumen endobronchial tube is in place.
2. Position the patient in the lateral decubitus position (Fig. 27.1), arm at 90 degrees in the ‘praying’ position, back flush with edge of operating table. Support the patient with sandbags or a vacuum suction bean bag, strapped to the table for additional security if necessary. Apply padding to bony prominences, for example place a pillow between the knees.
Fig. 27.1 The lateral decubitus position.
3. Break the table to increase the distance between the rib spaces.
4. If necessary shave the skin, then prepare the chest, extending down to the operating table on both sides, up to the neck and down to the umbilicus. Apply the drapes.
5. Identify the tip of the scapula. Initially, start the incision approximately 2 cm below the tip of the scapula, and approximately 5 cm anterior to it, extending along the intercostal space to between the scapula and the spine. If necessary, extend the incision during the operation. Deepen the incision down to the dermis, followed by diathermy through the superficial fat down to the latissimus dorsi fascia. Two Langenbeck retractors are used to expose the muscle and diathermy slowly through it layer by layer. Grasp with forceps and cauterize any visible blood vessels. Once through the latissimus, place a finger on the interspaces above and below the rib, and apply diathermy directly down to the rib. Pick up the anterior fascia with the cold tip of the diathermy, slide two fingers into the space and apply diathermy onto the finger. Repeat for the posterior aspect.
6. Check with the anaesthetist to ensure lung isolation – ventilation is undertaken by the single contralateral lung).
7. Count the ribs and correctly identify the interspace to incise it. The standard position is the 5th interspace (between the 5th and 6th ribs), corresponding to the line of the oblique fissure. Diathermy in a posterior to anterior direction through the intercostal muscles, to ensure that you stay on the superior border of the lower rib.
8. Visualize the pleura and puncture it with the cold tip of the diathermy. Insert your finger into the pleural space to ensure that the lung is not adherent and to protect the lung from the diathermy, and apply diathermy onto the finger.
9. Resect a small section (1 cm) of lower rib using a costotome at the most posterior aspect if you need to increase access. Insert a swab at the posterior osteotomy site to achieve haemostasis.
10. Introduce a suitable retractor, such as Finocheitto’s or two Tudor-Edwards retractors, with a medium and small blade on each.
11. Using the long tip diathermy extend the incision anteriorly and posteriorly with diathermy through the intercostal muscle.
Before closure
1. After achieving haemostasis, check for air leaks which may require attention.
2. Pour warm saline – or water in the presence of malignant disease – into the thoracic cavity and ask the anaesthetist to gently re-inflate the lung. Air leaks are revealed by bubbling.
3. After securing air leaks, insert one or two (28–32F) chest drains, through separate stab incisions anterior to the mid-axillary line.
4. Secure the drains with a purse-string suture so that the nurses can tie the purse string when the drains are removed.
Closure
1. Close the rib interspace incision with a pericostal suture such as 1 PDS. Take care not to catch the lung, intercostal vessels or drains in the sutures. Ensure that the lung inflates fully and in the correct orientation before you tie the pericostal sutures.
2. Close the muscle layer with a continuous suture such as 0 PDS.
3. Close the subcutaneous fat with a continuous suture such as 2/0 Vicryl.
4. Close the skin with a subcuticular stitch, using 3/0 Vicryl or metal clips. Cover it with an occlusive dressing.
ANTERIOR THORACOTOMY (Fig. 27.3)
AXILLARY THORACOTOMY (Fig. 27.4)
Appraise
Fig. 27.4 Right axillary thoracotomy incision.
Action
1. Make the skin incision in the desired interspace, continued down to the anterior border of the latissimus dorsi.
2. Retract the latissimus dorsi posteriorly and split the serratus anterior muscle in the direction of its fibres.
3. Access the rib interspace in the same manner as a posterolateral thoracotomy.
TRANSVERSE THORACOTOMY (CLAMSHELL) (Fig. 27.5)
Appraise
Fig. 27.5 Transverse clamshell incision.
1. This is an alternative to median sternotomy.
2. Utilize it when you require simultaneous bilateral thoracic access; for example, for penetrating chest injuries.
3. Through it, you can achieve digital control of penetrating wounds, cross-clamping of the thoracic descending aorta or pulmonary hilum, and internal cardiac massage.
Action
1. Make the incision over the 4th or 5th interspace extending to each posterior axillary line.
2. Beware of the internal thoracic vessels, each of which lies approximately 1 cm lateral to the sternal edge. Identify and ligate them.
3. Transect the sternum transversely with an oscillating or Gigli saw.
4. A midline incision in the pericardium allows access to the heart.
ANTERIOR MEDIASTINOTOMY (Fig. 27.6)
Action
1. Make a 5–6-cm transverse incision just lateral to the sternum at the 2nd or 3rd intercostal space.
2. Split the pectoralis major transversely and identify the intercostal space. A section of costal cartilage can be resected to allow better access but this is rarely necessary. Identify and attempt to preserve the internal thoracic vessels.
3. Dissect off the mediastinal pleural reflection from the sternum and retract it laterally. Use finger dissection to identify the aorta and pulmonary artery. Identify lymph nodes and assess masses for fixation to surrounding structures. Biopsy tissue under direct vision using a mediastinocope or a thoracoscope.
4. If required, open the pleura and obtain a lung biopsy: drain the chest if lung biopsy is performed.
VIDEO-ASSISTED THORACOSCOPIC SURGERY
Appraise
1. Diagnostic applications of video-assisted thoracoscopic surgery (VATS) include cancer staging, lung and pleural biopsy.
2. Therapeutic uses include drainage of fluid such as an effusion, empyema, blood, pleurodesis (Greek: desis = a binding together), pleurectomy, lung resection and sympathectomy.
Prepare
1. Position the patient as for posterolateral thoracotomy, with the operating table counter-flexed to increase the space between the ribs and to ensure that the hip does not restrict downward angulation of the camera.
2. Thoracoscopes range from 5–10 mm in diameter with varying degrees of lens angulation (0, 30 and 45 degrees). The standard scope is a 10-mm, 0 degree scope.
3. Your position depends on the site of the pathology. Place the monitor so that you, the site of pathology, and the monitor are aligned to allow you to look straight ahead when operating.
4. Vision is facilitated by white balancing of the camera and application of an anti-fog solution (e.g. FRED® – fog reduction elimination device).
Action
1. Correlate the initial port insertion with preoperative imaging. If you are undertaking VATS for a pleural effusion, you can use a needle and syringe to aspirate for fluid to ensure a safe position for entry.
2. Insert the camera port first. For indications such as pleurodesis the site of insertion is the junction between the middle and lower thirds of the chest. For indications such as management of pleural effusion place the incision a hand’s breadth above the costal margin (corresponding to the dome of the diaphragm).
3. Insert all other ports under direct vision (Fig. 27.7).
4. The length of VATS port incisions is similar to the diameter of the port (e.g. 11.5 mm). A Roberts’ forceps can be used as a retractor. Use diathermy all the way to the pleura. Ensure that the lung is isolated (see posterolateral thoracotomy above) before entry to the pleural cavity. Perform a finger sweep to confirm safe entry into the chest.
5. Instrument ports are inserted under direct vision using the scope. They are positioned to triangulate the lesion to facilitate easier dissection.
6. Rotation or tilting of the operating table can improve visualization by allowing the lung to drop away from the area to be examined.
CHEST DRAINS
1. Intercostal chest tube drainage with an underwater seal is a simple, effective and occasionally life-saving method to eliminate air or fluid in the pleural cavity.
2. Knowing when and how to insert a chest drain and its subsequent management is an important skill for all surgeons.
PERCUTANEOUS/SELDINGER CHEST DRAIN
Appraise
1. This versatile percutaneous technique involves passing the drain over a guide-wire and was devised by the Swedish radiologist Sven-Ivar Seldinger in 1953. It is relatively atraumatic compared to the open technique and is easy to learn.
2. Seldinger chest drains may be used to manage pneumothoraces (small air leak) or pleural effusions.
3. The disadvantage of Seldinger drains is that insertion is blind. You cannot use a finger sweep to ensure that there are no adhesions and so avoid lung injury. The size of drains available is smaller when compared to open chest drains. There is also the possibility of losing the guide-wire in the pleural cavity.
Prepare
1. In elective situations, have adequate imaging available (chest X-ray, ultrasound or CT) to confirm the site of drain insertion.
2. Ultrasound is particularly useful to identify a safe site for the entry point of a Seldinger drain for effusions, as it can identify the position of the diaphragm and the presence of any loculations. It is important to carry out the procedure with the patient in the same position as when the scan was performed.
3. Position the patient lying supine at 45 degrees with the arm resting on the side of the patient (Fig. 27.8), or sitting leaning forwards.
Fig. 27.8 Position for chest drain insertion.
Action
1. Ensure all equipment is present before starting. Seldinger chest drains come in pre-packaged sterile sets.
2. If possible, have a nurse or assistant helping you.
3. Before starting, confirm the site for drain insertion. Review the chest X-ray and percuss the chest to establish the fluid level.
4. Create a wheal of local anaesthetic over the point of entry. Continue deeper into the pleural space (confirmed by a flash back of fluid or bubbles) and withdraw slightly to anaesthetize the pleura.
5. Introduce the trocar attached to a syringe into the intercostal space and advance it slowly while aspirating on the syringe. A ‘give’ may be felt as the parietal pleura is punctured or fluid may be aspirated. As soon as fluid is aspirated stop advancing the needle. Remove the syringe and introduce the guide-wire.
[/not-level-membership-for-surgery-category]
