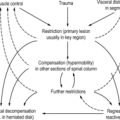
In the preceding chapters we have outlined the diagnosis of locomotor system dysfunctions, their pathogenesis, and the reflex changes they produce. Building on that foundation, we then considered the indications for specific therapeutic methods. However, to describe them all would go beyond the scope of this book. This chapter will confine itself principally to manipulative techniques, including those for soft tissue and especially for muscles, and to rehabilitation in the setting of locomotor system dysfunctions.
6.2. Indirect techniques
This term is used to denote osteopathic techniques that are extremely gentle and yet effective at the same time; and it is these characteristics that justify their inclusion here. Use of the term ‘indirect techniques’ indicates that neither diagnosis nor therapy involves taking up the slack or engaging the barrier.
6.2.1. Johnston’s functional techniques
Functional techniques seek to bring the patient into a position in which good relaxation and pain relief are obtained. Once this objective is successfully achieved, it is found that painfully increased tension gradually dissipates in other positions too.
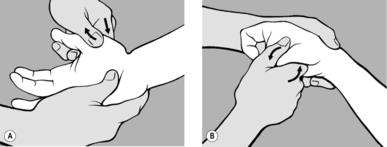
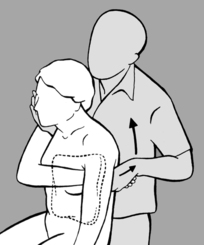
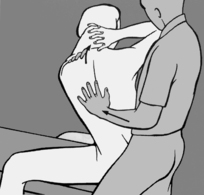
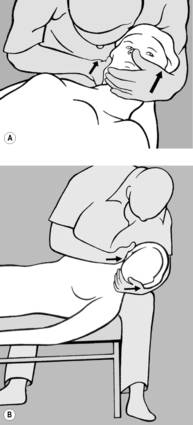
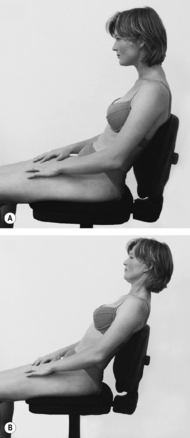
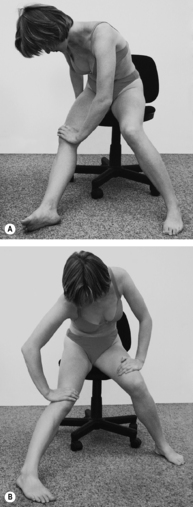
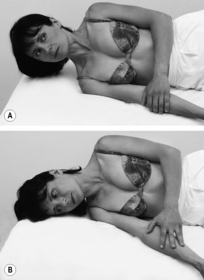
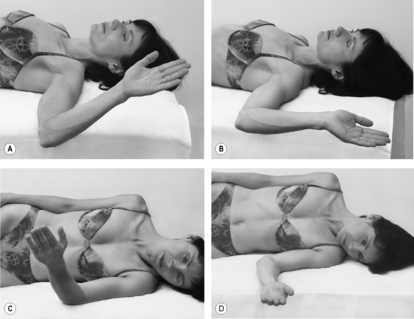
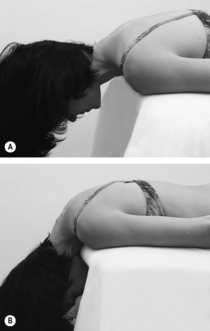
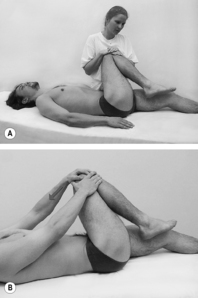
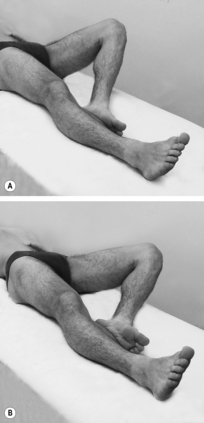
Treating the lumbar and thoracic spine
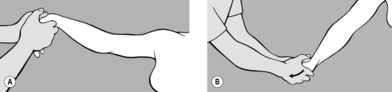
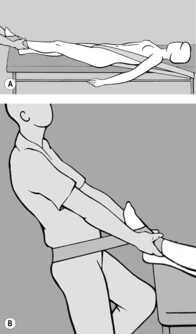
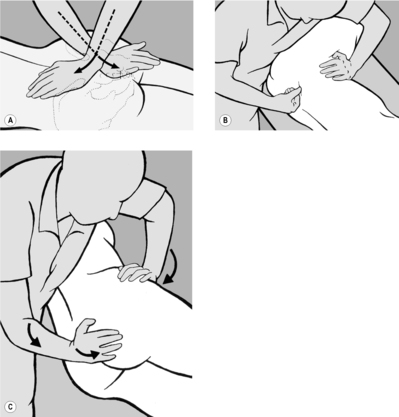
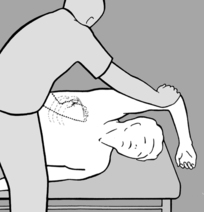
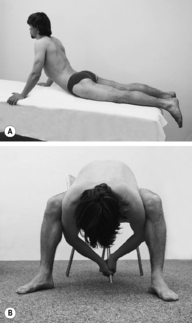
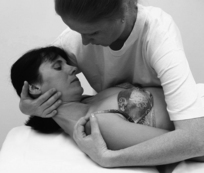
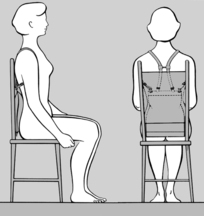
When the lumbar and thoracic spine are being treated, the patient should be seated with both hands clasped behind the neck; with one hand/forearm the practitioner stabilizes the patient, as illustrated in
Figure 4.21. With his other hand he palpates with thumb and forefinger in the segment where the tension imbalance between the two sides is greatest, that is where there is a palpatory illusion of rotation. He next establishes whether the tension imbalance diminishes in anteflexion or retroflexion. When this happens the practitioner will experience the palpatory illusion that the spine is ‘de-rotating.’ For example, if tension becomes balanced in retroflexion, then it follows that side-bending toward the side of the spasm will have a beneficial effect; and conversely, if anteflexion restores balanced tension, then side-bending in the opposite direction will alleviate spasm, and this is generally associated with freedom from pain.
In practice, the procedure is as follows: for example, if the practitioner finds that the tension imbalance is reduced in retroflexion, he should move the patient into maximum retroflexion with bending toward the side of the spasm. The patient’s trunk should be supported as effectively as possible so as to enhance relaxation. If tension in fact becomes balanced in this extreme position (wait to see if this happens), the practitioner slowly rocks the patient out of side-bending and maximum retroflexion and back into a neutral position. However, as soon as the tension reappears, he should return the patient to the relief position and make another attempt, taking care to progress slowly in this manner. As a rule, after a few rocking maneuvers back into the neutral position and some anteflexion, the tension will disappear with the result that, after a few repetitions, even full anteflexion and bending to the opposite side are tolerated. The palpating hand will always indicate whether the practitioner has ventured too far, i.e. whether it would be right to go back a step or to proceed further.
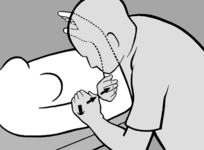
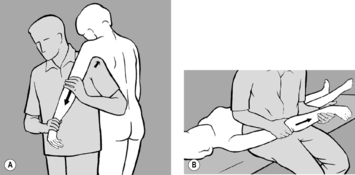
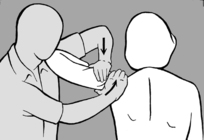
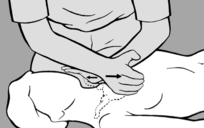
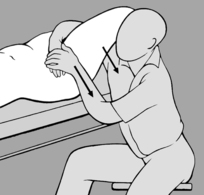
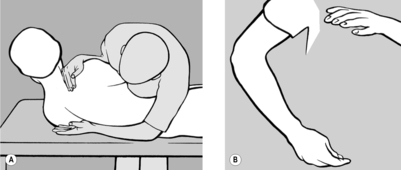
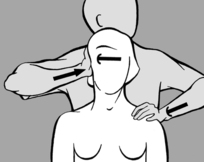
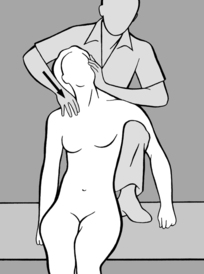
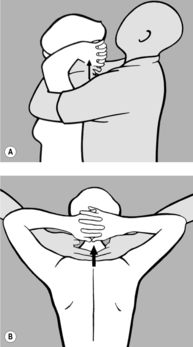
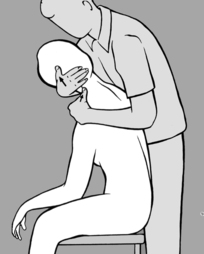
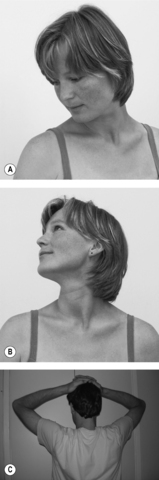
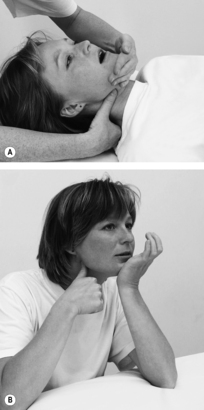
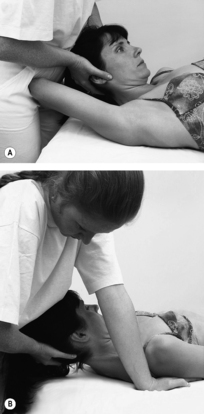
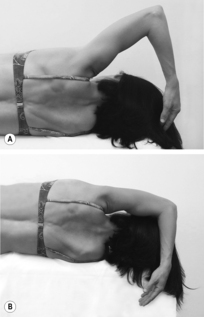
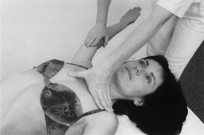
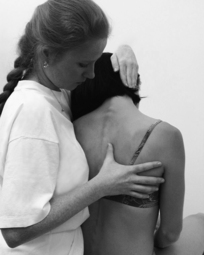
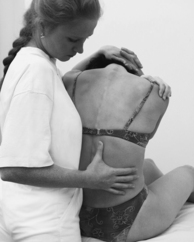
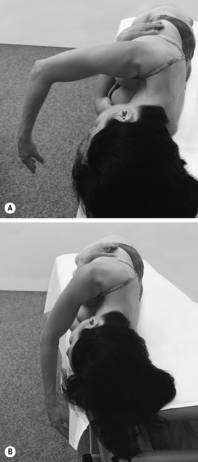
Treating the cervical spine
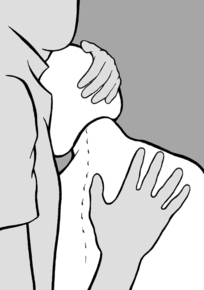
A similar approach is adopted when treating the cervical spine. As he stands beside the seated patient, the practitioner uses one hand to move the patient’s head into anteflexion, retroflexion, and side-bending; between the thumb and forefinger of the other hand he palpates next to the spinous processes the muscles that lie behind the transverse processes.
The following technique is even more effective: as he stands in front of the patient, the practitioner supports the patient’s forehead on his chest and palpates with both hands either side of the spinous processes (in this way he can use both hands to stabilize the patient’s head and neck). By raising or lowering his own ribcage, he then moves the patient’s head, taking it into anteflexion, retroflexion, and side-bending while simultaneously palpating the paravertebral muscles with his hands.
Once again, the practitioner starts by identifying the side and the segment affected by increased tension and then tests whether this finding is accentuated or diminished in anteflexion or retroflexion. If tension decreases in retroflexion, he moves the cervical spine into retroflexion and side-bending toward the lesioned side, and waits in this position until all tension disappears. Then with gentle rocking movements, he reduces retroflexion and side-bending, always supporting the patient’s head against his chest. He repeatedly returns to the relief position as soon as he notices that increasing anteflexion causes tension to reappear, until finally full anteflexion and bending to the opposite side are well-tolerated. Conversely, if tension is relieved on anteflexion, he performs the treatment the other way round (i.e. anteflexion and side-bending to the opposite side, followed by retroflexion and side-bending to the lesioned side).
This method is extremely gentle and safe and is always most agreeable to the patient. However, it is not easy to illustrate and teach with words alone because it depends entirely on the palpation skills of the practitioner.
6.2.2. Strain and counterstrain
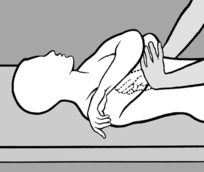
This method has much in common with Johnston’s functional techniques in that it does not engage the barrier and seeks out positions that afford pain relief. The best experiences with strain and counterstrain techniques are obtained in acute lesions where most other traditional methods have failed. Indeed L H Jones, the originator of the strain/counterstrain method, tells how he was called to treat an emergency case involving a patient who was unable to straighten up from flexion because of psoas spasm and could not find any relief position. On examination, however, Jones found that relief could be obtained when the patient was brought into a position of 45° of rotation and 30° of lateral flexion. He then went away to treat another patient. When he returned to his emergency case, he found that the patient was able to straighten up completely.
In his original publication,
Jones (1964) explained the rationale for his method, and this corresponds to the situation that is frequently observed in acute lesions: the patient picks up an object lying on the floor, usually bending forward to one side, and then straightens up (too) quickly out of anteflexion–rotation. It is conceivable that during this brisk movement something becomes caught or trapped. If we now help the patient to go back into the original flexed position and exaggerate this a little, then wait in this position before very slowly returning the patient into a neutral position, we give the impinged tissues the opportunity to slip out from their entrapment.
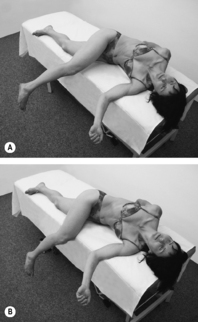
An essential prerequisite is to find the position of relief – information that is frequently volunteered by the patient. However, Jones noted objectively that this process can be used to eliminate the most varied pain points in the muscles, on the thorax close to the midline, and on the abdomen usually more to the left side. Once the patient has been slowly brought into the relief position thus found, it can be exaggerated a little, provided that the patient tolerates this. The patient then remains in this position for 90seconds. Afterward the patient is allowed to return (slowly!) to a neutral position.
As a routine method this technique is time-consuming and cumbersome. However, in a simplified form it is to be highly recommended in emergencies; and sometimes it is the only treatment method that is of help to the patient. It is employed most frequently in acute low-back pain and to treat radicular pain. For this, use is made of the positions (in anteflexion and retroflexion) that the patient adopts when performing McKenzie exercises (see Section
6.5.3). However, in each case, the position must be held for 90
seconds. A similar procedure may also be followed in acute cervical myalgia, that is the left-sided rotation and bending into mild flexion that is usually present can be slightly exaggerated and held.This technique has proved especially useful in instep pain where no movement restriction or TrPs are found and which develops sometimes on pronation and sometimes on supination of the foot. In such cases maximal supination or pronation in the direction of relief is the treatment of choice. On each occasion the position must be held for 90seconds, followed by a slow return to a neutral position.
6.3. Exteroceptive stimulation
(by H Hermach)
6.3.1. Tactile perception and muscle tone
Even though an unborn child in the womb already reacts when its mother’s abdomen is touched, tactile perception can properly be said to develop only after birth. In the very early stages a large part of a baby’s body surface area is in intimate contact with the floor or other support surface. Soon, however, growing babies start to support themselves on their arms and legs and on only limited areas of their trunk, until finally they stand up and support themselves only on the small surface area of the soles of their feet in contact with the ground. In adults, however, it is more common for the caudal end of the trunk to be the main support structure!
The size of the support surface of a child or adult will indicate whether muscle tone is increased, normal, or reduced. Starting from the contact area and our ability to use this, we develop the ability to push off from the support surface and return to it. The way in which individuals react to their surroundings in response to contact with their body surface indicates whether they accept this or reject it, how they interpret it, and whether their reactions to environmental stimuli are appropriate or not.
Our skin plays a major role in the processing of information we receive from the world about us; and it is on the basis of this information that we form an image of the space surrounding us and also of our own bodies. Pre-eminently it is our skin and sense of touch that enable us to differentiate between ‘self’ and ‘non-self’ out there. How much room does ‘self’ take up? A disordered or inadequate tactile sense disturbs our orientation in space and our understanding of the position that we occupy in it. And this necessarily has repercussions in the sphere of movement, that is in the locomotor system.
What we feel is closely related to our psyche. What we feel is interpreted, understood, grasped. And this interpretation also shows how we perceive the world, whether as agreeable, friendly and open (so that we open ourselves up to it in turn), or as disagreeable and hostile as we come into contact with it.
If we feel that touch or contact on our skin is agreeable, then contact with the world around us is welcome and we seek it out. Of course, the converse also applies. Hence our sense of inner security and our feelings of insecurity in a spatial sense when moving about are interconnected.
The more precisely we perceive, the better able we are to discriminate. The ability to discriminate precisely bears testimony to precise perception, and our tactile discriminatory skills tell us where we are. Reactions are shaped and behavior develops depending on the quality of our perceptive skills and how we interpret what we perceive.
Our skin’s sensation of touch also has implications for our locomotor system. These implications are so immediate because the sensitivity of our skin is linked to its tension, which in turn is connected with the tension of the subcutaneous connective tissues and of the muscles. Increased skin sensitivity is generally associated with increased tension in all tissues, including the muscles, while reduced sensitivity is linked with hypotonus. However, because sensations in the individual can be widely different, the symptoms can also be different. This explains why the skin may also be tense when sensitivity is reduced. Such a phenomenon may be the consequence of a reaction by the body as a whole to inadequate stimuli (information).
It is therefore extremely important that we are able to intervene at the level of the sense of touch. Our skin has the capacity to learn how to perceive more or less, or even how to perceive better. And we can do this by altering the tension of the skin, subcutaneous tissues, and muscles.
All of the above can be put to good use in the setting of treatment. Appropriate, discriminating sensation goes hand in hand with normal skin and muscle tone. The capacity of a muscle to alter its tension in a discriminating way is an expression of good coordination. Good tactile perception goes hand in hand with well-coordinated movements. If we succeed in the course of treatment in achieving well-balanced tactile perception, then it is no exaggeration to claim that the patient’s movements will then be optimal – coordinated and with good spatial orientation. In order to capitalize on this, we need to learn how properly to examine the tactile sensibility of the skin.
6.3.2. Assessing altered tactile perception
The assessment of tactile perception has much in common with neurological sensibility testing. Our prime assessment tools are our fingers and the dorsal surface of our thumb nail. In the process, we assess how the patient reacts, whether the response is appropriate, and how the patient behaves. We can stroke or scratch, only lightly or even intensively, depending on the part of the body being examined. It is a good idea to begin abruptly so as to provoke a clearly discernible reaction. After a few repetitions, the reaction will change as the skin adapts to the stimulus. Failure of adaptation to materialize is a sign of hypersensitivity.
Paradoxical reactions may also be encountered: instead of pulling the sole of the foot away when tickled, the patient may breath-hold and tense the thoracic muscles. Sometimes a patient will develop goose bumps merely at the mention of tickling the soles of the feet.
The most telling signs of a generalized reaction are altered respiration and sweating. These are indicative of instability in the organism as a whole, and the changes in respiration can also affect motor activity. Due consideration must also be given to the patient’s personality and cultural background and to whether current stress might be a factor. There are moments when all of us may react in an exaggerated manner.
6.3.3. Normalizing tactile perception
Sensitivity for tactile stimuli is anything but constant; it alters and adapts rapidly. Sensitivity in response to stroking may also alter in the long term. This means that the skin learns to feel and to discriminate, and as a result the patient learns to interpret.
The effect of a great many massage techniques is also based in part on tactile stimulation, and they can be applied with this in mind, provided that they are gentle and primarily have a surface effect. Brushing is another method that can safely be used in patients with diminished tactile sensitivity. In patients in whom altered tactile perception is expressed as algodynia or hypersensitivity, we must seek to use a technique that is agreeable to the patient or is at least felt to be tolerable. If treatment is felt to be disagreeable, it will provoke a defense reaction that will preclude any successful outcome.
Treatment in patients with altered tactile perception begins in principle with slow and gentle stroking over large areas of the body. Tickling must be avoided. Our hand will provide feedback because it will ‘pick up’ changes in the tension of the skin, subcutaneous tissues, and muscles. As long as the findings improve, we may continue. If this is not the case, then we have failed to understand our task correctly or else the stimulus was too weak. If improvement fails to materialize, we must stop, review the diagnosis and decide whether the stimulus was the correct one. Stroking is generally performed along the long axis of the body, but may also be transverse to the long axis at the buttocks, or diagonal on the abdomen.
If the skin is hypersensitive, we have two options: we can continue stroking through a fine fabric or else the patient can self-stroke for a few minutes each day until the touch of the practitioner’s hand can be tolerated.
If the skin is hyposensitive, we can intensify the stimulus by stroking more quickly, changing pressure and direction, or using a hedgehog ball, brush, or towel. However, we should understand that good tactile perception permits a response to tiny stimuli that can never be achieved with coarse stimuli.
In order to achieve good coordination, a muscle must be able to interact with other muscles as soon as tension changes. Heightened or diminished muscle tonus should not persist anywhere. Each muscle should be capable of relaxing and adapting to modified circumstances. If we have successfully altered muscle tonus using any method, then this means that well-coordinated movement has resulted without the need for special exercises and the correction they bring. If our own experience suggests that we have successfully normalized the tone of the muscles and subcutaneous tissue simply by stroking, then coordination will also improve, along with locomotor system function in every respect.
6.3.4. Altered superficial tactile perception following surgery (due to scarring)
When assessing the tactile perception of the skin, we must also take account of any active scars that may be present. To determine the
sensitivity of a scar, we ‘fold’ it a little. If the patient feels pain when we do this, hypersensitivity is present. If sensitivity remains unchanged after stretching and mobilization (see
Section 5.2.2), then the pain point is more deep-seated.
Hypersensitivity can be so intense that the patient cannot even bear contact with clothes. This condition is known as ‘clothing sensitivity,’ and the patient may also demonstrate a powerful emotional reaction. In such cases we should perform stroking through a sheet of fabric, or the patient should be encouraged to self-stroke daily until being touched by someone else’s hand becomes tolerable. And even if the sensitivity of the scar has been restored to normal, the patient must repeat the stroking as soon as hypersensitivity returns.
The muscles beneath the active scar are usually hypertonic and painful. These aspects too may also improve as soon as normal cutaneous tactile perception is restored.
Cutaneous tactile perception differs not only from person to person but also depending on body region and age. Infants recognize objects and first touch them with their mouths, and only later with their hands. Soon, however, they also use their feet to feel objects until they stand up and start to toddle. In that phase the foot serves as a support but it is by no means passive: the body reacts to the surface on which its stands to adopt an erect posture.
As is well known, the tongue, mouth, hands (especially the thumbs), and feet are served by large areas of the sensory cerebral cortex. They play a pre-eminent role in tactile perception, and therefore changes in sensibility in those regions result in changes to overall behavior.
The tongue and mouth
The tongue tends to be examined in exceptional cases only. However, it must be examined in young children with behavioral abnormalities: the findings often reveal a restless or, on the contrary, an immobile tongue. Examination is also necessary in cases where the mandible and lips are restless or the patient’s mouth is constantly open. A moistened finger is used for the examination. Where hypersensitivity is present, the tongue will react with a twitching defense movement or else gagging is provoked simply when the tip of the patient’s tongue is touched. In the case of a tongue where there is no reaction, indicative of reduced sensitivity, the tongue, lower jaw, and oral cavity can be stroked with a moistened finger. Adult patients may do this for themselves; for toddlers and children, the parents should be instructed how to do this. It is necessary to proceed with caution owing to the ever-present risk of vomiting.
The hands
It is not easy to assess the sensitivity of the hands. This is probably because the hands themselves are constantly touching objects and working on them. For the examination, the patient is seated in a relaxed position with palms facing upward. In this position, tension of the flexors is the dominant feature. Therefore the fingers are generally in slight flexion. The practitioner should surprise the patient by suddenly scratching one palm. Usually the patient will rapidly jerk the fingers away before returning them to their original position. One sign of hypersensitivity is finger extension, especially if this recurs when the test is repeated. The most effective therapy is stroking or a repetitive activity such as moving the fingers in a bowl of rice, kneading dough, or model-making with Plasticine®. Patients with hypersensitive hands are generally creative but they need to learn to relax their hands.
The feet
An assessment of the sensitivity of the feet should form part of the routine patient examination. The feet play a key role in human upright posture and they are significant for the function of the spinal column. For the examination, the patient should be supine, with legs slightly flexed over a pillow placed behind the knees. Without warning the patient, the practitioner uses his fingernails to simultaneously stroke the soles of both the patient’s feet, from heel to toe in the direction of the big toe. Where tactile perception is normal, the patient will attempt to move away a little from this touch, by slightly increasing knee and hip flexion, dorsiflexing the feet, and flexing the toes a little. It is not uncommon for the observed reaction to be asymmetrical, and this is clinically important. When asked, the patient will also report asymmetric sensitivity.
If the practitioner detects asymmetric sensitivity of the feet, he should also screen for asymmetries in other body regions – lower legs, thighs, abdomen, thorax, arms, and face. In this way it will be possible to identify asymmetry involving the whole body, something that occurs particularly when one side of the body is markedly dominant. Such asymmetry will affect the locomotor system as a whole. The patient then needs to become aware of the ‘forgotten side of the body’ and learn to use it too. Once again, therapy consists of stroking the less sensitive body side (and the patient can also do this independently). However, it is important to establish with certainty whether and when symmetry is restored.
The abdomen
Ticklishness, especially on the abdomen, is also a sign of hypersensitivity. This usually goes hand in hand with increased muscle tension. As a result, coordination, respiration, and spinal function are also disturbed. Ticklishness is linked with nociception and therefore also with TrPs. It is a precursor of pain.
6.3.5. Individual characteristics of perception
The reactions of all patients also need to be assessed in the context of their personality. What appears to be exaggerated may be entirely normal in a highly-strung person. In someone with a very calm temperament, what seems to be normal may already be an indication of hypersensitivity. The practitioner needs to listen to the patient very precisely – the patient’s own words will betray the underlying attitude toward pain – and simultaneously observe the patient’s behavior. Thus, an unusual reaction may ensue following simple skin contact because there is a disturbance at the emotional level, something that may be found in unloved children, even persisting into adulthood.
Differing sensitivity on one side of the body means that the patient has a false perception of body center and hence of the immediate surroundings. Objects seem to some extent less real on the side of diminished sensitivity, explaining why the patient may bump into things more often on that side. This sensitivity imbalance is often associated with emotional lability. As soon as the patient learns to be aware of the whole body and to use the side on which sensitivity was originally diminished, there will be an increase in self-confidence.
Normal sensitivity of the feet is also a prerequisite for good balance and hence for a sense of security. Where such security is absent, the patient will seek to maintain balance through exaggerated activity of other muscle groups, for example in the pelvis and lumbar region, diaphragm, thoracolumbar junction, shoulder girdle, and those involved in mastication. These disturbances of muscle function generate characteristic chain reactions. Individuals with hypersensitive hands are often excessively neat and tidy, with a tendency toward perfectionism.
6.3.6. Self-treatment
Patients can use the following self-treatment techniques to restore a balanced pattern of skin sensitivity:
• Stroking themselves with their fingers.
• Stroking themselves with a towel.
• Rolling a soft rubber ball or tennis ball with their feet.
• Walking on pebbles or hot charcoal.
• Wriggling their fingers in a bowl of rice or peas, etc.
• Lying on a mattress filled with small plastic balls, chestnuts, or other nuts; children may play with balls or chestnuts in a bath containing just a little water.
• Brushing to stimulate the skin.
The prime goal of therapy is to reintegrate the region of diminished or heightened sensitivity into the overall body pattern. There are right-handed people who need to learn how to use their left hand too. Many patients have to re-learn how to walk barefoot or how to roll down a grassy slope (‘roly-poly’ fashion), and others have to be made aware of their thorax.
6.4. Soft-tissue manipulation
As with joints, we examine mechanical function in order to assess elasticity, mobility relative to other structures, and mutual patterns of displacement. The importance of soft tissue is evident from the simple facts that the locomotor system as a whole is embedded in soft-tissue layers, that connective tissue elements are also present in muscles themselves, and that the mutual mobility and displacement of all these structures is made possible by soft tissue. Indeed, motion of the locomotor system proper would not be possible if, starting with the skin, all the aforementioned structures and tissues were not freely mobile or capable of relative shift and stretch. The same applies to the visceral organs, especially in the abdominal cavity. Some of these movements involve quite considerable excursions. Consequently, soft-tissue function needs to be examined diagnostically and treated.
The
technique is characteristically uniform for
all soft tissue, but differs from most forms of massage in that on each occasion, whether we wish to stretch or shift, we first take up the slack (engage a barrier), and then, without much change in pressure (pull), release occurs after a brief latency period. Release itself may take from a few seconds to half a minute or longer. The practitioner’s role is to sense this. If the release process is cut short prematurely, we will be depriving ourselves of the best possible treatment outcome. During this period of release it may be helpful to slightly modify both the direction and the intensity of pressure (pull). It must never be forceful, and the patient should never feel pain.
If muscles and joints are to move, then the surrounding soft tissue also needs to shift and stretch with them. This capacity for concomitant movement may be disturbed, with adverse repercussions for the locomotor system as a whole.
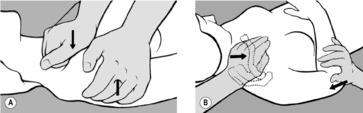
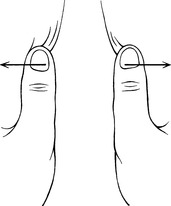
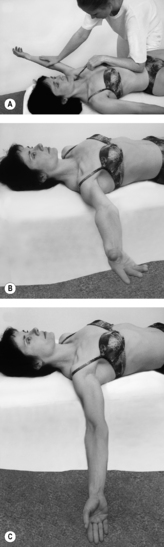
6.4.1. Skin stretching
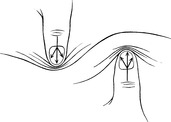
As explained in
Section 4.3.2, a small area of the skin can be stretched between two fingertips; larger skin areas can be stretched between the practitioner’s thenar eminences or between the ulnar aspects of his palms with hands crossed. Stretching should be performed with a minimum of force, so as to take up the slack. Under normal circumstances a springing resistance will be felt.
If there is a
hyperalgesic zone (HAZ), the slack is taken up sooner and there is much less spring. If the skin is then held in this end position, resistance weakens after a brief latency period until the physiological barrier is reached and normal springing is restored (see
Figure 6.56). The HAZ is then usually no longer detectable. If the HAZ is the cause of pain, this stretching method is quite as effective as needling, electrostimulation, and similar treatments. Moreover, it is painless and well suited for self-treatment. The effect can even be measured. The method is particularly suitable for small skin areas where a fold cannot be formed, for example between fingers and toes, in radicular syndromes, or in the region of the carpal tunnel if the skin there is taut.
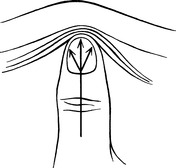
6.4.2. Stretching a connective tissue fold
Folds of soft connective tissue are usually formed between the thumb and forefinger of the practitioner’s two hands; in this way he can produce pull or stretch (but never compression!) and take up the
slack. The stretch is held and, after a brief latency period, he will notice that the tissue fold stretches (relaxes) until the physiological barrier is reached (see Figure 6.57). This technique is appropriate for treating HAZs in the subcutaneous tissue and especially for scars with active interference zones (pain points). It is particularly suitable for stretching taut muscles where the connective tissue element is shortened. In the case of large muscles, such as the ischiocrural group, the fold is produced between the palm of one hand and the fingers of the other. This is probably the most effective way of obtaining muscle stretch while avoiding the stretch reflex (‘cross-stretching’).
6.4.3. Sustained application of pressure
In locations where a fold cannot be formed, pressure may be exerted with fingers, thumb, or even the elbow (see
Figure 6.58). Here, too, the practitioner takes up the slack using the very minimum of pressure, and after a brief latency period he will notice that the tissue starts to yield and his finger sinks into the deep layers until a new barrier is reached. In the process both the intensity and direction of pressure can be modified slightly. This method is most effective for eliminating TrPs, for example in the erector spinae and the gluteal muscles; it can also be applied by a pincer movement between two fingers, for example in the sternocleidomastoid. The sustained application of pressure is also useful in treating deep, contracted scars where it is impossible to form a skin fold.
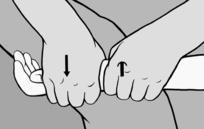
6.4.4. Shifting (stretching) the deep fascia
The most important task of soft-tissue manipulation appears to be restoration of the normal mobility of the fascia. Once again, the technique is similar to those described above: after taking up the slack, the practitioner waits until release occurs and the tissue can be shifted in relation to the structure beneath. Many of these techniques were originally elaborated by R Ward (personal communication, 1989). It is worth emphasizing here that restrictions in the mobility of the deep fascia are a sign of a chronic disease stage.
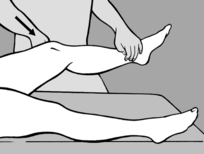
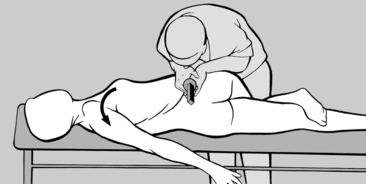
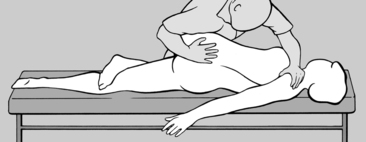
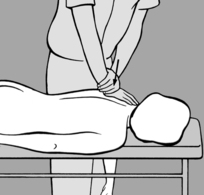
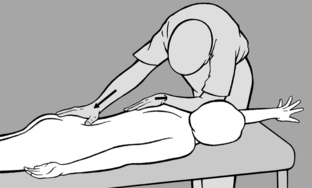
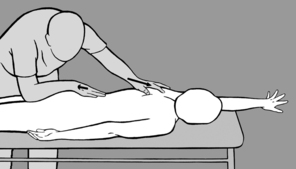
Shifting the deep lumbar fascia caudally
Shifting and stretching the dorsal fascia cranially
The practitioner takes up a position to one side of the patient who is prone with feet protruding beyond the end of the treatment table. He starts by comparing the extent to which the soft tissue can be shifted cranially on both sides. He then instructs the patient to press the toes on the side to be treated against the edge of the table, to stretch out the arm on that side as far as possible with fingers splayed, and to turn her head toward the practitioner. With one hand placed at the level of the shoulder blade, the practitioner shifts the soft tissue cranially to take up the slack, while his other hand fixes the soft tissue in the thoracolumbar region using downward pressure toward the treatment table (see
Figure 6.60). He next instructs the patient to breathe in deeply, breath-hold, and then breathe out slowly. Release occurs while the patient is breathing out. The procedure is repeated several times. If release is not satisfactory, the situation can be helped by asking the patient to cough.
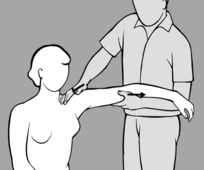
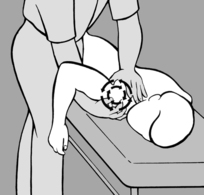
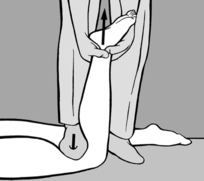
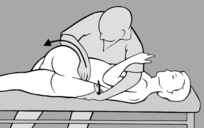
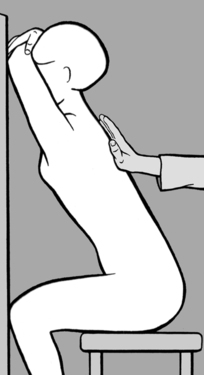
Stretching the fascia on both sides of the trunk
This technique is indicated where side-bending is restricted due to muscle shortening. For diagnosis and treatment, the practitioner takes up a position behind the patient, who is seated. On the side to be treated, the patient raises her arm above head height and bends it at the elbow. The practitioner takes hold of the elbow with one hand while his other hand fixes the patient’s hip from above. He takes the patient into side-bending over his thigh, which is supported on the treatment table, until the slack has been taken up (see
Figure 6.61). He then tells the patient to look up and breathe in deeply, breath-hold, and then look down and breathe out. Stretching occurs after a brief latency period. The procedure is repeated two or three times.
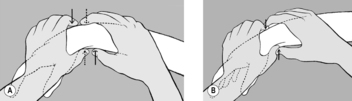
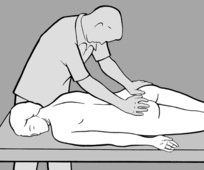
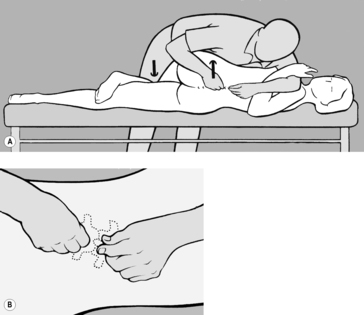
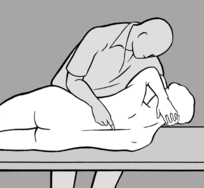
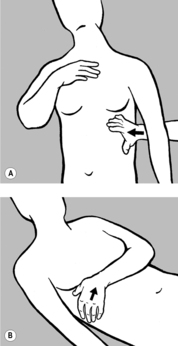
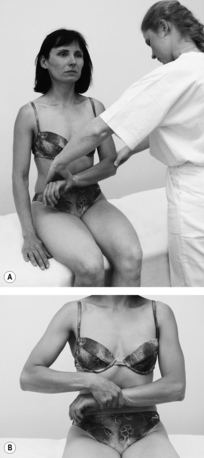
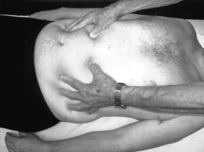
Rotational shifting of the fascia around the thorax
With the patient supine, the practitioner examines and mobilizes the soft tissue around the thorax, particularly on the lateral surface, in a ventromedial direction (see
Figure 6.62 A). He palpates for resistance, usually on one side, and makes a comparison with the other side. In the direction in which he feels resistance (a pathological barrier), he takes up the slack during inhalation and senses the release during exhalation. During mobilization, it is helpful for the practitioner to guide the patient’s hand with his own so that the patient can feel the barrier and release first hand, and then continue the (always agreeable) self-treatment at home (see
Figure 6.62 B). Clinically, this dysfunction is especially common and significant in the setting of pain in the region of the shoulder and shoulder blade.
In a similar way, in patients experiencing pain in the inguinal region, the shifting qualities of the soft tissue relative to the pubic bone may be reduced. In all such situations, the treatment is fundamentally the same: the practitioner takes up the slack in the direction of increased resistance. This is then held, after which release is obtained and the barrier is restored to normal.
The same also applies for the shifting quality of the buttocks in a caudal-to-cranial direction: the practitioner takes up the slack on the side of increased resistance by exerting pressure in a cranial direction and then, after a brief latency period, release is obtained.
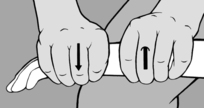
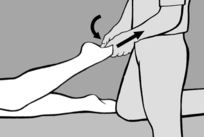
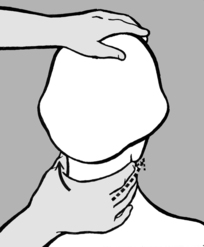
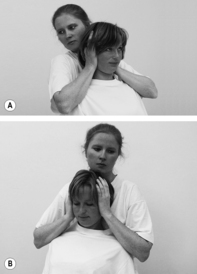
Fascia at the neck and the extremities
The soft tissue (fascia) at the
neck and in the
cervicothoracic region can be examined and treated by applying a rotational movement around the long axis of the neck. The practitioner stands behind the seated patient, places one hand round the patient’s neck from behind, and applies a rotational movement to detect increased resistance in one direction (see
Figure 6.63). He takes up the slack in that direction and, after a brief latency period, release is obtained as the patient breathes out. Treatment may be applied in the direction of the thumb or of the fingers; treatment in the direction of the thumb is more specific while that in the direction of the fingers covers a larger surface. With his free hand the practitioner fixes the patient’s head.
At the cervicothoracic junction, the same technique can be employed if the patient is extremely slim; in most cases, however, the practitioner will need to take hold of the cervicothoracic junction with both hands and rotate the soft tissue around a vertical axis. Here it is also possible to perform a wringing action with one hand against the other. In each case, the barrier is engaged and then release is obtained.
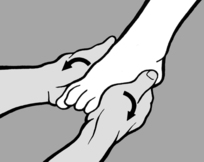
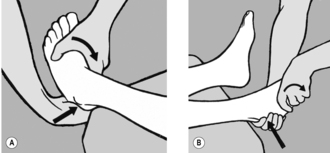
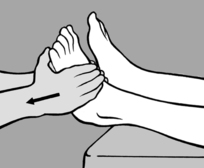
Heel pain
In cases of painful calcaneal spur, it may be found that at least in one direction the soft-tissue pad at the heel is less readily shifted than on the other side. As soon as the practitioner detects the pathological barrier, he takes up the slack and then overcomes the resistance to restore normal tissue mobility. Usually it is necessary to apply strong (lateral) pressure in the immediate vicinity of the bone using both thumbs while fixing the heel with the other fingers (see
Figure 6.64).
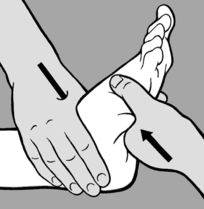
In cases of heel pain around the
attachment point of the Achilles tendon, the soft tissue between the tendon and the bones of the lower leg is tender to the touch. In such cases, this tissue must be folded and stretched between the fingers. For this, the patient is prone with the knee flexed. The practitioner stabilizes the patient’s lower leg against his body. He applies pressure with the finger of one hand just above the heel and with the thumb of his other hand a few centimeters further proximally. He then repeats the procedure in the opposite direction (see
Figure 6.65). For this, it is necessary to position the thumb flat because there is only minimal space between the Achilles tendon and the tibia. After the slack has been taken up, the fold will stretch during release.
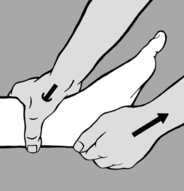
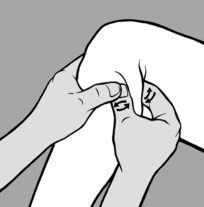
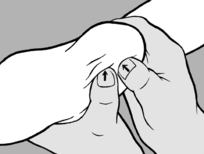
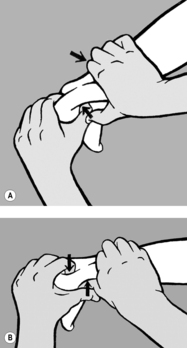
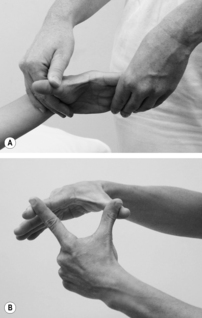
6.4.5. Mutual shifting of metacarpal and metatarsal bones
In radicular syndromes radiating to the fingers (or toes), stretching is not limited only to the skin between the fingers (toes); generally there is also increased resistance (‘bind’) if we try to move one metacarpal (metatarsal) bone against the next, in a dorsopalmar (dorsoplantar) direction. This resistance does not stem from any joint but from the soft tissue between the individual bones. As soon as the practitioner detects increased resistance compared with the other side, he uses a pincer hold (see
Figure 6.7) to engage the barrier, and once the slack has been taken up, he waits for release.
The restricted fibular head can be treated in the same way and for the same reasons (see Section
6.1.2,
Figure 6.25).
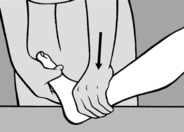
6.4.6. Painful periosteal points
Pathological barriers are also encountered at painful periosteal points, most frequently in the vicinity of attachment points of ligaments and tendons; these barriers are characterized by restriction of subperi-os-te-al tissue on shifting, in at least one direction. It is always necessary to make a comparison with a symmetrical painless area on the non-affected side. Thus, on examination of the epicondyles, it is normally possible to shift the soft tissues easily in all directions; however, when pain is present, shifting is generally restricted in at least one direction. This signals the presence of a pathological barrier, which is indicated by an abrupt end-feel that is devoid of springing. Once the barrier has been engaged, release can be obtained after a brief latency period. After mobilization, the patient experiences relief from pain. Shifting always occurs in a tangential direction and is therefore painless. Pressure is never applied directly to the periosteal point itself (see
Figure 6.66).
This technique is also important, for example, in cases where the spinous processes are painful, particularly in the lower lumbar region in hypermobile patients. It is worth emphasizing that the pain point on the spinous process is never precisely in the midline, but always slightly to one side. On the side of painful tenderness, deep pressure ventrally (i.e. parallel to the spinous process) will encounter greater resistance than on the non-painful side. These areas represent painful attachment points of the short intervertebral muscles. Accordingly, the practitioner takes up the slack using downward pressure applied with a fingertip; as the pressure is held, release is obtained.
In the very frequently encountered condition where the spinous process at the axis is tender, the pain point is also located to one side; this is revealed by axis rotation following side-bending of the patient’s head to the non-painful side. In this case it is usual for the mobility of soft tissue to be clearly restricted in a caudal or cranial direction. Therefore the practitioner fixes the patient’s head in side-bending, with his free hand palpates the pain point lateral to the spinous process, and takes up the slack in the direction of the restriction. Release is obtained after a brief latency period. The procedure is repeated and the pain is usually found to have been alleviated.
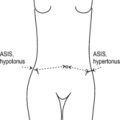
Another extremely common pain point is at the PSIS, a lateral projection on the iliac crest that runs obliquely in a ventral direction. Soft-tissue mobility in this direction is tested and treated tangentially. A similar procedure may be followed for the pes anserinus and the styloid process of the radius, etc.
6.8. Re-training to correct faulty movement patterns
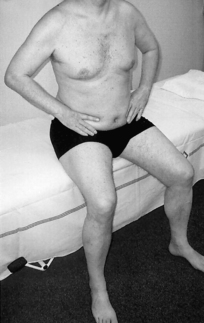
6.8.1. Standing on both feet
First and foremost, therefore, it is necessary to activate the feet. In the ‘Chinese stance’ the patient stands with her legs slightly apart, her feet parallel to each other and knees slightly bent. This position greatly facilitates the activity of the foot flexors, enabling the patient to ‘grip’ the surface on which she is standing. Obviously, this is easier to do without shoes.
The stability of this type of standing can be tested very simply by giving a gentle unexpected push to the patient’s trunk from in front or behind. If she is standing in the conventional way with her feet in external rotation, she is likely to lose her balance. Her stability is greatly enhanced if she stands with legs slightly apart, feet parallel in slight internal rotation and knees bent. This, however, is not the only effect: the pelvis will automatically be in a neutral position, thus greatly improving body statics and posture.
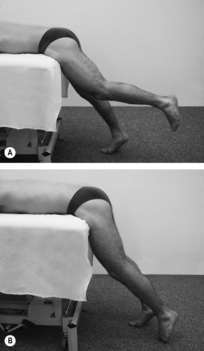
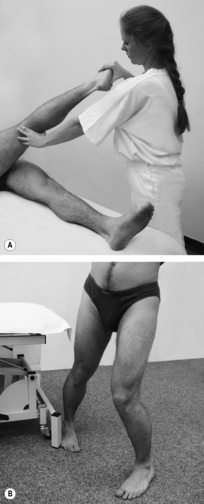
6.8.2. Standing on one leg and walking
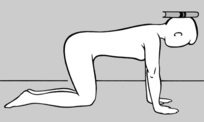
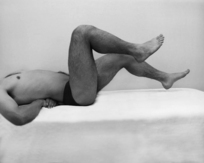
Because these are asymmetric functions, asymmetric exercises are used to bring about correction. The ability to stand correctly on one leg is also a prerequisite for a normal gait pattern because walking entails alternate standing on one leg (see
Figure 4.77). However, a certain degree of asymmetry is normal, and this is why we distinguish the supporting leg from the free leg. The supporting leg is the one a person puts more weight on when standing at ease. The asymmetry should not be too marked, however. In both standing and walking, it is essential to pay attention to the activity of the feet, and of the toes in particular. In standing, the knee should be bent very slightly and the toes should be pressing against the floor. In walking, the heel strikes the ground first, then the foot rolls on to its lateral edge and its arch should not sink down medially. Pronation does not occur until toe-off; that is toe-off is achieved by the metacarpal bone of the hallux and flexion of all toes.
Understanding and correcting pelvic obliquity
The supine patient is instructed to push one leg and the corresponding side of her pelvis away from her in the direction of its long axis (see
Figure 6.146). At the same time she is told to make the opposite movement with her other leg, thus producing pelvic obliquity due to contraction of her non-tense quadratus lumborum. While this is happening, her lumbar spine is firmly fixed against the treatment table by contraction of the abdominal musculature. Her other muscles are relaxed.
The purpose of this exercise is to help the patient understand how pelvic obliquity occurs and how she can correct this.
Rotation of the hip
The side-lying patient abducts (raises) her extended uppermost leg and (as in the preceding exercise) pushes it away from her. She then performs external and internal rotation of her foot (see
Figure 6.147). In the process the position of her pelvis is fixed by her abdominal and buttock muscles.
The purpose of this exercise is to re-educate the hip muscles while the pelvis and lumbar spine are fixed in position.
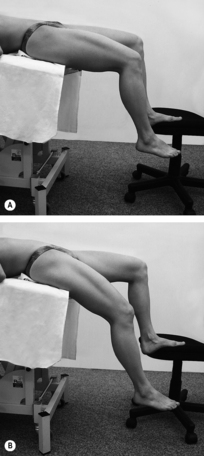
Flexion and extension of the leg
As for the preceding exercise the patient is side-lying with her uppermost leg slightly raised (abducted) and flexed at the knee. This leg is then flexed at the hip (see
Figure 6.148 A) and extended (see
Figure 6.148 B).
Her pelvis and lumbar spine are fixed in position. Flexion of all leg joints is accompanied by moderate kyphosis of the lumbar spine via the pelvis. The abdominal muscles and hip flexors are involved in this movement. In the second phase of the exercise, as the leg is extended, all the extensor muscles of the leg contract, and the lumbar spine participates in this movement only by going into moderate lordosis. Correct contraction of the abdominal muscles should prevent hyperlordosis during extension. The exercise can be made easier if the practitioner offers light resistance at the knee against flexion and at the heel against extension.
The purpose of this exercise is to re-educate the hip stabilizers and abdominal muscles, and to re-learn the coordinated movement pattern as in walking where movement is controlled not by the hip but by the lumbar spine. It has proved effective to have the exercise performed side-lying, that is in an exercise position that is ‘unusual’ for the patient.
6.8.3. Sitting
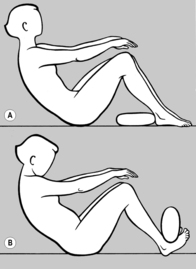
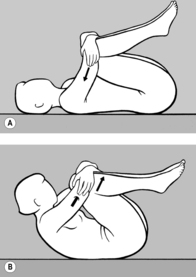
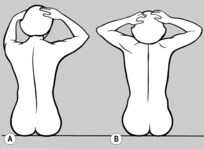
Sitting erect with trunk rotation
The patient is seated on the floor, resting back on her ischial tuberosities. Her knees are parallel and slightly flexed, and her hands are clasped over her occiput (see
Figure 6.149 A). The coordinated contraction of her abdominal muscles holds her spinal column erect in a neutral position. In the second phase of the exercise, the patient rotates her trunk from her hips up to and including her head (see
Figure 6.149 B). The movement must be performed smoothly from bottom to top and back again. The patient’s spinal column must be kept vertical, avoiding all anteflexion, retroflexion, and side-bending.
This exercise is demanding because the patient’s pelvis is not fixed. Therefore it should be practiced initially with the patient sitting astride a chair or treatment table, thus fixing the pelvis. Good facilitation can be obtained if the patient looks toward the side of rotation and up a little, breathing in during rotation to the side and breathing out as she returns to a neutral position. All this holds true for trunk rotation while standing with legs apart.
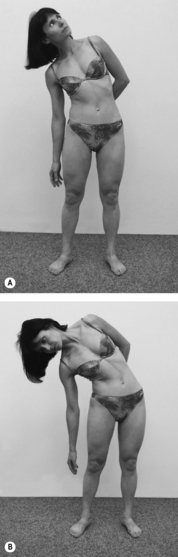
Lateral movement of the thorax
The patient is seated on a chair with her feet supported on the floor, and preferably in front of a mirror so that she can correct her position. Her arms are held in abduction at 90°. She then moves her thorax to one side, as if someone were pulling her arm horizontally. If the patient contracts her abdominal wall correctly, her thoracic spine will move sideways without itself curving laterally (see
Figure 6.150 A and B). During this sideways movement the patient’s body weight will shift on to one buttock and the leg on the same side. The exercise can be facilitated if the practitioner effects light
resistance against the patient’s ribs, first from one side and then from the other.The purpose of this exercise is for the patient to become aware of how to compensate for scoliotic posture and how to control the oblique and deep abdominal muscles that are so important in this context.
Correction of pelvic tilt while seated
The patient sits on a stool or on her heels facing a mirror. She first intentionally relaxes her abdominal muscles, bringing her lumbar spine into lordosis. She then slowly contracts her abdominal and gluteal muscles to cause lumbar kyphosis. Her shoulders should move as little as possible during this exercise.
The purpose of this exercise is for the patient to achieve ‘dynamic sitting’, something that can be practiced particularly well on an exercise ball.
6.8.4. Anteflexion
It is well-known that a stooped or forward-bent posture can be indicative of underlying pathology. However, anteflexion is an entirely normal function of the locomotor system that should not be avoided but carried out correctly.
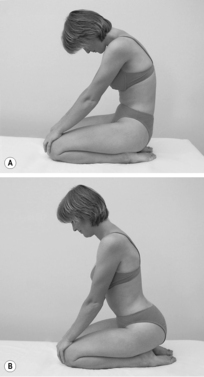
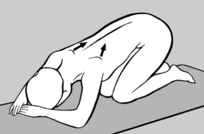
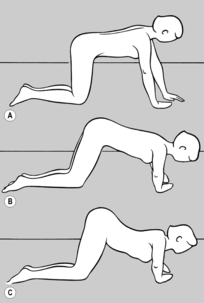
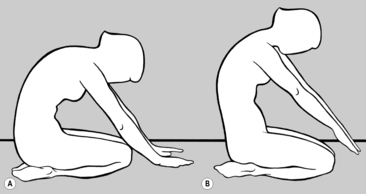
Straightening up from anteflexion
The patient is seated on her heels, resting her hands on the floor in front of her knees. As she breathes
calmly, her lumbar spine is in kyphosis (see Figure 6.151 A). On coordinated contraction of her abdominal and back muscles and with her pelvis fixed by her gluteals, the patient lifts her hands from the floor and her lumbar spine and thoracic spine straighten up (see
Figure 6.151 B).
The purpose of this exercise is to prepare the patient for subsequent exercises.
Anteflexion and retroflexion of the trunk with pelvis upright
Standing erect, the patient contracts her abdominal and gluteal muscles, and begins anteflexion of the head and neck followed by her thoracic and lumbar spine. Her pelvis should remain upright, which means that anteflexion is never extremely pronounced. The patient never touches the floor with her hands, and usually cannot reach further than her knees. From this position she straightens up in reverse sequence (lumbar spine, thoracic spine, head) and continues seamlessly into retroflexion, contracting her gluteal muscles and pushing her pelvis forward. She then straightens up again to her starting position.
The purpose of this exercise is for the patient to learn how to control the position of her pelvis and to master the smooth straightening of her thoracic and lumbar spine.
Lifting an object
In a standing position, the patient places one foot forward, simultaneously bending her trunk and the knee of her forward leg to pick up the object (see
Figure 4.72). In this way the load is evenly distributed between leg, pelvis, and trunk. She then straightens her trunk, simultaneously extending her forward leg and righting her pelvis using her gluteal and ischiocrural muscles, while her abdominal and back muscles control the (successive) uncurling of her spinal column. Facilitation of the abdominal muscles can be enhanced by the patient either breathing out against resistance or pressing her outstretched fingers toward the floor. Contraction of the abdominal muscles should be maintained as the patient straightens up and subsequently also during forward-bending, and she can check this using her fingers. She should also keep her trunk as close as possible to her thighs, which in turn prevents leverage. Her body’s center of gravity is over the advanced knee and is supported to some extent.
6.8.5. Lifting the arms
The critical constants here are correct fixation of the shoulder girdle and hence relaxation of the cervical spine.
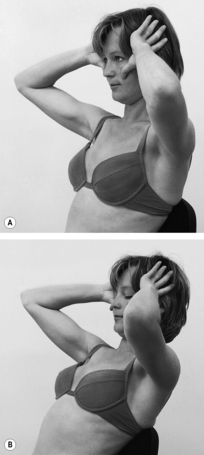
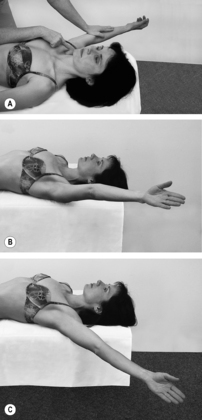
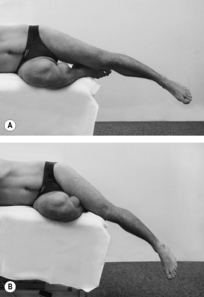
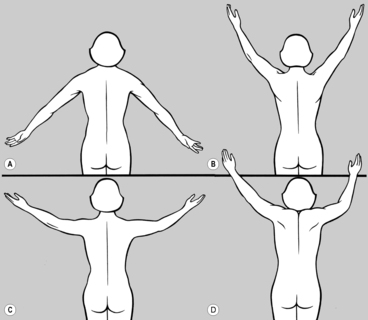
Lifting the sideways-extended arms
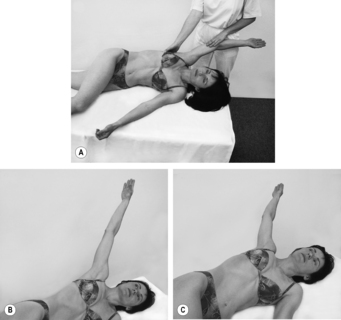
The patient is prone, with arms relaxed and extended sideways and her forehead resting on the exercise mat. Her arms are in internal rotation with palms facing upward (see
Figure 6.152 A). Her pelvis is fixed by the abdominal and gluteal musculature. The practitioner brings the patient’s shoulder blade passively into the correct starting position by raising her shoulders and moving her shoulder blades caudally. In this process the patient’s arms go into external rotation and her palms are now flat on the floor. In this position the patient now actively fixes her shoulders. She then raises her forehead slightly and moves her outstretched arms up toward the level of her head, rotating them further externally and lifting them only so far that her forearms are still touching the exercise surface while her shoulders remain higher than her hands (see
Figure 6.152 B and C). In this process the lower fixators of her shoulder girdle remain contracted, while the upper fixators are relaxed. This exercise can be performed on one side initially, and later on both sides.
The purposes of this exercise are to enhance coordinated rotation at the shoulder while the upper shoulder blade fixators are relaxed, to achieve coordinated fixation of the trunk, to stretch the pectoralis, and to strengthen the lower shoulder blade fixators.
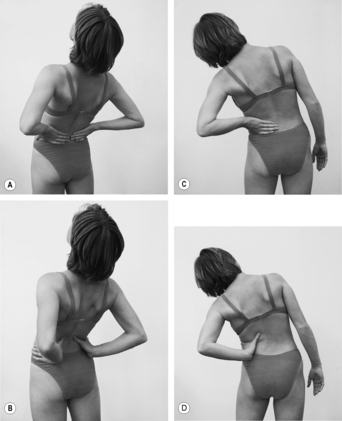
Raising and lowering the shoulders
The patient is seated erect on a chair, preferably in front of a mirror, with arms hanging down. As forcefully as she can, she fixes her shoulder
blades using the lower shoulder blade fixators (see Figure 6.153 A). Now chiefly using the levator scapulae, she lifts her shoulders, leaving the upper part of the trapezius as relaxed as possible while activating the lower part (see
Figure 6.153 B). If only one side is being exercised, the patient can check the lower part of the trapezius with her other hand.
The purpose of this exercise is for the patient to learn to feel the relaxation of the upper fixators of the shoulder while consciously contracting the lower fixators.
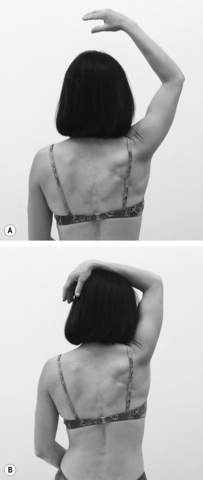
Lifting the arms above head height
The patient is seated erect on a chair and performs a routine movement, bringing one hand up to her head (e.g. as when combing her hair). It is important that the shoulder blades are fixed properly, the neck muscles are relaxed, and head posture is correct. The levator scapulae and upper part of the trapezius should also remain relaxed (see
Figure 6.154 A). The exercise can be performed on one side only, and if done on both sides, the two hands do not need to be lifted equally high.
Head rotation
The patient, who is seated on a chair, is instructed to rotate her head. There should be rotation of the cervical and upper thoracic spine, and the shoulder blades should remain fixed from below, with the upper shoulder blade fixators relaxed (see
Section 4.15.1,
Figure 4.75). There should be no side-bending and the rotational movement should be around the vertical axis of the body.
The purpose of this exercise is to train properly coordinated head rotation with the upper shoulder blade fixators relaxed.
6.8.6. Carrying loads correctly
For correct load-carrying, the proper fixation of the shoulder blades is just as essential as during lifting of the arms. Here, however, special attention must be paid to relaxing the subclavicular part of the pectoralis major so as to avoid drawing the shoulders forward. The coordinated contraction of the interscapular muscles is also important. Once the patient succeeds in holding her shoulders back behind the body’s gravity line, the upper fixators of the shoulder girdle remain relaxed and the load being carried is not transmitted to the cervical spine (see
Figure 4.76). It is no less important to keep the head back, otherwise the shoulders are again drawn forward. It is also necessary to relax the hands when carrying something and not to actively flex the fingers, instead holding a handle by the terminal phalanges, whenever possible. In fact, the terminal phalanges flex automatically thanks to the same mechanism that enables rock-climbers to hold on to the rock face without actively flexing their fingers. This also helps to prevent epicondylopathy.
6.8.7. Breathing
The most serious fault here is
clavicular breathing in which the thorax is lifted during inhalation (see
Figure 4.78). When this occurs, the tensed scalenes take over the activity of the diaphragm, which means that the deep stabilizers are no longer able to function as they should. In this faulty breathing pattern, not only is the cervical spine constantly overloaded, but the thorax also moves away from the pelvis with every breath taken, causing the diaphragm to tilt and abolishing any fixation of the thorax from below by the abdominal wall. The first step is to restore coordinated activity between the diaphragm and the deep abdominal muscles. As preparation for this it is also helpful to relax the scalenes (see
Figure 6.94).
During
normal breathing there is eccentric contraction of the transversus abdominis as a result of the concentric contraction of the diaphragm during inhalation, which can be easily palpated at the waist and lateral abdominal wall. To teach this to the patient, the practitioner places his hands with the radial edge of his forefingers at the waist and tells the patient to apply pressure against the fingers at the waist. After a little stimulation with the hands, this will be learned in most cases. However, if this fails to work, the patient should exercise using one of the tests described in
Figure 6.140,
Figure 6.141,
Figure 6.142 and
Figure 6.143, which are designed to contract this muscle group.
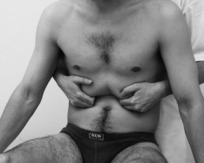
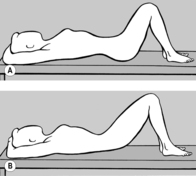
Once the patient is able to
contract the lateral abdominal wall, he is asked to lie supine. The practitioner stands at the head of the treatment table and places both hands over the patient’s lower thorax. As the thorax is usually fixed in an inspiratory position, the practitioner first mobilizes the thorax in a caudal direction during exhalation and then stimulates the lateral abdominal wall with his forefingers (see
Figure 6.155). The patient is instructed to breathe out. As he then breathes in, the practitioner uses his hands to prevent the patient’s thorax from moving cranially and simultaneously stimulates the lateral abdominal wall so that the patient feels how to fix his thorax himself using his own muscles. This process helps to coordinate the concentric contraction of the diaphragm and the eccentric contraction of the transversus abdominis in particular. After taking a few breaths, the patient will learn to fix his thorax himself using his abdominal muscles. The practitioner next insists that the patient also contracts his lower abdomen, thus preventing his navel from moving cranially and his abdomen from protruding.
Once the patient is breathing properly in the supine position, he is invited to sit on a chair. He should be erect and not leaning back, stabilizing himself with both legs in slight abduction and feet rotated externally; he can check his position in the mirror. In this position the practitioner starts by placing his hands on the patient’s waist while simultaneously checking the lower abdomen with his fingers. As soon as he notices that the patient is contracting his lateral abdominal wall and lower abdomen, and that his thorax is widening instead of lifting as he breathes in, then the practitioner places the patient’s hands on his waist so that he can feel with the radial edge of his forefingers for himself the contraction of the lateral abdominal wall and palpate with his other fingers his lower abdomen. He can also watch his clavicles in the mirror to check that these are not lifting during inhalation (see
Figure 6.156). After a few repeats, the patient will be able to perform the exercise at home in front of the mirror several times a day. After 10–14 days he should attend a follow-up appointment where the main focus will be to establish whether and how he has practiced and what still needs to be corrected. It should also be clarified whether the exercise has helped the patient. Mastery of correct breathing technique is usually associated with restoration of deep stabilizer function.
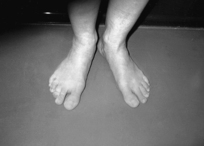
6.8.8. The feet
In our earlier discussion of the
key regions in the locomotor system, we already emphasized the absolutely crucial role played by the feet. This is reflected in the simple fact that the feet have the highest density of sensory receptors, and is also commensurate with their very significant level of representation in the sensorimotor part of the cerebral cortex. Clinically, this is manifested among other things in the unusually frequent chain reaction patterns that have their origin in the feet. It was clearly stated earlier (see
Section 4.20) that the deep stabilizers are the source of the commonest chain reaction patterns, and the same claim can be made emphatically for the feet.
The latest research findings indicate that the feet form a functional unit with the deep stabilizers, as illustrated by the following: the feet play a prominent role in maintaining balance, especially in the sagittal plane. As is well known, when we stand ‘at ease’ our muscles are constantly having to compensate for the oscillations of our body in all directions in order for us to keep our balance. If the feet are functioning well, then the greatest muscle activity occurs in the muscles of the lower legs and feet. It has also been emphasized that one of the characteristics of the deep stabilizers (e.g. the transversus abdominis or the muscles of the pelvic floor) is that we do not generally move them consciously; therefore we have to learn how to control them deliberately. A similar situation occurs with the autochthonous muscles of the foot; it is difficult consciously to accentuate the arch of the foot using the deep plantar flexors or to abduct the hallux.
However, one special characteristic of the feet – something that is not as evident anywhere else in the locomotor system – is their
tactile sensitivity and, in this connection, it is possible to use afferent impulses to achieve clinical effects. Although it is repeatedly stressed that the nervous system is an information-processing organ, our knowledge is insufficient to achieve rehabilitation. However, amazing successes in this respect have been recorded with the feet. And here, too, it can be seen especially clearly how sensitivity is linked with changes in muscle tonus (see Section
6.3). This sensitivity of the soles of the feet to exteroceptive stimuli may also be linked to the fact that the feet are shielded by footwear from a host of physiological stimuli and are suffering from constant sensory deprivation.
Functional pes planus (flat foot)
Rehabilitation per se is primarily directed at ‘functional’ pes planus, a condition in which the arch of the foot collapses during the gait cycle, irrespective of whether the foot is normal or flat in purely morphological terms. And here again it has proved useful to exploit afferent impulses. In the gait cycle, after heel-strike, the foot normally rolls first on to its lateral edge, then goes into pronation on toe-off, before completing toe-off in pronation by pushing off with the toes, especially the hallux. Therefore, if pronation occurs prematurely, that is if the foot does not remain on its lateral edge and collapses, then the patient should be instructed when walking to perceive or sense the lateral edge of the foot. If pes planus is not extreme, then the longitudinal arch will momentarily hold far better. The patient then needs to be told constantly to cultivate this ‘awareness’ when walking, regardless of whether barefoot or wearing shoes.
Functional pes planus is also commonly characterized by diminished tonus. As well as exteroceptive stimulation, gentle pressure along the longitudinal axis of the toes has also proved beneficial, that is pressure that is transmitted to the interphalangeal and metacarpophalangeal joints and constitutes a proprioceptive stimulus.
Splay foot
Splay foot is primarily a
weakness of the foot and toe flexors in terms of their postural function. Patients are generally able to flex their toes strongly without difficulty but are unable to utilize this
in the toe-off phase of the gait cycle. This is indicated by the fact that the toes are unable to perform the test devised by Véle (personal communication). For this, the barefoot patient shifts his body weight forward without lifting his heels from the floor. Normally, this movement automatically produces flexion of the toes, probably as they seek to prevent the person falling forward. Véle has shown that this reaction is absent on the lesioned side in the S1 radicular syndrome. However, it is very much more common for this sign to be positive in functional faulty movement patterns of the foot stabilizers, that is when toe flexion is absent (see
Figure 6.157). For rehabilitation, the patient learns to achieve automatic and sufficiently strong toe flexion by rocking back and forth on both feet slowly, and relaxing when rocking back. Recent experience has shown that this rocking technique is the most effective method of mobilization and relaxation for the treatment of restrictions and TrPs in the feet and of chain reaction patterns related to foot dysfunction (e.g. forward-drawn posture). This is true regardless of whether the reaction of the toes on forward rocking is abnormal or entirely normal.
This exercise, together with gait training in which the patient learns awareness of the lateral edge of the foot, eliminates TrPs and movement restrictions in the same way as when exercising the deep stabilizers of the trunk – further evidence that the feet are also a component part of the deep stabilization system.
Where
pain due to splay foot is present, it is often the metatarsophalangeal joint of the fourth toe that is worst affected, with pressure from a plantar direction being extremely painful. In these circumstances, counterstrain is often instantaneously effective: for this, the patient applies dorsal pressure on to the transverse arch of the foot at the level of the metatarsal heads, fixes the first and fifth metacarpal bones, and holds this pressure for 90
seconds. Padded shoe inserts are also effective, especially when placed under the fourth metatarsophalangeal joint.
Abductor pollicis brevis and hallux valgus
Weakness is often also detected in another postural muscle, the abductor pollicis brevis, especially if hallux valgus is developing. The patient must then learn to abduct the big toe or perform fan-wise abduction of the toes, including the little toe. This, too, is a predominantly postural function, a fact that explains why some time is generally needed before the patient masters it. However, motivation to persist should stem from the experience that active abduction brings immediate relief from the pain of hallux valgus.
Dorsiflexion
The form of weakness most commonly encountered is that involving dorsiflexion of the foot, with the big toe usually being most affected. Among a wide spectrum of possible causes, the commonest is a radicular lesion at L5. In terms of rehabilitation, it is especially effective and simple to utilize the great extent to which the big toe is represented in the sensorimotor cerebral cortex. Rather than advising patients to practice dorsiflexion as assiduously as possible, they should instead be counseled to think of their big toe as often as possible, especially when walking – even when wearing shoes.
6.8.9. The shoulder blade and upper cervical spine
The muscles which stabilize the shoulder blade play a similar role for the upper extremities to that played by the deep stabilizing system of the trunk for the lumbar spine. The most important muscles here are the lower (ascending) part of the trapezius and the caudal part of the serratus anterior. If these muscles are weak, active caudal movement of the shoulder (shoulder blade) with the patient prone does not produce the normal caudal and slightly medial movement of the inferior angle of the shoulder blade; instead the inferior angle of the shoulder blade protrudes like a hook toward the spinal column. This movement can be easily resisted if the practitioner catches the lower angle of the scapular wing between thumb and forefinger. In contrast, the normal movement in a caudal and slightly medial direction cannot be resisted at all.
Training the correct function of the lower fixators of the shoulder blade is described in Section
6.7.1 (see
Figure 6.136). The patient learns to palpate the contraction of the lower part of the trapezius, first in the position of facilitation and then sitting. The patient next trains the fixators of the shoulder blade (see
Figure 6.137). Immediately after this exercise it frequently happens that there is a marked improvement in TrPs and restrictions in the upper extremity, for example in epicondylar pain and painful shoulder. Current experience indicates that, in painful conditions of the upper extremity, the stabilizing muscles of the shoulder blade play an even greater role than the cervical spine, which itself is stabilized by the shoulder blade.
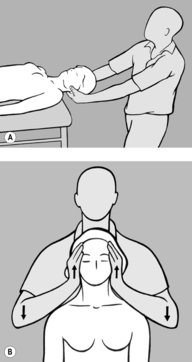
The extremely labile craniocervical junction is stabilized mainly by the short extensors and the deep flexors. In ancient times, people used to carry heavy loads on their heads, thus improving their posture. While this practice can certainly be recommended even today, it is not readily accepted. Clinical experience has shown that rapid, shaking, vertical pressure in the direction of the axis of the cervical spine with the patient upright engages the deep stabilizing system of the cervical spine and has a strong mobilizing effect on restrictions and relaxes TrPs (see Sections
6.1.3 and
6.5.6 and
Figure 6.81 C).
6.8.10. The hands
Probably the most common disorder is cramping of the hands and the hypertonus associated with it. Once again, stroking along the axis of the fingers and metacarpals is indicated here. Helpful self-treatments include wriggling the fingers in a bowl of uncooked rice or peas, or playing/exercising with a soft rubber ball.
For hypertonus of the hands, axial pressure via the fingertips is indicated, placing the interphalangeal and metacarpophalangeal joints under pressure.
6.10. Local anesthesia
Within the scope of this volume it is not possible to cover the innumerable treatment methods that employ reflex mechanisms. The method that is probably most popular is local anesthesia. As already emphasized in
Section 5.3.3, there is no essential difference between the effect of local anesthesia and of dry needling (
Frost et al 1980). The critical factor is
technique. The needle must touch the point where pain is maximal. It is not enough for the patient to feel pain; this pain must be sufficiently intense for the patient to react involuntarily, and wherever possible, the pain thus provoked should reproduce the patient’s spontaneous pain. Only when the most painful point in the pain zone is touched will needling achieve immediate alleviation (frequently elimination) of pain, affording relief that is just as intense as that of a local anesthetic, a fact that the patient can also corroborate instantly.
The advantage of dry needling is that the position of the needle can be corrected if an analgesic effect is not obtained immediately. If the most painful point is not touched by the needle in local anesthesia, the effect is considerably diminished as soon as the local anesthetic wears off.
If, however, the object is to achieve conduction anesthesia (e.g. of a painful nerve root or a peripheral nerve) or epidural anesthesia is required, then the administration of a local anesthetic is indispensable.
The treatment of TrPs involves the use of methods that employ reflex mechanisms: PIR, RI, minimal pressure, mobilization and/or manipulation of joints and often even of chain reaction patterns arising as a result of treatment of other, often remote TrPs and other dysfunctions. However, there are some TrPs that are not (or no longer) entirely reversible, where needling or traumatic massage are necessary. In such circumstances, however, needling is not so much a form of reflex therapy but more a form of traumatization (microsurgery).