9 The Shave Biopsy
Indications
The following lesions are among those that are frequently diagnosed by shave biopsy:
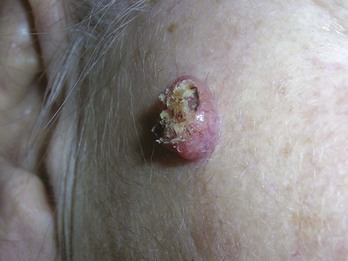
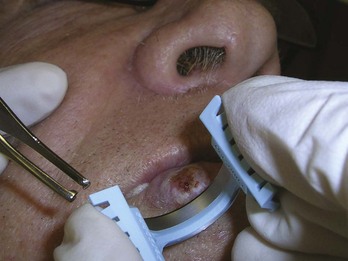
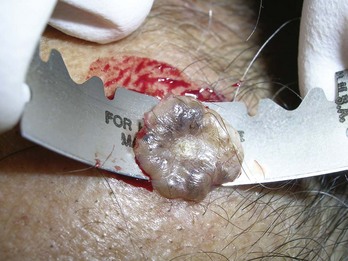
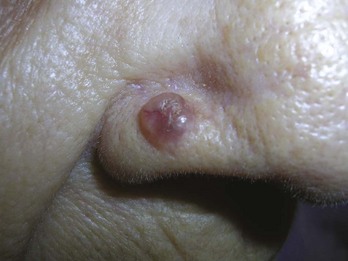
FIGURE 9-3 A keratoacanthoma on face is appropriate for a shave biopsy.
(Copyright Richard P. Usatine, MD.)
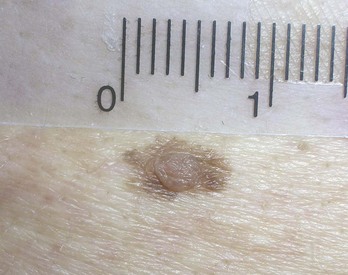
FIGURE 9-4 Dysplastic nevus can be shaved with a deep shave for diagnosis and treatment.
(Copyright Richard P. Usatine, MD.)
Shave excision can also be used to remove the following benign lesions:
Contraindications
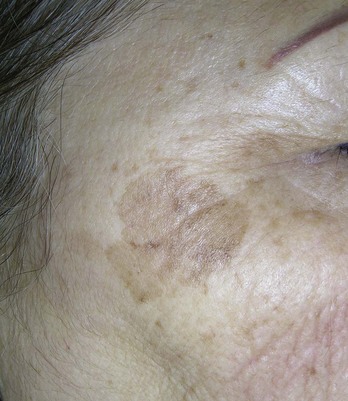
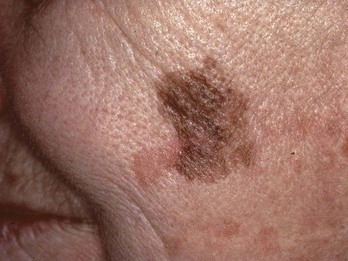
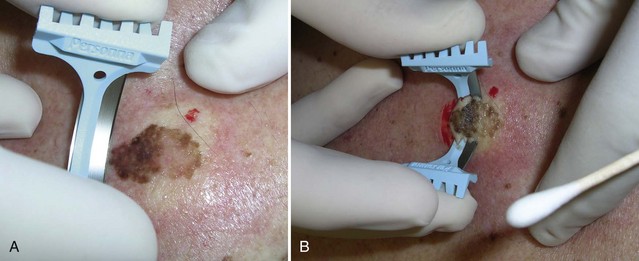
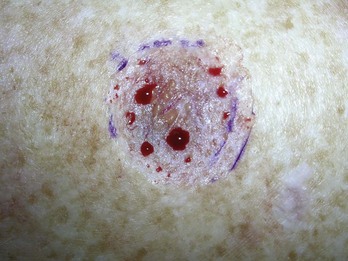
There are no contraindications for shave biopsy based on location of the lesion. The use of a shave biopsy to diagnose a melanoma is controversial with a wide range of opinions. A superficial shave biopsy of a suspected melanoma runs the risk of losing important depth information used for staging and margin determination. However, if the melanoma is thin and the shave biopsy gets below the tumor, then nothing is lost. On the other hand, if a punch biopsy is performed of a large lesion and the punch misses the area with melanoma, this false-negative result can lead to missing the diagnosis of the melanoma. Although doing a complete full-thickness biopsy of a small suspected melanoma is optimal, this may be too deforming for a large superficial pigmented lesion on the face that might possibly be lentigo maligna melanoma (LMM) but appears more consistent with a solar lentigo (Figure 9-7). A broad scoop shave biopsy of LMM (Figure 9-8) may give a better tissue sample than one or more punch biopsies and will not cause the cosmetic deformities of a large full-thickness biopsy. It is also common practice to use a broad scoop shave to remove an atypical mole suspected of being a dysplastic nevus.
Advantages of A Shave Biopsy
The following advantages of a shave biopsy benefit the patient:
A number of studies have shown the shave biopsy to produce a better cosmetic result than the punch biopsy and the fusiform diagnostic excision.1–3
Disadvantages of A Shave Biopsy
For the patient, the disadvantages of shave biopsy include the following:
A superficial shave biopsy should heal with little to no indentation of the skin.4 Deep-shave biopsies are more likely to leave an indentation. Persistence rates of melanocytic lesions for shave biopsy range from approximately 13% to 28%.5 Persistence does not always translate into regrowth. If regrowth does occur, it is important to have access to the original pathology report to avoid overdiagnosing a benign regrowth as a melanoma (pseudomelanoma). Methods useful to differentiate pseudomelanoma from melanoma include accurate clinical records of prior biopsy sites along with evidence of scarring within the current biopsy.5
Equipment
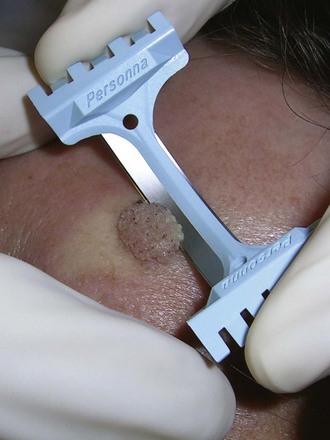
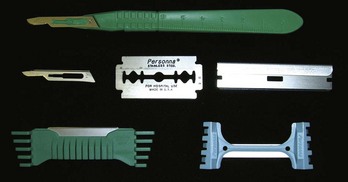
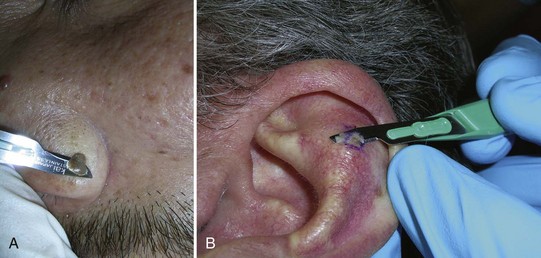
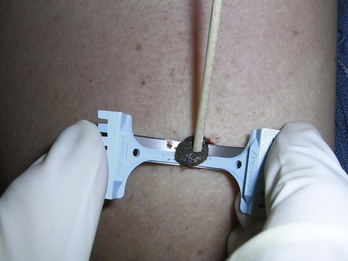
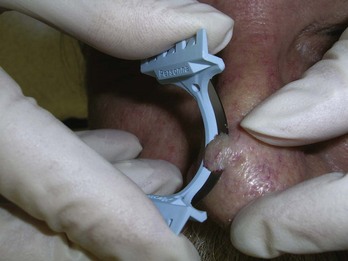
The Personna DermaBlade is an excellent razor blade for shave biopsies. The blue plastic handle makes it easy and safe to grip the sharp razor blade and control the blade for an accurate and precise shave excision. The cost of the disposable DermaBlade is about the same as a standard disposable No. 15 scalpel. Other options include the Personna or Wilkinson double-edge razor blade. The Personna (or Personna Plus with Teflon coating) double-edge blade is very sharp and can be broken in half for easy use (Figure 9-9). Although these do not come in sterile packaging, they can be safely used for shave biopsies without using the autoclave. At approximately 15 cents per cutting blade (30 cents per two-sided blade), these are the most cost-effective tool for shave biopsies. They can be broken in half within their paper container to avoid cutting your hand prior to use. It might take some more time to get used to the bare blade, but once you have mastered its use, you will find this type of low-cost blade to be sharp and effective.
Miltex produces a BiopBlade flexible scalpel for shave biopsies. Its design is similar to that of the DermaBlade, using a single-edge razor blade with a plastic bendable handle. It is currently more expensive than the DermaBlade and has no advantages over the DermaBlade. The plastic handle can snap in half if the blade is bent incorrectly. The Personna single-edge razor blade is too rigid for shave biopsies. All of these blades (Figure 9-10) are available for purchase through Delasco (www.delasco.com) and some can be purchased through other suppliers.
Shave Biopsy: Steps and Principles
Three critical steps in the shave biopsy include:
Preoperative Measures
Cutting the Shave Biopsy
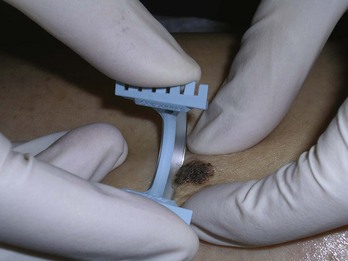
Using a Razor Blade
Using a Scalpel Blade
Snip Excision with Scissors
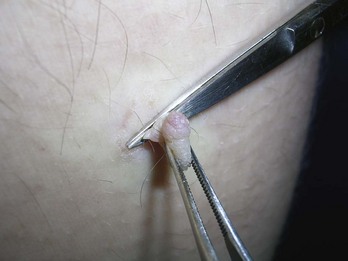
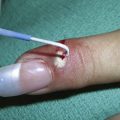
Another variation of the shave excision for small raised lesions is the snip excision performed with sharp scissors (Figure 9-14). Anesthesia and hemostasis are executed in the same manner as for the other types of shave excision. The only difference is that the lesion is snipped off with sharp scissors rather than shaved with a blade. Lesions particularly amenable to snip excision are skin tags, small warts, and polypoid nevi. We recommend using a good pair of sharp iris scissors (straight or curved). Small lesions may be snipped without anesthesia, but larger lesions should be anesthetized with 1% lidocaine and epinephrine. The lesion is grasped with forceps and cut at the base with the scissors. The crushing effect of the scissor on the soft tissue helps to prevent bleeding. Additional hemostasis can be achieved with aluminum chloride or electrosurgery.
Electrosurgical Shave
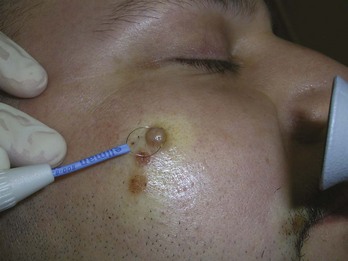
A loop electrode may be used to perform an electrosurgical shave (Figure 9-15). The loop electrode can be used to feather the remaining tissue and sculpt a nice result. One downside is that there will be burn artifact on the biopsy specimen. Also, if the lesion is caused by human papillomavirus (HPV), there is a very small risk of transmission of the HPV by the plume. Whether the instrument is set on cut only or cut and coag, it is important to not use too much power, which can result in unnecessary tissue destruction leading to increased scarring. (Also see Chapter 14, Electrosurgery.)
Scoop Shave (Deep-Shave Saucerization Technique)
A saucerization technique involves the removal of the lesion using a deep shave or scoop technique with 1 to 2 mm of surrounding normal skin laterally and extending into the deep dermis (Figure 9-16).5 For thin and small-diameter melanocytic lesions, a scoop shave can remove the entire lesion.5 The National Comprehensive Cancer Network (NCCN) recommendations suggest deep-shave biopsies be used when the index of suspicion for melanoma is low.5 However, a deep-shave biopsy can also be performed for suspected melanoma in certain circumstances (see Chapter 8, Choosing the Biopsy Type).
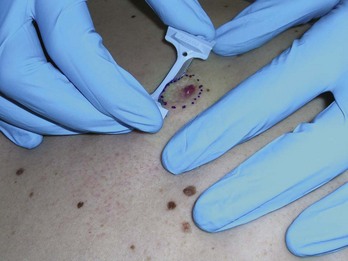
FIGURE 9-16 Scoop shave of a dysplastic nevus that was not fully excised with the initial shave.
(Copyright Richard P. Usatine, MD.)
A pigmented lesion on the back suspected to be a superficial spreading melanoma can be easily and safely biopsied with a deep-shave approach (Figure 9-17). The scoop shave using a razor blade of the thickest pigmented area produces a good specimen for diagnosis of melanoma. (Breslow’s thickness of 0.6 mm was obtained in Figure 9-7.) In Figure 9-17 note how the shave went completely under the pigment and the depth information was not lost. If pigment were to be found below the shave, a deeper shave or full-thickness incisional biopsy could be performed of the remaining lesion.
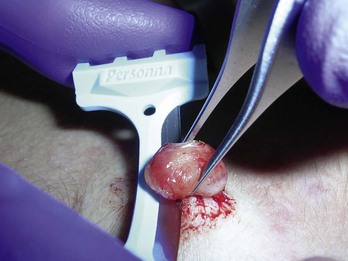
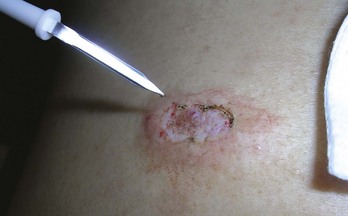
When performing a deep scoop shave to remove a nonmelanoma skin cancer, it is appropriate to cut down deep enough so that small fat globules will be visible (Figure 9-18). If all margins are clear this can serve as the definitive treatment for less aggressive nonmelanoma skin cancers such as superficial or nodular BCCs (not sclerosing) or SCC in situ. This method is not recommended for skin cancers larger than 2 cm or in danger areas around vital structures. Definitive treatment for invasive SCC and melanoma should include a full-thickness excision with appropriate margins. As with all skin cancers, regular examinations need to be done to investigate for recurrence and new cancers. A shave excision of any depth should never be the definitive surgery to treat a melanoma.
Stabilization Techniques
Lesions should be stabilized during the shave biopsy to maximize the control during cutting. In Figure 9-19, forceps are used, and in Figure 9-20, the skin is pinched because the lesion is very flat. Note how the fingers of the nondominant hand are kept in the biopsy area to provide gentle countertraction and to stabilize the tissue. On certain areas of thin skin near vital structures such as the eye or hand, it may be necessary to pinch and elevate the surrounding skin with one hand while doing the biopsy with the other. The end of a CTA is useful for preventing the lesion from flipping over near the final portion of the cut (Figure 9-21). Raising a flat lesion with anesthetic just prior to excision can help stabilize the lesion but may increase the risk of indentation. Regardless of which method is used, it is important to not pull up on the lesion to avoid creating an unintended deep indentation.
Hemostasis
After the biopsy, blot the site with a dry cotton-tipped applicator or gauze to remove any pooled blood. Then roll and twist another CTA that has been dipped in aluminum chloride back and forth over the site. Apply downward pressure with the twisting applicator to stop the bleeding (Figure 9-12C). It is important to not leave wet blood in the field because this will dilute the aluminum chloride and minimize its effectiveness. Monsel’s solution (ferric subsulfate) may be used instead of aluminum chloride but it has a slight risk of tattooing the skin. If chemical hemostasis does not stop the bleeding or if it is desirable to destroy any remaining tissue then electrosurgery may be used (see Chapter 4, Hemostasis).
Remaining Tissue after Shave Biopsy
Remaining tissue is often found at the trailing edge of the lesion where the blade finished the shave. First obtain hemostasis and then cut the remaining tissue off with your blade. If the tissue is too small to stabilize for a second cut, options to remove the remaining tissue include scraping with the blade perpendicular to the skin or using a curette or electrodesiccation (Figure 9-22). If using electrodesiccation, the charred tissue may be left alone or wiped away with a moist gauze pad or a curette.
Aftercare
After the procedure is complete, place a small amount of clean petrolatum and an adhesive bandage over the biopsy site and give the patient wound care instructions. See the patient handout titled Care of Your Skin after a Shave Biopsy in Appendix A.
Pathology and Follow-Up
If the lesion turns out to be nonmelanoma skin cancer (NMSC), definitive treatment will be necessary unless the original biopsy was deep and the pathologist unambiguously states that there are clear margins. If you intend to remove a whole BCC or SCC in situ with a shave excision using a deeper and broader approach, and your pathologist reports clear margins, you may give the patient the choice to not have additional surgery. Always perform full-thickness excisions for sclerosing, micronodular or infiltrating BCCs and invasive SCC (see Chapter 34, Diagnosis and Treatment of Malignant and Premalignant Lesions).
Suggestion for Learning the Shave Biopsy Technique
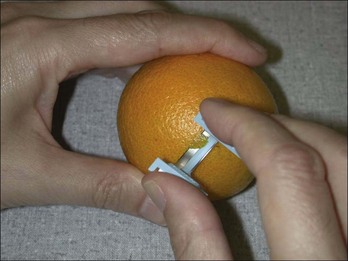
When learning the shave biopsy technique, it may be helpful to practice on an orange. Use a razor blade or No. 15 blade and attempt to remove portions of the outer skin without encroaching on the underlying pulp (Figure 9-23). Practice performing the shave at different depths and sizes.
Less Than Optimal Outcomes
Infections are rare complications of shave biopsies.
Expected but less than optimal outcomes that often occur after shave biopsies include the following:
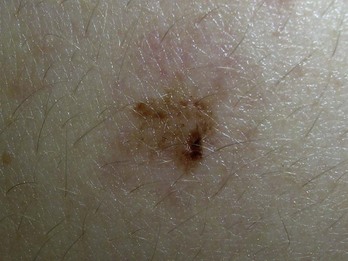
FIGURE 9-26 Pigment that returned after the shave biopsy of an intradermal nevus.
(Copyright Richard P. Usatine, MD.)
Serious complications are extremely rare after a shave biopsy.
Cosmetic Results
Gambichler et al.4 examined the cosmetic outcome of macular melanocytic lesions utilizing the deep-shave biopsy technique with a razor blade followed by chemical hemostasis. During routine skin cancer screening 45 patients with 77 macular melanocytic nevi were prospectively recruited. Histologically, 88% of the melanocytic lesions were described as completely excised and 60% were diagnosed as atypical melanocytic nevi. At 6 months, 56 sites were available for evaluation and mild hypopigmentation was observed in 52%, hyperpigmentation in 32%, and erythema in 23%. Recurrent nevi occurred in 13% at 6 months. The evaluation of the cosmetic outcome by the patients was better than the evaluation by the physician.4
In another prospective study, shave excision of 204 common acquired melanocytic nevi was performed.6 Mid-dermal shave biopsies were performed using a No. 15 blade followed by gentle electrocoagulation. Three months after surgery, cosmetically excellent results occurred in 33% of the patients, acceptable results in 59%, and poor results in 8% as assessed by two dermatologists. The likelihood of having an imperceptible scar was significantly greater in lesions excised from the face. Of 192 patients surveyed, 98% stated that “the scar looked better than the original mole” and would undergo the procedure again. Clinical and dermatoscopic recurrences were observed in 19.6% of the scars.6
Additional Examples for Shave Biopsy
Basal Cell Carcinomas
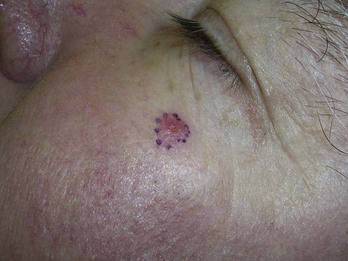
In Figure 9-27, a shave biopsy is preferred on the nasal ala rather than a punch biopsy. After the diagnosis was made, this patient was referred for Mohs surgery. One study showed that specimens from punch and shave biopsies of suspected BCCs produced equivalent diagnostic accuracy rates: 80.7% and 75.9%, respectively. Either biopsy technique is appropriate for a BCC.7 The woman in Figure 9-28 has had multiple BCCs and had chosen to have a shave excision of a small BCC on her cheek. A previous biopsy had proven the diagnosis and she wanted less invasive surgery than a full elliptical excision. The margins were clear and the area healed with minimal scarring.
Pyogenic Granuloma
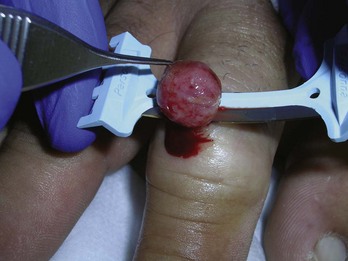
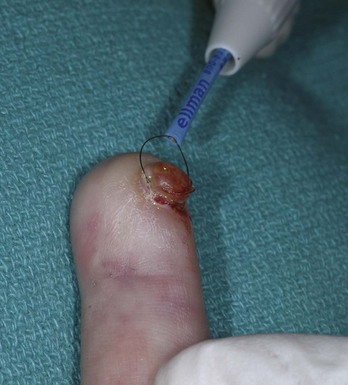
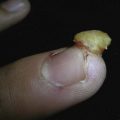
Most pyogenic granulomas are easy to distinguish based on their clinical appearance and behavior. The rare amelanotic melanoma can appear similar to a pyogenic granuloma. Thus, it is best to send all suspected pyogenic granulomas for histologic confirmation. The easiest way to do this is to do an initial shave excision before performing ED&C of the base of the pyogenic granuloma. In Figure 9-29 an electrosurgical loop is being used for the initial shave biopsy. This could easily be done with a razor blade. Most importantly the remaining tissue is curetted and the base is treated with electrodesiccation. See Chapter 33, Procedures to Treat Benign Conditions.
Psoriasis
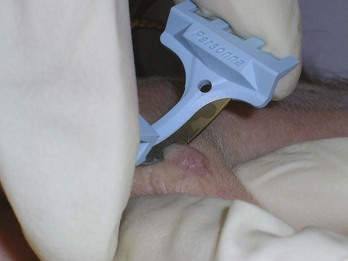
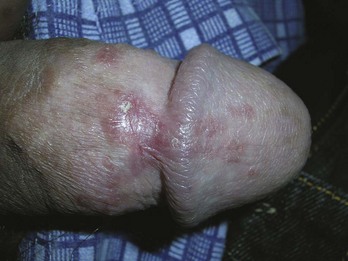
Psoriasis is frequently a diagnosis made on clinical appearance and history only. Sometimes psoriasis presents in an atypical pattern and a biopsy is needed to make the diagnosis. The patient in Figure 9-30 developed a rash on his penis and had no other skin findings. A shave biopsy of the lesion allowed the diagnosis of psoriasis to be made. While a punch biopsy would have provided adequate tissue, greater risks are involved in a punch biopsy of the penis. Having a definitive diagnosis was helpful to guide treatment of this disturbing eruption.
Coding and Billing Pearls
CPT codes and fees for shave biopsies are summarized in Table 38-7 of Chapter 38, Surviving Financially. Note that, although these codes cover shave biopsies, they also cover biopsies done by punch or curette. The codes are based on location only and not on the size of the biopsy or lesion. The codes are also independent of whether the lesion turns out to be benign or malignant, so there is no need to wait for the pathology result to submit the bill.
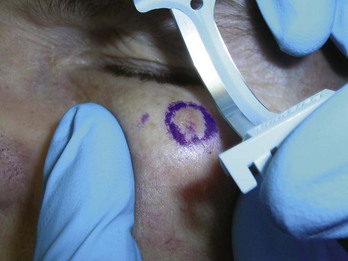
Selected CPT codes and fees for shave excisions are provided in Table 38-10 of Chapter 38. These codes are based on size and location, so it is crucial to measure the lesion before excising it. Do not estimate the size later because estimates are usually rounded to the nearest centimeter and the reimbursement goes up 0.1 cm above each rounded number (e.g., payment is greater for a shave excision of a 1.1-cm lesion than a 1.0-cm lesion). Location also matters but these codes are generally used for benign lesions rather than skin cancers. Most skin cancers will be excised deeply or destroyed and there are codes specific to these procedures on malignant lesions.
1. Grabski WJ, Salasche SJ, Mulvaney MJ. Razor-blade surgery. J Dermatol Surg Oncol. 1990;16:1121-1126.
2. Harrison PV. Good results after shave excision of benign moles. J Dermatol Surg Oncol. 1985;11:668. 686
3. Hudson-Peacock MJ, Bishop J, Lawrence CM. Shave excision of benign papular naevocytic naevi. Br J Plast Surg. 1995;48:318-322.
4. Gambichler T, Senger E, Rapp S, et al. Deep shave excision of macular melanocytic nevi with the razor blade biopsy technique. Dermatol Surg. 2000;26:662-666.
5. Tran KT, Wright NA, Cockerell CJ. Biopsy of the pigmented lesion—when and how. J Am Acad Dermatol. 2008;59(5):852-871.
6. Ferrandiz L, Moreno-Ramirez D, Camacho FM. Shave excision of common acquired melanocytic nevi: cosmetic outcome, recurrences, and complications. Dermatol Surg. 2005;31:1112-1115.
7. Russell EB, Carrington PR, Smoller BR. Basal cell carcinoma: a comparison of shave biopsy versus punch biopsy techniques in subtype diagnosis. J Am Acad Dermatol. 1999;41:69-71.

