[level-membership-for-internal-medicine-category]
Chapter 21 The Musculoskeletal System
Generalities
This is a difficult area of physical exam, but one necessary in ambulatory medicine and often rewarding. One of 10 patients presenting to a primary care office will do so because of musculoskeletal complaints. Most of these can be diagnosed through a thorough exam, specific maneuvers (Table 21-1), and a proper knowledge of joints’ anatomy and physiology.
| Joint | Problem | Maneuver |
|---|---|---|
| Shoulder | General | Painful arc sign |
| Acromioclavicular (AC) arthritis | Cross-body and cross-arm maneuvers | |
| Bicipital tendinitis | Yergason’s and Speed’s tests | |
| Rotator cuff pathology | Gerber’s lift-off test, drop arm test, empty can test | |
| Impingement | Neer (impingement) and Hawkins-Kennedy tests | |
| Anterior shoulder instability | Apprehension and Jobe’s relocation tests | |
| Inferior shoulder instability | Sulcus sign | |
| Glenoid labral tears | O’Brien’s and anterior slide tests | |
| Elbow | Cubital tunnel syndrome | Elbow flexion test |
| Wrist | Carpal tunnel syndrome | Tinel’s sign, Phalen’s sign, flick sign |
| Rheumatoid arthritis | Piano key sign | |
| De Quervain’s tendinitis | Finkelstein test (positive) | |
| Intersection syndrome | Finkelstein test (negative) | |
| Hand | Interosseous tightness versus capsular contraction | Bunnel-Littler test |
| Hip | General | FABER maneuver |
| Knee | Patellofemoral syndrome | Patellofemoral grinding test |
| Effusion | Bulge sign, patellar ballottement, fluid wave test | |
| Anterior cruciate ligament | Lachman’s test, anterior drawer test, lateral pivot shift test | |
| Posterior cruciate ligament | Posterior drawer test, tibial sag test | |
| Meniscal tears | Medial-lateral grind test, McMurray’s test, Apley’s grind and distraction test | |
| Ankle | Anterior talofibular tear | Anterior drawer test |
| Anterior talofibular/calcaneofibular tear | “Talar tilt” test | |
| Tibiofibular syndesmosis | “Squeeze” test | |
| Tarsal tunnel syndrome | Submalleolar tap |
8 What is the significance of articular warmth and erythema (calor and rubor)?
They indicate pathology, too. Normal joints should be cooler than the surroundings and not red.


A. The Shoulder
15 Describe the muscles and tendons of the shoulder
 The rotator cuff consists of four muscles: supraspinatus, infraspinatus, teres minor, and subscapularis (mnemonic, SITS). Their tendons converge on the humerus, thus allowing for most of the joint movements (abduction of the arm and rotation of the shoulder, both internal and external). They also hold the humeral head in the glenoid cavity, thus stabilizing the joint.


16 What are the shoulder’s movements? How do you test its ROM?
 Abduction: Ask patients to raise the arms laterally and away from the body: first, to the level of the shoulder and with palms facing down (90 degrees of glenohumeral motion), and then above the head and with palms facing each other (another 90 degrees, of which 60 degrees are scapulothoracic motion and 30 degrees are combined glenohumeral and scapulothoracic). Normal individuals should complete a smooth 180-degree arc. Average, however, is a little less (150 degrees).


17 What areas of the shoulder girdle should be palpated?


19 What is the general approach to the shoulder exam?
1. Inspect for scars, color, edema, deformities, muscle atrophy, asymmetry, and guarding.
2. Palpate for pain or point tenderness (the presence of either narrows the exam):
 Bony and soft-tissue structures, such as coracoid process, acromioclavicular joint, greater tubercle


3. Assess active and passive ROM, especially in regard to elicited pain and reduced movement.
4. Determine muscle strength. This is an essential part of the exam, and comparing side to side may help you locate the area of concern. Always carry it out with and without resistance. To isolate the various muscles, use the following maneuvers:


20 What is the shoulder pad sign?
A sign of bilateral shoulder effusions. Very typical of amyloidosis.
21 What are the most common musculoskeletal causes of shoulder pain?

 Impingement (with its complications of tendinitis and rotator cuff tears)


Hence the mnemonic, “Basically I Test Religiously For Damaged Objects.”
23 In addition to history, how else do you identify referred shoulder pain?
By its being typically nondescript, poorly localized, and not reproducible on shoulder exam.
28 What are the symptoms/findings of bicipital tendinitis?
Achy anterior shoulder pain, worsened by overhead activity, lifting of heavy objects, and elevated pushing/pulling. Rest is usually beneficial, whereas flexion of the elbow against resistance is detrimental. Pain is vague, though at times it may become localized to the anterior humerus. On exam, there is point tenderness over the bicipital groove, which is the area where the long tendon is anatomically exposed. This lies 3 inches below the anterior acromion and may be best localized by holding the arm in 10 degrees of external rotation. Pain also can be elicited by passive abduction of the arm in a painful arc maneuver (see question 41), which is typical of impingement syndrome, although at times it also may be positive in patients with isolated biceps tendinitis.
29 Which specific maneuvers can reproduce the pain of bicipital tendinitis?
Maneuvers that resist the normal function of the biceps—supination and flexion of the forearm:
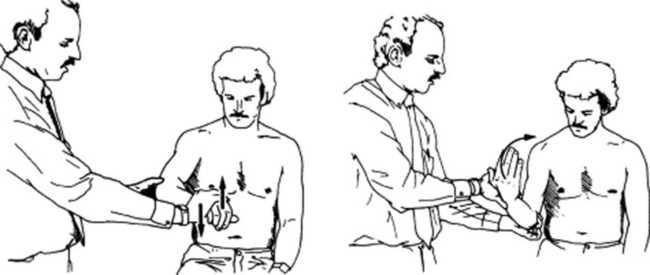
 Yergason’s test: The hand is pronated, the elbow flexed to 90 degrees, and the shoulder in adduction (i.e., arm against the body). With the patient attempting supination of the forearm (i.e., palm up), you resist with one hand while with the other you press on the bicipital tendon. The test is positive when it elicits pain and tenderness over the bicipital groove.

33 How do you diagnose rotator cuff tendinitis?
 The supraspinatus is the most important and most commonly damaged of the four. It links the top of the scapula to the humerus, inserting into its greater tuberosity. It is partially responsible for arm abduction (the initial 15–30 degrees are actually produced by the deltoid, the next 60 degrees by the supraspinatus, and the final 90 degrees by the deltoid again). Hence, inflammation of the supraspinatus tendon leads to pain at 30–90 degrees of abduction, as the humerus impinges the tendon against the acromion. It can be easily tested through the empty can test.


Note that given the anatomic closeness of the long head tendon of the biceps (which passes down the bicipital groove in a fibrous sheath between the subscapularis and supraspinatus tendons), patients with rotator cuff disease also may have biceps tendinitis (see questions 27 and 28).
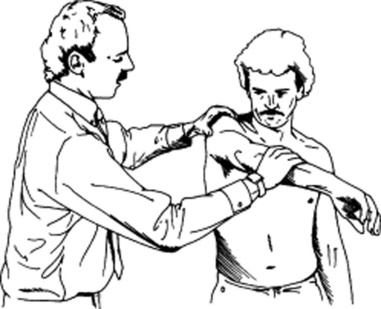
38 How do you perform the Neer (impingement) test?
The patient’s forearm is internally rotated, so that the thumb points downward. While standing behind the patient, place one hand on the patient’s scapula and with the other hand grasp the forearm and forward flex it, eventually positioning the patient’s hand over the head. Forced elevation and internal rotation of the arm cause the greater tuberosity of the humerus to compress the subacromial bursa. This, in turn, squeezes the supraspinatus tendon against the acromion, causing pain in cases of impingement. The test also can differentiate AC arthritis from subacromial bursitis (Fig. 21-1).
49 How do you test for glenohumeral instability?
It depends on the type of instability: anterior versus inferior.
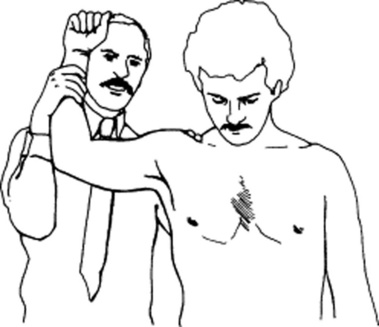
50 How do you test for anterior shoulder instability?
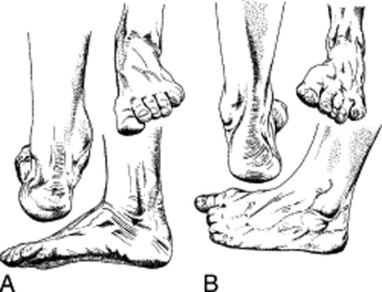
Through the apprehension and Jobe’s relocation tests. Start with “apprehension” (Fig. 21-2). To perform it, ask patients to lie supine, with the affected shoulder just off the examining table. Grasp the elbow with one hand, and gently bring the arm to 90-degree abduction and 90-degree external rotation. Then push with your other hand on the posterior aspect of the humeral head, from back to front. Anterior shoulder instability will give a feeling that the arm is about to pop out of the joint. At the same time, patients will experience pain, apprehension, and guarding. In the original series of Rowe and Zarins, all 60 cases of anterior shoulder instability had a positive apprehension test. If the patient experiences pain and/or apprehension, move on to the second part of the maneuver: the Jobe’s relocation test. This is performed in the same position, but this time by pushing on the anterior aspect of the humeral head, from front to back, as if relocating a glenohumeral joint that had been partially dislocated by the apprehension test. Patients with primary impingement will have no change in pain, whereas those with anterior instability (subluxation) and secondary impingement will have relief of pain and/or apprehension. When relying primarily on relief of apprehension, the relocation test has sensitivity for anterior instability of 68%; specificity, 100%; positive predictive value, 100%; negative predictive value, 78%; and accuracy, 85%.
57 What is the mechanism of adhesive capsulitis?
Inflammation, which “glues” the capsule and surrounding structures into a frozen shoulder.
B. The Elbow
62 What do valgus and varus mean?
This is a very confusing terminology. In orthopedics, valgus indicates an outward angulation of the “distal segment” of a bone or joint, so that it is “twisted away” (i.e., away from the body, or midline of the limb). Conversely, varus indicates its inward angulation (so that it is now twisted toward the body, or midline of the limb). Note that both terms always refer to the direction in which the distal segment of the joint (or bone) is pointing. In fact, when referred to as a bone, the bone itself is considered to be the distal segment of the joint. Hence, a varus or valgus deformity of the forearm refers to the arm/forearm joint (the elbow) and not to the wrist. Having said that, a normal elbow is in valgus, because with the joint fully extended (and the palms facing upward) the distal segment of the forearm will point away from the body (or midline of the limb). If you think this is confusing, wait until you see how it applies to the knee exam (see question 213).
68 What is “golfer’s elbow” (medial epicondylitis)?
An overuse injury to the proximal attachment of the flexor/pronator muscles of the forearm, commonly seen in the dominant elbow of a golfer. Its mechanism is similar to that of lateral epicondylitis, but less common since wrist flexors are stronger and less likely overstressed (see Fig. 21-3).
C. The Wrist
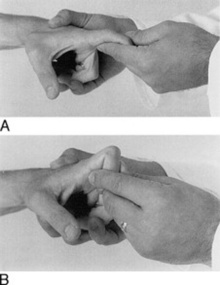
84 What is the physical exam of CTS?
Once the appropriate history is obtained, two maneuvers are typically carried out: Tinel’s sign and Phalen’s sign (first described by the American orthopedist George S. Phalen, 1911–1998) (see Fig. 21-4).
D. The Hand
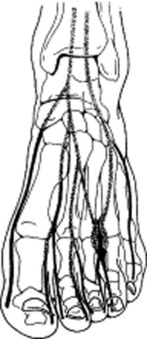
104 What is the nerve supply of the hand?


105 How can you differentiate ostheoarthritis from rheumatoid arthritis (RA)?
By the pattern of involvement in the small joints of the hand.
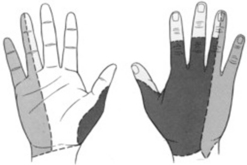
 Rheumatoid arthritis (RA) is a symmetric process, affecting metacarpophalangeal (MCP) and proximal interphalangeal (PIP) joints, but typically sparing the distal interphalangeal (DIP) joints. It is often associated with lateral (ulnar) deviation of the fingers.
 Osteoarthritis (OA) is instead asymmetric, affecting the DIP and PIP, without involving the MCP.
106 Describe the typical deformities of rheumatoid arthritis


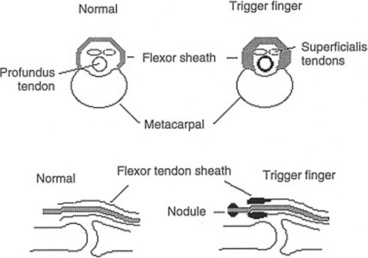
107 What is a trigger finger?
The most common entrapment tendinitis, 20 times more frequent than de Quervain’s. It is a painful condition characterized by locking of the affected finger in flexion (Fig. 21-6). This is usually due to tenosynovitis of the flexor tendon to the digit (hence, its term of flexor tendinitis) resulting in palpable swelling of the tendon itself, often nodular. Alternatively, it may be due to inflammation and swelling of the sheath surrounding the tendon. Either way, the tendon becomes unable to glide smoothly through the sheath. Hence, whenever the patient forces the finger to bend, there may be a painful snap as the tendon passes through the thickened portion of the sheath into its final flexed position. Then, given its inability to glide back into the sheath, the tendon will stay flexed. With more vigorous attempts, either by increased force from the finger extensors or by application of an external force (such as use of the other hand), the finger will eventually extend, usually with another (and often painful) snap as the tendon passes back through the thickened portion of the sheath—like a trigger being pulled and released. Yet, in more severe cases the finger will remain locked. Women are more affected than men, especially musicians, writers, gardeners, and hobbyists, since all these occupations require repetitive gripping actions. Treatment varies, depending on the severity of the condition, ranging from rest, to medications, to surgery.
109 What other typical deformities can be seen in the hand?
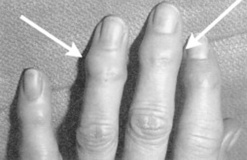
 Mallet finger (or deformity): This is the inability to fully extend the DIP joint, with some degree of resting flexion. It results from injury to the long extensor tendon, causing tendinous lengthening during healing and permanent flexion of the distal phalanx (Fig. 21-7).
 Heberden’s nodes: Bony enlargement at the DIP joints; typical of osteoarthritis
 Bouchard’s nodes: Bony enlargement at the PIP joints; typical of osteoarthritis

110 What are Heberden’s nodes?
They are painless nodules on the distal interphalangeal joints (Fig. 21-8). These may involve one or more fingers, but typically spare the thumb. The overlying skin is normal, and the nodes are hard, 2–3 mm in diameter, not interfering with fingers’ movement, twin in presentation, and typically located on the lateral and medial dorsal surface of the DIP (if affecting the PIP, the nodes are instead called Bouchard’s). Both reflect localized osteoarthritis. Hence, they are more common in the elderly. Involvement of a single joint is more prevalent in men, whereas multiple involvement is more frequent in women, where the condition is usually postmenopausal and hereditary.
111 Who were Heberden and Bouchard?
 William Heberden (1710–1801) was an English physician, who studied in Cambridge and practiced in London at the local university. A devout Christian, he was a leading Latin and Hebrew scholar, referred to by Samuel Johnson as “the last of the Romans” (“Dr. Heberden ultimus Romanorum—the last of our learned physicians”). In fact, his reputation as the master clinician of his times eventually gained him a position at the court of King George (the same “mad George” who lost the American colonies) as personal physician to the Queen. He was only 51. His contributions to medicine are indeed staggering, including the aforementioned nodules but also classic descriptions of angina, chickenpox, and night blindness. A lifelong sufferer from gout (which he described masterfully in his “Commentaries on the History and Cure of Diseases”), Dr. Heberden was also able to recognize that his eponymous osteoarthritic nodes (“digitorum nodi”) were not gouty in origin. In Chapter 28 of the “Commentaries” he wrote:

114 What are tophi?
They are deposits of uric acid (tophus is Latin for a calcareous deposit from springs, tufa). These can occur over the ears, feet, and hands of gouty patients. In the hands, they are pathognomonic of the disease (Fig. 21-9), even though they often get confused for rheumatoid nodules.
118 What is the shape of the hand in acromegaly?
Spade-like. Due to enlargement of the distal parts of the body—acromegaly’s defining feature.
122 What is the significance of calluses and abrasions on the dorsal aspect of the fingers?
They are an important clue to bulimia, due to trauma by the teeth during the induction of vomiting.
126 What is a sausage digit?
It is the inflammation of a whole digit, giving it a diffusely swollen appearance. A sausage-shaped swelling of a toe or finger (i.e., dactylitis, from the Greek daktulos, finger) can be quite painful. When unassociated with trauma, it is usually caused by tenosynovitis, and often periostitis as well as arthritis. It is frequently seen in seronegative arthritis, typically psoriatic, but also sarcoid–related. In psoriasis, it is often associated with pitting of the fingernails (see Chapter 3, questions 20–22.
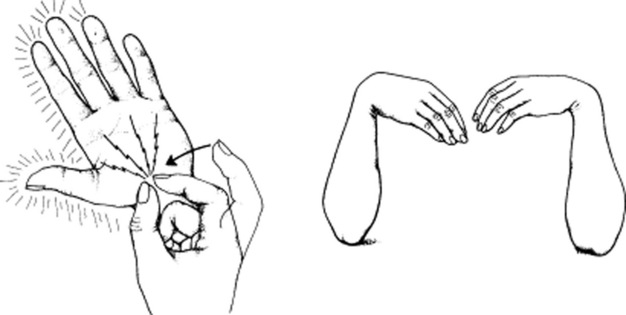
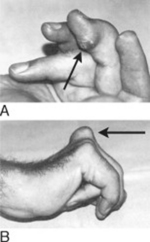
128 Describe the Bunnell-Littler test
It is a test for patients with difficulty flexing the PIP joint, since it can differentiate interosseous tightness from capsular contraction. To carry it out, ask patients to hold the MCP joint in a few degrees of extension, and then flex their PIP joint. If unable to do so, have them place the MCP in flexion, and then reattempt PIP flexion. Those with capsular contraction will not flex the PIP at all, whereas those with interosseous tightness will flex it by using the second maneuver (Fig. 21-10).
130 What is a paronychia? A felon?


E. The Head and Neck
135 What is torticollis?
An involuntary rotation of the head to one side. Due to spasm of the cervical musculature.

F. The Thoracic Spine
140 What is the most common type of spinal deformity?
It is adolescent idiopathic scoliosis, a strongly familial condition of unknown etiology.
141 Describe the difference between scoliosis and kyphosis
 Viewed from the side, a normal spine has an anterior convexity in the neck and lower trunk (lordosis), with an interposed anterior concavity in the upper trunk (kyphosis). Certain amounts of thoracic kyphosis (25–40 degrees) and cervical/lumbar lordosis are indeed normal and in fact necessary for appropriate trunk balance over the pelvis. Excessive misalignment, however, reflects abnormal kyphosis or lordosis, or more commonly both. Hence, a pathologic kyphosis is one associated with an excessive anterior concavity of the thoracic spine, and a compensatory lordosis of the lumbar segment, often resulting in a protruding belly.

145 How do you measure chest expansion?
Place a tape measure around the chest at the nipple line; ask the patient to first inhale to forced maximal inspiration and then exhale forcefully. The difference in circumference between maximal inspiration and expiration is the chest expansion, normally 5 cm (see Chapter 13, questions 60, 61, 152, and 153).
G. The Lumbar Spine
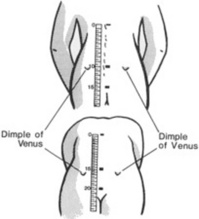
150 What is Schober’s test?
It is a bedside assessment of lumbar spine flexibility. It measures the degree of lumbar forward flexion, as the patient bends over while attempting to touch the toes (Fig. 21-11). It is carried out as follows: with the patient standing up straight, draw a line at the level of the posterior iliac spine. This corresponds to L5/S1 (i.e., the dimples of Venus, DV). Place a mark on the spine 5 cm below this line and another 10 cm above the line, so that the distance between the two is 15 cm. Then instruct the patient to touch his or her toes (i.e., to maximally flex forward the lumbar spine). If the increase in distance between the marks is <5 cm, the patient has reduced lumbar flexion—an early sign of ankylosing spondylitis in young individuals and degenerative disease in older ones.
154 How are radicular symptoms reproduced in patients with spinal stenosis?
By asking the patient to either extend maximally the lumbar spine or flex it laterally.
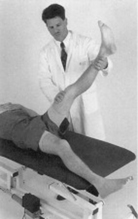
158 What is the Lasègue test? How is it performed?
Lasègue is the straight-leg raising (SLR) test (Fig. 21-12), a maneuver aimed at detecting lumbosacral nerve root irritation/compression, as in patients with disk prolapse and sciatica. To carry it out:


163 How else can one separate organic from nonorganic back pain?
By the Waddell’s signs. In 1980, Waddell et al. reported eight signs (referred to as behavioral signs) that in a prospective study of 26 findings in 350 patient evaluations were consistently capable of identifying non-organic back pain (Table 21-3).
| Sign | Positive Finding* |
|---|---|
| Superficial tenderness | Skin discomfort on palpation |
| Nonanatomic tenderness | Tenderness that crosses multiple somatic boundaries |
| Axial loading | Report of low back pain |
| Simulated rotation | Report of back pain |
| Distracted straight-leg raise | Report of pain in low back or posterior thigh; lessening of pain with continued leg raising; severe pain at 10-degree flexion in patient with no apparent disability |
| Regional sensory change | “Stocking” or global distribution of numbness |
| Regional weakness | Sudden, uneven weakness (e.g., “cogwheeling,” “dithering”) in patient with normal strength on muscle testing |
| Overreaction to examination | Exaggerated, non-reproducible response to stimulus (grimacing, sighing, guarding, bracing, rubbing) |
* The predictive value is greatly improved when three or more positive signs are present.
(Adapted from Waddell G, McCulloch JA, Kummel E, et al: Nonorganic physical signs in low-back pain. Spine 5:117?125, 1980; and from Main CJ, Waddel G: Behavioral responses to examination: A reappraisal of the interpretation of nonorganic signs. Spine 23:2367?2371, 1998.)
169 What is the most common site of disk herniation?
The L5–S1 interspace. Due to thinning of the posterior longitudinal ligament as it extends caudally.
171 In a nerve root syndrome, can you separate impingement from inflammation/irritation?


172 What are the physical findings of patients with low back pain?
They vary from patient to patient. Focus your exam on:
 Lumbar range of motion: Assess this in flexion (Schober’s test), extension, lateral bending, and rotation. ROM is usually painful and limited, especially into flexion; however, extension also may be restricted and painful.


 Straight-leg raising test: Carry this out both in supine and seated positions.

 Gait: To test S1, ask ambulatory patients to walk on their toes. Gait should otherwise be normal.

 Pelvic examination: Only in women complaining of menstrual abnormalities or vaginal discharge.

| Nerve Root | Motor Exam | Functional Test |
|---|---|---|
| L3 | Extend quadriceps | Squat down and rise |
| L4 | Dorsiflex ankle | Walk on heels |
| L5 | Dorsiflex great toe | Walk on heels |
| S1 | Stand on toes | Walk on toes (plantarflex ankle) |
173 What are the physical findings of patients with a true herniated disk?


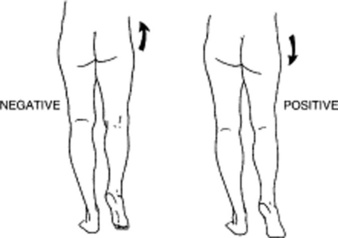
176 What is the Trendelenburg’s sign?
A sign of weakness of the gluteus medius. This originates on the ilium (between the anterior and posterior gluteal lines), eventually terminating on the lateral surface of the greater trochanter. Its contraction pulls the two insertion sites toward one another, thus elevating the opposite side of the pelvis. This typically occurs when the subject stands on one leg: contraction of the gluteus medius of the weight-bearing limb prevents the pelvis from tipping toward the opposite (and unsupported) side, thus keeping it level. When the gluteus medium is weak, the contralateral hemipelvis tips down, the buttock sags, and the unsupported leg hangs lower (positive sign) (Fig. 21-13).
179 What is a Trendelenburg’s gait?
A typical gait of gluteal muscle weakness (see Chapter 1, questions 75–80). While stepping from one leg to the other, the glutei are unable to hold up the pelvis, causing it to sag on the unsupported side. As a result, the “swinging” limb may become too low to clear the ground, causing the patient to compensate in one of two ways: (1) by leaning away from the unsupported side, trying to raise the swinging leg in the typical “waddling” fashion of progressive muscular dystrophy (so called because its gait resembles that of a duck), or (2) by stepping very high on the unsupported side, so that the swinging leg can clear the ground (“high steppage gait”).


H. The Sacroiliac Joint
186 What is the presentation of sacroiliitis?
Pain and tenderness over the SIJ joints, but no peripheral neurologic findings.
I. The Hip
189 What is the normal range of motion of the hip?
 Hip flexion: Patient supine, knee bent up to the chest and pulled firmly against the abdomen. ROM, 110–120 degrees.
 Hip extension: Patient prone and thigh extended posteriorly. ROM, 10–15 degrees.
 Hip abduction: Patient supine, leg extended and moved laterally. ROM, 30–50 degrees.
 Hip adduction: Patient supine, leg extended and moved medially. ROM, 30 degrees.


190 How many bursae does the hip have? Why are they important?


199 How should one approach a patient with hip pain?
 Anterior hip pain is the most common, usually due to pathology of the joint per se (osteoarthritis being the most common), with iliopsoas bursitis and involvement of the hip flexor muscle (strain or tendinitis) being other possibilities. Stress fractures and labral tears are instead less common causes, but not that uncommon in athletes.


J. The Knee
207 What are the menisci?
Two semilunar fibrocartilaginous ligaments that wedge between the femur and tibia. Their function is (1) to spread the weight of the body over a larger area and (2) to help the ligaments stabilize the joint. If one can imagine the knee as a ball (femur) resting on a flat plate (tibia), the menisci work like a gasket, filling the space between the femoral condyles and tibial plateaus and thus distributing the weight. Without menisci, the concentration of force onto a small area of the tibial plate would quickly damage the cartilage and lead to arthritis. Thicker on the outside than the inside, they also convert the tibial surface into a shallow socket. And since a round ball in a socket is more stable than a round ball on a flat plate, they enhance the stability of the joint. The patellar tendon further stabilizes the joint by connecting anteriorly the quadriceps tendon to tibia and patella. Finally, note that the medial meniscus is attached at its most medial surface to the MCL. Conversely, the lateral meniscus does not have any attachment to the LCL. This is quite important for the knee exam (see question 240).
213 What are the most common types of knee misalignment?
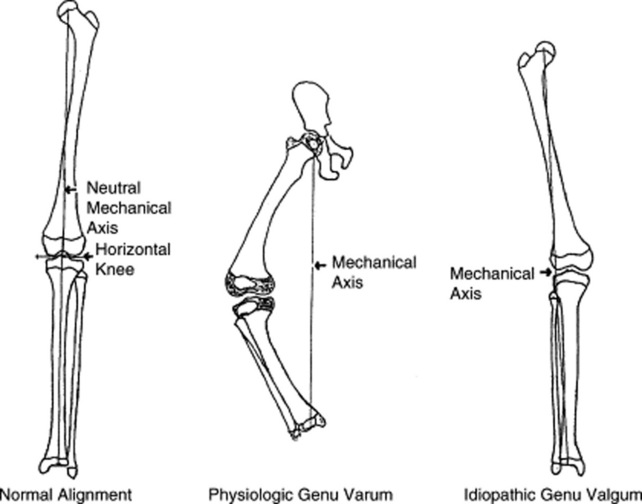
“Genu varum” and “valgum.” Varum is an angulation of the knees away from each other. Valgum is instead an angulation of the knees toward each other. Both can be congenital or acquired. A less-common condition is windswept knees, where one knee is varum and the other valgum (see Fig. 21-14). If the use of these terms seems to contradict that of question 62, is because of their etymology, considering that in Latin valgum means “knock-kneed,” while varum means “bowlegged.” In other words, in a knock-kneed person, the femur is deviated inward in relation to the hip (and thus the term varum is correctly applied for the hip, since it refers to the distal segment being angled inward). Yet, in the same knock-kneed person, the opposite situation is found at the knee, with its distal segment (i.e., the tibia) now being deviated outward (so that the term valgum is indeed the one to use for the knee). Hence, it is correct for a knock-kneed deformity to be called both varum (at the hip/femur) and valgum (at the knee/tibia), although the common terminology is to refer to it as genu valgum. Conversely, in a varum deformity of the knee, the distal part of the leg below the knee is deviated inward, resulting in a bowlegged appearance. If this is confusing, just remember that “varum = inward” and “valgum = outward,” and that both terms always refer to the direction in which the distal part of the joint points. When the terminology specifies a bone rather than a joint, the bone is taken to be the distal segment of a joint. Thus, a varum deformity of the tibia refers to the femur/tibia joint (the knee) and not to the ankle.
214 Can osteoarthritis cause misalignment of the knee?
Yes. And since it usually affects the medial aspect of the joint, it causes primarily bowing.
222 What is the role of palpation?
Tenderness on palpation reflects different processes based on location:


224 How do you evaluate the knee’s range of motion?
With a goniometer, and by comparing the affected to the unaffected side.


228 How do you detect knee effusions?


229 What about intermediate-sized effusions?
They require either patellar ballottement or the fluid wave test.
 Ballottement: With the patient supine, flex slightly the knee and then use the thumb and index finger of one hand to embrace the suprapatellar pouch (located above the patella and communicating with the joint space). Push down and toward the patella, forcing any fluid into the central part of the joint. Then, push down on the patella with the thumb of your other hand. In cases of effusion, you will appreciate (1) a palpable click (due to the patellar collision against the femur) and (2) a bouncing back up of the patella itself.

230 What are the mechanisms of ligament injuries?
 Cruciate ligaments: The ACL is typically injured during traumatic twisting, wherein the tibia moves forward to the femur, often in association with a valgus stress. Although the foot is usually planted, no direct blow to knee or leg is required. Approximately one half of all patients with ACL injuries also have meniscal tears. PCL injuries are instead 10–20 times less common than ACL injuries, representing less than 7% of all acute knee injuries. They also occur during twisting with a planted foot, but their force of injury is directed instead posteriorly against the tibia, while the knee is flexed.

232 How does the function of cruciate ligaments relate to symptoms?
 The ACL prevents anterior motion of the tibia on the femur. Hence, its injury causes an abnormal forward slide of the tibial plateau, giving the feeling that the knee is buckling, or “giving out.” Although this may occur with normal walking, it is usually most prominent during pivoting movements, such as quick changes in direction. Injury to the ACL also may cause loss of confidence in the knee’s stability, possibly because of its role in proprioception.

237 How do you assess the posterior cruciate ligaments?
Through (1) the posterior drawer test and (2) the tibial sag test.
241 How accurate are these maneuvers?
 Anterior cruciate ligament: A composite examination for ACL injuries has sensitivity >82% and specificity >94%, with a likelihood ratio (LR) of 25.0 for a positive examination and 0.04 for a negative one. As for individual maneuvers, the anterior drawer test has mean specificity of 67%, with an LR for a positive exam of 3.8 and for a negative exam of 0.30. Lachman is more sensitive than the anterior drawer test, but more difficult to perform. It has a mean sensitivity of 84%, and a specificity that in one study was 100%, LR for a positive test of 42.0, and for a negative test of 0. Finally, the lateral pivot shift test has mean sensitivity of 38% and unknown specificity. Overall, a positive Lachman argues strongly in favor of ACL tear, whereas a negative is fairly good evidence against it. The anterior drawer is the least accurate test.

246 What are the physical findings of a meniscal tear?
 Antalgic gait. Limping is very common, since patients may be unable to bear weight and thus exhibit antalgic deviations or compensatory movements.


 Forced knee flexion may instead cause medial or lateral pain.
 Finally, popliteal masses or cysts should be searched for, since a Baker’s cyst (see questions 255 and 256) often coexists with chronic meniscal tears.
251 Who were these folks?
 Thomas Porter McMurray (1886–1949) was a Belfast-born and educated orthopedist, who taught and practiced in Liverpool for most his life (as first professor of Orthopedics at the local University), until dying suddenly in a railway station at age 63. More than for his writings, he was famous for his lightning-speed skills, which allowed him to remove an entire meniscus in 5 minutes and disarticulate a hip in 10 minutes. He reported his eponymous maneuver in 1938, in an article titled “Observation of Internal Derangement of the Knee” (which borrowed on a term used by Hey in a famous 1803 paper).

K. The Ankle and the Foot
262 What ankle structures should be palpated?
 The medial aspect of the ankle comprises the medial malleolus, the deltoid ligament, and the structures just below it. First, palpate the medial malleolus and its posterior border. Then ascend proximally to 6 cm from its distal tip and palpate the deltoid ligament (which runs as a thick structure distally to the medial malleolus). Pain along this course usually suggests injury. Yet, since the deltoid ligament is rarely injured in isolation, any lesion of it should raise suspicion for concomitant pathologies.


269 What are pes cavus and pes planus?
The two most common foot deformities (Fig. 21-15). A pes cavus has an abnormally high longitudinal arch, whereas a planus has lost the arch completely (i.e., flat foot). This loss may be flexible or fixed, insofar as a flexible flat foot has some discernible arch at rest, but loses it with weight-bearing, whereas a fixed flat foot lacks the arch even at rest.
276 What is Morton’s neuroma? How is it demonstrated?
Morton’s is not a true neuroma but rather a perineural fibrosis and nerve degeneration of the common digital nerve (Fig. 21-16). This also is the result of repetitive friction, usually from ill-fitting shoes. It develops most frequently between the third and fourth metatarsal heads (i.e., third web space), but is also found in the second web space. Morton first described it in 1876:
279 What is Achilles tendon bursitis?
It is an inflammation of the bursae associated with the calcaneal insertion of the Achilles tendon: (1) the retrocalcaneal (which is anterior to the tendon, deeply sandwiched between the distal part of the Achilles and the calcaneus) and (2) the tendocalcaneal (i.e., Achilles’ bursa), which is instead superficial, between the posterior aspect of the tendon and the skin. Both bursae limit the friction of the tendon, and both, if inflamed, may cause posterior heel pain. This may be severe enough to cause limping. The patient also may complain of noticeable redness, warmth, and swelling (often referred to as “pump bump,” from the infamous high-heeled shoes—or “pumps”).
284 What is plantar fasciitis? What is its presentation?
Plantar fasciitis is the most common cause of pain on the bottom of the heel. In fact, pain is on the plantar aspect of the calcaneus, dull and similar to that of a toothache. It typically starts upon standing or walking or running. It is usually most prominent with the first morning steps, possibly decreasing as activity progresses, but only to return after a period of rest is followed by resumption of activity. Pain resolves with rest (since this allows contraction of the plantar fascia [i.e., plantar flexion]), but restarts as soon as the first dorsiflexion step of the day restretches the irritated fascia. Although typically at the heel, pain also may radiate throughout the bottom of the foot and toward the toes. On exam, there is calcaneal tenderness at the midpoint of the plantar surface, but no tenderness with medial-to-lateral heel compression (which would otherwise suggest a stress fracture or osteomyelitis). There also may be heel tenderness with dorsiflexion of the foot or great toe, resolving with plantar flexion of the foot (since this relaxes the fascia). Edema is usually mild. There also may be a radiographic spur at the attachment of the plantar fascia, although this is not the pain’s cause (see question 283).
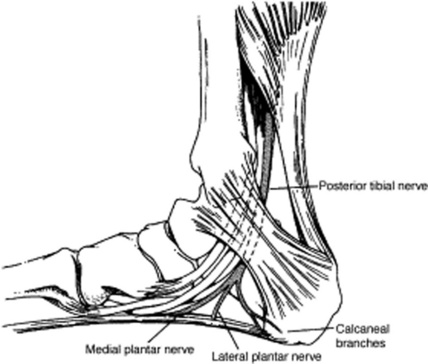
286 What is tarsal tunnel syndrome (TTS)?
It is to the ankle what carpal tunnel syndrome is to the wrist: an entrapment of the tibial nerve or its associated branches as they pass underneath the flexor retinaculum at the medial malleolus (Fig. 21-17). This leads to numbness, tingling, and pain along the posterior tibial nerve (medial plantar surface of the foot, from first toe to heel). It also may cause motor dysfunction, weakness, and atrophy.
1 Ad Hoc Committee. Guidelines for the initial evaluation of the adult patient with acute musculoskeletal symptoms. Arthritis Rheum. 1996;39:1-6.
2 Anderson AF, Lipscomb AB. Clinical diagnosis of meniscal tears. Description of a new manipulative test. Am J Sports Med. 1986;14:291-293.
3 Castro WHM, Jerosch J, Grossman TW. Examination and Diagnosis of Musculoskeletal Disorders. Clinical Examinations: Imaging Modalities. New York, Thieme, 2001.
4 Chaudhuri R, Salari R. Baker’s cyst simulating deep vein thrombosis. Clin Radiol. 1990;41:400-404.
5 Cozen L. Tests for chronic back pain. Contemp Orthop. 1992;24:405-410.
6 D’Arcy CA, McGee S. Does this patient have carpal tunnel syndrome? JAMA. 2000;283:3110-3117.
7 Deville WL, van der Windt DA, Dzaferagic A. The test of Lasegue: Accuracy in herniated discs. Spine. 2000;25:1140-1147.
8 Hawkes CH. Diagnosis of functional neurological disease. Br J Hosp Med. 1997;57:373-377.
9 Jackson JL, O’Malley PG, Kroenke K. Evaluation of acute knee pain in primary care. Ann Intern Med. 2003;139:575-588.
10 Main CJ, Waddell G. Nonorganic signs. Spine. 1998;23:2367-2371.
11 Margo K, Drezner J, Motzkin D. Evaluation and management of hip pain. J Fam Pract. 2004;53:420.
12 Morton TG. Peculiar painful affection of fourth MTP articulation. Am J Med Sci. 1876;71:37.
13 Solomon DH, Simel DL, Bates DW, et al. The rational clinical examination. Does this patient have a torn meniscus or ligament of the knee? Value of the physical examination. JAMA. 2001;286:1610-1620.
14 Sugrue D, McEvoy M, Dempsey J, et al. Diabetic stiff hand syndrome. Ir J Med Sci. 1983;152:152-156.
15 Waddell G, McCulloch JA, Kummel E, et al. Nonorganic physical signs in low-back pain. Spine. 1980;5:117-125.
16 Wipf JE, Deyo RA. Low back pain. Med Clin North Am. 1995;79:232-246.
[/level-membership-for-internal-medicine-category][not-level-membership-for-internal-medicine-category]
Chapter 21 The Musculoskeletal System
Generalities
This is a difficult area of physical exam, but one necessary in ambulatory medicine and often rewarding. One of 10 patients presenting to a primary care office will do so because of musculoskeletal complaints. Most of these can be diagnosed through a thorough exam, specific maneuvers (Table 21-1), and a proper knowledge of joints’ anatomy and physiology.
| Joint | Problem | Maneuver |
|---|---|---|
| Shoulder | General | Painful arc sign |
| Acromioclavicular (AC) arthritis | Cross-body and cross-arm maneuvers | |
| Bicipital tendinitis | Yergason’s and Speed’s tests | |
| Rotator cuff pathology | Gerber’s lift-off test, drop arm test, empty can test | |
| Impingement | Neer (impingement) and Hawkins-Kennedy tests | |
| Anterior shoulder instability | Apprehension and Jobe’s relocation tests | |
| Inferior shoulder instability | Sulcus sign | |
| Glenoid labral tears | O’Brien’s and anterior slide tests | |
| Elbow | Cubital tunnel syndrome | Elbow flexion test |
| Wrist | Carpal tunnel syndrome | Tinel’s sign, Phalen’s sign, flick sign |
| Rheumatoid arthritis | Piano key sign | |
| De Quervain’s tendinitis | Finkelstein test (positive) | |
| Intersection syndrome | Finkelstein test (negative) | |
| Hand | Interosseous tightness versus capsular contraction | Bunnel-Littler test |
| Hip | General | FABER maneuver |
| Knee | Patellofemoral syndrome | Patellofemoral grinding test |
| Effusion | Bulge sign, patellar ballottement, fluid wave test | |
| Anterior cruciate ligament | Lachman’s test, anterior drawer test, lateral pivot shift test | |
| Posterior cruciate ligament | Posterior drawer test, tibial sag test | |
| Meniscal tears | Medial-lateral grind test, McMurray’s test, Apley’s grind and distraction test | |
| Ankle | Anterior talofibular tear | Anterior drawer test |
| Anterior talofibular/calcaneofibular tear | “Talar tilt” test | |
| Tibiofibular syndesmosis | “Squeeze” test | |
| Tarsal tunnel syndrome | Submalleolar tap |
8 What is the significance of articular warmth and erythema (calor and rubor)?
They indicate pathology, too. Normal joints should be cooler than the surroundings and not red.
A. The Shoulder
15 Describe the muscles and tendons of the shoulder
The rotator cuff consists of four muscles: supraspinatus, infraspinatus, teres minor, and subscapularis (mnemonic, SITS). Their tendons converge on the humerus, thus allowing for most of the joint movements (abduction of the arm and rotation of the shoulder, both internal and external). They also hold the humeral head in the glenoid cavity, thus stabilizing the joint.
16 What are the shoulder’s movements? How do you test its ROM?
Abduction: Ask patients to raise the arms laterally and away from the body: first, to the level of the shoulder and with palms facing down (90 degrees of glenohumeral motion), and then above the head and with palms facing each other (another 90 degrees, of which 60 degrees are scapulothoracic motion and 30 degrees are combined glenohumeral and scapulothoracic). Normal individuals should complete a smooth 180-degree arc. Average, however, is a little less (150 degrees).
17 What areas of the shoulder girdle should be palpated?
19 What is the general approach to the shoulder exam?
1. Inspect for scars, color, edema, deformities, muscle atrophy, asymmetry, and guarding.
2. Palpate for pain or point tenderness (the presence of either narrows the exam):
Bony and soft-tissue structures, such as coracoid process, acromioclavicular joint, greater tubercle3. Assess active and passive ROM, especially in regard to elicited pain and reduced movement.
4. Determine muscle strength. This is an essential part of the exam, and comparing side to side may help you locate the area of concern. Always carry it out with and without resistance. To isolate the various muscles, use the following maneuvers:
20 What is the shoulder pad sign?
A sign of bilateral shoulder effusions. Very typical of amyloidosis.
21 What are the most common musculoskeletal causes of shoulder pain?
Impingement (with its complications of tendinitis and rotator cuff tears)
Hence the mnemonic, “Basically I Test Religiously For Damaged Objects.”
23 In addition to history, how else do you identify referred shoulder pain?
By its being typically nondescript, poorly localized, and not reproducible on shoulder exam.
28 What are the symptoms/findings of bicipital tendinitis?
Achy anterior shoulder pain, worsened by overhead activity, lifting of heavy objects, and elevated pushing/pulling. Rest is usually beneficial, whereas flexion of the elbow against resistance is detrimental. Pain is vague, though at times it may become localized to the anterior humerus. On exam, there is point tenderness over the bicipital groove, which is the area where the long tendon is anatomically exposed. This lies 3 inches below the anterior acromion and may be best localized by holding the arm in 10 degrees of external rotation. Pain also can be elicited by passive abduction of the arm in a painful arc maneuver (see question 41), which is typical of impingement syndrome, although at times it also may be positive in patients with isolated biceps tendinitis.
29 Which specific maneuvers can reproduce the pain of bicipital tendinitis?
Maneuvers that resist the normal function of the biceps—supination and flexion of the forearm:
Yergason’s test: The hand is pronated, the elbow flexed to 90 degrees, and the shoulder in adduction (i.e., arm against the body). With the patient attempting supination of the forearm (i.e., palm up), you resist with one hand while with the other you press on the bicipital tendon. The test is positive when it elicits pain and tenderness over the bicipital groove.
33 How do you diagnose rotator cuff tendinitis?
The supraspinatus is the most important and most commonly damaged of the four. It links the top of the scapula to the humerus, inserting into its greater tuberosity. It is partially responsible for arm abduction (the initial 15–30 degrees are actually produced by the deltoid, the next 60 degrees by the supraspinatus, and the final 90 degrees by the deltoid again). Hence, inflammation of the supraspinatus tendon leads to pain at 30–90 degrees of abduction, as the humerus impinges the tendon against the acromion. It can be easily tested through the empty can test.
Note that given the anatomic closeness of the long head tendon of the biceps (which passes down the bicipital groove in a fibrous sheath between the subscapularis and supraspinatus tendons), patients with rotator cuff disease also may have biceps tendinitis (see questions 27 and 28).
38 How do you perform the Neer (impingement) test?
The patient’s forearm is internally rotated, so that the thumb points downward. While standing behind the patient, place one hand on the patient’s scapula and with the other hand grasp the forearm and forward flex it, eventually positioning the patient’s hand over the head. Forced elevation and internal rotation of the arm cause the greater tuberosity of the humerus to compress the subacromial bursa. This, in turn, squeezes the supraspinatus tendon against the acromion, causing pain in cases of impingement. The test also can differentiate AC arthritis from subacromial bursitis (Fig. 21-1).
49 How do you test for glenohumeral instability?
It depends on the type of instability: anterior versus inferior.
50 How do you test for anterior shoulder instability?
Through the apprehension and Jobe’s relocation tests. Start with “apprehension” (Fig. 21-2). To perform it, ask patients to lie supine, with the affected shoulder just off the examining table. Grasp the elbow with one hand, and gently bring the arm to 90-degree abduction and 90-degree external rotation. Then push with your other hand on the posterior aspect of the humeral head, from back to front. Anterior shoulder instability will give a feeling that the arm is about to pop out of the joint. At the same time, patients will experience pain, apprehension, and guarding. In the original series of Rowe and Zarins, all 60 cases of anterior shoulder instability had a positive apprehension test. If the patient experiences pain and/or apprehension, move on to the second part of the maneuver: the Jobe’s relocation test. This is performed in the same position, but this time by pushing on the anterior aspect of the humeral head, from front to back, as if relocating a glenohumeral joint that had been partially dislocated by the apprehension test. Patients with primary impingement will have no change in pain, whereas those with anterior instability (subluxation) and secondary impingement will have relief of pain and/or apprehension. When relying primarily on relief of apprehension, the relocation test has sensitivity for anterior instability of 68%; specificity, 100%; positive predictive value, 100%; negative predictive value, 78%; and accuracy, 85%.
57 What is the mechanism of adhesive capsulitis?
Inflammation, which “glues” the capsule and surrounding structures into a frozen shoulder.
B. The Elbow
62 What do valgus and varus mean?
This is a very confusing terminology. In orthopedics, valgus indicates an outward angulation of the “distal segment” of a bone or joint, so that it is “twisted away” (i.e., away from the body, or midline of the limb). Conversely, varus indicates its inward angulation (so that it is now twisted toward the body, or midline of the limb). Note that both terms always refer to the direction in which the distal segment of the joint (or bone) is pointing. In fact, when referred to as a bone, the bone itself is considered to be the distal segment of the joint. Hence, a varus or valgus deformity of the forearm refers to the arm/forearm joint (the elbow) and not to the wrist. Having said that, a normal elbow is in valgus, because with the joint fully extended (and the palms facing upward) the distal segment of the forearm will point away from the body (or midline of the limb). If you think this is confusing, wait until you see how it applies to the knee exam (see question 213).
68 What is “golfer’s elbow” (medial epicondylitis)?
An overuse injury to the proximal attachment of the flexor/pronator muscles of the forearm, commonly seen in the dominant elbow of a golfer. Its mechanism is similar to that of lateral epicondylitis, but less common since wrist flexors are stronger and less likely overstressed (see Fig. 21-3).
C. The Wrist
84 What is the physical exam of CTS?
Once the appropriate history is obtained, two maneuvers are typically carried out: Tinel’s sign and Phalen’s sign (first described by the American orthopedist George S. Phalen, 1911–1998) (see Fig. 21-4).
