Chapter 15 The Central Quadriceps Free Tendon for Anterior Cruciate Ligament Reconstruction
Introduction
The central quadriceps has been used for anterior cruciate ligament reconstruction (ACLR) for more than 25 years.1,2 Stability results are similar to those with other autograft alternatives, but patients experience less pain and reach rehabilitation landmarks sooner.3 Staubli et al4,5 have studied the anatomy and biomechanical properties of the quadriceps tendon. We became interested in this ACL graft in the early 1990s, first using it with bone6 but later discovering that it is a desirable free tendon graft option7 for ACLR. We wanted to avoid the risk of postoperative problems noted with bone–tendon–bone–patella tendon graft harvest,8,9 were concerned about subtle weakness after taking out the medial hamstring tendons for ACLR in young athletes,10 and continue to worry about the possibility of prions in allograft tissue. We wanted to avoid these risks by using the central quadriceps free tendon (CQFT) for our ACLR. We confirmed and later reported the strength of the quadriceps tendon after harvesting the graft.11 Our experience has remained very positive as we begin our 10th year with the CQFT graft. Also, patients frequently come into our office impressed with how little postoperative pain and difficulty they have compared with bone–tendon–bone and hamstring ACLR patients they encounter in physical therapy, as noted by Joseph et al3 in their short-term recovery study of ACLR patients.
Technique
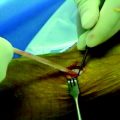
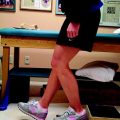
To harvest the CQFT, make a short 1.5- to 2-inch incision from the mid proximal patella upward (Fig. 15-1), and retract to view the quadriceps tendon. Retract slightly medially and note the vastus medialis obliquus (VMO). The graft should be taken preferentially from the thicker medial part of the quadriceps tendon but started proximally by retracting upward to the proximal VMO where the first incision is placed. Use a #10 scalpel blade and draw it distally at a 6- to 7-mm depth (just slightly less than the breadth of a #10 blade). The medial border of the graft then will usually be about 5 to 8 mm from the VMO at the level of the proximal patella.
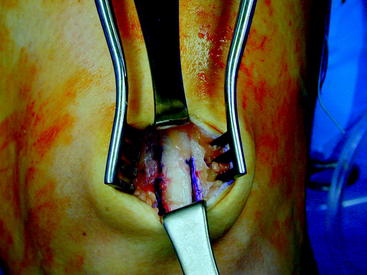
Grasp the released end of the quadriceps tendon with a uterine T clamp, and further dissect it proximally using a combination of blunt stripping and careful sharp dissection. We usually place two whipstitches12 with at least one Fiberwire (Arthrex, Naples, FL) in the released end and use this for traction during the dissection.
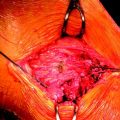
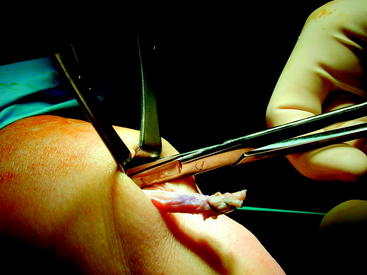
Release the CQFT graft proximally at 7 to 8 cm from the distal end. May scissors work best in our hands (Fig. 15-2).
Fixation of the Central Quadriceps Free Tendon Graft
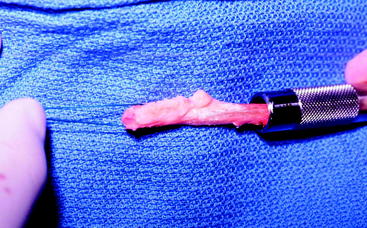
We take the CQFT graft to the back table and place two sets of #5 whipstitches in each end using a combination of Ethibond or Ticron and Fiberwire. McKeon et al have shown that it is not necessary to place more than two whipstitch throws in each side of the tendon.12 Use sizing cannulas (Fig. 15-3) to determine the size of the graft and the tunnels you will drill in the tibia and femur. In most cases, the graft will fit snugly into 8- or 9-mm tunnels.
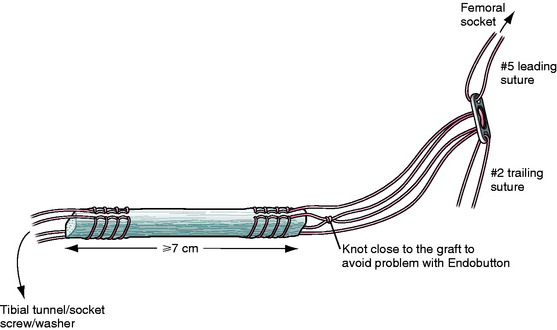
Next, place a circumferential mark on the graft at the point where it will exit the femoral socket (we like 2 cm of CQFT in the femoral socket). We prefer an Endobutton on the femoral end (Fig. 15-4), tying the #5 sutures (four strands off the end of the graft) after measuring the depth of the femoral tunnel such that the distance from the Endobutton to the marked femoral socket exit point on the graft is the same as the tunnel length, measured with the Endobutton depth gauge. Tie the sutures together (we use a Graftmaster to hold the graft and Endobutton during this process) with the knot just adjacent to the tendon graft (tying it elsewhere may cause problems in full deployment of the Endobutton).
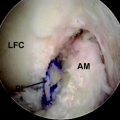
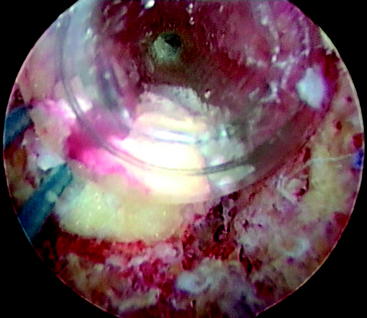
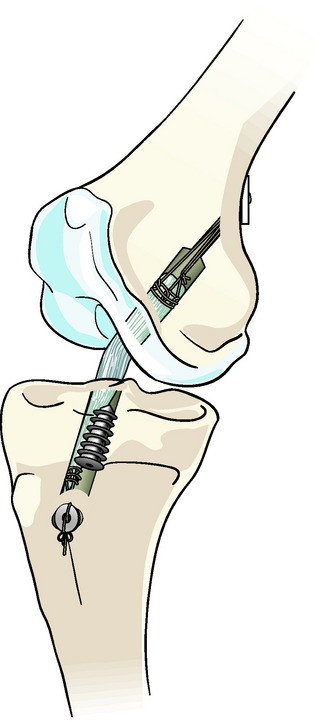
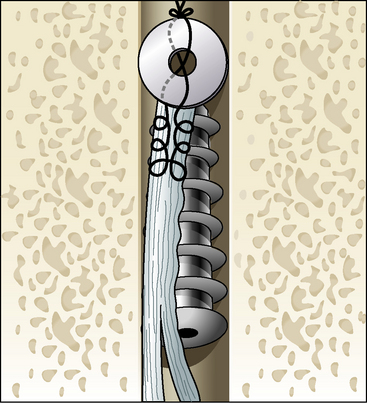
We use a biointerference screw that is one size larger than the tunnel size for tibial side fixation. After thoroughly cycling the graft in the knee and while maintaining tension on the graft, flex the knee 20 degrees and insert the biointerference screw over a guidewire that is held in place just anterior to the graft in the tibial tunnel. Be sure not to push the screw and graft, but rather advance it by turning only after seating the screw. We prefer to have the tip of the screw 5 to 8 mm back from the intercondylar notch and recommend viewing the screw/graft construct from below to confirm proper placement (Fig. 15-5). A button may be tied over the tibial tunnel for added fixation if desired.13 We have been pleased with these fixation methods (Figs. 15-6 and 15-7).
1 Marshall JL, Warren RF, Wickiewicz TL, et al. The anterior cruciate ligament: a technique of repair and reconstruction. Clin Orthop Relat Res. 1979;Sep:97-106.
2 Blauth W. Die zweizugelige Ersatzplastik des Vorderen Kreuzband der Quadricepssehne. Unfallheilkunde. 1984;87:45-51.
3 Joseph M, Fulkerson J, Nissen C, et al. Short-term recovery after anterior cruciate ligament reconstruction: a prospective comparison after three autografts. Orthopedics. 2006;29:243-248.
4 Staubli HU, Schatzmann L, Brunner P, et al. Quadriceps tendon and patellar ligament: cryosectional anatomy and structural properties in young adults. Knee Surg Sports Traumatol Arthrosc. 1996;4:100-110.
5 Staubli HU, Schatzmann L, Brunner P, et al. Mechanical tensile properties of the quadriceps tendon and patellar ligament in young adults. Am J Sports Med. 1999;27:27-34.
6 Fulkerson JP, Langeland R. An alternative cruciate reconstruction graft: the central quadriceps tendon. Arthroscopy. 1995;11:252-254.
7 Fulkerson J. Central quadriceps free tendon for anterior cruciate ligament reconstruction. Oper Tech Sports Med. 1999;7:195-200.
8 Viola R, Vianello R. Three cases of patella fracture in 1320 anterior cruciate ligament reconstructions with bone-patellar tendon-bone autograft. Arthroscopy. 1999;15:93-97.
9 Sachs RA, Daniel DM, Stone ML, et al. Patellofemoral problems after anterior cruciate ligament reconstruction. Am J Sports Med. 1989;17:760-765.
10 Marder RA, Raskind JR, Carroll M. Prospective evaluation of arthroscopically assisted anterior cruciate ligament reconstruction. Patellar tendon versus semitendinosus and gracilis tendons. Am J Sports Med. 1991;19:478-484.
11 Adams D, Mazzocca A, Fulkerson J. Residual strength of the quadriceps versus patellar tendon after harvesting a central free tendon graft. Arthroscopy. 2006;22:76-79.
12 McKeon B, Heming J, Fulkerson J, et al. The Krackow whipstitch: a biomechanical evaluation of changing the number of loops versus the number of sutures. Arthroscopy. 2006;22:33-37.
13 Nagarkatti DG, McKeon BP, Donahue BS, et al. Mechanical evaluation of a soft tissue interference screw in free tendon anterior cruciate ligament graft fixation. Am J Sports Med. 2001;29:67-71.