CHAPTER 27 Suture suspension for face and neck
History
Nature provides us with many barbed structures; such as the honeybee stinger, the woodpecker tongue and the porcupine quill; all can penetrate but defy being withdrawn. These barbs are all in one direction. In the early 1960s, Alcamo advanced the prehistoric inventions of a barbed fishing hook and arrowhead when he proposed a unidirectionally barbed suture.
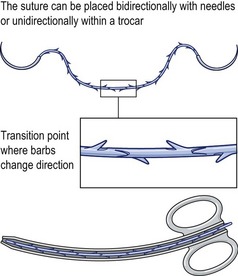
In the early 1990s Ruff developed a bidirectional barbed device (Fig. 27.1), as well as its means of manufacture and method of use. Placed by a cannula or by needles deployed in opposite directions, one set of barbs anchors the other and eliminates the need to tie a knot to secure the end. The potential advantages over a knotted loop include less ischemic necrosis, greater surgeon control of tissue approximation, more speed and obviation of the manifold problems of the knot itself. The ability to realign tissues along the array of barbs may not only be used to compress the edges of a wound together, but also to reverse the ptosis associated with aging and weight loss. In the late 1990s, Drs. Harry Buncke and Marten Sulimanidze independently described similar concepts. The USFDA approved the use of barbed sutures for tissue suspension and approximation in 2003.
Anatomy
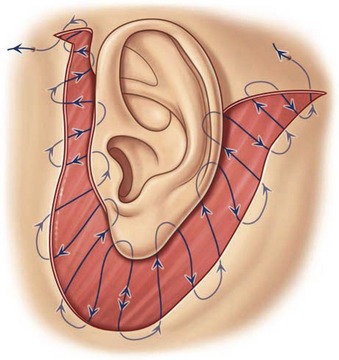
The force applied to the barbs in the face must be countered by an equally forceful opposite one. If the respective ends go in opposite directions, only half the barbs lift the face. In a U-shaped configuration, all the barbs engage the target and so this is more commonly used (Fig. 27.2).

The forehead
The suture is anchored under the galea and extends toward the brow in the deep subcutaneous fat (Fig. 27.3). It is important to avoid placing the suture deep to the frontalis in the loose areolar plane because it will elevate the brows poorly and may “click” when the frontalis contracts. The vector of the lift is reviewed as the patient looks in the mirror.
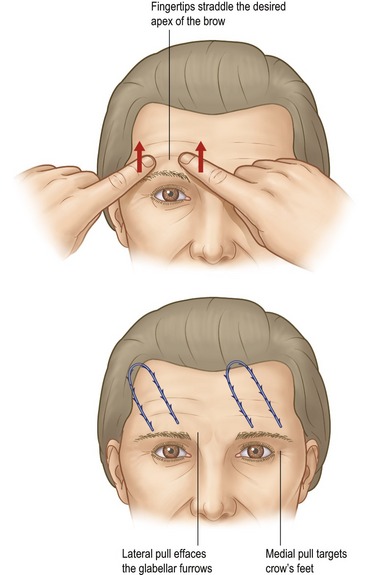
The supraorbital notch should be avoided, lest traction cause dysesthesias.
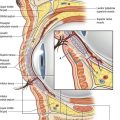
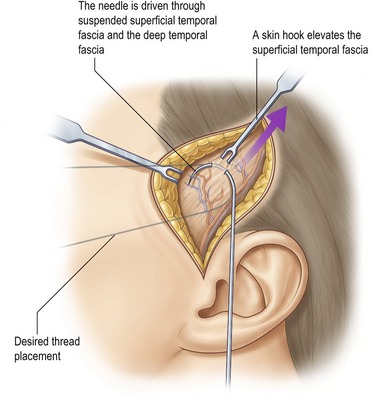
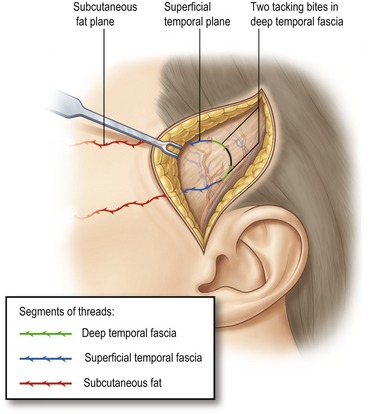
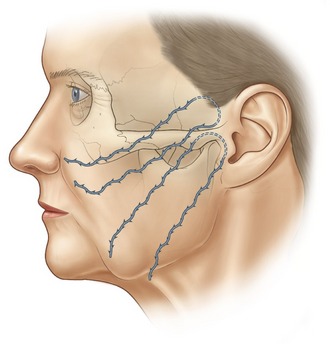
The midface
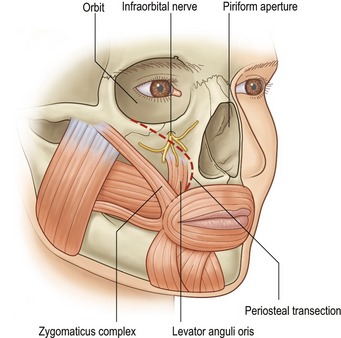
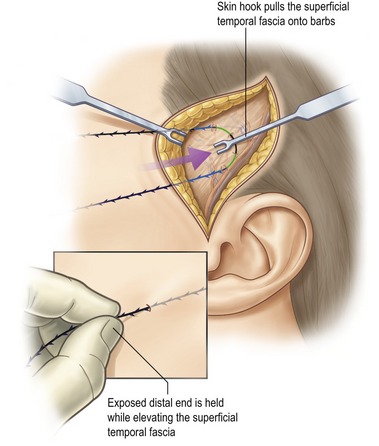
Excellent anchorage is provided by the deep temporal fascia. The barbs then extend more superficially in the SMAS and most distally in the malar fat pad. Placed more deeply, the sutures can retract the elevated malar periosteum and with it the origins of the zygomaticus and levator anguli oris muscles. If the periosteum is adequately released medially, this maneuver will elevate the oral commissure (Fig. 27.4). The barbs should not extend past the nasolabial fold where they will engage the orbicularis oris and so reduce traction on the malar fat pad. Rare instances of lower lid edema behoove the surgeon to stay inferior to the malar septum, though the reason for this occurrence is unknown. A practical guideline is to remain deep to the cheek, not eyelid skin.
The lower face
The more vertical the lift of the jowls, the tighter the neck. However, the caveats regarding excess lower lid skin which pertain to the midface also apply here. If a more horizontal vector is warranted, anchorage inferior to the deep temporal fascia is provided by the immobile SMAS and parotid capsule. As with the nasolabial fold, the barbs should not pass medial to the labiomental fold. They may extend over the mandibular border without distortion as long as the suture remains at the same depth below the skin as it courses into the neck.
Physical evaluation
• The skin laxity should be at least mild. Greater laxity warrants more mobilization, and hence dissection.
• Moderately thick subcutaneous fat provides concealment without excessive weight.
• Thin foreheads might reveal buckling when the frontalis contracts, so the vector of lift should be oblique to the muscle’s fibers.
• Median platysmal bands require transection for the best result.
• Fine wrinkles and dyschromia which warrant resurfacing should be treated at the time of the lift where feasible.
• Excess fat can be removed from an area with liposuction and immediately secured with a barbed suture. Like resurfacing, this should be done with the lift so the resulting collagen is created with the tissues the rejuvenated position.
• Tear troughs will improve with midface lifting, reducing the need to remove or reposition lower lid orbital fat.
• Lower lid skin excess can be created by elevation of the mid or lower face.
Technical steps
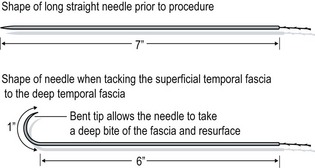
 of a circle with a chord of 1.5 cm, so it can easily pass from one puncture to the other.
 circle and clamped in the needle holder to control its rotation. The tip is withdrawn into the fat and thrust forward and out of the skin. This terminal curve adds strength and also deflects the suture’s end when the tissues are compressed, as when the patient smiles or raises the brow.
Open techniques
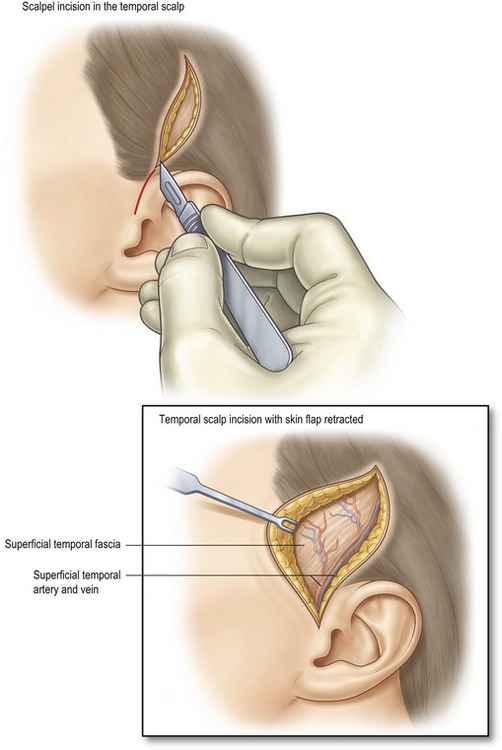
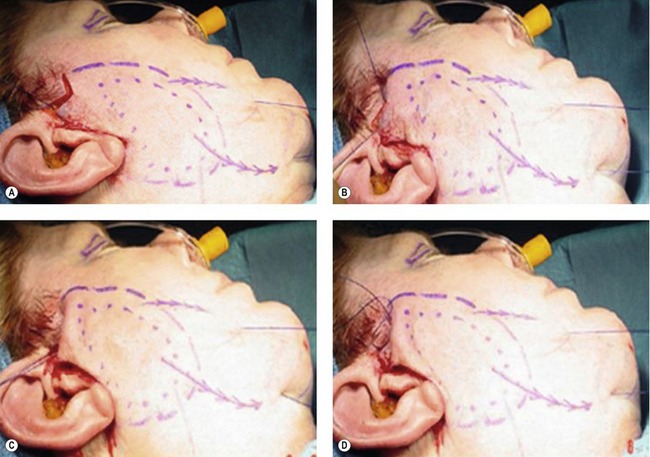
For patients with moderate laxity which creates significant brunching near the hairline, an open procedure might be best with just enough undermining to excise the redundancy, usually about 3 cm, just superficial to the SMAS (Fig. 27.5). The anchor is readily performed under direct vision and then the needles woven through the exposed SMAS, smoothly transitioning to the subcutaneous layer distally. Further mobility might be achieved by additionally undermining the galea and superficial temporal fascia.
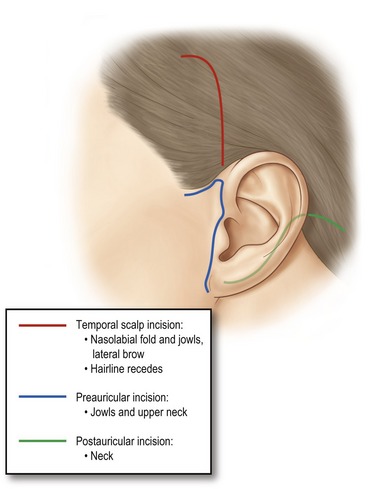
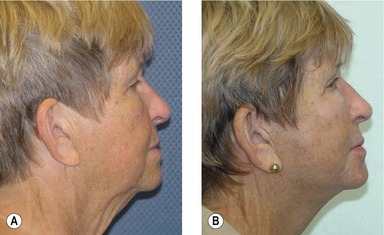
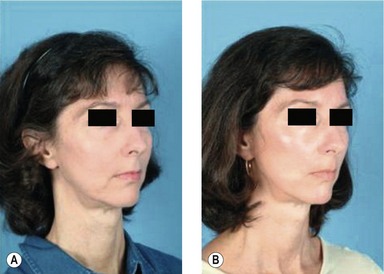
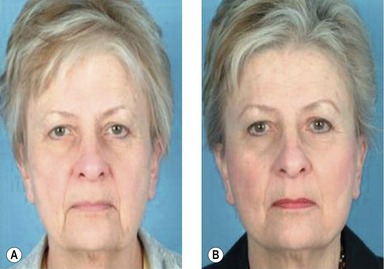
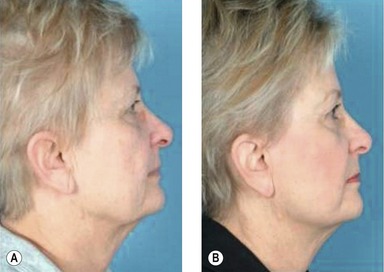
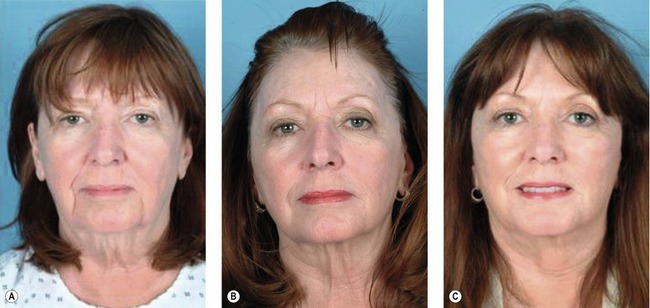
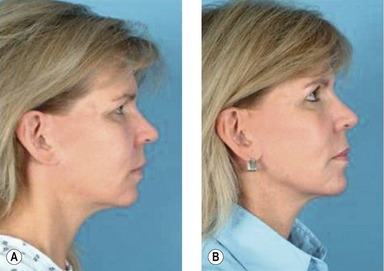
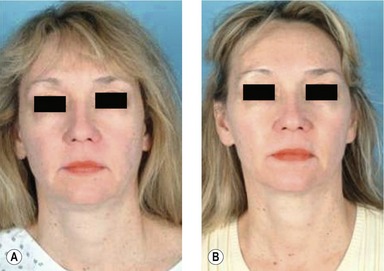
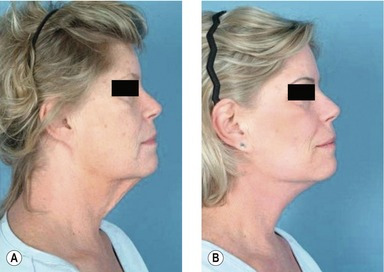
The workhorse of these options is the temporal incision. From this area, of course, the midface can be addressed, but the pull is sufficiently vertical when directed at the jowls to suspend the neck as well (Figs 27.6–27.10).
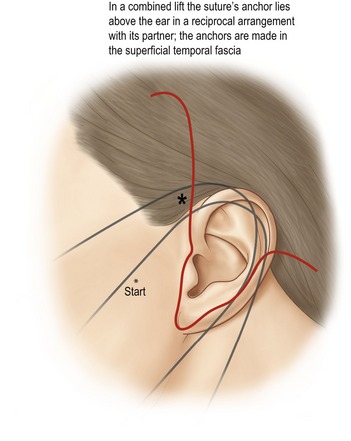
As an adjunct to conventional techniques, such as MACS lift or face with SMAS plication, the barbed suture can be woven through the platysma under direct vision, to augment or supplant the SMAS plication and purse-string sutures, and lift the brow with precise control of its shape (Figs 27.11–27.13). When pre- and postauricular skin have been elevated, a very secure anchor can be created by passing the first bite under the intact scalp (Fig. 27.14).
Barbed sutures with ordinary curved needles can be used to approximate tissues with conventional suture patterns. The closure typically begins at the middle of the wound with one needle advancing in each direction. The surgeon controls the tension of each bite, for the barbs will not allow it to back out or migrate to where the wound is under the greatest tension, as it does with a smooth suture in a continuous closure (Fig. 27.15). A running horizontal mattress for the galea, sinuous subcuticular for the deep dermis or over-and-over to plicate the malar fat provide speed and security for the closure and bite-by-bite control of suture tension.
Postoperative care
The patient should refrain from actions that pull against the barbs as much as possible. The effects of sneezing and coughing can be controlled by supporting the elevated brow with the hand (that is not covering the mouth). Widely opening the mouth and drinking with straws are discouraged after lifting the cheeks. Turning the neck excessively can compromise sutures there, so patients are given a removable polyurethane wrap to remind them of these restrictions while supporting the lower face and neck. They are asked to sleep on their backs for 2 weeks to prevent shearing of the face against the pillow (Figs 27.21, 27.22, Tables 27.1–27.4).
| Patients by age | Patients by gender |
|---|---|
| 30–39: 1 | Male: 4 |
| 40–49: 9 | Female: 44 |
| 50–59: 23 | Total: 48 |
| 60–69: 13 | |
| 70+: 2 | |
| Total: 48 |
| Sites | Threads | |
|---|---|---|
| Brows | 24 | 98 |
| Neck | 35 | 158 |
| Cheeks | 24 | 96 |
| Total | 83 | 352 |
19 cases received a micro-lift using threads remaining in place from a prior thread-lift procedure.
| Additional procedures – mean follow-up 8 months | ||
|---|---|---|
| More threads | Surgery post | |
| Brows | 0 | 0 |
| Cheek | 0 | 3 |
| Neck | 0 | 2 |
| Paresis | 0 |
| Hypesthesia | 0 |
| Extrusion | 0 |
| Breakage | 0 |
| Infection | 0 |
| Visible tails | 4 |
| Visible threads | 0 |
Complications
Pearls & pitfalls
Pearls
• The microlift really utilizes the ability of the barbed suture to tighten the target laxity at a distance from the limited dissection.
• Use this technique for those with pre-existing scars and smokers. It has minimal downtime.
• More sutures hold better and distort less.
• Try closing the galea with security like an interrupted closure, but without the hair in the knots.
• Consider barbed sutures where a loop or purse-string is now used.
Pitfalls
• Barbed sutures do not belong in the dermis except to close wounds. Long needles might be an unfamiliar tool to some surgeons.
• The suture cannot be backed out without significantly compromising the barbs. Assess the bite with the needle before pulling through.
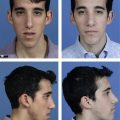
• Patient expectations might be too high. Pre- and postoperative photographs often help to convey a realistic result.
• Currently the barbs weaken a given size suture a little more than a knot does, so select a barbed suture that is one size larger.
Summary of steps
1. Assess the patient’s desires and expectations.
2. Analyze their faces and show them in the mirror various vectors of lift and their consequences.
3. Realign their expectations and contrast the procedure with an alternative, preferably with realistic pre- and postoperative photographs.
4. Plan on two barbed segments (one double-armed suture), for each of the four areas involved.
5. Anchor the suture securely. More than one bite can be used.
6. Imbricate thin fascia with many small bites.
7. Engage the subcutaneous tissue by moving side-to-side with the needle in a plane parallel to the skin.
8. Expose and bend the needle to curve its terminus. Withdraw the bent end until the dermis releases then thrust it forward away from the oral commissure and supraorbital nerves.
9. Lift the tissues along the barbs to emphasize the redundancy.
11. Trim the suture by depressing the skin to leave the end several millimeters from the dermis. It can be left exposed until the edema subsides for delayed adjustment.
12. Emphasize that the patient’s compliance is a requisite for success.
DeLorenzi CL. Barbed sutures: rationale and technique. Aesthetic Surg. 2006;26:223–229.
Murtha AP, Kaplan AL, Paglia MJ, et al. Evaluation of a novel technique for wound closure using a barbed suture. Plast Reconstr Surg. 2006;117:1769–1780.
Paul MD. Using barbed sutures in open/subperiosteal midface lifting. Aesthet Surg. 2006;26:725–732.
Ruff GR. Techniques and uses for absorbable barbed sutures. Aesthet Surg. 2006;26:620–628.