CHAPTER 38 Primary open rhinoplasty
Physical evaluation
• Motivation. It is important to have patients verbalize their desires regarding potential changes in their nasal appearance. In order to have a satisfactory outcome, such requests have to be realistic, attainable, and in harmony with the patient’s overall facial features.
• Psychological. If the surgeon and a patient both agree that a cosmetic deformity exists, and have the same goal for an outcome, it is generally safe to consider a rhinoplasty. Avoid patients who are bothered by deformities that one cannot appreciate, or who are disproportionately bothered by minor deformities. Do not discount the opinions of your office staff, as some patients appear perfectly reasonable in the presence of the physician and remarkably change character when dealing with the staff.
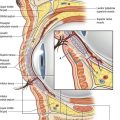
• Anatomic. In addition to visually inspecting the nose for variables such as size, projection, length, dorsal height, and tip configuration, it is very important to palpate the nose. Palpation allows the evaluation of the length of nasal bones, the character of the middle vault, and the quality of tip support. If the nasal bones are short or the middle vault feels weak and narrow on pinching, one should consider the use of spreader grafts. If pressure on the tip reveals poor recoil, tip projection may be deficient thus, necessitating enhancement.
• Functional. It is rather embarrassing to have patients begin complaining of breathing problems only after a cosmetic rhinoplasty. All patients should have an intranasal examination to look for potential troublesome anatomy such as septal deviations, turbinate hypertrophy, and internal and external nasal valve narrowing.
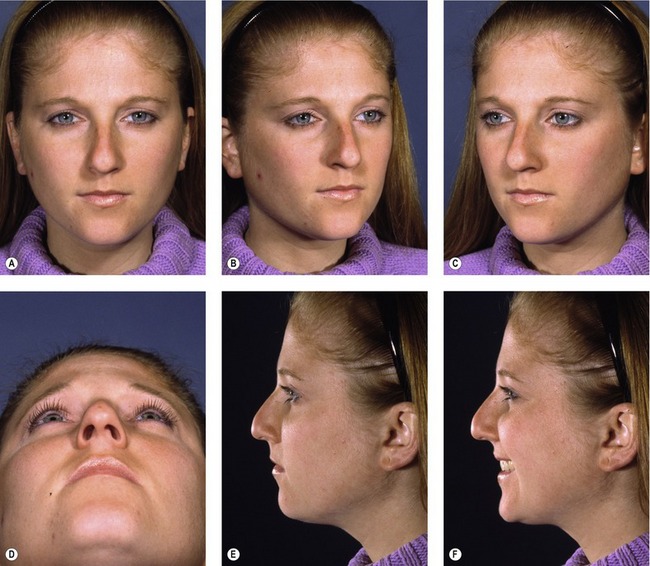
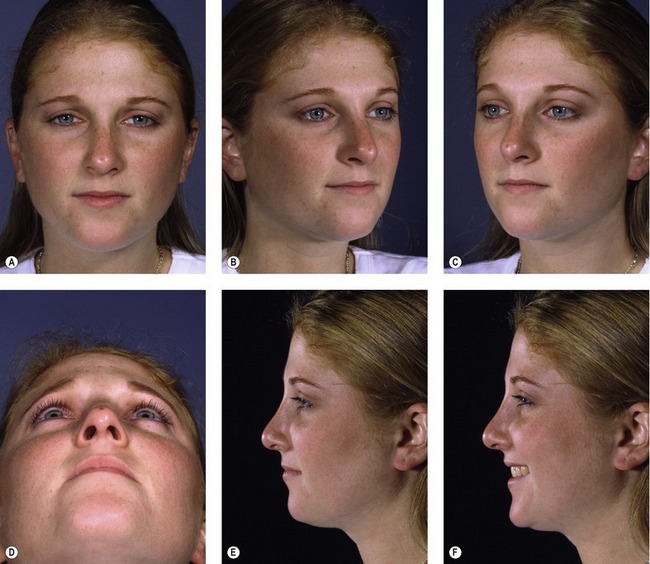
• Photographs. A good set of standardized photographs are mandatory for documentation purposes as well as surgical planning. Views include: Full-face frontal, oblique, profile, smiling profile, and worm’s-eye view. Re-assess your analysis of the face and nose while looking at the pictures.
• Computer imaging. Computer imaging is a powerful tool to enhance communication between the surgeon and the patient. Showing the patient a visual rendition of the potential outcome can reduce the risk of miscommunication and weed out the few patients who have unrealistic expectations or an unorthodox taste.
Technical steps
Most surgeons have their favorite way of “opening” the nose. We will present ours, as we feel it is expeditious, safe, and easy to perform. The procedure is performed under general anesthesia, typically using an LMA. Four milliliters of 4% cocaine are used to moisten two strips of approximately 18 inches of 1-inch plain nu-gauze. The gauze is wrung out and placed in each naris. Lidocaine (2% with 1 : 100,000 epinephrine) is then infiltrated across the dorsum, columella, and sidewalls for a total volume of 4 mL. The vibrissae are trimmed and the face is then prepped.
A Chevron or V-shaped incision is designed on the columella, either where it contacts the lip, or at its narrowest portion (Fig. 38.3A1). The V-shaped incision at the base is preferable when the columella is short. With a 15 blade, the incision is made through the dermis, carried just inside the vestibule, then directed towards the tip for a distance of approximately 10 mm bilaterally. Using Converse scissors, blind subcutaneous dissection is performed connecting both vestibular rim incisions, taking care not to injure the inferior border of the medial crura (Fig. 38.3A2). The columellar incision is finalized by connecting these planes. The columellar flap is then elevated quickly, and the medial crura immediately visualized. From this point on, scissor dissection is guided by following the lower border of the lower lateral crura. A Converse alar retractor distracts the flap, while your assistant provides downward counter-traction on the medial crura with a single hook (Fig. 38.3A3). Dissection should stay on the cartilage to avoid interfering with the blood supply of the skin flap. When both lateral crura are visualized, the domes are distracted inferiorly with a double hook in order to provide the necessary counter traction and allow undermining of the dorsal flap. Undermining is started by first dividing the suspensory ligaments, which attach the skin to the underlying domal area. Then the correct dissection plane is identified by finding the bluish color of the dorsal septum (Fig. 38.3A4). Once the bony dorsum is reached, a Joseph elevator is used to complete the dissection, making sure that the attachments of the upper lateral cartilages to the nasal bones laterally are not violated.
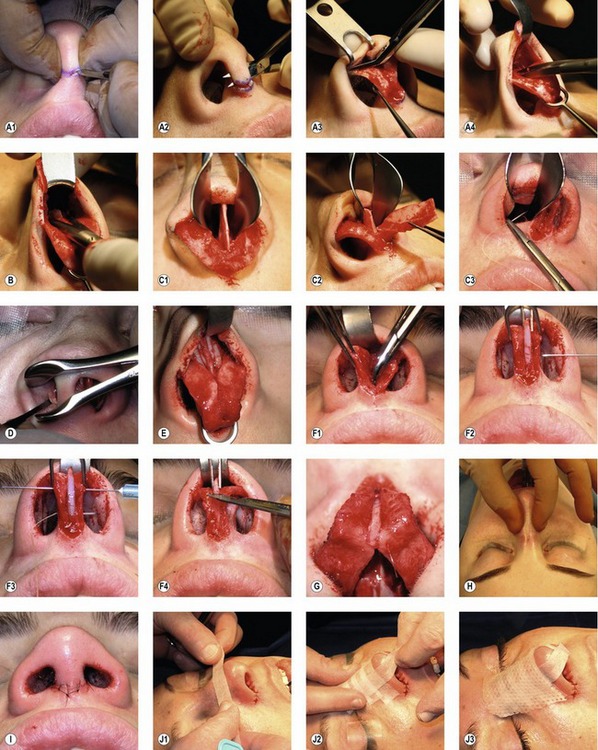
The septum is approached at this stage if a septoplasty is to be performed. Local anesthetic is injected on both sides in the subperichondrial plane to help with the dissection and hemostasis. A clean and direct way to approach the septum is to separate the medial crura and identify the caudal septum (Fig. 38.3C1). This avoids additional mucosal incisions, and affords an excellent exposure of the septum. This approach tends to destroy some elements of tip support and will generally necessitate the later use of a columellar strut in order to restore and maintain tip support. If the tip is already under projected, this is of little consequence, as additional support is required anyway. The caudal septum can be shortened if needed, then the septal pathology is addressed (Fig. 38.3C2). An L-shaped strut is preserved, making sure to retain as much cartilage as possible. A 10 mm horizontal strip is the bare minimum. To avoid the use of postoperative nasal packing, the septal mucoperichondrial flaps can be re-opposed with the use of a quilting suture of 4-0 Plain Gut on an SC-1 needle (Fig. 38.3C3).
Osteotomies and infractures of the nasal bones are performed next. If spreader grafts are to be placed, the osteotomies should be executed prior to placement of grafts to avoid displacement. We prefer the use of a 2 mm sharp osteotome via the endonasal route, generally in a low-to-low fashion (Fig. 38.3D). Perforating lateral osteotomies are performed. Medial osteotomies are typically not necessary, especially if the dorsum has been reduced. Digital infracturing is performed, making sure that any evidence of an open roof has been eliminated by proper mobilization of the nasal bones.
Spreader grafts are used next if the middle vault appears narrow, or if the dorsal septum is deviated. These strips of cartilage measure approximately 4 mm in width, and should be long enough to traverse the distance from the keystone region to just short of the septal angle (unless they are intentionally to be used as extended spreader grafts to lengthen the nose.) When placing these grafts, the mucosa is dissected off the dorsal septum after the final dorsal height has been determined. No change in dorsal height is possible after the grafts are secured in position. The cephalic portion of the spreader graft is carefully placed under the caudal portion of the nasal bone at the keystone area in order to avoid its postoperative displacement and visibility. We secure these grafts with 5-0 PDS in mattress fashion to reduce the chance of their displacement (Fig. 38.3E). Single or multiple grafts can be placed unilaterally to correct a dorsal deviation, bilaterally to correct a narrow middle vault, or to lengthen the overshortened nose when they are extended beyond the septal angle.
At this point, the dorsal height has been established, as well as the width of the nose. The shape and the projection of the nasal tip are evaluated next. Intercrural sutures of 6-0 PDS are used to improve domal definition. A tight pocket is created between the medial crura to accept the columellar strut if one is needed (Fig. 38.3F1). The dissection is not carried down to the nasal spine, in order to avoid a clicking sensation between the base of the strut and the underlying bone. The strut is placed into the pocket and pushed down with forceps while the domes are symmetrically grasped with a double hook and distracted forward, away from the facial plane (Fig. 38.3F2). Two 25-gauge needles are passed through the columella complex in order to maintain a relationship of tension between the strut and the adjacent medial crura. Perfect symmetry is mandatory in both the coronal and sagittal planes in order to avoid the creation of a columellar asymmetry. Horizontal mattress 4-0 Plain Gut on a straight SC-1 needle is used to percutaneously fixate the strut in position (Fig. 38.3F3). PDS sutures are also used to approximate the strut to the medial crura. The strut is then trimmed so it does not protrude beyond the domes (Fig. 38.3F4), and an interdomal suture is placed in the cephalic portion of the domes to bury the strut. Divergence of the caudal aspect of the domes is maintained (Fig. 38.3G).
The skin is redraped, and final assessments performed. The strength of the middle vault is assessed by pinching the region (Fig. 38.3H). Feel the dorsum for any irregularities; assess for supertip break by supporting the columella with your thumb and placing the index finger in the supertip. Confirm that the nose is straight by looking from the head of the bed down. On the profile view and basal view, check for any alar notching or retraction. These can be addressed with alar contour grafts (also know as alar rim grafts).
Closure is performed next. 6-0 nylon is utilized in simple fashion, first aligning the “V” of the Chevron incision and then both lateral edges, taking particular care to appropriately medialize and inset the edges of the columellar flap (Fig. 38.3I). 5-0 chromic is utilized for closure of the infracartilagenous component of the incision. If contour grafts have been placed, they can be secured during this closure by taking a small bite of the medial portion of the graft.
Final assessment is performed, and then taping/splinting is carried out. This is a key portion of the procedure, as it maintains the soft tissue relationship with the underlying framework in the postoperative edema phase. The dorsum is prepared with mastisol, and then  -inch paper tape is applied in overlapping strips across the dorsum (Fig. 38.3J1). The tape is first placed exactly at the supertip break and then three or four more strips are placed moving cephalad. Two long strips are placed following the dorsal nasal lines, and are pinched together across the tip (Fig. 38.3J2). A heated thermoplastic nasal splint is then applied over the tape and allowed to harden while mild digital pressure is applied to contour its shape (Fig. 38.3J3). A 2 × 2 gauze is folded into a triangle as a drip pad, taped across the vestibule, and the case is complete.
 strength hydrogen peroxide, and then bacitracin ointment is applied to any incisions. The patient is allowed to shower with the splint. The splint and sutures are removed after 5 or 6 days. The patient is to wash the nose twice daily and control oil production with the use of an astringent. The patient is to abstain from exercise for 3 weeks postoperatively. Contact sports can be resumed 3 months later.
Complications
Pearls & pitfalls
• Recognize anatomical landmines (occult under projected tips, short nasal bones, weak middle vault, dorsal nasal deviation, malpositioned alar cartilages) and address them during surgery to avoid revisions.
• In addition to looking for nasal asymmetry, look for facial asymmetry, as you will not be correcting facial asymmetry during your rhinoplasty. You have much more credibility pointing out these issues preoperatively rather than trying to explain these limitations after surgery.
• The currently available maneuvers of struts and suture techniques are very powerful, and can be “overused”. For example, it is possible to over-project the nasal tip while using a columellar strut, thus creating a totally new iatrogenic deformity. As such, utilize restraint.
• The ideal technique is the one with which the surgeon is most comfortable. There are many options that are good solutions for particular problems (e.g. alar struts, alar spreader grafts, or even horizontal mattress sutures to strengthen and contour the lateral crura), and a good knowledge base and flexibility during surgery will allow you to make the best use of intrinsic anatomy and available graft materials.
Summary of steps
1. Open the nose from medial to lateral.
2. If necessary, lower the dorsum close to the desired height.
3. Perform cephalic trim of the lower lateral cartilages.
5. Perform nasal osteotomies and infractures.
7. Address middle vault issues with spreader grafts.
8. Trim the upper lateral cartilages to match the dorsum.
9. Place the columellar strut if needed.
10. Utilize suture techniques to define the tip.
11. Judge if tip requires additional grafting for definition (cap, shield, buttress).
12. Judge if rim irregularities need to be addressed (alar struts, rim grafts).
Daniel RK. Rhinoplasty: an atlas of surgical techniques. New York: Springer Verlag; 2002.
Gruber RP, Nahai F, Bogdan MA, Friedman GD. Changing the convexity and concavity of nasal cartilages and cartilage grafts with horizontal mattress sutures: Part II. Clinical results. Plastic Reconstr Surg. 2005;115(2):595–606.
Gunter JP, Friedman RM. Lateral crural strut graft: technique and clinical applications in rhinoplasty. Plast Reconstr Surg. 1997;99(4):943–952.
Rohrich RJ, Raniere J, Ha RY. The alar contour graft: correction and prevention of alar rim deformities in rhinoplasty. Plast Reconstr Surg. 2002;109(7):2495–2505.
Sheen JH. Spreader graft: a method of reconstructing the roof of the middle nasal vault following rhinoplasty. Plast Reconstr Surg. 1984;73(2):230–237.
Tabbal N, Boutros SG. Advances in secondary rhinoplasty: personal perspective. In: Gunter JP, Rohrich RJ, Adams WP. Dallas rhinoplasty: nasal surgery by the masters. 2nd edn. St Louis, MO: Quality Medical Publishing; 2007:809–839.
Tebbetts JB. Primary rhinoplasty: a new approach to the logic and techniques. Edinburgh: Mosby; 1998.
Toriumi DM. New concepts in nasal tip contouring. Arch Facial Plast Surg. 2006;8:156–185.