CHAPTER 102 SURGICAL PROCEDURES IN THE SURGICAL INTENSIVE CARE UNIT
Bedside procedures are an integral part of the care delivered to critically ill patients. Whether performed for diagnostic or therapeutic purposes, bedside procedures have specific indications and complications. With the pressure of more effective utilization of the operating rooms (ORs), bedside procedures in the surgical intensive care unit (SICU) have become more frequent.
HISTORICAL PERSPECTIVE
Critically injured patients are more likely to survive their injuries today due to a multitude of improvements in trauma systems and critical care.1 As a result, “diseases of survivorship” have become more prevalent and are posing new and complex challenges to the trauma surgeon. Clearly, surgeons are most comfortable operating in the OR where conditions are optimal. However, the safe performance of bedside elective surgical procedures has already been demonstrated with tracheostomy and percutaneous feeding access. Currently, there are now circumstances where it is not safe to transport the patient to the OR, and the surgeon is forced to operate under less optimal conditions, in the patient’s best interest, in the SICU. This situation arises if the patient is too critical to travel to the OR but needs urgent or emergent surgery, or if the patient needs an emergent surgery but the OR is not immediately available due to other emergencies. This chapter will provide indications and management of both elective and emergent bedside procedures.
SURGICAL PROCEDURES
Bedside Tracheostomy
Patients with persistent respiratory failure following major trauma frequently require tracheostomy since the complications related to the presence of an endotracheal tube for more than 7 days increases and can be life threatening. Patients who have a high likelihood of requiring prolonged mechanical ventilation undergo tracheostomy at the earliest possible time when conditions are stable and optimal. Some of the theoretic and proven benefits of tracheostomy include reduction of dead space and airway resistance, facilitation of weaning, improved pulmonary toilet and oral care, and better toleration by the patient, and establishing a secure long-term airway.2
Procedure Options, Contraindications, and Preparation
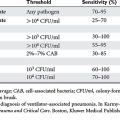
Adequate preparation for this procedure is critical, as errors can quickly lead to major complications. A complete surgical tracheostomy set and percutaneous tracheostomy kit are present at the bedside (Table 1). Lighting in the SICU should be optimized or surgeons may prefer using a headlight. Assisting personnel include a surgical team with an operating surgeon attending and one or two assistant surgeons, one respiratory therapist, one anesthesiologist, and a nurse. All personnel in the room have protective headwear, masks, and gloves, and the surgeons also wear sterile gowns and gloves.
| Bedside Tracheostomy | Equipment |
|---|---|
| Tracheal set | Retractors |
| Hemostats | |
| Right-angle clamps | |
| Metzenbaum and suture scissors | |
| Tracheal hook and dilator | |
| Electrocautery | |
| #11- and #15-blade scalpels | |
| Airways | 8F tracheostomy and 6F tracheostomy |
| Lubricating gel | |
| Capnometer | |
| Anesthesia kit with endotracheal tubes | |
| Sutures | Nylon skin sutures |
| Silk sutures and silk ties | |
| Anesthesia | Paralytic and sedatives |
| 1% lidocaine anesthetic | |
| Field | Sterile drapes and Betadine prep |
| Sterile towels | |
| Percutaneous Tracheostomy | |
| Percutaneous tracheostomy kit | |
| Bronchoscope | |
Open Tracheostomy Technique
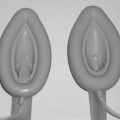
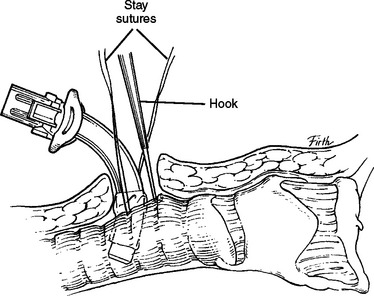
Once the patient is paralyzed and sedated, the neck is prepped and draped. Local anesthetic is injected at the surgical site, and then a 2-cm vertical midline incision is made below the cricoid. The platysma is divided and the strap muscles are retracted laterally. The second to fourth tracheal rings are exposed by retracting the isthmus of thyroid superiorly (using a vein retractor) or by dividing the isthmus of the thyroid. Stay sutures can be placed at the lateral aspect of trachea; note that the balloon of endotracheal tube should be deflated while placing stay sutures. Before the procedure begins, the surgeon should test the balloon of the tracheostomy, and ensure that the anesthesiologist suctions the endotracheal tube and mouth and that all equipment works and is within reach. A tracheotomy is performed using an 11-blade scalpel, the opening is dilated, and under direct vision the endotracheal tube is pulled back to just above the tracheotomy site. The tracheostomy is inserted, the inner cannula is placed, and the balloon is inflated. Then capnography is performed, adequate return of tidal volume is assessed, and chest wall movement is visualized. When placement is confirmed, the tracheostomy is sutured to the skin and secured with tracheal ties, and then the endotracheal tube is removed (Figure 1).
Percutaneous Dilatation Technique
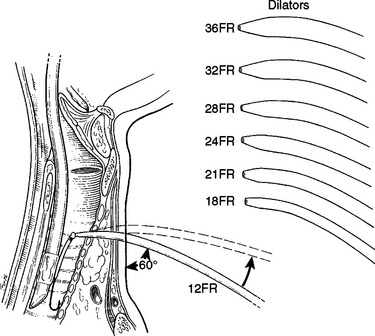
There are several kits available today with various modifications for the percutaneous tracheostomy using the Ciaglia technique. The authors recommend the following percutaneous technique, which includes making a 2-cm vertical midline incision below the cricoid, and gentle dissection and retraction of the strap muscles with the ability to identify the thyroid and palpate the tracheal rings. With or without the use of a bronchoscope in the endotracheal tube, the endotracheal tube is pulled back superiorly so that a 10-ml saline-filled syringe is inserted into the trachea just below the endotracheal tube at about the second or third tracheal ring. Once air bubbles enter the syringe, the syringe is removed and a guidewire is advanced into the tracheal lumen. The needle is removed and the tract is dilated with the short dilator. With the use of a guiding catheter, either serial dilation (12–36 Fr) or a single tapered dilation is performed. The 28-Fr dilator within a #8 tracheostomy tube is placed over the guiding catheter and the entire unit is inserted into the trachea (Figure 2). Once in place, the guidewire, the guiding catheter, and the 28-Fr dilator are removed; the inner cannula is placed; and the balloon is inflated. Placement is confirmed and securing of the tracheostomy is performed as previously explained.
Mortality, Morbidity, and Complications
Bedside tracheostomy is considered a safe procedure when performed meticulously and using the suggestions stated above. It has a low mortality rate (0.1%–1%) and minimal morbidity (up to 3%).3 Complications related to tracheostomy occur intraoperatively, early postoperatively, and late postoperatively. Intraoperative complications include bleeding, perforation of posterior wall of the trachea or anterior wall of esophagus, hypoxia, and loss of the airway. Early postoperative complications include bleeding, hematoma, pneumothorax, and tracheoesophageal fistula. Late postoperative complications include subglottic stenosis, laryngeal nerve injury, tracheal granulation, and tracheoinnominate fistula.
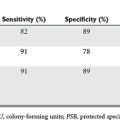
A meta-analysis comparing open surgical and percutaneous tracheostomies found that the rate of serious complication was similar in the two groups.4 The authors also noted that perioperative complications occurred more often with the percutaneous technique, but that postoperative complications were more frequent with the open surgical tracheotomy. However, most of the differences in complication rates were attributed to minor complications. Another meta-analysis by Freeman et al.5 found no difference in overall operative complication rates, but found lower postoperative complications and bleeding in the percutaneous technique. Currently, there are no prospective data to support the use of bronchoscopy to reduce complications related to percutaneous tracheostomy, but using it is advocated during the learning curve.
Percutaneous Feeding Catheters
Seriously injured patients are at risk for malnutrition and all of its complications. In addition, failure to use the gastrointestinal tract for a prolonged period leads to atrophy of the intestinal mucosa and bacterial translocation.6 Short-term enteral nutrition is often provided via a naso- or oro-gastric tube. Due to the high incidence of patient discomfort, accidental dislodgment, and sinusitis from prolonged use of nasoenteric tubes, percutaneous cannulation of the gastrointestinal tract is preferred for long-term feeding access. Percutaneous endoscopic gastrostomy (PEG) can be performed by the surgeon at the bedside in the SICU. PEG was introduced in 1980 as an alternative to laparotomy for placement of gastrostomy.7–9 The surgeon intensivist operator has the advantage of being familiar with the patient’s condition and possible recent abdominal surgery.
Technique
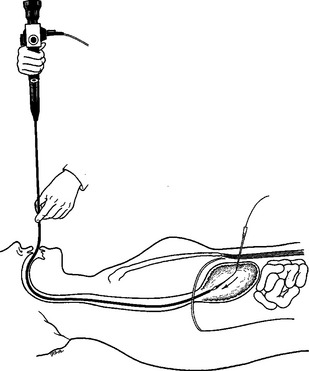
The basic elements of all PEG techniques include gastric insufflation to bring the stomach into apposition with the abdominal wall, percutaneous placement of a cannula into the stomach, passage of a guidewire into the stomach, placement of the gastrostomy tube by “push” or “pull” techniques, and verification of the proper position of the gastrostomy button (see Figure 1).
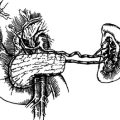
In an intubated patient, the easiest way to introduce the gastroscope is to stand at the patient’s head and elevate the tongue and the endotracheal tube. This may be facilitated with the use of a laryngoscope. Gently using the inflation button, the scope is passed down through the esophagus into the stomach under direct visualization. With the stomach insufflated, a place in the antrum is selected for cannulation. This location is generally two fingerbreadths below the xiphoid and two finger-breadths below the left costal margin in most patients. After placing the needle, a guidewire is thread through the needle and with the gastroscope a snare is used to secure the guidewire (Figure 3). The endoscope is removed from the mouth with snare secured to the guidewire.
Mortality, Morbidity, and Complications Management
This procedure is safe and effective with a mortality rate of 0.3%–1% and a morbidity rate of 3%–6%.10–12 Complications are often related to the initial endoscopic procedure, the puncturing of the stomach, and the administering of feedings. There are no specific complications related to performing the procedure at bedside in the SICU, in the endoscopy suite, or in the OR. Specifically, aspiration is an important risk in all SICU patients, and gastroparesis, esophageal trauma, retention of tube feeds, and bacterial overgrowth in an acid-suppressed stomach all contribute to the risk. This risk is minimized by keeping the stomach empty, minimizing air insufflation, and carefully inserting the endoscope. Perforation with the gastroscope is rare if the gastrointestinal tract is anatomically normal. Other structures can be punctured including the colon and liver; however, if the stomach is distended enough and there is clear transillumination of the skin, this complication is rare.
Wound infection is the most common complication and occurs in 5% of patintents.13 This complication may be reduced by avoidance of overtight placement of silastic cuff, and adequate skin incision surrounding PEG and possibly prophylactic antibiotics. A rare but potentially life-threatening complication is the development of necrotizing fasciitis. The area of cellulites should be assessed for crepitance as the treatment includes wide surgical debridement and broad-spectrum antibiotics.
Buried bumper syndrome refers to the clinical picture resulting from partial or complete growth of the gastric mucosa over the internal bolster and occurs in 0.3%–2.4% of patients.14,15 The bumper may migrate through the gastric wall. The buried bumper syndrome presents with leakage or infection around the gastrostomy and is usually caused by excessive tension on the bolsters.
Inferior Vena Caval Filter Placement
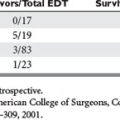
Trauma patients are at increased risk for deep-vein thrombosis (DVT) and pulmonary embolism (PE). The principal methods that have reduced DVT incidence include anticoagulation, the use of sequential compression devices, and early mobilization after surgery. At least three groups of trauma patients at high risk for PE have been consistently identified: severe head injury with coma, spinal cord–injured patients with deficits, and severe pelvic and long bone fractures.15–17 Vena caval interruption has been an effective method of PE prophylaxis, and advances in technology have allowed insertion of inferior vena caval (IVC) filters is done percutaneously. IVC filters are routinely placed under fluoroscopic guidance in the OR or in the interventional radiology suite. Bedside placement of IVC filters alleviates transportation risks and has been shown to be a safe and more cost-effective treatment.18
Indications
High-risk trauma patients who have IVC filter insertion are often in the SICU and require mechanical ventilation, intracranial pressure monitoring, multiple intravenous infusions, and other invasive monitoring modalities, which puts them at risk when transported from the SICU. Absolute indications for IVC filter placement include the presence of a contraindication to anticoagulation in patients with a known PE or DVT and recurrent PE despite adequate anticoagulation. The relative indications for IVC filters include a chronic PE in a patient with pulmonary hypertension and a large free-floating iliofemoral thrombus. Prophylactic indications for IVC filter placement include spinal cord injury with paralysis, spinal trauma without paralysis, severe closed head injury, severe pelvic trauma, extensive lower extremity trauma, and prolonged immobilization. The indications for IVC filter placement are no different if the IVC filter is placed in the OR or interventional radiology suite. The secondary benefits of bedside IVC filter insertion include avoiding the hazards of intrahospital transport as well as cost-effectiveness due to less resource use.19
Mortality, Morbidity, and Complications Management
Failure of bedside placement is a common complication. Placement may fail if the renal vein is inadequately visualized, which may occur due to morbid obesity or intraluminal bowel gas. Inexperience recognizing landmarks can lead to delay in placement. Another common complication is bleeding at the placement site. To avoid this complication, adequate digital pressure should be applied. There is 5% incidence of filter tilting, either at the time of placement or over a follow-up period.20 The change in position may be due to migration of the filter or fracture of a strut. Penetration of the IVC can occur during any step of insertion and its incidence is 0.1%–9%.20
Insertion site complications include local thrombosis of the femoral vessel, arterial-venous fistula, and pseudoaneurysm formation.20 Long-term caval thrombosis is reported in 3%–9% of IVC filter placements. The incidence of PE with an IVC filter in position has been reported to occur in 0.1%–10% of patients.20
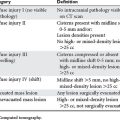
Diagnostic Peritoneal Lavage and Laparoscopy
Diagnosis of intra-abdominal injury in critically ill patients is a challenge. Diagnostic peritoneal lavage (DPL) is useful in detecting intra-abdominal injuries in trauma patients. While the use of DPL occurs primarily in the emergency room, the technique does a have a role in the ICU as well. DPL can provide cell counts and Gram stains of the fluid effluent. Similarly, laparoscopy allows for the direct intra-abdominal visualization of pathology, which is more specific in determining the etiology of the injury. Often these unstable critically ill patients cannot be transported to CT scan, and diagnostic plain radiographs are often not helpful. The importance of diagnosing intra-abdominal injuries in critically ill patients can be overstated since the mortality of missed injuries exceeds 25%.21 The intent is to avoid a nontherapeutic laparotomy in a critically ill patient with no intra-abdominal cause for the patient’s acidosis, sepsis, or clinical deterioration.
Procedure Options, Contraindications, and Preparation
Both DPL and laparoscopy are diagnostic options. DPL is accurate in diagnosing the presence of bleeding and peritonitis. It can also be completed in less than 15 minutes, and results are obtained from the laboratory rather quickly. The disadvantage of DPL is its lack of specificity. Laparoscopy has the advantage of directly visualizing the peritoneal cavity and diagnosing intra-abdominal pathology. Its disadvantages include the transport of the equipment to the SICU as well as the use of pneumoperitoneum. The brevity of the procedure should result in minimal hemodynamic instability related to the pneumoperitoneum. Also, significant respiratory acidosis and hypercarbia can occur in these patients. Hypercarbia occurs due to the peritoneal absorption of CO2. Changes in airway pressures directly correlate with intra-abdominal pressures and should encourage low-pressure insufflation for the procedure.
Intra-Abdominal Pressure Monitoring, Decompressive Laparotomy, and the Open Abdomen
CONCLUSIONS
The development of guidelines for performance of bedside surgery is currently in evolution. Performance of these surgical procedures by the surgeon intensivist is safe because of their awareness of need for these procedures as well as the physiologic effects on these critical patients. Complication rates of “road trips” for critically ill patients from the ICU to other parts of the hospital (i.e., radiology department or OR) can result in a mishap rate of 5%–30%.19 These factors have made it easy to “bring the procedure to the patient,” which is particularly advantageous in critically ill ICU patients.
1 Sluys K, Haggmark T, Iselius L. Outcome and quality of life 5 years after major trauma. J Trauma. 2005;59:223-232.
2 Shoemaker WC, Velmahos GC, Demetriades D, editors. Procedures and Monitoring in the Critically Ill. Philadelphia: WB Saunders, 2002.
3 Dulguerov P, Gysin C, Perneger TV, et al. Percutaneous or surgical tracheostomy: a meta-analysis. Crit Care Med. 1999;27:1617-1625.
4 Feller-Kopman D. Acute complications of artificial airways. Clin Chest Med. 2003;24:445-455.
5 Freeman BD, Isabella K, Lin N, et al. A meta-analysis of prospective trials comparing percutaneous and surgical tracheostomy in critically ill patients. Chest. 2000;118:1412-1418.
6 Deitch EA. Bacterial translocation or lymphatic drainage of toxic products from the gut: what is important in human beings? Surgery. 2002;131:241-244.
7 Gauderer MWL, Ponsky JL, Izant RJJr. Gastrostomy without laparotomy: a percutaneous endoscopic technique. J Pediatr Surg. 1980;15:872.
8 P Crookes Percutaneous feeding catheters
9 Ponsky JL, Gauderer MWL. Percutaneous endoscopic gastostomy: a nonoperative technique for feeding gastrostomy. Gastrointest Endosc. 1981;27:9.
10 Ponsky JL, Gauderer MWL, Stellato TA, et al. Percutaneous approached to enteral alimentation. Am J Surg. 1985;149:102.
11 Foutch PG, Haynes WC, Bellapravalu S, Sankowski RA. Percutaneous endoscopic gastrostomy (PEG). A new procedure comes of age. J Clin Gastroenterol. 1984;8:10.
12 Larson DE, Burton DD, Schroeder KW, Dimagno EP. Percutaneous endoscopic gastrostomy. Gastroenterology. 1987;93:4852.
13 Jones SK, Neimark S, Panwalker AP. Effect of antibiotic prophylaxis in percutaneous endoscopic gastrostomy. Am J Gastroenterol. 1985;80:438-441.
14 Venu RP, Brown RD, Pastika BJ, Erickson LWJr. The buried bumper syndrome: a simple management approach in two patients. Gastrointest Endosc. 2002;56:582-584.
15 Rodrigues JL, Lopez JM, Proctor MC, et al. Early placement of prophylactic vena caval filters in injured patients at high risk for pulmonary embolism. J Trauma. 1996;40:797-804.
16 Khansarinia S, Dennis JW, Veldenz HC, et al. Prophylactic Greenfield filter placement in selected high-risk patients at high for pulmonary embolism. J Trauma. 1995;22:231-236.
17 Rogers FB, Shackford SR, Ricci MA, et al. Routine prophylactic vena cava filter insertion in severely injured trauma patients decreases the incidence of pulmonary embolism. J Am Coll Surg. 1995;180:641-647.
18 Ebaugh JL, Chiou AC, Morasch MD, et al. Bedside vena cava filter placement with intravascular ultrasound. J Vasc Surg. 2001;34:21-26.
19 Sing RF, Jacobs DG, Heniford BT. Bedside insertion of inferior vena cava filters in the intensive care unit. J Am Coll Surg. 2001;192:570-576.
20 Rowe VL, Hood DB. Inferior vena caval filter placement. In: Shoemaker WC, Velmahos GC, Demetriades D, editors. Procedures and Monitoring in the Critically Ill. Philadelphia: WB Saunders, 2001.
21 Walsh RM, Popovich MJ, Hoadley J. Bedside diagnostic laparoscopy and peritoneal lavage in the intensive care unit. Surg Endosc. 1998;12:1405-1409.