[level-membership-for-anesthesiology-category]
5 Supraclavicular Block
Traditional Block Technique
Placement
Anatomy
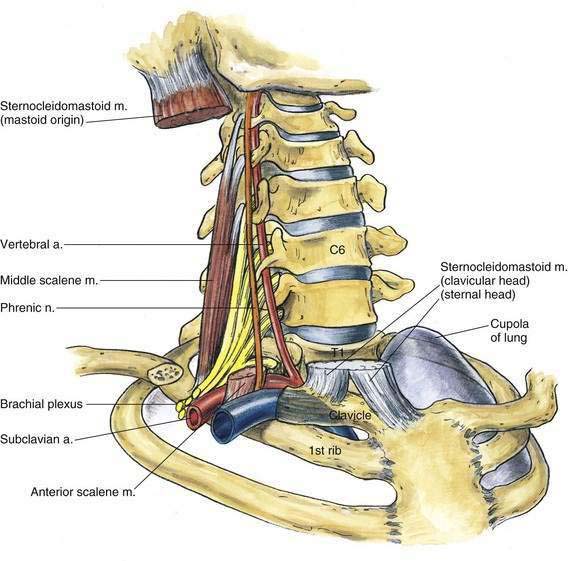
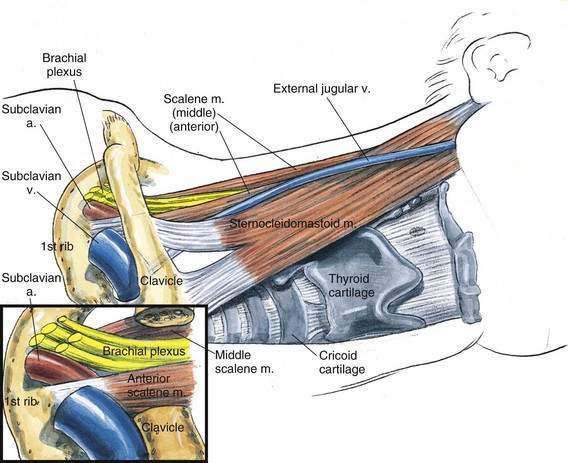
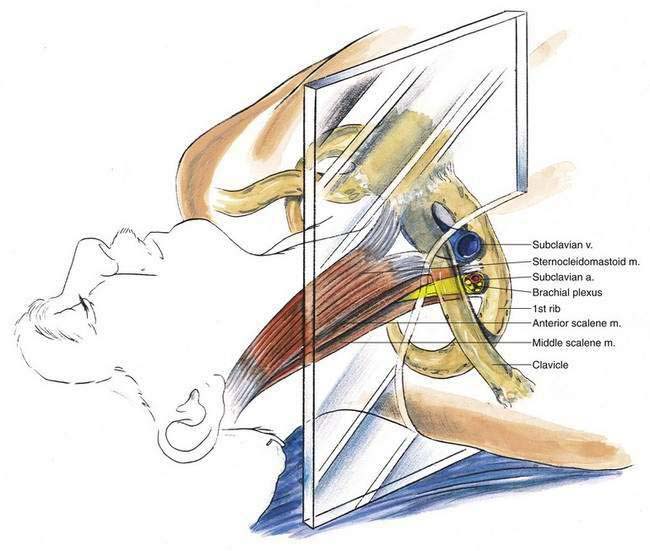
The anatomy of interest for this block is the relationship between the brachial plexus and the first rib, the subclavian artery, and the cupola of the lung (Fig. 5-1). My experience suggests that this block is more difficult to teach than many of the other regional blocks, and for that reason two approaches to the supraclavicular block are illustrated: the classic Kulenkampff approach and the vertical (“plumb bob”) approach. The vertical approach has been developed in an attempt to overcome the difficulty and time necessary to become skilled in the classic supraclavicular block approach. Both techniques are clinically useful, once mastered. As the subclavian artery and brachial plexus pass over the first rib, they do so between the insertion of the anterior and middle scalene muscles onto the first rib (Fig. 5-2). The nerves lie in a cephaloposterior relationship to the artery; thus, a paresthesia may be elicited before the needle contacts the first rib. At the point where the artery and plexus cross the first rib, the rib is broad and flat, sloping caudad as it moves from posterior to anterior, and although the rib is a curved structure, there is a distance of 1 to 2 cm on which a needle can be “walked” in a parasagittal anteroposterior direction. Remember that immediately medial to the first rib is the cupola of the lung; when the needle angle is too medial, pneumothorax may result.
Needle Puncture: Classic Supraclavicular Block
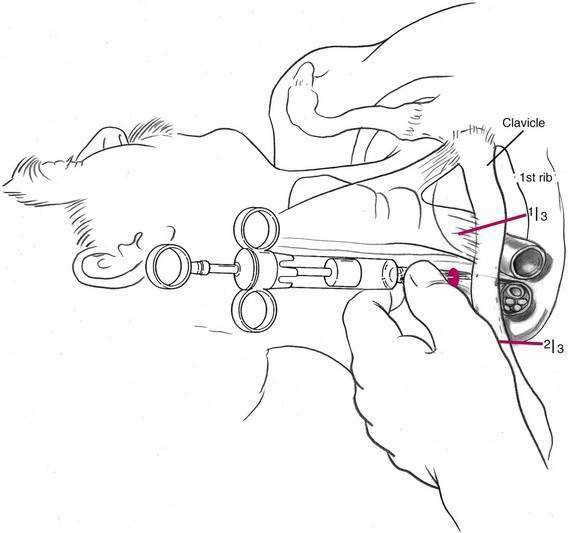
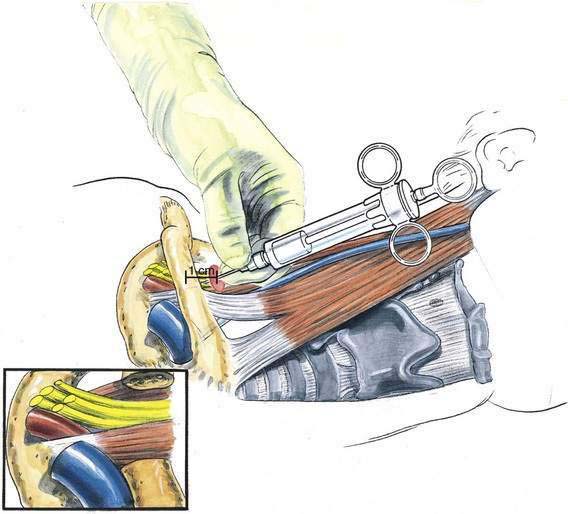
In the classic approach, the needle insertion site is approximately 1 cm superior to the clavicle at the clavicular midpoint (Fig. 5-3). This entry site is closer to the middle of the clavicle than to the junction of the middle and medial thirds (as often described in other regional anesthesia texts). In addition, if the artery is palpable in the supraclavicular fossa, it can be used as a landmark. From this point, the needle and syringe are inserted in a plane approximately parallel to the patient’s neck and head, taking care that the axis of the syringe and needle does not aim medially toward the cupola of the lung. A 22-gauge, 5-cm needle typically will contact rib at a depth of 3 to 4 cm, although in a very large patient it is sometimes necessary to insert it to a depth of 6 cm. The initial needle insertion should not be carried out past 3 to 4 cm until a careful search in an anteroposterior plane does not identify the first rib. During the insertion of the needle and syringe, the assembly should be controlled with the hand, as illustrated in Figure 5-4. The hand can rest lightly against the patient’s supraclavicular fossa because patients often move the shoulder with elicitation of a paresthesia.
Needle Puncture: Vertical (Plumb Bob) Supraclavicular Block
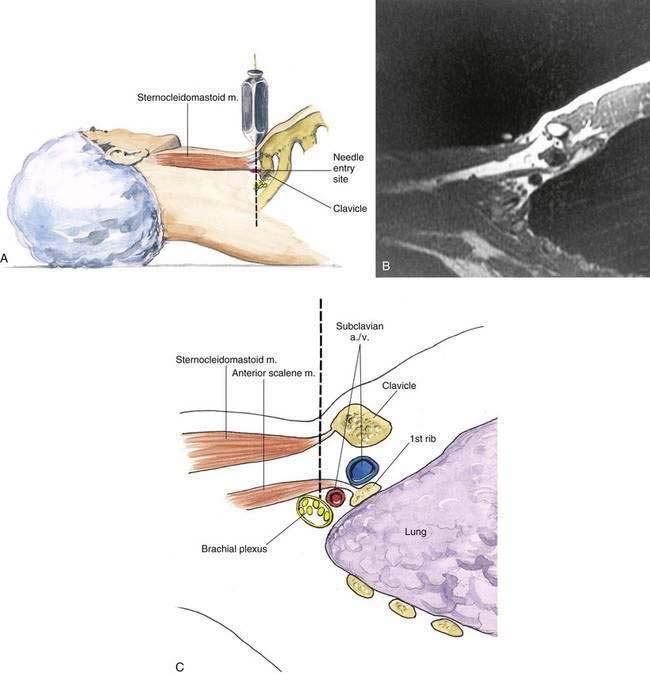
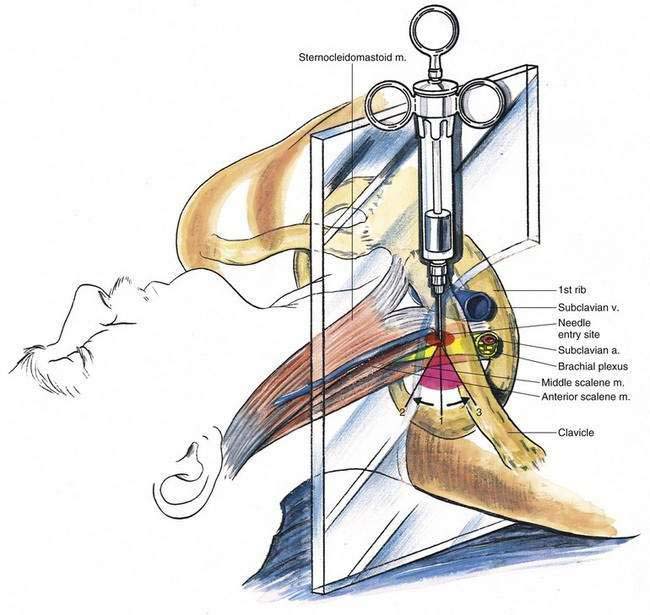
Patients are asked to raise the head slightly off the block table so that the lateral border of the sternocleidomastoid muscle can be marked as it inserts onto the clavicle. From that point, a plane is visualized running parasagittally through that site (Fig. 5-5). The name “plumb bob” was chosen for this block concept because if one were to suspend a plumb bob vertically over the entry site (Fig. 5-6), needle insertion through that point, along the continuation of the vertical line defined by the plumb bob, would result in contact with the brachial plexus in most patients. Figure 5-6 also illustrates a parasagittal section obtained by magnetic resonance imaging in the sagittal plane necessary to carry out this block. As illustrated, the brachial plexus at the level of the first rib lies posterior and cephalad to the subclavian artery. Once this skin mark has been placed immediately superior to the clavicle at the lateral border of the sternocleidomastoid muscle as it inserts into the clavicle, the needle is inserted in the parasagittal plane at a 90-degree angle to the tabletop. If a paresthesia is not elicited on the first pass, the needle and syringe are redirected cephalad in small steps through an arc of approximately 20 degrees. If a paresthesia still has not been obtained, needle and syringe are reinserted at the starting position and then moved in small steps through an arc of approximately 20 degrees caudad (Fig. 5-7).
Ultrasonography-Guided Technique
To start, the transducer should be placed in the supraclavicular fossa (Fig. 5-8). With this approach, the goal is to image the subclavian artery and brachial plexus in their short axis. If there is difficulty finding the subclavian artery, slide the transducer medially to first identify the distal carotid artery, then move the transducer laterally to image the subclavian artery. The subclavian artery will appear as a pulsatile, hypoechoic circular structure. Confirm the pulsation with color-flow Doppler. Once the subclavian artery has been located, the plexus will appear as several hypoechoic circles lateral and superior (cephaloposterior) to the artery (Fig. 5-9). The exact number of hypoechoic circles vary (three to six is common) because the image represents a variable portion of the brachial plexus from the trunks to divisions. Several other structures that are important to identify include the first rib and pleura. The first rib appears as a hyperechoic line with a characteristic acoustic dropout shadow posterior to it. The pleura appears as a hyperechoic line that moves with respiration (see Video 4: Supraclavicular Anatomy: A Case of a Large Anomalous Branch of the Subclavian Artery on the Expert Consult Website). 
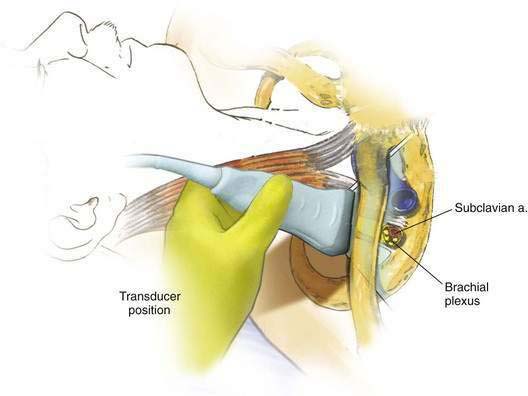
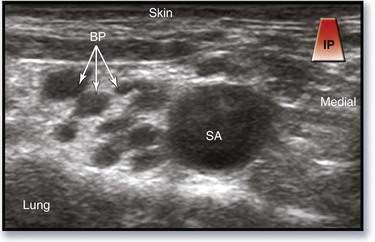
Figure 5-9. Supraclavicular block, ultrasonography-guided approach: image obtained with transducer placement as in Figure 5-8. BP, brachial plexus; SA, subclavian artery.
The transducer should be manipulated such that the subclavian artery and brachial plexus appear on the medial side of the ultrasonographic screen, which will allow an appropriate trajectory. Using the in-plane needle insertion technique, the needle is advanced from lateral to medial with the goal of having the tip enter the brachial plexus sheath at the most posterior imaged aspect (Fig. 5-10). This tends to be in an area previously described as the “corner pocket” for the needle using the aforementioned technique (see Video 5: Supraclavicular Nerve Block on the Expert Consult Website). 
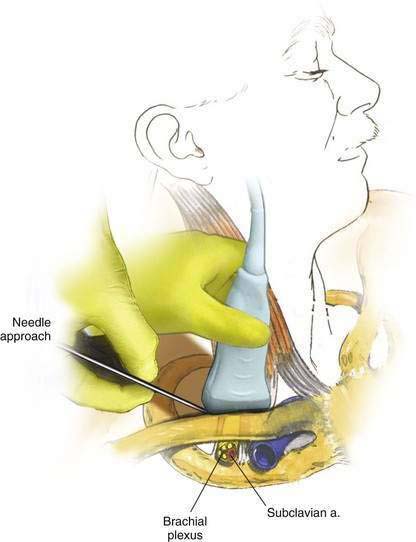
Figure 5-10. Supraclavicular block, ultrasonography-guided approach: needle placement for “corner pocket.”
[/level-membership-for-anesthesiology-category][not-level-membership-for-anesthesiology-category]
5 Supraclavicular Block
Traditional Block Technique
Placement
Anatomy
The anatomy of interest for this block is the relationship between the brachial plexus and the first rib, the subclavian artery, and the cupola of the lung (Fig. 5-1). My experience suggests that this block is more difficult to teach than many of the other regional blocks, and for that reason two approaches to the supraclavicular block are illustrated: the classic Kulenkampff approach and the vertical (“plumb bob”) approach. The vertical approach has been developed in an attempt to overcome the difficulty and time necessary to become skilled in the classic supraclavicular block approach. Both techniques are clinically useful, once mastered. As the subclavian artery and brachial plexus pass over the first rib, they do so between the insertion of the anterior and middle scalene muscles onto the first rib (Fig. 5-2). The nerves lie in a cephaloposterior relationship to the artery; thus, a paresthesia may be elicited before the needle contacts the first rib. At the point where the artery and plexus cross the first rib, the rib is broad and flat, sloping caudad as it moves from posterior to anterior, and although the rib is a curved structure, there is a distance of 1 to 2 cm on which a needle can be “walked” in a parasagittal anteroposterior direction. Remember that immediately medial to the first rib is the cupola of the lung; when the needle angle is too medial, pneumothorax may result.
Needle Puncture: Classic Supraclavicular Block
In the classic approach, the needle insertion site is approximately 1 cm superior to the clavicle at the clavicular midpoint (Fig. 5-3
[/not-level-membership-for-anesthesiology-category]
