13 Suctioning the Airway
Note 1: This book is written to cover every item listed as testable on the Entry Level Examination (ELE), Written Registry Examination (WRE), and Clinical Simulation Examination (CSE).
The listed code for each item is taken from the National Board for Respiratory Care’s (NBRC) Summary Content Outline for CRT (Certified Respiratory Therapist) and Written RRT (Registered Respiratory Therapist) Examinations (http://evolve.elsevier.com/Sills/resptherapist/). For example, if an item is testable on both the ELE and WRE, it is shown simply as (Code: …). If an item is testable only on the ELE, it is shown as (ELE code: …). If an item is testable only on the WRE, it is shown as (WRE code: …).
MODULE A
1. Manipulate suctioning devices by order or protocol (ELE code: IIA8) [ELE Difficulty: R, Ap, An]
a. Get the necessary equipment for the procedure
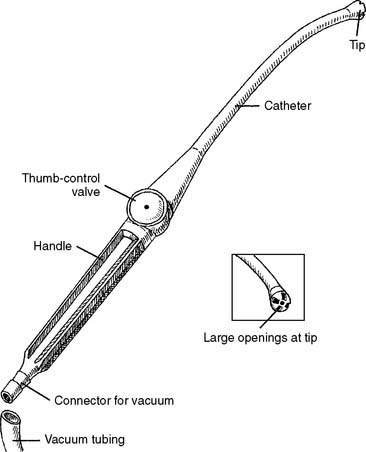
Oropharyngeal suctioning is considered a clean (not sterile) procedure. The suctioning device is often originally packaged sterile but may be used more than once. The Yankauer suction catheter is widely used, although several types are available. The Yankauer suction catheter is made of hard plastic and is angled to reach into the back of the mouth. One large opening or several medium-sized openings may be found at the tip of the catheter. The openings are large enough to permit easy suctioning of saliva, food, or vomit. Some handles include a thumb control valve so that suction can be applied to the tip only when wanted. Covering the opening with a thumb creates a vacuum at the tip for suctioning the patient’s mouth (Figure 13-1). The Yankauer may be discarded when no longer needed or sterilized for use with another patient.
A flexible plastic or rubber catheter also can be used. It should be the largest diameter possible to reduce the chance of its becoming plugged. The opening at the catheter tip should be cut straight (perpendicular) across instead of at an angle. No side openings should be present (Figure 13-2). The catheter is discarded when no longer needed.
b. Put the equipment together and make sure that it works properly
c. Troubleshoot any problems with the equipment
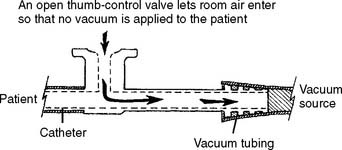
If no vacuum is felt at the catheter tip, several causes are possible and must be investigated.
1. The vacuum is not turned on.
2. The system is not sealed, and the vacuum is lost to the atmosphere.
3. The system is blocked, and no vacuum can get through to the tip.
2. Suction catheters
Table 13-1 presents the recommended suction catheter sizes for the various endotracheal or tracheostomy tubes. The practitioner also can easily compare the relative sizes of the tube and suction catheter at the bedside before suctioning. Suction catheters are sized by the French (Fr) scale of the OD. Endotracheal and tracheostomy tubes are sized by ID and OD in millimeters and often by OD in French. Review Table 12-1 if necessary.
TABLE 13-1 Recommended Suction Catheter French Sizes for Endotracheal and Tracheostomy Tubes*
| Age | Tube Internal Diameter (mm) | Size of Suction Catheter (Fr) |
|---|---|---|
| NEWBORN | ||
| 1,000 g | 2.5 | 5 |
| 1,000-2,000 g | 3 | 6 |
| 2,000-3,000 | 3.5 | 8 |
| 3,000 g to 6 mo | 3.5-4 | 8 |
| PEDIATRIC | ||
| 18 mo | 4 | 8 |
| 3 yr | 4.5 | 8 |
| 5 yr | 5 | 10 |
| 6 yr | 5.5 | 10 |
| 8 yr | 6 | 10 |
| ADULT | ||
| 16 yr | 7 | 10 |
| Normal-size woman | 7.5-8 | 12 |
| Normal-size man | 8-8.5 | 14 |
| Large adult | 9-10 | 16 |
(TT), the suction catheter’s one half the inner diameter of the ET or TT.
* For suctioning of endotracheal tubes (ET) and tracheostomy tubes
a. Calculations related to catheter size (math review)
Suction catheter size (Fr) × 0.33=OD(mm) of suction catheter
Calculate the OD of a 12 Fr suction catheter:

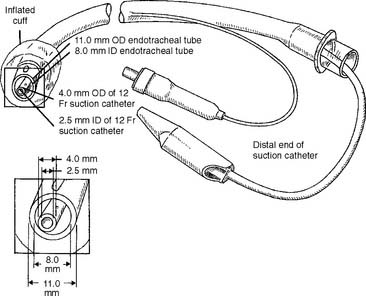
This size catheter, therefore, could be used with an 8-mm ID endotracheal tube. Figure 13-3 shows the relative sizes of this endotracheal tube and catheter.


b. Get the necessary equipment for the procedure
The term open-airway suctioning is used here to refer to a suctioning procedure on a patient who is spontaneously breathing room air after being disconnected from the source of supplemental oxygen. For example, in a patient with a normal upper airway, the oxygen mask is removed for nasotracheal suctioning. Also, in a patient with an endotracheal or a tracheostomy tube, the aerosol T-piece (Briggs adapter) or ventilator circuit is removed to allow suctioning.
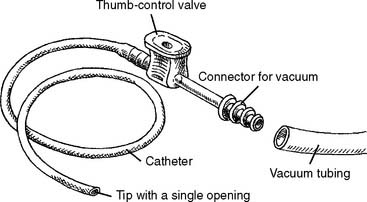
These types of catheters have been in use for many years. The two basic types are shown in Figure 13-4. Closing the thumb control, as shown in Figure 13-5, allows the vacuum to be selectively applied to the secretions when desired. The tips of the catheters can vary greatly. A considerable amount of effort has been spent trying to develop a catheter tip that most effectively removes secretions without damaging the tracheal mucosa. Figure 13-6 shows some of the catheter tips that have been developed to minimize mucosal damage. Note that all feature at least one opening in the catheter that is back from the opening at the tip. Compare this with the single end opening found on the oral suction catheter (see Figure 13-2). The side openings are designed to prevent the vacuum from being applied to the tip when it makes contact with the mucosa.

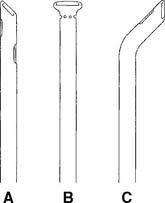
Notice in Figures 13-4 and 13-6 that most catheters are straight throughout their length. All of these catheters tend to enter the right mainstem bronchus during deep suctioning. This is because the right mainstem bronchus’s angle off of the trachea is less acute than that of the left mainstem bronchus. Therefore, it is difficult, if not impossible, to use any of these catheters to suction the left mainstem bronchus. The Coudé catheter has an angled tip to make it easier to guide into the left (or right) mainstem bronchus (see Figure 13-6, C). When these catheters are used, the direction of the thumb control valve can help determine the angle of the bent tip.
c. Get the necessary equipment for the procedure
In closed-airway suctioning systems, a flexible, clear plastic sheath covers the catheter to maintain its sterility (Figure 13-7). The practitioner does not need gloves. When used for patients who need frequent suctioning, self-contained systems have a financial advantage over the traditional catheter and gloves suctioning method, because they can be reused. Closed-system suction catheters come with either the traditional straight tip or the Coudé tip for selective bronchial suctioning.

Another device used to create a sealed system for endotracheal tube suctioning consists of an elbow adapter that has an inner plastic sleeve or diaphragm. As the traditional catheter is inserted into the opening on the elbow adapter, the sleeve or diaphragm conforms to the catheter so that no air leakage occurs (Figure 13-8). This ensures that the ventilator-delivered volumes and pressures are not lost through a leak.

d. Put the equipment together andmake sure that it works properly
Figure 13-4 shows the attachment of an open-airway suction catheter to the vacuum tubing, and Figure 13-7 shows the attachment of a closed-airway suction catheter to the vacuum tubing. The other end of the vacuum tubing is attached to the vacuum regulator system.
While holding the body of the catheter, the thumb control valve, and the vacuum connector with the sterile-gloved hand and the vacuum tubing with the cleangloved hand, slip the vacuum tubing over the catheter’s vacuum connector. The seal should be tight so that no vacuum leak occurs. From now on, only the sterile-gloved hand may touch the part of the catheter that makes contact with the patient. The clean-gloved hand may touch only the thumb control valve and vacuum tubing. If the catheter is contaminated, it must be discarded.
3. Specimen collectors
a. Get the necessary equipment
A variety of specimen collectors (commonly called Lukens traps) are available. They are packaged as sterile so that no contamination of the sputum sample occurs with nonpatient organisms. Figures 13-9 through 13-12 show the key features and functions of several sputum sample collectors. The sputum sample is obtained through a suction catheter or bronchoscope.
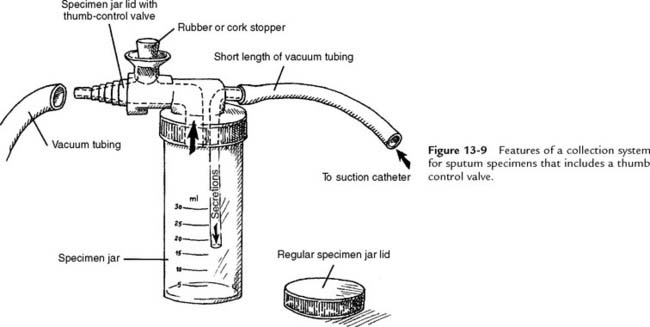
Figure 13-9 Features of a collection system for sputum specimens that includes a thumb control valve.

Figure 13-10 Features of a collection system for sputum specimens that does not have a thumb control valve.
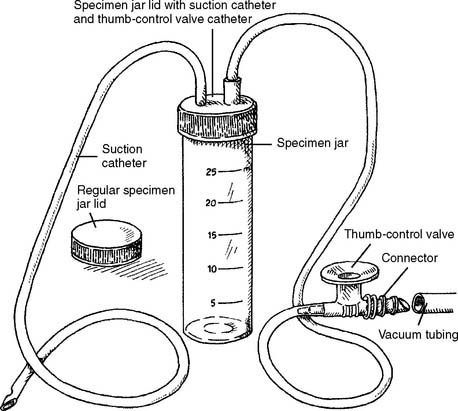
Figure 13-11 Features of a collection system for sputum specimens that has a thumb control valve built into catheter.
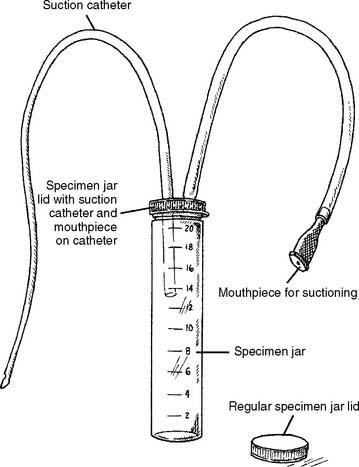
The specimen jar has volume markings. It screws into either a special lid used to suction the specimen or a regular lid. The regular lid is used for shipment to the laboratory. The special lids used in the systems featured in Figures 13-9 and 13-10 must be connected to a sterile catheter. Figure 13-11 shows a system with its own catheter. The vacuum source is provided to these specimen collectors by a length of vacuum tubing, as in the previously described suction catheter systems. Figure 13-12 shows a DeLee system, which is sometimes used in the delivery room. The physician, nurse, or practitioner uses mouth suction to remove secretions from the newborn. In all of these examples, after the sample has been collected, the special lid is unscrewed and replaced with the regular specimen jar lid.
MODULE B
1. Manipulate vacuum regulator systems by order or protocol (ELE Code: IIA21) [ELE Difficulty: R, Ap, An]
3. Put the equipment together and make sure that it works properly
a. Portable vacuum systems
Portable units are designed to be moved with the patient. They may be mounted on a small platform (Figure 13-13) or on a wheeled cart. The portable systems generally include an electrically powered vacuum pump with an ON/OFF switch and a collection bottle. Some units have a control valve for adjusting the level of negative pressure. A negative-pressure gauge is used to determine how much vacuum is being applied. A length of rubber vacuum tubing is used to pass the negative pressure from the pump to the collection bottle. Another length of vacuum tubing is used to pass the vacuum through to the suction catheter. Portable systems are not as powerful as central vacuum systems. They are not very effective at suctioning out large amounts of thick secretions.
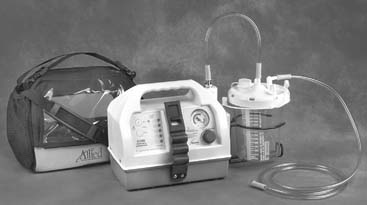
Figure 13-13 Portable suction machine, showing the electrically powered motor, collection bottle and cap, and connecting tubing.
(Courtesy Allied Health Care Products, St Louis, Mo.)
In general, the following steps are followed to make the units operational:
b. Central vacuum systems
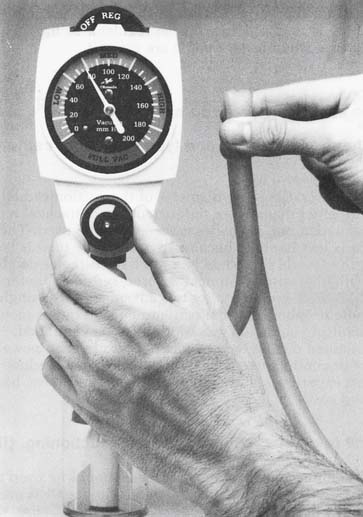
Central (wall) vacuum systems usually are available at each patient’s bedside in all special care units. Each of the wall outlets is connected through a hospital-wide piping system to a large, electrically powered vacuum pump. It is capable of generating a negative pressure far greater than that needed in most patient care situations. A regulator is used to reduce the vacuum to the desired clinical level (Figure 13-14). Either a Quick Connect or a Diameter Index Safety System (DISS) connector is used to attach the regulator to the central vacuum system.
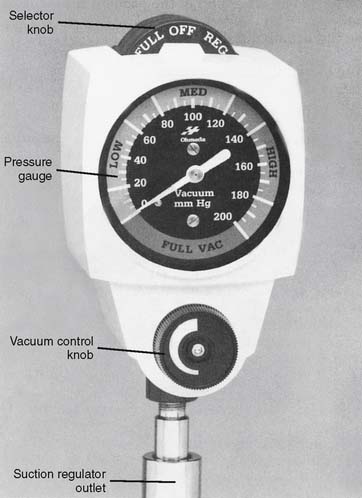
Figure 13-14 Features of the Ohmeda central vacuum regulator with a three-position selector knob.
(Courtesy Ohmeda Medical, Columbia, Md.)
In general, the following steps are followed to make the units operational:
MODULE C
1. Prevent hypoxemia during the suctioning procedure (ELE code: IIID9) [ELE Difficulty: R, Ap, An]
Before beginning the procedure, check the patient’s arterial blood gas results or Spo2 to see whether the patient is hypoxic. The Spo2 also can be monitored throughout the suctioning procedure to see how low the saturation drops (review the chapter for guidelines on oxygenation and limiting hypoxemia). After suctioning, give the patient supplemental oxygen until the Spo2 reaches at least 90%. The patient’s chart also should be checked for any history of cardiac problems. Sudden hypoxemia from suctioning can result in life-threatening dysrhythmias, such as premature ventricular contractions (PVCs). Check the patient’s pulse rate and rhythm before and after suctioning. If the patient is using a cardiac monitor, it should be watched for rate and rhythm changes that are related to the suctioning procedure. Tachycardia is frequently seen with hypoxemia. Check the blood pressure of any patient who has suctioning-related dysrhythmias. The patient’s vital signs should return to normal when oxygenation is restored.
2. Perform endotracheal or tracheostomy tube suctioning on the patient (Code: IIIC2) [Difficulty: ELE: R, Ap; WRE: An]
Box 13-1 presents the hazards and complications of endotracheal suctioning.
3. Perform nasotracheal suctioning on the patient (Code: IIIC1b) [Difficulty: ELE: R, Ap; WRE: An]
The generally accepted steps in the procedure are as follows:
Box 13-2 presents the contraindications, hazards, and complications of nasotracheal suctioning.
4. Perform oropharyngeal suctioning on the patient (Code: IIIC1c) [Difficulty: ELE: R, Ap; WRE: An]
If a patient is unable to swallow saliva or food properly or has vomitus in the mouth, it must be removed. Signs of improper swallowing may include drooling, gagging, retching, and coughing. Oropharyngeal suctioning is performed on intubated and unintubated patients. In many institutions, the suctioning device may be used more than once.
The generally accepted steps for oropharyngeal suctioning of an unintubated patient are as follows:
MODULE D
1. Analyze available information to determine the patient’s pathophysiologic state (Code: IIIH1) [Difficulty: ELE: R, Ap; WRE: An]
2. Determine the appropriateness of the prescribed therapy and goals for the identified pathophysiologic state (Code: IIIH3) [Difficulty: ELE: R, Ap; WRE: An]
a. Make a change in the size and type of suction catheter (ELE code: IIIF2h2) [ELE Difficulty: R, Ap, An]
As discussed earlier, the OD of the suction catheter should be no more than one-half the ID of the patient’s endotracheal tube. If the secretions are easy to suction out, a smaller catheter may be used. A spontaneously breathing patient is less likely to become hypoxic if the tube is less obstructed.
d. Change the frequency of suctioning (ELE code: IIIF2h1) [ELE Difficulty: R, Ap, An]
Secretions obstruct the airways and should be removed if possible. Often this requires more than one suctioning episode. The patient is unlikely to be harmed with repeated suctioning as long as proper technique is followed and the patient is reoxygenated between sessions. Watch for any of the complications listed in Boxes 13-1 and 13-2. Listen to the patient’s breath sounds for crackles (rhonchi) or palpate the chest for secretions (tactile fremitus) between suctioning efforts. Stop suctioning when it is no longer needed.
f. Terminate the procedure based on the patient’s response (Code: IIIF1) [Difficulty: ELE: R, Ap; WRE: An]
Stop the procedure if the patient becomes hypoxic or has tachycardia, bradycardia, arrhythmias, hypotension, bronchospasm, or any of the other hazards or complications listed in Boxes 13-1 and 13-2. Bloody secretions indicate possible mucosal damage and justify stopping the procedure. Hypoxemia can cause unstable vital signs, and vagal stimulation can cause bradycardia and bronchospasm. Be prepared to stop suctioning, give extra oxygen, or get help.
MODULE E
1. Record and evaluate the patient’s response to the procedure or procedures.
a. Record and interpret the following: heart rate and rhythm, respiratory rate, blood pressure, body temperature, and pain level (Code: IIIA1b4) [Difficulty: ELE: R, Ap; WRE: An]
See the discussion on these topics in Chapter 1 or earlier in this chapter.
b. Record and interpret the patient’s breath sounds (Code: IIIAb3) [Difficulty: ELE: R, Ap; WRE: An]
American Association for Respiratory Care (AARC) Clinical Practice Guideline. Endotracheal suctioning of mechanically ventilated adults and children with artificial airways. Respir Care. 1993;38:500.
American Association for Respiratory Care (AARC) Clinical Practice Guideline. Nasotracheal suctioning: 2004 revision and update. Respir Care. 2004;49:1080.
American Association for Respiratory Care (AARC) Clinical Practice Guideline. Nasotracheal suctioning. Respir Care. 1992;37:898.
American Association for Respiratory Care (AARC) Clinical Practice Guideline. Suctioning of the patient in the home. Respir Care. 1999;44:99.
American Association for Respiratory Therapy. Guidelines for the prevention of nosocomial infections. AAR Times. 1983;7(9):49-52.
Burton GG. Patient assessment procedures. In: Barnes TA, editor. Respiratory care practice. St Louis: Mosby, 1998.
Cairo JM, Pilbeam SP, editors. Mosby’s respiratory care equipment, ed 8, St Louis: Mosby, 2009.
Caldwell SL, Sullivan KN. Suctioning protocol. In Burton GG, Hodgkin JE, editors: Respiratory care, ed 2, Philadelphia: Lippincott, 1984.
Durbin CG. Airway management. In Cairo JM, Pilbeam SP, editors: Mosby’s respiratory care equipment, ed 7, St Louis: Mosby, 2004.
Eubanks DH, Bone RC. Comprehensive respiratory care, ed 2. St Louis: Mosby, 1990.
Fink JB, Hess DR. Secretion clearance techniques. In: Hess DR, MacIntyre NR, Mishoe SC, et al, editors. Respiratory care principles and practice. Philadelphia: WB Saunders, 2002.
Hess DR, Branson RD. Airway and suctioning equipment. In Branson RD, Hess DR, Chatburn RL, editors: Respiratory care equipment, ed 2, Philadelphia: Lippincott Williams & Wilkins, 1999.
Lewis RM. Airway care. In: Fink JB, Hunt GE, editors. Clinical practice in respiratory care. Philadelphia: Lippincott Williams & Wilkins, 1999.
May RA, Bortner PL. Airway management. In: Hess DR, MacIntyre NR, et al, editors. Respiratory care: principles and practice. Philadelphia: WB Saunders, 2002.
McIntyre D. Airway management. In: Wyka KA, Mathews PJ, Clark WF, editors. Foundations of respiratory care. Albany, NY: Delmar, 2002.
Pettignano MM, Pettignano R. Airway management. In: Barnhart SL, Czervinske MP, editors. Perinatal and pediatric respiratory care. Philadelphia: WB Saunders, 1995.
Plevak DJ, Ward JJ. Airway management. In Burton GG, Hodgkin JE, Ward JJ, editors: Respiratory care, ed 4, Philadelphia: Lippincott-Raven, 1997.
Rarey KP, Youtsey JW. Respiratory patient care. Englewood Cliffs, NJ: Prentice-Hall, 1981.
Roth P. Airway care. In Aloan CA, Hill TV, editors: Respiratory care of the newborn and child, ed 2, Philadelphia: Lippincott, 1997.
Scott AA, Koff PB. Airway care and chest physiotherapy. In Koff PB, Eitzmann DV, Neu J, editors: Neonatal and pediatric respiratory care, ed 2, St Louis: Mosby, 1993.
Shapiro BA, Kacmarek RM, Cane RD, et al. Clinical application of respiratory care, ed 4. St Louis: Mosby, 1991.
Simmons KF, Scanlan CL. Airway management. In Wilkins RL, Stoller JK, Kacmarek RM, editors: Egan’s fundamentals of respiratory care, ed 9, St Louis: Mosby, 2009.
White GC. Equipment theory for respiratory care, ed 4. Clifton Park, NY: Thomson Delmar Learning, 2005.
Wilkins RL, Stoller JK, Kacmarek RM, editors. Egan’s fundamentals of respiratory care, ed 9, St Louis: Mosby, 2009.
Wilkins RL, Specht L. Fundamentals of physical examination. In Wilkins RL, Krider SJ, Krider SJ, editors: Clinical assessment in respiratory care, ed 5, St Louis: Mosby, 2005.
Wilkins RL, Hodgkin JE, Lopez B. Lung sounds: a practical guide. St Louis: Mosby, 1988.
Wojciechowski WV. Incentive spirometers and secretion evacuation devices and inspiratory muscle training devices. In Barnes TA, editor: Core textbook of respiratory care practice, ed 2, St Louis: Mosby, 1994.
SELF-STUDY QUESTIONS FOR THE ENTRY LEVEL EXAM See page 596 for answers
SELF-STUDY QUESTIONS FOR THE WRITTEN REGISTRY EXAM See page 621 for answers