[level-membership-for-orthopaedics-category]
Chapter 37 Stryker Biosteon Cross-Pin Femoral Fixation for Soft-Tissue Anterior Cruciate Ligament Reconstruction
Introduction
In the past, soft-tissue anterior cruciate ligament (ACL) reconstructions have had several distinct disadvantages, despite the fact that multiple-strand hamstring grafts have been shown to have higher strength, stiffness, and cross-sectional area compared with patellar tendon grafts.1–3 Soft-tissue healing into bone tunnels is considerably slower than bone–bone healing (about three times slower4) and probably takes as long as 10 to 12 months for mature healing with Sharpey’s fibers to occur.5 Fixation points distant from the intraarticular portion of the graft have resulted in more motion of the graft within the tunnel, creating additional problems with graft–tunnel healing, as well as contributing to tunnel widening. Fixation has traditionally been the weak link in soft-tissue reconstructions, with constructs that both were weak initially and failed to withstand extended cyclical loading, which would be necessary to allow the additional time for soft-tissue–bone healing to occur. However, the morbidity of hamstring harvest seems to offer several significant advantages over that of patellar tendon grafts, including issues such as extensor weakness, anterior knee pain, patellar entrapment/patella baja, and patella fracture. In short, the conventional wisdom was that patellar tendon grafts provided tighter knees with more secondary problems, whereas hamstring grafts resulted in increased laxity but less morbidity.
Successful ACL reconstruction using hamstring autograft requires stable initial graft fixation and, ultimately, graft–bone healing. Hamstring reconstruction using femoral cross-pin fixation has been shown to have excellent initial mechanical properties, including pullout strength.8,9 Whereas femoral interference screw fixation requires a slightly more anterior femoral tunnel that fails to reproduce native ACL anatomy exactly, cross-pin fixation allows for placement of the femoral tunnel in the far posterolateral notch, a more anatomical position that provides improved biomechanical properties. The Stryker Biosteon Femoral Cross-Pin technique described in this chapter has the mechanical advantage of achieving “press-fit” graft fixation close to the knee joint and therefore increased graft stiffness,10 as well as the biological advantage of not interfering with bony and soft-tissue–bone healing.
Why Hydroxyapatite?
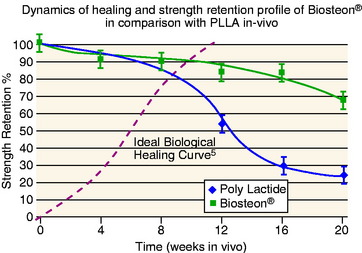
Hydroxyapatite has been widely investigated and used extensively as a bone graft substitute, and it has a track record of being safe and effective (references). The basic advantages of this application are: (1) pH buffering, (2) the implant material is replaced by bone, and (3) the modulus of elasticity is matched to bone (i.e., no stress shielding). In terms of pH, hydroxyapatite particles provide a buffering effect as the poly-L-lactic acid (PLLA) is degraded into lactic acid.11 The material is therefore not subject to autocatalytic degradation, which can result in formation of a sterile abscess. This also serves to create a more controlled degradation process, with more gradual loss of strength over an extended period of time compared with PLLA alone (Fig. 37-1).
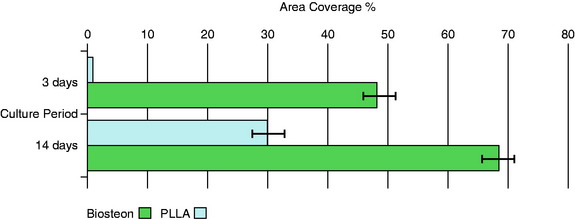
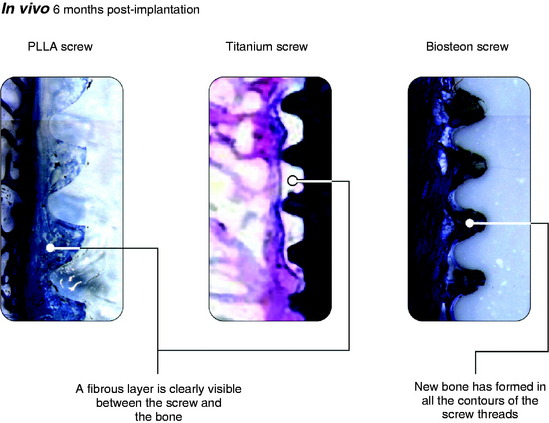
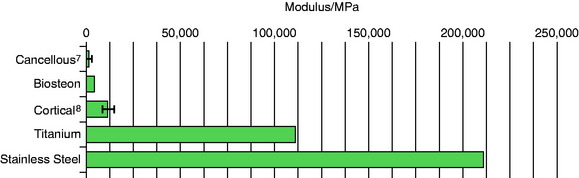
Osteoblasts bind preferentially to the surface of Biosteon as compared with poly-L-lactic acid (PLLA) alone (Fig. 37-2). Hydroxyapatite is remodeled through cell-mediated processes. Osteoblasts cultured on the surface of hydroxyapatite express genes associated with the production of osteocalcin and CBFA-1 (proteins involved in the process of osteogenesis). With hydroxyapatite, a direct biological bond is achieved through osteoconduction, with less of a fibrotic reaction. It is therefore less likely that fixation will be compromised by an interface consisting of fibrous tissue that encapsulates the implant (Fig. 37-3). As far as modulus of elasticity, Biosteon lies somewhere between the moduli of cortical and cancellous bone (Fig. 37-4), thereby greatly decreasing the risk of stress shielding, even prior to the breakdown of the implant material. In short, hydroxyapatite enhances the healing properties of PLLA while minimizing many of the drawbacks.
Surgical Technique
Initial Arthroscopy
The patient receives intravenous antibiotics preoperatively. After induction of anesthesia, an exam under anesthesia is performed. The patient is then positioned supine with the operative leg in an arthroscopic leg holder and a tourniquet on the upper thigh. The knee is routinely injected with 30 mL of 0.25% bupivacaine (Marcaine) at the beginning of the case for purposes of preemptive analgesia. Diagnostic arthroscopy is performed, and any chondral or meniscal procedures are performed at this time. A minimal lateral wall notchplasty is performed for visualization purposes only; we rely upon accurate graft placement rather than an aggressive notchplasty to avoid impingement, as a débrided notch has been shown to regrow.12 In addition, an overzealous notchplasty may have deleterious effects on the ACL reconstruction by altering the femoral attachment site and increasing graft forces, resulting in loosening.13,14 Furthermore, removal of too much of the lateral condyle can change joint contact forces significantly.15 Preservation of the integrity of the fat pad is also of paramount importance because it reduces the risk of patellar entrapment during recovery and rehabilitation.16,17 Placement of the anterolateral portal a few millimeters superior to the conventional position serves to avoid the fat pad and will improve visualization without the need to débride or excise any of the fat pad. We typically place the anterolateral portal at the level of the distal pole of the patella (if patella alta is not present), immediately lateral to the patellar tendon.
Femoral Fixation
The transverse drill guide is aimed parallel or slightly anterior to the transcondylar axis to protect the neurovascular structures in both the posterior and medial aspects of the knee and to ensure sufficient posterior bone support for the Biosteon cross-pin, as detailed earlier. A stab incision is created laterally, and the transverse guide bullet is advanced gently to bone. It is important to avoid forcing the bullet into position against the lateral femoral cortex, as this can torque the guide and lead to significant problems in later steps due to a malaligned guide pin. If in doubt, simply ensure that the bullet slides freely in the drill guide, without regard for whether or not it is seated on bone, because the alignment of the guide is the critical factor. The bullet can be advanced down to bone after the guide pin is in place for measuring purposes (see later discussion). Once the guide bullet is in place, the 2.7-mm transverse threaded guide pin is advanced through the bullet from lateral to medial until it exits the skin medially (Fig. 37-5). Use gentle pressure rather than forcing the drill so to avoid misdirecting the pin. The guide pin should emerge at or slightly posterior to the medial epicondyle.
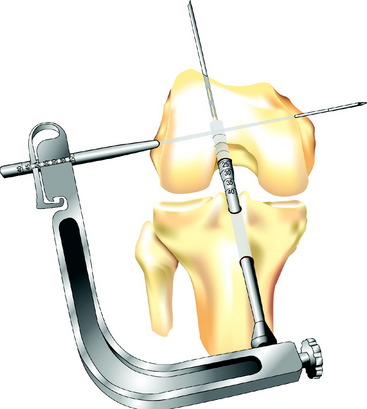
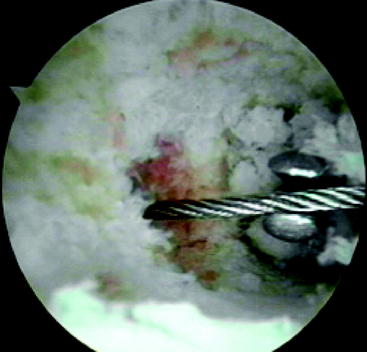
Once the transverse threaded guide pin is in place, the transverse drill guide is removed. Direct arthroscopic visualization into the femoral tunnel (through the tibial tunnel) allows the surgeon to confirm that the transverse guide pin passes through the center of the femoral tunnel (Fig. 37-6). With the arthroscope still in the femoral tunnel, the 5-mm fluted reamer is advanced over the transverse guide pin into the femoral tunnel. In most patients the drill is advanced to a depth of approximately 10 mm less than the length of the Stryker cross-pin being used. Under direct visualization, this usually corresponds to drilling just a few millimeters into the lateral wall of the femoral tunnel. In patients with less dense bone, it may only be necessary to perforate the lateral femoral cortex.
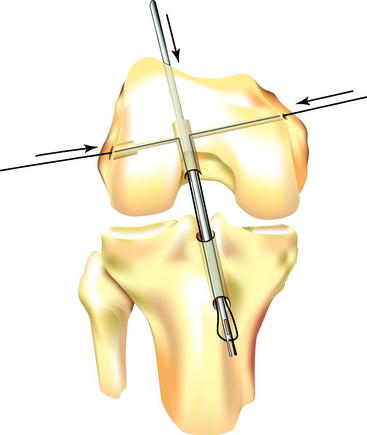
The Flexwire is then secured to the lateral end of the 2.7-mm transverse threaded guide pin already in position in the femur. The threaded guide pin is then pulled out of the femur medially, pulling the Flexwire into the femur and across the femoral tunnel. The threaded guide pin is detached medially, and the Flexwire is secured on both sides of the knee. With the arthroscope again looking into the femoral tunnel for direct visualization, the surgeon advances the 2.4-mm forked femoral guide pin back down the femoral tunnel toward the scope and captures the Flexwire with the forked end of the pin. (This step is made easier if the femur is reamed to 4.5 mm all the way out of the anterolateral cortex, as described earlier, which allows the surgeon to have some control of the direction of the forked pin while attempting to capture the Flexwire.) The pin and wire are then advanced by hand into the joint and out through the tibial tunnel (Fig. 37-7). (We opt here to detach the camera from the arthroscopic sleeve, retracting the camera and advancing the pin and wire into the sleeve under direct vision. This prevents twisting and soft-tissue impingement as the pin, wire, and sleeve are retracted together through the joint and out the tibial tunnel.) It is critically important to keep the Flexwire from twisting at all times, especially once is it out of the tibial tunnel distally. Twisting the Flexwire can be disastrous if unrecognized, causing at best abrasion and weakening of the graft as it is pulled into the tunnel and the Flexwire untwists, and at worst breakage of the Flexwire and/or amputation of the graft if the Flexwire is not untwisted prior to impacting the cross-pin into position.
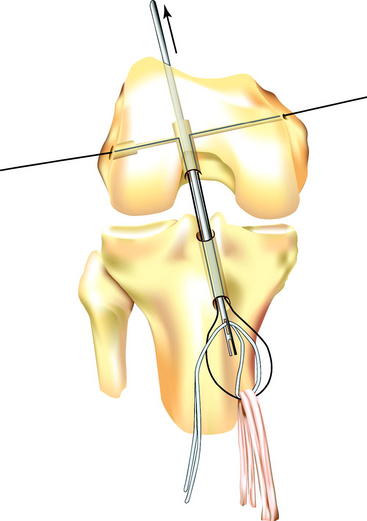
With the Flexwire and the forked femoral guide pin protruding from the distal end of the tibial tunnel, the hamstring (or other soft tissue) graft is looped over the Flexwire, again taking care not to twist either the graft or the wire. Next, a loop of polyester tape (our preference) or #5 suture, which has previously been passed through the loop of hamstring graft, is threaded through the eyelet at the end of the forked femoral guide pin (Fig. 37-8). The forked femoral guide pin is then pulled proximally through the tibial and femoral tunnels and out the skin of the anterolateral thigh, delivering the polyester tape or suture to the surgical assistant. The assistant applies tension to the tape, and the graft is advanced into the femoral tunnel to the maximum depth, while at the same time, even tension is applied to both ends of the Flexwire to pull it back up into the femoral tunnel to form a straight line again. These two actions are performed simultaneously, but the suture or tape must perform the work of pulling the graft into the femoral tunnel. If tension on the Flexwire is used to seat the graft, abrasion of the graft and/or tunnel may occur. Once the ACL graft is in place, the Flexwire should glide easily medially and laterally with minimal resistance; this confirms that there is free passage through the transcondylar tunnel and the loop of graft. However, this maneuver should only be performed once so as to avoid abrasion of the graft. After graft position is confirmed, one end of the tape or suture is cut and the other end is pulled out of the thigh. This is done to avoid trapping the tape or suture when the stepped insertion pin and subsequently the cross-pin itself are passed, and also to facilitate their passage.
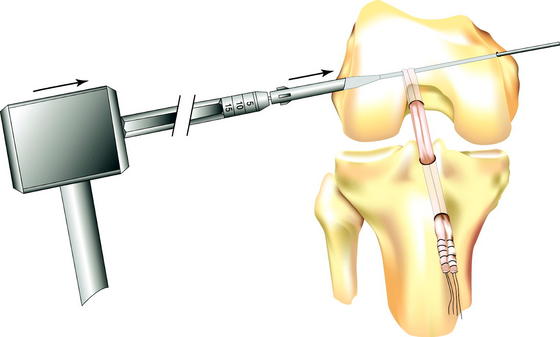
The stepped insertion pin is then attached to the Flexwire laterally and advanced into the femur and through the loop of graft in the femoral tunnel, leaving enough of the pin protruding laterally to guide the cross-pin into position. The Flexwire can then be detached from the pin medially, although this step is not necessary. The surgeon can test graft position by tensioning the distal sutures, confirming that the graft is looped over the rigid guidewire in the femoral tunnel. The Biosteon cross-pin is then passed over the lateral end of the stepped insertion pin and advanced by hand until the cross-pin is seated against the shoulder of the stepped insertion pin. The cannulated tamp is placed against the cross-pin and used to advance it over the insertion pin (and thereby under the graft) with a mallet until it is seated (Fig. 37-9). The cross-pin is fully seated into the lateral condyle when the shoulder of the tamp is flush with the lateral femoral cortex. The stepped insertion pin is then removed medially.
Biomechanical Performance of Stryker Biosteon Cross-Pin
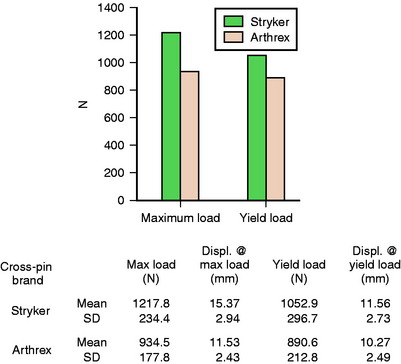
The Biosteon cross-pin was tested for pullout strength and mode of failure at an outside laboratory in a porcine model. In the porcine model, the average maximum load was 1217.8N, whereas the average yield load was 1052.9N. This compared favorably with the Arthrex Bio-TransFix (PLA) pin, which had significantly lower values in both categories. Displacement at yield load averaged 11.56 mm for the Stryker implant, which was similar to the Arthrex implant. (Please see Fig. 37-10 for full details.) Of note is the fact that a higher percentage of the Arthrex ACL reconstructions failed via graft failure at the proximal end, which could be attributed to the fact that the Arthrex implant has a 5-mm diameter compared with the 6-mm diameter of the Stryker implant, which should create less of a stress riser on the graft as it loops over the implant. In keeping with this trend, a greater proportion of the Stryker implants actually broke, as opposed to the grafts failing, although again this was at a higher load.18
Conclusions
The Stryker Biosteon cross-pin achieves many of the previously unattainable goals in soft-tissue ACL fixation on the femoral side. Rigid initial fixation, which is resistant to cycling, is obtained. The fixation is placed relatively close to the intraarticular portion of the graft, thereby effectively shortening graft length and minimizing the potential for creep and tunnel widening. A good press-fit is obtained, which should serve to promote graft–bone healing. A bioabsorbable implant material is used, which promotes bony healing in addition to simplifying revision surgery. Finally, anatomical graft placement is possible, and fixation is not compromised by posterior wall blowout. We believe that these factors represent a significant advancement in soft-tissue ACL reconstruction, bringing it closer to the gold standard of bone–patellar tendon–bone reconstruction in terms of stability and healing while maintaining the advantages of less morbidity (see Table 37-1 for pitfalls and solutions).
| Problem | Solution |
|---|---|
| Posterior wall disruption | No compromise in fixation, as long as cross-pin is oriented properly (parallel to transepicondylar axis or angled slightly anteriorly). Consider making the femoral tunnel slightly deeper to ensure adequate bone support posterior to the cross-pin. |
| Difficulty capturing Flexwire with forked femoral guide pin | As part of femoral tunnel preparation, overdrill with a 4.5 reamer all the way through the femur and out the anterolateral cortex, which will allow some control of the direction of the forked guide pin while trying to capture the Flexwire. |
| Twisting of Flexwire (can cause breakage of Flexwire and/or amputation of graft) | Prevent this by bringing the Flexwire down through the tibial tunnel under direct visualization with the arthroscope. After the graft is pulled into the femoral tunnel, confirm that no twist is present by checking that the Flexwire slides back and forth easily across the femur (once only to avoid graft abrasion). |
| Damage to forked femoral guide pin (by either the transverse threaded guide pin or the step drill) | Ensure the pin is withdrawn far enough proximally so that the tip is completely out of the femoral tunnel but still in the femur (under direct arthroscopic visualization through the tibial tunnel). |
| Difficulty passing stepped insertion pin and/or cross-pin (implant) | When drilling with the step drill, make sure to penetrate all the way into the femoral tunnel, and then touch the tip of the drill bit against the far (medial) side of the tunnel to create a small divot to assist the stepped insertion pin, and later the actual implant, in finding the path. If the stepped insertion still will not pass, you may tap gently with a mallet while maintaining tension on the Flexwire from the medial side. |
1 Brahmabhatt V, Smolinski R, McGlowan J, et al. Double-stranded hamstring tendons for anterior cruciate ligament reconstruction. Am J Knee Surg. 1999;12:141-145.
2 Hamner DL, Brown CH, Steiner ME, et al. Hamstring tendon grafts for reconstruction of the anterior cruciate ligament: biomechanical evaluation of the use of multiple strands and tensioning techniques. J Bone Joint Surg. 1999;81A:549-557.
3 Noyes FR, Butler DL, Grood ES, et al. Biomechanical analysis of human ligament grafts used in knee ligament repairs and reconstructions. J Bone Joint Surg. 1984;66A:344-352.
4 Rodeo SA, Arnoczky SP, Torzilli PA, et al. Tendon-healing in a bone tunnel. A biomechanical and histological study in the dog. J Bone Joint Surg. 1993;75A:1795-1803.
5 Robert H, Es-Sayeh J, Heymann D, et al. Hamstring insertion site healing after anterior cruciate ligament reconstruction in patients with symptomatic hardware or repeat rupture: a histologic study in 12 patients. Arthroscopy. 2003;19:948-954.
6 Ciccone WJ, Motz C, Bentley C, et al. Bioabsorbable implants in orthopaedics: new developments and clinical applications. J Am Assoc Orthop Surg. 2001;9:280-288.
7 Martinek V, Lattermann C, Watkins SC, et al. The fate of the poly-L-lactic acid interference screw after anterior cruciate ligament reconstruction. Arthroscopy. 2001;17:73-76.
8 Kousa P, Järvinen TL, Vihavainen M, et al. The fixation strength of six hamstring tendon graft fixation devices in anterior cruciate ligament reconstruction. Part I: femoral site. Am J Sports Med. 2003;31:174-181.
9 Paulos LE, Ellis B. ACL fixation pullout studies. Salt Lake City: Orthopedic Biomechanics Institute, 2002.
10 Scheffler SU, Südkamp NR, Göckenjan A, et al. Biomechanical comparison of hamstring and patellar tendon graft anterior cruciate ligament reconstruction techniques: the impact of fixation level and method under cyclic loading. Arthroscopy. 2003;18:304-315.
11 Agrawal CM, Fan MM, Zhu C, et al. A new technique to control the pH in the vicinity of biodegradable implants. Presented at the Fifth World Biomaterials Congress, Montreal, Canada, April, 1996. 1996.
12 LaPrade RF, Terry GC, Montgomery RD, et al. The effects of aggressive notchplasty on the normal knee in dogs. Am J Sports Med. 1998;26:193-200.
13 Hame SL, Markolf KL, Hunter DM, et al. Effects of notchplasty and femoral tunnel position on excursion patterns of an anterior cruciate ligament graft. Arthroscopy. 2003;19:340-345.
14 Markolf KL, Hame SL, Hunter DM, et al. Biomechanical effects of notchplasty in anterior cruciate ligament reconstruction. Am J Sports Med. 2002;30:83-89.
15 Lowe WR, Noble P. Unpublished data
16 Paulos LE, Rosenberg TD, Drawbert J, et al. Infrapatellar contracture syndrome: an unrecognized cause of knee stiffness with patella entrapment and patella infera. Am J Sports Med. 1987;15:331-341.
17 Paulos LE, Wnorowoski DC, Greenwald AE. Infrapatellar contracture syndrome: diagnosis, treatment, and long-term follow-up. Am J Sports Med. 1994;22:440-449.
18 Stryker Endoscopy data. 2002. Study performed by Frontier Biomedical, Logan, UT
Böstman 1992 Böstman O. Intense granulomatous inflammatory lesions associated with absorbable internal fixation devices made of polyglycolide in ankle fracture. Clin Orthop. 1992;278:191-199.
Brand JC, Pienkowski D, Steenlage E, et al. Interference screw fixation strength of a quadrupled hamstring tendon graft is directly related to bone mineral density and insertion torque. Am J Sports Med. 2000;28:705-710.
Ciarelli MJ, Goldstein SA, Kuhn JL, et al. Evaluation of orthogonal mechanical properties and density of human trabecular bone from major metaphyseal regions with materials testing and computed tomography. J Orthop Res. 1991;9:674-682.
Frokjaer J, Moller BN. Biodegradable fixation of ankle fractures. Complications in a prospective study of 25 cases. Acta Orthop Scand. 1992;63:434-436.
Gefen A. Optimising the biomechanical compatibility of orthopaedic screws for fracture fixation. Engineering Physics. 2002;23:337-347.
Kehoe NJS, Hackney RG, Barton NJ. Incidence of osteoarthritis in the scapho-trapezial joint after Herbert screw fixation of the scaphoid. J Hand Surg. 2003;28B:496-499.
Kousa P, Järvinen TL, Vihavainen M, et al. The fixation strength of six hamstring tendon graft fixation devices in anterior cruciate ligament reconstruction. Part II: tibial site. Am J Sports Med. 2003;31:182-188.
Lotz JC, Gerhart TN, Hayes WC. Mechanical properties of metaphyseal bone in the proximal femur. J Biomech. 1991;24:317-329.
[/level-membership-for-orthopaedics-category][not-level-membership-for-orthopaedics-category]
Chapter 37 Stryker Biosteon Cross-Pin Femoral Fixation for Soft-Tissue Anterior Cruciate Ligament Reconstruction
Introduction
In the past, soft-tissue anterior cruciate ligament (ACL) reconstructions have had several distinct disadvantages, despite the fact that multiple-strand hamstring grafts have been shown to have higher strength, stiffness, and cross-sectional area compared with patellar tendon grafts.1–3 Soft-tissue healing into bone tunnels is considerably slower than bone–bone healing (about three times slower4) and probably takes as long as 10 to 12 months for mature healing with Sharpey’s fibers to occur.5 Fixation points distant from the intraarticular portion of the graft have resulted in more motion of the graft within the tunnel, creating additional problems with graft–tunnel healing, as well as contributing to tunnel widening. Fixation has traditionally been the weak link in soft-tissue reconstructions, with constructs that both were weak initially and failed to withstand extended cyclical loading, which would be necessary to allow the additional time for soft-tissue–bone healing to occur. However, the morbidity of hamstring harvest seems to offer several significant advantages over that of patellar tendon grafts, including issues such as extensor weakness, anterior knee pain, patellar entrapment/patella baja, and patella fracture. In short, the conventional wisdom was that patellar tendon grafts provided tighter knees with more secondary problems, whereas hamstring grafts resulted in increased laxity but less morbidity.
Successful ACL reconstruction using hamstring autograft requires stable initial graft fixation and, ultimately, graft–bone healing. Hamstring reconstruction using femoral cross-pin fixation has been shown to have excellent initial mechanical properties, including pullout strength.8,9 Whereas femoral interference screw fixation requires a slightly more anterior femoral tunnel that fails to reproduce native ACL anatomy exactly, cross-pin fixation allows for placement of the femoral tunnel in the far posterolateral notch, a more anatomical position that provides improved biomechanical properties. The Stryker Biosteon Femoral Cross-Pin technique described in this chapter has the mechanical advantage of achieving “press-fit” graft fixation close to the knee joint and therefore increased graft stiffness,10 as well as the biological advantage of not interfering with bony and soft-tissue–bone healing.
Why Hydroxyapatite?
Hydroxyapatite has been widely investigated and used extensively as a bone graft substitute, and it has a track record of being safe and effective (references). The basic advantages of this application are: (1) pH buffering, (2) the implant material is replaced by bone, and (3) the modulus of elasticity is matched to bone (i.e., no stress shielding). In terms of pH, hydroxyapatite particles provide a buffering effect as the poly-L-lactic acid (PLLA) is degraded into lactic acid.11 The material is therefore not subject to autocatalytic degradation, which can result in formation of a sterile abscess. This also serves to create a more controlled degradation process, with more gradual loss of strength over an extended period of time compared with PLLA alone (Fig. 37-1).
Osteoblasts bind preferentially to the surface of Biosteon as compared with poly-L-lactic acid (PLLA) alone (Fig. 37-2). Hydroxyapatite is remodeled through cell-mediated processes. Osteoblasts cultured on the surface of hydroxyapatite express genes associated with the production of osteocalcin and CBFA-1 (proteins involved in the process of osteogenesis). With hydroxyapatite, a direct biological bond is achieved through osteoconduction, with less of a fibrotic reaction. It is therefore less likely that fixation will be compromised by an interface consisting of fibrous tissue that encapsulates the implant (Fig. 37-3). As far as modulus of elasticity, Biosteon lies somewhere between the moduli of cortical and cancellous bone (Fig. 37-4), thereby greatly decreasing the risk of stress shielding, even prior to the breakdown of the implant material. In short, hydroxyapatite enhances the healing properties of PLLA while minimizing many of the drawbacks.
Surgical Technique
Initial Arthroscopy
The patient receives intravenous antibiotics preoperatively. After induction of anesthesia, an exam under anesthesia is performed. The patient is then positioned supine with the operative leg in an arthroscopic leg holder and a tourniquet on the upper thigh. The knee is routinely injected with 30 mL of 0.25% bupivacaine (Marcaine) at the beginning of the case for purposes of preemptive analgesia. Diagnostic arthroscopy is performed, and any chondral or meniscal procedures are performed at this time. A minimal lateral wall notchplasty is performed for visualization purposes only; we rely upon accurate graft placement rather than an aggressive notchplasty to avoid impingement, as a débrided notch has been shown to regrow.12 In addition, an overzealous notchplasty may have deleterious effects on the ACL reconstruction by altering the femoral attachment site and increasing graft forces, resulting in loosening.13,14 Furthermore, removal of too much of the lateral condyle can change joint contact forces significantly.15 Preservation of the integrity of the fat pad is also of paramount importance because it reduces the risk of patellar entrapment during recovery and rehabilitation.16,17 Placement of the anterolateral portal a few millimeters superior to the conventional position serves to avoid the fat pad and will improve visualization without the need to débride or excise any of the fat pad. We typically place the anterolateral portal at the level of the distal pole of the patella (if patella alta is not present), immediately lateral to the patellar tendon.
