Chapter 34 Stratis ST Femoral Fixation System
Introduction
It has been estimated that approximately 200,000 anterior cruciate ligament (ACL) injuries occur annually, with approximately 100,000 patients per year undergoing reconstruction.1 Over the past decade, ACL reconstruction utilizing soft tissue grafts, such as hamstring autograft or tibialis anterior allograft, has gained increased popularity compared with bone–patellar tendon–bone (BPTB) autograft due to the decreased morbidity of hamstring harvesting, excellent clinical results, and availability of a variety of soft tissue allograft constructs. There remains continued controversy regarding graft options for ACL reconstructions. Of the graft choices available, the two most commonly used are autologous BPTB grafts and autologous hamstring tendon grafts. Even more perplexing is the number of fixation methods currently available.
For many surgeons, BPTB autograft remains the gold standard. Several long-term studies have demonstrated good outcomes with the use of this graft.2,3 Due to the morbidity associated with BPTB autograft, the use of hamstring tendon autograft has become increasingly popular. A number of prospective clinical trials comparing patellar tendon versus hamstring tendon have demonstrated comparable clinical results after 2-year follow-up.4–9 Additional studies, including a study by Feller and Webster,10 have demonstrated increased laxity based on KT-1000 in ACL reconstructions with hamstring tendon compared with patellar tendon. However, this difference was not clinically significant because patients in both groups demonstrated similar clinical scores and functional outcomes.
One of the primary advantages of using hamstring tendon in ACL reconstruction appears to be less donor site morbidity compared with patellar tendon. Namely, there is a lower incidence of anterior knee pain and a decreased risk of extension deficits, although some authors have found flexion deficits in patients with ACL reconstruction using hamstring tendon grafts.11,12 The weakness in extension or flexion following either patellar tendon or hamstring tendon harvest appears to be most pronounced early on, with differences diminishing between groups over time.13 Another concern regarding the use of hamstring tendon grafts is the phenomenon of tunnel widening associated with early forms of femoral fixation.14 With improvements in surgical technique and advances in femoral fixation devices, the differences in tunnel widening between hamstring and patellar tendon grafts have been reduced.15
The earliest forms of fixation for soft tissue grafts included post and washer and staple fixation. This required a significant lateral femoral dissection for the over-the-top or outside-in femoral guide, as well as placement of the devices used. Although the fixation strength was acceptable, the issues surrounding this technique included the surgical dissection and the rehabilitation consequences and the occurrence of painful hardware necessitating a second procedure for hardware removal and the so-called “bungee and windshield wiper effect.” Although biomechanical studies have shown that hamstring autografts have an ultimate yield strength greater than the native ACL and a stiffness curve more similar to the native ACL, the distally fixed construct placed these grafts at a disadvantage.16,17
The distal fixation also acts as a pivot point about which the graft moves during knee flexion and extension until the graft–femoral tunnel interface matures. This results in a cone-shaped tunnel widening at the articular femoral origin. Although the effect of tunnel widening on clinical outcome remains unclear, there is concern that this may affect healing of the graft–femoral tunnel interface and also create problems in the revision setting.18,19
To address these issues, different fixation devices have been devised and used. Suspensory anterior-lateral femoral cortical fixation devices have had great clinical success. They eliminate the need for a secondary lateral dissection and have good pullout strength.20 They do, however, suffer the consequences of elongation resulting from excessive length of the functional graft due to the distance of femoral cortical fixation. The use of interference screws has addressed the issue of aperture fixation at the femur. However, the concern regarding the damage the screw threads cause to the graft, as well as the less-than-optimal pullout strength, has limited their use. In addition, interference screws take up most of the space within the femoral tunnel, pushing the soft tissue graft to one side and limiting its contact with the femoral tunnel, which raises concerns of impaired graft tunnel healing.
Recently, transverse femoral tunnel pinning (transfemoral) fixation has been introduced and is gaining in popularity. These devices either spear the graft or drape the graft over a fixation pin in an anteroposterior orientation. The different designs have resulted in improved fixation and pullout strength.21,22 However, for each design there are concerns regarding graft damage and passage of the graft into the tunnel by pulling either axially or perpendicular to the tunnel, which often necessitates making a wider femoral tunnel to aid in graft passage.
Design Rationale of the Stratis ST
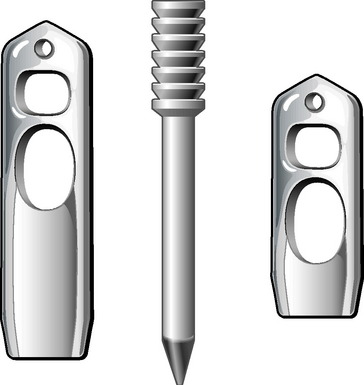
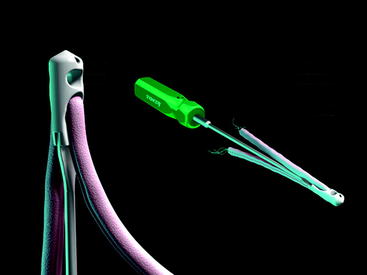
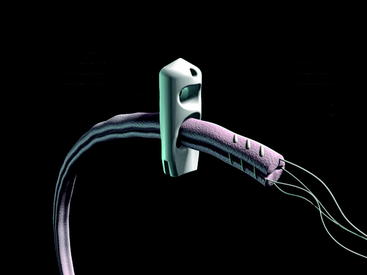
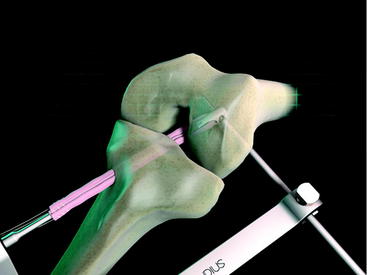
The Stratis ST femoral fixation system consists of a graft block and a ribbed transverse locking pin (Fig. 34-1). The graft block and pin are available in nonabsorbable polymer and absorbable poly-L-lactic-acid (PLLA).
1 Do Not Compromise Graft Integrity
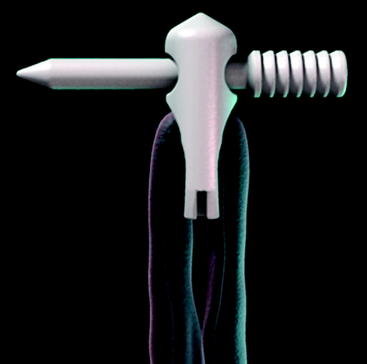
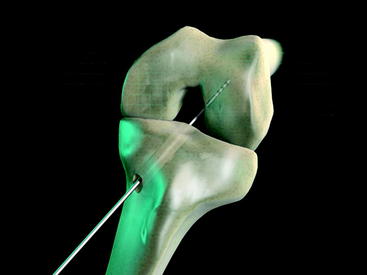
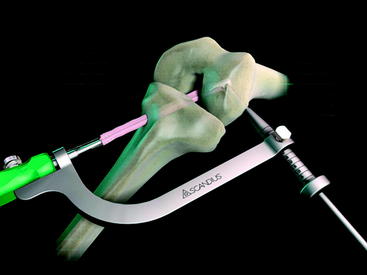
The Stratis ST femoral fixation system is designed for use with any soft tissue graft, with the quadrupled hamstring tendon being the most common autograft and tibialis anterior being the most common allograft used. The graft is passed through the distal graft portal and draped distally (Fig. 34-2). This hole is tapered smooth and contoured to deliver the graft to the distal biconcave compression fins. The transverse locking pin does not compromise or contact the soft tissue graft in any way. Instead, it locks the graft block within the femoral tunnel by docking with and traversing the more proximal locking portal. This ensures graft integrity and allows for a stiffer construct.
2 Have Excellent Pullout Strength
With the locking pin engaged in the graft block, it forms a “fixed T” construct that yields superior biomechanical characteristics. Pullout studies have shown an ultimate failure load of up to 1250N depending on which graft block is used. Cyclical loading studies of 50N to 250N showed no evidence of any creep, failure, or pin backout after 250,000 cycles.23 The locked fixed T construct also gives a theoretical decreased rotation moment because it is harder to rotate a fixed T construct through bone than it would be a simple transverse pin.
3 Have Aperture Fixation with Graft Tunnel Compression and Optimized Graft Tunnel Contact
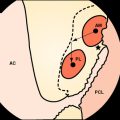
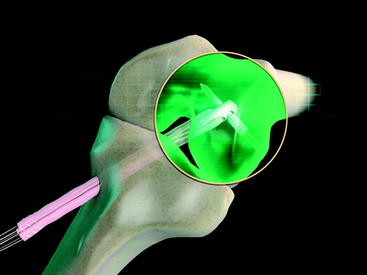
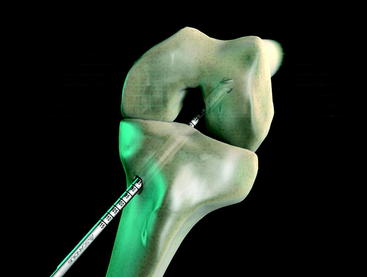
The graft block is seated no less than 5 mm from the femoral tunnel origin. This placement allows the fin of the graft block to provide rigid fixation at the tunnel aperture. In addition, the 2-mm-thick fin provides graft compression to the tunnel wall with more than 90% graft tunnel interface23 (Fig. 34-3).
4 Be Pushed into the Femoral Tunnel
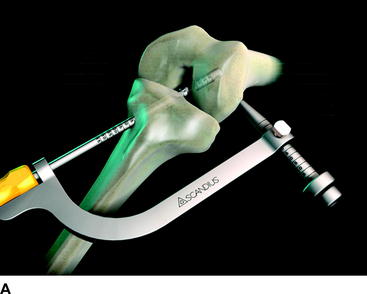
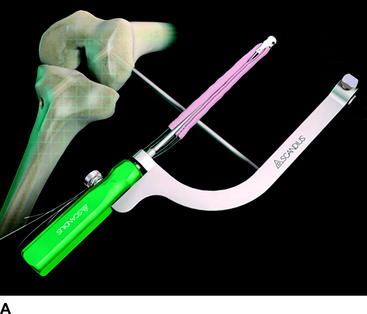
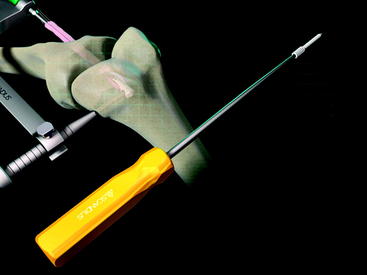
At the distal tip of the Stratis ST graft block is a docking station at which the insertion tool locks into place (Fig. 34-4). Once connected, the soft tissue graft–graft block construct can be delivered into the femoral tunnel. This locked construct allows the surgeon to better aim and guide the graft construct into the tunnel and then, once it is engaged with the tunnel, to push it into position with a mechanical advantage. This allows the surgeon to take full advantage of the compression fin and, if desired, oversize the graft but not the tunnel.
5 Orient the Graft Limbs in the Correct Anatomical Orientation
Anatomical studies show that the femoral ACL footprint consists of an anteromedial (AM) and a posterolateral (PM) bundle orientation. The design of the graft portal, which is parallel to the transverse pin, and the technique of insertion position the graft bundles into the correct anatomical orientation. This orientation, although probably not truly important to single-bundle reconstruction, plays an important role in anatomical single femoral tunnel, double-tibial tunnel, hybrid ACL reconstruction.24
Technique
Tendon Harvest
Soft tissue autografts and allografts can be used with the Stratis ST system. We most commonly use the Stratis ST system for fixation of hamstring autografts. The technique we use for harvesting hamstring tendons is outlined in a paper by Solman and Pagnani.25
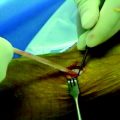
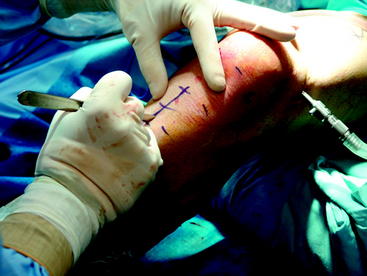
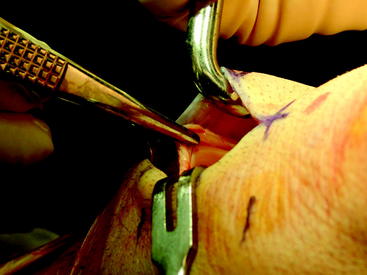
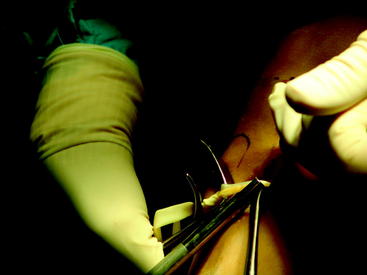
Briefly, make a longitudinal or oblique incision approximately 2 cm medial to the tibial tubercle and 4 cm distal to the joint line (Fig. 34-5). Dissect the subcutaneous tissue to expose the sartorius fascia. Incise the rolled edge of the sartorius fascia to expose the gracilis and semitendinosus tendons, which are covered by the sartorius (Fig. 34-6). Separately isolate each tendon with a 90-degree snap and deliver each under the sartorius (Fig. 34-7). Take care to cut all projecting bands and adhesions from each tendon, and bluntly dissect to the adductor hiatus. Sharply release the tendons from their attachment to the tibia. Whipstitch the ends with a sturdy suture (usually #2 nonabsorbable).
Graft Preparation
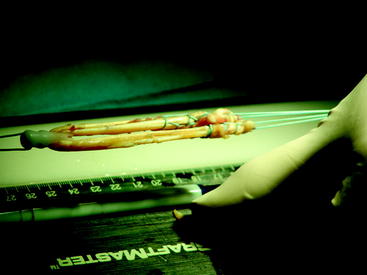
Pinch the harvested tendon between the ends of a forceps and subsequently pull it through repeatedly in order to remove any remaining muscle. Alternatively, use a Cobb elevator or the back end of a ruler. Whipstitch the ends with a sturdy suture (usually #5 nonabsorbable). Fold the two grafts over a #5 suture (Fig. 34-8).
Creation of Tibial and Femoral Tunnels
Clear the tunnel of bone debris, and chamfer it as necessary. With the knee typically bent to 90 degrees, position an appropriately sized over-the-top guide. With the appropriate position confirmed, drill the graduated guidewire until it engages the femoral cortex. Note the measured depth (Fig. 34-9). Typically a 25-mm-long graft block implant is used. However, a 35-mm graft block may be used if the guidewire hits the cortex at a depth of 50 mm or more. Advance the appropriate-diameter acorn drill over a guidewire and into the femur to a depth equal to the graft block to be used plus 5 mm; typically this will be 30 mm deep (Fig. 34-10).
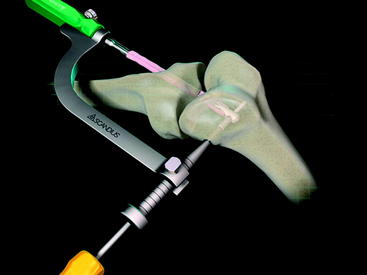
Creation of Transverse Tunnel
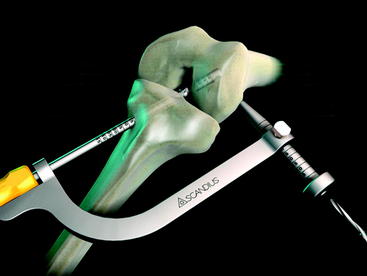
Select the tunnel guide that corresponds to the diameter of the femoral tunnel. Attach the transverse drill guide to the tunnel guide. Insert the assembled tunnel guide/transverse guide through the tibial tunnel until it is fully seated in the femoral tunnel (Fig. 34-11). The gradations on the tunnel guide should indicate a depth that corresponds to the drilled femoral tunnel depth.

Insert the drill sleeve and obturator into the opening on the distal end of the transverse guide. Make a 1-cm incision at the point where it engages skin. Using a snap to spread the iliotibial band, dissect down to the lateral femoral cortex. Advance the drill sleeve and obturator to the lateral femoral cortex (Fig. 34-12, A and B). Take care to ensure that no tissue is trapped between the sleeve and the cortex.
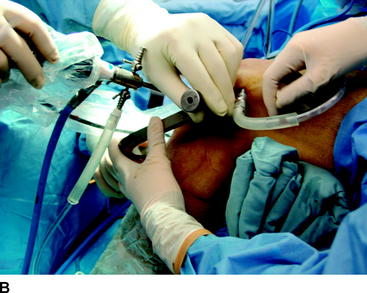
Markings on the proximal aspect of the drill sleeve indicate the distance from the lateral cortex to the lateral wall of the femoral tunnel (see Fig. 34-12, A). To provide adequate purchase for the barbed end of the fixation pin, confirm that a minimum of 15 mm lateral distance is available.
Remove the obturator from the drill sleeve. Advance the transverse drill through the drill sleeve and into the femur to the same depth as noted on the sleeve to create the transverse tunnel (Fig. 34-13).
Preparation of the Graft Block–Graft Construct
Choose the appropriate Stratis implant set. The set will contain a graft block and a fixation pin. Insert the prepared soft tissue graft into the lower eyelet of the graft block (Fig. 34-14).
Place the graft block/graft construct onto the appropriate graft block inserter. Attach the transverse guide onto the graft block inserter (Fig. 34-15, A and B). Wrap the graft suture ends around the lock nut. Temporarily insert the drill sleeve into the distal end of the transverse guide, confirming that it lines up with the upper eyelet in the graft block and that the correct inserter has been selected. Remove the drill sleeve after confirming.
Insertion of the Graft Block
During this step, the switching stick should pass through the slot in the distal end of the transverse guide (Fig. 34-16). With the inserter/construct in position, advance the drill sleeve over the switching stick and to the cortex; secure it in place (Fig. 34-17). Make note of the depth measurements on the drill sleeve; these should be roughly the same as the previous measurements.
Femoral Fixation
Place the fixation pin on the fixation pin inserter (Fig. 34-18).
Confirm the depth by reading the measurements on the shaft of the fixation pin inserter (Fig. 34-19). These should be roughly the same as those drilled with the transverse drill and measured on the drill sleeve.
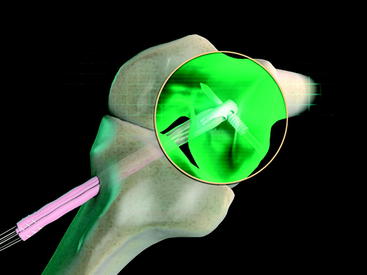
The fixation pin will engage the upper eyelet of the graft block, providing device-to-device fixation and preserving graft integrity (Fig. 34-20). The graft block offers enhanced tissue-to-tunnel compression in a more anatomical mediolateral orientation. This compression provides rigid fixation at the joint line of the femur.
Pearls and Pitfalls
1 Owings MF, Kozak LJ. Ambulatory and inpatient procedures in the United States, 1996. Vital Health Stat. 1998;139:1-119.
2 Shelbourne KD, Gray T. Anterior cruciate ligament reconstruction with autogenous patellar tendon graft followed by accelerated rehabilitation. A two- to nine-year follow up. Am J Sports Med. 1997;25:786-795.
3 Buss DD, Warren RF, Wickiewicz TL, et al. Arthroscopically assisted reconstruction of the anterior cruciate ligament with use of autogenous patellar-ligament grafts. Results after twenty-four to forty-two months. J Bone Joint Surg. 1993;75A:1346-1355.
4 Aglietti P, Giron F, Buzzi R, et al. Anterior cruciate ligament reconstruction: bone-patellar tendon-bone compared with double semitendinosus and gracilis tendon grafts. J Bone Joint Surg. 2004;86A:2143-2155.
5 Aune AK, Holm I, Risberg MA, et al. Four-strand hamstring tendon autograft compared with patellar tendon-bone autograft for anterior cruciate ligament reconstruction. Am J Sports Med. 2001;29:722-728.
6 Ejerhed L, Kartus J, Sernert N, et al. Patellar tendon or semitendinosus tendon autografts for anterior cruciate ligament reconstruction? A prospective randomized study with a two-year follow-up. Am J Sports Med. 2003;31:19-25.
7 Jansson KA, Linko E, Sandelin J, et al. A prospective randomized study of patellar versus hamstring tendon autografts for anterior cruciate ligament reconstruction. Am J Sports Med. 2003;31:12-18.
8 Laxdal G, Kartus J, Hansson L, et al. A prospective randomized comparison of bone-patellar tendon-bone and hamstring grafts for anterior cruciate ligament reconstruction. Arthroscopy. 2005;21:34-42.
9 Shaieb MD, Kan DM, Chang SK, et al. A prospective randomized comparison of patellar tendon versus semitendinosus and gracilis tendon autografts for anterior cruciate ligament reconstruction. Am J Sports Med. 2002;30:214-220.
10 Feller JA, Webster KE. A randomized comparison of patellar tendon and hamstring tendon anterior cruciate ligament reconstruction. Am J Sports Med. 2003;31:564-573.
11 Beynnon BD, Johnson RJ, Abate JA, et al. Treatment of anterior cruciate ligament injuries, part I. Am J Sports Med. 2005;33:1579-1602. [review]
12 Marder R, Raskind J, Carroll M. Prospective evaluation of arthroscopically assisted anterior cruciate ligament reconstruction: patellar tendon versus semitendinosus and gracilis tendons. Am J Sports Med. 1991;19:478-485.
13 Herrington L, Wrapson C, Matthews M, et al. Anterior cruciate ligament reconstruction, hamstring versus bone-patella tendon-bone grafts: a systematic literature review of outcome from surgery. Knee. 2005;12:41-50. [review]
14 Simonian PT, Erickson MS, Larson RV, et al. Tunnel expansion after hamstring anterior cruciate ligament reconstruction with 1-incision EndoButton femoral fixation. Arthroscopy. 2000;16:707-714.
15 Roe J, Pinczewski LA, et al. A 7-year follow-up of patellar tendon and hamstring tendon grafts for arthroscopic anterior cruciate ligament reconstruction: differences and similarities. Am J Sports Med. 2005;33:1337-1345.
16 Hamner DL, Brown CHJr, Steiner ME, et al. Hamstring tendon grafts for reconstruction of the anterior cruciate ligament: biomechanical evaluation of the use of multiple strands and tensioning techniques. J Bone Joint Surg Am. 1999;81:549-557.
17 Noyes FR, Butler DL, Grood ES, et al. Biomechanical analysis of human ligament grafts used in knee-ligament repairs and reconstructions. J Bone Joint Surg. 1984;66A:344-352.
18 Fahey M, Indelicato PA. Bone tunnel enlargement after anterior cruciate ligament replacement. Am J Sports Med. 1994;22:410-414.
19 Fauno P, Kaalund S. Tunnel widening after hamstring anterior cruciate ligament reconstruction is influenced by the type of graft fixation used: a prospective randomized study. Arthroscopy. 2005;11:1337-1341.
20 Barrett GR, Papendick L, Miller C. Endobutton button endoscopic fixation technique in anterior cruciate ligament reconstruction. Arthroscopy. 1995;11:340-343.
21 Kousa P, Jarvinen TL, Vihavainen M, et al. The fixation strength of six hamstring tendon graft fixation devices in anterior cruciate ligament reconstruction. Part I: femoral site. Am J Sports Med. 2003;31:174-181.
22 Fabbriciani C, Mulas PD, Ziranu F, et al. Mechanical analysis of fixation methods for anterior cruciate ligament reconstruction with hamstring tendon graft. An experimental study in sheep knees. Knee. 2005;12:135-138.
23 Studies on file. Littleton, MA, Scandius Biomedical
24 Frank DA, Altman GT, Re P. Hybrid anterior cruciate ligament reconstruction: introduction to a new technique for anatomic anterior cruciate ligament reconstruction. Arthroscopy. 2007. In Press
25 Solman CG, Pagnani MJ. Hamstring tendon harvesting: reviewing anatomic relationships and avoiding pitfalls. Orthop Clin N Am. 2003;34:1-8.