18 Special Procedures
Note 1: This book is written to cover every item listed as testable on the Entry Level Examination (ELE), Written Registry Examination (WRE), and Clinical Simulation Examination (CSE).
The listed code for each item is taken from the National Board for Respiratory Care’s (NBRC) Summary Content Outline for CRT (Certified Respiratory Therapist) and Written RRT (Registered Respiratory Therapist) Examinations (http://evolve.elsevier.com/Sills/resptherapist/). For example, if an item is testable on both the ELE and the WRE, it will simply be shown as: (Code: …). If an item is only testable on the ELE, it will be shown as: (ELE code: …). If an item is only testable on the WRE, it will be shown as: (WRE code: …).
MODULE A
2. Participate in land or air patient transport outside of the hospital (Code: III I3a) [Difficulty: ELE: R; WRE: Ap, An]
3. Participate in the medical emergency team (MET) (e.g., rapid response team) (Code: III I3d) [Difficulty: ELE:R, WRE: Ap, An]
The first is airborne chemical exposure to the lungs and skin. This could include lung-damaging agents (e.g., ammonia, chlorine, and phosgene gases); blistering agents of the skin, eyes, and mucous membranes (e.g., sulfur mustard [mustard gas] and phosgene); blood agents that block oxygen’s metabolism (e.g., hydrogen cyanide and cyanogen chloride); and nerve agents that block the breakdown of acetylcholine (e.g., organophosphate pesticides). In all cases, the first action is to remove the victim from the toxic area. First responders must wear a hazardous materials suit to protect themselves before entering the toxic area to remove any victims. Once a victim is taken to a safe area, specific treatment is based upon the type of chemical exposure. Then the victim will receive other supportive measures such as supplemental oxygen, airway management, and mechanical ventilation.
Second is exposure to airborne infectious agents such as the viruses that cause avian flu and severe acute respiratory syndrome (SARS) or the spores that cause anthrax. In these cases the victim must be treated by caregivers who are wearing personal protective devices such as an N95 mask or a powered air protection respirator (PAPR). See Chapter 2 for the guidelines on airborne infection control precautions.
The third scenario would be trauma from explosion, gun fire, or train wreck, for example. The most severely injured victims would have trauma to the head, neck, chest, and/or abdomen. Many would require intubation and mechanical ventilation. Airway management and intubation are covered in Chapters 12 and 18; mechanical ventilation is covered in Chapters 15 and 16.
4. Participate in disaster management (Code: III I3c) [Difficulty: ELE:R, WRE: Ap, An]
MODULE B
1. Assist with moderate (conscious) sedation (Code: IIIJ7) [Difficulty: ELE: R, Ap; WRE: An]
Medications in the benzodiazepine group are preferred for conscious sedation and given intravenously. Currently midazolam (Versed) is preferred but diazepam (Valium) is also commonly used. When the patient’s procedure is completed, these medications can be reversed by intravenous flumazenil (Romazicon). Another option is to intravenously administer the narcotic agent fentanyl (Duragesic, Sublimaze) for rapid sedation. After the procedure is completed, naloxone (Narcan) is given intravenously to reverse the effects of fentanyl. There is more discussion of these and other sedative agents in Chapter 9, Pharmacology.
The respiratory therapist must be prepared for the possibility of the patient being overdosed with a sedative agent. This could result in a decreased respiratory rate and tidal volume or apnea. Safety guidelines require either a nurse or a respiratory therapist to monitor the patient’s breathing, pulse oximetry values, heart rate, blood pressure, and electrocardiogram. The therapist must be prepared to administer supplemental oxygen or begin bag-mask ventilation if needed.
2. Assist with the insertion of venous or arterial catheters (WRE code: IIIJ6) [Difficulty: WRE: An]
Chapter 5, Advanced Cardiopulmonary Monitoring, contains discussions on preparation, care, and maintenance of central venous, arterial, and pulmonary artery lines. Review the chapter if needed.
3. Assist with ultrasound (ELE code: IIIJ9) [Difficulty: ELE: R]
4. Assist with cardioversion (Code: IIIJ8) [Difficulty: ELE: R, Ap; WRE: An]
Cardioversion (or countershock) refers to deliberately sending a direct current (DC) electrical shock through the patient’s heart. Its purpose is to suppress an abnormal heartbeat so that the normal pacemaker at the sinoatrial (SA) node assumes control. This is accomplished if a great enough electrical current is sent through the chest wall to cause the depolarization of a critical mass of myocardial cells. After this, the SA node should take over as the pacemaker, provided that the heart muscle is oxygenated and not too acidotic. Two different types of cardioversion exist: defibrillation (also called unsynchronized cardioversion) and synchronized cardioversion. Both were introduced in Chapter 11 for the treatment of specific arrhythmias.
Defibrillation is performed in an emergency situation (see Figure 11-41). Patients who need to be defibrillated include those who have ventricular tachycardia or ventricular flutter (see Figures 11-38 and 11-39) when they are pulseless, unresponsive, or hypotensive or patients who have pulmonary edema and ventricular fibrillation (see Figure 11-40). Because the fastest possible action is needed, no attempt is made to synchronize the defibrillation shock with the heart’s rhythm. While cardiopulmonary resuscitation (CPR) is being performed, the defibrillator unit is prepared. The defibrillating paddles (large positive and negative electrodes) are placed on the patient’s right anterior and left lateral chest wall. The physician or other qualified person (respiratory therapist, registered nurse, or paramedic) performing the defibrillation should call out, “Stand clear.” All other medical personnel should stand back from the patient and the bed and not touch anything that is electrically grounded. When the buttons on the paddles are pushed, the shock is administered. If it is successful, the patient’s heartbeat returns to normal sinus rhythm. If the initial shock is unsuccessful, CPR is continued. The defibrillator is then recharged for another attempt as quickly as possible. Box 18-1 shows the sequence of increasingly more powerful countershocks that can be given.
BOX 18-1 Wattage Used in Synchronous Cardioversion and Defibrillation
Synchronized cardioversion is similar in some ways to defibrillation. An electrical shock is sent by two paddles through the heart to suppress paroxysmal atrial tachycardia, atrial flutter, atrial fibrillation, or hemodynamically stable ventricular tachycardia (see Figures 11-25, 11-26, and 11-27) so that the SA node assumes control. Its major difference from defibrillation is that the electrical shock is administered automatically by the defibrillator after an R wave is recognized by the electrocardiogram (ECG) monitor (see Figure 11-5). The ECG electrodes must be in place and the best lead (often lead II) selected to show a clear, strong, upright R wave. The defibrillator unit is programmed for synchronized cardioversion. The physician holds the paddles on the patient’s right anterior and left lateral chest wall. When the discharge buttons are pushed on the paddles, the shock is sent after the next R wave is identified by the ECG monitor.
The respiratory therapist’s role in cardioversion may include the following:
5. Bronchoscopy
Bronchoscopy is a procedure that involves looking directly into the patient’s tracheobronchial airways. The physician can perform a number of diagnostic and therapeutic tasks under direct vision. (See Box 18-2 for uses, limitations, and risks of bronchoscopy.)
BOX 18-2 Uses, Limitations, and Risks of Bronchoscopy
RIGID BRONCHOSCOPY
Therapeutic Uses
FIBEROPTIC BRONCHOSCOPY
Diagnostic Uses
a. Recommend a diagnostic bronchoscopy procedure to evaluate hemoptysis or atelectasis (Code: IC3) [Difficulty: ELE: R, Ap; WRE: An]
Hemoptysis commonly is caused by blunt chest trauma or a bleeding bronchial tumor. Segmental or lobar atelectasis is commonly caused by an aspirated foreign body or a bronchial tumor. As listed in Box 18-2, bronchoscopy can be used to help diagnose and manage these problems.
c. Assist with the bronchoscopy procedure (Code: IIIJ2) [Difficulty: ELE: R, Ap; WRE: An]
Typical duties of the respiratory therapist during bronchoscopy may include the following:
d. Manipulate a bronchoscope by order or protocol (Code: IIA27) [Difficulty: ELE: R; WRE: Ap, An]
1. Get a bronchoscope for the planned procedure
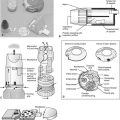
The rigid bronchoscope is a straight, hollow, stainless-steel tube (Figure 18-1). It has a distal light source so that the airway can be seen and a side port for providing oxygen or mechanical ventilation to the patient. The right and left mainstem bronchi can be observed by passing a mirror through the main channel. A hook or net can be passed through the main channel into the trachea or either bronchus to remove a foreign body. The rigid bronchoscope is preferred for the treatment of massive hemoptysis or to remove a foreign body.
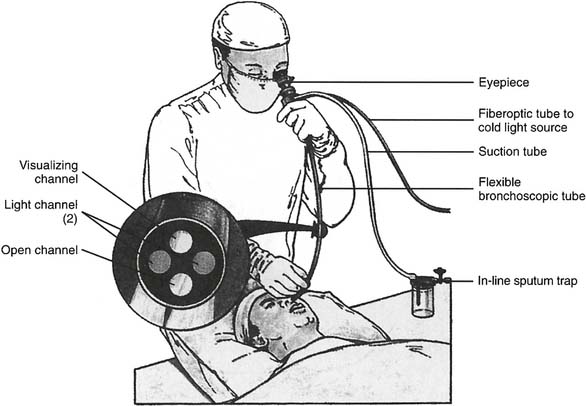
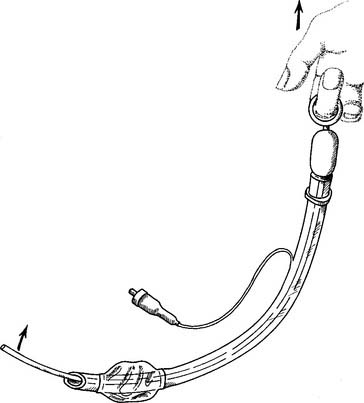
Flexible fiberoptic bronchoscopy (FFB) uses a smaller diameter flexible tube with two sets of fiberoptic bundles that shine light into the airway and allow viewing of the airway. It has gained wide popularity because it is better tolerated by the patient and allows for better visualization and collection of specimens from smaller bronchi (Figures 18-2 and 18-3). The adult bronchoscopy tube is about 5- to 6-mm outer diameter (OD), and the pediatric tube is about 3-mm OD. The small diameter and ability to guide the catheter allow the operator to look into the bronchus to each lung segment (segmental bronchi). The fiberoptic bronchoscope is preferred over the rigid one when the patient is being mechanically ventilated or has disease or trauma to the skull, jaw, or cervical spine. As shown in Figure 18-2, a photo connection allows the assistant either to take still photographs of pulmonary anatomy or to videotape the entire procedure.
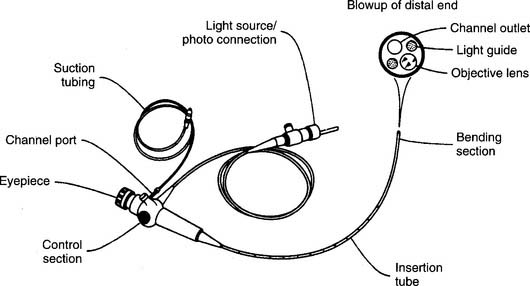
Figure 18-2 A flexible fiberoptic bronchoscope with its components and special features.
(From Wilkins RL, Stoller JK, Kacmarek RM: Egan’s fundamentals of respiratory care, ed 9, St Louis, 2009, Mosby.)
2. Put the equipment together and make sure that it works properly
The fiberoptic bronchoscope is preassembled (see Figure 18-2 for its primary features). If photographing or videotaping is planned, the camera must be attached at the photo connection. Have a central or portable suctioning system set up with suction tubing. In addition, the following steps must be used to check for proper functioning:
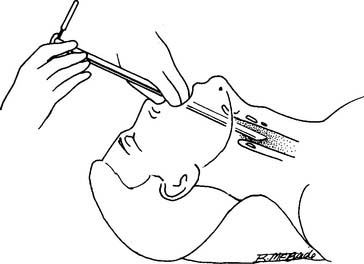
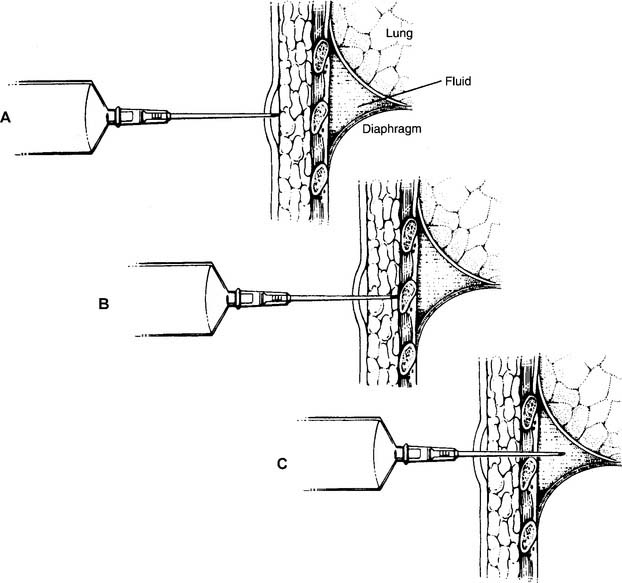
6. Thoracentesis
a. Recommend a thoracentesis to treat a pleural effusion (WRE code: IC14) [Difficulty: WRE: R, Ap, An]
b. Assist with a thoracentesis procedure (Code: IIIJ3) [Difficulty: ELE: R, Ap; WRE: An]
General steps in the removal of pleural fluid:
c. Assist with percutaneous needle aspiration biopsies of the lung
A pleural biopsy is indicated when exudative fluid is found during a thoracentesis procedure. The cause could be from an infection, including tuberculosis, or a lung tumor. Additionally, a pleural biopsy is indicated when a chest x-ray shows a pleural tumor or unexplained pleural thickening. A cutting needle is inserted into the parietal pleura to withdraw a specimen for analysis.
7. Management of a pneumothorax
a. Treat a tension pneumothorax (Code: III I2) [Difficulty: ELE: R, Ap; WRE: An]
In an emergency when the patient has a tension pneumothorax and rapidly worsening vital signs, the trapped pleural air must be rapidly removed from the chest. This is done by inserting a large-bore needle (16 gauge or larger) through the second or third intercostal space in the midclavicular line of the affected lung. Place the needle over the top of the rib to avoid injury to the blood vessels and nerves below the ribs. The intrapleural air leaves the chest, allowing the lung to expand. A pleural chest tube is then inserted for a long-term solution to the problem. If necessary, review the discussion in Chapters 1 and 15 on the signs and symptoms of a pneumothorax.
b. Assist with chest tube insertion (Code: III J5) [Difficulty: ELE: R, Ap; WRE: An]
A chest tube (also called tube thoracostomy) may be inserted into either one or both pleural spaces around the lungs, the mediastinal space, or the pericardial space around the heart. This procedure is indicated when air or fluid, or both, in any of these spaces interferes with normal lung or heart function. Box 18-4 lists the indications for the insertion of a chest tube.
General steps in inserting a pleural chest tube follow:
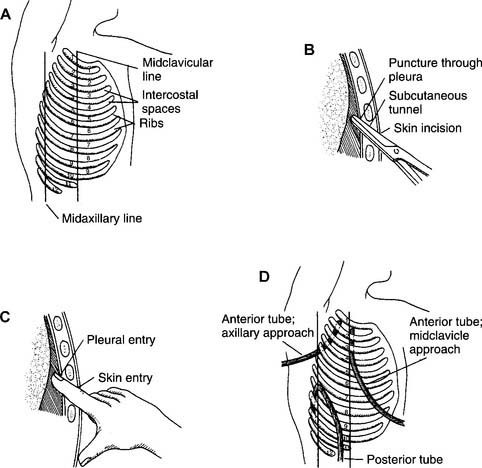
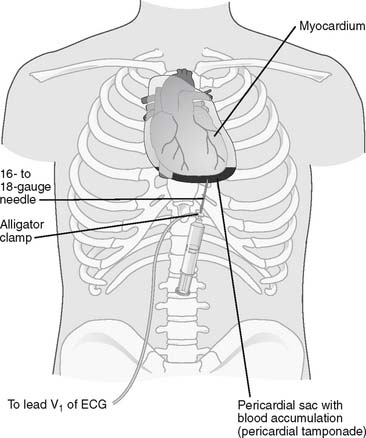
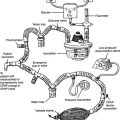
Figure 18-7 Pericardiocentesis procedure.
(From Black JM, Hawks JH: Medical-surgical nursing, clinical management for positive outcomes, ed 8, St Louis, 2009, Saunders.)
Every past examination has included at least one question that relates to identifying a patient having a tension pneumothorax, requiring the insertion of a large-bore needle or a pleural chest tube. Know the indications of a tension pneumothorax, including sudden deterioration of vital signs and hypoxemia, decreased breath sounds over the affected lung, decreased chest wall movement over the affected lung, hyperresonant percussion noted over the affected lung, and shift of the mediastinal structures away from the affected lung. See Figure 1-2 for a chest radiograph showing a pneumothorax.
c. Manipulate a pleural drainage system by order or protocol (ELE code: IIA21) [ELE difficulty: R, Ap, An]
2. Assemble a pleural drainage system, ensure that it works properly, and identify any problems with it
Refer to Figure 18-8 for the assembly and operation of the three-chamber drainage system. The four-chamber drainage system is shown in Figure 18-9 and is discussed concurrently.
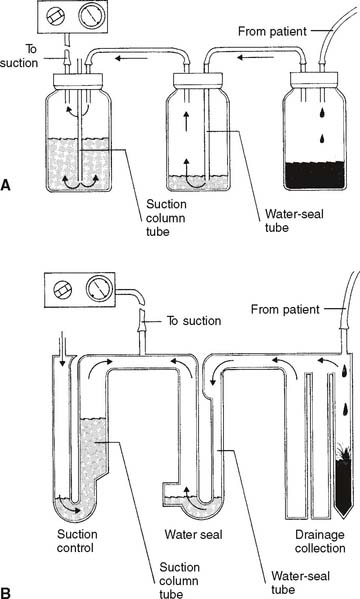
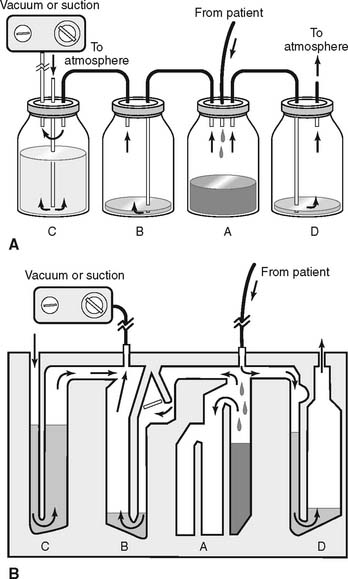
a. Vacuum level.
The operation of the wall or central vacuum systems was discussed in Chapter 13. It is common practice to set a partial vacuum of −15 to −20 cm H2O pressure to the pleural space.
b. Suction control.
It is normal to have room air drawn into the opening on top and bubbling through the water column. This corresponds to bottle or chamber C in Figure 18-9. The constant air bubbling causes the water level to gradually decrease from evaporation. Water must be added occasionally.
c. Water seal.
The water-seal chamber, which corresponds to chamber B in Figure 18-9, is a safety feature. It is dry when unpacked. Follow the manufacturer’s directions regarding the amount of water to add. Typically, the water-seal tube should be filled with about 2 cm of water through which any patient air can bubble. As indicated by the arrows, it is designed to permit air to leave the patient’s chest cavity. (Air also will be seen bubbling when fluid enters the drainage collection chamber and displaces some of its air.) However, room air cannot be drawn “backward” through the water to enter the chest if the vacuum fails or is disconnected.
d. Drainage collection.
The drainage collection chamber, which corresponds to bottle or chamber A in Figure 18-9, is designed to hold any fluid that is removed from the pleural space. It is divided into several sections that are demarcated for volume measurement. The volume that has accumulated in the chamber should be recorded each hour. A sudden, significant increase in the amount of drainage should be called to the physician’s attention. This is especially important if the patient is losing blood. Note the color of the drainage. Blood is obviously red, chyle is white, pus from an empyema is yellow or green, and pleural effusion fluid is a straw-yellow color. The whole drainage system must be replaced when the drainage collection chamber becomes filled.
e. Pressure-relief valve on the four-chamber system.
This additional chamber is a safety feature and is seen on four-chamber systems such as those shown in Figure 18-9, chamber D. Its purpose is to act as an escape route for any gas leaking from the patient if the vacuum system is accidentally turned off or disconnected. Without the relief valve, air pressure from a pneumothorax might increase to a dangerous level. Instead, the air and pressure are released. In three-chamber systems, the pressure has to build up to the point that water in the suction control chamber “geysers” out before the pressure is relieved.
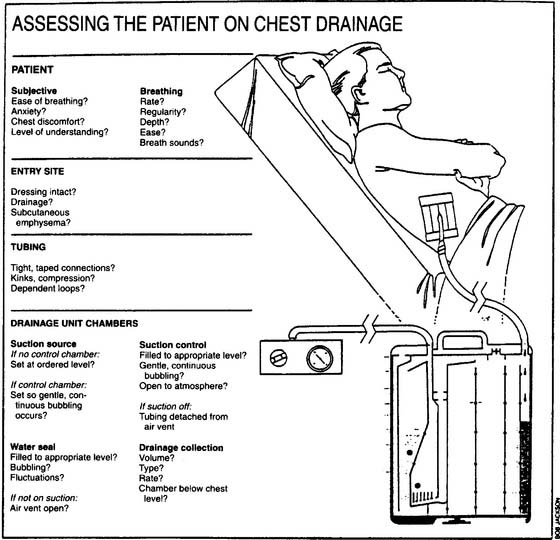
3. Troubleshoot any problems with the pleural drainage system
A number of problems can occur with chest drainage systems. The practitioner must understand how the systems are designed to work and how to recognize and correct any problems. See Table 18-1 for examples of problems and their correction. Figure 18-10 lists important considerations when assessing the patient who is connected to a chest drainage system.
TABLE 18-1 Troubleshooting Problems with Chest Drainage Systems
| Problem | Corrective Action |
|---|---|
| Drainage system is cracked open or drainage tubing is permanently disconnected from the drainage system | If the patient has a leaking pneumothorax: |
| Leave the tube open to room air so the pleural air can be vented out. | |
| As quickly as possible, place the distal end of the tubing into a glass of water to create a water seal. | |
| If the patient does not have a leaking pneumothorax, clamp the distal end of the tube to prevent room air from being drawn into the pleural space. | |
| In either case, attach the tube to a new drainage system as soon as possible. | |
| No bubbling through the suction control chamber | Increase the vacuum pressure. |
| Correct any leak in the system. | |
| Water is spouting out of the suction control chamber (three-bottle system) | Turn on the vacuum. |
| Remove obstruction inside tubing between vacuum and drainage system. | |
| Air leak through the water-seal chamber | Check the patient for a pneumothorax; report a new air leak to the physician. |
| Check for a hole in the drainage tube, a loose connection between the tube and the drainage system, or if a fenestration in the tubing has pulled out of the chest wall. | |
| Fluid has filled a dependent loop in the tubing | Drape the tubing so that are no loops or kinks |
| No change in drainage | Check for loops or kinks in tube. |
| Carefully milk the tube to remove any clots. | |
| Do not rapidly strip the chest tube. | |
| Drainage collection chamber is full | Prepare another unit, clamp the tube while making the exchange, and unclamp the tube after the new unit is functioning. |
8. Assist with an intubation (Code: IIIJ1) [Difficulty: ELE: R, Ap; WRE: An]
The procedure for a therapist (or physician) performing oral endotracheal intubation was discussed in Chapter 12. The following discussions are limited to assisting an anesthesiologist or other trained physician in performing a nasal endotracheal intubation. Most commonly, the respiratory therapist is the assistant. This procedure is usually only carried out on spontaneously breathing patients. See Box 18-5 for indications and contraindications and Box 18-6 for complications of nasal endotracheal intubation. Two different procedures are used for passing an endotracheal tube by the nasal route: blind nasotracheal intubation and direct vision nasotracheal intubation.
BOX 18-5 Indications and Contraindications for Nasal Endotracheal Intubation
a. Blind nasotracheal intubation
Be prepared to assist in blind nasotracheal intubation by positioning the patient properly in a sitting or supine position, providing supplemental oxygen or manual ventilation to the patient, selecting the proper endotracheal tube, making sure the cuff properly inflates and deflates, and securing the tube. Often, the physician orders spraying 1% phenylephrine or 0.25% racemic epinephrine into the patient’s nares. These medications constrict the blood vessels. This dilates the nasal passages, makes intubation easier, and also reduces the risk of bleeding. Often, 2% to 4% lidocaine (Xylocaine) is sprayed into the nares for its local anesthetic effect. The distal end of the endotracheal tube is usually also covered with a sterile, water-soluble lubricant for easier insertion (K-Y Brand Jelly), or lidocaine ointment can be used to lubricate the tube and numb the nasal passage.
This procedure is done without the aid of a laryngoscope and blade to visualize the patient’s anatomy and expose the trachea. However, other supplies will be needed. See Box 12-4 for a general list of equipment needed for intubation. The general steps in the procedure are listed here:
Because blind nasotracheal intubation can be challenging, several different devices can aid in this intubation procedure. The physician may choose to place a so-called trigger tube (see Figure 12-25) into the patient. This special endotracheal tube has a wire placed into it along the inside curve to the tip. The wire is pulled when the tube is near the larynx to bend the tip more anteriorly and aim it into the trachea. A flexible lighted stylet can be passed through the tube so that the light source is at the distal tip. The light shines through the skin over the larynx. When this is seen, the tube is advanced and the stylet is removed. A fiberoptic bronchoscope (Figure 12-31) can be placed through the tube and guided into the patient’s trachea. The tube is then advanced and the bronchoscope removed. Another choice is the intubation guide. This is a stylet with a flexible tip that can be bent through a proximal handle (performed by the physician) (Figure 18-11). The intubation guide is passed through and beyond the distal end of the endotracheal tube. When the guide is in the oropharynx, the tip can be bent in an anterior direction and directed into the trachea. The tube is then advanced over the guide and into the trachea. The guide is then removed.
b. Direct vision nasotracheal intubation
This procedure is different from blind nasotracheal intubation in that intubation equipment is used to visualize the patient’s anatomy and see the glottis. See Box 12-4 for a general list of equipment needed for intubation. A Magill forceps is needed but a hard stylet is not. Prepare a laryngoscope handle and the physician’s choice of either a straight or a curved blade (see Figures 12-29 and 12-30). The general steps in the procedure are listed here:
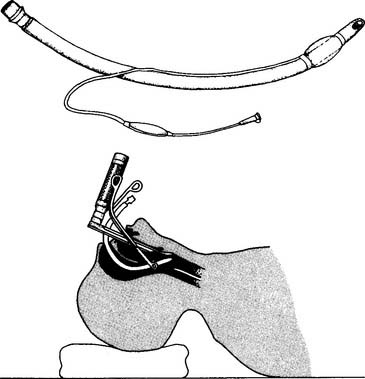
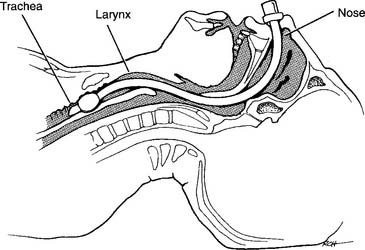
Figure 18-13 Properly placed nasotracheal tube.
(From Shapiro BA, Harrison RA, Cane RD: Clinical application of respiratory care, ed 4, St Louis, 1991, Mosby.)
Be aware that nasal intubation can be difficult in some patients. It may be necessary to perform oral intubation (discussed in Chapter 12) or perform a tracheostomy to ensure a safe airway.
9. Assist with a tracheostomy procedure (Code: IIIJ4) [Difficulty: ELE: R, Ap; WRE: An]
A tracheostomy is a surgical opening in the anterior tracheal wall. The opening is usually placed below the cricoid cartilage and through the second, third, or fourth ring of tracheal cartilage (Figure 18-14, A). The term tracheotomy is used to describe the surgical procedure itself (the two terms are often used interchangeably).
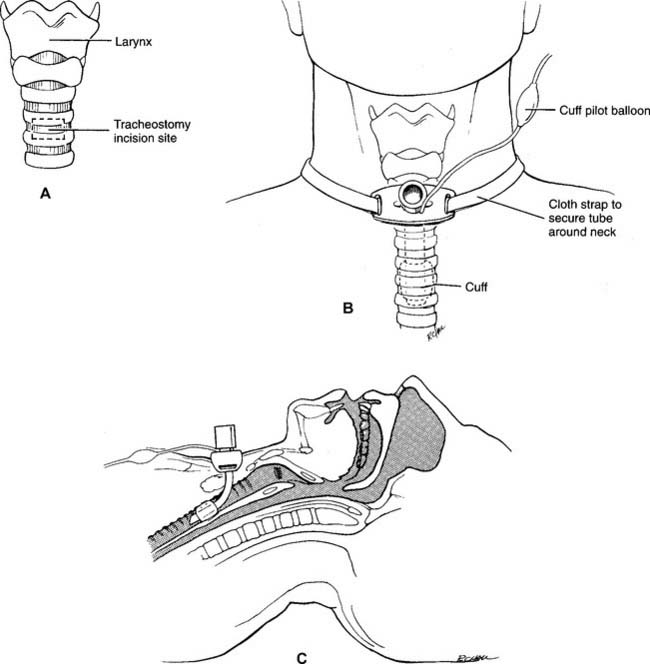
See Chapter 12 for further discussion on the indications for the various airway routes and when to routinely change a tracheostomy tube. Table 18-2 lists the common complications of a tracheostomy.
| Complication | Approximate Time of Onset |
|---|---|
| Bleeding | During and after surgery for up to 24 hr; if possible, do not replace the first tube for 2 to 3 days |
| Pneumothorax | During the procedure |
| Infection of the stoma or lungs | Usually seen after second day |
| Subcutaneous or mediastinal emphysema | May be seen during the procedure or at any later time |
MODULE C
1. Stress testing
a. Perform stress testing (e.g., ECG, pulse oximetry) (Code: IB9t) [Difficulty: ELE: R, Ap; WRE: An]
Stress testing is performed to determine a patient’s limits to exercise. The limiting factor(s) to exercise provide(s) much information about a patient’s medical condition. Box 18-7 lists the indications for stress testing. Before starting a stress test the patient’s chart should be reviewed for information on any previous stress testing. It is important to know the type of testing that was performed, how the patient tolerated it, and what caused the patient to stop the test. Review the physician’s evaluation of the test results and the patient’s diagnosis.
BOX 18-7 Indications for Exercise Testing
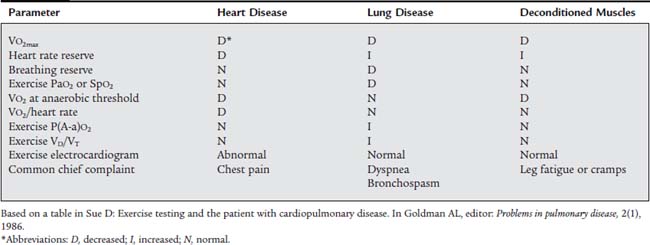
Despite the risks involved in the procedure, a stress test is an important diagnostic or clinical evaluation tool for many patients (Table 18-3). Box 18-8 lists the steps in the patient work-up before testing can be safely performed. Box 18-9 lists the contraindications to exercise testing. Patients with any of these problems are too ill to be jeopardized by the procedure.
TABLE 18-3 Exercise Intolerance: Differentiating between Heart Disease, Lung Disease, and Deconditioned Muscles
1. Commonly measured patient parameters specific to exercise testing metabolic equivalent of basal metabolic rate
A person who is sleeping or totally relaxed is consuming the minimum number of calories and the least amount of oxygen to stay alive. The minimum amount of carbon dioxide is being produced as a waste product of metabolism. He or she is said to be at basal metabolic rate (BMR). At BMR a person consumes about 3.5 mL of oxygen/kilogram of body weight/minute. Multiplying this value by the person’s body weight produces the metabolic equivalent of basal metabolic rate for oxygen, or MET, as it is abbreviated. The average adult at BMR consumes about 250 mL of oxygen/minute and produces about 200 mL of carbon dioxide/minute. Obviously, the more active a person is the more calories and oxygen are consumed and the more carbon dioxide is produced. Often a person’s exercise limit is quantified in terms of how many METs he or she can perform. For example, light household cleaning might be 2 METs of exercise while competitive swimming might be 8 to 10 METs of exercise.
2. Respiratory quotient and respiratory exchange ratio
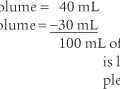
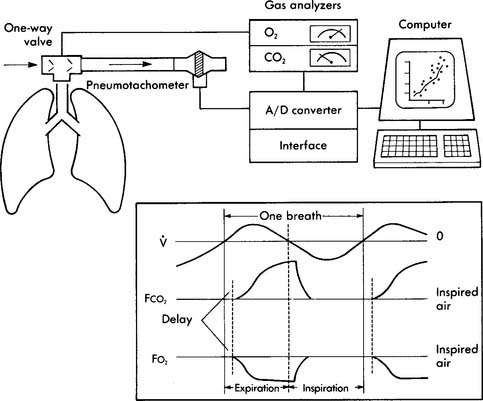
A metabolic study is performed to evaluate a patient’s oxygen consumption in 1 minute (Vo2) and carbon dioxide production in one minute (Vco2) for the assessment of a patient’s metabolism at rest or during exercise, or as part of a general nutritional assessment. The bedside testing procedure is called indirect calorimetry and involves collecting the patient’s exhaled gases to send them through a rapid O2 analyzer and CO2 analyzer. In a normal, healthy person the cellular metabolic processes, lung function, and cardiovascular function are working properly. As can be seen in Figure 18-15, this results in a cellular respiratory quotient (RQ) of 0.80 and a resulting respiratory exchange ratio (R) measured at the lung of 0.80. This indicates normal oxygen consumption and carbon dioxide production. The calculation is shown in the following equation.
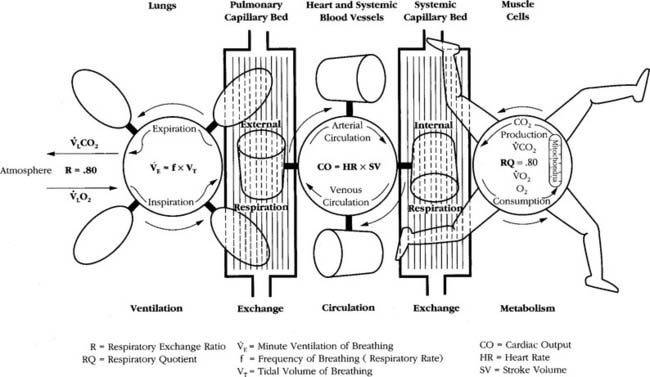
Sick patients will often have an R value of greater than 0.80. This can be the result of the patient’s diet. However, in many sick patients, the high R value is because of the inability of the lungs to remove carbon dioxide (many COPD patients) or insufficient oxygen delivery to the tissues. Tissue hypoxia results in anaerobic metabolism with resulting lactic acid production. This lactic acid, in turn, converts to excessive carbon dioxide. Even a healthy person can have an increased R value during heavy exercise with a stress test.

The R value (and RQ) of 0.80 remains quite steady during light to moderate exercise (see Figure 18-15). A normal, healthy person can quite easily increase the amount of oxygen consumed and eliminate the extra carbon dioxide produced during exercise. This is what is seen during aerobic metabolism when all body systems are functioning smoothly. It is only during heavy exercise that the body has difficulty coping and must eventually stop.


6. Exercise equipment
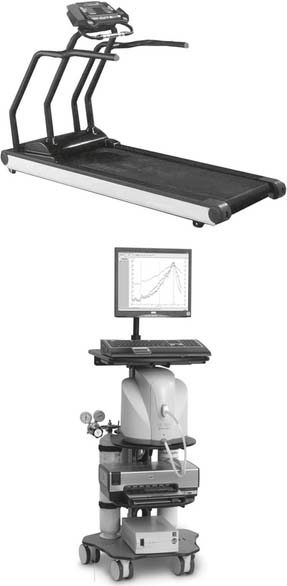
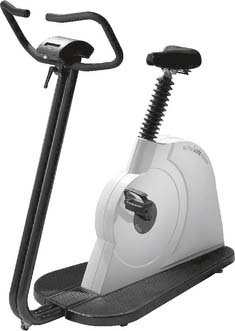
Whether the patient is exercising on a treadmill or a bicycle, it is very informative to perform indirect calorimetry by analyzing the patient’s exhaled gases for oxygen and carbon dioxide. There are two different types of systems for this. One utilizes a mixing chamber from which the patient’s gases are periodically analyzed. The other is a breath-by-breath system that samples and analyzes each exhaled breath (see Figure 18-16). The measured patient parameters in both systems usually include the following: (a) fraction of exhaled oxygen (FEo2), (b) fraction of exhaled carbon dioxide (FEco2), (c) respiratory rate, (d) exhaled gas temperature, (e) exhaled volume, and (f) time from the start of the test.
a. Treadmill.
The treadmill is a motorized continuously looped belt combined with a ramp. The belt’s speed may be adjusted from the stopped position to 1.5 to 10 miles per hour (great enough to exhaust a trained runner). The ramp may be adjusted from flat (0% grade) to sloped (30% grade) (great enough to require the patient to run to keep from falling off the back of the treadmill). There is a railing for the patient to hold if necessary. Commonly there is also an emergency button that the patient can hit to stop the unit. Adjunct equipment is nearby for monitoring the electrocardiogram, exhaled gases, and so forth (see Figure 18-17). The treadmill has an advantage over the bicycle ergometer in that it trains the patient’s muscles that are needed for walking. This is an important practical consideration for most patients. However, it is more difficult to quantitate the exercise test results from a treadmill compared to a bicycle because the patient’s stride and mechanics of walking vary as the speed increases.
b. Bicycle ergometer.
The bicycle ergometer is a stationary bicycle with seat, handle bars, and electronics for calculating distance, effort, and so forth. The electromechanical units as shown in Figure 18-18 have electronic brakes to increase the patient’s workload. Although less practical in training muscles for everyday tasks such as walking, the ergometer allows for easier workload adjustments and calculation of the exercise test results. Other exercise methods such as an arm ergometer or a rowing machine are rarely performed on patients.
8. General steps in the procedure
b. Interpret the results of stress testing (e.g., ECG, pulse oximetry) (Code: IB10t) [Difficulty: ELE: R, Ap; WRE: An]
1. In a healthy person the following physiologic changes can be expected
b. Heart rate, stroke volume, and cardiac output.
At low and moderate workloads the stroke volume increases from about 80 mL to 110 mL in healthy adults. Increases in heart rate account for the rest of the increase in cardiac output from low to heavy exercise. The heart rate increases are almost parallel with the increases in Vo2 values (see Figure 18-19). A patient with a diseased left ventricle or heart block would be unable to increase cardiac output sufficiently when exercising and must stop earlier than predicted.

d. Blood gases and pH.
Pao2, Paco2, and pH will remain stable in the normal ranges during low and moderate exercise. The cardiopulmonary system is able to deliver adequate oxygen to the tissues and remove sufficient carbon dioxide to keep the body functioning properly. However, at high levels of work, a lactic acid buildup occurs and a progressive metabolic acidosis is seen. This forces the patient to decrease the exercise level. Some may need to stop. Patients with cardiopulmonary disease will not be able to exercise heavily because they can provide only very limited increases of oxygen to the muscles or eliminate the extra carbon dioxide produced during even moderate exercise. Figure 18-19 shows the parameter changes seen as a healthy individual exercises from a low to a maximal level.
c. Limitations caused by abnormal physiology
Patients who are forced to stop exercising at a lower than predicted workload will probably fall into one of the following three broad categories. Box 18-10 lists conditions that would require that the stress test be stopped. Table 18-3 lists parameters that will help in differentiating between deconditioned muscles, pulmonary limitations, or cardiac limitations as the reason that exercise had to be stopped.
2. Oxygen titration
a. Perform oxygen titration with exercise (Code: IB9i) [Difficulty: ELE: R, Ap; WRE: An]
Oxygen titration with exercise involves determining the amount of supplemental oxygen needed by a patient with cardiopulmonary disease to keep the Spo2 value at no less than 93% during an exercise period. Many of the principle considerations for this procedure are the same as those discussed during the 6-minute walk exercise discussed in Chapter 17 and earlier in this module. See Box 18-7 for the patient indications for this procedure. Patient evaluation before testing is presented in Box 18-8 and contraindications to testing are listed in Box 18-9.
The patient’s history will indicate that he or she is hypoxemic at rest or becomes so during exercise. Therefore, the patient’s oxygen level must be monitored, along with the vital signs and electrocardiogram, during the oxygen titration with exercise procedure. Minimally, continuous pulse oximetry must be done. However, it is preferred to have arterial blood gas samples taken at rest and during peak exercise. While single samples can be taken, it is preferable to place an arterial catheter into the radial artery. The respiratory therapist’s duties will probably include monitoring the patient, changing the oxygen flow (likely by nasal cannula), and adjusting the exercise equipment.
b. Interpret the results of oxygen titration with exercise (Code: IB10i) [Difficulty: ELE: R, Ap; WRE: An]
When the physician or patient decides to stop the procedure there must be a record of the workload level, inspired oxygen flow or percentage, vital signs, and pulse oximeter reading. An arterial blood gas sample should be taken to send to the laboratory for analysis. Note the reason that the test was stopped. See Box 18-10 for indications to stop an exercise test.
MODULE D
1. Recommend sleep studies (Code: IC13) [Difficulty: ELE: R, Ap; WRE: An]
A sleep apnea study (cardiopulmonary sleep study or polysomnography) is performed to determine whether the patient has sleep-disordered breathing. Furthermore, it can help to determine the type of disorder and monitor the patient’s response to treatment. Box 18-11 lists the indications for a polysomnography sleep study.
BOX 18-11 Indications for a Cardiopulmonary Sleep Study
2. Review data on sleep study results (e.g., diagnosis, treatment) (WRE code: IA10) [Difficulty: WRE: R, Ap]
The following procedures are usually performed before the sleep study:
The following physiologic parameters are usually measured during a polysomnography sleep study:
4. CPAP/BiPAP titration
b. Interpret the results of CPAP/BiPAP titration during sleep (Code: IB10v) [Difficulty: ELE: R, Ap; WRE: An]
1. Obstructive sleep apnea
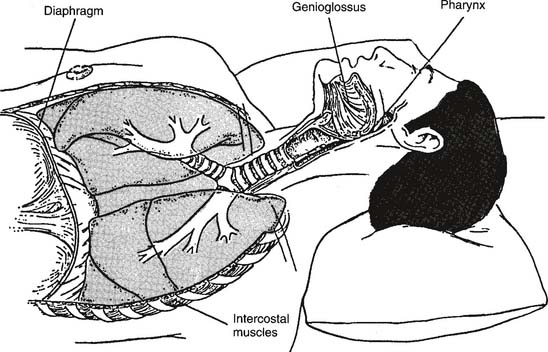
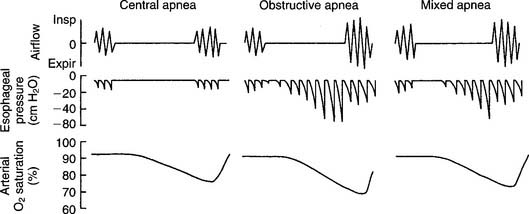
Obstructive sleep apnea (OSA) results when the patient’s upper airway is obstructed despite continued breathing efforts (Figures 18-20 and 18-21). Patients with this problem often exhibit the following symptoms: loud snoring (reported by the bed partner), morning headache, excessive daytime sleepiness, depression or other personality changes, decreased intellectual ability, sexual dysfunction, bed-wetting (nocturnal enuresis), or abnormal limb movements during sleep.
Obstructive sleep apnea is associated with the following: middle-age men, obesity, short neck, hypothyroidism, testosterone administration, myotonic dystrophy, temporomandibular joint disease, narrowed upper airway from excessive pharyngeal tissue, enlarged tongue (macroglossia), enlarged tonsils or adenoids, deviated nasal septum, recessed jaw (micrognathia), goiter, laryngeal stenosis or web, or pharyngeal neoplasm. Management of patients with obstructive sleep apnea may include any of the following:
a. CPAP and BiPAP titration.
CPAP and BiPAP have become essential components of the treatment plan for obstructive sleep apnea. The positive upper airway pressure generated by CPAP or BiPAP will act as a “splint” to keep the soft tissues of the upper airway from blocking the oropharynx (see Figure 18-20). Part of the CPAP or BiPAP titration process involves finding a mask or other appliance that fits the patient properly. The appliance should fit the patient’s face tight enough to prevent air leaks but without causing skin irritation. See Figure 15-23 and the related discussion on CPAP and BiPAP masks.
BiPAP is also called bilevel ventilation because it involves using a lower pressure and a higher pressure to support the patient’s breathing. The goal of BiPAP is to find the proper pressure to eliminate obstructive sleep apnea episodes and to support tidal volume breathing. As stated previously, the patient is assessed, has the BiPAP system put on, and falls asleep. During BiPAP titration, the lower pressure (known as expiratory positive pressure airway pressure [EPAP]) acts like CPAP to open the soft tissues of the airway. The higher pressure (known as inspiratory positive pressure airway pressure [IPAP]) is set to help deliver a tidal volume. When the respiratory therapist recognizes an apnea episode, the BiPAP system is activated. Both EPAP and IPAP pressures are gradually increased from zero until the apnea episodes are eliminated over the sleep period. Most adults will need between 7.5 and 12.5 cm H2O pressure of EPAP to eliminate obstructive apnea. The IPAP pressure is then gradually increased until the tidal volume goal is reached. The patient is assessed throughout the polysomnography sleep study.
2. Central sleep apnea
Central sleep apnea is diagnosed when the respiratory center of the medulla fails to signal the respiratory muscles for breathing to occur. The patient makes no respiratory effort, and no air movement occurs (see Figure 18-21). Patients with this problem often exhibit normal weight, mild snoring, insomnia, and lesser levels of daytime sleepiness, depression, or sexual dysfunction than found in the obstructive sleep apnea patient.
3. Mixed sleep apnea
Mixed sleep apnea is diagnosed when the patient shows evidence of both central and obstructive apnea. The patient usually first stops all breathing efforts (central apnea). After some time, the patient makes attempts to breathe but cannot because the upper airway is blocked (obstructive apnea) (see Figure 18-21). Patients with mixed sleep apnea may show a variety of symptoms and traits from those listed earlier. Clinical management may include any of the treatments mentioned that prove to be effective. This includes the patient using a CPAP or BiPAP system to correct the obstructive sleep apnea.
5. Overnight pulse oximetry
a. Perform overnight pulse oximetry (Code: IB9q) [Difficulty: ELE: R; WRE: Ap, An]
MODULE E
1. Analyze the available information to determine the patient’s pathophysiologic state (Code: IIIH1) [Difficulty: ELE: R, Ap; WRE: An]
See the previous topics for discussion of the patient’s disease state.
2. Determine the appropriateness of the prescribed therapy and goals for the patient’s pathophysiologic state (Code: IIIH3) [Difficulty: ELE: R, Ap; WRE: An]
a. Terminate the treatment or procedure based on the patient’s response to therapy (Code: IIIF1) [Difficulty: ELE: R, Ap; WRE: An]
MODULE F
1. Develop a quality improvement program (Code: IIIH6a) [Difficulty: ELE: R; WRE: Ap, An]
3. Record and monitor quality assurance data by using accepted statistical methods (Code: IIC8) [Difficulty: ELE: R, Ap; WRE: An]
4. Monitor the outcomes of quality improvement programs (Code: IIIH7a) [Difficulty: ELE: R; WRE: Ap, An]
Quality improvement (QI) refers to the processes used to identify areas for improvement in patient care services. QA refers to any evaluation of services provided and the results achieved as compared with accepted standards. These standards are developed through a process called benchmarking in which agreement is reached on fair and reasonable patient care criteria and outcomes. Previous chapters contain information on quality control procedures in the NBRC areas listed earlier.
AARC Clinical Practice Guideline. Fiberoptic bronchoscopy assisting. Respir Care. 1993;38:1173.
AARC Clinical Practice Guideline. Management of airway emergencies. Respir Care. 1995;40:749.
AARC Clinical Practice Guideline. Polysomnography. Respir Care. 1995;40:1236.
AARC Clinical Practice Guideline. Exercise testing for evaluation of hypoxemia and/or desaturation: 2001 revision & update. Respir Care. 2001;46:514.
AARC. Clinical Practice Guideline: In-hospital transport of the mechanically ventilated patient: 2002 revision and update. Respir Care. 2002;47(6):721.
Anderson HL, Bartlett RH. Respiratory care of the surgical patient. In Burton GG, Hodgkin JE, Ward JJ, editors: Respiratory care: a guide to clinical practice, ed 3, Philadelphia: JB Lippincott, 1991.
Arand DL, Bonnet. Sleep-disordered breathing. In Burton GC, Hodgkin JE, Ward JJ, editors: Respiratory Care: A Guide to Clinical Practice, ed 4, Philadelphia: Lippincott-Raven Publishers, 1997.
Barnes TA, editor. Core textbook of respiratory care practice, ed 2, St Louis: Mosby, 1994.
Branson RD, Hess DR, Chatburn RL, editors. Respiratory care equipment, ed 2, Philadelphia: Lippincott Williams & Wilkins, 1999.
Brutinel WM, Cortese DA. Fiberoptic bronchoscopy. In Burton GC, Hodgkin JE, Ward JJ, editors: Respiratory care: a guide to clinical practice, ed 4, Philadelphia: Lippincott-Raven, 1997.
Byhahn C, Wilke JH, Halbig S, et al. Percutaneous tracheostomy: Ciaglia Blue Rhino versus basic Ciaglia technique of percutaneous dilational tracheostomy. Anesthesia & Analgesia. 2000;91:882-886.
Cairo JM. Sleep diagnostics. In Cairo JM, Pilbeam SP, editors: Mosby’s respiratory care equipment, ed 8, St Louis: Mosby, 2009.
Chadha TS, Schneider AW, Tobin MJ, et al. Noninvasive monitoring of breathing patterns during wakefulness and sleep. Respir Ther. 27-40, May/June 1985.
Chavis AD, Grum CM. Fiberoptic bronchoscopy with mechanical ventilation. Choices Respir Manage. 1991;21:4.
Chavis AD, Grum CM. Pulmonary procedures during mechanical ventilation. Choices Respir Manage. 1991;21:29.
Coppolo DP, Brienza LT, Pratt DS, May JJ. A role for the respiratory therapist in flexible fiberoptic bronchoscopy. Respir Care. 1985;30:323.
Curity thoracentesis tray package insert, Kendall Hospital Products, Boston, Mass.
Decker MJ, Smith BL, Strohl KP. Center-based vs. patient-based diagnosis and therapy of sleep-related respiratory disorders and role of the respiratory care practitioner. Respir Care. 1994;39(4):390-400.
Deshpande VM, Pilbeam SP, Dixon RJ. A comprehensive review in respiratory care. East Norwalk, Conn: Appleton & Lange, 1988.
Des Jardins TL. Clinical manifestations and assessment of respiratory disease, ed 5. St Louis: Mosby, 2006.
Downey RIII, Dexter JR., Assessment of sleep and breathing. Wilkins RL, Krider SJ, Sheldon. Clinical assessment in respiratory care, ed 3, St. Louis: Mosby, 1995.
Epstein LJ, Dorlac GR. Cost-effectiveness analysis of nocturnal oximetry as a method of screening for sleep apnea-hypoventilation syndrome. Chest. 1998;113:97.
Erickson RS. Mastering the ins and outs of chest drainage: I. Nursing. 1989;19:37.
Erickson RS. Mastering the ins and outs of chest drainage: II. Nursing. 1989;19:47.
Eubanks DH, Bone RC. Comprehensive respiratory care: a learning system, ed 2. St Louis: Mosby, 1990.
Fischback F. A manual of laboratory & diagnostic tests, ed 6. Philadelphia: Lippincott Williams & Wilkins, 2000.
Garay SM. Therapeutic options for obstructive sleep apnea. Respir Management. 1987;17(4):11-17.
Guidelines for fiberoptic bronchoscopy. ATS News. 1986;12:14.
Howard TP. Foreign body extraction by means of combined rigid and flexible bronchoscopy: a case report. Respir Care. 1988;33:786.
Indications and standards for cardiopulmonary sleep studies. Am Rev Respir Dis. 1989;139:559-568.
Johnson MD. Noninvasive monitoring. In Aloan CA, Hill TV, editors: Respiratory care of the newborn and child, ed 2, Philadelphia: Lippincott-Raven, 1997.
Kendall Hospital Products, Curity Thoracentesis Tray (package insert), Boston, Mass.
Khoury JB, Radtke RA. Sleep assessment. In: Hess DR, MacIntyre NR, Mishoe SC, et al, editors. Respiratory care principles and practices. Philadelphia: WB Saunders, 2002.
Kilkenny LA, Fernandes KS, Strollo PJJr. Disorders of sleep. In Wilkins RL, Stroller JK, Kacmarek RM, editors: Egan’s fundamentals of respiratory care, ed 9, St Louis: Mosby, 2009.
Lewis CA, Eaton TE, Fergusson W, et al. Home overnight pulse oximetry in patients with COPD: more than one recording may be needed. Chest. 2003;123:1127.
Lewis RM. Airway care. In: Fink JB, Hunt GE, editors. Clinical practice in respiratory care. Philadelphia: Lippincott Williams & Wilkins, 1999.
Lough MD. Newborn respiratory care procedures. In: Lough MD, Williams TJ, Rawson JE, editors. Newborn respiratory care. St Louis: Mosby, 1979.
Madama VC. Pulmonary function testing and cardiopulmonary stress testing, ed 2. Albany: Delmar Publishers, 1998.
Malitino EM. Strategic national stockpile: overview and ventilator assets. Respir Care. 2008;53:91.
Mathewson HS. Drug therapy for obstructive sleep apnea. Respir Care. 1986;31(8):717-719.
Mims BC. You can manage chest tubes confidently. RN. 1985;48:39.
Mishoe SC. The diagnosis and treatment of sleep apnea syndrome. Respir Care. 1987;32(3):183-201.
Muskat PC. Mass casualty chemical exposure and implications for respiratory failure. Respir Care. 2008;53:58.
Netzer N, Eliasson AH, Netzer C, Kristo DA. Overnight pulse oximetry for sleep-disordered breathing in adults. Chest. 2001;120:625-633.
Peters RM. Chest trauma. In Moser KM, Spragg RG, editors: Respiratory emergencies, ed 2, St Louis: Mosby, 1982.
Phillipson EA. Breathing disorders during sleep. Basics Respir Dis. 1979;7(3):1-6.
Plevak DJ, Ward JJ. Airway management. In Burton GC, Hodgkin JE, Ward JJ, editors: Respiratory care: a guide to clinical practice, ed 4, Philadelphia: Lippincott-Raven, 1997.
Podnos SD, Chappell TR. Hemoptysis: a clinical update. Respir Care. 1985;30(11):977-985.
Rapaport DM. Techniques for administering nasal CPAP. Respir Management. 1987;17(4):17-21.
Ruppel G. Manual of Pulmonary Function Testing, ed. 9. St. Louis: Mosby-Year Book, Inc., 2009.
Sachs S. Fiberoptic bronchoscopy. In: Hess DR, MacIntyre NR, Mishoe SC, et al, editors. Respiratory care principles and practices. Philadelphia: WB Saunders, 2002.
Shapiro BA, Kacmarek RM, Cane RD, et al. Clinical application of respiratory care, ed 4. St Louis: Mosby, 1991.
Smalling T, Valente J. Examining laser surgery. J Respir Care Pract. 1998;11:93.
Whitaker K. Comprehensive perinatal and pediatric respiratory care, ed 2. Albany, NY: Delmar, 1997.
Williams SF, Thompson JM. Respiratory disorders. St Louis: Mosby, 1990.
SELF-STUDY QUESTIONS FOR THE ENTRY LEVEL EXAM See page 602 for answers
SELF-STUDY QUESTIONS FOR THE WRITTEN REGISTRY EXAM See page 628 for answers